

Page 1
RTM-8000D
GSM/GPRS Compact Flash
Owner’s Manual
Page 2

Copyright Statement
Copyright 2002 by Audiovox Communications Corp. All rights reserved. No part
of this publication may be reproduced, transmitted, transcribed, stored in a
retrieval system or translated into any language or computer language, in any
form or by any means, electronic, mechanical, magnetic, optical, chemical,
manual or otherwise, without the prior written permission of Audiovox
Communications Corp.
Disclaimer
Audiovox Communications Corp. makes no representations or warranties,
either expressed or implied, with respect to the contents hereof and specifically
disclaims any warranties, merchantability or fitness for any particular purpose.
Further, Audiovox Communications Corp. reserves the right to revise this
publication and to make changes from time to time in the contents hereof
without obligation of Audiovox Communications Corp. to notify any person of
such revision or changes.
ALL INFORMATION IS PROVIDED BY AUDIOVOX COMMUNICATIONS
CORP. ON AN "AS IS" BASIS ONLY. THIS COMPANY PROVIDES NO
REPRESENTATIONS AND WARRANTIES, EXPRESS OR IMPLIED,
INCLUDING THE IMPLIED WARRANTIES OF FITNESS FOR A
PARTICULAR PURPOSE, MERCHANTABILITY AND NONINFRINGEMENT.
Regulatory Information and Safety Section
This Section outlines important regulatory notices concerning your new
GSM/GPRS Compact Flash Card.
Regulatory Notices
This device complies with Parts 15, 22, and 24 of the FCC rules. This CF card
has been tested with the typical laptop computer with the side loading
PCMCIA bay. This CF card must not be co-location or operated in conjunction
with any other antenna or transmitter. Use of this device in any other
configuration may exceed the FCC RF Exposure compliance limit. Operation
of this device is subject to the following two conditions:
1. This device may not cause harmful interference, and
1
Page 3
2. This device must accept any interference received, including
interference that may cause undesirable operations.
Audiovox Communications Corp. stipulates that the antenna should be more
than 1.5 cm (0.60”) from by-standers and 1.0cm (0.39”) from the user. When
in use, the antenna should be fully extended upward at a 90-degree angle.
FCC ID: QDJ-200205EDS01
CAUTION:
Unauthorized modification or change not expressly
approved could void compliance with RF exposure guidelines.
WARNING:
This equipment has been tested and found to comply with the
limits pursuant to Part 15, 22, and 24 of the FCC Rules. These limits are
designed to provide reasonable protection against harmful interference
in an appropriate installation. This equipment generates, uses, and can
radiate radio frequency energy and, if not installed and used in
accordance with the instruction, may cause harmful interference to radio
communication. However, there is no guarantee that interference will not
occur in a particular installation.
If this equipment does cause harmful interference to radio or television
reception, which can be determined by turning the equipment off and on, the
user is encouraged to try to correct the interference by one or more of the
following measures:
• Reorient or relocate the receiving antenna
• Increase the separation between the equipment and receiver
• Connect the equipment into an outlet on a circuit different from that to
which the receiver is connected
• Consult the dealer or an experienced radio/TV technician for help
WARNING:
This digital apparatus does not exceed the Class B limits for
radio noise emissions from digital apparatus as set out in the
2
Page 4

interference causing equipment standard entitled “Digital Apparatus,”
ICES-003 of the Department of Communications.
Cet appareil numerique respecte les limites de bruits radioelectriques
applicables aux appareils numeriques de Classe B prescrites dans la
norme sur le materiel brouilleur. “Appareils Numeriques,” NMB-003
edictee par le ministre de Communications.
If you have purchased this product under a United States Government
contract, it shall be subject to restrictions as forth in subparagraph (C)(1)(ii) of
Defense Federal Acquisitions Regulations (DFARs) Section 252.227-7013 for
Department of Defense contracts, and as set forth in Federal Acquisitions
Regulations (FARs) Section 52.227-19 for civilian agency contracts or any
successor regulations. If further government regulations apply, it is your
responsibility to ensure compliance with such regulations.
Safety Information
This section outlines important liability and safety guidelines concerning your
new CF Card.
Important Notice
Because of the nature of wireless communications, transmission and
reception of data can never be guaranteed. Data may be delayed, corrupted
(i.e., have errors) or totally be lost. Although significant delays or losses of
data are rare when wireless devices such as the CF Card-Model RTM8000D
GSM/GPRS modem are used in a normal manner with a well constructed
network, they should not be used in situations where failure to transmit or
receive data could result in damage of any kind to the user or another party,
including but not limited to personal injury, death or loss of personal property.
No responsibility for damages of any kind resulting from delays or errors in
data transmitted or received using the CF Card-Model RTM8000D
GSM/GPRS modem, or for failure of the CF Card-Model RTM8000D to
transmit or receive such data.
Safety and Hazards
Blasting Areas and Hospitals
Do not operate the CF Card-Model RTM8000D in areas where
blasting is in progress, where explosive atmospheres may be present,
3
Page 5

near medical equipment, life support equipment, or any equipment
which may be susceptible to any form of radio interference. In such
areas the CF Card-Model RTM8000D MUST BE POWERED OFF. It
can transmit signals that could interfere with this equipment.
Aircraft
Do not operate the CF Card-Model RTM8000D in any aircraft whether
the aircraft is on the ground or in flight. In aircraft, the CF Card-Model
RTM8000D MUST BE POWERED OFF. When operating it can
transmit signals that could interfere with various onboard systems.
Driving
The driver or operator of any vehicle should not operate the CF
Card-Model RTM8000D while in control of a vehicle. Doing so will
detract from the driver or operator’s control and operation of that
vehicle. In some jurisdictions, operating such communications
devices while in control of a vehicle is an offense.
4
Page 6

Attention
Handle the product with care. Do not drop, bend or apply
strong forces to the product. Otherwise, unrecoverable
There are no user serviceable parts inside this product. If
Keep this product out of reach of small children.
Remove this product from your handheld device when not
The antenna of this product is non-removable. Do not try
Avoid touching the antenna while in use, otherwise it may
This product does not provide water proof feature. Avoid
damages will occur in its internal components.
this product appears to be broken, call a qualified service
personnel or send this product to your original dealer. Do
not attempt to disassemble or repair this product as it may
result in electric shock or unrecoverable damage to the
product itself.
in use. Store this product in its protective case in a cool
dry place.
to detach the antenna from the product.
cause adverse effect to signal reception.
using this product in the rain or place the product near a
cup or glass filled with water or other liquid.
5
Page 7

Tips When Using
• Avoid using the product near metal structures (for example, large metal
furniture or steel frames of a building). The transmission and reception of
signal can be effected by these objects.
• Avoid using the product near strong electromagnetic sources, such as
microwave ovens, sound speakers, TV and radio.
• Avoid using the product right after dramatic change of temperature.
• Make sure that the signal strength is in good condition before sending or
receiving important data.
• This product runs on the power of your handheld device or portable PC.
Check the power regularly. If the power is low, the transmission or reception
will become unstable.
• Avoid transmitting a large file at a time. Try splitting it into several smaller files
and send them seperately.
6
Page 8

TABLE OF CONTENTS
OVERVIEW .................................................................... 1
WELCOME ................................................................................... 1
PACKAGE CONTENTS .................................................................... 1
APPEARANCE............................................................................... 2
The RTM-8000D.................................................................................. 2
The status indicator.................................................................................. 2
INSTALLING AND CONFIGURING THE
RTM-8000D.................................................................... 3
SYSTEM REQUIREMENTS............................................................... 3
Hardware & software requirements.......................................................... 3
Network requirements........................................................................ 3
Inserting the SIM card........................................................................ 3
Installing RTM-8000D on a Pocket PC........................................... 4
Installing the RTM-8000D on a PC.................................................. 9
USING THE RTM-8000D...........................................23
USING WIRELESS DATA CONNECTION ON POCKET PC 2000/2002...23
USING WIRELESS DATA CONNECTION ON WINDOWS MOBILE 2003...27
USING WIRELESS DATA CONNECTION ON WINCE...........................30
USING WIRELESS DATA CONNECTION ON PC.................................36
TROUBLESHOOTING & WARRANTY .................. 38
TROUBLESHOOTING TIPS .............................................................38
Installation of the RTM-8000D is unsuccessful ...................................... 38
Can not establish GPRS connection...................................................... 38
GPRS connection is slow and unstable ................................................. 38
12 MONTH LIMITED WARRANTY....................................................39
i
Page 9
Overview
Welcome
Congratulations on your purchase of the RTM-8000D, GSM/GPRS Compact
Flash card!
With this card, you can instantly turn your Pocket PC or PC into a wireless
communication device so you can perform data communication anytime and
anywhere and enjoy rapid and stable GPRS data connection. You can finally
get rid of the tiny little screen of your mobile phone and access various on-line
information comfortably.
This manual will help you to better understand your RTM-8000D GSM/GPRS
Compact Flash card as well as familiarize yourself quickly with how to use it.
Please follow us step-by-step and get the most out of your card.
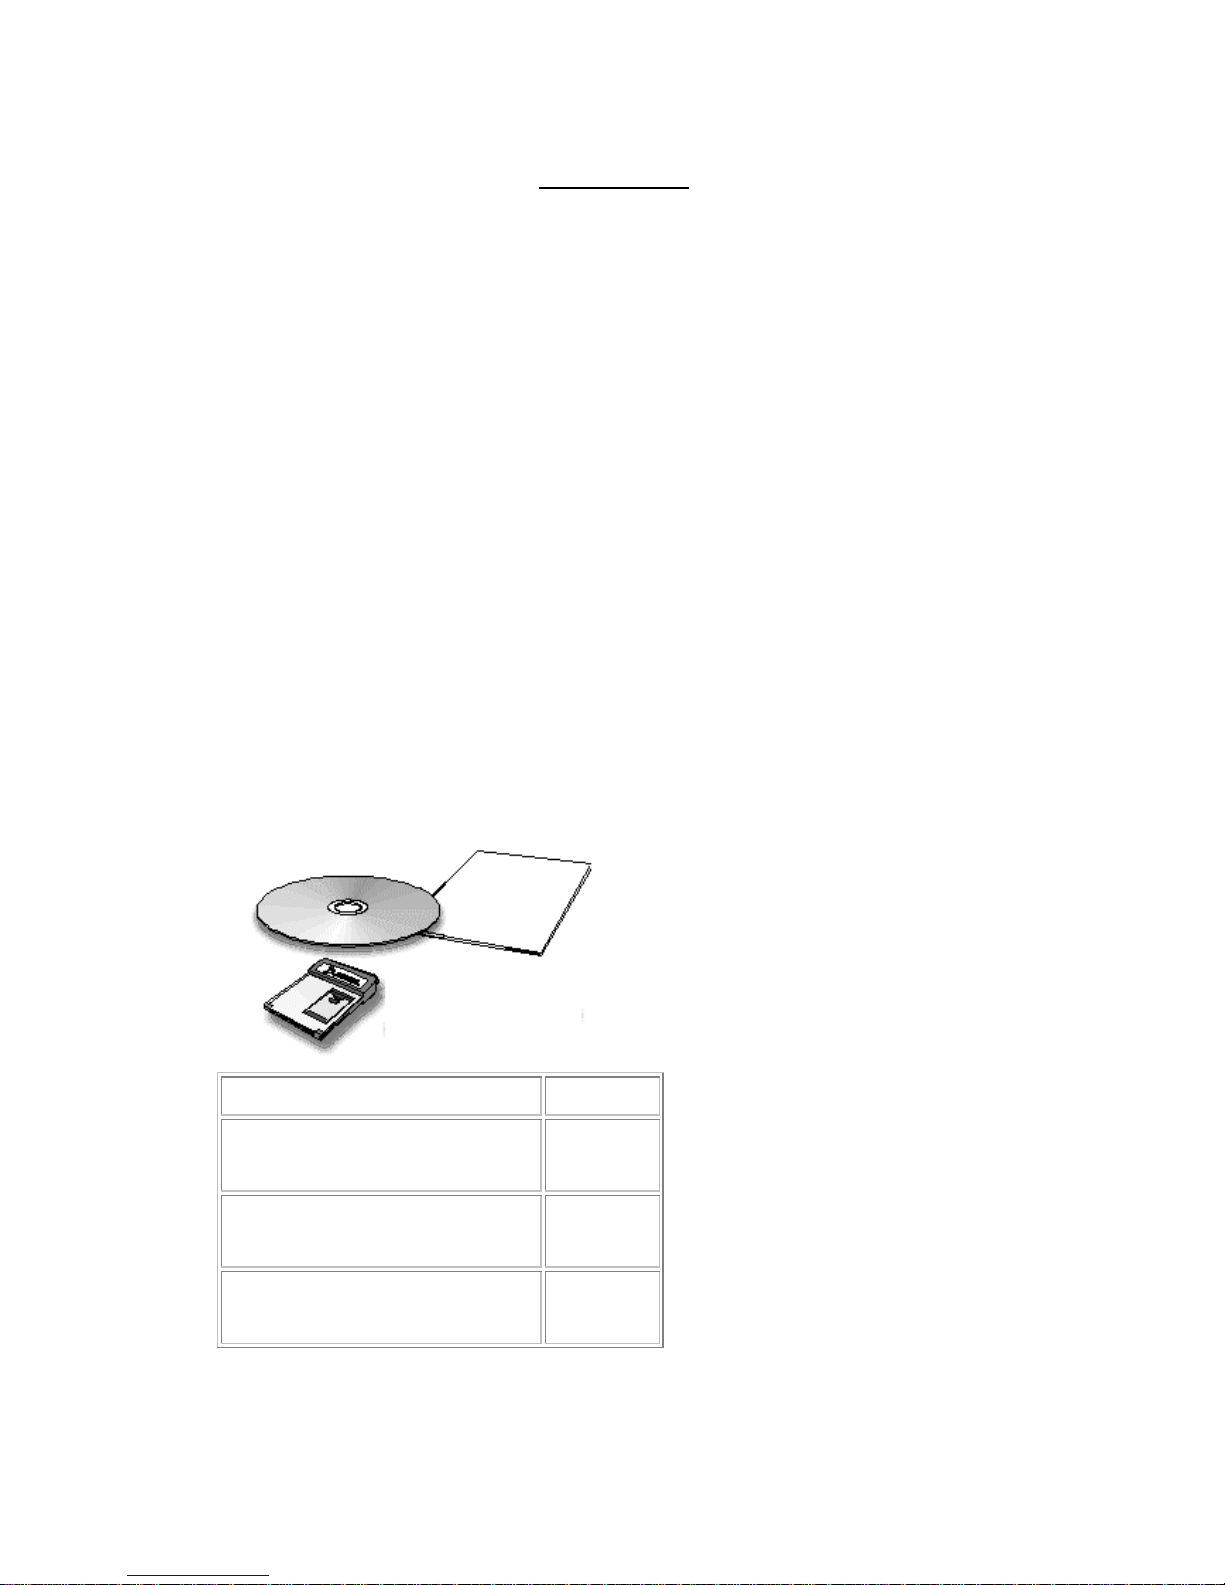
Package Contents
Check the contents of the package. The following items should be included. If
there is any item damaged or missing, please contact your dealer immediately.
Description
The GSM/GPRS Compact
Flash Card
Software
CD-ROM
Owner's
Manual
Quantity
1
1
1
1
Page 10
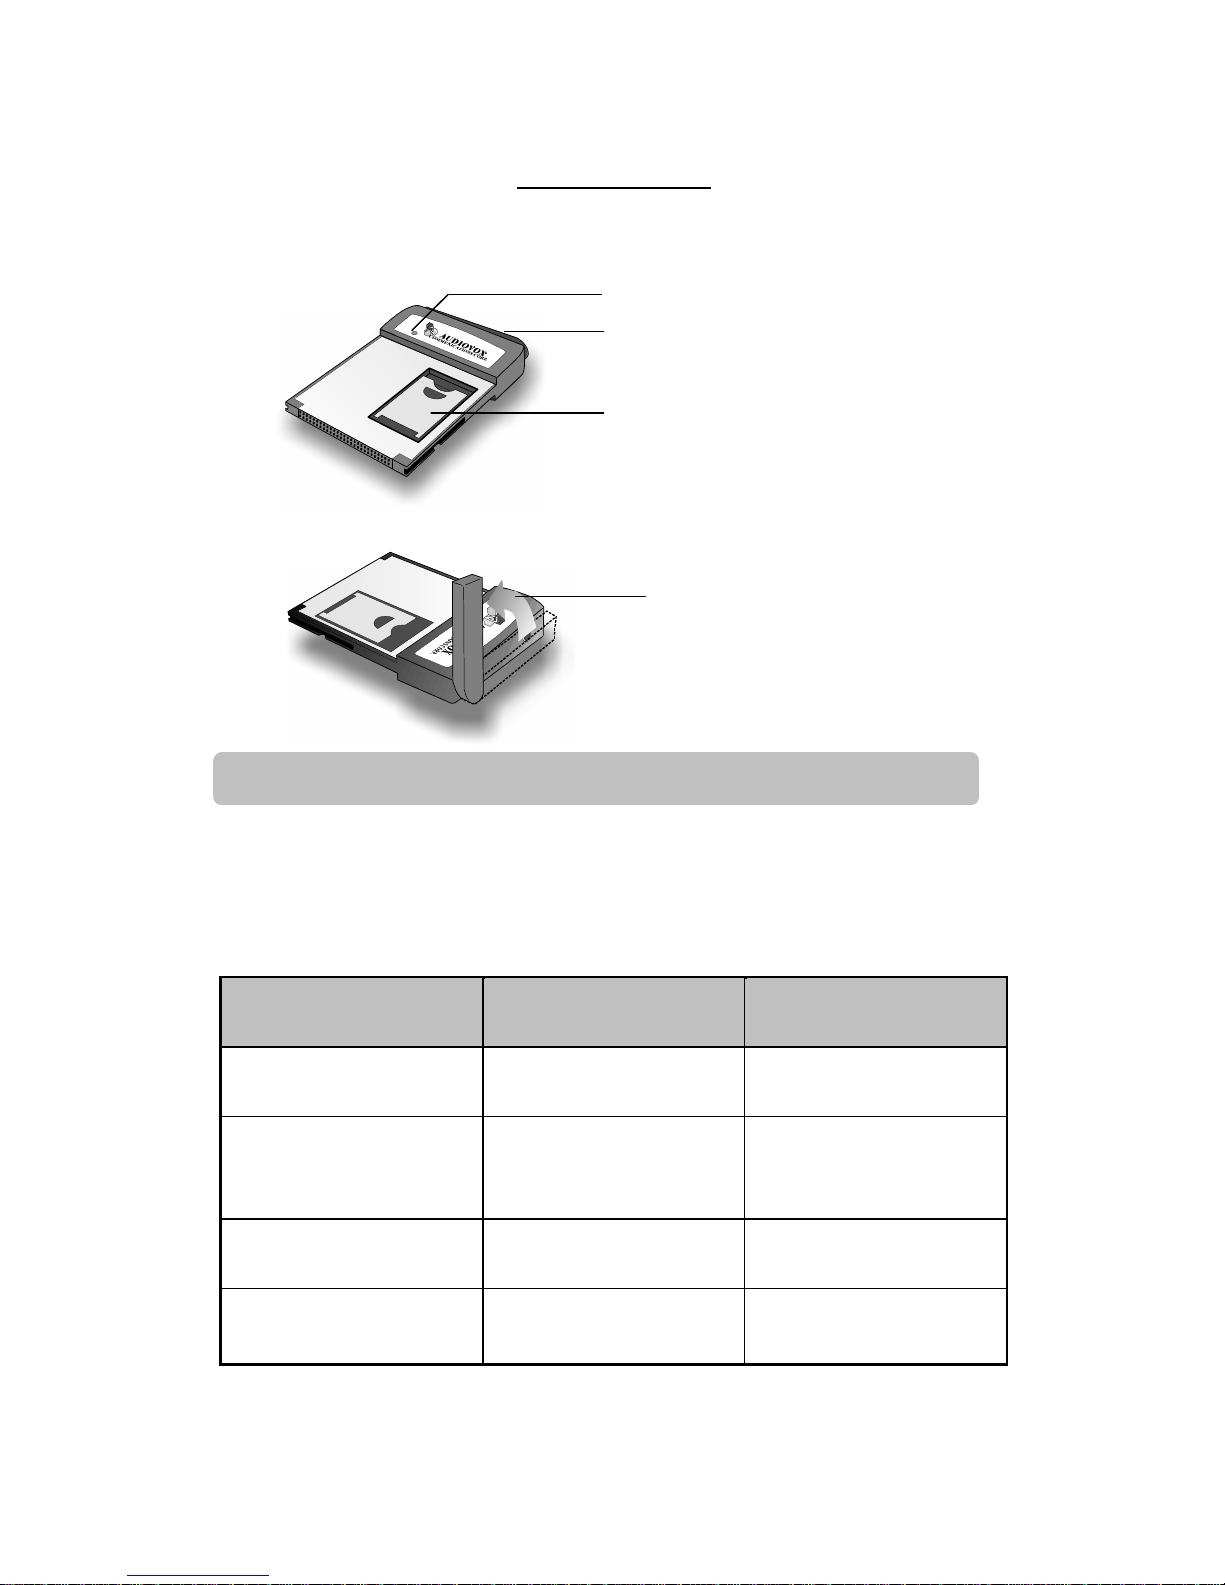
The RTM-8000D
Move the antenna upward
SIM card
Antenna
Status Indicator
Appearance
Note: Do not remove the antenna from the RTM-8000D.
The Status Indicator
The working status of the RTM-8000D is shown by the status indicator. Please
refer to the table below for the blinking patterns of the indicator and the status
they represent:
Color Pattern Status
Amber Blink every second No service
Amber Blink slowly GSM network
connected
Amber Blink fast Searching for network
Green Blink slowly
GSM/GPRS connected
2
Page 11

Installing and Configuring the RTM-8000D
System Requirements
Check your hardware and software and see if they satisfy the requirements
below. If you are not sure, please consult your dealer or operator.
Hardware & software requirements
A valid SIM card.
•
• A Type I Compact Flash Card slot or a PCMCIA (PC Card) slot and a
PCMCIA-to-Compact Flash adapter card (not included)
For PDA:
• Operating system: Pocket PC 2000/2002, Windows Mobile 2003, WinCE 3.0
and WinCE.NET.
ActiveSync must be installed on the host system
•
For PC:
IBM compatible, 486DX4-100Mhz PC or above
•
• System memory: At least 64MB
Operating system: Windows 98 SE/ME/2000/XP
•
Network requirements
Some features require support from your network operator, and may require
additional subscription.
Inserting the SIM card
Follow the steps below to insert the SIM card into the SIM card socket of the
RTM-8000D.
Open the SIM card socket flip as illustrated.
3
Page 12
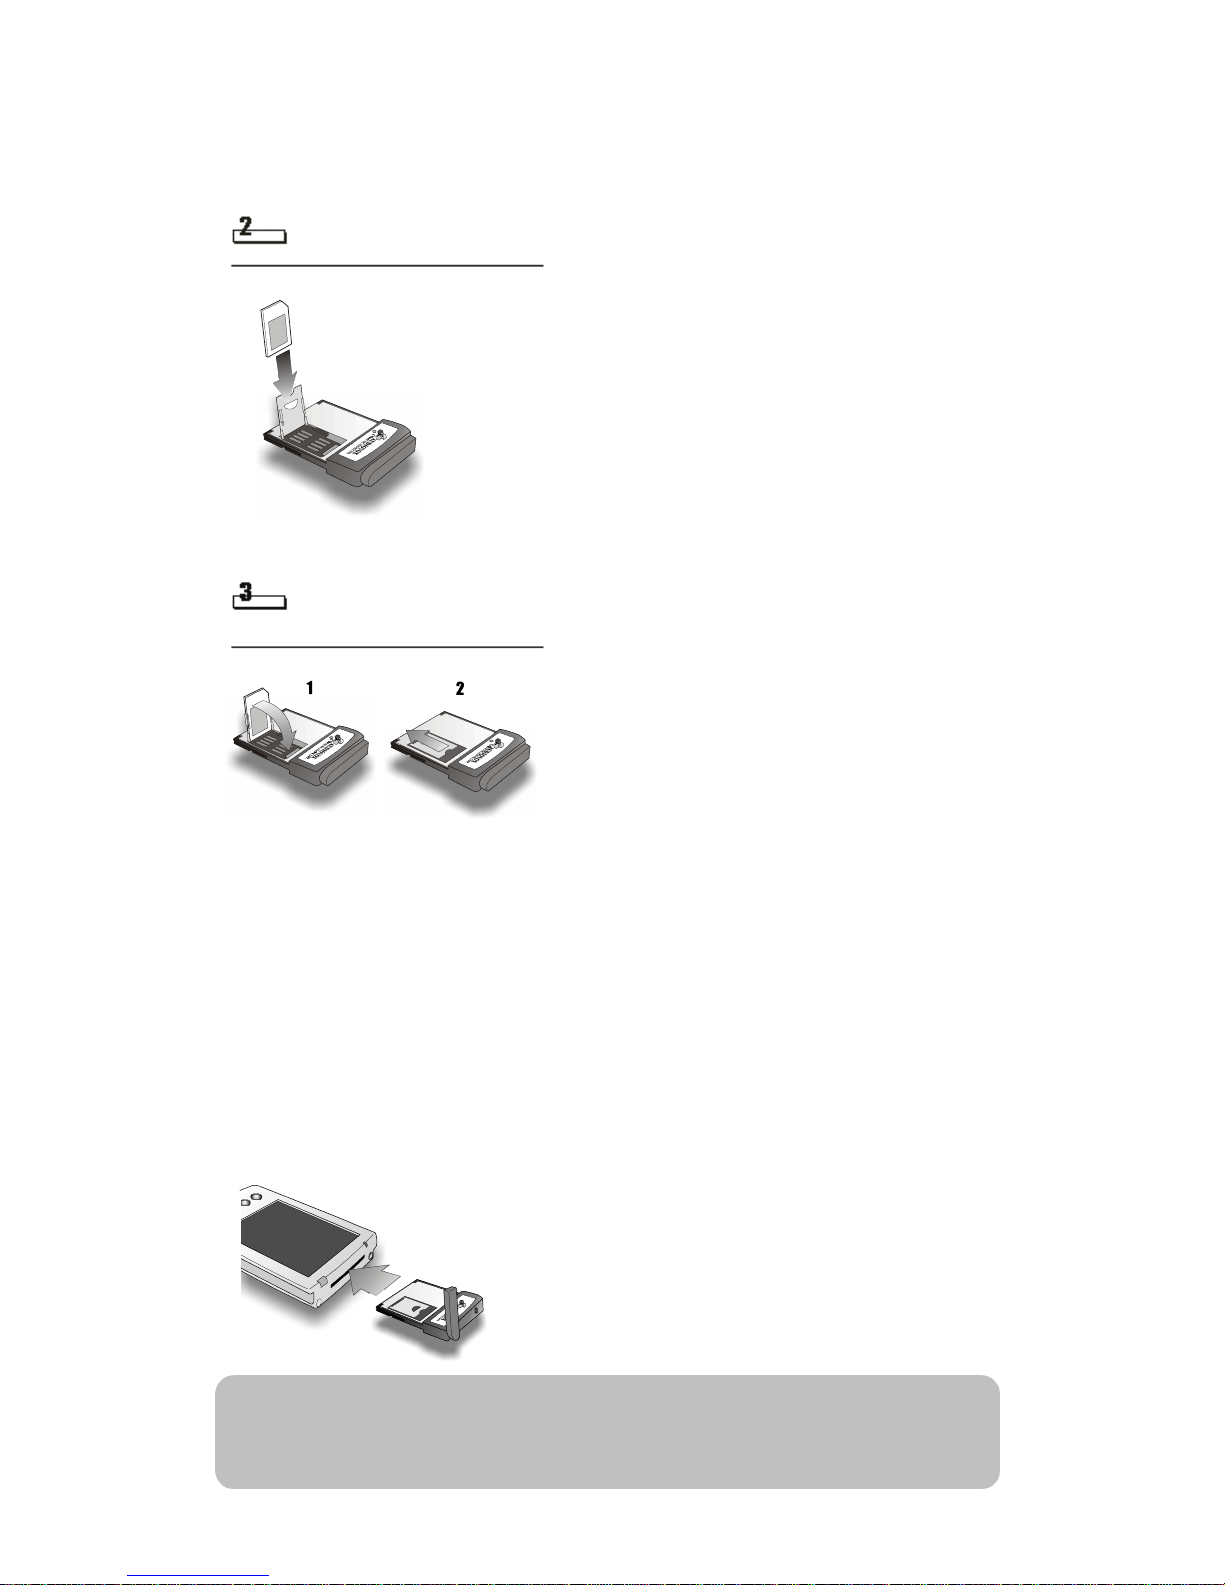
Insert the SIM card into the SIM card socket flip. Pay attention to the direction of
the SIM card and the metal contact when you insert.
Close the SIM card socket flip and slide it into place.
Installing RTM-8000D on a Pocket PC
To install RTM-8000D on a Pocket PC:
Insert RTM-8000D into the Compact Flash card slot of your Pocket PC.
•
• Install GPRS Settings Tool on your Pocket PC
Configure GPRS settings.
•
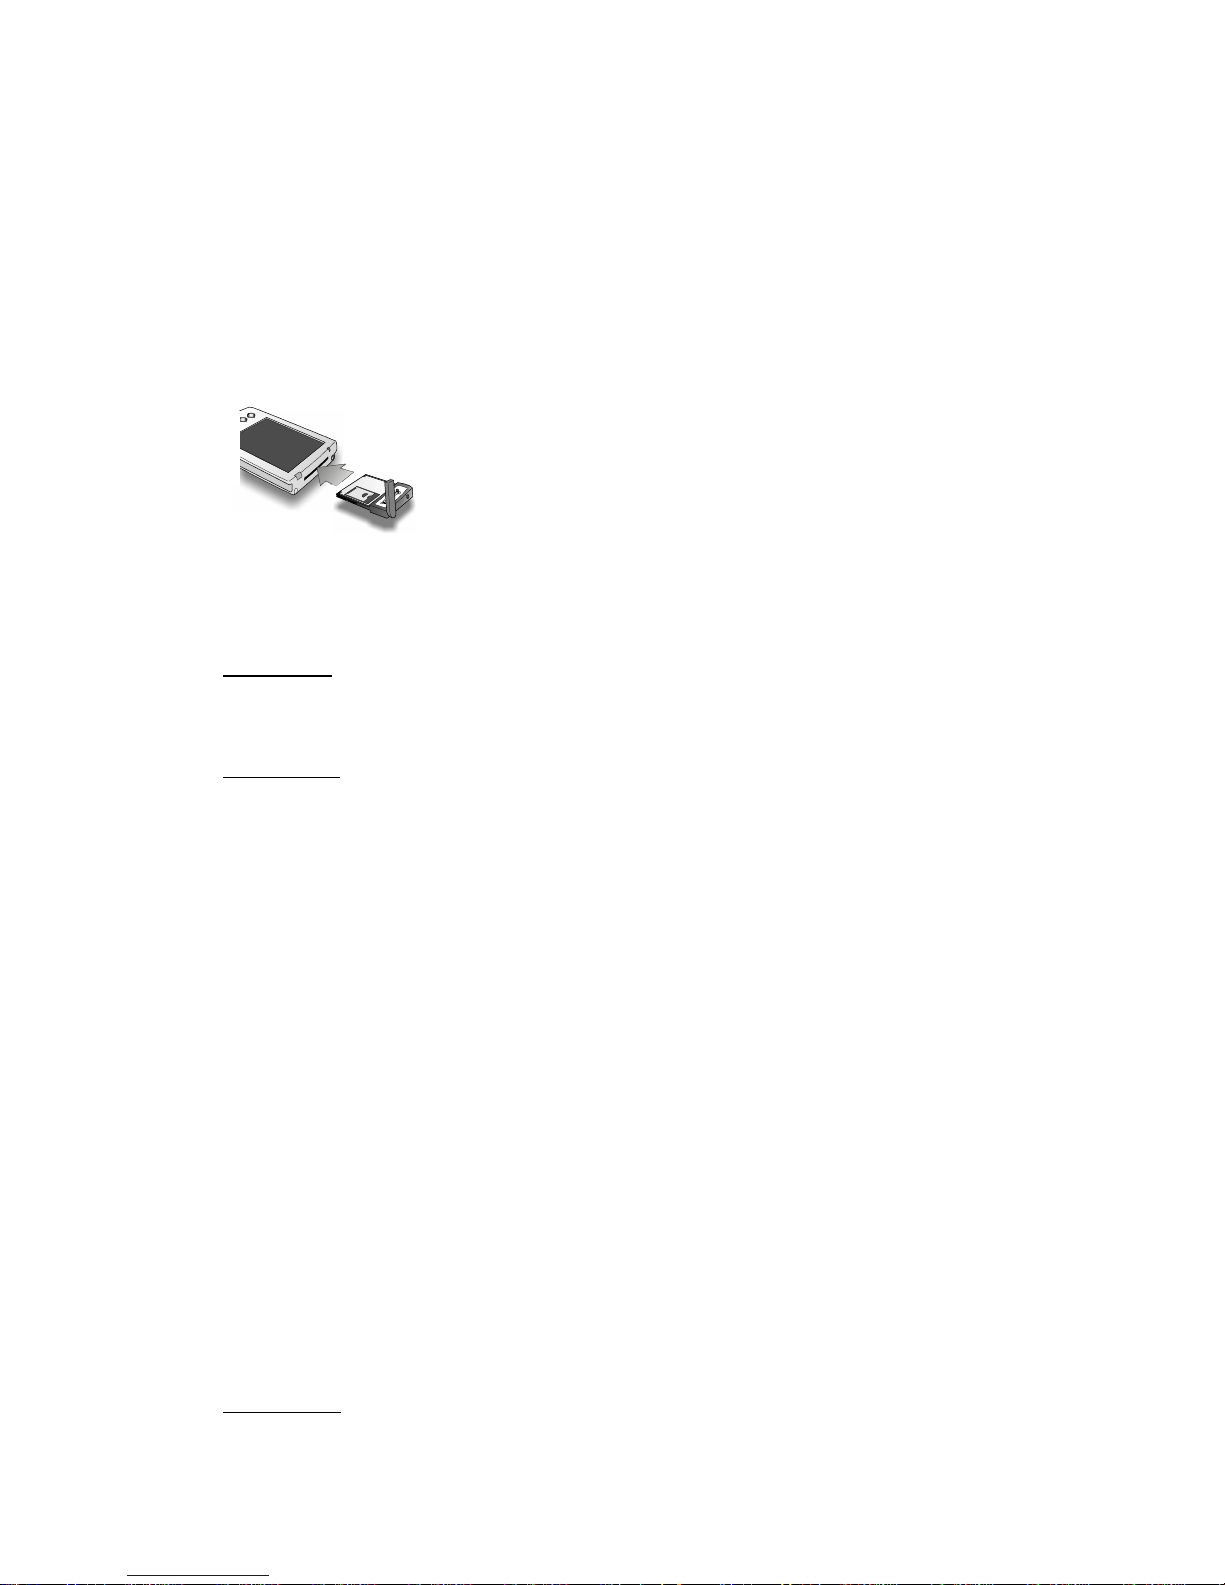
Inserting RTM-8000D into Pocket PC
Refer to the illustration below to insert RTM-8000D into Pocket PC.
Note: The way to insert RTM-8000D may be different from Pocket PC to
4
Page 13
Pocket PC. Please refer to the documentation of your Pocket PC for
details.
Removing the RTM-8000D from a Pocket PC
Please remember that before removing the RTM-8000D from your Pocket PC,
you must close any ongoing connections you may have open.
After doing so, you must also close any running applications using the
RTM-8000D. When this is complete, you may remove the RTM-8000D from
your Pocket PC.
Installing GPRS Settings Tool
Note: The GPRS Settings Tools are designed for Pocket PC 2002 and
Windows Mobile 2003 only. If you are installing RTM-8000D on a
PDA using Pocket PC 2000 system, please refer to the file
PPC2000setup.pdf on the CD-ROM for instructions.
Before installing GPRS Settings Tool:
• Back up the data on your Pocket PC.
Make sure your Pocket PC is connected to your PC and RTM-8000D is
•
inserted.
5
Page 14
Insert the software CD-ROM into your CD-ROM drive and double-click the
Setup.exe icon in the GPRS Setting Tool_PPC/PPC2002 or Windows Mobile
2003 folder.
The installer starts automatically. Follow the instructions on the screen to
proceed.
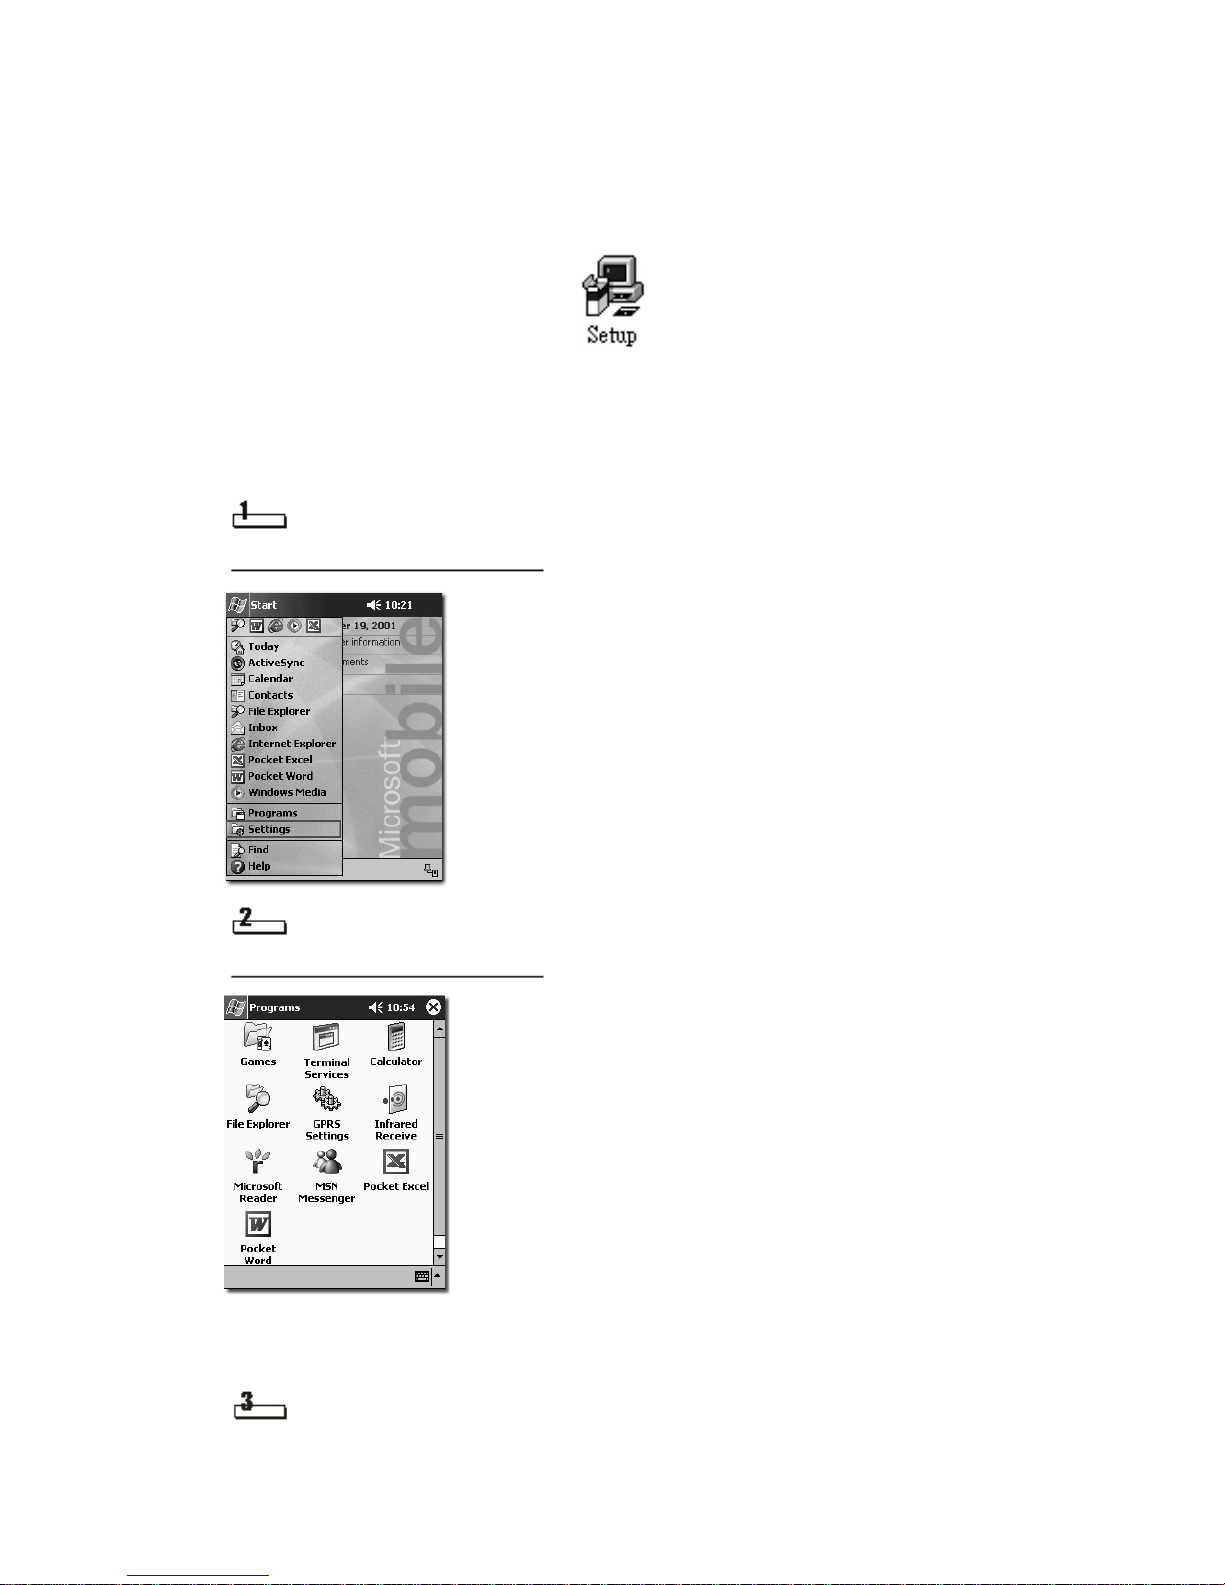
Configuring GPRS Settings
Tap Start, Programs.
Tap GPRS Settings.
A new connection is established automatically when the GPRS Settings Tool is
run for the first time.
Tap OK.
6
Page 15

A new dialing location will also be created.
Tap OK.
Note: The new dialing location is created specially for GPRS connection.
When you use other connections, remember to switch back to your
original dialing location.
The GPRS Settings window where you can configure GPRS
parameters will appear.
7
Page 16

Pho
ne Number
Enter the phone number to dial for data connections (such as *99#) in this field.
This is specified by your operator.
PIN Code Required
If the PIN code of your SIM card is activated, check this checkbox. Enter your
PIN code in the PIN field and your PIN code again in the Confirm field.
Extra Setting Required
If extra settings are required, tap to check the Extra Setting Required checkbox
and enter following information:
APN Only : If only the APN address is required, tap APN only radio button and
enter the APN of your operator.
Entire setting : If a complete setting string is required, tap Entire Setting radio
button and enter the string.
Logon Options
Tap Logon... button. The following window will appear.
8
Page 17

If your operator requires you to enter your user name and password to log on to
the network, tap to check the Username and Password Required checkbox.
Enter your user name in the Username field, password in the Password field
and password again in the Password Confirm field. Tap ok.
TCP/IP Settings
Tap TCP/IP... button. The following window will appear.
If your operator requires you to enter the IP address, tap Use Specific IP
Address radio button and enter the IP address. Otherwise, tap Use Server
Assign IP Address radio button.
If your operator requires you to enter the DNS address, tap Use Specific DNS
radio button and enter the DNS address. Otherwise, tap Use Server Assign
DNS radio button.
The configuration of GPRS settings is complete. Now you are ready to use the
GPRS connection.
Installing the RTM-8000D on a PC
To install the RTM-8000D on a PC:
• According to the operating system of your PC, install appropriate driver and
then the RTM-8000D Compact Flash card.
Configure the settings of the RTM-8000D Compact Flash card driver.
•
Note: Be sure to install RTM-8000D driver before inserting the card into
your PC.
Installing RTM-8000D Driver:
Installation procedure in Windows 98 SE/Me
9
Page 18

Insert the CD-ROM into your CD-ROM drive and double-click the
setup.exe icon in the GPRS Setting Tool_PC folder.
Driver installation wizard will appear on the screen.
Click Next.
Click Next.
10
Page 19

The installation wizard will start copying files to your system.
Click Finish.
Insert RTM-8000D into your PC.
11
Page 20

Note: A CompactFlash to PCMCIA adapter card is not sold with the
RTM8000D.
The way to insert the CompactFlash and PCMCIA card may be
different from PC to PC. Please refer to the documentation of your
PC for details.
RTM-8000D will be detected automatically as a GPRS Modem.
The installation of RTM-8000D is complete. Follow the description of
See Configuring the settings of RTM-8000D
to configure the settings of
driver.
12
Page 21

Installation procedure in Windows 2000
Insert the CD-ROM into your CD-ROM drive and double-click the
setup.exe icon in the GPRS Setting Tool_PC folder.
Driver installation wizard will appear on the screen.
Click Next.
Click Next.
13
Page 22

Click Next.
Click Finish.
14
Page 23

Insert RTM-8000D into your PC.
RTM-8000D will be detected automatically.
Click Yes.
The installation of RTM-8000D is complete. Follow the description of
See Configuring the settings of RTM-8000D
to configure the settings of
driver.
15
Page 24

Install
ation procedure in Windows XP
Insert the CD-ROM into your CD-ROM drive and double-click the
setup.exe icon in the GPRS Setting Tool_PC folder.
Driver installation wizard will appear on the screen.
Click Next.
16
Page 25

Click Next.
The installation wizard will start copying files to your system.
17
Page 26

Click Finish.
Insert RTM-8000D into your PC.
Note: The way to insert the CompactFlash and PCMCIA card may be
different from PC to PC. Please refer to the documentation of your
PC for details.
Found New Hardware Wizard will appear on the screen. Click Next.
18
Page 27

The computer will start detecting RTM-8000D.
Click Continue Anyway.
The wizard will continue installing.
19
Page 28

Click Finish.
The installation of RTM-8000D is complete. Follow the description of
See Configuring the settings of RTM-8000D
driver.
to configure the settings of
20
Page 29

Configuring the settings of RTM-8000D
Click Start on Windows Taskbar and select GPRS Modem Tools, GPRS
Modem Configuration to open the GPRS Modem Configuration Tool.
The section below describes each setting item in the window. For actual setting
parameters, please consult your operator.
User Name and Password Required
If your operator requires you to enter your user name and password before
connecting, check this checkbox. Enter your user name in the Username field,
password in the Password field and password again in the Confirm Password
field.
PIN Code Required
If the PIN code of your SIM card is activated, check this checkbox. Enter your
PIN code in the PIN Code field and your PIN code again in the Confirm PIN
Code field.
Phone Number
Enter the phone number to dial, for data connections (such as *99#) in this field.
This is specified by your operator.
Extra Setting Required
If extra settings are required, you can enter the parameters here. These
include:
APN Only: If only the APN address is required, enter that of your operator here.
Entire setting: If a complete setting string is required, enter the string here.
21
Page 30

IP Address
Double click on this icon
Click
Double click on this icon.
Click
If your operator requires you to enter the IP address, check the Specify an IP
Address checkbox and enter the IP address here. Otherwise, check the Server
Assigned IP Address checkbox.
DNS Address
If your operator requires you to enter the DNS address, check the Specify a
DNS Address checkbox and enter the DNS address here. Otherwise, check the
Server Assigned DNS Address checkbox.
Removing the RTM-8000D from a PC
Please remember that before removing the RTM-8000D from your PC, you
must close any ongoing connections you may have open.
After doing so, you must also close any running applications using the
RTM-8000D. Please then stop the card by double-clicking on the PCMCIA icon
in the tool bar on the bottom right portion of your screen, and then select the
RTM-8000D to stop/close it down.
When this is complete, you may remove the RTM-8000D from your Pocket PC.
22
Page 31

Using the RTM-8000D
Using Wireless Data Connection on Pocket PC 2000/2002
Tap Start , Settings.
Tap Connections tab.
23
Page 32

Tap Connections icon.
Tap Modify.
24
Page 33

Tap and hold the new GPRS Connection and tap Connect on the
submenu that appears.
The Connecting... dialogue box pops up.
25
Page 34

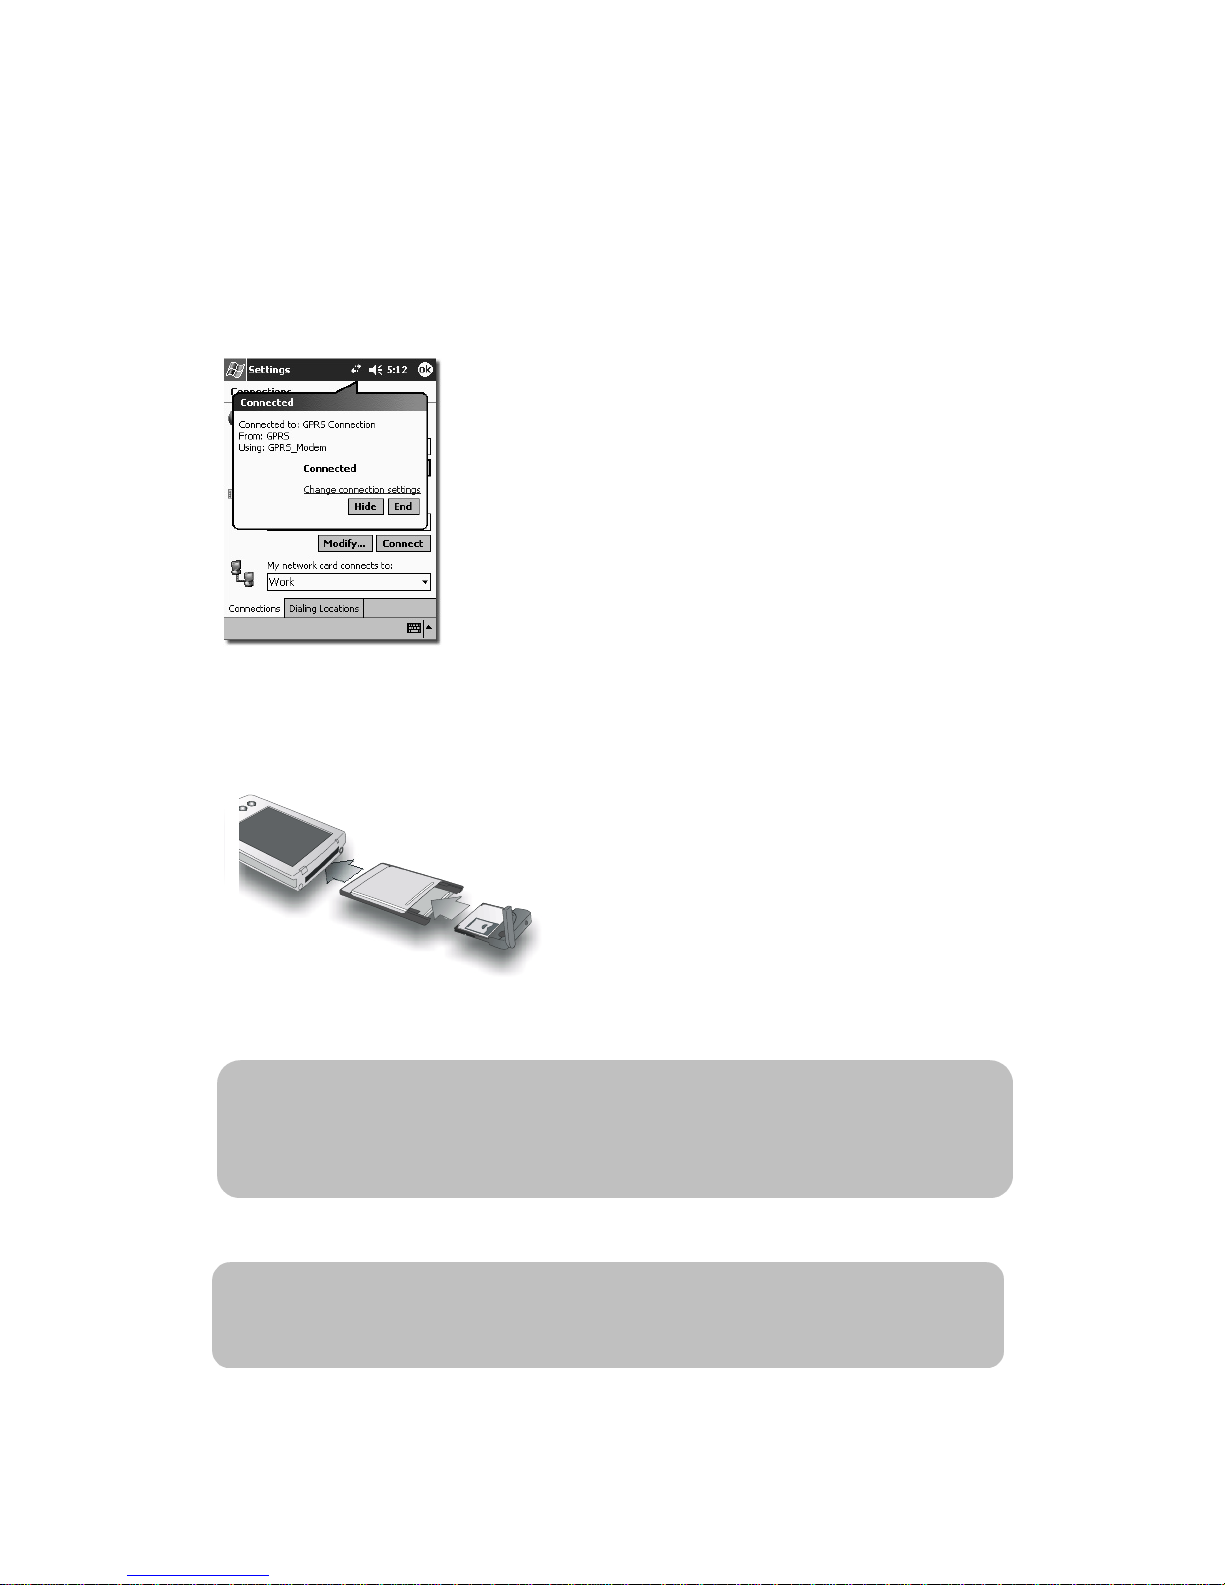
If connection is established successfully, the Connected dialogue box
will appear. Now you are ready to surf the Internet using Pocket
Internet Explorer or other applications.
Note: To disconnect from the Internet, tap the two-arrow symbol on the
top bar of your Pocket PC screen. When the dialog box appears, tap
End.
26
Page 35

Using Wireless Data Connection on Windows Mobile 2003
Tap Start, Settings.
Tap Connections tab.
27
Page 36

Tap Connections icon.
Tap Manage existing connections.
28
Page 37

Tap and hold the new GPRS Connection and tap Connect on the
submenu that appears.
The Connecting... dialogue box pops up.
If connection is established successfully, Connected dialogue box will
appear. Now you are ready to surf the Internet using Pocket Internet
Explorer or other applications.
29
Page 38

Note: To disconnect from the Internet, tap the two-arrow symbol on the
top bar of your Pocket PC screen. When the dialog box appears,
tap Disconnect.
Using Wireless Data Connection on WinCE
Tap Start, Settings, Network and Dial-up Connections.
Double tap Make New Connection.
30
Page 39

Type a name for the connection and tap Next.
Select GPRS_Modem from the drop-dowm menu and tap Configure….
31
Page 40

Tap the drop-down menu of Baud Rate and select 115200.
Tap Call Options, enter +CPIN=”****”;+CGDCONT=1,”IP”,”APN”
(where **** is your PIN code, and APN is the Access Point Name of your
operator) in the Extra Settings field. IF the PIN code of your SIM card is
not enabled, just enter +CGDCONT=1,”IP”,”APN”. Tap OK and tap Next.
32
Page 41

Enter the phone number to dial for data connections and tap Finish.
This phone number is specified by your operator.
Double tap the new connection.
33
Page 42

Tap Dial Properties….
Tap Dialing Patterns….
34
Page 43

Edit the dialing pattern for each type of call and tap OK.
Tap Connect.
35
Page 44

Connection is established successfully.
Using Wireless Data Connection on PC
The RTM-8000D driver creates a GPRS Modem Connection icon on
your desktop. Double-click the icon and the connection dialogue box
will appear on the screen.
36
Page 45

You can also open such dialogue box by clicking the Start button on Windows
Taskbar and selecting Programs, GPRS Modem Tools , GPRS Modem
Connection .
Click Connect or Dial.
The Connecting... dialogue box will pop up on the screen.
If connection is established successfully, Connected dialogue box will
appear. Now you are ready to use the connection with your favorite
applications.
37
Page 46

Troubleshooting & Warranty
Troubleshooting Tips
Installation of the RTM-8000D is unsuccessful
If you are installing the RTM-8000D to a PC, check the following:
If you are using an adapter card, is it broken or damaged?
•
• Did you insert the RTM-8000D all the way into the slot or adapter card?
If you are installing the RTM-8000D to a Pocket PC, check the following:
• Did you enter correct parameters (such as your PIN code if it is activated, or
the APN of your operator) when installing the RTM-8000D?
Did you insert the RTM-8000D all the way into the slot of your Pocket PC?
•
Can not establish GPRS connection
Check the following:
• Is such service activated by your operator?
Did you enter correct parameters (such as your PIN code if it is activated, or
•
the APN of your operator) when installing the RTM-8000D?
GPRS connection is slow and unstable
Disconnect and connect again. You may be switched to a better network
•
trunk line with better communication quality.
• If the problem persists, avoid using GPRS connection during the time when
network traffic is heavy, or move to a location where signal reception is better.
38
Page 47

12 Month Limited Warranty
Protect Your Warranty
Audiovox Communications Corp. (the Company) warrants to the original retail
purchaser of this Audiovox GSM/GPRS Compact Flash Card, that should this product
or any part thereof during normal consumer usage and conditions, be proven defective
in material or workmanship that results in product failure within the first twelve (12)
month period from the date of purchase, such defect(s) will be repaired or replaced
(with new or rebuilt parts) at the Company’s option, without charge for parts or labor
directly related to the defect(s).
This Warranty extends only to consumers who purchase the product in the United
States or Canada and it is not transferable or assignable.
This Warranty does not apply to:
(a) Product subjected to abnormal use or conditions, accident, mishandling,
neglect, unauthorized alteration, misuse, improper installation or repair or
improper storage;
(b) Product whose mechanical serial number or electronic serial number has been
removed, altered or defaced.
(c) Damage from exposure to moisture, humidity, excessive temperatures or
extreme environmental conditions;
(d) Damage resulting from connection to, or use of any accessory or other product
not approved or authorized by the Company;
(e) Defects in appearance, cosmetic, decorative or structural items such as
framing and non-operative parts;
(f) Product damaged from external causes such as fire, flooding, dirt, sand,
weather conditions, battery leakage, blown fuse, theft or improper usage of any
electrical source.
The Company disclaims liability for removal or reinstallation of the product, for
geographic coverage, for inadequate signal reception by the antenna or for
communications range or operation of the cellular system as a whole.
To obtain repairs or replacement within the terms of this Warranty, the product should
be delivered with proof of Warranty coverage (e.g. dated bill of sale), the consumer’s
return address, daytime phone number and/or fax number and complete description of
the problem, transportation prepaid, to the Company at the address shown below or to
39
Page 48

the place of purchase for repair or replacement processing. In addition, for reference
to an authorized Warranty station in your area, you may telephone in the United States
(800) 229-1235, and in Canada (800) 465-9672 (in Ontario call 905-712-9299).
THE EXTENT OF THE COMPANY’S LIABILITY UNDER THIS WARRANTY IS
LIMITED TO THE REPAIR OR REPLACEMENT PROVIDED ABOVE AND, IN NO
EVENT, SHALL THE COMPANY’S LAIBILITY EXCEED THE PURCHASE PRICE
PAID BY PURCHASER FOR THE PRODUCT.
ANY IMPLIED WARRANTIES, INCLUDING ANY IMPLIED WARRANTY OF
MERCHANTABILITY OR FITNESS FOR A PARTICULAR PURPOSE, SHALL BE
LIMITED TO THE DURATION OF THIS WRITTEN WARRANTY. ANY ACTION FOR
BREACH OF ANY WARRANTY MUST BE BROUGHT WITHIN A PERIOD OF 18
MONTHS FROM DATE OF ORIGINAL PURCHASE. IN NO CASE SHALL THE
COMPANY BE LIABLE FOR AN SPECIAL CONSEQUENTIAL OR INCIDENTAL
DAMAGES FOR BREACH OF THIS OR ANY OTHER WARRANTY, EXPRESS OR
IMPLIED, WHATSOEVER. THE COMPANY SHALL NOT BE LIABLE FOR THE
DELAY IN RENDERING SERVICE UNDER THIS WARRANTY OR LOSS OF USE
DURING THE TIME THE PRODUCT IS BEING REPAIRED OR REPLACED.
No person or representative is authorized to assume for the Company any liability
other than expressed herein in connection with the sale of this product.
Some states or provinces do not allow limitations on how long an implied warranty lasts
or the exclusion or limitation of incidental or consequential damage so the above
limitation or exclusions may not apply to you. This Warranty gives you specific legal
rights, and you may also have other rights which vary from state to state or province to
province.
IN USA: AUDIOVOX COMMUNICATIONS CORP.
555 Wireless Blvd.
Hauppauge, NY 11788
(800) 229-1235
IN CANADA: AUDIOVOX COMMUNICATIONS CANADA CO.
5155 Spectrum Way, Unit #5
Mississauga, Ontario L4W 5A1
(800) 465-9672
40
 Loading...