

Page 1
RTM-8000
GSM/GPRS Compact Flash Card
Owner’s Manual
Page 2

Copyright Statement
Copyright 2002 by Audiovox Communications Corp. All rights reserved. No part of
this publication may be reproduced, transmitted, transcribed, stored in a retrieval system or translated into any language or computer language, in any form or by any
means, electronic, mechanical, magnetic, optical, chemical, manual or otherwise, without the prior written permission of Audiovox Communications Corp..
Disclaimer
Audiovox Communications Corp. makes no representations or warranties, either
expressed or implied, with respect to the contents hereof and specifically disclaims any
warranties, merchantability or fitness for any particular purpose. Further, Audiovox
Communications Corp. reserves the right to revise this publication and to make
changes from time to time in the contents hereof without obligation of Audiovox
Communications Corp. to notify any person of such revision or changes.
ALL INFORMATION IS PROVIDED BY AUDIOVOX COMMUNICATIONS
CORP. ON AN "AS IS" BASIS ONLY. THIS COMPANY PROVIDES NO REPRESENTATIONS AND WARRANTIES, EXPRESS OR IMPLIED, INCLUDING
THE IMPLIED WARRANTIES OF FITNESS FOR A PARTICULAR PURPOSE,
MERCHANTABILITY AND NONINFRINGEMENT.
Page 3
Important Safety Precautions
When using this product, the safety precautions below must be taken against possible
legal issues and damages.
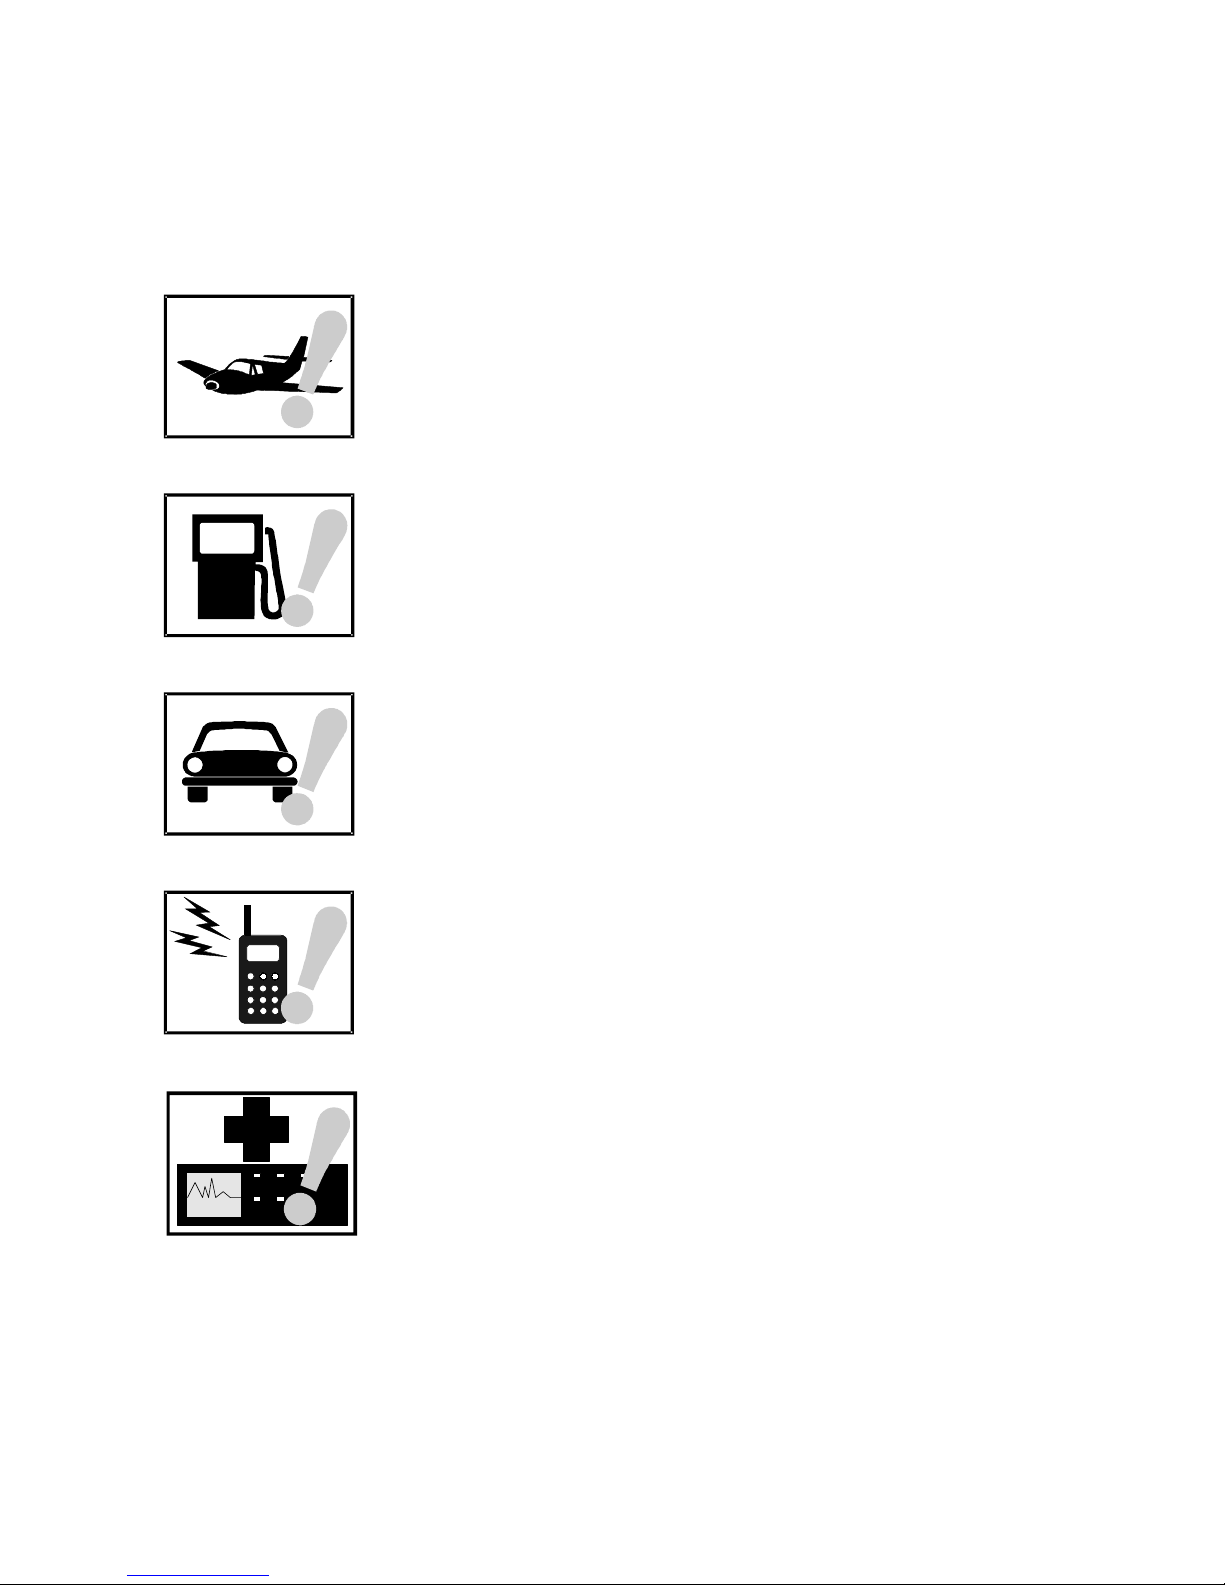
SAFETY IN AIRCRAFT
The interference would be caused by this product to an aircraft's
navigation system and its network. In most countries, using this
product on board an airplane is against the law.
SAFETY FOR ENVIRONMENTS
Do not use this product in gas stations. Also the use of this
product is prohibited in fuel storehouse, chemical plants and
locations containing explosives.
SAFETY ON THE ROAD
Vehicle drivers in motion are not permitted to use telephony
services with the handheld device, except in the case of emergency. In some countries, using hand-free devices as an alternative is allowed.
SAFETY ABOUT RADIATION
This product should be operated in the suggested normal condition only to ensure the radiative performance and safety of the
interference. When using the product, keep a distance of 5 mm
from your body to eliminate possible electromagnetic effects.
SAFETY FOR MEDICAL EQUIPMENT
This product may cause malfunctions of medical equipment. In
most hospital or medical centers, the use of this product is forbidden.
Page 4
Attention
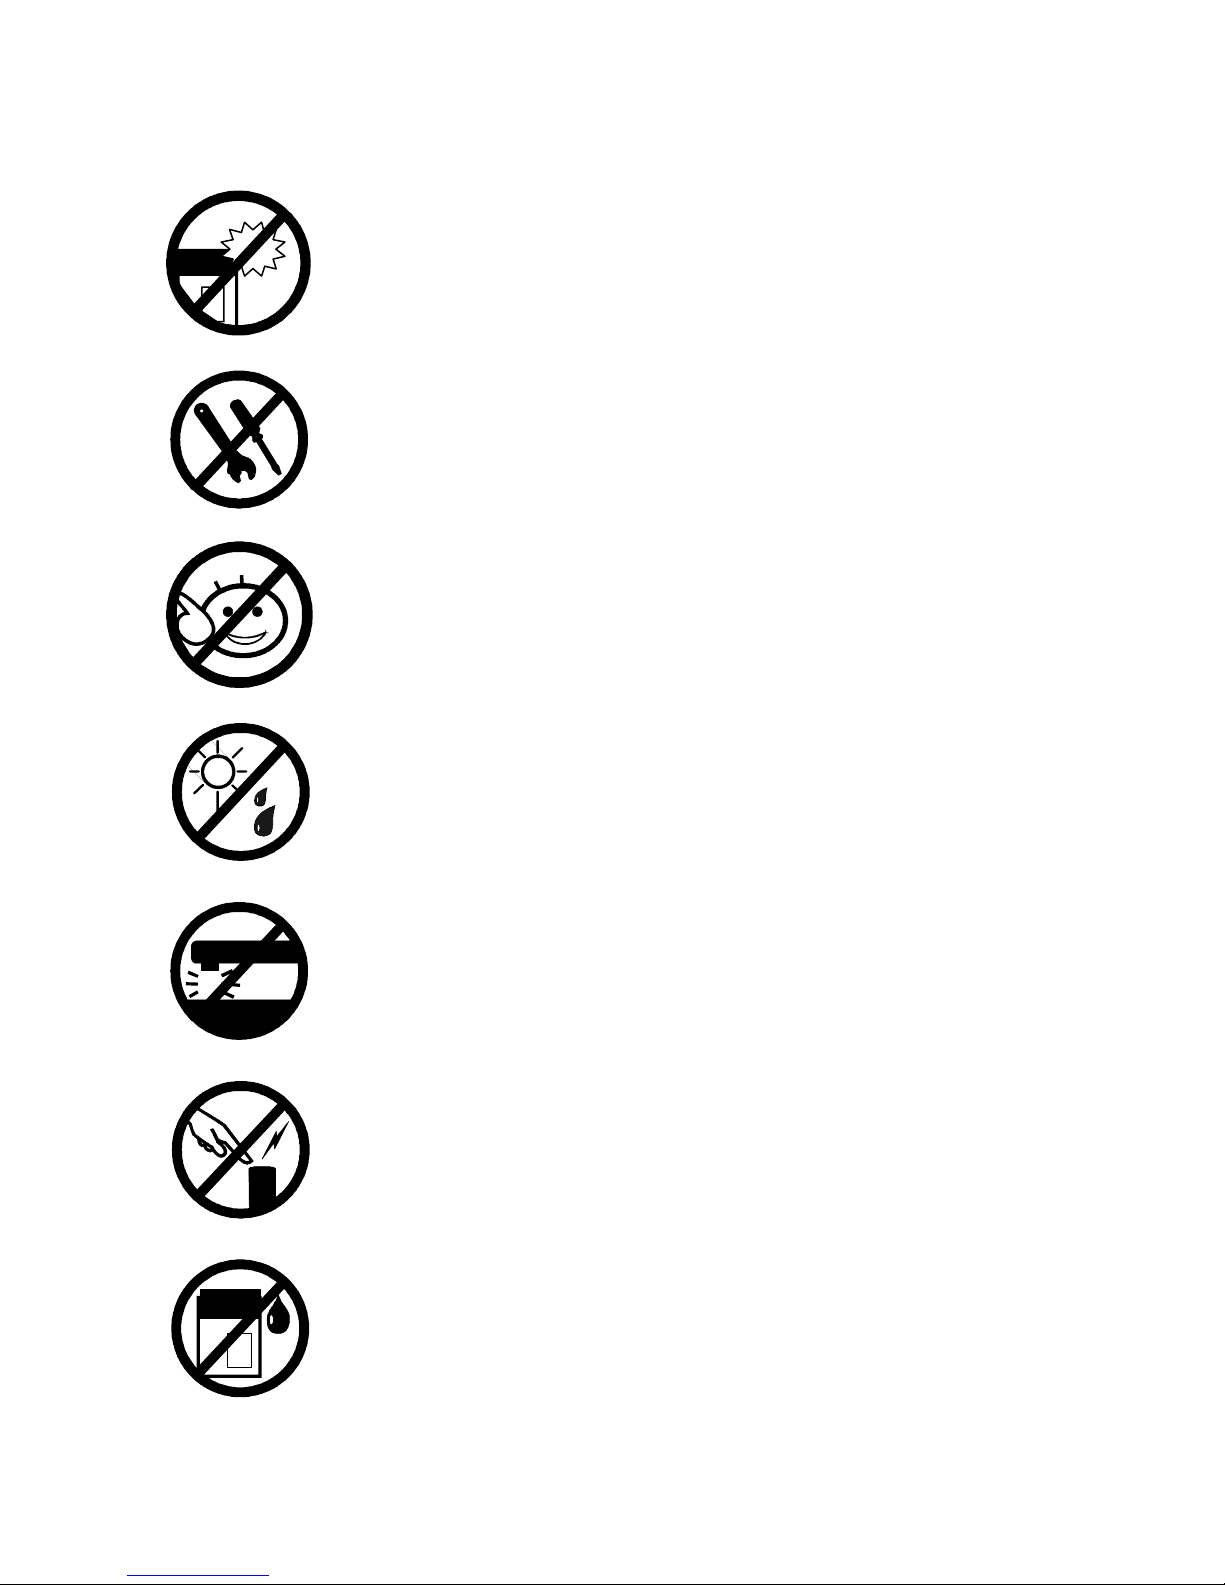
Handle the product with care. Do not drop, bend or apply strong
forces to the product. Otherwise, unrecoverable damages will
occur in its internal components.
There are no user serviceable parts inside this product. If this
product appears to be broken, call a qualified service personnel or
send this product to your original dealer. Do not attempt to disassemble or repair this product as it may result in electric shock or
unrecoverable damage to the product itself.
Keep this product out of reach of small children.
Remove this product from your handheld device when not in use.
Store this product in its protective case in a cool dry place.
The antenna of this product is non-removable. Do not try to
detach the antenna from the product.
Avoid touching the antenna while in use, otherwise it may cause
adverse effect to signal reception.
This product does not provide water proof feature. Avoid using
this product in the rain or place the product near a cup or glass
filled with water or other liquid.
Page 5

Tips When Using
• Avoid using the product near metal structures (for example, large metal furniture or steel frames of a building). The transmission and reception of signal can
be effected by these objects.
• Avoid using the product near strong electromagnetic sources, such as microwave
ovens, sound speakers, TV and radio.
• Avoid using the product right after dramatic change of temperature.
• Make sure that the signal strength is in good condition before sending or receiving important data.
• This product runs on the power of your handheld device or portable PC. Check
the power regularly. If the power is low, the transmission or reception will
become unstable.
• Avoid transmitting a large file at a time. Try splitting it into several smaller files
and send them separately.
Exposure to Radio Frequency Radiation
The radiated output power of this internal wireless radio is far below the FCC
radio frequency exposure limits. Nevertheless, the wireless radio shall be used in
such a manner that the radio is 2.5 cm or further from the human body.
The internal wireless radio operates within guidelines found in radio frequency
safety standards and recommendations, which reflect the consensus of the scientific
community.
Audiovox Communications Corp. therefore believes the internal wireless radio is
safe for use by consumers. The level of energy emitted is far less than the electromagnetic energy emitted by wireless devices such as mobile phones. However, the
use of wireless radios may be restricted in some situations or environments, such as
aboard airplanes. If you are unsure of restrictions, you are encouraged to ask for
authorization before turning on the wireless radio.
Page 6

<Blank Page>
Page 7

Table of Contents
Overview Welcome ..........................................2
Package Contents ............................3
Appearance ......................................4
The RTM-8000 ................................................... 4
The status indicator ............................................. 5
The remote controller .......................................... 5
Installing and
Configuring the
RTM-8000
Using the RTM8000
System Requirements .......................7
Hardware & software requirements ..................... 7
Network requirements ......................................... 7
Installing the RTM-8000 ..................7
Inserting the SIM card ......................................... 7
Install the RTM-8000 to Pocket PC .................... 9
Installing the RTM-8000 on a PC ....................... 18
Installing RTM-8000 driver .......................... 18
Installing driver for Windows 98 SE/Me 18
Installing driver for Windows 2000 ........ 22
Installing driver for Windows XP ........... 26
Configuring the settings of the RTM-8000 ... 31
Using Wireless Data Connection on
Pocket PC .........................................34
Using Wireless Data Connection on PC
.........................................................38
Dialer (For Pocket PC Only) ...............39
Overview ............................................................. 39
Features ........................................................ 39
Installing Dialer ................................................... 40
Getting to know Dialer ........................................ 40
i
Page 8

Starting Dialer .............................................. 40
Exit ..................................................................... 43
Dialer Screen ................................................ 44
Icons on the Status Display .......... 44
Command Bar ........................................ 45
Mode Buttons ........................................ 45
Show/hide Tool Bar Button ................... 45
Volume Adjustment Slider ..................... 46
Send Key ................................................ 46
Cancel Key ............................................. 46
Using Dialer ........................................................ 47
Making a call ................................................. 47
Redialing the last dialed call .......................... 48
Answering a call ............................................ 49
Missed call message ....................................... 50
Receiving text messages ................................ 50
Listening to voicemail ................................... 51
Options during a call ..................................... 52
Call waiting ............................................ 52
Making a new call ................................... 52
Call swapping ......................................... 53
Conference call ....................................... 54
Private call .............................................. 54
Holding/Unholding a call ....................... 55
Disconnecting a call ................................ 55
Phonebook .......................................................... 56
ii
Adding a new Phonebook entry .................... 56
Specifying your own number .................. 57
Specifying the emergency number .......... 57
Viewing Phonebook entries .......................... 58
Viewing details of a Phonebook entry ........... 58
Viewing call records ...................................... 58
Making a call from Phonebook ...................... 59
Editing a Phonebook entry ........................... 59
Deleting a Phonebook entry .......................... 59
Searching for a Phonebook entry .................. 59
Adding/editing/deleting a Phonebook category60
Copying/moving a Phonebook entry to another
Page 9

category ........................................................ 62
Duplicating a Phonebook entry ..................... 63
Message ............................................................... 64
Writing and sending a new message .............. 64
Reading a message ........................................ 66
Searching for a message ................................ 67
Replying to a message ................................... 68
Forwarding a message ................................... 69
Re-sending a message ................................... 70
Adding/renaming/deleting a message folder .. 71
Services ............................................................... 73
Call Service ................................................... 73
General ................................................... 74
Call divert .............................................. 74
Call waiting ............................................ 75
Call barring ............................................ 76
Send unstructured supplementary service data
............................................................... 77
Network Service ........................................... 78
Security Service ............................................. 79
Changing access codes ............................ 80
SMS Service .................................................. 81
Settings ............................................................... 83
General Settings ............................................ 83
Choosing a skin (background) ................ 84
Adjust power setting .............................. 84
Ringer Settings ............................................. 85
Button Settings ............................................. 86
Display Rules ................................................ 88
Establishing a display rule ....................... 88
Changing the priority of a display rule .... 89
Editing a display rule .............................. 89
Deleting a display rule ............................ 89
Reset to default settings ................................ 90
Data Connection ................................................. 91
Establishing GPRS Data Connection ............ 91
Returning to voice services from GPRS data con-
nection .......................................................... 95
iii
Page 10

Information ......................................................... 96
Card information .......................................... 96
Online Help .................................................. 96
About Dialer ................................................. 96
Troubleshooting Installation of the RTM-8000 is unsuccessful ....... 98
Can not make or receive calls ............................... 98
Can not establish GPRS connection ..................... 98
GPRS connection is slow and unstable ................ 99
Cannot return to voice services from GPRS data
connection ........................................................... 99
Can not use certain call functions ......................... 99
There is noise during a call ................................... 99
iv
Page 11

1
Overview
1
Page 12

Welcome
Congratulations on your purchase of the RTM-8000, GSM/GPRS Compact Flash card!
With this card, you can instantly turn your Pocket PC or PC into a wireless communication device so you can perform voice/data communication
anytime and anywhere. You can not only enjoy high quality voice communication but rapid and stable GPRS data connection. You can finally
get rid of the tiny little screen of your mobile phone and access various
on-line information comfortably.
This manual will help you to better understand your RTM-8000 GSM/
GPRS Compact Flash card as well as familiarize yourself quickly with
how to use it. Please follow us step-by-step and get the most out of your
card.
Overview2
Page 13
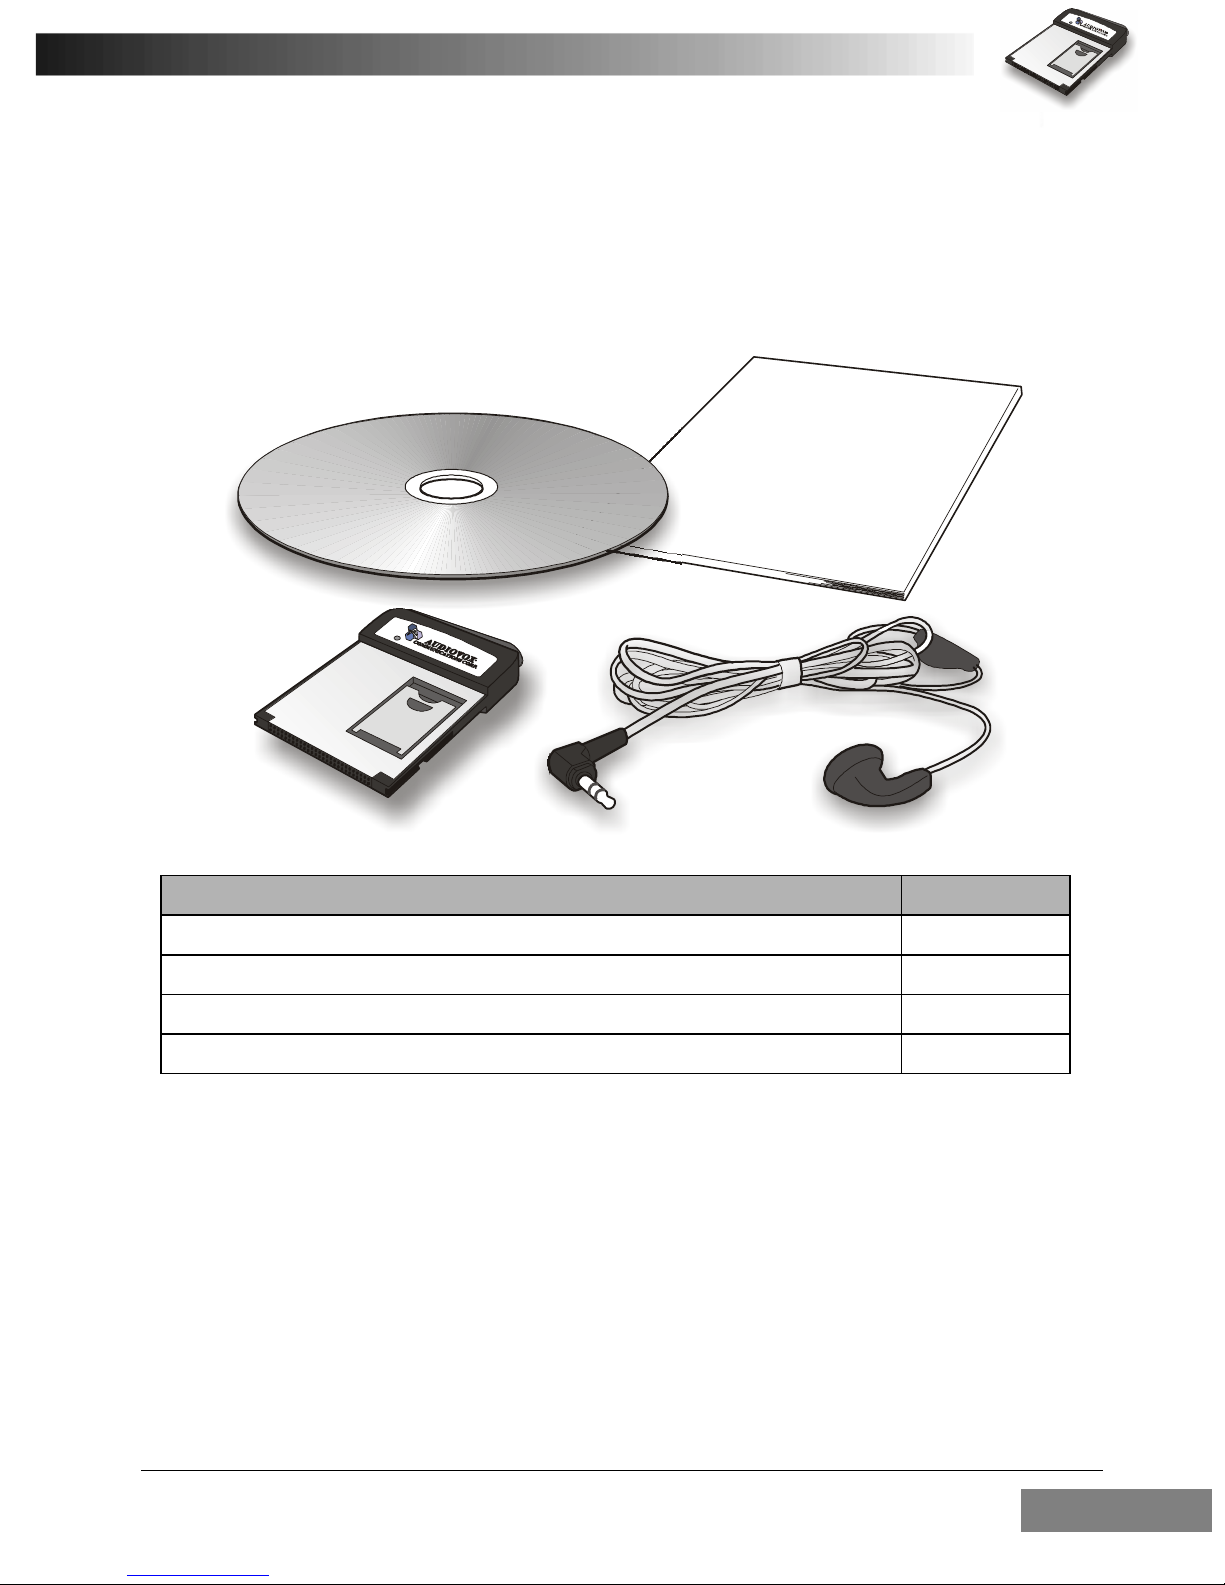
Package Contents
Check the contents of the package. The following items should be
included. If there is any item damaged or missing, please contact your
dealer immediately.
Description Quantity
The GSM/GPRS Compact Flash Card 1
Earphone (with remote controller) 1
Software CD-ROM 1
This Owner’s Manual 1
Overview 3
Page 14
Appearance
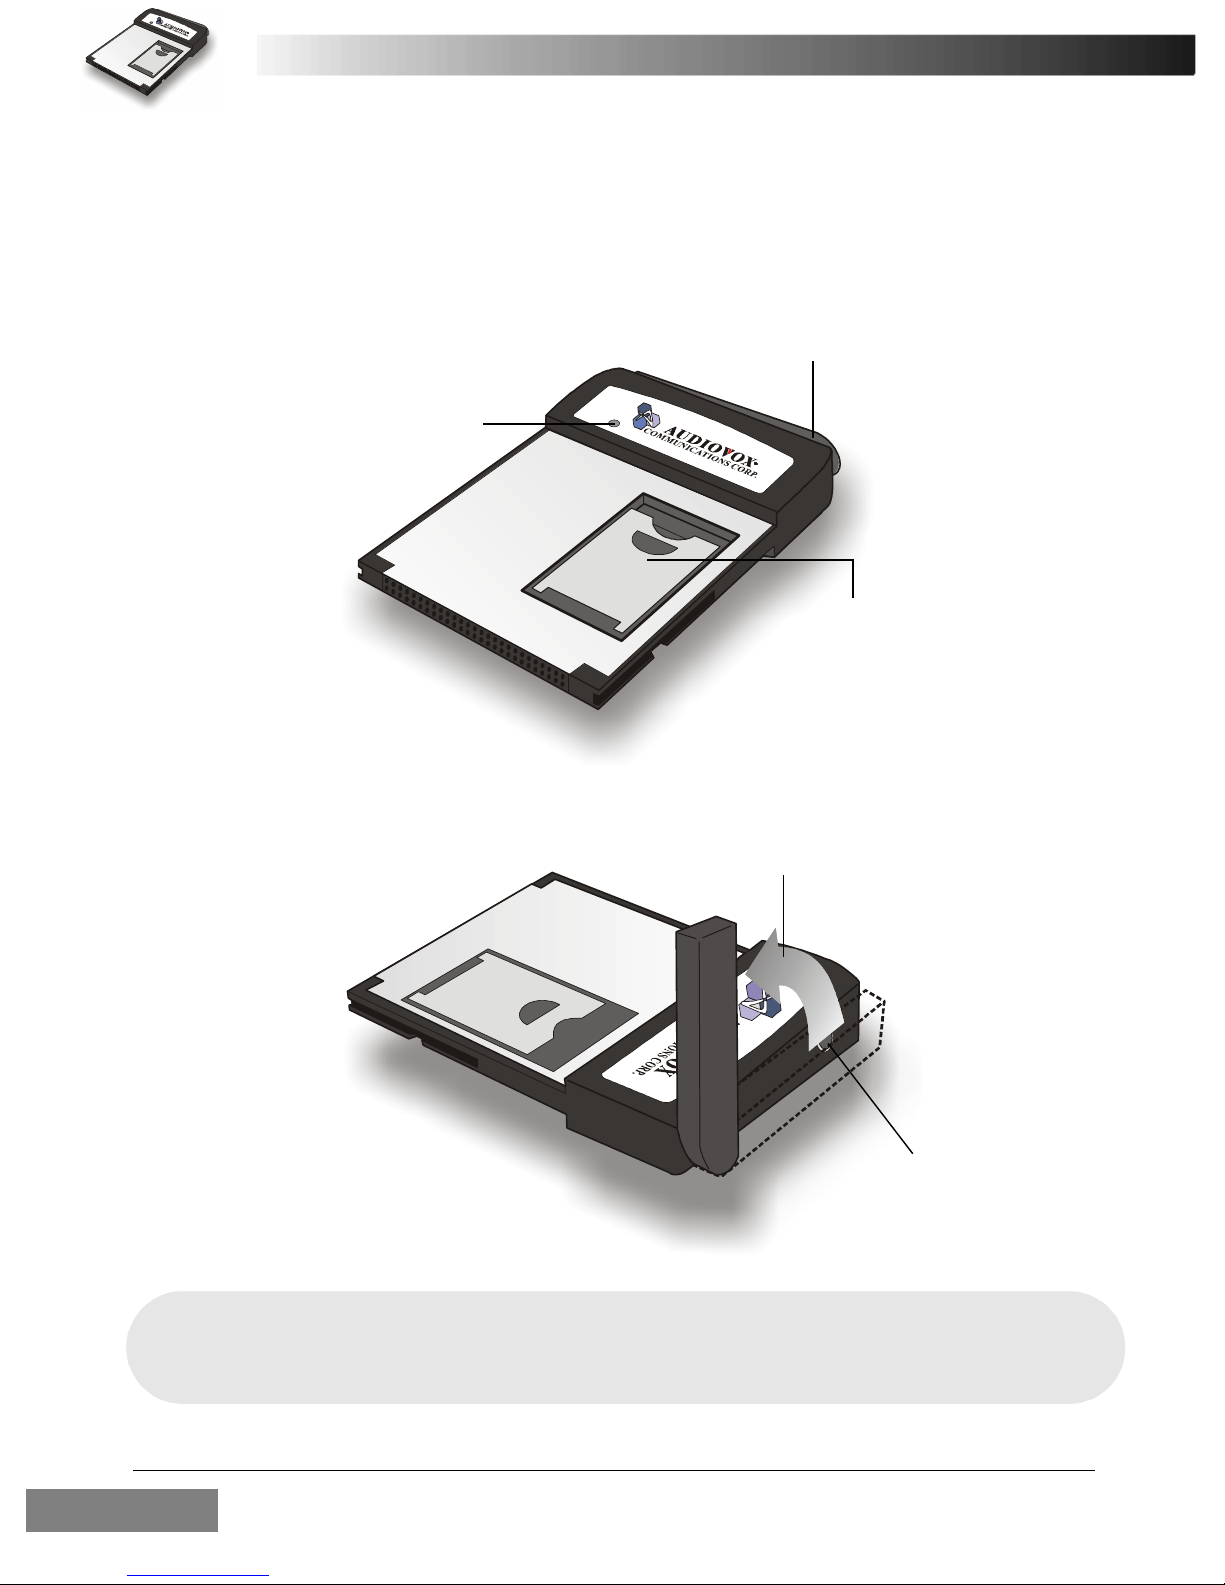
The RTM-8000
Status indicator
Antenna
SIM card socket
Move the antenna upward while in use.
Headset jack
Note: The headset can be plugged into the headset jack for making a call or answer-
ing incoming calls.
Do not remove the antenna from the RTM-8000.
Overview4
Page 15
The status indicator
The working status of the RTM-8000 is shown by the status indicator.
Please refer to the table below for the blinking patterns of the indicator
and the status they represent:
Color Pattern Status
Amber Blink every second No service.
Amber Blink slowly GSM network connected.
Amber Blink fast Searching for network.
Green Blink slowly
GSM/GPRS connected.
Voice/data call in progress.
Green Blink fast There is an incoming call.
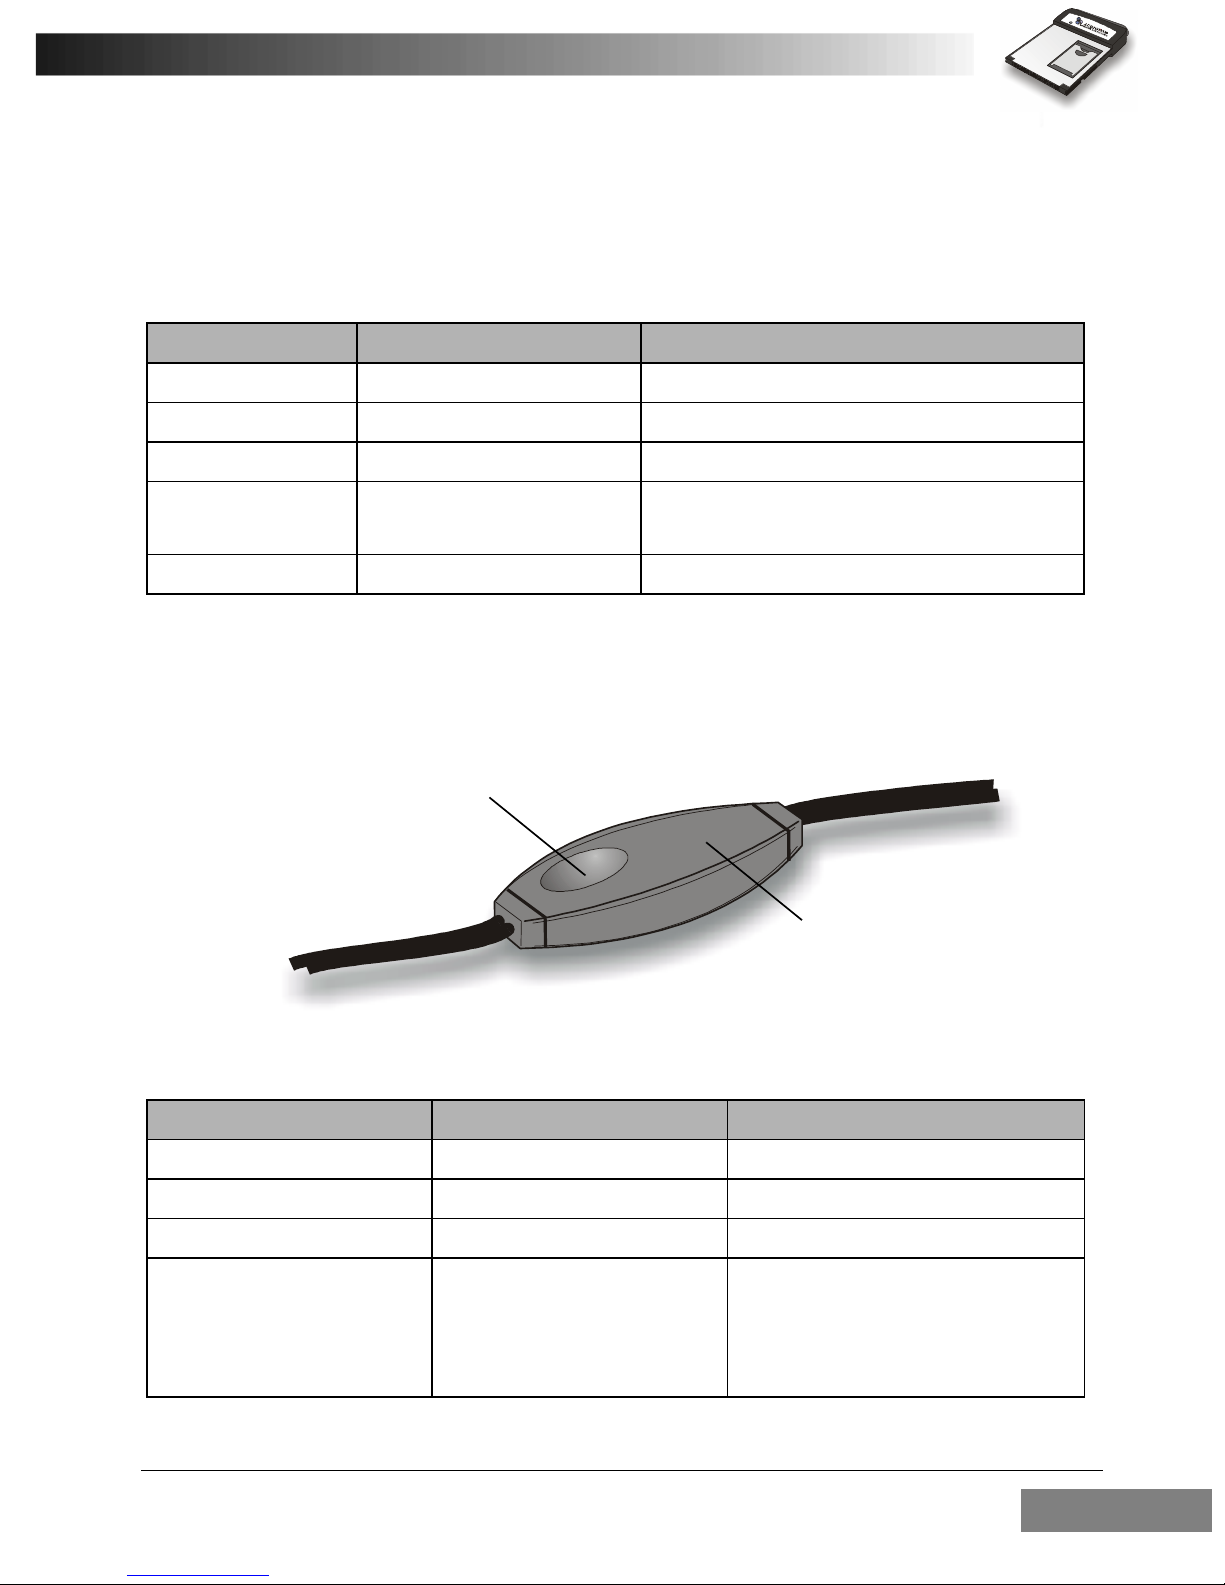
The remote controller
A remote controller is attached to the headset cable for easy and convenient control over certain functions.
Control button
Remote controller
Please refer to the table below for use:
When... Press the control button... To...
There is an incoming call Once Answer the call.
There is an incoming call Two times in a row Reject the call.
You are on a call Two times in a row End the call.
You are on a call Press and hold
Cycle headset volume from soft
to loud and vise versa. Release
the button when you find the
desired volume level.
Overview 5
Page 16

2
Installing and Configuring
the RTM-8000
6
Page 17
System Requirements
Check your hardware and software and see if they satisfy the requirements
below. If you are not sure, please consult your dealer or operator.
Hardware & software requirements
• A valid SIM card.
• A Type I Compact Flash Card slot or a PCMCIA (PC Card) slot and a
PCMCIA-to-Compact Flash adapter card (Optional)
For Pocket PC:
• Operating system: Pocket PC 2000 or 2002
• ActiveSync must be installed on the host system
For PC:
• IBM compatible, 486DX4-100Mhz PC or above
• System memory: At least 64MB
• Operating system: Windows 98 SE/Me/2000/XP
Network requirements
Some features require support from your network operator, and may
require additional subscription.
Installing the RTM-8000
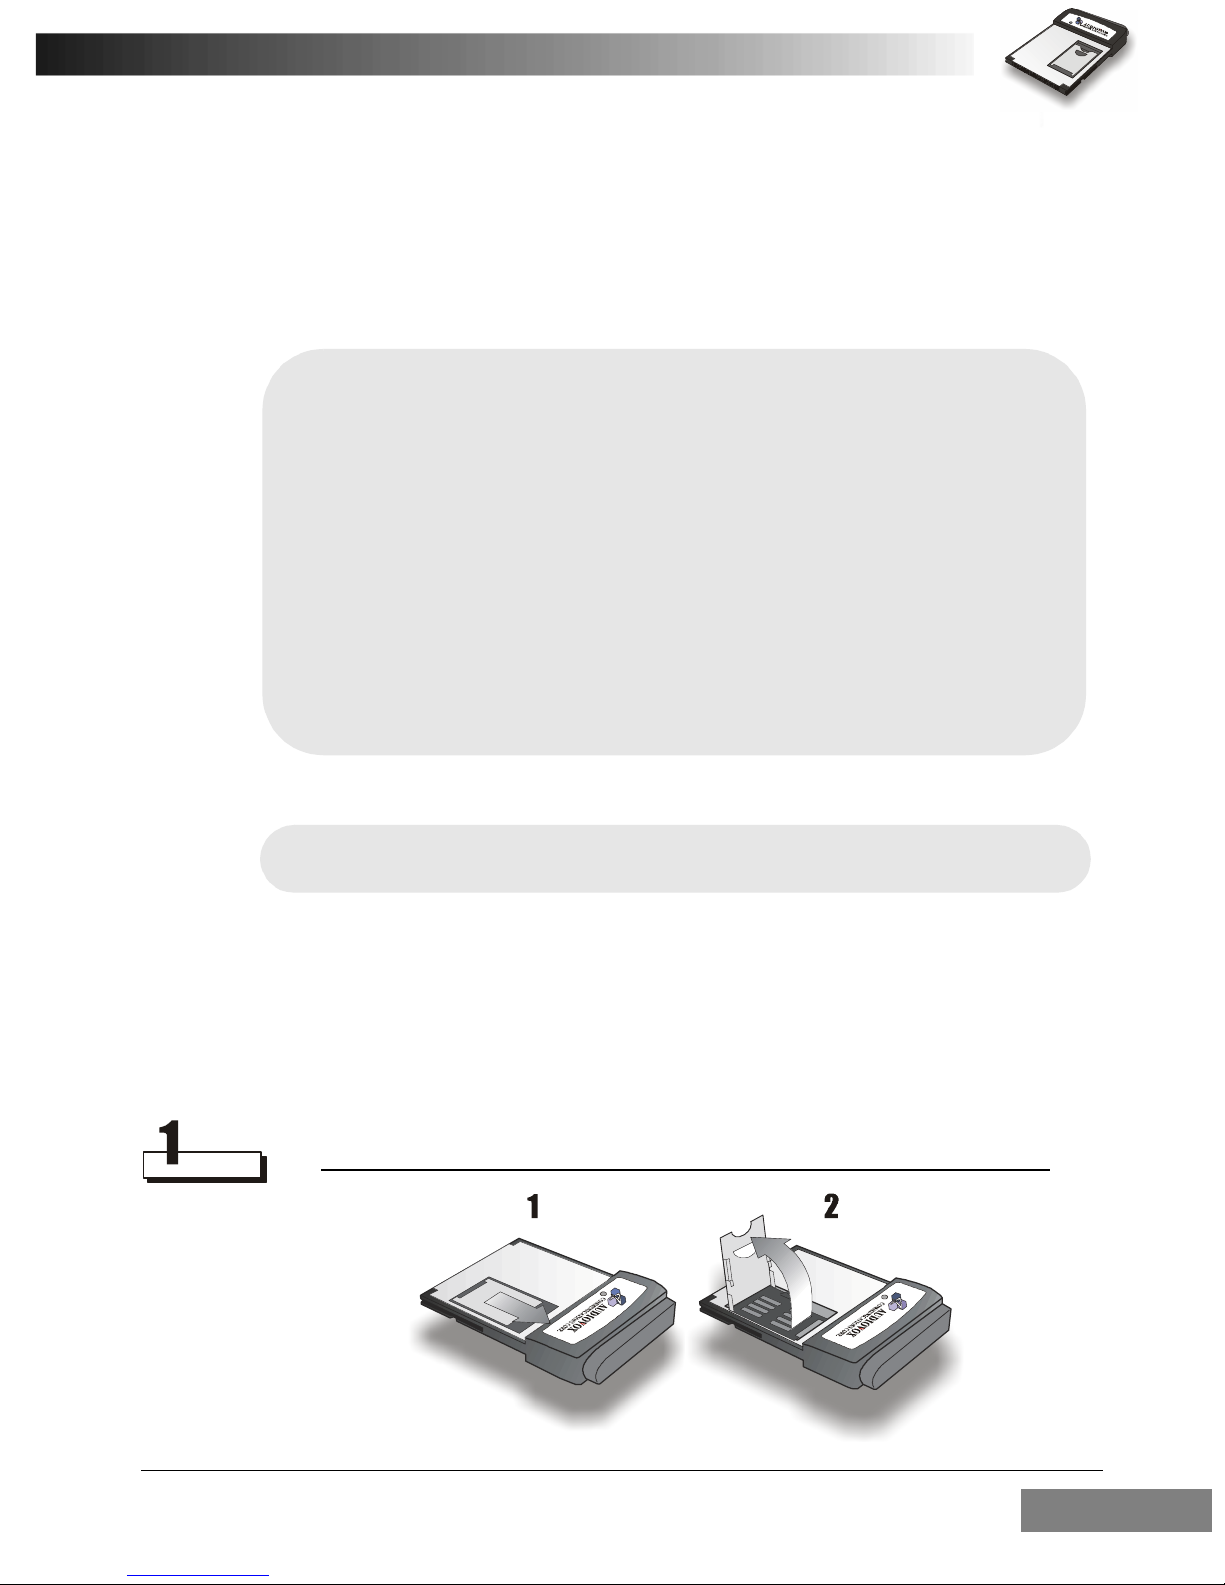
Inserting the SIM card
Follow the steps below to insert the SIM card into the SIM card socket of
the RTM-8000.
Open the SIM card socket flip as illustrated.
Installing and Configuring the RTM-8000 7
Page 18
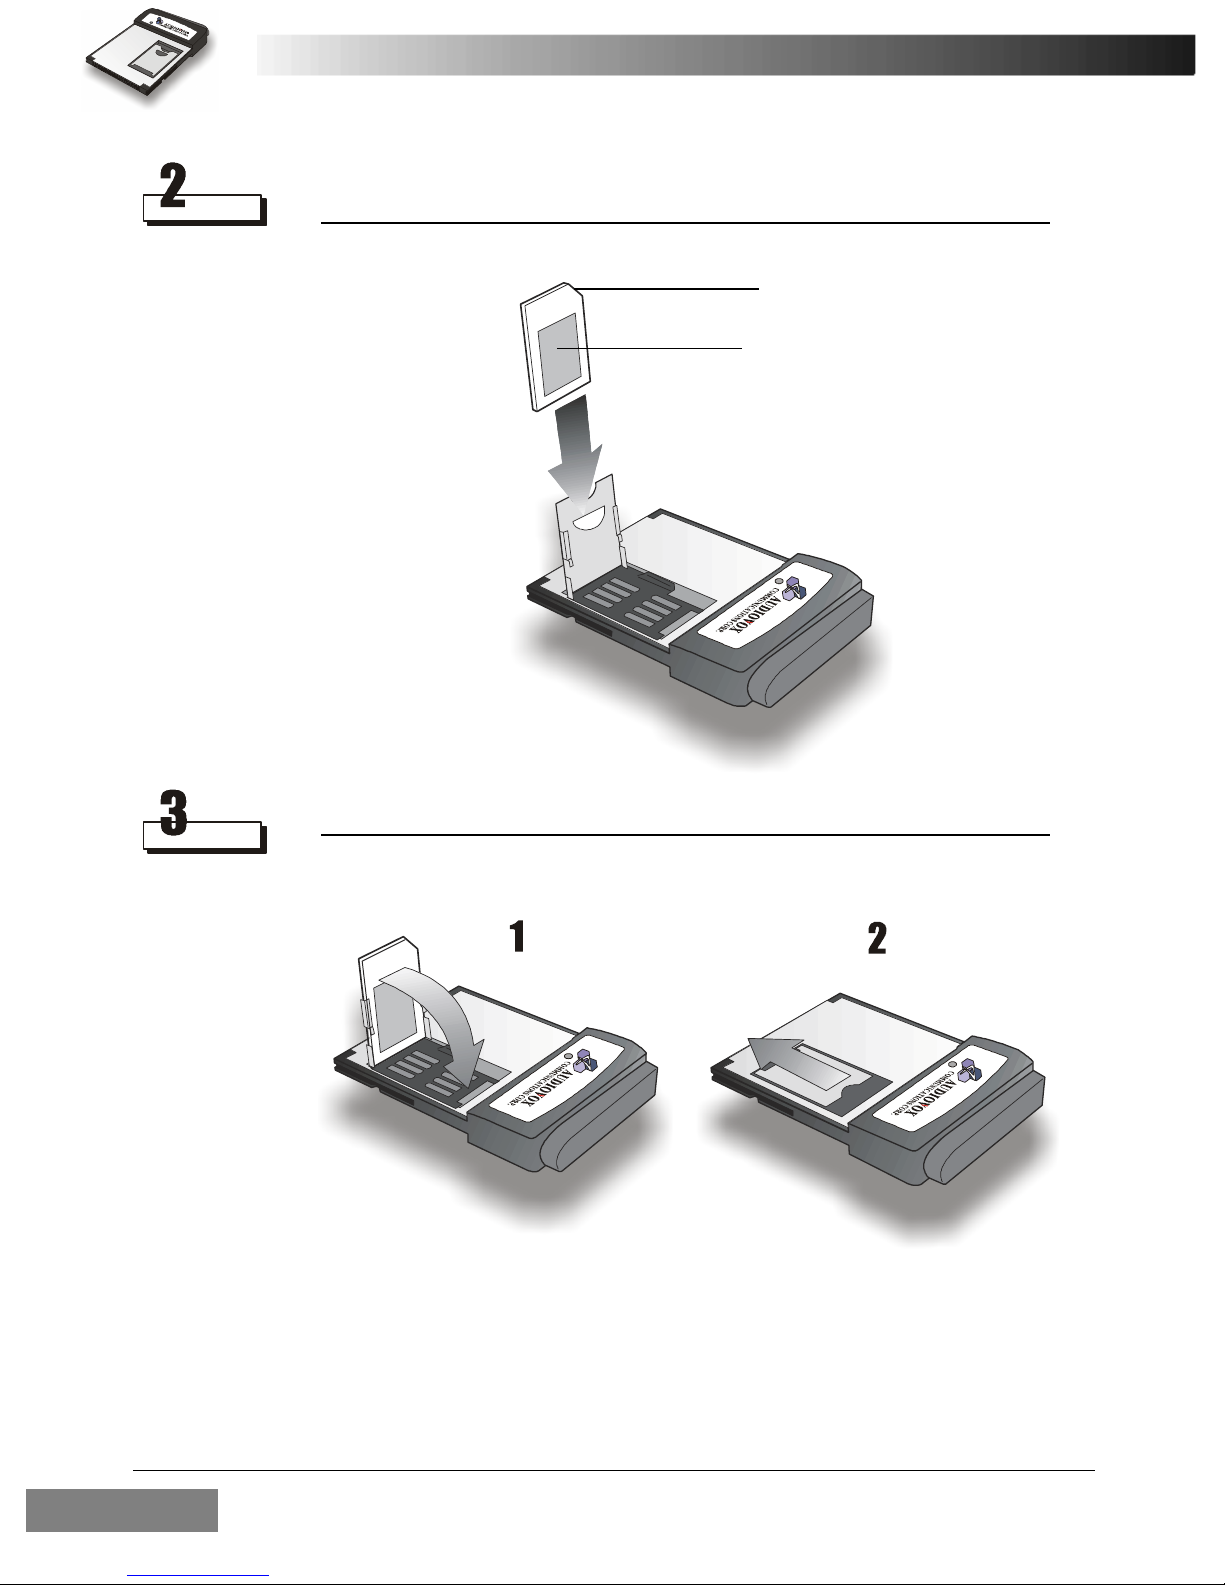
Insert the SIM card into the SIM card socket flip. Pay attention to the
direction of the SIM card and the metal contact when you insert.
The beveled corner
Metal contact
Close the SIM card socket flip and slide it into place.
Installing and Configuring the RTM-80008
Page 19
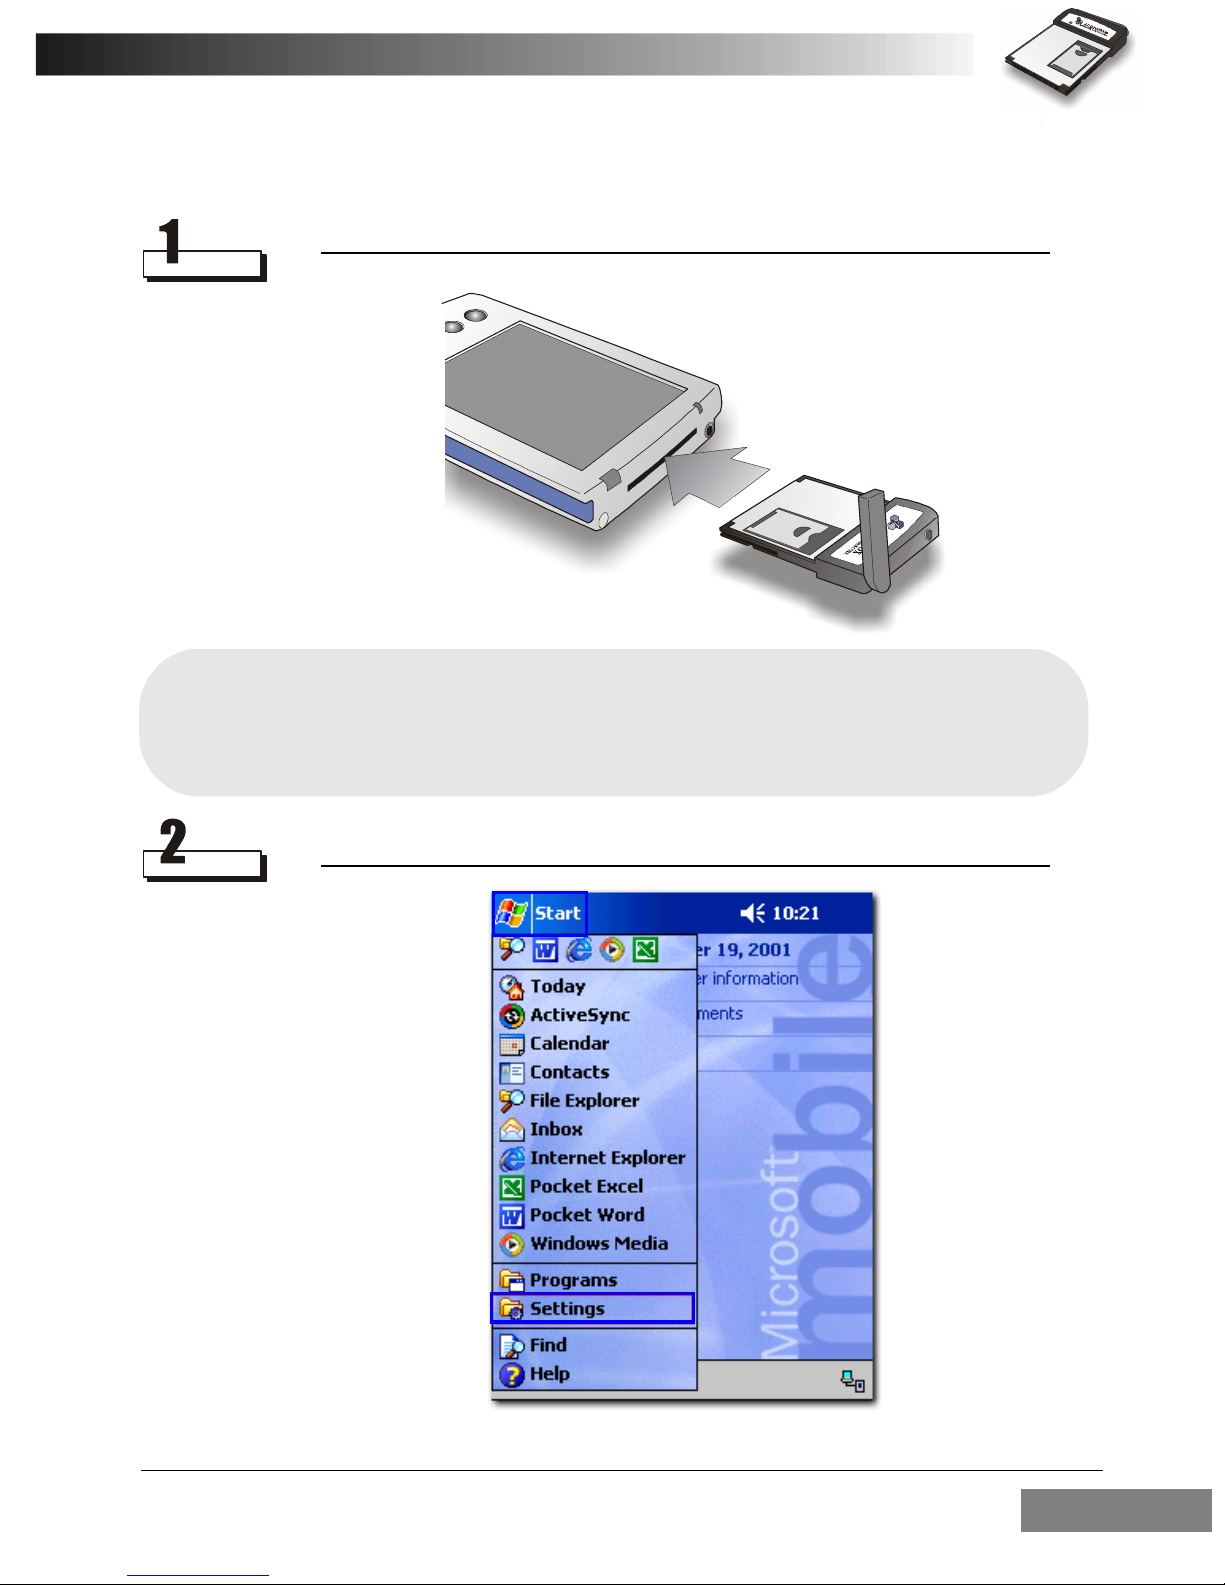
Install the RTM-8000 to Pocket PC
Refer to the illustration below to insert the RTM-8000 into Pocket PC.
Note: The way to insert the RTM-8000 may be different from Pocket PC to Pocket
PC. Please refer to the documentation of your Pocket PC for details.
The configuration below is for reference only. Please consult your operator
for detailed configuration parameters.
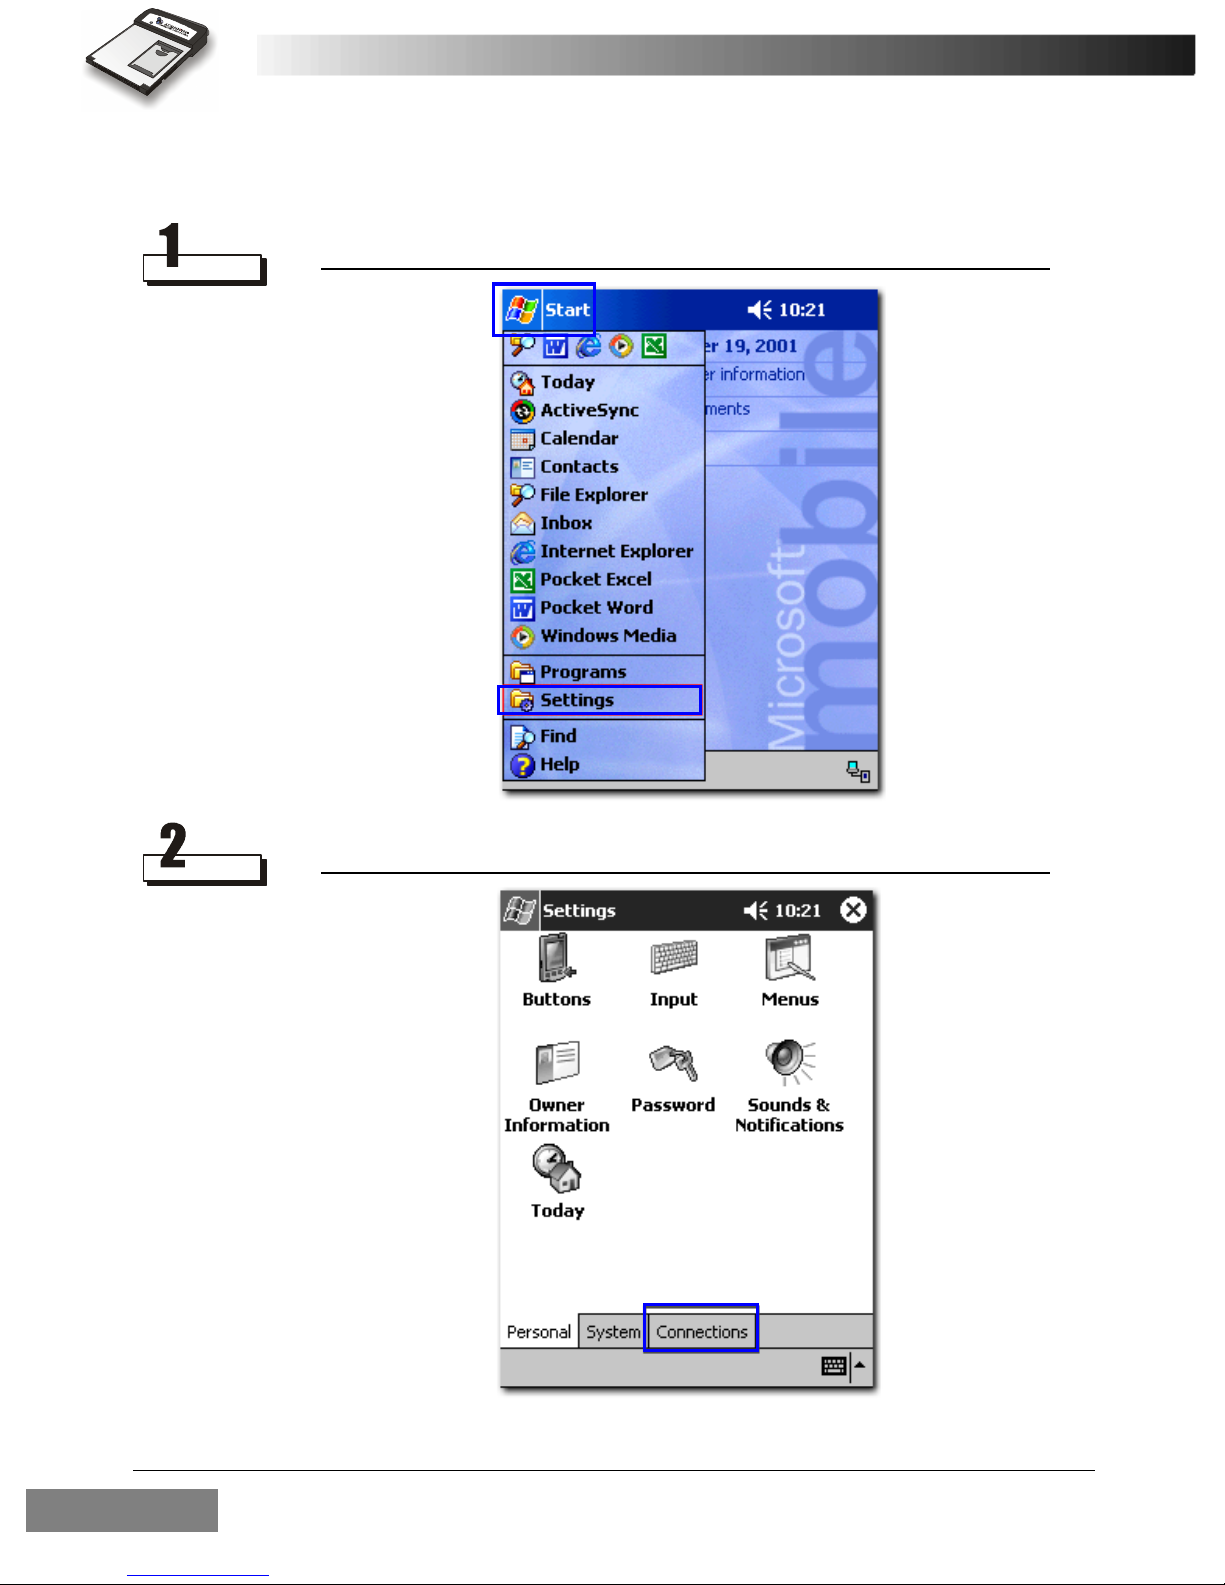
Tap Start, Settings.
Installing and Configuring the RTM-8000 9
Page 20
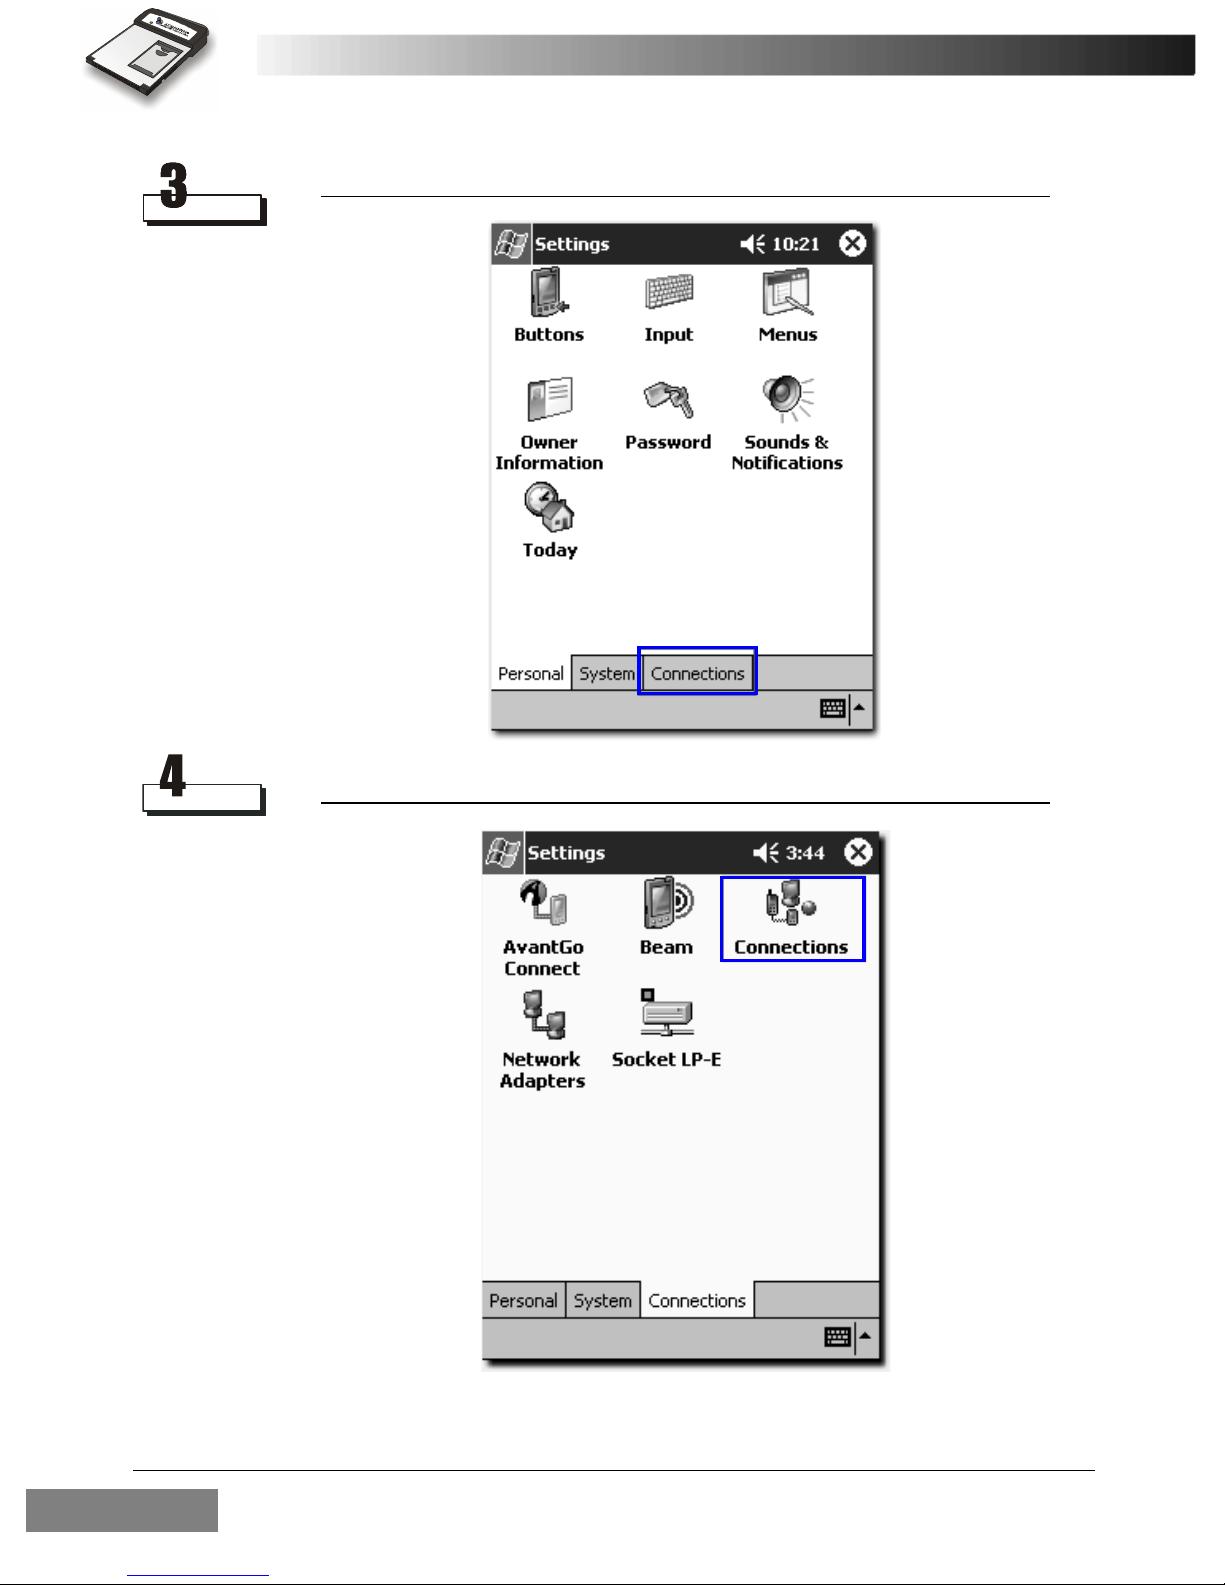
Tap the Connections tab.
Tap the Connections icon.
Installing and Configuring the RTM-800010
Page 21
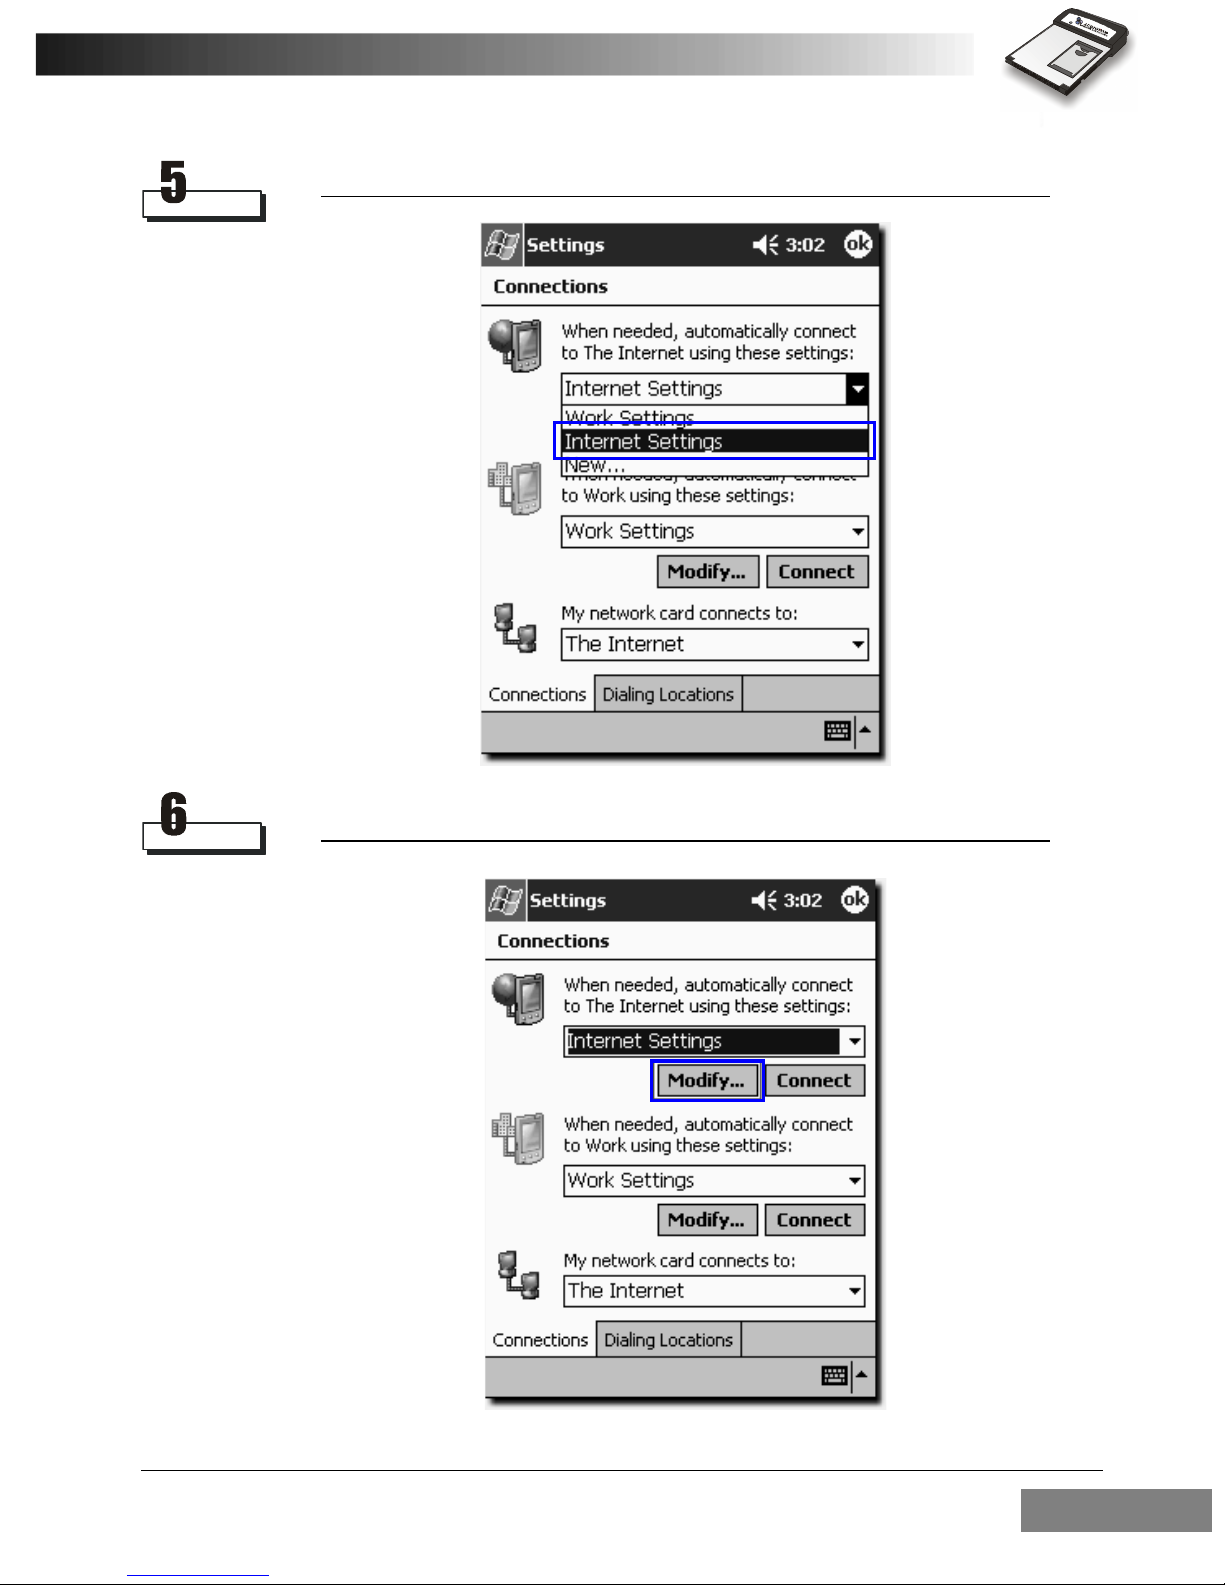
Tap to select Internet Settings.
Tap Modify.
Installing and Configuring the RTM-8000 11
Page 22
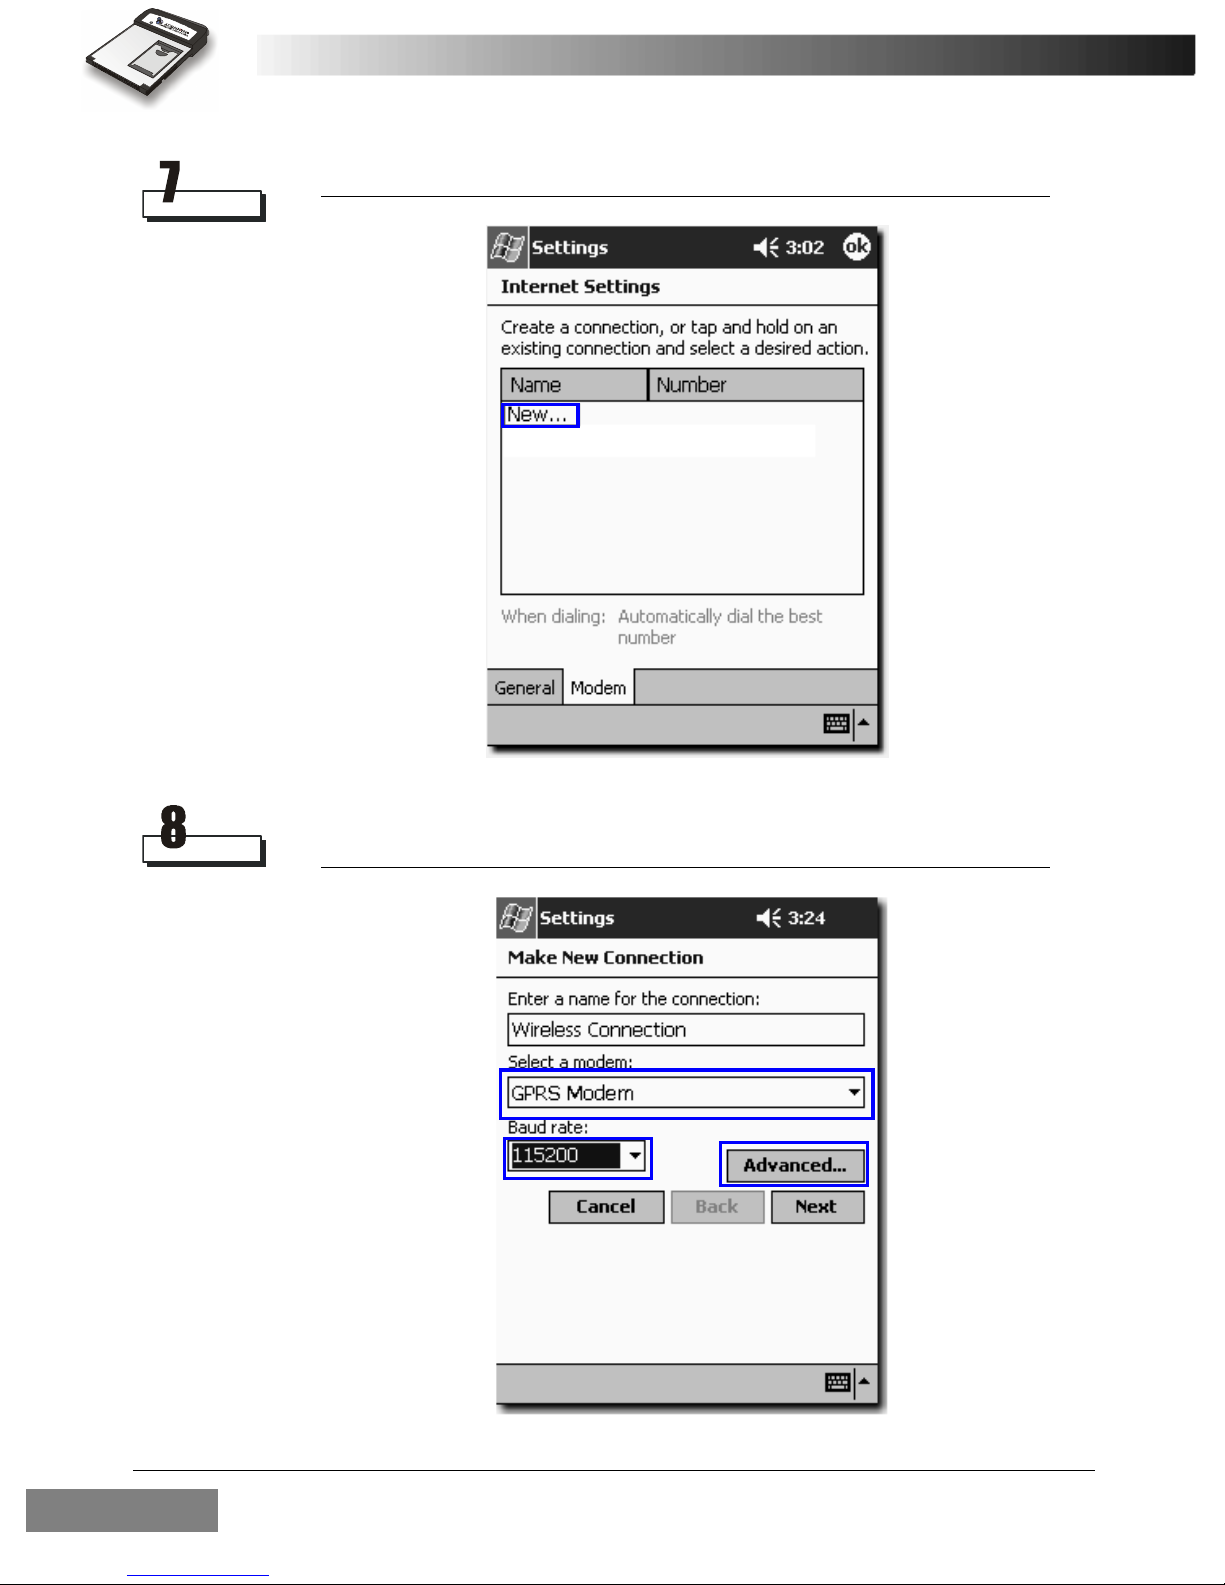
Tap New....
Enter the name of the connection and select GPRS Modem. Set baud rate
to 115200. Tap Advanced... to continue.
Installing and Configuring the RTM-800012
Page 23
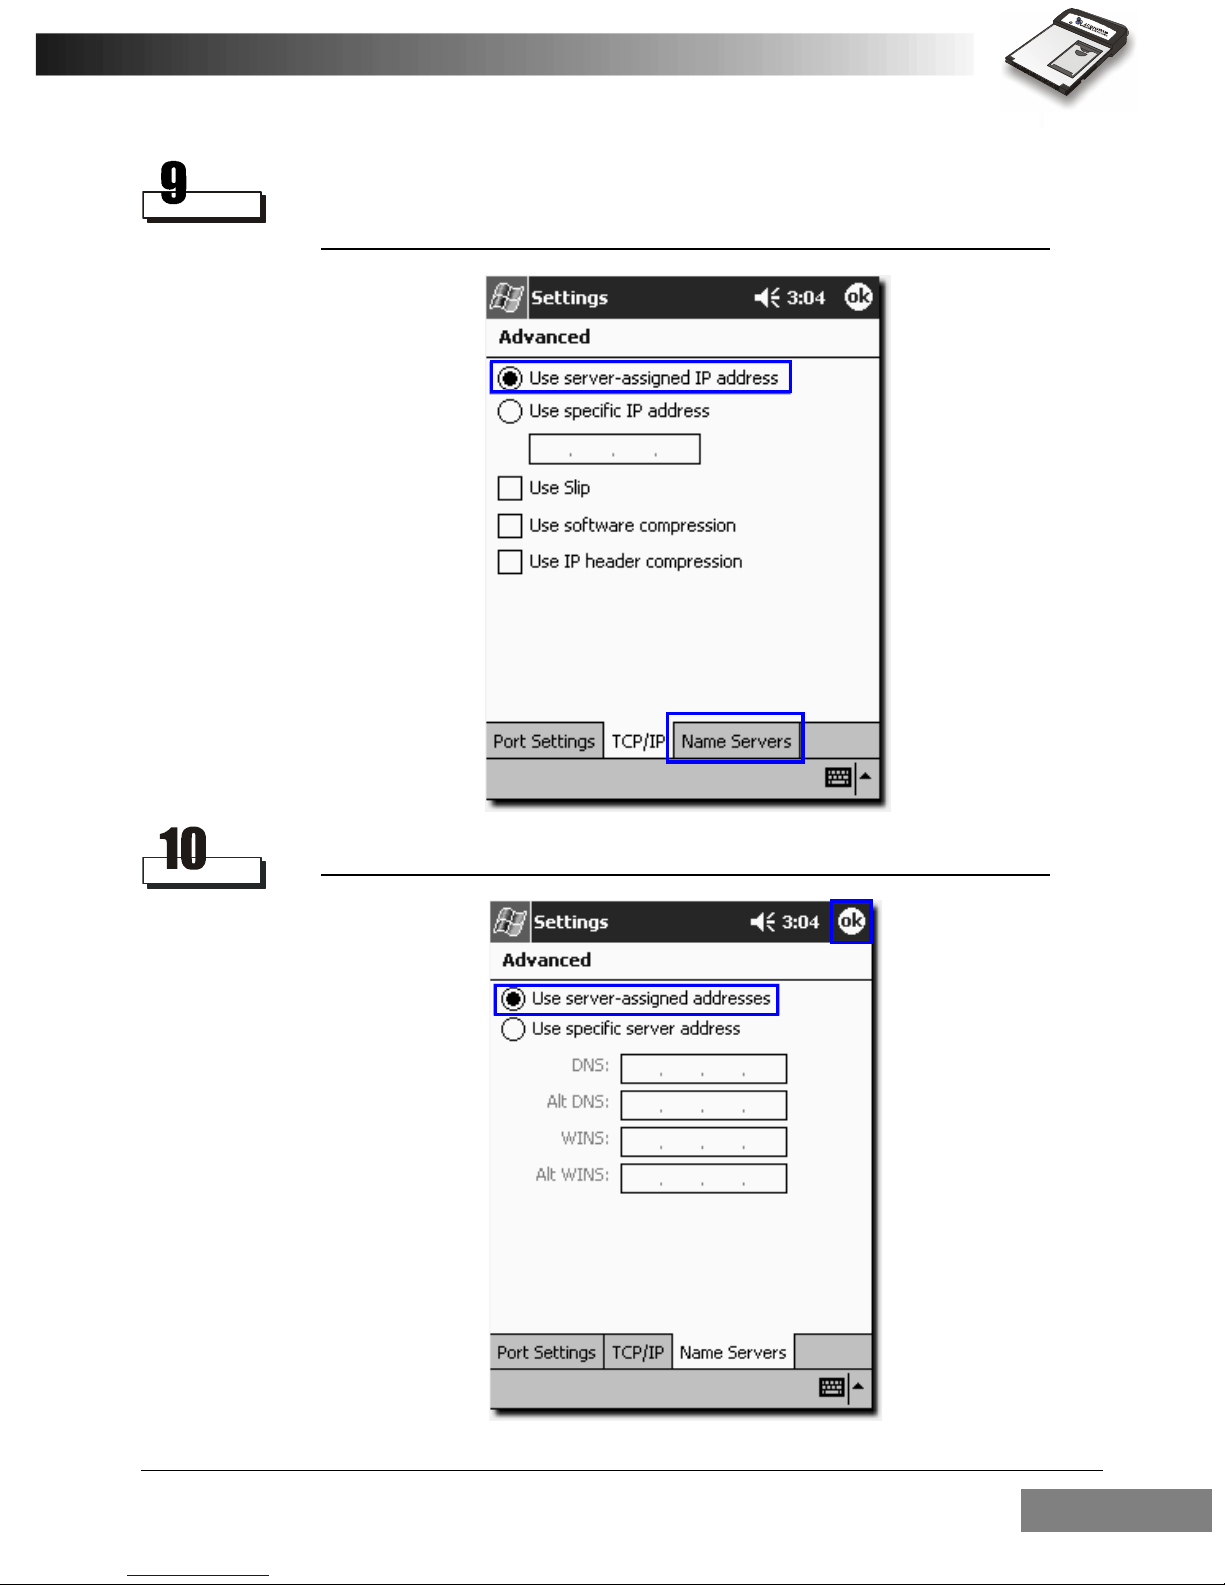
Tap TCP/IP tab. Make sure that Use server-assigned IP addresses is
selected. Uncheck Use software compression and Use IP header compres-
sion checkboxes. Tap Name Servers tab to continue.
Make sure that Use server-assigned addresses is selected and tap ok.
Installing and Configuring the RTM-8000 13
Page 24
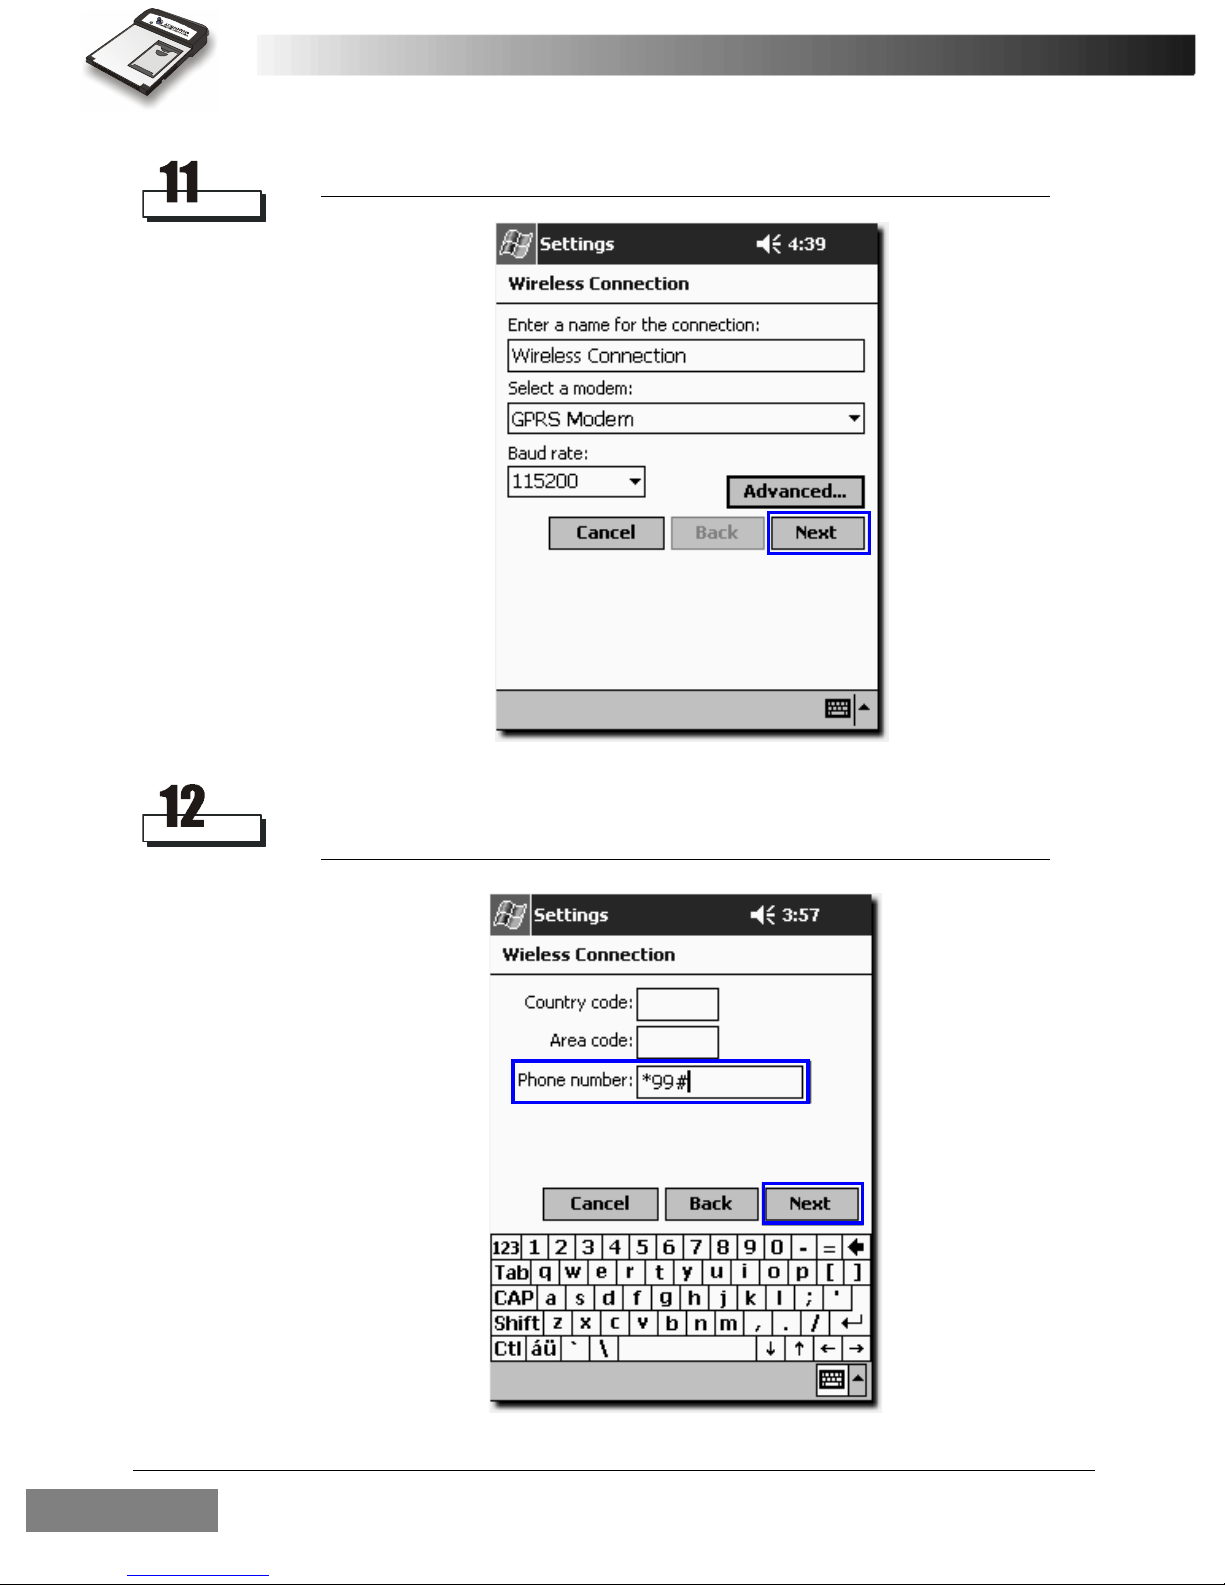
Tap Next.
Enter *99# in the Phone number field and leave the Country code and
Area code fields empty. Tap Next.
Installing and Configuring the RTM-800014
Page 25
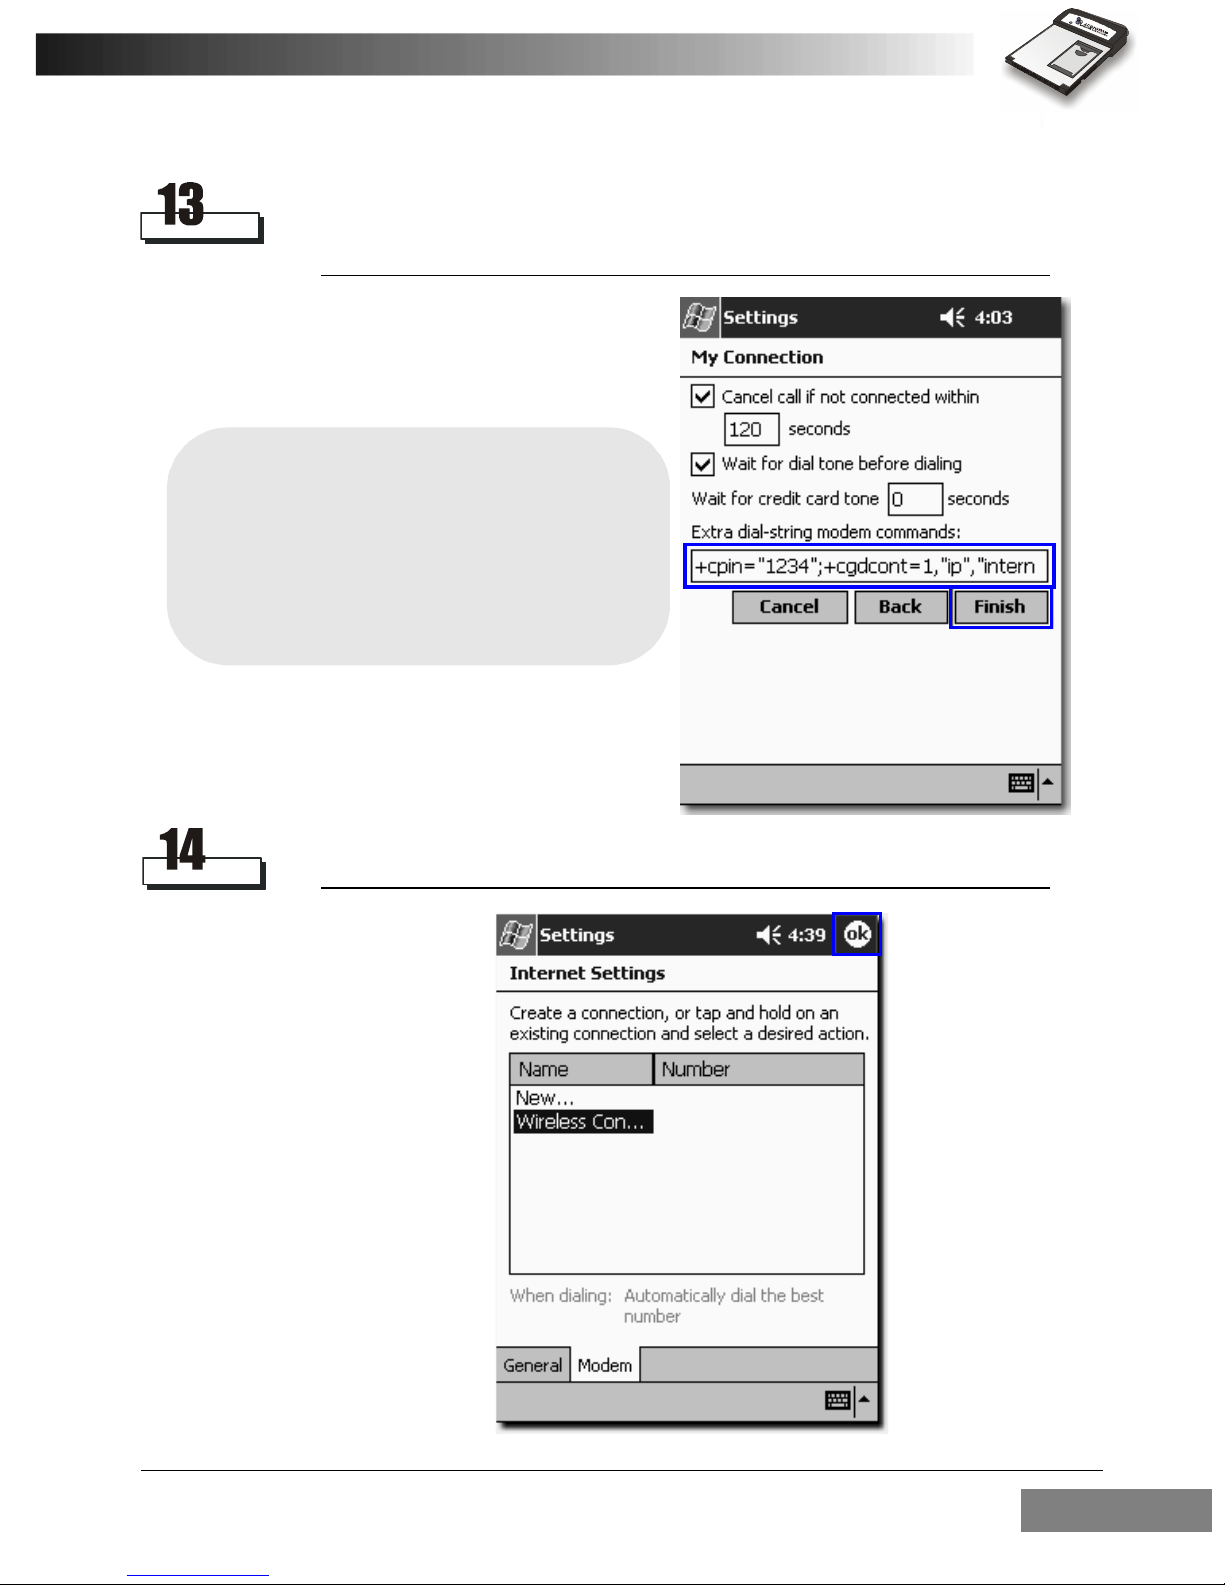
Enter +cpin="****";+cgdcont=1,"ip","APN" (where **** is your PIN
code, and APN is the Access Point Name of your operator) in the Extra
dial-string modem commands: field. If the PIN code of your SIM card is
not enabled, just enter +cgdcont=1,"ip","APN". Tap Finish.
For example,
If your PIN code is 1234, and the APN of
your operator is "internet", enter the following:
+cpin="1234";+cgdcont=1,"ip","internet"
Tap ok.
Installing and Configuring the RTM-8000 15
Page 26
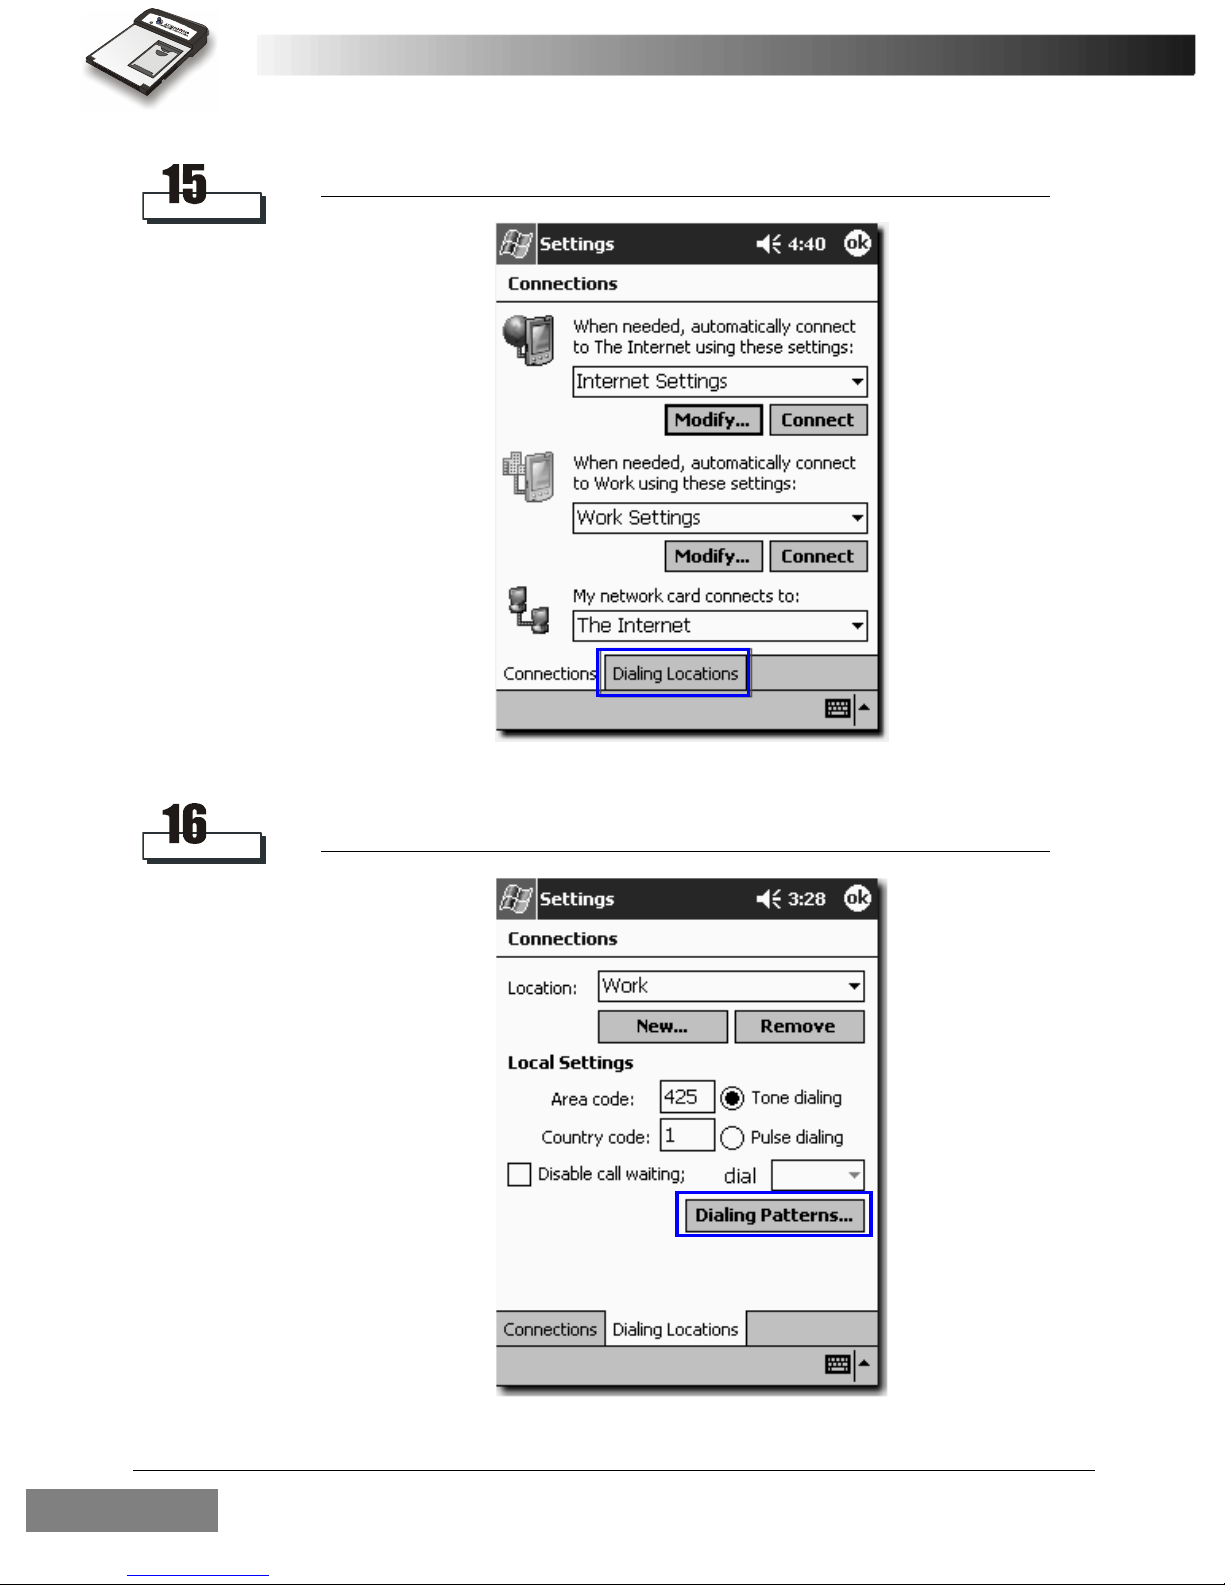
Tap Dialing Locations tab.
Tap Dialing Patterns....
Installing and Configuring the RTM-800016
Page 27
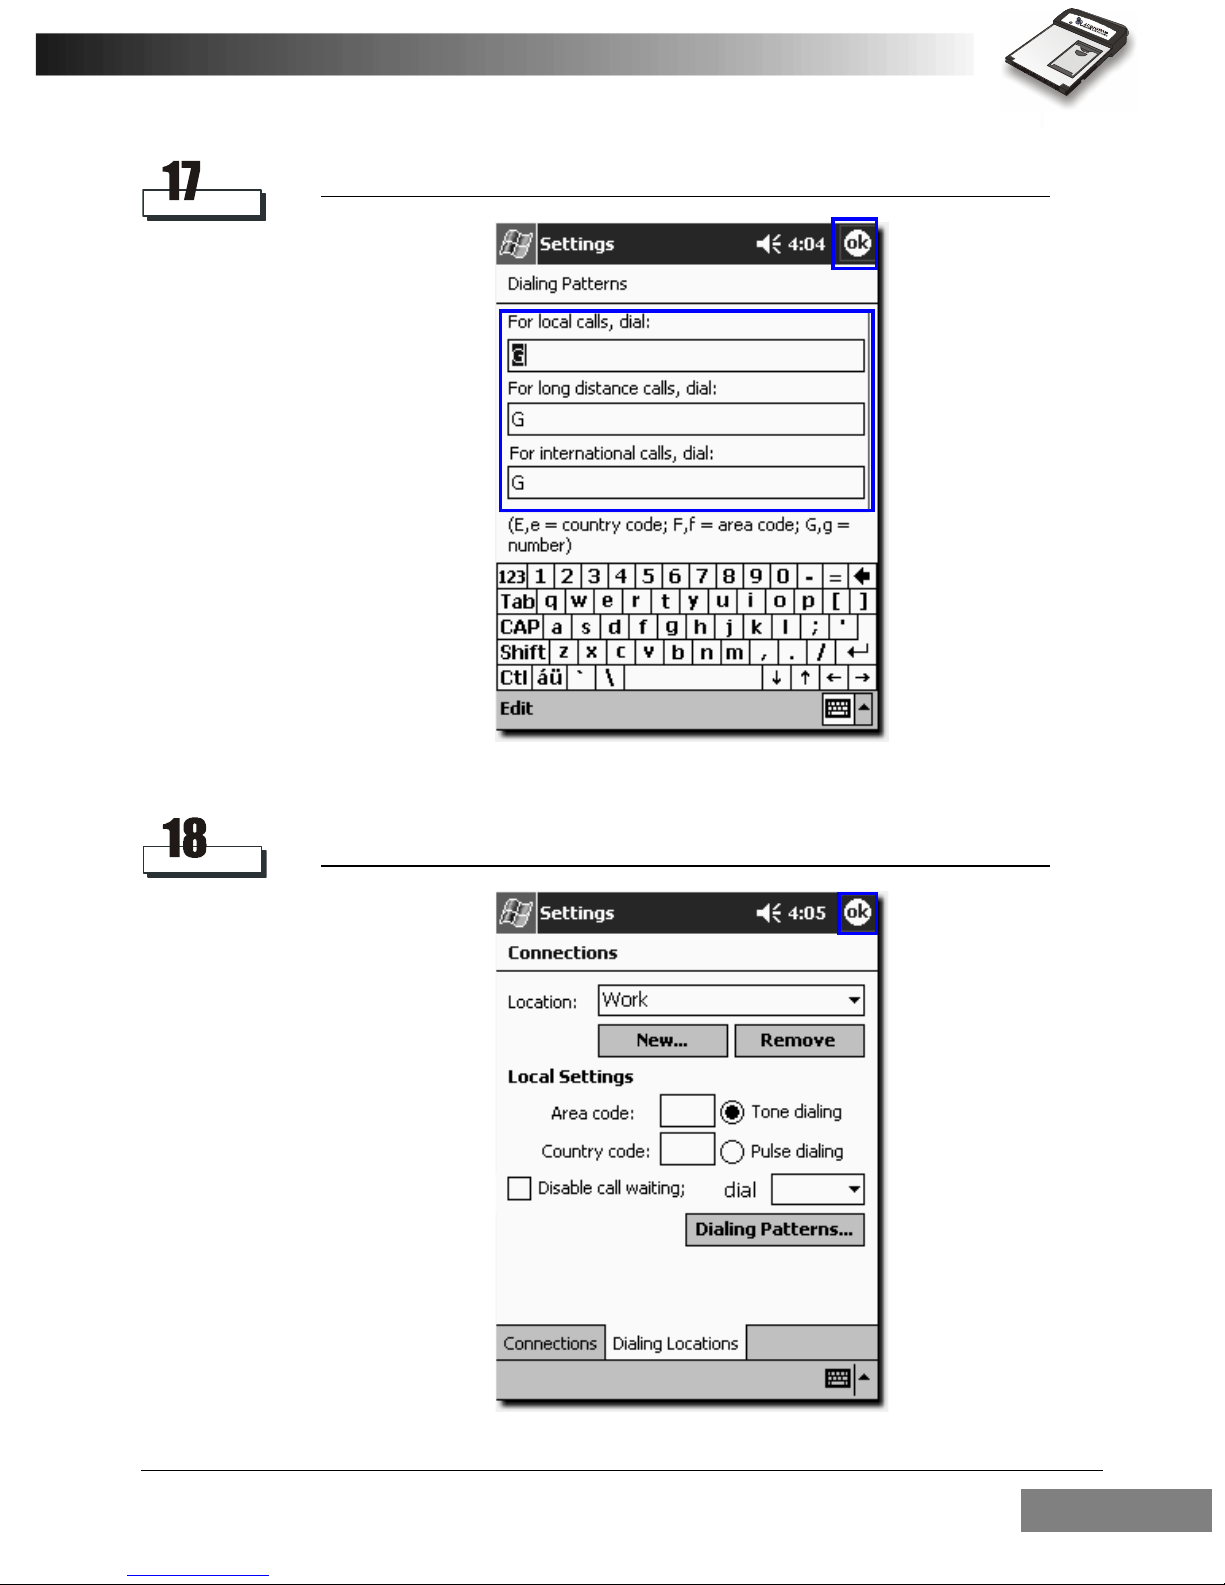
Enter G in all fields and tap ok.
Tap ok. The configuration is complete.
Installing and Configuring the RTM-8000 17
Page 28
Installing the RTM-8000 on a PC
To install the RTM-8000 on a PC:
• According to the operating system of your PC, install appropriate
driver and then the RTM-8000 Compact Flash card.
• Configure the settings of the RTM-8000 Compact Flash card driver.
Note: Be sure to install RTM-8000 driver before inserting the card into your
PC.
Installing RTM-8000 driver
Installing driver for Windows 98 SE/Me
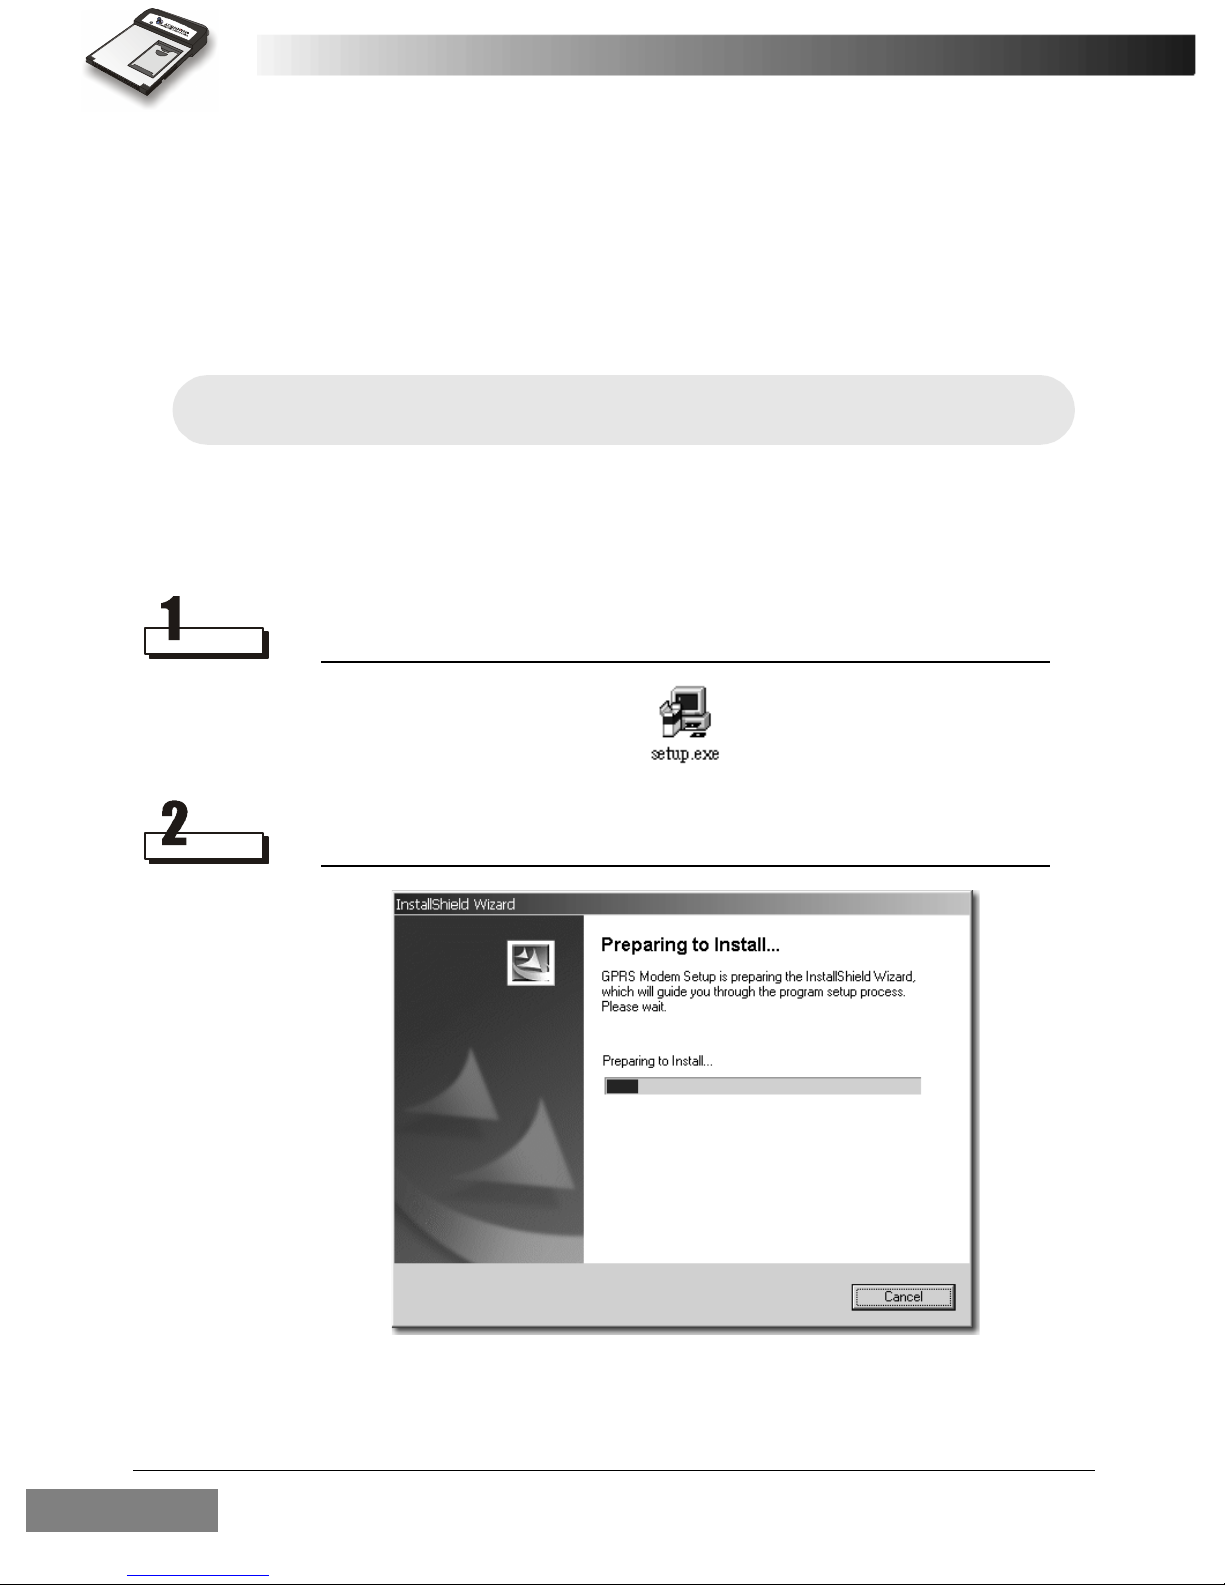
Insert the CD-ROM into your CD-ROM drive and double-click the
setup.exe icon in the WIN98SE&ME folder.
Driver installation wizard will appear on the screen.
Installing and Configuring the RTM-800018
Page 29
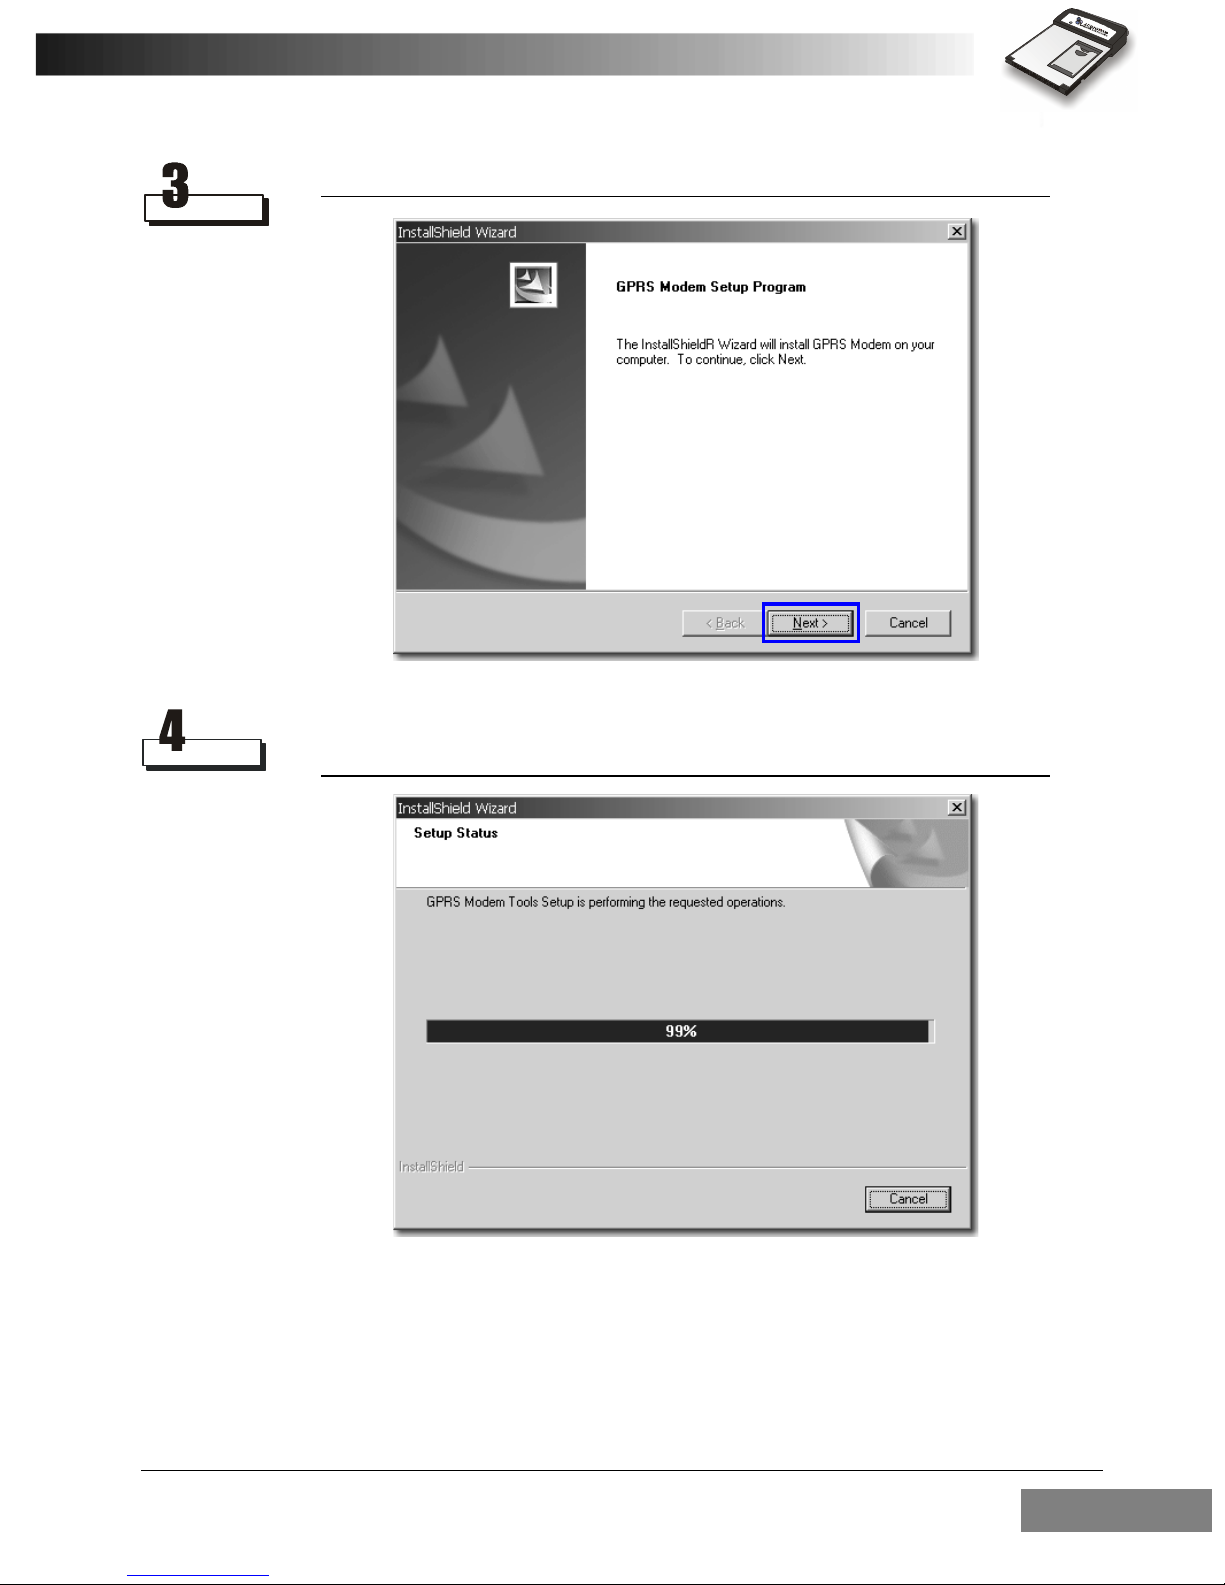
Click Next.
The installation wizard will start copying files to your system.
Installing and Configuring the RTM-8000 19
Page 30
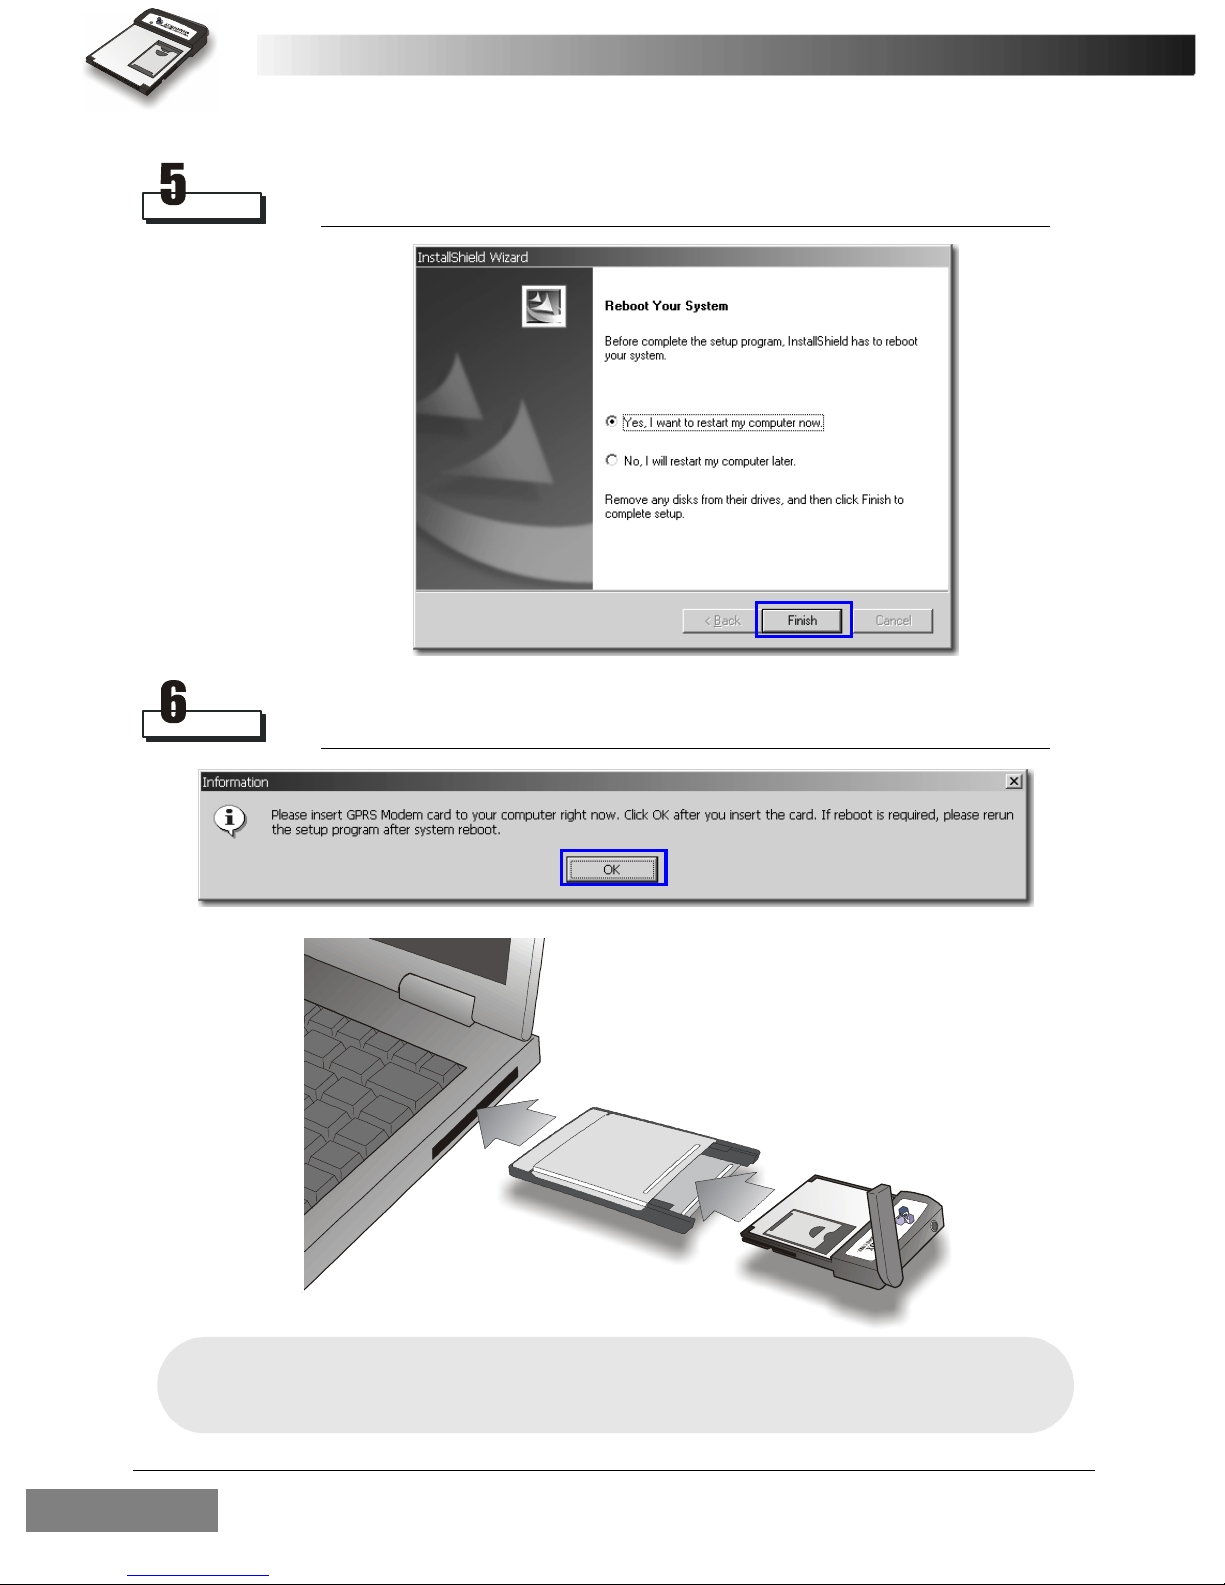
The installation wizard will ask you to restart your computer. Close all
running programs and click Finish to restart your computer.
The following message will appear on the screen after restart. Insert the
RTM-8000 into your PC and click OK.
Note: The way to insert the CompactFlash and PCMCIA card may be differ-
ent from PC to PC. Please refer to the documentation of your PC for
details.
Installing and Configuring the RTM-800020
Page 31
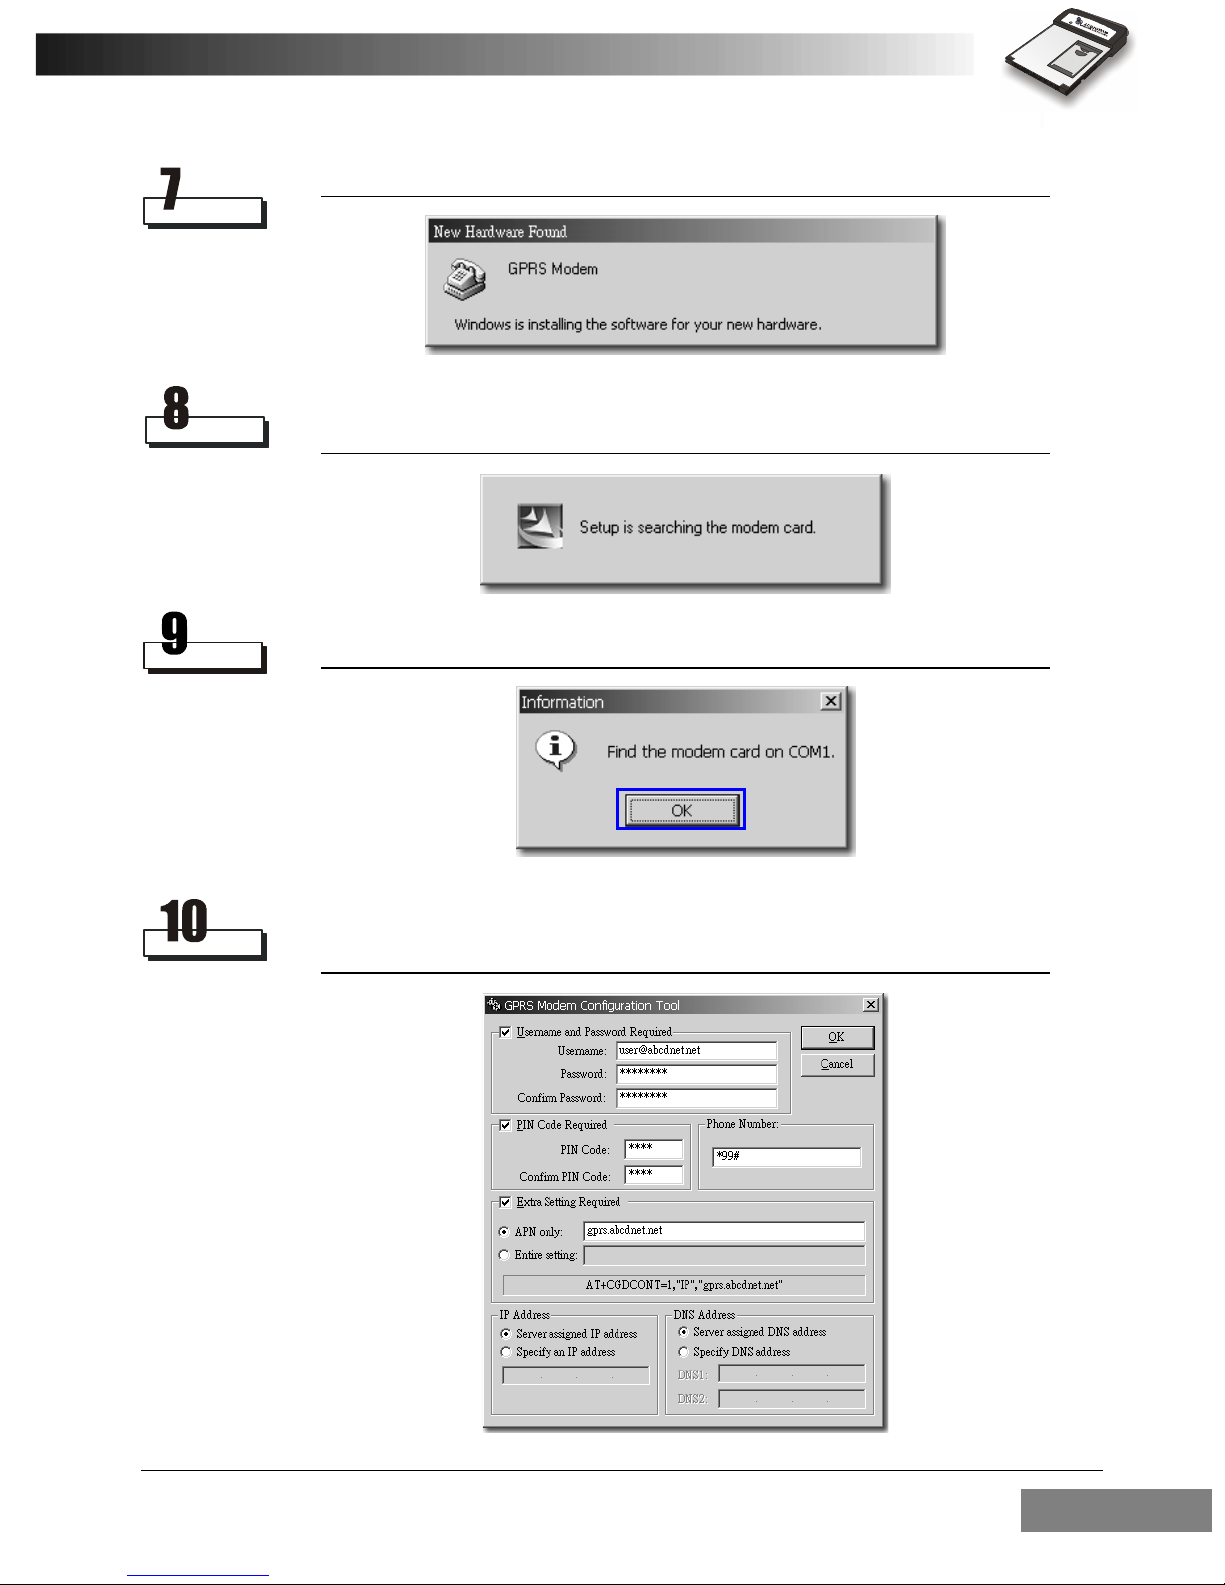
The RTM-8000 will be detected automatically as a GPRS Modem.
The installation wizard will continue with the rest of the installation process automatically.
Click OK.
The GPRS Modem Configuration Tool window will appear. Follow the
description of “Configuring the settings of the RTM-8000” on page 31
to configure the settings of driver.
Installing and Configuring the RTM-8000 21
Page 32

Click Finish. The installation of the RTM-8000 is complete.
Installing driver for Windows 2000
Insert the CD-ROM into your CD-ROM drive and double-click the
setup.exe icon in the WIN2000&XP folder.
Driver installation wizard will appear on the screen.
Installing and Configuring the RTM-800022
Page 33

Click Next.
The installation wizard will start copying files to your system.
Installing and Configuring the RTM-8000 23
Page 34

The following message will appear on the screen. Insert the RTM-8000
into your PC and click OK.
Note: The way to insert the CompactFlash and PCMCIA card may be differ-
ent from PC to PC. Please refer to the documentation of your PC for
details.
The RTM-8000 will be detected automatically.
The installation wizard will continue with the rest of the installation process automatically.
Installing and Configuring the RTM-800024
Page 35

Click OK.
The GPRS Modem Configuration Tool window will appear. Follow the
description of “Configuring the settings of the RTM-8000” on page 31
to configure the settings of driver.
Click Finish. The installation of the RTM-8000 is complete.
Installing and Configuring the RTM-8000 25
Page 36

Installing driver for Windows XP
Insert the CD-ROM into your CD-ROM drive and double-click the
setup.exe icon in the WIN2000&XP folder.
Driver installation wizard will appear on the screen.
Click Next.
Installing and Configuring the RTM-800026
Page 37

The installation wizard will start copying files to your system.
The following message will appear on the screen. Insert the RTM-8000
into your PC and click OK.
Note: The way to insert the CompactFlash and PCMCIA card may be differ-
ent from PC to PC. Please refer to the documentation of your PC for
details.
Installing and Configuring the RTM-8000 27
Page 38

Found New Hardware Wizard will appear on the screen. Click Next.
The computer will start detecting the RTM-8000.
Installing and Configuring the RTM-800028
Page 39

Click Continue Anyway.
The wizard will continue installing.
Click Finish.
Installing and Configuring the RTM-8000 29
Page 40

The computer will detect the RTM-8000 again.
Click OK.
The GPRS Modem Configuration Tool window will appear. Follow the
description of “Configuring the settings of the RTM-8000” on page 31
to configure the settings of driver.
Click Finish. The installation of driver is complete.
Installing and Configuring the RTM-800030
Page 41

Configuring the settings of the RTM-8000
You can configure the settings of the RTM-8000 in the GPRS Modem
Configuration Tool window during installation. If you need to change
these settings afterwards, click Start on Windows Taskbar and select
GPRS Modem Tools, GPRS Modem Configuration to open the GPRS
Modem Configuration Tool window and make changes.
The section below describes each setting item in the window. For actual
setting parameters, please consult your operator.
User Name and Password Required
If your operator requires you to enter your user name and password
before connecting, check this checkbox. Enter your user name in the
Username field, password in the Password field and password again in the
Confirm Password field.
PIN Code Required
If the PIN code of your SIM card is activated, check this checkbox. Enter
your PIN code in the PIN Code field and your PIN code again in the
Confirm PIN Code field.
Installing and Configuring the RTM-8000 31
Page 42

Phone Number
Enter the phone number to dial, for data connections (such as *99#) in
this field. This is specified by your operator.
Extra Setting Required
If extra settings are required, you can enter the parameters here. These
include:
APN Only: If only the APN address is required, enter that of your opera-
tor here.
Entire setting: If a complete setting string is required, enter the string
here.
IP Address
If your operator requires you to enter the IP address, check the Specify an
IP Address checkbox and enter the IP address here. Otherwise, check the
Server Assigned IP Address checkbox.
DNS Address
If your operator requires you to enter the DNS address, check the Specify
a DNS Address checkbox and enter the DNS address here. Otherwise,
check the Server Assigned DNS Address checkbox.
Installing and Configuring the RTM-800032
Page 43

3
Using the RTM-8000
33
Page 44
Using Wireless Data Connection on Pocket PC
Tap Start, Settings.
Tap Connections tab.
Using the RTM-800034
Page 45
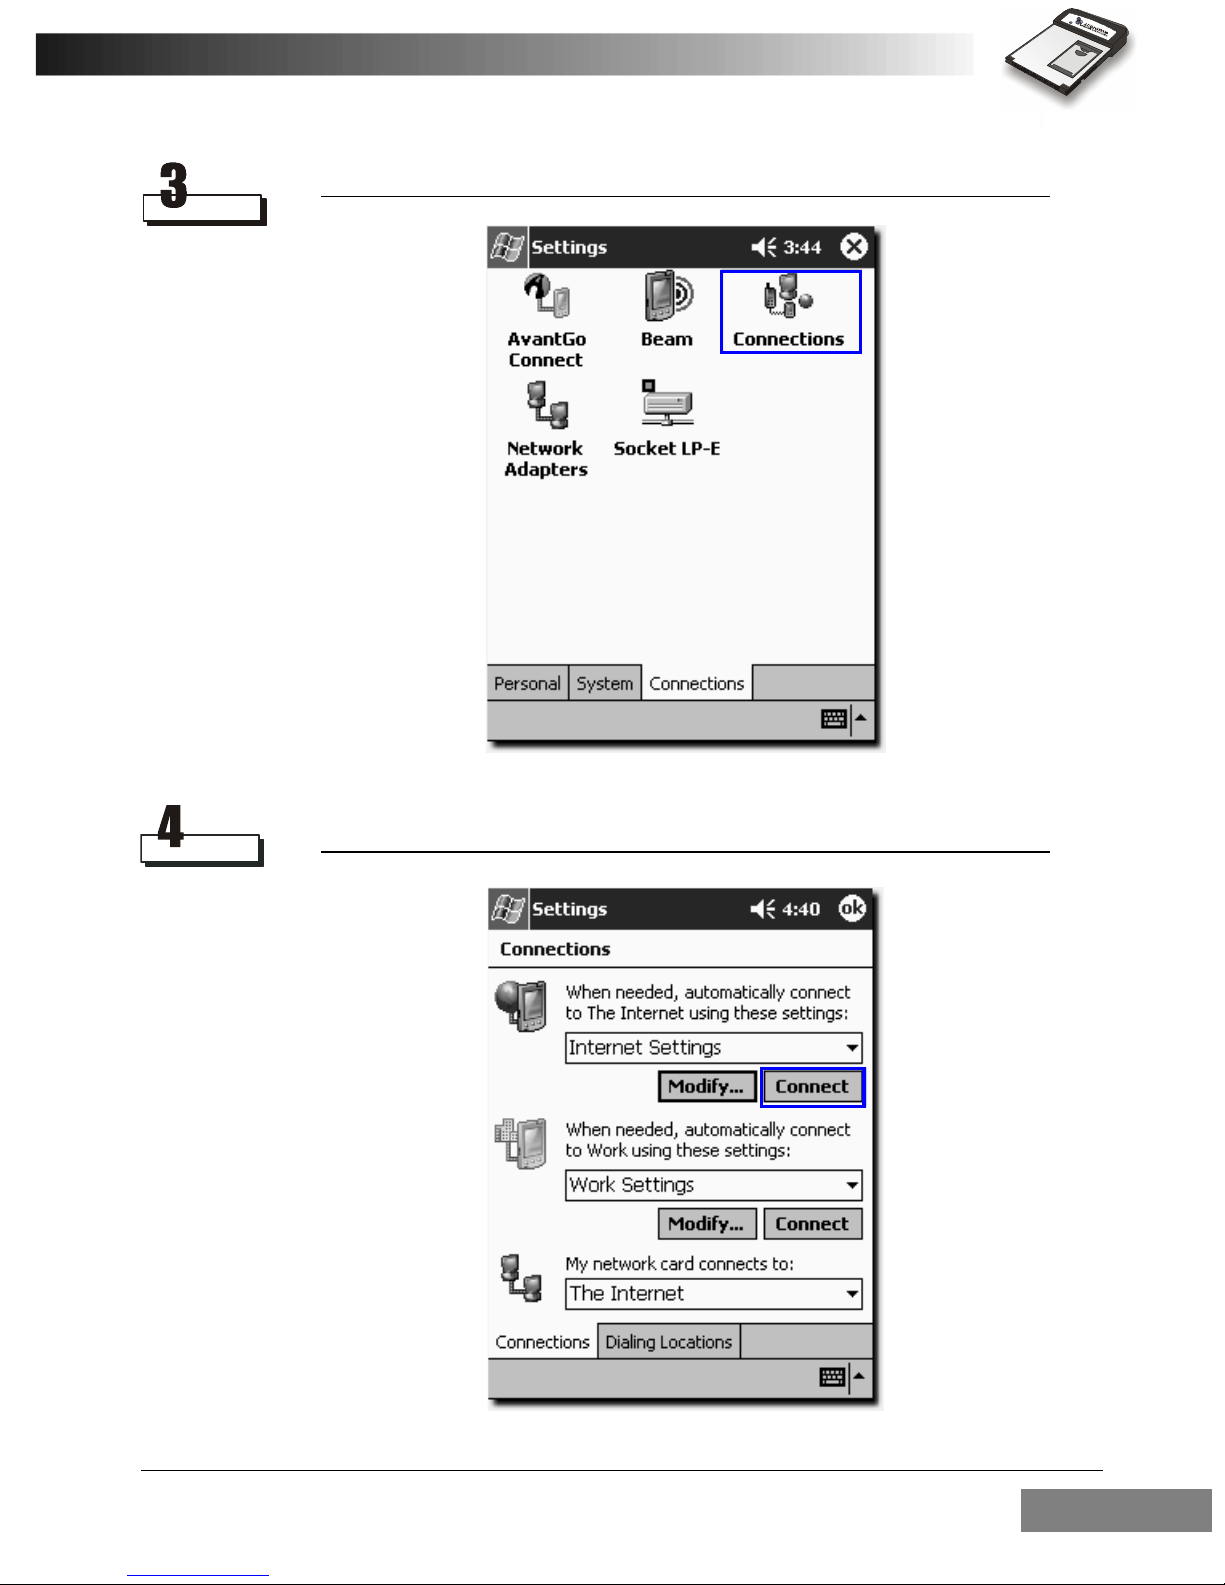
Tap the Connections icon.
Tap Connect.
Using the RTM-8000 35
Page 46

If used, enter the user name and password supplied by your operator. Tap
OK.
The Connecting... dialogue box pops up.
Using the RTM-800036
Page 47

If connection is established successfully, Connected dialogue box will
appear. Now you are ready to surf the Internet using Pocket Internet
Explorer or other applications.
Note: To disconnect from the Internet again, tap the two-arrow symbol on
the top bar of your PDA screen. When the dialog box appears, tap End.
Using the RTM-8000 37
Page 48
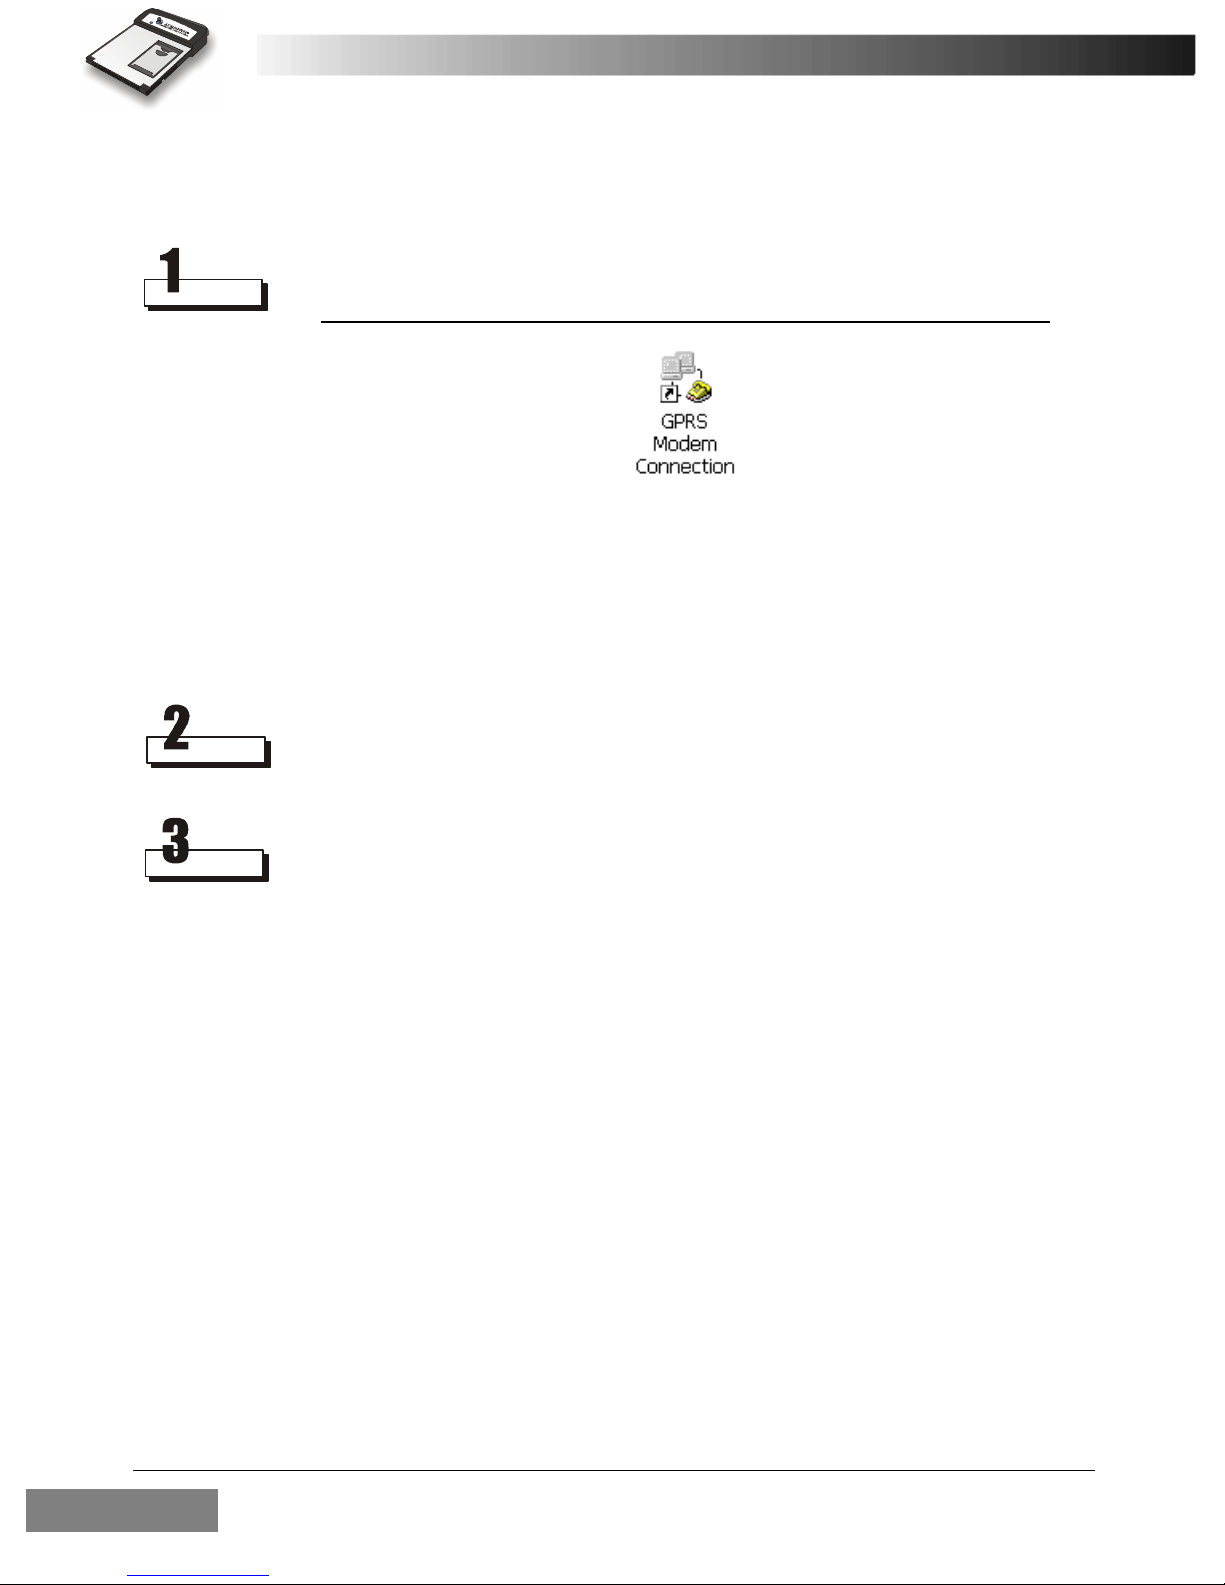
Using Wireless Data Connection on PC
The RTM-8000 driver creates a GPRS Modem Connection icon on your
desktop. Double-click the icon and the connection dialogue box will
appear on the screen.
You can also open such dialogue box by clicking the Start button on Win-
dows Taskbar and selecting Programs, GPRS Modem Tools, GPRS
Modem Connection.
Click Connect or Dial.
The Connecting... dialogue box will pop up on the screen.
If connection is established successfully, Connected dialogue box will
appear. Now you are ready to use the connection with your favorite
applications.
Using the RTM-800038
Page 49

Dialer (For Pocket PC Only)
Overview
Dialer is a Pocket PC application program that is designed to work with
the RTM-8000. It provides an easy and intuitive interface to change your
Pocket PC into a GSM/GPRS mobile phone.
Features
• Integrates the data in your Contact and Phonebook. You can make
phone calls from your entries directly.
• Provides capability that allows you to send long text messages.
• Easy management of your Phonebook and Messages.
• Supports subscription-dependent call services like call barring, call
divert and call waiting.
• Wide range of ring tone selection. You can select any .wav file as the
ring tone or message alert tone.
• The skin (background) can be changed freely according to your preference.
• The hardware buttons on your Pocket PC can be assigned to initiate
frequently performed actions.
Note: When changing from the Dialer application to making a data/internet
connection, the phone functions are temporarily disabled. This means
that while using data/internet, voice calls can not be made or received.
Please also see “Data Connection” on page 91.
Using the RTM-8000 39
Page 50

Installing Dialer
Before installing Dialer:
• Backup the data on your Pocket PC.
• Make sure your Pocket PC is connected to your PC and RTM8000 is inserted.
Insert the software CD-ROM into your CD-ROM drive and double-click
the Dialer10EN.exe icon.
The installer starts automatically. Follow the instructions on the screen to
proceed.
Getting to know Dialer
Starting Dialer
To start Dialer:
Tap Start, Programs.
Using the RTM-800040
Page 51

Tap Dialer.
If the PIN code of your SIM card is enabled, you will be prompted to
enter it. Enter your PIN code and tap OK.
Note: If you entered wrong PIN code three times in a row, the SIM card will be
blocked. In order to unblock the SIM card, you have to enter the PUKcode of your SIM card. Contact your operator to unblock it.
Using the RTM-8000 41
Page 52

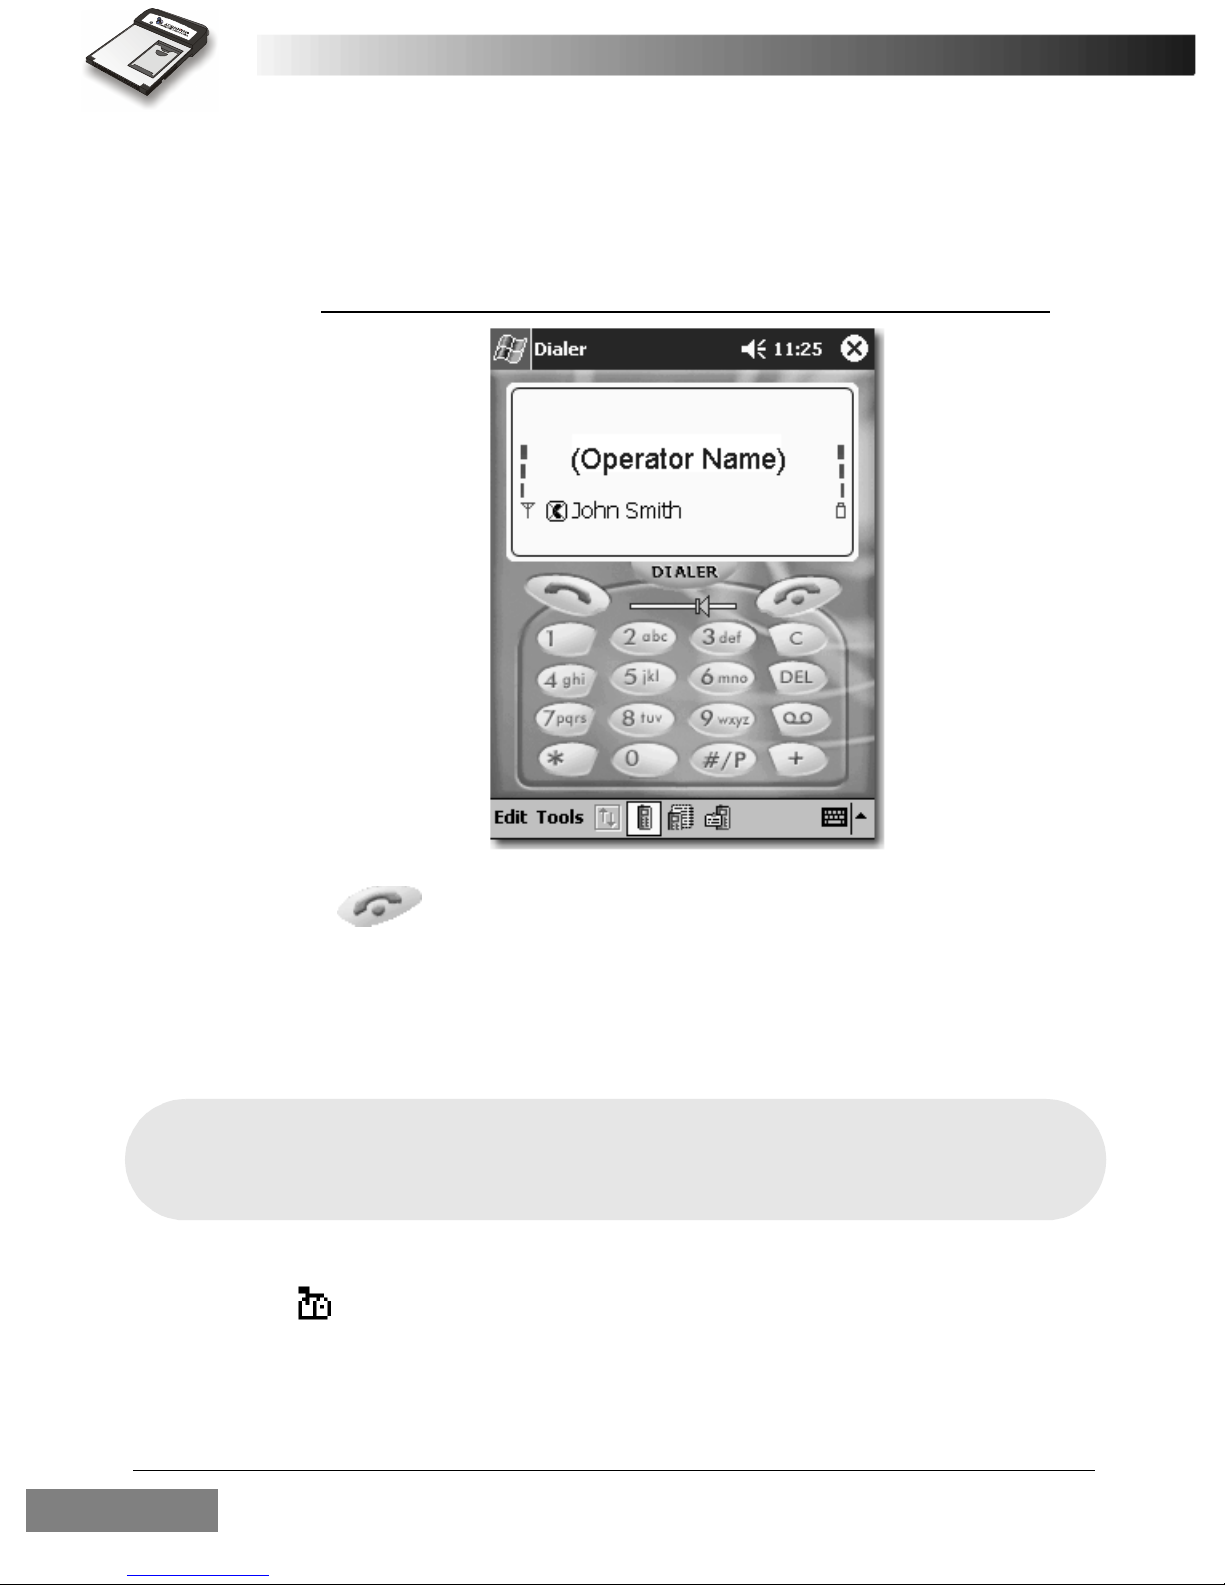
Dialer main screen will appear. It will start searching for the network
automatically.
If network is acquired, the operator name will appear on Dialer. If no network is available, Off Line will appear instead.
Using the RTM-800042
Page 53

Note: If no SIM card is installed on RTM-8000, or the SIM card is invalid,
you can only tap SOS to make emergency calls.
Exit
To exit Dialer, tap Edit on the Command Bar and select Exit.
Using the RTM-8000 43
Page 54

Dialer Screen
Send Key
Status Display
Volume
Adjustment
Slider
Cancel Key
Alphanumeric
Keys
Command Bar
Show/hide Tool Bar Button
Mode Buttons
Icons on the Status Display
Icon Meaning Description
Indicates the strength of network signal. The
Signal strength
more bars displayed, the stronger the signal.
Indicates the level of Pocket PC battery. The more
bars displayed, the more battery power available.
Battery level
The bars scroll if the Pocket PC is using AC
power.
Using the RTM-800044
Page 55

New voicemail This icon indicates that you have a new voicemail.
New text message
This icon appears when a new text message is
received.
This icon indicates that your mailbox is full and
Mailbox full
you need to delete some messages.
This icon indicates that you are roaming under
Roaming
another GSM network.
This icon appears when the ring volume is turned
Silent
off (silent).
This icon indicates that GPRS connection is
GPRS connection
established.
This icon flashes when there is an incoming call. If
Call in progress
there is a call in progress, this icon remains steady.
Command Bar
The Command Bar contains menus for using the functions of Dialer.
Mode Buttons
The Mode Buttons on the Command Bar allow you to switch among different operation modes easily. Tap a button to switch to the corresponding mode.
To Phone mode
To Message mode
To Phonebook mode
Show/hide Tool Bar Button
In Phone Book and Message modes, tap this button to show or hide the
Tool Bar.
Using the RTM-8000 45
Page 56

Volume Adjustment Slider
Drag the slider to adjust headset volume. Dragging it to the right
increases volume and left decreases volume.
Send Key
• When there is an incoming call, tap this key to answer the call.
• After phone number is entered using alphanumeric keys, tap this key to
dial.
• Tap and hold this key to redial the last dialed number.
Cancel Key
• When there is an incoming call, tap this key to reject the call.
• When you are dialing phone numbers, you can tap this key to cancel
dialing.
Using the RTM-800046
Page 57

Using Dialer
Making a call
To make a call:
Tap alphanumeric keys to enter phone number.
Note:
• To clear a wrong number, tap key. Tapping key clears a whole line.
• To insert pauses between numbers, tap P on key.
• To make an international call, tap and hold key until "+" (international call
prefix) appears, and then enter the country code, area code (omit the zero) and
phone number.
Using the RTM-8000 47
Page 58

Tap key to dial. When the call is connected, the phone number
and call time counter will appear on the status display.
Phone number
Call time counter
Tap key to end the call.
You can also make a call from your Phone Book. For details, please refer
to “Making a call from Phonebook” on page 59.
Redialing the last dialed call
Tap and hold key. The last dialed number will be dialed automatically.
Using the RTM-800048
Page 59

Answering a call
When an incoming call is received, ring tone is generated and the icon
flashes. Meanwhile, if the caller ID is available and can be found in
your Phonebook, the caller’s name will appear on the status display. Otherwise, only "Unknown number" will appear.
Caller ID
Tap to answer the call. Otherwise, tap to reject.
To end the call, tap key.
Using the RTM-8000 49
Page 60
Missed call message
If a call (or multiple calls) is missed, the missed call message containing
the last missed caller’s name ("Unknown number" is shown when the
caller’s name is unknown) will appear on the status display.
Tap key to clear the message.
You can also view the details of missed calls or reply to them. See “Viewing call records” on page 58.
Receiving text messages
Note: Related message settings must be configured before you can use the text mes-
sage and voicemail message functions. For details, please refer to “SMS Service” on page 81.
When a text message is received, an alert sound is generated and the icon
appears on the status display. Tap the icon to open your mailbox and
view the received message(s). The new message(s) is highlighted and you
can double-tap on it to view the contents.
For more information about messages, see “Message” on page 64.
Using the RTM-800050
Page 61

Listening to voicemail
When a voicemail message is received, the icon appears on the status
display. Tap key to connect to your voicemail box and listen to the
voicemail message.
Using the RTM-8000 51
Page 62

Options during a call
Note: To use the functions during a call, you need to subscribe them to your opera-
tor and enable them in Dialer. For details on how to enable them in Dialer,
please see “Call Service” on page 73.
Call waiting
If another call is received when you are on a call, the call waiting message
will appear. To answer the new incoming call, tap Answer. Otherwise,
tap Reject.
Current active call
The new incoming call
The current call will be held automatically if the new call is answered.
Making a new call
During a call, you can make a new call by entering phone number and
tapping key. If the new call is connected, the current call will be
held automatically.
Using the RTM-800052
Page 63

Call swapping
To swap two active calls:
Tap Options.
The Call State window appears. Tap Swap.
Using the RTM-8000 53
Page 64

Conference call
To establish a conference call in a multi-party call, tap Conference in the
Call State window.
Private call
During a conference call, tap to select a calling party and tap Private in the
Call State window. With this function, you can talk to the calling party
you selected without being heard by the other calling parties.
To return to the conference call, tap Conference.
Using the RTM-800054
Page 65

Holding/Unholding a call
To hold/unhold a call in a multi-party call, tap to select the call you want
to hold/unhold and tap Hold or Unhold.
Disconnecting a call
To disconnect a call in a multi-party call, tap the call you want to disconnect in the Call State window and tap Disconnect.
Using the RTM-8000 55
Page 66

Phonebook
Dialer’s Phonebook integrates the Phonebook data on your SIM card and
the Contact data in the Pocket PC. You can manage the data easily and
make calls from them quickly.
To enter Phonebook mode, tap the Phone Book mode button .
Adding a new Phonebook entry
To add a new Phonebook entry:
In Phonebook mode, tap the Show/hide Tool Bar Button and then
the button on the Tool Bar. Or, in any operation mode, tap Edit on
the Command Bar and select Add New Phone Number....
Tap the Show/hide Tool bar button
and then the Add new number
button on the Tool Bar in
Phonebook mode.
Using the RTM-800056
In any operation mode, tap Edit on
the Command Bar and select Add
New Phone Number...
Page 67

The Add New Phone Number screen will appear. Enter name, number
and select where this new entry will be saved in the Memory drop-down
menu. Specify a location by tapping the arrows in the Position box.
Specifying your own number
Select Owner number in the Memory drop-down menu and enter your
own phone number.
Specifying the emergency number
Select Emergency in the Memory drop-down menu and enter the emergency number. The emergency number can be called even when SIM card
is not inserted.
Tap ok and the entry will be saved to the designated memory.
Note: You can not add a new Contact record in Dialer. To do so, please use the
Contact program in your Pocket PC.
Using the RTM-8000 57
Page 68
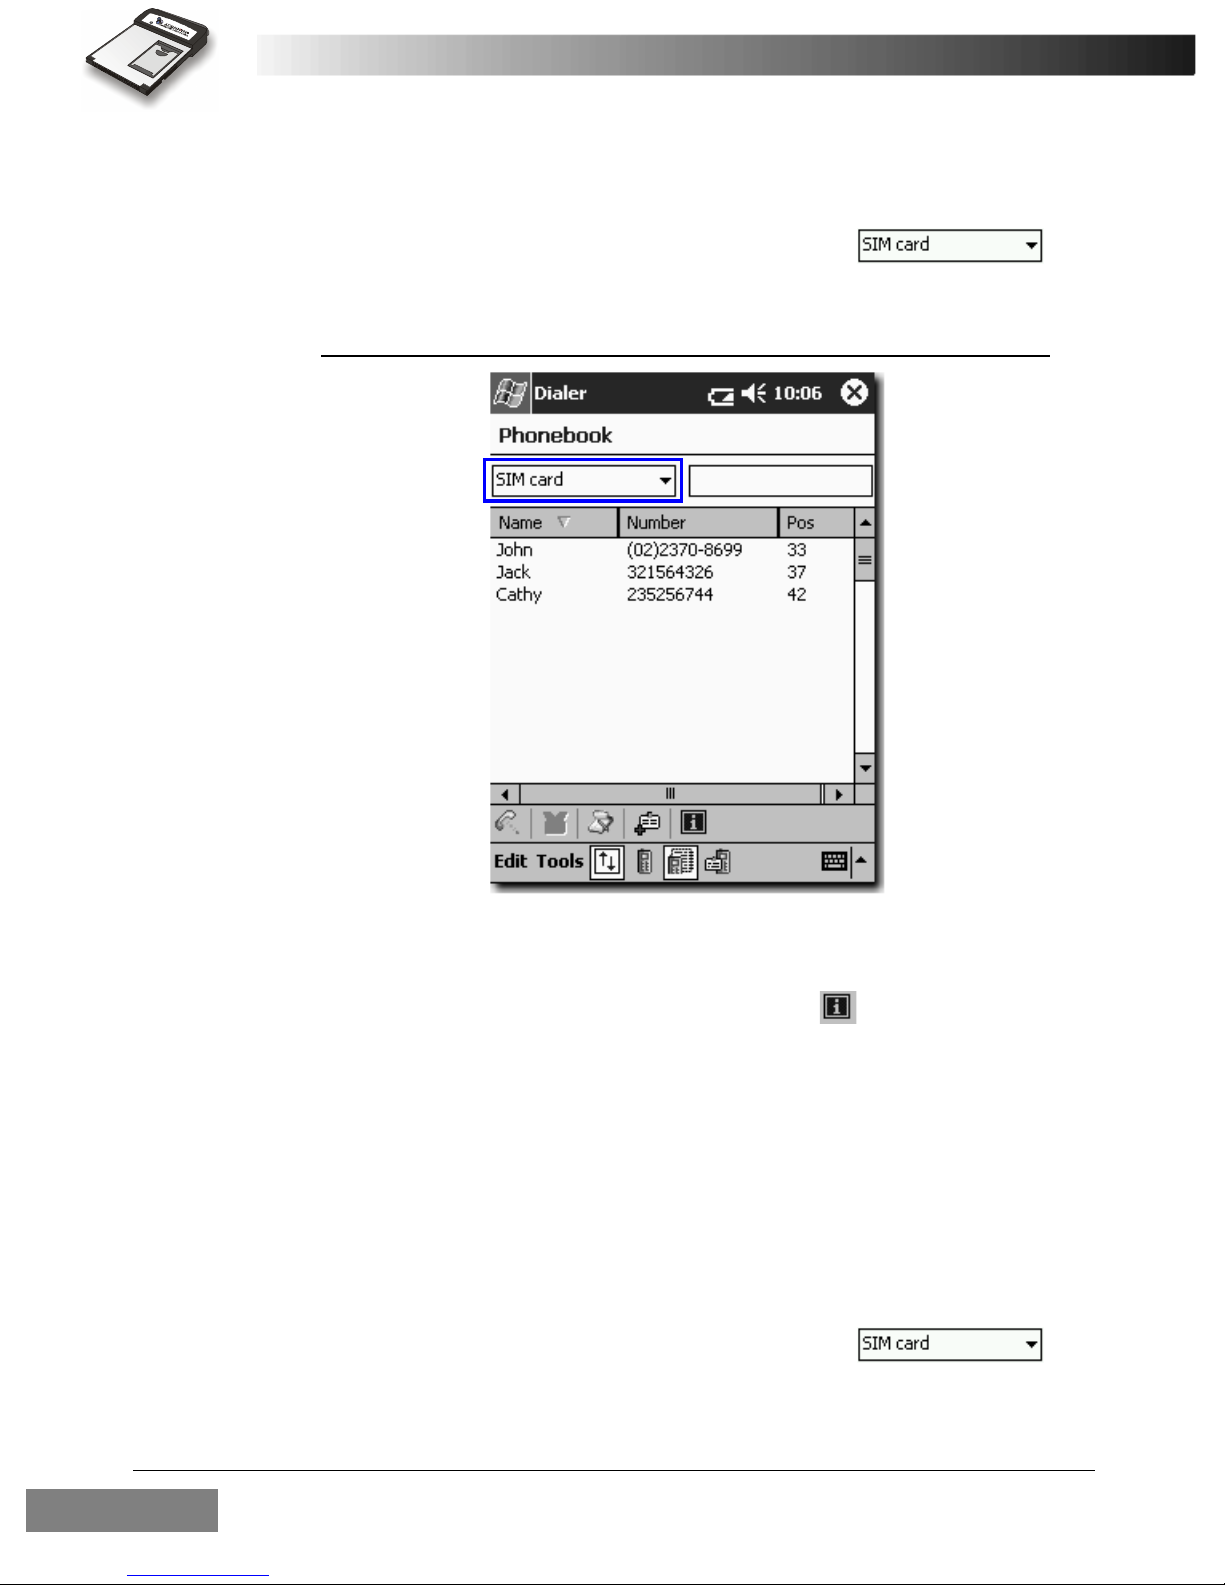
Viewing Phonebook entries
In Phonebook mode, tap the drop-down menu to
select a category, and the Phonebook entries under selected category will
appear. For example, if SIM card is selected, all Phonebook data stored
on the SIM card will appear.
Viewing details of a Phonebook entry
• Tap to select an entry and then tap the button on Tool Bar.
• Double-tap an entry.
• Tap to select an entry, then tap Edit on the Command Bar and select
Properties.
• Tap and hold an entry and select Properties... in the submenu that
appears.
Viewing call records
In Phonebook mode, tap the drop-down menu to
select Calls missed, Calls received or Calls dialed. Corresponding call
records will appear.
Using the RTM-800058
Page 69

Making a call from Phonebook
In Phonebook mode, tap an entry (or a call record) and then tap button on the Tool Bar. Or, Tap and hold an entry and select Dial in the sub-
menu that appears. Dialer will begin making the call automatically.
Editing a Phonebook entry
Refer to “Viewing details of a Phonebook entry” on page 58 to open the
details of the Phonebook entry you want to edit.
Edit the Phonebook entry. When you are done editing, tap ok.
Deleting a Phonebook entry
In Phonebook mode, tap to select the Phonebook entry you want to
delete, then tap Edit on the Command Bar and select Delete. Or, tap and
hold an entry and select Delete in the submenu that appears.
Searching for a Phonebook entry
Enter name (or starting characters of the name) in the Search field. The
Phonebook entries starting with the characters you entered will appear.
Enter here
Using the RTM-8000 59
Page 70

Adding/editing/deleting a Phonebook category
In Phonebook mode, tap Edit on the Command Bar and select Edit a
Category....
Enter the name of the new category and tap Add.
Using the RTM-800060
Page 71
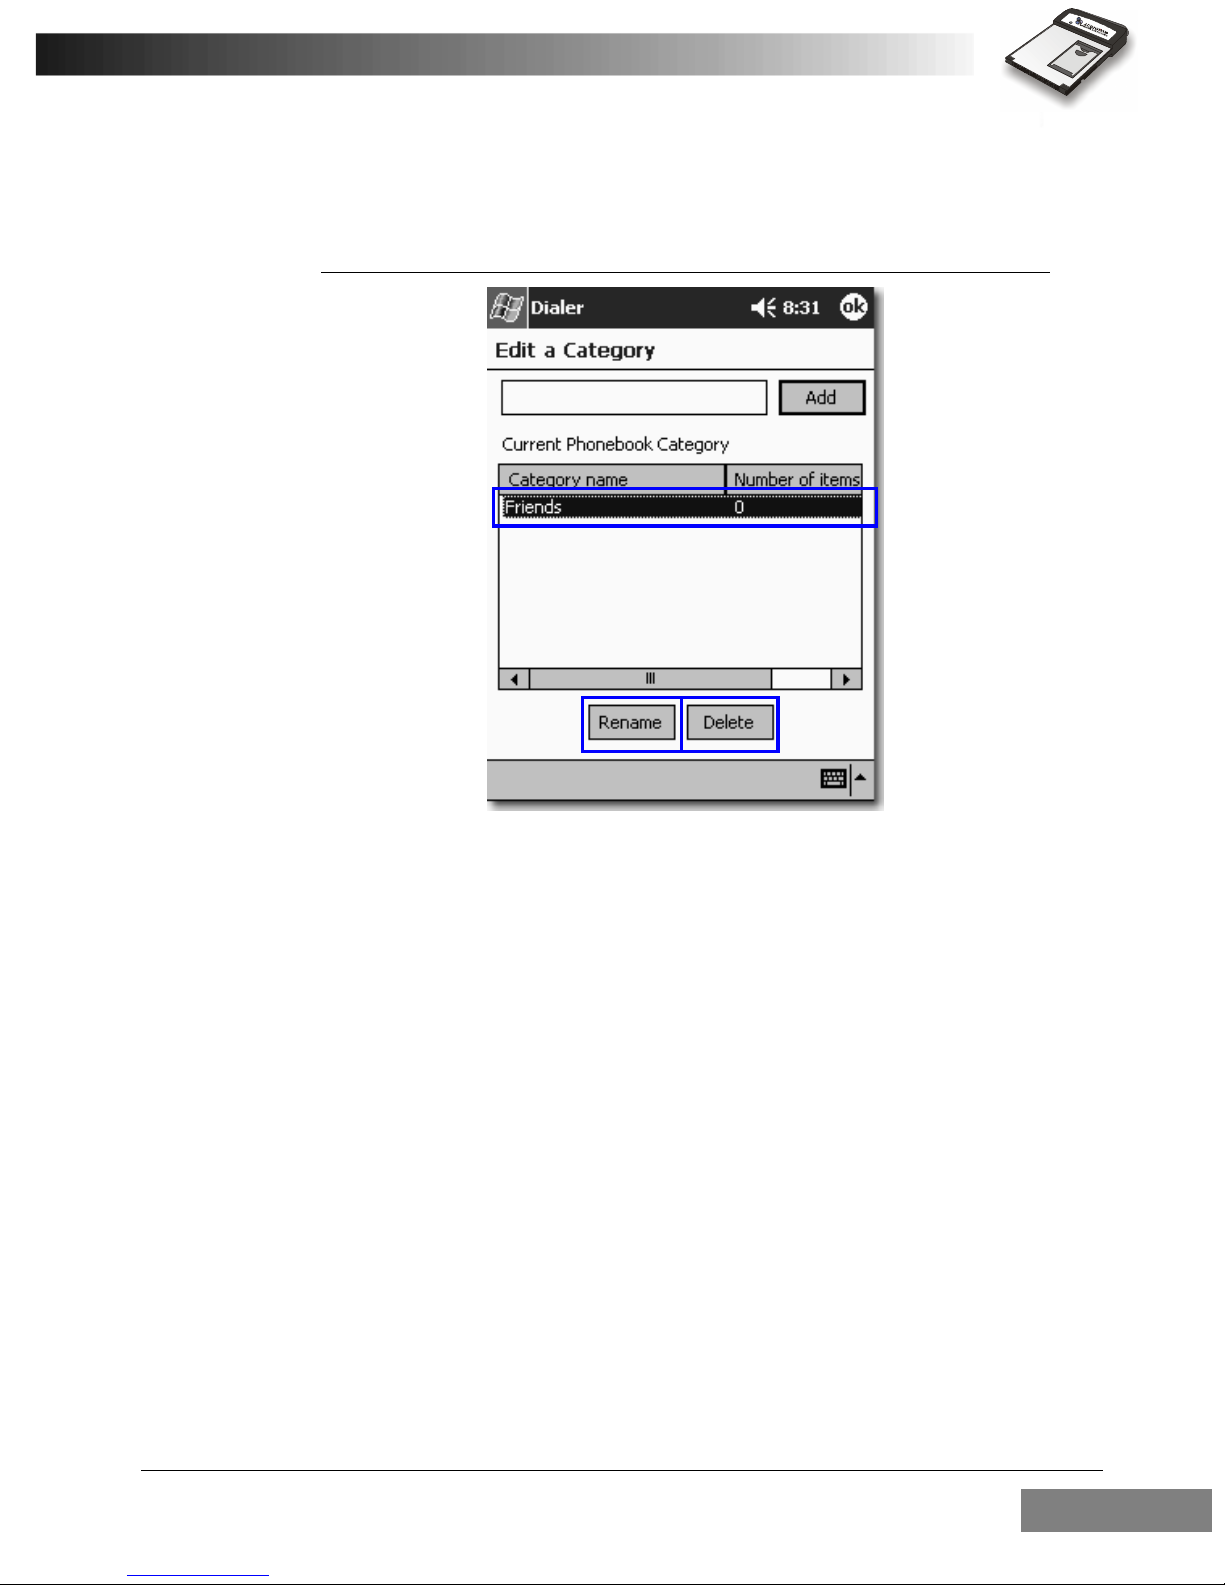
To rename an existing category, tap to select the category in the Current
Phonebook Category list and tap Rename.
To delete a category, tap to select the category and tap Delete.
Using the RTM-8000 61
Page 72

Copying/moving a Phonebook entry to another category
After you create a new Phonebook category, you can use this function to
copy or move Phonebook entries to the new category.
In Phonebook mode, tap to select a Phonebook entry (or tap and drag to
select multiple entries), then tap Edit on the Command Bar and select
Copy to....
Or, tap and hold on a Phonebook entry and select Copy to... in the submenu that appears.
In Phonebook mode, tap to select a
Phonebook entry (or tap and drag
to select multiple entries), then tap
Edit on the Command Bar and
select Copy to...
Using the RTM-800062
Tap and hold on a Phonebook entry
and select Copy to... in the submenu that appears.
Page 73

The "Copy Phone Number to" screen appears. If you want to copy
selected entry (or entries), tap Range. Tap All to copy all entries.
Then, tap the "To:" drop-down menu to select the destination category.
Tap OK to start copying.
Copy the selected Phonebook
entries or all Phonebook entries.
Destination category
Follow similar steps to move Phonebook entries.
Duplicating a Phonebook entry
To duplicate a Phonebook entry:
• Tap a Phonebook entry and then tap Edit on the Command Bar and
select Duplicate.
• Tap and hold a Phonebook entry and select Duplicate in the submenu
that appears.
Using the RTM-8000 63
Page 74

Message
You can read, write and send text messages in Message mode. Tap
button on the Tool Bar to enter Message mode.
Note: Before you can use the Message functions, you need to set up related mes-
sage settings first. For details, please refer to “SMS Service” on page 81.
Writing and sending a new message
Tap the Show/hide Tool Bar Button and then the Add new mes-
sage... button on the Tool Bar in Message mode.
Or, in any operation mode, tap Edit on the Command Bar and select Add
New Message....
Tap the Show/hide Tool Bar Button
and then the Add new mes-
sage... button on the Tool Bar
in Message mode.
Using the RTM-800064
Or, in any operation mode, tap Edit
on the Command Bar and select
Add New Message....
Page 75

Edit the message.
Enter receiver’s number or tap the Receiver button to pick up
a receiver or multiple receivers from Phonebook.
Enter the contents of the text
message. The maximum length
is 459 characters (including
symbols and spaces).
If you want to save the message,
tap to select a destination folder.
Tap Send to send the message immediately. If you want to save the message and send it later, tap Save.
The sent messages will be saved in Sent folder automatically.
Using the RTM-8000 65
Page 76
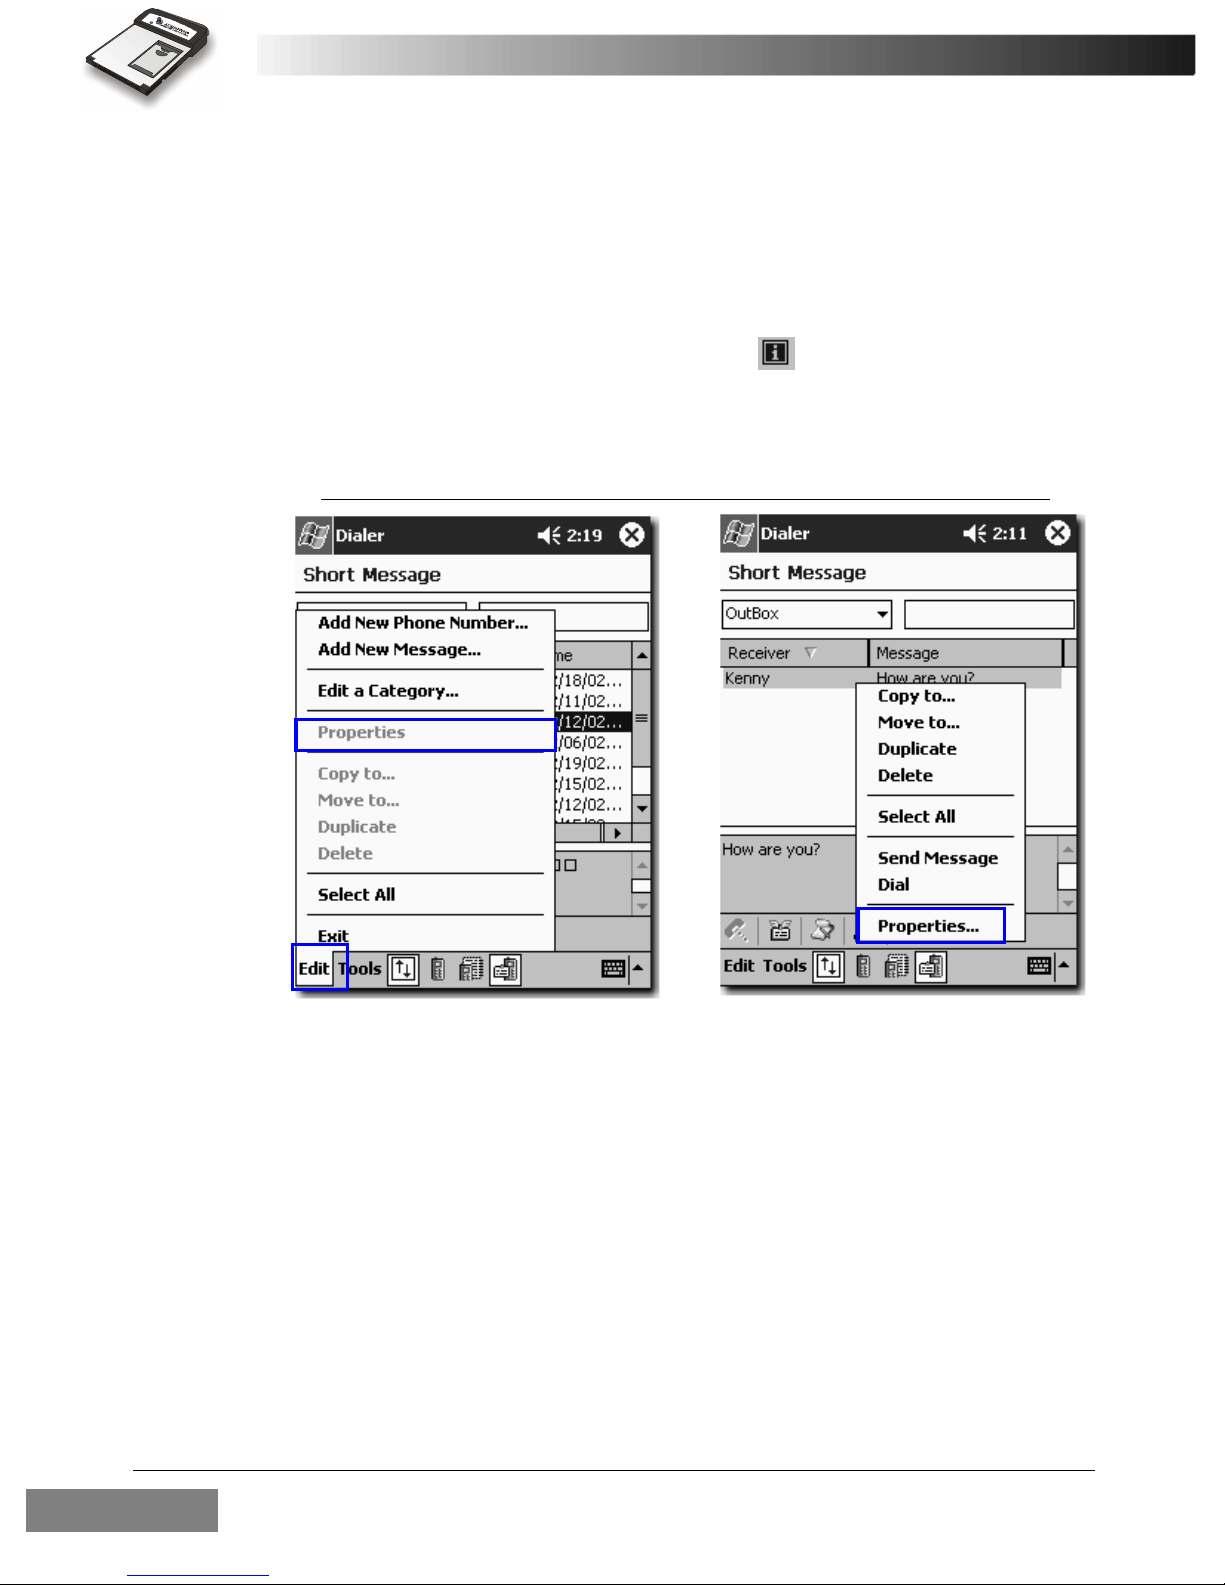
Reading a message
You can view the contents of a message by doing any of the following:
• In Message mode, tap to select a message, then tap Edit on the Command Bar and select Properties.
• Tap to select a message and then tap the button on the Tool Bar.
• Tap and hold a message and select Properties in the submenu that
appears.
• Double-tap a message.
Using the RTM-800066
Page 77

Searching for a message
Enter the keyword in the Search field. The message(s) containing the keyword will appear.
Enter here
Using the RTM-8000 67
Page 78

Replying to a message
In Message mode, double-tap the message you want to reply. Or, tap to
select the message you want to reply, then tap Tools on the Command
Bar and select Reply Message....
Edit the reply message and tap Reply.
Using the RTM-800068
Page 79

Forwarding a message
In Message mode, double-tap the message you want to forward in Out-
box or Draft folder.
Edit the message.
Enter receiver’s number or tap the Receiver button to pick up a
receiver or multiple receivers from the Phonebook.
Enter the contents of the text
message (optional). The maximum length is 459 characters
(including symbols and spaces).
If you want to save the message,
tap to select a destination folder.
Tap Send to send the message or Save to save the message and send later.
Using the RTM-8000 69
Page 80

Re-sending a message
You can use this function to send a message again.
In Message mode, tap to select a message in Outbox, Draft or Sent folder
and tap the button on the Tool Bar.
Or, tap and hold a message in Outbox, Draft or Sent folder and select
Send message in the submenu that appears.
Using the RTM-800070
Page 81

Adding/renaming/deleting a message folder
In Message mode, tap Edit on the Command Bar and select Edit a Cate-
gory...
To add a new folder, enter the name of the new folder and tap Add, ok.
Using the RTM-8000 71
Page 82

To rename an existing folder, tap to select the folder in the Current SMS
Category list and tap Rename.
To delete a folder, tap to select the folder and tap Delete.
Using the RTM-800072
Page 83

Services
You can set up and activate/deactivate operator dependent services.
Call Service
Tap Tools on the Command Bar and select Options..., Call Service....
The Call Service screen will appear. Tap each tab to view its options.
Using the RTM-8000 73
Page 84

General
Here you can decide whether you want to send your number to the recipient or not when calling. If you do not send your number while making a
call, your number will not appear on recipient’s phone.
Use your operator default setting.
Send your number.
Don’t send your number.
Call divert
If for any reason you can not answer a call, you can activate the call divert
function to direct incoming calls to a specific phone number.
Tap to select a divert condition.
Enter the number you want to diver to.
Tap On to activate.
Tap Off to deactivate.
Tap Status to inquire current call divert
status.
Using the RTM-800074
Page 85

• Voice call - Divert all: divert all incoming voice calls unconditionally.
s
• Voice call - Divert when busy: divert all voice calls when you are on a
call.
• Voice call - Divert when no reply: divert all voice calls when they are
not answered.
• Voice call - Divert when not reachable: divert all voice calls when you
are outside the network coverage area.
• Voice call: Divert when not available: divert all voice calls whenever
you are not available for answering a call.
• Data call - Divert all: divert all data calls.
• Fax call - Divert all: divert all fax calls.
• Cancel all divert calls: cancel all call divert functions.
Call waiting
You can activate/deactivate the call waiting function here.
Activate call waiting.
Deactivate call waiting.
Inquire current call waiting statu
Using the RTM-8000 75
Page 86

Call barring
With this call service, you can bar (restrict) incoming and outgoing calls
under certain conditions.
Tap to select a barring condition.
Tap On to activate. You will be
prompted to enter the call barring code.
Tap Off to deactivate.
Tap Status to inquire current call
barring status.
• Outgoing call - Barring all: bar all outgoing calls.
• Outgoing call - Barring international calls: bar all outgoing interna-
tional calls.
• Outgoing call - Barring international calls except home: bar all outgo-
ing international calls except the calls made to your home country.
• Incoming call - Barring all: bar all incoming calls.
• Incoming call: Barring when roaming: bar all incoming calls when
roaming.
• Cancel all barring calls: cancel all call barring functions.
Note: You need network code to enable call barring functions. Please contact
your operator for such code.
Using the RTM-800076
Page 87

Send unstructured supplementary service data
You can enter unstructured supplementary service data (USSD) and
access related services. For details about the contents of service, please
consult your operator.
Enter data here and tap Send.
Using the RTM-8000 77
Page 88

Network Service
Tap Tools on the Command Bar and select Options..., Network Service...
The network service setting deals with the selection of network. You can
let the RTM-8000 select a home network automatically, or when you are
roaming under another network, you can select the friendly network
manually by yourself.
Current operator name.
Tap Automatic to let RTM-8000 select a
home network automatically.
Tap Manual to let RTM-8000 scan all
existing networks and you select one later.
If Manual is tapped, available networks
will appear in this box and you can tap
one and then tap the Register button to
select.
Using the RTM-800078
Page 89

Security Service
Tap Tools on the Command Bar and select Options..., Security Service...
Options in Security service allow you to enable/disable and modify security codes.
Enable/disable PIN code request. If
enabled, you will be asked to enter your
PIN code when starting Dialer.
Enable/disable phone code request.
Tap to change access codes.
Using the RTM-8000 79
Page 90

Changing access codes
About the access codes
Network Code: The code for accessing your operator’s GSM network. You can
get such code from your operator
Phone code: The code for preventing unauthorized use of your RTM-8000. If
Phone code is enabled, you have to enter it each time you run
Dialer. The default Phone code of your RTM-8000 is 12345678.
If you change the phone code from its default value, please write
the new code here, or in a safe place of your own choice:
___________________
PIN code: The code that is supplied by your operator upon subscription. If the
PIN code is enabled, you have to enter it each time you run Dialer.
PIN2 code: The second set of PIN code that is supplied by your operator to con-
trol over certain special services.
To change access codes:
Tap ok.
Select the access code you
want to change from the dropdown menu.
Enter the old code.
Enter the new code.
Enter the new code again to
verify.
Using the RTM-800080
Page 91

SMS Service
Tap Tools on the Command Bar and select Options..., SMS Service....
Here you can configure message settings. For detailed parameters, please
contact your operator.
Using the RTM-8000 81
Page 92

• SMS service center: enter your message service center number (available form your operator).
• Voice mail number: enter the voicemail box number (available form
your operator).
• Send as: depending on the device that will receive your message, tap to
select a format for sending messages.
• Send SMS: tap to select the type of carrier that is used to send your
messages.
• Delivery report: tap to check or uncheck the checkbox. If checked, after
you send a message, the operator will send you a report, letting you
know if the message is sent successfully.
• Reply path: tap to check or uncheck the checkbox. If checked, the reply
path feature allows the recipient of your message to send you a reply
message via your message center.
• Relative validity and Absolute validity: the validity determines the dura-
tion of time the message is stored in the message center if it can not be
successfully received by the receiver. You can specify the duration by
tapping Relative validity and specify a certain weeks, days or hours. Or,
you can specify the deadline date by tapping Absolute validity and
select a date.
Using the RTM-800082
Page 93
Settings
General Settings
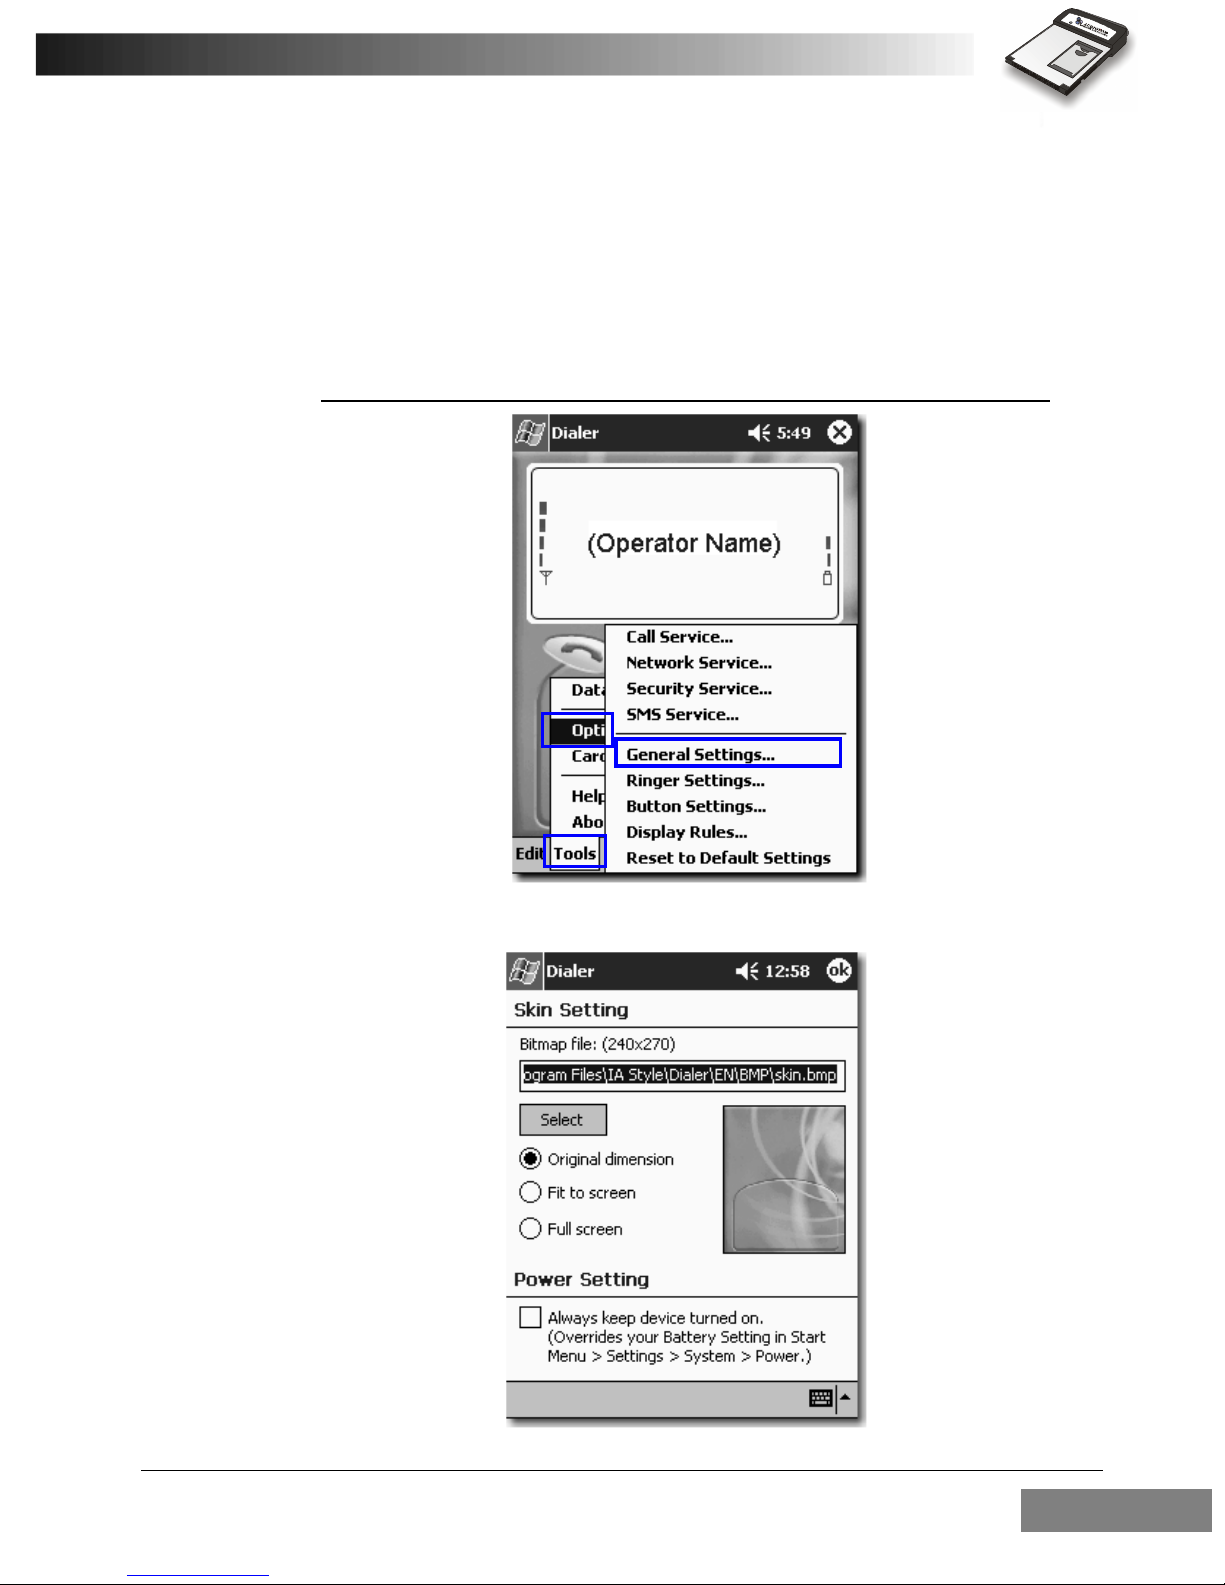
The options of General Settings allow you to replace Dialer skin (background) and adjust power settings.
Tap Tools on the Command Bar and select Options..., General Settings...
The General Setting window will appear.
Using the RTM-8000 83
Page 94

Choosing a skin (background)
You can select any bitmap (.bmp format, 240x270 pixels) file (for example, your favorite photo) as the skin (background appearance) of your
Dialer main screen.
Tap Select to browse for and select a desired file.
There are three skin options:
• Original dimension: keep the original dimension of the skin file you
selected.
• Fit to screen: if the dimension of the image file you selected does not fit
that of screen, fit the image to screen size either by width or by height.
• Full screen: stretch (or shrink) the image to screen size. Deformation of
image may occur.
Tap ok and return to Dialer main screen. The skin is replaced by the
image you selected.
Adjust power setting
If the Always keep device turned on checkbox is checked, the power of
Pocket PC and the RTM-8000 will always remain on and will not enter
suspend mode.
The setting here overrides the Power setting of your Pocket PC. In order
to prevent loss of data, please be sure to check the battery status of your
Pocket PC on a regular basis when using this feature, as some Pocket PC
models does not have battery backup.
Using the RTM-800084
Page 95

Ringer Settings
The options of Ringer Settings allow you to customize the ring tones for
incoming calls and messages.
Tap Tools on the Command Bar and select Options..., Ringer Settings....
Tap the arrows
to adjust delay
duration.
Drag the slider
to adjust ring
tone/alert tone
volume.
Tap to browse for a .wav
file and select it as the ring
tone for incoming calls.
Tap to delete selected ring
tone.
Tap to play selected ring
tone.
Tap to delete selected message alert tone.
Tap to play the selected
message alert tone.
Tap to browse for a .wav
file and select it as the message alert tone.
Using the RTM-8000 85
Page 96

Button Settings
Options of Button Settings allow you to assign several frequently used
actions to the hardware buttons of your Pocket PC.
Tap Tools on the Command Bar and select Options..., Button Settings....
Tap to select a button in the Hardware button box.
Using the RTM-800086
Page 97

Tap to select an action in the Button assignment box.
Tap ok. Now you can use the hardware buttons of your Pocket PC to execute their assigned actions.
Note: The Screen toggle action allows you to turn off the screen while keeping Dialer
active. You can use it to save the power of your Pocket PC.
Using the RTM-8000 87
Page 98

Display Rules
You can set up the display format of phone numbers in Dialer with the
options of Display Rules. Multiple display rules can be established and
Dialer will detect the numbers you entered and convert them to corresponding preset formats automatically.
For example, if a 10-digit display rule has been created:
(0x)xxxx-xxxx
When you enter a 10-digit phone number 0234567890, Dialer will
change its format into (02)3456-7890 automatically.
If you have multiple display rules with the same number of digits, Dialer
will apply the rule that has higher priority.
Establishing a display rule
Tap Tools on the Command Bar and select Options..., Display Rules....
Using the RTM-800088
Page 99

Enter a new display rule and tap Add.
Note: The new display format is assigned the lowest priority by default.
Changing the priority of a display rule
Tap to select a display rule and then tap to move the priority one level
up, or to move the priority one level down.
Editing a display rule
To edit a display rule, tap the one you want to edit and tap Modify.
Deleting a display rule
To delete a display rule, tap the one you want to delete and tap Delete.
Using the RTM-8000 89
Page 100

Reset to default settings
To reset the settings of Dialer to their default values, tap Tools on the
Command Bar and then select Options, Reset to Default Settings....
Using the RTM-800090
 Loading...