

Page 1

CDM-9900
VERIZON
English
Production Version
Apr.27, 2004
OWNER’S MANUAL
Page 2

Page 3

AUDIOVOX
AUDIOVOX
CDM-9900
CDM-9900
Tri-Mode Digital CDMA/Amps
Handheld Portable Telephone
In today’s fast paced world, it has become a necessity to have access to your family and friends as well as real-time information.
Your communications tools must provide you with this access from
anywhere at anytime. With that in mind, Audiovox developed the
CDM-9900, our first camera/video phone with dual LCD displays including an inner display with 262k color.
This 1XRTT digital handset enables carriers supporting 1x technology to provide consumers with access to high speed connectivity
for web browsing, email and mobile e-commerce. Operating on the
800 MHz Amps/ CDMA and 1900 MHz PCS frequencies, the CDM9900 allows for seamless nationwide coverage as well as offering
other state-of-the-art user-friendly features. Voice activated dialing
and two way speakerphone are ideal for hands-free use, while
®
T9
Text Input, vibrating alert and multi-lingual menus make the
CDM-9900 easier to use. The CDM-9900 also offers downloadable
melody ringers and wallpapers to personalize your handset to fit
your style or mood.
With all the standard features already available, the CDM-9900 also
offers the latest wireless phone options: Get It Now
15 second recording video clips, camera with flash, TTY compatibility and GPS for E911 calling. The 2 line outer display offers at a
glance information such as Caller ID without opening your phone.
Your new CDM-9900 provides you with something only an Audiovox
phone can: the proven reliability that has made us a leading wireless handset provider. Please take a few moments to read the following pages of the owner’s operating manual. It will help you make
the most efficient use of this valuable communications tool.
®
compatibility,
1
Page 4

TABLE OF CONTENTS
TABLE OF CONTENTS
SAFETY INSTRUCTIONS .............................................. 9
1 BEFORE USING YOUR PHONE .................................. 17
Package Contents ............................................................... 18
Front View ............................................................................ 19
Key Functions...................................................................... 20
Icons on Main Display ......................................................... 21
Using the Battery ................................................................. 22
Installing the Battery Pack ................................................... 22
Removing the Battery Pack ................................................. 22
Charging the Battery ........................................................... 23
Charging the Phone’s Battery ............................................. 23
Charging with the Desktop Charger .................................... 24
Battery Information .............................................................. 24
Getting Started ..................................................................... 25
Turning the Phone On/Off ................................................... 25
Antenna Position ................................................................. 25
Multiple Languages ............................................................. 25
Security Code ...................................................................... 25
Using Phone’s Menu ........................................................... 26
Accessing Phone’s Menu .................................................... 26
Menu Tree ............................................................................ 27
Using My Menu ................................................................... 28
2 BASIC OPERATION ..................................................... 29
Making Calls ......................................................................... 30
Making a Call....................................................................... 30
Ending a Call ....................................................................... 30
Making a Call with Speakerphone ....................................... 30
Dialing the Last Number ...................................................... 30
Answering Calls ................................................................... 31
Answering a Call ................................................................. 31
Answering a Call with Speakerphone.................................. 31
Caller ID with Name ............................................................ 31
Missed Calls ........................................................................ 31
2
Page 5

During Calls ......................................................................... 32
Adjusting the Volume ........................................................... 32
Muting the Microphone ........................................................ 32
Speakerphone Mode ........................................................... 32
Using Scratch Pad............................................................... 32
Call Waiting ......................................................................... 33
Three-Way Calling............................................................... 33
Sending Tones ..................................................................... 33
Recent Calls ......................................................................... 34
Recent Calls Menu .............................................................. 34
Viewing Recent Calls .......................................................... 34
Recent Call Options ............................................................ 35
Saving Numbers into Your Phonebook ................................ 35
Viewing Call Timers............................................................. 35
Making Emergency Calls .................................................... 36
Calling Emergency Numbers............................................... 36
Locating Position in Emergency Calls (GPS) ...................... 36
Emergency Call Mode ......................................................... 36
Entering Letters and Symbols ............................................ 37
Text Entry Mode .................................................................. 37
T9 Mode .............................................................................. 37
Abc Mode ............................................................................ 38
Numeric Mode (123) ........................................................... 40
Symbol Mode ...................................................................... 40
3 PHONEBOOK MENU ................................................... 41
Phonebook Outline .............................................................. 42
Phonebook Menu ................................................................ 42
Phonebook Entry ................................................................. 42
Saving Phonebook Entries ................................................. 43
Adding a New Phonebook Entry ......................................... 43
Saving a Phone Number ..................................................... 44
Digits Options ...................................................................... 44
Finding Phonebook Entries ................................................ 45
Finding a Phonebook Entry ................................................. 45
Dialing from a Phonebook Entry ......................................... 46
Phonebook Entry Options ................................................... 46
Prepending Dialing .............................................................. 47
Dialing Numbers with Pauses ............................................. 47
3
Page 6

Editing Phonebook Entries ................................................. 48
Editing a Phonebook Entry .................................................. 48
Phonebook Edit Options...................................................... 48
Selecting Ringer Type for Numbers ..................................... 49
Assigning Pictures for Caller ID........................................... 50
Deleting Phone Numbers .................................................... 51
Deleting Phonebook Entry .................................................. 51
Using Speed Dialing ............................................................ 52
Speed Dialing ...................................................................... 52
Quick Dialing ....................................................................... 52
Assigning a Speed Dial Location......................................... 52
Changing Speed Dial Locations .......................................... 53
Clearing a Speed Dial Entry ................................................ 53
Voice Activated Dialing (VAD) ............................................ 54
Registering a Name ............................................................ 54
Replaying Registered Names.............................................. 55
Dialing with Your Voice ......................................................... 55
Changing Registered Names .............................................. 56
Deleting Registered Names ................................................ 56
Deleting All Registered Names ........................................... 56
Group List for Messaging ................................................... 57
Adding an Entry to Group List ............................................. 57
Copying from Phonebook Entries........................................ 58
Deleting a Number from Group List..................................... 58
4 VOICE MAIL AND TEXT MESSAGES ......................... 59
Messaging Features ............................................................ 60
New Message Notification ................................................... 60
Messaging Menu ................................................................. 60
Voice Mail Messages ........................................................... 61
Checking Voice Mail Messages ........................................... 61
One-Touch Voice Mail Dialing .............................................. 61
Sending Text Messages ...................................................... 62
Sending a New Text Message ............................................. 62
Recipient Options ................................................................ 63
Pending and Canceled Messages....................................... 63
Edit Options ......................................................................... 64
Message Options ................................................................ 65
Saved Folder ....................................................................... 65
4
Page 7

Checking Your Inbox ........................................................... 66
Checking Incoming Messages ............................................ 66
Inbox Options ...................................................................... 66
Reviewing Your Outbox ...................................................... 68
Reviewing Outgoing Messages ........................................... 68
Outbox Options ................................................................... 69
Message Settings ................................................................ 70
Common Settings ................................................................ 70
Pix./Video Message Settings............................................... 73
Text Message Settings ........................................................ 73
Voice Mail Number Setting .................................................. 74
Erase All .............................................................................. 74
5 PICTURE/VIDEO FUNCTIONS..................................... 75
Taking Pictures .................................................................... 76
Taking a Picture with Your Camera ...................................... 76
Recording Videos ................................................................ 78
Recording a Video with Your Camcorder ............................. 78
Sending Pictures ................................................................. 80
Sending a Picture Message ................................................ 80
Recipient Options ................................................................ 81
Using Your Online Album ..................................................... 81
Picture Message Options .................................................... 82
Sending Template Messages .............................................. 82
Sending Videos .................................................................... 83
Sending a Video Message to an E-mail Address ................ 83
Video Message Options ...................................................... 83
Inbox and Outbox ................................................................ 84
Incoming Picture Messages ................................................ 84
Outgoing Picture/Video Messages ...................................... 84
6 GET IT NOW AND MOBILE WEB ................................ 85
Get It Now ............................................................................. 86
Launching Get It Now .......................................................... 86
Downloading Games/Applications....................................... 86
Playing Games/Applications................................................ 87
Downloading Ringers/Wallpapers ....................................... 87
Setting Up Get It Now.......................................................... 87
Mobile Web ........................................................................... 88
Launching Web Browser ..................................................... 88
Browser Menu ..................................................................... 89
5
Page 8

7 MEDIA GALLERY ......................................................... 91
Managing Your Media Gallery............................................. 92
Media Gallery Menu ............................................................ 92
Using My Folder .................................................................. 92
Viewing Your Media Gallery ................................................ 93
Viewing Your Pictures and Images ...................................... 93
Viewing Your Videos ............................................................ 93
Playing Ringers ................................................................... 94
Media Gallery Options ......................................................... 94
Assigning Pictures and Ringers ........................................ 95
Assigning a Picture to Phone Tasks .................................... 95
Assigning a Ringer to Phone Tasks ..................................... 96
Media Gallery Folder Options.............................................. 96
8 SETTING MENU ........................................................... 97
Sound Settings .................................................................... 98
Volume Settings (Menu 711) ............................................... 98
Ringer Type (Menu 712) ...................................................... 98
Key Tone Length (Menu 713) .............................................. 99
Vibration Alert (Menu 714) .................................................. 99
Alert Notification (Menu 715) ............................................. 100
DTMF Send (Menu 716).................................................... 100
Display Settings ................................................................. 101
Backlight (Menu 721) ........................................................ 101
Auto Hyphen (Menu 722) .................................................. 103
Sub Display Contrast (Menu 723) ..................................... 103
Time and Date Adjustment (Menu 724) ............................ 103
Wallpaper (Menu 725) ....................................................... 104
Idle Screen Selection (Menu 726) ..................................... 105
Sub Display Direction (Menu 727)..................................... 106
Answer Option Settings .................................................... 107
Auto Answer Mode (Menu 731) ......................................... 107
Open to Answer Setting (Menu 732) ................................. 107
Any Key Answer Setting (Menu 733)................................. 107
6
Page 9

Security Settings ............................................................... 108
Phone Lock (Menu 741) .................................................... 108
Auto Phone Lock (Menu 742)............................................ 108
Side Key Lock (Menu 743) ................................................ 109
Restricting Calls (Menu 744) ............................................. 109
Changing Security Code (Menu 745) ................................ 110
Call Timer Reset (Menu 7461) .......................................... 110
Phonebook All Clear (Menu 7462) .................................... 110
Recent Calls All Clear (Menu 7463) .................................. 111
Phone’s Settings Reset (Menu 7464)................................ 111
Media Gallery Reset (Menu 7465) .................................... 111
Dial Option Settings .......................................................... 112
Quick Dialing Setting (Menu 751)...................................... 112
Auto Retry (Menu 752) ...................................................... 112
Network Settings ............................................................... 112
System Mode (Menu 761) ................................................. 112
Data Service Mode ............................................................ 113
Data Service (Menu 762) .................................................. 113
Data Mode (Menu 763) ..................................................... 114
TTY Mode (Menu 764) ...................................................... 115
NAM (Menu 765) ............................................................... 116
NAM Name Tag (Menu 7651) ............................................ 116
NAM Change (Menu 7652) ............................................... 116
Auto NAM (Menu 7653)..................................................... 116
Connection Settings .......................................................... 117
Web Connection Settings (Menu 766) .............................. 117
Get It Now Connection Settings (Menu 767) ..................... 117
Language Setting .............................................................. 118
Language (Menu 771) ....................................................... 118
Location Setting ................................................................ 118
GPS Location Mode (Menu 781) ....................................... 118
Voice Guidance Settings................................................... 119
Voice Guidance (Menu 79) ................................................ 119
Main Menu Settings ........................................................... 121
My Menu Settings .............................................................. 122
7
Page 10

9 PRODUCTIVITY TOOLS ............................................ 123
Voice Notes ........................................................................ 124
Recording Voice Notes ...................................................... 124
Playing Voice Notes ........................................................... 124
Voice Notes Options .......................................................... 125
Deleting All Voice Notes .................................................... 125
Calculator ........................................................................... 126
Scheduler ........................................................................... 127
Scheduler Outline .............................................................. 127
Saving a New Event .......................................................... 128
Event Alarm Options ......................................................... 129
Scheduled Events Notification........................................... 129
Editing Events ................................................................... 130
Deleting a Day’s Events .................................................... 130
Deleting Events from the Calendar ................................... 130
Alarm Clock ........................................................................ 131
Countdown Timer .............................................................. 132
Scratch Pad ........................................................................ 133
Phone Information ............................................................. 134
My Number (Menu 91) ...................................................... 134
Help (Menu 92).................................................................. 134
Versions (Menu 93) ........................................................... 134
Status Info (Menu 94) ........................................................ 134
10 SAFETY INFORMATION ............................................ 135
Safety Information for Wireless Handheld Phones ........ 136
SAR Information ................................................................ 140
Ten Driver Safety Tips ....................................................... 142
Emergency Calls and GPS ................................................ 144
Operating Procedures ....................................................... 145
FDA Consumer Information on Wireless Phones........... 146
11 WARRANTY................................................................ 151
12 MONTH LIMITED WARRANTY ..................................... 152
PROTECT YOUR WARRANTY .......................................... 154
ACCESSORIES .......................................................... 155
INDEX.......................................................................... 157
8
Page 11

SAFETY INSTRUCTIONS
WARNING : To help avoid potential hazards that could result in
bodily injury or property damage, always read and understand
all of the Warnings and Safety Instructions contained in this
Manual before attempting to use this Audiovox CDM-9900 Cellular
Phone.
Always keep this manual conveniently available for future reference,
as it contains important information that will enhance the safe operation and maintenance of this instrument.
The safety instructions have been classified according to the seriousness of the risk, as follows :
DANGER : “Danger” indicates the existence of a
hazard that could result in death or catastrophic bodily
injury, if the safety instruction is not observed.
WARNING : “Warning” indicates the existence of a
hazard that could result in serious bodily injury, if the
safety instruction is not observed.
CAUTION : “Caution” indicates the existence of a
hazard that could result in minor bodily injury or property
damage, if the safety instruction is not observed.
NOTICE : “Notice” contains general information that
relates to the safe operation of the telephone.
9
Page 12

Safe Operation of Your Phone
WARNING
♦
Never attempt to disassemble the phone or any of its accessories. If service or repair is required, return the unit to an Audiovox
authorized service center. If the unit should be disassembled, a
risk of electric shock or fire may result.
♦
Always use authorized Audiovox accessories and optional devices when operating this cellular phone, as the use of incompatible auxiliary equipment could result in fire, electric shock or other
bodily injury. The use of unauthorized accessories will also void
your Warranty.
♦
When the phone is used for extended periods of time in high temperature conditions the phone surface could become hot. Please
use caution when touching the phone under such conditions.
Protection of Children
♦
Never allow children to play with your phone, as they might hurt
themselves or others (e.g., by poking themselves or others in the
eye with the antenna).
♦
Always keep all accessories and components out of the reach of
small children. Small parts, in particular, might present a choking
hazard to children.
Use in Vehicles
♦
Never store or transport flammable liquids, gases or explosive
materials in the same compartment as the phone or any of its
accessories, as possible sparking in the equipment could ignite a
fire or explosion.
♦
Always secure the phone in its holder, when it is not in use. Never
place the phone on the passenger seat or anyplace else in the car
where it can become airborne during a collision or sudden stop.
10
Page 13

Safe Operation of Your Phone (continued)
CAUTION
♦
Never expose this phone to high temperatures, such as those
found near a heater or in a closed car parked in the sun. This can
cause heat damage to the plastic parts, the electronic components and the battery.
♦
Never drop this phone or subject it to violent impact or shock.
This can cause mechanical damage.
♦
Never allow any liquids to spill on this phone or expose it to rain,
water or moisture. This can cause corrosion damage.
♦
Never store this phone in cold areas. When the phone warms up
(to its normal operating temperature), moisture can form inside
the phone, which may damage the phone’s electronic circuit board.
♦
Never use harsh chemicals, cleaning solvents, or strong detergents to clean this phone. Always clean it with a soft cloth that
has been slightly dampened in a mild soap-and-water solution.
♦
Never paint this phone. This can clog the moving parts.
♦
If you at anytime notice an allergic skin reaction from use of this product, immediately discontinue use and consult with your physician.
♦
Do not aim your camera at the sun. The sunlight passing through
the camera lens may cause damage to the camera.
♦
Do not use your camera’s flash close to a person’s eyes. This
may cause the person to lose eyesight temporarily and result in
an accident.
Before connecting this cellular phone or any of its accessories to
any other device, always read the Instruction Manual for that other
device first to obtain detailed safety instructions. Never connect this
cellular phone to any unauthorized or incompatible auxiliary product that has not been expressly approved by Audiovox.
11
Page 14

Safe Operation of Battery Pack
WARNING
♦
Never short-circuit a battery pack by either accidentally or intentionally bringing the terminals in contact with another metal object. That could result in burns, other bodily injury or a fire, and
could also damage the battery pack.
♦
Never expose the terminals of the battery pack to any other metal
object. Always wrap it or place it in a plastic bag, whenever transporting it.
♦
Never heat and never attempt to disassemble the battery pack,
as that could cause leakage of the caustic electrolyte. If the battery is accidentally broken, avoid skin contact with the contents.
In the event of skin contact, wash the affected area immediately
and obtain prompt medical attention.
♦
Never attempt to dispose of a battery pack by throwing it into a
fire. That can cause the battery pack to explode.
♦
Never attempt to use an unauthorized battery pack with your phone
in order to avoid any risk of bodily injury or property damage.
Since unauthorized accessories have different specifications, they
may be incompatible with your phone.
12
Page 15

Safe Operation of Battery Pack (continued)
RBRC
WARNING
Safe Disposal of Used Battery Packs
♦
Never discard a used battery pack with ordinary solid wastes,
since it contains toxic substances.
♦
Always dispose of a used battery pack in accordance with prevailing community regulations relating to the disposal of household toxic wastes. Always cover the metal terminals with insulating tape first, to prevent accidental short-circuiting.
CAUTION
♦
Always turn your phone OFF before removing the battery pack,
and always use the battery pack for its intended purpose only.
♦
Always use the battery pack supplied by Audiovox, or an approved
replacement battery pack, to avoid any risk of damage to your
cellular phone.
13
Page 16

Safe Operation of Travel Charger
The Travel Charger and the Desktop Charger that were designed
by Audiovox for this unit both require the use of a standard 120 V
AC power source for their operation.
DANGER
♦
Never attempt to disassemble or repair a travel charger or desktop charger, as exposure to electric shock hazards may result.
Always contact an Audiovox authorized service center, if repair
or replacement is required.
♦
Never alter the AC cord or plug on your travel charger or desktop
charger. If the plug will not fit into the available outlet, have a
proper outlet installed by a qualified electrician. Improper connection can result in the risk of electric shock.
WARNING
♦
Never allow any liquids or water to spill on the travel charger or
desktop charger when it is connected to an AC power source.
There is a risk of fire or electric shock.
♦
Always use the authorized Audiovox travel charger or desktop
charger to avoid any risk of fire or damage to your cellular phone
or battery. Bodily injury or property damage may occur as a result
of the use of an unauthorized and incompatible travel charger or
desktop charger.
♦
Never use a travel charger or desktop charger if it has a damaged or worn power cord or plug. The use of damaged or worn
power cords or plugs could result in electric shock, burns or fire.
Contact an Audiovox authorized service center immediately to
obtain a suitable replacement.
14
Page 17

Safe Operation of Travel Charger (continued)
WARNING
♦
Always unplug the travel charger or desktop charger from the
power source before attempting any cleaning in order to avoid
the risk of electric shock. Always use a soft cloth dampened with
water to clean the equipment, after it has been unplugged.
♦
Never attempt to use an unauthorized travel charger or desktop
charger with your phone in order to avoid any risk of bodily injury
or property damage. Since unauthorized accessories have different specifications, they may be incompatible with your phone.
♦
Handling the cord on this product or cords associated with accessories sold with this product, will expose you to lead, a chemical known to the State of California to cause birth defects or other
reproductive harm.
Wash hands after handling.
CAUTION
♦
Always confirm where the power cord for any accessory is located so that it will not be stepped on, tripped over, or otherwise
subjected to damage or stress.
♦
Never place heavy objects on a power cord, as this could result in
damage to the cord.
♦
Never bend or twist a power cord, and never pull on a power cord
in an attempt to remove a travel charger or accessory plug from a
socket. Always grasp the travel charger or the accessory plug
directly when unplugging the device in order to avoid damaging
the cord.
♦
Always disconnect the travel charger or desktop charger from the
power source when it is not in use.
15
Page 18

Memo
Memo
16
Page 19

1
1
BEFORE USING YOUR
BEFORE USING YOUR
PHONE
PHONE
Before using your phone, be sure to read and fully understand this
manual. This chapter addresses the phone’s keys and display icons
and also covers charging and proper battery usage.
♦
Package Contents
♦
Front View
♦
Using the Battery
♦
Charging the Battery
♦
Getting Started
♦
Using Phone’s Menu
Chapter 1
17
Page 20
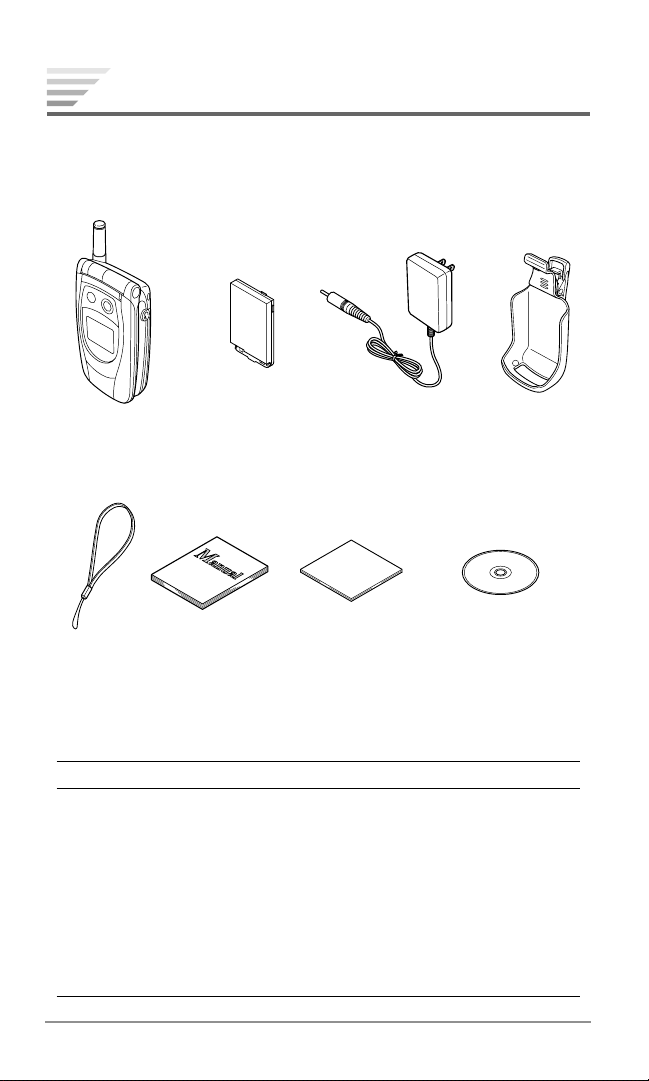
Package Contents
Thank you for purchasing the CDM-9900 wireless handset. The
phone’s giftbox contains all of the items listed below. If any items
are missing, contact the dealer where you purchased the phone.
1 Handheld
Portable
Telephone
5 Wrist
Strap
2 Standard
6 Owner’s
Manual
CDM-9900 Package
No.
1
Handheld Portable Telephone
2
Standard Lithium Ion Battery Pack
3
Travel Charger
4
Belt Clip
5
Wrist Strap
6
Owner’s Manual
7
Quick Reference Guide
8
Welcome Kit CD
3Travel
Lithium Ion
Battery Pack
7 Quick
Reference
Guide
(Getting to know your new phone & Service)
Charger
reference
8 Welcome Kit CD
(Getting to know your
new phone & Service)
Item
4 Belt Clip
18
Chapter 1
Page 21
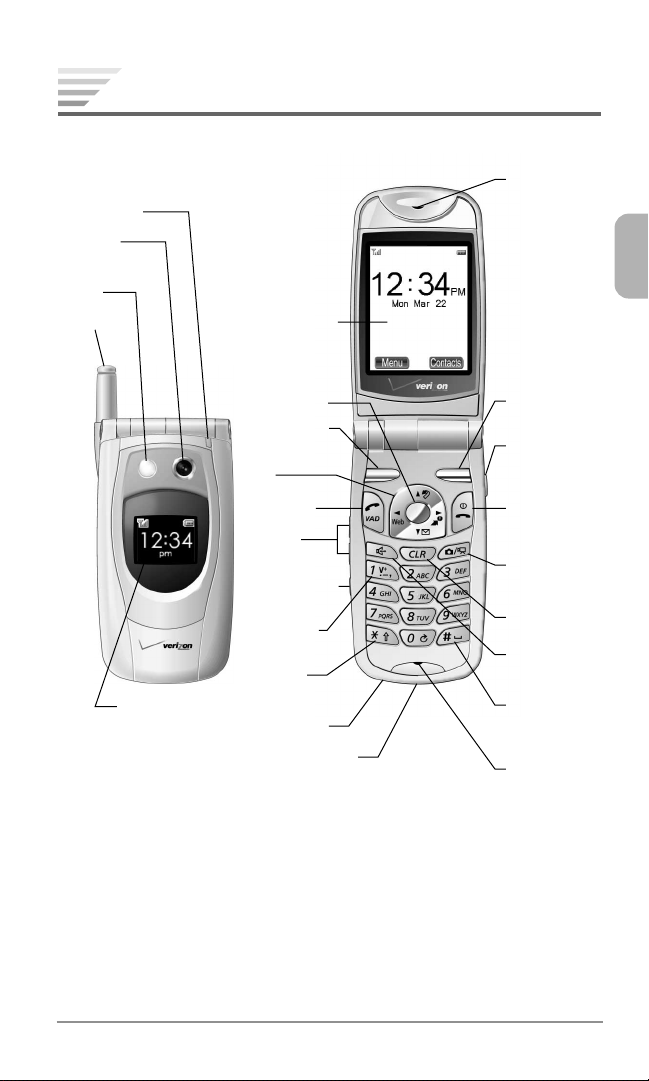
Front View
LED
(green/red)
Camera
Lens
Flash
Antenna
Sub
Display
Main Display
Center Key
Left Softkey
Navigation
Key
Send Key
Volume
Keys
Side Camera
Key
Voice Mail
Key
Star Key
(Vibration)
Power Jack
Data Connector
Earpiece
Right
Softkey
Earphonemicrophone
Jack
End Key
(Power)
Camera/
Video Key
Clear Key
Speakerphone Key
Pound Key
(Side Key
Lock)
Microphone
♦
Sub Display: Displays the date and time, phone’s status, notifi-
cation of a scheduled event, missed call and incoming message.
♦
LED (green/red): Blinks green for incoming calls; blinks red for
notifications (incoming messages and voice mail); lights red while
the battery is charging.
♦
Flash: Improves picture or video quality in low-light conditions.
Chapter 1
19
Page 22
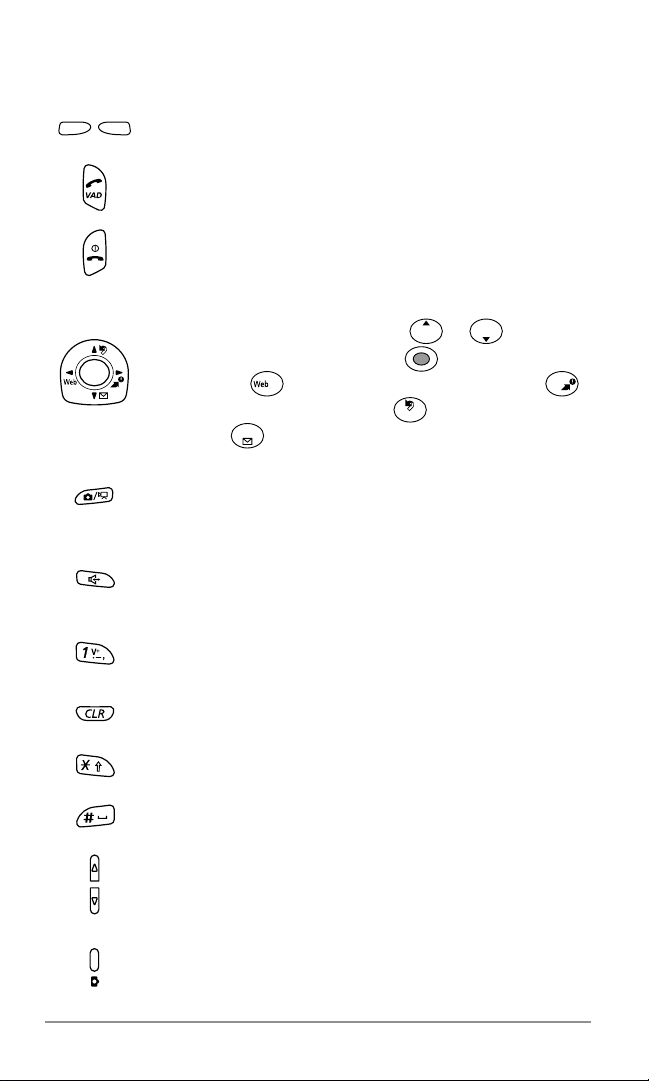
Key Functions
Soft Keys: Press to perform the function indicated at
the bottom of the display.
Send Key: Press to make or answer a call. Press and
hold to use Voice Activated Dialing.
End Key: Press to end a call or exit from the menu.
Press and hold to turn the phone on or off.
Navigation Key:
menu. To scroll menu items press or . To select
a menu item press the center key
mode, press for Mobile Web (page 88); press
for Get It Now (page 86); press for My Menu (page
28); press for the Messaging menu (page 60).
Camera/Video Key: Press to activate the camera mode
(page 76); press and hold to activate the video mode
(page 78).
Speakerphone Key: Press to activate speakerphone
mode during a call (page 32); press to access Voice
Notes from the standby mode (page 124).
Voice Mail Key: Press and hold to access the voice
mailbox (page 61).
Clear Key: Press to clear digits and letters or return to
the previous screen.
Star Key: Press and hold to activate the vibration alert
mode (page 99).
Pound Key:
Volume Keys: Press to adjust the earpiece or speak-
erphone volume during a call; press to adjust the ringer
volume in the standby mode.
Allows you to navigate through the
. From the standby
Press and hold to lock or unlock the side keys.
20
Side Camera Key: Press and hold to activate the cam-
era mode (page 76).
Chapter 1
Page 23
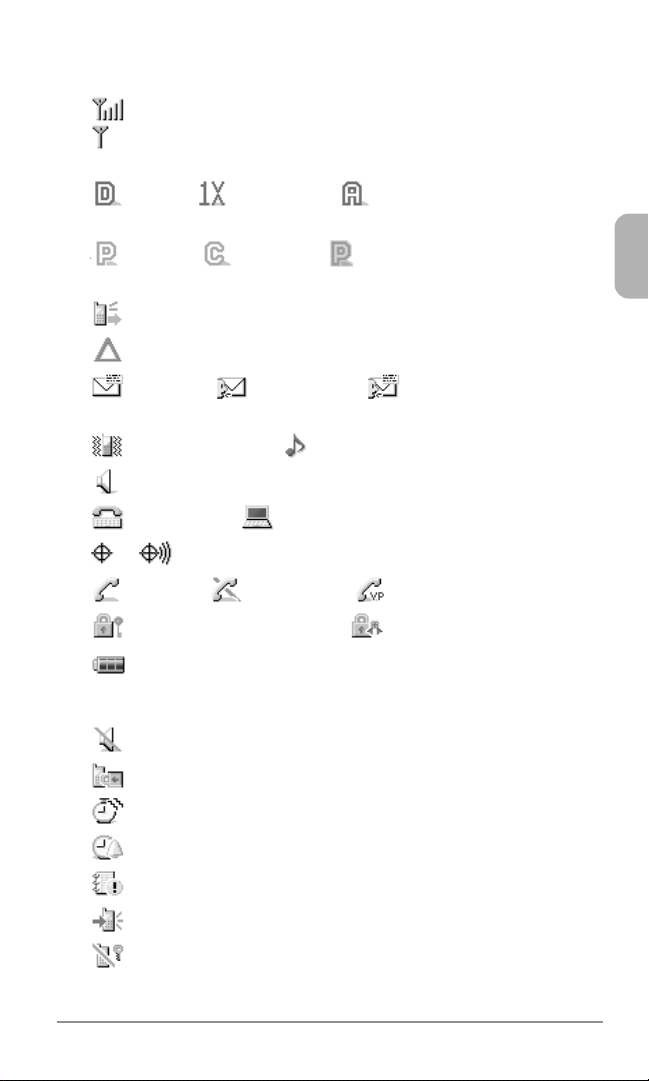
Icons on Main Display
♦
Signal Strength indicates the signal your phone is receiving.
appears when you are out of the service area or the phone is
searching for the signal.
♦
Digital, Digital 1x or Analog indicates the mode
your phone is operating in.
♦
Packet, Circuit or Dormant
service status of your phone (page 113).
♦
Voice Guidance is active (page 119).
♦
Roaming indicates your phone is out of the home area.
♦
Message, Voice Mail or Message & Voice Mail
indicates you have new messages (page 60).
♦
Vibration Alert or Ringer Tone is active.
♦
Speakerphone is active (page 32).
♦
TTY Mode or Data Mode is active (page 115 or 114).
♦
or indicates GPS Location mode (page 118).
♦
In Use or No Service. ( Voice Privacy)
♦
Web Security is normal or high for the Web page.
indicates the
data
♦
Battery indicates the current battery charge level.
Additional Icons
♦
Ringer Volume is silent (page 98).
♦
Phone Lock is active (page 108).
♦
Countdown Timer is active (page 132).
♦
Alarm Clock is active (page 131).
♦
Scheduler Event Alarm is scheduled for today (page 128).
♦
Automatic Answering is active (page 107).
♦
Side Key Lock is active (page 109).
Chapter 1
21
Page 24
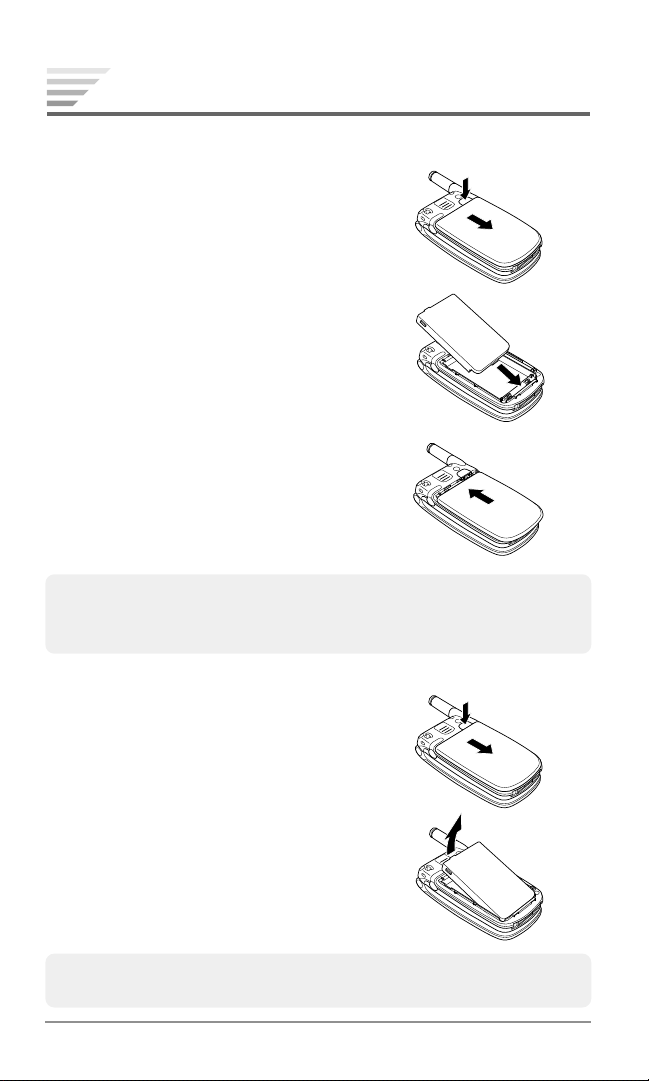
Using the Battery
Installing the Battery Pack
1.
Press and hold the latch on the phone
and slide the battery cover to remove it.
2. Insert the bottom of the battery pack
into the phone and place it down.
3. Place the battery cover on the phone
and slide it until the latch snaps into
place.
Note: Make sure the cover is securely attached to the phone. The bat-
tery pack may separate from the phone if the cover is not properly attached.
Removing the Battery Pack
1. Make sure the power is off. Press and
hold the latch on the phone and slide
the battery cover to remove it.
2. To remove the battery pack, lift up
using the tab at the top of the battery.
Tip: When using the optional accessory BTE-9900 Extended Lithium
Ion Battery Pack, use the supplied battery cover.
22
Chapter 1
Page 25
Charging the Battery
Charge the battery before using the phone.
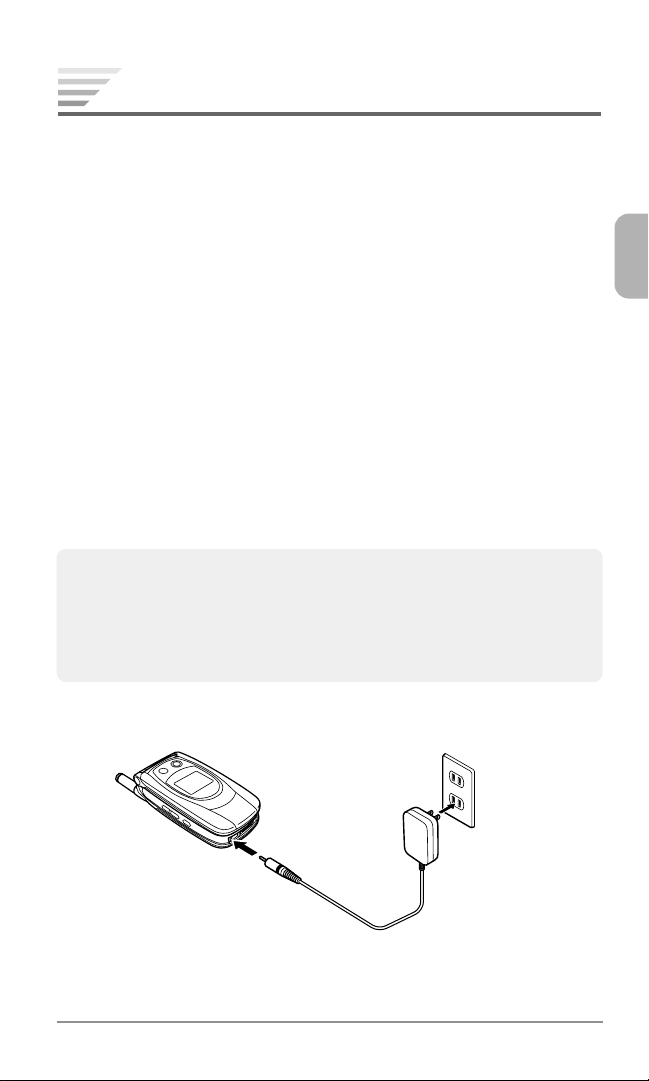
Charging the Phone’s Battery
1. Turn the phone off.
2. Insert the round connector of the TRC-4 Travel Charger into the
Power Jack (round port) on the bottom of the phone.
3. Plug the travel charger into an AC120V outlet.
4. The LED on the phone will light red and “Charging” will appear
on the sub display.
5. When charging is complete, the LED will turn off and “Charged”
will appear on the sub display.
6. Disconnect the travel charger from the outlet.
7. Gently pull the travel charger’s connector from the phone.
Note:1. For complete charging, it is recommended that the phone be kept
off during charging.
2. It is normal for the battery to become warmer during charging.
3. Do not feed power to the phone without the battery pack attached.
CDM-9900
AC120V
Travel Charger
TRC-4
Chapter 1
23
Page 26
Charging Time
Battery Type
Standard Battery Pack (BTR-9900)
Extended Battery Pack (BTE-9900)
The charging time, from empty to full, depends on the environmental temperature, 0 to +35˚C.
Charging Time
Approx. 2.5 hrs.
Approx. 3.5 hrs.
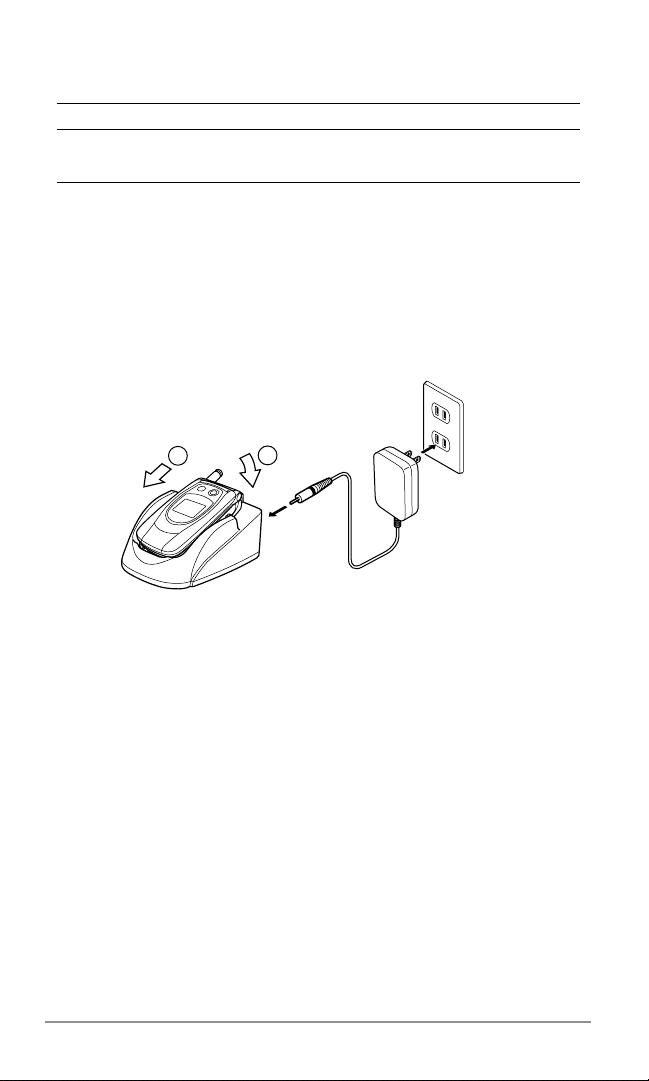
Charging with the Desktop Charger
The DTC-9900 Desktop Charger (sold separately) allows you to
charge the phone’s battery as illustrated below.
CDM-9900
1
Desktop Charger DTC-9900 (Option)
2
AC120V
Battery Information
♦
Temperature extremes affect the Battery Pack’s ability to charge;
always allow it to completely cool down or warm up first.
♦
Subjecting the Battery Pack to extremely high or low temperatures reduces its capacity and its life expectancy. If possible,
always try to keep the Battery Pack between 59˚F and 77˚F (15˚C
and 25˚C).
♦
After repeatedly using the rechargeable battery, the talk and
standby times may become shortened when the battery is fully
charged. When this occurs, replace it with a manufactured-approved battery pack.
24
Chapter 1
Page 27

Getting Started
Turning the Phone On/Off
To turn the phone on, press and hold .
To turn the phone off, press and hold .
Antenna Position
For optimum performance and signal strength, or while operating in
poor signal areas, fully extend the antenna.
Multiple Languages
Your phone can display menus, prompts and text in multiple languages (English, Spanish, French and Portuguese). It also supports entering text in the same languages. To change the language,
see “Language (Menu 771)” on page 118.
Security Code
Your phone is equipped with the Security Code to access various security features. The security code is four digits long and has been preset to the last four digits of your phone number. To change the security
code, see “Changing Security Code (Menu 745)” on page 110.
Chapter 1
25
Page 28
Using Phone’s Menu
tions
Menu
Phonebook
Messa
in
Messa
in
Mobi
eWeb
Mobi
eWeb
Get
Now
Get
Now
Set
Set
Tool
Tool
Phonebook
Phonebook
Phone
Phone
RecentCa
RecentCa
Select
tions
Menu
Phonebook
Phonebook
Recent
Rece
Mess
Messa
et I
t Now
Get I
t Now
W
W
et
oo
oo
Your phone allows you to access the phone’s various menus from
one main menu.
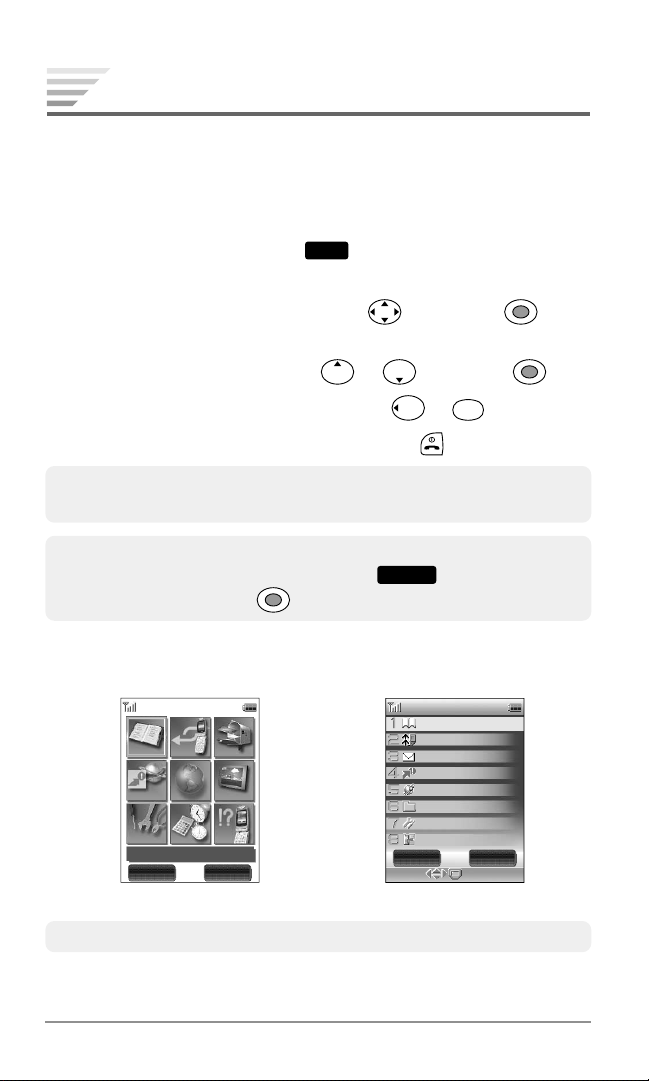
Accessing Phone’s Menu
1. Press the left softkey under
main menu appears in thumbnail view or list view.
Menu
from the standby mode. The
2. Select the desired menu item with
then press . The
second level menu appears in the list view.
3. Select the desired option with
♦
To return to the previous screen, press or
♦
To exit any part of the menu screen, press .
Tip: You may select a numbered menu item by pressing the correspond-
ing digit key.
Note: To switch the main menu between the thumbnail view and list
view, press the right softkey under
or List then press .
Main Menu in
Thumbnail View
g
g
g
Phonebook
Phonebook
Get
It Now
Get
It Now
Set
tingsSet
tings
Phonebook
MyMenu
RecentCa
Mobi
Mobi
Tool
llsRecentCa
lls
leWeb
leWeb
sTool
s
Options
Messa
in
Messa
in
MediaGaller
MediaGaller
Phone
InfoPhone
Info
g
y
y
or then press .
CLR
.
Options
, select Thumbnail
Main Menu in
List View
Phonebook
Phonebook
a
a
t C
o
o
e
e
et
etett
oo
b
b
i
i
d
d
i
i
t
l
l
n
ging
ging
a
t Now
t Now
e
e
W
W
l
l
a
a
G
G
g
g
s
s
in
in
sToo
s
s
C
sRece
ll
ll
e
e
b
b
y
y
alle
alle
r
r
Options
Select
Recent
Messa
Mess
Get I
Get I
M
M
M
M
S
S
T
MyMenu
Tip: To customize the menu style, see “Main Menu Settings” on page 121.
26
Chapter 1
Page 29

Menu Tree
1. Phonebook
1. Contacts
2. Add New Entry
3. Speed Dial #’s
4. Voice Dial
5. Group List
2. Recent Calls
1. All Calls
2. Received
3. Dialed
4. Missed
5. Call Timers
3. Messaging
1. Voice Mail
2. New Text Msg
3. New Pix. Msg
4. New Video Msg
5. New Template Msg
6. Inbox
7. Outbox
8. Saved
9. Msg. Settings
1. Common
2. Pix./Video Message
3. Text Message
4. Voice Mail Number
0. Erase All
1. Inbox Msg.
2. Outbox Msg.
3. Saved Folder Msg.
4. All Msg.
4. Get It Now
5. Mobile Web
6. Media Gallery
My Folder
Photo Gallery
Video Gallery
Images
Tones
7. Settings
1. Sounds
1. Volume
2. Ringer Type
3. Key Tone Length
4. Vibration Alert
5. Alerts
6. DTMF Send
2. Display
1. Backlight
2. Auto Hyphen
3. Contrast (Sub)
4. Time & Date
5. Wallpaper
6. Idle Screen
7. Direction (Sub)
3. Answer Options
1. Auto Answer
2. Open to Answer
3. Any Key Answer
4. Security
1. Phone Lock
2. Auto Lock
3. Side Key Lock
4. Restriction
5. Code Number
6. Reset
5. Dial Options
1. Quick Dialing
2. Auto Retry
Chapter 1
27
Page 30

Menu Tree (Continued)
Options
6. Network
1. System Mode
2. Data Service
3. Data Mode
4. TTY
5. NAM
6. Web Connection
8. Tools
1. Voice Notes
2. Calculator
3. Scheduler
4. Alarm
5. Countdown Timer
6. Scratch Pad
7. Get It Now Con.
7. Language
8. Location
9. Voice Guidance
1. Voice Guidance
2. Settings
9. Phone Info
1. My Number
2. Help
3. Versions
4. Status Info
Using My Menu
In addition to the main menu, your phone offers you My Menu that
includes a group of shortcuts to the phone’s various tasks.
Accessing through My Menu
1. From the standby mode press or press the left softkey un-
My Menu
der
nail view or list view.
2. Select the desired task then press
from the main menu. My Menu appears in thumb-
to access it.
Note: To switch My Menu between the thumbnail view and list view,
press the right softkey under
then press .
, select Thumbnail or List,
Adding a Shortcut to My Menu
1. To display My Menu from the standby mode, press .
2. Select the empty entry then press the right softkey under
3. Select Assign My Menu then press
icons for the phone’s tasks.
4. Select your desired task then press
Tip: To customize the menu style, see “My Menu Settings” on page 122.
28
Chapter 1
to display a group of
to save the setting.
Options
.
Page 31

2
2
BASIC OPERATION
BASIC OPERATION
This chapter addresses the basic calling functions of your phone
and outlines how to enter letters and symbols in various features.
♦
Making Calls
♦
Answering Calls
♦
During Calls
♦
Recent Calls
♦
Making Emergency Calls
♦
Entering Letters and Symbols
Chapter 2
29
Page 32

Making Calls
Making a Call
1. Enter the phone number.
2. Press
Tip: To clear the last digit, press
. The icon will appear.
VAD
press and hold
CLR
.
CLR
. To clear all the digits entered,
Ending a Call
To end a call, press .
Tip: If no external device (such as an earphone microphone or TTY de-
vice) is connected to the phone, you can end a call by closing the
phone.
Making a Call with Speakerphone
To make a call using the speakerphone mode, enter or recall the
phone number, then press
Note: For optimal performance, do not use this feature in a noisy envi-
ronment.
. The icons and will appear.
Dialing the Last Number
1. To recall the last number from the Recent Calls, press
2. Press
again to dial the number. (For more information, see
VAD
“Recent Calls” on page 34.)
.
VAD
Note: During extended periods of use, the phone may become warm.
This is part of the normal operation of the phone. Discontinue
using if the phone becomes uncomfortable to operate.
30
Chapter 2
Page 33

Answering Calls
When you receive an incoming call the phone rings or vibrates and
the LED blinks green.
Answering a Call
To answer the call, press
icon
will appear.
Tip: To mute the ringer or stop the vibrating, press or any of the side
keys. (You can still answer the call.)
or the left softkey under
VAD
Any Key Answer
If “Any Key Answer Setting” (Menu 733) is on (see page 107), you
can answer the call by pressing any digit key.
Open to Answer
If “Open to Answer Setting” (Menu 732) is on (see page 107), you
can answer the call by simply opening the phone.
Answering a Call with Speakerphone
To answer the call using the speakerphone mode, press . The
icons
and will appear.
Answer
. The
Caller ID with Name
If a caller’s name and number are saved in your phonebook, they
will appear on the display before you answer the call.
Missed Calls
If you have missed incoming calls, the number of missed calls and
the last caller’s phone number appear on the display.
♦
To dial the last missed number, press
♦
To review the missed call history, press .
.
VAD
Chapter 2
31
Page 34

During Calls
Adjusting the Volume
To raise or lower the earpiece or speakerphone volume during a
call, press the volume keys on the side of your phone.
Muting the Microphone
1. To mute the microphone during a call, press the right softkey
Mute
under
2. To return to normal mode, press the right softkey under
Speakerphone Mode
1. To activate the speakerphone during a call, press . The icon
will appear.
2. To deactivate, press again.
Using Scratch Pad
You can enter a phone number during a call and save it to the Scratch
Pad memory, so you may dial the number after the call. The Scratch
Pad saves the last three numbers.
To save the phone number to the Scratch Pad:
. “Phone is Muted!” displays.
Unmute
.
1. Enter a phone number during a call.
2. Press the right softkey under
3. Select Scratch Pad then press to save.
To dial the number from the Scratch Pad:
1. Press the left softkey under
2. Select the number you want to dial then press
32
Chapter 2
Options
.
Menu
then press 8 6.
.
VAD
Page 35

Call Waiting
VAD
Options
If you have Call Waiting service, you may hear a beep tone when
you are on a call alerting you of an incoming call. “New Caller” is
displayed along with the new caller’s name and number.
1. To answer the new call, press
2. To switch between the two calls, press
.
VAD
again.
VAD
Three-Way Calling
Three-Way Calling allows you to call a third party when a call is
already in progress. This service is system dependent.
1. To call the third party, enter a number and press
2. To connect all three parties, press
again.
VAD
.
Sending Tones
There are three ways to send tone signals to the party during a call.
Sending Tones from Keypad
When “DTMF Send (Menu 716)” (page 100) is on, tone signals are
sent to the party as you press digit keys during a call.
Sending Tones from Display
To send tone signals from the display during a call when “DTMF
Send (Menu 716)” (page 100) is off:
1. Enter the number during a call.
2. Press the right softkey under
press
.
, select Send Tone then
Sending Tones from Memory
To send tone signals from the phonebook memory during a call:
1. Press the left softkey under
book then press
2. Select the number you want to send in tone signals then press the
right softkey under
Menu
during a call, select Phone-
to find a number.
Options
. Select Send Tone then press .
Chapter 2
33
Page 36

Recent Calls
VAD
The Recent Calls feature automatically saves the entire call history
(including received, dialed and missed calls) so you may easily recall and dial a number.
Recent Calls Menu
1. All Calls: Last 90 numbers including received, dialed and missed.
2. Received: Last received numbers out of the All Calls entries.
3. Dialed: Last dialed numbers out of the All Calls entries.
4. Missed: Last missed numbers out of the All Calls entries.
5. Call Timers: Displays Last Call, Home Calls, Roam Calls, and
more.
Viewing Recent Calls
1. From the standby mode, press the left softkey under
2. To display the Recent Calls menu, select Recent Calls then press
.
3. Select All Calls, Received, Dialed or Missed then press .
4. Scroll through the call list to view the recent call entries.
Menu
.
5. To view an individual entry, select the entry then press .
6. To dial the number from the list or the individual entry, press
Shortcut: To display the All Calls list from the standby mode, press
Note: In the All Calls list, icons are displayed next to the numbers:
received, dialed, and missed .
Tip: To switch a call list to another one, press the left softkey under
Mode
, select an option (All Calls, Received, Dialed or Missed)
then press .
34
Chapter 2
.
VAD
.
Page 37

Recent Call Options
From the recent call list or the individual entry, the following options
are available by pressing the right softkey under
♦
Call: Dial the number.
♦
Send Message: Go to the messaging feature to send a message.
♦
Save: Save the number to your phonebook.
♦
Delete: Delete the number.
♦
Prepend Dial: Dial the number by adding digits.
Options
.
Saving Numbers into Your Phonebook
1. From the standby mode, press
2. Select the entry you want to save to your phonebook, then press
the right softkey under
Options
3. Select Save then press to switch to a phonebook entry.
See “Saving a Phone Number” on page 44.
VAD
. The All Calls list appears.
.
Viewing Call Timers
1. From the standby mode, press the left softkey under
2. Select Recent Calls then press .
Menu
.
3. To display the call timers, select Call Timers then press .
♦
Last Call: Talk time of the last call.
♦
Home Calls: Cumulative talk time of incoming and outgoing calls
within your home area.
♦
Roam Calls: Cumulative talk time of incoming and outgoing calls
while you are roaming.
♦
All Calls: Cumulative talk time of all incoming and outgoing calls.
♦
Kilobyte Counter: Packet data calls transmitted (Tx), received
(Rx) and both (Total).
♦
Lifetime: Cumulative talk time of all incoming and outgoing calls.
This timer cannot be reset to zero.
Chapter 2
35
Page 38

Making Emergency Calls
Calling Emergency Numbers
You can make calls to “911”, “ 911” or “ 911”, even if your phone is
locked or your call is restricted.
Example:
1. Enter
2. Press
9
1 1.
.
VAD
Locating Position in Emergency Calls (GPS)
Your phone supports the system to locate your position when you
make an emergency call to “911”, “
mode. This feature is system dependent. The emergency call is momentarily interrupted, while the phone receives the GPS (Global
Positioning System) signals.
Important: See “Emergency Calls and GPS” on page 144.
911” or “ 911” in the digital
Emergency Call Mode
When the emergency number “911”, “ 911” or “ 911” is dialed, the
phone enters Emergency Call Mode and will attempt to complete
the emergency call using any available cellular system it can find.
After the call is ended, the phone will stay in the Emergency Call
Mode, and attempt to continue to receive service from the cellular
system used to complete the call. “Emergency Call Mode, Press
[End] to exit.” will display and the phone will automatically exit the
Emergency Call Mode after five minutes or after you press
.
36
Chapter 2
Page 39

Entering Letters and Symbols
4
GHI
Text entry is automatically activated for functions where you can
enter letters; such as names or messages.
Text Entry Mode
There are several text entry modes available (T9, Abc, Numeric,
Symbol, and more) depending on the feature in use. The current
mode is displayed at the lower left corner of the screen as
(T9 mode), (Abc mode), or (Numeric mode).
To Change the Entry Mode:
1. Press the left softkey under
2. Select a new entry mode (T9, abc, Number or Symbols) then
press
Shortcut: 1. To change the mode (Abc > T9 > Numeric > Abc), press and
.
hold .
2. To change the mode between T9 and Abc, press and hold
the left softkey under
3. To change to the Numeric mode, press and hold .
Mode
Mode
.
.
T9 Mode
The T9 mode allows you to enter text quickly by pressing one key
per letter. This function suggests words as you type.
Example in English:
MNO
1. Type
2. Press 0 to display the next choice go.
3. Press to select the word “go” and add a space.
6
. Your phone displays in.
Chapter 2
37
Page 40

T9 Mode Basics
5
JKL
♦
The Shift key
changes the letter case: (normal),
(initial cap.) and (caps. lock).
♦
The Next key 0 displays the next choice.
♦
The Space key selects a word and adds a space.
♦
To select a word, press .
♦
To insert punctuation, press 1.
♦
To delete a character, press
♦
To delete all characters, press and hold
CLR
.
CLR
when the cursor is
at the beginning or end of the text.
♦
To move the cursor, press
♦
To enter digits, press and hold keys 0 to 9.
Note: For more information, visit http://www.T9.com.
.
Abc Mode
The Abc mode allows you to enter characters by repeatedly pressing the digit key. For example, to enter “J” press
JKL
enter “L” press
5
three times.
Abc Mode Basics
♦
The Shift key
changes the letter case: (normal),
(initial cap.) and (caps. lock).
once, and to
♦
The Space key adds a space.
♦
To select a character, press .
♦
To delete a character, press
♦
To delete all characters, press and hold
CLR
.
CLR
when the cursor is
at the beginning or end of the text.
♦
To move the cursor, press
♦
To enter digits, press and hold keys 0 to 9.
38
Chapter 2
.
Page 41

Assigned Alpha Characters in Abc Mode
English
1
.@? ! - , & : ' / 1
ABC
2
ABC2
DEF
3
DEF 3
GHI
4
GH I 4
JKL
5
JKL5
MNO
6
MNO6
PQRS
7
PQRS 7
TUV
8
TUV8
WXYZ
9
WX Y Z 9
0
0
French
1
.@? ! - , & : ' / 1
ABC
2
A ÄÀÁÂBCÇ 2
DEF
3
DEËÈÉÊF3
GHI
4
GH I ÏÍÎ4
JKL
5
JKL5
MNO
6
MNÑ O ÖÓÔ 6
PQRS
7
PQRS 7
TUV
8
TUÜÙÚÛV8
WXYZ
9
WX Y Z 9
0
0
Spanish
1
.@? ! - , & : ' / 1
ABC
2
A Á BC2
DEF
3
DEÉ F3
GHI
4
GH I Í 4
JKL
5
JKL5
MNO
6
MNÑ O Ó 6
PQRS
7
PQRS7
TUV
8
TUÜÚV8
WXYZ
9
WX Y Z 9
0
0
Portuguese
1
.@? ! - , & : ' / 1
ABC
2
A ÀÁÂÃBCÇ 2
DEF
3
DEÉÊF3
GHI
4
GH I Í 4
JKL
5
JKL5
MNO
6
MNÑ O ÓÔÕ 6
PQRS
7
PQRS7
TUV
8
TUÜÚV8
WXYZ
9
WX Y Z 9
0
0
Chapter 2
39
Page 42

Numeric Mode (123)
Press 0 to 9 to enter digits; to delete a digit, press
To return to the previous mode (T9 or Abc), press and hold the left
softkey under
Mode
.
CLR
.
Symbol Mode
1. To select one of the symbols, move the cursor with then
press
2. The symbol is inserted into the text. The screen will automatically return to the previous mode.
.
40
Chapter 2
Page 43

3
3
PHONEBOOK MENU
PHONEBOOK MENU
This chapter addresses saving a phone number to the phonebook
and how to use Speed Dialing and Voice Activated Dialing.
♦
Phonebook Outline
♦
Saving Phonebook Entries
♦
Finding Phonebook Entries
♦
Editing Phonebook Entries
♦
Using Speed Dialing
♦
Voice Activated Dialing (VAD)
♦
Group List for Messaging
Chapter 3
41
Page 44

Phonebook Outline
View
tions
Edit
ovox.coco
htt
The Enhanced Phonebook can save 300 entries, each with up to
five telephone numbers, three e-mail addresses and a Web address (URL).
bers, and voice dialing for up to 100 numbers. A picture and ringer
type can be assigned to a phonebook entry so the phone alerts you
with the picture and ringer from the specific caller.
Phonebook Menu
1. Contacts: Displays your phonebook entries. See page 45.
2. Add New Entry: Creates a new entry. See page 43.
3. Speed Dial #’s: Displays your speed dial list. See page 52.
4. Voice Dial: Displays your voice dial list. See page 54.
5. Group List: Displays your group list. See page 57.
Phonebook Entry
A phonebook entry includes the following items.
The phonebook supports speed dialing for up to 98 num-
: Name
: Picture assigned (see page 50).
: Phone numbers
: E-mail addresses
: Web address (URL)
Info Icons:
: Ringer type selected (see page 49).
: Voice dial tag registered (see page 54).
02-99 : Speed dial location assigned (see page 52).
42
Chapter 3
Example:
JiJill
657–456–7890
j
ill@l@auaudidiovox.
p
://w/www.auaudidio
htt
Edit
Options
View
...
02
m
Page 45

Saving Phonebook Entries
Select
tions
Save
Adding a New Phonebook Entry
To save phone numbers, e-mail addresses, and a Web address
(URL) with a name into your phonebook:
1. From the standby mode, press the left
softkey under
Menu
.
2. Select Phonebook then press .
3. Select Add New Entry then press .
Add New Entr
<Name>
<
Picture
<Number>
<E–mail>
<URL>
The Add New Entry screen is displayed.
4. Select the item you want to enter then press
Save
.
♦
<Name>: Enter a name for the entry (up to 36 characters),
then press
. See “Entering Letters and Symbols” on page 37
for details.
♦
<Picture>: Assign a picture for caller ID. See “Assigning Pic-
tures for Caller ID” on page 50 for details.
♦
<Number>: Enter a phone number (up to 32 digits) then press
. Select the icon to match the type of number then press .
You may enter up to five phone numbers.
♦
<E-mail>: Enter an e-mail address (up to 48 characters), then
press
♦
. You may enter up to three e-mail addresses.
<URL>: Enter a URL (up to 48 characters), then press .
5. To enter additional options, press the right softkey under
See “Phonebook Edit Options” on page 48.
6. To save the new entry, press the left softkey under
Save
y
>
Options
Select
Options
.
.
Chapter 3
43
Page 46

Saving a Phone Number
To save a phone number from the standby mode into your
phonebook:
1. From the standby mode, enter a phone number then press
2. Select New Entry then press . Select the icon to match the
type of number then press
.
3. The Add New Entry screen is displayed with the number you entered. You can enter the name and other information at this point.
4. To save the new entry, press the left softkey under
Save
.
Digits Options
To insert a pause or hyphen when you enter a phone number:
1. Enter digits from the standby mode or a phonebook entry.
2. Press the right softkey under
3. Select from the options listed below then press .
4. Enter additional digits.
♦
Hard Pause: Inserts a hard pause marked with “P”.
♦
2 Sec. Pause: Inserts a two-second pause marked with “T”.
♦
Manual Hyphen: Inserts a manual hyphen. (This will deactivate
the auto hyphen function for that number.)
Note: You may use phone numbers with pauses for automated sys-
tems such as voice mail. To dial, see “Dialing Numbers with
Pauses” on page 47.
Options
.
.
Tip: You can save numbers with pauses up to 80 digits per phone num-
ber.
44
Chapter 3
Page 47

Finding Phonebook Entries
Select
Contacts
Audiovox
Jack
Nam
Jill
Katie
Pa
tions
Mode
tions
Edit
ovox.coco
Saved phonebook entries are automatically sorted by name and
can be easily accessed from the Contacts screen.
Finding a Phonebook Entry
To find the desired entry from the alphabetically sorted phonebook list:
1. From the standby mode, press the left
softkey under
2. Select Phonebook then press .
3. Select Contacts then press . The Con-
tacts screen appears.
4. To find an entry, scroll pages with
, or enter the first letters of a name.
5. Select the name then press . The
entry’s details screen is displayed.
6. To dial a phone number, select the number then press
Shortcut: To display the Contacts screen from
Menu
.
VAD
.
the standby mode, press the right
softkey under
Contacts
.
or
Example:
Contacts
Contacts
Nam
e
g
Pa
e
01/03
Audiovox
Jack
Jill
Katie
657–456–7777
Mode
Options
Select
Example:
Entry’s details
JiJill
657–456–7890
657–111–1111
657–222–2222
j
ill@l@auaudidiovox.
Edit
Options
View
m
Chapter 3
45
Page 48

Dialing from a Phonebook Entry
VAD
Options
1. From the standby mode, press the right softkey under
2. From the Contacts screen, find the entry you want to dial. (To
dial the first phone number in an entry, select the entry’s name
then press
.)
VAD
3. To display the entry’s details screen, select the name then press
.
Contacts
.
4. Select the number you want to dial then press
Tip: To make a call using the speakerphone, press instead of
.
VAD
Phonebook Entry Options
From the entry’s details screen, the following options are available
by selecting a phone number, e-mail address or Web address (URL)
and pressing the right softkey under
♦
Call to dial the phone number.
♦
Send Message to go to the messaging feature to send a message (only appears in phone numbers and e-mail addresses).
♦
Set Speed Dial to add the phone number to the Speed Dial list
(see “Assigning a Speed Dial Location” on page 52).
♦
Set Voice Dial to add a voice dial tag to the phone number (see
“Registering a Name” on page 54).
♦
Prepend Dial to dial by adding digits to the phone number (see
“Prepending Dialing” on page 47).
♦
Go to URL to go to the Website (only appears in Web address).
.
.
46
Chapter 3
Page 49

Prepending Dialing
VAD
Convenient for adding an area code to a number from the phonebook.
1. From the standby mode, press the right softkey under
Contacts
2. To display the details screen, select the entry then press .
3. Select the phone number then press the right softkey under
Options
.
4. Select Prepend Dial then press .
5. When Prepend Dial screen appears, enter the digits you want to
add, then press
Note: Added digits are only applied for the current call.
VAD
to dial.
Dialing Numbers with Pauses
To dial a phone number with hard pause (P):
1. From the standby mode, press the right softkey under
Contacts
.
.
2. Select the entry then press
3. Select the number then press
to display the details screen.
. The phone number will be
VAD
dialed.
4.
Press
5. Succeeding numbers can be sent sequentially by pressing
again. The additional number will be sent in tone signals.
VAD
.
To dial a phone number with two-second pause (T):
1. From the standby mode, press the right softkey under
Contacts
.
2. Select the entry then press to display the details screen.
3. Select the number then press
. The phone number will be
VAD
dialed. With two-second pause, the additional number will automatically be sent in tone signals.
Note:
To save phone numbers with pauses, see “Digits Options” on page 44.
Chapter 3
47
Page 50

Editing Phonebook Entries
Editing a Phonebook Entry
To add or change a phonebook entry’s items including name, numbers, e-mail addresses and Web address (URL):
CLR
Contacts
.)
1. From the standby mode, press the right softkey under
2. Select the entry then press to display the details screen.
3. Press the left softkey under
Edit
. The Edit screen appears.
4. Select the name, phone number, e-mail address or URL you
want to add or change, then press
.
5. Enter a new name, phone number, e-mail address or URL then
press
. (To delete a digit or character, press
6. To add or change additional options, press the right softkey un-
Options
der
7. Press the left softkey under
Tip: To assign or change a picture to the entry, see “Assigning Pictures
for Caller ID” on page 50.
. See “Phonebook Edit Options” below.
Save
.
Phonebook Edit Options
From the entry’s Edit screen, select an item then press the right
softkey under
Options
to display the following options:
.
♦
Icon: Changes the icon for the phone number.
♦
Ringer: Selects a ringer type for the phone number or e-mail
address.
♦
Speed Dial: Assigns a speed dial location to the phone number.
♦
Replace: Interchanges the order of phone numbers or e-mail
addresses in the entry.
♦
Delete: Deletes the item (name, phone number, e-mail address
or Web address) from the entry.
48
Chapter 3
Page 51

Selecting Ringer Type for Numbers
To distinguish callers from each other, assign a different ringer tone
to a particular phone number:
1. From the standby mode, press the right softkey under
2. Select the entry then press to display the details screen.
3. Press the left softkey under
Edit
.
4. Select the phone number then press the right softkey under
Options
.
5. Select Ringer then press .
6. Select one of the categories listed below then press .
♦
Media Gallery: Includes ringer tones, alarm tones, melodies,
other tones and downloaded melodies.
♦
Voice Notes: Includes voices you have recorded. See “Record-
ing Voice Notes” on page 124.
♦
Common: Cancels the assigned ringer. A phone’s ringer type
will be applied. See “Ringer Type (Menu 712)” on page 98.
Contacts
.
7. Select the ringer type then press
8. Press the left softkey under
Tip: Ringer types may also be assigned to e-mail addresses.
Save
.
.
Chapter 3
49
Page 52

Assigning Pictures for Caller ID
You can assign a picture to a phonebook entry so the picture will
display for incoming calls from the specific caller.
Assigning a Picture to Phonebook Entry
1. From the standby mode, press the right softkey under
2. Select the entry then press to display the details screen.
3. Press the left softkey under
Edit
.
4. Select the icon then press . Thumbnail pictures are displayed from the Media Gallery.
Contacts
.
5. Select the picture then press
to expand the picture.
6. To assign the picture to the phonebook entry, press .
7. Press the left softkey under
Note: If the ringer assigned to a phone number (see page 49) includes
an animation, the animation will be displayed on incoming calls in
place of the picture assigned to the same entry.
Save
.
Canceling the Assigned Picture
1. From the standby mode, press the right softkey under
2. Select the entry then press to display the details screen.
3. Press the left softkey under
Edit
.
4. Select the icon then press the right softkey under
5. Select Remove then press .
6. When the prompt appears, select Yes then press .
7. Press the left softkey under
Save
.
Contacts
Options
.
.
50
Chapter 3
Page 53

Deleting Phone Numbers
To erase an individual phone number, e-mail address or Web address (URL):
1. From the standby mode, press the right softkey under
Contacts
2. Select the entry then press to display the details screen.
3. Press the left softkey under
Edit
.
4. Select the phone number, e-mail address or URL to be erased
then press the right softkey under
Options
.
5. Select Delete then press .
6. When the prompt appears, select Yes then press .
7. Press the left softkey under
Save
.
Deleting Phonebook Entry
To erase a phonebook entry:
1. From the standby mode, press the right softkey under
2. Select the entry to be erased then press the right softkey under
Options
.
3. Select Delete then press .
4. When the prompt appears, select Yes then press .
Contacts
.
.
Chapter 3
51
Page 54

Using Speed Dialing
Your phone allows you to assign speed dial locations (2 to 99) to
individual phone numbers in your phonebook entries. To dial a speed
dial entry simply press its location number on the keypad.
Speed Dialing
1.
Enter the one or two digits of the speed dial location (2 to 9 or 10 to 99).
2. To dial, press
.
VAD
Quick Dialing
You can dial the speed dial entries by pressing one or two keys,
when “Quick Dialing Setting (Menu 751)” is on (see page 112).
♦
One-Touch Dialing: Press and hold a digit key 2 to 9 (for the
speed dial location 2 to 9).
♦
Two-Touch Dialing: Enter the first digit then press and hold the
second digit (for the speed dial location 10 to 99).
Tip: The key 1 is used for voice mail dialing. See “One-Touch Voice
Mail Dialing” on page 61.
Assigning a Speed Dial Location
To assign the speed dial location to a phone number:
1. From the standby mode, press the left softkey under
2. Select Phonebook then press .
3. Select Speed Dial #’s then press .
4. To scroll pages, press or . To find a specific speed dial
location, enter the location (2 to 99).
5. Select <Empty> then press the left softkey under
Contacts screen appears with selectable entries.
Menu
Entry
. The
.
6. Select the entry then press
7. Select the phone number then press the left softkey under
52
Chapter 3
.
Save
.
Page 55

To assign a speed dial location after selecting a phone number:
1. From the standby mode, press the right softkey under
Contacts
2. Select the entry then press .
3. Select the phone number then press the right softkey under
Options
.
4. Select Set Speed Dial then press .
5. To scroll pages, press or . To find a specific speed dial
location, enter the location (2 to 99).
.
6. Select <Empty> then press
.
Changing Speed Dial Locations
To change the speed dial location for a number:
1. From the standby mode, press the left softkey under
Menu
2. Select Phonebook then press .
3. Select Speed Dial #’s then press .
4. Select the entry then press the right softkey under
Options
5. Select Move then press .
6. Select <Empty> then press .
Clearing a Speed Dial Entry
To clear a speed dial entry from your speed dial list:
1. From the standby mode, press the left softkey under
2. Select Phonebook then press .
3. Select Speed Dial #’s then press .
4. Select the entry you want to clear then press the right softkey
Options
under
.
5. Select Remove then press .
Menu
.
.
.
6. When the prompt appears, select Yes then press .
Chapter 3
53
Page 56

Voice Activated Dialing (VAD)
Voice Activated Dialing (VAD) allows you to dial a saved phone number by simply saying a name. Up to 100 names can be registered.
Registering a Name
To record a voice dial tag then select the phone number:
1. From the standby mode, press the left softkey under
2. Select Phonebook then press .
3. Select Voice Dial then press .
4. Press the left softkey under
5. After you hear the voice prompt “Name please”, say the name to
be registered into the microphone (up to 3 seconds). The phone
will replay the recording.
6. After you hear the voice prompt “Again”, say the name. Each
time, the phone will play the recording.
7. If the registration is successful, you will hear the prompt “Entry
Completed”.
Entry
.
Menu
.
8. When a menu screen appears, select Contacts then press
9. Select the desired entry then press .
10. Select the phone number then press the left softkey under
11. When the prompt appears, select
To select the phone number then record a voice dial tag:
1. From the standby mode, press the right softkey under
2. Select the desired entry then press .
3. Select the phone number then press the right softkey under
Options
.
4. Select Set Voice Dial then press .
5. Follow steps 5 to 7 above.
54
Chapter 3
Yes then press .
Save
Contacts
.
.
.
Page 57

Tip: You can also assign the voice dial tag to a new phonebook entry by
selecting Add New Entry from step 8 in “Registering a Name” on
page 54.
Note:1. Register names in your normal voice tone and in a quiet environ-
ment.
2. For better recognition, similar sounding names should not be registered.
3. The same person’s voice that was used to record the names must
be used for dialing, otherwise the VAD feature may not work properly.
Replaying Registered Names
1. From the standby mode, press the left softkey under
2. Select Phonebook then press .
3. Select Voice Dial then press to display the Voice Dial list.
4. Select the entry then press the right softkey under
5. Select Play then press to play the registered name.
Menu
Options
Dialing with Your Voice
1. Press and hold
2. After you hear the voice prompt “Name please”, say the name
you want to call into the microphone.
.
VAD
.
.
3. When the phone recognizes your voice, you will hear the prompt
“Calling ....”.
4. The number will automatically be dialed.
Tip: To use voice activated dialing with the speakerphone, press and
hold .
Note: If you hear “Did you say ...?”, answer “Yes” or “No”.
Chapter 3
55
Page 58

Changing Registered Names
1. From the standby mode, press the left softkey under
2. Select Phonebook then press .
3. Select Voice Dial then press to display the Voice Dial list.
4. Select the entry then press the right softkey under
5. Select Edit then press .
6. Register a name. (See “Registering a Name” on page 54.)
Menu
Options
Deleting Registered Names
1. From the standby mode, press the left softkey under
2. Select Phonebook then press .
3. Select Voice Dial then press to display the Voice Dial list.
4. Select the entry you want to delete then press the right softkey
Options
under
.
Menu
.
.
.
5. Select Delete then press
.
6. When the prompt appears, select Yes then press .
Deleting All Registered Names
1. From the standby mode, press the left softkey under
2. Select Phonebook then press .
3. Select Voice Dial then press to display the Voice Dial list.
4. Press the right softkey under
Options
.
5. Select Delete All then press .
6. When the prompt appears, select Yes then press .
56
Chapter 3
Menu
.
Page 59

Group List for Messaging
Your phone provides a Group List that saves up to 10 mobile phone
numbers or e-mail addresses with name. This helps you send a
text/picture/video message to multiple addresses.
Adding an Entry to Group List
1. From the standby mode, press the left softkey under
2. Select Phonebook then press .
3. To display a group list, select Group List then press .
4. Select <Empty> then press the right softkey under
5. Select Edit then press .
6. To add a name, select Enter Name then press . Enter the
name then press
7. To add a phone number or e-mail address, select Enter Address
then press
press
8. Press the left softkey under
9. When the prompt appears, select Yes then press .
.
.
. Enter the phone number or e-mail address then
Save
.
Menu
Options
.
.
Tip: To edit an entry in the group list, select the entry instead of <Empty>
in step 4 above then follow steps 5 to 9.
Note: To apply the group list, see “Selecting Recipients from Your Group
List” on page 63.
Chapter 3
57
Page 60

Copying from Phonebook Entries
1. From the standby mode, press the left softkey under
2. Select Phonebook then press .
3. To display a group list, select Group List then press .
4. Select <Empty> then press the right softkey under
5. Select Get Phonebook then press .
6. From the Contacts screen, select the entry then press .
7. Select the number or e-mail address to copy to the group list,
then press
8. Press the left softkey under
.
Save
.
9. When the prompt appears, select Yes then press .
Note: The group list is saved in a separate memory from your
phonebook. Changes in your phonebook are not reflected on your
group list.
Menu
Options
Deleting a Number from Group List
1. From the standby mode, press the left softkey under
2. Select Phonebook then press .
Menu
.
.
.
3. To display a group list, select Group List then press .
4. Select the entry to be erased then press the right softkey under
Options
.
5. Select Delete then press .
6. When the prompt appears, select Yes then press .
58
Chapter 3
Page 61

4
4
VOICE MAIL AND TEXT
VOICE MAIL AND TEXT
MESSAGES
MESSAGES
This chapter addresses how to check voice mail messages and
sending and receiving text messages using the handset.
♦
Messaging Features
♦
Voice Mail Messages
♦
Sending Text Messages
♦
Checking Your Inbox
♦
Reviewing Your Outbox
♦
Message Settings
Chapter 4
59
Page 62

Messaging Features
Your phone allows you to send and receive enhanced text messages and picture/video messages. Voice mail notification is also
supported. These services are system dependent. Please contact
your service provider for details.
New Message Notification
When you have a new text message, picture/video message or voice
mail message, the phone alerts you in the following ways:
♦
Displaying animation on the screen.
♦
Sound or vibrate in the standby mode. See “Alert” on page 71.
While you are on a call, this alert is disabled.
♦
Displaying a message icon flashing (urgent/high) or steady (normal) at the top of the screen:
voice mail or both.
Messaging Menu
To access the Messaging Menu from standby mode, press .
1. Voice Mail: Displays number of voice mails (page 61).
2. New Text Msg:
3. New Pix. Msg: Takes and sends your pictures (page 80).
4. New Video Msg: Records and sends your videos (page 80).
5. New Template Msg: Sends prepared messages (page 83).
6. Inbox: Saves incoming text/picture/video messages (page 66).
7. Outbox: Saves outgoing text/picture/video messages (page 68).
8. Saved: A folder that saves draft messages or moved messages
from Inbox or Outbox (page 65).
9. Msg. Settings: Customizes the messaging feature (page 70).
0. Erase All: Erases all messages in Inbox, Outbox and Saved
Folder (page 74).
Creates and sends new text messages (page 62).
text/picture/video messages,
Tip: The number next to the Voice Mail, Inbox, Outbox and Saved is the
number of messages each contains. The number in brackets at Inbox
is the number of unread messages.
Chapter 4
60
Page 63

Voice Mail Messages
In order to use voice mail, you must first activate your voice mailbox. Please contact your service provider for more information.
Checking Voice Mail Messages
1. From the standby mode, press . The number of waiting voice
mail messages will be displayed next to Voice Mail.
2. To view the detailed information, press
screen appears.
3. To listen to the voice mail messages, call your voice mailbox.
(See “One-Touch Voice Mail Dialing” below.)
. The Voice Mail
Voice Mail Options
From the Voice Mail screen, the following options are available by
pressing the right softkey under
♦
Delete Message: Deletes the message.
♦
Extract Number: Extracts phone numbers from the message.
♦
Extract E-mail: Extracts e-mail addresses from the message.
♦
Extract URL: Extracts Web addresses (URL) from the message.
Options
:
One-Touch Voice Mail Dialing
To access your voice mailbox:
1. Press and hold 1 from the standby mode. The voice mail number will be dialed.
2. Follow the system prompts.
Tip: To view or edit the voice mailbox number, see page 74.
Chapter 4
61
Page 64

Sending Text Messages
tions
Mode
To
OK
Add
Mode
Edit Messa
You can send enhanced text messages to mobile phones that support the enhanced text messaging services from your service provider. Please ask your service provider for more information.
Sending a New Text Message
1. From the standby mode, press , select New Text Msg then press
.
2. From the To: screen, enter a recipient’s
mobile phone number or e-mail address
then press
. The Recipient List appears. (You may also select recipients from
your phonebook or group list. See “Recipi-
ent Options” on page 63.)
3. To add more recipients, select the next
entry then press the right softkey under
Add/Edit
. Repeat step 2 above.
Mode
To
:
01
OK
00/48
Options
4. Press to proceed.
Edit Messa
5. When the Edit Message screen appears,
enter your text message. (See “Edit Options” on page 64. See “Message Options”
on page 65.)
6. To send the text message, press
Note: This function is available when the icon or is displayed.
(See “Pending and Canceled Messages” on page 63.)
Note: To send your text message with the EMS (Enhanced Text Mes-
saging Services) options, make sure that recipient’s phone sup-
Note: Closing the phone ends the messaging function unless a mes-
62
ports these options. See “Edit Options” on page 64.
sage is being sent or received.
Chapter 4
VAD
.
Mode
OK
g
e
16001/07
Add
Page 65

Recipient Options
Selecting Recipients from Your Phonebook
1. From the To: screen, press the right softkey under
2. Select Phonebook then press . The Contacts screen is dis-
played.
Options
.
3. Select a recipient’s name then press
to check the box next
to the recipient. (If the entry includes more than one mobile phone
number or e-mail address, the list of them appears. Check the
box next to the mobile phone number or e-mail address by pressing
then press the right softkey under OK.)
4. To add more recipients, repeat step 3 above.
5. Press the right softkey under OK. The marked recipients are
copied to the Recipient List.
Selecting Recipients from Your Group List
1. From the To: screen, press the right softkey under
2. To display your group list, select Group List then press .
3. Select a recipient’s name then press the right softkey under
Check
ent. Press
or
Uncheck
to proceed.
to check or clear the box next to the recipi-
4. The marked recipients are copied to the Recipient List.
Tip: To create your group list, see “Group List for Messaging” on page 57.
Options
.
Pending and Canceled Messages
If you attempt to send a message (text, picture or video) when no appropriate digital service is available, the phone will prompt you to send
the message later. Select the left or right softkey under
Yes
or No.
♦
Yes: The message is saved to the outbox with the icon
(pending) and will automatically be sent in the standby mode when the
appropriate digital service is available.
♦
No: The message is saved to the outbox with the icon
celed).
Chapter 4
(can-
63
Page 66

Edit Options
Mode Options
From the Edit Message screen, the following options are available
by pressing the left softkey under
♦
T9: See “Entering Letters and Symbols” on page 37.
♦
abc: See “Entering Letters and Symbols” on page 37.
♦
Number: See “Entering Letters and Symbols” on page 37.
♦
Symbols: See “Entering Letters and Symbols” on page 37.
♦
Text Style: Select from Normal, Bold, Italic, Underlined and
Strikethrough.
♦
Text Color: Change the color of your text.
♦
Background Color: Change the background color.
♦
Set Alignment: Align text Left, Center and Right.
Note: To use the last four options (Text Style, Text Color, Background
Color and Set Alignment), make sure that your recipient’s phone
supports these EMS (Enhanced Text Messaging Services) options.
Add Options
From the Edit Message screen, the following options are available
by pressing the right softkey under
Mode
Add
:
:
♦
Quick Text: Select from the prepared text options.
♦
Signature: Add your signature. See “Signature” on page 70.
♦
Emoticon: Select a smiley icon from options.
♦
Sound: Add sound from the Media Gallery.
♦
Picture: Add a picture icon from the Media Gallery.
♦
Animation: Add an animated icon from the Media Gallery.
Note: To add the last three options (Sound, Picture and Animation),
make sure that your recipient’s phone supports these EMS (En-
hanced Text Messaging Services) options.
Chapter 4
64
Page 67

Message Options
From the Edit Message screen, the following options are available
by pressing
♦
Edit Recipient: Add, delete or change the recipients.
♦
Edit Message: Returns to the Edit Message screen.
♦
Message Priority: Mark your message Normal or Urgent.
♦
Insert Signature: Insert your signature that you set. See “Sig-
nature” on page 70.
♦
Call Back Number: Turn the callback number on or off. See
“Default Call Back Number” on page 73.
♦
Save Message: Saves a draft of your message to the Saved
Folder and ends the messaging function.
♦
Save Address: Saves the address to your phonebook or your
group list.
♦
Save Quick Text: Saves a part of your message as quick text.
.
Saved Folder
The Saved Folder saves up to 100 draft messages or moved messages from the Inbox or Outbox if the memory space is available.
To view the Saved Folder:
1. From the standby mode, press
to display the Saved Folder list.
2. Select a message then press to display the message.
Note: For applying list options, see “Inbox List Options” on page 66 or
“Outbox List Options” on page 69.
Note: For applying message options, see “Inbox Message Options” on
page 67, “Outbox Message Options” on page 69 or “Message
Options” above.
, select Saved then press
Chapter 4
65
Page 68

Checking Your Inbox
023/099
How are
ou?
On m
ho
da
Jack
Katie
Jill
o!
The Inbox saves up to 200 incoming messages including, text and
picture if the memory space is available.
Checking Incoming Messages
Example:
1. From the standby mode, press , select Inbox then press
to display the
Inbox list.
2. Select a message then press
play the message.
3. To scroll the text message, press
. (A sound is played, when you high-
to dis-
or
Inbox
Jill
How are
Katie
HeHello!
Jack
y
On m
ho
Delete
023/099
y
ou?
y
lida
Options
Select
light a sound icon in the text message.)
Tip: To view picture messages, see “Incoming Picture Messages” on
page 84.
Icons:
♦
Text message unread or read
♦
Picture message unread or read
♦
Notification for incoming picture messages
♦
Urgent message or high priority message
♦
Locked message
Inbox Options
Inbox List Options
From the Inbox list, press the right softkey under
the following menu options:
Options
to display
s
66
♦
Lines:
Select a display format (1 Line, 2 Lines or 3 Lines per mes-
sage) for all the message lists including Inbox, Outbox and Saved.
♦
Memory: Displays the inbox memory status.
Chapter 4
Page 69

Inbox Message Options
When a message is displayed, press the right softkey under
to display the following menu options:
♦
Save Sender: Saves the sender’s phone number or e-mail address to your phonebook or your group list.
♦
View Sender: Displays the sender’s information.
♦
Reply: Replies to the message. Select from Text Message, Pix.
Message, Video Message and Template Message.
♦
Reply with Copy: Replies to the message by copying a part of
its text.
♦
Forward: Forwards the message.
♦
Delete Message: Deletes the message.
♦
Lock/Unlock: Locks or unlocks the message. (Locked messages
are marked with
♦
Save Message: Moves the message to the Saved Folder.
♦
Save Quick Text: Saves a part of the message as quick text.
♦
Extract Number: Extracts phone numbers from the message.
♦
Extract E-mail: Extracts e-mail addresses from the message.
♦
Extract URL: Extracts Web addresses (URL) from the message.
♦
View Detail: Displays the detailed message information.
The following options are only for the picture messages:
♦
View Address: Displays the sender’s information.
♦
Reply to All: Replies to the sender and recipients.
♦
Save: Select from further options.
• Message: Moves the message to the Saved Folder.
• Picture: Saves a picture to Media Gallery.
• Sound: Saves a sound to Media Gallery.
• Quick Text: Saves a part of the message as quick text.
♦
Extract: Extracts Number, E-mail or URL from the message.
♦
Information: Displays the header (sender, subject and more).
♦
Back to Message: Returns to the message from the header.
and prevented from automatic deleting.)
Options
Chapter 4
67
Page 70

Reviewing Your Outbox
Select
Outbox
tions
Delete
o! How are
ou?
Ha
ppy
rthda
Yesterda
I went to
Katie
Jack
Jill
The Outbox saves up to 200 outgoing messages including text, picture and video if the memory space is available.
Reviewing Outgoing Messages
Example:
1. From the standby mode, press , select Outbox then press
to display the
Outbox list.
2. Select a message then press
play the message.
3. To scroll the text message, press
. (A sound is played, when you high-
to dis-
or
Outbox
Katie
HeHello! How are
Jack
Ha
Jill
Yesterda
Delete
ppy
001/050
b birthda
y
I went to
Select
Options
light a sound icon in the text message.)
Tip: To view picture or video messages, see “Outgoing Picture/Video
Messages” on page 84.
Icons:
♦
Message sent to the system
♦
Message failed to send
♦
Message delivered to destination
♦
Message canceled
♦
Message pending (This will automatically be sent when the
appropriate digital service is available.)
y
ou?
y
68
♦
Urgent message or high priority message
♦
Locked message
♦
Message to multiple addresses (This icon appears in an
individual message.)
Chapter 4
Page 71

Outbox Options
Outbox List Options
From the Outbox list, press the right softkey under
play the following menu options:
♦
Lines:
Select a display format (1 Line, 2 Lines or 3 Lines per mes-
sage) for all the message lists including Inbox, Outbox and Saved.
♦
Memory: Displays the outbox memory status.
Outbox Message Options
When a message is displayed, press the right softkey under
to display the following menu options:
♦
View Address: Displays the recipients’ addresses.
♦
Resend: Resends the message to the same address.
♦
Send To: Sends the message to a new address.
♦
Delete Message: Deletes the message.
♦
Lock/Unlock: Locks or unlocks the message. (Locked messages
are marked with
♦
Save Message: Moves the message to the Saved Folder.
♦
View Detail: Displays the detailed message information.
and prevented from automatic deleting.)
Options
to dis-
Options
The following options are only for the picture/video messages:
♦
Information: Displays the header (recipient, subject and more).
♦
Back to Message: Returns to the message from the header.
Chapter 4
69
Page 72

Message Settings
The messaging settings allow you to customize the messaging feature including text, picture, video and voice mail.
Common Settings
These are applied to text/picture/video messages. To access these
settings from the standby mode, press
Save Sent Message
Select whether or not to save sent messages.
♦
Auto Save: Saves all messages in the outbox.
♦
Prompt: Prompts you to choose Yes or No for every message.
♦
Do Not Save: Deletes messages.
Entry Mode
Selects the text entry mode abc or T9 that first appears when entering a message.
Font Size
Selects a font size, Medium or Small, for editing and displaying
text in a message.
then 9 1.
Signature
Edits signature that will be inserted at the end of message, and
turns your signature on or off. To insert it into an individual message, see “Insert Signature” on page 65, 82 and 83.
Quick Text
Saves messages that can be recalled when entering text in a message. There are two types of quick text: preset and custom. You can
edit or delete custom quick text by pressing the softkey
Delete
.
Chapter 4
70
Edit
or
Page 73

Alert
Customizes alert types to distinguish types of incoming messages.
When Vibration Alert is activated, the following alert settings will be
disabled.
Message Types:
♦
Voice Mail Message: Voice mail notification message.
♦
E-mail Message: Text message(s) from e-mail address.
♦
Text Message: Text message(s) from cellular phone number.
♦
Page Message: Numeric page message(s).
♦
Pix./Video Message: Picture message(s).
♦
Ack Message: Acknowledgment message(s) from the system.
To set up message alerts:
1. From the standby mode, press
2. Select the message type then press .
3. Select the desired alert from the following options then press
.
♦
Silent: Does not sound or vibrate.
♦
Vibrate Once: Vibrates once.
♦
Vibrate Remind: Vibrates once and repeats a low beep every 2
minutes.
♦
Custom Tone: Selects one of the ringer tone options. See “Ringer
Type” on page 98. To set the tone length and volume, see “To set
the length and volume of the Custom Tone:” on page 72.
♦
Low Beep Once: Sounds a low beep once.
♦
Low Beeps: Repeats a low beep every 2 minutes.
♦
Loud Beep Once: Sounds a loud beep once.
♦
Loud Beeps: Repeats a loud beep every 2 minutes.
then 9 1 6.
Chapter 4
71
Page 74

To set the length and volume of the Custom Tone:
1. From the standby mode, press then 9 1 6.
2. Select Alert Settings then press .
3. Select Tone Length or Tone Volume then press .
4. Select an option for Tone Length (1 through 30 seconds) or Tone
Volume (level 1 through 5) then press
Tip: These also apply to the phonebook-specified ringer tones.
Note: If the sender’s mobile phone number or e-mail address is saved in
your phonebook with a particular ringer type, the phone will sound
the phonebook-specified ringer tone in place of the text message
or e-mail message alert (if set to the Custom Tone, Low Beep
Once, Low Beeps, Loud Beep Once or Loud Beeps).
.
Auto Delete
To activate or deactivate the auto delete function of the inbox and
outbox:
1. From the standby mode, press
then 9 1 7.
2. Select Inbox or Outbox then press .
3. Select On or Off then press .
♦
On: When the inbox or outbox is full, it deletes the unlocked
oldest message (except for the pending message) to save a new
message.
♦
Off: When the inbox or outbox is almost full, a warning message
is displayed when you access the inbox or outbox.
Chapter 4
72
Page 75

Pix./Video Message Settings
To access these settings from the standby mode, press then
9
2.
Retrieve Mode
Select a retrieve mode for incoming picture messages:
♦
Prompt: Prompts you to retrieve an incoming picture message.
♦
Automatic: Automatically retrieves an incoming picture message.
Slide Time
Select the default slide time (the time to play per slide on picture
messages) up to 60 seconds.
Text Message Settings
To access these settings from the standby mode, press then
9
3.
Default Call Back Number
Turns the callback number that will be added to all outgoing text
messages on or off. Your phone number has been preset as the
callback number. To change the number, press the right softkey
Edit
under
Back Number” on page 65.
. To turn it on or off for an individual message, see “Call
Direct View
Controls the function that automatically displays new message content upon receipt.
Chapter 4
73
Page 76

Voice Mail Number Setting
To change your voice mail number:
1. From the standby mode, press then 9 4. The Edit Voice
Mail Number screen appears.
2. Enter a new voice mail number then press
Tip: For more convenient access to your voice mail you may include
additional numbers (such as a password) by adding a hard pause
(P) or a two-second pause (T). See “Digits Options” on page 44.
.
Erase All
To erase all the messages from your Inbox, Outbox and Saved
Folder:
1. From the standby mode, press
screen appears.
2. Select the folder you want to clear (Inbox Msg., Outbox Msg.,
Saved Folder Msg. or All Msg.) then press
3. If Inbox Msg. is selected, select from further options (All Msg.,
Unread Msg. and Read Msg.) then press
4. When the prompt appears, select Yes then press .
then 0. The Erase All
.
.
74
Chapter 4
Page 77

5
5
PICTURE/VIDEO
PICTURE/VIDEO
FUNCTIONS
FUNCTIONS
This chapter addresses how to take pictures and videos with your
built-in camera and camcorder and how to send them through your
phone to your family and friends.
♦
Taking Pictures
♦
Recording Videos
♦
Sending Pictures and Videos
♦
Inbox and Outbox
Chapter 5
75
Page 78

Taking Pictures
Take Pix.
tions
Mem
Mem
Taking a Picture with Your Camera
1. To activate the camera mode from the standby mode, press
or press and hold the side camera key. The LED blinks red. You
may choose options below and on page 77.
♦
To select a zoom option (1x or 2x for the Medium resolution, 1x,
2x, or 4x for the Small resolution), press
volume keys on the side of your phone).
♦
To adjust the brightness, press
or .
2. Point the camera lens at your subject and view it through the
phone’s main display. (When the phone is closed, you may view
the picture subject through the sub display.)
3. Press
or the side camera key to take the picture. Your pic-
ture will automatically be saved to the Photo Gallery.
4. After saving, your picture is displayed on your screen.
♦
To send the picture, press
♦
To take another picture, press the left softkey under
(see page 80).
or the side camera key.
♦
To delete the picture, press the right softkey under
or (or the
Save
or
Delete
.
Resolution icon
Camera mode icon
Fine/Normal icon
Flash icon
Self-timer icon
Finder Scope mark
Tip: To access the Photo Gallery from the camera mode, press the left
softkey under
76
Chapter 5
Galler
Camera Mode
Gallery
(see page 93).
(Picture Image)
Brightness adjustment
.
.
Mem
Mem
y
Options
Take Pix.
Memory gauge of
Media Gallery
Brightness icon
Zoom icon
Zoom adjustment
Page 79

Camera Mode Options
When the camera mode is active, the following options are available by pressing the right softkey under
♦
Shutter Sound:
Select Shutter Sound, Click Sound, Beep, Say
Cheeze!, or Silent. (The shutter does not sound, if your phone’s
Ringer Volume is set to Silent or Vibration Alert is activated.)
♦
Resolution: Select Large (480x640), Medium (240x320) or
Small (120x160).
♦
Quality: Select the picture quality Normal or Fine.
♦
Flash: Select Off, On This Shot, or Always On.
♦
Zoom: Select 1X or 2X for the Medium resolution; select 1X, 2X
or 4X for the Small resolution.
♦
Brightness: Select the brightness by pressing
♦
Picture Effects: Select Off, Black & White, Sepia, Watermark,
or Glitter. (The last two are only for the Medium and Small resolutions.)
♦
Self-timer: Activate the timer for the current shot (see page 79).
♦
Self Shot: Switch the monitor to the sub display or back to the
main display. (This helps you view yourself when the phone is half
open and placed on a table.)
♦
LED Blink: Select On or Off.
♦
Video Mode: Switch to the video mode to record videos. (You
may also press
♦
Other:
to switch to the video mode.)
• Picture Frames: Select your favorite picture frame (only for
the Medium resolution).
• Date Stamp: Select On or Off (for the Medium resolution).
• Memory Gauge: Select Show or Hide.
• Finder Scope: Select Show or Hide.
Options
:
or .
Note:
Note: Once you have taken a picture, the picture frame and picture
Exiting the camera mode resets Flash, Zoom, Brightness, Picture
Effects, Self Shot and Picture Frames to their default settings.
effect cannot be removed from the picture.
Chapter 5
77
Page 80

Recording Videos
(Movie Ima
e)
Galler
Recording a Video with Your Camcorder
1. To activate the video mode from the standby mode, press and
hold
and on page 79.
♦
To select a zoom option (1x, 2x or 4x), press the volume keys.
♦
To adjust the brightness, press
♦
To switch the video screen view, press
2. Point the camera lens at your subject and view it through the
phone’s main display. (When the phone is closed, the camcorder
does not work.)
3. To start recording a video, press
(The recording automatically stops after 15 seconds.)
4. To end recording, press
saved to the Video Gallery.
5. After saving, the first frame from your video is displayed.
♦
To play the video, press the right softkey under
Playback then press
press the volume keys on the side of your phone.)
♦
To send the video, press
♦
To record another video, press the left softkey under
. The LED blinks red. You may choose options below
or .
or .
or the side camera key.
. Your video will automatically be
Options
twice. (To adjust the speaker volume,
(see page 83).
or the side camera key.
Brightness adjustment
, select
Save
or
Video mode icon
Movie Light icon
Self-timer icon
Progress gauge
(Movie Ima
y
Galler
g
e)
Options
Record
Standby/Rec/Play
Brightness icon
Zoom icon
Zoom adjustment
Video Mode
Tip: To access the Video Gallery from the video mode, press the left
softkey under
78
Chapter 5
Gallery
(see page 93).
Page 81

Video Mode Options
Options
When the video mode is active, the following options are available
by pressing the right soft key under
♦
Movie Light: Select On or Off.
♦
Zoom: Select 1X, 2X, or 4X.
♦
Brightness: Select the brightness by pressing
♦
Self-timer: Activate the timer for the current video (see below).
♦
Camera Mode: Switch to the camera mode to take pictures. (You
may also press
Note: Exiting the video mode resets Movie Light, Zoom and Bright-
ness to their default settings.
to switch to the camera mode.)
:
or .
Using the Self-Timer
To include yourself in the picture or video, you may half open the
phone and place it on a table. To activate the self-timer:
1. When the camera or video mode is active, press the right softkey
Options
under
2. Select Self-timer then press .
3. Select an option (Off, 2 Sec., 5 Sec., or 10 Sec.) then press .
4. To start the timer, press . The phone beeps every second.
(The beep tone does not sound, if your phone’s Ringer Volume
is set to Silent or Vibration Alert is activated.) The LED blinks
green and turns red for the last few seconds.
.
5. When the self-timer expires, the phone takes a picture or starts
recording a video automatically.
Tip: To cancel the self-timer after it has started, press the right softkey
Cancel
under
Note: While the self-timer is active, all keys are disabled except
Note: After taking a picture or video, the self-timer turns off.
.
and the right softkey under
Cancel
CLR
.
Chapter 5
,
79
Page 82

Sending Pictures
DeleteDelete
SaveSave
SendSendSendSend
Optionstions
ModeMode
ToTo:01
00/48
MessaMessage
Send
Options
Mode
Edit MessaEdit Message
5.5.001/0101/01
You can send picture messages to mobile phones that support the
picture messaging services from your service provider. Please ask
your service provider for more information.
Sending a Picture Message
1. Take a new picture (see page 76) then
press
from your Photo Gallery. See page 93.)
2. From the To: screen, enter a recipient’s
mobile phone number or e-mail address.
(You may also select recipients from your
phonebook or group list. See “Recipient
Options” on page 81.)
3. If you want to add more recipients, press
the right softkey under
To (or Add Cc, or Add Bcc) then press
next entry then press the right softkey under
do not want to add recipients, press
to proceed.
4. When the Edit Message screen appears,
add your text message. You may apply various options (see on page 82).
5. To send the picture message, press
. (You may also select a picture
Options
, select Add
. From the Recipient List, select the
Add/Edit
. Repeat step 2 above. If you
Example:
.
Note: This function is available when the icon
is displayed. (See “Pending and
Canceled Messages” on page 63.)
Note: Closing the phone ends the messaging function unless a mes-
sage is being sent or received.
80
Chapter 5
Page 83

Recipient Options
From the To: screen, the following options are available by pressing
the right softkey under
♦
Phonebook: Select recipients from your phonebook entries. (See
“Selecting Recipients from Your Phonebook” on page 63.)
♦
Group List: Select recipients from your Group List. (See “Selecting Recipients from Your Group List” on page 63.)
♦
Online Album: Send your pictures/videos to your personal Online
Album.
♦
Add To: Add a recipient to the “To” category.
♦
Add Cc: Add a recipient to the “Cc” category.
♦
Add Bcc: Add a recipient to the “Bcc” category.
Options
:
Using Your Online Album
You can save your pictures and videos to your personal Online Album so you can access them at any time from your PC. Please ask
your service provider for more information about this service.
Saving Pictures and Videos to Your Online Album
1. Take a new picture or video then press . (You may also select a picture or video from your Photo Gallery or Video Gallery.)
2. From the To: screen, press the right softkey under
lect Online Album then press
then press
3. When the Edit Message screen appears, press
picture or video message to your Online Album.
.
. Confirm the Recipient List
Options
. Se-
to send the
Accessing Your Online Album from a PC
1. From your computer, visit your service provider’s Website for the
picture/video messaging service.
2. Follow the prompts to view your pictures and videos.
Note: To replay video clips from your Online Album with your computer,
download QuickTime® 6.5 for free at http://www.apple.com/quicktime.
Chapter 5
81
Page 84

Picture Message Options
You may compose a slide show (up to 4 slides) by adding more
slides to the picture message. (Each slide can include one picture,
one sound, and text.) From the Edit Message screen, the following
options are available by pressing the right softkey under
♦
Quick Text: Select from the prepared text options.
♦
Emoticon: Select a smiley icon from options.
♦
Picture: Add or delete a picture.
• Add Picture to take and add a picture (Camera) or to add a
saved picture (Media Gallery).
• Delete Picture to delete the picture.
♦
Sound: Add or delete a sound.
• Add Sound to record and add your voice (Record New Voice)
or to add a saved sound (Media Gallery or Voice Notes).
• Delete Sound to delete the sound.
♦
Preview: View your picture message in a slide show.
♦
Insert Signature: Insert your signature that you set.
♦
Edit Subject: Add or change the message subject.
♦
Edit Recipient: Add or change the recipients.
♦
Settings: Select from the following options:
• Set Timing to set the timing for a slide show (Slide Time,
Picture Time, Sound Time and Text Time).
• Message Priority to select High or Normal.
♦
Save: Select from Message, Quick Text and Address.
♦
Slide: Add or delete a slide (Add New Slide or Delete Slide).
Options
:
Tip: To switch from one slide to another, press the right softkey under
Slide
Options
, then press the left or right softkey under
or
Slide
Sending Template Messages
1. From the standby mode, press , select New Template Msg
then press
2. Select the message you want to send then press
3. Follow steps 2 to 5 in “Sending a Picture Message” on page 80.
82
Chapter 5
. The list of template messages appears.
.
.
Page 85

Sending Videos
You can send video messages to e-mail addresses. Please ask
your service provider for more information.
Sending a Video Message to an E-mail Address
1. Record a new video (see page 78) then press . (You may
also select a video from your Video Gallery.)
2. From the To: screen, enter an e-mail address then press
3. When the Edit Message screen appears, add your text message.
4. To send the video message, press
Note: This function is available when the icon is displayed.
Tip:
To play Video Messages sent to e-mail, please download Apple’s
QuickTime® 6.5. Go to www.apple.com/quicktime/download to download
the free player or upgrade your existing QuickTime Player. During the
download process, when asked to choose an installation type (Minimum,
Recommended or Custom) select Minimum for a quicker download.
.
Video Message Options
Each video message can include one video and text. From the Edit
Message screen, the following options are available by pressing
the right softkey under
Options
:
.
♦
Quick Text: Select from the prepared text options.
♦
Emoticon: Select a smiley icon from options.
♦
Delete Video: Delete the video.
♦
Add Video: Record and add a new video (Camcorder) or to
add a saved video (Media Gallery).
♦
Preview: View your video message.
♦
Insert Signature: Insert your signature that you set.
♦
Edit Subject: Add or change the message subject.
♦
Edit Recipient: Add or change the recipients.
♦
Message Priority: Select High or Normal.
♦
Save: Select from Message, Quick Text and Address.
Chapter 5
83
Page 86

Inbox and Outbox
Msg.
Msg.
Incoming Picture Messages
To view incoming picture messages:
1. From the standby mode, press , select Inbox then press
to display the Inbox list.
2. Select a picture message ( ) then press .
♦
A picture message is displayed in a slide show (if it includes
more than one slide).
3. To view the sender, subject and more, press the right softkey
Options
under
the message, press the left softkey under
Note: For more information about icons and options, see “Checking In-
coming Messages” on page 66.
Outgoing Picture/Video Messages
To view outgoing picture/video messages:
1. From the standby mode, press , select Outbox then press
to display the Outbox list.
2. Select a message then press .
, select Information then press . To return to
.
♦
A picture message is displayed in a slide show (if it includes
more than one slide).
♦
From a video message, a text part is displayed first (if available).
To play a video from the message, press
3. To view the recipient, subject and more, press the right softkey
Options
under
the message, press the left softkey under
Note: For more information about icons and options, see “Reviewing
Outgoing Messages” on page 68.
84
Chapter 5
, select Information then press . To return to
twice.
.
Page 87

6
6
GET IT NOW AND
GET IT NOW AND
MOBILE WEB
MOBILE WEB
This chapter addresses how to use “Get It Now” to download games,
applications, ringers, wallpapers and more and how to use the Web
browser to access the Wireless Internet.
♦
Get It Now
♦
Mobile Web
Chapter 6
85
Page 88

Get It Now
CLR
Get It Now
Your phone enables you to download games, applications, ringers,
wallpapers and more right to your phone. Please contact your service provider for more information about these services.
Launching Get It Now
1. From the standby mode, press the left
softkey under
2. Select Get It Now then press to
launch Get It Now. The menu icons appear.
♦
Get It Now: Download contents.
♦
Settings: Customize the screen.
♦
Help: Displays help tips.
More icons will appear after you download games or applications.
3. To end Get It Now, press or close the phone.
Shortcut: To launch Get It Now from the standby mode, press .
Selecting
♦
To select from listed options, press
Menu
.
or then press .
♦
To select from options at the bottom line of the screen, press
or then press .
♦
When prompted, press to proceed or
Downloading Games/Applications
1. To launch Get It Now from the standby mode, press .
2. Select Get It Now from the menu then press .
The phone will access your service provider’s server.
3. Follow the prompt to download games or applications.
Note: The downloading function is available when the icon (digital
mode) or (digital 1x mode) is displayed.
86
Chapter 6
to cancel.
Page 89

Playing Games/Applications
1. To launch Get It Now from the standby mode, press .
2. Select a game or application then press to play it.
3. To close the game or application, press
CLR
.
Downloading Ringers/Wallpapers
1. To launch Get It Now from the standby mode, press .
2. Select Get It Now from the menu then press .
3. Download a downloader application for the desired category.
4. From the menu, launch the downloader application.
5. Follow the prompt to download ringers or wallpapers.
Tip: Once you have downloaded ringers and wallpapers, they are auto-
matically saved to your Media Gallery (see page 91).
Setting Up Get It Now
1. To launch Get It Now from the standby mode, press .
2. Select Settings from the menu then press .
3. Select the option you want to set up then press .
♦
Order Apps: Change the order displaying applications in this
feature’s main menu.
♦
Move Apps: Move an application from one folder to another
(Main Menu, Favorites, Work and Fun).
♦
Manage Apps: Check the application status, remove the application, and more.
♦
Main Menu View: Select Small Icon or List for this feature.
♦
Screen Savers: Select an image to this feature’s menu screen.
♦
View Log: View your log in this feature.
Chapter 6
87
Page 90

Mobile Web
CLR
MenuMenu
VZW with MSNVZW with MSN
E–Mail/Messagin
g
Entertainment
News
Sports
Mone
y
/Tradin
g
PortaPortals/Dis/Directorirectorieses
More Categories
Search/BookmarksSearch/Bookmarks
1
2
3
4
5
6
7
8
If you subscribe to Internet service through your service provider you
can use our phone to browse various websites. This provides access
to up-to-date information such as news, weather and stock quotes.
Launching Web Browser
Example:
To access the Internet, make sure that the icon
(digital mode) or (digital 1x mode) is
displayed.
1. From the standby mode, press the left
softkey under
Menu
.
2. Select Mobile Web then press .
3. The Web browser launches and your home
page will be displayed.
4. To end the browser, press
Shortcut: To launch the browser from the standby mode, press .
or close the phone.
Softkeys
♦
To perform the function labeled at the lower of the screen, press
the left or right softkey under the function label.
Scrolling
♦
To scroll a line, press
♦
To scroll a page, press the volume keys on the side of your phone.
or .
Selecting
♦
Returning
♦
♦
88
To select a menu option, press
or , then press or
press the softkey under the appropriate function label.
CLR
To return to the previous page, press
To return to your home page, press and hold
Chapter 6
.
.
Page 91

Browser Menu
To open the browser menu, press the right softkey under
while the browser is active.
Tabs
The browser menu appears with the following tab options. To turn
the tab, press
♦
Menu: Display basic menu options (see below).
♦
History: Display Web addresses (URL) that you visited recently.
Select the desired Web address then press
Web page.
♦
Tools: Select from utility functions (Find Text and Copy Text).
♦
Options: Select from special functions (if applicable).
♦
Input Text: Select a text input mode from T9, abc, 123, and more
(if applicable).
♦
Image: Select an option for the image (if applicable).
.
to access the
Menu
From the Menu tab, select the option then press .
♦
Home: Returns to your home page.
Menu
♦
Back: Returns to the previous page.
♦
Clear Memory: Clears the history, cache, cookies, and auto fill
memories.
♦
Show URL: Displays the current Web address (URL).
♦
Forward: Goes forward one page within the viewed pages.
♦
Reload URL: Reloads the current page.
♦
Inbox: Reserved.
♦
Exit Browser: Allows you to exit the browser.
♦
Advanced…: Allows you to configure and manage your browser
settings.
Chapter 6
89
Page 92

Memo
Memo
90
Chapter 6
Page 93

7
7
MEDIA GALLERY
MEDIA GALLERY
This chapter addresses how to use your Media Gallery that includes
your pictures/videos and downloaded contents.
♦
Managing Your Media Gallery
♦
Viewing Your Media Gallery
♦
Assigning Pictures and Ringers
Chapter 7
91
Page 94

Managing Your Media Gallery
Once you have taken pictures and videos or downloaded images
and tones, they are automatically saved to your Media Gallery.
Media Gallery Menu
♦
My Folder: Includes 20 folders for your managing.
♦
Photo Gallery: Includes pictures you have taken.
♦
Video Gallery: Includes videos you have recorded.
♦
Images: Provides Frames and Graphics sub folders. Frames includes preloaded images. Graphics includes preloaded images,
images downloaded from the server, and pictures saved from
the messaging feature.
♦
Tones: Includes preloaded tones, downloaded from the server,
and saved from the messaging feature.
Using My Folder
To move contents from the original folders to one of the folders
under My Folder:
1. From the standby mode, press the left softkey under
2. Select Media Gallery then press .
Menu
.
3. Select Photo Gallery, Video Gallery, Images or Tones then
press
4. Press the right softkey under
5. Select Move then press .
6. Select the contents you want to move then press the left softkey
under
7. To display the folder list of My Folder, press .
8.
Select the folder you want to move the contents to then press .
Note: Once you have moved contents to My Folder, they cannot be
92
Chapter 7
to display the contents in list or thumbnail view.
Options
.
Check
to check boxes on the contents.
moved back to the original folder.
Page 95

Viewing Your Media Gallery
Once you have taken pictures and videos or downloaded images
and tones, you can view them at any time on your phone.
Viewing Your Pictures and Images
To view pictures or images from Photo Gallery or Images folder:
1. From the standby mode, press the left softkey under
2. Select Media Gallery then press .
3. Select Photo Gallery or Images then press . (When Images
is selected, further select Frames or Graphics then press
The pictures or images are displayed in thumbnail view. (To display them in list view, press the left softkey under
4. To view the pictures or images, scroll through the thumbnails.
5. To expand the selected picture, press . To scroll through the
pictures in the full-screen view, press
6. To return to thumbnail view, press the left softkey under
or .
Viewing Your Videos
To view the video from Video Gallery:
1. From the standby mode, press the left softkey under
Menu
List
.)
Thumbnail
Menu
.
.)
.
.
2. Select Media Gallery then press .
3. To display the video list, select Video Gallery then press .
4. Select a video from the list then press . The first frame from
the selected video is displayed.
5. To switch the video screen between the full-screen view and small
view, press the left softkey under
6. To play the video, press . (To adjust the speaker volume,
press the volume keys on the side of your phone.)
Increase
or
Decrease
Chapter 7
.
93
Page 96

Playing Ringers
To play a ringer or melody from the Tones folder:
1. From the standby mode, press the left softkey under
2. Select Media Gallery then press .
3. To display the tone list, select Tones then press .
4. Select a tone then press to play the tone. (To adjust the
speaker volume, press the volume keys on the side of your phone.)
Menu
Media Gallery Options
From the list or thumbnail view of the contents, the following options are available by pressing the right softkey under
♦
Send Text Msg: Send the image or tone to your recipients. (This
option is only for My Folder, Graphics and Tones. See “Sending
Text Messages” on page 62.)
♦
Send Pix. Msg: Send the picture, image or tone to your recipients. (This option is only for My Folder, Photo Gallery, Graphics
and Tones. See “Sending a Picture Message” on page 80.)
♦
Send Video Msg: Send the video to your recipients. (This option is only for My Folder and Video Gallery. See “Sending a
Video Message to an E-mail Address” on page 83.)
♦
Send Online Album: Send your picture or video to your personal
Online Album. (This option is only for My Folder, Photo Gallery
and Video Gallery. See “Using Your Online Album” on page 81.)
♦
Assign: Assign the picture, image, or tone to the phone’s tasks.
(This option is only for My Folder, Photo Gallery, Graphics and
Tones. See “Assigning a Picture to Phone Tasks” on page 95.
See “Assigning a Ringer to Phone Tasks” on page 96.)
♦
Move: Move the picture, image, video, or tone to My Folder.
♦
Delete: Delete a picture, image, video, or tone.
♦
Delete Multiple: Delete pictures, images, videos, or tones.
♦
Rename: Edit a caption for the picture, image, video or tone.
♦
Properties: Display a caption, time/date, size, etc. for the picture, image, video, or tone.
Options
.
:
94
Chapter 7
Page 97

Assigning Pictures and Ringers
Assigning a Picture to Phone Tasks
To assign a picture or image saved in the Media Gallery to display
for specific tasks:
1. From the standby mode, press the left softkey under
2. Select Media Gallery then press .
3. Select Photo Gallery or Images then press . (When Im-
ages is selected, further select Graphics then press
pictures or images are displayed in thumbnail view.
4. To select your desired picture or image, scroll through the thumbnails.
5. Press the right softkey under
6. To display a list of phone tasks, select Assign then press .
7. Select your desired task then press . Select:
♦
Wallpaper to display the picture on the main display in the standby
mode.
♦
Phonebook to display the picture for incoming calls from a specific caller.
Options
.
Menu
.) The
.
♦
Scheduler to display the picture on a specific scheduled event.
♦
Sub LCD to display the picture on the external display.
♦
Main Menu to display the picture on the main menu.
♦
My Menu to display the picture on the My Menu.
Tip: A picture or image may be assigned to more than one task.
Note: If an assigned picture or image is deleted from the Media Gallery,
the first four tasks will work on the default settings, while the Main
Menu and My Menu will remain unchanged.
Chapter 7
95
Page 98

Assigning a Ringer to Phone Tasks
To assign a tone saved in the Media Gallery to specific tasks:
Options
Menu
.
1. From the standby mode, press the left softkey under
2. Select Media Gallery then press .
3. To display a list of tones, select Tones then press .
4. Select a tone then press the right softkey under
5. To display a list of phone tasks, select Assign then press .
6. Select your desired task then press . Select:
♦
Phonebook to alert you of an incoming call from a specific caller.
♦
Ringer Type to alert you of incoming calls.
♦
Time to alert you of Alarm Clock or Countdown Timer.
♦
Scheduler to alert you of a specific scheduled event.
♦
Message to alert you of incoming messages including voice mail,
e-mail, text, page, picture/video and acknowledgment.
Tip: A ringer may be assigned to more than one task.
Note: If an assigned ringer is deleted from the Media Gallery, the de-
fault ringer for each task will be applied.
.
Media Gallery Folder Options
1. From the standby mode, press the left softkey under
2. Select Media Gallery then press .
3. Select a folder then press the right softkey under
♦
Used Memory to display the memory status.
♦
Delete Folder to delete all the contents from the selected folder.
♦
Delete All to delete all the contents from the Media Gallery. To
restore preloaded images and tones, see “Media Gallery Reset
(Menu 7465)” on page 111.
96
Chapter 7
Options
Menu
.
.
Page 99

8
8
SETTING MENU
SETTING MENU
This chapter addresses the phone’s various functions and settings.
♦
Sound Settings
♦
Display Settings
♦
Answer Option Settings
♦
Security Settings
♦
Dial Option Settings
♦
Network Settings
♦
Language Setting
♦
Location Setting
♦
Voice Guidance Settings
♦
Main Menu Settings
♦
My Menu Settings
Chapter 8
97
Page 100

Sound Settings
Volume Settings (Menu 711)
To adjust the ringer, key beep, earpiece or speakerphone volume:
Menu
1. Press the left softkey under
2. Select one of the categories listed below, then press
♦
Ringer Volume for adjusting ringer volume.
♦
Key Volume for adjusting key beep volume.
♦
Earpiece Volume for adjusting earpiece volume.
♦
Speaker Volume for adjusting speakerphone volume.
3. Adjust the volume level with
♦
Level 1-5: Sets the volume level (1 to 5).
♦
Silent: Mutes the ringer or key beep. (Only appears in Ringer
and Key Volume settings.)
Tip:
You can use the volume keys on the side of your phone to adjust the
ringer volume in standby mode (or the earpiece volume during a call).
Note: When the ringer volume is set to Silent (indicated by the icon ),
the ringer tone will not sound for an incoming call. However, if Automatic Answering is ON, the ringer tone will sound at the lowest
available volume.
then press 7 1 1.
. Select:
or then press .
Ringer Type (Menu 712)
To select a ringer tone pattern for incoming calls:
Menu
1. Press the left softkey under
2. Select Media Gallery or Voice Notes then press
♦
Media Gallery: Includes ringer tones, alarm tones, melodies, other
tones and downloaded melodies.
♦
Voice Notes: Includes voices you have recorded. See “Record-
ing Voice Notes” on page 124.
98
Chapter 8
then press 7 1 2.
.
 Loading...