

Page 1

06/09 2000.6.9 9:56 AM 페이지1
DO NOT
PRINT
THIS
PAGE
Page 2

06/09 2000.6.9 9:56 AM 페이지2
Table of Contents
CHAPTER 1 BEFORE USING YOUR PHONE . . . . . . 1
Package Contents . . . . . . . . . . . . . . . . . . . 2
Handset Description . . . . . . . . . . . . . . . . . . 3
Basic Functions . . . . . . . . . . . . . . . . . . . . . 4
The Function Keys . . . . . . . . . . . . . . . . . . . 4
Display Indicators . . . . . . . . . . . . . . . . . . . 5
Screen Status, Display and Function . . . . . . . . . . . 5
Using the Battery . . . . . . . . . . . . . . . . . . . . 6
Using the Battery . . . . . . . . . . . . . . . . . . . 6
Removing the Battery . . . . . . . . . . . . . . . . . 6
Charging the Battery . . . . . . . . . . . . . . . . . . 7
Power Connection . . . . . . . . . . . . . . . . . . . 7
Charging the Battery Only . . . . . . . . . . . . . . . 7
Charging the Battery with the Handset . . . . . . . . . . 8
Charging Completion . . . . . . . . . . . . . . . . . . 8
Status of Charger LED’s . . . . . . . . . . . . . . . . 9
Safety at a Glance . . . . . . . . . . . . . . . . . . . 10
Menu Flowchart for PE-2 . . . . . . . . . . . . . . . . 11
Chapter 2 Basic Operation . . . . . . . . . . . . . 13
Switching the Phone On or Off . . . . . . . . . . . . . 14
Making a Call . . . . . . . . . . . . . . . . . . . . . 14
Fixing Dialing Mistakes . . . . . . . . . . . . . . . . 14
Answer Calls . . . . . . . . . . . . . . . . . . . . . 15
One-Touch Dialing . . . . . . . . . . . . . . . . . . . 15
Getting Your Own Phone Number . . . . . . . . . . . 15
Etiquette Mode . . . . . . . . . . . . . . . . . . . . 16
Adjusting the Volume . . . . . . . . . . . . . . . . . 16
Locking the Keypad . . . . . . . . . . . . . . . . . . 16
Emergency Dialing . . . . . . . . . . . . . . . . . . . 18
Calling 911 . . . . . . . . . . . . . . . . . . . . . . 18
Storing and Editing Emergency Numbers . . . . . . . . 18
Description of Screen . . . . . . . . . . . . . . . . . 19
Navigation Key . . . . . . . . . . . . . . . . . . . . 20
Chapter 3 The Main MENU . . . . . . . . . . . . . 22
The Main MENU . . . . . . . . . . . . . . . . . . . . 23
[ i]
Page 3

06/09 2000.6.9 9:56 AM 페이지4
Table of Contents (cont’d.)
The Main MENU [Call Log] . . . . . . . . . . . . . . . 24
Called . . . . . . . . . . . . . . . . . . . . . . . . 24
Answered . . . . . . . . . . . . . . . . . . . . . . 31
Missed . . . . . . . . . . . . . . . . . . . . . . . 32
Erase . . . . . . . . . . . . . . . . . . . . . . . . 33
The Main MENU [Phonebook] . . . . . . . . . . . . . 34
Search by Phone Number . . . . . . . . . . . . . . . 34
Search by Name . . . . . . . . . . . . . . . . . . . 40
Search by Memory Location Number . . . . . . . . . . 42
Adding an Entry . . . . . . . . . . . . . . . . . . . 45
The Main MENU [Timers] . . . . . . . . . . . . . . . 48
Last Call . . . . . . . . . . . . . . . . . . . . . . . 48
All Calls . . . . . . . . . . . . . . . . . . . . . . . 49
Home Calls . . . . . . . . . . . . . . . . . . . . . 49
Roam Calls . . . . . . . . . . . . . . . . . . . . . 50
Resettable . . . . . . . . . . . . . . . . . . . . . . 50
The Main MENU [Sounds] . . . . . . . . . . . . . . . 51
Volume . . . . . . . . . . . . . . . . . . . . . . . 51
Alert Type . . . . . . . . . . . . . . . . . . . . . . 52
SMS Alert . . . . . . . . . . . . . . . . . . . . . . 53
Ringer . . . . . . . . . . . . . . . . . . . . . . . . 54
Tone Length . . . . . . . . . . . . . . . . . . . . . 55
Melody . . . . . . . . . . . . . . . . . . . . . . . 56
To Enter New Music . . . . . . . . . . . . . . . . 56
How to Enter Melody . . . . . . . . . . . . . . . . 57
To Edit My Melody . . . . . . . . . . . . . . . . . 58
To Select the Tempo . . . . . . . . . . . . . . . . 58
To Play My Melody . . . . . . . . . . . . . . . . . 59
The Main MENU [Display] . . . . . . . . . . . . . . . 60
Back Light . . . . . . . . . . . . . . . . . . . . . . 60
Banner . . . . . . . . . . . . . . . . . . . . . . . 61
Contrast . . . . . . . . . . . . . . . . . . . . . . . 62
My Number . . . . . . . . . . . . . . . . . . . . . 63
Version . . . . . . . . . . . . . . . . . . . . . . . 64
The Main MENU [Security] . . . . . . . . . . . . . . . 65
Locking the Phone . . . . . . . . . . . . . . . . . . 65
To Unlock the Phone . . . . . . . . . . . . . . . . . 66
Changing the Lock Code . . . . . . . . . . . . . . . 67
If the User Re-Enters the New Code Incorrectly . . . . 68
Restrict . . . . . . . . . . . . . . . . . . . . . . . 69
Table of Contents (cont’d.)
Reset . . . . . . . . . . . . . . . . . . . . . . . . 70
Resetting the Phone . . . . . . . . . . . . . . . . 70
Resetting the Timers . . . . . . . . . . . . . . . . 71
Emergency Numbers . . . . . . . . . . . . . . . . . 72
Voice Privacy . . . . . . . . . . . . . . . . . . . . 73
Advance . . . . . . . . . . . . . . . . . . . . . . . 74
Set NAM . . . . . . . . . . . . . . . . . . . . . 74
Auto NAM . . . . . . . . . . . . . . . . . . . . 75
Activation, DCS, PCSl . . . . . . . . . . . . . . . 76
Data / Fax . . . . . . . . . . . . . . . . . . . . 77
The Main MENU [Setup] . . . . . . . . . . . . . . . . 78
Auto Retry . . . . . . . . . . . . . . . . . . . . . . 78
Auto Answer . . . . . . . . . . . . . . . . . . . . . 79
Auto Hyphen . . . . . . . . . . . . . . . . . . . . . 80
Keyguard . . . . . . . . . . . . . . . . . . . . . . 81
One-Touch . . . . . . . . . . . . . . . . . . . . . . 83
The Main MENU [Alert] . . . . . . . . . . . . . . . . 84
Roam Alert . . . . . . . . . . . . . . . . . . . . . . 84
Drop Alert . . . . . . . . . . . . . . . . . . . . . . 85
Minute Alert . . . . . . . . . . . . . . . . . . . . . 86
Service . . . . . . . . . . . . . . . . . . . . . . . 87
Voice Privacy . . . . . . . . . . . . . . . . . . . . 88
Chapter 4 SMS MENU . . . . . . . . . . . . . . . 90
SMS MENU . . . . . . . . . . . . . . . . . . . . . . 91
SMS MENU [Voice Mail] . . . . . . . . . . . . . . . . 92
Voice Mail . . . . . . . . . . . . . . . . . . . . . . 92
Retrieving New Voice Mail . . . . . . . . . . . . . 94
SMS MENU [Text/Page] . . . . . . . . . . . . . . . . 96
Viewing New Text Messages . . . . . . . . . . . . 96
Chapter 5 Logs Menu . . . . . . . . . . . . . . . 101
Call Logs . . . . . . . . . . . . . . . . . . . . . . . 102
Chapter 6 In-Call Menu . . . . . . . . . . . . . . 107
Send ph # . . . . . . . . . . . . . . . . . . . . . . 109
[ii]
[iii]
Page 4

06/09 2000.6.9 9:56 AM 페이지6
Table of Contents (cont’d.)
Scratch Pad . . . . . . . . . . . . . . . . . . . . . 109
Mute . . . . . . . . . . . . . . . . . . . . . . . . . 110
My Number . . . . . . . . . . . . . . . . . . . . . 111
CHAPTER7 Making An Emergency Call . . . . . . 112
Making an Emergency Call . . . . . . . . . . . . . . 113
E911 Using Any Available System . . . . . . . . . . . 113
CHAPTER8 SAFETY . . . . . . . . . . . . . . . 115
Safety Information for Wireless Handheld Phones . . . . 116
Driving Safety . . . . . . . . . . . . . . . . . . . . 117
Electronic Devices . . . . . . . . . . . . . . . . . . 118
Other Safety Guidelines . . . . . . . . . . . . . . . 120
Precautions . . . . . . . . . . . . . . . . . . . . . 121
Warning . . . . . . . . . . . . . . . . . . . . . . 122
Safety Information for FCC RF Exposure . . . . . . . . 123
Cautions . . . . . . . . . . . . . . . . . . . . . . 123
CHAPTER9 WARRANTY . . . . . . . . . . . . . 125
Protect Your Warranty . . . . . . . . . . . . . . . . . 126
12 Month Limited Warranty . . . . . . . . . . . . . . 127
CHAPTER 1
BEFORE USING YOUR PHONE
Please read this chapter before using this product.
PACKAGE CONTENTS
u
HANDSET DESCRIPTION
v
BASIC FUNCTIONS
w
DISPLAY INDICATORS
x
USING THE BATTERY
y
CHARGING THE BATTERY
z
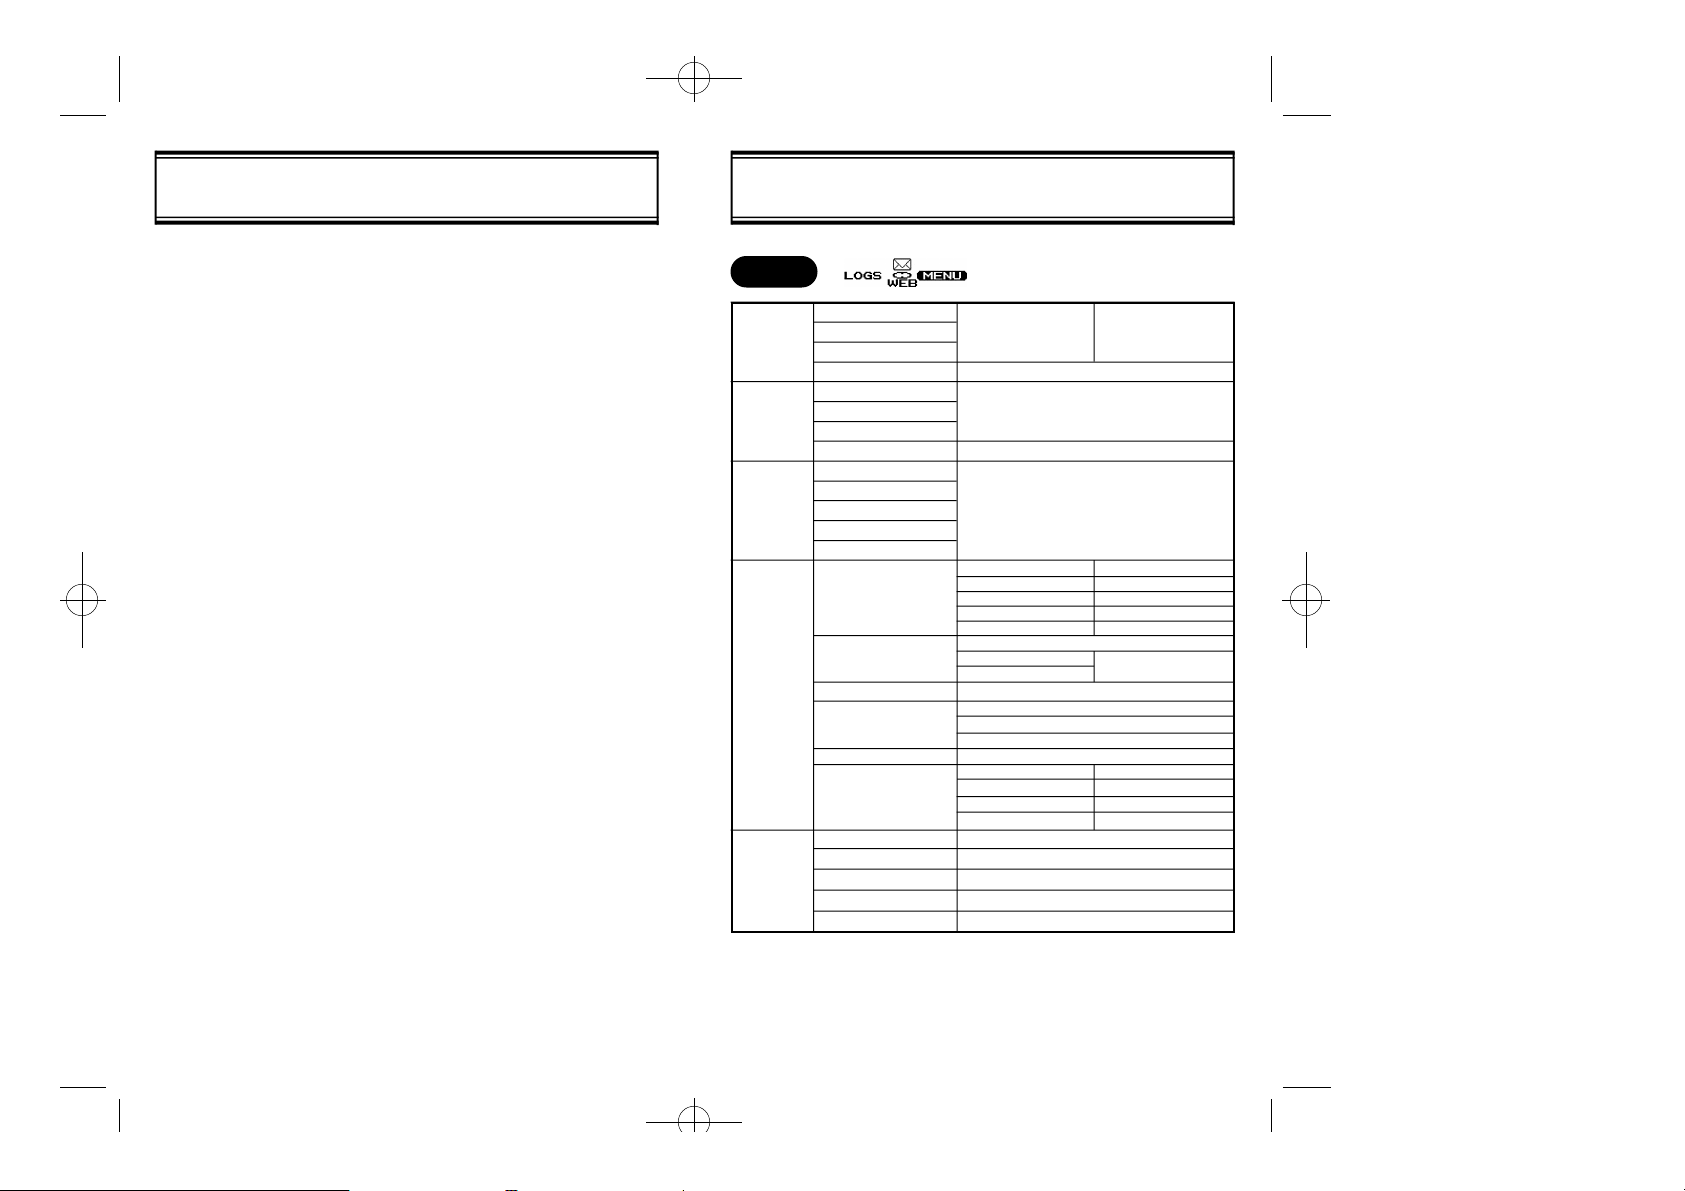
SAFETY AT A GLANCE
{
MENU FLOWCHART
|
[iv]
[1]
Page 5
06/09 2000.6.9 9:56 AM 페이지8
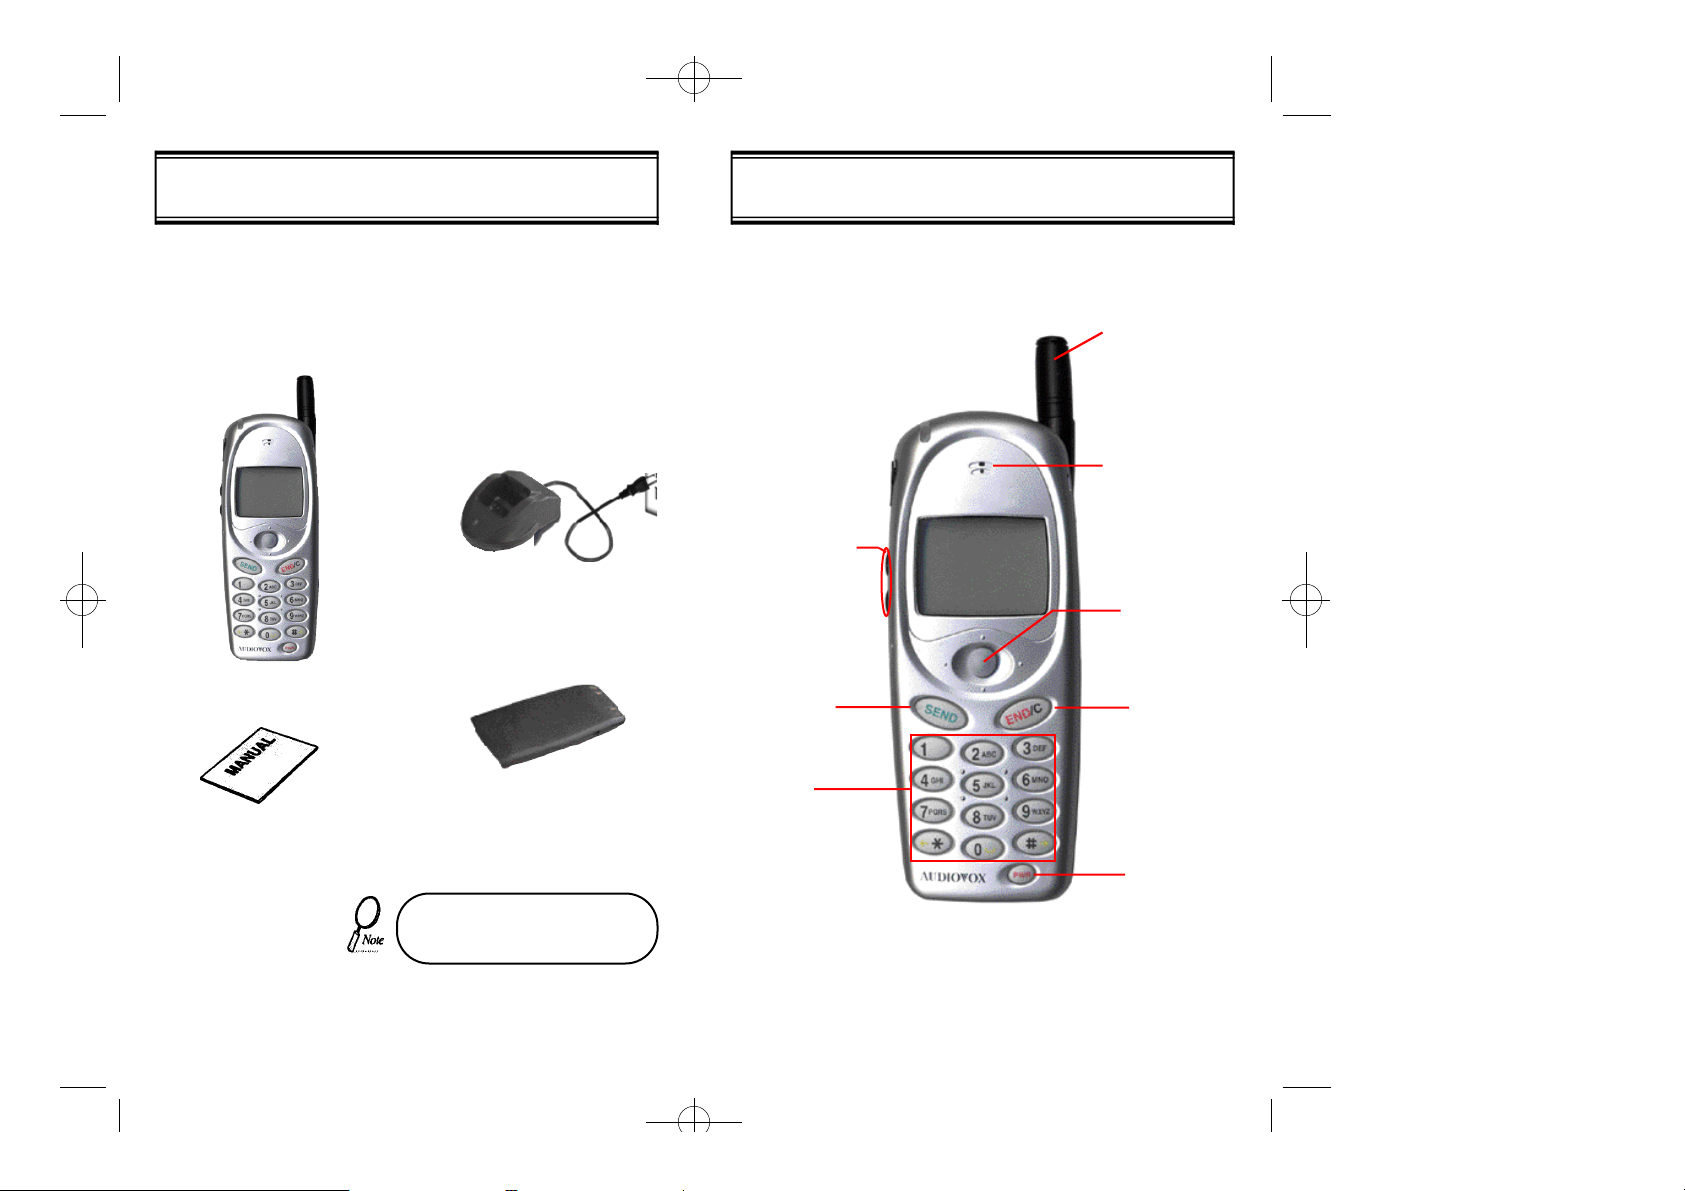
Thank you for purchasing this product. Please check the product contents by comparing them with the following pictures.
Handset
Desktop Charger
HANDSET DESCRIPTIONPACKAGE CONTENTS
Extend Antenna
For best call
quality, extend
the antenna during the call
Earpiece
Volume
Control Buttons
Five-point
Navigational
Button
SEND Button
Standard Battery
User Manual
If there are any product defects,
please report it to the place of pur chase immediately.
[2] [3]
Dial Keys
END Button
Power Button
Page 6
06/09 2000.6.9 9:56 AM 페이지10
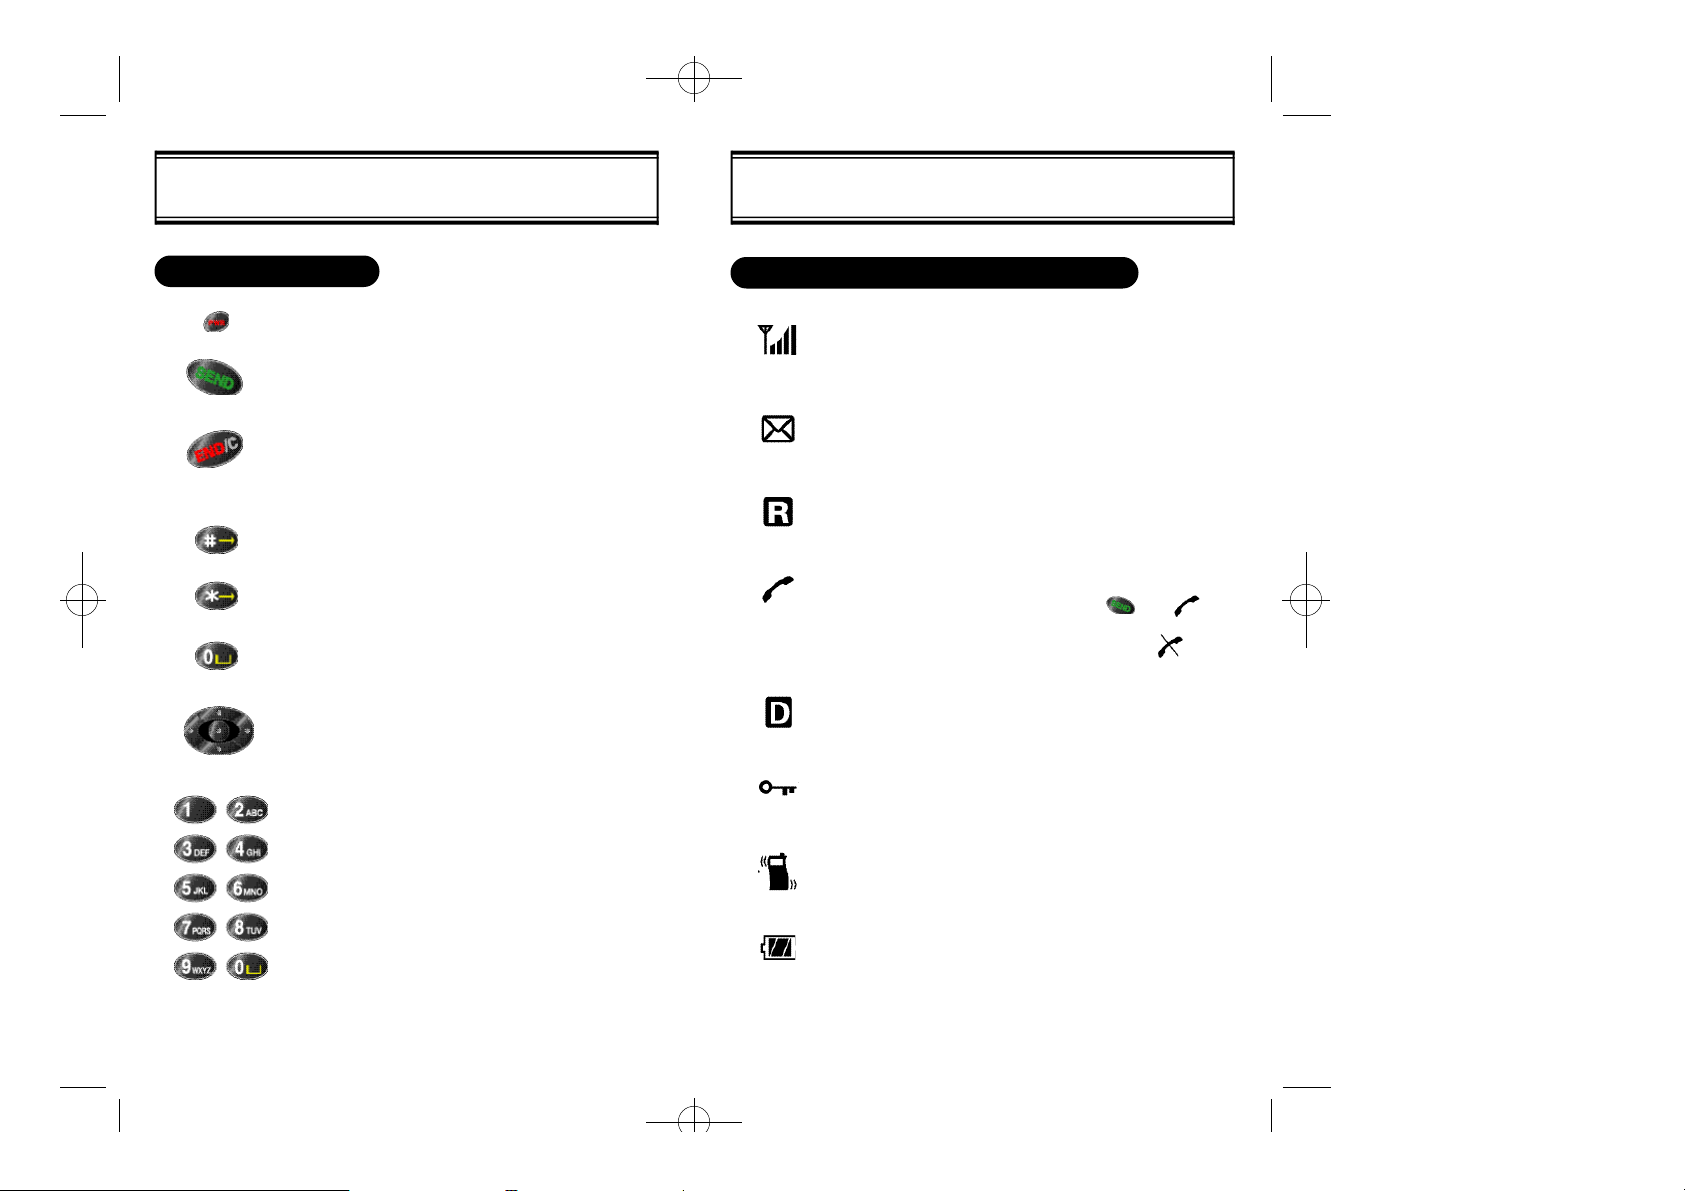
DISPLAY INDICATORSBASIC FUNCTIONS
THE FUNCTION KEYS
Turns the handset on / off.
Calls a number.
Ends a call.
Backs out to main menu.
Backspaces when entering text.
Scrolls down a menu.
Puts a space between letters when entering text.
Scrolls up a menu.
Moves cursor left when entering text.
Selects special characters when entering text.
Press [left], [right], [up], or [down] to choose
menu/display items.
Press [center] to make selection.
10 Numeric Keys
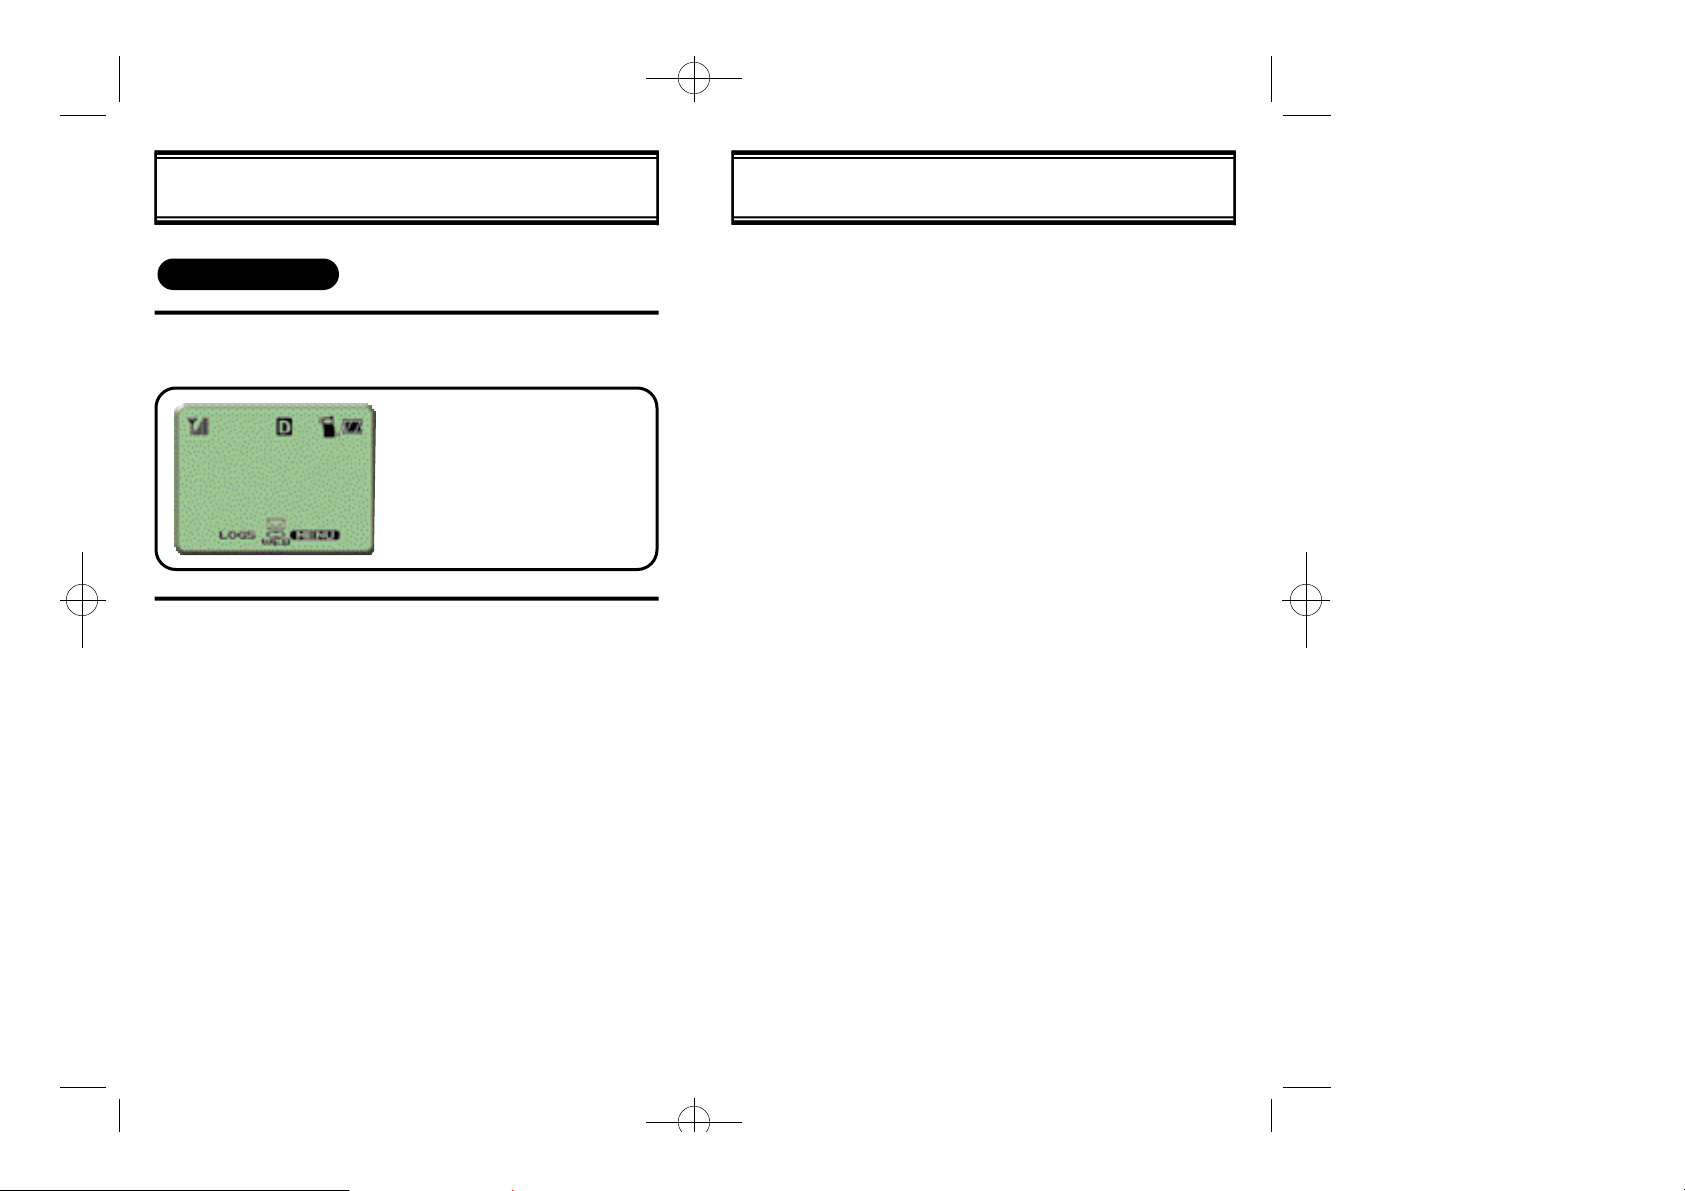
SCREEN STATUS, DISPLAY AND FUNCTION
Signal strength
Number of bars (0~4) displays current strength of
signal
Short Message Service(SMS)
Appears when voicemail, pages, or text messages
have been received.
Roaming
Appears when the user is outside the Home service
area.
Connecting/Service not possible
When you dial a number and press ,the indicator appears while the phone attempts to access the
network. When service is not possible, the indicator is displayed.
Digital Mode
Digital service is available.
Voice privacy
Appears during a call when voice privacy is in
operation.
Vibration mode
Vibration or Vibration + Ringer is the selected alert
type.
Balance of battery power
Number of bars (0~3) displays available battery power.
[4] [5]
Page 7
06/09 2000.6.9 9:56 AM 페이지12
CHARGING THE BATTERYUSING THE BATTERY
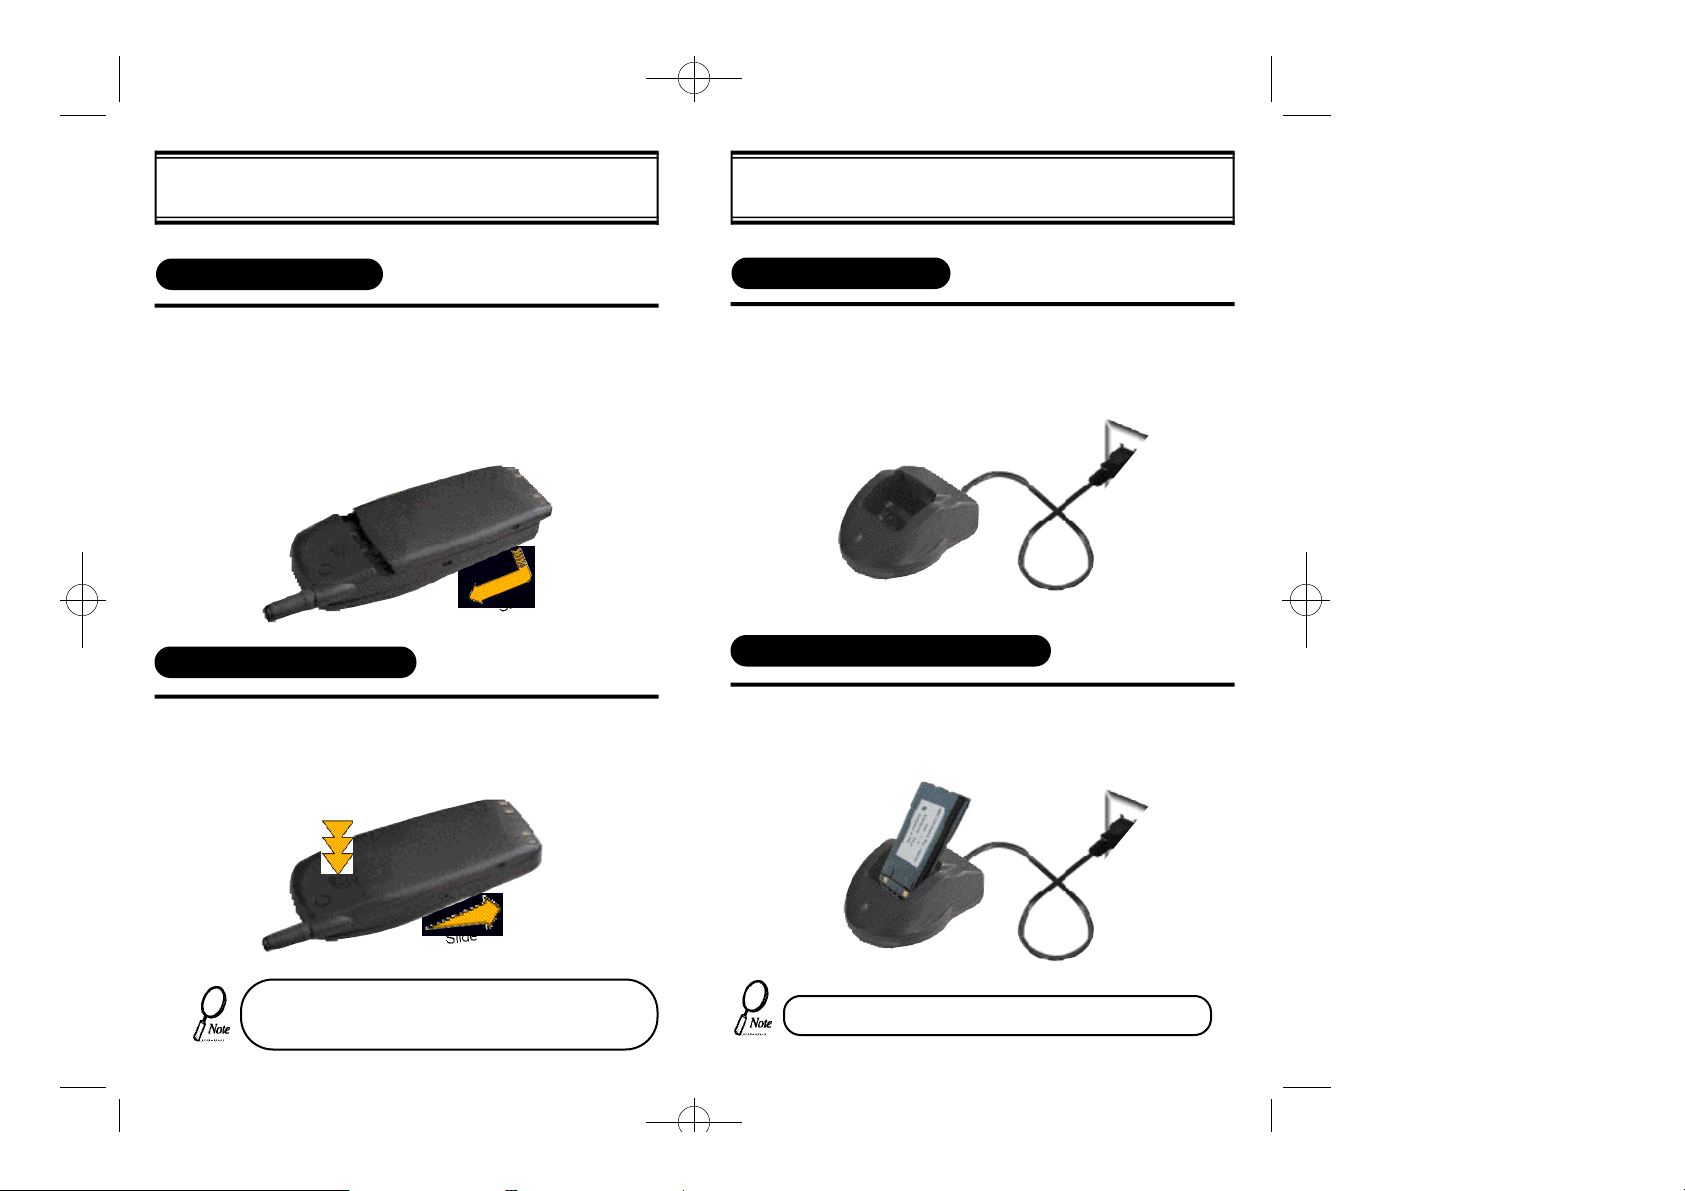
USING THE BATTERY
1) Hold the battery so that the metal contacts are at the bottom.
2) Place the battery against the back of the phone, with the top
of the battery about 1/4 inch from the latch. The tabs of the
battery should line up with the grooves of the phone.
3) Slide the battery toward the top of the phone until it
snaps into place
REMOVING THE BATTERY
1) Press and hold down the button at the top of the battery.
2) Slide the battery toward the bottom of the phone until the
tabs of the battery are free from the grooves of the phone.
Then remove the battery.
Press button
POWER CONNECTION
Connect the charger to a standard 120V AC outlet.
The LED will briefly glow orange.
CHARGING THE BATTERY ONLY
To charge the battery only, insert the battery pack
into the charger.
The battery must be correctly placed in the battery com partment. If battery is incorrectly inserted, the handset
[6] [7]
will not turn on or the battery may slip out during use.
• Battery is not charged when you first purchase the product.
• Fully charge the battery before use.
Page 8
06/09 2000.6.9 9:56 AM 페이지14
CHARGING THE BATTERYCHARGING THE BATTERY
CHARGING THE BATTERY WITH THE HANDSET
To charge the battery with the handset, insert
the handset into the charger.
Charging the battery with the handset
power on is less efficient than charging it
with the handset power off.
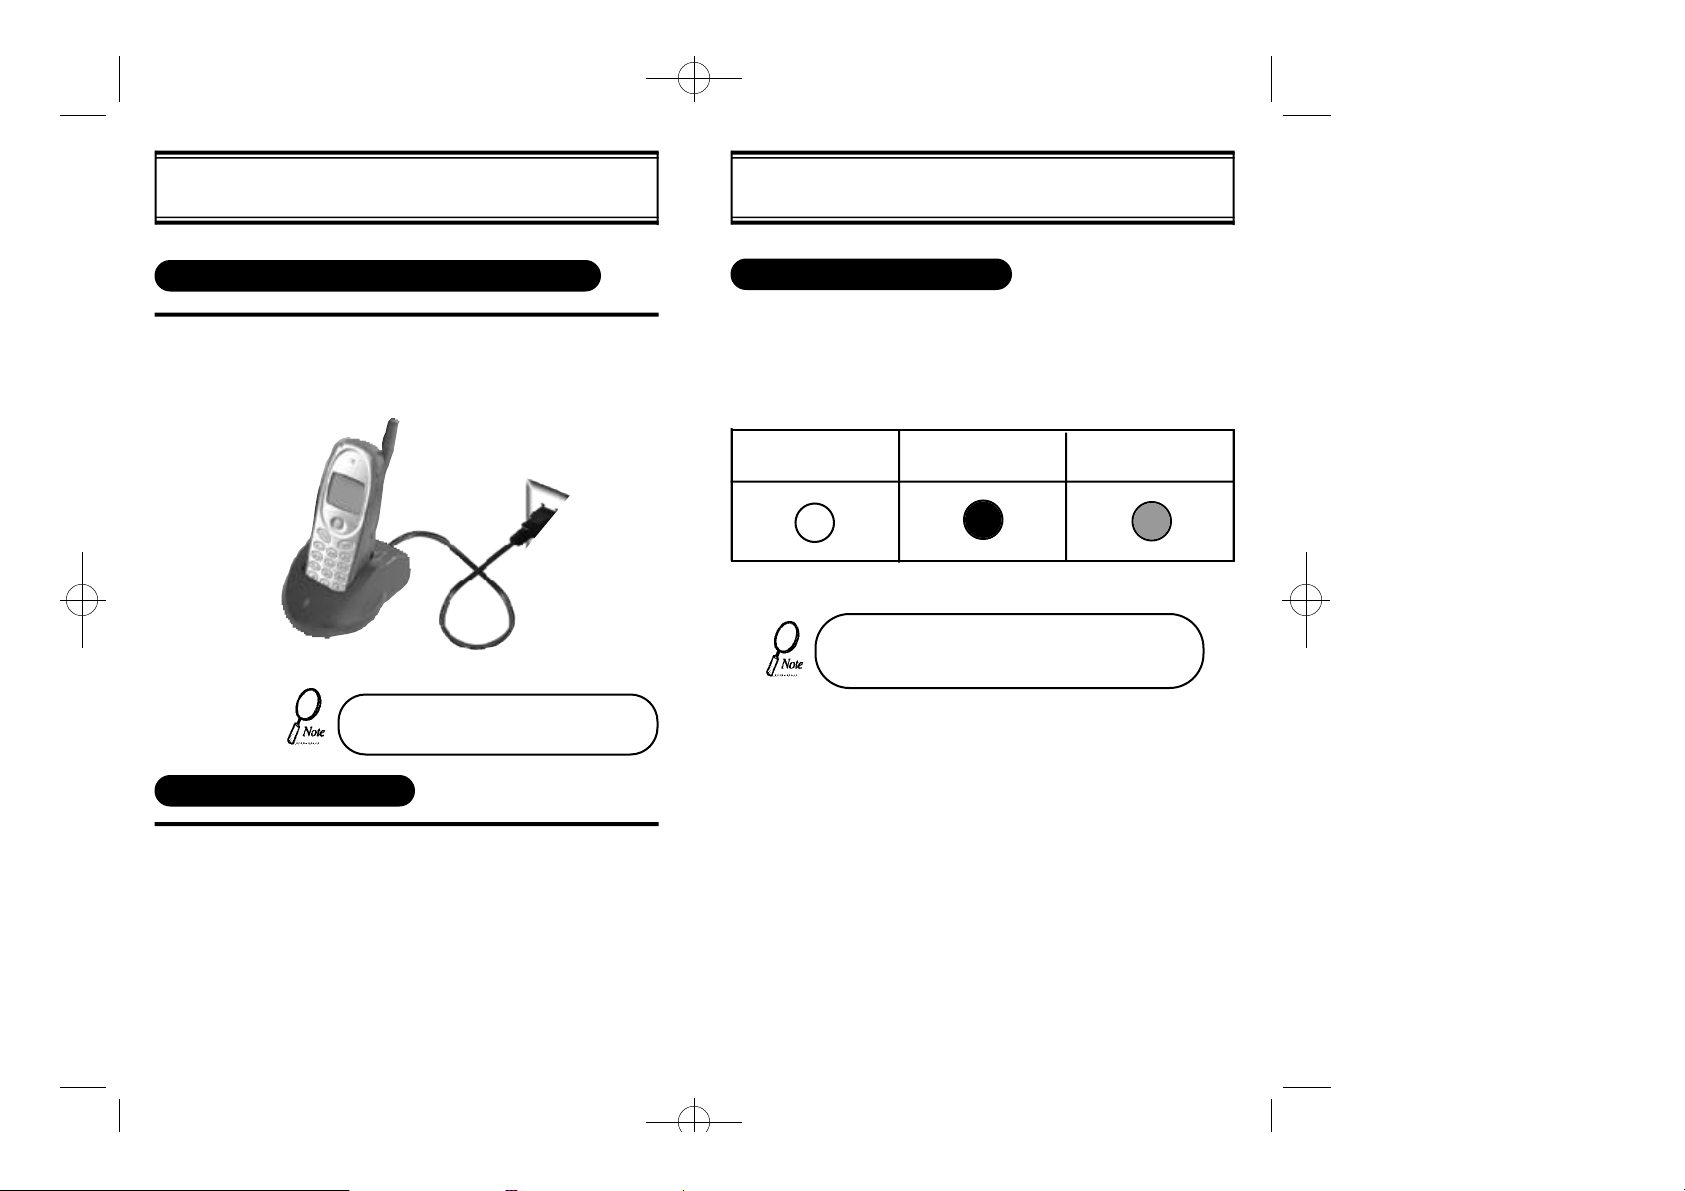
CHARGING COMPLETION
Charging is completed when the green-colored
LED stays on.
STATUS OF CHARGER LED’S
A steady red light means the phone is charging.
A flashing red light means the connection is bad, Unplug the phone
and try again.
An orange light means there could be something wrong with either
the charger or the battery. Reinsert and try again.
A green light means charging is completed.
Possible Defect Charging in Progress Charging Completion
(Orange Color On) (Red Color On) (Green Color On)
If the red LED does not come on after the handset or
battery has been inserted into the charging slot, reinsert or check power.
[8] [9]
Page 9
06/09 2000.6.9 9:56 AM 페이지16
SAFETY AT A GLANCE
Read these simple guidelines before using your phone.
Failure to comply with these guidelines may be dangerous or illegal.
FCC Identifier
CKLHGT-1000E
Road Safety Comes First
Do not use a hand-held phone while driving. Park the vehicle first.
Switch Off In Hospitals
Switch off your phone when near medical equipment.
Follow any regulations or rules in force.
Switch Off On Aircraft
Mobile phones can cause interference.
Using them on aircraft is illegal.
Switch OffWhen Refueling
Do not use the phone at a refueling point.
Do not use near fuels or chemicals.
Switch Off Near Blasting
Do not use the phone where blasting is in progress.
Observe restrictions and follow any regulations or rules in force.
Use Sensibly
Use only in the normal position (to ear).
Avoid unnecessary contact with the antenna when phone is on.
Qualified Service
Only qualified service personnel may install or repair cellular phone equipment.
Accessories and Batteries
Use only approved accessories and batteries.
Do not connect incompatible products.
Body-worn Operating Reguirements
When wearing your phone on your body, you must use a belt-clip, holster, or
similar accessory that has no metallic component in the assembly and provides
at least 2cm separation between your body and the phone, including its antenna whether extended or retracted.
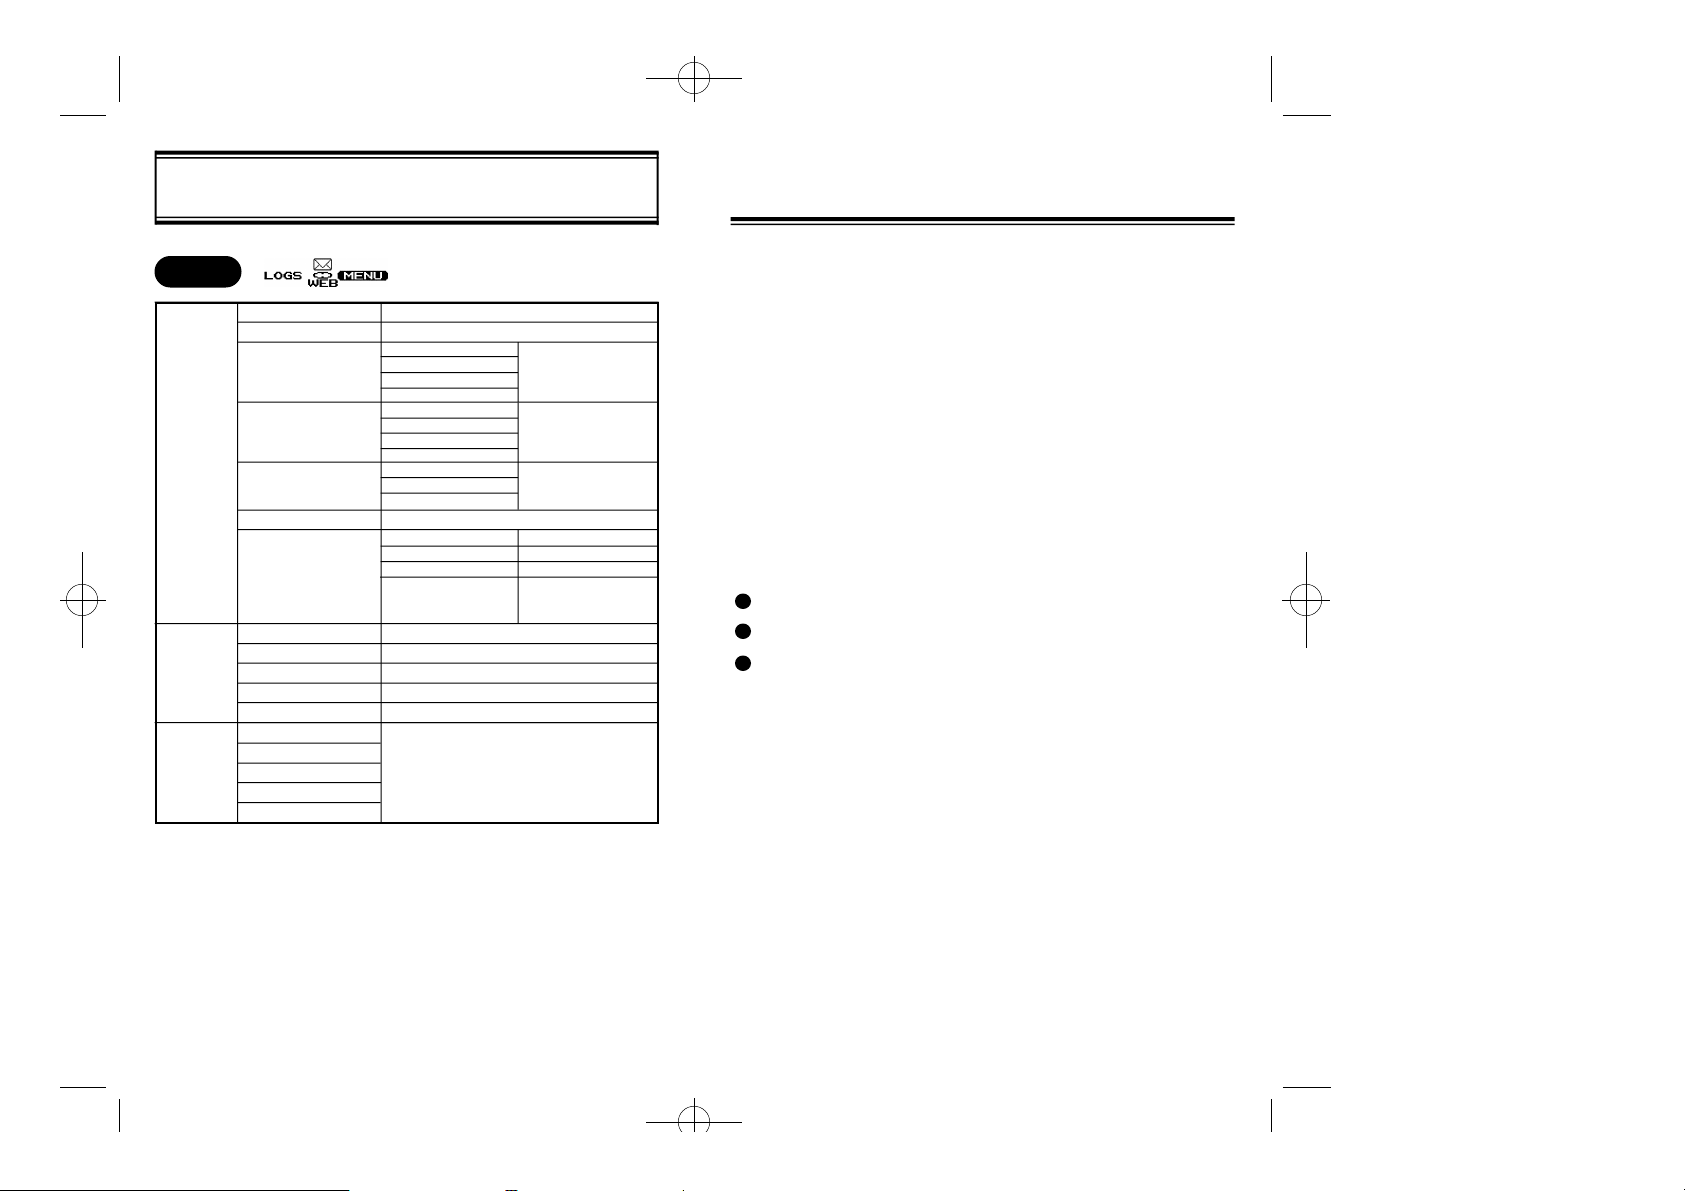
MENU
1.Call Log
2.Phonebook
3.Timers
4.Sounds
5.Display
MENU FLOWCHART FOR PE-2
1.Called
2.Answered
3.Missed
4.Erase
1.Find #
2.Find Name
3.Find Loc
4.Add Entry
1.Last Call
2.All Calls
3.Home Calls
4.Roam Calls
5.Resettable
1.Volume
2.Alert Type
3.SMS Alert
4.Ringer Type
5.Tone Length
6.Melody
1.B a c k l i g h t
2.Banner
3.Contrast
4.My number
5.Version
List of last ten
numbers
Called, Answered, Missed, All
Options:
Edit,Erase,ID Ringer
Enter: Name, Phone #, Mem #
Reset
1.Ringer
2.Earpiece
3.Keypad
4.Hands free
5.Headset
1.Ringer
2.Vibration
3.Vib+Ringer
Off, On (Once, Every 5 min)
1.Voice Call
2.
Page/Text
3.Voice Mail
Short, Long
1.New Music
2.Edit Music
3.Tempo
4.Play Music
Off, 5(default), 20 Secs, Always On
Edit
Bars (2,4,6,8,10,12,14)
XXX-XXX-XXXX
PCB, B/B, S/W, PRL, ESN
Options:
Save,Erase,ID Ringer
Silent, Bars (3,6,9,12)
Bars (3,6,9,12)
Silent, Bars (3,6,9,12)
Bars (3,6,9,12)
Bars (3,6,9,12)
Vibration Mode icon is
displayed
Program My Melody
Largo, Adagio, Moderato, Allegro, Presto
Listen to My Melody
[10]
[11]
Page 10
06/09 2000.6.9 9:56 AM 페이지18
MENU
6.Security
7.Setup
8.Alerts
MENU FLOWCHART FOR PE-2
1.Phone Lock
2.Lock Code
3.Restrict
4.Reset
5.Emergency
6.Voice Priv
7.Advance
1.Auto Retry
2.Auto Answer
3.Auto Hyphen
4.Keyguard
5.One-Touch
1.Roam
2.Drop
3.Minute
4.Service
5.Voice Priv
Off,Now,On Pwr-up
Enter New Code
1.Phone Book
2.Incoming
3.Outgoing
4.Phbk Call
1.Timers
2.Phone Book
3.Call Log
4.All
1.EMERGENCY#1
2.EMERGENCY#2
3.EMERGENCY#3
Standard/Enhanced
1.Set NAM
2.Auto NAM
3.Activation
4.Data/Fax
On/Off
Off,#Rings(1,3,5)
On/Off
Off,On,On pwr-up
Yes/No
On/Off
Yes, No
Reset
Edit
NAM#1/NAM#2
On/Off
DCS, PCS
OFF,Fax for next call,Data for
next call,Fax until power OFF,
Data until power OFF
CHAPTER 2
BASIC OPERATION
SWITCHING THE PHONE ON OR OFF
u
MAKING A CALL
v
FIXING DIALING MISTAKES
w
ANSWERING CALLS
x
ONE-TOUCH DIALING
y
GETTING YOUR OWN PHONE NUMBER
z
ETIQUETTE MODE
{
ADJUSTING THE VOLUME
|
LOCKING THE KEYPAD
}
1 0
EMERGENCY DIALING
1 2
DESCRIPTION OF SCREEN
}
1 3
NAVIGATION KEY
[13][12]
Page 11
06/09 2000.6.9 9:56 AM 페이지20
BASIC OPERATION
SWITCHING THE PHONE ON OR OFF
1
MAKING A CALL
Follow these easy steps whenever you want to make a call:
1
2
3
4
l To turn your phone on, just press the key
once. To turn off, press and hold the key until
the screen says “POWR OFF”, then release the
key.
Make sure the phone is on by checking the screen
for display indicators.
Enter the phone number.
Press to place the call.
Press to disconnect when you’re finished with
the call.
BASIC OPERATION
ANSWER CALLS
1
ONE-TOUCH DIALING
You can dial a phone book entry simply by pressing its memory
location number. For memory locations 1 to 9 , press and hold the
appropriate key until the display shows “Connecting...”
For locations 10 to 99, press the first digit, then press and hold the
key for the second digit.
GETTING YOUR OWN PHONE NUMBER
You may forget your own phone number since you probably won’t call
it often. Follow these steps to get it:
1
l Your phone must be turned on to receive calls.
When your phone rings, press to answer the
call. You can adjust the ringer volume when you
have an incoming call by pressing the volume control buttons. These buttons can also be used to
adjust the earpiece volume during a call.
Select “MEMU”
• You can also place calls by using your unit’s
call log, phone book, or one-touch dialing.
FIXING DIALING MISTAKES
1
l If you make a mistake while entering a phone
number, just press to erase the last digit. To
erase the entire number, hold down until the
screen is blank. Then press once to display
the menu.
2
3
Scroll and select “DISPLAY”
Scroll and select “MY NUMBER”
[15][14]
Page 12

06/09 2000.6.9 9:56 AM 페이지22
BASIC OPERATION BASIC OPERATION
ETIQUETTE MODE
There are times when a ringing phone is inappropriate or disrup-
tive(movie theater, library, wedding, etc.). To quickly prevent your
phone from ringing, press and hold the “ ”key until the message
“Etiquette Mode ON”appears. The phone will now only vibrate,
even when the selected alert type is Ringer(see page xx). The
screen will continuously display “-Ringer Off ”while Etiquette
Mode is active. To deactivate, press and hold the “ ”key until the
message “Etiquette Mode OFF”appears.
ADJUSTING THE VOLUME
1
l You can adjust the volume settings for your
phone’s ringer, earpiece, and keypad beep,
as well as for optional items like the handsfree car kit and headset.
To do this, see page 51.
*
*
LOCKING THE KEYPAD
You can lock the keypad to avoid accidental key presses. Your phone
will still receive incoming calls and messages. Just follow these steps:
1
2
3
4
A shortcut method is to simply hold down the “#” key until the
“KEYGUARD” message appears.
Select “MENU”
Scroll and select “SETUP”
Scroll and select “KEYGUARD”
Select “ON”
• To unlock your keypad, press any key to show
the message that the keypad is locked.
Then press 1 2 3.
• Dialing an emergency number will disable the
keyguard for five minutes.
[17][16]
Page 13
06/09 2000.6.9 9:56 AM 페이지24
BASIC OPERATION
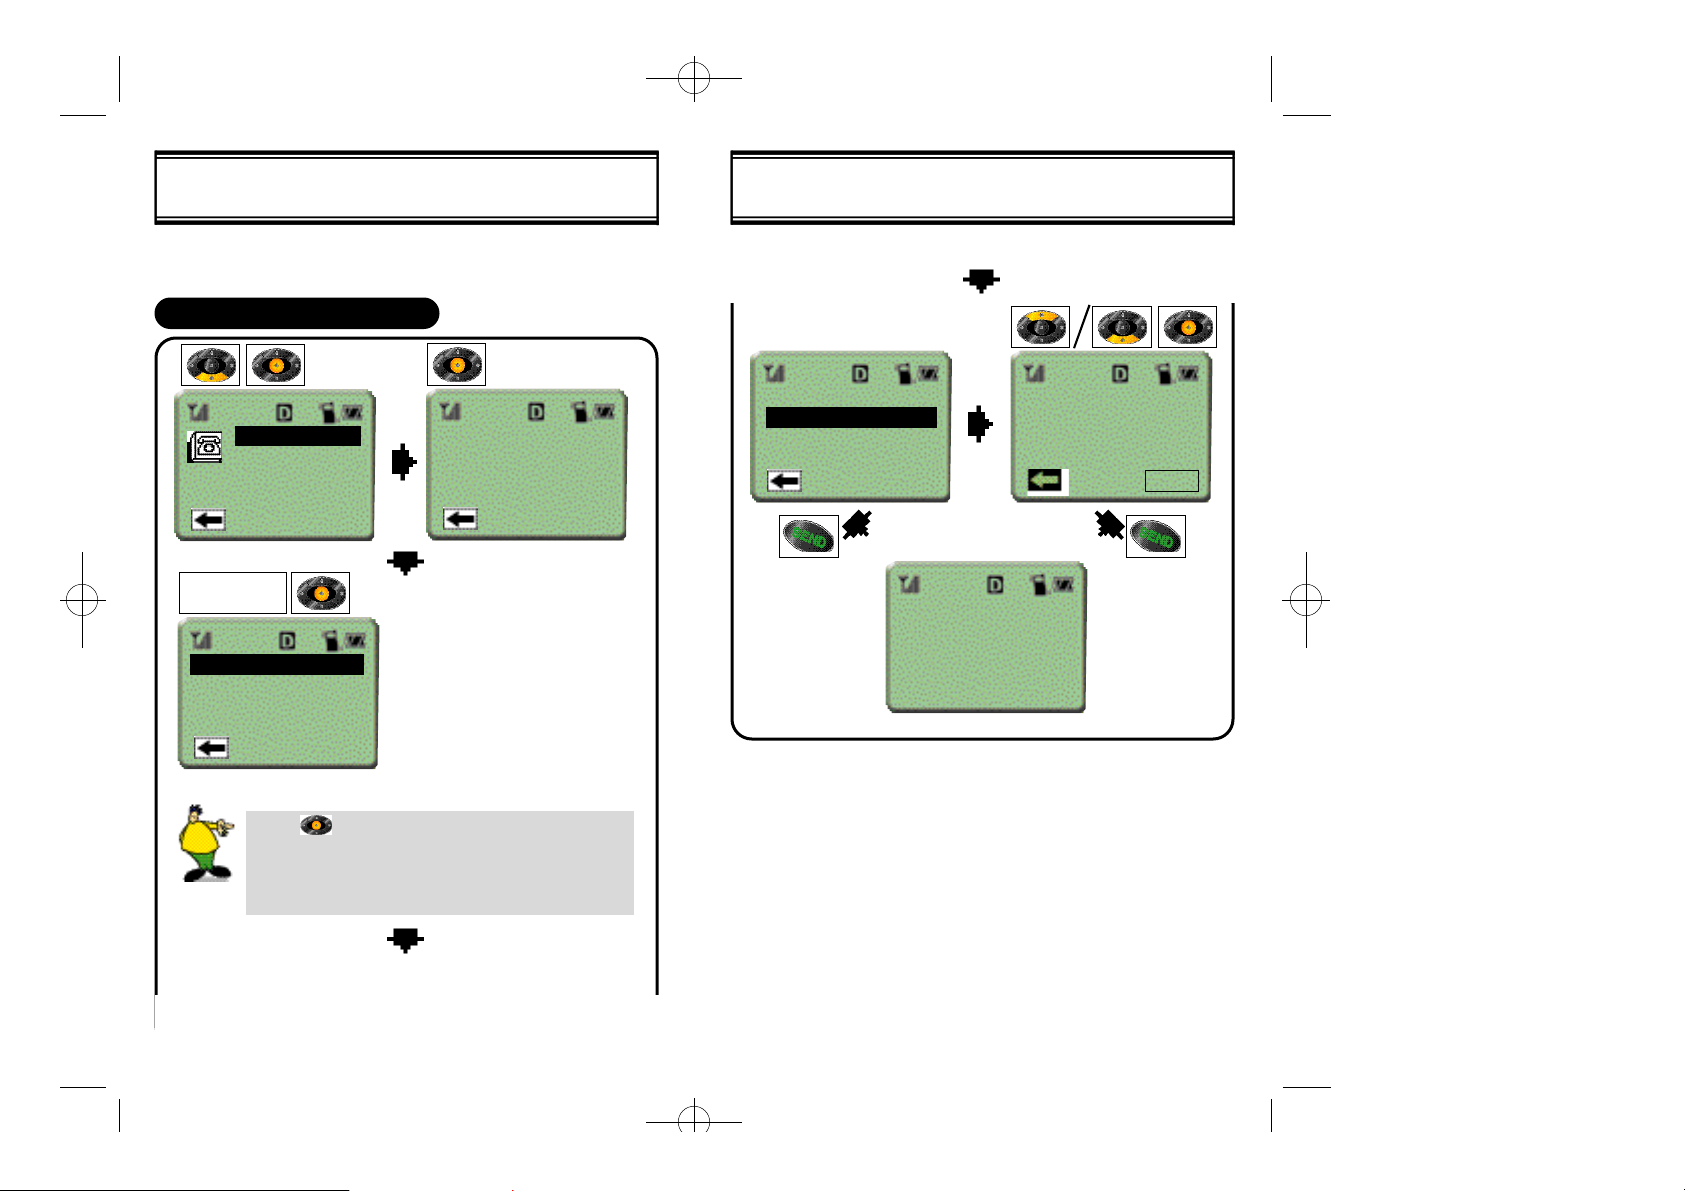
EMERGENCY DIALING
You can call 911 or one of your other three emergency numbers even
when your phone is locked or the keyguard is on. These numbers can
be dialed as long as you’re within a service area (check the signal
strength indicator)
CALLING 911
Dial 911 and press SEND
STORING AND EDITING EMERGENCY NUMBERS
You can save three emergency numbers (in addition to 911)
that can be dialed even when your phone is locked.
To store an emergency number:
1
2
3
Select “MENU”
Scroll and select “SECURITY”.
Enter your 4-digit lock code.(The default code is
usually the last four digits of your phone number.
To change your code, see page 66)
Scroll and select “EMERGENCY”
BASIC OPERATION
DESCRIPTION OF SCREEN
1
l The start screen, or banner screen,
appears when you first turn the phone on.
l Press [ ]to return to the start screen
from any submenu.(NOTE: Pressing [ ]
during a call will terminate the call.)
• If the user presses, when the phone is
requesting input (for example, a phone book
entry or an option setting), the phone reverts
to the start screen and does not save the
entry or set the option.
[18]
4
5
6
Select one of the three emergency numbers.
Select “EDIT” to enter or edit the emergency number.
Press to store.
[19]
Page 14
06/09 2000.6.9 9:56 AM 페이지26
BASIC OPERATION MEMO
NAVIGATION KEY
1
l Your phone has a navigation key below the
display.
Banner
04/05 Web 10:41a
2
l The navigational button allows you to high-
light [Logs], [SMS] (Short Message
Service, represented by the envelope
icon), [Menu], and [Web]. Press the navigation key up, down, left or right to navigate through the phone’s menus and submenus. You can also use it to scroll
through a list, such as the names, locations and numbers stored in the phone
book. Simply press the center of the navigation key to make the selection.
l You may also use the “ ”Key to scroll [up]
and the “#”key to scroll[down].
l The start screen includes:
Banner (user programmable),
time, date, four menu options
*
[20] [21]
Page 15
06/09 2000.6.9 9:56 AM 페이지28
CALL LOG
u
PHONEBOOK
v
TIMERS
w
SOUNDS
x
DISPLAY
y
SECURITY
z
SETUP
{
ALERTS
|
CHAPTER 3
THE MAIN MENU
THE MAIN MENU
Banner
04/05 Wed 10:41a
Sounds
Display
Security
Setup
Alerts
Call Log
Phonebook
Timers
Sounds
Display
l Scroll [Down] to see 8 menu
options and press [Center] to
select.
l To exit, press [Left] to
highlight and
press [Center].
[22]
[23]
Page 16
06/09 2000.6.9 9:56 AM 페이지30
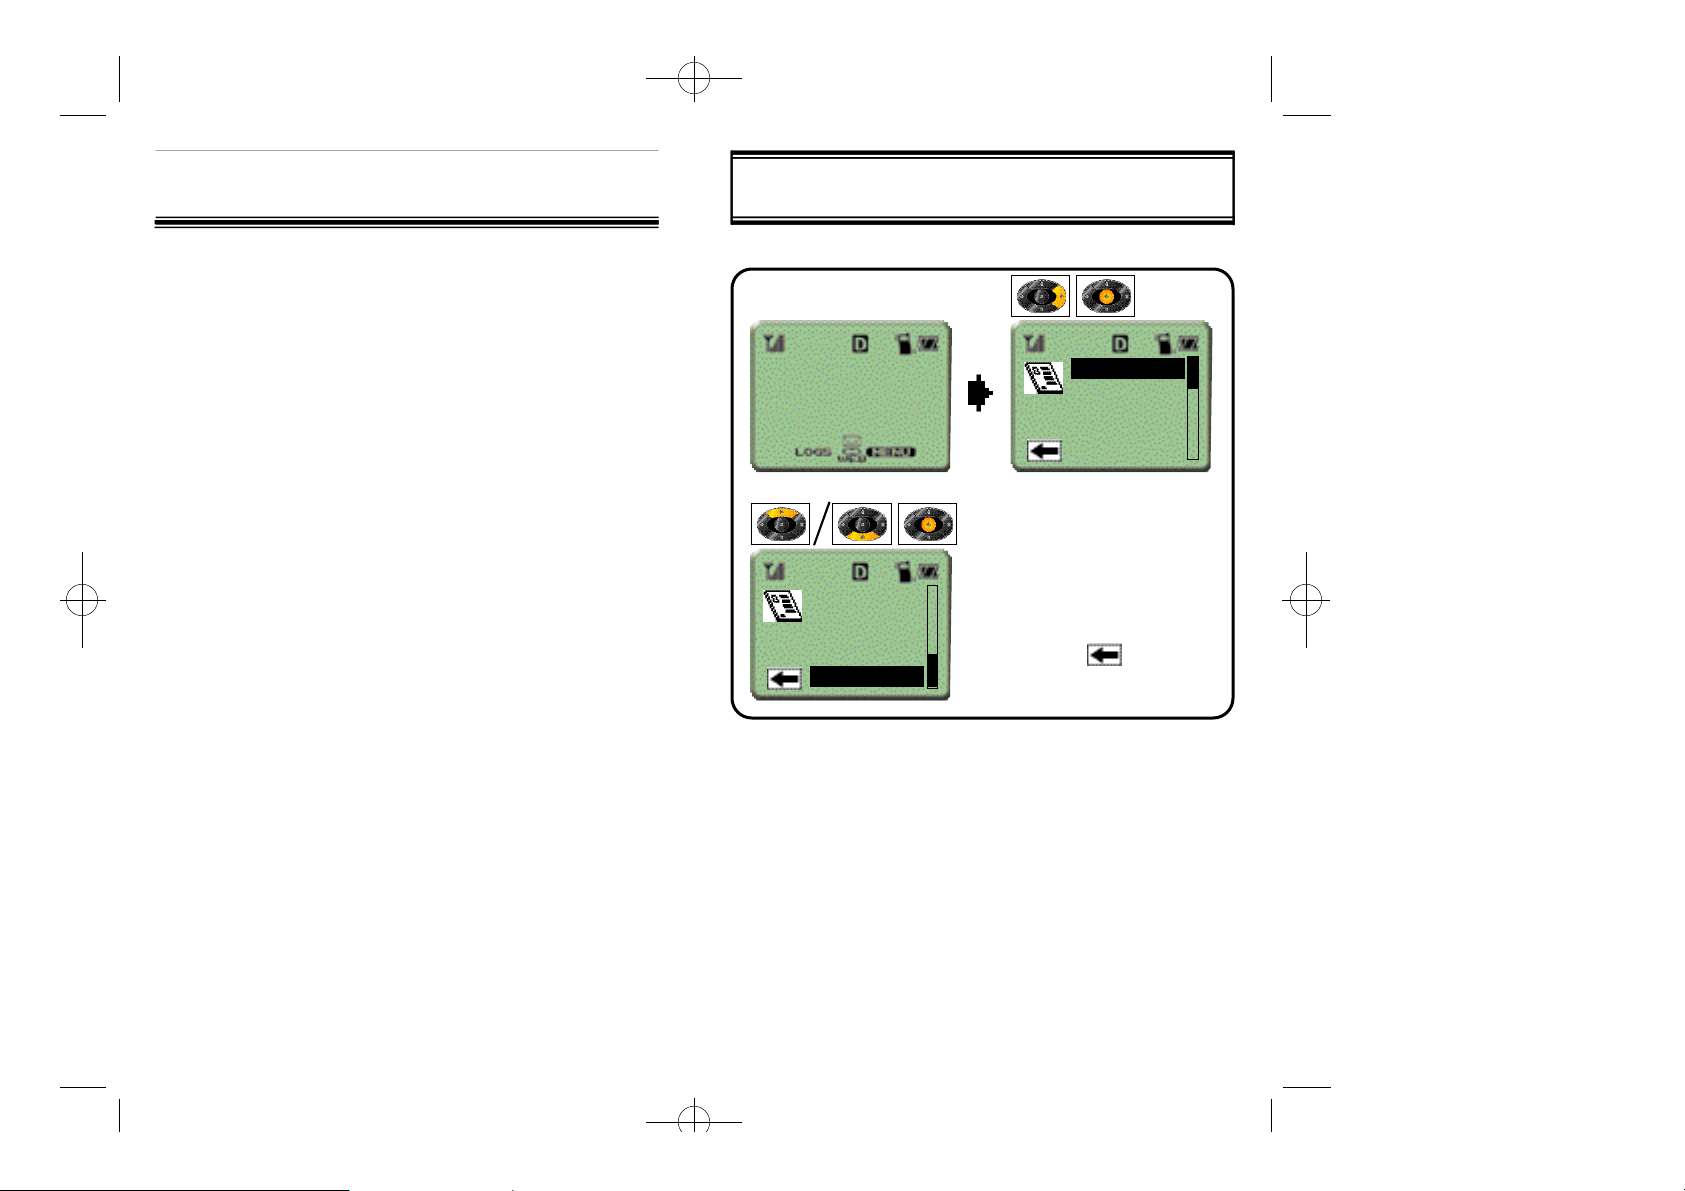
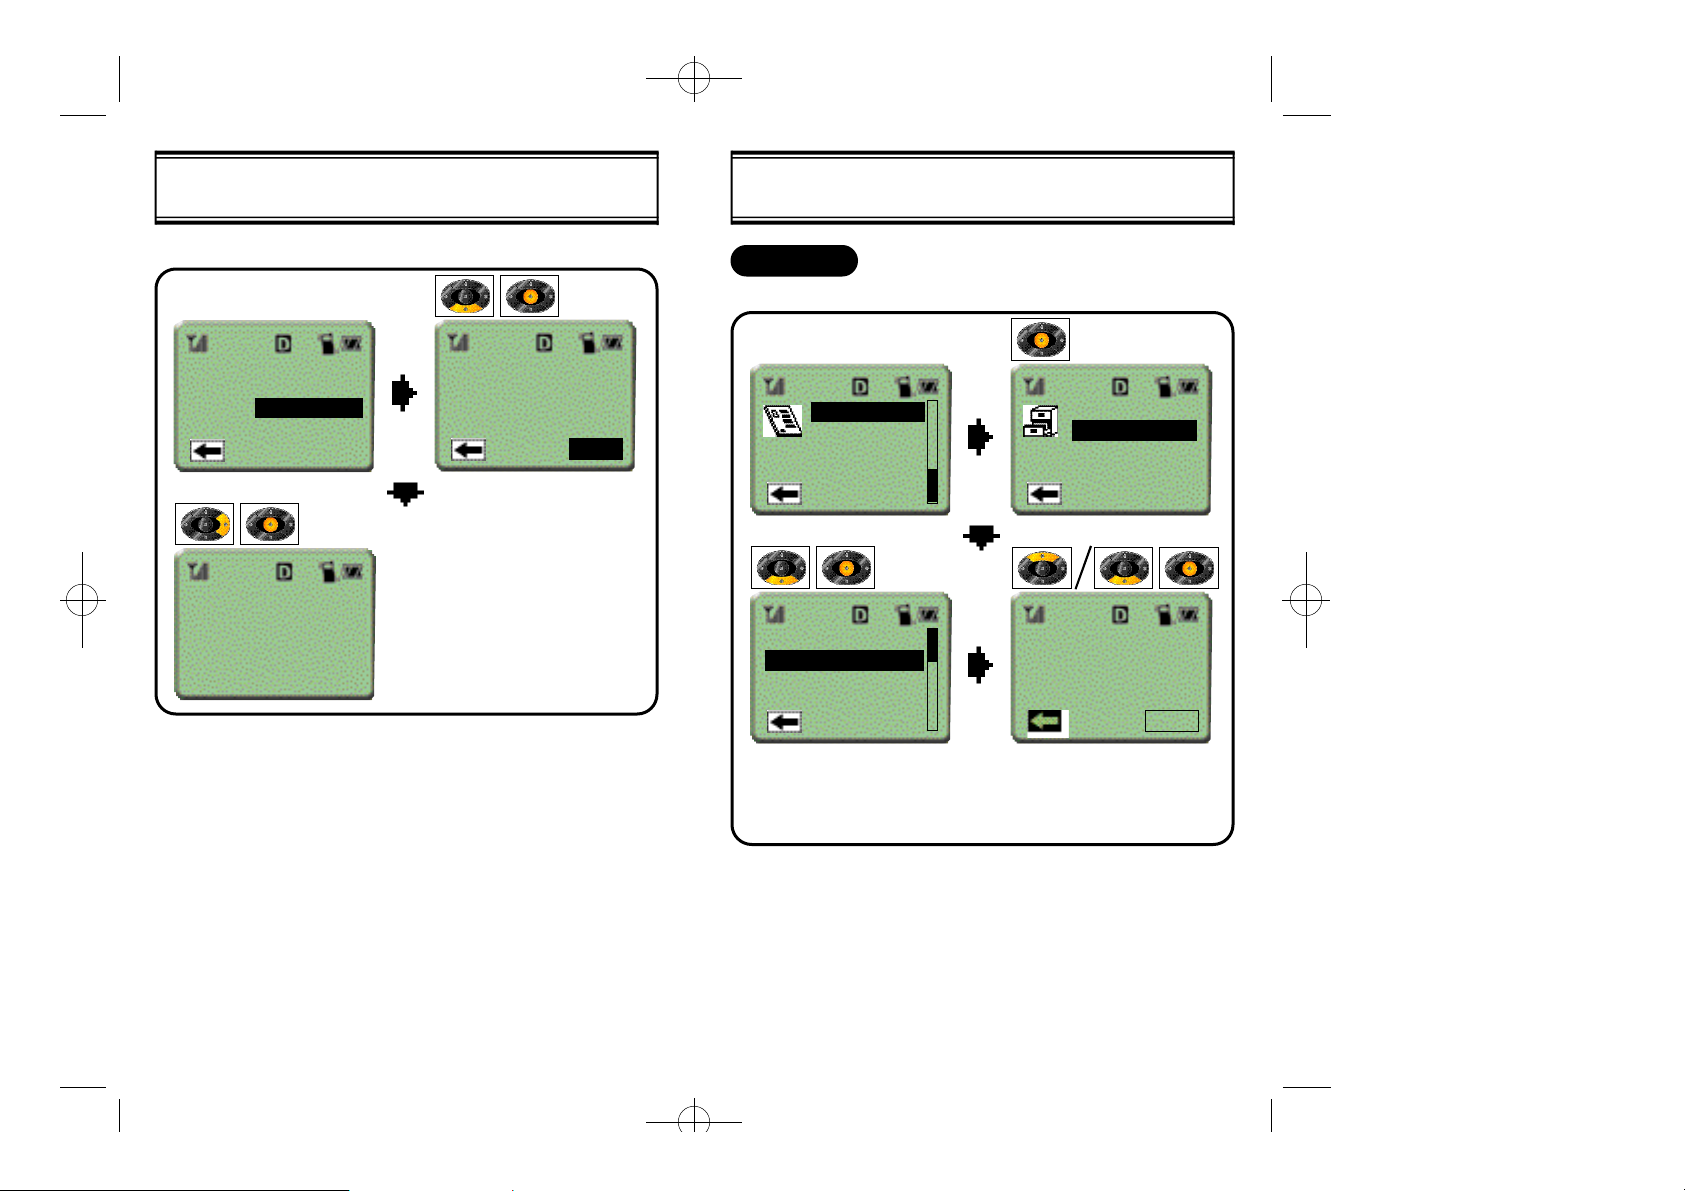
THE MAIN MENU [CALL LOG]
In this option, you can view the number, name (if stored in the
phonebook), date/time, and duration of the last ten numbers called,
answered, or missed.
CALLED
Displays information for the last ten numbers called.
Call Log
Phonebook
Timers
Sounds
Display
619-611-6005
123-475-7890
Jane Doe
My Office
Called
Answered
Missed
Erase
CALL TO
619-611-6005
10:30P 08/15
27m30s
OPTION
THE MAIN MENU [CALL LOG]
When OPTION and SAVE are selected for a number that is not in the
phonebook, you can enter a name, memory location secret, and ringer
type for that number:
OPTION:CALL TO
619-611-6005
10:30P 08/15
27m30s
619-611-6005
ENTER NAME
OPTION
PHONE NUMBER
Bob Johnson
Save
Erase
ENTER
Enter Name
SELECTMEM LOC#
l Scroll [up]/[down] with the nav-
igation key. Press[center] to
select.
If the number is stored under a name in the phonebook, the
name appears in the list. Otherwise, the number is shown.
Bob Johnson
Location??
auto=02
619-611-6005
SECRET?
Yes
No
[25][24]
Page 17

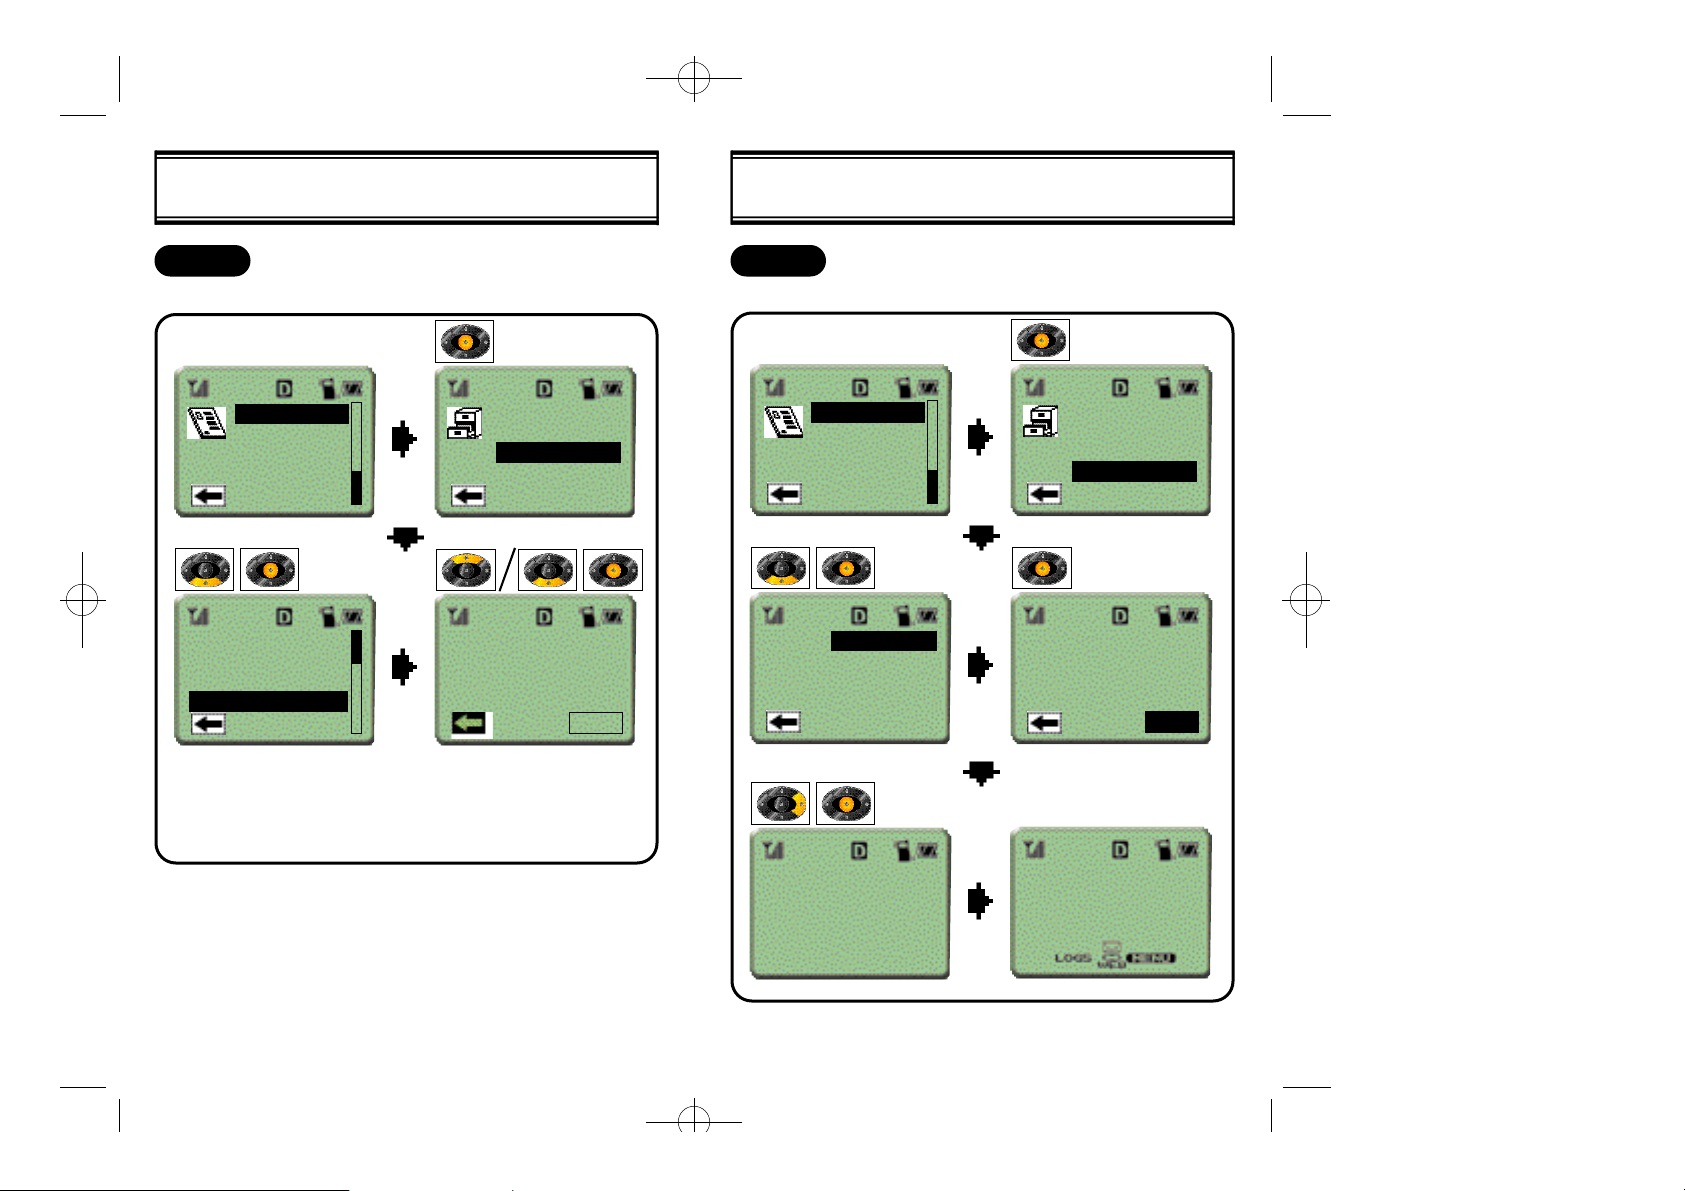
06/09 2000.6.9 9:56 AM 페이지32
THE MAIN MENU [CALL LOG]
SELECT
SECRET
1▶
ID RINGER TYPE
Type 1
Type 2
Type 3
l Scroll [up]/[down] with the
navigation key.
Press[center] to select.
This screen now says 1▶RINGER TYPE.
There is no “NONE”type.
There is a before selected type.
✓
RINGER TYPE
SELECT
SAVED!
THE MAIN MENU [CALL LOG]
When OPTION and EDIT are selected for a number that is already in
the phonebook, the user may change the entry. Suppose someone in
the phonebook has changed her last name:
OPTION:CALL TO
Jane Doe
10:30P 08/15
27m30s
123-123-1234
OPTION
PHONE NUMBER
Jane Deer
Edit
Erase
ID Ringer
ENTER
Enter Name
ENTER NAME
Jane Deer
Location??
auto=02
123-123-1234
SELECT
MEM LOC#
SECRET?
Yes
No
[27][26]
Page 18
06/09 2000.6.9 9:56 AM 페이지34
THE MAIN MENU [CALL LOG]
SELECT
SECRET
RINGER TYPE
None
Type 1
Type 2
Type 3
SELECT
RINGER TYPE
Overwrite 02?
Jane Doe
714-241-1500
YES
● This screen shows the old
information that shall be
overwritten with the new.
SAVED!
THE MAIN MENU [CALL LOG]
When OPTION and ID Ringer are selected, the user can choose the
ringer type for that person.
CALL TO
Jane Deer
10:30P 08/15
27m30s
OPTION
OPTION:
Save
Erase
ID Ringer
SELECT
RINGER TYPE
OPTION:
Save
Erase
ID Ringer
1▶
ID RINGER TYPE
Type 1
Type 2
Type 3
SAVED!
[29][28]
Page 19
06/09 2000.6.9 9:56 AM 페이지36
THE MAIN MENU [CALL LOG]
To erase an entry from memory:
OPTION:
Edit
Erase
ID Ringer
-
Erased
-
Erase
this Entry?
ERASE
● Press [right] on navigation
key to highlight “ERASE”
then press[center].
THE MAIN MENU [CALL LOG]
ANSWERED
Displays a list of the last ten calls answered.
Call Log
Phonebook
Timers
Sounds
Display
321-654-0987
Jane Doe
285-9738
My Office
CALLED BY
Jane Doe
10:30P 08/15
Called
Answered
Missed
Erase
27m30s
OPTION
l Scroll [up]/[down] with the
navigation key.
Press[center] to select.
[31][30]
Page 20
06/09 2000.6.9 9:56 AM 페이지38
THE MAIN MENU [CALL LOG]
MISSED
Call Log
Phonebook
Timers
Sounds
Display
123-123-1234
Henry 8
567-7825
My Office
Called
Answered
Missed
Erase
MISSED
My Office
11:06A 08/15
14m22s
OPTION
ERASE
The user can empty the memory one category at a time or all at once.Displays the last ten missed calls.
THE MAIN MENU [CALL LOG]
Call Log
Phonebook
Timers
Sounds
Display
Called
Answered
Missed
All
Called
Answered
Missed
Erase
Erase the
Dialed Stack?
ERASE
l Scroll [up]/[down] with the
navigation key.
Press[center] to select.
Dialed Stack
has been
CLEARED!
● Press [right] to highlight
“ERASE” then press
[center].
Banner
04/05 Wed 10:41a
[33][32]
Page 21
06/09 2000.6.9 9:56 AM 페이지40
THE MAIN MENU [PHONEBOOK]
The user can store up to 99 entries. The phonebook can be searched
by phone number, name, or memory location.
SEARCH BY PHONE NUMBER
Find #
Find Name
Find Loc
Add Entry
ENTER
PHONE NUMBER
713-777-1122
713-888-2211
Clark Smith
Enter Number
713
THE MAIN MENU [PHONEBOOK]
713-777-1122
713-888-2211
Clark Smith
Connecting...
713-888-2211
Memory 03
713-888-2211
OPTION
[34]
When [ ] is pressed after entering two or more
digits, the screen will show all the numbers that contain those consecutive digits in the phone book. For
example, a search for “21”above will display 713-8882211 but not 713-777-1122.l
[35]
Page 22

06/09 2000.6.9 9:56 AM 페이지42
THE MAIN MENU [PHONEBOOK]
Use OPTION to make changes to the entry. Suppose someone in the
phonebook has changed his phone number:
OPTION:Memory 03
Bob Johnson
713-241-1500
713-241-8888
ENTER NAME
OPTION
PHONE NUMBER
Bob Jonson
Edit
Erase
ID Ringer
ENTER
Enter Name
SELECT
MEM,LOC#
THE MAIN MENU [PHONEBOOK]
1▶
ID RINGER TYPE
Type 1
Type 2
Type 3
SAVED!
Overwrite 03?
Bob Johnson
713-241-1500
● This screen shows the old
information that shall be
overwritten with the new.
YES
Bob Johnson
Location??
auto=03
713-241-8888
SECRET?
Yes
No
[37][36]
Page 23

06/09 2000.6.9 9:56 AM 페이지44
THE MAIN MENU [PHONEBOOK]
Use OPTION to Erase an entry
Option:
Edit
Erase
ID Ringer
-
Erased
-
Erase
this Entry?
ERASE
l Press [right] on the naviga-
tion key to highlight “ERASE”
then press[center].
THE MAIN MENU [PHONEBOOK]
Use OPTION to Add an ID Ringer
OPTION:
Edit
Erase
ID Ringer
OPTION:
Edit
Erase
ID Ringer
1▶
ID RINGER TYPE
Type 1
Type 2
Type 3
l Scroll [up]/[down] with the
navigation key.
Press[center] to select.
[39][38]
Page 24

06/09 2000.6.9 9:56 AM 페이지46
THE MAIN MENU [PHONEBOOK]
SEARCH BY NAME
Call Log
Phonebook
Timers
Sounds
Display
ENETR NAME
SEARCH FOR
Jan
Jane Doe
Janet Smith
l Scroll [up]/[down] with the
navigation key.
Press[center] to select.
Find #
Find Name
Find Loc.
Add Entry
THE MAIN MENU [PHONEBOOK]
Jane Doe
Janet Smith
Connecting...
415-123-1234
You can use OPTION to Edit information, Erase the
entry, or select an ID Ringer.
Memory 20
Janet Smith
415-123-1234
OPTION
When [ ] is pressed after entering two or more
characters, the screen will show all the names that
contain those consecutive characters.
[41][40]
Page 25

06/09 2000.6.9 9:56 AM 페이지48
THE MAIN MENU [PHONEBOOK]
SEARCH BY MEMORY LOCATION NUMBER
Call Log
Phonebook
Timers
Sounds
Display
Enter Mem #
Memory 03
Find #
Find Name
Find Loc.
Add Entry
ENTER
MEMORY NUMBER
Memory 03
Jane Doe
123-987-9876
THE MAIN MENU [PHONEBOOK]
Connecting...
123-987-9876
The user can use OPTION to Edit information, Erase
the entry, or select an ID Ringer.
OPTION
To view the entire list of entries, press [up] or [down]
before entering a number. scroll and select the
desired entry.
[43][42]
Page 26

06/09 2000.6.9 9:57 AM 페이지50
THE MAIN MENU [PHONEBOOK]
When you make a phone number secret, the number is private and
cannot be viewed by other users. To view or edit a secret number ,
scroll [up]/[down] the phonebook list and select the entry by pressing
[center]. Select “option” and enter your 4-digit lock code. The secret
number is shown and you may now edit the entry by selecting
“option”.
Jane Doe
John Johnson
ENTER
LOCK CODE
----
Memory 22
John Johnson
-
SECRET
ENTER
LOCK CODE
Memory 22
John Johnson
123-000-1234
-
OPTION
OPTION
THE MAIN MENU [PHONEBOOK]
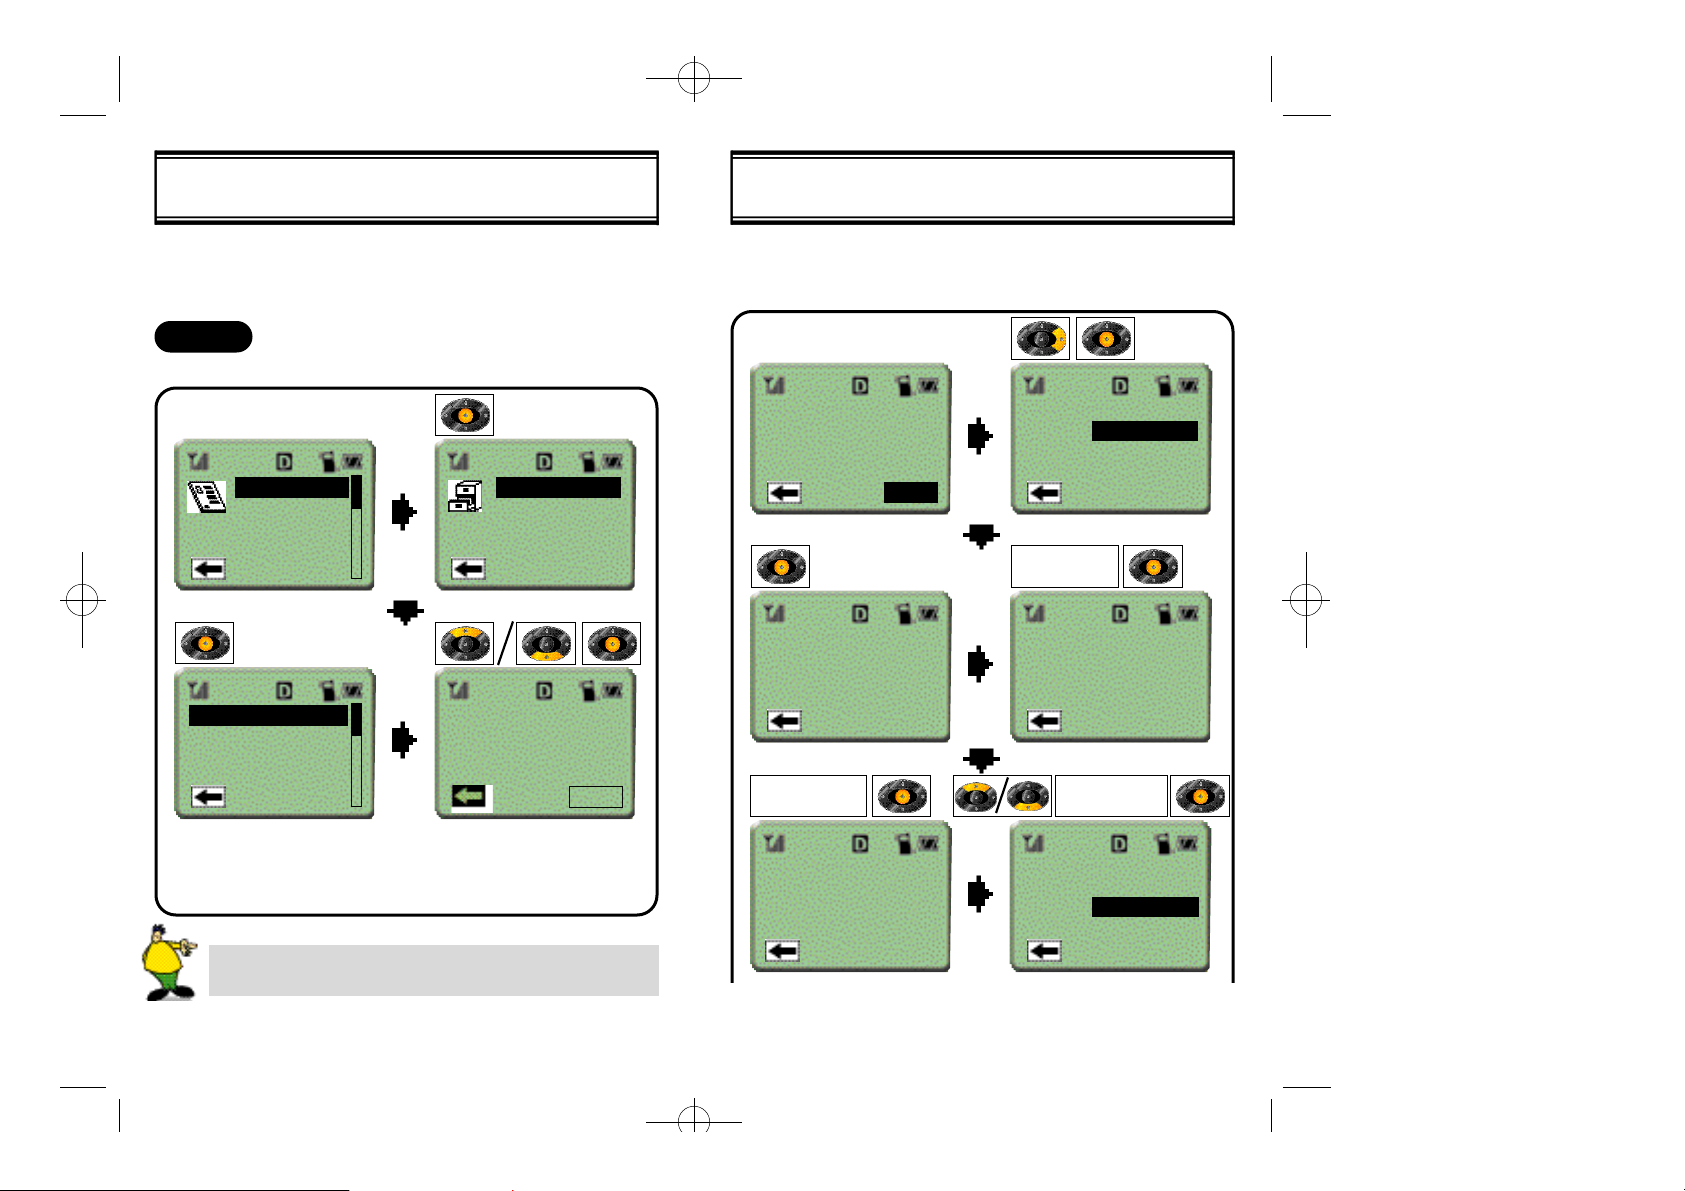
ADDING AN ENTRY
To enter text, use the numeric keys [1]...[9]. The following table shows
the character sequence when the same key is pressed repeatedly
Keypad 1 2ABC 3DEF 4GHI ... 9WXYZ
1
press
2
presses
3
presses
4
presses
5
presses
6
presses
7
presses
1 A D G ... W
1 B E H ... X
1 C F I ... Y
1 2 3 4 ... Z
1 a d g ... 9
1 b e h ... w
1 c f i ... x
1.The first character in a word will appear in upper
case for the first 3 presses (4 presses for 7PQRS
and 9WXYZ). From the second character on, the
letters will appear in lower case before cycling
through to the upper case letters.
2. clears the character marked by the cursor, or
the previous character if the cursor is blank.
3. Press and hold to clear the whole line.
Then tap once to show the cursor
4. Press [0] repeatedly to enter special characters
such as 0 . , ? ! @ % / ~ _ + - = ( ) # : ; ‘ “
5. [ ] moves the cursor to the left.
*
6. [#] moves the cursor to the right or puts a space
after a name.
7. [down] erases a character
8. [left] highlights and [right] returns to editing.
*
[45][44]
Page 27

06/09 2000.6.9 9:57 AM 페이지52
THE MAIN MENU [PHONEBOOK]
Call Log
Phonebook
Timers
Sounds
Display
Enter Number
123-123-1234
ENTER NAME
Find #
Find Name
Find Loc.
Add Entry
ENTER
PHONE NUMBER
Enter Name
Mike
SELECT
MEM LOC#
THE MAIN MENU [PHONEBOOK]
SELECT
RINGER TYPE
1▶
ID RINGER TYPE
Type 1
Type 2
Type 3
SAVED!
Mike
Location??
auto=02
123-123-1234
SECRET?
Yes
No
[47][46]
Page 28

06/09 2000.6.9 9:57 AM 페이지54
THE MAIN MENU [TIMERS]
In this menu you can check your phone’s timers to see the durations
for the last call, calls in the home area, calls in the roam area, and
total call airtime.
LAST CALL
Displays the duration of the last call
Call Log
Phonebook
Timers
Sounds
Display
LAST
CALL TIME
5:32
Last Call
All Calls
Home Calls
Roam Calls
Resettable
THE MAIN MENU [TIMERS]
ALL CALLS
Displays the total duration of all calls.
This timer is not resettable by the user.
Last Call
All Calls
Home Calls
Roam Calls
Resettable
HOME CALLS
Displays the duration of calls made from the home area.
ALL
29 calls
45:15
RESET
Last Call
All Calls
Home Calls
Roam Calls
Resettable
HOME CALL
14 calls
20:32
RESET
[49][48]
Page 29

06/09 2000.6.9 9:57 AM 페이지56
THE MAIN MENU [TIMERS]
ROAM CALLS
Displays the duration of calls made from the roam area.
Last Call
All Calls
Home Calls
Roam Calls
Resettable
RESETTABLE
Reset the timers for Last Call,Home Calls,and Roam Calls.
Call Log
Phonebook
Timers
Sounds
Display
ROAM CALL
12 calls
16:08
Last Call
All Calls
Home Calls
Roam Calls
Resettable
RESET
THE MAIN MENU [SOUNDS]
There are 6 options that you can set.
VOLUME
You can adjust the following volume levels: Ringer, Earpiece, Keypad,
Handsfree car kit, and Headset.
Call Log
Phonebook
Timers
Sounds
Display
Ringer
Earpiece
Keypad
Handsfree
Headset
Volume
Alert Type
SMS Alert
Ringer
Tone Lngth
SELECT
RING VOL
RING
VOLUME
RESETTABLE
35 calls
03:20:32
l Scroll [up]/[down] with the
navigation key.
Press[center] to select.
RESETTABLE
0 calls
0:00
RESET RESET
[51][50]
Page 30

06/09 2000.6.9 9:57 AM 페이지58
THE MAIN MENU [SOUNDS]
ALERT TYPE
You can select the alert type as audible ringer, vibration, or both.
Call Log
Phonebook
Timers
Sounds
Display
RINGER TYPE
✓
Ringer
Vibration
Vib+Ringer
Volume
Alert Type
SMS Alert
Ringer Type
Tone Lngth
Volume
Alert Type
SMS Alert
Ringer Type
Tone Lngth
THE MAIN MENU [SOUNDS]
SMS ALERT
When a new SMS message is received, the phone can alert you
either once or every five minutes. You can also choose to turn off the
audible indicator.
Call Log
Phonebook
Timers
Sounds
Display
SMS ALERT
Off
✓
Once
Every5min
Volume
Alert Type
SMS Alert
Ringer
Tone Lngth
Volume
Alert Type
SMS Alert
Ringer
Tone Lngth
l Scroll [up]/[down] with the
navigation key.
Press[center] to select.
l Scroll [up]/[down] with the
navigation key.
Press[center] to select.
[53][52]
Page 31

06/09 2000.6.9 9:57 AM 페이지60
THE MAIN MENU [SOUNDS]
RINGER
Choose from 20 different ringer types: 10 beeps, 9 preprogrammed
melodies, and the user-programmable My Melody.A different ringer
may be assigned to incoming calls, pages, and voice mail.
Volume
Alert Type
SMS Alert
Ringer Type
Tone Length
RINGER TYPE
✓
Type 1
Type 2
Type 3
Type 4
Voice Call
Page/Text
Voice Mail
RINGER TYPE
Type 8
Type 9
Type 10
Type 11
THE MAIN MENU [SOUNDS]
TONE LENGTH
You can select the length of the touch-tone when dialing numbers.
This is useful because some devices (such as answering machines)
require tones of longer length.
Call Log
Phonebook
Timers
Sounds
Display
TONE LENGH
✓
Short
Long
l Scroll [up]/[down] with the
Volume
Alert Type
SMS Alert
Ringer Type
Tone Length
navigation key.
Press[center] to select.
RINGER TYPE
Type 17
Type 18
Type 19
✓
My Melody
l Scroll [up]/[down] with the
navigation key.
Press[center] to select.
[55][54]
Page 32

06/09 2000.6.9 9:57 AM 페이지62
THE MAIN MENU [SOUNDS]
MELODY
You compose your own melody and select it as the
ringer type.
TO ENTER NEW MUSIC
New Music
Edit Music
Tempo
Play Music
USE NUMERIC KEYS TO
CHOOSE NOTES
Largo
Adagio
Moderato
Allegro
Presto
THE NAME OF
THE MELODY?
Sweet Home
SELECT
TEMPO
THE MAIN MENU [SOUNDS]
HOW TO ENTER MELODY
- The numeric dial keys [1], [2], [3] [8] correspond to the musical
notes do, re, mi, fa, sol, la ti, and do, respectively. Accordingly, [9]
and [0] are re and mi, but an octave higher than [2] and [3].
- Select the length of tone by pressing [up] or [down] after the quarter
note is displayed.
- When [#] key is pressed, the # sign is displayed under the musical
note, and the note is raised by a half step. Does not affect mi [3 or
0] or ti [7].
- To enter a pause, press [ ], then [up] or [down] to select length of
pause.
- Use the volume control buttons to select a note for editing. Press
[vol. up] to scroll left and [vol. down] to scroll right.
- Press to erase the last note entered.
- Press to play back at any time during editing.
(Press to stop playback.)
- After entering ten notes, the screen moves to the next page.
You can enter up to 100 notes.
- Press [center] key when editing is finished.
*
ENTER NAME
OVERWRITE?
Yes
No
[
MELODY
SAVED!
[57][56]
Page 33

06/09 2000.6.9 9:57 AM 페이지64
THE MAIN MENU [SOUNDS]
TO EDIT MY MELODY
You can edit a previously stored My Melody using the commands listed above.
TO SELECT THE TEMPO
New Music
Edit Music
Tempo
Play Music
SELECT
TEMPO
New Music
Edit Music
Tempo
Play Music
- Select the speed at which the music
is played.
Largo
Adagio
Moderato
Allegro
Presto
THE MAIN MENU [SOUNDS]
You can check the music stored in My Melody.
TO PLAY MY MELODY
New Music
Edit Music
Tempo
Play Music
SELECT
MELODY
New Music
Edit Music
Tempo
Play Music
THE NAME OF
THE MELODY:
Sweet Home
[59][58]
Page 34

06/09 2000.6.9 9:57 AM 페이지66
THE MAIN MENU [DISPLAY]
There are five options that you can choose from:
BACK LIGHT
You can select how long the back light of the LCD will stay on after
each key press.
Call Log
Phonebook
Timers
Sounds
Display
BACK LIGHT
Off
5 Secs
✓
20 Secs
Always On
Backlight
Banner
Contrast
My Number
Version
Backlight
Banner
Contrast
My Number
Version
THE MAIN MENU [DISPLAY]
BANNER
You can customize the Banner (Power-on Message) that appears on
the screen when the phone is turned on.
Call Log
Phonebook
Timers
Sounds
Display
Banner
EDIT
Backlight
Banner
Contrast
My Number
Version
EDIT NAME
My Phone
EDIT NAME
My Phone
04/05 Wed 10:41a
[61][60]
Page 35

06/09 2000.6.9 9:57 AM 페이지68
THE MAIN MENU [DISPLAY]
CONTRAST
Call Log
Phonebook
Timers
Sounds
Display
CONTRAST LEVEL Backlight
Backlight
Banner
Contrast
My Number
Version
CONTRAST LEVEL
Banner
Contrast
My Number
Version
SELECT
THE MAIN MENU [DISPLAY]
MY NUMBER
You can see your own mobile identification number (MIN).Set the contrast level of the LCD screen.
Call Log
Phonebook
Timers
Sounds
Display
123-456-7890
Backlight
Banner
Contrast
My Number
Version
[63][62]
Page 36

06/09 2000.6.9 9:57 AM 페이지70
THE MAIN MENU [DISPLAY]
VERSION
You can see the phone’s software version.
Call Log
Phonebook
Timers
Sounds
Display
Phone Version
PCB :
B/B :
S/W :
NEXT
PRL
ESN
Backlight
Banner
Contrast
My Number
Version
THE MAIN MENU [SECURITY]
In this option, you can access the phone’s secured information by
entering the 4-digit lock code.
LOCKING THE PHONE
Phonebook
Timers
Sounds
Display
Security
INPUT CODE
Phone Lock
Lock Code
Restrict
Reset
Emergency
ENTER
LOCK CODE
LOCK MODE
✓
Off
Now
On pwr up
----
LOCK MODE
✓
Off
Now
On pwr up
My Phone
04/05 Wed 10:41a
Press END
to unlock
[65][64]
Page 37

06/09 2000.6.9 9:57 AM 페이지72
THE MAIN MENU [SECURITY]
l Choosing NOW sets an immediate, one-time lock on
the phone. When the user unlocks the phone, the
lock mode will be set to OFF.
l Choosing ON PWR-UP locks the phone so that the
4-digit lock code must be entered each time the
phone is turned on.
l The user can dial emergency numbers while the
phone is locked.
TO UNLOCK THE PHONE
My Phone
04/05 Wed 10:41a
Press END
to unlock
INPUT
PHONENUMBER
ENTER
LOCK CODE
----
THE MAIN MENU [SECURITY]
CHANGING THE LOCK CODE
Phone Lock
Lock Code
Restrict
Reset
Emergency
ENTER NEW CODE ENTER NEW CODE
RE-ENTER
NEW CODE
----
ENTER
NEW CODE
----
Banner
04/05 Wed 10:41a
CORRECT CODE INCORRECT CODE
My Phone
LOCK CODE
04/05 Wed 10:41a
INCORRECT
[67][66]
Page 38

06/09 2000.6.9 9:57 AM 페이지74
THE MAIN MENU [SECURITY]
IF THE USER RE-ENTERS THE NEW CODE INCORRECTLY
CODES DO NOT
MATCH PLEASE
TRY AGAIN
ENTER NEW CODE
RE-ENTER
NEW CODE
----
ENTER
NEW CODE
----
Banner
04/05 Wed 10:41a
THE MAIN MENU [SECURITY]
RESTRICT
The user can restrict the usage of the phone book, incoming calls,
and outgoing calls.
Phone Lock
Lock Code
Restrict
Reset
Emergency
RESTRICT
PHONEBOOK
Yes
✓
No
Phonebook
Incoming
Outgoing
Phbk Call
If both the keyguard and the Phone Lock are activated, you must first unlock the keyguard before you
can turn off the Phone Lock.
l Phonebook : Deny all access to the internal
phone book.
l Incoming : The phone will not accept any
incoming calls.
l Outgoing : The phone cannot make any
outgoing calls.
l Phbk Call : The phone can make outgoing calls
only to numbers in the internal
phone book.
[69][68]
Page 39

06/09 2000.6.9 9:57 AM 페이지76
THE MAIN MENU [SECURITY]
RESET
This option allows the user to reset the timers, phonebook, and call.
RESETTING THE PHONE
Phone Lock
Lock Code
Restrict
Reset
Emergency
Reset Phone’s
Parameters?
Timers
Phonebook
Call Log
All
THE MAIN MENU [SECURITY]
RESETTING THE TIMERS
This option allows the user to reset all the parameters to factory
default values.
Phone Lock
Lock Code
Restrict
Reset
Emergency
Reset Timers?
RESET
Timers
Phonebook
Call Log
All
Reset
Complete!
RESET
Banner
04/05 Wed 10:41a
Resetting Timers will
reset the last call, home
calls, and roam calls.
[71][70]
Page 40

06/09 2000.6.9 9:57 AM 페이지78
THE MAIN MENU [SECURITY]
EMERGENCY NUMBERS
The user can dial emergency numbers even when the phone restricts
outgoing calls or when the keypad is locked.
The user can store up to three emergency numbers.
Phone Lock
Lock Code
Restrict
Reset
Emergency
Christine
123-1029
Christine
Bill wk.
<empty>
THE MAIN MENU [SECURITY]
VOICE PRIVACY
Set the voice privacy mode. Unless you are certain the service area
supports Enhanced voice privacy, this option should be set to Standard.
Lock Code
Restrict
Reset
Emergency
Voice Priv
VOICE PRIVACY
✓
Standard
Enhanced
EDIT
[73][72]
Page 41

06/09 2000.6.9 9:57 AM 페이지80
THE MAIN MENU [SECURITY]
ADVANCE
This option opens the submenu for Set NAM, Auto NAM, Activation,
and Data/Fax
SET NAM
set the number assignment module(NAM)
Restrict
Reset
Emergency
Voice Priv
Advance
SELECT
✓NAM #1
On this screen, the user can
scroll [up] and [down] with the
navigation key to choose
between NAM #1 or #2, then
press [center] to activate.
Set NAM
Auto NAM
Activation
Data/Fax
THE MAIN MENU [SECURITY]
AUTO NAM
The user can activate automatic NAM assignment.
Set NAM
Auto NAM
Activation
Data/Fax
To exit, press [left] to highlight and press [center]
AUTONAM
✓ On
Off
On this screen, the user can
scroll [up] and [down] with the
navigation key to choose
between “ON” or “OFF.” Press
[center] to activate.
To exit, press [left] to highlight and press [center]
[75][74]
Page 42

06/09 2000.6.9 9:57 AM 페이지82
THE MAIN MENU [SECURITY]
ACTIVATION
In this menu, the user can activate DCS or PCS by selecting an
Activation menu option.
DCS
Set NAM
Auto NAM
Activation
Data/Fax
Scroll [up] and [down] to
choose between DCS or PCS,
then press [center] to activiate.
Or to exit, press [left] to highlight and press [center].
PCS
DCS
PCS
THE MAIN MENU [SECURITY]
DATA/FAX
The user can choose a power activation setting in this menu.
Set NAM
Auto NAM
Activation
Data/Fax
DATA/FAX
Data until
power OFF
On this screen, the user can
scroll [up] and [down] with the
navigation key to choose
between “data until power
OFF,” “fax until power OFF,”
“Data for next call,” “fax for
next call,” or “off.” Then press
[center] activate.
PHONE ACTIVATE
On Band A
On Band B
PHONE ACTIVATE
On Blck A
On Blck B
On Blck C
On Blck D
To exit, press [left] to highlight and press [center]
To exit, press [left] to highlight and press [center]
[77][76]
Page 43

06/09 2000.6.9 9:57 AM 페이지84
THE MAIN MENU [SETUP]
AUTO RETRY
When a call is not connected due to heavy traffic in the network or
weak signal strength, the phone can be set to retry making the call
automatically.
Timers
Sounds
Display
Security
Setup
AUTO RETRY
✓On
Off
Auto Retry
Auto Answer
Auto Hyphen
Keygurd
One-Touch
Auto Retry
Auto Answer
Auto Hyphen
Keygurd
One-Touch
THE MAIN MENU [SETUP]
AUTO ANSWER
Phone automatically anwers after a set number of rings.
Timers
Sounds
Display
Security
Setup
AUTO ANSWER
✓ Off
1 Ring
3 Rings
5 Rings
Auto Retry
Auto Answer
Auto Hyphen
Keygurd
One-Touch
Auto Retry
Auto Answer
Auto Hyphen
Keygurd
One-Touch
[79][78]
Page 44

06/09 2000.6.9 9:57 AM 페이지86
THE MAIN MENU [SETUP]
AUTO HYPHEN
Hyphen is automatically inserted when entering a number.
Timers
Sounds
Display
Security
Setup
AUTO HYPHEN
✓On
Off
Auto Retry
Auto Answer
Auto Hyphen
Keygurd
One-Touch
Auto Retry
Auto Answer
Auto Hyphen
Keygurd
One-Touch
THE MAIN MENU [SETUP]
KEYGUARD
You can lock the Keypad to prevent accidental key pressing. A
shortcut method is to simply hold down the “#”key until the
“KEYGUARD” message appears. To unlock, press any key to
show the “Keypad Locked” message, then press 1 2 3
Timers
Sounds
Display
Security
Setup
KEYGUARD
Off
✓On
On pwr up
Auto Retry
Auto Answer
Auto Hyphen
Keygurd
One-Touch
Banner
04/05 Wed 10:41a
KEYGUARD
[81][80]
Page 45

06/09 2000.6.9 9:57 AM 페이지88
THE MAIN MENU [SETUP]
To deactivate the keyguard, press[center] followed by 123
Banner
04/05 Wed 10:41a
Keypad Locked
Type 1 2 3 to
deactivate the
KEYGUARD
Keyguard
1/2/3 BUTTON
Banner
04/05 Wed 10:41a
THE MAIN MENU [SETUP]
ONE-TOUCH
This allows you to dial phone book entries by pressing and holding
the memory location number for the person you want to call.
Timers
Sounds
Display
Security
Setup
ONE-TOUCH
DIALING
✓Yes
No
Auto Retry
Auto Answer
Auto Hyphen
Keygurd
One-Touch
Auto Retry
Auto Answer
Auto Hyphen
Keygurd
One-Touch
[83][82]
Page 46

06/09 2000.6.9 9:57 AM 페이지90
THE MAIN MENU [ALERT]
The phone can notify you of the following events.
ROAM ALERT
Notifies you when you are no longer in the home service area.
Sounds
Display
Security
Setup
Alerts
ROAM ALERT
✓On
Off
Roam
Drop
Minute
Service
Voice Priv
Roam
Drop
Minute
Service
Voice Priv
THE MAIN MENU [ALERT]
DROP ALERT
Notifies you that the call has been dropped.
Sounds
Display
Security
Setup
Alerts
DROP ALERT
✓ On
Off
Roam
Drop
Minute
Service
Voice Priv
Roam
Drop
Minute
Service
Voice Priv
[85][84]
Page 47

06/09 2000.6.9 9:57 AM 페이지92
THE MAIN MENU [ALERT]
MINUTE ALERT
Notifies you when another minute has elapsed during a call.
Sounds
Display
Security
Setup
Alerts
MINUTE ALERT
✓ On
Off
Roam
Drop
Minute
Service
Voice Priv
Roam
Drop
Minute
Service
Voice Priv
THE MAIN MENU [ALERT]
SERVICE
Notifies you when you are not in a serviceable area.
Sounds
Display
Security
Setup
Alerts
SERVICE ALERT
✓ On
Off
Roam
Drop
Minute
Service
Voice Priv
Roam
Drop
Minute
Service
Voice Priv
[87][86]
Page 48

06/09 2000.6.9 9:57 AM 페이지94
THE MAIN MENU [ALERT] MEMO
VOICE PRIVACY
Notifies you when you are not in a service area that supports voice
encryption.
Sounds
Display
Security
Setup
Alerts
VOICE PRIVACY
ALERT
✓ On
Off
Roam
Drop
Minute
Service
Voice Priv
Roam
Drop
Minute
Service
Voice Priv
[89][88]
Page 49

06/09 2000.6.9 9:57 AM 페이지96
VOICE MAIL
u
TEXT / PAGE
v
CHAPTER 4
SMS MENU
SMS MENU
Banner
04/05 Wed 10:41a
3 Voice
5 Txt/Pg
[91][90]
Page 50

06/09 2000.6.9 9:57 AM 페이지98
SMS MENU [VOICE MAIL]
VOICE MAIL
Voice Mail Notification: When a new voice message is received, both
visual and audible indicators will notify you. The message can be
retrieved immediately by pressing the key. If you choose to listen to the message later, you can retrieve it by selecting the
SMS(envelope) menu from the banner screen.
Banner
1 Voice Mail!
04/05 Wed 10:41a
11:30a 8/15
Connecting...
SMS MENU [VOICE MAIL]
If the message is urgent, the screen will show “URGENT” and the
SMS icon (envelope) will continuously blink until the message is
retrieved.
1 Voice Mail!
11:30a 8/15
**URGENT**
Connecting...
8888
*
8888
*
In this example, 8888 is the number for the Voice mail center
*
[93][92]
Page 51

06/09 2000.6.9 9:57 AM 페이지100
SMS MENU [VOICE MAIL] SMS MENU [VOICE MAIL]
RETRIEVING NEW VOICE MAIL:
Banner
04/05 Wed 10:41a
11 Voice
13 Txt/Pg
DIAL
Connecting...
8888
*
- Retrieve the message
Banner
VOICE MAIL
11:30p 8/15
NEW:
URGENT:
DIAL
04/05 Wed 10:41a
- Exit SMS Menu
11 Voice
13 Txt/Pg
- Return to previous menu
[95][94]
Page 52

06/09 2000.6.9 9:57 AM 페이지102
SMS MENU [TEXT/PAGE]
Audible and visual indicators notify the user of a page. The display
shows the time/date of its receipt and the call back number .
The user can press SEND to call the number on the screen.
Page!
11:30a 8/15
from
123-123-1234
VIEWING NEW TEXT MESSAGES
Voice Malil
Txt/Pg
Connecting...
123-123-1234
2 New Msg
5 Old Msg
Saved Msg
Erase Old
SMS MENU [TEXT/PAGE]
If the message takes up more than one screen:
2 New Msg
5 Old Msg
Saved Msg
Erase Old
than I expected.
SAVE
Next
This is my first
message. This
message is longer
This is my first
message. This
message is longer
SAVE
Next
This is my first
message
This is the second
message.
SAVE
NextSAVE
Next
[97][96]
Page 53

06/09 2000.6.9 9:57 AM 페이지104
SMS MENU [TEXT/PAGE]
Viewing old messages:
2 New Msg
5 Old Msg
Saved Msg
Erase Old
This is an
old message
SAVE
Old Message
1234567890
Another Msg
Hello Jane
SMS MENU [TEXT/PAGE]
Viewing saved messages:
2 New Msg
5 Old Msg
Saved Msg
Erase Old
This is a
saved message
ERASE
Saved Messg
1234567890
Another Msg
Hello Eric
ERASE
Erasing old messages:
2 New Msg
5 Old Msg
Saved Msg
Erase Old
Erase Old
Text messages?
ERASE
[99][98]
Page 54

06/09 2000.6.9 9:57 AM 페이지106
SMS MENU [TEXT/PAGE]
To erase a saved message,
you must first enter the 4-digit lock code.
This is a
saved message
ERASE
Erasing
please wait...
CHAPTER 5
LOGS MENU
ENTER
LOCK CODE
----
[101][100]
Page 55

06/09 2000.6.9 9:57 AM 페이지108
Select LOGS from the main display screen. In this list
you’ll find the last 10 calls you made, answered, and
missed in chronological order, starting with the most
recent. Old entries are bumped off the end of the list as
new ones are added to the beginning. If the number is in
your phone book and has an associated name, the name
appears in the list. Otherwise, the number is shown.
When you select an entry, the following information is
shown:
● Whether the number was called, answered, or missed
● The time / date of the call
● The duration of the call
LOGS MENULOGS MENU
The user can view a list of the last ten numbers called, answered, or
missed.
Banner
04/05 Wed 10:41a
- Highlight LOGS, not
MENU
111-222-3333
222-222-2222
Mike
555-555-5555
Jane Doe
111-222-3333
222-222-2222
Mike
555-555-5555
Jane Doe
CALLED BY
Jane Doe
10:30p 8/15
00:27:30
OPTION
[103][102]
Page 56

06/09 2000.6.9 9:57 AM 페이지110
OPTION
When is selected.
LOGS MENULOGS MENU
The user can view a list of the last ten numbers called, answered, or
missed.
CALL TO
CALL TO
111-222-3333
111-222-3333
10:30P 08/15
10:30P 08/15
111-222-3333
Bob Williams
Location ??
auto=05
111-222-333
27m30s
27m30s
OPTION
OPTION
OPTION:
Save
Erase
Enter Name
Bob Williams
SECRET? Yes
No
ID RINGER TYPE
✓Type 1
Type 2
Type 3
Type 4
SAVED!
[105][104]
Page 57

06/09 2000.6.9 9:57 AM 페이지112
SEND PH #
u
SCRATCH PAD
v
MUTE
w
MY NUMBER
x
CHAPTER 6
IN-CALL MENU
[107][106]
Page 58

06/09 2000.6.9 9:57 AM 페이지114
IN-CALL MENU
During a call, select MENU to see these options.
CALLING...
Banner
04/05 Wed 10:41a
Time: 00:14
123-123-1234
Connecting...
123-123-1234
Send phn#
Scratch Pad
Mute
My Number
IN-CALL MENU
SEND PH #
The user can send his/her own phone number to a pager without
pressing the entire number.(see My Number below).
Send phn#
Scratch Pad
Mute
My Number
SCRATCH PAD
During a call, the user can store a phone number to the phone book.
Send phn#
Scratch Pad
Mute
My Number
333-333-3333
Enter Number:
123-1234
[108]
ENTER
PHONE NUMBER
Enter Name
Jane
ENETR NAME
Enter
Memory#:
Default:13
[109]
Page 59

06/09 2000.6.9 9:57 AM 페이지116
IN-CALL MENU
SECRET? Yes
No
To erase a character, press[down]on the navigation key. Pressinbg
END will terminate the call.
MUTE
During a call, the user can mute the mouthpiece.
ID RINGER TYPE
✓Type 1
Type 2
Type 3
Type 4
IN-CALL MENU
MY NUMBER
The user can see his/her own number during a call.
Send ph#
Scratch Pad
Mute
My Number
333-333-3333
Send ph#
Scratch Pad
Mute
My Number
Time:00:13
MUTE
[111][110]
Page 60

06/09 2000.6.9 9:57 AM 페이지118
CHAPTER 7
MAKING AN EMERGENCY CALL
You can dial 911 or one of your three emergency numbers at any
time. Your phone will make the call even when it is locked, the keyguard is on, or the phone has no service.
● If your phone has service, the 911 or emergency call will be
processed immediately on any available system.
● If your phone has no service, it will search for any available sys
tem and process the emergency call.
● Phone Lock and keyguard will be disabled.
MAKING AN EMERGENCY CALL
E911 USING ANY AVAILABLE SYSTEM
AUDIOVOX
-LOCKED-
PASSWORD?
_ _ _ _
Enter911 and press[SEND]. - When a call ends, the
Voice Privacy:
EMERGENCY CALL
phone returns to the emer
gency mode.
EMERGENCY CALL
MAR 13,MON
PM 3:00
- Reserve Emergency mode
00:00:23
911
When the emergency call is terminated, your phone will remain on the
system from which the call originated for several minutes. During this
period you cannot enable the Phone Lock or Keyguard. If your phone
was locked before the emergency case, it will set the Phone Lock
after the serveral minutes have elapsed. Also, you may wish to check
the display for the “Roaming”status icon before placing another call
during this period.
[113][112]
Page 61

06/09 2000.6.9 9:57 AM 페이지120
CHAPTER 8
SAFETY
[115][114]
Page 62

06/09 2000.6.9 9:57 AM 페이지122
SAFETY INFORMATION FOR
WIRELESS HANDHELD PHONES
Read This Information Before Using Your Handheld Portable
EXPOSURE TO RADIO FREQUENCY SIGNALS
Your wireless handheld portable telephone is a low power radio transmitter and receiver. when it is ON, it receives and also sends out radio
frequency (RF) signals.
In August, 1996, the Federal communications Commissions (FCC)
adopted RF exposure guidelines with safety levels for handheld wireless phones. Those guidelines are consistent with the safety standards
previously set by both U.S. and international standards bodies:
ANSI C95.1 (1992) *
NCRP Report 88 (1986) *
ICNIRP (1996) *
Those standards were based on comprehensive and periodic evaluations of the relevant scientific literature. for example, over 120 scientists, engineers, and physicians from universities, government health
agencies, and industry reviewed the available body of research to
develop the ANSI Standard (C951).
The design of your phone complies with the FCC guidelines (and those
standards).
;
˙
American National Standards Institute;
National Council on Radiation protection and measurements;
International Commission on Nonionizing Radiation Protection.
Cellular Telephone
SAFETY INFORMATION FOR
WIRELESS HANDHELD PHONES
DRIVING SAFETY
Talking on the phone while driving is extremely dangerous and is illegal
in some states. Remember, safety comes first. Check the laws and
regulations on the use of phones in the areas where you drive. Always
obey them.
Also, if using your phone while driving please:
l Give full attention to driving. Driving safety is your first responsi-
bility.
l Use hands-free operation, if available.
l Pull off the road and park before making or answering a call, if dri-
ving conditions require.
If you must use the phone while driving, please use one-touch, speed
dialing, and auto answer modes.
An airbag inflates with great force. DO NOT place objects, including
both installed or portable wireless equipment, in the area over the
airbag or in the air bag deployment area. If in-vehicle wireless equipment is improperly installed and the air bag inflates, serious injury could
result.
WARNING: Failure to follow these instructions may lead to serious personal injury and possible property damage.
ANTENNA CARE
Use only the supplied or an approved replacement antenna.
Unauthorized antennas, modifications, or attachments could damage
the phone and may violate FCC regulations.
[117][116]
Page 63

06/09 2000.6.9 9:57 AM 페이지124
SAFETY INFORMATION FOR
WIRELESS HANDHELD PHONES
ELECTRONIC DEVICES
Most modern electronic equipment is shielded from RF energy.
However, certain electronic equipment may not be shielded against the
RF signals from your wireless phone.
Pacemakers
The Health Industry Manufacturers Association recommends that a
minimum separation of six (6”) inches be maintained between a handheld wireless phone and a pacemaker to avoid potential interference
with the pacemaker. These recommendations are consistent with the
independent research by and recommendations of Wi r e l e s s
Technology Research.
If you have a pacemaker:
l ALWAYS keep the phone more than six inches from your pace-
maker when the phone is turned on.
l Do not carry the phone in a breast pocket.
l Use the ear opposite the pacemaker to minimize the potential for
interference.
l If you have any reason to suspect that interference is taking place,
turn your phone OFF immediately.
SAFETY INFORMATION FOR
WIRELESS HANDHELD PHONES
ELECTRONIC DEVICES
Other Medical Devices
If you use any other personal medical device, consult the manufacturer of your device to determine if they are adequately shielded from
external RF energy. Your physician may be able to assist you in obtaining this information.
Turn your phone OFF in healthcare facilities when any regulations posted in these areas instruct you to do so. Hospitals or healthcare facilities may be using equipment that could be sensitive to external RF
energy.
Vehicles
RF signals may affect improperly installed or inadequately shielded
electronic systems in motor vehicles. Check with the manufacturer or
its representative regarding your vehicle. You should also consult the
manufacturer of any equipment that has been added to your vehicle.
Posted Facilities
Turn your phone OFF where posted notices so require.
Hearing Aids
Some digital wireless phones may interfere with some hearing aids. In
the event of such interference, you may want to consult your service
provider (or call the customer service line to discuss alternatives).
[119][118]
Page 64

06/09 2000.6.9 9:57 AM 페이지126
SAFETY INFORMATION FOR
WIRELESS HANDHELD PHONES
OTHER SAFETY GUIDELINES
Aircraft
FCC Regulations prohibit using your phone while in the air. Switch
OFF your phone before boarding an aircraft.
Blasting Areas
To avoid interfering with blasting operations, turn your phone OFF
when in a “blasting area” or in areas posted: “Turn off two-way radio.”
Obey all signs and instructions.
Potentially Explosive Atmospheres
Turn your phone OFF when in any area with a potentially explosive
atmosphere and obey all signs and instructions. Sparks in such areas
could cause an explosion or fire resulting in bodily injury or even death.
Areas with a potentially explosive atmosphere are often, but not
always, clearly marked. They include fueling areas such as gas stations; below deck on boats; fuel or chemical transfer or storage facilities; vehicles using liquefied petroleum gas (such as propane or
butane); areas where the air contains chemicals or articles, such as
grain, dust, or metal powders; and any other area where you would normally be advised to turn off your vehicle engine.
SAFETY INFORMATION FOR
WIRELESS HANDHELD PHONES
PRECAUTIONS
Your Handheld Portable Telephone is a high quality piece of equipment.
Before operating the equipment, read all instructions and cautionary
markings on (1) AC Adaptor (2) Battery and (3) Product Using Battery.
1. DO NOT use this equipment in an extreme environment where
high temperature or high humidity exists.
2. DO NOT abuse the equipment. Avoid striking, shaking or shocking. When not using the unit, lay down the unit to avoid possible
damage due to instability.
3. DO NOT expose this equipment to rain or spilled beverages.
4. DO NOT use unauthorized accessories.
5. DO NOT disassemble the phone or its accessories. If service or
repair is required, return unit to an authorized audiovox cellular
service center. If unit is disassembled, the risk of electric shock or
fire may result.
6. DO NOT short-circuit the battery terminals by metal items etc.
[121][120]
Page 65

06/09 2000.6.9 9:57 AM 페이지128
SAFETY INFORMATION FOR
WIRELESS HANDHELD PHONES
WARNING
The following offenses are punishable by fine, imprisonment, or both:
l Using obscene, indecent, or profane language.
l Using the unit to give off false distress calls.
l Wiretapping or otherwise intercepting a telephone call, unless that
person has first obtained the consent of the parties participating in
the call.
l Making anonymous calls to annoy, harass, or molest other people.
l Charging to an account without authorization to avoid payment for
service.
l Refusing to yield a party line when informed that it is needed for
an emergency call (It is also unlawful to take over a party line by
stating falsely that it is needed for an emergency).
SAFETY INFORMATION FOR
FCC RF EXPOSURE
WARNING! Read this Information brfore using your phone
CAUTIONS
In August 1996 the Federal Communications Commission (FCC) of
the United States with its action in Report and Order FCC 96-326
adopted an updated safety standard for human exposure to radio frequency electromagnetic energy emitted by FCC regulated transmitters. Those guidelines are consistent with the safety standard previously set by both U.S. and international standards bodies. The design
of this phone complies with the FCC guidelines and these international standards.
Use only the supplied or an approved antenna. Unauthorized antennas, modifications, or attachments could impair call quality, damage
the phone, or result in violation of FCC regulations.
Do not use the phone with a demaged antenna. If a demaged antenna comes into contact with the skin, a minor burn may result. Please
contact your local dealer for replacement antenna.
Body-worn Operation
This device was tested for typical body-worn operation with the back
of the phone kept 0.5 inchs (1.27cm) from the body. To comply with
FCC RF exposure requirements, a minimum separation distance of
0.5 inchs (1.27cm) must be maintained between the user’s body and
the back of the phone, including the antenna, whether extended or
retracted. All belt-clips, holsters and similar accessories used by this
device must not contain any metallic components. Body-worn accessories that do not meet these requirements may not comply with FCC
RF exposure limits and should be avoided.
Vehicle Mounted External Antenna(optional, if available)
A minimum separation distance of 7.9 inches (20cm) must be maintained between the user/bystander and the vehicle mounted external
antenna to satisfy FCC RF exposure requirements.
Note: For more information about RF exposure, please visit the FCC website at www.fcc.gov
[123][122]
Page 66

06/09 2000.6.9 9:57 AM 페이지130
CHAPTER 9
WARRANTY
PROTECT YOUR WARRANTY
u
12 MONTH LIMITED WARRANTY
v
[125][124]
Page 67

06/09 2000.6.9 9:57 AM 페이지132
PROTECT YOUR WARRANTY
Read your Warranty carefully, with the special consideration
to paragraph seven of the Limited Warranty for your unit.
“Warranty does not apply to... or to any product or part
thereof which has suffered through alteration... mishanding
misuse, neglect or accident”.
Many companies are making look alike accessories and in
some cases, promoting that their product is equal to or better
than the Audiovox product Be careful. Some of these products
may not be compatible to use with your Audiovox product and
may damage the unit or cause it to malfunction. It service is
required on your unit and it is determined that a non-Audiovox
accessory has created the problem with your unit the
Warranty with not apply. In addition it the unit has already suffered irreversible damage by reason of a non-compatible
accessory the Warranty will be volded. To protect your
Warranty use only compatible accessories which cannot damage or interfere with the functioning of your Audiovox product.
12 MONTH LIMITED WARRANTY
AUDIOVOX COMMUNICATIONS CORP.(the Company). warrants to the original retail purchaser of this Audiovox Handheld
Portable Cellular Telephone, that should this product or any
part thereof(except the items listed below), under normal use
and conditions, be proven defective in material or workmanship within the first twelve (12)month period from the date of
purchase, such defect(s) will be repaired or replaced (with
new or rebuilt parts)at the Company’s option, without charge
for parts or labor directly related to the defect(s).
The keypad and display are similarly warranted for ninety
(90) days from date of purchase.
The accessories consisting of the antenna and rechargeable
battery pack, desktop charger are similarly warranted for
twelve (12) months from original purchase.
This Warranty does not apply to batteries, fuses, or costs
incurred for testing or checking, or to any product or part
hereof which has suffered through alteration, serial number
defacement, improper installation, excessive temperature or
humidity, environmental conditions, mishandling misuse,
neglect or accident. This Warranty is not assignable or transferable.
AUDIOVOX COMMUNICATIONS CORP.
555 Wireless Blvd., Hauppauge, New York 11788, 631-233-3300
16808 Marquardt Avenue, Cerritos, California 90703, 562-802-5100
Audiovox Canada
405 Britannia Rd, East, Ste 101, Mississauga, Ontario,
Canada L4Z3E8, 905-712-9299
To obtain repairs or replacement within the terms of this
Warranty, the product should be delivered with proof of warranty coverage, specification of defect(s), transportation prepaid, to the Company at the address shown below. For TRAVELERS WARRANTY SERVICE.
[127][126]
Page 68

06/09 2000.6.9 9:57 AM 페이지134
PROTECT YOUR WARRANTY
Call toll free to (800) 229-1235 (in N. Y. State. (631)233-3410)
for reference to an Authorized Warranty Station in your area.
THE EXTENT OF THE COMPANY’S LIABILITY UNDER THIS
WARRANTY IS LIMITED TO THE REPAIR OR REPLACEMENT PROVIDED ABOVE AND, IN NO EVENT, SHALL THE
COMPANY’S LIABILITY EXCEED THE PURCHASE PRICE
PAID BY PURCHASER FOR THE PRODUCT.
The Company disclaims liablity for geographic coverage, inadequates signal to antenna, communications range or operation of the Cellular System as a whole.
ANY IMPLIED WARRANTIES, INCLUDING ANY IMPLIED
WARRANTY OF MERCHANTABILITY SHALL BE LIMITED
TO THE DURATION OF THIS WRITTEN WARRANTY. ANY
ACTION FOR BREACH OF ANY WARRANTY HEREUNDER
INCLUDING ANY IMPLIED WARRANTY OF MERCHANTABILITY MUST BE BROUGHT WITHIN A PERIOD OF
24 MONTHS FROM DATE OF ORIGINAL PURCHASE IN NO
CASE SHALL THE COMPANY BE LIABLE FOR ANY CONSEQUENTIAL OR INCIDENTAL DAMAGES FOR BREACH
OF THIS OR ANY OTHER WARRANTY, EXPRESS OR
IMPLIED, WHATSOEVER.
12 MONTH LIMITED WARRANTY
No person or representative is authorized to assume for the
Company any liability other than expressed herein in connection with the sale of this product.
Some states do not allow limitations on how long an implied
warranty lasts or the exclusion or limitation of incidental or
consaquential damage so the above limitation or exclusions
may not apply to you. This Warranty gives you specific legal
rights, and you may also have other rigths which vary from
state to state.
IN U.S.A.: AUDIOVOX COMMUNICTIONS CORP.
555 Wireless Blvd., Hauppauge, New York
11788
(631)233-3300
IN CANADA: AUDIOVOX CANADA LTD.
405 Britannia Road East, Mississauga,
Ontario L4Z3E6
(905)712-0299
[129][128]
 Loading...