

Page 1
Page 2

TABLE ОЕСОтШЖЗ
SAf=ETY ifiFORMATiON FOR WtRELESS
HANDHELD PHONES
PHECAUTtONB..........................................................
SYSTEM CONFfGURATlON
WRiS T STRA P ATTACHMENT,
BATTERY mSTALLATlON AND
RECHAftGiNG,
To Attach the Battery Pack
To Detach the Battery Pack.....................................
To Recharge Sattory
FUNCTiONS.....................................
External View..........................................................
Function of Keys
LCD Display Indication
GETTING STARTED
Turning the Phone On/Off
Antenna Poaitkin
Receiving Signal Strength Indicator tTiill)
Battery Levsiindicator
Power Management.......................................
8A&C OPERAVON
Placing Calls
To place a Call.........................................................
To Tarmlnate a Call.....
Last Number Redial
To Dial the Last Number Rccoivied
Phonebook Dialing
To mule a Phone Conversation
Speed Dialing..........................................................
Quick Dialing..........................................................
Emergency CaU
OneTouch Emergency Call.....
Emerpenty Call Mode
Receiving Calls
To Receive a Call
Any Key Answering
Caller ID with Name ...............................
Aulomalic Calls-rn-Absence Indlcalcr
Ringing Tone with Melody.......................................
Distinctlva Ringing (Audible Caller ID)....................
During Cells
To Adjust the Earpiece Volume...............................
Scratch Pad Dialing.................................................
Automatic 1^1k Timer
Call Wair'rig .....................................
Three-Way CalSng
Standby .....................................................................
Clock Indicator {Dicitai Mode Only).........................
End to End Signaling ..........
Touch Tone™ from Dls)>lay..................................
Touch Toner" lutomory
...
.......................
.........
PHONEBOOK OPERATION
Phonebook Entry
To Store a Number withoul Name
Overwrile Warning...................................................
Auto Hyphenation
Manual Hyphenation
Aulomalic Storing into Phonebook
To Store Dual Numbers in Phonebook
To Store a Name with the Phona Number.............
Alpha Mode
To Store a Ring Tyi>e with the Phone Numbor
.............................................................
..........................................
.............................
......
....................
.
..............................................
.....................................
...............................................
....................
...............................................
.....................................
....................................
.................................. ..........
......................
....................
...
......................................................
......
....
................................
............................................
...........
.......................
............................................
...............................................
................................................
............
...........................................
.................................................
............................................
................
...............................
...............................
..............................
................................
.................................
.........
..............................
................................
..................
..................................................
....................................................
...............................................
.............
........
....
...
............
.............*.......
...
.................
..........
..........
..........
.........................
...................
......
......
.......
.......
..
.........
........
.....
.
......
.
... в
... 3
. 10
. 11
. 1г
. 12
. 12
„12
. 14
. 14
. 15
. 15
. 16
. 1€
. IS
, ie
, ie
, ie
. 17
. 17
. t7
. 17
, 17
, 17
-17
. 17
- 10
. IS
. 10
, ia
, 10
. 19
. 19
, 19
20
. 20
„ 20
. 20
. 20
. 20
. 20
21
..21
„ 21
..21
,. 21
. 22
-22
.22
.23
. 23
.. 23
„ 24
24
.. 2S
.. 25
„ 25
.. 27
„ 27
.. 29
Recall Menu
Recall Menu Tree,,,,
Phonebook Recall....................................................
Phonebook Address Mode
Phonebook Sort Scroll Mode ..........................
Phonebook Key Word Search Mode
To Dial Dual Numbers
To Review Long Numbere......................................
To Review Long Narrioe.............................................
Prap>ending Dialing
Phonebook Edit
To Modify Numbera and Names................................
To Move Numbers and Names.................................
To Change Priority of Dual Numbers....^
To Erase Numbers and Names
Secret Memory..,..
To Store a Seofel Number
To Recall a Secret Number
Link Dialing
Ta Store Linked Numbers in Phonebook...................
To Place Calls using Linked Numbers.......................
Voice Activated Dialing [VAD)
Voice Registration......................................................
Reviewing the Registered Name
Voice Activated Dialing
To Register a Name lo a Number Stored In Mernory
To Delete the Registered Name.......................
Call History
To Review Outgoing Call History...............................
To Review Inooming Call History...............................
To Review Scraich Pad
To Save a Number to Phonebook
WEB BROWSING................................
Web Access.........................................................
Browser Menu
AJpha Entry ir Browser Modo..........................
MESSAGING FEATURES
Voice Mall .................................................................. 47
Voice Mail Notiflcalion ................................................47
To Display the Number of Voice Mail Messages
Voice Mail Oiali™
Text Measeges (Short Message Servloe]
............
.
........................................
..............................................
...................................
...........................................................
..................................................
.........................................................
...........................................................
...................................................
.......................................................
.....................................
.......................................
................
..............................................
...........................................
...............................................
.........................
..............
........................
...................
.......
.............................
...................
..
.....
............
........................
...
.......
.
...
......
.......
.
...
......
.
..........
To Review a Text Message...................................... 50
ЕОНСТЮЫ MENU
To Access Function Menu
Function Menu Tree
Lock Features
Security Code and Unlock Code
Keypad Lock (F11)............................................
Phone Lock (F12)
Aulomatic Phone Lock (F13)
To Unlock the Phone
To Change the Unlock Code (FI4)....................
Display Features
Own Telephone Number Display ^21) -
Backlight Control (Slendby) (F22-1)
Backlight Control (In-Use) (F2e-2)
Auio Hyphenation (F23)
SMS Тем Lines Sefeciton (F24)........... .
Oonirast Control (F25).......................................
Sottware Weraion Review (F2S).......................
Laat Rescan SiD Indicaloi (F27)
PRL ID Review (F2B)........................................
№lume and Tone Control«
Alert Tone Volume Control (F31).....
Ring Type Selection (F32)
Key Tone Volume Control (F33)
To Mute a Phone Conversation (F34)
.........
....................................
......
.............................
........................................
....
..................................................
.....
........................................
........................................
..................
.......................
.............................
................................
...................................
................
...................
............
.........
....................
............
.
■ ■ esH-MiH MIH+ II
.
............
....
.
..
.
. за
.. 30
..
. 31
. 31
, 31
,. 32
„ 33
.
, 33
. 33
..34
.34
.35
.33
.3«
.
, 37
..
-37
. 37
.
. ae
. 33
.39
. 40
..
, 41
.41
, 41
.,
, 42
. 42
. 43
, 43
. 44
. 44
. 45
, 45
-46
47
40
40
49
......
5T
....... 51
......
52
_
___
S3
.
.....
53
.......
53
......
54
.......
54
.......
54
......
54
......
55
......
55
.......
55
.......
56
.......
56
.......
56
.......
56
.......
37
.......
57
......
57
......
sa
.......
58
......
59
/f-
33
40
45
se
Page 3

Sending DTMF (F36)
Setting Tones (F36)
Key Torte Length (F36-1)
Single Aierl Beep Tone (F36-2)................................ 60
Voice Mall Alert (F36‘3j
Toiii Meeaage Alert tF36-4).
Caller ID Alert (F36-6)
fiervica Mode Alert {F3fi-6).
Voice Privacy Aiert {F36-7)
One Minuie Beep Tone (F36-&) -
Low Battery Aiaim {F36-9)
Call Timers ....
Last Call Timer ÍF41-1)
Outgoing Calf Timor (F41-2)
Aif Caila Timer {F41-3)
Lifetirne Timer fFAt-*)
Clock Indicator (F42)
Sysierri Features
A/B System Soleciion (F51)
Enhanced Roaming.....................
NAM Seiection (F52)
Fore* Analog Ceil (Fsai
Syalem Settings (F54).
NAM Name Dfapiay (F54-1)......................................65
Automatic NAM ^F5A-2)............................................65
Automatic Relry (F54-ÍJ).......................................... 66
Enhanced Voice Privacy Service (F54-4)
Arvtl Fraud Security Features....................................66
To Place a Cali with the Manual PIN Entry
To Place a Call with the Aulomalic PIN Feature ...™*** 67
To Place a Call lo Voice Mail
using me Automatic PIN Feature...........................67
To Turrt ihe Aulomalic PIN Feature OrVOtf ÍFS4-6)..67
To Program or Change yoijf AutomalK PIN (F54-6) ... 6S
Security Features
Call ResIrifilfOn (F61)
To Change Emergency Numbers (F63)
To Turn OniOlf OneTouch Emergency
Call FaalijriB (F63)
To Change the Security Code (F64)
Reset Functiorva (F65)
Call Timar Rasai (F65-11
Phonebook All Clear (F65-2)
Call History Alt Clear (Fes-S)
Text Message & Voice Malt Alt Clear (F65-4)
Function Reset (F65-5)
Data Commuriications
Data/Fax Mode (F7i)
vyeo Setup Features (F72) ...........................
Web Lock fFT2't)
Web Backlight tP72-2)
Web Idle Timer {F72-3Ì.............................
Web IP Address 1 S. 2 (F72-4) (F72-5)
Wob User Name (F72-6)
Web Password (F72-7)
Web Browser (F73).............................
Vibrator Alert......................................................... 73
Other Functions
Quick Dialing (Fbl)
Automatic Answering (F02)
Function Reset Status
................-...............................
..................
.........
................
................
..................
...................
_______________
...................
....................................
................................................
.....
..........
.......
........
........
..................
^
..
.
.
.
.
...................................... 59
.........
....
.............
.....
...............
................
.......
......
.............
......
.....
..................................
.............................................
.......................................
..........................................
.....................
.....................................
......................
...................
...............................
.................................
.........................
.....................................
....................................
..
...............
‘■+++ki++Tl44«h
..
.....
.
...........
.
..........
.......................................................
.....................................................
.......................................
...
........................................
59
66
.
.. 71
.. 72
..72
.. 72
..79
.. 72
..72
.72
59
.62
.62
.62
.63
.63
. 64
. 64
.65
67
68
.
.
.
.
73
73
73
74
INDEX......................................................................... 75
WARNING
.....................................-..........
............... 76
12 MONTH L/ftf/T£D WARRANTY............................. 77
Quick ReferSfics....................................................... 79
ACCESSORIES..................-....................-.................
91
Touch Tone"'" is a registered trade mark o1 AT &T
69
60
60
61
61
61
61
G2
62
62
63
68
60
69
69
70
70
70
70
71
71
71
72
mDiomx
aumr450Q
Dual Mode CDMA/AMPS
Handheld Portable
Cellular Telephone
tn today's tost paced woritj, it has become a necessity
to have access to real-time infoirnalion. Iftjur communicaiJons tools must pro vide you with ihls access. With
ihai in mind, Audiovox devaieped Ihe CDM-450Ü.
This COMA BOO MHz/Amps dual mode phone is our
fifsl with a built-in Web Browser. The CDM-4500 also
features a Vibrating Alert Option, Voice Recognition and
Data Capabilities, in addition, the phone features a
Üthium ion battery providing you with 190 minutes of
talk time and 170 hours of stand-by, an Enhanced Phone
Book with 99 Alpha/198 Mumeric Memory Locations;
One touch emergency dialing; 15 distinctive ring tones
and Menu Driven Operation.
The CDM-4SO0 digital cellular telephone has several
optional accessories available, including: leather carry
ing case, cigarette lighter plug-ln charger, desktop
holder, AC adapter. Hands-free car kit and earphone
microphone.
And of course, your new CDM-4500 digital handset pro
vides you with something only an Audiovox phone can;
the proven reiiablNty that has made us one of the lead
ing wireless handset providers.
Please take a few moments to read the following pages
of the user's operation manual. It will help you make
the roost efticlent use of this valuable communications
tool.
£
r
Page 4

SAfEíY ÍNFmmWSÍ FOR
WIRELESS HANDHELD PHONES
iRoad this inlorniDlion before using your
handhcId^portshleCellularTelcphone.
Tips on Efficient Operation;
For your phone to operate most efficiently;
• Extend your antenna fully,
• Do not touch the antenna unnecessarily when the
phone Is in use.Contact with the antenna affects call
quality and may cause the phone to operate at a
higher power level than otherwise needed-
EXPOSURE TO RADIO FREQUENCY SIGNALS
Your wireless handheld portable telephone 1s a low
power radio transmitter and receiver. When it is OM, it
receives and also sends out radio frequency (RF) sig
nals.
In August, 1995, the Federal Communications Commis
sion (FCC) adopted RF exposure guidelines with safety
levels for handheld wireless phones. Those guideh'nes
are consistent with the safety standards previously set
by both U.S, and international standards bodies;
*ANSi C95,t (t992)
*NCRP Report 88 (1986)
*iCMIRP{1996)
Those standards were based on comprehensive and
periodic evaluations of the relevant scientific literature.
For example, over 120 scientists, engineers, and phy
sicians from universities, government health agencies,
and industry reviewed the available body of research to
develop ihe ANSI Standard (C95-1 ).The design ot your
phone complies whh the FCC guidelines (and those
standards).
ANTENNA CARE
Use only the supplied or so approved replace mem an
tenna. Unauthorized antennas, modifications, or attach
ments could damage the phone arvi may violate FCC
regulations,
PHONE OPERATION
Normal Position: Hold Ihe phone as you would any
other telephone with the antenna pointed up and over
your shoulder.
*The meanings ot the acronyms are:
ANSI ; American National Standards Institute
NCRP : Nalional Council on Radi alien Protection
1CNÍRP; International Commission on Nonionizing
*
and Measurements
Radiation Protection
DRiVING
Check the laws and regulaliorts on the use of wireless
telephones in the areas where you drive. Always obey
them. Also, If using your phone while driving, please;
• Give full attention to driving — driving safely is your
first nespon Sibil ity.
• Use handsfree operation, if available.
• Pull off the road and park before making or answer
ing a call if driving conditions so require.
ELECTRONIC DEVICES
Most modem electronic equipment is shielded from RF sig
nals. However, certain electronic equipment may not be
shieided agairist the RF signals from your wireless phone.
Pacemakers
The health Industry Manufacturers Association recom
mends that a minimum separation of six (S”) inches be
miaintained between a handheld wireless phone and a
pacemaker to avoid potential interference with the pace
maker. These recommendations are consistent with the
independent research by and recommendations of Wire
less Technology Research.
Persons with pacemakers:
■ Should ALWAYS keep the phone more than six
(5") inches from their pacemaker when the
phone is turned ON,
■ Should not carry the phone in a breast pocket-
■ Should use the ear opposite the pacemaker to
minimize the potential for interference.
W If you have any reason to suspect that interfer
ence is taking place, turn your phone OFF im
mediately.
Hearing Aids
Some digital wireless phones may interfere with some
hearing aids, In the event of such Interference, you may
want to consult your service provider (or call the cus
tomer service line to discuss alternatives.]
Page 5

Other Medical Devices
H you use any olher personaf rnsdical device, consult the
manufacturer of your cievice to determine if lliey are ad
equately shielded from external RF energy, ifoiir physician
may be able to assist you in obtaining this inktirmation,
Vehicies
RF signals may affect improperly Installed or Inadequately
shielded electronic systems in niotor vehicles. Ched< wilh
the manulacturer or its representalive regarding your
vehicle. You should also corsuft Hie manufacturer of any
equipment that has been added to your vehicle.
Posted Facilities
Turn your phone OFF in any facility where posted no
tices so require,
AIRCRAFT
FCC regulations prohibit using your phone whrJe in the
air. Switch OFF your phone before boarding an aircraft.
PRECAUTlOm
Your Handheld Porta We Telephone is a high quality
piece of equipment. Before operating the equipmeni,
read all Instructions and cautionary markings on (1) AiC
Adapter, (S) Battery and ¡3) Product using Battery.
1. DO NOT use this equipment in an extreme
environment where high temperature or
high humidity exists.
2. DO NOT abuse the equipment. Avoid strik
ing, shaking or shocking. When not using
the unit, lay down the unit to avoid possible
damage due to instability.
3- 00 NOT expose this equipment to rain or
spilled beverages.
4. DO NOT use unauthorized accessories.
BLASTING AREAS
To avoid interfering with blasting operations, turn your
phone OFF when in a '^Blasting aree"or in areas posted
"Turn off two-way radio". Obey all signs and inslructipns.
POTENTIALLY EXPLOSIVE ATMOSPHERES
Turn your phone OFF when in any area wilh e poten
tially explosive atmosphere and obey all signs and instruclions. Sparks in such areas could cause an explo
sion or fire resulting in bodily injury or even death.
Areas with a potentially explosive atmosphere are of
ten but not always clearly marked. They include fueling
areas such as gasoline stations, below deck on boats,
fuel or chemioal transfer or storage vehicles using liq
uefied petroleum gas (such as propane or butane), ar
eas where the air contains chemicals or particles, such
as; grain, dust, or metal powders, and any other area
where you would normally be advised to turn off your
vehicle engine.
For Vehicles Equipped with an Air Bag
An air bag Inflates with great force. DO NOT place ob
jects, including both Installed or portable wireless
equipment, in the area over the air bag or In the air
bag depioymantarea. If in-vehicle wireless equipment
Is improperly installed and I he air bag Inflates, serious
injury could result.
DO NOT disassemble the phone or its accessoriesjf service or repair is required,
return the unit to an authorized Audi о vox
ceilutar service center. Lf the unit is disas
sembled, the risk of electric shock or fire
may result.
6. To prevent injury or bums, DO NOT allow
metal objects to contact or short circuit the
battery termlnafs.
7. DO NOT open the battery case. H the bat
tery is accidentally broken, avoid skin con
tact with the internal chemical contents, if
there Is skin contact, wash the affected area
immediately and seek medical advice.
e. DO NOT put the battery close to, nor dis
pose it Into fire.
3. The product that you have purchased con
tains a rechargeable Battery. At the end of
Its useful life, under various state and local
laws, it may be illegal to dispose of this
Battery Into the municipal waste stream.
Check with your local solid waste officials
for proper disposal procedures In ycur area.
Page 6
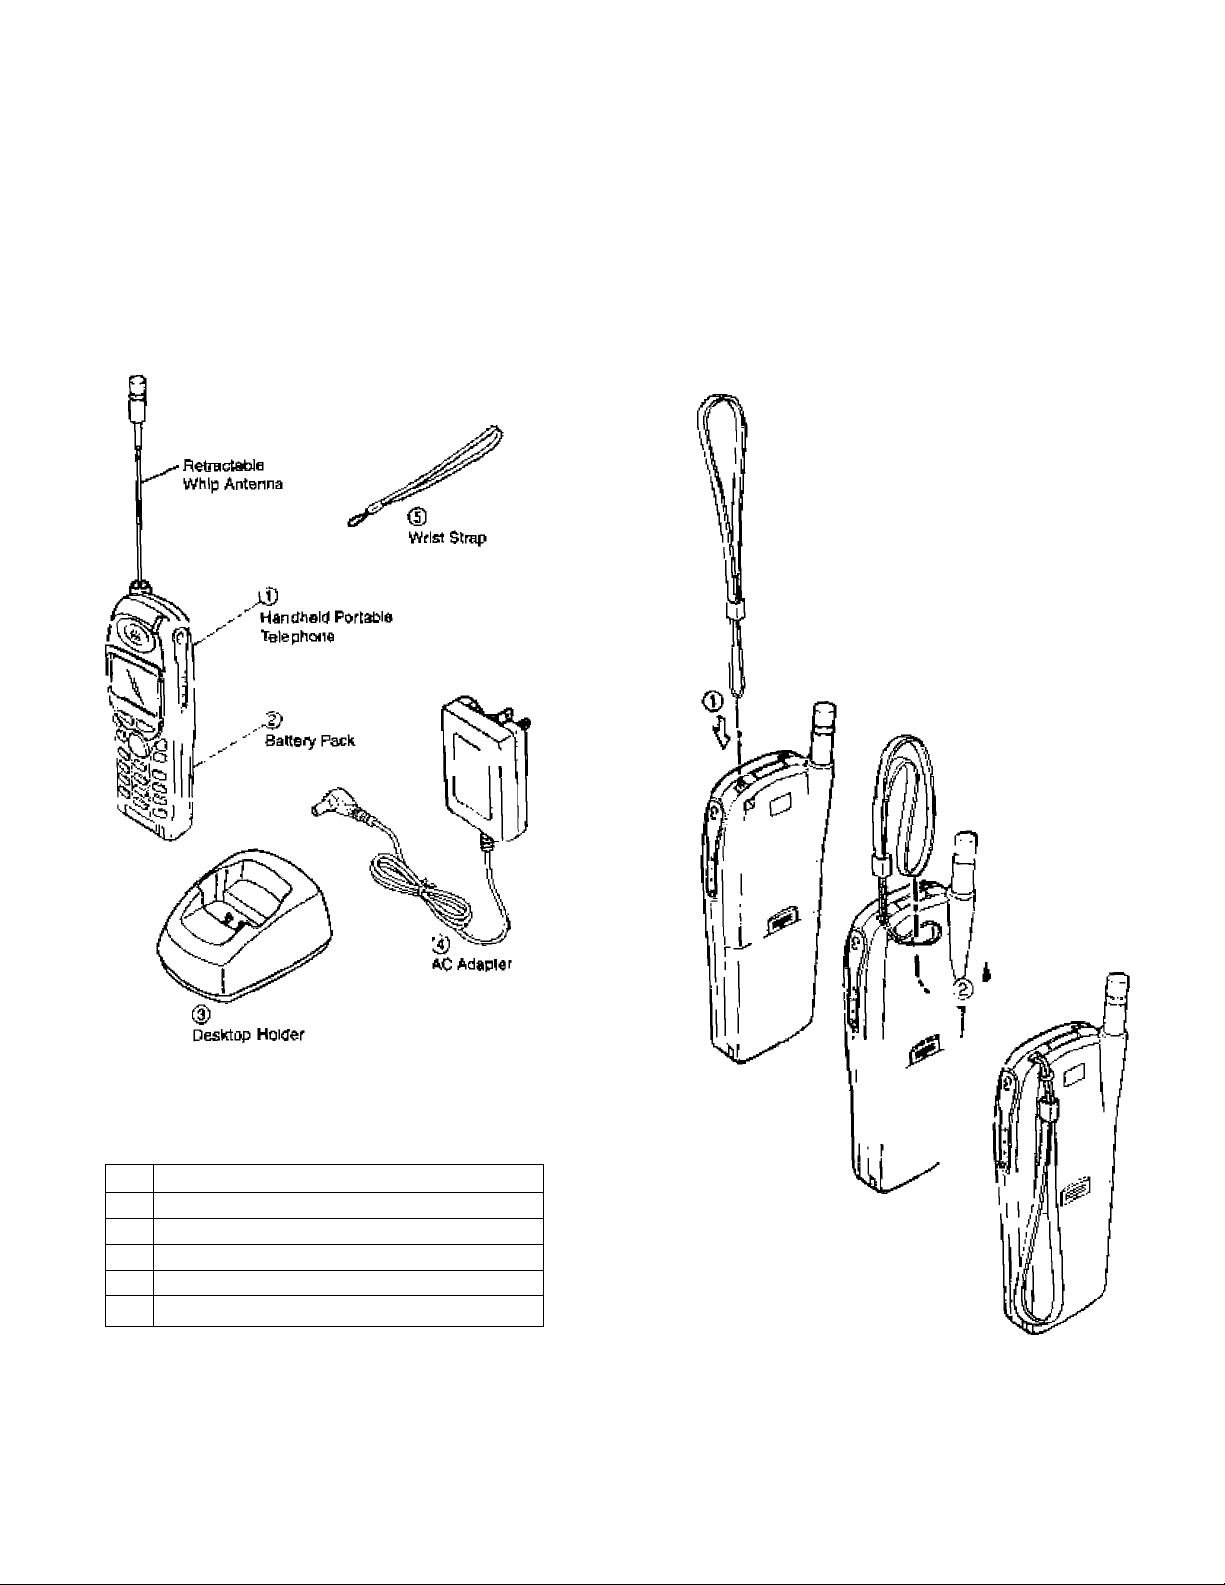
SYSTEM COt№KîimATlOft
VfRlSr STRAP AnACHSmUT
System configuration and the equipment Hat ara as
Shown below
Attach the wrist strap to the phone through the strap
hfliB as shown below ® .
Than pul (he long loop through the smalier loop as
shown below 0.
«
List of Equipment
No.
Handheld Portable Telephone
©
Slim Lrrhium Ion Baisery Paci t0TR-45OCi|
©
Desktop Kplder (DTH-^OM)
@
AC Adapter (CNR-JOhO)
@
WrlEl Snap
®
Nsrne dI the Equipment
i/o
Page 7
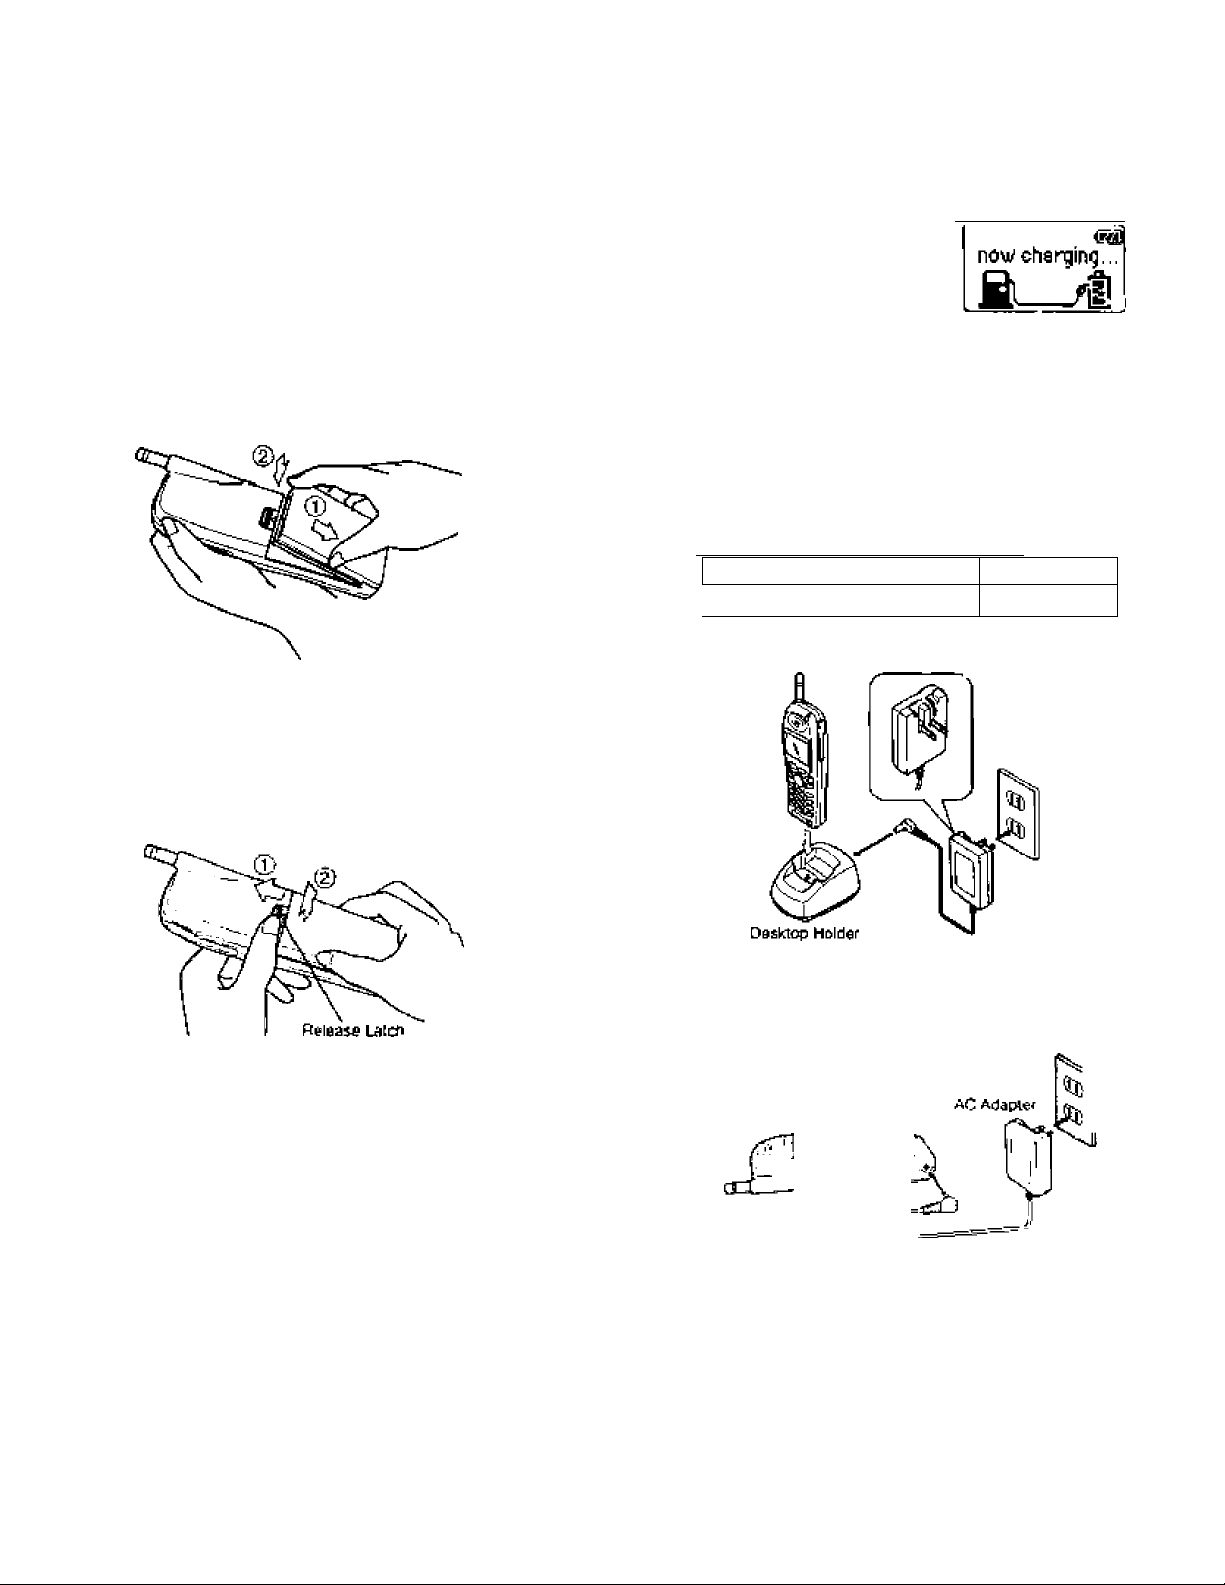
BATTERY msiMumom
AHD T^T^fjmGUiG
To Attach the Battery Pack
0 Insert the hook at the end of the Battery Pack Into
the slot at the end of the phone.
0 Press the Battery Pack down to lock the Battery Pack
onto the phone.
To Detach the Battery Pack
® Slfda back the Release Latch as shown below.
® Uft up to remove the Battery Pack from the phone
&ently.
4. Then the recharging starts. The display indicates
'now charging" with animaiion. You can sea a
battery level indicator scroll
ing a1 the upper-right of the
display.
5- For complete recharging, it
is recommended that the phone is turned oft durirtg recharging.
6- When Ihe recharging is completed, the dispiay
indicates “ТиНу charged".
7. it is погппаГ that Battery Pack may become a lltrie
warmer during recharging.
The recharging time, from empty to toil, depends on
Ihe environmentai temrterature, 0 to +35*C-
Battery Type Recharging Timo
Slim LHhium Ion (BTFUigoo)
;.S10 2 h
To Recharge Battery
Your CDM‘4500 has a buill-ln tiiarger function. To re
charge the Battery Pack, always install the Baltery Pack
to the Phone.
1. Attach the Battery Pack to the Phone.
2. Insert the DC plug of the AC Adapter (CMR--1000)
to the Desktop Holder (DTH-4000). Plug the AC
Adapter to AC outlet.
3. Place the Phone with Battery Pack into the Desk
top Holder.
4/2
AC Adapter
Attsrnatiueiy you can recharge ihe Phone using AC
Adapter as fllustraied below.
Not«; Do oot teed the power to the Phone without Bat
isry Pack,
Page 8
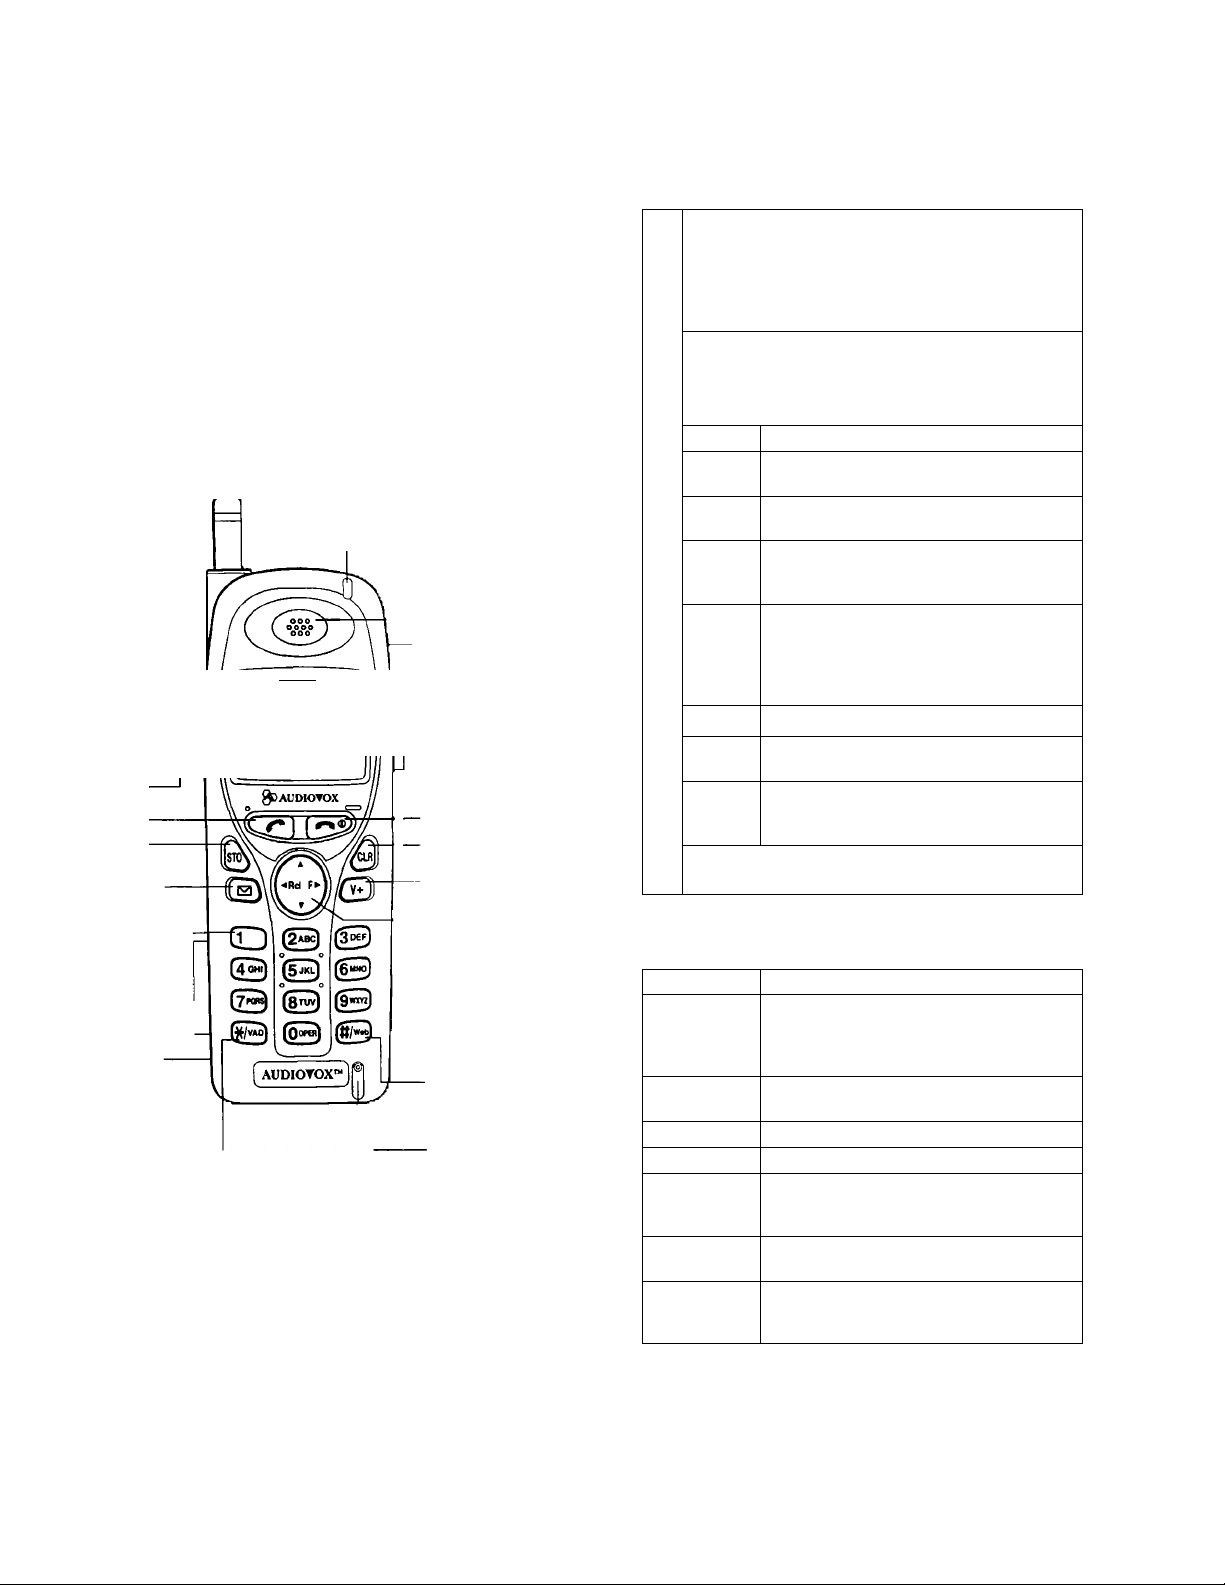
External View
Retractable
Whip Antenna
FUN:an<mS
Function of Keys
Digit Keys
(O d3 ® To enterTelephone Numbers, Names
(4=) rra ^ or special characters (* or«).
~ ^ ^ (O is also used for OneTouch
!
® ® ® Emergency feature.
® @ 1©
Function Keys (5$^
f
Powier
Indicator—-Receiving
Signal
Strength
Indicator —
Digital
Mode
Indicator IN USE
Indicator Roaming
Indicator Message
Indicator Battery Level
Indicator
Send Key
Store Key
Message
Access Key
OneTouch
Emergency Key
Digit Keys
DC
Power Jack
Voice Activated
Dialing Key —
-----
Digital
RBCDEFGHIJKL
HNOPQRSTUW
XVZ12345678
il4
Incoming Call
Indicator
Earpiece
Earphone
Mic Jack
Data
Connector
Graphic
Display
End Key with
- Power On/Off
- Clear Key
Voice Mail
Access Key
Multi Function
Key
▲ Up-arrow
M Recall
► Function
▼ Down-arrow
Web Browsing
Key
Microphone
® (E>
SEND key. To originate or receive a Call.
- ^
c
0)
E ;
o>:
C ’
CO
<
T3
CO
o
tn
>»
0)
0
G
1
END key. To terminate a Call and to turn
the phone ON/OFF.
To recall phone numbers from memory.
Also used as Left-arrow key.
To be used with other keys to activate
various special features. Also used as
Right-arrow key
To control Earpiece audio level, Alert Tone
and Key Tone.
Also used as Up/Down-arrow keys.
To store phone numbers in memory.
To clear digits from the display or from a
memory location.
To review Text Messages or to learn how
(D
many Voice Messages are in your Voice
Mailbox.
To access your Voice Mail with only one
key.
LCD Display Indication
Items Descriptions
Receiving Signal Strength Indicator.
Tull
Q
IINUSEl
Rm
(3
DBCDErGHIJKL
HHOPQRSTUVW
XVZ12343678
The number of lines indicates the received
Signal Strength, and T is also used as a
POWER ON Indicator.
Digital Mode Indicator. To Indicate the
phone is operating in digital mode.
A Call is in progress.
The phone is out of the Home-Area.
Message Indicator. To indicate that Text
Messages are stored in memory or Voice
Messages are in your Voice Mailbox.
Battery Level Indicator.
Monitors the battery charge condition.
Graphic full-dot matrix display with flexible
font size in 2 to 4 lines.
J5J
Page 9

GErriNG STARTED
BASIC OPEBATICm:
Turning the Phone On/Off
Press (5^ lor more than one second. All the indicators
and the digit display will light momentatily, and a tone will
be heard. The Indicator T will stay while the phone is
turned on.
To turn the phone off, press tor more Ihan one sec
ond.
Antenna Position
The antenna can be used irr its tuify eKterded or fully reiracled positiori only. It la recommended that Ifie anienna
should be fully extended for optimum performance and
signal strength or while operaling In poor signal areas.
Receiving Signal Strength Indicator (Tjifl)
The number of lines indioales the Sigrial Strer>gth in
your area. Four lines show Hie maximum level. The dis
play will vary as you move with the phone, if the signal
is not sirong enough to place a caft, "No Service’ will
appear on the LCD display.
■ , Placing Calls
To Place B Call
1. Enter the phone number.
(A maximum of 33 digits will
be displayed.)
2. Press .
The IlMMSil Indicator will light.
* Ter Correct a Number
Press /S?| to clear the last digit.
Press and hold /O) to erase all the digits entered.
* tf the Caii Felts to Go Through
Press and to rediaf the number.
To Terminate a Calf
Press (5^^ - "''he QEIM] indicator will go out.
j^fir
123-1156-7890
CSTn] MEMUk-
Tull liñBt:
Calima
Battery Level Indicator
You can always monitor the battery charge condition
with the constant battery level indicator. The number of
blocks Indicates the battery conditions as follows:
Full charge
o Low charge
^ Flashing indicates dischatged.
^ower Management
Battery Moefe
Slim Battery
(BTfl-4500)
The operating times are approximate values and may
vary depending on network oonflgurcHlon and handset
usage.
CDMA
Analog
Talk Time
up to
190 min. 170 h
65 mir.
iJ6
Standby Time
op to
12 h
Last Number Redial
Press to recall (he fast number you dialed,
then press ,
See Call History on page 42 for details.
To Dial the Last Number Received
Press >0 dial the last number wiih Caller ID
you received, then press .
See Call History on page 42 for details.
Phonebook Dialing
Press and enter an address £01 lo 99) to recall a
number from your phonebook, then press .
See Phonebook Recall on page 31 for details
To Mute a Phone Conversation
Press to mute your conversation at any time
during a call. "Mute' will be displayed.
To return to norniai conversation, press
again.
Page 10

Speed Dialing
If you know the phonebook address of the telephone
number that you want to call, you may place a call with
out using .
1. Enter the one or two digits of your Phonebook ad
dress (1 ~ 9 or 10 ~ 99).
2. Press QQ .The phone number will be displayed.
The I IN USE I indicator will light, and the call will be
placed.
Note: If two telephone numbers are stored in the ad
dress, the Primary Number will be dialed.
Quick Dialing
When this feature is on, the Primary number in your
Phonebook address 02 to 09 can be dialed with just
one push of the key. See Quick Dialing (F01) on page
73 to turn this feature on/off.
1. Press a digit key ((2^ to (9^) for more than one
second.
2. The number in your phonebook is automatically
dialed. The phone number will be displayed. The
I
IN USE I indicator will light.
Note: The key (1 ) is not for Quick Dialing, but for One
Touch Emergency Call, page 19.
Emergency Call
This feature permits you to place an emergency call even
if your telephone is in “Phone Lock”, “Keypad Lock” or
“Restrict” mode. Up to 3 numbers can be programmed as
Emergency numbers. The emergency numbers “911” and
“ir9H” are already preprogrammed. See To Change
Emergency Numbers (F62) on page 69.
Example: To Call 911 in “Phone Lock” or “Key
pad Lock” mode.
1. Enter (9^ (i ) (1 ).The “911 ” will not be dis
played, but “Phone Lock” or “Keypad Lock” will
be displayed.
2. Press .
The “911” will be displayed.
The lIN USEl indicator will light,
and the call will be placed.
OneTouch Emergency Call
This feature permits you to dial an emergency number
by a single key stroke, even in the “Phone Lock” or
“Restrict” mode. This feature can be turned off to pre
vent unintentional calls to the emergency number.
See To Turn On/Off OneTouch Emergency Call Fea
ture (F63) on page 69.
1. Press and hold [i ) for more than 2 seconds. The
number in emergency memory location “1” will be
dialed.
2. Then the UN USE| indicator will light, and the call will
be placed. (The factory preset number is “911”.)
Note: This feature cannot be used if the Keypad Lock
is on. You need to dial all the digits and .
Emergency Call Mode
When you dial one of the 3 pre-programmed emergency
numbers, your phone will enter the “Emergency Call
Mode". In this mode, the phone will attempt to com
plete the emergency call using any available cellular
system from which it can obtain service.
After it places an emergency call, the phone will stay in
the “Emergency Call Mode”, and will display “Emer
gency Call Mode, END to exit”. In the “Emergency
Call Mode", the phone will attempt to continue to re
ceive service from the Cellular system that it used to
complete the call. The phone will automatically exit the
“Emergency Call Mode” after 5 minutes or after you
press END.
________Receiving Calls
________
To Receive a Call
When the telephone rings, press CIQ to answer the
call. The QnDSE] indicator will light.
Any Key Answering
This feature permits you to answer an incoming call by
pressing any key on the key pad except and .
I
^8
19J
Page 11

Caller ID with Name
Tills feature allows you to preview in your display ttie
number and name of Ihe party calling you before you
answer the call. The name is as you programmed it in
your Phonebook,
1. When the phone rings, the Calling Number ap
pears in the display,
2. The last tO Caller IDs are
stored in the memory for
your review and redial. See Call Hiefory on page
42 for details,
Nats: “Number Restricted" or “ftftfmijer Unevsitebte’
i$ dispfayed when the Catier IÛ is restricied or
not available.
iMconiiiiS Call
JACK
l23-456-7SW
Automatic CahS'in-Absence Indicator
This feature Indicates the number of unanswered in
coming calls. If incoming calls are not answered, the
LCD display will indicate "Called XX", “XX" is the num
ber of calls (Û1 to 99) missed. Depressing any key will
clear the display.
Ringing Tone with Melody
The CDM-asoo offers you t5 styles of ringer tones and
melodies tor alerting incoming calis. Ringer volume can
also be adjusted. See Ring Type Selection (F32) and
Alert Tone Volume Control (F31) on page 58 lor setting.
See also Vibrator Alert (Ffl) on page 73.
Afler lerminatiing ihe call, tha number you entered can
be dialed by CQ,
Note; Yoacan deactivata "Seoding OTXfP'so ihat key
pad tones wil! no! bs iransmttled ¡0 iho cailtng
party SeeSenii/flai£>rjMFira5jlon page 59, | k
Automatic Talk Timer
The talk lime oi ihe current call will be automalicalty
displayed.
For example, '‘Th23m4Ss*.
Call Waiting
Your service provider may provide Call Waiting service.
When you are on a call, you may hear beep lone alert
ing you of another incoming call Your phone displays
New Caller' and the new caller’s ID with the name.
The name Is as you programmed ii in your phonebook,
!. Press to answer the new caii.
2. Press again to switch between the two calls.
Three-Way Calling
Your service provider may provide Three-Way Calling
service, When a call is already in progress, you may
call Ihe third party.
1- Enter a number and press to call the third
party.
2, Press again lo oonnect all three parties.
Ask your service provider for the detailed information,
Distinctive Ringing (Audible Caller 10}
You may program different ringer styles for different
Phonebook addresses. See To Store a Ring Type with
the Phone Number on page 29 for setting.
During Calls
To Adjust the Earpiece
Volume
Simply press or
just Earpiece ^ume during a call.
Ellll VGL1II1E
-whIiII
Scratch Pad Dialing
If you enter a telephone number during a call, the hum
ber wilt be stored in the Scratch Pad memory.
^0
Standby
Clock Indicator (Digital Mode Only)
When the phone is in an area with digital service (Digital
Mode), Date and Time are automatically displayed, If this
feature is enabled. See Clock Indicator (F42) on page
62 to turn this fealure on/off.
Example;
Notes: f. Dunng Diff/'iai Mode, the E indicator fyhts.
2. During Analog Mode, or while "No Service'
is indfcaled, fhe time display is nol available
even if this ieati/re is snabled.
TiilfQ ^
flPr 12 Mon
1№3D am
Page 12

HP.''
End to End Signaling
PHONEBOOK OPStATUM
To otiiiM ceha^n phone services, such as accessing an
allernate long distance network, signaling a pager or
hanking by phone etc . Touch Tone^^ signaling is re
quired, The following features will make it easy to send
frequenliy used Touch Tone’^ signals. See Link Dial
ing on page 38 for more inionmation.
Touch Tone^"^ fram Display
When Sending OTMF (page 5Q1 mode is on, Ihe riumbers will be sent in TouchTone™ signals during a call
as you press digit keys. When Sending DTMF mode Is
off, you can send TouchTone^'^ signals in the tollowing
manner.
1. Enter the number.
123-456-7890
2- Press **i and scroll lo
TONE’
3. Press . The nurnber In the display will be
sent in Touch Tone^“ signals.
tlUTE
n=irra
LINK MORK
MEMUk-
htENUj
k-l
Touch Tone™ from Memory
Touch Toner" signals can he sent from memory during
a call.
t. Press recall the
number you want to send
in Touch Tone^” signals.
2. Press and scroll to
TONE'.
3. Press , The number In the display will be
sent in Touch Tone^“ signals.
123-«6'7M(I
H01 MINU»]
MENU
'-ПМДМ
-yiEW TEL«
■У1ЕУ НЙМЕ
►
Vour phone has an Enhanced Phonebook wilh 99 diialnomber memory addresses. At each address, you can
store up 10 two telephone numbers under one name. This
feature allows you to store, under orre name, a person's
home and office ruimber, office and mobile number, etc.
Stored numbers can be easily recalled and dialed by
pressing , Numbers can ahso be marked Secret tor
added privacy.
Number of Digits per Phonebook Address
Address
01 10 94
91 to 90 Up ID 32 digits Up to 60 digits
Ncjte
Single Number or
Dual Numbers
Up 10 3S dJgils
Includes Dual tAark
and Manual Hyphens
Linked Numbers
Up to 40 digits
Includes Unk Marks
and Manual Hyphens
Phonebook Entry
To program your phonebook, enter the Information in
the following order. You may skip "Name", “Option" and/
or "Voice".
/CL^[Numbar](St5^ lysfri?][St5\[optionir^dress [1 VoiceJ
To Store a Number without Name
1. Press , then enter the phone number.
2. Press . ihen enter the desired memory
address [0i through 99).
fiddressJ
Э. Press ¡st5\ [sTo\ .
ШП] OPT ION к-.
____
I
i
{22
4. Enlar (P^ and press
OG-
23J
#07 Stored)
95 EmPtii
4 U$ed
1
Page 13

Overwrite Warning
when you aliempi to store a number In an address
where another number has been already stared, you
will have "OVERWRITE" warning
Manual Hyphenation
You can manuaHy insert a hyphen at any place when
you enter a telephone number, The maximum number
is 32 digits long including hyphens.
Example: To store the number 9876543210
In the address 07, where another nunv
ber12345678g0is already stored.
1. Press /Sufi),
£. Enter 1^^ [t^i [^5
907“654"32IO
3. Press [St3\
[tarm HENu>-
Qddresst
_____
flu1t>!D4
[STDl OPTIONN-
4, Enter (0^ [7^ .
The already sloted number
is displayed momenlarily.
5. TVvd seconds laler.
e. II you accept to overwrite, ecroli to "VES" and
press
OO O-
7. If you do not want to overwrite, scroll to “NO"
and press . The screen returns to the step
3 again.
123-456-7B*10
ШЛ7 ÜS.ED
PHONE&OOK
OVERWRITE
ГЧО
Auto Hyphenation
with this feature on, hyphens are automatically Inaerled
when you enter telephone numbers and when you re
call the numbers from the Phonebook. Sea Auto Hy*
phenation (E23) on page 58 to activate or deactivate
this feature.
Length of Number Display Example
to digits or less 123-458-7890
1110 21 diglls 1-234-567-89012
22 digiis Or more
Note: When you menuslly insert hyphens, the "'Auto
/iypfiwiflf/on'feaiun? wiil not work for that per-
ticular number.
fJa hyphens
Example; To Insert a hyphen in the number 12 3
4 5 6 7 to display It as 123-4587.
1. Press .
2. Enter (i ] (3^ .
' 123
[5ТШ
3. Press and scroll to
“HYPHEN",
4, Press
__________
LINK NflFiK
DUQL МЙЕК
HVPHEN
tSTÜJ
MENU»-
MENU
1E3-
МЕКиИ-
V
B. Enter (4^ (7^^
E5TD] MENUk-
123-Ш
Automatic Storing Into Phonebook
This feature allows convenient automatic storing into a
vacant Phonebook address.
The number wilt be stored in the first available memory
address which witt be indicated In the display. This fea
ture can prevent the possible overwriting o( a previously
sloped number.
1, Enter the phone number.
2. Press [st5^ .
Example: To store Ihe phone number 12346578
9 0 into a vacant riemory address 04.
1. Prase jTcLHj.
2. Ehter(Q(^g^[4^
(f^ [9^
l23-q56-78!l0
15ТП1 MEHUP-
a Press [ето\ (Sr&y.
lid dress!—
Йи1а:04
tsrm OPTIONS
Щ
^4
Page 14

4. Press
#04 Stored
04 EmPtu
Ъ
Bsed
To Store Dual Numbers in Phonebook
Viju can store Dual Nuiribers witii Duai Mark * \" op to
32 digits for all the address 01 to Й9 In the phoeeboak.
------------- Up to 32 digits —
Primary Numbar
To store two telephone numbers in one phonebook ad*
dress, errterlhe first number, select the Dual Mark" \ "
by using Menu, then enter the second number.
\
Saeontlary Numtiar
To Store a Name with the Phone Number
To use this procedure, you win need to reier to "Atpha
Mode” below.
1. Enter the phone number.
2. Press |5t^ to select the Alpha Mode.
3. Enter the name.
4. Press . therr enter the memory address (01
through 99) to store the number with the name
into memory.
Ettample: To store the phone number 1 2 3 4 56 7
0 9 0 with the name Mr. JACKSON into
aiernory address 11, .
1, Enter the phone number;
Example; To store the primary number 12 3 4 5 6
7 89 0 and the secondary number 907
G B4321 Oinaddress08.
1, Press jTem].
2* Enter ] (2*^ [5^ [4^
(S^ (53 55 55 55
3. Press
'DUAL MARK”.
4. Press The Dual Mark “ \ ” is in
serted-
5. Enlat (b3) 55^ 53
5555 5555 5Z)
6, Press (St&S
7. £nter(?5 (15 and press
О
and soiotl to
oo.
note: You can add a second number after sfon'n^ a
first nurrttigr See To Enter a SecotTd Number
on page 34.
I2ì-I|56-7MD
[5TQ] ИЕЫиР
LINK HARK
DUAL MARK
HVPHEN
23-456-7890\
ItSTfll MENUH
987-ИИг1в
ИТШ MENU^
MENU
Dddress:
8uto:05i
[Him OPTIONS
#flS Stared
93 CinPtv
6 U$ed
1
_
[0(1355 5555
{6^(7^[a^(9^(o^.
2. Set Alpha Mode; (irS^
1 Enter the Name;
[6^fQr“M",
©^55353*’°'"'''^'
(^) d3 53 53 •i'''“'*'! 53 for
"A”. (23 53 53 53 ts3 "•i".
(t3 (73(7353 tor "S" 153 53 53 C3
far “O", and 53 (13 tor “N".
4. Pisss (st3\ . [
5. Ehiier(iII] (13 and press
OO
123-456-78111
[5T01 MENU»-
Enter Hlpha!
Ifsrni
|Hr.JRCKSON
tSTD]
|[S1Q]
iU4]!X)-M
CU*J!XN{
nuta:05
OPTIONN-
#11 stored
92 EmPtu
7 Used
Alpha Mode
Vtou can add an identifying name ("Alpha Tag' up to 2
lines or 20 to 24 Characters) to the phone numbers al
each Phonebook address.
To ffrier A/ames using Alpha (Letters)
1. Press , then enter the
phone number.
2. Press (sT^
EntirAlplia!
[STCl
[Ut]:X>1t
27J
Page 15

3. Press digit key repeatedly to display the leflerttiat
you warn. The tollo wing table shows Which chaf
ada r is assigned with each digit key. For example,
to enter the letter “D*, press [3°^ once. For the
lettor "P, press [5^ 3 limes.
Assigned Atpha Characters
Key t press
1
2 ABC Ala
3DEF D/d
4GMI
5JKL J/t
BMNO M/m
7PQRS ?lp
0TUV
эшуг W/w
OOPER
4, To change from upper to lower case characters
or vice versa, press (0 during entry of Alpha,
5. To enter special characlers, press or
and a digit key to select characters from the table
below.
BlarA
¿press 3 press 4 press
1
B/b Cfc
E/e Ffl
Gfg H/ti l/i 4
K/k L/l
N/n O/o
Q/q R/r
Tl\ U/u
TUx
0
Vfv 6
vfy
S/s 7
Zli 9
5 press
z
z
5
6
Assigned Speciai Characters
____________
1
4
7
6v It you make a rn ¡stake, press to erase ihe
7, Press to move the cursor, which Inserts a
B. Press to move the cursor back to Insert new
characlers.
&, To exit the Alpha Mode, press (5^ *
Note; You must enter the phone number first, then add
2 7
!
5
*
8 1
last character. Press and hold to erase all
the characters on the display.
blank space after Ihe last character.
the name. Entering a number after the name will
erase the name.
-
3 1
=
9
2
(
4
7
■k
5
8
3
)
>
6
'
&
if
9
To Store a Ring Type with the Phone Number (Distinctive Ringing)
You can choose one ot 15 ring types for each phonehook
address. With this feature, you will be able to distin
guish who Is calling by hearing the ringing tone. The
ring type Is selected while storing Ihe number when the
word “OPTION” appears.
Example: To store a number with Ring Type #02
in the address 12.
1. Enter the phone number,
and press ¡s15^ .
2. Press and scroll to
“RING TYPE",
3. Press and scroll to
one of Wie numbers, wbich
you want to sei-
4. Press and scroll to
sample the different ring
types.
5. Press to set the new
ring type.
6- Enter Ci~) and press
OG-
Wofes. f. If you have one niimber only, the step 3 is
skipped-
2. The “COMftfOW" shown in the step 4 is the
ring type you selected with the Funcfion
Menu. See Ring Type Selection (F32) an
page S3.
Oddressi
lluta:05
tiTOl
RINti TYPE
SECRET
TEL NUMBER
RING TYPE
VCOMMON
QPTlQNk-
B87-6&4-32ie
R1NG«01
RlNGttO£
OPTION
8ELECTK
Rddresst—
[5TM QPTtONP
№ stored
91 EnPtti
8U$«d
_
■■ ►
Aitto;D^
Í2S
29^
Page 16

Recall Menu
Phonebook Recall
Press key. The foNowing 'RECALL'’ menu wiH
prompt you to recail the numbar
from i^e memofy.
• "ADDRESS"
• SEARCH":
-• -HISTORY-
Phonebook Address Mode
Phonebook Sort Scroll Mode or
Pbofiebook Keyword Search Mode
Call History Mode
r:T-]«J:i=№1
S.EORCH
HI5-T0RV
REcaiX!
Recall Menu Tree
Main Menu
- ADOftesa■
p (Son ScroN) —
■ SEARCH fKsy WonJl —
HISTOnV -I- OUTGOiNG
— ihCOMiNQ-
<- SCRATCHPAD-
Afofes." I. The Submenu ffi!.CHANGE’win be avaH-
aWe Dfiiy when two tsiephong numbere
stoned in thai address.
2. The strPmeny "ftEPLAY” wilt be avaHabfg
only when your voice is stored in thai ad
dress.
-----
^30
Phftr*-
booic
Oulfoing
htisturjH
Incoffltng
History
Scr«ch
Pad
Sub-manu
■ VIEW TELi
VIEW NAME
REPLftV
MOOlFV
HOVE
PPI. change
erase
VIEW TELi
VIEW КАМЕ
SAVE
erase
-VIEW TELi
- VIEW ПАГ^Е
- SAVE
- ERASE
VIEW TELi
SAVE
ERASE
To recall the numbers stored ir your Phonebook, you
have three rneihodfli Address Mode. Son Scroll Mode
and Key Word Search Mode.
Phonebook Address Mode
This TTiode is useful m finding a phone number by re
calling a specific address or by scrolling the Phonebook,
t. Press , I^CQLU
2, Enterthe two-digit Meoiory |seprqh —M
Address.
3, Press or to scroll,
Note: The scroil feature will skip any vacant memory
addressees).
HISTORV
Phonebook Sort Scroll Mode
This mode sorts and displflys, in alphabetical order, tele
phone numbers stored with "Alpha Tags" (Names). Blank
digits on lop will bo disregarded for scrolt.
Example: To display the numbers stored in the
memory alphabetically from “J".
1. Press i
2. Press for"J"'.
■© O-
RDDRE^i* 1—
HiSTORV
OPPRESS :
Н^;1:НЯ :Jf P
Hli-TORV
RECPLL
ВВ5ЩЗ - ►
RECnLL
____
a. Press
ШК
22г-ггг-гггц
fl27 HEHUH
A. Press
5. Press
Wofe: When the Alpha Tag is 2 lines fong, oniy the Al
pha Tag is dispisyed wiihoul the telephone num
ber. However, a csH can stiil be made by srmpfy
pressing .
JILL
B33-333-3333
TL22 r^ENUk-
kEK
UUbSiJOESiJOUU
ТА£Д НЁМик-
3tJ
I
Page 17

Example: To search the character siring AN siore<J
In the Phonebook,
i. Press .
2. Press (iS) 1ог‘А'-
3. Presa (Вм) [SS) for "hi".
4. Press
ftDDRE^S :
HJSTORV
fGDDRESS :
tessa K
4HI1TORV
Key tford?
UNI
Albany
777-777-7777
Т1Э7 MENl>
____
RE^LL
r_ ►
RECCILL
____
.SEfìRCHPj
L0U1S1Ì1H(]
88ff-8Se-3&SS
TAS2 NEHUh-
6l Press
7. Press
0, Press
San
rrarvci$co
Tisa иЕни>>
fllbany
777-7T7-7777
!T>37 MENUÌ-
San
TranciiCd
ТЖЗ>1 MENUh
To Dial Dual Numbers
Afler the number js recalled in the display, it can bo
easily called by pressing -
• To diaUhe primary number, just press
• To dial the secondary nurnber, press -
Primary Number -
Secondary Number -
_
MFMi
To Review Long Numbers
This fealure ailoMS you to review all the digits of very
long ruunbors or numbers stored with Alpha Tags.
Jsa any of the previously described Phonebook
search modes to recall a number.
i. Press and scroll to "VIEW TEL#’, and the
entire digits ol the rrumber wili be displayed.
To Review Long Names
This feature allows you to review whole Alpha Name
Tag stored witb dual numbers.
1. Use any of the previously described Phonebook
search rncKJes to recall a number.
2. Press scroti to "VIEW NAME". Press
G again, and all the charactors of Iba Name
will be displayed.
Prepending Diailng
This feature will be convenient when you need to add
an area code to the number In the Phonebook.
Example: To add 1 2 3 to a number J 5 6 7 8 9 D.
1. Reoaii the number. |
^56-78901
Н1Л MENUhl
Z Enter (2^ (3^
123
9%-709O
3v Press . Then the caN is placed to ^33-
45670ЭО.
Wole; The added digils tf/Ш not be stored in the phone-
book memory.
33J
Page 18

Phonebook Edit
This section guides you how lo modify, move, change
priority and omse the phonshook contents.
To Modify Numbers and Names
You can rnodify any of iho phonebock conEonts you ha^/e
stored, irroluding Phone Numbers, Names, Ring Type,
Secret and Address.
To Modify Phone Numbers
Recall the number from tho Phonebook,
Press to select "MENU", then scroll to “MODfFV""
and press (^3- Enter the new dtglt(s) and delete the
old digitfs) by pressing r^CLfll, jo mot/e the cursor, press
О left, О to Tight.
To Modify Alpha Name Tag
Recall the number and proceed to "MODIFY' as above.
Press [sT^, and the Name Tag wi ll appear by itself. Press
to clear the letterfs), and enter the new Name.
To Modify ^olcfress
After you modified number/name, just press with
out entering new address, and the current Phonebook
address will be overwritten. If you enter a new address,
and press (ето\, the modified number^name witi be cop
ied to the new address, white the original address will
remain unchanged.
To Enter a Second Number
Exampfe: To add the secondary number 9 3 7 6 5
4 3 2 1 D in the address 07.
t Recali the number stored
in the memory address 07.
2. Press and scroll to
-MODIFY".
3. Press .
4. Press
“DUAL MARK".
G
and scroll to
I2H56‘M
TA&7 MENUk-
^ MENU
UIEU TEUt
UIEWNOME
1ÍB-456-789D
I5TDI MENUk-
LINK MARK
DUOL MARK
HYPHEN
*■MODIFY
MENU
5l Press .
The Dual Mark " ^' is in
serted,
6. Enter
fS^ [4^
7. Press fsT^.
8. Press [
The original number is dis
played momentarily.
9. Two seconds later.
1&. Press 10
store in the original ad-
dress.
Z3-<156-7890\
[tSTni MENUN-
tSTPJ MENUk-
Rddresf!
______
0ri9in^1:07
И5ТПД OPTIONS
12H56-Í890
,WB7 USED
PHONEBOOK
OVERWRITE
HO
ЩС7
Stored
90 EiiPtY
9 Used
To Move Numbers and Names
Vbu can move ihe phonebook conients to a new ad
dress, The original address wlH Ehen be erased.
Example: To move the number 1234567890
from the address 20 lo 15.
1. Recall the number stored
In the address 20,
2. Press and scroll to
“MOVE“,
3. Press
G
123-456-7890
TA£0 MENUk-
VIEW NAME
MODIFY I
MENU
Hove
flu1o;05
1ИТ01
4. Enter(^ (s*^ as a new
address.
тъ Hoved
90
ImPU
9 Used
^4
Page 19

To Change Priority of Dual Numbers Memory
To Store a Secret Number
This feature permits you to store a phone rnjmber that
you want to keep secret in your Phonebook,The secret
number can be accessed only by entering the security
E «ampia;
1. Recall itie nirmbef.
Prifnary Number —t.
Secondary Number —►
MENU^
2. Press and scroll to
"PRI.CHANGE".
code (see page 53].
Example: To store the phone number 12 34 5 5 7
3 90 In address 30 as a secret riumber.
1, Press
2. Enter (Q (2^ (3^(4^
(15) ® ®
12]-i|M-789fl
ISTQ] MENUk-
3. Press .
Th»e display shows the sta
tus after change.
4. Press to decide it.
No fa: r/w pnmary numiwr rv/fl be tf/atecf wfjen you usb
Speed D/el/nff and Oulck D/el/ng fealuras.
To Erase Numbers and Names
This feature erases the number already stored in the
Phonebook.
Enample: To erase tine numbers 6765432 1 0
t 2 3 sic red in the memory address 16.
t. Recall the number stored
In the inomorv address 16,
2. Press and scroll lo
^ERASE"
3. Press (^),
The number Is shov^rn
again.
J. Two seconds iaior ihe [ADDRESS
scfoen is changed.
5l To erase the number scroll to “YES", otherwise
"NO", and Press .
6-543-210123
MODIFV
MOUE
5-543-210123
ERfiSE
NO
9-87
MENU
9-87
1 Presa |Si^ |5t^ .
Auto: 10
ilSTDl OPTIONk-
4. Prosa and scroll to
"SECn^
5. Press
6. Press to put a mark SECRET 1
7. Press
8, Enter (5^ and press
G
" 1^ " on the number to be v 23-456-789(1
___
, IhTQ] S-ETk-i
socrat.
to store It,
fRING TVPE
Ì0SaHÌ
fSET SECRET
I 23-456-7090
[lini GETk-
Address:.-
[5T01 OPTION«-
130 stored
80 £mPt9
19 Used J
To Recall a Secret Number
nurnber.
[TA3e O&DEk-l
Rddresf!.^
OPTION
Auto; 10
J7J
Page 20

г Press
3. Enter the Ibur-digit secu
Q
rity eodesnd press -
Í.EC0R1TV
CODE:
OK^
r. ■ —
123-№B90
TA3C
___
MENU^.
Link Dialing
This feature permits you lo Irak groups of numbers to
be sent in sequence. The linked numbers can be stored
in memory. When dialed, the first group of numbers will
be sent in digital signaling, and the rest of the numbers
will he sent in Touch Tone™ group by group each time
you press .
To Store Linked Numbers in Phonebook
Linked Numbers can be stored using ar>y of the proce
dures described under memory operations (at a spe
cific address, with a Name Tag. at the nent vacant
memory location or as secret). The only difference Is,
thait a Link Mark " = " must be entered between the
linked numbers. The link mark is entered using the key
sequence GG-
You can store Linked Numbers with Link Martrs " s' up
to 40 digits for the address 01 lo 90, and up to SO digits
for the address 91 to 99 in the Phonebook,
-Ч---------------- Up to 40 or eo fligits ■
L01
^ =
31 tr less, 3f or t
The example on the next page shows how to store a
Linked number at a specific memory address
1. Enter the first number.
2, Press , A link mark" = " will be added
at the end of the number.
3l Enter the second number. If you wi^ to link addi
tional number(s), return to 2.
4, Press (sT^ |St5\ , then enter the memory address
(01 - 99),
^38
31 (|i9ilsixi««s
Example: To link a mrmhera and store In Address 35
t. Enter (7^(4^ (s^ (3^
G[9 С7к*^'(э^.
3. Press( ^
3. Press
4. Enter (1
5. Press ^
É- Press ,
7, Enter
3, Press [|Э
)
(?5i (9^
OO'
A/o/e: White enterirjs s linked ni/mber, you may reviev^
dll the parte of that number; even fifiose siresdy
entered.
Ipnass (^, scroll to VtBW TELtT and press
- The linked numbers you have just entered
Witt be df^iayBcf one by one each time you press
,
7^16-3479
.CSTDl __MENU»-,
__________
‘DUAL MQRJ<
‘HYPHEN
?чь-м=
Lqt MENUk-
L02
LINK MARK
_____ ►
DUAL
HYPHEN
\l&2
1гЗ<15Б7890
L03
______
I^^IENU
k-
123
MEMUk-
HÉNÜ1
MENUk-
MENUk-
Í35 Stored!
30 ErTYptu t
_
^Used I
To PJace Calls using Linked Numbers
1 - Press , and sated the linked number you wan t
to call. (See Phonebook Recall on page 3t.)
2- Press Then the ÍHtiiíl indicator will light as
the first number Is dialed.
3. Press GCJ ■ second linked number will be
sent in Touch Tone™ signals. Succeeding num
bers can be sen! sequentially by pressing CQ
again.
39J
Page 21

Voice Activated Dialing (VAD)
W№ this ieaiure, you can make a call Iron your phonebooK
by just saying ths ngrriO. You can register, in your own
voice, names for up to 20 numbers in your Phonebook.
Voice Registration
Example: Slora the telephone number 1234 5 6
7 0 9 0, and register the name “Katie*.
1, Enterlhetelephonenuinber(1234S67a90).
2. Press . [gOlCE DflfA
3. Press .
4. After you hear the voice
pfQinpt, “Name, please",
speak "Katie" into the microphone of the hand
set. You will hear back "Katie" repeated from the
handset.
5. After you hear the voice prompt, “Again*, repeat
the name "Kalie*. You will hear ‘Katie” repeated
from the handset again.
6. if the registration Js successful, you wifi hear the
prompt “Entry CompJeled*.
7. Your voice registration sta
tus is displayed.
0. And your Phonebook slalu$ is displayed.
ieNTRV
IrOS >
eNo
__________
Voice Dial
Data Entrtf
Voice Data
19 EmPtV
___
1 Used
Ш Stored
» EnPty
10 Used
Notes: 1. Please register names iwih your normaf tone
of voice, end in a quiet environrnanf.
2- For better recognitior^, if is recommended
that very simita r souncfing names shouid not
f>e registered.
2. The majfimum ierr^lfj of names that the
phone wiii accept is 2 seconds.
4. The same person's voice that was used to
record Ihg names most be used tor dieting,
otherwise the VAD toafure may not work
property.
idO
Reviewing the Registered Name
1- Press and recali
the number from the
Phonebook.
2- Press G and scroll to “REPLAY".
3. Place the phone near your ear. and press
4. You will hear the registered name.
Note: Addresses with voice are marked with "V".
1гЗ-Ч56-7И0
figsg NENUk
Voice Activated Dialing
Example: Dial the number by speaking "Katie*,
1. Press and hold .
2. Listen ID the phone “Name, please*, then
speak into the microphone “Katie".
3. Ybu will hear from the phone, ‘X^alling Katie*
4. Katie's number in the Phonebook will be auto
matically dialed.
5. In case you wish to cancel the call, please say
"No" within 2 seconds after you hear “Calling
Katie', You can start from the above step 2,
Notes; 1. ft you hear “Again" from the handset, please
repeat the name.
2. If you hear “Old you say ‘Katie ‘ ?", ptease
artswer to it "Vfes’or “No”,
3. When you use this feature through car kit
option, it is recommended that you speak
slightly louder for better rectogniiton.
To Register a Name to a Number Stored in Memory
1, Press , and recall the number from the
Phonebook.
2, Press , scfoUto “MODIFY" and press G
again.
3, Press .
4, Two seconds later, press G-
5, You will have the screen “VOICE DATA ENTRY".
6, Press &r*d go to the step 4 of Voice Fiegis-
tratlor^ on page 40.
41J
...ivl!
Page 22

Nate; fn cs$e doai numbots or finked numbers are
stareilin lha Phonebook, ths primary number or
the first number can be dialed using VAD.
To Delete the Registered Name
1. Press , and recall the number from the
Phonebook,
2. Press , scnolt to "ERASE" anti press
agaifi.
3 Soroil to "VOiCE DATA" and preas ■
4. You will have the screen “VOICE DATA ERASE".
Scroft to ■"Ves" and press •
~ _— Call History
This feature recalls oulgoing Call History and incoming
Caller ID numbers. This is convenient tor redlalirtg re
cently called numbers or lor returning missed calls by
using the stored Caller ID. (See Caller ID with Name
on page 20.)
Calf Wstory Memoriei
Memory
OUTGOING Last 10 nurnbers ycu dialed. Address
INCOWffNG
scratchpad Last 3 rumbéis you wrote during calls,
You can access the memory In two ways, Scroll and
Shortcut.
01 to 10,
Last 10 numbert you answered or
missed. Address oi to 10.
Adckass 01 to Q3.
____________
Descrlplton
By Serotfing
1, Press and scroft lo
"HISTORY".
2. Press and scroll to
the menu item you want,
3. Press to select
4. To review the numbers In
rtiemoty, scroll wilh or O
S. After a number is displayed^ it can be easily di
aled, by simply pressifig .
SEORCH
HISTORY
IfINCOHIWG
tUcRRTCHPflP
RECRLL
У
HISTQR?!
fidü^giB H
Shortcut:
* Press lo display the fatest number In Ihe
outgoing history rnemory.
• Press 1^^ to display the latest number trr the
incoming history memory.
To Review Outgoing Call History
Example: To iecfiH a number from Outgoing History.
1. Press 1^^.
The most recent calf is dis
played.
a. Scroll with Of
review other numbers.
3. You can place a call by simply pressing
When duplicate numbers are called, only the latest call
la Stored in the outgoing call history mamory.
123-45S-7MB
TA^i HENUJ^
To Review Incoming Call History
Exampie: To recall a received Caller ID from
Memory Stack.
1. pm«0© TzhFÍÍI
The fcost receñí call is dis-
piayed._
2. Press Q . A time Stomp
is shown, if available.
3. Press .
A name is shown, it avail
able In your Phonebook.
4. You can place a call by sirnply presgirrg
tn the incoming caH history, the calls are martoed with " ♦ "
or " b ”, Numbers wilh ” * ‘ represent calls you missed,
and numberswith** "representcallsthal you answered.
When duplicate numbers are received, only the latest
call is stored to ihe incoming catl history memory.
ЙРГ И 20=15
ТАЭ2-Р HENU»-
fill
BPrIг 1№зо
T1P3A MENU>-
Í42
4ÍJ
Page 23

To Review Scratch Pad
ГрГ©00
OG-
2. Scroll with or O'" review other num
bers.
3. \Ъи can place a call by simply pressing .
To Save a Number to Phonebook
The numbers of Call History and Scratch Pad Memory
can be stored in your phonebook,You can add a name
in the same way as ''MODIFY". See To Modify Num
bers and Names on page 34,
Example: To save a received Caller ID to Phone
book.
1, Recali a number.
1гз-ФЬ-7И(1
TiS 1 MENU^
123-№?8!m
ТА01» NENUN>
2. Prass and scroll to
“SAVE'.
hUIEW 1
UIEW TEL#
UIEW NOME
luiEW f
MENU
lB3Bl
3. Press
12H5ll-7890
(5TPJ MENUk-
4. Press (sto\ (5t5s ,
5. Enter (4~ди) as an
address, and press ( J
n. ^
Rddreff:
flii1oi25
[STDl OPTIONN-
iiO stored
T5 Used
__
WEB BROWSING
When operating in tt>e Digital mode, you can access vari
ous Inlernet websites directly from your oellutar phone.
Please contact your Ser vies ProvidBr for details of the avaiP
aWe services. See page 72 for the set-up instructions
Web Access
1, Press and hold - Th^ Web Browser will start.
The cached iniornnallon may be displayed.
2. Press and hold r@l. your phone will access the
retwork, and display your service provider’s
website.
Example;
3. Press or to scroti the menu or displayed
text
4. Press or G 10 select the menu option in
the bottom line of the display. ,
5. To relum to the previous page, press ,
6. To terminate the network access, press (5^ ■
You can still browse the cached information.
7. press (5^ again to close the web browser.
xxxxxxxxxx
i^vvvvyvyv
B^ck 4
Browser Menu
Press (Ж) key ■while the browser is active to see the
browser's local menu. (Brouwer bienu
1. Help: To get help informa- jl^HelP
lion. -i ДК
2. Home: To get back to the Home page. Press and
hold will do the same.
3. Mark Site: To store the current page in your book
mark list.
4. GoTo URL: To input URL (Uniform Resource Lo
cator), and access that page.
5- Show URL: To display the URL of the curreni
page.
6. Reset UP: To clear the cache
memory In your browser.
7. About UP: To display the
version of your browser.
JSA'
hfDww by
i
^*4
р11апвл111
Page 24

Alpha Entry in Browser Mode
"Alpha' mode will automatically be active when it is пес
essarv 10 enter alphabet character auch as
Example:
ALPHA/afpha — Atpttabei Mode
Press (y^ to switch upper and lower cases.
Press to move the cursor to lelt, and to right.
To exit the Alphabet Mode, press .
SYM —Symbol Mode
By pressing "SVM1“ (symbol) mode will be ac
tive. Scroll "SYMI "to “SYM0" by or O' press
the corresponding digit key {[T^ to (6^) to select.
WLfftf — Numeric Mode
Press 00
0
agairi lo reset to "Alpha" mode.
to set "MUM" (numeric) rrode. Press
Alphabet Mode
1 prese
Key
1
г ABC
aoíF
4GHt
5 JKL
6MWO
7 POPS
BTUV
BWXYZWr'W X.'* Yfy
doper 0
© *
© Ц
2 pmse 3 press Í press 5 press
BJant 1
A13
Dj'e E 'e
Gig
J.'i J
Ul/m hJ / n
Г1'-
Bib c.':
hih
K/k
0^ q
Uhu VIv
7
.
Symbol Mode
1 2 3 4
SYWl
SYW2 1
SYM3
SYMA
SYM5
SYM6 1 1
1
<
■:
Í 1
Enter URL;
abci
alpha Ж
e 1
РЛ
III
1Л
D.'O 6
R/r
1
/ S %
■■ “
!
7
e
1
& %
г
Э
4
5
Sis
ъ
Z!i
7
Í )
5
*
1 1 '
1
'
+
1
VbLrr CDM-4S00 Audiovox Cellular Telephone has been
engineered to operate wilh the latest technology that will
allow you to enjoy the benefit of Voice Mail Notification
and Text Messages. Please note that operation of these
features depends on the Cellular Syslern and Ihereiore
may net be available in all areas.
Message Indicator
A message indicator ^ shows you the current status
as explained below.
You have new Text Messages or new \feice
0
Flashing Mail Notilicalion.
0
Steady Notification, which you have seen already.
В
off
in addition ID the 0 Indicator, whenever your Voice
Mail contairis unravlewed messages, you will occasion^
ally hear a short beep as a reminder.
Vbu have Text Messages or Voice Mail
Neilher Text Message nor Voice Mail Notlfjcation.
Voice Mail
Voice Mail Notification
Your cellular telephone notifies you when new messages
are In your Voice Mail. When messages are left in your
Voice Mail, the Q indicator at the upper right of the
display flashes to alert you.
Normal Yotce Matt Notification
When your phorie is notitied by the cellular system that
there are messages in your Voice Mail, the following
occurs.
1. The phone sounds a short beep tone.
2. The [3 indicator at the upper right of the display
flashes to alert you.
The display Indicates
"NEW MESSAGE" with
animation.
3. The Phone's Memory
Stack is updated as to the number of unreviewed
messages in your Voice Mail.
iiH
NEW MESSAGE
^46
47J
Page 25

Voice Mail Notification with Mail Retrieval Service (MRS)
1. The phone sounds a short ^
beep tone. Messa9e
Retrieval
2. Press to answer the incoming caii, your
phone wili be connected to your Voice iVlessage
Service so that you may retrieve your messages.
3. If you choose not to answer the incoming caii,
“Message Retrieval” wili be stored in the stack
for retrievai of your messages at a iater time.
To Display the Number of Voice Mail Messages
Example:
____
1. Press . A mark “ »r ” is
fiashing, when a new mes
sage is avaiiable.
2. Press to seiect
"VOICE”.
The number of messages
in your Voice Maii wiii be dispiayed.
3. if a Text Message is attached to the Voice Maii
Notification, the Text Message can be reviewed
by C ^Otherwise this step is skipped.
4. PressQ^.Scroilto'‘QUIT’
or “ERASE” the notification
you reviewed.
5. Press .
6. To erase the Voice Mail
Notification, scroil to “YES”,
othenwise “NO”, and press
^ TEXT ,
MESSPGE
10/30 USED!
x<Voice Mai1x<
12 Vaitins
ERPSE
I NO
VIEWh
MENU
►
Voice Mail Dialing
You can store one set of iinked numbers in a speciaiiy
provided memory, and access these numbers with one
touch of the “Voice Maii Access” key .
To Store the Voice Mail Access Number
Piease see To Store Linked Numbers in Phonebook
on page 38, and follow the steps 1 - 3 to make a set of
linked numbers. Press to store.
Up to 80 digits of linked numbers can be stored includ
ing link mark “ = ”. You can also add a Name Tag (up to
20 to 24 characters) with your voice mail number. (See
To Store a Name with Phone Number on page 27.)
To Call Your Voice Mail
1. Press and hold (vT). The first number will be dis
played and dialed.
2. Press (v£) .The second number will be displayed
and sent in Touch Tone™ signal.
3. The succeeding numbers can be sent sequentially
by pressing (vT).
To Review the Voice Mail Access Number
1. Press to select the Phonebook Address
Mode.
2. Press (v+) .The first linked number in (VT) will be
displayed.
3. Press (one or more times) to display the re
maining linked numbers in (VT).
I
Text Messages (Short Message Service)
Your phone is able to receive and display Text Mes
sages of up to 255 characters long. The Text Message
memory stack can store up to 30 messages. When an
SMS message is received, the following occurs.
1. A short beep tone sounds.
2. The ^ indicator at the upper right of the display
flashes to alert you.
The display indicates “NEW
MESSAGE” with animation.
3. The Text Message just re
ceived is stored in the Memory Stack. To review
stored messages, see To Review a Text Message
on page 50.
4. If the Memory Stack is full, any new Text Messages
will not be stored, and you
will have the display:
Tiiil
NEW MESSAGE
op
MEMORY FULL!
Mew Te»t
Rejected
ys
49J
Page 26

To Review a Text Message
Text massages are s[(?re<t in the address 01 lo 30 in the
memory siactt. The address 0l has the iasl message.
Every message moves to the next address when a new
message is stored.
Exam pie: To display a Text Message stored ir the
Memory Slack.
1. Preaa scroft to
"TEXT", You have now 10
Text Messages oirt of 30 L 1 B/'3& USED
memories. A mark ■ * " is
flashing, when a new message is available
Press . The firel Text
Message is displayed. A
longer Thessage will be au
tomatically scrolled every 6 secondB.
3. Press or wail lor 6
seconds to review an op
tional Information.
4. Press Q e riCalTBackir
seconds, tt a CaMback 1гн5б-ш
Number is displayed, you TiOl» MEfKl»
can dial it by simply pressing Cj^
5. Press and scroll Г
mrror-ERASE-brthe |
message that you iust re
viewed.
6. Press to Select.
7. To erase the Text Message, scroll to *VES’, oth
erwise “NO*, and press .
8, To review another message, scroll with or
■
Nates: New Text Messages are marked with '♦ *. Text
Messages you have aireacfy reviewed are
marked with
YPICE
*Тен1к
Call OHice!
ТА01» >ЛЕ*1И
'»'Time StaruPA
Mas 121»
_____
MENU
ER05E
ЕЯЙ^Е
ESS
NO
¥■
FUNCTION MENU
To Access Function Menu
Various phone settings can be changed through Func
tion Menu to customize your phone’s (unctions to tit your
convenience. See Function Menu Tree in the foilow-
ing page. Ytou can reach the Function you want to ac
cess in two ways- Scroll and Shortcut.
By Sc/ryHirtg
1. Press to enter Main f Fi_
Menu,
2. ScitJll with ot
key to the desired item In
the Main Menu,
3. Press G to enter the
submenu.
4. Scroll with or
key to the desired item in
ttie submenu,
5. Press to enter the function.
By Shortcut
Each Function has its shorlcut number for direct ac
cess. For example, to enter the function “RING TYPE" (F32),
press (3^ (5^ .
иваш
£:D1SFLPV
3: TONES
l:LOCti
DISFLRV
TONES
_________
1ма«[ДД1мМ N>
£:RING TYPE
3=KEV UOU.
l:RINO t/QL.
KEV WL.
P3_
F31
рзг
To Exit from Function Menu
* To return from a submenu to the main menu, press
0.
• To exit from Function Menu, press .
Notes: 1, A mark 'at the right In a menu prompt
you that you can see its dergHjfeci rfems by
pressmg o
2. A mark “ ^ " shows the currertt setting ot
the function
V
Page 27

Function Menu Tree
Lock Features
Main Menu Submenu Branch
- 1;L0CK
- 2; DISPLAY-
- Э: TOMES-
- 4; DMES ■
5; SYSTEM
6; SECUHiry
TiDATA/FAX-^ IrMODE
8; VIBRATOR
0; OTHER
•1lKEYLX)CK {Fll)
Sr LOCK (FT2)
5;А1Я0и0СК (F13)
4;LOO<CODE ¡FHl
■ 1iMVMUMBEFHF3f|
- 2: BACliUQITr (F22)
'3;HVPHEM (FM)
■JlSUS LINES (F24)
■SiCCkMTftAST (F25)
■ 6; VERSION (F26)
■ 7; LAST SIO (F2i)
■ 8: PRL ID (F2si-
■ 1; RING VOL.
■ 2; RING TYPE
■ Э: KEYVOL.
■ 4: MUTE
■ 5- DTMF SEND
6: SETTINGS
-liTlMEHS {F41) -r- 1: LAST CALL
■i: CLOCK (F42) ^ 3: OUTGOING
—I- LA/BSW (F51)
I— 2. NAM ChG. (F52)
\- 3: analog (FS3)
>—4-SETTINGS (PM)-
1: RESTRICT
2r EMER. »
3:[11 EMER.
SEC CODE
1
b; RESET
—I— 1: STANDBY
>—1-. IN-US£
iF3l)
I- 1; KEY TONE
{F3£J
- 2: BEEP ALT.
- 3: VOICEMAIL
(F3aj
(FW)
- -tlTEifT Mse,
tm
- £: CALLER ID
(F3«)-
-6: SERVICE
- T: PRIVACY
-SiMINLTTE
к 3; ALL CALLS
— Э: RETRY
-Sr AUTO PIN
'—t: PIN CODE
(ESI)
(FS2)
(FS3)
(EM)
fFes)
1
^ 2: WEB SETUP (F72)
I— 3: BROWSER
IrOUlCKOIAL (F01)
ALfTOANS. (FOZ)
1
ABSENCE (F03)
:;A8S. TIMER (PlM)
(F7)|
(F72).
(FT3)
T- liLOCK
^ 7-, PASSWORD
— 2r BACKLIGHT
-3: IDLE TIMER
— 4: (P ADDR.1
— 5; IP ADDH.2
-fliUSER NAME
&; LOW HATt,
4;UFETIME
t; NAM NAME
2: ALTTONAW
4l privacy
1; TIMERS
2; PRONE0OOK
Э; HISTORY
4; TKT/VOICe
Si SETTINGS
Security Code and Unlock Code
VouT phone Is equipped wiih ihe Security Code and the
Unlock Coda to access various security features. You
may chartge the preset codes for added proleoilon.
Code Preset
Security
Code
Unlock
Coda
See To Change the Security Cod« {F64) or] page 69
See To Change the Unioek Code (El 4) on page 54,
1234
1234 To unlock the Phone
To access Secret Number, to sat Call
Restriciion, eic.
Descripfton
Keypad Lock(F11)
This mode is useful for preventing Inadvertent pressing
of keys. (For example, when the phone is in a purse or
pocket.)
With this feature on. the following functions are stiff avaii-
able.
* Incoming calls can be answersd with CQ .
* Programmed emergency numbers can be called.
(Except for OneTouch Emergency Call.)
When this feature is on, the following functions are not
available.
• Aulomatk: Answering
• Any Key Answering
♦ OneTouch Emergency Call
• Quick Dialing
* Turning off the phone by (5^ ■
To Activatei/i?eactlvate this Feature:
1. Press [T~} (Q Id
activate ''Keypad Lock*
mode.
2 Press (1^ again lo deactivate
KfetfP-ad Lack
I
SJJ
Page 28

Phone Lock(F12)
This mode is to prevent unauthorized use of tha
phone. With ihis feature on, the following functions are
still availatHe.
» incoming calls can he answered with ,
• Any Key Answering
» Programmed Emergency Caii
• OneTouch Emergency Cali
» Turning oft the phone by (5^ The folfowing functions are nol available when this fea
ture is on,
• Automatic Answering
• Quick Dialing
To Activate:
1. Press {T~l to Phone lock
activate "Phone Loclc’
mode. ---------------------
Wore: Trte phone will remain looked even if the power
is turned off.
Automatic Phone Lock (F13)
II you aotivaia this fealure, the phone will auiomaticaliy
go into the phone lock condition after it is turned off.
(See Phone Lock (F12) above.} When you turn the
phone on, you must enter the four-digit urtlock code
before it operates. (See To Unlock the Phone below.)
1. Press (2^ (Q . IftJTO LOCK FIS
QN
2. You can turn this feature on/oH by or O-
3. Press to set.
To Unlock the Phone
1. Enter the four-digfl unlock code.
2, The "Phone Lock" indicator will go out.
To Change the Unlock Code (FI 4)
1 - Press (t~3 .
Enter the four-digit socorUy code and press t
SECUftlTV
CODE;
OKk-
3 The cu/reni unlock code (HEW F14|
will be displayed. 1234
A. Enter a new four-digit unlock, code and press
^ CODE?
[____________5ETK
^ Display Features .
Own Telephone Number Display (F21)
This feature enables you to display your own telephone
number and the ID number (SID) of your "Home" Cellu
lar System.
Press [2^ (T^ -
MV PHONE
NUMEER
(SIDH» eeeze
l23-456-m0
Backfighi Control (Standby) (F22-1)
The LCD display and k^pad are backlighted aulomaih
call у after Power-On.
The backlighting duration can be changed. Four modes
are available.
t. Press (2^
2. Press (^-)
3- Vbu can change Й10 current mode by O4, Press to set.
• 10SEC- iO Seconds Mode
Bacidighl is on for 10 seconds after a key is pressed. It
also lights automatically when the power is turned on
and for arr incoming call. The duration is variable be
tween 510 30 seconds, by pressing .
• OFF-Off Mode
Backlight is on momentarily when the power is first
turned on, but remains off thereafter.
• ALWAYS ON -Always On Mode
Backlight is always on.
Мо(н: Vbu can keep the backlight on while you are en
gaged in a conversation. See Backlight Con
trol ^fn-dse; (F23-2) on page 5S.
ЕЯСКиЮИТ Г2Й
CONTROL f
вяскионт F££
■STANOeV
кПйШЗ ►
OFF
FZTl
_________
^
i¿4 ,15>
Page 29

Backlight Centro! (In-Use) (F22-2)
Fof ease of operallon, you may select lo have (he back
light always on while you are engaged in a conversation.
When this Feature is set to Ihe 'ALWAYS ON" moefe, ihe
backlight is turned on as long as the call Is connected.
1, press {2*^ I and
scroll 10 IN-USE"
SfiCK LIGHT F££
fliSTPNQEV
control Î
p-
2. Presfi
3. Scroll with or o
WAYS OK",
i. Press to sel.
DftCKLIGHT F22;
IN-USE
гИЕШШ!
1 PLWGVï ОН
to "NORMAL’ or 'AL-
Auto Hyphenation (F23)
See Auto Hyphenation on page 24.
1, Press (a^.
2, Scroll with or O'"* "ON" о г'OFF,
3. Press to set
ClUTO F2»
HYPHEN
■/НИ h
OFF
SMS Text Lines Selection (F24)
You can ^lect to have Text Messages dispiayed In ei
ther 3 or 4 lin^.
1 Press I ■' 2‘K, iT-i»!
2, Scroll with or Qio"
3. Press to set.
feii^ FMI
TEXT LINE^
||/Ё1Ш5В0 ►
I 4LINES
3UNES"or “ALINES".
_______
Software Version Review (F26)
This feature permits you to review the software version
which is inslailed In your phone.
1, Press (2^ .
Z Press to exit
VER<EION F£&
01.23
OK^
Last Rescan SID Indicator (F27)
This menu item permits you to view the System Identi
fication number (SID), which your phone is currently
using.
FS!7
0oeae
eaeesi
z Press
G
to exit.
tfiST
RESCAN
SIO
N10
PRL ID Review (F28)
This menu item permits you to view (he Preferred
Roaming List (PRL) version that is programmed in your
phone.
1. Press [i^ .
2. Press to exil.
PRL 10
F2Sl
1234^
OKP
Contrast Control (F25)
The LCD display coniraBi can be adjusled in 7 steps for
your bosi condiiion.
1. Press ( 'd \^\ 15^'. (owfRBET F2E
^ I ШШ
ТЛ p
2. Adjust the contrast wiih
3. Press ■; f) to sel.
or
iS6
Page 30

Volume and Tone Controls
Alert Tone Volume Control (F31)
, p..,.Ooo
2- Kjeep pm^sing or until you gel the da-
sited sound level, or "silent" mode,
Not0: in “siienf" sieri mods, sien tone is not given fsjf
an irtcíiming catt. Howie ven if AutomStic Answer
ing toaiure is ON, aien tans is gtV&n mih the
lowest avsitsbte votume.
Ring Type Selection (F32)
This feature permits you lo seFect an alert lone pattern
tram IS options including melody ringers.
1. Press ¡5^ .
2. Press or О lo selecl lha alen lona.
3 Pres$ lo set.
Key Tone Volume Control (F33)
t- Press C ^ [3^
2. Koep pressing or achieve (ha
desired sound leve(. or"srfenr mode.
Note: Key ions will be off in “silent mode", but tone wifi
iw heard on the other side of tbe Una.
iitiittVouE"
RIMO
TVPE
RINGttOl
r^l
RINGWQ2
m
..■■■III
V3LÜHE
Mirilll
To Mute a Phone Conversation (F34)
You can mute your conversation at any lima during a
call.
1. Press (5^ -
2. Tien the "Mute” indicglor is displayed, TM transmit
audio wilt be muted but the
receive audio will still be
heard from the receiver.
3. To return to normal conversation, press (3^
(jaij} again.
4. Mute is reset when the call is terminaied.
Mute
Sending DTMF (F35)
This ieature alJows you to activate or deactivate Send
ing DTMF (Touch Tone™) when you enter a number
during a call.
T Press (3 © ■ tiTMP F&S
2. Scrcli to "Orr or 'OFF' to
select.
3. Press to set.
Setting Tones (F36)
This is a group of 9 tunctkjris related to the setting of
tones.
1. Press (3^ (|5l The Branch Menu is dis
played.
2. Refer lo the particutgr functions tor details.
KEV TOME
1:|
2: BEEP ALT.
SiyOICEMOll
F5Ó
H
Key Tone Length (F36-1)
This feature selects the duration of the tone length when
a key is pressed,
1. Press (3^ and
(D- ■
TONE
LENOTH
fUEOIEM
4HORT
F(»e
W-
1
2. Ybu can change the current rncde by or o-
3. Press to set
* NORMAL - Normal Mode
Tone is heard as long as the key is being pressed.
• SHORT - Short Mode
I
Tone Is heard for a short time even if the key remains
pressed.
59J
Page 31

single Alert Beep Tone (F36-2)
This feature is used to signal ал inecHTiing call with ол1у
a single beep. This feature can only be used with the
hsilent" alert mode. See Alert Tone Volume Controt
(F3l) on page SB.
t, Press[5^ (6^ and
@ '
BEEP
ALERT
F36'
УЩа
Z You can turn this feaiure on/off by ^ o
3^ Press to set.
Voice Mall Alert (F36-3)
This feature audibly alerts you when a Voice Mail Noti
fication is received, A Voice Mail Notification is received
if your Voice Mail contains messages that have not been
reviewed.
1. Press and [OoiCEMfllL
IfYEE] *-
it OFF
2. You can turn this feaiure orVdff by or
1 Press to set,
Text Message Alert (F36-4)
This feature audibly alarts you when a Text Message is
received,
1. Press ¡f^fSD^i^ and fTEKT MSO. F36
^ ‘ ALERT
® . nr'HP
2. You еал turn this feature on/ott by or
3, Press to set-
Caller ID Alert {F36-5)
This feature audibly alerts you when a Caller iD is re
ceived
1. Press ГбЧ and (CALLER Ю FS6>’
2. You can turn this feature on/otl by or
3. Press to set.
- -■ ^ ^— ALERT
C^J
‘ OFF
Vi'
OFF
Service Mode Alert (F36-6)
With this feature on, an audible lone alerts you when
Ihe service mode changes from Digital to Analog, or
vice versa.
1, Press!
2. You can turn this feature on/off by or c
3 Press to set.
'V (a“h arid
SERVICE
ALERT
Í
Fse
Voice Privacy Alert (F36-7)
This feature audibiy aferts you when the voice privacy
service Is provided, and also when the service is can
celed,
■f. Press and fPRIUflCV
2. You can turn this feature orVoff by or o
3, Press to set. '
ALERT
QN
F3S
One Minute Beep Tone (F36-0)
With this feature on, you will be notified during a call
once every minute by a short beep tone, in addition
two beep tones will sound every five minules.
1, Press [3^ (6^ and
2, You can turn ihis feaiure on/off by
3 Press to set.
MINUTE
ALERT
I QM
VEH3
Fee
or
Low Battery Alarm (F36-9)
When activated, this feature warns by an audible alarm
when the battery laval is low,
if Ihe alarm is given, recharge the battery or replace it
wilh a fully charged battery.
1, Pressif^ ^i^and Lou ВАТТ. РВе]
— alarm
2. You can turn Ihis feaiure on/off by or O-
3. Press to set.
УЕВ
■ OFF
61J
Page 32

Call Timers
System Features
To help you managa your youJ' phone Js equipped
with sevgral Call Tlnrwrs.
Last Call Timer (F41-1)
1. Press @ (33 . [TIMERS
The laik time ot the Last call
will be dfspfayad-
2. Press to exit.
LPs^T ChLL
OUTGOING
Ш
iMges
Outgoing CailTimer (F41-2)
1- Press 1^3 iiD ll3 ■ CLimulative
lalk lime of all oulgoing |TIME~RG
calls will bq disoiayed. i£:|
2, Press 10 exit. COy^S
OUTGOING
F41
All Calls Timer (F41-3)
1- Press (43 fi 1 (53 cumiifative
Talk time of aft Inocming ^ ^ ^
and outgoing calls will be
displayed.
2. Press to exti.
Note: The above three timers can be reset to sen? by
using 'Calf Timer fleser/lM/Liiie. See page 70,
PLL COLLS
LIFETIME
1Й
TIMERS F41
1H23M4E«
Lifetime Timer (F41 -4)
1. Press (43 '(Si CLimLitgtiwie
"fifetima* talk time of all In
coining ar^d outgoing calls
will be displayodThis timer cannot be reset to zero.
2, Press IjQ exit.
TIMERS F41
i2H@4MEGS
LIFETIME
[4=
[LOST COLL
ill
Clock Indicator (F42)
VVhen the phone is in an area with digital service (Digi
tal Mode) with this feature enabled, the dale and time
are automatically displayed.
Press r ^ (4*^ .
2. You can turn this feature on/off by or O
3, Press to set,
(clock
УНЯ
['
\62
OFF
F4t
►
A/B System Selection (F51)
This feature permits you to select whiph Cellular sys
tem (A or B) your phoriB uses. When you turn the phone
on, it ramembers the last A/B setting and will scan the
radio channels based on that setting,
Leaire this setting as It has been preprogrammed un
less you nave a reason to alter the system selecllon.
To alter the system selection:
t. Press fT~l - Ifli/i ^
The current mode will be '
displayed
2 Vbu can change the currerit mode by of O-
3, Press О to set. *
* AUTO ROAM - Auto Roam Moefe
The phone will scari the priority systems first, and then
non-prlorliy systerns. For more information as to how
this mode works, see Enhanced Roaming below. .
- HOME - Home Only Mode
You can pface or receive calls only within your home
area or home affiliated area.
• A-ONLY " ^-System Only Mode
The phone will scan the A-system only and prevents
swilching over to the B-system.
■ B-OHLY - BSystem Only Mode
The phone will scan the B-system only.
Note: If your L CD displays 'AUTO ROA M ONLY", your
phone has Ьаел pre-programmed to operaie in
the Auto Roam Mode only.
^^ GWITCH
дито ROtjM
HOME
FEl
H
Enhanced Roaming
Cellular systems are identified by a number called System
Identifier or SID. Vour phone is equipped with a Preferred
Roaming List (PRL) which can be programmed by your
Carrier to taka advantage of the families of cellular system
(SiDs) lhat your Carrier owns, or has special billing ar
rangements with, in different cities.
In your Home System Area, both "No Service" and "ЯГП"
are off in your display. Outside of the Home System in Ser
vice Areas closely associated with your Carrier, the phone's
display may appear the same as when operating in Ihe
HoFifte System.
63 J
Page 33

In areas where your Carrier has Roaming agreements,
your phone wiil display a steady 'Rm" indication. It your
display indicates a fiashing 'Rfir. you are in a celiuiar
system which Is not assoclaled with your Carrier (you
can still make or receive calls).
[f your display indicates ^No Service)", you rriay have to
change your A/B System Selection or NAM Selection tn
ordor to obtain seivice. It your display indicates "No Ser
vice", you are tn an area where there Is no cellular service.
NAM Selection (F52)
Some Cellular users may find it beneficial to register
their phones with multiple numbers, for diPerent cities
where they may frequently travel. To provide this ability,
your phone has two NAMs (Number Assignment Mod
ules) enabling up lo two registrations.
(f you have multiple registrations, the NAM Selection
feature enables you to change the NAM being used by
your phone. Do not use this feature, if you do not have
multiple reglstralions-
750 change NAMs:
1. Press (5^ (2^ - fNOM ~
2. Vou can change itie current NAM by or
3, Press to sei,
CHQMGE
^i^m4567e5a>-
«2бБаэ21а
FE2
Force Analog Call (F53)
This leaTure lemporarily directs The phone to use the
Analog Mode even il 1hs Digital Mode has been previ
ously seleciad,
T Press f ’■) (5^ [3^]
Z Press { ^ when scanning I he Analog Mode
Notes; Ths <ea:urs aulomaricaify ends if:
}} The phone is (urnsd oft.
2} An Outgoing call is made.
An incoming call is received.
4} After 10 minulBs if items t) - 31 did not occur.
Force
ANQLOC
tVi^
Ino
FEE
F
System Settings (F54)
This Is a group of several functions for settings related
to the system.
1. Press (5^ [4**) ,
The Branch Menu is dis
played.
___
_______Fbfl
ÊiPDTO NOM
3:RETRV
NAM Name Display (F54-1)
Vou can program a greeting or a name of a maximum
10 to characters in the second line o( your LCD dis
play. This will be displayed when the phone is turned on
or when you change the NAM. (See NAM Selection
(FS2) on page 64.) As you can program different name
for each NAM, you can tell which NAM Is currently ac
tive when you turn the phone on.
f. Press (5^ @ and [nQM NAME
(IT^.
2. You can select other NAM INOM NAME
/-Ч ШР]
Then press to edit,
3. Enter your message,
(See Alpha Modo on page 27.)
4. Presa to store Ihe message.
_______
ГРО
E3] <NCi NPIME>N-
^^»2 <NQ NQME>
F54
Automatic NAM (F54-2)
If you have multiple NAM registralions (see previous de
scription). youf phone will recegniie NAMs for which you
are registered. The phone will then automalJcalfy switch
lo the proper NAM for the area in Which you are in.
1. Press [5^ [4^ and 'flUTO
© .
2. Vou can turn this feature
orVoff by or ■
3. Pnpss ( r4 10 sei.
NPH.
ON
v'ha a
FE4
Automatic Retry (F54'3)
With this feature on, your telephone will automatically
make up lo seven call attempts when the first try is not
successful.
^64
65J
Page 34

The [|H IBE] indicator wl]| stay on, and ths speaker will be
muled. Proas (5^ cancot the Aulomatle Rolry,
1, Press and ftCTRV
IS '
2, Vou can turn this feature on/off by or o
3, Press lo set.
ON
PBd
Enhanced Voice Privacy Service (F54-4)
(Digital Mode Only)
Thha feature requests [ho cellular system to provide the
enhanced voice privacy service. This service can only
be provided in the Digilai Mode, and its availabifity de
pends on the cellular systern and your service provider.
To Set the Enhanced Voice Privacy Afodo:
1. Press (5^ {4^ and
2. To request ihe eoliuiar system lo provide the en
hanced voice privacy service, select "EN
HANCED” with or , and press .
3. When the phone is operating in the Enhanced
Voice Privacy Mode, "VP" appears ir^ the upper
line of the display during tai king,
4. To request the cellular systern not to use the en
hanced voice privacy service, select "STANDARD^
with Of . and press .
IVotej.' 1. TT)is feafure mus/ be activated before the calí
is initiated.
2. Even if the standard mode is selected, the
ceituiar system may cfírecí /he phone io use
ihe Enhanced Voice Privacy Mode.
[VOICE
FRIVPCV
г ENHANCED
vHECBBSiag ^
РБ41
Anti Fraud Security Features
Your new Audiovox Ce11uiar telephorre has been engi
neered with the ialBsl technology to help prolecl from
the fraudulent use of yourceiiuiar teiephone number.
Vbur phone is equipped with Authentication and PIN
[Persor^af Identification Number) Dialing. (Avaliabilfty of
these features depends on your Service Provider).
Should your Service Provider require use of a PIN, your
PIN can be sent marujally or programmed into the phone
for more convenient use.
To Place a Call with the Manual PIN Entry
1. Enter the number you are caiiing, or recali the
number from a specifie memory location.
2. Press .Your call will be processed. Listen
for a double beep, which will prompt you to send
your PIN.
3. Enter your PIN number, and press CQ . \bur
caH will then be placed.
To Place a Call with the Automatic PIN Feature
1. Enter the number you are caiiing, or recall the
number from a specific memory location.
2. Press "SEND" key QQ - As your call is being
processed, you will have
Ihe display;
[Send PIM
Presi
tSEHDlKeti
3 Press "SEND” key QQ again. Your call wifi then
be placed.
Note: Before you can use this feature, you must pro
gram your PIN and turn the Automatic PiN fea
ture on. (See procedures below.}
To Place a Call to Voice Mail using the
Automatic PLN Feature
(See Voice Mall Dialing on page 48.)
1. Press fyr) for more than one second. As your call
is being processed, you
will have the display;
2. Press (v7) again, your PiN will be sent,
a Press again. The second number stored in
will be sent In Touch Tone^“ signals.The sutisequent numbers, it any, can be sent sequentially
by pressing .
ToTurn the Somatic PIN Feature On/Off (FS4-5)
1
Press (S^ {4^ and
2. You can turn this feature on/oft by
3. Press to set.
<f7A
[Send Plht
Press
[у±ЖеУ
' '' FbOl
ON
Of
О
Page 35

To Program or Change your Automatic PIN (Р5Ф6)
1. Pross (5^ gnd
(¿5 -
2. Ènte г (he four-digit secu
rity code and press ■
SECURITY
CODE:
NEW
COOE-7
OKIr
F=.4
г^т>
3. Enter ^'our new PiN Code. Press to program
^ Security Features
Call Restriction (F61)
This leature permUs you I0 impose various kinds of re
strictions on oulgoing calls. Emergency nurnbers can
be placed even when this feature is or.
To Set Celt Restriction Mode
1. Press [6^
2. Enter the (our-digil secu
rity code and press .
3, ^rdii can change the current Restriction mode by
0“0
-
Î.ECUR1TV
CÛDEr
RESTRICT F61
1IDISITS
QK»-
To Change Emergency Numbers (F62)
Vou can program your own emergency numbers. Up to
3 numbers el maximuni 32 digils can be stored.
Memory Location Preset Emergency Number
в 1
b2
b3
Press [б1Ц [2^
2, Enter the four-digit secu
rity code and press .
3. Press or o to select the emergency num
ber memory location (1,2 or 3) that you want to ' ' f
change or program, arrd press ,
4. Enter the new emergency number, and press .
Rote: The emersency numbef in memory location t
Witt be dialed when the OnaTouch Emergency
Call iesture is used-
911
*911
Blank
^ÊCUftîTV
GODEI
lEtfER.
NUMBER
Шеи
ttE it^il
QK»-
F62
ToTurn On/Off OneTouch Emergency
Call Feature (F63)
1. Press (6^
^ECURITV
GODEI
4. Press to set.
The available Resttici'ron modes are as follows;
• IIDiGiTS -11 Digits Mode
Only phone numbers of 11 digits or less are accepted.
Operator assisted dialing is prohibited.
• 7DIGITS - 7 Digits Mode
Only phone numbers of 7 digits or Jess are accepted-
Operator assisted dialing Is prohibited.
• OPERATOR - Operator Mode
Operator assisted dialing (0 Origination Call) k prohibited.
• RCL01-Q9 - Phonebook A ddress Mode
Only outgoing calls to the numbers stored In the
Phonebook addressrange01~09 can be made, if the re
is a need to expand this range of addresses please ask
your dealer.
- OFF-Off Mode
No restriction.
Z Enter the lobr-digit secu-
ri(y code and press .
3. You can turn this feature on/off by or
4. Press !0 set.
1 TOUCH F&3;
EMEROENCV ■
ri^wti k-
OFF
_________
To Change the Security Code (F64)
1. Press (4^ .
2. Enter the tour-dlgii sacurliy code and press
3. The current security code
Is displayed.
4. Efi(erariewlour-digilsecuritycoddandprEss(
NEW
CODE?
QKV
.
ОКИ
Fi4
SE1>
Page 36

Reset Functions (F65)
TTiis is a group of several luncfions tor Functloñ/Memory
ñesei.
1 Press [6^ [5^ . CURI TV
2. Enter the four-digu secu
rity code and press
Then ihe Branch Menu Is
displayed.
CODE:
RESET
TIMERS
2: PHONEBOOK
U!
F&5
¥■
Can Timer Reset (F65-1)
This feature resels alt ttie foJIowing three Cat! Timers;
Last CflllTirrrer, Outgoing CallTlrner and All CallsTimer
1, Press .
2, Enter the fouT-dlgil security code and press ■
3, Press (J3) ■
1. Press to reset the call timers.
reset
TIMERS
rQi^
Lnd
F6B
Phonebook All Clear (F65-2)
This feature clears all of Phonebook locatloriE (Of to
99) and the voice maii dialing mernory .
f, Press (6^ .
2. Enter the four-digit securily code and press .
3. Press {2^ .
4. Press to clear the memory.
RESET F6S
PHONEBOOK
BlaH eNO
Call History All Clear (FG5<3)
This teature clears all calf history for outgoing and in
coming calls Including Caller ID,
1. Press .
2. Enter the four-digit security code and press ■
3, Press (3^
4, Press ^ to ctear the history.
RE-SET
HISTORV
NO
F6l;
Text Message & Voice Mail All Clear (FG5-4)
This teatura clears al Ted Messages and llie Voitse Mail nimbw.
Press (6^ (s^ ,
2. Enter the four-digil security
code and press .
3. Prass (4^
4. Press to clear the message.
TXt/OOICE
zm
N0
F&S
Function Reset (F65'5)
This feature permits you to reset the User-Program
mabte functions to their initial settings.
-f. press ,
2. Enter the tour-digit security
code and press .
3. Press .
4. Press to resei.
RESET
SETTINGS
[KSl^
Ino
►
V:'
Note: See Function fieset Status on page 74.
Data Communications
Data/Fax Mode (F71)
Your CDM-4500 will work as wireless modem, if cori-
nected toa PC with the optional daia cable (D1C-4000).
When operating in the Digital mode. Ihe phone can be
used for|Async Data or Fax at the speed of up to
14.4kbpз.^ítluг CDM-4500 also supports QNC (Quick
Network Connection) tor faster internet access.
To Receive Dat^ax Cait
1. Press ¡T~1 .
2. Scroll the menu, and press
to select one of the
modes described below.
3. To exit the dataAax mode, press O©o.
and BoroN to '‘OFP, then press ,
DATA: Data mode until the power is turned off.
FAX: Fax mode until the power is turned off,
DATA ONCE: Data mode for one call only,
FAX ONCE: Fax mode for one call only.
Note: “DATA ONC£" or “FAX ONCE" mode Wifi be au-
tofnalicalty reset ¡0 "OFF“ mode after receiving
daisi^x once, orto fOmtoures.
DfiTfi/FftX
MODE
l-FMJd
1 DOTP
FTl
4?"
7iJ
Page 37

To Place Data/Fax Call or Access Internet
It is not necessary to set the phone in data/fax mode.
Note: Please refer to the separate instruction of the
Data Cable kit for additional details.
Web Setup Features (F72)
Web Lock (F72-1)
You can lock the unauthorized access to the internet. If
the browser is locked by this feature, you will need to
enter your 4 digit Security Code to access the web. Press
(7^ (2^ and (O to set.
Vibrator Alert
1. To turn the vibrator alert
on, press G (5^, then
scroll to “ON".
Press to select.
2. To turn the vibrator alert off, press (8^ , then
scroll to “OFF. Press to select.
Notes: 1. When the Vibrator Alert feature is on, the
audible ringer/melody will be muted.
2. Be sure to turn the Vibrator Alert feature off
when you use the phone in Car Kit option.
VIBRATOR F8_
ON
i/MJal
Web Backlight (F72-2)
You can turn on/off the backlight setting during the web
access. Press (7^ (2^ and (2^ to set.
Web Idle Timer (F72-3)
The Web Idle Timer will automatically terminate the
access when your phone is left untouched for the pro
grammed time. Press (7^ (2^ and (3^ to set.
Web IP Address 1&2 (F72-4) (F72-5)
Example: To set an IP address 123.45.07.89, en
ter 123 045 067 089 tti your phono.
1. Press [7^ (2“^ and ^
2. Enter your 4 digit Security Code and press ,
3. Enter
[7^ , (0^[8^(9"'^ and press .
4. Enter the port address, and press ,
Web User Name (F72-6)
Press (z5) (2^ and (|5 .You may program the
User Name.
Web Password (F72-7)
Press (t^ (2^ and (7^ . You may program a
password.
_______
Other Functions
________
Quick Dialing (F01)
When this feature is on, the primary number in your
Phonebook address 02 to 09 can be dialed with just a
single press of the key.
1. Press (0^ (i ) .
2. Scroll to “ON” or “OFF you
want and press .
QUICK
DIAL
rk'[!il£]
1 OFF
F01
N-
Automatic Answering (F02)
With this feature on, incoming calls will be automati
cally answered after a preset duration of alert tones.
This feature may be convenient when your telephone is
installed In the handsfree car kit.
1. Press (0^ (2^ .
2. Scroll to “ON” and press
AUTO F0£
ANSWER
r ON
►
G-
3. Enter duration (5 to 30) in
seconds.
4. Press to set.
Note: This feature will not function if the phone is in
“Phone Lock”, or “Keypad Lock” mode.
Web Browser (F73)
Press (75 (3^ to start the Web Browser.
i?2
73J
Page 38

Function Reset Status
INDEX
Th0 following functions will re^turn to the Inillal settings
afier Function Reset.
Functions
¡Auto HyphenaliDn (F23|
I Eext Lines Selection (F24)
I Corniest Conlrol^(F25) ^
Eatpiece Volume Conitol
Ateil Tone Volurre Conliol (F31)
I Ring Type Selection (F32)
I Key Tone tfttlume Conliol {F33)
I Sending PTWF tF35)
Clock Indicator {F‘42)
A/e System Selection (FS1)
NAM Selwtlo^(F52)
.AutomaSo NAM iFS4-2)
lAutomalic Helry (F5A-3I
1 Voice Privacy Service {FSa-a)
lAulomatie PIN Mode (F54-5)
Cell Restriction (F61)
QneTcHich Emergency Call (F^)
jOata/Far Mode {F7t)
jVifarater (F9^
________
__
I'q^ick Dialing (F01]“ _
Automallc Answering (FOE)
'Call In ^serwe Indicator (FQ3)
,‘Safet^mer (F04)
' Aftecis Handsfree apenallon only.
Ftalar to Handsfree Car Kit (HF-4000) manual
AIpne Woae
Any Кйу Answering te
Autamalic Answering
AiilomBlH: CaUs-in-Abswica
Indicator „
Bsçlilrght Oünmi
Ir-Uae............................
&1згк1Ьу..............
Battery
Alarm .................
Aflach/tJelach ...............
HwtieigB
Cell
Pisce
Receive ...........
Terminale
Call tiiElüry
All Clear
Call neairlctlon....
Call Timers
Reset
Call W'HiUng
Caller 10
Alen
Clock Indicator „
Contrast
Data/Fax................................T1
Distinctive Ringing ..
DTHF
Emergency Call ...............
One Touch
Emergency Number
Chartge
Ermanced Roaming.............S3
Form Analog Call ...
Funclion Menu
Access
Tree
Function Raael
Hypnenaliort
Auto
Manuel....
Keypad Lock
Link Diellng..^.,,..
Mute
NAM
ALjtOrttellC. ....
Selection
Marne Dlipiey ...
Own Telephone
Mumtjer
..............-.....
..........
......................................
В
... .. .. ..
................
...........
..........
...............
..............
........
........
....................................
.............
ai
___
19. 69
......................
.......
.................
.....................
___
^
.........
.......
—T1
К
........
К
M
........
24.56
.... 25
......S3
. IT, 59
N
..............
.....66
.....64
.....66
0
.
.........
.... 20
Phone Loch
ZT
TS
20
.ss
. Èt
. 1г
. 1г
Automalic
UnhKfi
Phonebook
Alt Clear
Phonebook Edit
Cnange Prtoflly
Erase............
к
Uodily...................
Uove
Phonebook Entry
Automalic Slorvig..
□ ual Number;
Mame...................
Mumber
Overwrite
Pina Type
IT
Phonebook Reoall
19
Addrees Mode
IT
Key Word
42
Search Mode
70
Sort Scroll Mode ...
ea
PIM
G2
Autornalk;
70
Manuel
21
Prepending Dialing .
19
PHL
eo
62
.........................
Oulok Dialing.......
Recall Menu
Retry
...........................
Ring Type
Ringing Tone .......
Scratch Pad
Secret Memory
Sacurrly Code
Shod Message
Service
SiD
................................
Speed Dialing .......
System Sele^un .
TalkTIitnar
Text Messegea..
Alert
All Clear
ToLichTone™
From Display ...
from Memory..
Unlock Code.
Vibrator Alert
Voice Activated Dialing 40
Voice Mail
Alert......................................60
All Ctear......................71
Dialing.........................46
Nolification
Voice Privacy
Alert..........................
Volume
AJert Tone
EarpiBce
Key Tone.....................56
10
B9
59
И
51
52
3a
5i
Web Browalng .............
......
.............
.............
...............
.
....................
.....
..........
.............
...........
.......
............
................
H
....
..........
.............
..........
...............
.....
.....
......................
......
.
...........
.............
U
___
..................
.................
.................
...................
W
....
.
......
.....
_____
...
.
......32
......3t
.67. 68
..... 67
..... 33
. 57. 63
. IB, 73
......
......
........
......
. 29, 44
.53,69
......
. 57, 63
......
. 54
.54
. Б4
Э&
35
25
26
2T
23
30
Б5
55
29
37
49
16
S3
. 21
. 49
.60
. 7t
.22
.22
53.54
73
47
66
ei
56
20
„-45
TO
№
H4
24
29
3T
75J
Page 39

WARNING
12 MONTH LIMITED WARRANTY
When using your cellular telephone, please rtote that
the bllowing offenses are punishable by fine, imprison
ment, or both;
+ Using obscene, Indecenl, or profane language.
» Using the phone to give off false distress calls.
■ Wiret^pLng or otherwise Intercepting a telephone
call, unless that person has first obtained the con
sent of the parties participating in the call.
• Making anonymous calls to annoy, harass, or mo
lest other people.
• Charging to an account without eulhorization to
avoid payment for service.
• Refusing to yield line when inforirted that It is
needed for an emergency call {It Is also unlawful
to take over a line by stating falsely that it is needed
far an emergency^.
The CDM-4500 is using one or more of the
following US patents licensed by
QUALCOMM Incorporated:
A901,307
5,066,109
5,101,601
5,109,390
5,228,054
5,257,283
5,265,119
5.267.261
5.267.262
5.289.527
5.309,474
5,103,459
5,099,204
6,107,225
5,203,536
5,200,472
5,337,338
6,339,046
5,341.456
AU010V0X COMMUNICATIONS CORR (the Company^. warrants to the original retail purchaser of
this Audio vox Handheld Portable Cellular Tele
phone, that should this product or any part thereof
(except the Items listed below), under normal use
and conditions, be proven defective In material or
woriinnanship within the first twelve (12) month pe
riod from the date of purchase, such defect(s) will
be repaired or replaced [with new or rebuilt parts)
at the Company's option, without charge tor parts
or labor directly related to the defect(s).
The keypad and display are similarly warranted for
ninety (SO) days frcm date of purchase.
The accessories consisting of the antenna and re
chargeable battery pack, desktop charger are simi
larly warranted for twelve (12) months from origi
nal purchase.
This Warranty does not apply to batteries, fuses,
or costs incurred for testing or checking, or to any
product or pari hereof which has suffered through
alteration, serial number defacement, improper in
stallation, excessive temperature or humidity, envi
ronmental conditions, mishandling, misuse, negleci
Or accident. This Warranty is not assignable or trans
ferable.
To obtain repairs or replacement within the terms
of this Warranty, the product should be delivered
with proof of warranty coverage, specification of
defects), transportafion prepaid, to the Company
al the address shown below. For TRAVELERS
WARRANTY SERVICE.
Call toil free to [800) 229-1235 [In N. Y. Stait<T516)
233-3410) for reference to an Authorized Warraniy
Station in your area.
iJ6
THE EXTENT OF THE COMPANY'S LIABILITY
UNDER THIS WARRANTY IS LIMITED TO THE
REPAIR OR REPLACEMENT PROVIDED ABOVE
AND, IN NO EVENT, SHALL THE COMPANY'S LtABIL1TY EXCEED THE PURCHASE PRICE PAID
BY PURCHASER FOR THE PRODUCT.
Page 40

Quick Reference
: i V Vv
The Company disclaims liabilily tor geographic cov
erage, inaiequate signal lo anlenna, 001011100103*
lions range or operation of the (J&iiuiar System as
a whole.
ANY IMPLIED WARRANTIES, INCLUDING ANY
IMPLIED WARRANTY OF MERCHANTABILITY
SHALL BE LIMITED TO THE DURAT ON OFTHIS
WRITTEN WARRANTY. ANY ACTION FOR
BREACH OF ANY WARRANTY HEREUNDER IN
CLUDING ANY IMPLIED WARRANY' OF MERCHANTABIUTY MUST BE BROUGHT WITHIN A
PERIOD OF 24 MONTHS FROM DATE OF ORIGI
NAL PURCHASE, IN NO CASE SHALL THE COM
PANY BE LIABLE FOR ANY CONSEQUEMTÍAL
OR INCIDENTAL DAMAGES FOR BREACH OF
THIS OR AN Y OTHER WARRANTY, EXPRESS OR
IMPLIED, WHATSOEVER.
No person or re presenl alive is airiheriied Iq as
sume for ihe Company any Habilliy oiisr Than екpressed herein In connection with the sale of Ihis
product.
Some states do not allow limilationson how long
an implied warranty lasts or the exclusion or limita
tion ot IncidenEal or consequential damage so the
above limitation or exclusions may not apply to you.
This Warranty gives you specific legal rights, and
you may also have other rights which vary (rom stale
to state.
IN U.S.A,
AUDIO VOX COMMUNICATIONS
CORP.
555 Wireless BIvcI., Hauppauge,
New York 11760
(316) гзэ-гэзоо
IN CANADA:
AUDIOVOX CANADA _TD.
iOS Britonnla Hoad East,
Mississauga. Ontario L4Z3ES
(905) 712-9299
Basic Operation
Turn OnfOff
Place a Call
Terminate a Call
Receive a Call
Clear Last Digit
Clear All Digits
Earpiece Volume
Messaging Features
Review Voice Mail Number C[3
Review Text Messages (M) ^
for scroll
QuSck Reference
Basic OparailDn
Turn OrVOff
Place a Call
Terminate a Call
Receive a Call
Clear Last Digit
Clear All Digits
Earpiece Volume
Canvenlence Features
Store NurTiter in Phonebook
Phonehook Dlefing
Speed Dialing
Last Number Redial
Dial last Number Received
Messaging Features
Review Voice Maii Number
Review Texl Messages
(3^ (more Thar one second)
Phone Number, Ciy
Any Key (except («i and @ )
^{less than 0,5 ssc.)
/Siii (frore than O.S sec.)
O or O during a call
, Phone Numbar. ¡
Phonebook Address
Pncfi ebook Addnesa, CQ
Phonebook Address,
©IS) 03
0® 03
®o
® (0 О ■ О о
Page 41

Functions
Mule^Unmute
Keypad LhA
oo
CDM’4500
DUAL mOEDIGtTAL CDMA TELEPHONE
ACCESSORIES
Ì
Lodi Ihe Phone
Aotomatit Lock
Display Own Phofie Number & SlD
Backlight Conind
Ljst Can Time Display
Ootgoiag Call Time Display
All Calls Tima Display
Automallc Answeiag
AIB System Selection
Force Analog Call
Async Data/FAX
Vibrator Alert
Qo@
OCD®
OdBCiD
(3@(T3
(3@@
(35Z)
(3d^[33
O@o
(3®
[2^
too BatiirY
CftR40ea
AC Adapter
Ptiig-in Chargor
ornmc
Desktop HoMot
Functions
MmeAJfioHJte
Keypad Lock
Lock tbe Ptione
AutomatFc lock
Display Own Phone. Numt>er i SiD
BacWiQhl Centnot
Last Call Time Display
Outgoing Call Time Display
AH Calls Time Display
AutomaEic Answering
WB System Selecllon
Force Analog Call
GG
OiDO
Oo®
Go®
G®o
G® ®
G®o
O®o®
G®o®
G®®
O®o
O® ®
Dasktep CItarger With AC Aitapter
DTC-AOOO
£M-4S5 LS-4BOO HF-400Ù
£3fphanB Mlcrophene Leathor Carrying Case Rsnàs Free Car Kit
Nat Sho wn: PHS-4000 Privacy HaoBsot
Page 42

PROTECT YOURWARRANTY
RCcid your Warranly carefully, wtlh ihe special
consideralion to paragraph seven of the Lim
ited Warranty for your unit,
"Warranty does not apply to...or to any
product or part thereof which has suffered
through alteration... mishandling, misuse,
neglect, or accident".
Many companies are maKing look-alike acces
sories and in some cases, promoting that their
product is equal to or better than the Audiovox
product. Be careful. Some of these products
may not be compatible far use with your
Audiovok product and may damage the unit or
cause it to malfunction. If service is required
on your unit, and it is determined that a non-
Audi ovox accessory has created the problem
with your unit, the Warranty will not apply. In
addition, if Ihe unit has already suffered irreversibie damage by reason of a non-compal-
ibie accessory, the Warranty will be voided. To
protect your Warranty, use only compatible ac
cessories which cannot damage or interfere
wilh the functioning of your Audiovox product.
^.v
'AUDIOTOX-
CO^,.^^UNfCAT[ONS COUt'
AUDIOVOX COUHUNICATIOU3 ooap.
5SB WijeJMS BivcT., Havecauge, New Vpiit (lifiS, 516-233-3300
tssoe ManquarJI Avenue. Cerrilos, CBlifornia 90701, 5S2-fl02-5T00
40S Sriiennii ad. east, ste Oni^río.
110 Roehy Point FWad, Kogarati. NSW £2t7, AOfilfSlia.
Unit 0, 6 HanderiOn Placs, Auckland, 6496345720
M5 Orchart Poail, #07-07, Singepcre, 236866.65-733-5002
D ilHi Audlsvtn Cappersllon
AuiMvdk Canada
Canids L4Z3ES, 905-712-9299
AlfdiOlO* Paoilic Pili CIO
02-9507-0000
AudtOvQx New ZealsnO Ply Lid
Audievtm Singapore Pte Lid
íií/pVAvww.flodiovdJi, corti
 Loading...