

Page 1
HOME THEA TER SYSTEM
INSTRUCTION MANU AL
Please read the instruction manual carefully before using your unit.
Page 2
GENERAL
Table Of Contents
IMPORT ANT SAFETY INSTRUCTIONS ...........1
Supplied Accessories
Main unit .............................................................X1
Remote control unit ..............................................X1
Home theater speaker .........................................X6
Speaker wire .......................................................X5
Audio/Video cable ................................................X1
AM LOOP antenna ..............................................X1
FM antenna .........................................................X1
Manual guide book ..............................................X1
FUNCTION CONTROL .......................................2
Front Panel .........................................................2
Rear Panel .........................................................2
Remote Control ..................................................3
Using the Remote Control Correctly ......................3
Battery Replacement ..........................................3
SETUP ..............................................................4
Power Connection ...............................................4
Connecting the Speakers & Subwoofer .................4
Mounting the Rear Surround Speakers .................4
Positioning the Speakers & Subwoofer .................5
Setting the Input Mode and Listening Channels ...5
Connecting the Radio Antenna ............................6
Video & Audio Input/Output Setting ......................6
SOUND ADJUSTMENT ......................................8
To Adjust the Balance ........................................8
To Adjust the Sound Quality ................................8
To Adjust the Delay Effect ...................................8
RADIO OPERA TION ..........................................9
To Tune Into a Station Manually ...........................9
To Search for a Station Automatically ..................9
To Preset Stations ..............................................9
To Tune Into a Preset Station ..............................9
TROUBLE SHOOTING GUIDE .........................10
Introduction
Thank you for purchasing this production.
For best performance, please read this manual
carefully.
It will guide you in operating your product.
Manufactured under license from Dolby
Laboratories.‘Dolby’,‘Dolby Digital’,‘Pro Logic’
and the double-D symbol are trademarks of
Dolby Laboratories.
Page 3
FCC Information
This device complies with Part 15 of FCC Rules.
Operation is subject to the following two conditions:
(1) This device may not cause harmful interference, and
(2) This device must accept any interference received, including interference that may cause undesirable
operation.
Notes on Placement
• Do not use the unit in places which are extremely hot, cold, dusty, or humid.
• Place the unit on a flat and even surface.
• In a cabinet, allow about 2.5cm (1 inch) of free space around the unit for adequate ventilation.
• Do not restrict the air flow of the unit by placing it in a place with poor air flow, by covering it with a cloth,
or by placing it on carpet.
Notes on Safety
• When connecting or disconnecting the AC cord, grip the plug and not the cord itself. Pulling the cord
may damage it and create a hazard.
• Unplug the unit during lightning storms or when unused for a long period of time.
• Check that the rated voltage of your unit matches your local voltage before use.
Note on Condensation
• When left in a heated room where is warm and damp, water droplets or condensation may form inside
the unit. When there is condensation inside, the unit may not function normally. Let the unit stand for
1 to 2 hours before turning the power on, or gradually heat the room up and dry the unit before use.
Notes on Maintenance
• Do not use volatile chemicals on this unit. Clean by lightly wiping with a soft cloth.
• Do not place a heavy object on or step on the unit. The object may fall, causing serious personal injury
and serious damage to the unit.
• Protect the power cord from being walked on or pinched particularly at plugs, convenience receptacles,
and the point where they exit from the unit.
IMPORTANT SAFETY INSTR UCTIONS
The lightning flash with an arrowhead symbol, within
the equilateral triangle, is intended to alert the user to
the presence of uninsulated "dangerous voltage" within
the product's enclosure that may be of sufficient
magnitude to cause an electric shock.
The exclamation point within the equilateral triangle is
intended to alert the user to the presence of important
operating and maintenance (servicing) instructions in
this owner manual.
WARNING: TO REDUCE THE RISK OF ELECTRIC
SHOCK, DO NOT REMOVE COVER (OR BACK).
NO USER-SERVICEABLE PARTS INSIDE.
REFER SERVICING TO QUALIFIED SERVICE
PERSONNEL.
WARNING:
TO PREVENT FIRE OR SHOCK HAZARD, DO NO T EXPOSE THIS APPLIANCE TO RAIN OR
MOISTURE.
CAUTION: TO PREVENT ELECTRIC SHOCK, MA TCH WIDE BLADE OF PLUG TO WIDE SLOT, FULLY
INSERT . (FOR USA AND CANAD A ONL Y)
The symbol for Class II (Double lnsulation)
1
WARNING:
• Should any trouble occur, disconnect the AC power cord and refer servicing to a qualified technician.
• Do not place anything directly on top of the unit, it may cause damage.
Page 4
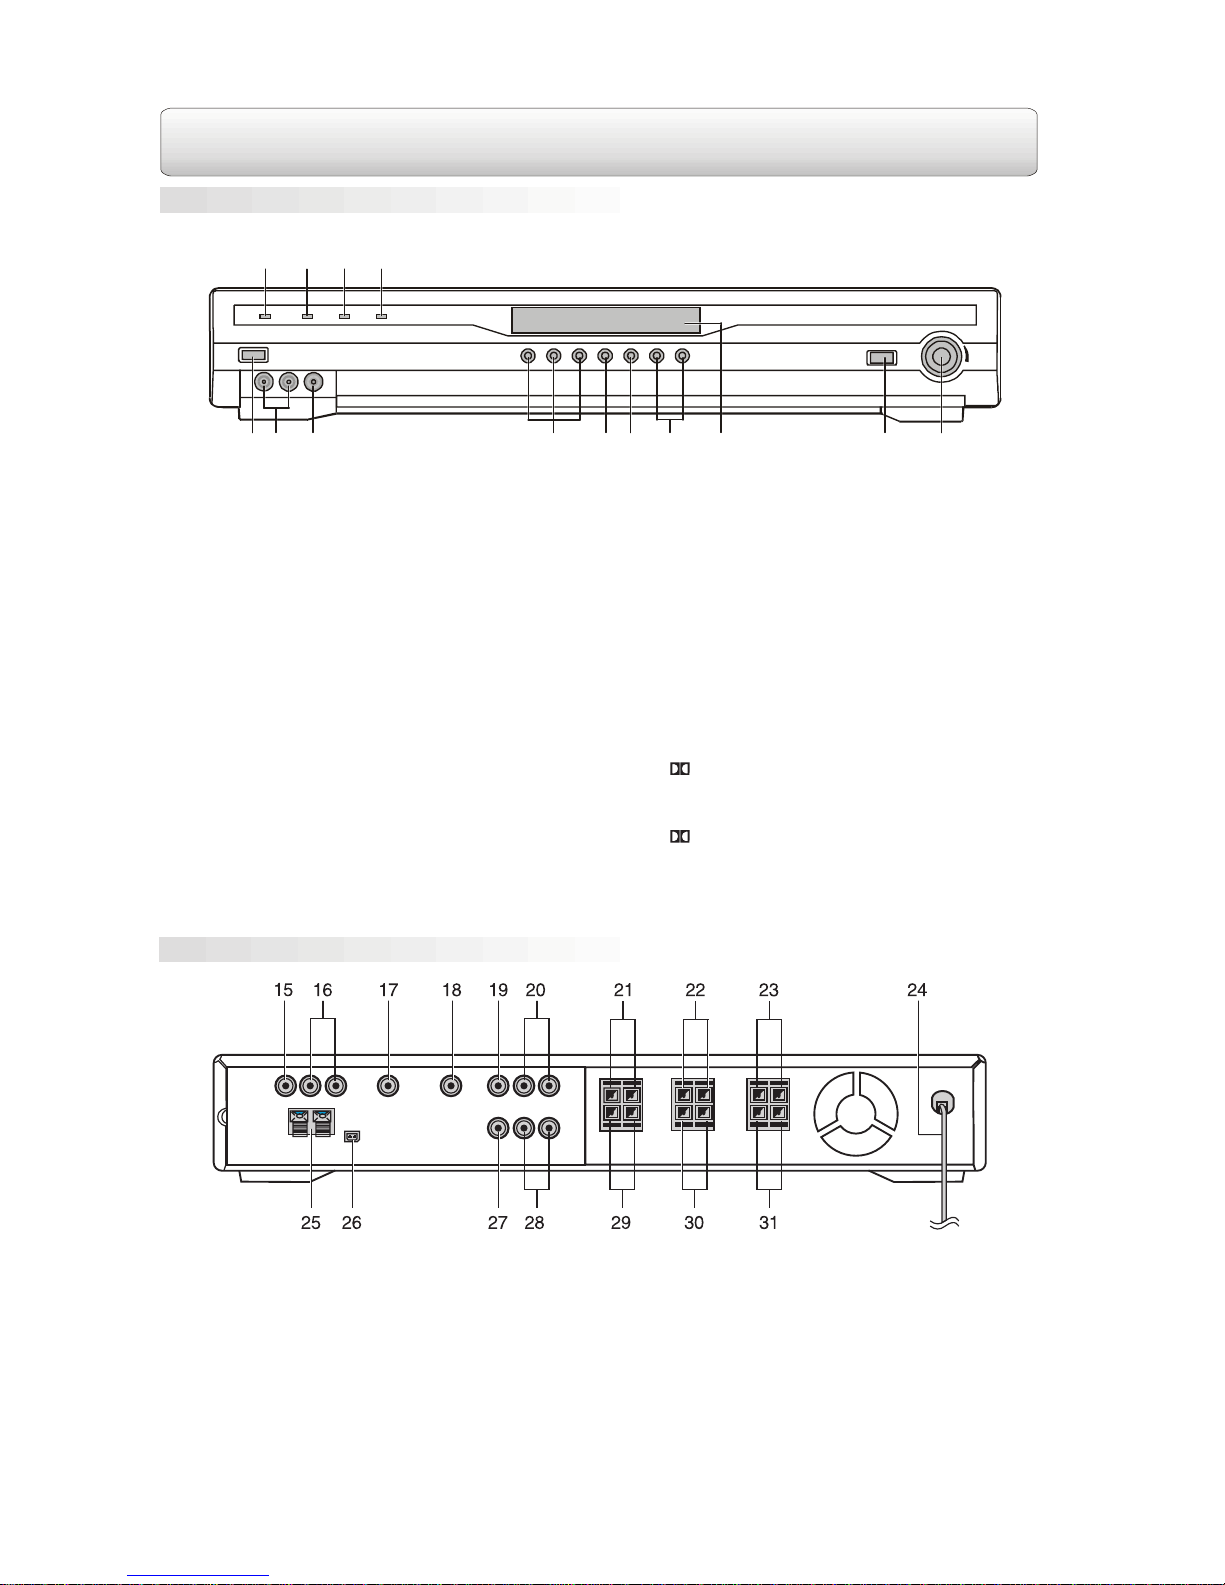
Rear Panel
FUNCTION CONTROL
1. PO WER button
Turn the power on or off.
2. A V3 A UDIO IN (L&R) jacks
Connect to audio outputs.
3. AV3 VIDEO IN jac k
Connect to video outputs.
4. A V1/2/3 buttons
Press AV1 or AV2 to enter auto-detected/autoswitching mode, press again to switch to
“forced analog mode”. Press AV3 button to
select the AV3 input.
5. TUNER / BAND button
Select the radio mode and press again to select
between FM and AM band.
6. PRESET button
Select the memorized radio station.
7. TUNING -/+ buttons
Search a radio station.
8. Display window
Show the status of the unit.
9. Remote Control sensor
Accepts the remote control signals.
10. V OLUME knob
Adjust the volume.
11. ST ANDBY indicator
When the unit is turned into standby mode by
the remote control, the light will illuminate.
12. 3 STEREO indicator
The light illuminates when 3 STEREO is
selected in AV IN mode.
13. PRO LOGIC indicator
The light illuminates when Dolby Pro Logic is
active in AV IN mode.
14. DIGIT AL indicator
The light illuminates when Dolby Digital signal
is input in AV IN mode.
Front Panel
15. AV2 VIDEO IN Jack
16. AV2 AUDIO IN (L & R) Jacks
17. AV2 DIGITAL AUDIO IN Jack
18. AV1 DIGITAL AUDIO IN Jack
19. AV1 VIDEO IN Jack
20. AV1 AUDIO IN (L & R) Jacks
21. Right Front Speaker terminals
22. Center Speaker terminals
23. Left Front Speaker terminals
24. Power Cord
25. FM ANTENNA terminals
26. AM LOOP ANTENNA jack
27. TV VIDEO OUT jack
28. TV AUDIO OUT (L & R) jacks
29. Right Rear Speaker terminals
30. Subwoofer terminals
31. Left Rear Speaker terminals
2
12 3 4
5
67 8 9 10
11
12 13 14
Page 5
FUNCTION CONTROL
(Continued)
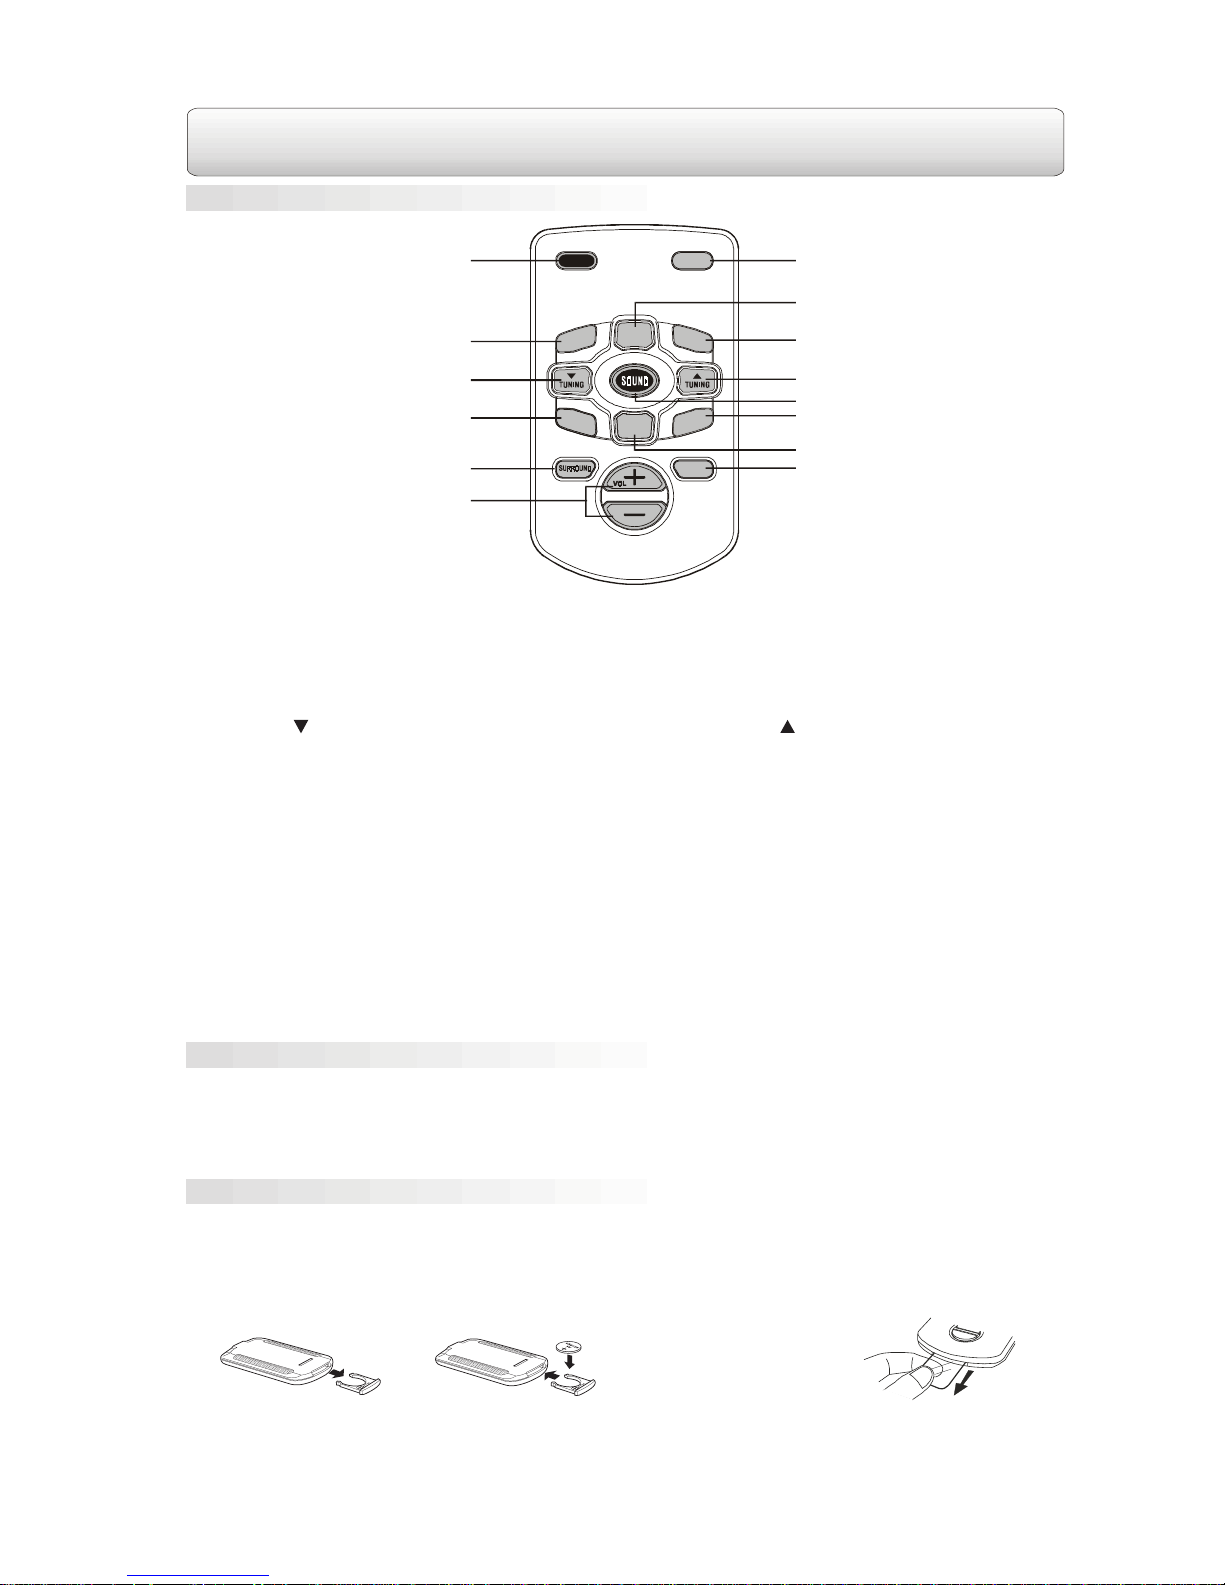
Remote Control
1. Point the remote control at the remote sensor located on the unit.
2. When there is a strong ambient light source, the performance of the infrared remote sensor may be degraded,
causing unreliable operation.
3. The recommended effective distance for remote operation is about 4 meters (13 feet).
When the battery becomes weak, the operating distance of the remote control is greatly reduced and you will
need to replace the battery.
Note:
If the remote control will not be used for a long prriod of time, remove the battery to avoid damage caused by
battery leakage corrosion.
1.Open the battery door. 2.Insert one CR2025
(3V) size battery.
Attention:Take out the PVC sheet before operating
the remote control.
1. PO WER button
Turns the unit ON, or puts the unit into
STANDBY mode.
2. BAND button
Switch the radio band between FM and AM.
3. TUNING button
Search a radio station.
4. MEMOR Y button
Memorize a radio station.
5. SURROUND button
Change the output channels or the output
sound mode in AV IN mode.
6. V OL +/- buttons
Increase or decrease the volume.
7. FUNCTION button
Select the tuner mode and AV inputs. Every
time the button is pressed, the mode will
change cyclically as: AV1->AV2->AV3->Tuner
3
8. NEXT button
Select the preset stations or adjust the sound
level.
9. DISPLA Y b utton
Show the current sound channel or status.
10. TUNING button
Search a radio station.
11. SOUND button
Select sound balance and tone control for
adjustment with the NEXT/PREV buttons.
12. MONO/STEREO button
Select FM STEREO or FM MONO mode.
13. PREV button
Select the preset stations or adjust the sound
level.
14. TEST button
Test the volume of each speaker.
M
O
N
O
/
S
T
E
R
E
O
M
E
M
O
R
Y
FUNCTION
D
I
S
P
L
A
Y
TEST
B
A
N
D
NEXT
PREV
POWER
1
8
9
10
11
12
13
14
7
2
3
4
5
6
Battery Replacement
Using the Remote Control Correctly
Page 6
SETUP
Power Connection
Caution:
• Before you plug in the unit, make sure that the rated voltage of your unit matches your local voltage.
• Keep your hands dry when you are connecting the power cord to the wall outlet in case of electric shock.
• When you are not going to use the unit for a long period of time, disconnect the power cord.
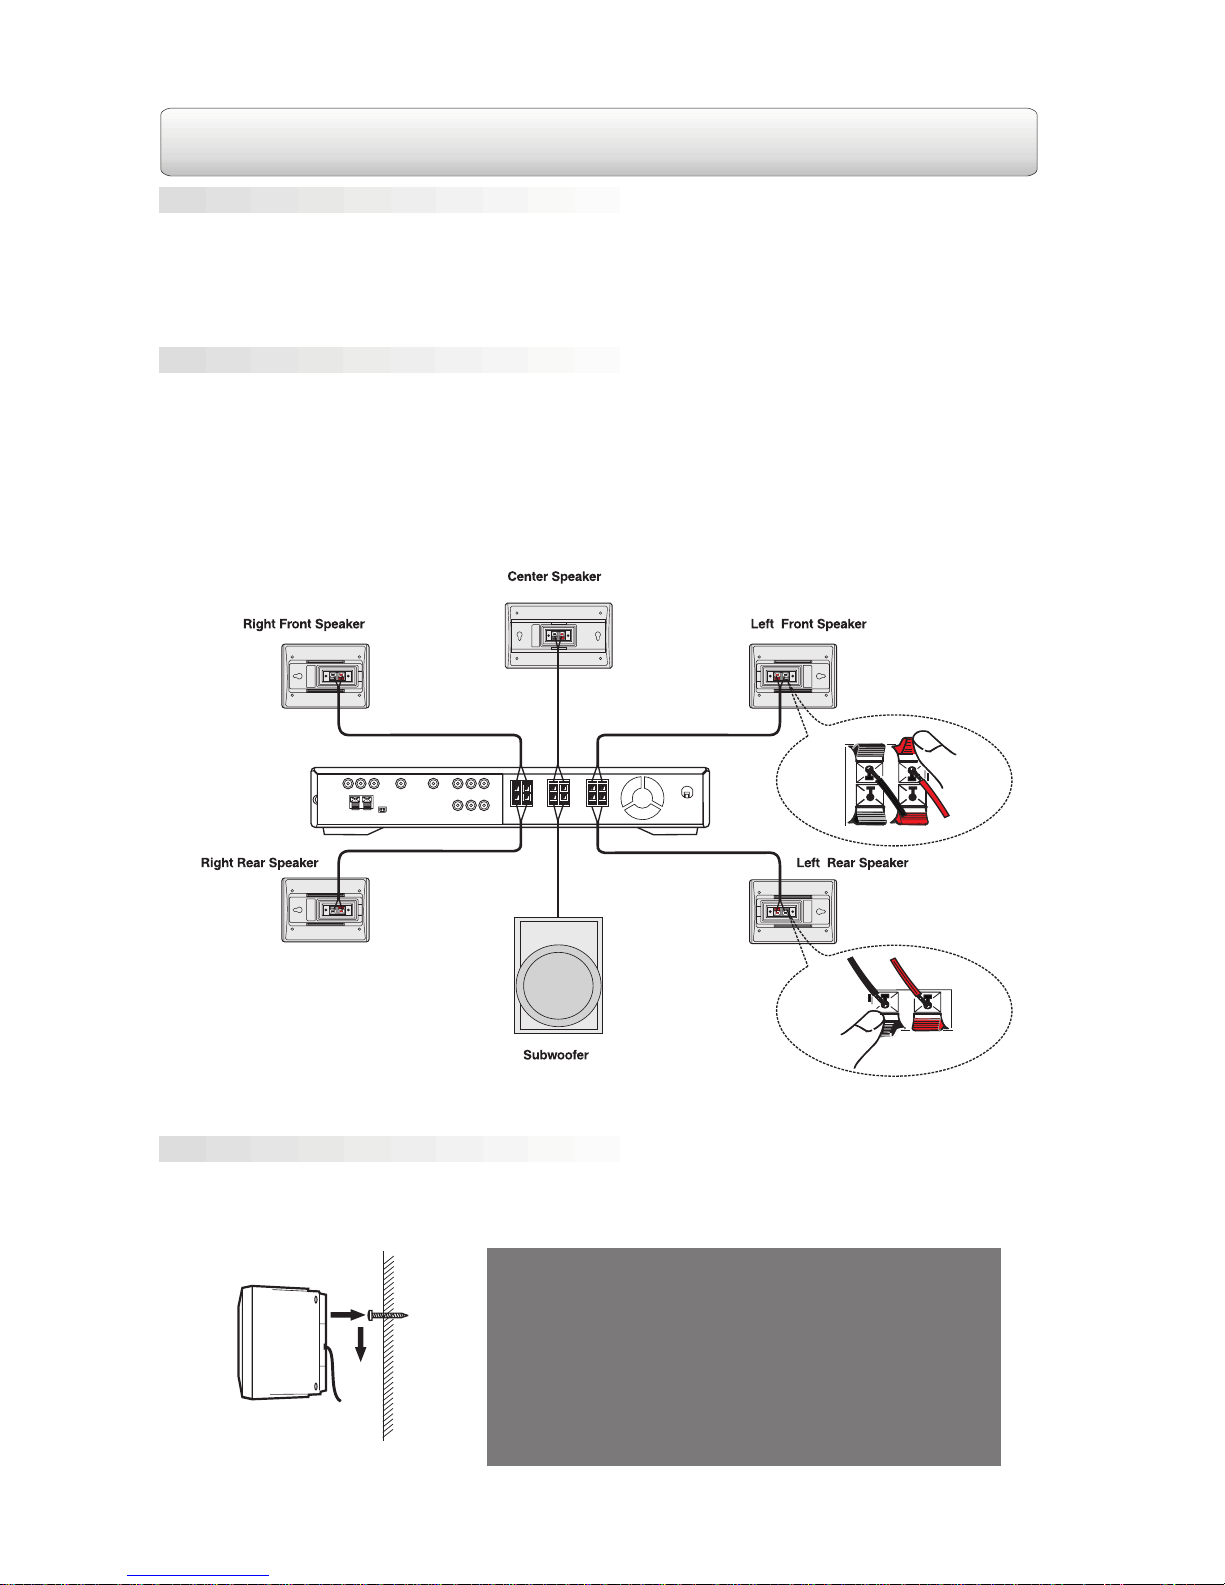
1. The speaker cords have been color-cord to simplify connection. Just plug the ends of each speaker wire
into the corresponding jacks on the rear of the unit, matching the color tube on the end of the speaker wire
to the color-cord connector. Make sure to connect the red (+) wire to the red (+) terminal on the rear of the
unit, and the black (-) wire to the black (-) terminal on the rear of the unit.
2. Connect each of the speaker wires to a satellite speaker. Make sure to connect the red (+) wire to the red (+)
terminal on the rear of the unit, and the black (-) wire to the black (-) terminal on the rear of the unit.
3. The subwoofer is the ONLY speaker which should be connected to the subwoofer jacks on the rear of the
unit. Connecting any other speaker to the subwoofer jacks may damage the unit.
Caution:
To prevent damage to the unit, be sure to turn off the unit before making any connection.
1. Mark the correct mounting position on the wall.
2. Insert a fixing screw(s) at the marked position on the wall.
3. Align the slot hole(s) of the speaker over the screw and pull the speaker downward until it is firmly hooked.
Need More Help?
DO NOT RETURN THIS TO THE STORE
Please call Customer Service at 1-800-252-6123
or visit online help at http://www.18002526123.com
4
Mounting the Rear Surround Speakers
Connecting the Speakers & Subwoofer
Page 7
SETUP
(Continued)
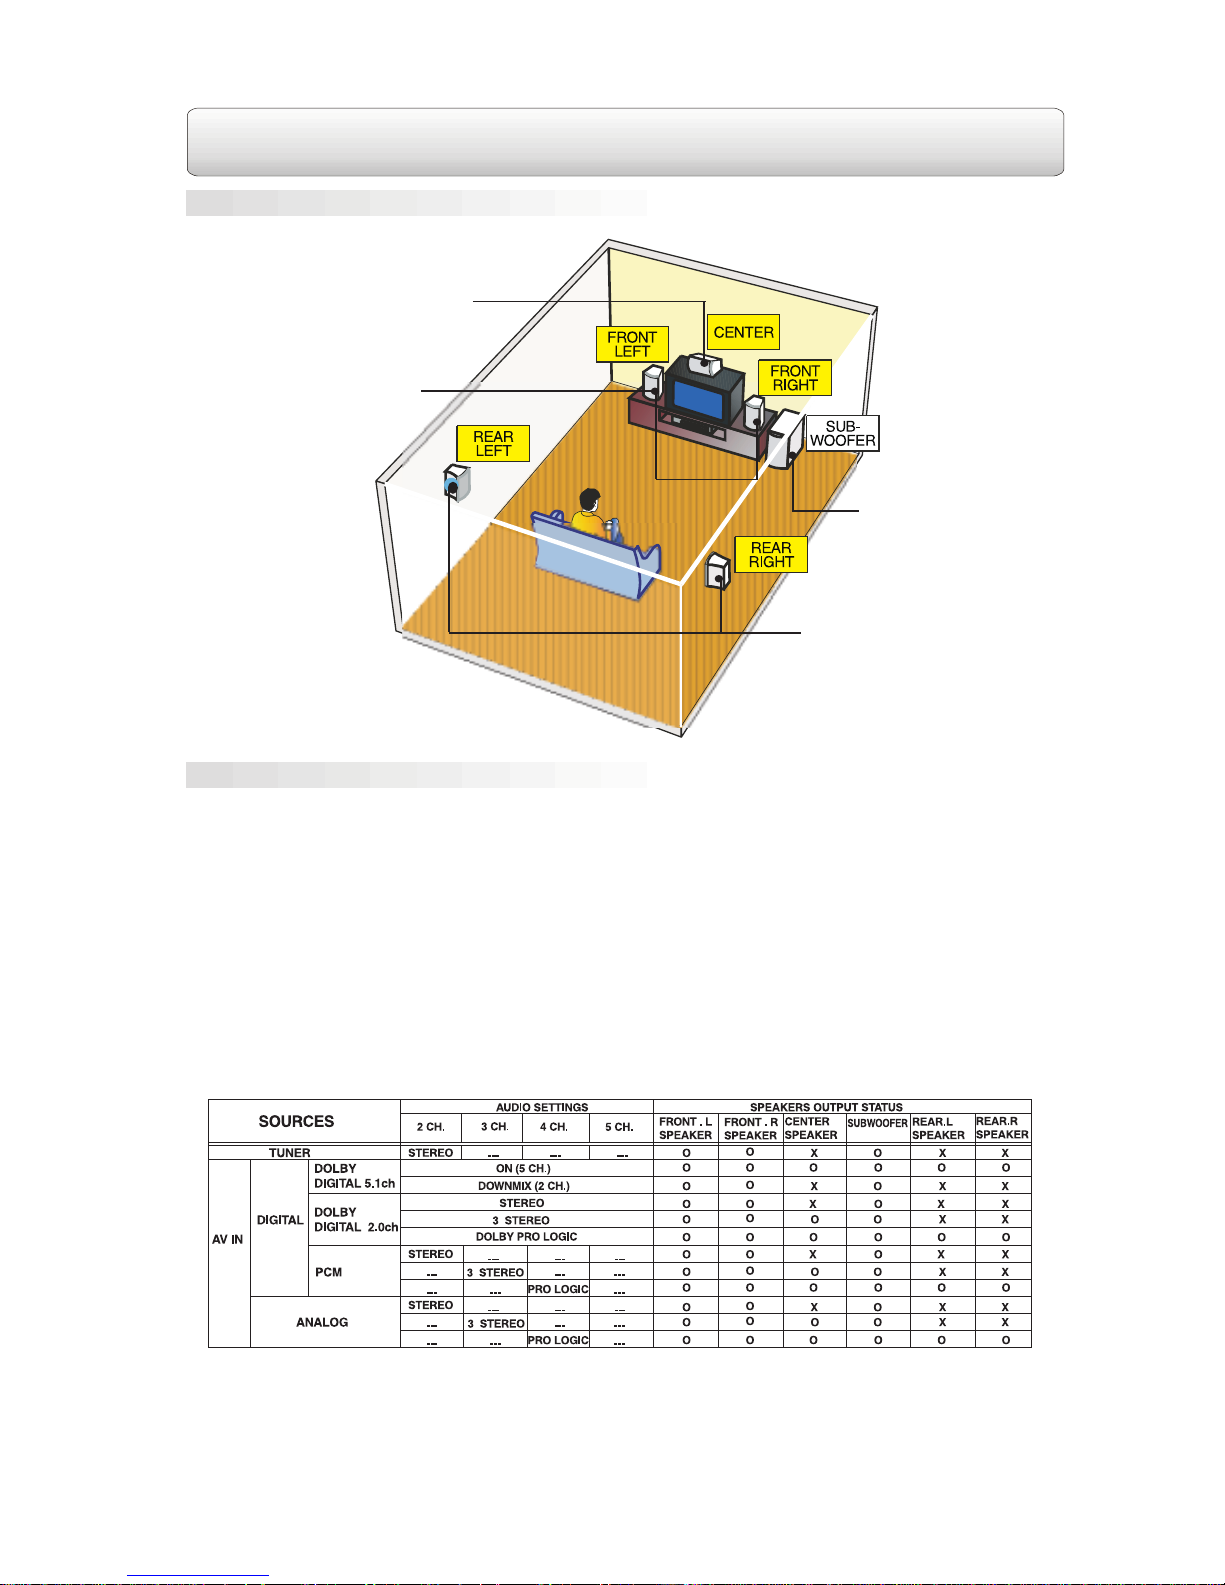
Positioning the Speakers & Subwoofer
Setting the Input Mode and Listening Channels
Remarks:
1. "O" The speaker is active." X " The speaker is inactive.
2. Generally, only Front Left, Right speakers and Subwoofer are active in TUNER mode.
3. 3 STEREO mode creates a surround sound effect without using the rear speakers. In this mode, no sound
comes from the rear speakers.
AV1: Turn on the unit and “AV1” will automatically show on the display, press AV1 button again until “AV1
ANALOG” appears on the display.
AV2: Turn on the unit and press AV2 button to select the AV2 input mode, press the button again until “AV2
ANALOG” appears on the display.
AV3: The AV3 audio input is analog only.
Notes:
• AV1 and AV2 input mode can auto-detect the input source(digital or analog) and auto-switch to the
corresponding mode.
• To enter “force analog” mode, press AV1 or AV2 button again until “AV1 ANALOG” or “AV2 ANALOG” appears
on the display. “Force analog” mode is available for AV1 and AV2 only.
• You can press the SURROUND button repeatedly on the remote control to change the sound output status.
Please see the table below.
The following table shows which speakers are working in various modes.
5
SUBWOOFER
Can be placed anywhere.
REAR SPEAKERS
Place right beside or slightly
behind your listening position,
and a little higher than your ears.
CENTER
Place on the top of or below the TV.
FRONT SPEAKERS
Place on both sides of the TV,
equal distances apart.
Page 8
SETUP
(Continued)
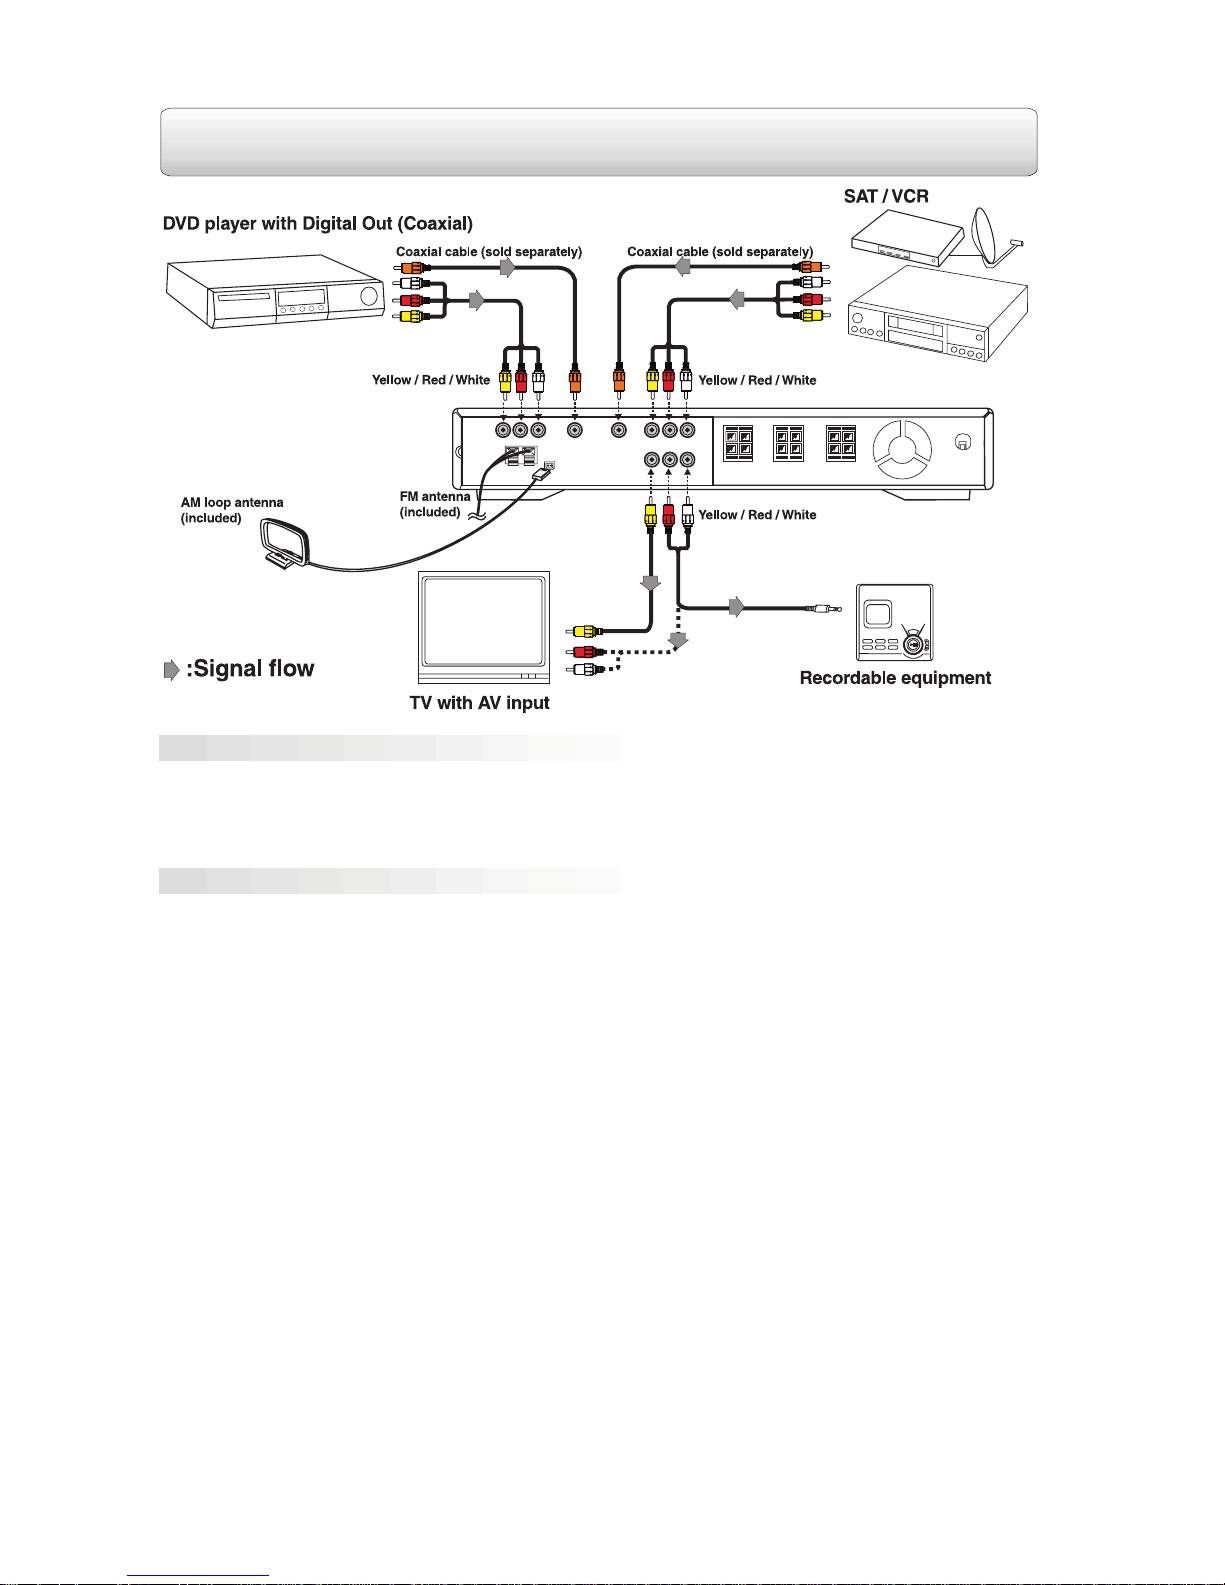
Connecting the Radio Antenna
FM: Connect the FM antenna (included) to the FM ANTENNA terminals. Fully unwind the wire antenna. Then
extend the wire antenna and place it in the position that sounds best.
AM: Connect the loop antenna (included) to the AM LOOP ANTENNA jack. Rotate the antenna to get the best
receiving position.
A V1 (SA T/VCR)
Connect the audio and video output jacks of the AV equipment (VCR, Satellite receiver, etc.) to the audio and
video input jacks on the unit with an Audio/Video cable (included).
If the AV equipment has a bitstream/PCM coaxial audio out jack, Connect the equipment to the unit by using
a coaxial cable.
A V2 (DVD)
Connect the audio and video output jacks of the DVD player to the audio and video input jacks on the unit with
an Audio/Video cable (included).
Connect the coaxial digital audio output jack of the DVD player to the DIGITAL AUDIO IN on the unit by using
a coaxial cable.
Video & Audio Input/Output Setting
6
TV
Connect the audio and video input jacks of your TV to the audio and video output jacks on the unit with an
Audio/Video cable (included). Refer to that TV’s owner’s manual.
To record the playing signal, connect AUDIO OUT to the recordable equipment (Recordable cassette player,
Recordable MD player, etc.).
Watching a D VD
1. Connect the unit to the TV and the DVD player.
2. Turn on the unit and press the FUNCTION button on the remote control to select AV2 auto-detected mode,
or press AV2 button on the front panel directly. If no sound in digital input mode, press AV2 button of the
front panel to AV2 ANALOG mode. “Force analog” mode is activated by pressing the front panel AV2 button
only.
3. Turn on your TV and select the corresponding video input that you have connected to the unit.
4. Turn on your DVD player to start playing.
Page 9

Video & Audio Input/Output Setting(Continued)
SETUP
(Continued)
AV3
Connect the audio and video output jacks of the AV equipment (Video game console, etc.) to the audio and
video input jacks on the unit.
7
Remarks:
Dolby Digital is a surround sound technology used in theaters showing the latest movies, and now available
to reproduce this realistic effect in the home.
You can enjoy motion picture and live concert DVD video discs with this dynamic realistic sound by connecting
the unit to the DVD player with bitstream/PCM coaxial output.
Dolby Pro Logic is a sound system that was developed to get a better sense of presence from sources
encoded with Dolby Surround. The feeling of position has been improved by the addition of a separate center
speaker channel.
You can enjoy the dynamic realistic sound of Dolby Pro Logic Surround by connecting the unit to the equipment
gives Dolby Pro Logic signal with a coaxial cable or Audio cable. The output sound from the rear speakers will
be monaural.
Page 10
Adjust the speaker balance with the remote control. Press the SOUND button to select the desired speaker
and press NEXT or PREV button to adjust the channel level.
Notes :
1. If you do not press any button within a few seconds, the display will return to normal.
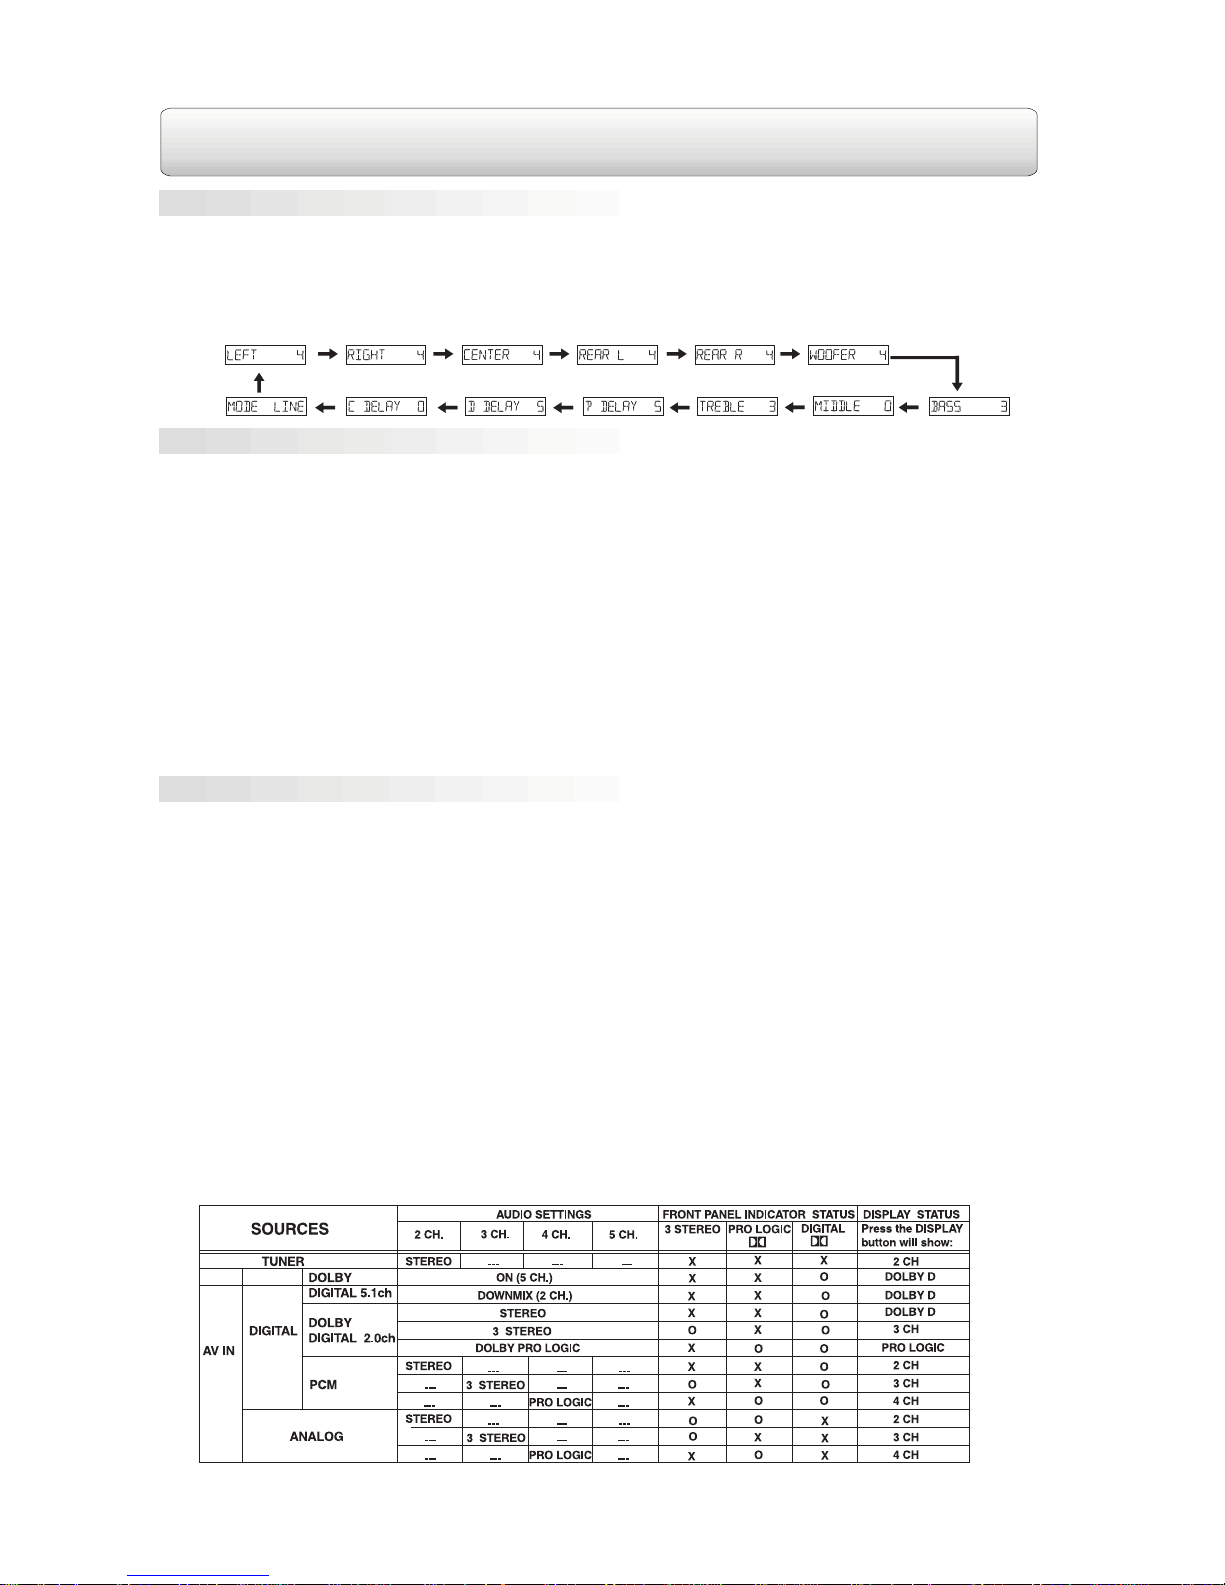
2. Every press on the SOUND button will change the menu cyclically as below:
Press the SOUND button repeatedly to select an equalization mode (BASS, MIDDLE, TREBLE). Press the
NEXT or PREV button to adjust the level.
• BASS: Adjust the low range of sounds.
• MIDDLE: Adjust the middle range of sounds.
• TREBLE: Adjust the high range of sounds.
Press the SOUND button until the menu “ MODE LINE ” appears. Press the NEXT or PREV button to switch
between “ MODE LINE ” and “ MODE RF ”. The “ MODE LINE” and “ MODE RF ” are only effective when Dolby
Digital signal is input in AV IN mode.
• MODE LINE: Enables dialogue normalization without compression scaling.
• MODE RF: Causes dialogue to be reproduce at a level that compares well with quality television broadcasts
and premium movie channels with fully compression scaling.
Note:
• Bass, middle and treble control the sound from the front left and right speakers.
Press the SOUND button repeatedly to select the delay time of the center speaker and the rear speakers.
Press the NEXT or PREV button to adjust the delay time (millisecond).
• P DELAY: Set the delay time of the rear speakers for Dolby Pro Logic mode.
• D DELAY: Set the delay time of the rear speakers for Dolby Digital mode.
• C DELAY: Set the delay time of the center speaker.
8
SOUND ADJUSTMENT
To Adjust the Balance
To Adjust the Sound Quality
To Adjust the Delay Effect
Notes:
1. This unit supports three digital input modes:
• Dolby Digital 5.1ch. In this mode, press the SURROUND button on the remote control to select between
Dolby D (5 CH.) and Downmix (2 CH.).
• Dolby Digital 2.0ch. In this mode, press the SURROUND button to select among Dolby D (2 CH.), 3
STEREO (3 CH.) and DOLBY PRO LOGIC (4 CH.).
• PCM. In this mode, press the SURROUND button to select among STEREO, 3 STEREO and DOLBY
PRO LOGIC.
2. When analog signal is input, press the SURROUND button to select among STEREO, 3 STEREO and
DOLBY PRO LOGIC.
The table below shows the front panel indicator and the display status in various modes.
Page 11
RADIO OPERA TION
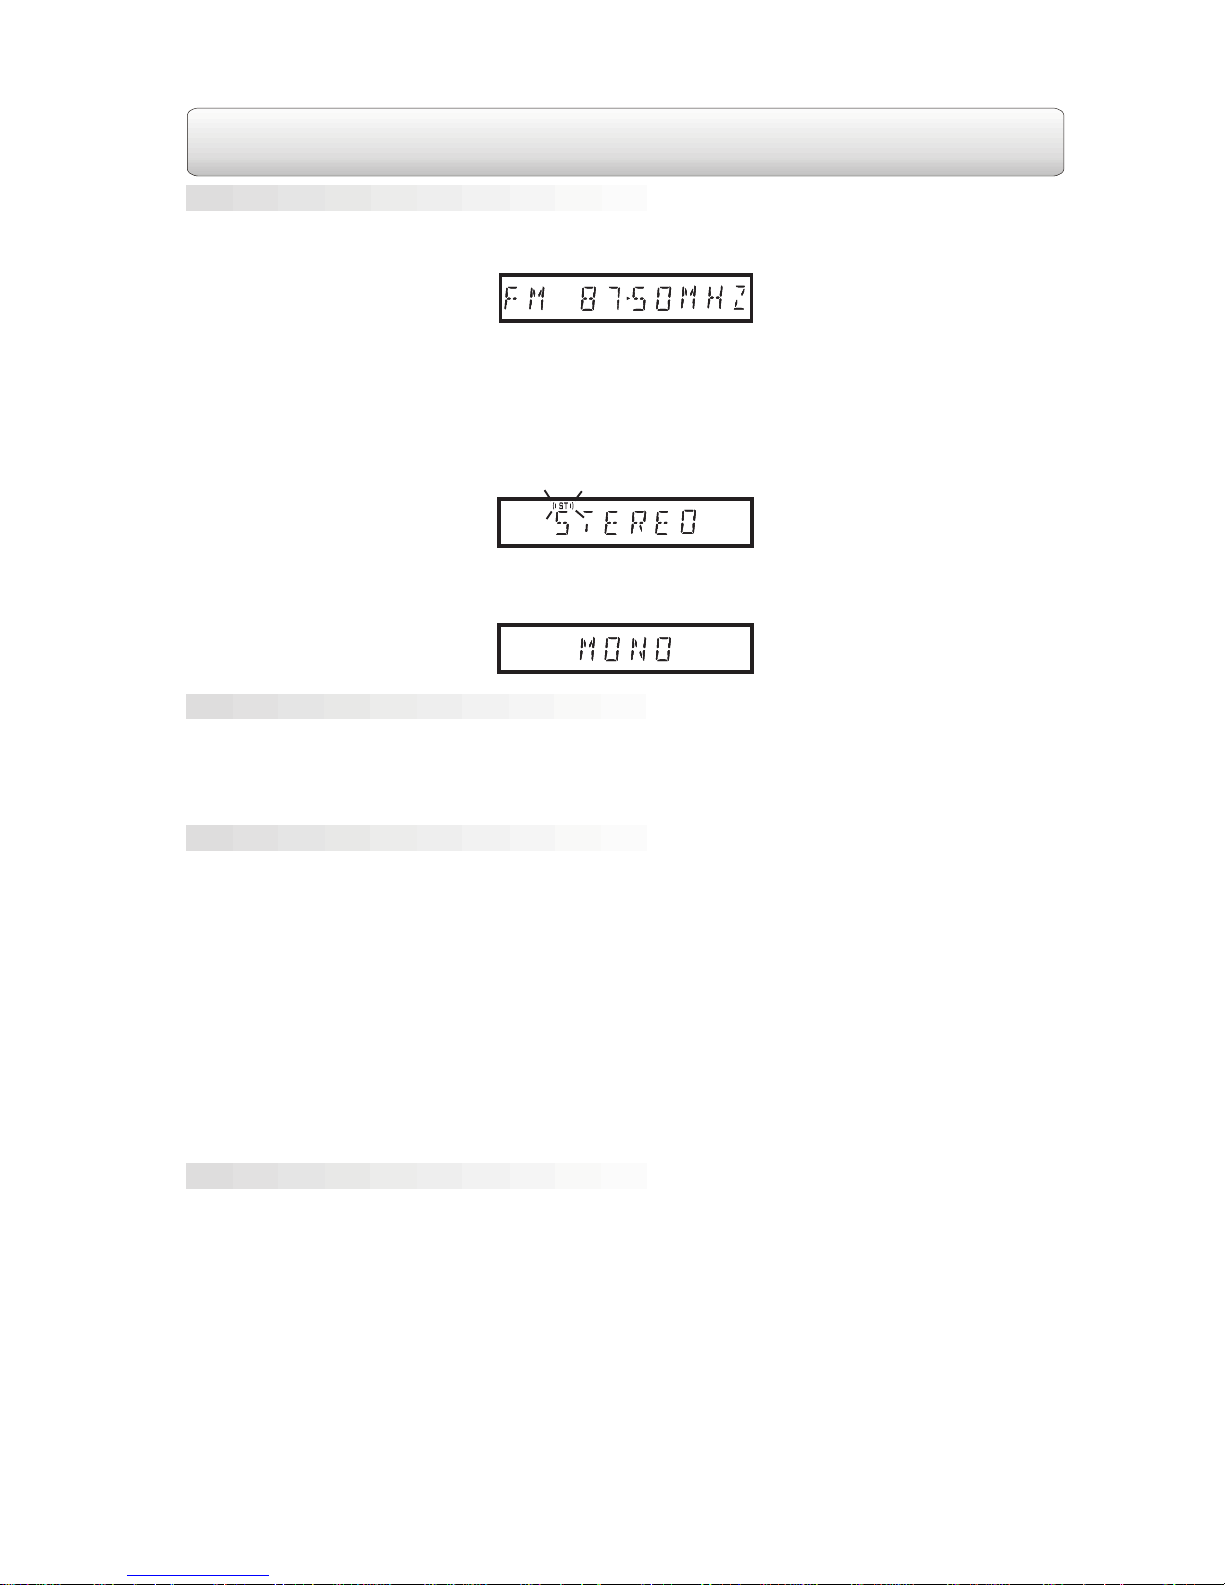
1. Press the TUNER/BAND button on the unit or the FUNCTION button on the remote control until the frequency
band appears on the display.
2. Press the TUNER/BAND button again or the BAND button on the remote control to select the desired band.
3. Press either of the TUNING buttons to tune into a station.
FM Stereo
Press the MONO/STEREO button on the remote control until “STEREO” appears on the display. When the
radio signal is weak, the “ ((ST)) ” indicator will flash.
Weak FM Stations
Press the MONO/STEREO button until “MONO” appears on the display. Background noise will be reduced but
the signal reproduced will be mono. To restore stereo reception, press the MONO/STEREO button again.
• Hold down either of the TUNING buttons on the unit or the remote control for 1 to 2 seconds, and a station
is searched automatically. After tuning into a station, the search stops.
• The search may not stop at a station with a very weak signal.
• When the search is in progress, press either of the TUNING buttons again to stop searching.
You can tune into a stored station directly by pressing the PRESET button.
20 stations on FM band can be preset.
20 stations on AM band can be preset.
1. Press the TUNER/BAND button on the unit or the FUNCTION button on the remote control until the frequency
band appears on the display.
2. Press the TUNER/BAND button on the unit again or the BAND button on the remote control to select the
desired band.
3. Use the TUNING button to find your desired station.
4. Press the MEMORY button on the remote.
5. Press the NEXT or PREV button to select the preset number and press the MEMORY button on the remote
control to store the station.
6. Repeat steps 2-5 to store other stations.
7. To change the preset station. Repeat steps 2-5.
1. Press the TUNER/BAND button on the unit or the FUNCTION button on the remote control until the frequency
band appears on the display.
2. Press the TUNER/BAND button again or the BAND button on the remote control to select the desired band.
3. Press the PRESET button on the unit repeatedly or the NEXT or PREV button to select the preset station.
4. To check the preset stations. Press the PRESET button repeatedly.
Notes:
• Only the two front speakers and the subwoofer are active in tuner mode.
• The SURROUND and TEST buttons on the remote control are unavailable in tuner mode.
9
To Tune Into a Station Manually
To Search for a Station Automatically
To Preset Stations
To Tune Into a Preset Station
Page 12

The following checks will assist in the correction of most problems which you may encounter with your
system.
TROUBLE SHOO TING GUIDE
PROBLEMS
No Power.
No sound.
No sound from one channel or
unbalanced left and right volume.
Reversed left and right sound.
The centre speaker or the surround
speakers give no sound
The remote control does not function.
RADIO RECEPTION
The FM STEREO indicator flashes.
Severe hum or noise.
SOLUTIONS
• Check that the AC power cord is connected.
• Rotate the VOLUME clockwise to increase volume.
• Select the correct AV input and the correct input mode
(Digital or analogy sound).
• Check the speaker connections of the inoperative channel.
• Check the speaker cord connection and speaker location.
• Check the speaker connection for proper phasing.
• Check that the speaker connections are correct.
• The current mode does not support surround sound.
• Remove any obstacles between the remote control and
the unit.
• Use the remote control near the unit.
• Point the remote control at the remote sensor on the unit.
• Replace the battery in the remote control with new one.
• Unwind the antenna.
• Unwind the antenna.
• Switch to MONO sound in FM Radio mode.
10
PRINTED IN CHINA
811-AVR291-011
Specifications and external appearance are subject to change without advance notice
due to continuous product improvement.
Page 13

CHAÎNE DE CINÉMA MAISON
MANUEL D’INSTRUCTIONS
V euillez lire ce manuel d’instructions attentivement av ant d’utiliser l’appareil.
Page 14

RENSEIGNEMENTS D’ORDRE GÉNÉRAL
Accessoires fournis
Appareil principal................................................X1
Télécommande.................................................X1
Enceintes et câble pour cinéma maison..............X6
Fils d’enceintes..................................................X5
Câble audio/vidéo..............................................X1
Antenne CADRE AM.........................................X1
Antenne FM......................................................X1
Manuel d’utilisation............................................X1
Table des matières
CONSIGNES DE SÉCURITÉ IMPORT ANTES ..1
COMMANDE DE FONCTION.... ........................2
Panneau Devant................................................2
Panneau Arrière........... .....................................2
Télécommande.................................................3
Utilisation correcte de la télécommande..............3
Remplacement de la pile...................................3
RÉGLAGE INITIAL...........................................4
Branchement d’alimentation...............................4
Raccordement de toutes les enceintes................4
Pose des enceintes ambiophoniques arrière........4
Emplacement de toutes les enceintes...............5
Réglage du mode d’entrée et des canaux
d’écoute .........................................................5
Raccordement de l’antenne de radio...................6
Réglage d’entrée et sortie vidéo et audio............6
RÉGLAGE DU SON.........................................8
Réglage de I’équilibre......................................8
Réglage de la qualité du son..............................8
Réglage du temps de propagation.........................8
FONCTIONNEMENT DE LA RADIO...................9
Syntonisation manuelle d’une station..................9
Recherche automatique d’une station...................9
Préréglage de stations.......................................9
Syntonisation d’une station préréglée....................9
GUIDE DE DÉPANNAGE................................10
Introduction
Nous vous remercions d’avoir acheté ce produit.
Pour obtenir un rendement optimal, veuillez lire ce
manuel attentivement.
Il vous aidera à faire fonctionner correctement votre
appareil.
Fabriqué sous licence de Dolby Laboratories. Dolby,
Dolby Digital, Pro Logic et le symbole à deux D sont
des marques de commerce de Dolby Laboratories.
Page 15

Renseignement FCC
Cet appareil est en conformité avec la section 15 des règles de la FCC.
Son fonctionnement est soumis aux deux conditions suivantes :
(1 ) Cet appareil ne doit pas causer d’interférences gênantes, et
(2 ) Cet appareil doit supporter toute interférence reçue, y compris celles qui pourraient causer son mauvais
fonctionnement.
Emplacement
• N’utilisez pas l’appareil dans les endroits extrêmement chauds, froids, poussiéreux ou humides.
• Placez l’appareil sur une surface plate et de niveau.
• Dans une armoire, laissez un espace libre d’environ 2,5 cm (1 po) pour assurer une aération adéquate.
• Laissez l’air circuler librement autour de l’appareil. Ne le couvrez pas avec du tissu et ne le placez pas sur
un tapis.
Sécurité
• Lorsque vous branchez et débranchez le cordon CA, tenez la fiche et non le cordon. Le tirage du cordon
peut l’endommager et créer un risque.
• Débranchez l’appareil durant les orages et s’il ne va pas être utilisé pendant une longue période de temps.
• Débranchez le cordon d’alimentation CA si vous n’allez pas utiliser l’appareil pendant une longue période
de temps.
Condensation
• Si l’appareil est laissé dans une pièce chaude et humide, des gouttelettes d’eau ou de la condensation
peuvent se former à l’intérieur de l’appareil. S’il y a de la condensation à l’intérieur de l’appareil, son
fonctionnement normal peut être affecté. Attendez de 1 à 2 heures avant de mettre l’appareil en marche,
ou chauffez graduellement la pièce pour faire sécher l’appareil a vant de l’utiliser .
Remarques sur l’entretien
• N’utilisez pas de produits chimiques volatils sur cet appareil. Nettoyez-le en l’essuyant avec un chiffon
doux.
• Ne placez pas un objet lourd sur l’appareil et ne montez pas dessus. Un objet lourd peut tomber et causer
une blessure grave ou endommager considérablement l’appareil.
• Veillez à ce que personne ne marche sur le cordon d’alimentation et à ce qu’il ne soit pas coincé
particulièrement près des fiches, des prises et des points de sortie de l’appareil.
CONSIGNES DE SÉCURITÉ IMPORTANTES
Le symbole de l’éclair et d’une flèche à l’intérieur
d’un triangle équilatéral signale qu’il y a une «
tension dangereuse » non isolée à l’intérieur de
l’appareil, suffisamment élevée pour causer un
choc électrique.
Le point d’exclamation à l’intérieur d’un triangle
quilatéral signale qu’il y a des instructions
importantes de fonctionnement et d’entretien qui
accompagnent l’appareil.
DE CHOCS ÉLECTRIQUES, NE PAS RETIRER LE
COUVERCLE (NI LE DOS). AUCUNE PIÈCE
NÉCESSITANT L’ENTRETIEN PAR L’UTILISATEUR À
L’INTÉRIEUR. POUR RÉPARATION, S’ADRESSER À
UN RÉPARATEUR QUALIFIÉ.
AVERTISSEMENT : POUR ÉVITER UN INCENDIE OU UN RISQUE DE CHOC ÉLECTRIQUE, NE PAS
EXPOSER CET APPAREIL À LA PLUIE OU À L’HUMIDITÉ.
MISE EN GARDE : POUR ÉVITER UN CHOC ÉLECTRIQUE, FAIRE CORRESPONDRE LA BROCHE
LARGE DE LA FICHE AVEC LA FENTE LARGE DE LA PRISE ET ENFONCEZ LA
FICHE À FOND. (CANADA ET É.-U. SEULEMENT)
1
A VERTISSEMENT :
• En cas de problème, débranchez le cordon d’alimentation CA et faites réparer l’appareil par un personnel
qualifié.
• Ne placez aucun objet sur le dessus de l’appareil, car ceci pourrait l’endommager .
WARNING
A VER TISSEMENT
POUR RÉDUIRE LE
RISQUE
Symbole pour Classe II (double isolation)
Page 16

panneau arrière
COMMANDES DE FONCTION
1. T OUCHE POWER
Met l’alimentation en et hors circuit.
2. PRISES ENTRÉE A UDIO A V3 (G et D)
Pour raccordement aux sorties audio.
3. PRISES ENTRÉE VIDÉO A V3
Pour raccordement aux sorties vidéo.
4. TOUCHES AV1/2/3
Pressez AV1 ou AV2 pour mode autodétection/auto-commutation; pressez de
nouveau pour passer au mode analogique
forcé. Pressez la touche AV3 pour choisir
l’entrée AV3.
5. T OUCHE TUNER / BAND
Pour choisir le mode de radio et à presser de
nouveau pour alterner entre les bandes FM et
AM.
6. T OUCHE PRESET
Pour choisir les stations à mettre en mémoire .
7. TOUCHES TUNING -/+
Pour chercher une station de radio .
8. FENÊTRE D’AFFICHAGE
Indique le mode de fonction de l’appareil.
9. CAPTEUR DE TÉLÉCOMMANDE
Capte les signaux de la télécommande.
10. BOUTON DE V OLUME
Pour régler le v olume.
11. INDICATEUR STANDBY
Quand l’appareil est mis en mode STANDBY
(disponibilité) à l’aide de la télécommande, ce
voyant s’allume.
12. INDICA TEUR 3 STEREO
Ce voyant s’allume lorsque le son 3 STEREO
est choisi en mode A V IN (entrée A/V).
13. INDICATEUR PRO LOGIC
Ce voyant s’allume lorsque le son Dolby Pro
Logic est mis en service en mode AV IN
(entrée A/V).
14. INDICATEUR NUMÉRIQUE
Ce voyant s’allume lorsque le signal d’entrée
est Dolby Digital en mode A V IN (entrée A/V).
panneau devant
15. Prise d’entrée AV2 VIDÉO IN
16. Prises d’entrée AV2 A UDIO IN (G et D)
17. Prise d’entrée AV2 DIGITAL AUDIO IN
18. Prise d’entrée AV1 DIGITAL AUDIO IN
19. Prise d’entrée AV1 VIDÉO IN
20. Prises d’entrée AV1 A UDIO IN (G et D)
21. Bornes pour enceinte avant droite
22. Bornes pour enceinte centrale
23. Bornes pour enceinte avant gauche
24. Cordon d’alimentation
25. Bornes D’ANTENNE FM
26. Borne D’ANTENNE CADRE AM
27. Prise de sortie TV VIDÉO OUT
28. Prises de sortie TV AUDIO OUT (G et D)
29. Bornes pour enceinte arrière droite
30. Bornes pour enceinte d’extrêmes graves
31. Bornes pour enceinte arrière gauche
2
12 3 4
5
67 8 9 10
11
12 13 14
Page 17

COMMANDES DE FONCTION
(Suite)
Télécommande
1. TOUCHE POWER
Met l’appareil en circuit quand celui-ci est en
mode STANDBY (disponibilité) ou le met en
mode STANDBY.
2. TOUCHE BAND
Pour alterner entre la bande FM et la bande
AM
3. TOUCHE TUNING
Pour syntoniser une station de radio
4. TOUCHE MEMORY
Pour mise en mémoire d’une station de radio
5. TOUCHE SURROUND
Pour changer les canaux d’écoute et la sortie
du son en mode AV IN
6. TOUCHE VOL +/-
Pour augmenter ou diminuer le volume
7. SÉLECTEUR DE FONCTION
Pour choisir le mode TUNER (syntonisateur)
et les entrées A/V. Chaque fois que vous
pressez cette touche, le mode change de façon
cyclique comme suit : AV1->A V2->A V3->Tuner
3
8. TOUCHE NEXT
Pour choisir les stations préréglées ou régler
le niveau sonore.
9. TOUCHE DISPLAY
Indique le canal de la piste sonore en cours
ou l’état
10. TOUCHE TUNING
Pour syntoniser une station de radio
11. TOUCHE SON
Pour choisir l’équilibre de la piste sonore et
contrôler la tonalité pour permettre de faire des
réglages avec les touches NEXT/PREV
12. TOUCHE MONO/STÉRÉO
Pour choisir le mode FM STÉRÉO ou FM
MONO.
13. T OUCHE PREV
Pour choisir les stations préréglées ou régler
le niveau sonore.
14. TOUCHE TEST
Pour tester le volume de chaque enceinte
acoustique
M
O
N
O
/
S
T
E
R
E
O
M
E
M
O
R
Y
FUNCTION
D
I
S
P
L
A
Y
TEST
B
A
N
D
NEXT
PREV
POWER
1
8
9
10
11
12
13
14
7
2
3
4
5
6
Utilisation correcte de la télécommande
1. P ointez la télécommande vers le capteur de la télécommande situé sur l’appareil.
2. Si l’éclairage ambiant est élevé, le rendement du capteur de télécommande à infrarouge peut baisser et
entraîner un mauvais fonctionnement.
3. La distance efficace conseillée pour le fonctionnement de la télécommande est d’environ 4 m (13 pi).
Remplacement de la pile
Quand la pile s’affaiblit, la distance de fonctionnement de la télécommande baisse considérablement et il faut
remplacer la pile.
Remarque:
Si vous n’allez pas utiliser la télécommande pendant une longue période de temps, retirez la pile pour éviter
toute corrosion en cas de fuite de la pile.
1.Ouvrez le compartiment
de la piIle.
2.Insérez une pile
CR2025 (3V).
Attention : Retirez la pellicule de PVC avant
d’utiliser la télécommande.
Page 18

RÉGLA GE INITIAL
Branchement de l’alimentation
4
Avez-vous besoin d’aide
supplémentaire?
NE RETOURNEZ P AS L’APP AREIL A U MAGASIN
Veuillez appeler le service à la clientèle au 1-800-252-6123
ou visitez notre site d’aide au http://www.18002526123.com
Pose des enceintes ambiophoniques arrière
1. F aites un repère de l’emplacement désiré sur le mur .
2. Insérez une vis sur le repère au mur .
3. Faites coïncider l’encoche sur l’enceinte avec la vis et tirez l’enceinte vers le bas jusqu’à ce qu’elle soit
bien calée dans l’encoche.
MISE EN GARDE:
• Avant d’effectuer la conne xion, vérifiez si la tension indiquée pour l’appareil correspond à v otre tension
locale.
• Assurez-vous que vos mains soient sèches lorsque vous branchez le cordon d’alimentation dans la prise
murale pour éviter le risque d’un choc électrique.
• Débranchez le cordon d’alimentation si vous n’allez pas utiliser l’appareil pendant une longue période de
temps.
Raccordement de toutes les enceintes
1. Les fils des enceintes acoustiques comportent un code-couleur pour simplifier le branchement. Raccordez
l’extrémité de chaque fil d’enceinte dans la prise correspondante à l’arrière de l’appareil, en faisant
correspondre le tube de couleur sur l’extrémité du fil av ec le connecteur à code-couleur.
2. Raccordez chaque fil d’enceinte aux enceintes satellites. Les enceintes avant et arrière de gauche et de
droite sont identiques. Cependant, veillez à faire le raccordement de l’enceinte centrale (couleur) à l’enceinte
légèrement plus longue que les autres.
3. Ne raccordez pas les autres enceintes à l’enceinte d’extrêmes graves, car ceci risque d’endommager les
enceintes.
MISE EN GARDE:
Pour éviter d’endommager l’appareil, mettez-le hors circuit a vant d’eff ectuer un raccordement.
ARRIÈRE (DROITE)
EXTRÊMES GRAVES
ARRIÈRE (GAUCHE)
AVANT (GAUCHE)
AV ANT (DROITE)
CENTRE
Page 19

Remarques :
1. O indique que l’enceinte est en service. X indique que l’enceinte n’est pas en service.
2. En général, seules les enceintes avant de gauche et de droite et l’enceinte d’extrêmes graves sont en
service en mode TUNER (syntonisateur).
3. Le mode 3 STEREO crée un effet sonore ambiophonique sans utiliser les enceintes arrière. A vec ce mode
aucun son ne provient des enceintes arrière.
5
ENCEINTE D’EXTRÊMES GRAVES
Peut se placer n’importe où.
ENCEINTES ARRIÈRE
Placez juste à côté ou légèrement derrière
la zone d’écoute et légèrement plus haut
que le niveau des oreilles
ENCEINTES AV ANT
Placez de part et d’autre du téléviseur,
à distance égale de chaque côté.
RÉGLA GE INITIAL
(Suite)
Emplacement de toutes les enceintes
CENTRE
Placez sur le dessus ou en-dessous du
téléviseur.
EXTRÊMES
GRAVES
AVANT
GAUCHE
CENTRE
AVANT
DROITE
ARRIÈRE
DROITE
ARRIÈRE
GAUCHE
Réglage du mode d’entrée et des canaux d’écoute
A V1 : Mettez l’appareil en circuit et AV1 est affiché automatiquement; pressez la touche A V1 jusqu’à ce que
AV1 ANALOG soit affiché.
A V2 : Mettez l’appareil en circuit et pressez la touche AV2 pour choisir le mode d’entrée AV2; pressez de
nouveau la touche jusqu’à ce que A V2 ANALOG soit affiché.
Remarques :
• Les modes d’entrée AV1 et AV2 permettent une auto-détection de la source d’entrée (numérique ou
analogique) et une auto-commutation au mode correspondant.
• Pour obtenir le mode analogique forcé, pressez de nouveau la touche AV1 ou AV2 jusqu’à ce que A V1
ANALOG ou A V2 ANALOG soit affiché. Le mode analogique f orcé s’obtient seulement avec A V1 et A V2.
• Vous pouvez presser la touche SURR OUND de façon répétée sur la télécommande pour changer l’état de
sortie de la piste sonore. Veuillez consulter le tableau ci-dessous.
Le tableau suivant indique quelle enceinte acoustique est en service selon les modes variés
.
Page 20

Raccordement de l’antenne de radio
FM : Raccordez l’antenne FM (incluse) aux bornes FM ANTENNA. Déroulez complètement l’antenne filaire et
placez-la dans la position qui procure la meilleure réception.
AM :Raccordez l’antenne cadre (incluse) à la pr ise AM LOOP ANTENNA. Tournez l’antenne de façon à
obtenir la meilleure réception.
Réglage d’entrée et de sortie vidéo et audio
AV1 (SATELLITE/MAGNÉTOSCOPE)
Connectez les prises de sortie audio et vidéo des appareils A/V (magnétoscope, récepteur satellite, etc.) aux
prises d’entrée audio et vidéo sur l’appareil en utilisant le câble audio/vidéo (inclus).
Si l’appareil A/V comporte une prise de sor tie audio coaxiale à train numérique/PCM, établissez la connexion
en utilisant un câble coaxial.
A V2 (DVD)
Connectez la sortie AUDIO OUT L/R (G/D) et la sortie VIDEO OUT de l’appareil A/V (lecteur de D VD , etc.) à
la prise d’entrée AUDIO IN L/R (G/D) et l’entrée VIDEO IN sur l’appareil à l’aide d’un câble audio/vidéo .
Connectez la prise de sortie audionumérique coaxiale sur le lecteur de DVD à la prise DIGIT AL A UDIO IN sur
l’appareil en utilisant un câble coaxial.
TÉLÉVISEUR
L’appareil peut se raccorder à votre téléviseur ou moniteur en connectant la prise VIDEO OUT (sortie vidéo)
sur l’appareil à la prise VIDEO IN (entrée vidéo) sur votre téléviseur ou moniteur . P our enregistrer le signal de
lecture, connectez la prise VIDEO OUT à l’appareil d’enregistrement (magnétocassette, mini-lecteur de disque
à enregistrement, etc.).
Lecture d’un DVD
1. Connectez l’appareil au téléviseur et au lecteur de D VD .
2. Mettez l’appareil en circuit et pressez le sélecteur de FONCTION sur la télécommande pour choisir le
mode à auto-détection AV2 ou pressez la touche AV2 sur le panneau devant. S’il n’y a aucun son en
mode d’entrée numérique, pressez la touche A V2 sur le panneau devant pour obtenir le mode analogique
AV2 ANALOG. Le mode analogique f orcé s’obtient seulement en pressant la touche A V2 sur le panneau
devant.
3. Mettez votre téléviseur en circuit et choisissez l’entrée vidéo correspondant à celle utilisée pour connecter
l’appareil.
4. Mettez v otre lecteur de D VD en circuit pour commencer la lecture d’un DVD.
6
RÉGLA GE INITIAL
(Suite)
Page 21

Réglage d’entrée/sortie vidéo et audio (suite)
RÉGLA GE INITIAL
(Suite)
AV3
Connectez les parises de sortie audio et vidéo de l’appareil A/V (commande de jeu vidéo, etc.) aux prises
d’entrée audio et vidéo sur l’appareil.
7
Remarques :
Dolby Digital est un système de reproduction sonore mis au point par Dolby Laboratories Inc. qui crée une
sortie sonore semblable à celle dans les salles de cinéma quand l’appareil est raccordé à un processeur ou
amplificateur Dolby Digital à 5,1 canaux. Cet appareil reconnaît automatiquement les vidéodisques numériques
enregistrés avec Dolby Digital. Toutes les sources Dolby Digital ne sont pas enregistrées avec 6 canaux.
Certaines sources portant la marque Dolby Digital peuvent a voir été enregistrées en mode Dolby Surround, un
système à 2 canaux. Recherchez ce logo sur v otre appareil de D V D .
V ous pouvez effectuer la lecture de vidéodisques de films de cinéma et de concerts en direct grâce à cette
piste sonore dynamique et réaliste en établissant la connexion entre l’appareil et le lecteur de D VD a vec une
sortie coaxiale à train numérique/PCM.
Dolby Pro-Logic est un système de reproduction sonore mis au point pour améliorer l’emplacement des
sources sonores encodées avec Dolby Surround. L’impression de l’emplacement des sources sonores est
améliorée avec l’apport d’un canal séparé pour l’enceinte centrale. Recherchez ce logo sur l’affichage de votre
appareil.
Vous pouvez obtenir la piste sonore dynamique et réaliste de Dolby Pro Logic Surround en établissant la
connexion entre cet appareil et l’appareil auxiliaire procurant un signal Dolby Pro Logic à l’aide dun câble
coaxial ou d’un câble audio. La sortie sonore provenant des enceintes acoustiques arrière est monaurale.
Page 22

Utilisez la télécommande pour effectuer les changements suivants concernant l’équilibre des enceintes
acoustiques. Pressez la touche SOUND pour choisir l’enceinte désirée et pressez la touche NEXT (suivant)
ou PREV (précédent) pour régler le niveau du canal.
Remarques :
1. Si vous ne pressez aucune touche pendant quelques secondes, l’affichage retourne à l’état normal.
2. Chaque fois que vous pressez la touche SOUND, le menu change de façon cyclique comme indiqué cidessous :
Réglage de la qualité du son
Pressez la touche SOUND de façon répétée pour choisir un mode de compensation (BASS, MIDDLE, TREBLE.
Pressez la touche NEXT ou PREV pour régler le niveau sonore.
BASS : fréquences graves
MIDDLE : fréquences moyennes
TREBLE : fréquences aiguës
Pressez la touche SOUND jusqu’à ce que le menu MODE LINE soit affiché. Pressez la touche NEXT ou
PREV pour alterner entre MODE LINE et MODE RF. Les menus MODE LINE et MODE RF sont efficaces
seulement en mode AV IN si le signal d’entrée est Dolby Digital.
• MODE LINE : Permet une normalisation de dialogue sans échelle de compression.
• MODE RF : Permet une reproduction de dialogues à un niveau favorablement comparable à celui des
émissions de télévision de qualité et chaînes de films de choix à échelle de compression totale.
REMARQUE: Les réglages de sons graves, moyens et aigus contrôlent le son provenant des enceintes avant
gauche et droite.
Réglage du temps de propagation du son
Pressez la touche SOUND de façon répétée pour choisir le temps de propagation des enceintes arrière.
Pressez la touche NEXT ou PREV pour régler le temps de propagation des signaux sonores (million d’une
seconde).
• P DELAY : Règle le temps de propagation des enceintes arrière en mode Dolby Pro Logic.
• D DELAY : Règle le temps de propagation des enceintes arrière en mode Dolby Digital.
• C DELAY : Règle le temps de propagation de l’enceinte centrale.
8
Réglage de l’équilibre
Remarques :
1. Cet appareil accepte trois modes d’entrées numériques :
• Dolby Digital 5,1canaux. Avec ce mode, pressez la touche SURROUND sur la télécommande pour alterner
entre Dolby D (5 canaux) et Downmix (2 canaux).
• Dolby Digital 2,0 canaux. Avec ce mode, pressez la touche SURROUND pour choisir Dolby D (2 canaux),
3 STEREO (3 canaux) et DOLBY PRO LOGIC (4 canaux).
• PCM. Avec ce mode, pressez la touche SURROUND pour choisir STEREO, 3 STEREO et DOLBY PRO
LOGIC.
2. Si le signal d’entrée est analogique, pressez la touche SURROUND pour choisir STEREO, 3 STEREO et
DOLBY PRO LOGIC.
Le tableau ci-dessous indique l’indicateur du panneau devant et l’état d’affichage en fonction des
différents modes choisis.
RÉGLA GE DU DON
Page 23

FONCTIONNEMENT DE LA RADIO
9
Syntonisation manuelle d’une station
1. Pressez la touche TUNER/BAND (syntonisateur/bandes) sur l’appareil ou le sélecteur de FONCTION sur
la télécommande jusqu’à ce que la bande de fréquences apparaisse sur l’affichage.
2. Pressez de nouv eau la touche TUNER / BAND ou la touche BAND sur la télécommande pour choisir la
bande désirée.
3. Pressez les touches TUNING +/- pour syntoniser une station.
FM stéréo
Pressez la touche MONO/STEREO sur la télécommande jusqu’à ce que le mot STEREO apparaisse sur
l’affichage. Si le signal de la radio est faible, l’indicateur ST clignote.
Stations FM dont le signal est faible
Pressez la touche MONO/STEREO jusqu’à ce que le mot MONO apparaisse sur l’affichage. Le bruit de fond
est réduit, mais le signal reproduit est monaural. Pour rétablir la réception stéréo, pressez de nouveau la
touche MONO/STEREO.
Recherche automatique d’une station
• Maintenez enfoncée, de 1 à 2 secondes, l’une ou l’autre des touches TUNING sur la télécommande ou sur
le panneau devant, et la recherche d’une station s’effectue automatiquement. Quand une station est
syntonisée, la recherche cesse.
• Il peut ne pas avoir d’arrêt sur une station dont le signal est très faible.
• En cours de recherche, pressez de nouveau les touches TUNING pour cesser la recherche.
Préréglage de stations
V ous pouvez syntoniser directement une station mise en mémoire en pressant la touche PRESET (préréglage).
Vous pouvez prérégler 20 stations FM.
Vous pouvez prérégler 20 stations AM.
1. Pressez la touche TUNER/BAND sur l’appareil ou le sélecteur de FONCTION sur la télécommande jusqu’à
ce que la bande de fréquence apparaisse sur l’affichage.
2. Pressez de nouveau la touche TUNER/BAND sur l’appareil ou la touche BAND sur la télécommande pour
choisir la bande désirée.
3. Utilisez la touche TUNING pour trouver la station désirée .
4. Pressez la touche MEMOR Y sur la télécommande.
5. Pressez la touche NEXT ou PREV pour choisir un numéro de préréglage et pressez la touche MEMOR Y
sur la télécommande pour mettre la station en mémoire.
6. Répétez les étapes 2 à 5 pour mettre d’autres stations en mémoire.
7. P our changer une station préréglée, répétez les étapes 2 à 5.
Syntonisation d’une station préréglée
1. Pressez la touche TUNER/BAND sur l’appareil ou le sélecteur de FONCTION sur la télécommande jusqu’à
ce que la bande de fréquences apparaisse sur l’affichage.
2. Pressez de nouveau la touche TUNER/BAND ou la touche BAND sur la télécommande pour choisir la
bande désirée.
3. Pressez la touche PRESET sur l’appareil de façon répétée ou la touche NEXT ou PREV pour choisir la
station préréglée.
4. P our vérification des stations préréglées, pressez la touche PRESET de façon répétée .
REMARQUE:
• Seules les deux enceintes avant et l’enceinte d’extrêmes gra ves sont en service en mode de radio .
• Les touches SURROUND et TEST sur la télécommande ne sont pas fonctionnelles en mode TUNER
(syntonisateur).
Page 24

10
IMPRIMÉ EN CHINE
811-AVR291-031
Les caractéristiques et I’aspect extérieur peuvent changer sans préavis, car nous
visons continuellement à perfectionner nos produits.
Les vérifications suivantes vous aideront à corriger la plupart des problèmes susceptibles de se présenter
avec votre chaîne.
GUIDE DE DÉPANNA GE
SYMPTOME
Pas d’alimentation
Pas de son.
Pas de son d’un canal ou volume
déséquilibré de gauche et de droite
Son de gauche et de droite inversé.
Pas de son de l’enceinte centrale ou des
enceintes ambiophoniques.
La télécommande ne fonctionne pas.
RÉCEPTION DE LA RADIO
L’indicateur FM STEREO clignote.
Bourdonnement ou bruit très gênants.
CAUSE (ET SOLUTION)
• Cordon CA branché correctement?
• T ourner la commande de VOLUME dans le sens horair .
• Choisir l’entrée AV correcte et le mode d’entrée correcte
(son numérique ou analogique).
• Vérifier les connexions d’enceinte du canal inopérant.
• Vérifier la connexion du fil d’enceinte et l’emplacement
de l’enceinte.
• Vérifiez les connexions d’enceintes pour mise en phase
appropriée.
• Vérifier si les connexions d’enceintes sont correctes.
• Le mode en cours n’accepte pas le son ambiophonique.
• Retirer tout obstacle entre la télécommande et l’appareil.
• Utiliser la télécommande à proximité de l’appareil.
• Pointer la télécommande vers le capteur de
télécommande sur l’appareil.
• Remplacer la pile de la télécommande par une pile
neuve.
• Déroulez l’antenne filaire.
• Déroulez l’antenne filaire.
• Choisissez le mode MONO en mode de radio FM.
Page 25

EQUIPO PASAPELÍCULAS
“EL CINE EN SU CASA”
MAUNAL DE INSTRUCCIONES
Por favor , lea cuidadosamente estas instrucciones antes de usar esta unidad.
Page 26

GENERAL
IMPORTANTES INSTRUCCIONES DE
SEGURIDAD.....................................................1
CONTROL DE FUNCIONES.................................2
Panel frontal........................................................2
Panel posterior.....................................................2
Control remoto.....................................................3
Uso correcto del control remoto.............................3
Cambio de las pilas...............................................3
INSTALACIÓN..................................................4
Conexión con la corriente......................................4
Conexión de los parlantes y del subwoofer (parlante
de frecuencias bajas)...........................................4
Montaje de los parlantes posteriores para sonido
envolvente........................................................4
Ubicación de los parlantes y del subwoofer (parlante
de frecuencias bajas).........................................5
Programación de la modalidad de entrada y de los
canales de escucha............................................5
Conexión de la antena de la radio...........................6
Programación de entrada/salida de audio y video.....6
AJUSTE DEL SONIDO........................................8
Para ajustar el nivel del canal................................8
Para ajustar la calidad del sonido...........................8
Para ajustar el efecto de retraso (delay)..................8
FUNCIONAMIENTO DE LA RADIO......................9
Para sintonizar manualmente una estación.............9
Para buscar automáticamente una estación...........9
Para programar estaciones...................................9
Para sintonizar una estación programada................9
GUÍA P ARA RESOL VER PROBLEMAS.............10
Introducción
Gracias por comprar este producto. Para obtener un
rendimiento óptimo de este aparato, por favor lea
atentamente este manual que le servirá de guía para
su funcionamiento.
Fabricado bajo la licencia de Dolby Laboratories.
Los símbolos "Dolby", "Dolby Digital", "Pro Logic"
y el símbolo con la doble "D" son marcas
registradas de los laboratorios Dolby Laboratories.
Accesorios incluidos
Unidad principal....................................................X1
Control remoto......................................................X1
Parlante del equipo de hometheater (el cine en su
casa).................................................................X6
Alambre del parlante...........................................X5
Cable para audio y vídeo.......................................X1
Antena de cuadro AM............................................X1
Antena FM...........................................................X1
Manual...................................................................X1
Contenido
Page 27

IMPORTANTES INSTRUCCIONES DE SEGURIDAD
El rayo con punta de flecha ubicado dentro del triángulo
equilátero pretende alertar al usuario
de la presencia de “voltaje peligroso” sin aisalción al
interior del producto, el que puede ser de la magnitud
suficiente para ocasionar descargas eléctricas.
El signo de exclamación dentro del triángulo equilátero
pretende alertar al usuario de la presencia de
importantes instrucciones acerca del funcionamiento
y mantenimiento (reparación) del equipo en el presente
manual del usuario.
PRECAUCIÓN: PARA REDUCIR EL RIESGO DE
DESCARGA ELÉCTRICA, NO RETIRE LA CUBIERT A
NI LA PARTE POSTERIOR DEL APARATO. NO HAY
PIEZAS DE REPUESTO ÚTILES P ARA EL USUARIO
DENTRO DE ESTA UNIDAD. P ARA CUALQUIER TIPO
DE REPARACIONES, ACUDA A PERSONAL
CALIFICADO.
1
ADVERTENCIA:
• En caso que ocurriese cualquier problema desconecte el cable de alimentación de CA y derive la
revisión del equipo a un técnico calificado.
• No ponga ningún objeto directamente sobre la unidad, ya que esto puede ocasionar daños.
El símbolo para la Clase
II (Doble aislación)
ADVERTENCIA: PARA REDUCIR EL RIESGO DE INCENDIO O DESCARGA ELÉCTRICA, NO EXPONGA
ESTE AP ARA TO A LA LLUVIA NI A LA HUMEDAD.
CUIDADO:
P ARA PREVENIR EL RIESGO DE DESCARGA ELÉCTRICA, INSERTE COMPLET AMENTE
LA PATA ANCHA DEL ENCHUFE CONECTADO AL CABLE EN LA RANURA ANCHA
CORRESPONDIENTE DEL ENCHUFE DE LA PARED. (PARA ESTADOS UNIDOS Y
CANADÁ SOLAMENTE)
INFORMACIÓN DE LA FCC
Este aparato cumple con el capítulo 15 del Reglamento de la FCC.
Las operaciones de este equipo quedan sujetas a las dos condiciones siguientes:
(1) Este aparato no puede causar ningún tipo de interferencia perjudicial, y
(2) Este aparato debe reconocer cualquier tipo de interferencia recibida, incluído aquel tipo de interferencia capaz
de provocar operaciones indeseables por parte del equipo.
EN CUANTO A LA UBICACIÓN
• No use este equipo en lugares con exceso de calor, frío, humedad o polvo.
• Coloque el equipo en una superficie plana y pareja.
• Al poner el equipo en una repisa, permita que alrededor de la unidad haya aproximadamente 2,5 cm (1 pulgada)
de espacio libre para que el equipo cuente con la ventilación adecuada.
• No obstaculice la ventilación a través del equipo, poniéndolo en un lugar con poca ventilación, cubriéndolo
con un paño o poniéndolo sobre la alfombra.
EN CUANTO A LA SEGURIDAD
• Al conectar o desconectar el cable de alimentación de CA, tire del enchufe y no del cable mismo, ya que al tirar
del cable puede dañarlo y crear una situación de riesgo.
• Desenchufe la unidad cuando haya tormentas con rayos o cuando no vaya a usar el equipo por un período
prolongado.
• En caso que no vaya a usar el equipo por un período prolongado, desconecte el cable de alimentación de CA.
EN CUANTO A LA CONDENSACIÓN
• Si deja el equipo en una habitación calefaccionada que está temperada y húmeda, es posible que se forme
condensación o pequeñas gotas de agua en el interior del reproductor de discos compactos. Si hay condensación
al interior del equipo, es probable que éste no funcione como de costumbre. Deje reposar el equipo por 1 ó 2
horas antes de encenderlo, o bien, tempere gradualmente la habitación y séquelo antes de usarlo.
NOTAS SOBRE EL MANTENIMIENTO DEL EQUIPO
• No utilice químicos volatiles en este aparato. Limpie pasando suavemente un paño.
• No ponga objetos pesados sobre esta unidad ni se suba sobre este aparato, ya que dicho objeto se puede caer
y herir a alguna persona o también puede dañar la unidad.
• Proteja el cable de alimentación. No deje que caminen sobre él ni que se dañe el cable, especialmente en la
parte donde sale desde la unidad, en la parte correspondiente al enchufe, y en la parte correspondiente al
alargador.
Page 28

CONTROL DE FUNCIONES
1. BOTÓN POWER
Enciende y apaga el equipo.
2. ENCHUFES PARA ENTRADA DE AUDIO
A V3 (IZQ. Y DER.)
Conecta con la salida de audio
3. ENCHUFES PARA ENTRADA DE VÍDEO
AV3
Conecta con la salida de vídeo
4. Botones AV1/2/3
Presione AV1 ó A V2 para ingresar la modalidad
de detector automático o de interruptor
automático. Presione nuevamente para
cambiar a la "modalidad análoga forzada".
Presione el botón AV3 para seleccionar la
entrada de AV3.
5. Botón TUNER/BAND
Seleccione la modalidad de radio y presione
nuevamente para elegir entre las bandas AM
y FM.
6. Botón PRESET
Selecciona una estación registrada en la
memoria.
7. Botón TUNING +/-
Busca una estación de radio.
8. VENTANA DEL VISUALIZADOR
Muestra el estado de la unidad.
9. SENSOR REMOTO
Recibe las señales del control remoto.
10. PERILLA VOL
Ajusta el volumen.
11. Indicador de suspensión ST ANDBY
Cuando deje el equipo en la modalidad de
suspensión utilizando el control remoto, la luz
se iluminará.
12.Indicador 3 STEREO
La luz se ilumina al seleccionar 3 STEREO
bajo la modalidad de AV IN.
13. Indicador PRO LOGIC
La luz se ilumina al tener activada la
característica Dolby Pro Logic bajo la
modalidad de AV IN.
14. Indicador DIGIT AL
La luz se ilumina cuando la señal Dolby Digital
está entrando bajo la modalidad de AV IN.
15. Enchufe hembra A V2 VIDEO IN
16. Enchufes hembra (I y D) A V2 AUDIO IN
17. Enchufe hembra A V2 DIGITAL AUDIO IN
18. Enchufe hembra A V1 DIGITAL AUDIO IN
19. Enchufe hembra A V1 VIDEO IN
20. Enchufes hembra (I y D) A V1 AUDIO IN
21. Terminales del parlante frontal derecho
22. Terminales del parlante central
23. Terminales del parlate frontal izquierdo
24. Cable de alimentación
25. Terminales de la antena FM
26. Enchufe hembra para la antena de cuadro AM
27. Enchufe hembra TV VIDEO OUT
28. Enchufes hembra (I y D) TV AUDIO OUT
29. Terminales del parlante posterior derecho
30. T erminales del bafle de frecuencias ultra bajas
31. Terminales del parlante posterior izquierdo
Panel posterior
2
Panel frontal
12 3 4
5
67 8 9 10
11
12 13 14
Page 29

1. BOTÓN POWER
Encienda la unidad a partir de la modalidad de
suspensión, o bien encienda la unidad
llevándola a la modalidad de suspensión.
2. BOTÓN BAND
Seleccione la banda que desea (AM o FM)
3. BOTÓN TUNING
Busca una estación de radio.
4. BOTÓN MEMOR Y
Deja registrada en la memoria una estación
de radio.
5. BOTÓN SURROUND
Cambia los canales de audición y la salida
del sonido al estar bajo la modalidad de AV
IN.
6. BOTÓN VOL +/-
Aumenta o disminuye el volumen.
7. BOTÓN FUNCTION
Selecciona la modalidad de la radio y las
entradas para AV. Cada vez que presiona el
botón, la modalidad cambiará siguiendo la
secuencia siguiente: A V1->AV2-> A V3->radio
CONTROL DE FUNCIONES
(Continuación)
Control remoto
Uso correcto del control remoto
1. Apunte con el control remoto en direción al SENSOR REMOTO del equipo.
2. Al estar en presencia de una fuente de luz ambiental muy potente, es posible que el comportamiento del
SENSOR REMOTO infrarrojo se distorsione y cause, por ende, una operación poco fidedigna del equipo.
3. La distancia recomendada para un funcionamiento efectivo del control remoto es de aproximadamente 4
metros (13 pies).
Cambio de las pilas
Al agotarse la batería, la distancia de operación del control remoto disminuye enormemente. Usted deberá
cambiar la pila.
Nota:
En caso que no vaya a usar el control remoto por un período prolongado, retire la batería para evitar de esta
forma dañar el equipo debido a la corrosión ocasionada por el derrame de la batería.
1.Abra la tapa del
compartimento para
las baterías.
2.Ponga una batería
tamaño CR2025
(3V).
ATENCIÓN: Retire la lámina de plástico antes de
empezar a usar el control remoto.
3
8. BOTÓN NEXT
Selecciona las estaciones programadas o
ajusta el nivel del sonido.
9. BOTÓN DISPLA Y
Muestra el estado del equipo o el canal de
sonido actual.
10. BOTÓN TUNING
Busca una estación de radio.
11. BOTÓN SOUND
Seleccione el balance del sonido y el control
de tonos para poder ajustarlos con los botones
NEXT/PREV
12. BOTÓN MONO/STEREO
Selecciona la modalidad FM STEREO o FM
MONO.
13. BOTÓN PREV
Selecciona las estaciones programadas o
ajusta el nivel del sonido.
14. BOTÓN TEST
Revisa el volumen de cada parlante.
M
O
N
O
/
S
T
E
R
E
O
M
E
M
O
R
Y
FUNCTION
D
I
S
P
L
A
Y
TEST
B
A
N
D
NEXT
PREV
POWER
1
8
9
10
11
12
13
14
7
2
3
4
5
6
Page 30

1. Marque el lugar correcto en la pared donde vaya a poner el parlante.
2. Introduzca un(os) tornillo(s) en el lugar que haya marcado en la pared.
3. Haga corresponder el orificio de la ranura del parlante con el tornillo y empuje el parlante hacia abajo
hasta que quede enganchado firmemente.
Montaje de los parlentes posteriores para sonido envolvente
INSTALACIÓN
Conexión con la corriente
CUIDADO:
• Antes de llevar a cabo cualquier conexión, asegúrese de que el promedio de voltaje local sea el mismo
que el voltaje empleado por esta unidad.
• Al conectar el cable de alimentación al enchufe de la pared revise que sus manos estén secas, ante la
posibilidad de sufrir una descarga eléctrica.
• En caso que no vaya a usar el equipo por un período prolongado, desconecte el cable de alimentación de
CA.
1. Los cables de los parlantes han sido codificados con colores para simplificar la conexión. T an sólo conecte
los extremos de cada uno de los cables del parlante en los enchufes hembra correspondientes, ubicados
en la parte posterior de la unidad, asegurándose de que el color del extremo del cable sea el mismo que el
del conector.
2. Conecte cada uno de los cables de los parlantes a los parlantes satelitales. Los parlantes frontales
izquierdo y derecho y los parlantes posteriores izquierdo y derecho son iguales. Sin embargo, asegúrese
de conectar el parlante central (color) al parlante que es ligeramente más largo que los demás.
3. No conecte otros parlantes a los del parlante para frecuencias ultra bajas, ya que se pueden dañar los
parlantes.
CUIDADO:
Para evitar dañar la unidad, asegúrese de apagar la unidad antes de llevar a cabo cualquier conexión.
Necesita Más Ayuda?
NO DEVUELVA ESTE APARATO A LA TIENDA
Sírvase contactar nuestra oficina de Servicio al
Cliente: 1-800-252-6123
O bien visite nuestra dirección de internet
http://www.18002526123.com
4
Conexión de los parlantes y del subwoofer (parlante para frecuencias ultra bajas)
PARLANTE FRONTAL
(DERECHO)
PARLANTE CENTRAL
PARLANTE FRONTAL
(IZQUIERDO)
PARLANTE POSTERIOR
(DERECHO)
PARLANTE POSTERIOR
(IZQUIERDO)
PARLANTE PARA
FRECUENCIAS ULTREA
BAJAS
Page 31

INSTALACIÓN
(Continuación)
Ubicación de los parlantes y del bafle de frecuencias ultra bajas
5
OBSERV ACIONES:
1. "O": el parlante está activado. "X": el parlante no está activado.
2. Por lo general, bajo la modalidad de TUNER sólo se activan los parlantes frontales izquierdo y derecho y
el parlante de frecuencias bajas.
3. La modalidad 3 STEREO crea un efecto de sonido envolvente sin usar los parlantes posteriores. Al estar
bajo esta modalidad, no se emite sonido a través de los parlantes posteriores
Programación de la modalidad de entrada y de los canales de escucha
A V1: Encienda la unidad y "A V1" aparecerá automáticaente en el visualizador. Presione nuevamente el botón
AV1 hasta que "AV1 ANALOG" aparezca en el visualizador.
A V2: Encienda la unidad y presione el botón AV2 para seleccionar la modalidad de entrada de A V2. Presione
nuevamente el botón A V2 hasta que "A V2 ANALOG" aparezca en el visualizador .
Notas:
• La modalidad de entrada AV1 y AV2 pueden detectar automáticamente la fuente de entrada (digital o
análoga) y cambiar automáticamente a la modalidad correspondiente.
• Para ingresar la modalidad “force analog”[análoga forzada], presione nuevamente el botón AV1 ó AV2
hasta que “AV1 ANALOG” o “AV2 ANALOG” aparezca en la pantalla. La modalidad “force analog” está
disponible sólo en la modalidad A V1 y AV2.
• Usted puede presionar el botón SURROUND del control remoto una y otra vez para cambiar el estado de
salida del sonido. Sírvase ver la siguiente tabla.
La tabla siguiente muestra los parlantes que se activan en las distintas modalidades.
PARLANTE PARA
FRECUENCIAS
UL TRA BAJAS
Póngalo en cualquier lugar
P ARLANTES POSTERIORES
Place right beside or slightly behind your
listening position, and a little higher than
your ears: Póngalos inmediatamente al
lado o ligeramente hacia atrás del lugar
donde usted se sienta a ver la televisión,
y un poco más arriba de la altura de sus
oídos.
P ARLANTE CENTRAL
Póngalo encima o debajo del televisor
P ARLANTES
FRONT ALES
Póngalos a ambos lados del
televisor y a la misma
PARLANTE
FRONTAL
IZQUIERDO
PARLANTE
CENTRAL
PARLANTE
FRONTAL
DERECHO
PARLANTE
DE
FRECUENCIAS
ULTRA
BAJAS
PARLANTE
POSTERIOR
IZQUIERDO
PARLANTE
FRONTAL
IZQUIERDO
Page 32

INSTALACIÓN
(Continuación)
Conexión de la antena de la radio
FM: Conecte la antena FM (que viene incluida) a las terminales FM ANTENNA. Desenrolle completamente
la antena de cable, luego extiéndala y pongala en la posición que le brinde la mejor recepción.
AM: Conete la antena de cuadro (que viene incluida) al enchufe hembra AM LOOP ANTENNA. Gire la
antena para encontrar la mejor posición de recepción.
A V1 (SAT/VCR)
Conecte los enchufes de salida para audio y video del equipo de A V( videograbadora, receptor satelital, etc.)
a los enchufes de entrada para audio y video de la unidad, utilizando un cable para audio y video (que viene
incluido con este aparato).
Si el equipo de A V tiene un enchufe de salida de audio coaxial para corriente de bits/PCM, conecte el equipo
a la unidad utilizando un cable coaxial.
Para mirar un DVD
1. Conecte la unidad al televisor y al reproductor de DVD.
2. Encienda la unidad y presione el botón FUNCTION del control remoto para seleccionar la modalidad de
autodetección AV2, o bien, presione directamente el botón AV2 del panel frontal. De no haber sonido en la
modalidad de entrada digital, presione el botón A V2 del panel frontal y llévelo a la modalidad A V2 ANALOG.
La modalidad "force analog" sólo se activa al presionar el botón AV2 del panel frontal.
3. Encienda su televisor y seleccione la entrada de video correspondiente que haya conectado a la unidad.
4. Encienda el reproductor de DVD para iniciar la reproducción.
Programación de entrada/salida de audio y video
6
AV2 (DVD)
Utilizando un cable para audio y vídeo, conecte los enchufes AUDIO OUT izquierdo y derecho y el enchufe
VIDEO OUT del aparato de A V(reproductor de DVD, etc.) a los enchufes AUDIO IN izquierdo y derecho y
VIDEO IN de la unidad.
Conecte el enchufe coaxial de salida de audio digital del reproductor de DVD al enchufe DIGIT AL AUDIO
IN de la unidad, utilizando un cable coaxial.
TV
Esta unidad se puede conectar al televisor o monitor, conectando en enchufe VIDEO OUT de la unidad al
enchufe VIDEO IN de su televisor o monitor. Para grabar la señal de reproducción, conecte el enchufe VIDEO
OUT al equipo con el cual va a grabar (tocacasete, reproductor de mini disc, etc).
Reproductor de DVD con
salida digital (coaxial)
Cable coaxial (se vende
por separado)
Cable coaxial (se vende
por separado)
SA T / VCR
Amarillo/rojo/blanco
Amarillo/rojo/blanco
Amarillo/rojo/blanco
Antena de cuadro AM
(que viene incluida)
Antena FM
(que viene
incluida)
Televisor con entrada para A V
Equipo para grabar
Flujo de señal
Page 33

AV3
Conecte los enchufes de salida de audio y video del equipo de AV (consola de juegos de video, etc.) a los
enchufes de entrada para audio y video de la unidad.
Programación de entrada/salida de audio y video (Continuación)
INSTALACIÓN
(Continuación)
7
Observaciones:
Dolby Digital es una tecnología de sonido envolvente utilizada en las salas de cine que tienen en cartelera
las películas más recientes, y que ahora se encuentra disponible para reproducir este mismo efecto realista
en su hogar. Un sistema de dos canales. Busque este logo en su equipo de DVD.
Usted puede disfrutar los discos de video para DVD con películas y conciertos en vivo, con este sonido
realista dinámico al conectar la unidad al reproductor de DVD por medio de la salida coaxial para corriente de
bits/PCM.
Dolby Pro Logic es un sistema de sonido que ha sido desarrollado para obtener una mayor presencia a partir
de las fuentes codificadas con Dolby Surround. La sensación de ubicación ha sido mejorada con la adición de
un canal separado para el parlante central.
Usted puede disfrutar del sonido realista dinámico de "Dolby Pro Logic Surround" conectando la unidad al
equipo con un cable coaxial o de audio. La salida de sonido a través de los parlantes posteriores será
monoaural.
consola de juegos de video
Blanco/rojo/amarillo
Cable de audio
Cable coaxial (se vende por separado)
Cable coaxial (se vende por separado)
Page 34

AJUSTE DEL SONIDO
Para ajustar el nivel del canal
Use el control remoto para hacer los cambios siguientes en el balance del parlante. Presione el botón SOUND
para seleccionar el parlante deseado y presione NEXT o PREV para ajustar el nivel del canal.
Notas:
1. Si no presiona ningún botón dentro de unos segundos, el visualizador volverá a su estado normal.
2. Cada vez que presiona el botón SOUND, el menú cambiará siguiendo la secuencia siguiente:
Para ajustar la calidad del sonido
Presione reiteradas veces el botón SOUND para seleccionar la modalidad de ecualización (BASS, MIDDLE,
TREBLE). Presione NEXT o PREV para ajustar el nivel del sonido.
• BASS: rango bajo de sonidos.
• MIDDLE: rango mediando de sonidos.
• TREBLE: rango alto de sonidos.
Presione el botón SOUND hasta que aparezca el menú "MODE LINE". Presione el botón PREV o NEXT para
alternar entre "MODE LINE" y "MODE RF". La modalidad "MODE LINE" y "MODE RF" sólo son efectivas
cuando la señal de Dolby Digital está entrando a través de la modalidad A V IN.
• MODE LINE: permite la normalización de diálogo sin escala de compresión.
• MODE RF: hace que el diálogo se reproduzca a un nivel que se compara bien con las transmisiones de
calidad de televisión y los canales de películas de primera calidad, con escala de compresión completa.
Nota:
• Estas modalidades de ecualización controlan el sonido proveniente de los parlantes frontales izquierdo y
derecho.
Para ajustar el efecto de retraso (delay)
Presione repetidas veces el botón SOUND para seleccionar el tiempo de demora de los parlantes posteriores.
Presione el botón NEXT o PREV para ajustar el tiempo de demora (un millón de segundos).
• P DELAY: programa el tiempo de retraso de los parlantes posteriores bajo la modalidad de Dolby Pro
Logic.
• D DELAY : programa el tiempo de retraso de los parlantes posteriores bajo la modalidad de Dolby Digital.
• C DELAY : Fija el tiempo de demora del parlante central.
Notas:
1. Esta unidad brinda respaldo a tres modalidades de entrada digital:
• Dolby Digital del canal 5.1. Al estar en esta modalidad, presione el botón SURROUND del control remoto
para seleccionar entre Dolby D (5 canales) y Downmix (2 canales).
• Dolby Digital del canal 2.0. Al estar en esta modalidad, presione el botón SURROUND para seleccionar
entre Dolby D(2 canales), 3 STEREO (3 canales) y Dolby Pro Logic (4 canales).
• PCM. Al estar en esta modalidad, presione el botón SURROUND para seleccionar entre STEREO, 3
STEREO y DOLBY PRO LOGIC.
2. Cuando haya ingreso de una señal análoga, presione el botón SURROUND SURROUND para seleccionar
entre STEREO, 3 STEREO y DOLBY PRO LOGIC.
La siguiente tabla muestra el indicador del panel frontal y el estado del visualizador en las diversas
modalidades.
8
Page 35

FUNCIONAMIENTO DE LA RADIO
Para sintonizar manualmente una estación
1. Presione el botón TUNER/BAND de la unidad o el botón FUNCTION del control remoto hasta que la banda
de frecuencia aparezca en el visualizador.
2. Presione nuevamente el botón TUNER/BAND o el botón BAND del control remoto para seleccionar la
banda deseada.
3. Presione los botones TUNING +/- para sintonizar una estación.
FM estéreo
Presione el botón MONO/STEREO del control remoto hasta que la palabra “STEREO” aparezca en pantalla.
Cuando la señal de radio sea débil, el indicador “ST” empezará a parpadear.
Estaciones de señal débil en la banda FM
Presione el botón MONO/STEREO hasta que la palabra “MONO” aparezca en pantalla. El ruido de fondo
disminuirá, pero la señal reproducida será monoaural. Para restaurar la recepción estereofónica, presione
nuevamente el botón MONO/STEREO.
Para buscar automáticamente una estación
• Mantenga presionados los botones TUNING del control remoto o del panel frontal durante 1 ó 2 segundos
y el equipo buscará automáticamente una estación. Al encontrar una estación, la búsqueda se detiene.
• Es posible que la función de búsqueda no se detenga en una estación con señal muy débil.
• Mientras la búsqueda está en progreso, presione nuevamente los botones TUNING para detener la
búsqueda.
Para programar estaciones
Usted puede sintonizar directamente una estación almacenada en la memoria, presionando el botón PRESET .
Se pueden programar 20 estaciones en la banda FM.
Se pueden programar 20 estaciones en la banda AM.
1. Presione el botón TUNER/BAND de la unidad o el botón FUNCTION del control remoto hasta que la
banda de frecuencia aparezca en pantalla.
2. Presione nuevamente el botón TUNER/BAND de la unidad o el botón BAND del control remoto para
seleccionar la banda deseada.
3. Use el botón TUNING para encontrar la estación que desea oír.
4. Presione el botón MEMORY del control remoto.
5. Presione le botón NEXT o PREV para seleccionar el número de programación y presione el botón
MEMORY del control remoto para dejar registrada dicha estación.
6. Repita los pasos 2 al 5 para registrar otras estaciones.
7. Para cambiar una estación programada, repita de los pasos 2 al 5.
Para sintonizar una estación programada
1. Presione el botón TUNER/BAND de la unidad o el botón FUNCTION del control remoto hasta que la
banda de frecuencia aparezca en pantalla.
2. Presione nuevamente el botón TUNER/BAND de la unidad o el botón BAND del control remoto para
seleccionar la banda deseada.
3. Presione reiteradamente el botón PRESET de la unidad o el botón NEXT o PREV para seleccionar la
estación programada.
4. Para revisar las estaciones programadas, presione repetidas veces el botón PRESET.
Notas:
• Al estar bajo la modalidad de radio, sólo se activan los dos parlantes frontales y el parlante de frecuencias bajas.
• Los botones SURROUND y TEST del control remoto no están disponibles en la modalidad de radio.
9
Page 36

Las revisiones siguientes le ayudarán a corregir la mayoría de los problemas que pudieran presentarse
en este aparato.
GUÍA PARA RESOLVER PROBLEMAS
SÍNTOMA
No enciende.
No hay sonido.
Sonido invertido izquierdo y derecho.
El parlante central o los parlantes de
sonido envolvente no suenan.
El control remoto no funciona
RECEPCIÓN DE LA RADIO
El indicador FM STEREO está
parpadeando.
Ruido o chirrido severo.
CAUSA (Y SOLUCIÓN)
• Revise que el cable de alimentación de CA esté conectado.
• Gire el control de volumen en sentido de los punteros del reloj.
• Seleccione la entrada correcta de A V y la modalidad correcta
de entrada (sonido digital o análogo)
• Revise las conexiones del parlante del canal que no está
funcionando.
• Revise la conexión del cable del parlante y la ubicación del
parlante.
• Revise la conexión del parlante para asegurar que tenga la
sincronización adecuada.
• Revise que las conexiones del parlante estén bien hechas.
• La modalidad actual no permite el sonido envolvente.
• Retire obstáculos que haya entre el control remoto y la unidad.
• Use el control remoto cerca de la unidad.
• Apunte el control remoto hacia el sensor remoto de la unidad.
• Cambie la pila del control remoto.
• Conecte la antena
• Conecte la antena
• Cambie a la modalidad MONO al estar bajo la modalidad de
radio FM.
10
IMPRESO EN CHINA
811-AVR291-020
Las especificaciones y la apariencia externa de este aparato están sujetas a cambio sin aviso previo,
debido al continuo esfuerzo por mejorar este producto.
Hay un canal que no emite sonido o
hay un desbalance entre el volumen
izquierdo y derecho
 Loading...