

Page 1
Owner’s Manual
AVDBR1
AUTOMOTIVE BLU-RAY PLAYER
Page 2

Table of Contents
Warnings and Cautions .................................................................................................4
Introduction .................................................................................................................... 7
Features ......................................................................................................................................................... 7
Accessories ...................................................................................................................... 7
Installation ...................................................................................................................... 8
Installing the Player................................................................................................................................... 8
Powering Your Blu-Ray Player ................................................................................................................ 9
Connecting to Your Monitor .................................................................................................................. 10
Connecting the External Remote IR Receiver .................................................................................. 11
Controls and Indicators .................................................................................................. 12
Remote Control Operation ............................................................................................13
Using the Remote Control ...................................................................................................................... 13
Battery Replacement ................................................................................................................................ 13
Playing a Blu-ray Disc or DVD ....................................................................................... 16
Basic Playback (Blu-Ray Disc or DVD) ................................................................................................. 16
Special Functions ....................................................................................................................................... 18
Playing an Audio CD ....................................................................................................... 20
Basic Playback (Audio CD) ...................................................................................................................... 20
Playing Music Files ........................................................................................................ 21
Playing Picture Files ...................................................................................................... 23
Basic Playback (Picture Files) ................................................................................................................. 23
Viewing Files ................................................................................................................................................ 24
Playing Video Files ........................................................................................................ 25
Initial Setup ..................................................................................................................... 27
The Initial Setup Wizard ........................................................................................................................... 27
The Settings Menu .......................................................................................................... 29
Settings Menu ............................................................................................................................................. 29
Language Sub-Menu ................................................................................................................................ 30
Security Sub-Menu .................................................................................................................................... 31
Information Sub-Menu ............................................................................................................................ 32
Playback Sub-Menu .................................................................................................................................. 33
Display Sub-Menu ..................................................................................................................................... 34
Audio Sub-Menu ........................................................................................................................................ 37
System Sub-Menu ..................................................................................................................................... 38
- 2 -
Page 3

Table of Contents
Reference ........................................................................................................................39
Blu-Ray Region Codes .............................................................................................................................. 39
DVD Region Codes .................................................................................................................................... 40
Compatible Formats ................................................................................................................................. 41
Specications .................................................................................................................. 43
Troubleshooting .............................................................................................................44
Notes ................................................................................................................................45
- 3 -
Page 4
Warnings and Cautions
X
SEE MARKING ON BOTTOM OF PRODUCT
WARNING: TO REDUCE THE RISK OF FIRE
OR ELECTRIC SHOCK HAZARD, DO NOT
EXPOSE THIS PRODUCT TO RAIN OR
MOISTURE. THE APPARATUS SHALL NOT BE
EXPOSED TO DRIPPING OR SPLASHING.
THE LIGHTNING FLASH AND ARROWHEAD
WITHIN THE TRIANGLE IS A WARNING SIGN
ALERTING YOU OF “DANGEROUS VOLTAGE”
INSIDE THE PRODUCT.
THE EXCLAMATION POINT WITHIN THE
TRIANGLE IS A WARNING SIGN ALERTING
YOU OF IMPORTANT INSTRUCTIONS
ACCOMPANYING THE PRODUCT.
WARNING: TO REDUCE THE RISK OF
ELECTRIC SHOCK, DO NOT REMOVE COVER
(OR BACK). NO USER SERVICEABLE PARTS
INSIDE. REFER SERVICING TO QUALIFIED
SERVICE PERSONNEL.
Caution
This product uses a laser. Use of controls or
adjustments or performance of procedures
other than those specied may result in
hazardous radiation exposure. Do not open
covers and do not repair the unit yourself.
Refer servicing to qualied personnel.
Visible laser radiation when open. Avoid
exposure to beam.
Class 1 Laser Product
This unit must be opened only by qualied
technicians to prevent accidents caused by
the laser beam.
CLASS 1
LASER PRODUCT
The marking plate is located on the bottom
enclosure of the apparatus.
Please respect the environment and
prevailing regulations.
Before you dispose of batteries, ask your
dealer whether they are subject to special
recycling and if they will accept them for
disposal.
This product
contains a low
power laser
device.
FCC Information
This device complies with part 15 of the
FCC Rules. Operation is subject to the
following two conditions: (1) This device
may not cause harmful interference, and
(2) this device must accept any interference
received, including interference that may
cause undesired operation.
This equipment has been tested and
found to comply with the limits for a Class
B digital device, pursuant to part 15 of
the FCC Rules. These limits are designed
to provide reasonable protection against
harmful interference in a mobile installation.
This equipment generates, uses and can
radiate radio frequency energy and, if
not installed and used in accordance
with the instructions, may cause harmful
interference to radio communications.
However, there is no guarantee that
interference will not occur in a particular
installation. If reception, which can be
determined by turning the equipment o
and on, the user is encouraged to try to
correct the interference by one or more of
the following measures:
• Reorient or relocate the receiving
antenna
• Increase the separation between the
equipment and the receiver
- 4 -
Page 5

Warning and Cautions
• Connect the equipment into an outlet on
a circuit dierent from that to which the
receiver is connected
• Consult the dealer or an experienced
radio TV technician for help.
This class B digital apparatus complies with
Canadian ICES-003.
Notice
An LCD panel and/or video monitor may be
installed in a motor vehicle and visible to the
driver if the LCD panel or video monitor is
used for vehicle information, system control,
rear or side observation or navigation. If
the LCD panel or video monitor is used for
television reception, video or Blu-ray/DVD
play, the LCD panel or video monitor must
be installed so that these features will only
function when the vehicle is in “park” or
when the vehicle’s parking brake is applied.
Notice
An LCD panel or video monitor used for
television reception, video or Blu-ray/
DVD play that operates when the vehicle
is in gear or when the parking brake is not
applied must be installed to the rear of the
driver’s seat where it will not be visible,
directly or indirectly, to the operator of the
motor vehicle.
Service Information
Do not attempt to disassemble the unit.
This product does not contain customer
serviceable components. Refer all servicing
to qualied service personnel.
Servicing is required when the apparatus
has been damaged in any way, such as the
power cord or plug is damaged, liquid has
been spilled or objects have fallen into the
apparatus, the apparatus has been exposed
to rain or moisture, does not operate
normally, or has been dropped.
WARNING
Changes or modications to this unit not
expressly approved by the party responsible
for compliance could void the user’s
authority to operate the equipment.
Battery Precautions
Your remote control operates on batteries.
Please adhere to the following precautions:
• If you are not using the remote control
for a long period of time, remove the
batteries.
• Do not mix dierent types of batteries or
new and old batteries.
• A battery may leak electrolyte if mixed
with a dierent battery type, if inserted
incorrectly, or if all batteries are not
replaced at the same time.
• Replace only with the type of batteries
specied.
• Do not use rechargeable batteries.
• To avoid any risk of explosion, observe
the polarities indicated inside the battery
compartment.
• A battery may leak electrolyte or explode
if disposed of in re or an attempt is made
to charge a battery not intended to be
recharged.
• Discard leaky batteries immediately.
Leaking batteries can cause skin burns or
other personal injury.
• When discarding batteries, be sure to
dispose of them in the proper manner,
according to your state/provincial and
local regulations.
• Do not dispose of batteries in a re or
recharge them. Batteries may explode or
leak.
• Do not expose batteries to excessive heat
from sunshine, re or the like.
- 5 -
Page 6

Warnings and Cautions
Additional Precautions
• If your unit has been stored in a cool place
for any length of time, wait for about
2 hours before using it.
• Switching o the unit to standby
mode does not disconnect it from the
vehicle’s power. To completely isolate the
equipment, remove the plug from the
POWER connector as some components
remain connected to the electrical supply.
• If you notice any burning or smoke,
disconnect the unit immediately to avoid
any risk of electrocution.
• Do not expose the unit to dripping or
splashing.
• Care should be taken so that objects do
not fall into the unit.
• If an object or liquid enters inside the
unit, disconnect it immediately and have
it checked by an authorized servicer or
service center.
• The openings located on the unit are for
ventilation. Do not block any ventilation
openings.
• Always leave sucient space around the
unit for ventilation. Do not place the unit
in a cabinet that may prevent air ow
through vent openings.
• Connect the DC Power Cable only to
a 12 V power source as marked on the
product.
• Protect the DC Power Cable from being
pinched.
• Install in accordance with the instructions.
• Do not install the unit where it would
be subject to high temperatures, such
as from direct sunlight, from the vehicle
heater or from other apparatus (including
ampliers) that produce heat.
• Avoid installing the unit in locations
where it would be subjected to dust, dirt
or excessive vibration.
• Use only with a bracket specied by the
manufacturer, or sold with the apparatus.
Cleaning
• Use a soft, dry, clean cloth.
• Using solvents, abrasive or alcohol-based
products risks damaging the unit.
Handling and Caring for Discs
• Handle your discs with care. Hold the disc
with your ngers at the edges or through
the hole.
• Always put discs back in their cases after
use and store in a vertical position.
• Do not play cracked, chipped, badly
scratched or warped discs.
• Do not attach labels to discs.
• Do not try to repair discs with adhesive
tape or glue.
• Do not write on a disc.
• Do not scratch discs.
• Do not store discs in places exposed to
direct sunlight, high humidity or high
temperatures.
• Do not use aerosol cleaners, benzene,
anti-static liquids or any other solvent
for cleaning discs. When cleaning, wipe
gently with a soft damp (water only)
cloth. Always wipe from the center to the
edge. Avoid circular motions, which could
cause scratches and interference during
playback.
- 6 -
Page 7

Introduction
Thank you for choosing the AVDBR1 Blu-ray player. The AVDBR1 is designed to optimize the
enjoyment of your favorite Blu-ray/DVD discs in a mobile environment. This Blu-ray player is
designed to provide years of reliable, trouble-free service.
Please read this manual thoroughly prior to operating the Blu-ray player. Save this manual for
future reference.
Features
• Stand alone automotive Blu-ray player
• Slot Load
• Plays Blu-ray Discs (BD), DVD and CD discs, and JPEG discs
• One HDMI output
• Audio/Video output via RCA jacks
• Front panel controls
• USB input for thumb drives (up to 32 GB)
• Flexible mounting options
• IR remote control
• External Remote Infrared Receiver
Accessories
Please check and identify the included accessories:
Remote Control ................................................................................................................. x 1
AAA 1.5V Battery .............................................................................................................. x 2
RCA Audio/Video Cable ................................................................................................. x 1
DC Power Cable with 4-pin Power Connector ....................................................... x 1
External Remote IR Receiver ......................................................................................... x 1
Metal Mounting Brackets .............................................................................................. x 2
Black Pan Head Phillips Screw, M3 x 6 mm ............................................................. x 4
Rubber Foot ..........................................................................................................................x 4
Product Registration Card for Online Registration ............................................... x 1
- 7 -
Page 8
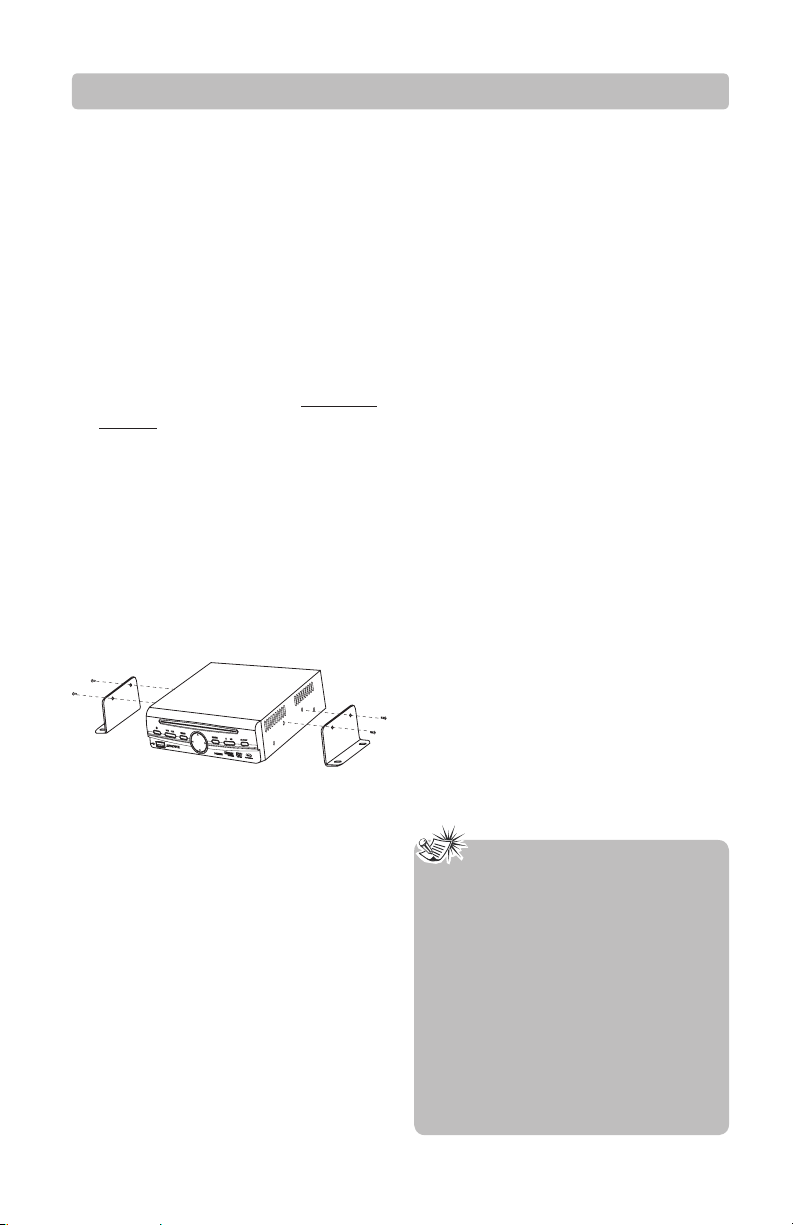
Installation
Before installing the player:
• Choose a mounting location where the
Blu-ray player does not get in the driver’s
way and cannot injure the passenger in
the event of an emergency stop.
• Connect the wiring temporarily. Make
sure the Blu-ray player is connected
correctly and the Blu-ray player and the
system work properly.
Installing the Player
1. Install the Blu-ray player in a horizontal
position with the front end up at a
convenient angle, but not more than 30
degrees.
2. Screws are provided to attach the Blu-
ray player to the (two) L-brackets. Fasten
the unit to the L-brackets by aligning
the screw holes on the L-brackets with
the screw holes on the unit. Refer to the
following gure.
3. Tighten the screws on each side of the
Blu-ray player.
4. Use self-tapping screws (not supplied)
to mount the L-brackets in the vehicle.
Be careful of hidden wiring under the
carpet.
Notes
• To ensure proper installation, use only
the parts included with the Blu-ray
player. The use of unauthorized parts
can cause malfunctions.
• Avoid installing the Blu-ray player
where it would be subject to high
temperatures, such as from direct
sunlight or from hot air from the
vehicle’s heater. Also avoid locations
where the player would be subjected to
dust, dirt or excessive vibration.
- 8 -
Page 9
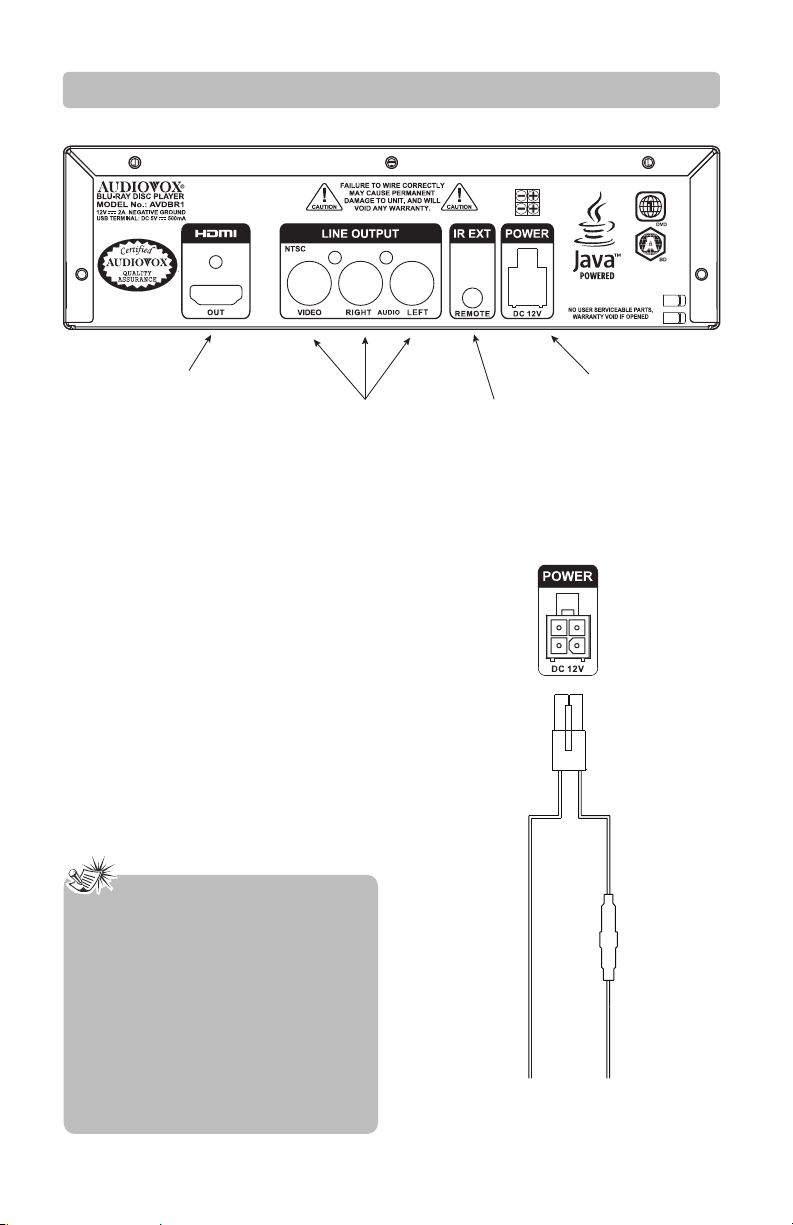
Installation
HDMI C
ONNECTOR
AUDIO & VIDEO
OUPUT RCA JACK
3 PLACES
Rear Panel
Powering Your Blu-ray Player
1. Connect the long black wire (-) to the
vehicle ground.
2. Connect the long red wire (+) to a
switched (Accessory) 12 VDC source.
3. Connect the 4-pin power connector to
the POWER connector on back of the
player.
Notes
• When connecting power and ground
in a mobile video installation ensure
that the ACC wire is fused at the point
where it is connected to the vehicle
ACC wiring. Failure to do so can result
in damage to the vehicle if a short
circuit develops between the vehicle
connection point and the mobile video
product.
IR SENSOR
INPUT JACK
Black (-) to
ground
12 VDC INPUT
4 PIN POWER
CONNECTOR
Fuse
housing
with 5A
fuse
Red (+) to
switched
12 VDC
- 9 -
Page 10
Installation
Monitor
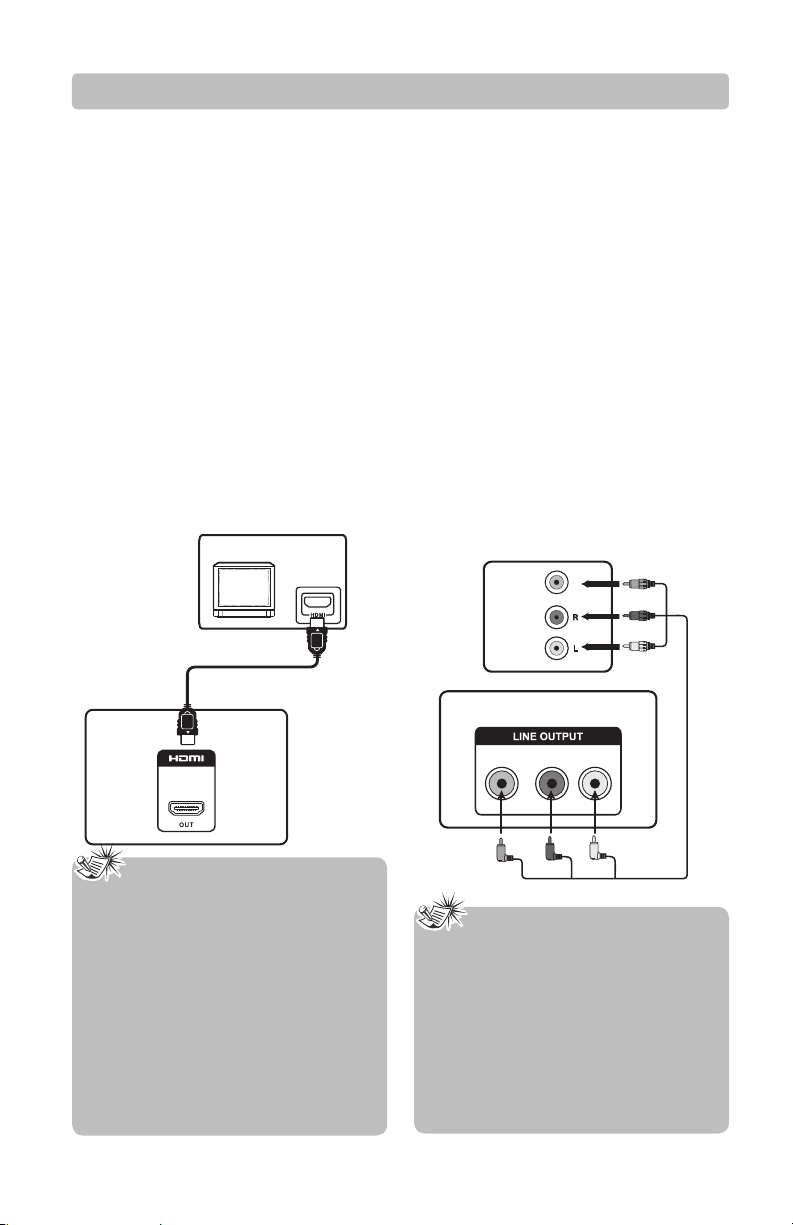
Connecting to Your Monitor
HDMI Jack
Audio and video connections to a monitor
can be done with a HDMI cable (not
supplied) if your monitor has a HDMI input.
1. Turn o the power to the Blu-ray player
and the monitor(s) before making any
connections.
2. Connect the HDMI OUT jack on the
rear of the unit to the HDMI IN jack on
your monitor using a HDMI cable (not
included).
3. Select the resolution of the player’s
HDMI output signals to match your
monitor’s resolution capabilities. See the
instructions on page 35 for details.
LINE OUTPUT Jacks (Audio and Video)
Audio and video connections to a
monitor can be done with RCA-type video
connections.
1. Turn o the power to the Blu-ray player
and the monitor(s) before making any
connections.
2. Connect the LINE OUTPUT jacks on the
rear of the unit to the AUDIO/VIDEO IN
jacks on your monitor using an audio/
video cable (supplied).
Match the color-coded plugs to the
appropriate jacks: Yellow (video) to
Yellow, White (left audio) to White, and
Red (right audio) to Red.
Monitor
HDMI cable
To HDMI
output
Notes
(not supplied
)
Rear of
the unit
• Refer to the owner’s manual of the
connected monitor as well.
• HDMI, the HDMI logo and HighDenition Multimedia Interface are
trademarks or registered trademarks of
HDMI licensing LLC.
• If your monitor is a high denition
monitor with an HDMI input, we highly
recommend you use the player’s HDMI
output to get the highest possible video
resolution.
To HDMI
input
VIDEO IN
AUDIO
IN
Rear of the unit
RIGHT
AUDIO
LEFT
VIDEO
Audio/Video cable (supplied)
Notes
• If one of the devices is not working,
check that all the cables have been
inserted properly into the jacks.
• If your component has only one input
for audio (mono), connect it to the
left (white L/Mono) audio jack on the
monitor and don’t connect the right
audio part of the cable.
- 10 -
Page 11
Installation
Connecting to Your Monitor
(Continued)
Note
• The RCA video connection only
supports 480i video output. If you have
the RCA video connected and the HDMI
connected, the following screen will
appear.
VIDEO OUT [Yellow RCA Jack]
does not support high
denition video. Please
switch the TV/monitor to HDMI
mode to enjoy the high
denition video; Or you may
unplug the connected HDMI
cable to resume 480i output on
RCA VIDEO OUT.
Note
• For best video quality, do not connect
an RCA audio/video cable and HDMI
cable at the same time.
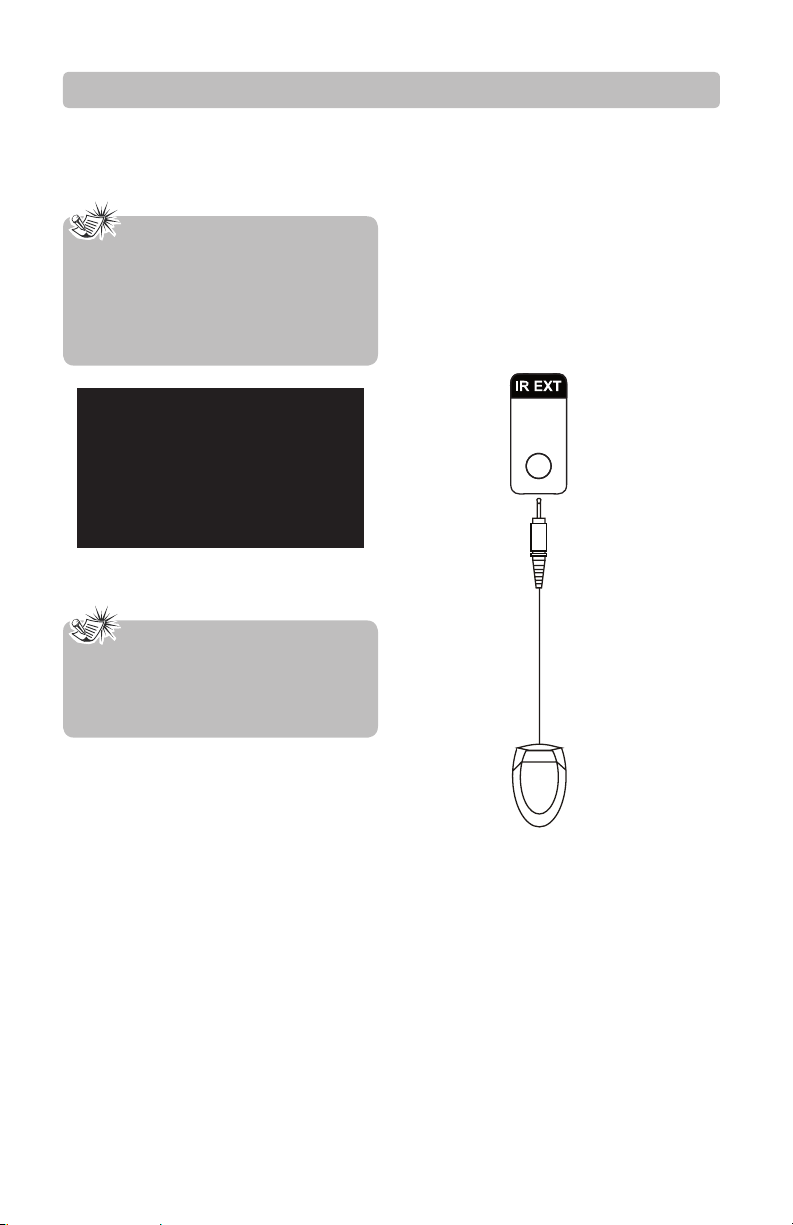
Connecting the External
Remote IR Receiver
1. Plug the 1/8” plug on the External
Remote IR Receiver cable into the IR EXT
jack on the back of the Blu-ray player.
2. Install the REMOTE SENSOR in a location
where the infrared beam will not be
blocked or interrupted.
REMOTE
External
Remote
IR Receiver
- 11 -
Remote
Sensor
Page 12
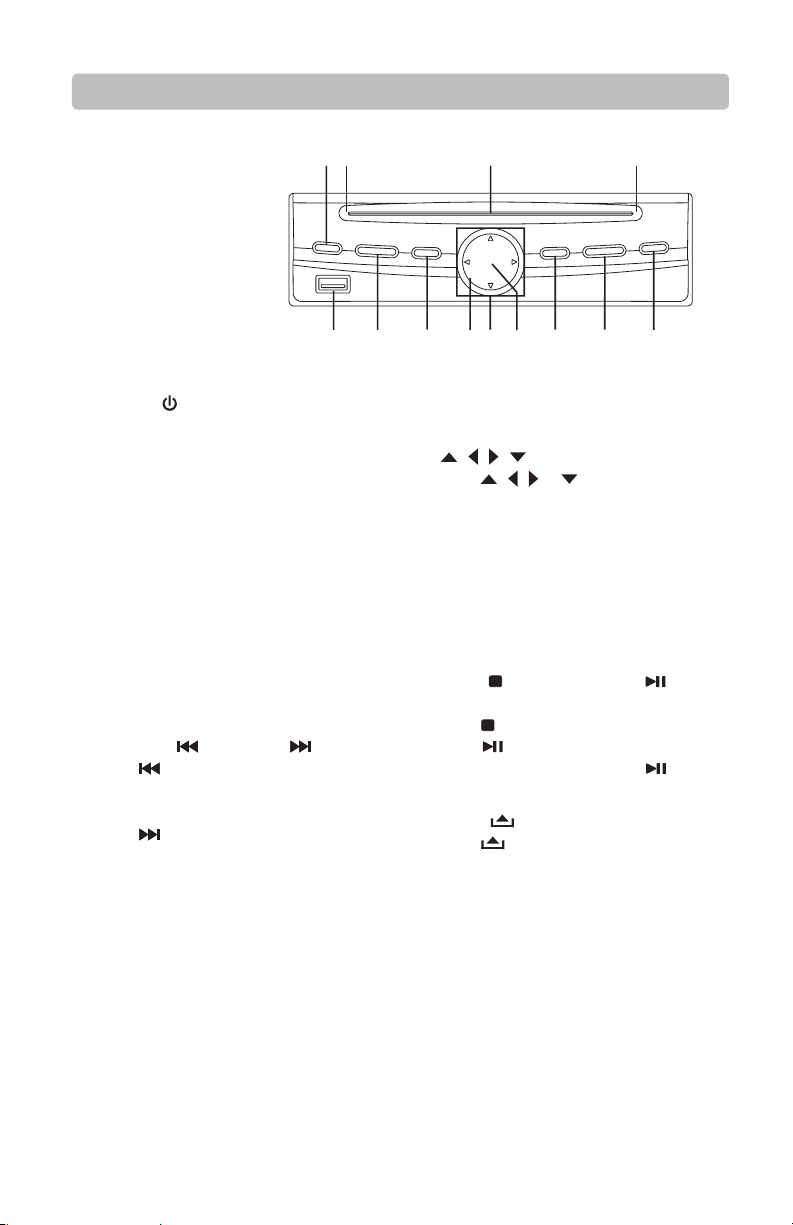
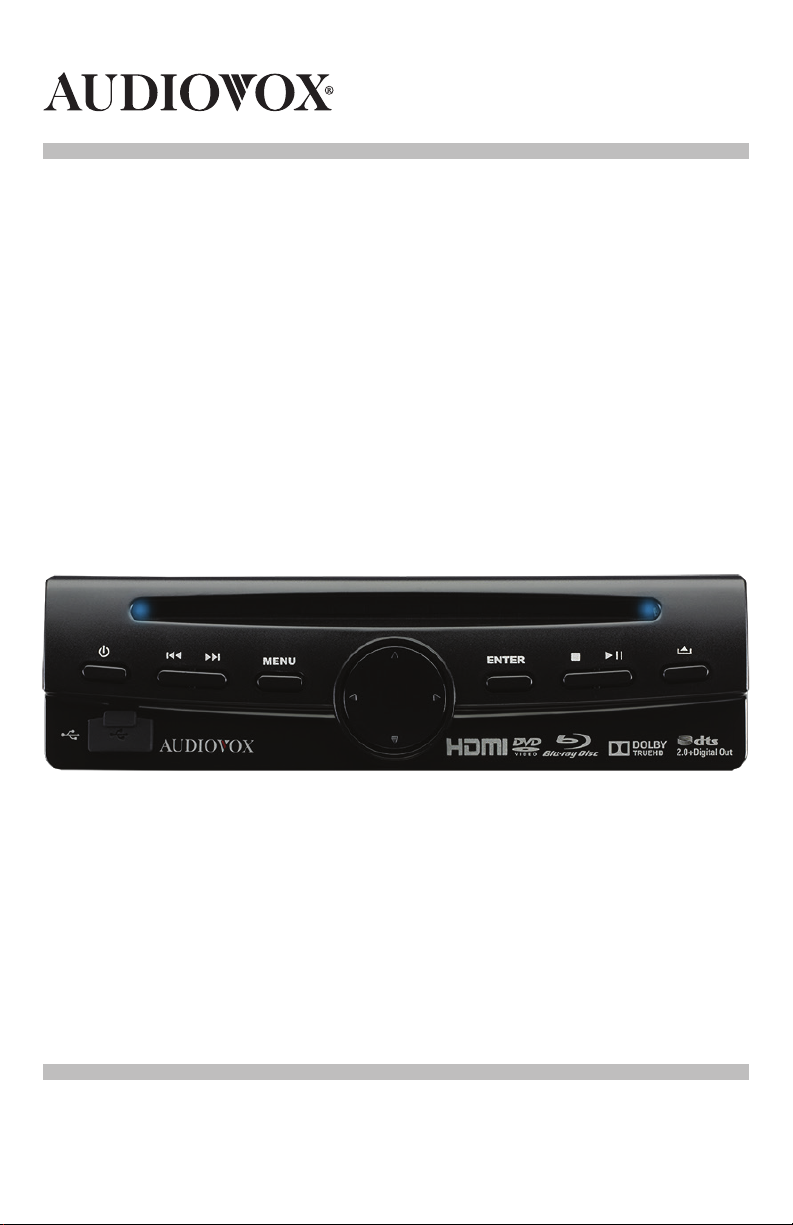
Controls and Indicators
1
23
2
Front Panel
1. Power ( ) Button
Press this button to turn on your player.
Press this button again to turn o your
player. The player will turn o after ve
seconds.
2. Power Indicator
Illuminates blue when the player is on.
3. Disc Slot
Accepts Blu-ray discs, DVDs, CDs, MP3 or
JPEG discs. Insert the disc into the slot
with the label facing up (for a singlesided disc).
4. USB Port
Connect a USB ash drive to this port.
5. Previous (
Press
(Blu-ray Disc/DVD), track (CD) or le
(MP3).
Press
(Blu-ray Disc/DVD), track (CD) of le
(MP3).
6. MENU Button
Press this button to access the disc
menu during playback. Press this button
again to resume playback.
) and Next ( ) Buttons
to go to the previous chapter
to go to the next chapter
54678 9
7. Infrared Remote Sensor
Detects signals from the remote control.
, , , Buttons
8.
Press
, , or to navigate through
a menu.
9. Standby Indicator
Illuminates red when the player is o
(standby mode).
10. ENTER Button
Press this button to conrm your
selection.
11. Stop (
Buttons
Press
Press
When a disc is playing, press
pause playback.
12. Eject (
Press
disc.
) and Play/Pause ( )
to stop playback.
to start or resume playback.
) Button
to stop playback and eject the
10
11
12
to
- 12 -
Page 13
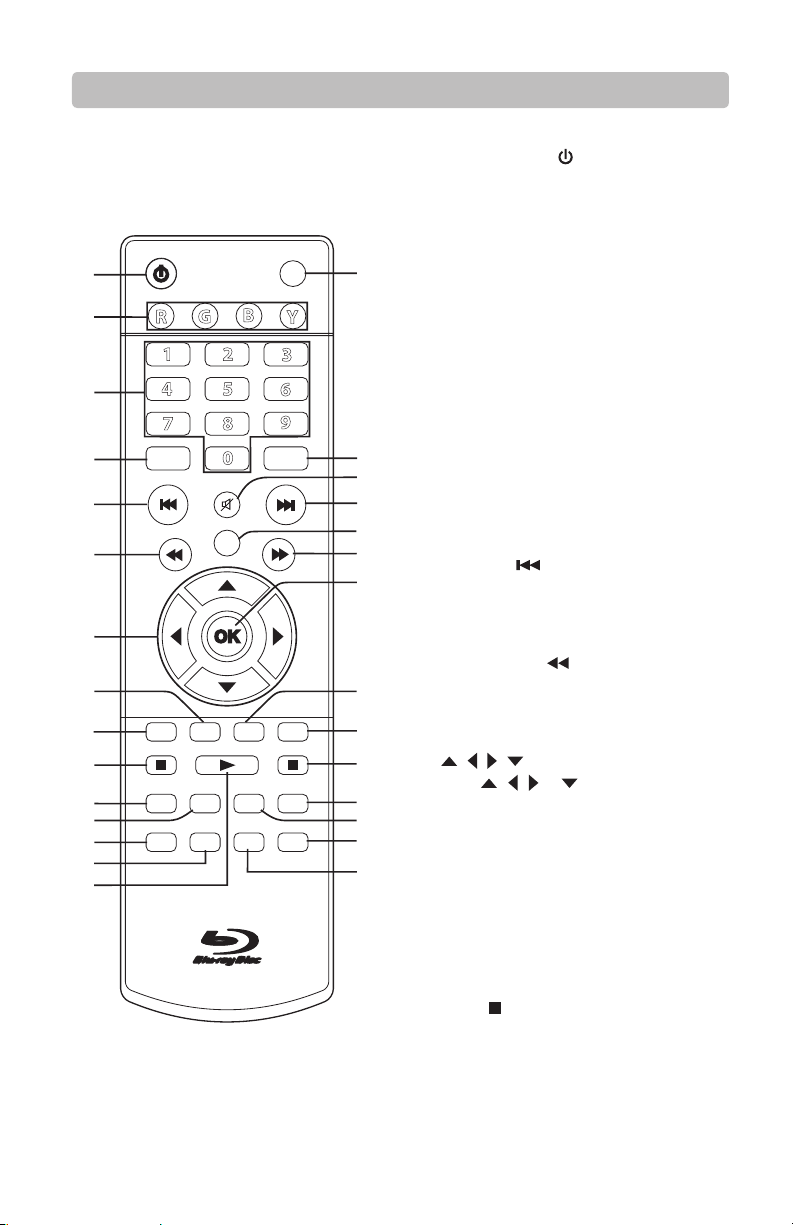
Remote Control Operation
Using the Remote Control
• Point the remote control at the Infrared
Remote Sensor located on the player
or the REMOTE SENSOR located on the
External Remote IR Receiver.
• When there is a strong ambient light
source, the perform ance of the infrared
REMOTE SENSOR may be degraded,
causing unreliable operation.
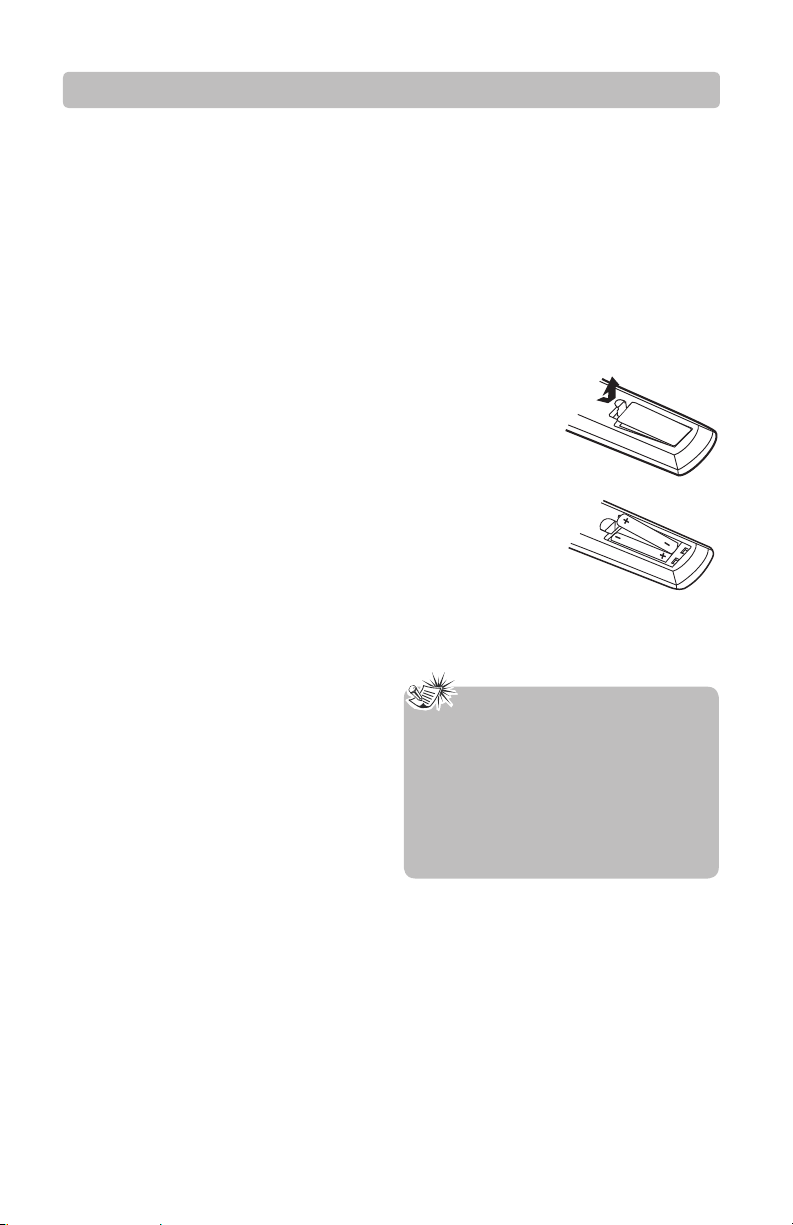
Battery Replacement
When the batteries become weak, the
operating distance of the remote control
is greatly reduced and you will need to
replace them.
Caution: Danger of explosion if batteries
are incorrectly replaced. Replace only
with the same or equivalent type.
To Install Batteries:
1. Open the battery
door.
2. Insert two AAA
batteries.
Make sure that
the proper
polarity (+ or -) is
observed.
3. Close the door.
Notes
• If you are not using the remote control
for a long period of time, remove the
batteries.
• Do not mix dierent types of batteries
or new and old batteries.
• Do not use rechargeable batteries.
- 13 -
Page 14
Remote Control Operation
Remote Control
EJECTSTANDBY/ON
1
2
3
4
R
1
2
5
4
7
8
CLEAR GOTO
0
MUTE
Y
3
6
9
B
G
5
POP UP
6
7
8
SETUP
PIP
BD/USB
EXIT
9
STEP
AUDIOINFOANGLE ZOOM
REPEAT
A - B MENU
SUBTITLE
1. STANDBY/ON ( ) Button
Press this button to turn on your player.
Press this button again to turn o your
player (standby mode). The player will
turn o after ve seconds.
16
2. R (red), G (green), B (blue), Y (yellow)
Buttons
When playing a Blu-ray Disc that has a
Java application, press R, G, B or Y to
control playback. For more information,
see the documentation that came with
the Blu-ray Disc.
3. Number Buttons
17
18
19
20
21
22
23
24
25
26
27
28
29
Press the number buttons to input a
number or select a track, a chapter, etc.
4. CLEAR Button
Press this button to clear an input.
5. Previous(
Press this button to go to the previous
chapter (Blu-ray Disc/DVD), track (CD) or
le (MP3).
6. Fast Reverse (
Press this button repeatedly for fast
reverse playback. The available speeds
are 2X, 4X, 8X, 16X, and 32X.
, , , Buttons
7.
Press
a menu.
8. BD/USB Button
Press this button to select BD (Blu-ray
Disc) or USB mode. You must stop BD or
USB playback prior to switching modes.
9. EXIT Button
Press this button to return to the
previous menu.
10. Stop (
Press this button to stop playback.
11. AUDIO Button
Press this button repeatedly to select the
audio languages available on the disc.
) Button
) Button
, , or to navigate through
) Button
- 14 -
Page 15

Remote Control Operation
12. INFO Button
Press this button to access the
Information Menu.
13. REPEAT Button
Press this button to repeat a chapter or
title of a BD/DVD. This function may not
be available on some Blu-ray discs.
Press this button to repeat a single track
or all tracks of a CD.
14. A-B Button
Performs point-to-point repeat playback
on a BD/DVD. Press to repeat a specic
section of a disc. Press this button to
mark down the starting point (A) and
press it again to mark down the ending
point (B). The unit will play back this
section over and over again. Press this
button a third time to cancel A-B repeat
and resume normal playback.
This function may not be available on
some Blu-ray discs.
15. Play (
Press this button to start or resume
playback.
16. Eject Button
Press this button to stop playback and
eject the disc.
17. GOTO Button
Press this button to search for a title,
chapter or track.
18. MUTE Button
Press this button to mute / unmute the
audio.
19. Next (
Press this button to go to the next
chapter (BD/DVD), track (CD) or le
(MP3).
20. POP UP Button
During Blu-ray Disc playback, press this
button to open a pop-up menu that lets
you control Blu-ray Disc playback.
During DVD playback, press this
button to open the DVD title menu (if
available).
) Button
) Button
21. Fast Forward (
Press this button repeatedly for fast
forward playback. The available speeds
are 2X, 4X, 8X, 16X, and 32X.
22. OK Button
Press this button to conrm your
selection.
23. PiP Button
Press this button to turn PiP (picture in
picture) mode on or o. This function is
only available to Blu-ray discs if available
on disc.
24. SETUP Button
Press this button to enter the Home
(Setup) Menu.
25. STEP (
Press this button to pause playback.
Press this button again to advance to
the next frame.
26. ZOOM Button
Press this button to zoom in to a scene.
The ZOOM button toggles through
x2, x3, x4 and then zooms out to x1/2,
x1/3 and x1/4, then returns to normal
playback.
When you are zoomed in, you can use
the direction buttons to move (pan) the
zooming center.
27. ANGLE Button
Press this button to access the camera
angle function for multi-angle BD/DVD
discs, if available on disc.
28. SUBTITLE Button
Press this button to select one of the
subtitle languages programmed on a
BD/DVD.
29. MENU Button
Press this button to access the disc
menu during playback. Press the button
again to resume playback.
) Button
) Button
- 15 -
Page 16

Playing a Blu-ray Disc or DVD
Basic Playback (Blu-ray Disc or
DVD)
To Play a BD/DVD:
1. Turn on your monitor.
2. Press the STANDBY/ON (
the remote control or the
POWER (
player’s front panel. The blue LEDs on
both sides of the disc slot illuminate.
3. Insert a disc label-side up into the disc
slot. The disc will load automatically.
The disc will begin to play if Disc Auto
Play is on. See page 38. If the disc
menu appears, select the Play option and
press the OK button to begin playback.
4. To eject the disc, press the
the front panel or the EJECT button on
the remote control.
) button located on the
Playback
• To start playback, press the button.
Pause
• To pause playback, press the button
on the front panel or the STEP (
button on the remote control.
• To resume normal playback, press
button.
the
Frame Advance
• Press the STEP ( ) button on the remote
control twice. The step forward (
symbol is displayed.
• Each time you press the STEP (
the video advances by one frame.
• Press the
playback.
button to resume normal
) button on
button on
)
)
) button,
Stop
• Press the button to stop playback.
• The player stores the point where
playback was interrupted.
For some BD playback - If you press
button, you will be asked to
the
resume playback. Select “Yes” to resume
or “No” to return to the disc menu.
For some BD playback - If you press
the
button, playback resumes from the
point it was interrupted.
For some BD playback - If you press
the
button, it will start play again from
the beginning.
DVD playback - If you press the
playback resumes from the point it was
interrupted.
• To stop playback completely or to start
again from the beginning, press the
button twice.
button,
Note
• When you leave the player in stop
mode for more than 5 minutes, the
screen saver is activated if you set the
Screen Saver to On. See page 38.
At the end of 25 minutes without any
user interaction, the player switches o
automatically.
Accelerated Play
• To fast-forward, press the button.
• To fast-reverse, press the
• Each time you press one of these buttons,
the fast-forward or fast-reverse speed
increases from 2X, 4X, 8X, 16X to 32X.
• Press the
playback.
button to resume normal
button.
- 16 -
Page 17

Playing a Blu-ray Disc or DVD
Changing the Chapter/Title
• Press the Previous ( ) button to skip to
the start of the current chapter or skip to
previous chapters.
• Press the Next (
beginning of the next chapter.
) button to skip to the
Zoom
• While a disc is playing, press the ZOOM
button until you reach the zoom size you
want. The ZOOM button toggles through
x2, x3, x4 and then zooms out to x1/2,
x1/3 and x1/4, then returns to normal
playback.
• To move from one area to another (pan),
use the
, , or buttons.
Notes
• The ZOOM feature may not be available
on some discs.
” will be displayed if the function
• “
you select is not available.
as type of disc, title number, chapter
number, audio format, elapsed time of
the current title, and subtitle language.
• Press the INFO button again to exit.
Notes
• The information displayed for discs
other than Blu-ray Discs will be dierent.
” will be displayed if the function
• “
you select is not available.
Displaying Disc Information
• Press the INFO button. Your player
displays information about the disc, such
- 17 -
Page 18

Playing a Blu-ray Disc or DVD
Special Functions
Repeating a Title or Chapter
• Press the REPEAT button one or more
times to select a repeat mode. This
function may not be available on some
Blu-ray discs.
Options: Repeat Chapter (CH), Repeat
Title (TT ), Repeat All, Repeat O.
Using Picture-in-Picture (PIP) Mode
Some Blu-ray Discs are compatible with
picture-in-picture (PiP) mode. In PiP mode,
the primary video is displayed on the full
screen, and the secondary video is displayed
in a small window.
Primary video
Secondary video
• Press the PiP button to turn PiP mode on
or o.
Note
• Some discs allow you to turn PiP on/o
only via the disc menu.
” will be displayed if the function
• “
you select is not available.
Using a Disc Popup Menu
1. During Blu-ray or DVD playback, press
the POP UP button. The Blu-ray popup
menu or the title menu of DVD disc
opens.
2. Press the
an option, then press the OK button.
3. Press the POP UP button again to exit
the popup menu.
, , or buttons to select
Selecting the Audio Mode
1. Press the AUDIO button. Your player
displays the disc’s audio channel
information, such as 1/3 English Dolby
Digital 2 CH.
2. Press the AUDIO button repeatedly to
select the desired audio language.
Selecting Subtitles
You can select a subtitle language from
those included on the BDs or DVDs.
Press the SUBTITLE button on the remote
control repeatedly to select your desired
language.
Selecting the Camera Angle (Blu-ray
Disc and DVD)
Some discs oer dierent camera angles for
specic scenes. To change the camera angle:
1. While you are playing a disc with
dierent angles recorded, press the
ANGLE button to view the number of
current angles available.
2. Press the ANGLE button repeatedly to
change the scene to the next angle in
those recorded.
• This function can only be used for discs
on which scenes shot from multiple
angles have been recorded.
• If only one angle is recorded, “
displayed.
” is
- 18 -
Page 19

Playing a Blu-ray Disc or DVD
Locating a Desired Section
Locating a specic time in a DVD or
Blu-ray Disc
1. Press the GOTO button.
2. Press the
(title) or CH (chapter), then press the OK
button. The hour is highlighted in blue.
or button to select TT
Locating a specic title in a DVD or
Blu-ray Disc
1. Press the GOTO button.
2. Press the
cursor to the title (TT), then press the OK
button. The title is highlighted in blue.
or button to move the
3. Press the or buttons to move the
cursor to the hour, minute or second.
• The first two numbers represent hours.
• The second two numbers represent
minutes.
• The third two numbers represent
seconds.
4. Press the
corresponding number buttons (1-9) for
the time you want, then press the OK
button to confirm. Playback starts from
the selected time.
Locating a specic chapter in a DVD or
Blu-ray Disc
1. Press the GOTO button.
2. Press the
the cursor to the chapter (CH), then
press the OK button. The chapter is
highlighted in blue.
3. Press the or button or the
corresponding number buttons (1-9) for
the chapter you want, then press the OK
button to confirm. Playback starts from
the selected chapter.
or buttons or the
or button to move
3. Press the or button or the
corresponding number buttons (1-9)
for the title you want, then press the OK
button to confirm. Playback starts from
the selected title.
- 19 -
Page 20

Playing an Audio CD
Basic Playback (Audio CD)
To Play an Audio CD:
1. Press the STANDBY/ON ( ) button on
the remote control or the
POWER (
player’s front panel. The blue LEDs on
both sides of the disc slot illuminate.
2. Insert a disc label-side up into the disc
slot. The disc will load automatically.
The disc will begin to play if Disc Auto
Play is on. See page 38.
3. To eject the CD, press the
the front panel or the EJECT button on
the remote control.
Playback:
• To start playback, press the button.
Pause
• To pause playback, press the button
on the front panel or the STEP (
button on the remote control. The sound
is muted when your unit is in pause
mode. To resume normal playback, press
the
• To stop playback completely, press the
button. To start playback again, press
the
) button located on the
button on
)
button.
button.
Accelerated Play
• To fast-forward, press the button.
• To fast-reverse, press the
• Each time you press one of these buttons,
the fast-forward or fast-reverse speed
increases from 2X, 4X, 8X, 16X to 32X.
• To resume normal playback, press
button.
the
button.
Changing the Track
• Press the button to skip to the start
of the current track or skip to previous
tracks.
• Press the
beginning of the next track.
button to skip to the
Repeating a CD Track
• Press the REPEAT button one or more
times to select a repeat mode.
Options: Repeat One, Repeat All, Repeat
O.
- 20 -
Page 21

Playing Music Files
This unit can play music (MP3) les that have
been recorded on a USB ash drive or disc.
To Play Music (MP3) Files from a USB
Flash Drive:
1. Insert a USB drive containing MP3 les
into the USB port.
2. If a BD, DVD or CD is playing, stop
playback of the disc. The Home screen
appears.
3. Press the or button to select Music.
4. Press the OK or
Center screen appears.
5. Press the or button to select USB1,
then press the OK button.
6. Press the
(or a folder), then press the OK button.
to start playback.
7. Press the EXIT button to stop playback.
Press the EXIT button again to return to
the Home screen.
8. Remove the USB ash drive when you
are nished.
button. The Media
or button to select a le
Notes
• The player does not support USB hard
disc mass storage devices, multi-card
readers, and other USB computer
peripherals.
• Do not disconnect the USB ash drive
when you are playing les, it may
corrupt the data.
• If you cannot easily insert the USB
ash drive, you may have inserted it
incorrectly. Try to turn over the USB
device and insert it again.
- 21 -
Page 22

Playing Music Files
To Play Music (MP3) Files from a Disc:
1. Insert a CD label-side up into the disc
slot. The Home screen appears.
2. Press the or button to select Music.
3. Press the OK or
Center screen appears.
button. The Media
4. Press the or button to select Data
Disc, then press the OK button.
5. Press the
(or a folder), then press the OK button.
to start playback.
6. Press the EXIT button to stop playback.
Press the EXIT button again to return to
the Home screen.
or button to select a le
- 22 -
Page 23

Playing Picture Files
Basic Playback (Picture Files)
This unit can play picture les stored on Bluray Disc (BD), USB ash drives, CD-R/CD-RW,
DVD+R/-R or DVD+RW/-RW discs.
To Play Picture (JPEG) Files from a USB
Flash Drive:
1. Insert the USB drive containing JPEG
les.
2. If a BD, DVD or CD is playing, stop
playback of the disc. The Home screen
appears.
3. Press the or button to select Photo.
4. Press the OK or
Center screen appears.
5. Press the or button to highlight
USB1, then press the OK button.
6. Press the
folder and press the OK button.
button. The Media
button to select the Photo
7. Press the or button to select a
le (or a folder) and press the OK or
button to start playback.
If you selected a folder, the les in this
folder are displayed. Press the
button to select a le and press the OK
or
button to start playback.
8. Press the EXIT button to stop playback
and return to the Media Center Menu.
Press the EXIT button again to return to
the Home screen.
9. Remove the USB drive when you are
nished.
Notes
• You can press the corresponding
number buttons (0-9) to select the
photo you want.
• The player does not support USB hard
disc mass storage devices, multi-card
readers, and other USB computer
peripherals.
• Do not disconnect the USB ash drive
when you are playing les, it may
corrupt the data.
• If you cannot easily insert the USB
ash drive, you may have inserted it
incorrectly. Try to turn over the USB
device and insert it again.
or
- 23 -
Page 24

Playing Picture Files
To Play Picture (JPEG) Files from a Disc:
1. Insert a CD label-side up into the disc
slot. The Home screen appears.
2. Press the or button to select Photo.
3. Press the OK or
Center screen appears.
4. Press the or button to select Data
Disc, then press the OK button.
5. Press the
le (or a folder) and press the OK or
button to start playback.
If you selected a folder, the les in this
folder are displayed. Press the
button to select a le and press the OK
or
button to start playback.
6. Press the EXIT button to stop playback
and return to the Media Center Menu.
Press the EXIT button again to return to
the Home screen.
button. The Media
or button to select a
or
Viewing Files
Play / Pause:
• Press the STEP (
playback. Press the
playback.
Skip to the Previous/Next Picture:
• Press the Previous (
the previous picture during playback.
• Press the Next (
next picture during playback.
Picture Rotation:
• During playback, press the
to rotate a picture on the monitor screen.
Press the
Zoom:
• Press the ZOOM button until you reach
the zoom size you want. The ZOOM
button toggles through x2, x3, x4 and
then zooms out to x1/2, x1/3 and x1/4,
then returns to normal playback.
• When the picture is zoomed in, move
from one area to another (pan) using the
, , or buttons.
Slide Show Speed
• Press the
decrease the slide show speed.
Options: Slow, Middle (medium), and Fast.
) button to pause
button to resume
) button to skip to
) button to skip to the
or button
or button to ip a picture.
or button to increase or
- 24 -
Page 25

Playing Video Files
This unit can play video (AVI) les that have
been recorded on a a USB ash drive or disc.
To Play Video (AVI) Files from a USB
Flash Drive:
1. Insert a USB drive containing AVI les
into the USB port.
2. If a BD, DVD or CD is playing, stop
playback of the disc. The Home screen
appears.
3. Press the or button to select Video.
4. Press the
screen appears.
5. Press the or button to select USB1,
then press the OK button.
6. Press the
(or a folder), then press the OK button.
to start playback.
7. Press the EXIT button to stop playback
and return to the Media Center Menu.
Press the EXIT button again to return to
the Home screen.
8. Remove the USB drive when you are
nished.
button. The Media Center
or button to select a le
Notes
• The player does not support USB hard
disc mass storage devices, multi-card
readers, and other USB computer
peripherals.
• Do not disconnect the USB ash drive
when you are playing les, it may
corrupt the data.
• If you cannot easily insert the USB
ash drive, you may have inserted it
incorrectly. Try to turn over the USB
device and insert it again.
- 25 -
Page 26

Playing Video Files
To Play Video (AVI) Files from a Disc:
1. Insert a CD (with AVI les) label-side
up into the disc slot. The Home screen
appears.
2. Press the or button to select Video.
3. Press the
screen appears.
button. The Media Center
4. Press the or button to select Data
Disc, then press the OK button.
5. Press the
(or a folder), then press the OK button.
to start playback.
6. Press the EXIT button to stop playback
and return to the Media Center Menu.
Press the EXIT button again to return to
the Home screen.
or button to select a le
- 26 -
Page 27

Initial Setup
When you connect your Blu-Ray player to a
monitor and turn the player on for the rst
time, the Initial Set Up Wizard appears.
The Initial Set Up Wizard will also appear if
you reload the factory default settings. See
page 38.
Initial Set Up Wizard
Follow the on-screen instructions to
customize the following settings to your
preference:
1. Turn on your monitor and Blu-ray player.
The AVDBR1 Player Set Up Wizard
appears.
2. Press the OK button. The Language
Settings screen appears.
3. Press the or button to select the
on-screen language.
Options: English, French or Spanish.
4. Press the OK button. The Resolution
Settings screen appears.
Press the
resolution.
Options: Auto, 480i, 480p, 720p, 1080i
or 1080p.
5. Press the OK button. The Aspect Ratio
screen appears.
6. Press the or button to select the
aspect ratio
Options: 16:9 Full, 16:9 Normal,
4:3 Pan & Scan or 4:3 Letterbox.
7. Press the OK button. The Setup Wizard is
nished screen appears.
or button to select the
- 27 -
Page 28

Initial Setup
8. Press the OK button to exit the wizard.
The Home screen appears.
9.
Note
10.
• When the player is turned on for the
rst time or after resetting it to the
factory default, the ADVBR1 Player Set
Up Wizard will pop up. Please follow
above steps to nish the setup.
- 28 -
Page 29

The Settings Menu
The Settings Menu allows you to personalize
the player’s settings to your preference.
Once the initial settings are set, they are
retained in the player’s memory until
modied.
Settings Menu
1. Press the SETUP button. The Settings
Menu appears.
2. Press the button enter the sub-menus.
3. When nished with your menu
selections, press the SETUP button to
exit.
- 29 -
Page 30

The Settings Menu
Language Sub-Menu
1. In the Settings menu, press the or
button to select Language.
2. Press the button, then press the or
button to select a setting.
3. Press the OK button to view the options
list. Press the
the desired option.
4. Press the OK button to conrm your
selection.
5. Press the
Settings Menu.
or buttons to select
button to return to the
Settings
OSD
This setting allows you to select the
preferred on-screen display language.
Options: English, French or Spanish.
Menu
This setting allows you to select the
preferred disc menu language.
Options: English, French, Chinese, Spanish
or More.
Audio
This setting allows you to select the
preferred audio language.
Options: English, French, Chinese, Spanish
or More.
Subtitle
This setting allows you to select the
preferred subtitle language.
Options: English, French, Chinese, Spanish,
More or O.
Notes
• If the selected language is not available
on a disc, the disc’s language will be
used instead.
• If the language chosen is available, it
is automatically selected when you
display the subtitles or press SUBTITLE
button on the remote control.
Otherwise, the subtitle language
indicated on the disc is selected.
- 30 -
Page 31

The Settings Menu
Security Sub-Menu
1. In the Settings menu, press the or
button to select Security.
2. Press the button and press the or
button to select Change Password or
Parental Control, and then press the OK
button.
3. Follow the prompts as described below.
Settings
Change Password
A new password can be set to replace the
default password. The default password is
3308.
1. Select Change Password as described
above.
2. Enter the current password (a 4-digit
number).
3. Enter a new 4-digit password in the
“New password” row. The password is
set.
4. Enter the new 4-digit password again
in the “Conrm password” row. The
password is set.
Notes
• You may reset the password if you
forgot the old password by using the
default password: 3308.
• The default password is 3308. This
password is always active even after
you have selected your own password
and changed it. To avoid the possibility
of others using the default password
to change the password or set the
parental code, record the default
password in another area and delete it
from this manual.
- 31 -
Page 32

The Settings Menu
Parental Control
This player has a built-in parental control
lock feature to prevent unauthorized
persons from viewing restricted disc
content. Parental controls allow you to limit
the content of movie playback from Kid Safe
to Adult. By default, the parental lock is o.
Once set up, the parental lock is released
only by entering the correct password or by
following the instructions provided by the
disc.
1. Select Parental Control as described
above.
2. Enter the current password (a 4-digit
number).
3. Press the
rating level you want to block, and then
press the OK button. The selected rating
and all higher ratings will be blocked.
You can select the following:
O
KID SAFE Suitable for all children.
G General audiences.
PG Parental guidance suggested.
PG-13 Not suitable for anyone under 13.
PG-R Parental guidance recommended.
R Not suitable for anyone under 17
NC-17 Not suitable for anyone under 17.
ADULT All Blu-ray™ Discs and DVDs can
4. Press the OK button to set the parental
level.
or button to select the
unless supervised by a parent or
adult guardian.
be played.
Information Sub-Menu
1. In the Settings Menu, press the or
button to select Information.
The player’s software version
information is displayed.
2. Press the
Settings Menu.
button to return to the
Note
• The parental lock feature may not be
available on some discs.
- 32 -
Page 33

The Settings Menu
Playback Sub-Menu
1. In the Settings Menu, press the or
button to select Playback.
2. Press the button, then press the or
button to select a setting.
3. Press the OK button to view the options
list. Press the
the desired option.
4. Press the OK button to conrm your
selection.
5. Press the
Settings Menu.
Settings
Angle Mark
This setting is available when a Blu-ray
Disc/DVD is encoded with multiple camera
angles.
Options: On or O.
PIP Mark
The Picture-in-Picture (PIP) mode displays
two pictures on the monitor at the same
time. The primary video is displayed on
the full screen, and the secondary video is
displayed in a small window. The PIP Mark
is displayed when PIP mode is On and PIP
Mark is set to On.
Options: On or O.
or buttons to select
button to return to the
Secondary Audio
This setting is available if your Blu-ray disc
supports secondary audio.
Options: On or O.
Last Memory
During playback or in a paused status, the
Last Memory function will memorize the last
playback time each time you eject the disc.
The next time you insert the same disc, the
unit will play from the memorized point.
Options: On or O.
Note
• This function may not be avaialble on
some Blu-ray Discs.
- 33 -
Page 34

The Settings Menu
Display Sub-Menu
1. In the Settings Menu, press the or
button to select Display.
2. Press the button, then press the or
button to select a setting.
3. Press the OK button to view the option
list. Press the
the desired option.
4. Press the OK button to conrm your
selection.
5. Press the
Settings Menu.
Settings
Closed Captions
This setting is available when a disc is
encoded with closed captions. When On,
closed captions closed captions will be
shown on the screen.
Options: On or O.
TV Screen
Depending on the type of monitor you
have, you may want to adjust the screen
size setting. The options available are: 16:9
Full, 16:9 Normal, 4:3 Pan and Scan, and 4:3
Letterbox.
16 : 9 Full:
High-denition 16:9 formatted video will
be displayed correctly on a wide-screen TV
(most modern TVs).
or buttons to select
button to return to the
16 : 9 Normal:
The video will be “squeezed” between two
vertical columns on the TV screen. This will
cause standard denition 4:3 video to be
displayed correctly on an wide-screen TV,
but will distort 16:9 video.
4 : 3 Pan & Scan:
When high-denition 16:9 video is played,
this mode clips the right and left sides of
the video so that it can be viewed with the
correct aspect ratio on an older analog TV
that has 4:3 aspect ratio. This setting will
distort video played on a wide-screen TV.
Some wide-screen DVDs that do not permit
Pan Scan mode playback are automatically
played in letterbox mode (black bands that
appear at the top and bottom of the screen).
4 : 3 Letterbox:
When high-denition 16:9 video is played in
this mode on an analog 4:3 aspect-ratio TV,
black bands appear at the top and bottom
of the screen.
This will cause high-denition 16:9 video to
be displayed correctly on a 4:3 screen but
will distort standard-denition 4:3 video
displayed on a 4:3 screen, and will distort
video played on a wide screen TV.
Notes
• The displayable picture size is preset
on the DVD. Therefore the playback
picture of some DVDs may not conform
to the picture size selected.
• If your TV is 16:9 wide-screen (most
modern TVs are) , then choose either
“16:9 Full” or “16:9 Pillarbox”. If your TV
is 4:3 (an older analog TV), then choose
“4:3 Pan and Scan” or “4:3 Letterbox”.
- 34 -
Page 35

The Settings Menu
Display Sub-Menu (Continued)
Resolution
You can dene the video output resolution
in this option. The options available are:
Auto, 480i, 480p, 720p, 1080i, and 1080p.
The number indicates the number of
lines of video per frame. The i and p
indicate interlaced and progressive scan,
respectively. The more lines, the higher the
quality.
Note
• This setting can only be selected if the
HDMI output is used.
Auto:
Select if your TV is a high-denition TV
(HDTV), is connected to the HDMI jack on
your player, and you want your player to set
the output resolution based on information
exchanged between the TV and your player
over the HDMI cable.
480i:
Select if your TV is a standard-denition
NTSC (analog) TV.
480p:
Select if your TV is an enhanced-denition
TV (EDTV).
720p:
Select if your TV is a high-denition TV
(HDTV) capable of 720p only.
1080i:
Select if your TV is a high-denition TV
(HDTV) capable of 1080i only.
1080p:
Select if your TV is a high-denition TV
(HDTV) capable of 1080p (any frame rate)
connected to the HDMI jack on your player.
Notes
• Selecting a resolution your TV does
not support could result in an unstable
picture or loss of the picture. See the
documentation that came with the TV
to nd the resolutions the TV supports.
• Only the HDMI output on your player
supports 1080p video output at any
frame rate.
- 35 -
Page 36

The Settings Menu
Display Sub-Menu (Continued)
Color Space
This setting allows you to set the color
space format for HDMI output to match the
capabilities of the connected monitor.
RGB:
If your monitor supports the RGB color
space via HDMI, select this to output the
normal RGB color gamut.
YCbCr:
If your monitor supports the YCbCr color
space via HDMI, select this to output the
YCbCr color gamut.
YCbCr422:
If your monitor supports the YCbCr422 color
space via HDMI, select this to output the
YCbCr422 color gamut.
Full RGB:
If your monitor supports the Full RGB color
space via HDMI, select this to output the
Fulll RGB color gamut.
HDMI Deep Color
Deep Color provides more accurate color
reproduction with greater color depth. This
setting is available only when the player is
connected to a monitor that supports Deep
Color via HDMI.
Options: On or O.
HDMI 1080 24p
Movies are recorded on lm at a rate of 24
pictures (frames) per second. Many of the
movies are recorded to Blu-ray Discs at this
frame rate. However, not all TVs can display
24 progressive frames/second of video. If
the TV cannot display this frame rate, you
need to turn o HDMI 1080P 24Hz.
Options: On or O.
Video Adjust
Press the OK button to access the
brightness, contrast, hue, and saturation
slider bars. Press the
select a slider bar, then press the
button to adjust the slider bar. Press the
EXIT button to conrm your entry and exit.
Sharpness
Adjusts the edge enhancement of the
picture.
Options: Low, Middle or High.
or button to
or
- 36 -
Page 37

The Settings Menu
Audio Sub-Menu
1. In the Settings Menu, press the or
button to select Audio.
2. Press the button, then press the or
button to select a setting.
3. Press the OK button to view the options
list. Press the
the desired option.
4. Press the OK button to conrm your
selection.
5. Press the
Settings Menu.
Settings
HDMI
This setting allows you to set the digital
output of the player to match the
capabilities of the AV receiver connected to
the player via HDMI.
Bitstream:
The disc’s raw (native) audio format will be
output via HDMI.
PCM:
Select when the player is connected to a
multi-channel digital stereo amplier via
HDMI.
O:
Audio output via HDMI is disabled.
or buttons to select
button to return to the
Dolby DRC
Dolby DRC allows you to make the loud
parts of a movie’s audio track quieter than
they would be in the theatre, without
making the dialog of the actors any quieter.
O:
Movie soundtracks are played with the
standard dynamic range.
On:
Select when movie soundtracks are played
at low volume or from smaller speakers. Your
player applies appropriate compression to
make low-level content more intelligible
and prevent dramatic passages from getting
too loud.
Auto:
This setting turns on the Dynamic
Range Control for all Blu-ray Disc movie
soundtracks except Dolby TruHD.
- 37 -
Page 38

The Settings Menu
System Sub-Menu
1. In the Settings Menu, press the or
button to select System.
2. Press the button, then press the or
button to select a setting.
3. Press the OK button to view the options
list. Press the
the desired option.
4. Press the OK button to conrm your
selection.
5. Press the
Settings Menu.
Settings
Screen Saver
This Blu-ray disc player has a screen saver
feature when your player is inactive. You can
set it to On or O to turn on/o the screen
saver.
Options: On or O.
When you leave the unit in stop mode for
more than 5 minutes, the screen saver of
the unit automatically appears if you set the
Screen Saver to On mode.
Disc Auto Play
By factory default, a disc will load
automaticallly and begin to play when it
is inserted into the disc slot if you set Disc
Auto Play to on.
Options: On or O.
or buttons to select
button to return to the
CEC
Consumer Electronics Control (CEC) is an
HDMI feature that allows you to command
and control up to 10 CEC-enabled devices
that are connected through HDMI by using
only one of their remote controls.
Options: On or O.
Load Default
If you choose OK in the prompt message
box and press the OK button, all settings will
be restored to the factory defaults.
Upgrade
This setting allows you to update your
player via a disc or USB device. Visit the
Audiovox Web site (www.voxxelectronics.
com) for information on available upgrades.
External Memory
Displays the free memory space of external
USB devices connected to the player’s USB
Port.
Note
• When an external USB device greater
than 1 GB is connected to the player’s
USB port, a folder named BUDA is
created on the USB device. The BUDA
folder is used to store BD-Live les.
• BD-Live requires Internet connectivity.
Internet connectivity is not currently
supported by the player.
- 38 -
Page 39

Reference
To get the optimum use out of your Blu-ray player, please read this section completely.
Blu-Ray Region Codes
This player is preset to a region code at the factory depending on where the player is sold.
Blu-ray Discs (BDs) are also coded by region. These region codes must match in order for the
disc to play. If the region codes don’t match, the disc won’t play.
The letter inside the globe refers to region of the world. This player has been designed to
play back Blu-ray Disc (BD) video encoded for region “A”. You cannot play back Blu-ray discs
that are encoded for other regions.
A
C
A
A
Region A - USA, Canada, Central America (including Mexico), South America, Japan, Taiwan,
North Korea, South Korea, Hong Kong , and South East Asia
Region B - Europe, Greenland, Middle East, Africa, Australia, and New Zealand
Region C - India, Nepal, Mainland China, Pakistan, Russia, Central Asia, and South Asia
- 39 -
B
Page 40

Reference
DVD Region Codes
This player is preset to a region code at the factory depending on where the player is sold.
DVDs are also coded by region. These region codes must match in order for the disc to play. If
the region codes don’t match, the disc won’t play.
The letter inside the globe refers to region of the world. This player has been designed to
play back DVD video encoded for region “1”. You cannot play back DVDs that are encoded
for other regions.
Region 1 - USA, Canada
Region 2 - Japan, Europe, South Africa, Middle East, Greenland
Region 3 - S. Korea, Taiwan, Hong Kong, Parts of South East Asia
Region 4 - Australia, New Zealand, Latin America (including Mexico)
Region 5 - Eastern Europe, Russia, India, Africa
Region 6 - China
- 40 -
Page 41

Reference
Compatible Formats
In order to ensure playback, discs must
conform with BD, DVD or CD standards.
This unit may not play some recordings or
les due to dierences in recording formats,
software used, and disc types.
BD-ROM
BD-ROMs (Blu-ray Disc Read-Only Memory)
are commercially produced discs and are
available in the same capacities as BD below.
Other than conventional movie and video
contents, these discs have enhanced features
such as interactive content, menu operations
using pop-up menus, selection of subtitle
display, and slide show. Although a BD-ROM
may contain any form of data, most BD ROM
discs will contain movies in High Denition
format, for playback on Blu-ray Disc players.
Blu-ray Disc (BD)
A disc format developed for recording/
playing high-denition (HD) video (for
HDTV, etc.), and for storing large amounts of
data. A single layer Blu-ray Disc holds up to
25 GB of data, and a dual-layer Blu-ray Disc
holds up to 50 GB of data.
DVD-Video
Digital video discs - 12 cm, single or double
sided, single or dual layer. DVDs are high
density optical discs on which high quality
picture and audio are recorded by means of
digital signals.
DVD-R, DVD-RW, DVD+R, DVD+RW
Most DVD-R and DVD+R (one recording
only), DVD-RW and DVD+RW discs
(rewritable), depending on the DVD
writer and discs used.
Recordings using DVD-R and DVDRW discs must be made in Video DVD mode.
Recordings using DVD+RW discs must be
made in accordance with the specications
for DVD+RW discs with a 4.7 GB capacity.
DVD+Rewritable
Audio CDs
Audio CDs (12 cm).
CD-R, CD-RW
Most CD-R (one recording only) and CD-RW
discs (rewritable).
CD-Rs written during a multisession
recording can be played, provided that the
session has ended before the disc is played
(depending on the write software).
However, depending on the condition of the
CD-writer, computer, and the disc used, you
may nd that not all discs will play. When
playing a CD-R disc, it is normal for the unit
to take up to 60 seconds to recognize the
disc before starting to play.
If the disc is not recognized after a period
of 120 seconds, remove the disc, and insert
it again.
• Do not use its full capacity.
• CD-Rs should be preferably used instead
of CD-RWs (rewritable CDs) as, in certain
cases, CD-RW playback may be faulty.
• Use reliable, good-quality CD write
software.
• Close all other applications on the
computer to ensure reliable CD-R disc
recording.
JPEG Files
CD-R and CD-RW with JPEG les. Certain
JPEG les, including progressive JPEG les,
cannot be read by this unit.
The total number of les and folders on the
disc should be less than 650. Make sure that
les have the “.jpg” extension. Files without
the “.jpg” extension will not be able to be
read by the unit - even though the les are
shown as JPEG images on your computer.
- 41 -
Page 42

Reference
“Blu-ray Disc” and
Manufactured under
license from Dolby
Laboratories. Dolby and
the double-D symbol
are trademarks of Dolby
Laboratories.
HDMI, the HDMI logo and
High-Denition Multimedia
Interface are trademarks or
registered trademarks of
HDMI Licensing LLC.
Manufactured under
license under U.S. Patent
Nos: 5,956,674; 5,974,380;
6,487,535 & other U.S.
and worldwide patents
issued & pending. DTS,
the Symbol, & DTS and
the Symbol together are
registered trademarks
& DTS 2.0+Digital Out is
a trademark of DTS, Inc.
Product includes software.
© DTS, Inc. All Rights
Reserved.
are trademarks.
DVD copy protection
This product incorporates copyright
protection technology that is protected by
U.S. patents and other intellectual property
rights. Use of this copyright protection
technology must be authorized by Rovi
Corporation, and is intended for home
and other limited viewing uses only unless
otherwise authorized by Rovi Corporation.
Reverse engineering or disassembly is
prohibited.
Java and all Java-based
trademarks and logos are
trademarks or registered
trademarks of Oracle
America, Inc. in the U.S. and
other countries.
- 42 -
Page 43

Specications
BD Video Format 1080 pixel (horizontal) x 1920 pixel (vertical)
DVD Video Format 720 pixel (horizontal) x 480 pixel (vertical)
HDMI Output Single Type A, 1.4b compliant
Video Output 1.0 Vp-p / 75 Ohm
Audio Output 1.2 V to 1.8 V
Signal-to-Noise Ratio More than 60 dB
Harmonic Distortion Less than 60 dB
Dynamic Range More than 70 dB
Power Source 12 VDC
Power Consumption Less than 1 Watt in stand-by mode and less than
15 Watts in use
USB 2.0 Compatible Supports ash stick type devices (≤500mA), FAT32/16
le system, max capacity 32GB (Hard Disks and other
computer peripherals are not supported.)
Dimensions
AVDBR1 Mounting Dimensions
Chassis Width 7.1”
Chassis Height 2.0”
Chassis Depth 8.1”
Chassis Depth with RCAs and
Harness
Remote Control Dimensions
Width 1.8”
Height 6.7”
Depth 0.9”
Weight
Net Weight (includes the unit
and accessories)
Package Weight 4.1 lbs
8.3”
3.5 lbs
- 43 -
Page 44

Troubleshooting
Problem Solution
The player does not switch
on.
The player switches o
spontaneously.
Blu-ray Disc or DVD does
not play.
Picture-in-Picture (PiP) does
not work on a Blu-ray Disc.
There is no picture. • Check that the monitor is operating correctly.
The picture is of poor
quality (with snow or lines).
There is no sound or the
sound is of poor quality.
A le can’t be found in the
JPEG listing.
The remote control does
not work or works only
intermittently.
The subtitles do not appear. • Check that the BD/DVD disc provides subtitles.
The disc menu language is
not the correct one.
“
” is displayed.
• Make sure the power wires are properly connected.
• Make sure the fuse has not blown. If the fuse has blown,
check for short circuits. Replace the fuse with a fuse of the
same rating.
• Press the STANDBY/ON button on the remote control or the
Power (
• The player will switch o automatically if it remains idle
and there is no user interaction for 25 minutes. Switch it
on again.
• Make sure that the disc has the correct region code.
• Some Blu-ray discs will only play over an HDMI
connection.
• It may be impossible to read the disc.
• Insert the disc with the printed side facing up.
• Check that the disc can actually be played by this device.
• Clean the disc.
• Make sure that the disc supports PiP mode.
• Check the connections.
• Replace the HDMI cable with a better one. A bad HDMI
cable can cause loss of video.
• Check the connections.
• Check the connections.
• Make sure the speakers are connected.
• Make sure the MUTE function is not on.
• Make sure the le name is valid.
• Check that batteries are properly inserted.
• The batteries are discharged. Change them.
• Aim the remote control at the player or the External
Remote IR Receiver. The infrared beam must not be
blocked or interrupted.
• Refer to the section on how to display subtitles.
• The language of your choice is not available on the disc.
• The feature or action is not available.
) button on the front of the unit.
- 44 -
Page 45

Notes
- 45 -
Page 46

Notes
- 46 -
Page 47

12 MONTH LIMITED WARRANTY
Applies to Audiovox Mobile Video Products
VOXX ELECTRONICS CORP. (the Company) warrants to the original retail purchaser
of this product that should this product or any part thereof, under normal use and
conditions, be proven defective in material or workmanship within 12 months from
the date of original purchase, such defect(s) will be repaired or replaced with reconditioned product (at the Company’s option) without charge for parts and repair labor.
A game controller, if supplied, is similarly warranted for ninety (90) days.
To obtain repair or replacement within the terms of this Warranty, the product is to
be delivered with proof of warranty coverage (e.g. dated bill of sale), specication
of defect(s), transportation prepaid, to the Company at the address shown below.
This Warranty does not extend to the elimination of externally generated static or
noise, to correction of antenna problems, to costs incurred for installation, removal or
reinstallation of the product, or to damage to digital memory/media devices, gaming
devices, discs, speakers, accessories, or vehicle electrical systems.
This Warranty does not apply to any product or part thereof which, in the
opinion of the Company, has suffered or been damaged through alteration, improper installation, mishandling, misuse, neglect, accident, or by
removal or defacement of the factory serial number/bar code label(s).
THE EXTENT OF THE COMPANY’S LIABILITY UNDER THIS WARRANTY
IS LIMITED TO THE REPAIR OR REPLACEMENT PROVIDED ABOVE
AND, IN NO EVENT, SHALL THE COMPANY’S LIABILITY EXCEED THE
PURCHASE PRICE PAID BY PURCHASER FOR THE PRODUCT.
This Warranty is in lieu of all other express warranties or liabilities. ANY
IMPLIED WARRANTIES, INCLUDING ANY IMPLIED WARRANTY OF
MERCHANTABILITY, SHALL BE LIMITED TO THE DURATION OF THIS
WRITTEN WARRANTY. ANY ACTION FOR BREACH OF ANY WARRANTY
HEREUNDER INCLUDING ANY IMPLIED WARRANTY OF MERCHANTABILITY MUST BE BROUGHT WITHIN A PERIOD OF 24 MONTHS FROM
DATE OF ORIGINAL PURCHASE. IN NO CASE SHALL THE COMPANY
BE LIABLE FOR ANY CONSEQUENTIAL OR INCIDENTAL DAMAGES
FOR BREACH OF THIS OR ANY OTHER WARRANTY. No person or representative is authorized to assume for the Company any liability other
than expressed herein in connection with the sale of this product.
Some states do not allow limitations on how long an implied warranty lasts or the
exclusion or limitation of incidental or consequential damage so the above limitations
or exclusions may not apply to you. This Warranty gives you specic legal rights and
you may also have other rights which vary from state to state.
Voxx Electronics Corporation, 150 Marcus Blvd., Hauppauge, New York 11788 1-800-645-4994
128-9330
Page 48

www.voxxelectronics.co
m
© 2014 VOXX ELECTRONICS CORPORATION,150 Marcus Blvd. Hauppauge, NY 11788
128-9367
 Loading...