

Audiovox 91155-GPX Owner's Manual
555 Wireless Boulevard • Hauppauge, New York 11788
800.229.1235 • www.audiovox.com • LTCLOM227 • Rev. 1.4
©
2002 Audiovox Communications Corp. • Printed in Japan • 07/02

2
In today’s fast paced world, it has become a necessity
to have access to your family and friends as well as
real-time information. Your communications tools must
provide you with this access from an ywhere at anytime.
With that in mind, Audiovox developed the 9155-GPX,
our first GPS capable 1x tri-mode phone with web
browsing and voice activated dialing features.
This 1x digital handset enables carriers supporting 1x
technology to provide consumers with access to high
speed connectivity for web bro wsing, email and mobile
e-commerce. Operating on the 800 MHz Amps/ CDMA
and 1900 MHz PCS frequencies, the 9155-GPX allows
for seamless nationwide coverage as well as offering
other state-of-the-art user-friendly features. Voice activated dialing and two-way speakerphone are great for
enhancing hands-free use of this phone. T9
®
Text Input, vibrating alert and a 7-line LCD Display with adjustable text size make 9155-GPX easier to use. The
9155-GPX also has user changeable faceplates, enabling you to express your individuality through your
wireless handset.
Sever al optional accessories are available f or the 9155GPX, including: hands-free devices, charging devices
(vehicle, tra vel, desktop, A C), data interface cable, belt
clip, and of course, color user changeable faceplates.
Your new 9155-GPX provides you with something only
an Audiovox phone can: the proven reliability that has
made us a leading wireless handset provider. Please
take a few moments to read the following pages of the
owner’s operating manual. It will help you make the
most efficient use of this valuable communications tool.
AUDIOVOX
9155-GPX
AUDIOVOX
9155-GPX
Tri-Mode CDMA/AMPS
Handheld Portable
Cellular Telephone

3
TABLE OF CONTENTSTABLE OF CONTENTS
SAFETY INSTRUCTIONS ........................................ 7
SAFETY INFORMATION FOR
WIRELESS HANDHELD PHONES ........................ 14
SAR INFORMATION ............................................... 17
SYSTEM CONFIGURATION................................... 18
BATTERY FUNCTIONS .......................................... 19
Attaching Battery Pack........................................... 19
Removing Battery Pack ......................................... 19
Recharging the Battery ...........................................20
FUNCTIONS ............................................................ 22
External View ......................................................... 22
Key Functions ........................................................ 23
LCD Display Indication........................................... 23
GETTING STARTED ............................................... 24
Turning the Phone On/Off ...................................... 24
Antenna Position.................................................... 24
Receiving Signal Strength Indicator (
) .............. 24
Battery Level Indicator ........................................... 24
Po wer Management ............................................... 24
BASIC OPERATION ............................................... 25
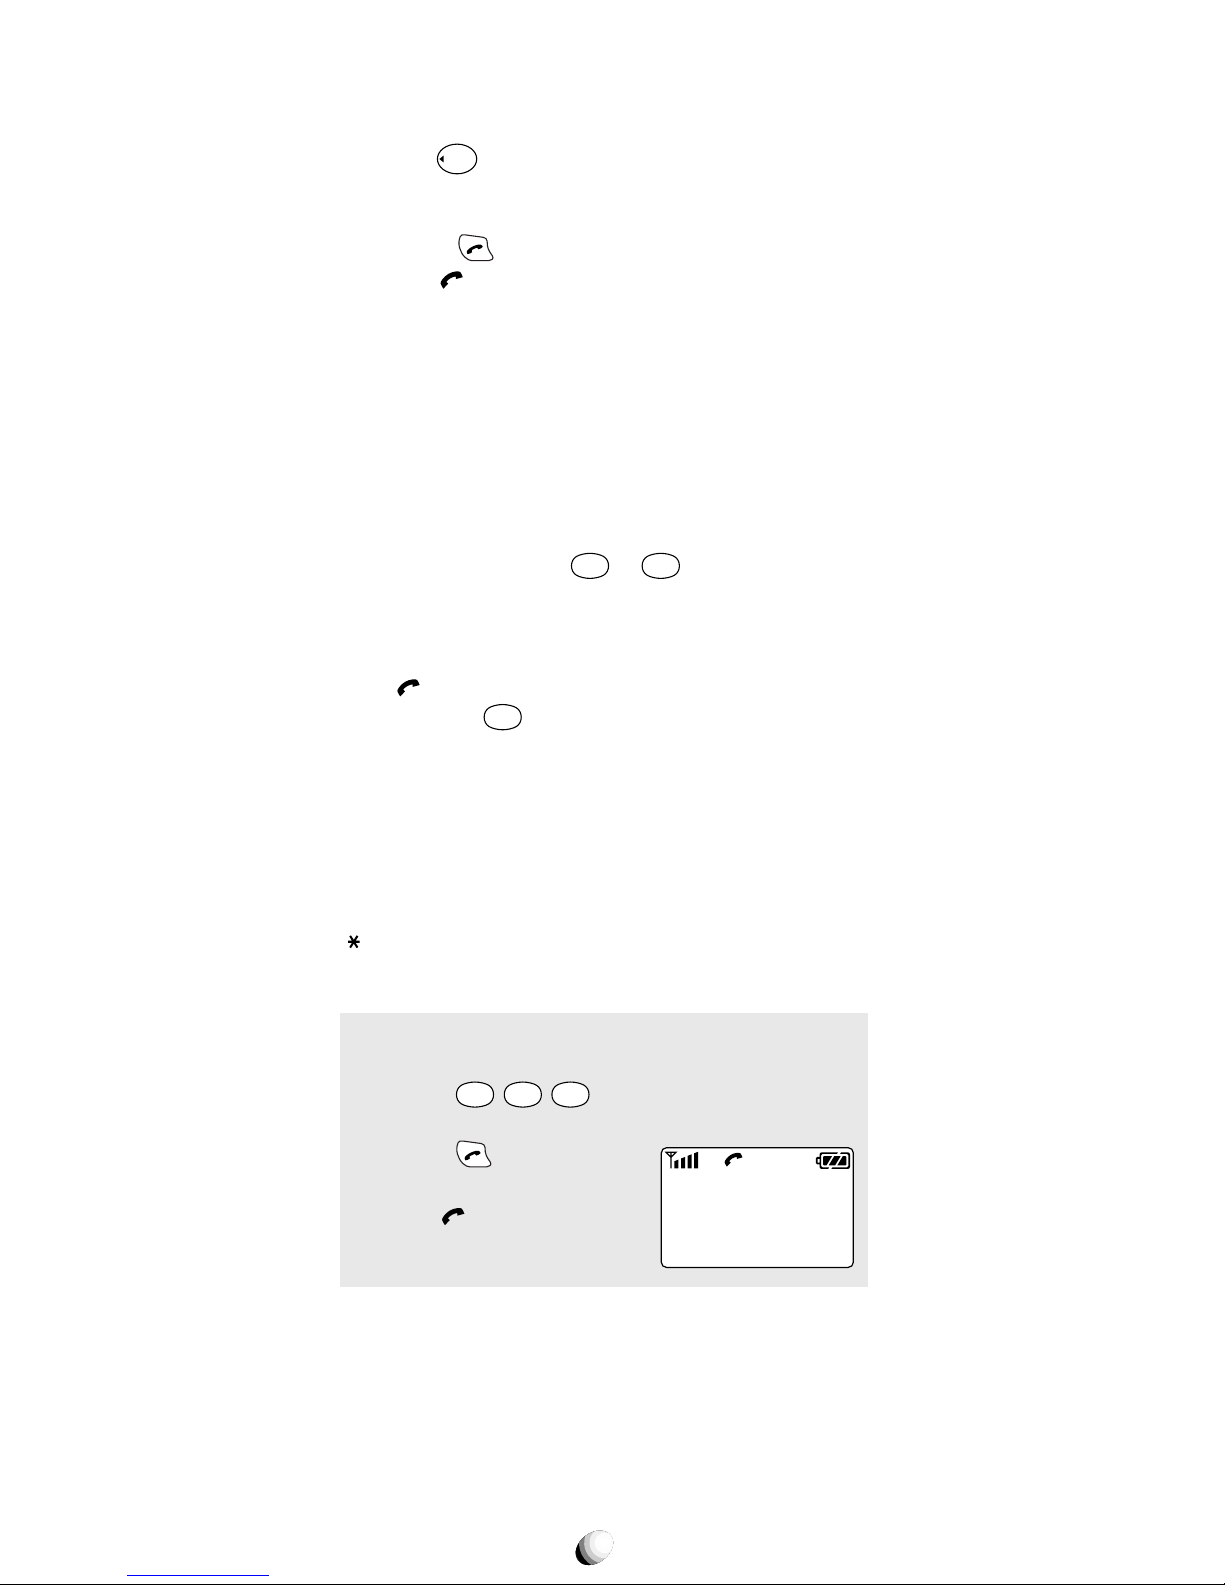
Placing Calls ....................................................... 25
Placing a Call ......................................................... 25
Terminating a Call .................................................. 25
Last Number Redial ............................................... 25
Dialing the Last Incoming Call ............................... 25
Phonebook Dialing................................................. 25
Speed Dialing ........................................................ 26
Quick Dialing.......................................................... 26
Emergency Call ..................................................... 26
One-Touch Emergency Call................................... 27
Emergency Call Mode ........................................... 27
Receiving Calls ................................................... 27
Receiving a Call ..................................................... 27
Any Key Answering ................................................ 27
Caller ID with Name ............................................... 28
Automatic Calls-in-Absence Indicator .................... 28
Ringing Tone with Melody ...................................... 28
Distinctive Ringing (Audible Caller ID) ................... 28
During Calls......................................................... 28
Adjusting the Earpiece Volume .............................. 28
Muting a Phone Conversation................................ 29
Speakerphone Mode (Two-Way)............................ 29
Automatic Talk Timer ...............................................29
Scratch Pad Dialing ............................................... 29
Call Waiting............................................................ 29
Three-Way Calling ................................................. 30
Standby................................................................ 30
Indicators on Standby ............................................ 30
Vibrating Alert ........................................................ 30
Multilingual ............................................................. 30
End to End Signaling.......................................... 31
Touch Tone™ from Display .................................... 31
Touch Tone™ from Memory................................... 31

4
Entering Letters and Symbols........................... 32
T9 Mode T9 (T9).................................................... 32
Alpha Mode
abc
(abc) ............................................ 32
Numeric Mode
Num
(Num) .................................... 33
Symbol Mode
Sym
(Sym1 to 4)..............................33
PHONEBOOK OPERATION ................................... 34
Phonebook Entry ................................................ 34
Basic Sequence ..................................................... 34
Storing a Number without Name............................ 35
Automatic Storing into Phonebook......................... 35
Auto Hyphenation .................................................. 36
Manual Hyphenation ...............................................36
Storing Dual Numbers ........................................... 37
Storing a Name with a Phone Number .................. 38
Storing E-mail Addresses ...................................... 39
Marking Numbers with Icons ..................................39
Storing a Ringer Type with the Phone Number ...... 40
Overwrite Warning ................................................. 41
Recall Menu......................................................... 42
Recall Menu Tree ................................................... 42
Phonebook Recall............................................... 43
Phonebook Address Mode .................................... 43
Phonebook Sort Scroll Mode ..................................43
Phonebook Key Word Search Mode...................... 44
Dialing Dual Numbers ............................................ 45
Reviewing Long Names and Numbers .................. 45
Locating E-mail Addresses .................................... 45
Prepending Dialing ................................................ 45
Phonebook Edit .................................................. 46
Modifying Numbers and Names ............................ 46
Moving Numbers and Names ................................ 47
Changing Priority of Dual Numbers ....................... 48
Erasing Numbers and Names................................ 48
Secret Memory .................................................... 49
Storing a Secret Number ....................................... 49
Recalling a Secret Number .................................... 50
Link Dialing ......................................................... 50
Storing Linked Numbers ........................................ 50
Placing Calls Using Linked Numbers..................... 51
Voice Activated Dialing (VAD)............................ 52
Voice Registration .................................................. 52
Replaying Registered Voices ..................................53
Voice Activated Dialing ...........................................53
Adding Voice to Stored Numbers........................... 53
Deleting Registered Voices.................................... 53
Call History.......................................................... 54
Reviewing Outgoing Call History ........................... 55
Reviewing Incoming Call History ........................... 55
Reviewing Scratch Pad ...........................................56
Saving a Number to Phonebook ............................ 56
MESSAGING FEATURES ...................................... 57
Receiving Text Messages .................................. 58
Checking Received Messages............................... 58
Sending Text Messages ..................................... 59
Sending Te xt Messages ......................................... 59
Reviewing Sent Messages..................................... 60
Voice Mail ............................................................ 61
Voice Mail Notification............................................ 61
Voice Mail Dialing
V
............................................ 62

5
Messaging Feature Settings .............................. 63
Default Call Back # ................................................ 63
Default Delivery Ack............................................... 63
New Message Alert................................................ 63
Voice Mail Alert ...................................................... 63
Text Entry Mode ..................................................... 64
Save Sent Message............................................... 64
Erase All Text Messages ........................................ 64
SMS Text Lines Selection ...................................... 64
SMS Memory Management ................................... 64
Reply with Copy ..................................................... 64
WEB BROWSING ................................................... 65
Accessing Internet.............................................. 65
Starting a Web Browser ......................................... 65
Browser Menu........................................................ 66
E-mailing with Browser ...................................... 66
Receiving E-mails .................................................. 66
Checking Alert Inbox...............................................67
Sending E-mails..................................................... 67
Web Browser Settings........................................ 67
Web Lock ............................................................... 67
Web Backlight ........................................................ 67
Web Idle Timer........................................................67
Confirm — Connect Prompt................................... 67
Connection Settings............................................... 68
FUNCTION MENU................................................... 69
Accessing Function Menu ................................. 69
Function Menu Tree ............................................... 70
Lock Features ..................................................... 71
Security Code and Unlock Code............................ 71
Keypad Lock (F11)................................................. 71
Phone Lock (F12) .................................................. 72
Automatic Phone Lock (F13) ..................................72
Unlocking the Phone...............................................72
Changing the Unlock Code (F14) .......................... 72
Display Features ................................................. 73
Own Telephone Number Display (F21) .................. 73
Backlight Control (Standby) (F22-1) ...................... 73
Backlight Control (In-Use) (F22-2) ......................... 73
Auto Hyphenation (F23)......................................... 74
Language Selection (F24) ..................................... 74
Contrast Control (F25) ........................................... 74
Software Version Display (F26).............................. 74
Last Rescan SID Indicator (F27) ........................... 74
PRL ID Review (F28) ............................................. 74
Volume and Tone Controls ................................ 75
Ringer Volume Control (F31) ..................................75
Ringer Type Selection (F32)................................... 75
Key Tone Volume Control (F33) ..............................75
Sending DTMF (F34) ............................................. 75
Key Tone Length (F35-1) ....................................... 76
Single Alert Beep Tone (F35-2).............................. 76
Caller ID Alert (F35-3)............................................ 76
Service Mode Alert (F35-4) ................................... 76
Voice Privacy Alert (F35-5) .................................... 77
One Minute Beep Tone (F35-6).............................. 77
Low Battery Alarm (F35-7)..................................... 77

6
Touch Tone™ is a registered trademark of AT & T.
Call Timers .......................................................... 77
Last Call Timer (F41-1) ...........................................77
Outgoing Call Timer (F41-2) .................................. 77
All Calls Timer (F41-3) ........................................... 78
Lifetime Timer (F41-4)............................................ 78
Web Total Timer (F41-5) ........................................ 78
Clock Indicator (F42)...............................................78
Clock Adjustment (F43) ......................................... 79
Clock Alarm (F44) .................................................. 79
Countdown Timer (F45) ......................................... 80
System Features ................................................. 81
A/B System Selection (F51)................................... 81
Enhanced Roaming ............................................... 81
NAM Selection (F52) ............................................. 82
Force Analog Call (F53)......................................... 82
NAM Name Display (F54-1)................................... 83
Automatic NAM (F54-2) ......................................... 83
Automatic Retry (F54-3) ........................................ 83
Enhanced Voice Privacy Service (F54-4) .............. 83
Security Features................................................ 84
Call Restriction (F61) ............................................. 84
Changing Emergency Numbers (F62) ................... 85
Turning On/Off One-Touch Emergency Call Feature (F63) ..
85
Changing Security Code (F64) .............................. 85
Call Timer Reset (F65-1) ....................................... 85
Phonebook All Clear (F65-2) ..................................86
Call History All Clear (F65-3) ..................................86
Text Message & Voice Mail All Clear (F65-4)......... 86
Function Reset (F65-5) ...........................................86
Data Communications........................................ 87
Service Mode (F71) ............................................... 87
Data/Fax Mode (F72)............................................. 88
TTY Mode (F73) .................................................... 88
Vibrator ................................................................ 89
Vibrating Alert (F8)................................................. 89
Voice Dialing ....................................................... 90
Voice Activated Dialing (F9)................................... 90
Other Functions .................................................. 90
Quick Dialing (F01) ................................................ 90
Automatic Answering (F02).................................... 90
Redial Soft Key (F04)............................................. 90
Location (F05)........................................................ 90
Function Reset Status........................................ 91
FACEPLATE OPTIONS .......................................... 93
FDA CONSUMER UPDATE.................................... 9 4
EMERGENCY CALLS............................................. 98
OPERATING PROCEDURES ................................. 99
INDEX .................................................................... 100
12 MONTH LIMITED WARRANTY....................... 101
QUICK REFERENCE ............................................ 103
ACCESSORIES..................................................... 105
7
Always keep this Manual conveniently available for future reference, as it contains important information that
will help effect the safe operation and maintenance of
this instrument.
The safety instructions have been classified according
to the seriousness of the risk, as follows :
DANGER : “Danger” indicates the existence of a
hazard that could result in death or catastrophic
bodily injury , if the saf ety instruction is not observed.
WARNING : “Warning” indicates the existence of
a hazard that could result in serious bodily injury, if
the safety instruction is not observed.
CAUTION : “Caution” indicates the existence of a
hazard that could result in minor bodily injury or
property damage, if the safety instruction is not
observed.
NOTICE : “Notice” contains general information
that relates to the safe operation of the telephone.
SAFETY INSTRUCTIONS
WARNING : Always read and understand all of the
Warnings and Safety Instructions contained in this
Manual before attempting to use this Audiovox 9155GPX Cellular Phone, to help avoid potential hazards
that could result in bodily injury or property damage.

8
Safe Operation of Your Phone
•
Never attempt to disassemble the phone or any of
its accessories. If service or repair is required, return the unit to an Audiovox authorized service center. If the unit should be disassemb led, a risk of electric shock or fire may result.
•
Always use authorized A udiovo x accessories and optional devices when operating this cellular phone, as
the use of incompatible auxiliary equipment could
result in fire, electric shock or other bodily injury . The
use of unauthorized accessories will also void your
Warranty.
Protection of Children
•
Never allo w children to play with your phone , as they
might hurt themselves or others (e.g., by poking
themselves or others in the eye with the antenna).
•
Always k eep all accessories and components out of
the reach of small children. Small parts, in par ticular, might present a choking hazard to children.
Use in Vehicles
•
Never store or tr ansport flammable liquids, gases or
explosive materials in the same compartment as the
phone or any of its accessories, as possible sparking in the equipment could ignite a fire or explosion.
•
Always secure the phone in its holder, when it is not
in use. Nev er place the phone on the passenger seat
or anyplace else in the car where it can become a
projectile during a collision or sudden stop.
W ARNING

9
Safe Operation of Your Phone (continued)
CAUTION
•
Never e xpose this phone to high temperatures, such
as those found near a heater or in a closed car parked
in the sun. This can cause heat-damage to the plastic parts, the electronic components and the battery.
•
Never drop this phone or subject it to violent impact
or shock. This can cause mechanical damage.
•
Never allow any liquids to spill on this phone or expose it to rain, water or moisture. This can cause
corrosion damage.
•
Never store this phone in cold areas . When the phone
warms up (to its normal operating temperature),
moisture can form inside the phone, which may damage the phone’s electronic circuit board.
•
Never use harsh chemicals, cleaning solvents, or
strong detergents to clean this phone. Always clean
it with a soft cloth that has been slightly dampened
in a mild soap-and-water solution.
•
Never paint this phone. This can clog the moving
parts.
Before connecting this cellular phone or any of its accessories to any other device, alw a ys read the Instruction Manual for that other de vice first to obtain detailed
safety instructions. Nev er connect this cellular phone to
any unauthorized or incompatible auxiliary product that
has not been expressly approved by Audiovox.

10
WARNING
Safe Operation of Battery Pack
•
Never short-circuit a battery pack by either accidentally or intentionally bringing the terminals in contact
with another metal object. That could result in b urns,
other bodily injury or a fire, and could also damage
the battery pack.
•
Never expose the terminals of the battery pack to
any other metal object. Alwa ys wrap it or place it in a
plastic bag, whenever transporting it.
•
Never heat and never attempt to disassemble the
battery pack, as that could cause leakage of the caustic electrolyte. If the battery is accidentally broken,
avoid skin contact with the contents. In the event of
skin contact, wash the affected area immediately and
obtain prompt medical attention.
•
Never attempt to dispose of a battery pack by thro wing it into a fire. That can cause the battery pack to
explode.
•
Never attempt to use an unauthorized battery pack
with your phone in order to avoid any risk of bodily
injury or proper ty damage. Since unauthorized accessories have different specifications , they may be
incompatible with your phone.

11
CAUTION
Safe Disposal of Used Battery Packs
•
Never discard a used battery pack with ordinary solid
wastes, since it contains toxic substances.
•
Always dispose of a used battery pack in accordance
with prevailing community regulations relating to the
disposal of household toxic wastes. Alw ays cov er the
metal terminals with insulating tape first, to prevent
accidental short-circuiting.
•
Always turn your phone OFF before removing the
battery pack, and always use the battery pack for its
intended purpose only .
•
Always use the battery pack supplied by Audiovox,
or an approved replacement battery pack, to avoid
any risk of damage to your cellular phone.
Safe Operation of Battery Pack (continued)
WARNING
RBRC

12
Safe Operation of AC Adapter
DANGER
•
Never attempt to disassemble or repair an AC adapter
or desktop charger, as exposure to electric shock hazards may result. Alwa ys contact an Audiov ox authorized
service center, if repair or replacement is required.
•
Never alter the AC cord or plug on your AC adapter
or desktop charger. If the plug will not fit into the a vailable outlet, hav e a proper outlet installed by a qualified electrician. Improper connection can result in the
risk of electric shock.
W ARNING
•
Never allow any liquids or water to spill on the AC
adapter or desktop charger when it is connected to
an AC power source . There is a risk of fire or electric
shock.
•
Always use the authorized Audiovox AC adapter or
desktop charger to avoid any risk of fire or damage
to your cellular phone or battery . Bodily injury or property damage may occur as a result of the use of an
unauthorized and incompatible AC adapter or desktop charger.
•
Never use an A C adapter or desktop charger if it has
a damaged or worn power cord or plug. The use of
damaged or worn power cords or plugs could result
in electric shock, burns or fire. Contact an Audiovox
authorized service center immediately to obtain a
suitable replacement.
The AC Adapter and the Desktop Charger that were
designed by Audiovox for this unit both require the use
of a standard 120 V A C power source f or their operation.

13
Safe Operation of AC Adapter (continued)
WARNING
•
Always unplug the AC adapter or desktop charger
from the power source before attempting an y cleaning in order to avoid the risk of electric shock. Always use a soft cloth dampened with w ater to clean
the equipment, after it has been unplugged.
•
Never attempt to use an unauthorized A C adapter or
desktop charger with your phone in order to avoid
any risk of bodily injury or proper ty damage. Since
unauthorized accessories have different specifications, they ma y be incompatible with your phone.
CAUTION
•
Always confirm that the power cord for any accessory is located so that it will not be stepped on, tripped
over, or otherwise subjected to damage or stress.
•
Never place heavy objects on a power cord, as this
could result in damage to the cord.
•
Never bend or twist a power cord, and never pull on
a power cord in a attempt to remove an AC adapter
or accessory plug from a socket. Always grasp the
AC adapter or the accessory plug directly when unplugging the device in order to avoid damaging the
cord.
•
Always disconnect the A C adapter or desktop charger
from the power source when it is not in use.

14
SAFETY INFORMATION FOR
WIRELESS HANDHELD PHONES
SAFETY INFORMATION FOR
WIRELESS HANDHELD PHONES
Read this information before using your handheld
portable Cellular Telephone.
Your wireless handheld por table telephone is a low
power radio transmitter and receiver. When it is ON, it
receives and also sends out radio frequency (RF) signals.
FCC RF EXPOSURE INFORMATION
In August 1996, the F ederal Communications Commission (FCC) of the United States, with its action in Report and Order FCC 96-326, adopted an updated safety
standard for human exposure to radio frequency (RF)
electromagnetic energy emitted by FCC regulated transmitters. Those guidelines are consistent with the saf ety
standard previously set by both U.S. and international
standards bodies. The design of this phone complies
with the FCC guidelines and these international standards.
Use only the supplied or an approved antenna. Unauthorized antennas, damaged antennas, modifications,
or attachments could impair call quality, damage the
phone, or result in violation of FCC regulations. Please
contact your local dealer for replacement antenna.
Body-worn Operation
This device was tested f or typical body-worn operations
with the BC-9100 belt-clip and LB-9100 holster models, offered b y Audio vo x as an accessory to this phone,
and found to comply with FCC RF exposure requirements. Third-party belt-clips, holsters and similar accessories should be avoided, as they have not been
tested and may not comply with FCC RF exposure limits.
For more information about RF exposure, please visit
the FCC website at
www.fcc.gov .
PHONE OPERATION
Normal position: Hold the phone as you would any
other telephone with the antenna pointed up and over
your shoulder.

15
Tips on Efficient Operation:
For your phone to operate most efficiently:
• Extend your antenna fully.
• Do not touch the antenna unnecessarily when the
phone is in use. Contact with the antenna affects call
quality and may cause the phone to operate at a
higher power level than otherwise needed.
DRIVING
Check the laws and regulations on the use of wireless
telephones in the areas where you drive. Always obey
them. Also, if using your phone while driving, please:
• Give full attention to driving — driving safely is your
first responsibility.
• Use hands-free operation, if available.
• Pull off the road and park before making or answering a call if driving conditions so require.
ELECTRONIC DEVICES
Most modern electronic equipment is shielded from RF signals. However, certain electronic equipment may not be
shielded against the RF signals from your wireless phone.
Pacemakers
The Health Industry Manufacturers Association recommends that a minimum separation of six (6”) inches be
maintained between a handheld wireless phone and a
pacemaker to av oid potential interference with the pacemaker . These recommendations are consistent with the
independent research by and recommendations of Wireless Technology Research.
Persons with pacemakers:
Should AL W AYS k eep the phone more than six
(6”) inches from their pacemaker when the
phone is turned ON.
Should not carry the phone in a breast pocket.
Should use the ear opposite the pacemaker to
minimize the potential for interference.
If you hav e an y reason to suspect that interfer-
ence is taking place, turn your phone OFF im-
mediately.
Hearing Aids
Some digital wireless phones may interfere with some
hearing aids. In the e vent of such interf erence, y ou may
want to consult your service provider [or call the customer service line to discuss alternatives].

16
Other Medical Devices
If you use any other personal medical device, consult the
manufacturer of your device to determine if they are adequately shielded from external RF energy. Your physician
may be able to assist you in obtaining this information.
Turn your phone OFF in health care f acilities when an y
regulations posted in these areas instruct you to do so.
Hospitals or health care facilities may be using equipment that could be sensitive to external RF energy.
Vehicles
RF signals may aff ect improperly installed or inadequately
shielded electronic systems in motor vehicles. Check with
the manufacturer or its representative regarding your
vehicle. You should also consult the manufacturer of any
equipment that has been added to your vehicle.
Posted Facilities
Turn your phone OFF in any facility where posted notices so require.
AIRCRAFT
FCC regulations prohibit using your phone while in the
air. Switch OFF your phone bef ore boarding an aircraft.
BLASTING AREAS
To avoid interfering with blasting operations, turn your
phone OFF when in a “Blasting area” or in areas posted
“T urn off two-wa y radio”. Obey all signs and instructions.
POTENTIALLY EXPLOSIVE ATMOSPHERES
Turn your phone OFF when in any area with a potentially explosive atmosphere and obey all signs and instructions. Sparks in such areas could cause an explosion or fire resulting in bodily injury or even death.
Areas with a potentially explosive atmosphere are often, but not alwa ys marked clearly. P otential areas ma y
include: fueling areas (such as gasoline stations); below deck on boats; fuel or chemical transfer or storage
facilities; vehicles using liquefied petroleum gas (such
as propane or butane); areas where the air contains
chemicals or particles (such as grain, dust, or metal
powders); and any other area where you would normally
be advised to turn off your vehicle engine.
For Vehicles Equipped with an Air Bag
An air bag inflates with great force. DO NOT place objects, including either installed or portable wireless
equipment, in the area over the air bag or in the air bag
deployment area. If in-vehicle wireless equipment is improperly installed and the air bag inflates, serious injury could result.

17
phones used by the public is 1.6 watts/kg (W/kg) averaged
over one gram of tissue. The standard incorporates a substantial margin of safety to give additional protection f or the
public and to account for any variations in measurements.
SAR INFORMATION
SAR INFORMATION
THIS MODEL PHONE MEETS THE GOVERNMENT’S REQUIREMENTS FOR EXPOSURE TO RADIO WAVES.
Your wireless phone is a radio transmitter and receiver. It is
designed and manufactured not to exceed the emission limits
for exposure to radiofrequency (RF) energy set by the Federal Communications Commission of the U.S. Government.
These limits are part of comprehensive guidelines and establish permitted levels of RF energy for the general population.
The guidelines are based on standards that were developed
by independent scientific organizations through periodic and
thorough evaluation of scientific studies . The standards include
a substantial safety margin designed to assure the safety of
all persons, regardless of age and health.
The exposure standard for wireless mobile phones employs a
unit of measurement known as the Specific Absorption Rate,
or SAR. The SAR limit set by the FCC is 1.6 W/kg.* Tests for
SAR are conducted with the phone transmitting at its highest
certified power level in all tested frequency bands. Although the
SAR is determined at the highest certified power level, the actual SAR level of the phone while operating can be well below
the maximum value. This is because the phone is designed to
operate at multiple power levels so as to use only the power
required to reach the network. In general, the closer y ou are to
a wireless base station antenna, the lower the power output.
Before a phone model is available for sale to the public, it
must be tested and certified to the FCC that it does not exceed the limit established by the gov ernment-adopted requirement for safe exposure. The tests are performed in positions
and locations (e.g., at the ear and worn on the body) as required by the FCC for each model. The highest SAR v alue for
this model phone when tested for use at the ear is 1.45 W/kg
and when worn on the body, as described in this user guide,
is 0.72 W/kg. (Body-worn measurements differ among phone
models, depending upon available accessories and FCC requirements). While there may be diff erences between the SAR
levels of v arious phones and at various positions, they all meet
the government requirement for safe exposure.
The FCC has granted an Equipment Authorization for this
model phone with all reported SAR levels ev aluated as in compliance with the FCC RF exposure guidelines. SAR information on this model phone is on file with the FCC and can be
found under the Display Grant section of http://www.fcc.gov/
oet/fccid after searching on FCC ID CJ6DCE45380A.
Additional information on Specific Absorption Rates (SAR) can
be found on the Cellular Telecommunications & Internet Association (CTIA) web-site at http://phonefacts.net.
*
In the United States and Canada, the SAR limit for mobile
18
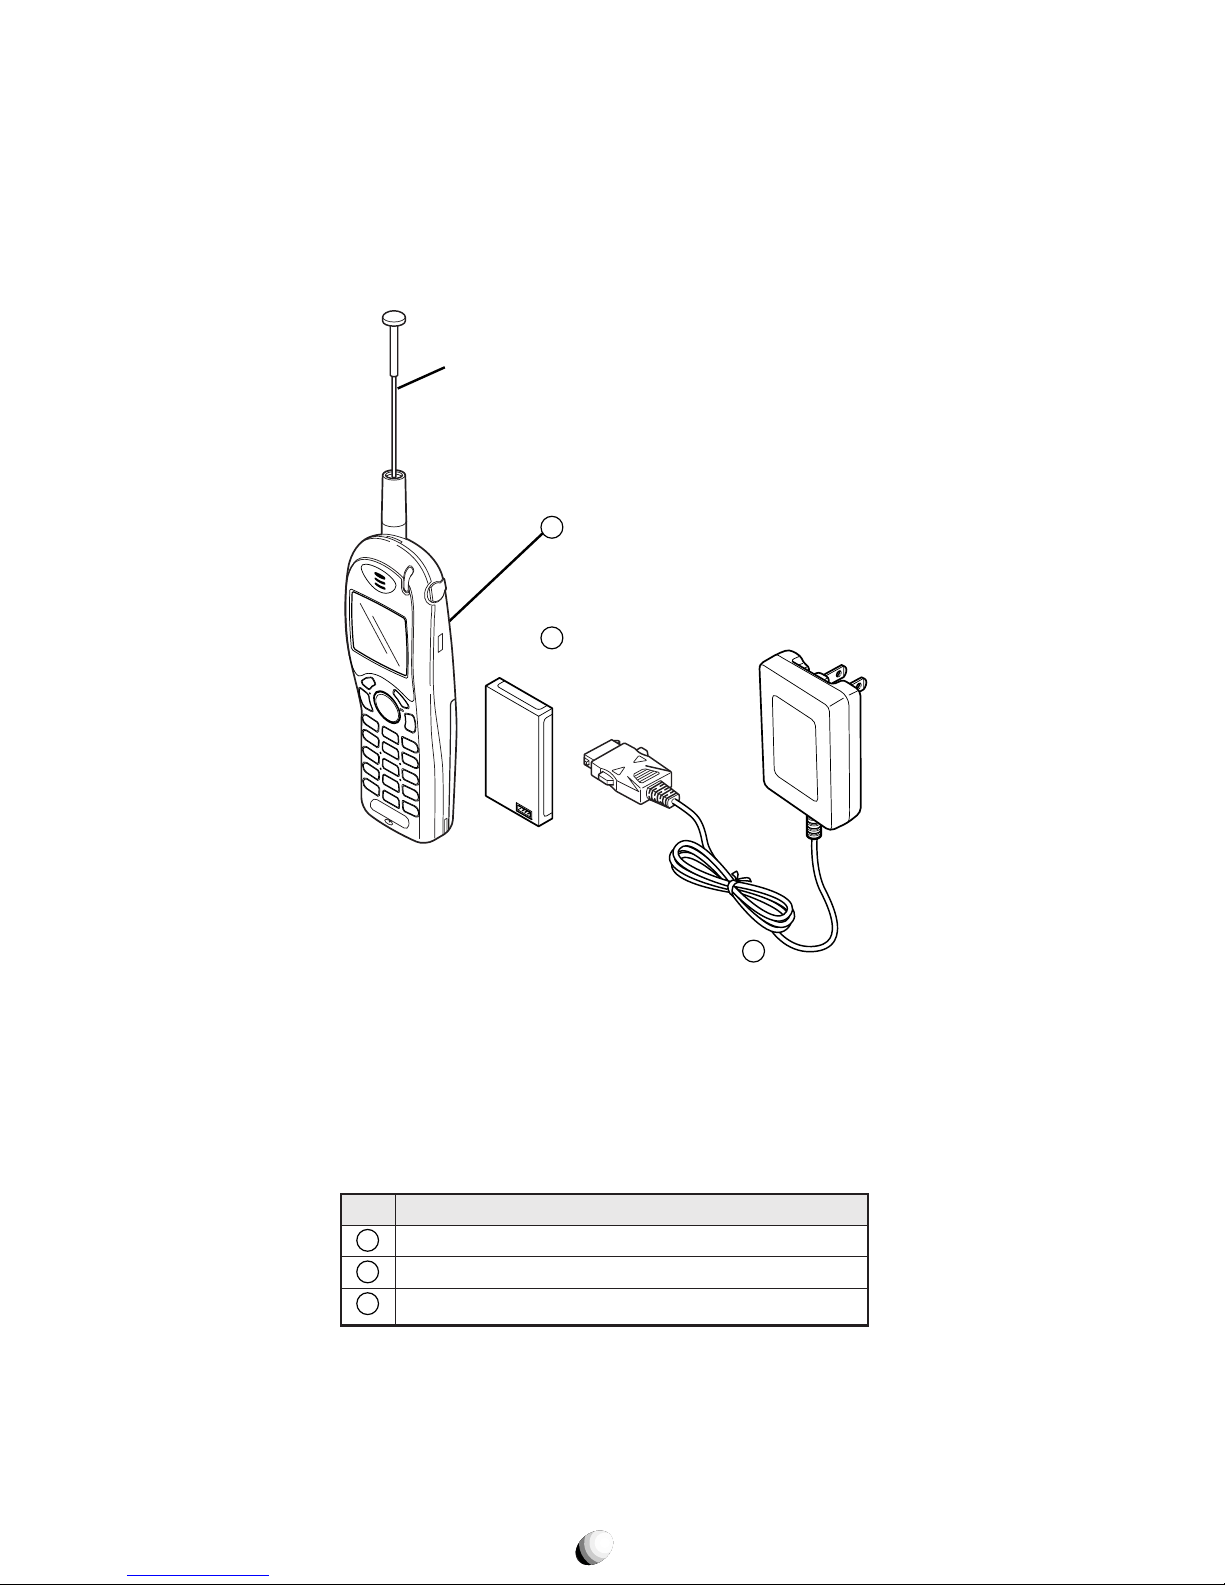
SYSTEM CONFIGURATIONSYSTEM CONFIGURATION
List of Equipment
Name of the Equipment
Handheld Portable Telephone
Lithium Ion Battery Pack (BTR-9100)
AC Adapter (CNR-9100)
No.
1
2
3
Retractable
Whip Antenna
Handheld Portable
Telephone
Lithium Ion
Battery Pack
AC Adapter
1
2
3
19
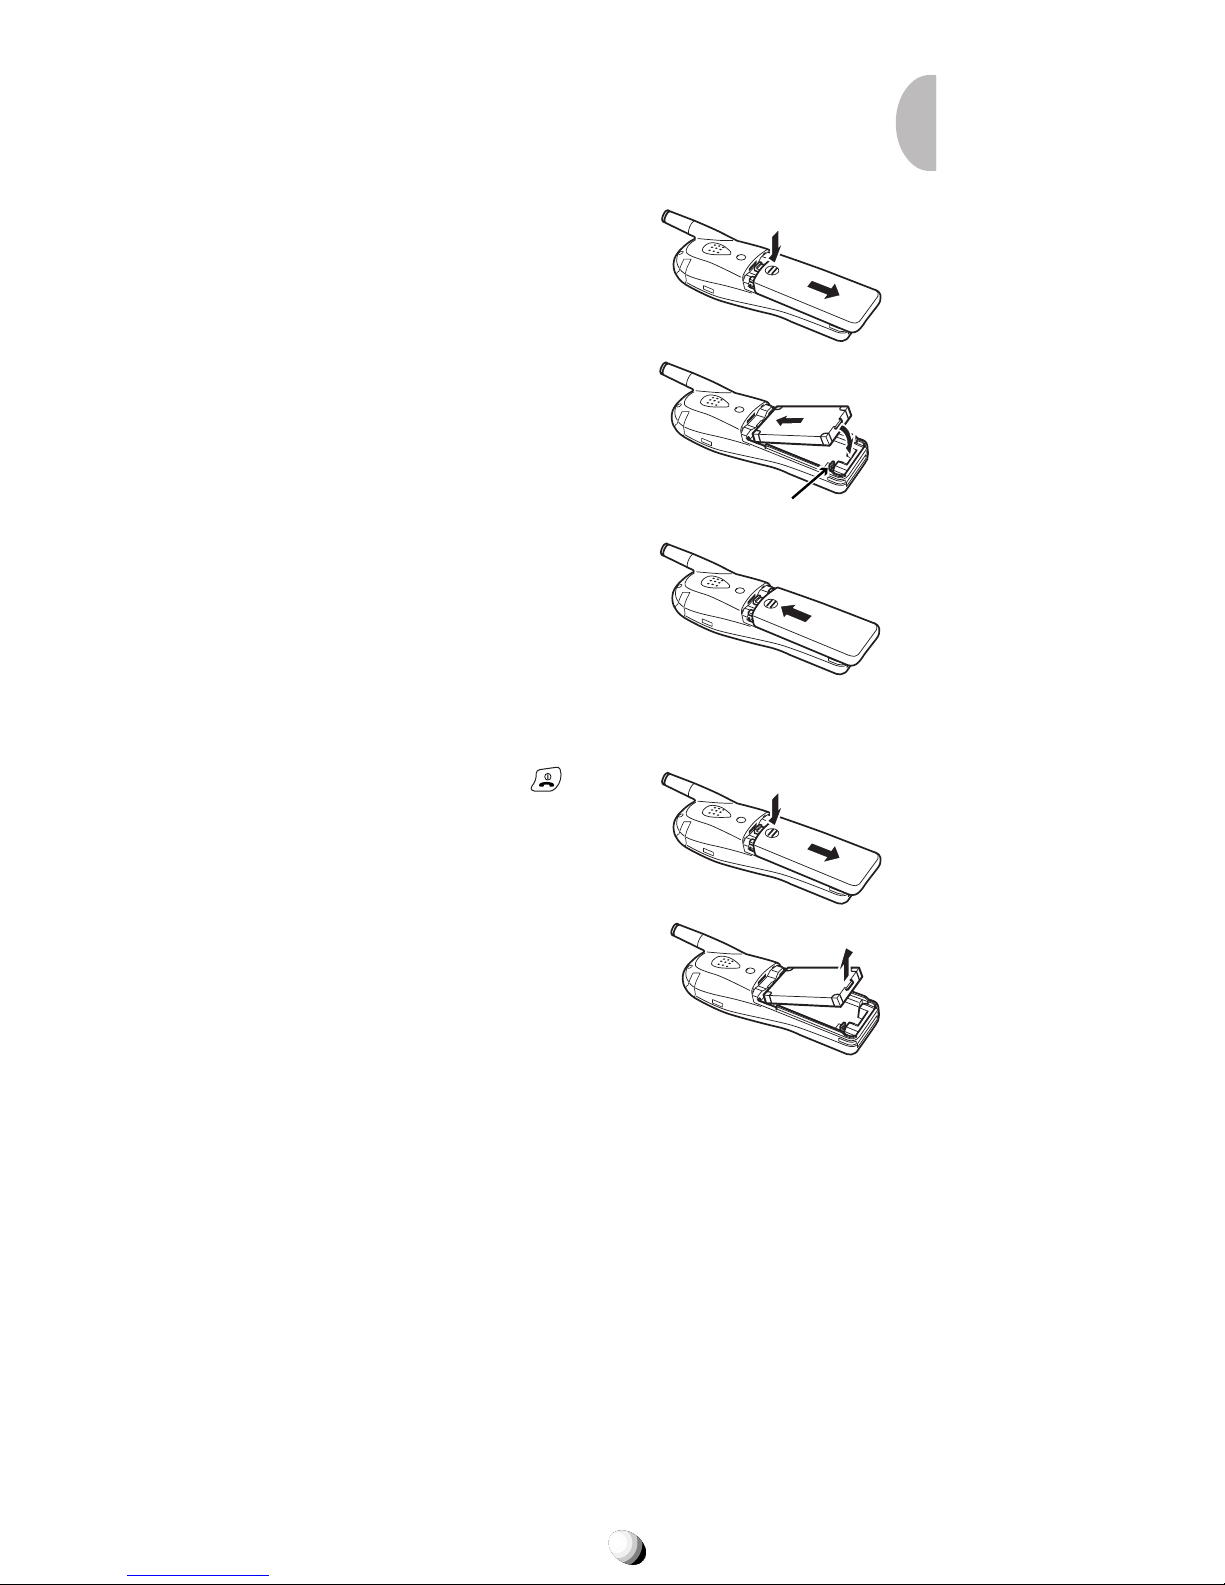
BATTERY FUNCTIONSBATTERY FUNCTIONS
Attaching Battery Pack
1. Press and slide the battery cover to remove it.
2. Place the BTR-9100 battery pack in the battery
cavity so that it fits over
the connector.
3. Slide the cover back to
snap it on.
Connector
Removing Battery Pack
1. Press and hold key to
turn the phone off. Then
press and slide the battery cover to remove it.
2. Lift the battery pack up to
take it out.

20
Recharging the Battery
Your 9155-GPX phone has a built-in charger function.
To recharge the Battery Pack:
1. Insert the BTR-9100 Battery Pack into the phone’ s
battery cavity.
2. If the phone is on with the
indicator displayed,
press and hold
to turn the phone off.
3. Insert the flat connector end of the CNR-9100 AC
Adapter into the connector port on the bottom of
the phone.
4. Plug the AC Adapter into AC120V outlet.
5. “Now Charging” will display with animation and
the
indicator will scroll
in the upper right corner of
the screen. The Charging Indicator at the top of the
phone will light green.
6. “Fully Charged!” displa ys when charging is com-
plete.
7. Disconnect the AC Adapter from the outlet.
8. Press and hold in the buttons on the flat connector of the AC Adapter and pull the connector aw ay
from the phone.
The recharging time, from empty to full, depends on
the environmental temperature, 0 to +35 °C.
Now Charging
Recharging Time
1.5 to 2 h
Battery Type
Lithium Ion Battery Pack (BTR-9100)
Notes: 1. For complete recharging, it is recommended that
the phone be turned off during recharging.
2. It is normal for the battery to become a little warmer
during recharging.
3. Do not feed power to the phone without the battery
pack attached.
AC Adapter
CNR-9100
Buttons to unlatch
9155-GPX
AC120V
21
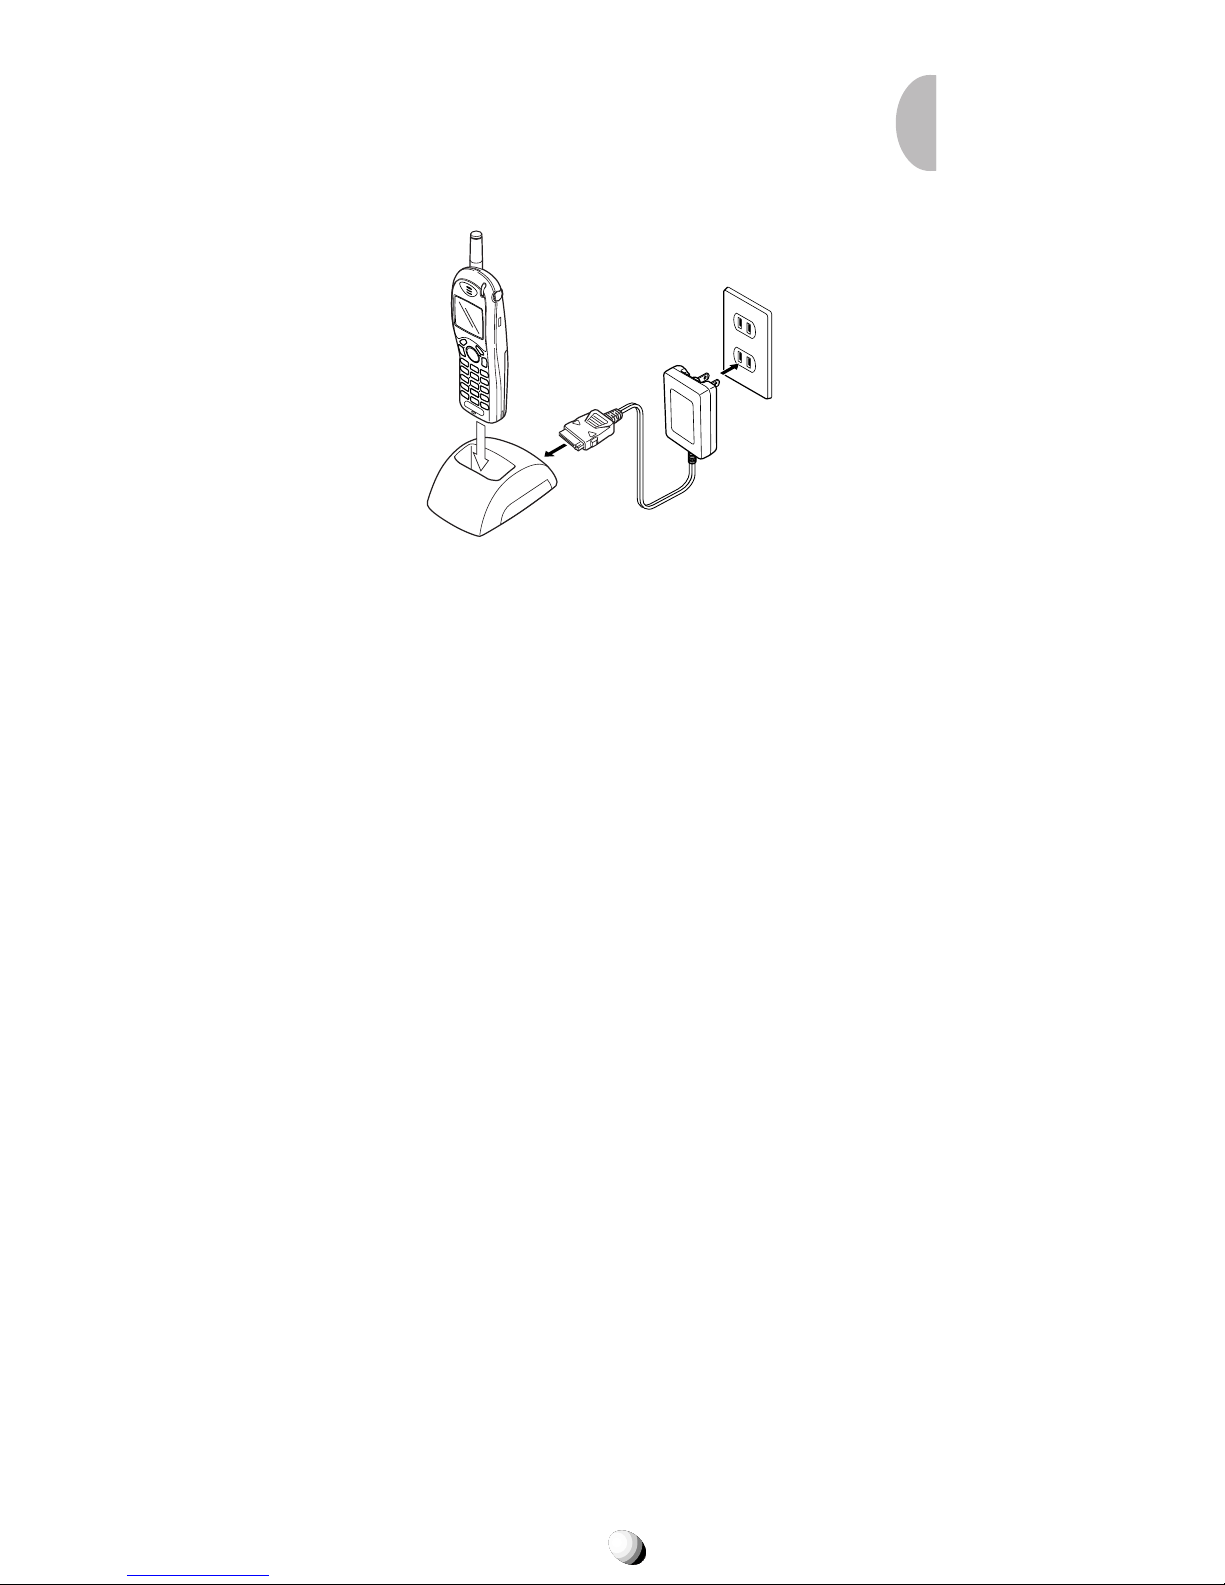
Recharging with the Desktop Holder
The CNR-9100 AC Adapter and the optional accessory
DTH-9100 Desktop Holder can also be used to recharge
the phone as illustrated below.
Desktop Holder
DTH-9100
(Option)
AC Adapter
CNR-9100
AC120V
9155-GPX
Battery Information
•
T emperature e xtremes affect the Battery Pac k’s ability
to charge; alwa ys allow it to completely cool do wn or
warm up first.
•
Subjecting the Battery Pack to e xtremely high or low
temperatures will reduce its capacity and its life expectancy. Always try to keep the Battery Pack between 59°F and 77°F (15°C and 25°C), if possible.
22
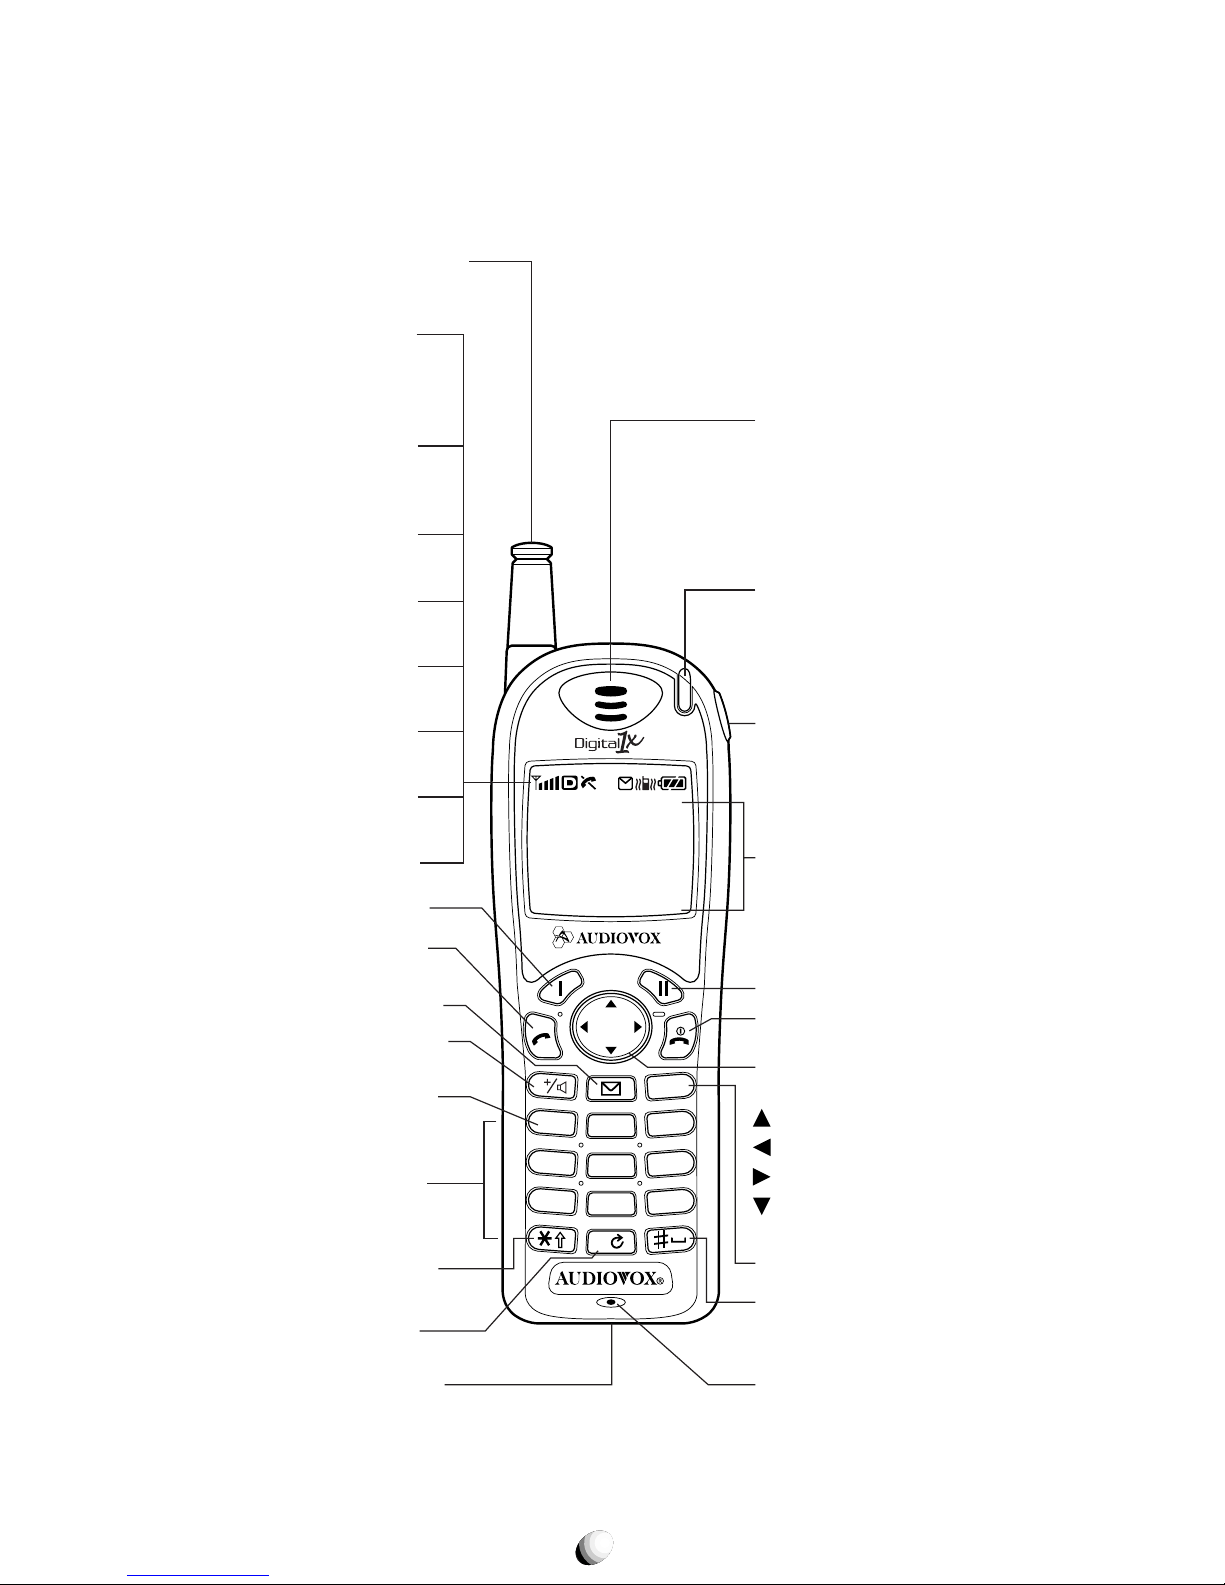
FUNCTIONSFUNCTIONS
External View
Rm
ABCDEFGHIJKL
MNOPQRSTUVWX
YZ1234567890
2
1
3
ABC
DEF
5
4
6
JKL
GHI
PQRS
MNO
8
7
9
TUV
WXYZ
0
CLR
Rc
l
F
V
Retractable
Whip Antenna
Incoming Call
& Charging
Indicator (LED)
Earpiece
Power/Data
Connector
Graphic
Display
End Key with
Power On/Off
Clear Key
Soft Key 2
Multi Function
Key
Up-arrow
Recall
Function
Down-arrow
Microphone
Voice Activated
Dialing &
Space Key
Power
Indicator
Receiving
Signal
Strength
Indicator
Digital
Mode
Indicator
IN USE
Indicator
Roaming
Indicator
Message
Indicator
Battery Level
Indicator
Send Key
Voice Mail &
Speakerphone
One-Touch
Emergency Key
Digit Keys
Vibrating &
Shift Key
Vibrating
Indicator
Soft Key 1
Message
Access Key
Next Key
Earphone
Mic Jack
23
Key Functions
LCD Display Indication
Key- Board Arrangement
Digit Keys
Function Keys
Soft Keys. Functions as shown in the
bottom line on the display.
SEND Key. Originates or answers a call.
END Key. Terminates a call and tur ns the
phone ON/OFF.
Recalls phone numbers from memory and
serves as left-arrow key.
Used with other keys to activate special
features. And serves as right-arrow key.
Controls the volume of Ringer, Key Tone
and Earpiece/Speakerphone and used for
up/down-arrow keys.
Accesses Voice Mail (see page 62) and
activates Speakerphone mode (see page
29).
Displays number of messages and re-
views Text Messages (see page 57).
Clears digits from the display or from a
memory location.
2
1
3
ABC
DEF
5
4
6
JKL
GHI
PQRS
MNO
8
7
9
TUV
WXYZ
0
ABCDEFGHIJKL
MNOPQRSTUVWX
YZ1234567890
Items Descriptions
Receiving Signal Strength Indicator.
Indicates Signal Strength, and
is also a
POWER ON indicator.
Digital Mode Indicator. Phone is operat-
ing in digital mode.
Call in progress.
Out of Service Area.
Out of the Home Area.
Message Indicator. Indicates new Text or
Voice Mail messages.
Vibrating Indicator. Vibrating alert is
active.
Battery Level Indicator. Monitors the
battery charge condition.
Graphic full-dot matrix display with flexible
font size in 3 to 7 lines.
Rm
Use to enter Telephone Numbers
and letters and symbols (see page
32). 1 used for One-Touch
Emergency Feature.
CLR
Rc
l
F
V
Rc
l
F
CLR
V

24
GETTING STARTEDGETTING STARTED
Turning the Phone On/Off
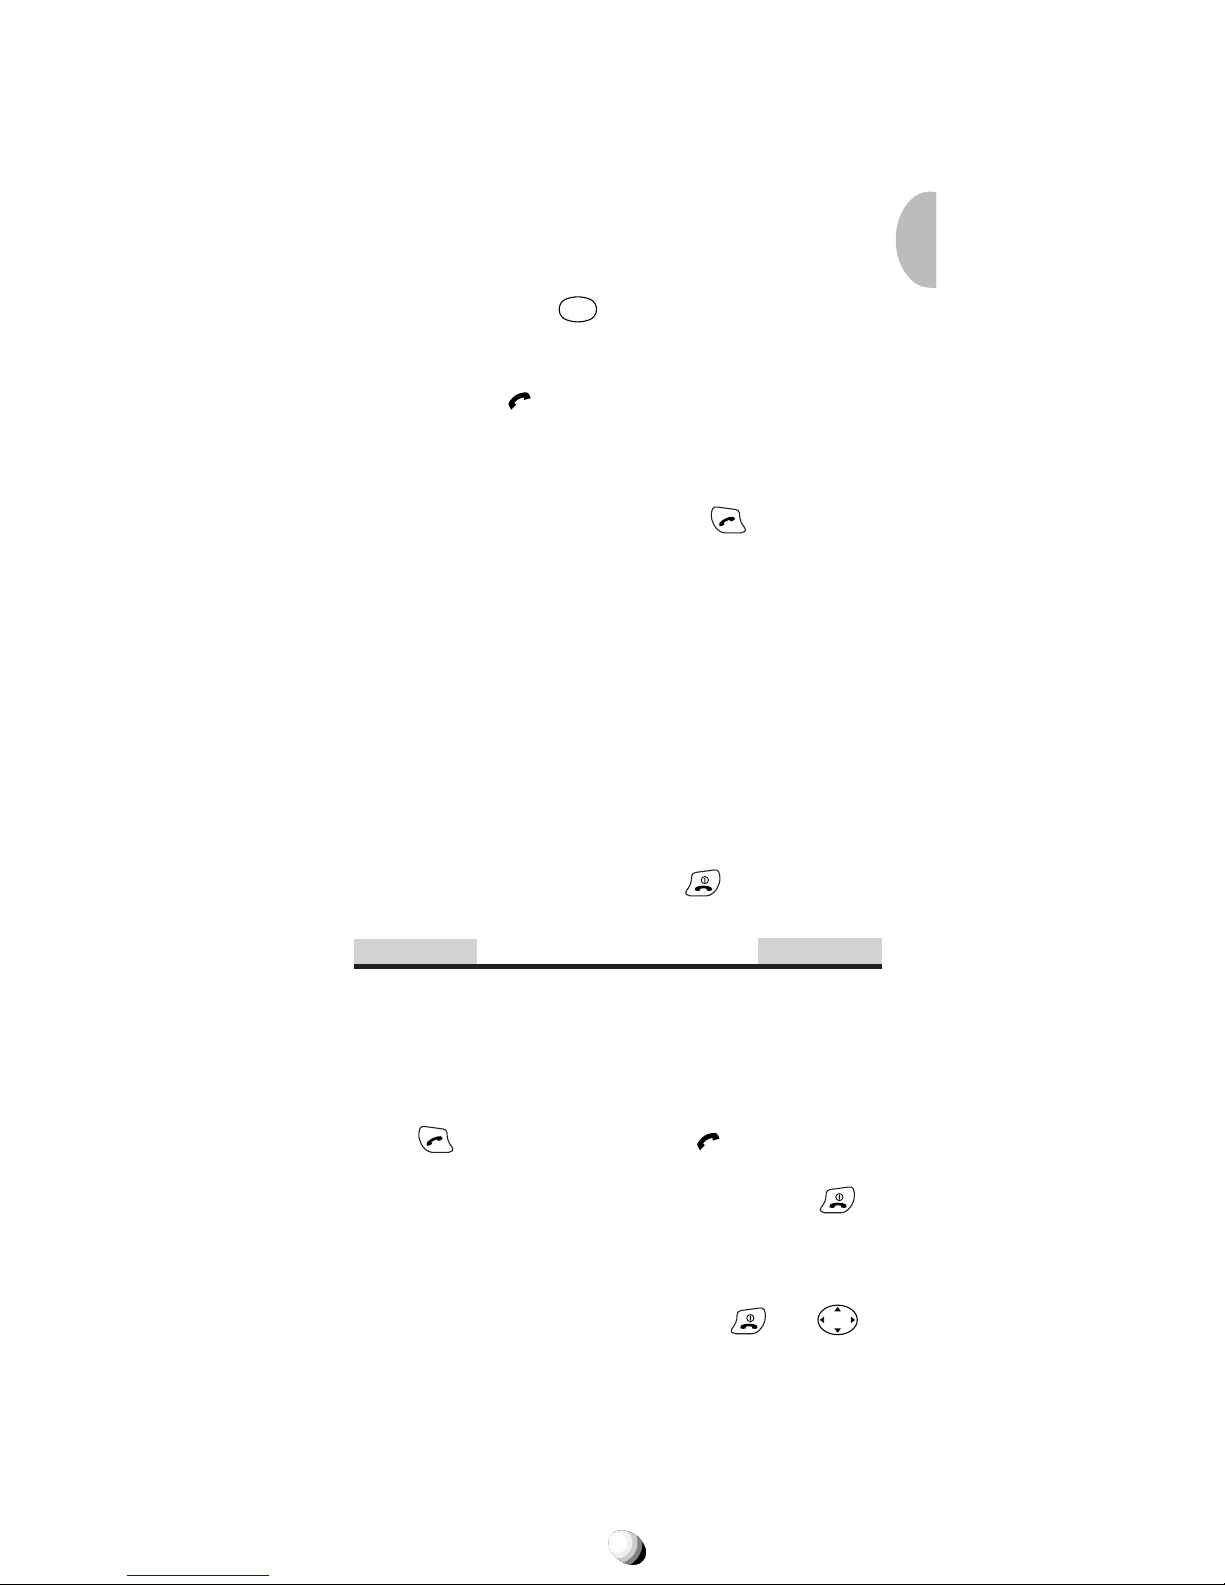
Press and hold .
Indicators and display will momentarily light, and a tone will be heard. To tur n the phone
off, press and hold
.
Antenna Position
The antenna can only be used in its fully extended or
fully retracted position. For optimum performance and
signal strength, or while operating in poor signal areas,
fully extend it.
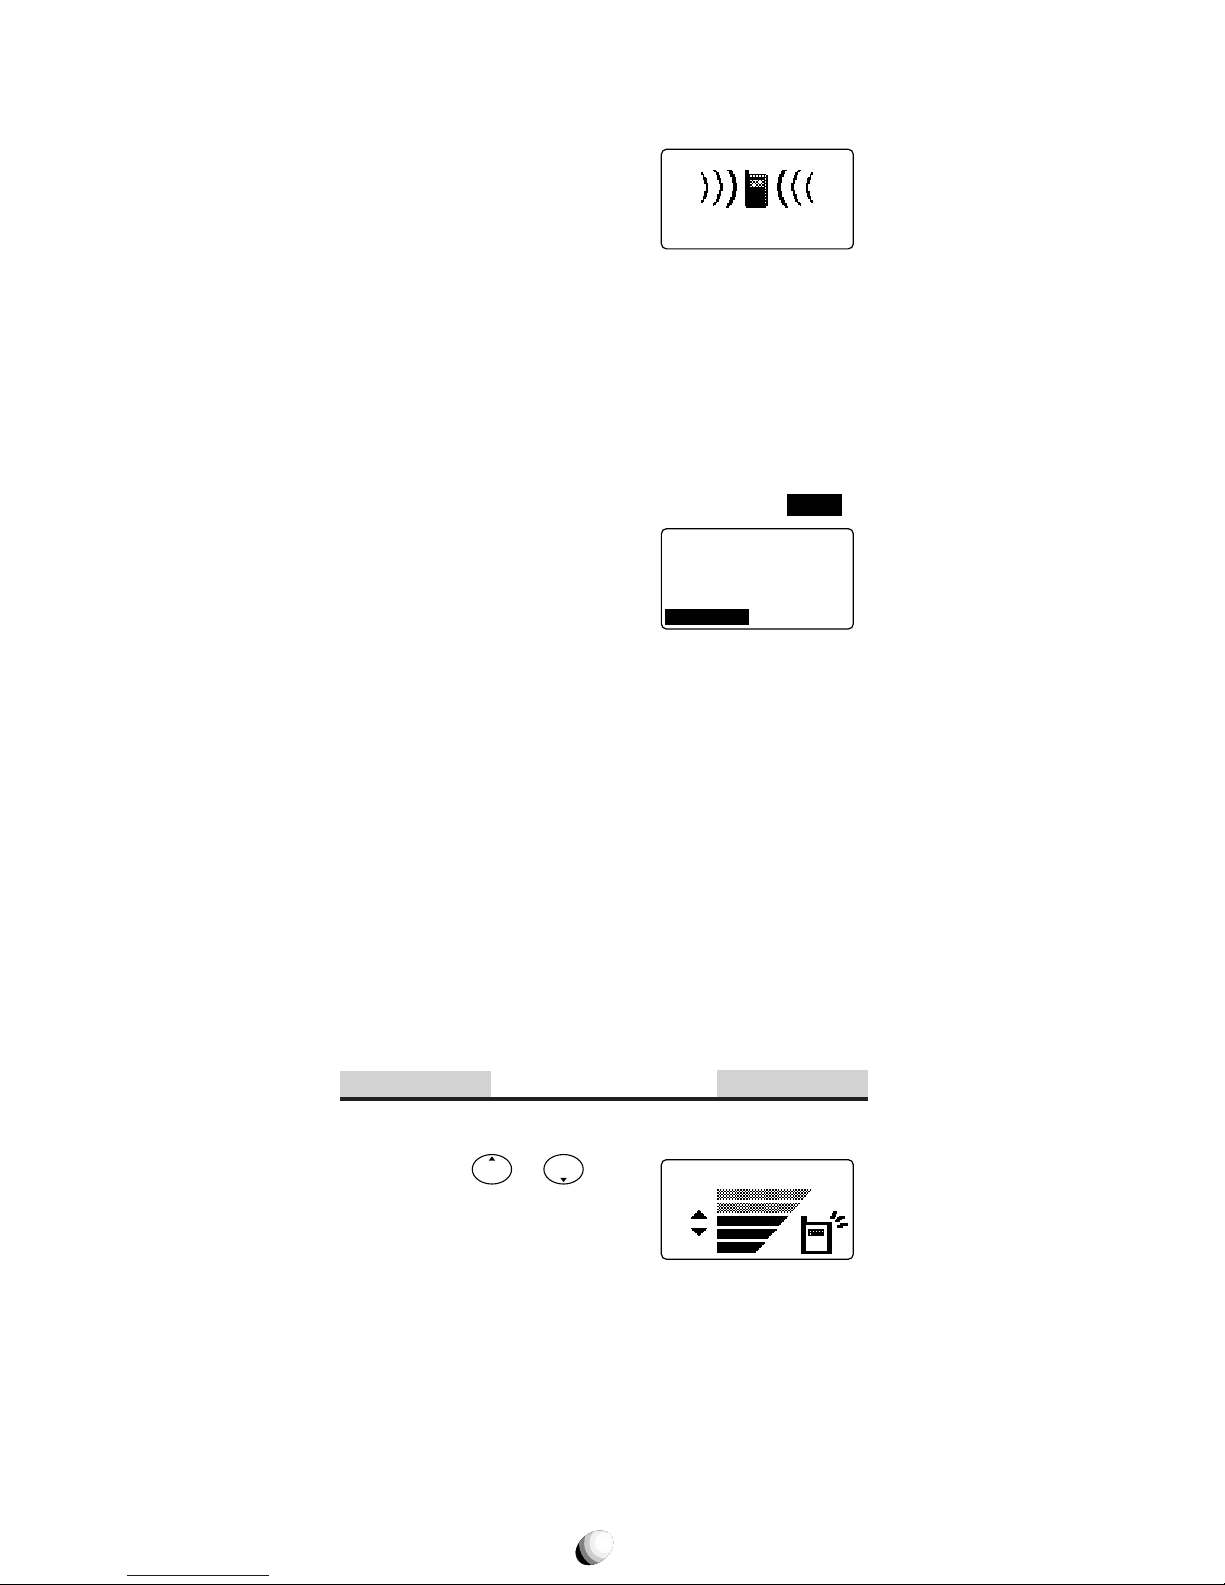
Receiving Signal Strength Indicator
( )
This icon indicates the strength of the signal your phone
is receiving. Four lines indicate maximum signal
strength. Line total may change as you move with the
phone to represent the changing signal strength. If the
signal is not strong enough to place a call, “
” will ap-
pear on the display.
Battery Level Indicator
Monitor the battery charge condition with the level indicator. The number of blocks indicates the battery conditions as follows:
Full charge
Low charge
Flashing indicates discharged.
Battery
Lithium Ion
(BTR-9100)
Mode
Digital 1x
Digital
Analog
Talk Time
up to
125 min.
170 min.
60 min.
Standby Time
up to
270 h
150 h
15 h
The operating times are approximate values and may
vary depending on network configuration and handset
usage.
Power Management
25
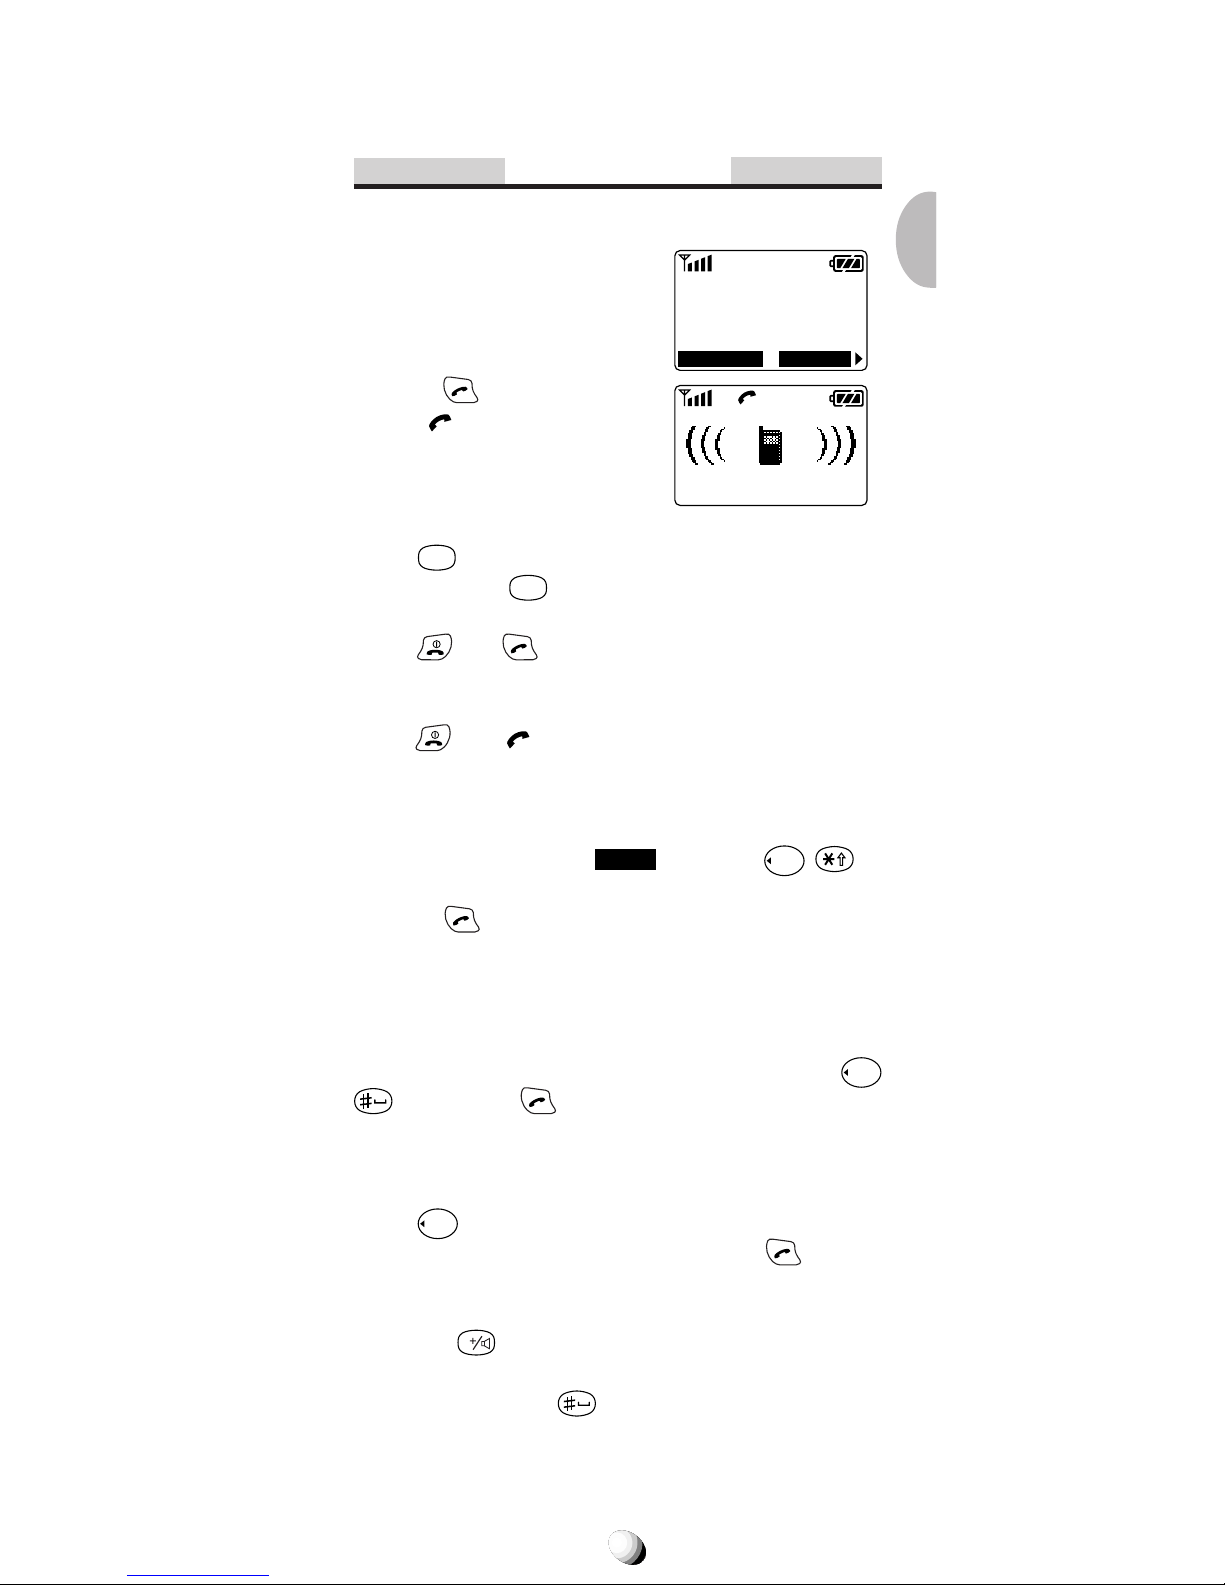
BASIC OPERATIONBASIC OPERATION
Placing Calls
Placing a Call
1. Enter the phone number.
(A maximum of 32 digits will
be displayed.)
2. Press
.
The
indicator will appear
on the display.
• To Correct a Number
Press
CLR
to clear the last digit.
Press and hold
CLR
to erase all the digits entered.
•
If the Call Fails to Go Through
Press and to redial the number.
Terminating a Call
Press . The indicator will no longer appear in the
display.
Last Number Redial
1. Press the key under
Redial
, or press
Rcl
to
recall the last number dialed.
2. Press
to place the call.
See Call History on page 54 for details. See also Re-
dial Soft Key (F04) on page 90.
Dialing the Last Incoming Call
To recall the last incoming Caller ID call, press
Rcl
, then press .
See Call History on page 54 for details.
Phonebook Dialing
Press
Rcl
and enter an address (01 to 99) to recall a
number from your phonebook, then press
.
See Phonebook Recall on page 43 for details.
Tip: The
V
key will be used for Voice Mail access. See
page 62.
Tip: Press and hold for Voice Activated Dialing. See
page 53.
123-456-7890
MenuSTO
Calling...
123-456-7890
26
Speed Dialing
Phone numbers stored in memory can be called without using
Rcl
.
1. Enter the one or two digits of your Phonebook address (1 to 9 or 10 to 99).
2. Press
. The phone number will be displayed.
The
indicator will be displayed and the call will
be placed.
Note: If two telephone numbers are stored in the address,
the Primary Number will be dialed.
Quick Dialing
When this feature is on, the Primary number in your
Phonebook address 02 to 09 can be dialed with just
one push of the key. See Quick Dialing (F01) on page
90 to turn this feature on/off.
1. Press a digit key (
2
ABC
to
9
WXYZ
) for more than one
second.
2. The number in your phonebook is automatically
dialed. The phone number will be displayed. The
indicator will light.
Note: The key 1 is not for Quick Dialing, but for One-
Touch Emergency Call, page 27.
Emergency Call
This feature permits you to place an emergency call ev en
if your telephone is in “Phone Lock”, “Keypad Lock” or
“Restrict” mode. Up to 3 numbers can be programmed as
Emergency numbers. The emergency numbers “ 911” and
“
911” are already preprogrammed. See Changing Emer-
gency Numbers (F62) on page 85.
Example: To Call 911 in “Phone Lock” or “Key-
pad Lock” mode.
1. Enter
9
WXYZ
1 1
. The “911” will not be dis-
played.
2. Press
.
The “91 1” will be displayed.
The
indicator will light,
and the call will be placed.
The emergency calls “911” and “*911” are momentarily
interrupted, while the phone receives the GPS (Global
Positioning System) signals under the digital mode operation.
Important: See EMERGENCY CALLS on page 98.
Calling...
Emergency
911
27
One-Touch Emergency Call
Dials an emergency number with a single key stroke,
even in the “Phone Lock” or “Restrict” mode and can
be turned off to prevent unintentional calls to the emergency number.
See T urning On/Off One-T ouch Emergency Call Fea-
ture (F63) on page 85.
1. Press and hold
1
for more than 2 seconds. The
number in emergency memory location “1” will be
dialed.
2. Then the
indicator will be displayed and the
call will be placed. (The factory preset number is
“911”.)
Note: This feature cannot be used if the Keypad Lock is on.
You need to dial all the digits and .
Emergency Call Mode
When one of the 3 preprogrammed emergency numbers is dialed the phone enters Emergency Call Mode
and will attempt to complete the emergency call using
any availab le cellular system it can find. After the call is
placed, the phone will stay in the Emergency Call
Mode, and attempt to continue to receive service from
the cellular system used to complete the call. “Emer-
gency Call Mode, END to exit” will display and the
phone will automatically exit the Emergency Call Mode
after 5 minutes or after you press
.
Receiving Calls
The phone sounds an alert or vibrates to aler t you of
an incoming call. Also , the LED on the top of the phone
will flash.
Receiving a Call
Press to answer the call. The indicator will be
displayed.
Note: To mute the ringer or stop the vibrating, press .
Any Key Answering
This feature permits you to answer an incoming call by
pressing any key on the key pad except
and
Rcl F
.
28
Caller ID with Name
Displays the number and name of the party calling you.
The last 10 Caller IDs are stored
in the memory for review and
redial. See Call History on page
54 for details.
Note: “Number Restricted” or “Number Unavailable” is dis-
played when Caller ID is restricted or unavailable.
Automatic Calls-in-Absence Indicator
Indicates the number of unanswered incoming calls
along with their name and number , by displaying “Called
XX”, the number of calls (01 to 99) you missed and
through a blinking LED. Press the key under
Refer
to
view Incoming Call History.
Depressing any ke y will clear the
display. See Redial Soft Key
(F04) on page 90.
Ringing Tone with Melody
The 9155-GPX offers 15 diff erent ringer tones and melodies. See Ringer T ype Selection (F32) on page 75 and
Ringer V olume Control (F31) on page 75 and V ibrating Alert (F8) on page 89 for more information.
Distinctive Ringing (Audible Caller ID)
Different ringer styles can be assigned to different
phonebook addresses. See Storing a Ringer T ype with
the Phone Number on page 40 for setting inf ormation.
During Calls
Adjusting the Earpiece Volume
Simply press or to adjust Earpiece/Speakerphone
Volume during a call.
Incoming Call
JACK
123-456-7890
Ear/SPK Vol.
Refer
Called 12
May 21 10:25 am
JACK
123-456-7890

29
Muting a Phone Conversation
1. Press the key under
Mute
, or press
F
F
.
2. Then the screen displays “Phone is muted!”.
3. To return to normal mode, press the key under
Unmute
, or press
F
F
again.
Note: Terminating a call cancels the muting.
Speakerphone Mode (Two-Way)
1. To activate this feature, press
V
during a call.
The screen displays “Speaker ON!”.
2. Press
or to adjust the earpiece/speak-
erphone volume.
3. To return to normal mode, press
V
again.
Notes: 1. Terminating a call cancels the speakerphone mode.
2. It is not recommended to use this feature in a noisy
environment.
Automatic Talk Timer
The talk time of the current call will be automatically
displayed. For example, “1H 23M 45S”.
Scratch Pad Dialing
When you enter a telephone number during a call, the
number will be stored in the Scratch Pad memory and
can be dialed by pressing
after terminating the call.
Note: You can deactivate “Sending DTMF” so that keypad
tones will not be transmitted to the calling party. See
Sending DTMF (F34)
on page 75.
Call Waiting
If you have Call Waiting service you may hear a beep
tone when you are on a call alerting you of an incoming
call. “New Caller” is display ed along with the new caller’ s
name and number.
1. Press
to answer the new call.
2. Press
again to switch between the two calls.
30
Three-Way Calling
Three-Wa y Calling allows y ou to call a third party when
a call is already in progress.
1. Enter a number and press
to call the third
party.
2. Press
again to connect all three parties.
Ask your service provider for the detailed information.
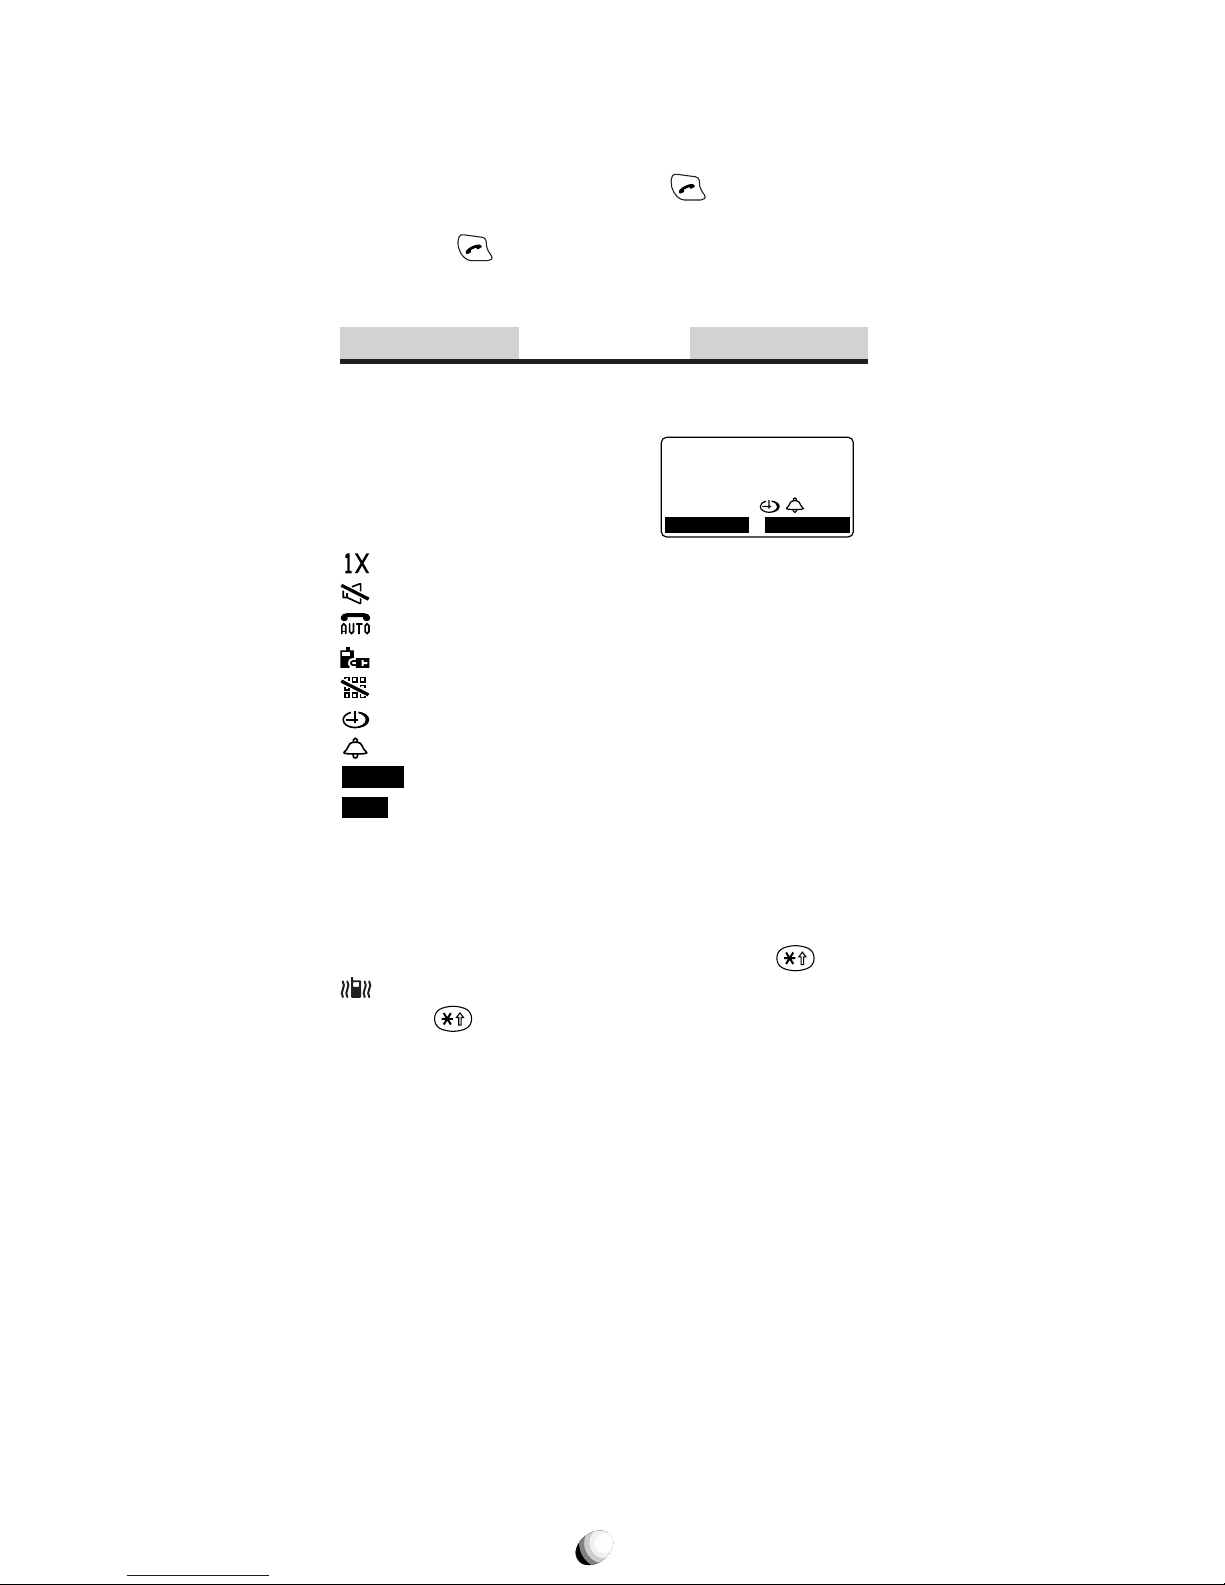
Standby
Indicators on Standby
In standby, your phone displays
date and time, various settings
status, and soft keys.
: See Service Mode (F71) on page 87.
: Ringer Volume is in Silent mode. See page 75.
: Automatic Answering is active. See page 90.
: Phone Lock is active. See page 72.
: Keypad Lock is active. See page 71.
: Countdown Timer is active. See page 80.
: Clock Alarm is active. See page 79.
Redial
: See Last Number Redial on page 25.
Web
: See Accessing Internet on page 65.
Note: For displaying date and time, see Clock Indicator (F42)
on page 78 and Clock Adjustment (F43) on page 79.
Vibrating Alert
To activate Vibrating Alert, press and hold . The
indicator will be displayed. To deactivate it, press
and hold
again. See also Vibrating Alert (F8) on
page 89.
Multilingual
Menus and prompts can be display ed in English, Spanish, French and Portuguese. See Language Selec-
tion (F24) on page 74 for more information.
Redial Web
May 20 Mon
3 : 15 pm
 Loading...