

Page 1

Audiothingies Micromonsta
User manual preliminary version
Page 2
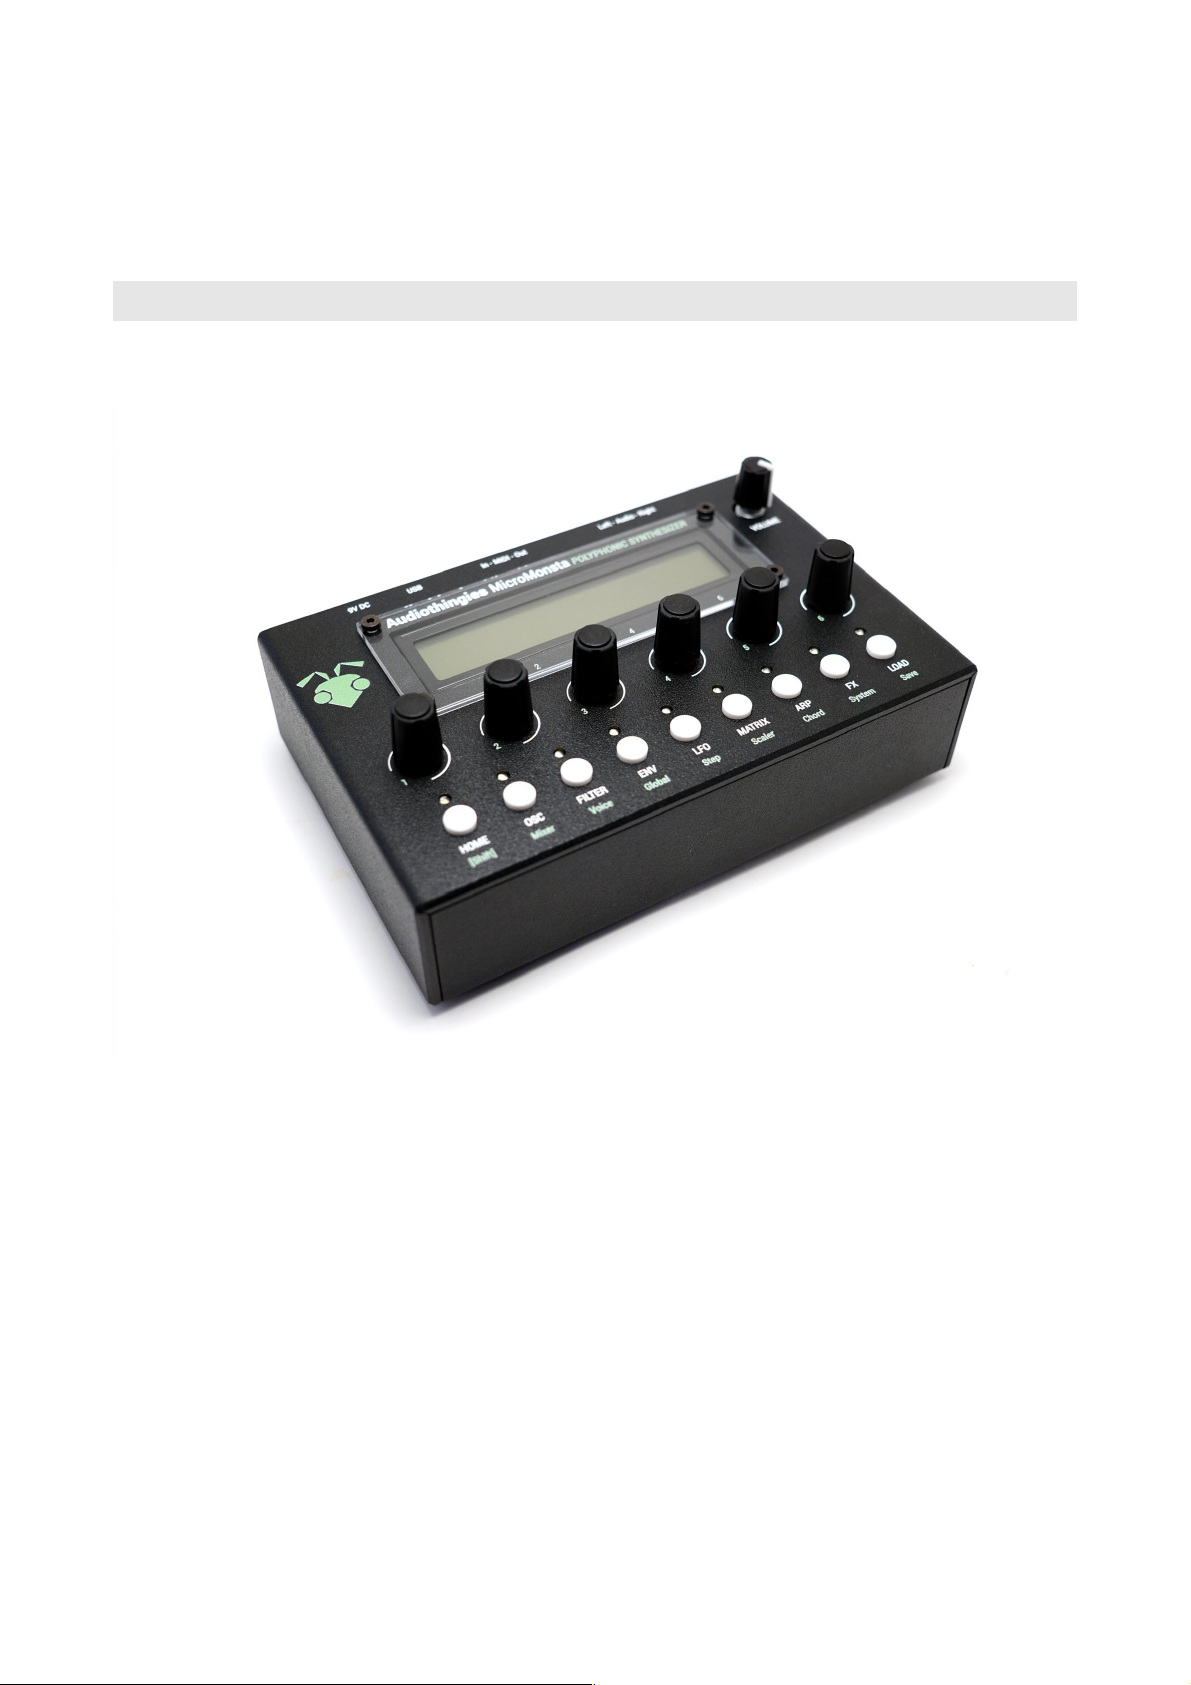
Overview
Specifications
The Micromonsta is an 8-voice polyphonic desktop synthesizer.
Small, powerful, great sound, usability and easy editing were key elements while designing the
Micromonsta.
It features:
• 8 voices of polyphony
• 2 oscillators, 1 sub oscillator, 1 multimode filter, 3 envelopes, 3 LFOs, 6 modulation slots, 3
scalers, 1 lag operator per voice
• 12 oscillator types + 30 (multi-sampled) wavetables (15 factory featuring both evolving
sweeps and totally random wavetables + 15 user for your own creations)
Audiothingies Micromonsta user manual 2
Page 3

• 8 filter types
• Powerful detuning options (both per voice and per oscillator)
• Powerful arpeggiator with step pattern editor, slide and accent capable for 303-ish
arpeggiated phrases
• Deep modulation matrix (with for example filter parameters, envelope or LFO speeds as
destination)
• A chorder module allowing the generation of 4-note chords within a key/scale
• Internal FXs
• 384 preset slots to store your sound creations
Audiothingies Micromonsta user manual 3
Page 4

Front panel
On the front panel you will find:
• 2 x 24 characters LCD screen – Black on white
• 6 encoders
• 9 pushbuttons with their associated LEDs
Audiothingies Micromonsta user manual 4
Page 5
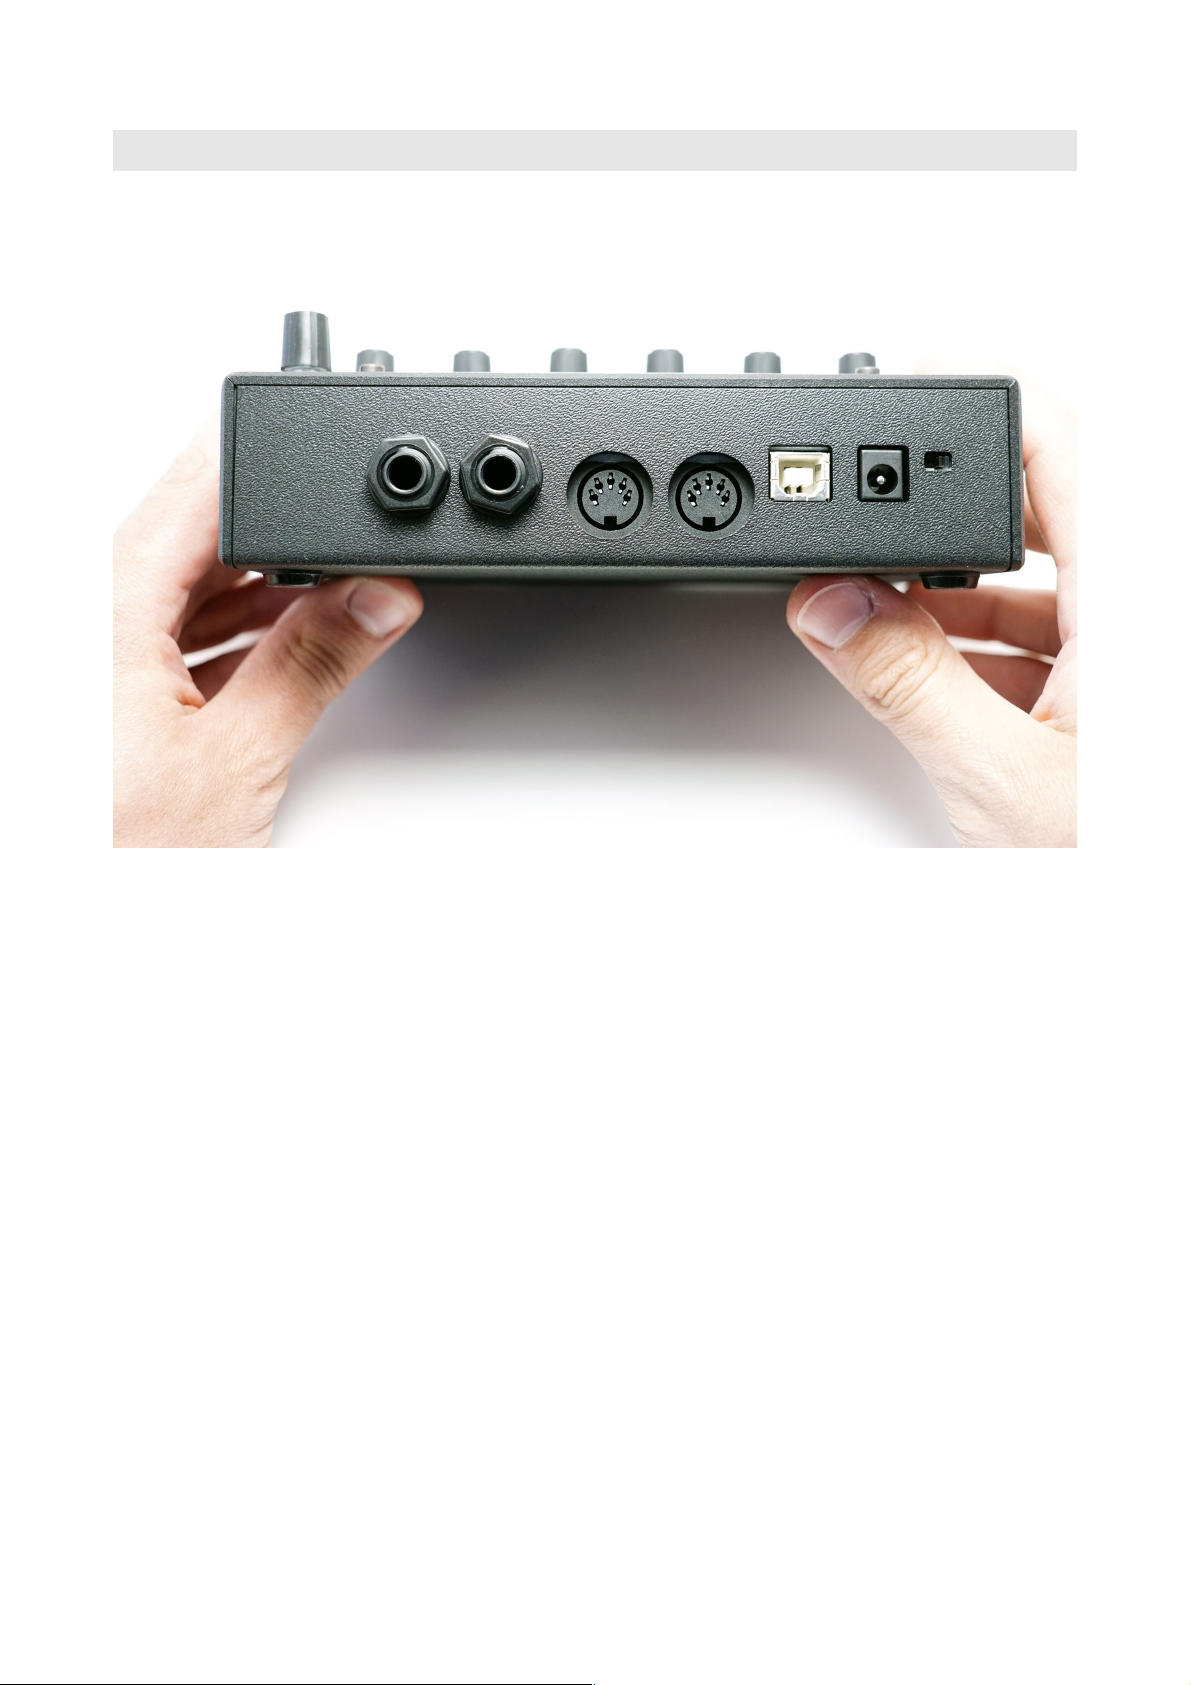
Rear panel
On the rear panel, from left to right on the above picture
• Audio outputs (use left output when using mono)
• MIDI connectors
• USB port – used only for firmware update and user wavetable update
• 9V DC input socket
• Power switch
Audiothingies Micromonsta user manual 5
Page 6

Quick start
1. Connect audio outs to a mix table, turn the volume knob fully clockwise.
2. Connect a MIDI keyboard into the MIDI Input
3. Power the MM with a 9V DC 2.1mm PSU.
4. Play some notes on MIDI channel 1, you should hear patch number 1 playing
5. Press Load
6. Turn encoder 6 to navigate thru the patches. Press Load again to load selected patch, press
Home to cancel and return to previously loaded sound.
7. Alternatively, you can push encoder 1 & 2 to navigate and load the previous or next patch
Audiothingies Micromonsta user manual 6
Page 7

Using the Micromonsta
The MM has been developed with easy editing in mind and we do think it is really easy to edit
given the synthesis complexity featured onboard. However, some parameters may need some
explanations that you will find in this manual.
Navigating pages
How to navigate throughout the MM architecture?
Parameters are mapped across different sections accessed by pressing a corresponding button on the
front panel.
When a section has several pages, you access them by successively pressing the same button several
times. When you are on the last page, it returns to the first one.
For example, pressing OSC several times will make you travel the following pages: OSC1 > OSC2
> SUB > OSC1 > OSC2 etc.
Some sections (the ones labelled in green) are accessible by simultaneously pressing Home [shift] +
another button. For example [shift] + OSC will take you to the Mixer page.
Editing parameters
The LCD provides up to 6 parameters to edit.
Use encoders 1-6 to change their corresponding parameter value.
Some parameters can be reset to a default value when pushing the corresponding encoder (all
bipolar parameters for example).
Audiothingies Micromonsta user manual 7
Page 8

HOME | Main page
This is where you land when you power your MM polyphonic synthesizer
P038 cut res mix bpm
RandJuno 0 100 74 100
You get the program number and name as well as shortcuts to 4 different parameters.
You can set these parameters, per preset, in the Globals menu (2nd page)
You can navigate presets from this screen by pressing encoder buttons 1 and 2.
Quite useful in a live situation.
NOTE: When in this mode, LEDs 2 to 9 will show the activity of voices 1 to 8.
Audiothingies Micromonsta user manual 8
Page 9

OSC | Oscillators
Oscillator 1
Oscillator 1 is the main oscillator. It also drives the sub oscillator.
OSC1 trs tun shp lfo1 mix
saw +3 +5 15 -25 121
• OSC1 oscillator algorithm selector
• trs patch transpose (+- 2 octaves per semitone step)
• tun oscillator fine tune
• shp oscillator shape modifier
• lfo1 lfo1 modulation amount (targets shape parameter)
• mix oscillator mix level
Oscillator 2
Oscillator 2 is functionally the same as oscillator 1, but its tune can be offset from -24 to 24
semitones.
OSC2 rng tun shp env3 mix
sin -7 -15 100 +10 99
• OSC2 oscillator algorithm selector
• rng oscillator coarse tune
• tun oscillator fine tune
• shp oscillator shape modifier
• env3 env3 modulation amount
• mix oscillator mix level
Audiothingies Micromonsta user manual 9
Page 10

Sub / Noise
In this page, you access oscillator 1′ sub oscillator and noise parameters.
SUB oct mix NZE mix
squ -1 127 -9 25
• SUB sub shape
• oct sub oscillator octave number
• mix sub oscillator mix level
• nze noise filter
• mix noise mix level
The oscillator algorithms
12 oscillators, 15 factory wavetables and 15 user wavetables are available for each of the 2 main
oscillators.
mph
Morphing oscillator, when turning the shape parameter, it morphs from triangle (shape = 0), to
sawtooth (shape = 42), to square (shape = 84) to pulse width.
Quite a very versatile oscillator, it can do lots of things other algorithms aren’t capable of doing.
sin
A sinus oscillator that turns into a basic FM operator with the shape control
tri
A triangle oscillator into a foldback digital distortion. Shape controls the gain.
When shape is set to 127, the oscillator will produce a triangle wave with its pitch one octave and a
fifth higher.
Audiothingies Micromonsta user manual 10
Page 11

saw
The classic sawtooth waveform.
Shape adds a second phase shifted sawtooth to the first one.When shape is set to 127, the oscillator
will produce a sawtooth wave with its pitch of 1 octave higher.
squ
The classic square oscillator with PW.
Shape controls the pulse width.
ss1
This oscillator produces 3 detuned saws for that Roland-ish “supers@w” sound, but without the
nasty aliasing.
Shape controls the detuning of 3 oscillators
ss2
Same as ss2, but the detuning between oscillators is unbalanced, which gives slightly different
results.
Shape controls the amount of detuning.
sws
This oscillator internally has 2 oscillators, 1 master, and 1 sawtooth slave oscillator that is hard
synced to the master.
The shape parameter controls the pitch of the slave oscillator.
sqs
Same as sws but with a square slave oscillator
rz1, rz2 and rz3
Those are phase distortion algorithms from the Casio CZ series.
They all simulate a filter sweep with the shape parameter.
Audiothingies Micromonsta user manual 11
Page 12

rz1 is the saw version, rz2 the triangle, and rz3 the trapezoidal one.
w01 to w15
Factory wavetables
• w01 sawtooth with formant shift
• w02 square with formant shift
• w03 random wavetable
• w04 sine + random partials
• w05 guitar note with formant shift
• w06 sample 1
• w07 sample 2
• w08 sample 3
• w09 sample 4
• w10 random organ waveforms
• w11 sine + even harmonics sweep
• w12 sine + odd harmonics sweep
• w13 sine + even + odd harmonics sweep
• w14 vowels
• w15 spoken words
Each wavetable contains 33 slices. The shape parameter controls the position of the reading index
and will interpolate between the slices.
w16 to w30
User wavetables. By default, these wavetables produce no sound… until you upload your own :)
Audiothingies Micromonsta user manual 12
Page 13

Oscillator tips
While both oscillators are essentially the same, they do not have the same direct shape modulation
source, lfo1 for osc1 and env3 for osc2.
So if you want to do the classic pwm sound, osc1 is better suited as you can directly modulate the
pulse width with lfo1, while if you want to do the classic hard sync sound, osc2 might be a wiser
choice as you’ll be able to control the pitch of the slave oscillator with env3.
This makes a better use of the internal architecture and can save modulation matrix slots.
About the noise filter (and all bipolar-value filters inside the MM)
Throughout the synthesis architecture, several bipolar-value filters are available (noise filter, delay
filter, global filter for example).
These filters are all working in the same way:
• When the value is negative, it acts as a 6dB lowpass filter
• When the value is positive, it acts as a 6dB hipass filter
• When set to 0, it has no effect
Audiothingies Micromonsta user manual 13
Page 14

Source mixer | MIXER
This is the mixer section, where you can adjust all sources volumes, as well as a VCA drive
parameter, allowing adjustments to the overall patch volume (if you want to balance patches
volumes, this is the parameter you need).
osc1 osc2 sub rmd nze vca
100 99 50 0 0 +6
You have access to the 2 oscillators mix level, as well as the Sub and noise level.
You can also set the rmd level, which is the level of the output of osc1 and osc2 thru a ring
modulator.
When adjusting patch volume, always compare the patch level compared to one of the factory
presets, pushing this parameter too hard (especially for polyphonic patches) may end with unwanted
nasty distortion.
Audiothingies Micromonsta user manual 14
Page 15

Filter | FILTER
This is the page where you control one of the main component of a subtractive synthesis capable
synthesizer: the filter. The filter allows to remove and emphasize the frequencies generated by the
oscillators.
FLTR cut res env2 lfo2 kbd
LP4 50 60 +50 -15 50%
• FLTR Filter type
• cut cutoff frequency (in semitones)
• res resonance amount
• env2 envelope 2 modulation amount (targets cutoff)
• lfo2 lfo2 modulation amount (targets cutoff)
• kbd keyboard tracking amount (0, 25%, 50%, 75%, 100%)
Filter types
The Micromonsta filter topology allows different filter types
• LP1 1-pole lowpass filter
• LP2 2-pole lowpass filter
• LP3 3-pole lowpass filter
• LP4 4-pole lowpass filter
• HP2 2-pole hipass filter
• BP2 2-pole bandpass filter
• Not Notch filter
• Pha Phaser filter
Audiothingies Micromonsta user manual 15
Page 16

All the lowpass filters have resonance compensation = no bass frequency loss with increased
resonance values.
The voice settings page | Voice
This is where you will find the settings related to the voices
mod uni detunin – pan p2 1 32 20 lin 28
• mod synth mode (polyphonic 1, polyphonic 2, mono, legato)
• uni number of unison voices (1/2/4)
• detunin voice detune amount
oscillator random detune amount
• pan pan spread algo (lin/equ)
pan spread amount
Audiothingies Micromonsta user manual 16
Page 17

Envelopes | ENV
The Micromonsta features 3 envelopes per voice. They all have the same parameters and their
behavior is the same.
ENV1 atk dcy sus rel rst
exp 0 60 95 25 off
• ENV1 envelope curve (fast | exponential | linear)
• atk attack time
• dcy decay time
• sus sustain level
• rel release time
• rst reset switch, when on, the envelope is reset to zero when the voice is
re-triggered (off = analog mode)
Attack, decay and release times can be set from 1ms to 30s, and they are available as destinations in
the modulation matrix.
Audiothingies Micromonsta user manual 17
Page 18

The Global page | Global
Per preset global settings
Here you will find the global settings for the preset
bnd gld eq bpm
2 25 0 125
• bnd pitch bend range (0 – 24 semitones)
• gld glide time
• eq global eq
• bpm patch tempo (only used if midi clock sync is off)
Home page parameter assignments
In this menu, you can set the 4 shortcuts to parameters available in the Home page.
encoder en3 en4 en5 en6
assign cut res bpm mix
• en3 encoder 3 assignment
• en4 encoder 4 assignment
• en5 encoder 5 assignment
• en6 encoder 6 assignment
Audiothingies Micromonsta user manual 18
Page 19

Low frequency oscillators | LFO
The Micromonsta has 3 LFOs per voice that can optionally be synced to the patch tempo
LFO1 spd dly atk phs rst
tri 1/8 0 30 45 on
• LFO1 waveform
• spd speed (around 0.05Hz to 78Hz – values above 127 are tempo sync values)
• dly delay time (0 to 10s – values above 127 are tempo sync values)
• atk attack time (0 to 30s)
• phs phase (0° to 315°)
• rst key-trig reset
LFO speed is available as a destination in the modulation matrix.
LFO waveforms
Different waveforms are available, they are:
• sin sinus
• tri triangle
• saw sawtooth
• squ square
• s&h sample and hold
• rnd continuously randomly moving waveform
• stp step sequence (uses the steps programmed in the step page)
The influence of the key-trig reset parameter
The LFOs behave differently whether the reset parameter is set to on or off.
Audiothingies Micromonsta user manual 19
Page 20

Rst = on
When set to on, the phase of the LFO will be set to the phase programmed with the phase parameter
when the voice is trigged by a key.
If delay is applied, then it will reset to this phase value when the delay time has elapsed.
Rst = off
When set to off, the phase is never reset to any value, the LFOs are free-running, however the phase
parameter now controls the phase offset between the 8 voices.
Example: if the phase is set to 90°, voice 2 and voice 1 will have their phase offset by 90°. Same for
voice 3 and voice 2. Etc… So if the phase is set to 0, you now have locked free running LFOs.
Note: This phase relationship will be true unless you modulate the LFO speed in the modulation
matrix. If you applied modulation and removed it, you can resync the LFOs either by:
• sending a MIDI start command
• turning the phase parameter encoders
Audiothingies Micromonsta user manual 20
Page 21

The 8-step LFO sequence | Step
This page is slightly different from the others:
>>> +8 0 +25 +51 len
-5 -59 +44 +53 8
To program a sequence:
• Use encoder 1 to select the 4 active steps to be edited (marked with >>>)
• Encoder 2 to 5 will set the 4 active step values.
• Encoder 6 sets the length of the sequence.
Remember that, to be active, one (or several) LFO(s) shape must be set to ‘stp’ for the sequence to
have an effect.
And you also need to set a modulation destination amount different from 0 for this LFO in the
matrix too to hear the effect of the sequence on the sound.
Audiothingies Micromonsta user manual 21
Page 22

The modulation matrix | MATRIX
This is where things can start to get real fun… The matrix contains 6 patch cords. Each patch cord
allows you to modulate a parameter (a modulation destination) with a modulation source, and set
the amount of modulation.
The 6 patch cords are spread on 3 pages, so that’s 2 patch cords per page.
Patch 1 Patch 2
vel>cut +12 lfo3>pan +32
As you can see, you have access to the modulation source, modulation destination and modulation
amount, for both patches at the same time.
Modulation sources
Not
vel
aft
bnd
whl
Note number
note velocity
aftertouch
pitch bend
mod wheel
Cst
rnd
env1
env2
env3
Constant value
random number
envelope 1
envelope 2
envelope 3
Lfo1
lfo2
flo3
LFO 1
LFO 2
LFO 3
Modulation destinations
Ptc
fin
tn1
ft1
tn2
ft2
osc1
osc2
nze
xO1
Pitch (coarse)
pitch (fine)
osc1 tune
osc1 fine tune
osc2 tune
osc2 fine tune
osc1 waveshape
osc2 waveshape
noise color
osc1 mix
XO2
xSb
xRm
xNz
cut
res
a1
d1
r1
Osc2 mix
sub mix
ringmod mix
noise mix
cutoff frequency
resonance
env1 atk time
env1 decay time
env1 release time
A2
d2
r2
a3
d3
r3
lfo1
lfo2
lfo3
env2 atk time
env2 decay time
env2 release time
env3 atk time
env3 decay time
env3 release time
LFO1 speed
LFO2 speed
LFO3 speed
Some sources are bipolar (lfo’s, rnd), other unipolar (envelopes, velocity, …).
Modulation amount is bipolar, meaning you can reverse the modulation source amount by setting a
negative number. On lfo’s, this reverse the phase for example.
Audiothingies Micromonsta user manual 22
Page 23

Before using the matrix
Without even using the matrix, the P6 has some fixed modulation assignments:
• ENV1 is routed to the AMP VCA
• ENV2 is routed to filter cutoff
• ENV3 is routed to OSC2 shape
• LFO1 is routed to OSC1 shape
• LFO2 is routed to filter cutoff
Look at the OSC1, OSC2 and Filter page to set these modulation amount.
This means that if you want to modulate the filter cutoff by a LFO, the first best candidate is LFO2,
as it is already routed to the filter cutoff, it does not “eat” a modulation slot.
Some more are available in the Voice and Global pages (glide, pitch bend, detune).
Audiothingies Micromonsta user manual 23
Page 24

Scalers & Lag | Scaler
Scalers allow you to scale the amount of a modulation source (for example scaling ENV1 with note
velocity will change the volume of the note according to its velocity).
The lag operator will lowpass filter a modulation source. It can be used to smooth a source, for
example a square LFO.
Scalers 1&2
Scaler1 Scaler2
mod>lfo2 +63 vel>env1 +32
You have access to scalers source, destination and amount, like the modulation matrix page.
Scaler 3 & Lag
Scaler1 LAG src amt
env3>lfo2 -20 lfo3 100
Here you can set scaler 3 source, destination and amount, as well as the lag source and amount.
About the scaler amount
To better understand what the scaler is doing, let’s take an example: say you scale LFO2 with
modulation wheel and LFO2 is routed to filter cutoff with a value of +40 in the filter page.
If you set the scaler amount to max (+63):
When modulation is set to max, LFO2 will change the filter cutoff, the maximum amount being set
in Filter page, that is +40
When modulation wheel is set to 0, LFO2 will have no effect on filter cutoff
Now, what does happen if you set the scaler amount to 50% (+32)
When modulation is set to max, LFO2 will change the filter cutoff, the maximum amount being set
in Filter page, that is +40
But when modulation wheel is set to 0, LFO2 WILL have an effect on Filter cutoff, the more the
scaler amount, the less the effect, here at 50% of +40, which is +20.
Audiothingies Micromonsta user manual 24
Page 25

In fact, the scaler amount allows you to set a minimum value for the scaler destination when the
source is set to its minimum value. Sounds scary? Try them by yourself, they’re easier than you
may think and they’re the ideal way to add velocity or aftertouch expression to your patches.
Audiothingies Micromonsta user manual 25
Page 26

The pattern arpeggiator | ARP
On top of its powerful synthesis capabilities, the Micromonsta is equipped with quite a powerful
arpeggiator engine, capable from classic to more esoteric polyphonic arpeggios.
The arp page
The first page is the classic side of the arpeggio
ARPG stl gat oct spd lat
off up 64 2 1/8 off
• ARPG arp on/off
• stl arp style (up, triplet up, down, triplet down, up & down, random, as played)
• gate gate time
• oct octave spread (0 to 3)
• spd arp speed
• lat keyboard latch
The arp pattern sequence edit page
This is where you can add spice to your arpeggio sequence.
You access this page from the arp page by pressing a 2nd time on the ARP button.
[<1c1]c1<c1c1<c1c8 len
-/&_&-_&x_&_&x_&Xx 16
This page can be quite intimidating, this is by far the most complex page of the whole synth, but it’s
quite powerful once you get into it.
In this page, encoder 1 allows you to select a block of 4 steps to edit.
Encoder 2 to 5 allow you to edit those 4 steps.
Encoder 6 allow you to set the length of the sequence.
Audiothingies Micromonsta user manual 26
Page 27

The 1st line
The first line is where you actually enters notes or events.
Here are the possible events:
• a arp note
• < lowest note minus 1 octave
• 1 to 8 a specific note within the chord you play (low to high)
• > highest note plus 1 octave
• c chord
The 2nd line
The 2nd line allows you to edit rhythm and accent. Essentially, it controls the note velocity and gate
time.
Here are the possible events:
• x velocity: note | gate: arp setting
• X velocity: full | gate: arp setting
• _ velocity: note | gate: 100% (tie)
• / velocity: full | gate: 100% (tie + accent)
• & extends the previous step (adds 1 step to gate time)
• o rest – or silence if you prefer
Tip 1: if you don’t want to bother with that and only use the arp like a classic arp, set length to 1,
and 1st step note to to a and rhythm to x and you’re done.
Tip 2: if you set the voice mode to m2 (legato mode), a step set to _ or / will slide to the next step if
it is different from a rest and if glide is different than 0. Great for 303-ish mono sequences.
Audiothingies Micromonsta user manual 27
Page 28

The chorder | Chord
The chorder can generate up to 4-note chords within a key/scale, that is to say it can generate 3
notes in addition to the note you play.
CHRD key scl iv1 iv2 iv3
on D min +3 +5 +7
• CHRD on/off switch
• key base key for chord generation
• scl scale (major, minor, harmonic minor)
• iv2 2nd note to add to the base note (from 1 octave down to 2 octaves up)
• iv3 3rd note to add to the base note
• iv4 4th note to add to the base note
Audiothingies Micromonsta user manual 28
Page 29

Effects | FX
The effect section contains different algorithm, each with its own set of parameters.
stw
Stereoizer effect: adds subtle stereo depth to the sound – the original and much appreciated pre-v1.0
effect!
Plus, we have added a hicut filter for more flexibility.
FX cut mix
stw 30 64
• cut eq cutoff
• mix effect mix level
p/p
The famous ping pong delay, this one with balance control and low pass filter
FX tim fbk bal cut mix
p/p 60 85 25 12 90
• tim delay time
• fbk feedback amount
• bal balance (-64: first ping on left channel | 63: first ping on right channel |
0: ping center (no ping pong effect))
• cut eq cutoff frequency
• mix mix level
dly
Stereo delay effect with a filter in the feedback path
Audiothingies Micromonsta user manual 29
Page 30

FX tim fbk cut mix
Lpf 60 85 25 90
• tim delay time
• fbk feedback amount
• cut eq cutoff frequency
• mix delay mix level
mod
Stereo modulated delay.
A LFO is modulating the delay time, adding a subtle – or not – pitch shift / chorus-y effect to the
delay line.
FX tim fbk spd dpt mix
Mod 60 85 25 90 90
• tim delay time
• fbk feedback amount
• spd lfo speed
• dpt lfo amount
• mix delay mix level
chf
Stereo chorus/flanger effect with positive or negative feedback path.
Basically, this is a short delay line modulated by a LFO.
You get a flanger sound with smaller delay time values and high feedback amount.
FX tim fbk spd dpt d/w
chf 30 60 25 55 64
• tim delay time
Audiothingies Micromonsta user manual 30
Page 31

• fbk feedback amount
• spd lfo speed
• dpt lfo amount
• mix chorus mix level
Audiothingies Micromonsta user manual 31
Page 32

System settings | System
System settings
These settings are saved globally and will affect the behavior of the synth for all patches
mid ext out ui dbl acc
1 off thr 16 on 1
• mid Receiving MIDI channel
• ext MIDI clock sync (off/on)
• out MIDI out mode (thru/cc/arp/polychain master/polychain slave)
• ui “popup” helper window hold time (0 to disable)
• dbl encoder double resolution switch (off/on)
• acc encoder acceleration
Note that to save the settings permanently, you have to enter tools menu and press encoder 5 – see
next section.
Tools menu
The tools menu is a bit different, you use it by pushing encoder buttons to trigger an action.
tools menu – push enc to
syx sav upd
• syx send patch sysex (only if midi out mode is set to cc)
• sav save system settings
• upd put the Micromonsta in update or wavetable upload mode (press 2 seconds to
trigger this action)
Audiothingies Micromonsta user manual 32
Page 33

MIDI control
All the Micromonsta parameters are mapped to either 1 CC or NRPN number.
The list can be downloaded from www.audiothingies.com/micromonsta
Audiothingies Micromonsta user manual 33
Page 34

Table of contents
Overview.............................................................................................................................................. 2
Specifications...................................................................................................................................2
Front panel....................................................................................................................................... 4
Rear panel........................................................................................................................................ 5
Quick start........................................................................................................................................6
Using the Micromonsta........................................................................................................................ 7
Navigating pages..............................................................................................................................7
How to navigate throughout the MM architecture?.................................................................... 7
Editing parameters........................................................................................................................... 7
HOME | Main page...............................................................................................................................8
OSC | Oscillators.................................................................................................................................. 9
Oscillator 1.......................................................................................................................................9
Oscillator 2.......................................................................................................................................9
Sub / Noise.....................................................................................................................................10
The oscillator algorithms............................................................................................................... 10
mph............................................................................................................................................10
sin.............................................................................................................................................. 10
tri............................................................................................................................................... 10
saw.............................................................................................................................................11
squ............................................................................................................................................. 11
3sw............................................................................................................................................ 11
ssq..............................................................................................................................................11
sws.............................................................................................................................................11
sqs..............................................................................................................................................11
rz1, rz2 and rz3..........................................................................................................................11
w01 to w15................................................................................................................................12
w16 to w30................................................................................................................................12
Oscillator tips.................................................................................................................................13
About the noise filter (and all bipolar-value filters inside the MM)..............................................13
Source mixer | MIXER....................................................................................................................... 14
Filter | FILTER................................................................................................................................... 15
Filter types..................................................................................................................................... 15
The voice settings page | Voice...........................................................................................................16
Envelopes | ENV................................................................................................................................ 17
The Global page | Global....................................................................................................................18
Per preset global settings............................................................................................................... 18
Home page parameter assignments................................................................................................18
Low frequency oscillators | LFO........................................................................................................ 19
LFO waveforms............................................................................................................................. 19
The influence of the key-trig reset parameter................................................................................19
Rst = on..................................................................................................................................... 20
Rst = off.....................................................................................................................................20
The 8-step LFO sequence | Step......................................................................................................... 21
The modulation matrix | MATRIX..................................................................................................... 22
Modulation sources........................................................................................................................22
Audiothingies Micromonsta user manual 34
Page 35

Modulation destinations.................................................................................................................22
Before using the matrix..................................................................................................................23
Scalers & Lag | Scaler........................................................................................................................ 24
Scalers 1&2....................................................................................................................................24
Scaler 3 & Lag............................................................................................................................... 24
About the scaler amount................................................................................................................ 24
The pattern arpeggiator | ARP............................................................................................................ 26
The arp page...................................................................................................................................26
The arp pattern sequence edit page................................................................................................26
The 1st line.................................................................................................................................27
The 2nd line................................................................................................................................ 27
The chorder | Chord............................................................................................................................28
Effects | FX.........................................................................................................................................29
stw..................................................................................................................................................29
p/p.................................................................................................................................................. 29
dly.................................................................................................................................................. 29
mod................................................................................................................................................ 30
chf.................................................................................................................................................. 30
System settings | System.....................................................................................................................32
System settings.............................................................................................................................. 32
Tools menu.....................................................................................................................................32
MIDI control.......................................................................................................................................33
Table of contents.................................................................................................................................34
Audiothingies Micromonsta user manual 35
 Loading...