

Audio-Technica AT8646QM Datasheet
AT8646QM
78.0 mm
Shock-mount Plate
Features
• Intended for use with microphones mounted on lecterns, pulpits,
conference tables and other surfaces
• XLRF-type connector works with plug-in gooseneck microphones
with XLRM-type outputs
• Suspended rubber panel isolates microphone from the
mounting surface
• Low-prole design with low-reectance black nish for
minimum visibility
accessories
shock isolator designed to minimize the pickup of mechanical noise from
the mounting surface. The associated microphone shall plug into the
mounting plate via a 3-pin XLRF-type input connector and a 3-pin terminal
strip shall be provided on the bottom of the plate for audio output. The
unit shall offer a low-reectance black nish. The unit’s dimensions shall
be: 78.0 mm (3.07") wide, 78.0 mm (3.07") deep, 8.4 mm (0.33") high.
Weight of the shock mount less microphone, shall be 64 g (2.3 oz).
The Audio-Technica AT8646QM is specied.
Specications
Input connector 3-pin XLRF-type connector
Output connectors Terminal Strip
Dimensions 78.0 mm (3.07") wide, 78.0 mm (3.07") deep,
8.4 mm (0.33") high
Weight 64 g (2.3 oz)
In the intere st of standards develo pment, A.T.U.S. offers full deta ils on its test method s to other industry pr ofessionals on request .
Specications are subject to change without notice.
Description
The AT8646QM shock-mount plate effectively isolates mounted
microphones from impact vibration and mechanical noise normally
transmitted from the mounting surface. It is intended for use with
microphones mounted on lecterns, pulpits, conference tables and similar
surfaces. Designed especially for UniPoint® and Engineered Sound®
gooseneck microphones, they may be used with other lightweight plug-in
microphones with XLRM-type outputs. The AT8646QM can be mounted
in any smooth, horizontal surface. All connections exit the bottom of the
mount and are via screw terminal strips.
Installation
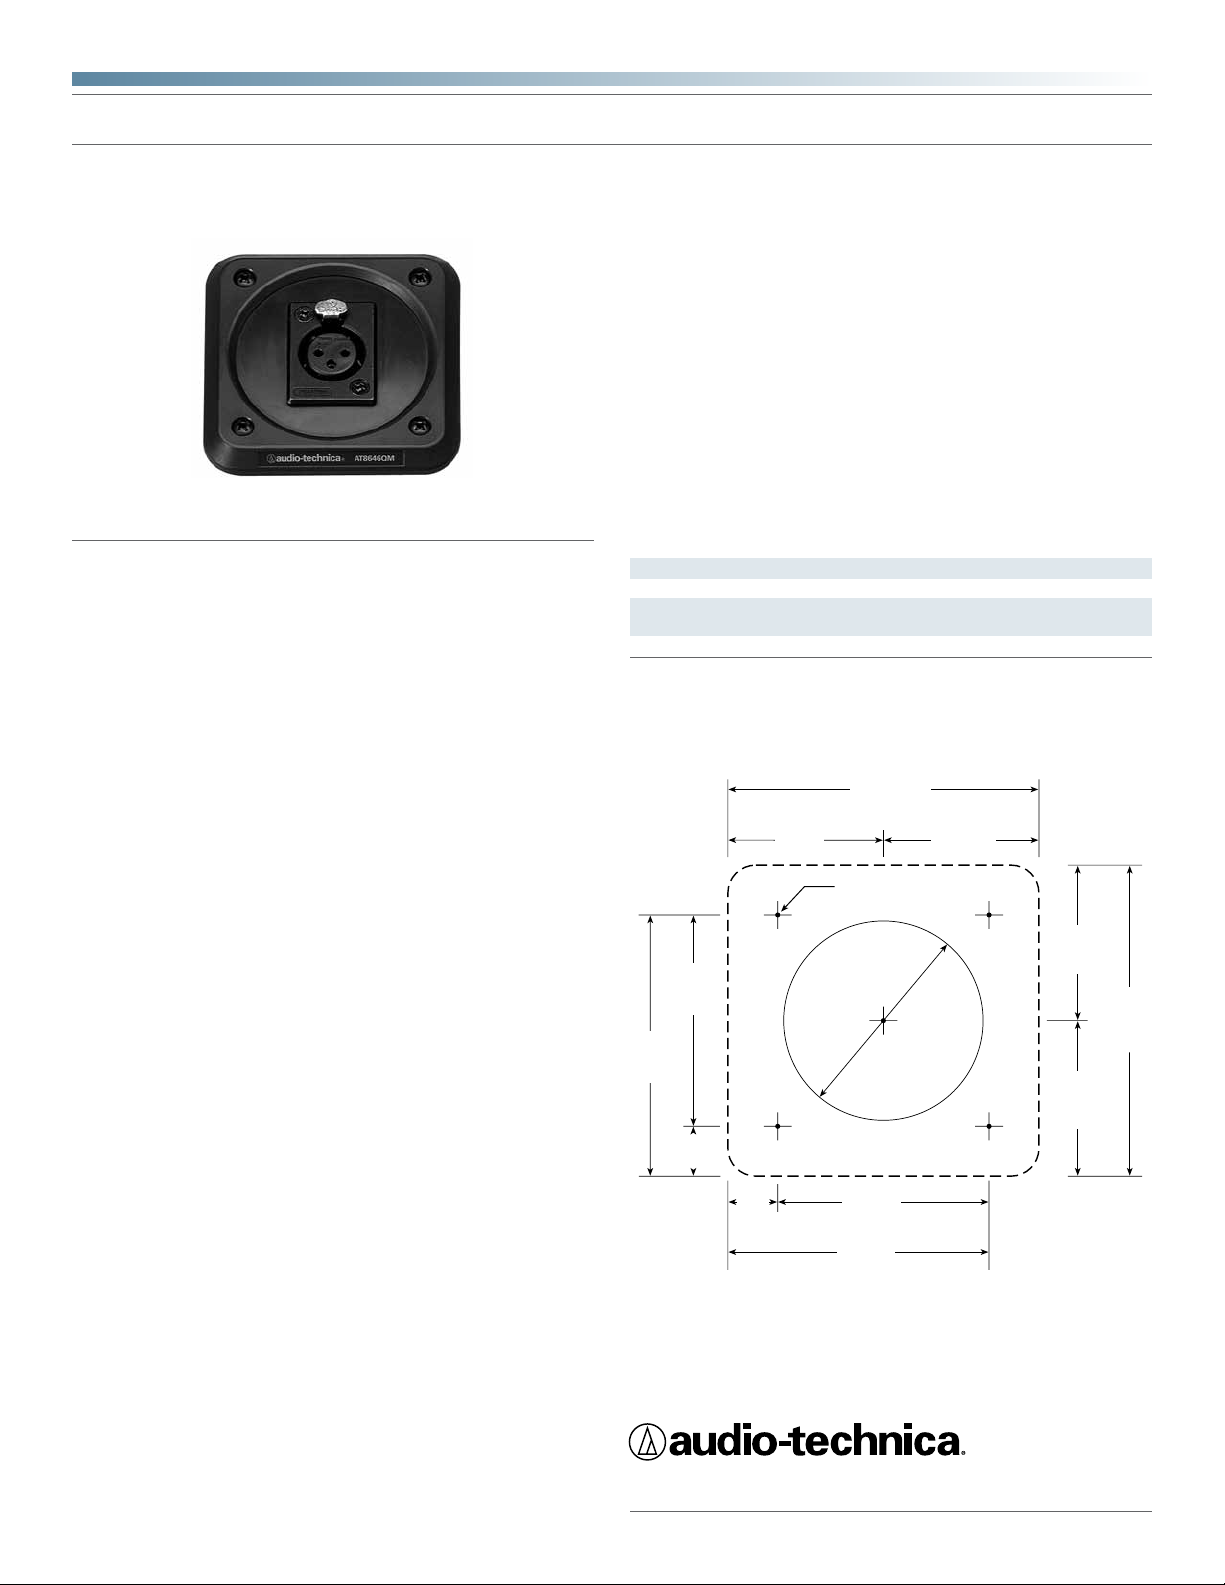
Following the dimensions included on this sheet, drill a 2" clearance hole
and four small pilot holes for screws in the mounting surface. A smooth,
horizontal (not tilted) surface is preferred for best performance.
Connect a exible two-wire shielded cable, such as AT8300, to the
screw-terminals on the bottom of the AT8646QM, after bringing
the cable-end up through the 2" mounting hole. Note that the terminal
order is 1-3-2. The terminal numbers are on the circuit board and on the
terminal strip. Connect the shield to Terminal 1, balanced signal/phantom
power to Terminals 2 and 3. Connect the “positive” signal lead to Terminal
2, in accordance with industry convention. Make certain that the
screw-terminals are on the bare wire strands, not the insulation, and that
there are no bare wires or loose strands that could touch each other.
Once the wiring is complete, carefully position the shock mount on the
mounting surface and attach it with the included screws, or with #6
hardware. Secure the mic cable to the bottom of the mounting surface
near the shock mount, using a cable clamp or similar device. Leave a
small “loop” of cable hanging freely below the shock mount. If the cable
is pulled snug, it will “bypass” the suspension and reduce its effectiveness. Securing the cable also helps protect the screw-terminal connections.
65.5 mm
(2.58")
37
(2
/64")
53.0 mm
(2.09")
3
(2
/32")
12.5 mm
(0.49")
31
(
/64")
12.5 mm
(0.49")
31
(
/64")
39.0 mm
(1.54")
17
(1
/32")
(3.07")
5
(3
/64")
PILOT HOLES
4 PLACES
THRU-HOLE
53.0 mm
(2.09")
3
(2
/32")
65.5 mm
(2.58")
37
/64")
(2
39.0 mm
(117/32")
2" DIA.
(50 mm)
(1.54")
39.0 mm
(1.54")
17
(1
/32")
39.0 mm
(1.54")
17
(1
/32")
78.0 mm
(3.07")
(3 5/64")
Architect’s and Engineer’s Specications
The shock mount plate shall be designed to work with any dynamic
gooseneck or phantom powered condenser gooseneck microphone with
an integral 3-pin XLRM-type output connector. The plate shall have a large
Audio-Technica U.S., Inc., 1221 Commerce Drive, Stow, Ohio 44224
Audio-Technica Limited, Old Lane, Leeds LS11 8AG England
©2010 Audio-Technica U.S., Inc. audio-technica.com 0001-0248-00
 Loading...