

Page 1

5000 Series
Wireless Control Interface v. 2.0
Installation and Operation
Page 2

Contents
Introduction ..............................................................................................................................................................................3
Our assumptions about you ..................................................................................................................................................3
Notice to novice users ....................................................................................................................................................3
What this manual covers ......................................................................................................................................................3
How this manual is organized................................................................................................................................................3
Where to go for further assistance........................................................................................................................................3
Minimum Requirements ..........................................................................................................................................................4
Tasks the Software Performs ..................................................................................................................................................4
System features the software monitors and controls ..........................................................................................................4
System features the software monitors (but does not control) ............................................................................................4
Software tools........................................................................................................................................................................4
Installing the Hardware............................................................................................................................................................5
Master and slave receivers....................................................................................................................................................5
General instructions for hardware installation ......................................................................................................................5
To connect one or more AEW-R5200 receivers to an existing network to which your
computer is also connected ..........................................................................................................................................6
To connect one or more AEW-R5200 receivers using DHCP-supporting router ............................................................6
To connect a single AEW-R5200 directly to a computer's Ethernet card ......................................................................7
To connect multiple receivers via link cables (for systems that include AEW-R4100
receivers, or for systems without access to multiple Ethernet connections) ..............................................................8
To link receivers via link cables ........................................................................................................................................8
To set up remote access to the AEW-R5200 via the Internet ........................................................................................9
Installing and Using the Software ..........................................................................................................................................9
Installing the software (PC) and (Macintosh) ........................................................................................................................9
Getting started ......................................................................................................................................................................9
Navigating the Software ......................................................................................................................................................10
Main System Window ..................................................................................................................................................10
Channel Detail Window ................................................................................................................................................10
Changing Receiver Name ..............................................................................................................................................11
Changing Frequency ......................................................................................................................................................11
Changing Squelch ..........................................................................................................................................................11
Changing Display Name ................................................................................................................................................11
Changing Lock Setting ..................................................................................................................................................11
Changing Meter Hold Setting ........................................................................................................................................11
Changing Antenna Power Setting..................................................................................................................................11
Muting/Unmuting System..............................................................................................................................................11
Mute ALL ......................................................................................................................................................................11
Navigating the File Menu ....................................................................................................................................................12
Open Environment ........................................................................................................................................................12
Save Environment..........................................................................................................................................................12
Receiver Configuration ..................................................................................................................................................12
To change the order of display of a receiver ..........................................................................................................12
To enable or disable a receiver ................................................................................................................................12
Network Configuration ..................................................................................................................................................12
To add a remote receiver by entering its IP address ..............................................................................................12
Exit ................................................................................................................................................................................12
Navigating the Tools Menu ..................................................................................................................................................13
IntelliScan
Spectrum Analyzer ........................................................................................................................................................14
Coverage Test ................................................................................................................................................................14
Reconnect to Network ..................................................................................................................................................14
Navigating the View Menu ..................................................................................................................................................15
Channel Display ............................................................................................................................................................15
Name Display ................................................................................................................................................................15
Navigating the Help Menu ..................................................................................................................................................15
Contents ........................................................................................................................................................................15
About ............................................................................................................................................................................15
Installing and Using the
General ..........................................................................................................................................................................15
2
Installing
™
....................................................................................................................................................................13
AE Reflector Serivce ....................................................................................................................15
AE Reflector ..................................................................................................................................................15
Page 3
Introduction
Thank you for choosing an Audio-Technica professional
wireless system. You have joined thousands of other satisfied
customers who have chosen our products because of their
quality, performance, and reliability. This Audio-Technica
wireless microphone system is the successful result of years
of design and manufacturing experience.
This manual will guide you through the process of installing and
navigating the Artist Elite
software on a computer running either Microsoft
or Apple®Macintosh®OS X operating systems. The software
enables you to monitor and control many of the system
features using your PC-compatible or Apple Macintosh
computer. Use this manual in conjunction with the AE Wireless
system manual included with the receiver/system.
Our assumptions about you
• You have working knowledge of wireless microphone
systems,
or you have thoroughly reviewed the product
manual and are familiar with the product’s operation.
®
Wireless Control Interface (AEWCI)
®
Windows
®
How this manual is organized
The manual starts with a description of the minimum
requirements for running the software and guides you through
the process of installing and running it:
1. Software and hardware minimum requirements
2. Instructions for installing the hardware
3. Instructions for running the software
4. Instructions for navigating the features
Where to go for further assistance
If you encounter questions or problems that this manual does
not address, you may find additional information on using
wireless systems here:
http://www.audio-technica.com/using/wireless/index.html
Audio-Technica maintains a Web page with software
downloads. The AEWCI software is available for download from
http://www.audio-technica.com/using/software.html
• You have strong computer skills (i.e., you can install and
run software,
and you have good working knowledge of
your operating system).
• You have access to a network on which you can set up this
system,
or you have the materials to build a separate
network using your computer, a cable/DSL router
(for multiple receivers), and one or more 5000 Series
receiver units.
Notice to novice users:
You should read this manual, as well as the system/receiver
manual, from start to finish and follow the instructions carefully
until you are familiar with the product. Experienced Artist Elite
Wireless users may scan the Table of Contents for the topics in
which they are interested.
What this manual covers
This manual takes you from the minimum requirements for
installing the software through setting up and running the
system with a network. It answers some general questions
about configuring your system. Finally, it discusses each
function of the software in detail.
These instructions
do not cover procedures that are different
for each user and usually must be handled by an IT professional. The manual does, however, give some general guidelines for
networking and for accessing the system over the Internet.
Caution: Use of this software on a previously
networked computer should be undertaken
with care. Consult your network administrator
or other professional before installing the
AEW-R5000 on an existing network.
Warning: Never connect a cable/DSL router to
an existing network without first consulting your
network administrator. The router may reassign
IP addresses being used by devices on the
network and may cause the devices or the
entire network to stop functioning.
3
Page 4

Minimum Requirements
Windows
Microsoft®Windows®98 or later, including the following
versions:
• 98 (1st or 2nd Edition)
• NT 4.0 with Service Pack 5 or higher
• ME
• XP Home
• XP Professional
• 2000 Professional with Service Pack 2 or higher
• 2000 Server with Service Pack 2 or higher
• 2000 Advanced Server with Service Pack 2 or higher
Pentium
™
Processor running at a minimum 166 MHz
100 MB hard disk space recommended
64 MB memory
Ethernet port
™
Java
2 Runtime Environment v.1.4.1 (Included on AEWCI
software CD ROM.)
Set your monitor resolution to a
minimum of 1024 x 768 pixels
for best results. Lower-resolution settings (such as 800 x 600)
allow for fewer channel strips to appear; as a result, you may
need to scroll to see your entire environment.
Tasks the Software Performs
Macintosh
• Apple®Macintosh®computer capable of running OS X
version 10.2.6 or later
®
• Apple
Macintosh®OS X v. 10.2.6 or later
100 MB of available hard disk space recommended
At least 128 MB of RAM
Ethernet port
™
Java
1.4.1 or later (Included with OS X)
Set your monitor resolution to a
minimum of 1024 x 768 pixels
for best results. Lower-resolution settings (such as 800 x 600)
allow for fewer channel strips to appear; as a result, you may
need to scroll to see your entire environment.
The Artist Elite®Wireless Control Interface automates many of
the tasks FOH engineers and other professionals perform on a
regular basis. Most of the features that can be monitored and
controlled by the receiver and transmitter can also be monitored
and controlled in real time by the software.
System features the software monitors and controls:
• Receiver Name (page 11)
• Receiver Frequency (page 11)
• Squelch Level (page 11)
• Display of Transmitter Name or Receiver Name (page 11)
• Receiver Lock Status (page 11)
• Meter Hold (page 11)
• Antenna Power (page 11)
• Receiver Mute (page 11)
• Mute ALL (page 11)
• Environment Open and Save (page 12)
System features the software monitors
(but does not control):
• Receiver RF Levels (for AEW-R5200 linked via Ethernet only)
• Receiver AF Level (for AEW-R5200 linked via Ethernet only)
• Receiver IP Address
• Receiver Link Address
• Transmitter Name
• Transmitter Type (Handheld or UniPak
™
)
• Handheld Capsule Type (Dynamic or Condenser)
• UniPak Input Type (Mic or Instrument)
• Transmitter Gain Trim Setting
• Transmitter Power Level (High or Low)
• Transmitter Battery Condition
• Transmitter Lock Status
• Transmitter Mute Status
Software tools:
• IntelliScan™(page 13)
• Spectrum Analyzer (page 14)
• Coverage Test (page 14)
• Reconnect to Network (page 14)
4
Page 5
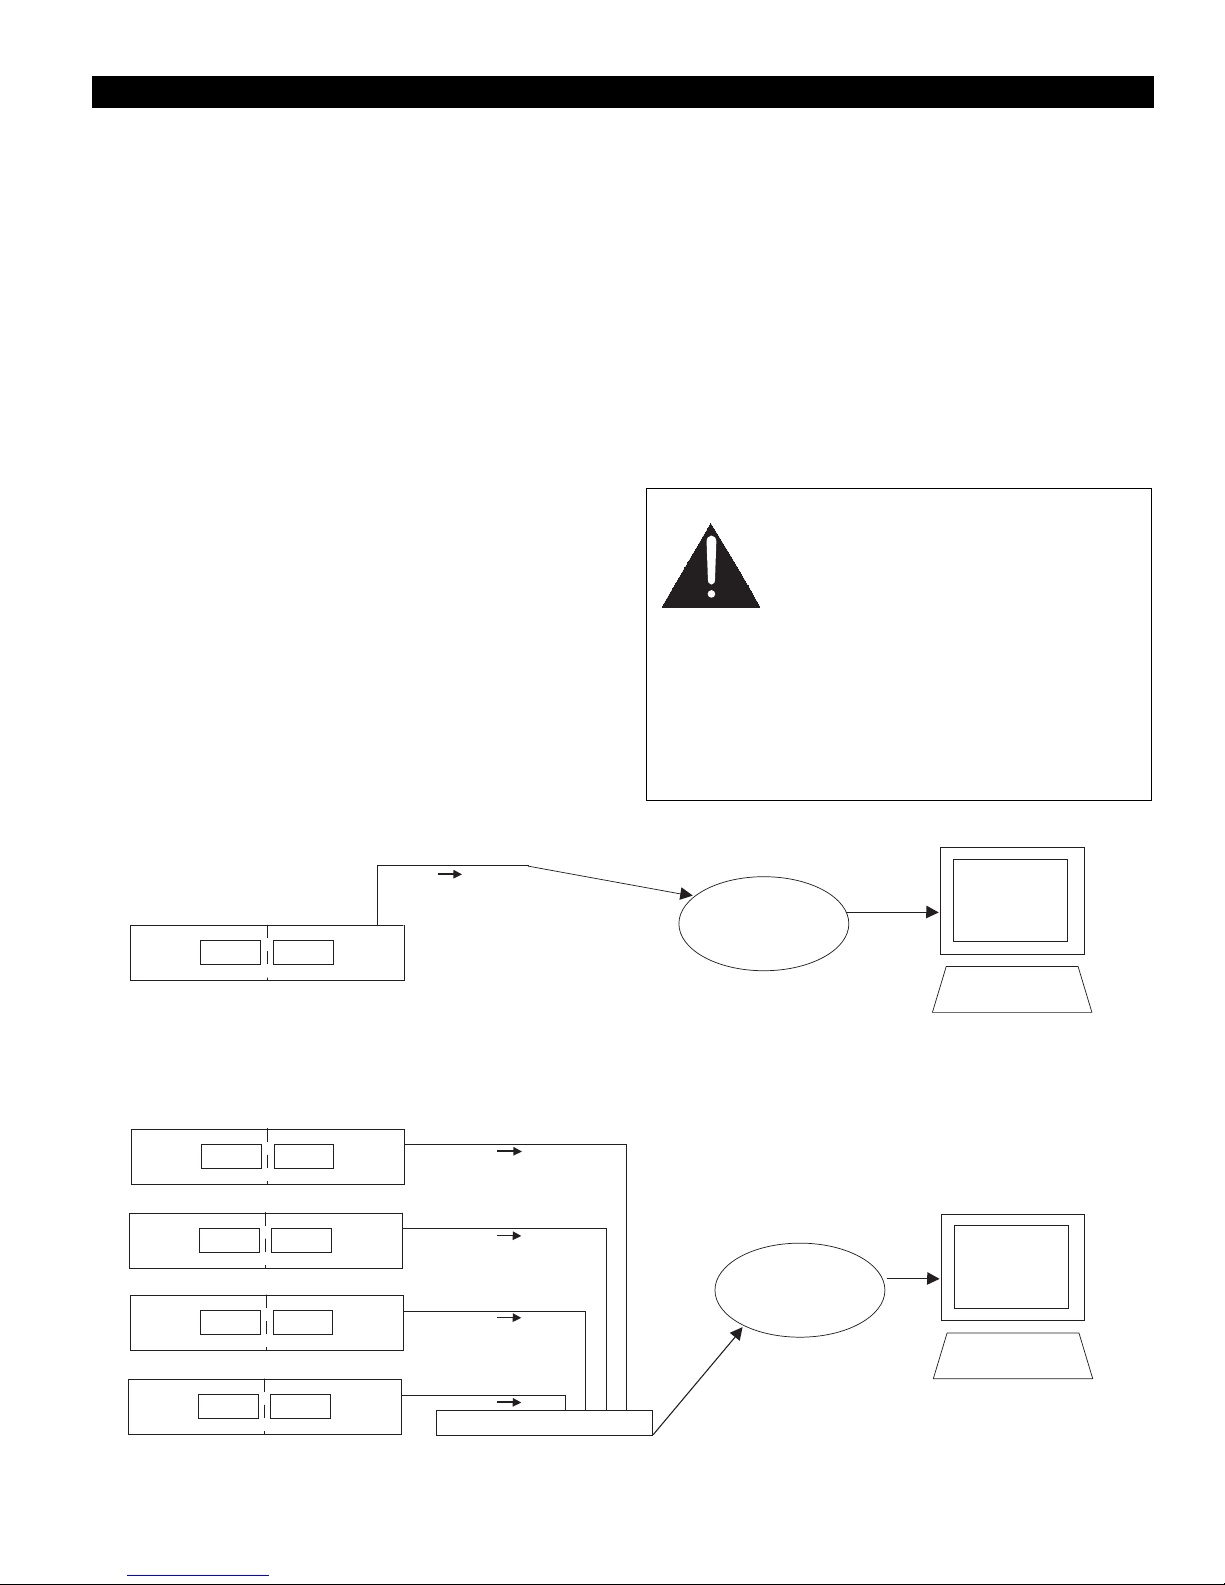
Installing the Hardware
AEW-R5200
RJ-45-terminated cable
DHCP-supported
network
Computer
Ethernet hub
RJ-45-terminated cables
Network
Computer
AEW-R5200
AEW-R5200
AEW-R5200
AEW-R5200
Depending on how the AEW-R5200 receiver will be used, the
installation and hookup process differs. For most applications,
however, setting up the AEW-R5200 is a simple process.
For example, if several receivers will be taken on tour and
controlled via a computer, it will be necessary to
stand-alone network
for use by only the computer and the
set up a
receivers. If, however, a receiver will be used in a permanent
installation in a building with its own network, it might be
necessary to
network
set up the receiver to work with the existing
.
Master and slave receivers
Because the AEW-R5200 unit houses two channels, channel #1
is always the
Master, and channel #2 is always Slave_1 of a
two-channel system comprising that single AEW-R5200 unit.
Any AEW-R5200 units that are part of a system
Ethernet cables
will contain one master and one slave channel
connected by
per unit.
AEW-R5200 receivers will work with other AEW-R5200 and
AEW-R4100 units; up to 19 receiver channels per band may
work together, depending upon clear frequencies available.
One AEW-R5200 can act as the master receiver for multiple
AEW-R5200 and AEW-R4100 receivers, which, if connected
using the included
link cables, all become slaves.
Note: Do not connect an Ethernet cable to the Ethernet port
and a link cable to the AEW-5200's OUT jack at the same time.
General instructions for hardware installation
Following are instructions for connecting receivers to an
existing network and for connecting receivers to a computer
without a network.
If your network supports DHCP (which automatically sets
IP addresses for devices on the network), you can connect a
single AEW-R5200 directly to an active network port. (Check
with your network administrator before connecting anything to
the network.) Or you can use an Ethernet hub to connect one
or more AEW-R5200 units to an existing network that is also
connected to your computer.
If you do not have access to a network connection (such as
on tour when traveling with a laptop computer), the AEWCI
software can still be used with an Ethernet-connected
AEW-R5200 receiver. Receivers can be connected via DHCPsupporting router or via the computer’s Ethernet card.
Warning:
programmed to search for a DHCP server. If it
does not locate one, it automatically sets the
receiver to a default IP address of 10.20.30.40.
Connecting multiple AEW-R5200 receivers to a
non-DHCP network would result in all receivers
being set to IP address 10.20.30.40, causing
contention.
We do not recommend using the AEW-R5200 on a non-DHCP
network. If your network does not support DHCP, ask the
network administrator for assistance. He or she will need to
determine whether any equipment on the network is using the IP
address 10.20.30.40. If the address is available, it is possible that
one receiver may work on the network; however, this should be
determined by the network administrator.
The Ethernet card in this receiver is
Figure A. Connecting the AEW-R5200 to a computer and an existing DHCP-supporting network.
Figure B. Connecting multiple AEW-R5200 units to a computer and an existing DHCP-supporting network.
5
Page 6

Installing the Hardware (Continued)
DHCP-supporting router
RJ-45-terminated cables
Computer
AEW-R5200
AEW-R5200
AEW-R5200
To connect one or more AEW-R5200 receivers to an existing
network to which your computer is also connected:
(Figure B)
You will need an Ethernet hub and sufficient Ethernet cables to
connect all receivers to the hub, plus one cable to connect the
hub to the network.
1. Check with the network administrator to make certain the
network you are connecting to supports DHCP. If it does not,
ask the network administrator for assistance before
proceeding.
2. Making certain that all hardware is turned off, connect the
hub to your network and to the AEW-R5200(s) by running
RJ-45-terminated cables from the receiver(s) and network to
the hub. (See Figures A and B on page 5.)
3. Power-on the hub, power-on the receivers as instructed in
Installing and Using the Software (page 9), and then
power-on the computer, ensuring that all connections are
live.
4. Run the software on the connected computer. The
AEW-R5200 units will obtain their own IP addresses.
To connect one or more AEW-R5200 receivers using DHCPsupporting router (stand-alone network): (Figure C)
You will need an Ethernet router that is configurable as a DHCP
Server, along with sufficient RJ45-terminated Ethernet cables to
connect all receivers to the router and one RJ45-terminated
Ethernet cable to connect the router to the computer.
1. Making certain all of the hardware is turned off, connect the
router to each of the receivers using the RJ45-terminated
Ethernet cables.
2. Connect the computer to an open port on the router using
an RJ45-terminated cable.
Note: Make certain that you do not connect the computer or
any receiver to the WAN port on the router.
3. Power-on the router; Power-on the receivers as instructed in
Installing and Using the Software (page 9); and then
Power-on the computer, ensuring all connections are live.
4. Configure the computer for TCP/IP networking as outlined
below.
For Windows
®
a. In Windows, open the Network and Dial-up Connections
(or Network Neighborhood for Windows®98) window
and create a LAN or High Speed Internet connection to
your network card.
b. Under
Networking, click on Internet Protocol (TCP/IP) >
Properties.
c. Set TCP/IP settings to
For Macintosh
®
Obtain IP address automatically.
a. Open system preferences and click on Network
b. In TCP/IP Tab, do the following:
Configure: Using DHCP
DNS Servers: Leave blank
Search Domains: Leave blank
DHCP Client ID: Leave blank
c. Click: Apply Now
The IP Address, Subnet Mask, and Router Fields will fill
with values by the DHCP Server (router connected to
the Mac)
Figure C. Connecting one or more AEW-R5200 units via DHCP-supporting router to a computer (stand-alone network).
6
5. Run the AEWCI software on your connected computer.
Page 7

Installing the Hardware (Continued)
RJ-45-terminated crossover cable
Computer
AEW-R5200
To connect a single AEW-R5200 directly to a computer's
Ethernet card:
For Windows
1. In Windows, open the Network and Dial-up Connections
(or Network Neighborhood for Win 98) window and create a
LAN or High Speed Internet connection to your network card.
2. Under
Properties
3. Click on
TCP/IP settings as follows:
• IP address: 10.20.30.* (where * is anything except
“40” because 10.20.30.40 is the receiver’s
Ethernet card’s default IP address)
• Subnet mask: 255.255.255.0
4. Connect a single AEW-R5200 receiver directly to the
computer’s Ethernet card via an RJ-45-terminated
cable. (See Figure D.) Failure to use the proper crossover
cable will prevent the receiver from being recognized by the
software.
5. Power-on the receiver as instructed in
the Software
connected computer.
®
Networking, click on Internet Protocol (TCP/IP) >
.
Use the following IP address, and configure the
crossover
Installing and Using
(page 9), and then run the software on your
For Macintosh
®
1. Open System Preferences and click on Network
2. In TCP/IP Tab do the following:
• Configure: Manually
• IP Address: 10.20.30.* (where * is anything except
“40” because 10.20.30.40 is the receiver’s
Ethernet card’s default address.
• Subnet mask: 255.255.255.0
• Router: Leave blank
• DNS Servers: Leave blank
• Search Domains: Leave blank
3. Click Apply now.
4. Connect a single AEW-R5200 receiver directly to the
computer’s Ethernet card via an RJ-45-terminated
crossover
cable. (See Figure D.) Failure to use the proper crossover
cable will prevent the receiver from being recognized by the
software.
5. Power-on the receiver as instructed in
the Software
(page 9), and then run the software on your
Installing and Using
connected computer.
Figure D. Connecting a single AEW-R5200 directly to a computer.
7
Page 8

Installing the Hardware (Continued)
RJ-45-terminated cable
Computer
AEW-R5200
AEW-R5200
AEW-R5200
AEW-R4100
MASTER SLV 1
SLV 2 SLV 3
SLV 4 SLV 5
SLV 6
OUT
IN
OUT
IN
OUT
IN
Network
OR
Link cable
Link cable
Link cable
To connect multiple receivers via link cables (for systems
that include AEW-R4100 receivers, or for systems without
access to multiple Ethernet connections):
The AEW-R5200 receiver has the capacity to connect to other
AEW-R5200 receivers and/or to AEW-R4100 receivers via the
included link cables. No network is required for this configuration. Channel 1 of the first unit in the chain will automatically
act as the master unit and must be connected via Ethernet
cable to the computer or network. Consult the receiver/system
manual for full details.
Never connect an Ethernet cable to the Ethernet port and a link
cable to the AEW-R5200 unit's OUT jack at the same time.
To link receivers via link cables:
1. Make certain that all receivers are turned off, and make
certain that an AEW-R5200 unit is first in the chain (i.e., has
no link cable attached to its LINK OUT jack). The software
will not run with an AEW-R4100 unit as master.
2. Link receivers to one another using the provided link cables.
When running link cables from one unit to another, connect
the cable from the OUT jack of unit 2 to the IN jack on unit
1, the cable from the OUT jack of unit 3 to the IN jack of unit
2, and so on. (See Figure E.)
3. Connect the master AEW-R5200 unit to the network (page 6)
or computer (page 7).
4. Power the receivers as instructed in
the Software
(page 9), and then run the software on your
connected computer.
Installing and Using
Note 1: Occasions may arise for which you wish to set up a
system comprising one master AEW-R5200 and multiple
slave AEW-R5200 units
. (For example, you may not have
access to enough Ethernet ports to connect all receivers.)
To make certain that all subordinate units function as slaves,
you must use link cables instead of Ethernet cables. Channel
1 of each AEW-R5200 unit that is connected to an Ethernet
hub or port will set itself as the master receiver of any
receivers linked to it via link cable.
However, be aware that
transmitted via link cable
AF- and RF-level data are not
. If you wish to monitor these
features using the AEWCI software, each AEW-R5200 must
be connected via Ethernet cable.
AEW-R4100 receivers do not have Ethernet ports; therefore,
they must be linked to an AEW-R5200 via link cable, and you
will not be able to monitor the AEW-R4100’s RF or AF levels
using the AEWCI software.
Note 2: The AEW-R5200 may also be connected to a system
using a wireless network access point and wireless Ethernet
network card for maximum flexibility. Consult the manufacturers’ instructions for these components for more information
on using them with your computer.
Note 3. If the master AEW-R5200 Receiver is connected
directly to the computer, (no network), refer to Page 7, for
instructions on how to connect a single AEW-R5200 directly
to a computer’s Ethernet card.
Figure E. Example of slave receivers linked via link cables to a master receiver connected via Ethernet to a
computer or network.
Warning:
the same time. Doing so will cause the system to function incorrectly or not at all. Only the master receiver may have a link
cable connected to its IN jack and an Ethernet cable connected to a computer or network.
8
Do not connect an Ethernet cable to the Ethernet port and a link cable to the AEW-R5200 unit’s OUT jack at
Page 9

Installing the Hardware (Continued)
To set up remote access to the AEW-R5200 via the Internet:
It is possible to configure your LAN or Internet connection
to access the receivers from a remote location using a
computer equipped with AEWCI software. Procedures for this
setup will vary, depending upon your network and any firewalls
that may be in place.
Ask the network administrator for
assistance.
Warning:
be set up and executed with extreme caution. Because DHCP routers may change each receiver’s IP address upon receiver
reboot, connection to the AEW-R5200 receivers may be lost, and the remote user may gain unintended access to other areas
of the network.
Accessing a company’s network through a firewall opens the network to security risks. This procedure should
Installing and Using the Software
Caution:
certain your receivers are powered (all at once,
or slaves first, then master). The receivers must
be on and connected to the network or directly
to the computer for the software to recognize
them.
If you accidentally start the software before powering the
receivers, you have two options: 1) close the software and restart
after receivers are powered; or 2) go to Tools > Reconnect to
Network to search for new connections.
Installing the software (PC)
1. Insert the AEWCI CD ROM into your CD-ROM drive.
2. If Autoplay is enabled, setup will begin automatically.
Otherwise, go to
(e.g., D:\setup.exe) to the Setup file on the CD-ROM.
3. InstallShield
™
will install Java™2 Runtime Environment
and the AEWCI software as well as the system manual
and software manual in PDF format. Follow the prompts on
the screen.
4. The installer automatically installs a desktop shortcut for the
software.
Before you start the software, make
Start > Run and type the path
Here are some general guidelines for accessing a system via
the Internet:
1. The remote engineer gains access to the client’s network
(via dial-up, network connection, or other Internet access).
To do so, he or she needs specific IP addresses, especially if
the client's network has a firewall.
2. The engineer then gains access to the AEW-R5200 receivers
by running the AEWCI software. The remote receiver can be
added by going to
clicking
Add… to add the receiver’s IP address. For
File > Network Configuration and
instructions, see page 12.
Getting started
1. Power-on all networked receivers on the system (all at once,
or slaves first, then master).
2. Go to
Start > Programs > Audio-Technica > Artist Elite
Wireless Control Interface
and click. (Alternatively,
double-click on the desktop shortcut.)
After the splash screen (the screen that appears while the
software is loading) disappears, you will view the
window
. The first time you load the software, the screen will
Main System
show any receivers connected within your subnet. (A subnet
[short for “subnetwork”] is an identifiably separate part of an
organization's network. Having an organization's network
divided into subnets allows it to be connected to the Internet
with a single, shared network address.)
To enable additional receivers outside your subnet, go to
Network Configuration
and enter the IP address to add the
File >
receiver (see page 13). Once the receiver has been added
and communication established, go to
Configuration
and enable the receiver. See page 12 for
File > Receiver
more details.
Installing the software (Mac)
1. Insert the AEWCI CD ROM into your CD drive
2. The CD mounts automatically to the desktop
3. Drag the Artist Elite application into your applications folder.
4. Double click Artist Elite application to run the software
For user convenience, the owner’s manuals are included on the
CD in Adobe PDF format.
9
Page 10

Installing and Using the Software (Continued)
Navigating the Software
Main System window
The Main System window shows all of the active (enabled)
receiver channels on the network. A vertical channel “strip”
represents each channel. The window can be resized to view
more channel strips. Alternate views (medium and small) can
be selected by clicking the View menu.
The following is displayed for each channel strip:
• RF level and which True Diversity Tuner is active
• AF (Audio) level and audio overload peak indicator
• Battery Fuel Remaining and Low Battery Condition
• TX and RX Mute status
• Channel Frequency and name
(Selectable TX or RX name per channel)
Double clicking any channel strip opens a “Channel Detail
Window” with additional channel information and user
adjustable parameters.
Channel Detail window
SECTION 1: Monitor RF levels for each antenna. The red
indicators at top show which True Diversity tuner is selected
(which antenna is receiving the stronger signal). RF levels are
grayed out for AEW-R4100 units and for AEW-R5200 units
linked via link cables, because link cables do not transmit
RF-level data.
SECTION 2:
when AF level reaches +12 dB (peak audio level). AF level is
grayed out for AEW-R4100 units and for AEW-R5200 units
linked via link cables, because link cables do not transmit
AF-level data.
SECTION 3:
functions (see Page 11 for instructions on editing settings):
• Receiver name
• Frequency
• Squelch level
• Display in Main System window channel strip
(transmitter name or receiver name)
• Receiver lock status
Monitor AF level. The red indicator at top lights
Monitor and control the following receiver
Figure F. Main System window
SECTION 5:
• Transmitter name
• Transmitter type
• Input type (if handheld, whether condenser or dynamic;
if UniPak
• Trim setting
• Power level (high or low)
• Transmitter lock status
SECTION 6:
If the battery level falls below
will light in red.
Note: The low battery indicator on the transmitter and receiver
LCDs does not display until all indicator bars are gone.
Monitor the following transmitter features:
™
, whether mic or instrument)
Monitor transmitter battery level and mute status.
1
/4power, the Low Batt indicator
1
SECTION 4:
features:
• Monitor the status of, and enable or disable, Meter Hold
and Antenna Power (clicking the
each function toggles it
• Monitor the receiver’s IP address and link address
(master or slave).
• Mute the receiver by clicking on the
(shows up red when system is muted) and monitor the
status of the transmitter (system’s failure to unmute when
Mute button is clicked may indicate a transmitter problem).
• Close the window using the
Monitor and/or control the following receiver
Off button beside
On).
Rx Mute button
Close button.
10
2
Figure G. Channel Detail window.
4
3
5
6
Page 11

Installing and Using the Software (Continued)
Navigating the Software (continued)
Channel Detail Window - Control Function Settings
Refer to Figure G (Page 10) for Control Function locations.
Changing Receiver Name
To assign a name to the receiver, access the Rx Name pop-up
by clicking on the
characters will display). Click
return to the Channel Detail window, or
Edit button. Type in the name (up to six
OK to accept the change and
Cancel to return to
the Channel Detail window without making the change.
Note: If changes are made to a receiver’s name at the receiver,
the new name will appear on the channel strip on the main
system window.
Changing Frequency
To change Receiver Frequency manually (bypassing the
IntelliScan
the desired frequency is displayed. Then click
™
function), simply click the Up or Down arrow until
Set. Alternatively,
you may type a frequency into the box. Only valid channel
frequencies are accepted. Typing in an invalid frequency value
will have no effect.
Changing Squelch
To change the Squelch setting, click on the Up or Down arrow
until the desired squelch setting is displayed. Then click
Set.
The software offers 16 different squelch settings. Accordingly,
the receiver’s squelch display has 16 bars, with one bar being
the minimum setting. These bars correspond with the squelch
settings in the software.
Caution:
receiver when RF drops below a user-chosen
level. It is useful for combating interference.
However, higher (“tighter”) squelch settings
may decrease the operating range of the
system. Always test the system before using
tighter squelch in a performance, to make certain that your
transmitters will operate at the desired range.
Squelch is a feature that mutes the
Changing Display Name
You may choose to display either the transmitter name or the
receiver name in the channel strip. (Transmitters may be given
separate names from receivers.) Click on the dropdown menu
and select the desired display setting
(Tx Name or Rx Name).
When you return to the Main System window, the display will
show either the receiver or transmitter name, as you selected.
To display either Tx Name or Rx Name in
go to
View > Show Transmitter Names or View > Show
Receiver Names
, respectively.
all channel strips,
Changing Lock Setting
Click on the dropdown menu to select one of the following
receiver lock options:
No Lock, Rx Lock, PC Lock, or All Lock.
For more details about using the lock settings, consult the
system manual.
•
No Lock: All controllable functions may be adjusted from
the receiver or the computer.
•
Rx Lock: Controllable functions may be adjusted only from
the PC, not from the receiver.
•
PC Lock: Controllable functions may be adjusted only from
the receiver, not from the PC. The software will still allow
you to access menus; you are restricted only from making
changes to settings.
•
All Lock: No changes at PC or receiver may be made while
this option is turned on.
Note: If
PC Lock or All Lock is selected, you will not be able to
change any further system settings from the computer until you
change the lock setting to either
Rx Lock or No Lock.
Changing Meter Hold Setting
Meter Hold indicates the highest-level AF and the lowest-level
RF signals received from the transmitter. This feature is useful
when setting up the system, performing a sound check, or
diagnosing operating problems. The button displays
or
Off (gray) depending on the current setting. Click the button
On (green)
to enable or disable this feature.
Changing Antenna Power Setting
The receiver’s antenna jacks have the capability to power
optional external antennas using +12V DC output on their
center pins. (Powered antennas are
operation.) Click the
On/Off button to enable or disable.
not required for normal
Note: Antenna power is not available on slave side of the
AEW-R5200 and is grayed out.
Muting/Unmuting System
Provided the transmitter for this receiver is on, you may
mute/unmute the receiver from this window by clicking the
Rx Mute button. (If the transmitter is off, the receiver is
automatically muted.)
Mute ALL
Selecting Mute All under the Tools menu or pressing Shift F5
will mute all receivers at once. Repeating the action will unmute
all receivers.
Note: If the
External Mute on the receiver is engaged or if the
transmitter is muted, the Rx Mute function will not unmute it.
For more information, see the system manual.
Note: Transmitter names must be set (entered) on the
transmitter itself. See the system manual for details.
11
Page 12

Installing and Using the Software (Continued)
Navigating the File Menu
Open Environment
Use the Open Environment command to open a previously
saved environment. An environment is a collection of receiver
channel detail settings for the currently enabled receivers on
the network.
To open a saved environment:
1. Click on File > Open Environment.
2. In the Open Environment input pop-up, select the name
of the environment to open.
3. Click
OK.
Save Environment
Use the Save Environment command to save the current
collection of receiver settings as an environment.
To save an environment:
1. Click on File > Save Environment.
2. In the Save Environment input pop-up, either choose an
already-entered environment name from the dropdown
menu (this will save the current environment over the
previous file), or select
name, and click
New Environment to enter a new
OK.
3. If you chose to enter a new environment name, type it in
the Environment Name pop-up and click
OK, or click Cancel
to return without saving the environment.
Note:
Saving an environment saves only the receiver
channel detail settings of the currently enabled receivers
on the network.
It does not save any network receiver
configurations (which receivers are enabled or disabled on the
network.) Loading an environment will not enable previously
disabled receivers or disable previously enabled receivers.
Environments are based on the MAC addresses of the enabled
receivers. If these change, the environment will not load. An
error message box appears: No enabled receivers were
changed by this environment.
Receiver Configuration
Use the Receiver Configuration command to open the
Receiver Configuration window. This window allows you to
enable or disable receivers on your network, and change the
channel strips’ display order on the Main System window.
When the software first starts up, it looks for receivers within
its network. Any receivers it finds appear in the
Configuration
window as Discovered. Any receiver that is
Network
discovered may be enabled in the Receiver Configuration
window, unless it is in use by another computer.
Note: Normally a receiver may be enabled on only one
computer connected to the network at a time. Other computers
on the network will be able to view the receiver’s IP address in
Network Configuration window, but they will not be able to
enable the receiver in the receiver configuration window.
If the AE Reflector Service is installed and activated on a
Windows PC, multiple users can access and make changes to
any receivers connected to the network. Refer to Page 15 for
information on installing and using the AE Reflector.
To change the order of display of a receiver:
1. Click on File > Receiver Configuration.
2. In the Receiver Configuration window, click on the receiver
to select it.
3. Click on
Move Up or Move Down to change its display
order.
4. Click
OK to accept the changes and return to the Main
window, or
Cancel to return to the Main window without
applying the changes.
To enable or disable a receiver:
1. Click on
File > Receiver Configuration.
2. In the Receiver Configuration window, click on the receiver
to select it.
3. Click on
Enable/Disable. (Enable allows you to activate a
discovered receiver; Disable allows you to free up a
discovered receiver so that other users on the network
may access it.) If the unit is enabled, Disable will display
on the button, and vice versa.
4. Click
OK to accept the changes and return to the Main
System window, or
Cancel to return to the Main System
window without applying the changes.
5. The system applies your changes and reconnects to the
network.
Note:
Disabling either channel of an AEW-R5200 unit
disables the entire receiver (channels 1 and 2), thus freeing
an Ethernet port. Any AEW-R4100 units linked to the
AEW-R5200 are also disabled.
Caution:
Receiver Configuration, the software performs a
Reconnect to Network. All receivers are muted
during this process. Therefore, do not make
changes to Receiver Configuration at any time
when system muting would be undesirable!
Any time you make changes to the
Network Configuration
The Network Configuration window shows information such
as IP address, MAC address, Firmware version (of the receiver
unit), Enabled status (enabled or disabled), and Discovered
status (detected or added) for all receivers in the system.
Until receivers have familiar frequency settings or receiver
names, you may not be able to distinguish them, unless you
know which receivers are using which IP addresses.
To add a remote receiver by entering its IP address:
From the Network Configuration window, click Add… and
enter the IP address in the Input pop-up. (See page 10 for an
application of this feature.)
Caution:
Network Configuration, the software performs a
Reconnect to Network. All receivers are muted
during this process. Therefore, do not make
changes to Network Configuration at any time
when system muting would be undesirable!
Any time you make changes to the
12
Exit
Use the Exit command to close all windows and exit the
software.
Page 13

Installing and Using the Software (Continued)
Navigating the Tools Menu
IntelliScan
™
The IntelliScan command starts the automatic channel
scanning and selection feature, which searches all available
frequencies and sets all receivers in the system to the best
open and compatible frequencies (within their frequency band).
IntelliScan now examines each receiver’s RF environment to
determine the best possible frequencies regardless of where
each receiver is located. If receivers from multiple bands (i.e.
US-C Band, US-D Band) are used in one system, the IntelliScan
function needs to be performed for each band. Select the band
to be scanned in the IntelliScan pop-up window (see below).
For more information on IntelliScan, frequency groups and
frequency bands, see the system manual.
The IntelliScan process may take several minutes to complete.
To start IntelliScan:
1. Turn off all Artist Elite transmitters, and turn on all non-Artist
Elite transmitters, as well as other possible sources of RF.
2. Making certain you do not have
IntelliScan
.
PC Lock on, go to Tools >
3. If your system has receivers from more than one frequency
band, use the drop-down box to select which band will be
scanned. If only one band is present, the box shows the
band.
4. In the Starting and Ending frequency boxes, enter the
frequencies for the start point and end point of the scan.
(This is useful if you wish to scan only a narrow portion of
the band.) The boxes default to the lowest and highest
frequencies available in the selected band. Values entered
out of the defined frequency range for the band will not be
accepted.
5. From the dropdown box, select the direction of the scan.
(Normally it starts from the lowest frequency in the band
and scans up. In some cases, it may be more desirable to
start from the highest frequency and scan downward.)
6. If desired, enter a Scan Threshold value in the threshold box.
(The factory default value is –85.5.) IntelliScan uses the scan
threshold level to determine whether an RF signal in the
environment is strong enough to make its frequency
unavailable to the receiver. In some applications,
environmental RF signals (especially DTV) may not be
seen by IntelliScan but would interfere with actual wireless
operation. Decreasing the threshold value increases the
sensitivity of IntelliScan to the RF environment.
7. Click
Start to begin the process (or Cancel to disregard
changes and return to the Main System window).
8. A box pops up with a warning “This is about to rechannelize
your system. Do you wish to continue?” Click “Yes” to
proceed. Clicking “No” or “Cancel” returns to the Main
System window without changing any existing frequency
settings.
9. The
Progress pop-up shows what frequency group is
currently being scanned, and a progress bar gives you an
idea of how long it will take to scan the current group.
10. When the process is complete, the master(s) and all slave
receivers are set to compatible frequencies. You will need to
set your transmitters to match the appropriate receiver
frequency.
Note:
If IntelliScan cannot locate enough available
frequencies
, it will set as many receivers as it can. Any
remaining receivers will be set to the lowest frequency in
the band.
Caution:
receivers are muted during this process.
Therefore, do not run IntelliScan at any time
when system muting would be undesirable!
Any time you run IntelliScan, all
Note: Clicking the DEFAULT button resets the threshold setting
to –85.5.
13
Page 14

Installing and Using the Software (Continued)
Navigating the Tools Menu (continued)
Spectrum Analyzer
Use the Spectrum Analyzer to discover which frequencies
are occupied in your area and at what power level (in dBm).
If you run Spectrum Analyzer with your transmitters on, the
software will pick them up and show spikes on the graph;
if your transmitters are off, the test can show frequencies of
other transmitters or RF sources in your area.
Note: The spectrum analyzer is band specific. If your system
has multiple bands, you will need to run it for each band in
order to see the complete RF picture.
To start Spectrum Analyzer:
1. Click on Tools > Spectrum Analyzer.
2. The
Spectrum Analyzer pop-up appears. From the
“RECEIVER” dropdown box, select the receiver you wish
to use for performing the spectrum analysis. The start and
end frequencies will change to reflect the band of the
selected receiver.
3. Enter the starting and ending frequencies you wish to
analyze, if necessary (useful if you want to analyze only a
narrow portion of the band or if you need to save time).
4. Click
Start to begin spectrum analysis. (Note this process
may take several minutes to complete.) During the process,
a Progress Pop-up appears showing the analysis in process
along with a “Spectrum Analyzer” window showing the RF
signal level as a red line. Resize this window by clicking and
dragging the borders to show more or less detail.
5. When the process is complete, the Progress Pop-up closes.
To stop the process, click Cancel in the Progress Pop-up. The
Spectrum Analyzer window remains displayed until the user
closes it.
6. Right clicking anywhere in the Spectrum Analyzer window
opens a menu box allowing you to:
Save as... Saves an image of the spectrum analysis as
a PNG graphic.
Print… Sends an image of the spectrum analysis to a
printer connected to the computer.
Zoom… Opens a submenu with zoom-in/zoom-out
functions.
Autorange… Allows the Horizontal and/or Vertical Axis of
the Spectrum Analyzer window to scale
automatically. This allows for greater detail to
be displayed when smaller areas of a
frequency band are analyzed.
Coverage Test
The Coverage Test helps you determine where in the
performance area your transmitters are strongest and where
they are weakest by providing a graph of RF power vs. time.
You may choose from seven test-duration times ranging from
30 seconds to one hour.
To start Coverage Test:
1. Make certain the appropriate transmitter is on and has
sufficient battery power for the desired test period.
2. Click on
3. The
duration from the
4. From the
Tools > Coverage Test.
Coverage Test Setup pop-up appears. Select the test
Choose Test Duration dropdown menu.
Receiver dropdown menu, select the receiver that
corresponds to the transmitter being tested.
5. Click
Start to begin the coverage test, or Cancel to return to
the Main System window.
6. Using the appropriate transmitter, have someone walk the
performance area while you observe the “Coverage Test”
window. Weak coverage will show up on the graph as low
RF values.
7. During the test, a Progress Pop-up appears showing the
Coverage Test in process along with a “Coverage Test”
window showing RF coverage for both A & B tuners of the
receiver under test. Resize the window by clicking and
dragging the borders to show more or less detail.
8. Right clicking anywhere in the Coverage Test window opens
a menu box allowing you to:
Save as… - Saves an image of the Coverage Test as a
PNG graphic.
Print… - Sends an image of the Coverage Test to a
printer connected to the computer.
Zoom… - Opens a submenu with zoom-in/zoom-out
functions.
Autorange… - Allows the Horizontal and/or Vertical Axis of
the Coverage Test window to automatically
scale. This allows for greater detail to be
displayed when smaller time segments are
tested.
Reconnect to Network
Reconnect to Network causes the software to rescan the
network for AEW receivers. You will need to run
Network
anytime a receiver is powered on/off, a receiver is
Reconnect to
added or removed from the network, or a change is made to a
receiver’s network connections.
Caution:
all receivers are muted during this process.
Therefore, do not run Spectrum Analyzer at
any time when system muting would be
undesirable!
Any time you run Spectrum Analyzer,
14
To reconnect to the network:
1. Click Tools > Reconnect to Network.
2. After closing the current connections, the software searches
for connected receivers on the network and refreshes the
Main System window.
Caution:
all receivers are muted during this process.
Therefore, do not Reconnect to Network at
any time when system muting would be
undesirable!
Any time you Reconnect to Network,
Page 15

Installing and Using the Software (Continued)
Navigating the View Menu
The View menu gives you:
• the opportunity to choose either large-, medium-, or smallsized receiver channel displays in the Main System window.
• the ability to change the display in the Main window to
show all receiver names or all transmitter names.
Channel Display
To change the size of the channel display:
1. Click View.
2. Select
Large Size Receivers View to see up to ten
full-height receiver channel strips.
3. Select
Medium Size Receivers View to see up to twenty
half-height receiver channel strips.
4. Select
Small Size Receivers View to show up to 40 mini
receiver channel strips.
Note: The number of visible receiver channel strips is also
affected by the computer’s display resolution and window size.
Name Display
To change name display in the Main System window:
1. Go to View > Show Receiver Names to show receiver
names at bottom of each channel strip.
2. Go to
View > Show Transmitter Names to show transmitter
names at the bottom of each channel strip.
Note: Transmitter names must be set (entered) on the
transmitter itself. See the system manual for details.
Navigating the Help Menu
Contents
The Contents of the Help Index are listed and accessible from
this menu.
To access the Help Index:
1. Click Help > Contents.
2. From the list, select the topic you want to learn more about.
Installing and Using the AE Reflector Service
General:
The AE Reflector service is a Windows software application
that allows multiple computer users on the network to view,
change and configure AE Wireless receiver parameters. You
may install the application on one of the networked computers
running the AEW Control Interface Software.
Note: Because
AE Reflector runs as a Windows service, it
must be installed on a computer running Windows NT, 2000
or XP operating system connected to your network.
Note: To use
AE Reflector, all of your receivers must have
version 4.2 or later firmware. To verify firmware version, click
File>Network Configurations. The Network Configuration
window opens, showing firmware version for all receivers on
the network.
Installing AE Reflector:
1. Using Windows Explorer or other file management tool,
navigate to the
default installation, this folder is located inside
AE Reflector folder on your hard drive. For a
Program
Files\Audio-Technica\Artist Elite Wireless Control Interface
ver. 2.0.
2. Open the AE Reflector folder and double click on the Install
AE Reflector icon. A DOS-type window will open indicating
status of the install. When the install is complete, the
window will prompt, “Press any key to continue.”
Press any key to close the window and complete the
installation.
Note: To start the service, you will need to restart the
computer.
After installation, the
AE Reflector service operates in the
background automatically, every time the computer is started.
To uninstall the
AE Reflector service, locate the AE Reflector
folder on the CD, open it and double click the Uninstall
AE Reflector icon.
About
The About screen gives details of copyright and software
version.
To access the About screen:
1. Click Help > About.
2. Click
OK to exit.
Caution:
running, any computer connected to the network
running the AEW Control Interface Software has
access to and can change parameters of any
receiver connected to the network. This
includes: rechannelizing the system, muting
receivers, and disabling or enabling receivers.
When the AE Reflector service is
15
Page 16

Visit our Web Site!
www.audio-technica.com
Audio-Technica U.S., Inc., 1221 Commerce Drive, Stow, Ohio 44224 330/ 686-2600 www.audio-technica.com
All trademarks and registered trademarks are the property of their respective owners.
P515 62- 01 ©2004 Audio-Technica U.S., Inc. Printed in U.S.A.
 Loading...