

Audionet VIP G3 User Manual

audionet
VIP G3
Versatile Integrated Player
User's Manual


Contents
1 Preface ............................................................................. 9
2 Overview of control elements ...................................... 11
2.1 Front panel ................................................................................ 11
3 Overview of connections .............................................. 12
3.1 Back panel ................................................................................. 12
4 Overview of display elements ...................................... 13
4.1 Display window ......................................................................... 13
4.2 About progressive scan video .................................................. 15
5 Installation and power supply ...................................... 16
5.1 Placement .................................................................................. 16
5.2 Mains connection ...................................................................... 16
5.3 Orientation of mains plug ........................................................ 16
6 Audionet System Remote Control ................................ 17
6.1 Key assignments VIP G3 ......................................................... 18
6.2 Using the touch screen ............................................................. 19
6.3 Using the numeric key pad ...................................................... 21
6.3.1 Selecting track / title / group number ......................................... 21
6.3.2 Selecting a time or chapter number ............................................ 21
7 Operational principles .................................................. 22
7.1 How to use on-screen displays ................................................. 22
8 About discs .................................................................... 23
8.1 Playable disc types .................................................................... 23
8.1.1 Non-playable disc types ............................................................. 23
8.1.2 Disc structures ............................................................................ 24
3

8.1.3 MP3 discs ................................................................................... 24
8.1.4 General disc compatibility ......................................................... 25
9 Getting started .............................................................. 27
9.1 Setting the TV system .............................................................. 27
9.1.1 Watching NTSC on a PAL TV .................................................. 28
9.2 Switching on/off ........................................................................ 28
9.2.1 Audionet Link............................................................................. 28
9.3 Inserting and removing discs .................................................. 29
9.4 Setting up with the Setup Navigator ....................................... 30
9.5 Using the on-screen displays.................................................... 30
9.6 Using the Setup Navigator ....................................................... 32
9.7 Playing discs .............................................................................. 38
9.7.1 Basic playback controls .............................................................. 39
9.7.2 Front panel controls .................................................................... 39
9.7.3 DVD disc menus ........................................................................ 40
9.7.4 Video CD/Super VCD PBC menus ............................................ 40
10 Playing discs ................................................................. 44
10.1 Introduction .............................................................................. 44
10.2 Using the Disc Navigator to browse the contents of a disc ... 44
10.2.1 Scanning discs ............................................................................ 47
10.3 Playing in slow motion ............................................................. 47
10.4 Frame advance/frame reverse ................................................. 48
10.5 Looping a section of a disc ....................................................... 49
10.6 Using Repeat Play ..................................................................... 50
10.7 Using Random Play .................................................................. 52
10.8 Creating a program list............................................................ 54
10.8.1 Editing a program list ................................................................. 58
10.8.2 Other functions available from the Program menu .......................... 59
10.9 Using the comfort keys ............................................................. 60
10.9.1 Track Repeat .............................................................................. 60
10.9.2 Disc repeat .................................................................................. 61
10.9.3 Looping a section ....................................................................... 62
10.9.4 Random play ............................................................................... 63
10.9.5 The program function ................................................................. 64
10.10 Searching a disc ........................................................................ 65
4

10.11 Switching subtitles .................................................................... 66
10.12 Switching the DVD Audio language ....................................... 67
10.13 Switching the DVD-RW audio channels ................................ 68
10.14 Switching the DVD Audio channels ........................................ 68
10.15 Switching the CD/MP3/Video CD/Super VCD audio channels ..... 69
10.16 Switching camera angles .......................................................... 69
10.17 Displaying disc information .................................................... 69
11 Audio Settings menu ..................................................... 72
11.1 Audio DRC ................................................................................ 72
11.2 Virtual Surround ...................................................................... 73
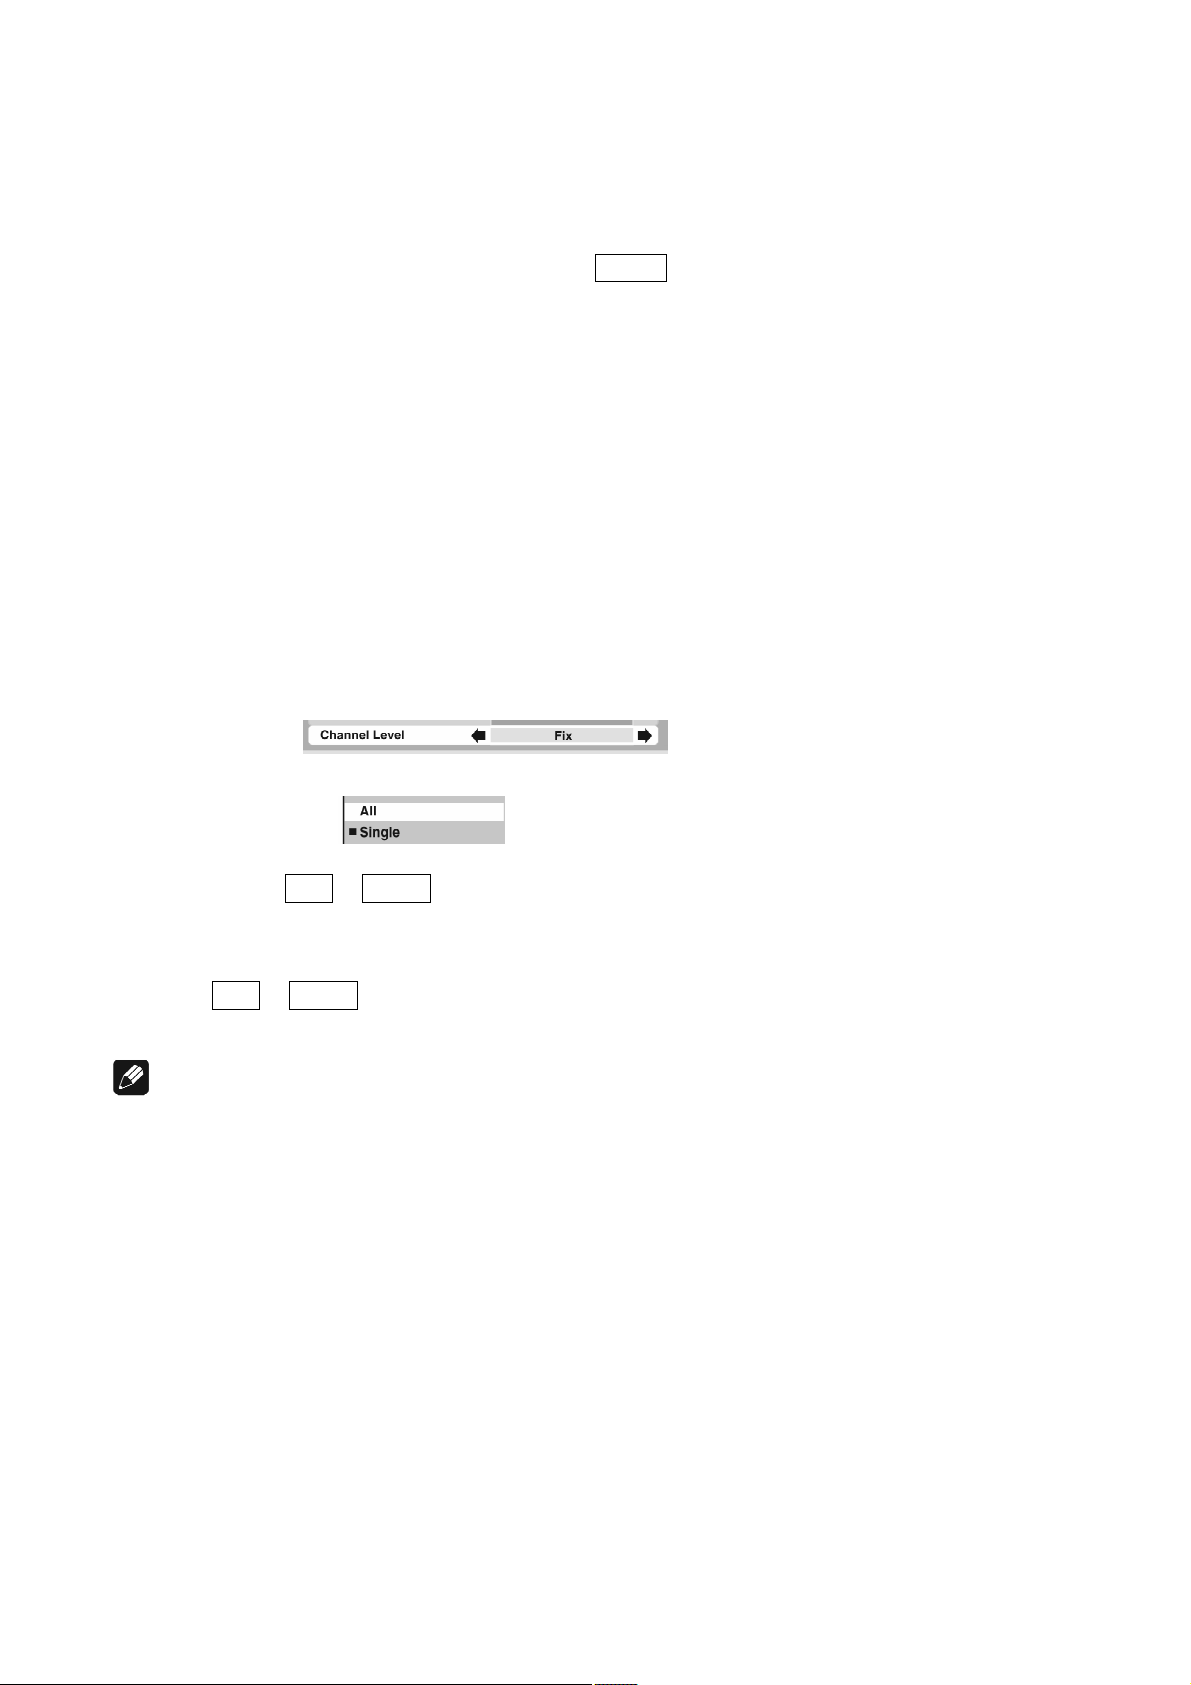
11.3 Channel Level ........................................................................... 74
11.4 Speaker Distance ...................................................................... 76
12 Video Settings menu ..................................................... 77
12.1 Video Adjust ............................................................................. 77
12.2 Creating your own presets ....................................................... 78
13 Initial Settings menu ..................................................... 81
13.1 Digital Audio Out settings ....................................................... 81
13.1.1 Dolby Digital Out ....................................................................... 82
13.1.2 DTS Out ..................................................................................... 82
13.1.3 Linear PCM Out ......................................................................... 83
13.1.4 MPEG Out .................................................................................. 84
13.2 Video Output settings ............................................................... 84
13.2.1 TV Screen ................................................................................... 84
13.2.2 Component Out .......................................................................... 85
13.2.3 AV Connector Out...................................................................... 86
13.2.4 S-Video Out ................................................................................ 87
13.2.5 Still Picture ................................................................................. 87
13.3 Language settings ..................................................................... 88
13.3.1 Audio Language ......................................................................... 88
13.3.2 Subtitle Language ....................................................................... 89
13.3.3 Auto Language ........................................................................... 90
13.3.4 DVD Menu Language ................................................................ 90
13.3.5 Subtitle Display .......................................................................... 91
5

13.4 Display settings ......................................................................... 92
13.4.1 OSD Language ........................................................................... 92
13.4.2 On Screen Display ...................................................................... 92
13.4.3 Angle Indicator ........................................................................... 93
13.5 Background ............................................................................... 93
13.5.1 Screen Saver ............................................................................... 94
13.6 Options ...................................................................................... 94
13.6.1 Parental Lock .............................................................................. 94
13.6.2 Registering a new password ....................................................... 95
13.6.3 Changing your password ............................................................ 96
13.6.4 Setting/changing the Parental Lock level ................................... 97
13.6.5 Setting/changing the Country Code ........................................... 98
13.6.6 Bonus Group............................................................................... 99
13.6.7 Auto Disc Menu ....................................................................... 100
13.6.8 Group Playback ........................................................................ 101
13.6.9 DVD Playback Mode ............................................................... 101
13.6.10 SACD Playback ........................................................................ 102
13.6.11 HDMI Settings ......................................................................... 103
13.6.12 CD Playback ............................................................................. 107
13.6.13 DTS Downmix ......................................................................... 107
13.7 Speakers .................................................................................. 108
13.7.1 Audio Output Mode ................................................................. 108
13.7.2 Speaker Installation .................................................................. 109
13.7.3 Speaker Distance ...................................................................... 110
13.7.4 Channel Level........................................................................... 111
13.8 i.LINK Setup ........................................................................... 114
13.8.1 Audio Out ................................................................................. 114
13.8.2 Connections Setup .................................................................... 114
13.8.3 Auto Select Play ....................................................................... 115
13.8.4 DVD Audio Out ....................................................................... 116
14 Additional information .................................................118
14.1 Taking care of your player and discs ................................... 118
14.1.1 Handling discs .......................................................................... 118
14.1.2 Storing discs ............................................................................. 118
14.1.3 Discs to avoid ........................................................................... 119
14.1.4 Cleaning the pickup lens .......................................................... 119
14.1.5 Problems with condensation ..................................................... 119
14.1.6 Hints on installation ................................................................. 120
14.1.7 Moving the player .................................................................... 120
14.1.8 Power cable caution ................................................................. 121
14.2 Screen sizes and disc formats ................................................ 121
14.2.1 Widescreen TV users ............................................................... 121
14.2.2 Standard TV users .................................................................... 121
14.3 Resetting the player ................................................................ 122
6

14.4 About the audio output settings ............................................ 123
14.5 About the HDMI output settings .......................................... 124
14.6 HDMI output with DVD Audio sources ............................... 125
14.7 About the i.LINK output settings ......................................... 126
14.8 Country Code list.................................................................... 127
14.9 Language Code list ................................................................. 127
14.10 Selecting languages using the Language Code list .............. 128
14.11 Glossary ................................................................................... 128
14.12 Troubleshooting ...................................................................... 133
14.12.1 General ..................................................................................... 133
14.12.2 DVD/CD/Video CD/Super VCD playback .............................. 134
14.12.3 HDMI troubleshooting ............................................................. 137
14.12.4 i.LINK troubleshooting ............................................................ 138
14.12.5 i.LINK-related messages .......................................................... 139
15 Connections and options on the back panel............. 140
15.1 Video outputs .......................................................................... 140
15.2 Analog audio outputs ............................................................. 142
15.3 Digital audio outputs .............................................................. 143
15.4 Digital output formats ............................................................ 145
15.4.1 LowBit mode ............................................................................ 145
15.4.2 HighBit mode ........................................................................... 147
15.5 About HDMI ........................................................................... 149
15.5.1 Connecting using HDMI .......................................................... 149
15.6 About i.LINK .......................................................................... 151
15.6.1 Connecting using i.LINK ......................................................... 151
15.6.2 Creating an i.LINK network ..................................................... 152
15.7 USB/SPDIF digital audio input ............................................. 154
15.7.1 Connecting the computer the USB-Audio input ...................... 154
15.7.2 Example overview Device Manager ........................................ 156
15.7.3 Using the SPDIF input.............................................................. 157
15.8 Connecting the external power supply EPS ......................... 158
16 Factory default settings VIP G3.................................. 159
17 Recommended setup for 2-channel analog usage ... 160
7

18 Security advice .............................................................162
19 Technical data ..............................................................163
8

1 Preface
The Audionet Team congratulates you on your purchase of this unit. But before
you start listening to your new Audionet VIP G3, please read this manual carefully so you are able to use and enjoy all functions of this unit without drawback on music or picture quality.
Audionet VIP G3: A Sensual Statement
Already his predecessor was considered to be the reference player for the enjoyment of music and film. Now, the third generation takes the stage: the
VIP G3 (Generation 3) is nothing less than Audionets final statement for the
classic audio and film media.
The VIP G3 is the outstanding specialist for the established and well proven
CD, DVD-Video and DVD-Audio as well as SACD formats. Media – that are
technically absolutely mature, easily available and, due to their uncountable
variety, define home entertainment. More than that, the VIP G3 receives and
decodes music even from servers or personal computers through its USB Audio
interface.
With a performance that sets standards in most aspects even compared to new
high resolution media, the VIP G3 exceeds the expectation from expert connoisseurs of high-quality music and video reproduction.
The VIP G3 fathoms the unimagined potential of established media. Therefore
the VIP G3 plays your familiar records in a way that touches each of your
senses.
9

Included
Included you will find the following items:
· the universal CD, SACD and DVD transport system VIP G3
· one low resonance stabilizer ('Puck') made of POM (black)
· the user's manual (that you are currently reading)
· one standard mains chord
· one DVD Audio disc 'Hamamura Quintett - Retold'
· Audionet System Remote Control Logitech Harmony Ultimate One (in
separate package)
Transportation
Important
· Please transport the VIP G3 only inside the included package.
· Use the provided bag to prevent scratches on the housing.
· Never leave a CD/DVD/SACD disc or the stabilizer inside the VIP G3
during transport. The sensitive mechanics could suffer damage.
10
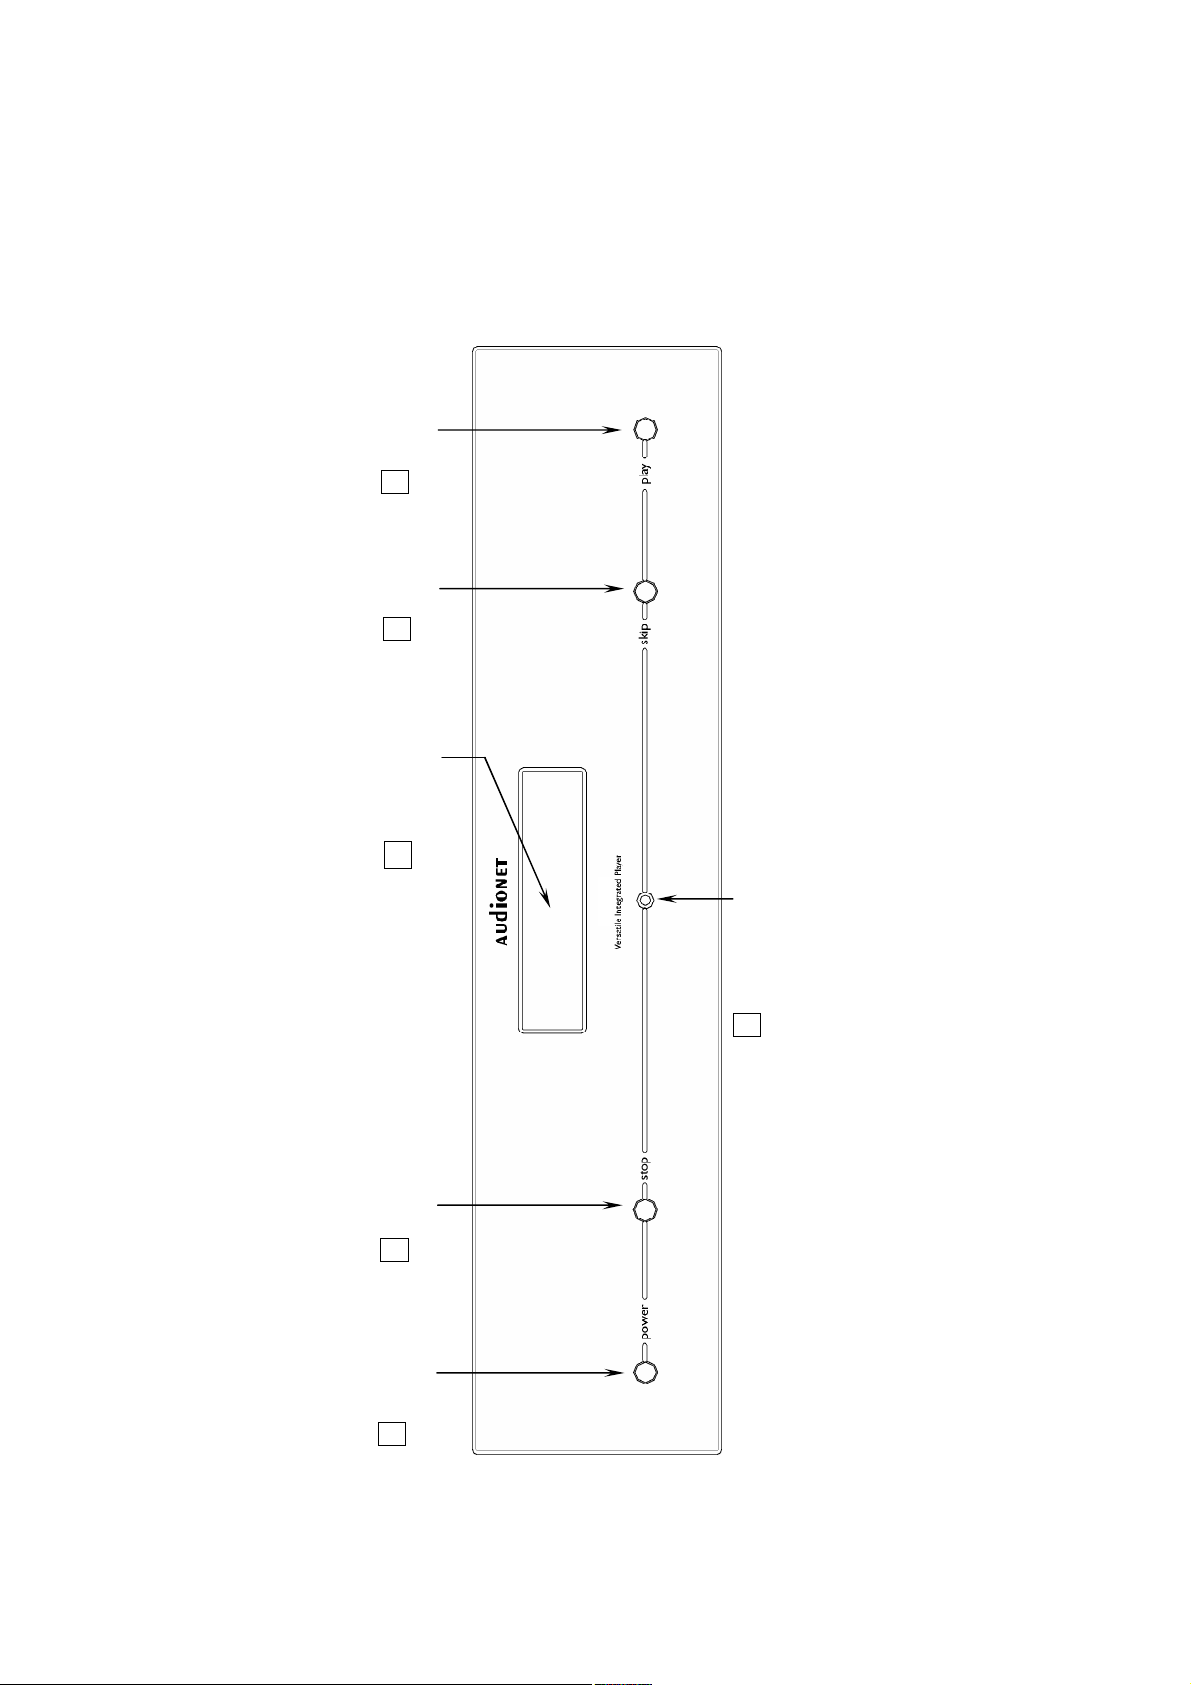
2 Overview of control elements
Used to skip a chapter, title or track. Also, used for the
VCD. Holding down skip key during playback
VIP G3
2.1 Front panel
key
play
6
key
skip
5
page selection of a menu screen (for Video CD/ Su-
per
3 Display window
5 Skip key
advances playback rapidly.
Starts or resumes playback.
6 Play key
4 Remote control sensor
key
stop
2
key
power
1
Turns unit on or off (stand-by)
1 Power key
Stops playback
2 Stop key
Indicates the current status of the unit
3 Display window
Receives signals from the romte control unit
4 Remote control sensor
11
3 Overview of connections
1
2
4
10
12
13
14
19
20
21
3.1 Back panel
14
15
16
13
17
12
11
18
19
Digital output 'DataLink'
Analog output Main Left (Cinch) 22 Analog output Main Left (balanced) 23 Analog output Main Right (balanced) 24 Analog output Main Right (Cinch) 25 Input Audionet Link 26 HDMI output 27 i.Link output (2 units) 28 SDI video output (optional)
Input EPS (Enhanced Power Supply)
10
9
20
21
22
8
23
7
24
25
Analog output Center 11 Selector output format for digital
outputs and digital ouputs on/off
USB-Audio input (SPDIF)
Mains input 15 Marking mains phase 16 Digital output 3 (AES/EBU) 17 Digital output 2 (SPDIF) 18 Digital output 1 (SPDIF)
Digital output 4 (SPDIF-TOS-Link)
6
26
5
R
B
4
27
3
28
2
Video output R/C
Video output G/Y 3 Video output B/C
Selector video on/off 5 Video output Composite (CVBS) 6 Video output S-Video (Y/C) 7 Analog output Subwoofer 8 Analog output Right Surround 9 Analog output Left Surround
1
For further information about connections and hardware settings please refer to
section 'Connections and options on the back panel' on page 140.
12
4 Overview of display elements
4.1 Display window
1 5.1CH lights when the analog 5.1 channel output is selected (refer to sec-
tion 'Audio Output Mode' on page 108).
2 V-PART lights while playing a video part of a DVD disc.
3 PRGSVE lights when the video output is progressive scan (refer to sec-
tion 'About progressive scan video' on page 14).
4 lights during multi-angle scenes on a DVD disc (refer to section
'Switching camera angles' on page 93).
5 GUI (Graphical User Interface) lights when a menu is displayed on-
screen.
6 GRP indicates that the character display is showing a DVD Audio group
number.
7 TITLE indicates that the character display is showing a DVD Video title
number.
13

8
*1
lights when V / TruSurround is active (refer to section 'Virtual
Surround' on page 73).
9 TRK indicates that the character display is showing a track number.
10 CHP indicates that the character display is showing a DVD chapter num-
ber.
11 REMAIN lights when the character display is showing the time or number
of tracks/titles/chapters remaining.
12 Character display
13 ▐▐ lights when a disc is paused.
14 ► lights when a disc is playing.
15
*2 lights when a Dolby Digital soundtrack is playing.
16 DTS *3 lights when a DTS soundtrack is playing.
*1
TruSurround and the
*2
'Dolby' and the double-D symbol are registered tademarks of Dolby Laboratories.
*3
'DTS' and 'DTS Digital Surround' are registered trademarks of Digital Theater Systems, Inc.
symbol are registered trademarks of SRS Labs, Inc.
14

4.2 About progressive scan video
Compared to interlace video
scanning rate of the picture, resulting in a very stable, flicker-free image. Progressive scan video is available only from the component video output. Use the
[Progressive] function in the [Video Output] menu to switch the component video output between interlace and progressive (refer to section
'Component Out' on page 85). With a DVD Video disc you can do this during
playback, or when the disc stopped. For other types of discs, the VIP G3 must
be stopped.
Important
· If you connect a TV that is not compatible with a NTSC or PAL progres-
sive scan signal and switch the VIP G3 to progressive, you will not be able
to see any picture at all. In this case, please deactivate the [Progressive]
function to switch back to interlace.
Note
*1
, progressive scan video*2 effectively doubles the
· You can’t switch video output when an OSD is on-screen.
· The picture on some TVs may momentarily break up when you switch the
video output of the VIP G3.
*1
refer to glossar 'Interlaced Video' on page 134.
*2
refer to glossar 'Progressive scan video' on page 135.
15

5 Installation and power supply
5.1 Placement
Please choose a level and dry place. It is recommended to place the VIP G3 into
a high quality rack or onto a stable table. Do not expose the unit to vibrations
and direct sunlight. Do not place the unit in close range to heat sources like
radiators.
5.2 Mains connection
The mains input 14 is on the back panel of the VIP G3. To connect the unit to
mains use the included mains cord. If you want to use a different power cord
make sure that it meets the specifications for your home country.
Important
· The electrical specifications at the back must meet the specifications of
your home country.
· The VIP G3 is a Class I unit and must be earthed. Please ensure a stable
earth connection. 'Phase' ('hot pin') is marked at the back panel (PHASE)
15 .
· Only in case of extended absence (like vacations) or if massive trouble on
mains power is to be expected you should disconnect the unit from mains.
To disconnect the unit from mains pull the mains plug.
5.3 Orientation of mains plug
The correct polarization of mains is important for reasons of audio clarity and
stability. Please connect the mains cord that the hot pin of the wall outlet is
connected to the pin of mains input 14 marked PHASE 15 on the back panel
of the unit.
16
6 Audionet System Remote Control
All functions of the VIP G3 can be controlled using the Audionet System Remote Control Logitech Harmony Ultimate One. Furthermore it is possible to
control up to 14 additional devices with the Harmony Ultimate One.
17

6.1 Key assignments VIP G3
No. Key Function
1
Play Pause Stop
2
2
2
2
3
4
5
6
Off
REC
9 :
78
Exit
For switching off the current Activity, long key
stroke (>10sec) to switch remote control on or off
Start, pause or stop playback of current title
Not assigned
Short key stroke: skip to previous / next title
Long key stroke: rewind / fast forward
Favourites: see manual Logitech;
for VIP G3 not relevant
Touch screen, functions are labelled
Cursor cross around OK key for navigating through
the menus of the VIP G3
Go back one step or exit a menu
7
8
9
10
11
12
13
14
14
OK
Vol +
Vol -
DVR
Guide
Info
Menu
Ch
Pg
Acknowledge a selection
Not assigned
Not assigned
Not assigned
Opens the on screen menu
Shows information on current disc
Colour keys: not assigned
Home: lists all Activities
Short key stroke: shows DVD disc menu or the Disc
Navigator, if a DVD-RW, CD, Video CD/Super VCD
or MP3 disc is inserted.
Long key stroke: opens the top menu of a DVD disc
Not assigned
Not assigned
15
O
Not assigned
18

You will find help for setting up your Logitech Harmony Ultimate One on the
internet on Logitech's webpage:
https://support.myharmony.com/de-de/harmony-ultimate-one-usermanual
6.2 Using the touch screen
Tap on the Symbol above the touch screen of your Harmony Ultimate One
to get a list of all your Activities. Tap now on the symbol on the lower
right and then on the key Devices . The screen will give you a list of all programmed devices to be controlled by your Harmony Ultimate One. Scroll
through the list with an up or down wipe and press then the key VIP G3 in
order to control your VIP G3 with the Harmony Ultimate One. The Device
mode gives you access to all remote control commands your VIP G3 understands. The following will discuss these commands in detail.
Important
· During everyday use, you should never need to use the Device Mode of
your Harmony Ultimate One, but control the VIP G3 (and other devices of
your audio setup) by customizing your Activities. For detailed information
on how to customize and use Activities on your Harmony Ultimate One
please consult the separate user manual for Harmony Ultimate One.
Key Function
123
Power Toggle
Power On
Power Off
Menu
Opens the numeric key pad
Switches the VIP G3 on / off (toggle)
Switches the VIP G3 on
Switches the VIP G3 off
Opens the DVD disc menu or the Disc Navigator, if a DVDRW, CD, Video CD/Super VCD or MP3 disc is inserted
Top Menu
Home Menu
Audio
Opens the top menu of a DVD disc
Opens / closes the on-screen menu of the VIP G3 (same function
a s key Guide )
Select the audio channel or language
19
Subtitle
Select subtitles (see section "Switching subtitles" on page 66)
Angle
SACD Mode
Surround
Dim Display
Video Adjust
OSD on/off
Random
Repeat
Repeat A-B
Switch camera angles during multi angle playback of a DVD
(see section "Switching camera angles" on page 69)
Select which area of a SACD you would like to playback (see
section "SACD Playback" on page 102).
Switch on/off V/ TruSurround (see section "Virtual Sur-
round" on page 73)
Change display brightness
Display the Video Adjust menu (see section "Video Adjust" on
page 77)
Display information about the disc playing (see section
"Displaying disc information" on page 69
Play tracks or chapters (DVD Video), groups or tracks
(DVD Audio) or tracks (CD, Video CD / Super VCD and MP3
discs) in random order (see section "Random play" on page 63).
Provides several repeat modes for DVD, CD, SACD, MP3, VCD or
SACD discs, e.g. track or disc repeat (see section "Track Repeat"
on page 60 and section "Disc repeat" on page 61)
Loop a section of a DVD, CD or SACD (see section "Looping a
section" on page 62)
Display the Play Mode menu (see pages 49 to 60 and 65). You
Play Mode
Program
can also get to the Play Mode menu by pressing
Home Menu or Guide and then selecting [Play Mode]
Program titles, chapters, folders, or tracks to playback in a desired order (see section "The program function" on page 64)
Important
· The Power key Off is only available for Activities. In Device Mode
the Power key has no function.
· Even without using an Activity, the user is able to control all functions
of the VIP G3 using the Harmony Ultimate One in Device Mode.
· The keys described below to control the VIP G3 refer to the factory
default programming of the Audionet System Remote Control Har-
mony Ultimate One. Understandably, any changes done to this setup by
the user cannot be discussed here.
Tip
· In order to switch the VIP G3 on/off, without using an Activity, please use
the keys Power On , Power Off or Power Toggle on the touch
screen. Of course, it is possible to control the VIP G3 without any Activ-
20

ity, but to tap the full potential of the Harmony Ultimate One you need to
configure Activities customized to your needs (please refer to separate
manual of the remote control Harmony Ultimate One).
Note
· Please read the separate user manual to your Audionet System Remote
Control Harmony Ultimate One. Activities, Devices and Device Mode as
well as customizing the remote control are discussed there. The user manual to the Audionet system remote control Harmony Ultimate One is available for download here:
http://cdn-www.myharmony.com/files/harmonyultimateoneusermanual-en.pdf
6.3 Using the numeric key pad
Use the digit keys of the numeric key pad to select a track, title or group directly. Additionally, you can use them to enter a time for the Time Search
function or a chapter for the Chaper Search function.
6.3.1 Selecting track / title / group number
To select a number between 1 and 9 please press the corresponding digit key
and confirm the selection with OK or enter .
To enter a two digit number please press the key for the first digit. After selecting the left digit press the key for the second (right) digit and confirm with
OK or enter . If you need to correct your last entry press clear to erase
the entry and start over.
Example: To enter number
- 5 press 5 à OK or enter
- 10 press 1 à 0 à OK or enter
- 24 press 2 à 4 à OK or enter
6.3.2 Selecting a time or chapter number
The method for entering a time for Time Search or a chapter number for
Chapter Search is different from above. Please refer to section "Searching a
disc" on page 65 for details.
Note
· There is a different method for selecting a track or folder of a MP3 disc. For
further information see section "Searching a disc" on page 65.
21
7 Operational principles
For this manual the following conventions of presentation are valid:
- keys on the remote control: Menu
- items of on-screen menus: [2-Channel]
- cursor keys to move cursor on the screen: ▲▼◄►
- on-screen menu message: Pause
- message in display window on front panel: LOADING
7.1 How to use on-screen displays
You can set preferences and perform advanced playback functions via various
on-screen displays. On-screen displays are operated as described in the following:
· Move the cursor with the cursor keys ▲,▼,◄ and ► onto the element you
would like to change/adjust.
· For elements like you change their
settings by using ◄ and ► while the element is selected.
· Elements of the type are used by positioning the cursor
(white background bar) over the item you want to select. Confirm selection
by pressing key OK or enter .
· Numbers are entered using the numeric keys.
· Some functions only become effective after conforming a selection by press-
ing key OK or enter .
Note
· Throughout this manual, examples of display messages and screens are in
the same language as this manual. In case you should have selected a different language for the screen menus all messages will be presented in the selected language. The order of menu items is independent from the selected
language. To change the language refer to section 'OSD Language' on page
92.
22
8 About discs
8.1 Playable disc types
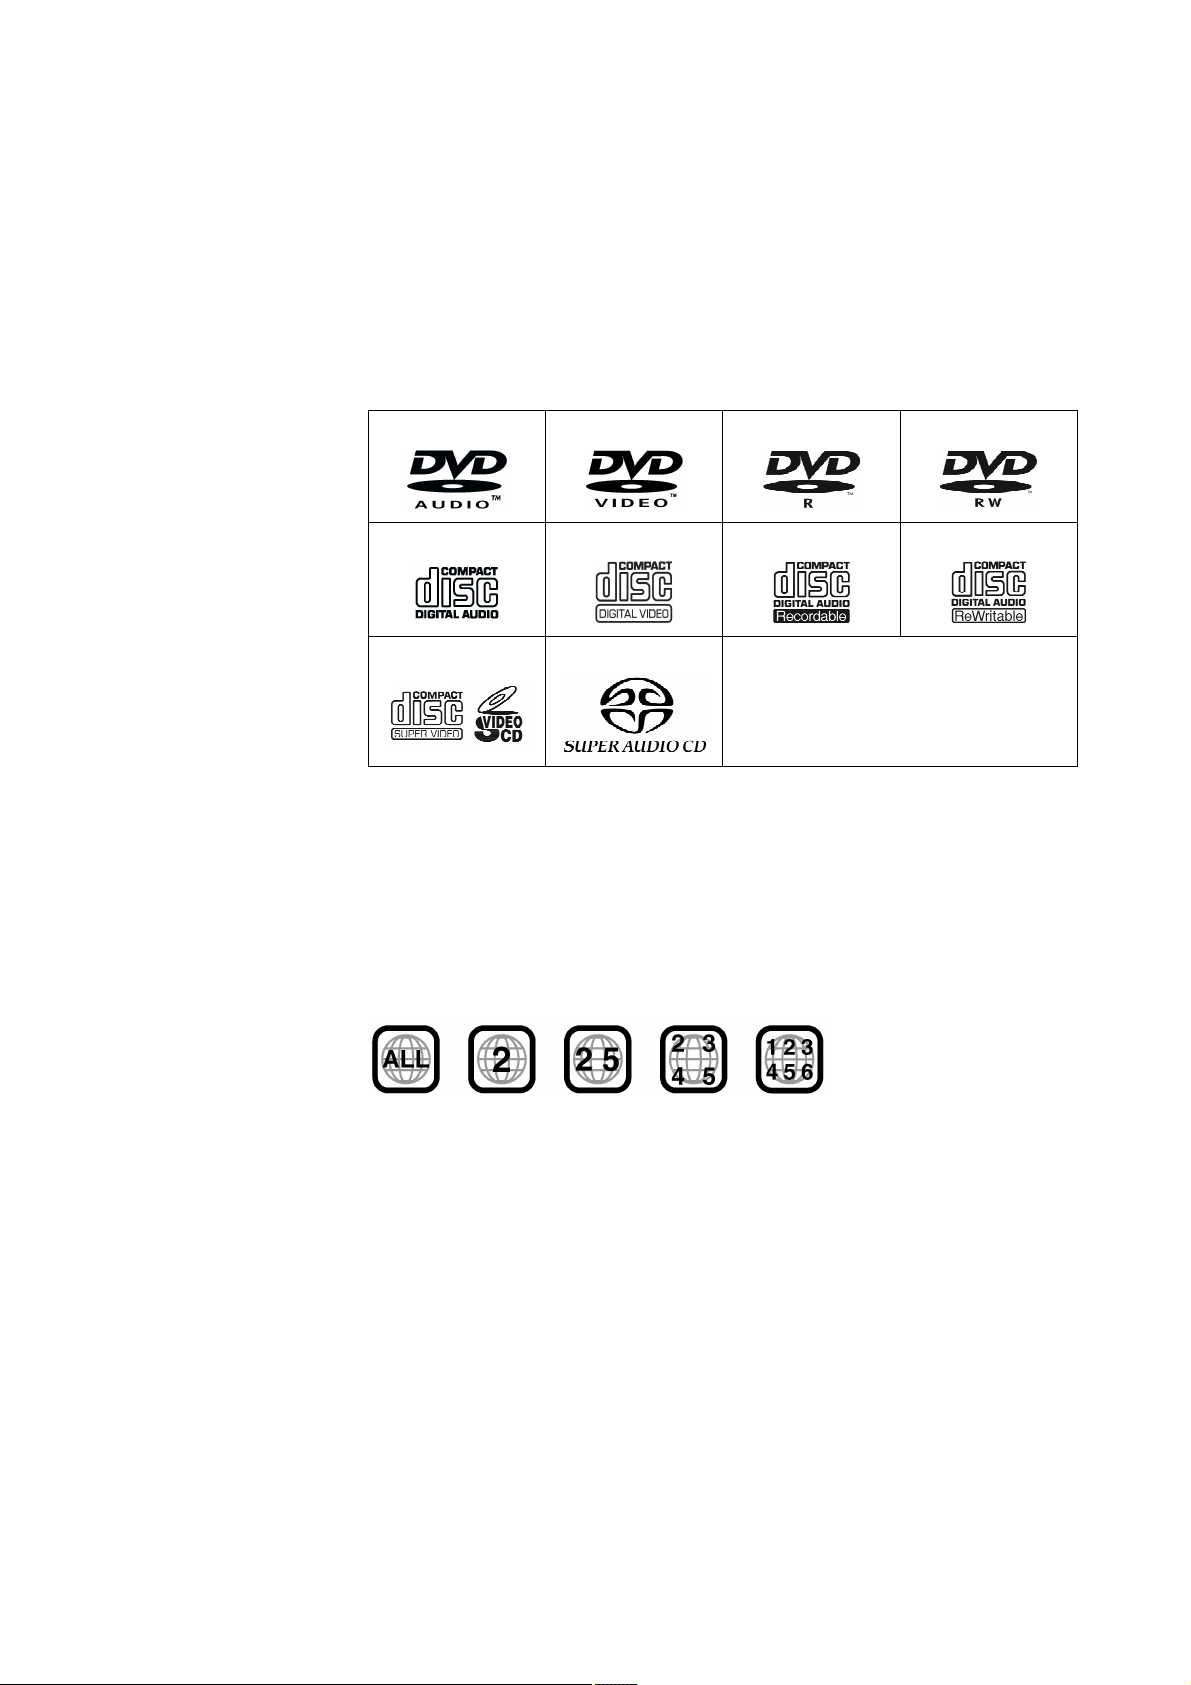
The VIP G3 is engineered to play back the following types of discs:
DVD Audio
Audio CD
Super VCD
CD-R and CD-RW discs recorded in the Audio CD or MP3 format can be
played back, though some of them may not be played back because of the disc
characteristics or recording conditions.
DVD Video discs have one or more Region Code numbers, which are indicated
on the cover. This unit can playback DVD Video discs whose Region Code
numbers include the unit's Region Code.
Example of playable DVD discs when the unit's Region Code is 2:
DVD Video
Video CD
Super Audio CD
DVD R
CD-R
DVD RW
CD-RW
The VIP G3 can playback a disc recorded with either the NTSC or PAL format.
8.1.1 Non-playable disc types
The following disc types are non-playable by the VIP G3:
DVD-ROM, DVD-RAM, CD-ROM, PHOTO CD, CD-EXTRA, CD-G, CDTEXT
Playing back discs listed above as 'non-playable discs' may generate noise and
could cause damage to your speakers
The VIP G3 can playback audio recorded on CD-G, CD-EXTRA and CDTEXT discs.
23
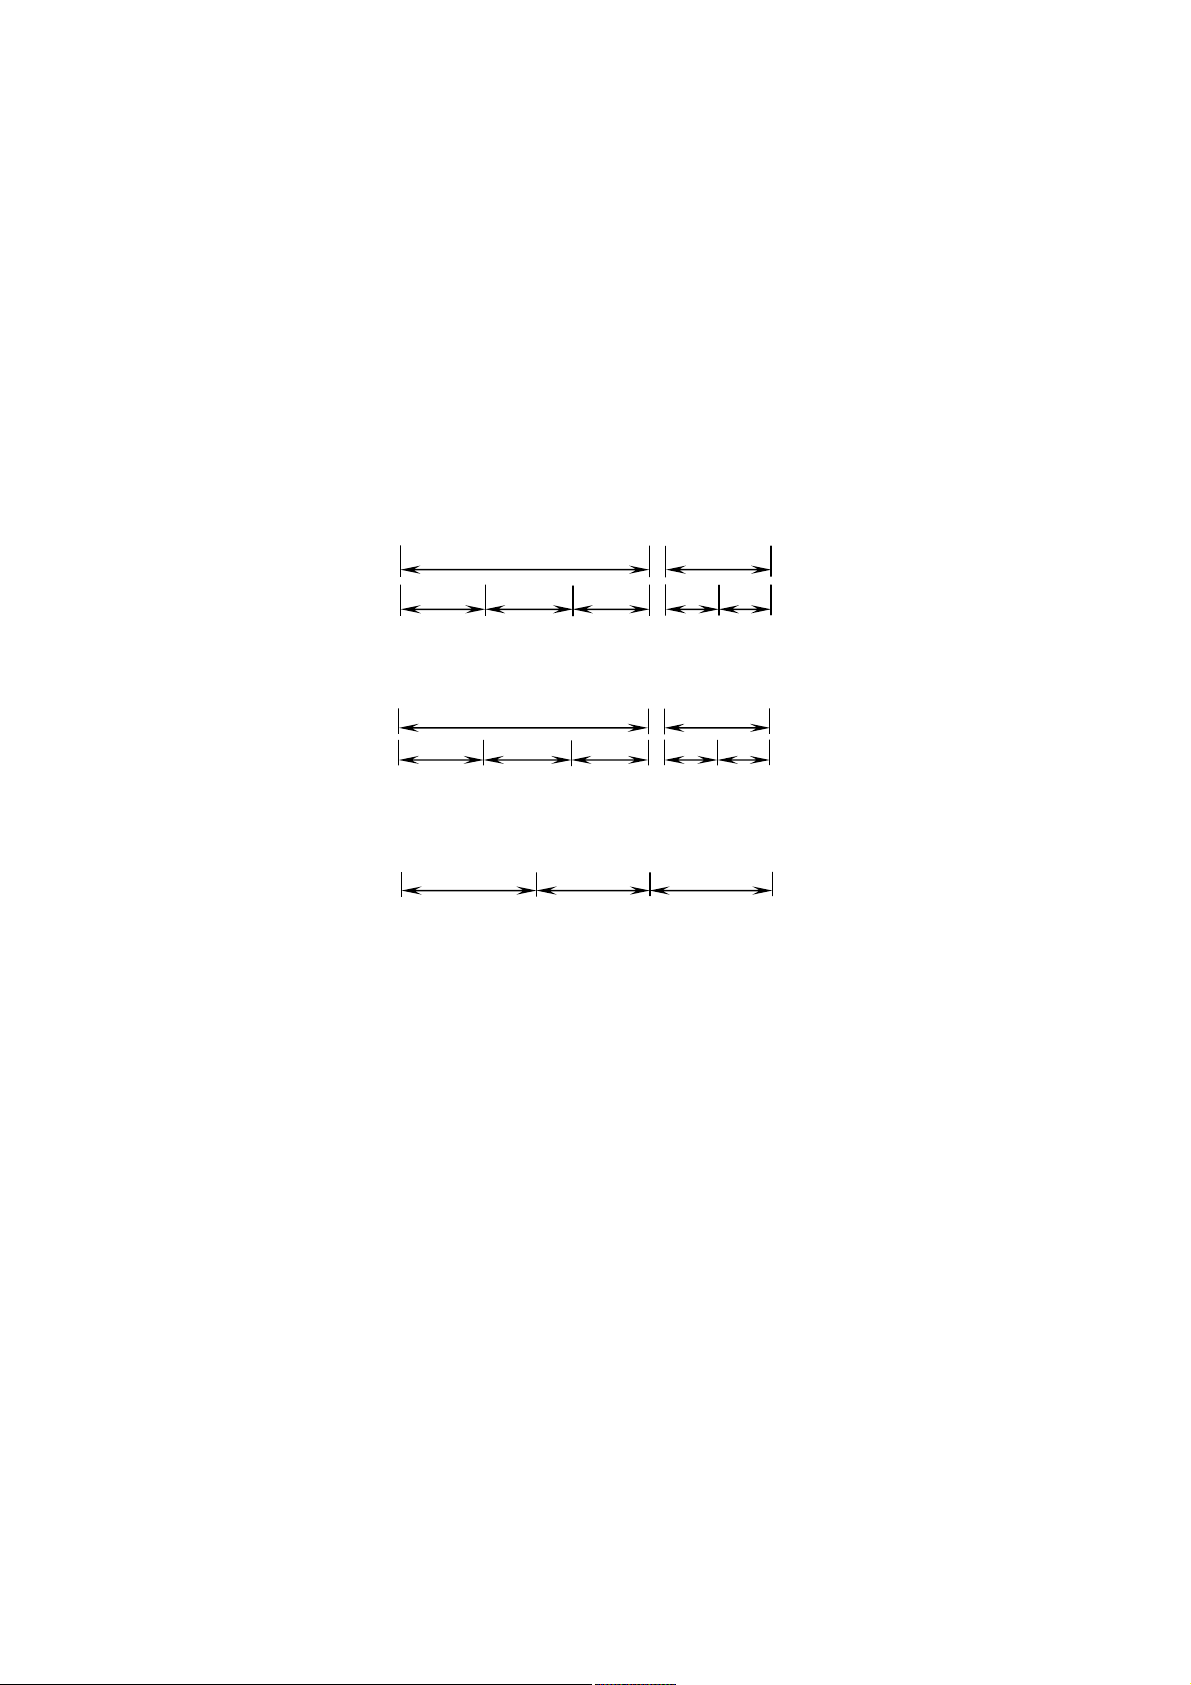
8.1.2 Disc structures
DVD Video discs are generally divided into one or more 'titles'. Titles maybe
further divided into 'chapters'. For example, if a DVD Video disc contains some
movies, each movie may have its own title number, and each movie may be
divided into some chapters. On a DVD Video Karaoke disc, each song usually
has its own title number and does not have chapters. DVD Audio discs are divided into one or more 'groups', and each group can contain a number of
'tracks'. Some DVD Audio discs also contain a 'bonus group' that will only play
after entering the 'key number' (a kind of password). Usually the contents of a
'bonus group' are not open to the public. Note that most DVD Audio discs include other information in addition to audio, such as still pictures, movies and
text. Audio CD, Video CD or Super VCD discs are divided into 'tracks'. CDROMs containing MP3 files are divided into 'folders'. Folders may also contain
subfolders.
Example: DVD Video disc
Chapter 1
Title 1
Chapter 2 Chapter 3
Title 2
Chapter 1 Chapter 2
Example: DVD Audio disc
Group 1
Track 2 Track 1 Track 2
Track 3
Group 2
Track 1
Example: Audio CD/Video CD
Track 1
Track 2
Track 3
SACD
8.1.3 MP3 discs
The VIP G3 will playback CD-R/CD-RW discs recorded in the MP3 format
(those discs are referred to as MP3 discs in this manual). Though available
functions with MP3 discs are limited, operations for the available functions are
similar to those with Audio CD discs.
MP3 is the abbreviation of 'MPEG1 Audio Layer 3'. MPEG Audio is a compression specification that compresses the audio portion only. The audio data
has been compressed into about 1/10. A similar compression method is also
used on images on DVD Video, Video CD and Super VCD discs.
On a MP3 disc, each material (song) is recorded in a file. Files are usually
grouped into folders, often sorted by category, by artist etc. In addition, folders
can also be subdivided into subfolders, creating hierarchical folder layers. If
you are familiar with personal computers, you may easily understand the hier-
24

archical folder layer construction of MP3 discs because it is similar to the
folder layer construction of computers.
Note
· The VIP G3 can recognize a combined total of up to 250 files and folders.
If a disc containing over 250 files/folders is loaded, only the first 250
files/folders recorded on the disc will be playable.
· The VIP G3 will play CD-ROM discs containing files saved in the
MPEG-1 Audio Layer 3 format (MP3) with a sampling rate of 44.1 or
48 kHz. Incompatible files will not play, and UNPLAYABLE will be displayed.
· Fixed bit-rate files are recommended. Variable bit-rate (VBR) files are
playable, but playing time may not be shown correctly.
· The CD-ROM used to compile your MP3 files must be ISO 9660 Level 2
compliant.
· CD physical format: Mode 1, Mode 2 XA Form 1.
· The VIP G3 only plays tracks that are named *.MP3 or *.mp3.
· The VIP G3 is compatible with multisession discs, but only plays sessions
that are closed.
· Use CD-R or CD-RW media for recording your MP3 files.
· Folder and track names (excluding the extension '.mp3') are displayed.
· There are many different recording bit-rates available to encode MP3 files.
The VIP G3 was designed to be compatible with all of them. Audio should
be encoded at least at 256 kbps for a reasonably decent sound quality. The
VIP G3 will playback MP3 files with lower bit-rates, but please note that
sound quality becomes noticeably worse at lower bit-rates.
8.1.4 General disc compatibility
DVD-R/RW and CD-R/RW discs recorded using DVD-/CD-Recorders or PCs
my not be playable on this unit. This may be caused by a number of possibilities, including but not limited to:
· the type of disc used,
· the type of recording,
· damage, dirt or condensation on either the disc or the VIP G3's pickup lens.
25

CD-R/RW compatibility
· The VIP G3 will play CD-R and CD-RW discs recorded in CD Audio or
Video CD/Super VCD format, or as CD-ROM containing MP3 audio files.
However, any other content may cause the disc not to play, or create
noise/distortion in the output.
· This unit cannot record CD-R or CD-RW discs.
· Unfinalized CD-R/RW discs recorded as CD Audio can be played, but the
full Table of Contents (playing time, etc.) will not be displayed.
DVD-R/RW compatibility
· The VIP G3 will play DVD-R/RW discs that were recorded using the
DVD Video format or Video Recording format.
· This unit cannot record DVD-R/RW discs.
· Unfinalized DVD-R/RW discs cannot be played in the VIP G3.
PC created disc compatibility
· If you record a disc using a personal computer (PC), even if it is recorded
in a 'compatible format' as listed above, there will be cases in which the
disc may not be playable in this machine due to the setting of the application software used to create the disc. In these particular instances, check
with the user's manual the software you are using.
· Check the DVD-R/RW or CD-R/RW discs boxes for additional compatibil-
ity information.
About DualDisc playback
· A DualDisc is a new two-sided disc, one side of which contains DVD con-
tent video, audio etc. while the other side contains non-DVD content such
as digital audio material
· The non-DVD audio side of the disc is not compliant with the CD Audio
specification and therefore my not play.
· The DVD side of a DualDisc plays in the VIP G3.
· For more detailed information on the DualDisc specification, please refer to
the disc manufacturer or disc retailer.
26
9 Getting started
9.1 Setting the TV system
The default setting of the VIP G3 is AUTO, and unless you notice that the picture is distorted when playing some discs, you should leave it set to AUTO. If
you experience picture distortion with some discs, set the TV system to match
your country or region's system. Doing this, however, may restrict the kinds of
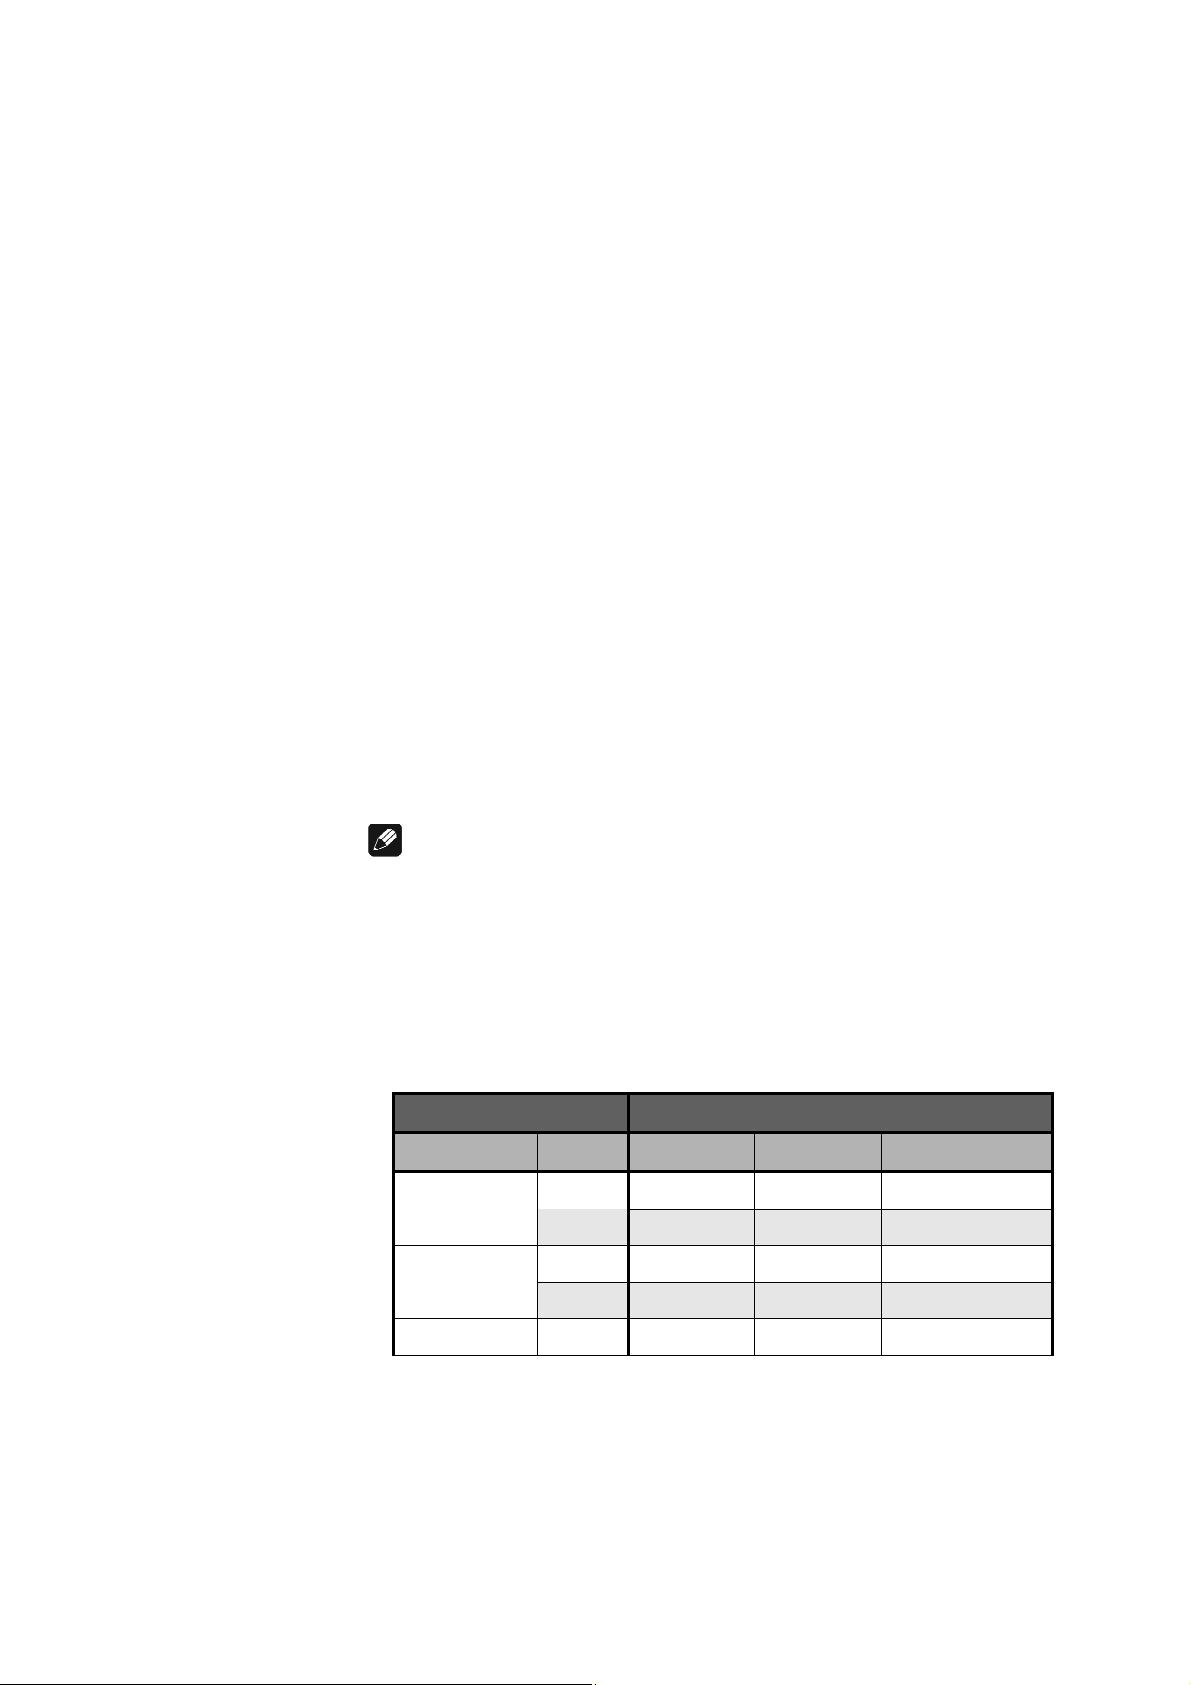
disc you can watch. The table below shows what kinds of disc are compatible
with each setting (AUTO, PAL and NTSC).
1. If the VIP G3 is not plugged in yet, plug it in now, but leave it in stand-by.
2. Using the front panel controls, hold the skip key down then press the
power key on the front panel to change the setting of the TV system. The
setting changes as follows:
AUTO à NTSC
NTSC à PAL
PAL à AUTO
The display of the VIP G3 indicates the new setting.
Note
· You have to switch the VIP G3 into stand-by (press power key on front
panel) before each change.
· If you are watching an NTSC disc on a PAL TV, you will only be able to
see interlace video. Progressive scan video is not compatible with the
MOD.PAL setting.
Disc Player setting
Type Format
NTSC
DVD
PAL
NTSC
Video CD
PAL
CD / No disc -
NTSC PAL AUTO
NTSC MOD.PAL NTSC
PAL PAL PAL
NTSC MOD.PAL NTSC
NTSC PAL PAL
NTSC PAL NTSC or PAL
27

9.1.1 Watching NTSC on a PAL TV
Most models of the newly developed countdown PAL TV system detect 50 Hz
(PAL) / 60 Hz (NTSC) and automatically switch vertical amplitude, resulting in
a display without vertical shrinkage.
If your PAL TV does not have a V-Hold control, you may not be able to watch
NTSC discs because of picture roll. If the TV has a V-Hold control, adjust it
until the picture stops rolling.
On some TVs, the picture may shrink vertically, leaving black bands at the top
and bottom of the screen. This is not a malfunction; it is caused by the NTSC to
PAL conversion.
9.2 Switching on/off
After making sure that everything is connected properly and that the VIP G3 is
plugged in, press the power key on the front panel or the key Power On or
Power Toggle of the remote control Harmony Ultimate One in Device
Mode for the VIP G3 to switch on the unit. The display on the front panel
shows LOADING for a short time.
If the disc drawer is open the display shows OPEN.
If you switch on the unit while the disc drawer is closed and no disc inserted, a
short time after switching on the display will read 0 for group / title / track /
chapter / time.
Switch off the unit by pressing the power key on the front panel or the key
Power Off or Power Toggle of the remote control Harmony Ultimate
One in Device Mode for the VIP G3. The display will first show -OFF- and
then go dark after a short time. Now the unit is in stand-by mode.
Tip
· Of course, it is much more comfortable to switch on/off the VIP G3 using
the Activity feature of the Audionet System Remote Control Harmony Ul-
timate One. For more information on Activities please read the user's manual of the Harmony Ultimate One.
9.2.1 Audionet Link
For your convenience, the VIP G3 can be controlled remotely by one of Audionet's multi-channel pre amplifiers MAP or MAP 1, as well as one of Audionet's
stereo pre amplifiers series PRE or PRE 1 using the "Audionet Link" interface.
You only need a simple optical "Toslink" cable to connect the "Audionet Link"
output of your Audionet pre amplifier to the "Audionet Link" input 25 of the
VIP G3. Now, the VIP G3 and all other units connected via "Audionet Link"
28

will be switched on/off automatically, when you switch on/off your pre amplifier at the front panel or by remote control.
Note
· Independently from the "Audionet Link" interface, you can switch on/off
manually your VIP G3 at any time by using the power key on the front
panel or the remote control.
9.3 Inserting and removing discs
Open the disc drawer on top of the unit by pushing it to the back using the handle. Put a disc onto the spindle with its printed side facing up. Fix disc with
included stabilizer ('Puck'). Please make sure that the stabilizer gives the disc a
centred and level position.
Close the drawer now. The display shows LOADING. After a short moment the
disc type is indicated (refer to section 'About discs' on page 23). For further
information about playback of discs please refer to section 'Playing discs' on
page 38.
Stop playback by using button stop at front panel or ■ on the remote control
before you open the drawer. Please wait until the disc stopped turning completely before lifting off the stabilizer ('Puck') to remove the disc.
Important
· If you open the disc drawer during playback the VIP G3 takes a short mo-
ment to stop the disc. Please wait until the disc stopped spinning completely before you remove it.
· The drawer always has to be closed completely in order to playback a disc.
· Please always use the provided stabilizer for fixing the disc during play-
back. Otherwise the disc and the player may suffer damage.
· Never use any additional disc stabilizers!
· Do not use any non-standard shaped discs available on the market because
it may damage the unit.
· Please check the copyright laws in your country before recording from
DVD Audio, DVD Video, Audio CD, SACD, Video CD, Super VCD or
MP3 discs. Recording of copyrighted material may infringe copyright laws.
· DVD Video discs are protected by the copyguard system. When you con-
nect the unit to your VCR directly, the copyguard system is activated, and
the picture may not be played back correctly.
29

· If you insert a DVD Video disc that has a Region Code incompatible to the
Region Code of the VIP G3, this unit will refuse to play the disc.
· With some DVD Video discs, the unit starts playback automatically after
inserting the disc and closing the drawer.
9.4 Setting up with the Setup Navigator
When you switch on the VIP G3 for the first time, you will see the audionet
logo on the TV screen. From here you can let the VIP G3 know what kind of
TV you have, then either use the Setup Navigator to make more settings, or
jump right in and start playing some discs.
Note
· If you have connected an HDMI compatible device to the VIP G3, the
HDMI settings screen will appear instead of the setup screens below. Refer
to section 'HDMI Settings' on page 103 for further information.
9.5 Using the on-screen displays
For ease of use, the VIP G3 makes extensive use of graphical on-screen displays (OSDs). You should get used to the way these work as you will need to
use them when setting up the VIP G3, using some of the playback features,
such as program play, and when making more advanced settings for audio and
video.
All the screens are navigated in basically the same way, using the cursor keys
▲,▼,◄ and ► to change the highlighted item and to select it by pressing
OK or enter .
Important
· Throughout this manual, 'select' means to use the cursor keys ▲,▼,◄ and
► to highlight a menu item, and then press OK or enter to confirm.
30
 Loading...