

Audionet STERN User Manual

STERN
Ultimate Linear Preamplifier
User’s Manual
HANDMADE
IN BERLIN,
GERMANY


3
Contents
1! Preface 5!
1.1! Included items 6!
1.2! Transport 6!
2! Overview front panel 7!
3! Overview back panel 8!
4! Installation and power supply 9!
4.1! Placement 9!
4.2! Mains connection 10!
4.3! Orientation of mains plug 11!
5! Inputs and outputs 12!
5.1! Inputs 12!
5.2! Outputs 12!
5.3! Bi-Amping 13!
5.4! Audionet Link 13!
6! Operating 15!
6.1! Powering up 15!
6.2! Switching on and off 15!
6.3! Using Audionet Link 16!
6.4! Control elements on the front panel 17!
6.5! Volume control 17!
6.6! Display 19!
6.7! Input selection 20!
6.8! Muting 21!

4
7! Setup Menu 23!
7.1! Global settings: Menu 26!
7.1.1! Display 26!
7.1.2! Balance 27!
7.1.3! Power 28!
7.1.4! By-Pass 31!
7.1.5! Network 36!
7.1.6! Reset 40!
7.1.7! Info 42!
7.2! Channel settings: Options 45!
7.2.1! Offset 45!
7.2.2! DC Servo 46!
7.2.3! Name 47!
7.3! Overview of factory defaults 48!
8! Audionet Metal Remote Control 49!
8.1! Key assignment 49!
8.2! Changing the batteries 50!
8.3! Settings for Audionet preamplifier 50!
9! STERN Control App 52!
10! Network setup 53!
10.1! Connecting to a wireless network 53!
10.2! Setting up the Access Point Mode 55!
10.3! Network trouble shooting 56!
10.4! Updating the STERN 58!
11! Monitoring mains power voltage 60!
12! Technical information 62!
13! Security advice 64!
14! Technical data 65!

5
1 Preface
The Audionet Scientists Team and its leading scholars congratulate you on your
purchase of this unit, sending cheers directly from our research and development
center.
Audionet components are no marketing products, they are authentic. Conceived
and developed with scientific inspiration, professional engineering expertise and
a deep passion for achieving the truly perfect sound. They are unique creations
designed to inspire musical enjoyment and have an excellent reputation amongst
all connoisseurs throughout the world. Each and every one of our precision-manufactured devices is individually crafted by hand at our new Berlin headquarters.
Built by audiophiles for audiophiles. With the utmost precision and total control
of each and every perceptible detail.
Even if you're an experienced aficionado of ultra-highend components, please
start listening to your new Audionet STERN by reading this manual carefully before you plug it in. This will ensure you'll enjoy all functions of this unit without
any compromise or potential disruption.

6
1.1 Included items
You will find the following items included:
• Stereo preamplifier STERN
• Audionet Metal Remote Control
• WIFI antenna
• Power cord
• Batteries for the remote control
• Allen key for battery replacement
• Covers for serial ports
• Cover bag
• Gloves, 2 pairs
• User's manual (that you are currently reading)
• Red warning note
• Fumigation certificate
1.2 Transport
Important
• Only transport the STERN in the original packaging.
• Always use the provided cloth bag to prevent scratches on the casing.
• Please allow the STERN to adapt to the climatic conditions in your listening
room before you switch the unit on for the first time after the transport.
7
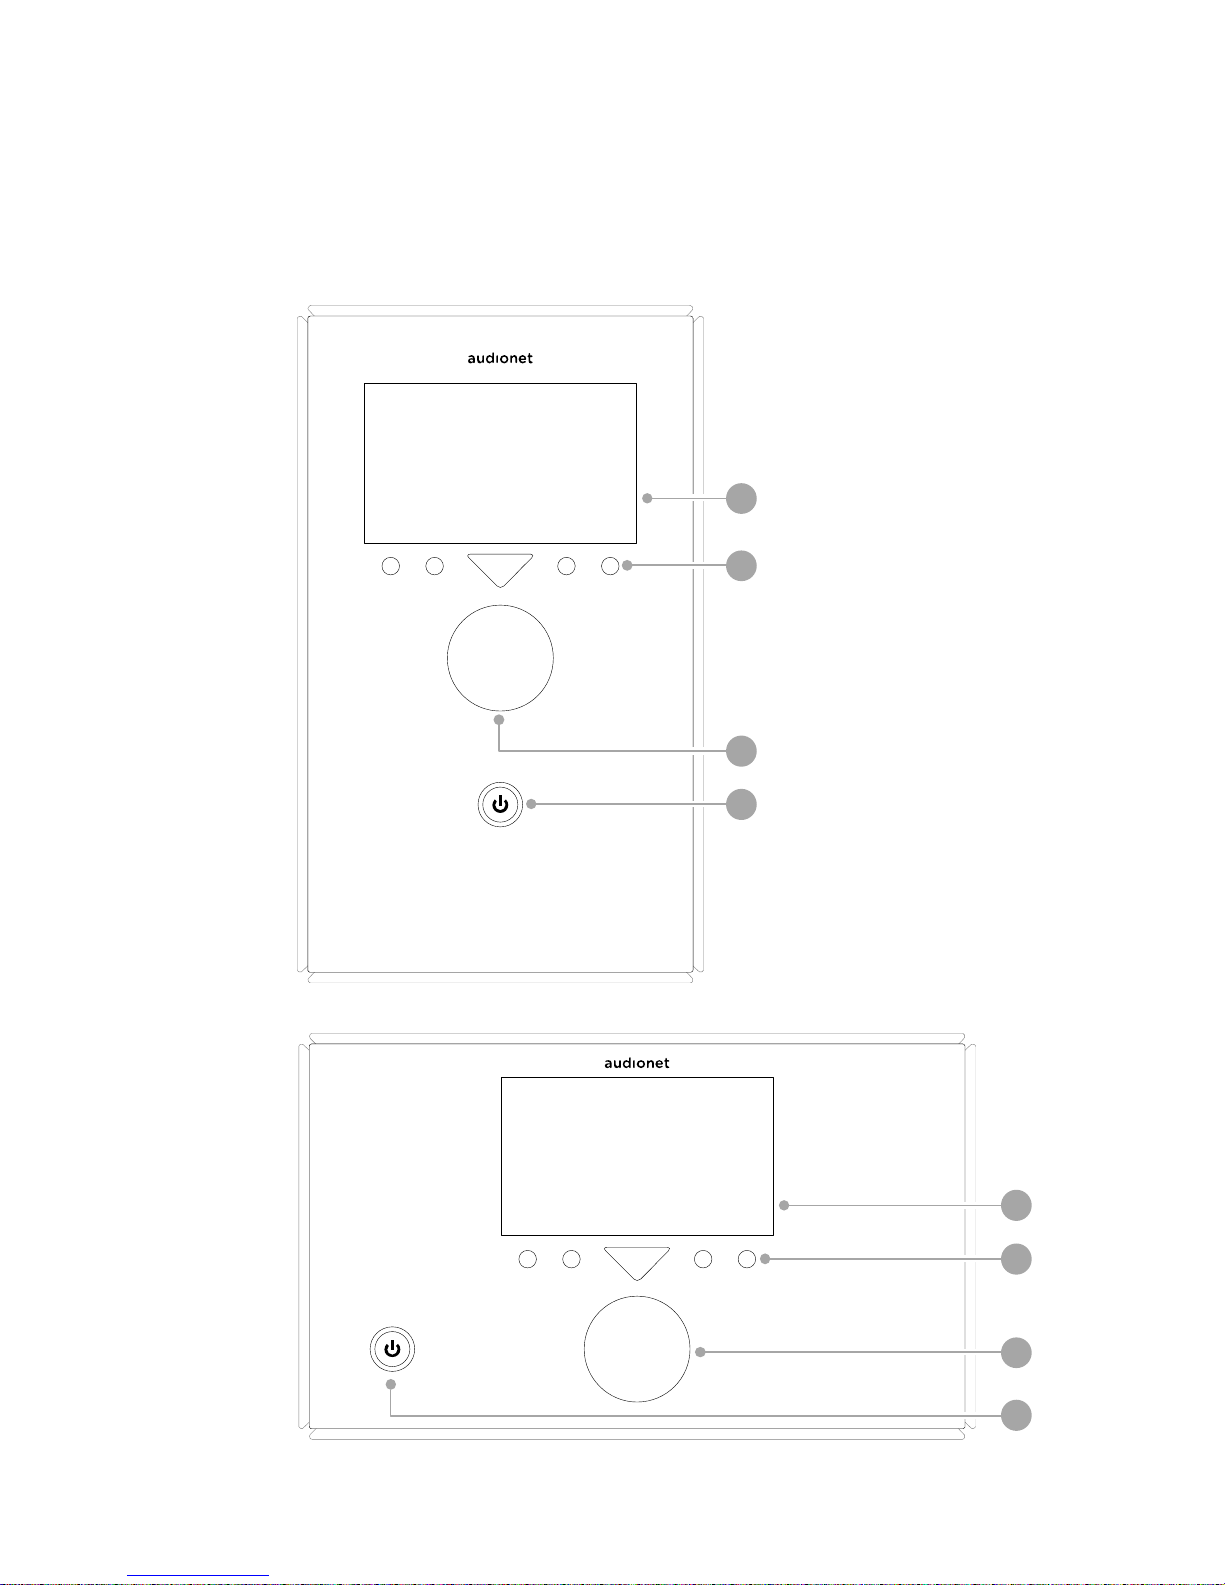
2 Overview front panel
I
2
3
4
I
2
3
4
1 power key
2
rotary encoder
3
keys (dynamically assigned functions)
4
display
8
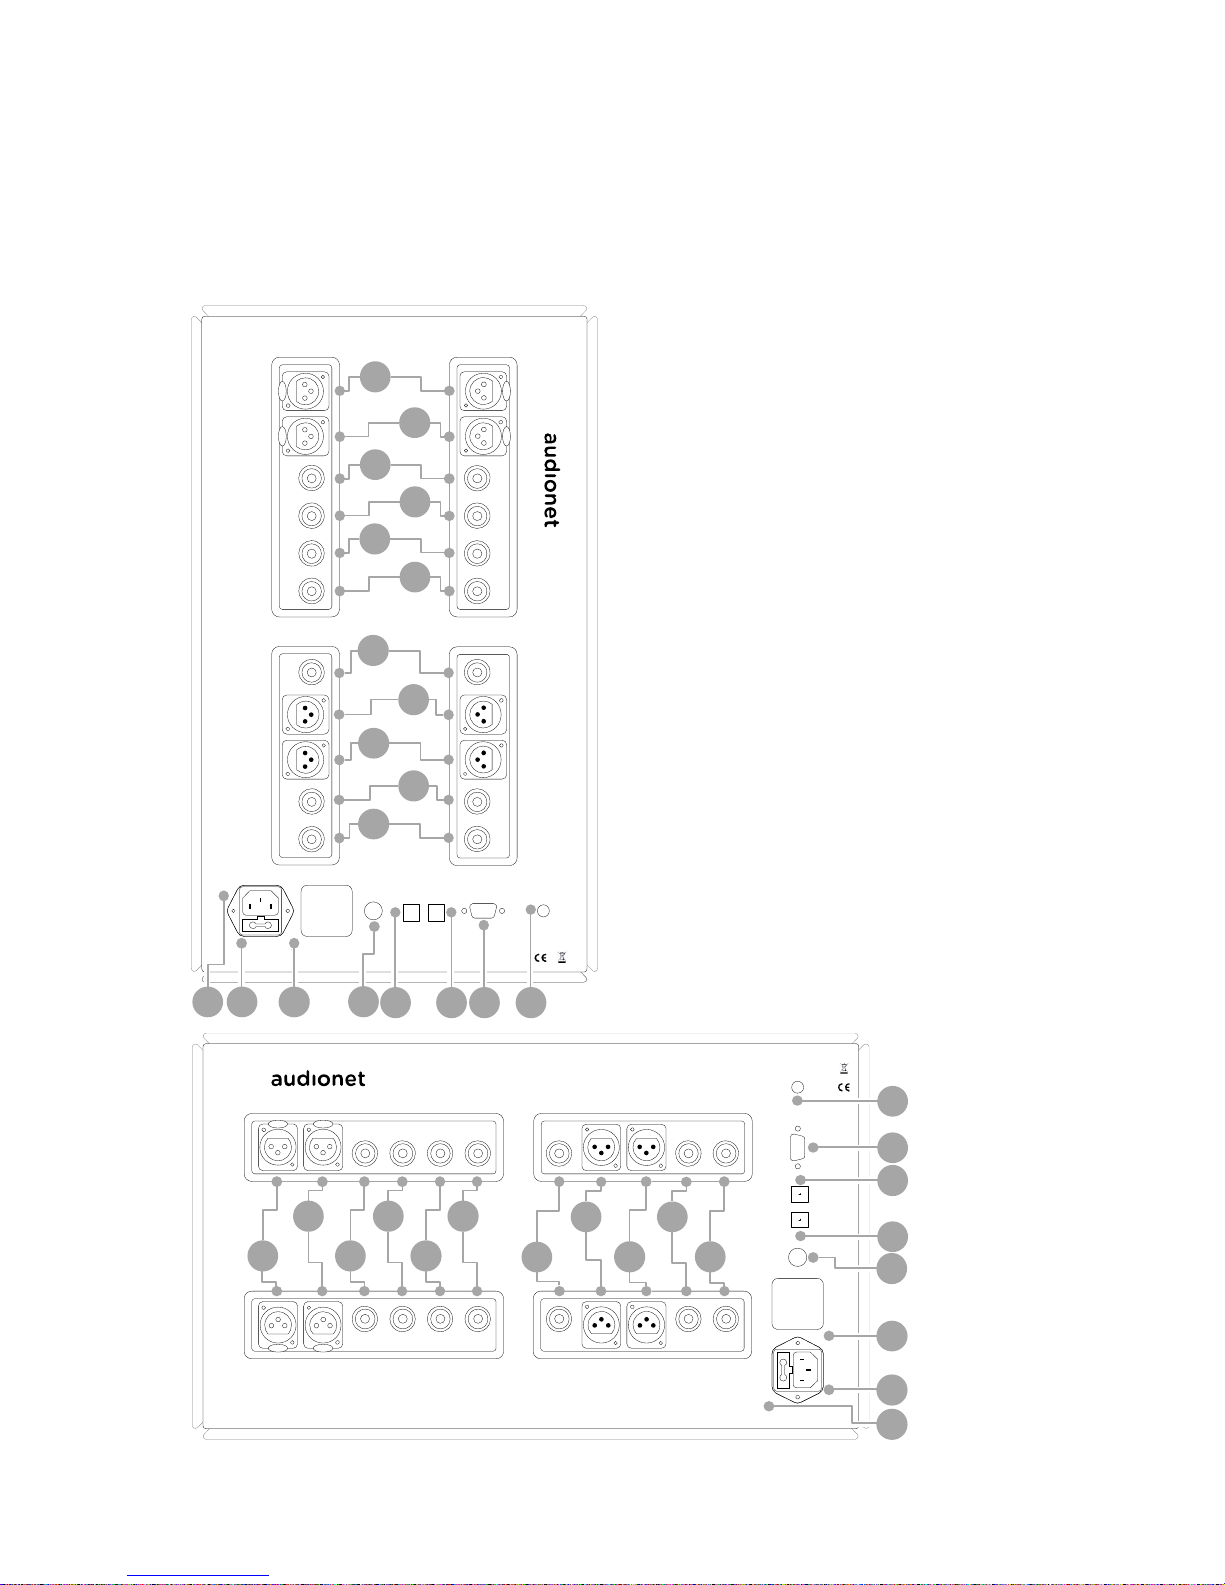
3 Overview back panel
3
4
5 balanced (XLR) in 1
6
balanced (XLR) in 2
7
line in 3
8
line in 4
9
line in 5
10
line in 6
11
inverted line out
12
balanced (XLR) out 1
13
balanced (XLR) out 2
14
line out 1
15
line out 2
16
WLAN antenna socket
17
serial port (RS232)
18
‘Audionet Link’ out 1
19
‘Audionet Link’ out 2
20 additional ground terminal
21
‘mains phase’ marking
22
mains input
23
fuse compartment
INPUT RIGHT
AUDIONET LINK
OUT2
220-240V
50-60Hz
1200W TYP.
SN 501.XX.XX
ENGINEERED AND HANDMADE BY IDEKTRON G MBH & CO. KG, BERLIN , GERMANY
DISCONNECT POWER CO RD BEFORE OPENING
THIS UNIT MUST BE EARTHED
PHASE
OUT1
GND RS232 WLAN
INVERTED
6
5
4
3
2
1
XLR 1
XLR 2
LINE 1
LINE 2
INPUT LEFT
OUTPUT RIGHT OUTPUT LEFT
STERN
MAINS
FUSE
5 6 7 8 9
10
11
12
13
14
15
16
17
18
19
20
21
23
22
INPUT RIGHT
AUDIONET
LINK
OUT1
ENGINEERED AND HANDMADE BY IDEKTRON G MBH & CO. KG, BERLIN, GERMANY
DISCONNECT POWER CO RD BEFORE OPENING
THIS UNIT MUST BE EARTHED
MAINS
FUSE
PHASE
OUT1
GND
RS232
WLAN
INVERTED654321 XLR 1 XLR 2 LINE 1 LINE 2
OUTPUT RIGHT
INPUT LEFT OUTPUT LEFT
220-240V
50-60Hz
1200W TYP.
SN 501.XX.XX
STERN
5 6 7 8 9
10
11
12
13
14
15
16
17
18
19
20
21
22
23
9
4 Installation and power supply
Important
• While connecting and removing sources or amplifiers to the STERN, all units
of your audio system have to be switched off to prevent damage to the
STERN or any connected units.
• Please make sure that all cables are in absolute best conditions! Broken shields
or short-cut cables could damage the STERN and/or any other unit connected.
4.1 Placement
Important
• It is recommended to place the STERN into a highquality rack or onto a stable
table.
• Do not expose the unit to direct sunlight.
• Do not place the STERN in close range to heat sources like radiators.
• Do not place the STERN on top of other units. Especially not on top of power
amplifiers, preamplifiers or similar components that produce heat. Both units
could suffer damage from thermal overload.
• Do not use the unit in places where it is exposed to vibrations.
• Do not place the unit close to loudspeakers or into the corner of a room
where it is exposed to high levels of sonic energy, which might reduce the
sound quality.
10
4.2 Mains connection
The mains input * is on the back panel of the STERN. Use the included power
cord to connect the unit to mains. If you prefer to use a different power cord,
make sure that it meets the specifications for your home country.
Important
• The electrical specifications of your home country must meet the electrical
specifications printed onto the back panel.
• The STERN is a Class I unit and must be earthed. Please ensure a stable earth
connection. The phase ('hot' pin) is marked on the back panel
('PHASE') .
• Never pull the mains plug while the STERN is switched on! Before you pull the
power cord off its socket at the back panel, power down the unit to stand-by
mode first.
The STERN should only be switched off from the mains in cases of extended
absence (like vacations) or if massive trouble on the mains power is to be expected. Pull the power cord off the mains input socket to completely disconnect the unit from mains.
Tip
• The use of high quality power cords could improve the sound quality. Please
ask your local retailer for more information.
*
Please refer to the sections "Overview front panel" on page 7 and "Overview back panel" on page 8.

11
4.3 Orientation of mains plug
The correct polarization of mains is important for the reasons of audio clarity
and stability. Please connect the power cord so that the hot pin of the wall outlet
is connected to the pin of the mains input marked with 'PHASE' .
12
5 Inputs and outputs
Important
• While connecting and removing sources or amplifiers to the STERN, all units
of your audio system have to be switched off to prevent damage to the
STERN or any connected units.
• Please make sure that all cables are in absolute best conditions! Broken shields
or short-cut cables could damage the STERN and/or any other connected
unit.
5.1 Inputs
The STERN is equipped with two balanced (XLR) and as well as four Cinch
(line) inputs to for connecting signal sources at line level. Due to its double
mono design, left and right channel input jacks are separated on the back panel.
Please connect the left and right input of the same number printed on the back
panel of the STERN to the corresponding output of the source which you would
like to connect to the STERN.
5.2 Outputs
The STERN is equipped with two balanced (XLR) and as well as three Cinch
(line) outputs , and – left and right channel each – to connect the unit to
your amplifier(s). The signal Cinch (line) output is inverted. Due to the double
mono design the left and right output jacks are separated.
Use the left and right Cinch (line) output to connect the STERN to your power
amplifier(s) using high quality Cinch cables. Alternatively, you may connect the
power amplifier using the balanced (XLR) outputs in case your power amplifier
does not support Cinch (line) inputs.
The inverted outputs are primarily designated for amplifiers in bridged operations (in combination with the Cinch (line) outputs ).
13
Important
• Bridged operations of an amplifier demand a correct setup and connection.
Please consult your retailer and/or the manufacturer of your power amplifier
to prevent any damage to your equipment.
5.3 Bi-Amping
While bi-amping, each loudspeaker is controlled by 2 power amplifiers: one amplifier for the bass range and one for the high and midrange. Generally, this setup
leads to an increase of the sound quality.
For the purpose of bi-amping the STERN has 2 Cinch (line) outputs and or
2 balanced (XLR) outputs and for each channel. Thus making it very easy to
make all the necessary connections for a bi-amping setup.
Important
• In most cases loudspeakers are equipped with bridges installed between the
terminals for bass and high/mid-range. These bridges have to be removed before you connect two power amplifiers to each speaker. Otherwise the
power amplifiers might get damaged!
• Please consult the user’s manual of your speakers to find out if the speakers
support bi-amping and how they have to be set up correctly.
5.4 Audionet Link
For your convenience, the STERN is able to switch all other Audionet units (e.g.
power amplifiers) on or off, that are connected via 'Audionet Link' (e.g. by a simple touch on the included remote control or the power key on the front panel).
Only a simple optical 'Toslink' cable is needed. Connect the 'Audionet Link' ouput
of your STERN to the 'Audionet Link' input of unit to be controlled.

14
The STERN is equipped with two identical 'Audionet Link' outputs. In case you
would like to control more than one Audionet unit via 'Audionet Link', use the
second 'Audionet Link' output of your STERN as well.
The 'power on' signal of the 'Audionet Link' output 2 is slightly time-delayed
in regard to the 'Audionet Link' output 1 in order to prevent all by 'Audionet
Link' connected devices switching on at the same time. Otherwise this could result in an overload of your home fuse.
Tip
• Audionet source units and power amplifiers are usually equipped with an 'Au-
dionet Link' input and additionally with an 'Audionet Link' output to connect
further Audionet devices to be controlled via 'Audionet Link' in a daisy chain.
Connect the 'Audionet Link' output to the 'Audionet Link' input of the next
unit, using a simple optical 'Toslink' cable. This will allow you to switch your
complete Audionet system on and off by your Audionet preamplifier.
15
6 Operating
All functions of the STERN are microprocessor controlled. This guarantees highest precision, exclusive functions, easy handling and protection against operating
errors.
6.1 Powering up
First of all, please make sure your STERN is connected correctly to your signal
sources, power amplifier(s) and mains (refer to sections 'Installation and power
supply' on page 9 and 'Inputs and outputs' on page 12).
The STERN is a stand-by unit. Please insert the power cord into the mains input
socket on the back panel and connect the STERN to mains power. The
display shows a welcome message for a brief moment. After that the STERN
is in stand-by mode. The display turns dark now.
The STERN should only be switched off from the mains in cases of extended
absence (like vacations) or if massive trouble on the mains power is to be expected. Pull the mains plug off the mains input socket to completely disconnect
the unit from mains.
Important
• Never pull the power cord while the STERN is up and running!
• Before you disconnect the power cord, always power the unit down to stand-
by mode first.
• If you disconnect the STERN from mains power, first power down and com-
pletely discharge all units connected to the outputs of the STERN first.
6.2 Switching on and off
Press the key on the front panel to power up the STERN from stand-by
mode. The STERN issues the message Waking up... and shows the normal op-
erating screen afterwards. The unit is in normal operating mode now.
16
If you would like to switch off the unit, please press the key on the front
panel. During powering down the display shows the message Going to sleep...
The display turns dark, indicating that the unit is in stand-by mode now.
Note
• Of course, you may switch the STERN on and off with the included Audionet
Metal Remote Control. For detailed information please refer to section 'Audionet Metal Remote Control' on page 49.
6.3 Using Audionet Link
Your STERN is equipped with two 'Audionet Link' outputs and , allowing
you to switch further Audionet units (e.g. power amplifiers, CD player or tuner)
on and off, if they are connected via 'Audionet Link' (refer to section 'Audionet
Link' on page 13).
If further Audionet units are connected to your STERN via 'Audionet Link', these
linked units will be switched on and off automatically, as soon as you switch the
STERN on and off by using the key on the front panel or the remote control.
Note
• The 'power on' signal is issued to the 'Audionet Link' output 2 of the
STERN with a small delay in order to prevent all connected from units powering up at the same time, which could overload your home fuse.
• Please do read the section 'Audionet Link' on page 13 and consult the user's
manuals of your Audionet components connected via 'Audionet Link' for further information.

17
6.4 Control elements on the front panel
The front panel has six keys to control the STERN (refer to section 'Overview
front panel' on page 7). You can control all functions with these keys as well as
all setup options to adjust the unit to your preferences (see section 'Setup Menu'
on page 23).
Use the key to switch the STERN on or off. There is a circular operating
indicator around the key, which lights up when the STERN is up and running,
ready to play back music.
The five keys directly underneath the display are dynamically assigned with
functions by the current operating mode of the STERN. The given function of a
key is shown as text in the display right above each key. If no text is displayed,
the key has no function in the present operating mode.
The rotary encoder is used to control the volume setting of the STERN (see
the following section 'Volume control') but as well for navigating through the
menus and user options.
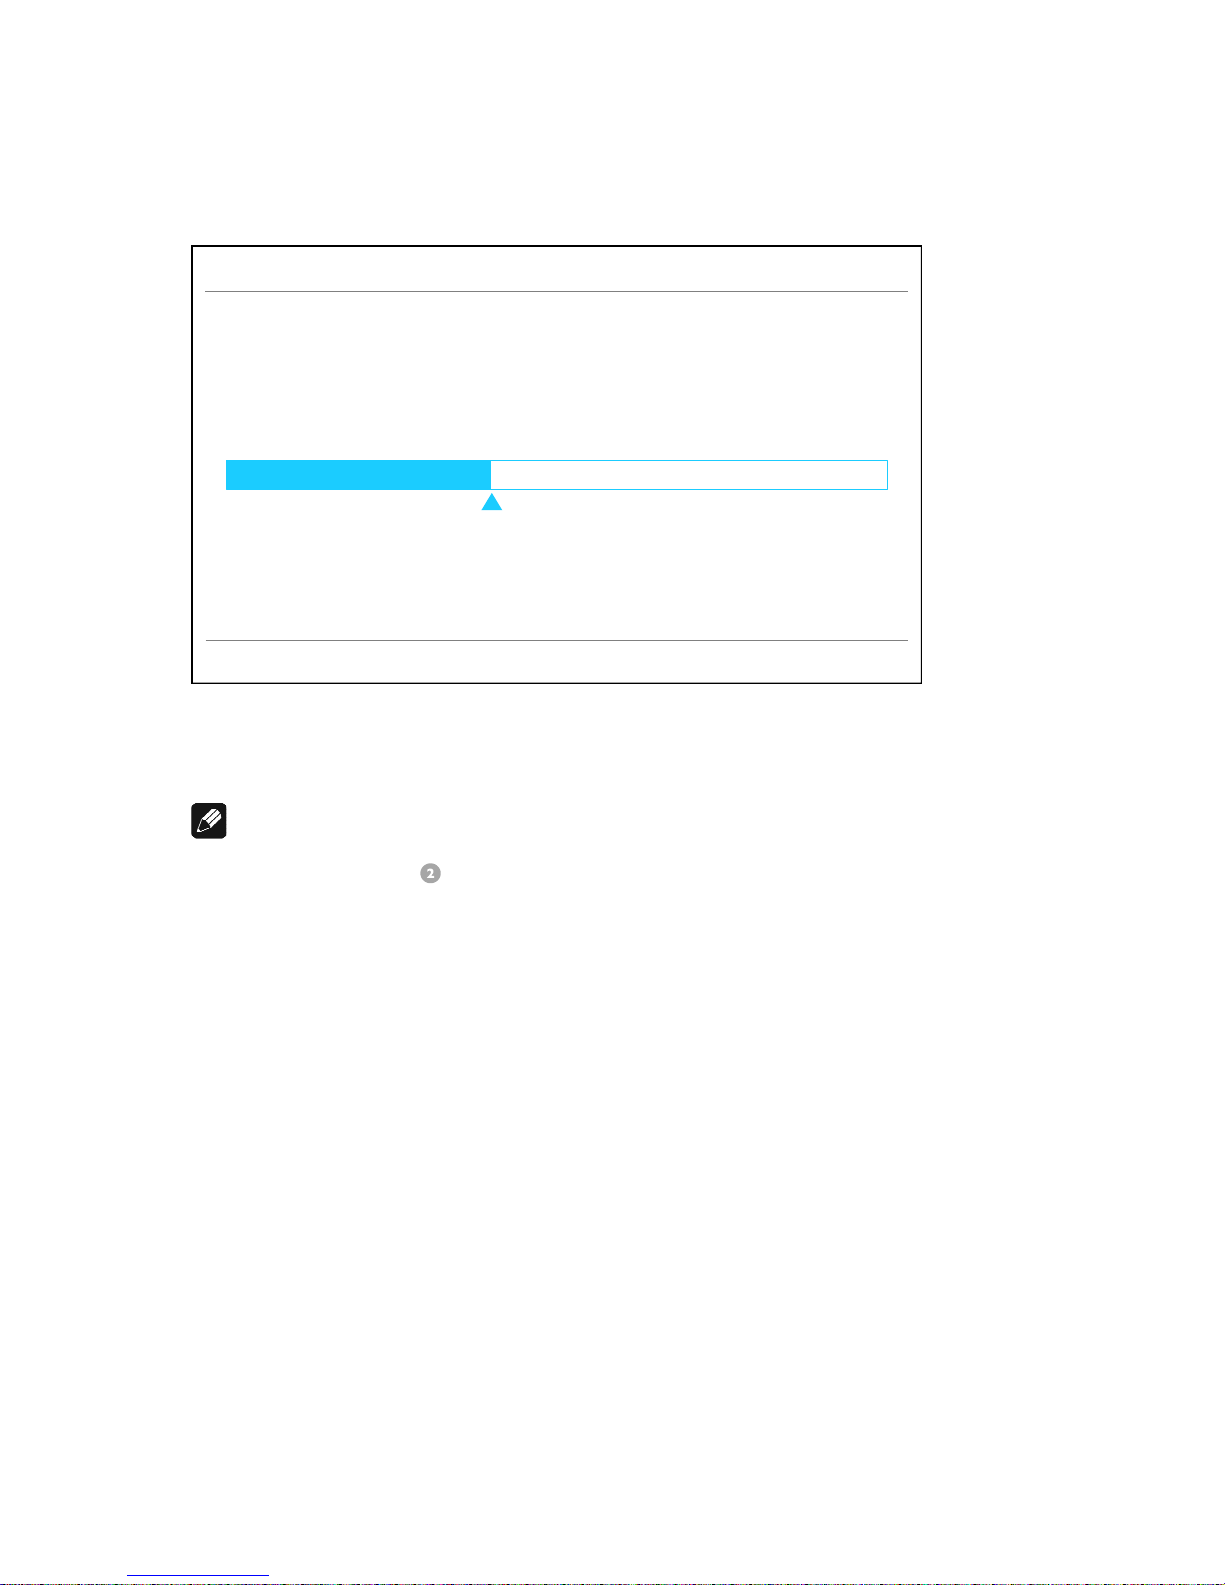
6.5 Volume control
The rotary encoder on the front panel of the STERN is used to set the desired
volume level. Turn the rotary encoder clockwise to increase and counter clockwise to decrease the volume.
The volume control of the STERN has a range from –80 dB to +10 dB in real
1 dB steps relatively to the level of the input signal. Differences in input levels can
be adjusted for each input channel of the STERN separately (see section 'Offset'
on page 45).
The rotary encoder is a magnetically buffered incremental impulse encoder without an end stop.
The display shows the current volume level in dB during the change of the volume
level as well as a bar graph of the volume in an enlarged manner for a better
readability:
18
Several seconds after the last volume change the display will revert to the normal
operating screen.
Note
• The rotary encoder is also used for navigating through the menus (see
section 'Setup Menu' on page 23) as well as for selecting the input channel
(see section 'Input selection' on page 20).
• Use the keys 'VOL+' and 'VOL-' (see section 'Key assignment' on page 49)
to control the volume with the Audionet Metal Remote Control.
3 - Line Input
Volume
-44 dB
Menu Options Mute Input Info
19
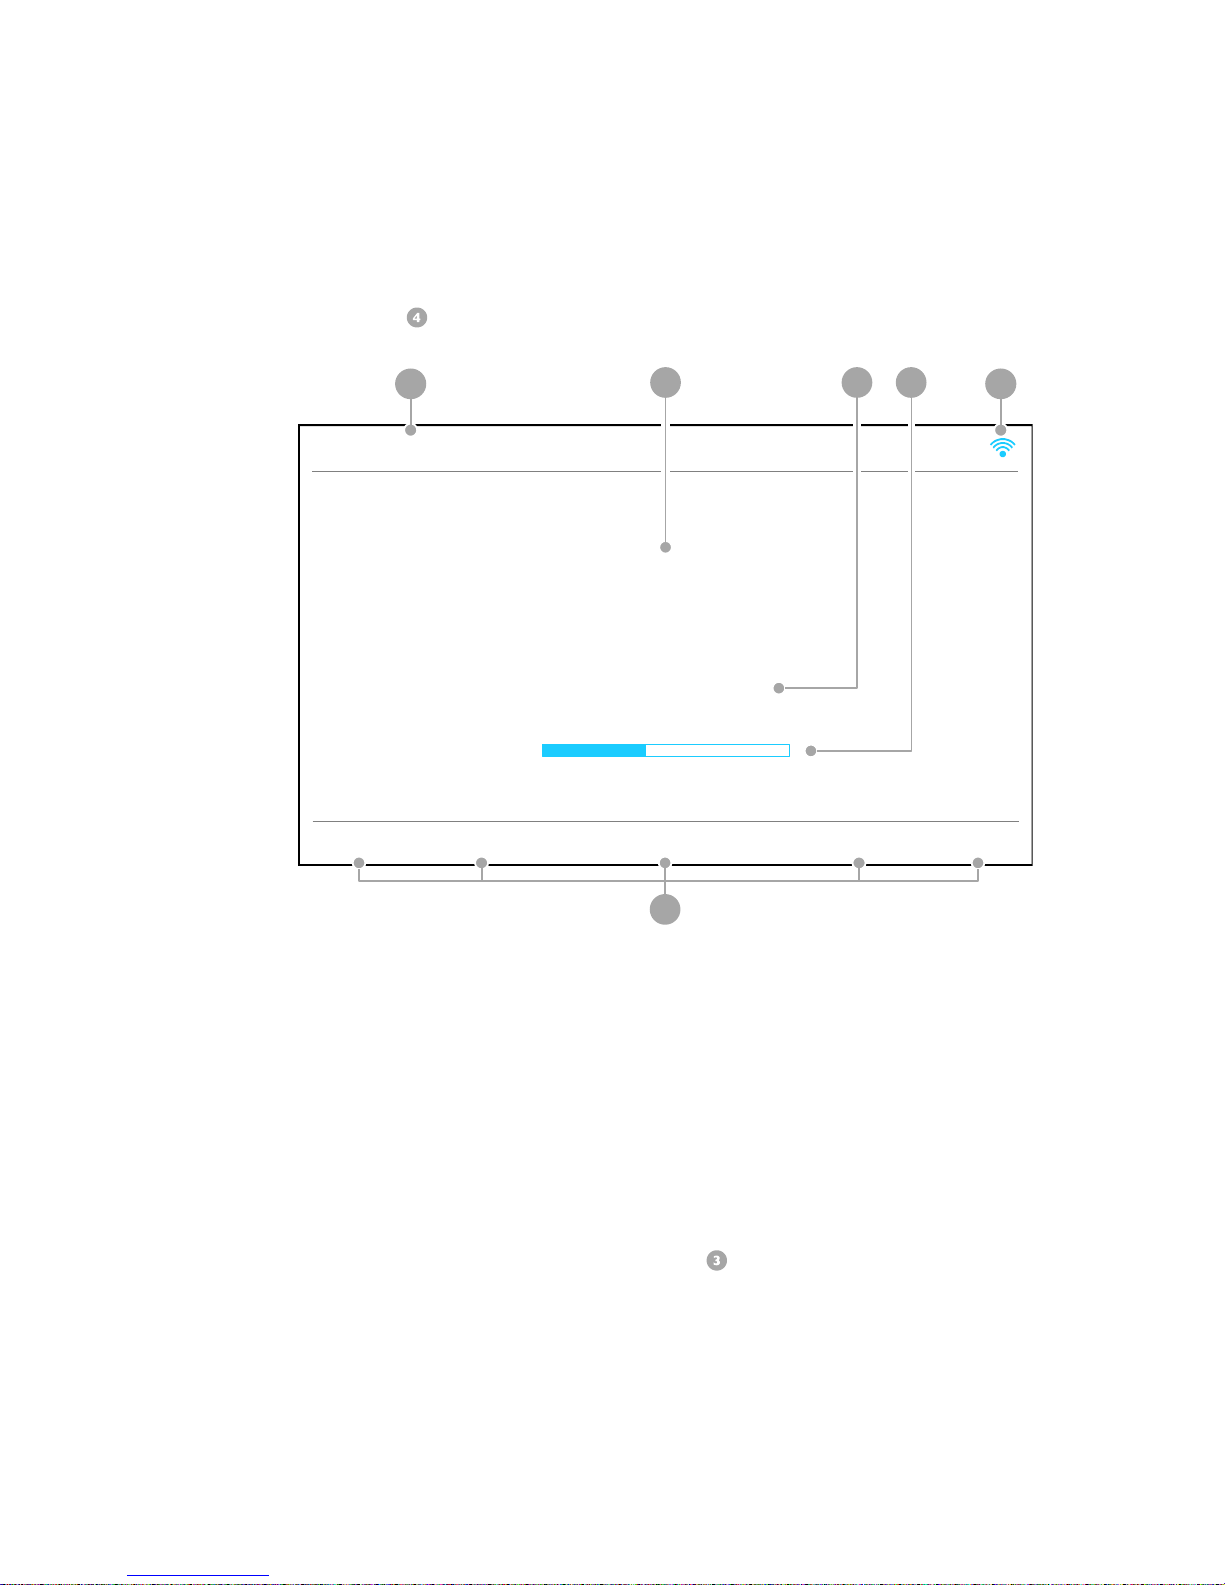
6.6 Display
The display provides the following information in normal operating mode:
1 Number and type of the currently selected input channel, corresponding to
the number printed above the input jack on the back panel (refer to section
'Overview back panel' on page 8).
2 Name of the currently selected input channel, fully user-definable (see section
'Name' on page 47).
3 Current volume level in dB relative to the input level (refer to previous sec-
tion 'Volume control').
4 Bar graph display of the current volume setting.
5 Currently assigned functions to the keys beneath the display.
6 Status of the wireless connection (see section 'Wireless' on page 36).
3 - Line Input
Line Input 3
-42 dB
Menu Options Mute Input Info
1
6
5
2 3 4
20
As soon as you push one of the keys beneath the display or change the volume
by using the rotary encoder, the display will change to show information related
to the new operating mode. For further display details refer to the description of
each menu item in section 'Setup Menu' starting from page 23.
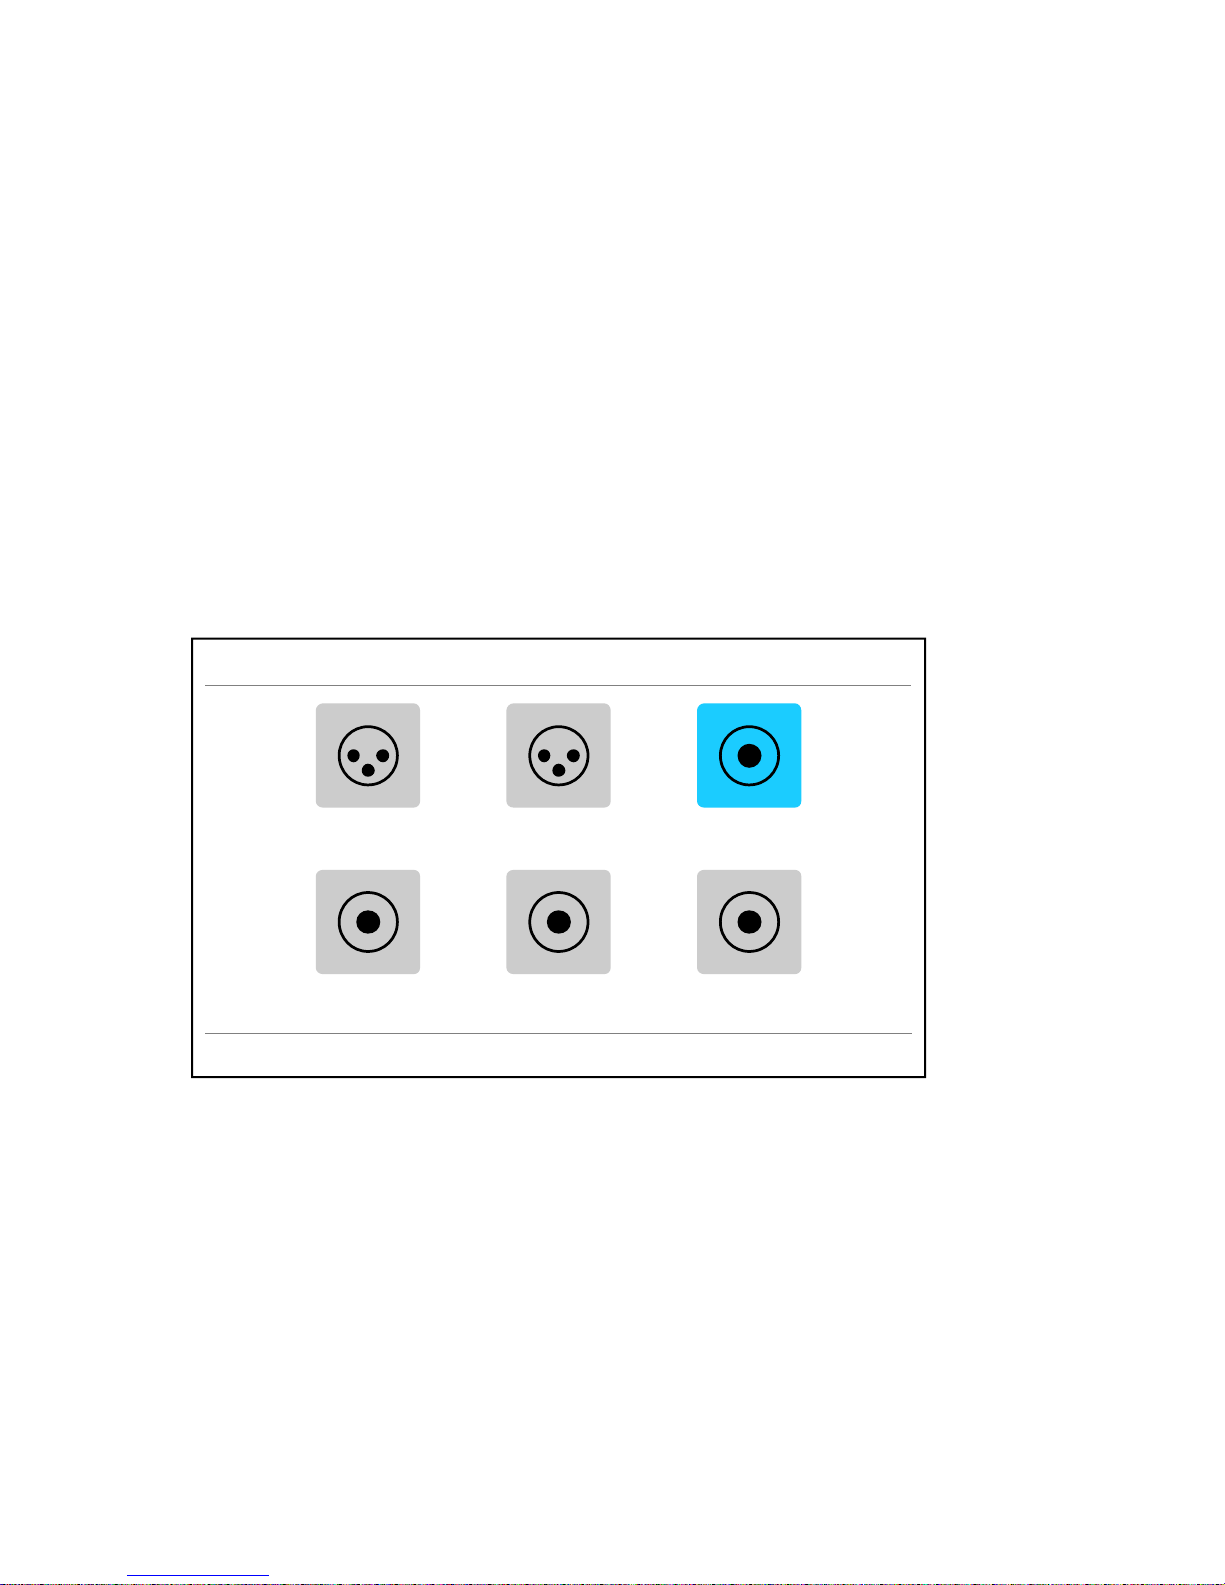
6.7 Input selection
Push the Input key on the front panel while the STERN is in normal operating
mode. Afterwards select the desired input channel by using the rotary encoder.
The display shows the following input selection screen:
The icon of the currently selected input channel and its user-defined name is
highlighted in blue. In order to actually switch to the selected input channel press
the Select key.
If you would like to go back to the main screen of the normal operating mode,
press the Home key. Use the Menu key to enter the setup menu.
The STERN features a 'soft' input selection. While switching inputs, the volume
is decreased to -80 dB first, followed by a deactivation of the outputs. Afterwards
the input section switches to the new input channel, followed by the activation
of the outputs and finally the increase of the volume up to its original level.
Select Input
Home Select Menu
Balanced 1 Balanced 2 Line Input 3
Line Input 4 Line Input 5 Line Input 6
By-Pass
1 2 3
4 5 6

21
Note
• To switch to the next or previous input channel by using the Audionet Metal
Remote Control, select an input channel by using the keys 'CH+' and 'CH-'
(refer to section 'Key assignment' on page 49).
Tip
• If you are within one of the setup menus and would like to change the volume,
press the Home key first to get back to the main screen. Afterwards you are
able to use the rotary encoder to change the volume level.
• Basically, the function Home is always assigned to the most left key beneath
the display.
6.8 Muting
While the STERN is in normal operating mode, press the Mute key on the front
panel to mute or un-mute the volume.
As well as during an input selection, the STERN uses 'soft' muting. The volume is
stepped down gently to -80 dB. Afterwards the outputs are switched off. The
displays second line informs on a muted unit with the text mute instead of the
volume value in dB.
To un-mute the STERN, press the Mute key again. The outputs are switched
back on and the volume is stepped up gently to its original level afterwards.
Note
• You may of course select a different input channel as described above, while
the unit is muted. But the STERN will of course stay muted, until you push
the Mute key again to un-mute the unit.
• If you turn the rotary encoder clockwise, i.e. you turn up the volume while
the unit is muted, the new volume level will be set and the unit is un-muted.
• To control the muting of your STERN by the Audionet Metal Remote Con-
trol, use the key (see section 'Key assignment' on page 49).
 Loading...