

Audionet SRC-7000 Owners manual
Smart remote control
User’s Manual

Preface
Preface
About this manual
This manual is created to give the owner the easiest access to the functions of
the SRC-7000 remote control. Informations in this document have been carefully
checked for accuracy and are subject to change without notice.
Figure 1-0: SRC-7000
i


Table of Contents
SRC ...............................................................................................................................0
PREFACE ..........................................................................I
TABLE OF CONTENTS..............................................1
CHAPTER 1 INTRODUCING SRC-7000 ............3
1.1 SRC-7000 FEATURES ..............................................................................4
1.2 UNPACKING THE SRC-7000......................................................................4
1.3 INSTALLING BATTERIES .............................................................................5
1.3.1 PRECAUTIONS FOR USING BATTERIES............................................................6
1.4 TURNING THE TOUCH SCREEN ON..............................................................6
1.5 IDENTIFYING COMPONENTS.......................................................................7
1.5.1 THE FRONT SIDE OF SRC-7000....................................................................7
1.5.2 THE REAR SIDE OF SRC-7000......................................................................8
1.5.3 DIRECT ACCESS BUTTONS (RUBBER BUTTONS).............................................9
1.5.4 LCD TOUCH SCREEN ................................................................................10
1.5.5 PRECAUTIONS OF USING THE TOUCH SCREEN ..............................................10
1.5.6 TOUCH SCREEN KEYS .................................................................................11
CHAPTER 2 QUICK START...................................16
2.1 RE-CALIBRATE THE SCREEN ....................................................................16
2.2 DATE / TIME SETTING ..............................................................................17
2.3 DEVICE SETTING.....................................................................................18
CHAPTER 3 HOW TO SET UP YOUR
SRC-7000........................................................................20
3.1 ADD A DEVICE.........................................................................................20
3.1.1 CREATE A NEW DEVICE ...............................................................................20
3.1.2 LOADING THE CODES FOR THE NEWLY-ADDED DEVICE ...................................22
3.2 ADDING A SOFT KEY ...............................................................................26
3.3 ADD TEXT...............................................................................................28
3.4 RE-LABEL A DEVICE, KEY OR TEXT..........................................................29
1

SRC-7000 User’s Manual
3.5 RE-SIZE A DEVICE, KEY OR TEXT ............................................................31
3.6 DELETE A DEVICE, KEY OR TEXT.............................................................32
3.7 PRE-CODE..............................................................................................33
3.8 LEARNING ..............................................................................................36
3.9 LEARN A CYCLE KEY ...............................................................................38
3.10 DELETE DEVICE/KEY CODES.................................................................40
3.11 CREATE A MACRO .................................................................................41
3.11.1 MACRO ...................................................................................................41
3.11.2 TIMER MACRO .........................................................................................44
3.12 CREATE YOUR FAVORITE CHANNELS.....................................................49
3.12.1 ADD THE FAVORITE CHANNEL KEYS ............................................................49
3.12.2 SET THESE MACROS AS YOUR FAVORITE CHANNELS....................................50
CHAPTER 4 MENUS.................................................51
4.1 SETTING.................................................................................................51
4.2 KEY LAYOUT...........................................................................................55
4.3 CODE SETTING.......................................................................................56
4.4 TIMER MACRO........................................................................................57
4.5 DUPLICATE .............................................................................................58
4.6 CALIBRATE .............................................................................................60
CHAPTER 5 INSTALL USB CABLE AND
SOFTWARE...................................................................61
5.1 INSTALL SLC-2080 USB CABLE .............................................................61
5.1.1 INSTALL THE DRIVER............................................................................61
5.2 INSTALL REMOTECOMM SOFTWARE ........................................................63
APPENDIX A .................................................................64
FEATURES....................................................................................................64
SPECIFICATIONS ...........................................................................................65
APPENDIX B.................................................................66
INCLUDED.....................................................................................................66
APPENDIX C.................................................................67
TROUBLESHOOTING TABLES .........................................................................67
2

Chapter 1 Introducing SRC-7000
Congratulations on purchasing the SRC-7000 Smart Remote Control
(SRC-7000). The SRC-7000 is a digital Universal Remote Control with
smart function design that is easy to configure and use, enabling you to
control most of all IR equipped electronic devices on the market.
One of the main features is the touch screen control panel, which could
integrate the number of remote controls to only one and reduce the
number of buttons for each device. The design makes it easy for you to
find the function you want to use. You can control up to 64 devices but
under 8 default categories such as TV, Satellite, VCR, DVD/VCD, Amplifier/Receiver, CD/MD, Tuner/Tape and AUX.
There are more features for users to setup the SRC-7000 easily. Combined with preprogrammed codes and Learning functions, the SRC-7000
enables you to easily configure each device at home or office. Approximately 95% success rate in integration of all brands of remotes verifies
the high compatibility of the SRC-7000. Furthermore, you can also easily
edit devices, change the LCD appearance, and customize other settings.
Macro and Timer functions enable you to initiate a chain of 60 commands
just by tapping one key. Besides, the Macro combined with timer can operate several units automatically at specific times.
Although most of all Universal Remote Controls have a code list for various brands and static controlling functions, they can not provide you with
a lot of flexibility. With the SRC-7000, you are able to add or delete devices, to re-label devices or keys, and to change the size and shape of
the LCD soft keys.
3

SRC-7000 User’s Manual
1.1 SRC-7000 Features
This following list identifies SRC-7000 key features. For more information on getting the most, please refer to the following chapters.
1. Control up to 64 devices including VCD/DVD, TV, Satellite, VCR,
CD/MD, Receiver/Tuner, Tape, etc.
2. Large LCD touch-screen display with automatic backlighting for visibility
in dimmed environment.
3. Direct access buttons for accessing frequently used functions such as
volume, channel, play, mute and stop.
4. Excellent learning ability with auto learning guide.
5. Huge preprogrammed codes database.
6. Motion detector enables users to power up remotes automatically.
7. Fully customizable keys, devices, icons and layouts.
8. Each macro can store up to 60 commands with time delays.
9. Timer design enables macros to operate automatically.
1.2 Unpacking the SRC-7000
When you unpacked the SRC-7000, please prove, if the following
items are included (Please refer to Apendix B on page 66):
n SRC-7000 Smart Remote Control 1x
n User’s Manual 1x
n Batteries (size AAA) 1 set of 3
n USB Data Cable + Transmit Wire 1 of each
If any of the above items is missing or appears damaged, please contact your local dealer immediately. Do not throw the shipping package
away in case you need to ship your SRC-7000.
For more information, you can contact local retailers directly or attend
to our web-site: www.audionet.de.
4
Chapter 1 Introducing SRC-7000
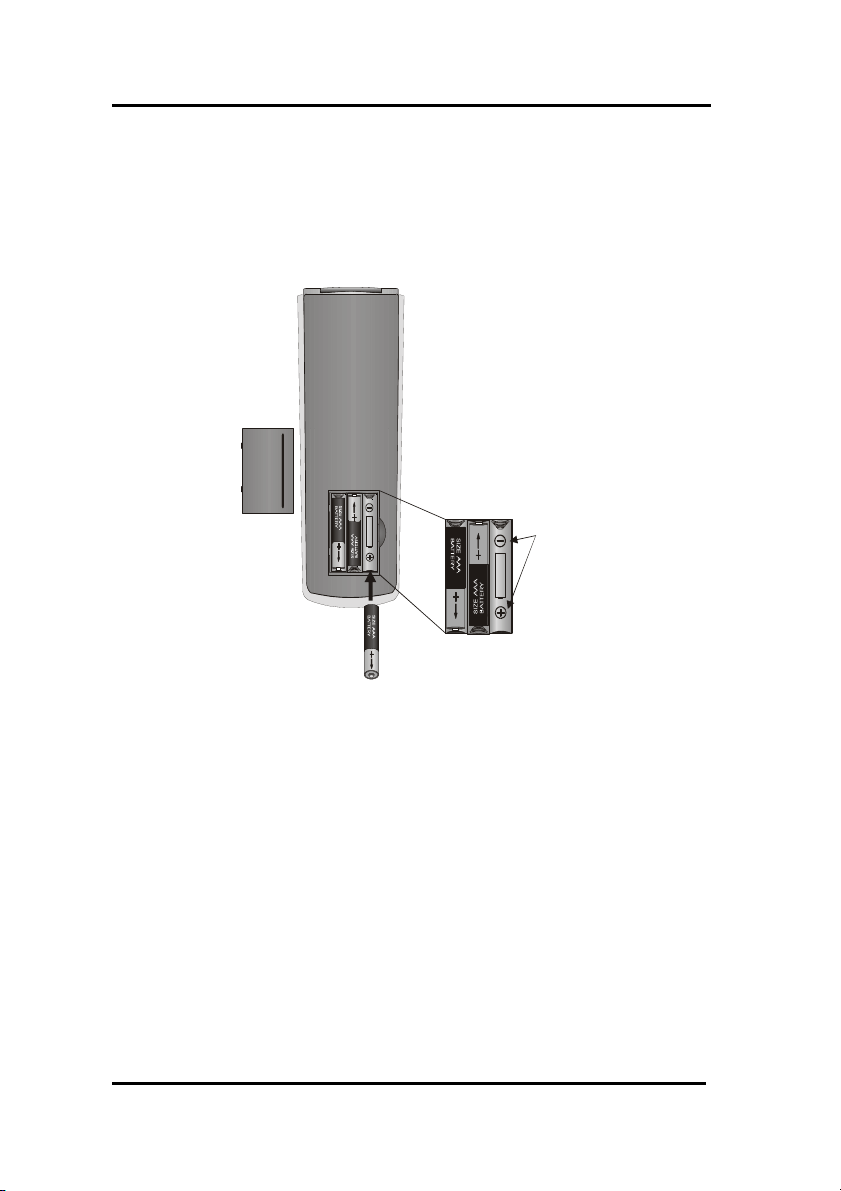
2. Insert batteries.
Ensure
that you
battery case.
1.3 Installing Batteries
Please refer to the following illustration and instructions for inserting the
batteries.
1. Remove
battery
cover.
insert
the batteries
according to
the marking
inside the
Figure 1-1: Inserting the batteries
The battery compartment is located at the back of the SRC-7000.
1. Put your thumb in the battery cover slot and pull to remove the
cover.
2. Insert new batteries into the bay in the direction indicated in the
battery compartment.
3. Replace the battery bay cover. You will hear it click into place.
5
SRC-7000 User’s Manual
1.3.1 Precautions for using batteries
Please pay attention to the following instructions:
1. Be sure that the positive (+) and negative (-) polarities of each battery match the polarities indicated in the compartment.
2. Do not expose the batteries to excessive heat or flame.
3. Keep the batteries away from children.
4. Low power batteries will reduce the effective distance of the unit.
5. Do not mix different type of batteries or mix new and used batteries
to use at the same time.
If you use Ni-MH rechargeable batteries, please pay more
attention to the following:
a. Before first use, please charge the batteries for 10 hours.
b. Do not recharge the batteries with an unqualified charger.
c. When the battery low power warning icon appears, please
recharge the batteries right away.
d. Please renew the batteries immediately when its running
time left is lower than half of preliminary after they are fully
recharged.
Warning:
When the battery low power warning icon appears,
you may not enter the Setup Menu to operate the functions such as using learning function, adding a Macro, or
deleting devices.
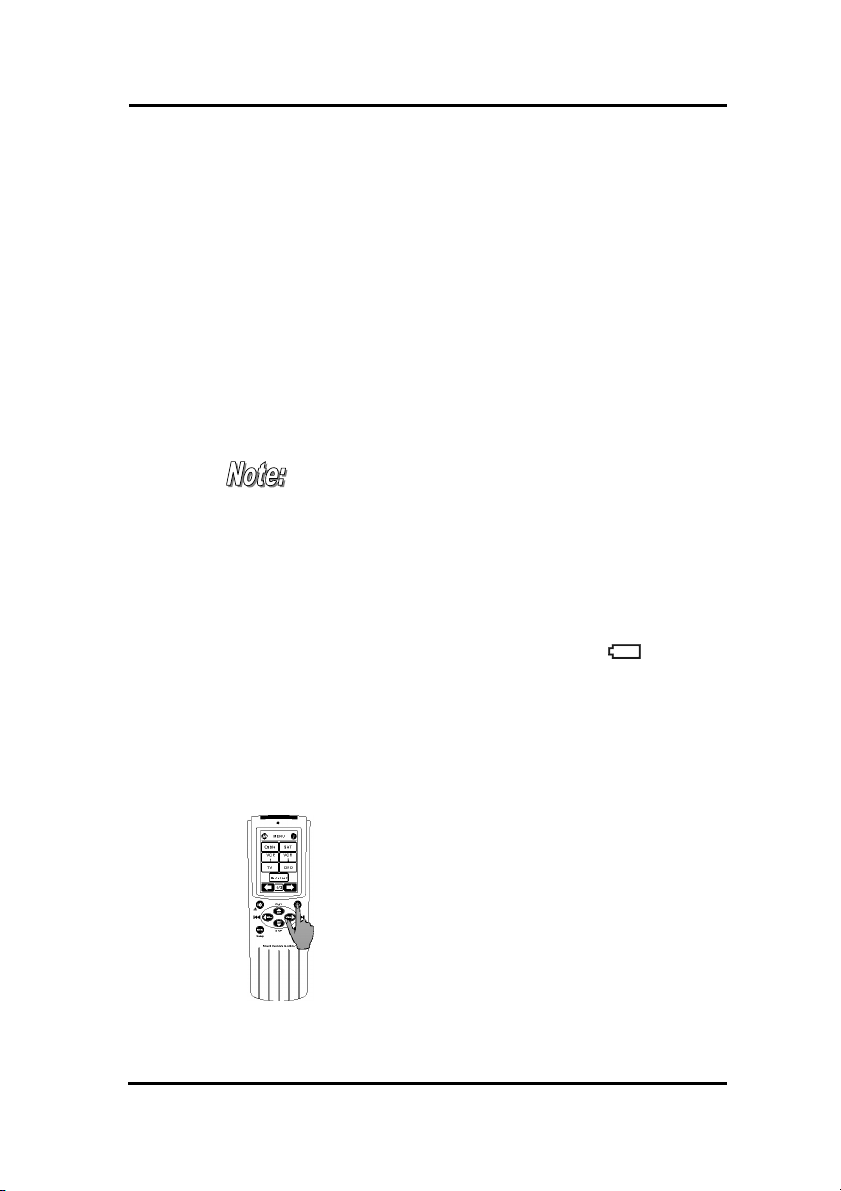
1.4 Turning the touch screen on
There are three ways to turn on the
SRC-7000:
1. Picking up the Smart Remote:
The motion detector design will
turn the SRC-7000 on.
2. Pressing any rubber key.
Figure 1-2: Turning the LCD on
6
3. Tapping the LCD touch screen.
Chapter 1 Introducing SRC-7000
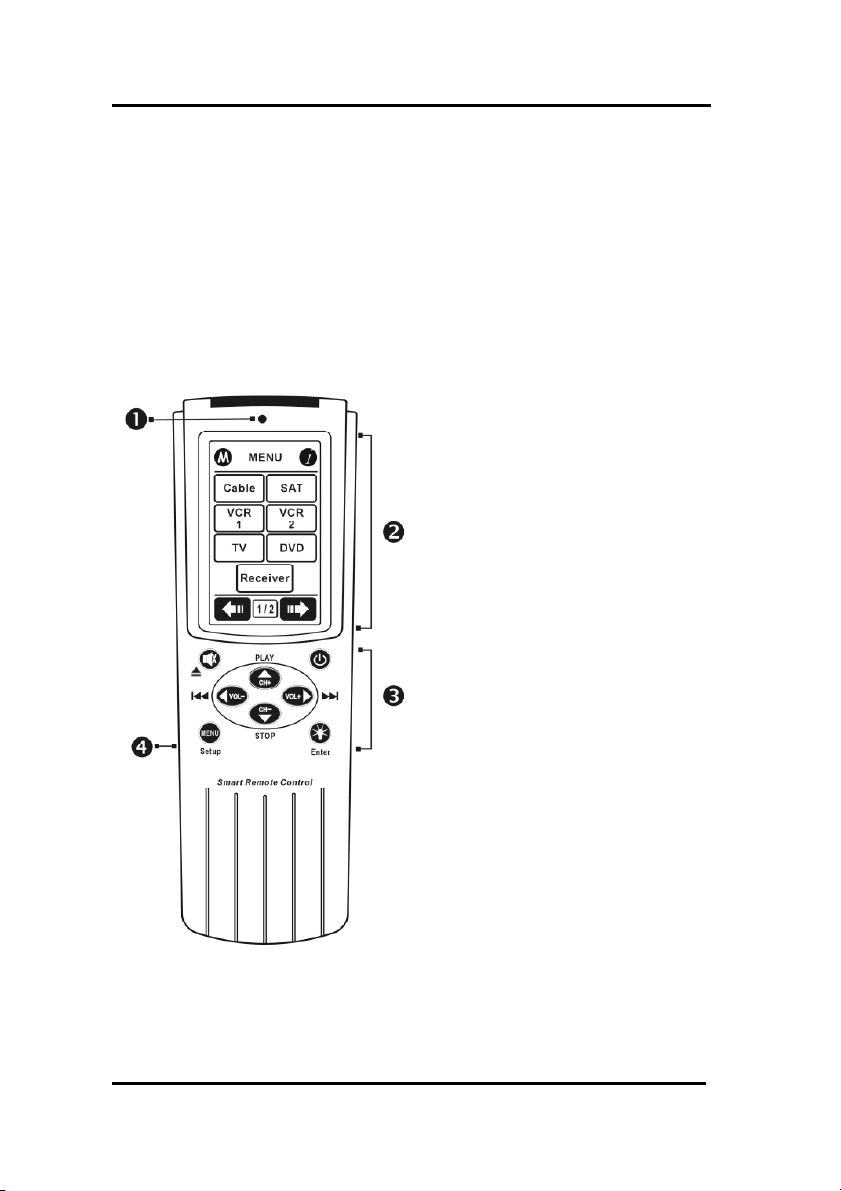
1.5 Identifying Components
Please refer to the following illustrations to identify the components of
the SRC-7000. This section provides you with an overview of the
SRC-7000. For the detailed description on operation, please refer to
Chapter 3.
1.5.1 The front side of SRC-7000
1. Light Sensor (P.53)
The Light Sensor will detect the
ambient brightness or dimness
to control the backlight whether
to turn on or not.
2. LCD (P.11)
The LCD screen enables you to
configure and control your devices on it by tapping the
screen. In addition, you can tap
the screen to power on the
SRC-7000.
3. Hard key (P.9)
You can operate the most frequently-used functions by
pressing these hard keys.
4. Transmission port (P.61)
With the port, you can connect
your PC and SRC-7000 with the
Figure 1-3: Front view
SLC-2080 USB cable.
7
SRC-7000 User’s Manual
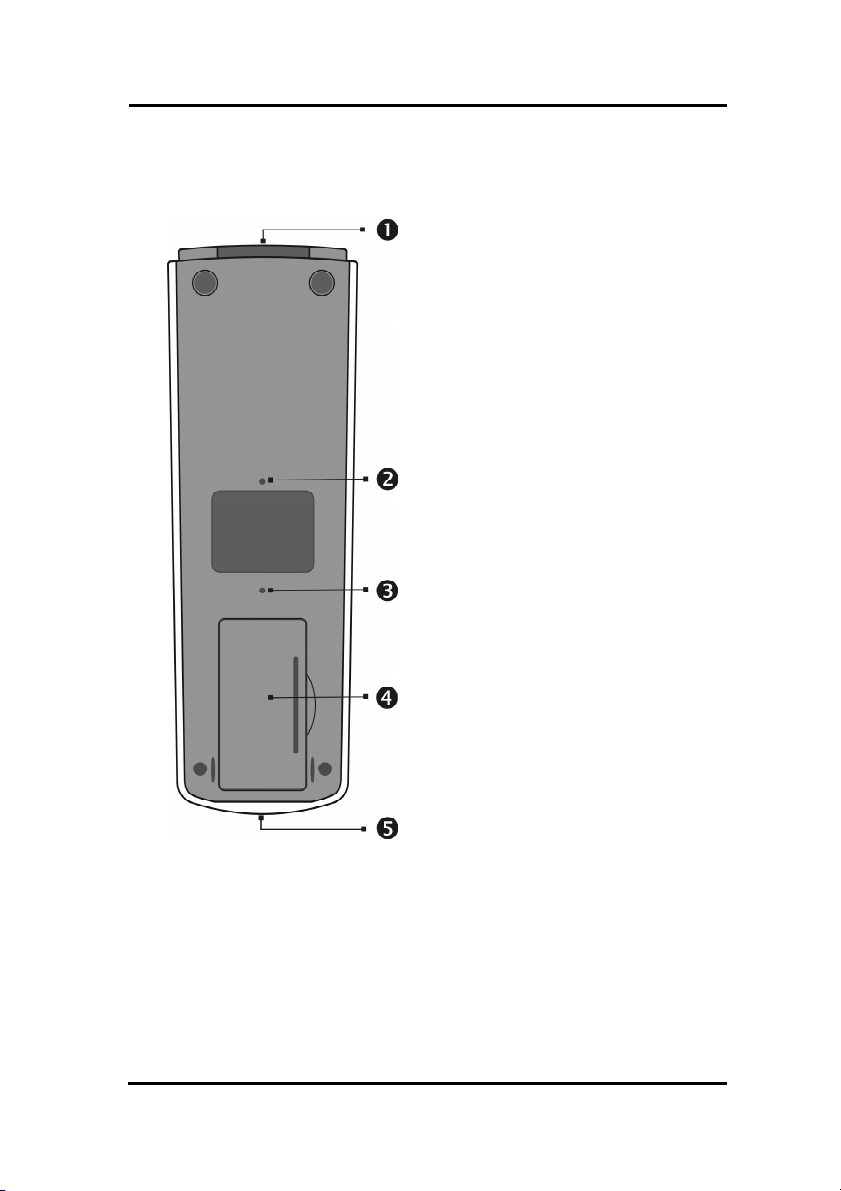
1.5.2 The rear side of SRC-7000
Figure 1-4: Rear view
1. IR Port
You can point the IR port at the IR
receiver of targeted devices to control the unit.
2. Reset switch
You can reset the SRC-7000 while
the SRC-7000 can’t work properly
or hang on.
3. Buzzer hole
Beeps signal are released from
here.
4. Battery compartment
You can remove the cover to replace the 3xAAA alkaline batteries
or Ni-MH rechargeable batteries.
5. Learning eye (P.36)
The SRC-7000 receives the IR
codes from here and saves the
corresponding codes. Take the
original remote control and point it
at the Learning eye of the
SRC-7000 and press the corresponding buttons to send out the IR
signals. In this way, the SRC-7000
will learn the IR codes from your
original device.
8
Chapter 1 Introducing SRC-7000
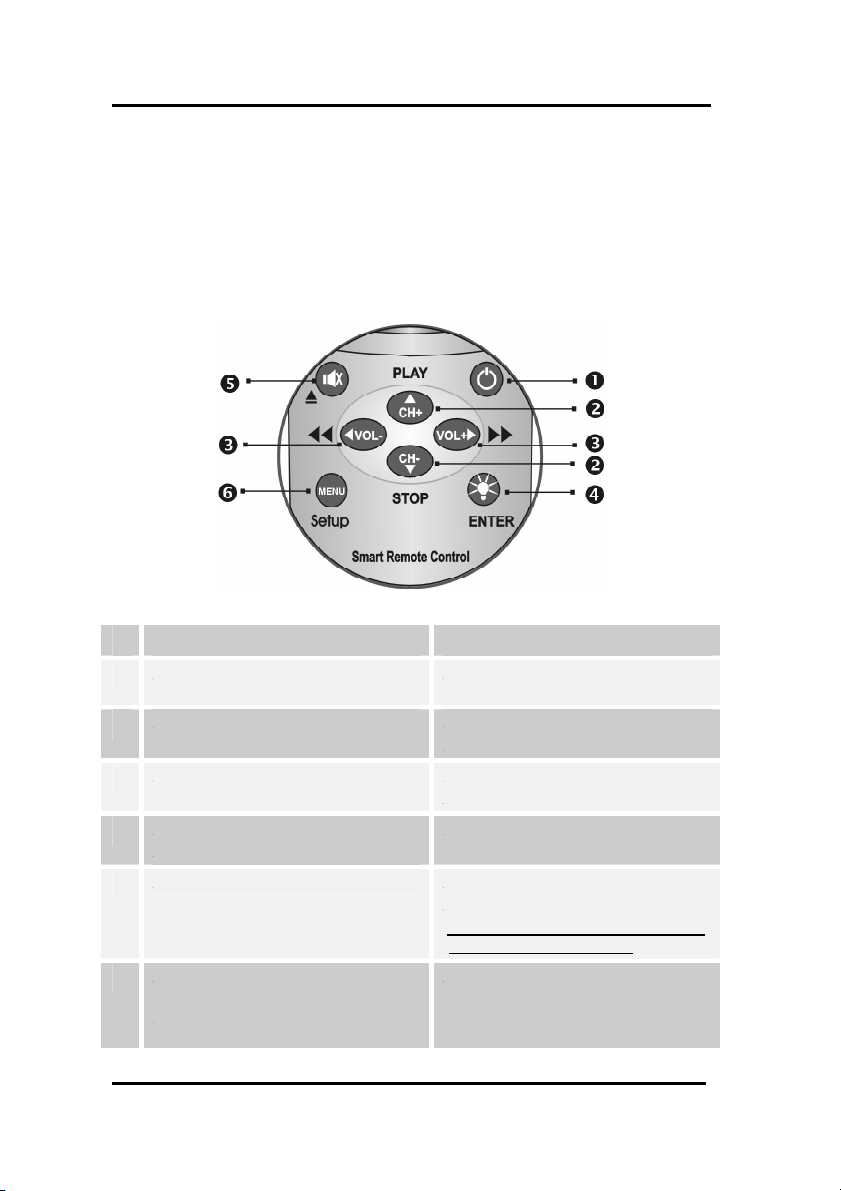
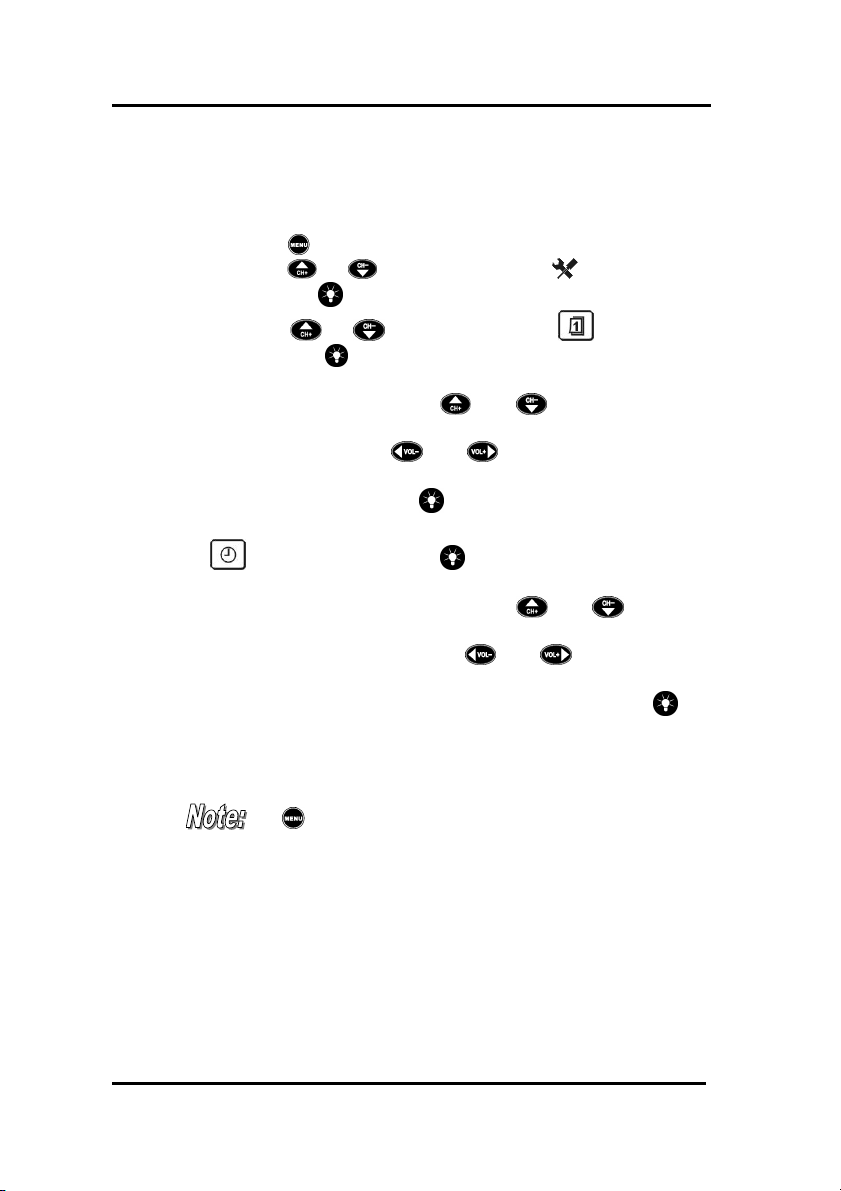
1.5.3 Direct Access Buttons (Rubber Buttons)
The Direct Access Buttons provide you with easy access to often-used
functions such as volume and channel control, fast forward and fast
reverse, play and stop, etc. Before using these, you have to set up the
SRC-7000 first. (Refer to Chapter 3, How to Set up Your SRC-7000,
Page 20.)
Figure 1-5: Direct access buttons
Setup mode function Device normal function
Œ
•
Ž
•
•
‘
No function Device power button: Press the button to
Select the items Channel up or channel down button.
Change the degree of the selected item. Volume up or volume down.
Enter the submenu
Confirm the setup item
No function Mute function.
Enter the setup menu by pressing it for
about 1 second.
Exit the setup item and back to last setup
mode.
turn on the selected device.
Play or Stop function.
Forward or back function.
Turns on the backlight.
Open the disk/ tape
*These buttons function differently according
to the currently selected device.
Back to the Main menu.
9

SRC-7000 User’s Manual
1.5.4 LCD Touch Screen
The LCD (Liquid Crystal Display) touch screen enables you to configure and operate your SRC-7000 with the touch of a finger.
1.5.5 Precautions of using the touch screen
Please pay attention to the following instructions:
1. Do not tap the LCD touch screen fiercely. Tap the LCD Touch
Screen gently.
2. Do not use a pen or any sharp object to tap the screen. You
might damage the surface. You can use a blunt object such as a
pencil eraser or the cap of a pen.
3. Do not immerse it in liquid. Keep the Remote dry. Wipe off any
spills immediately because the SRC-7000 is not waterproof.
4. Do not expose the SRC-7000 to extreme temperatures. Keep it
away from heat sources.
5. Do not drop the SRC-7000.
10
6. Do not place anything on the touch screen.
7. Do not use abrasives or cleaning solutions on the SRC-7000. If
needed, dampen a clean soft cloth slightly with clean water before cleaning.
Chapter 1 Introducing SRC-7000
1.5.6 Touch screen keys
The touch screen keys enable you to control your devices as you would
do with your original remote control. Besides, you can set up macros,
program timers, cycle keys and configure the LCD screen as often as
you like.
Figure 1-6: Touch screen buttons
It is very easy to use the touch screen. You just need to tap the soft buttons to activate the specific function. As Figure 2-3 shows, each button
with functionality is stated as below. Before use, you have to set up the
SRC-7000 first. (Refer to Chapter 3 How to Set up Your SRC-7000,
Page 20.)
11
SRC-7000 User’s Manual
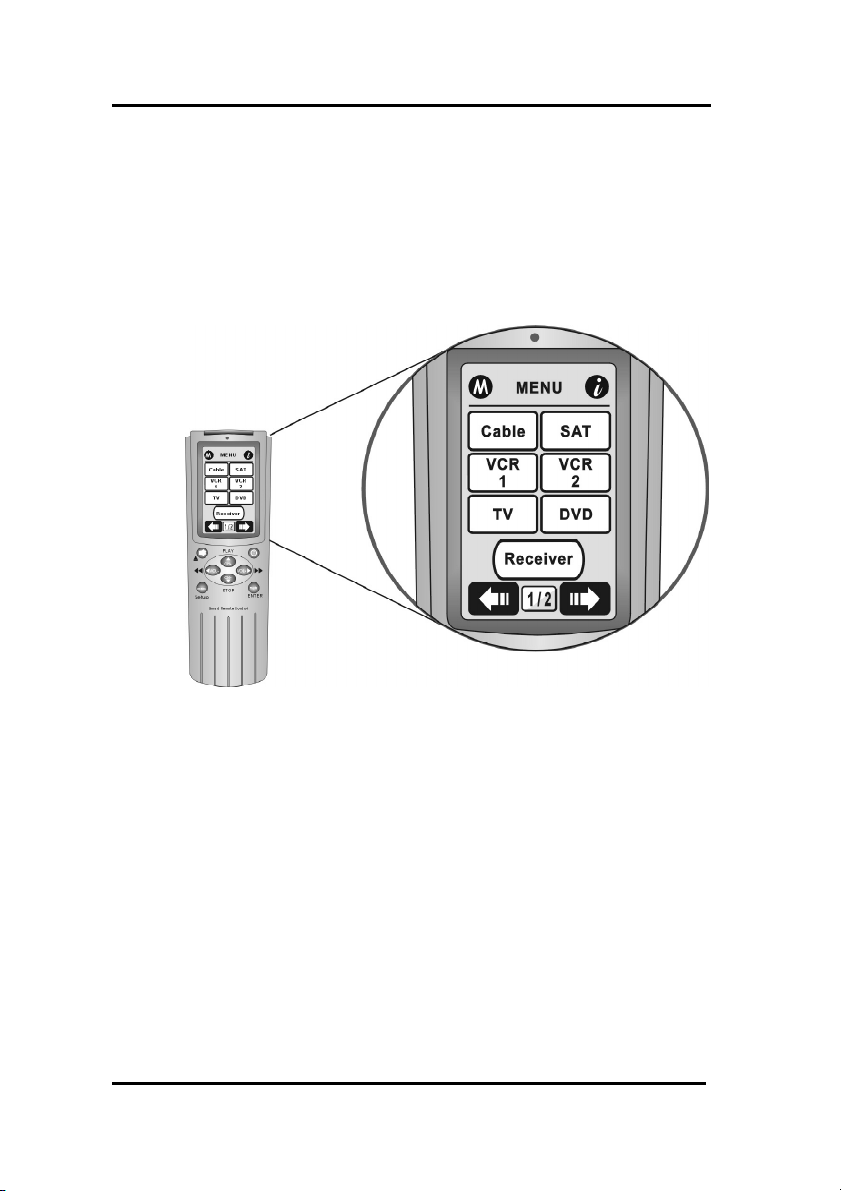
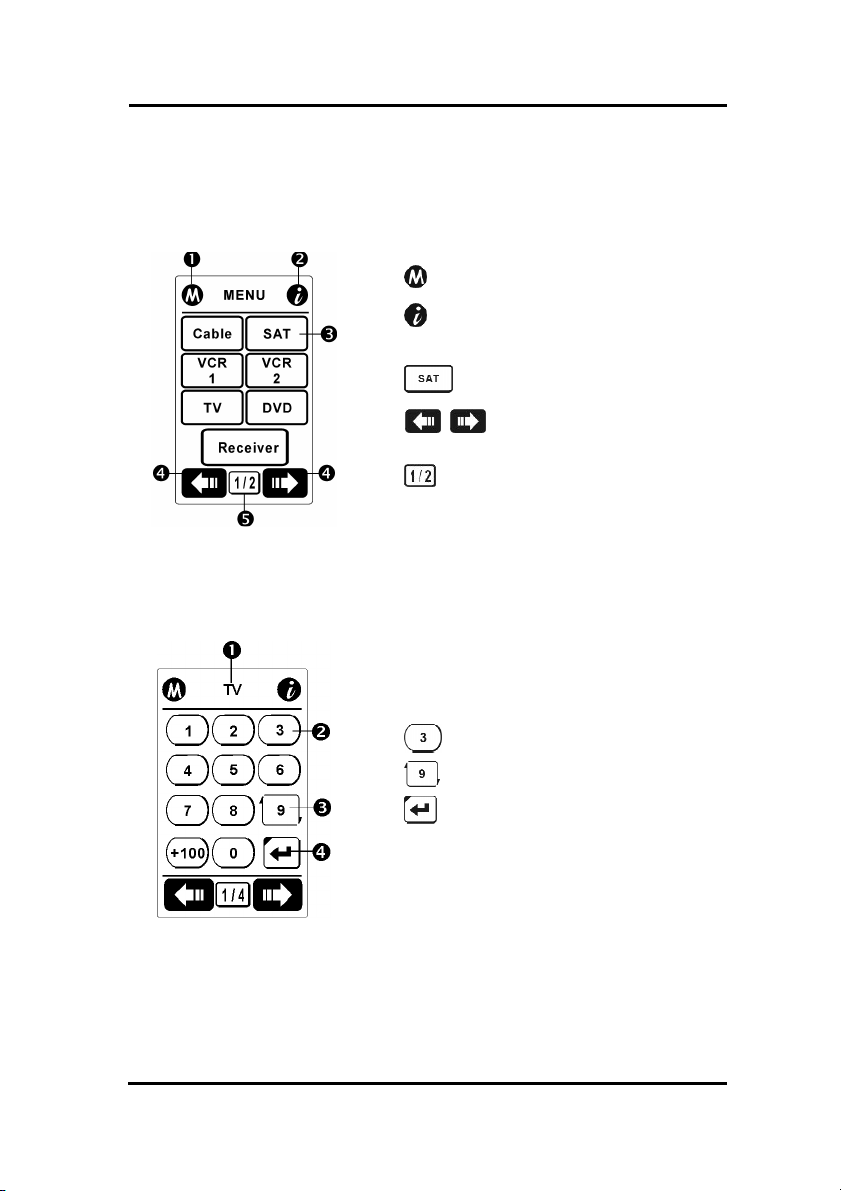
Introducing the frequently used LCD Layout as followed:
Ÿ Main Menu
Press the Menu button to start the Main Menu.
ΠThe access to Timer Macro.
• The access to the basic information
about the remote.
Ž Device key
• Tap the right or left icon to
change pages.
• Page indicator. It means that there
are totally 2 pages and you are in the first
one. There are totally 8 pages in the Main
Menu.
Ÿ Device Layout
Tap the device key directly to enter the device
page.
12
ΠTV Device name (P.20 )
• Soft key in the device (P.26)
Ž Cycle key (P.38)
• Macro key (P.41)
Chapter 1 Introducing SRC-7000
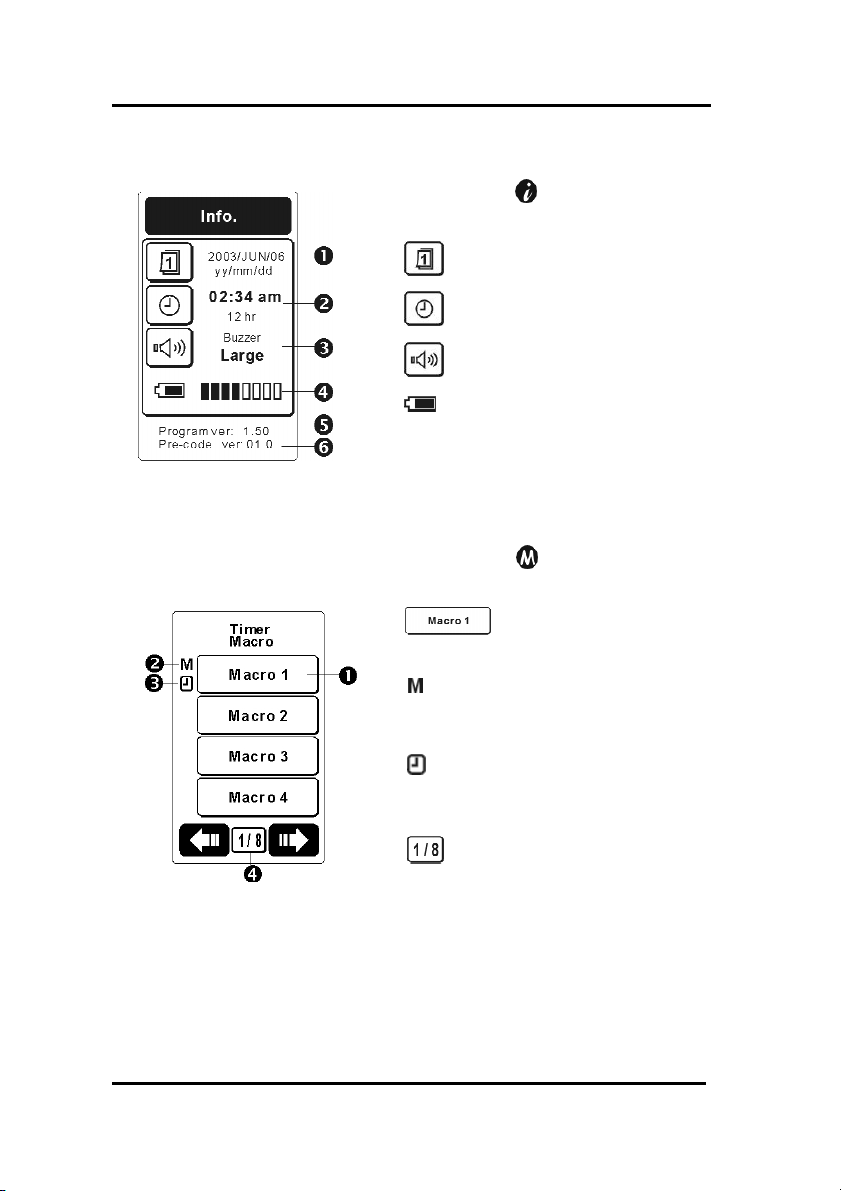
Ÿ Basic Information Layout
After pressing the icon, you can get the
basic information as follow:
ΠDate information (P.51)
• Time information (P.51)
Ž Buzzer information (P.51)
• Batteries power indicator ( P.51)
• Program version
‘ Pre-programmed code version
Ÿ Timer Macro Layout
After pressing the icon, you can get the
Timer Macro layout as follow:
ΠTap the Timer Macro key
directly to start the macro function. (P.44)
• If the Macro has been set, the
symbol will been shown next to the
Macro key. (P.44)
Ž If the Timer has been set, the
symbol will been shown next to the
Macro key. (P44)
• Page indicator. It means that
there are totally 8 pages in Timer Macro
function and you are in the first page.
There are totally 32 Timer Macros for
your use.( P.44)
13
SRC-7000 User’s Manual
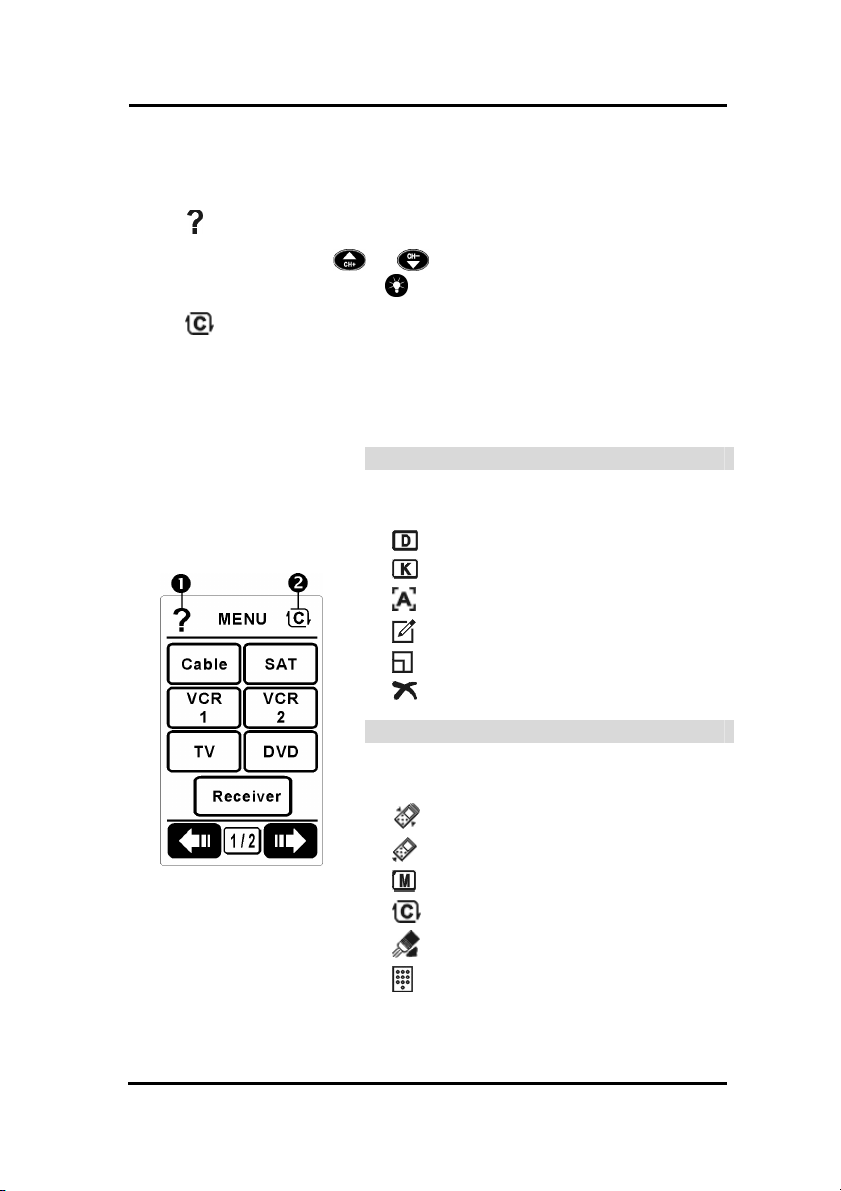
Ÿ Setup Menu Layout
When you are under the setup status you will see the icons as followed:
ΠHelp Guide. Tap this icon to get the setup process information.
You can press or to read the information pages. After
reading the tips, press “ Enter” button to exit.
• Under the setup mode you will see the icons show on the top right
of the screen. The fast way to edit SRC-7000 is tapping the icon directly to exchange the edit functions directly. You don’t need to exit
back to the setup menu for exchange the edit function. Every icon’s
function is introduced as follow.
Key Layout Setup Mode
• Tap the icon directly to exchange the functions in Key layout.
Add Device (P.20)
Add Key (P.26)
Add Text (P.28)
Re-label (P.29)
Re-size (P.31)
Delete Key (P.32)
14
Code Setting Setup Mode
• Tap the icon directly to exchange the functions in Code Setting.
Pre-code (P.33)
Learning (P.36)
Macro (P.41)
Cycle key (P.38)
Delete code (P.40)
Enter code number (P.33)
Chapter 1 Introducing SRC-7000
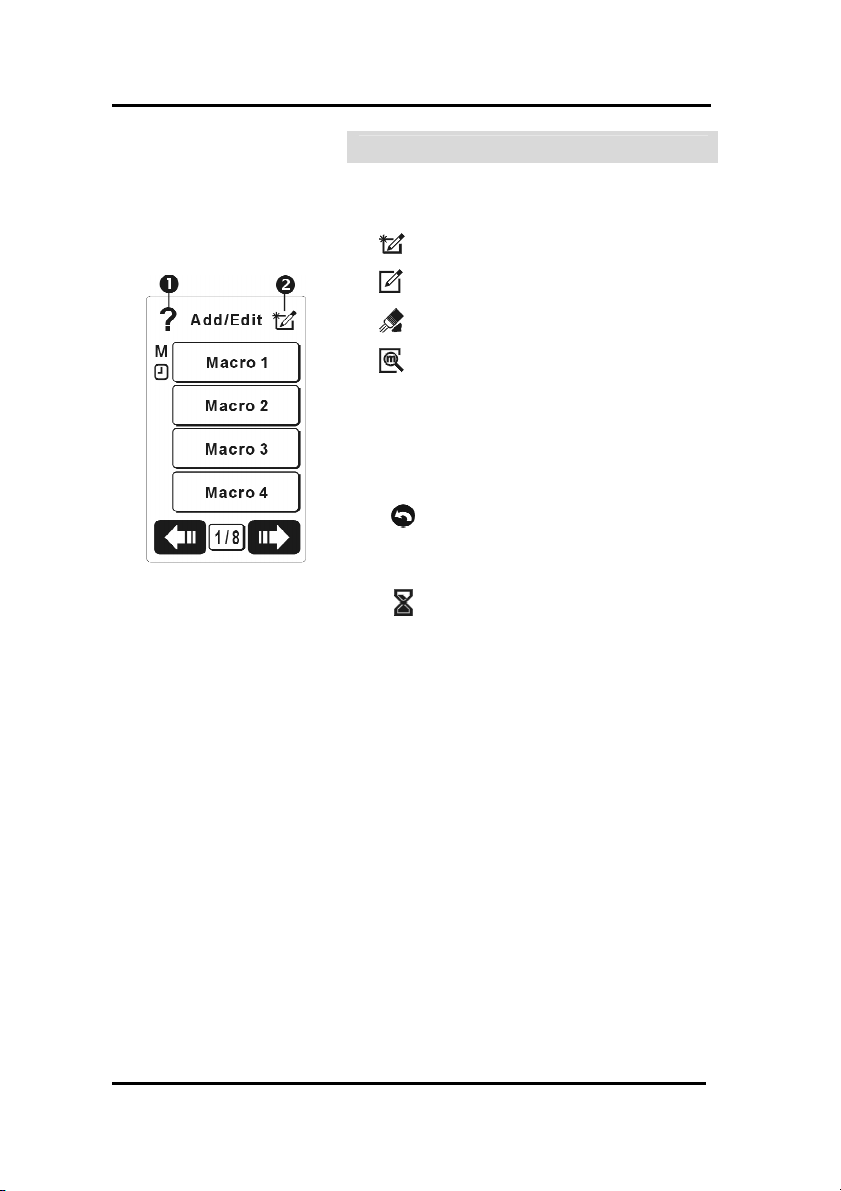
• Tap the icon directly to exchange the func-
* When you are adding or editing the macro
processes two icons appear as shown below:
ΠWhen setting the Macro processes
• Sets a delay between two com-
Timer Macro Setup Mode
tions in Timer Macro.
Add / Edit the Timer Macro
Re-label the Timer Macro
Delete Timer or Macro
View Macro processes
tap this icon to go back to the last
Macro step. (Please refer to page )
mands.
15
Chapter 2 Quick Start
In this chapter, you will learn how to set up the SRC-7000 quickly, without
going through complicate procedures.
When you turn on the SRC-7000, at first you will see the welcome greeting
message shown on the screen. From now on, you formally enter the setup
procedure. Please operate the SRC-7000 by the following instructions step
by step.
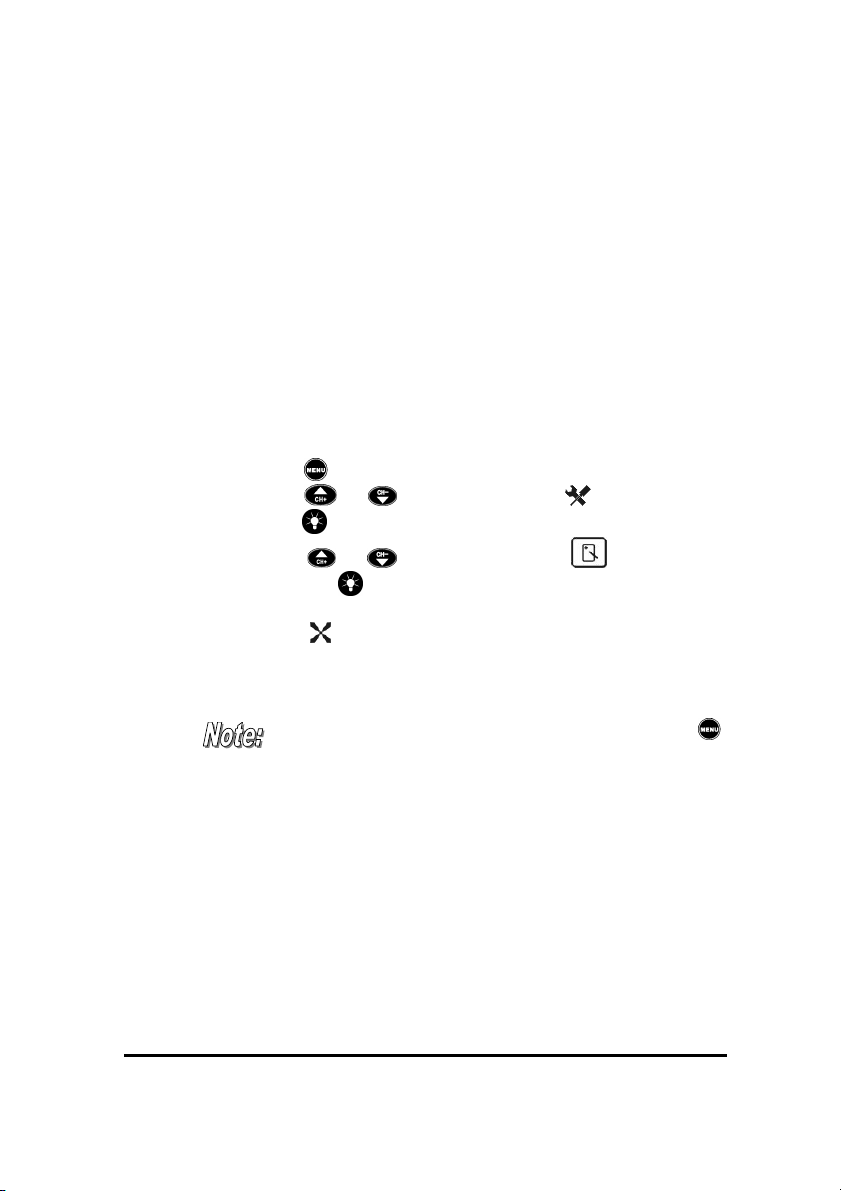
2.1 Re-calibrate the screen
1. Press the button for 1 second to enter the Setup Menu.
2. Scroll the or buttons to choose the Setting item and
press the button for entering “Setting” menu.
3. Scroll the or buttons to select the Calibrate item
and press the button for entering the “Calibrate Panel” opera-
tion screen for screen calibration.
4. Tap the 5 places following up screen indication step by step.
When finished, the screen will go back to the previous “Setting”
menu automatically.
If you want to exit from the current display, please press the
button until you get back to the main menu.
16
Chapter 2 Quick Start
2.2 Date / Time setting
1. Press the button for 1 second for entering the Setup Menu.
2. Scroll the or buttons to choose the Setting item
and press the button for entering the “Setting” menu.
3. Scroll the or buttons to select the Date item
and press the button for confirmation. After that, you will
notice the year column underlined and now you can put in the
current date by pressing the and button, and you
are able to move the underline forward and backward to target
any column by pressing and button.
4. Set up the actual date and date format as you like. When
everything is done, press the button to confirm and exit.
5. Continuously to setup time, scroll the cursor and choose the
Time item and press the button for confirmation. Also,
you will find the hour column underlined and now it is ready to
get the current time input by pressing the and button,
and you are able to move the underline forward and backward to
target any column by pressing the and button.
6. When you finished this, please choose a suitable time format
that is to your liking. When everything is done, press the
button to confirm and exit.
If you want to exit from the current display, please press the
button until you get back to the main menu.
17
SRC-7000 User’s Manual
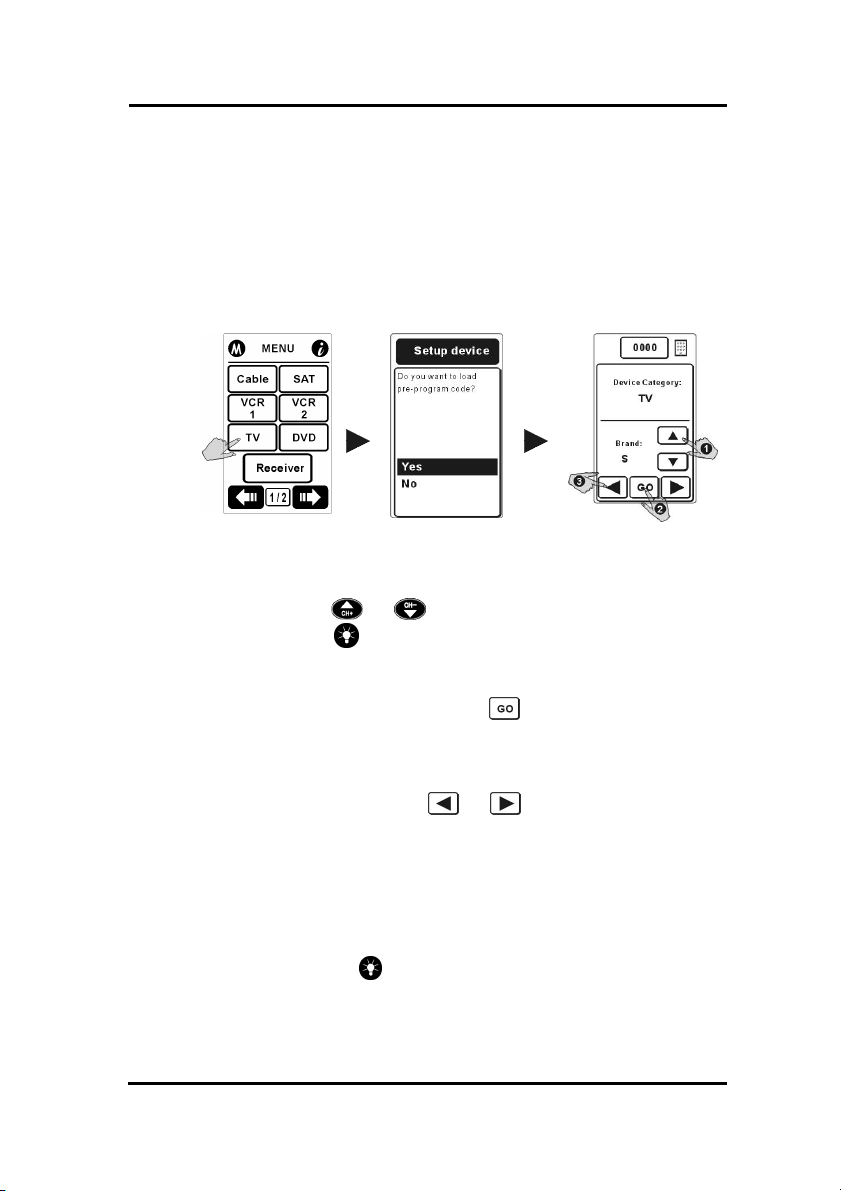
2.3 Device setting
1. Turn on the targeted device for the SRC-7000 to setting the device.
2. The SRC-7000 will directly get through the setup mode when you
operate the SRC-7000 for the first time. Please tap the target device key in the Main Menu to enter the “Setup device” menu. (ex.
“TV” device)
* Pre-code: load pre-programmed IR codes from the factory default
(no guarantee to being able to control all brand devices!).
3. Pressing the or buttons to choose the “Yes” item
and press the button for entering the operation mode.
4. Choose the first letter of targeted device brand (ex. Œ “S” on
behalf of Sony, Samsung…etc ), and point the SRC-7000 at the
targeted device, and then tap the • soft button to start
auto searching.
5. As soon as you recognize that the targeted device has been
turned off, please tap or press any of the buttons to stop auto
searching right away. Tap or Ž gently to figure out
the correct remote code (Code number as shown on the top
middle position of the LCD.) till the targeted device has been
turned on again. Press the power key or the hard key to test it
and to confirm the code. If the codes aren’t correct please continue to repeat step 4-5 again to search again for the proper
code for your target device.
6. Finally, press the button to load the code and exit.
18

Chapter 2 Quick Start
If you didn’t get completely correct remote codes from the
“Pre-programmed code list” item, or you did wrong steps,
please try the other ways to re-setup or supplement.
a. Use Pre-code function to load current remote codes.
(Please refer to 3.1.2 A. Pre-code page22.)
b. Use the Learning function to learn all or parts of correct
remote codes. (Please refer to 3.1.2 B. Learning
page24.)
From now on, you are able to control your devices by the SRC-7000.
For more information about advanced operation functions, please go
toward the next chapter.
19
 Loading...