

Audionet ART G3 User Manual

audionet
ART G3
Aligned Resonance Transport
Compact Disc Player
User's Manual

2

Contents
1 Preface ....................................................................... 5
1.1 Included ....................................................................................... 6
1.2 Transport..................................................................................... 6
2 Overview front panel ................................................ 7
3 Overview back panel ................................................ 8
4 Installation and power supply ................................. 9
4.1 Placement .................................................................................... 9
4.2 Mains connection ........................................................................ 9
4.3 Orientation of mains plug ........................................................ 10
4.4 Connecting the external power supply EPS or EPX ............................. 10
5 Outputs and inputs ................................................. 12
5.1 Outputs 'Analog Audio' ........................................................... 12
5.2 Output/Inputs 'Digital Audio' ................................................. 13
5.3 Digital output formats .............................................................. 14
5.3.1 LowBit mode .............................................................................. 14
5.3.2 HighBit mode ............................................................................. 15
5.4 USB/SPDIF digital audio input ............................................... 16
5.4.1 Connecting the computer to the USB audio input ...................... 16
5.4.2 Using the SPDIF inputs .............................................................. 20
5.5 Audionet Link ........................................................................... 21
6 Usage ....................................................................... 23
6.1 Switching on and off ................................................................. 23
6.1.1 Mains phase detection ................................................................ 24
6.1.2 Using Audionet Link .................................................................. 24
6.2 Inserting and removing discs ................................................... 25
6.3 Control elements on the front panel ....................................... 26
7 Audionet Metal Remote Control ............................ 27
7.1 Key Assignment RC 1 .............................................................. 28
7.2 Changing the batteries ............................................................. 30
7.3 Settings for Audionet preamplifier ......................................... 30
3

8 Playing discs .......................................................... 32
8.1 Playable disc types .................................................................... 32
8.2 Basic playback control ............................................................. 34
8.3 Searching ................................................................................... 35
9 Playback Options menu ......................................... 36
9.1 Time Display ............................................................................. 37
9.2 Repeat Playback ....................................................................... 38
9.2.1 Repeat disc ................................................................................. 38
9.2.2 Repeat track ................................................................................ 39
9.3 Random playback ..................................................................... 39
9.4 Time search ............................................................................... 40
9.5 Program Playback .................................................................... 41
9.5.1 Edit a playlist .............................................................................. 42
9.5.2 Playing a playlist ........................................................................ 44
9.5.3 Delete a playlist .......................................................................... 45
10 Setup menu Global Setup ...................................... 46
10.1 Set SPDIF Digital Input ........................................................... 47
10.2 Set Digital Output Mode .......................................................... 48
10.3 Set Display Brightness .............................................................. 49
10.4 Set AutoOff ............................................................................... 50
10.5 Set AutoPlay .............................................................................. 50
10.6 Overview factory defaults ........................................................ 51
11 Security advice ....................................................... 52
12 Technical data ........................................................ 53
4

1 Preface
The Audionet Team congratulates you on your purchase of this unit.
The predecessor model ART G2 is considered to be one of the bestsounding CD players ever made, boasting unique acoustic and design
characteristics that convinced music-lovers around the world. An impressive list of test victories, distinctions, and awards testifies to the long and
triumphant reign of the ART G2.
Curtain call for the third generation of CD player: the new ART G3
(Generation 3) is nothing less than Audionet’s final statement for reproducing the classical compact disc. At the same time, it also represents a
thoroughbred high-end D/A converter. Its sound quality can be used via
further digital systems, especially computers. This is possible via optical
and electrical digital inputs.
The ART G3 is geared towards the requirements of classical stereophony.
Expert connoisseurs of high-quality musical reproduction will find the
product not only delivers the aural satisfaction they dream of, but even
opens up previously unknown musical realms. Combining craft with precision and presence, ART G3 fulfils its makers' vision of pushing back
the quality frontiers of classical CD playback to rival the standard of advanced high-resolution media. ART G3 is equipped with the potential to
become a further milestone in audiophile acoustic art.
But before you start listening to your new Audionet ART G3, please read
this manual carefully so you are able to use and enjoy all functions of this
unit without drawback on music quality.
5
1.1 Included
Included you will find the following items:
· the Compact Disc player Audionet ART G3
· the Audionet Metal Remote Control RC 1
· the user's manual (that you are currently reading)
· one low resonance stabilizer made of black POM
· one standard mains cord
· one optical Toslink cable (Audionet Link)
1.2 Transport
Important
· Please transport the ART G3 only in the included package.
· Never leave a CD or the stabilizer inside the ART G3 during trans-
port. The sensitive mechanics of the drive could suffer damage.
· Always use the included bag to prevent scratches on the housing.
· Please allow the ART G3 to adapt to the climatic conditions in your
listening room after transport. As known for every optical device, low
temperatures and humidity may cause the laser unit to be covered
with condensation. Leave the drawer of the ART G3 open for several
hours before switching on the first time after transport.
6
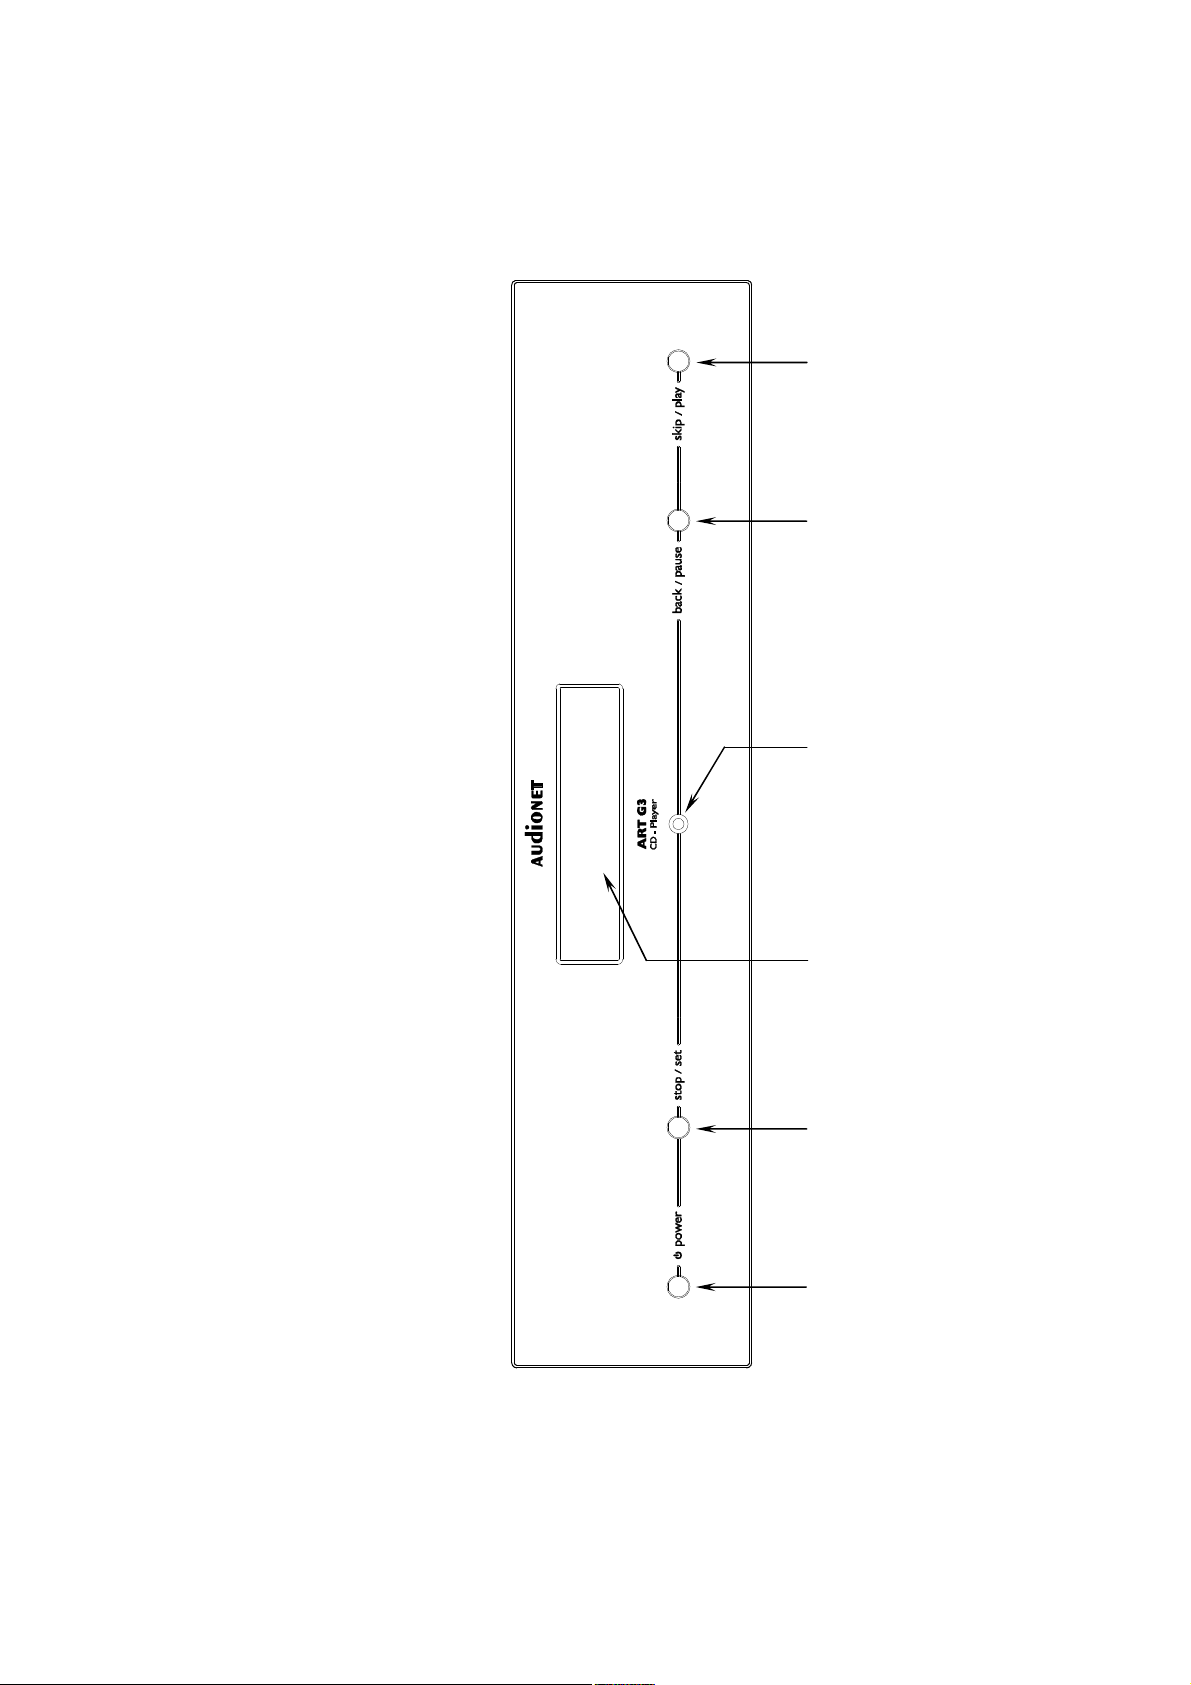
2 Overview front panel
power
stop / set
back
/ pause
skip / play
key
key
IR remote
control receiver
Display
key
key
7
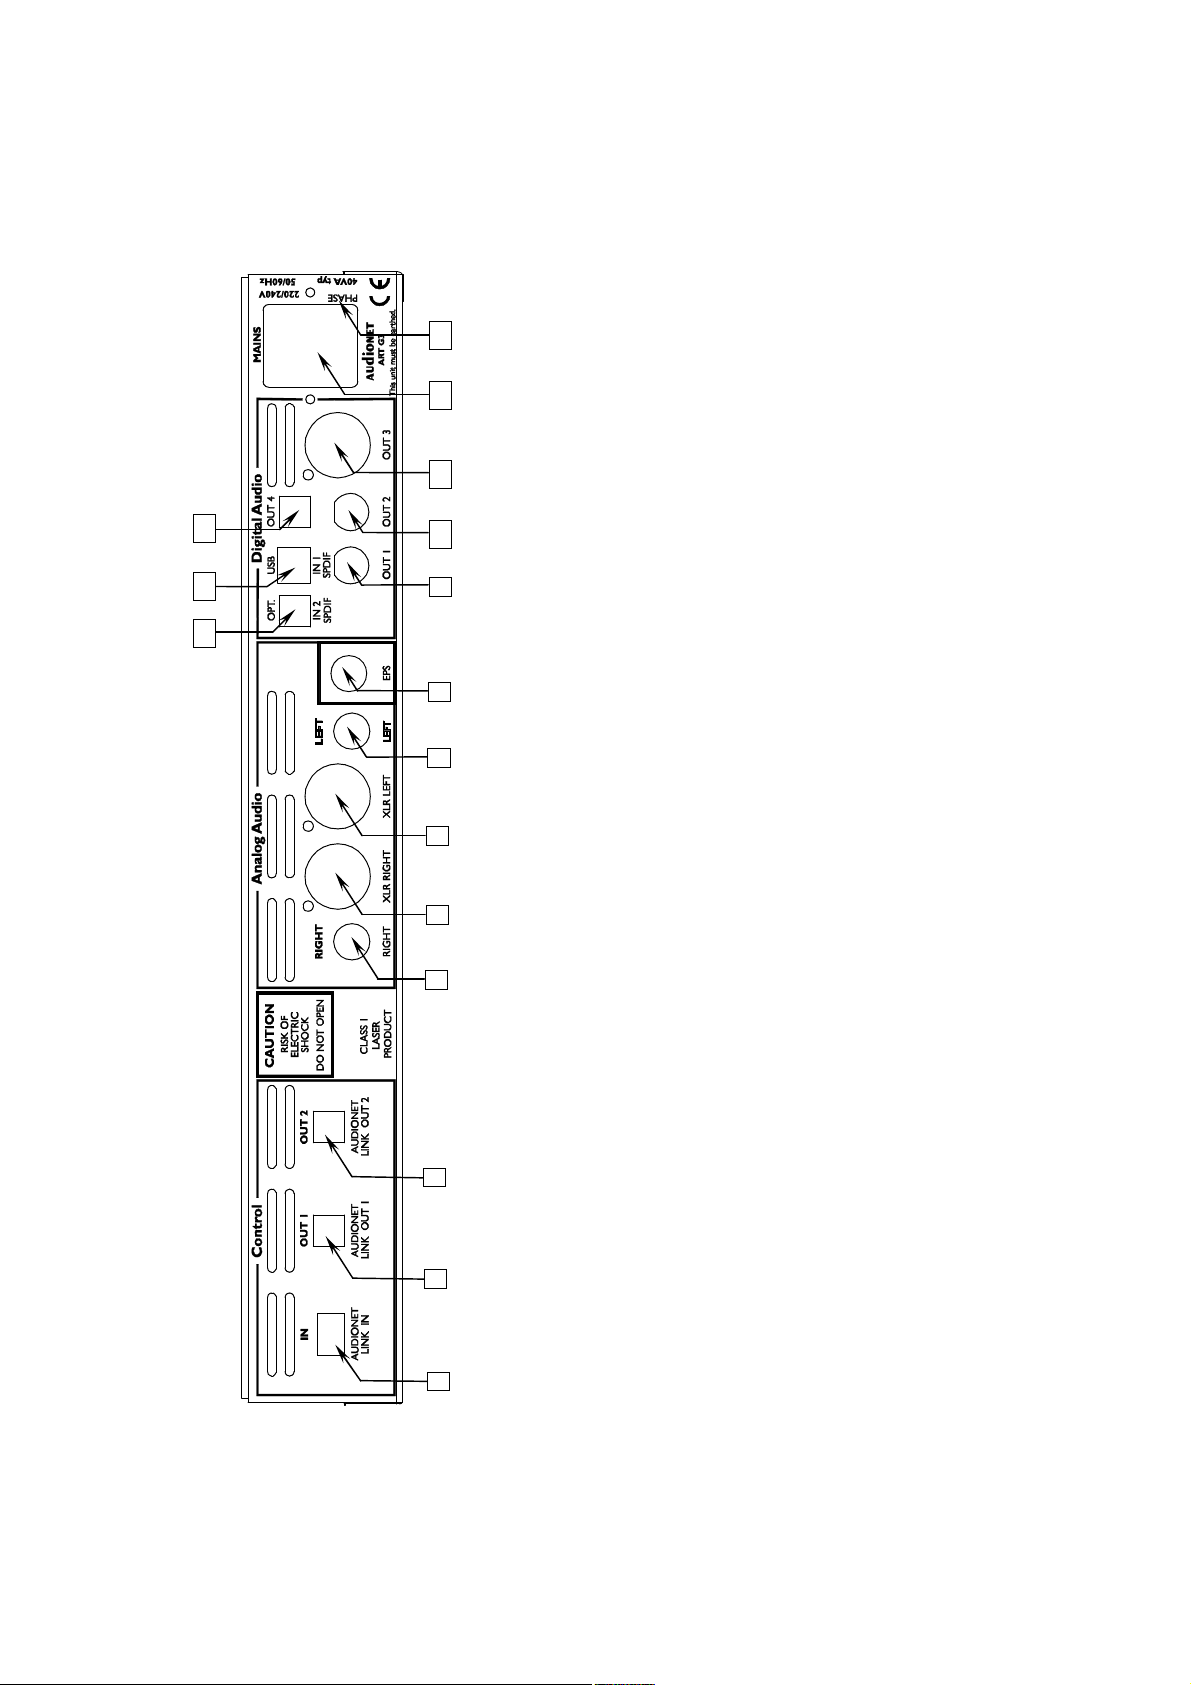
3 Overview back panel
1
9
10
13
12
11
14
15
16
10
9
8
7
Digital output 2 (RCA) 11 Digital output 3 (AES/EBU) 12 Mains input 13 Marking mains phase 14 Digital output 4 (optical) 15 Digital input IN 1 (USB/SPDIF) 16 Digital input IN 2 (SPDIF optical)
Digital output 1 (RCA)
6 5
4
3
Audionet Link input 2 Audionet Link output 1 3 Audionet Link output 2 4 Analog output Right (RCA) 5 Analog output Right (balanced) 6 Analog output Left (balanced) 7 Analog output Left (RCA) 8 Input for external power supply
Audionet EPS
2
1
8
4 Installation and power supply
Important
· During connecting or removing the ART G3 to/from a preampli-
fier both units and the corresponding power amplifiers have to be
switched off to prevent damage of the ART G3 or any of the
other connected units.
· Please make sure that all cables are in absolute best conditions!
Broken shields or short-cut cables could damage the ART G3
and/or any other connected unit.
4.1 Placement
Important
· It is recommended to place the ART G3 into a high quality rack or
onto a stable table.
· Do not expose the unit to direct sunlight.
· Do not place the ART G3 in close range to heat sources like radia-
tors.
· Do not place the ART G3 on top of other units, especially not on top
of power amplifiers, preamplifiers or similar that produce heat. Both
units could suffer damage from thermal overload.
· Do not use the unit in a place where it is exposed to vibrations.
· Do not place the unit close to loudspeakers or into the corner of a
room where it is exposed to high levels of sonic energy, which might
reduce the sound quality of the unit.
4.2 Mains connection
The mains input 12 * is on the back panel of the ART G3. To connect the
unit to mains use the included mains cord. If you prefer to use a different
power cord make sure that it meets the specifications for your home
country.
*
see numbers in section 'Overview back panel' on page 8.
9
Important
· The electrical specifications of your home country must meet the
electrical specifications printed onto the back panel.
· The ART G3 is a Class I unit and must be earthed. Please ensure a
stable earth connection. 'Phase' ('hot' pin) is marked on the back panel
('PHASE') 13 .
· Never pull the mains plug while the ART G3 is switched on! Always
power down the unit to stand-by mode first, before you pull the
mains cord from the mains input 12 on the back panel of the unit.
Wait at least 3 minutes before you re-plug the unit to mains.
Only in case of extended absence (like vacations) or if massive trouble on
the mains power is to be expected you should disconnect the unit from
mains. To disconnect the ART G3 completely from mains pull the mains
plug.
4.3 Orientation of mains plug
The correct polarization of mains is important for reasons of audio clarity
and stability. Please connect the mains cord that the hot pin of the wall
outlet is connected to the pin of mains input 12 marked 'PHASE' 13 on
the back panel of the unit. Your Audionet ART G3 is able to detect a
wrong polarization of the mains plug during start-up. If the message
► Attention: ◄
► Mains Phase incorrect ◄
appears in the display, switch off the unit and flip the mains plug in the
wall outlet (refer to section 'Mains phase detection' on page 24).
4.4 Connecting the external power supply EPS or EPX
To use one of the optional external power supplies EPS or EPX with your
ART G3 follow these steps:
1. Make sure both ART G3 and EPS / EPX are switched off and
disconnected from the mains.
2. Connect the EPS / EPX with the included cable to input jack 8
on the back panel of the ART G3. The shape of the plug prevents
any wrong polarity. The small 'nose' inside the plug has to face
upwards. Now screw the ring of the plug onto the input jack 8 .
10
3. Connect both (!!) units (ART G3 and EPS / EPX) to mains.
4. Switch on the EPS / EPX at the back panel first.
5. Use key power at the front panel or the key ART of the Audionet
Metal Remote Control RC 1 to switch on the ART G3. The
ART G3 is now ready to use and gets its power from the external
power supply EPS / EPX.
6. To switch off the ART G3 into stand-by mode, use the key power
on the front panel or key ART of the Audionet Metal Remote
Control RC 1.
Important
· Never switch on or off the EPS / EPX on its back panel while the
ART G3 is switched on or during playback.
· For further information referring to the external power supply
EPS / EPX please consult its user's manual.
Tip
· Use a high quality cable (for example the Audionet P10) to connect
the EPS / EPX to mains. The sound will improve.
11
5 Outputs and inputs
Important
· During connecting or removing the ART G3 to/from a preampli-
fier both units and the corresponding power amplifiers have to be
switched off to prevent damage of the ART G3 or any of the
other connected units.
· Please make sure that all cables are in absolute best conditions!
Broken shields or short-cut cables could damage the ART G3
and/or any other connected units.
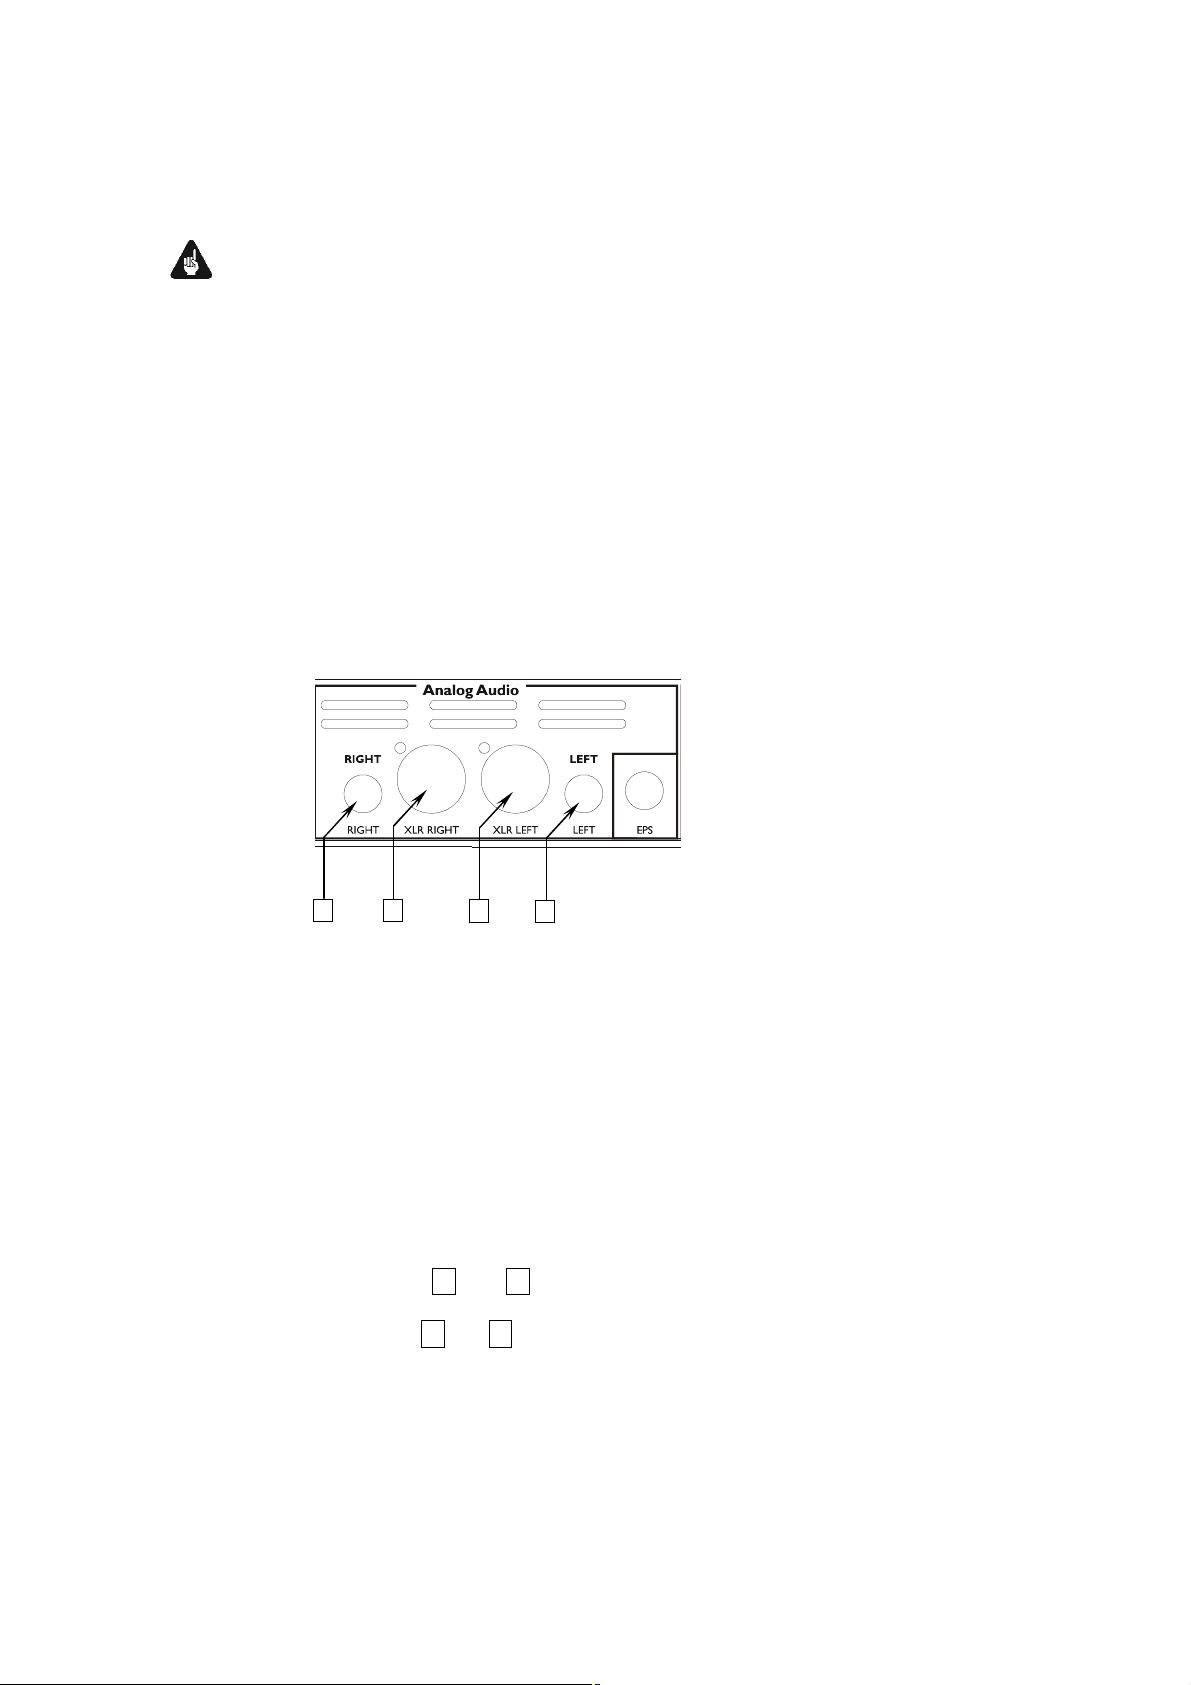
5.1 Outputs 'Analog Audio'
4
5
6
7
4 RIGHT
analog audio output of right channel (RCA)
5 XLR RIGHT
analog audio output of right channel (balanced / XLR)
6 XLR LEFT
analog audio output of left channel (balanced / XLR)
7 LEFT
analog audio output of left channel (RCA)
Connect the analog outputs 4 and 7 of your ART G3 to your (pre)
amplifier using high quality interconnectors. Alternatively, you can use
the balanced analog outputs 5 and 6 in case your (pre) amplifier has no
analog RCA inputs.
12
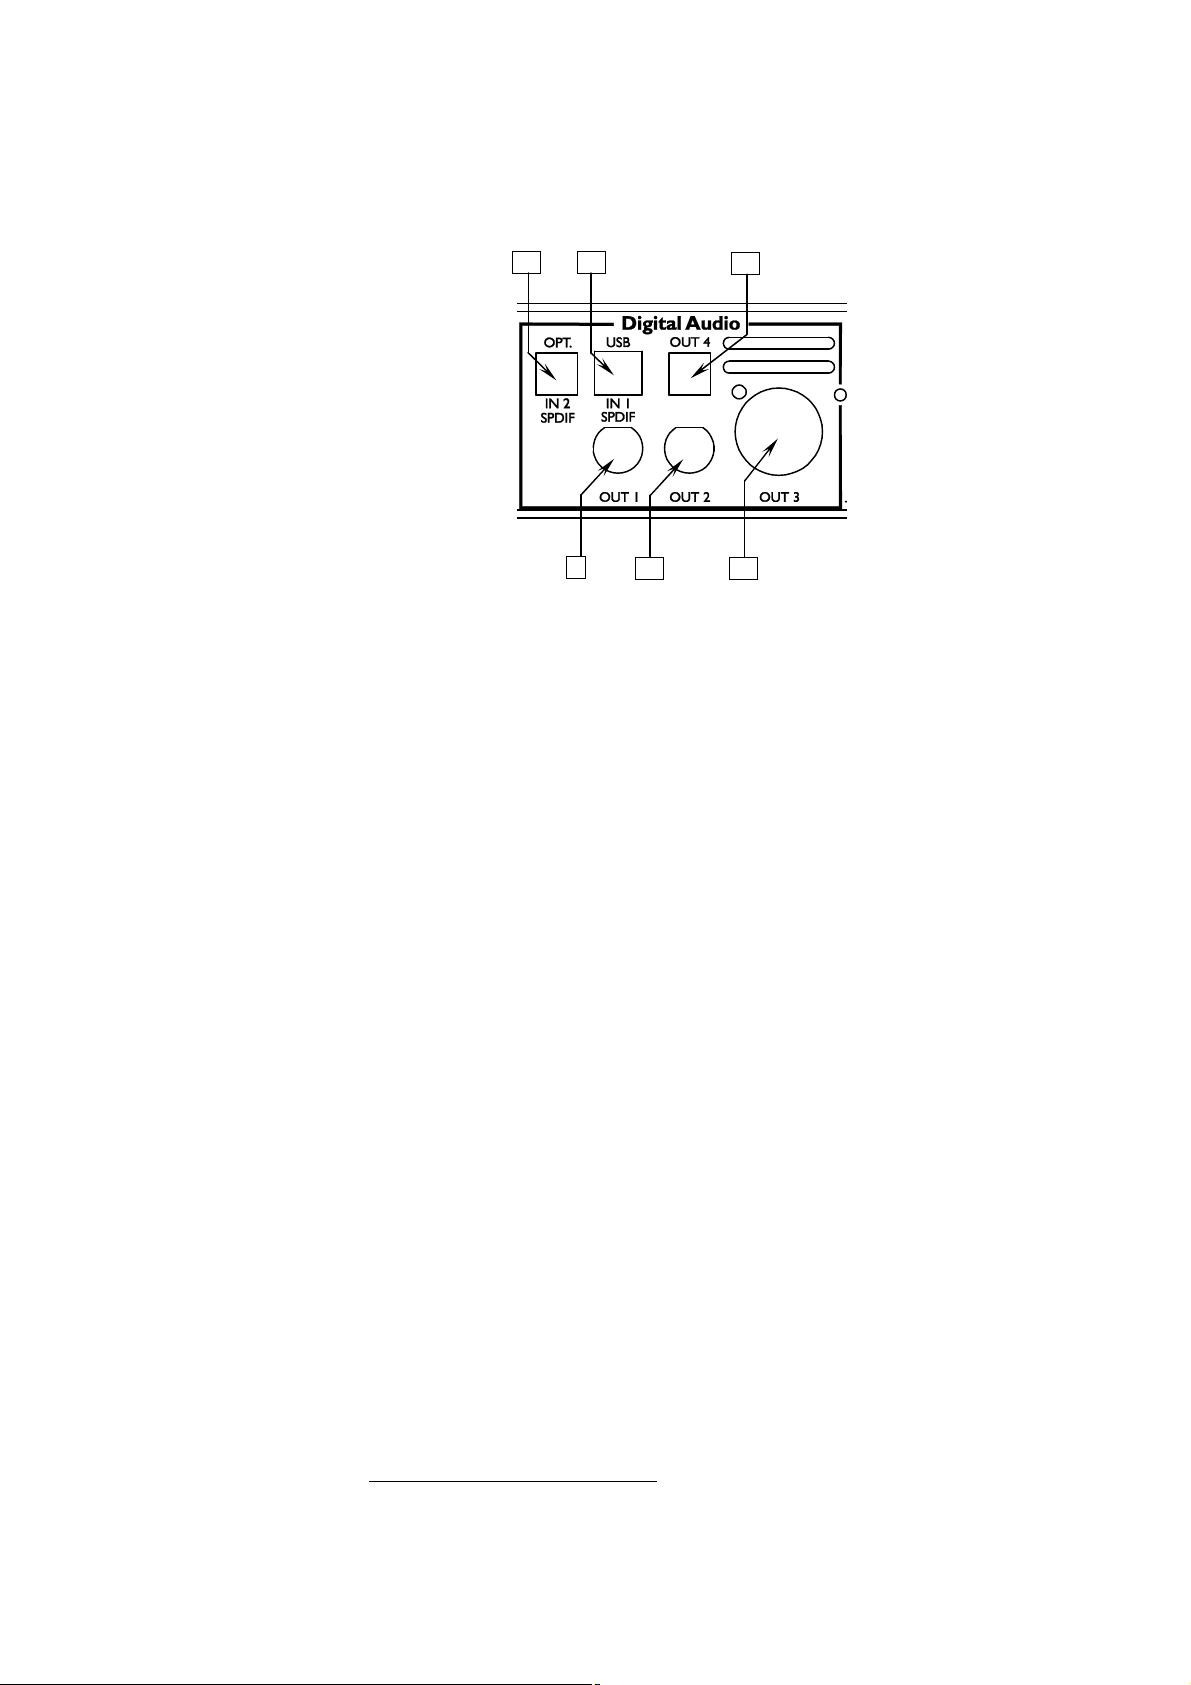
5.2 Output/Inputs 'Digital Audio'
16
9 Digital output OUT 1 (SPDIF)
The digital audio signal is available at the output OUT 1 in the
SPDIF format depending on the setting of option Set Digital
Output Mode (refer to sections 'Digital output format' on page 14
and 'Set Digital Output Mode' on page 48).
9
15
10
14
11
10 Digital output OUT 2 (SPDIF)
The digital audio signal is available at the output OUT 2 in the
SPDIF format depending on the setting of option Set Digital
Output Mode (refer to sections 'Digital output format' on page 14
and 'Set Digital Output Mode' on page 48).
11 Digital output OUT 3 (AES/EBU)
The digital audio signal is available at the output OUT 3 in the
AES/EBU format depending on the setting of option Set Digital
Output Mode (refer to sections 'Digital output format' on page 14
and 'Set Digital Output Mode' on page 48).
14 Digital output OUT 4 (optical/TOSLink)
Use an optical (TOSLink) cable to connect the optical digital output
OUT 4 of the ART G3 to any unit with an optical digital input. The
output signal depends on the setting of option Set Digital Out-
put Mode (refer to sections 'Digital output format' on page 14 and
'Set Digital Output Mode' on page 48).
15 Digital input IN 1 (USB/SPDIF)
Digital audio input to connect a computer to the ART G3 for playback of music and sound files using the sophisticated D/A-converter
of the ART G3. The ART G3 is recognized as 'USB Audio Device'
by the operating system of your computer, e.g. Windows 7*1. Use a
standard audio player (e.g. Windows Media Player*1) to playback
your music through the ART G3.
Via an optional adapter cable the USB input can be used as SPDIF
*1
'Microsoft Windows' and 'Windows Media Player' are registered trademarks of Microsoft Cor-
poration and were only used for information purposes.
13
input for connecting CD players, DAT recorders etc. (refer to section
'USB/SPDIF digital audio input' on page 16).
16 Digital input IN 2 (optical/TOSLink)
Audio input to connect digital devices (CD-Players, DAT recorders
etc) via optical fibre cable. This input is also available for the usage
of the D/A-converter.
5.3 Digital output formats
Important
· In order to use digital outputs OUT 1 to 4 of your ART G3, the op-
tion Set Digital Output Mode has to be set to either LowBit
Mode or HighBit Mode. If you selected setting disabled all digital outputs of the ART G3 are switched off (refer to section 'Set Digi-
tal Output Mode' on page 48).
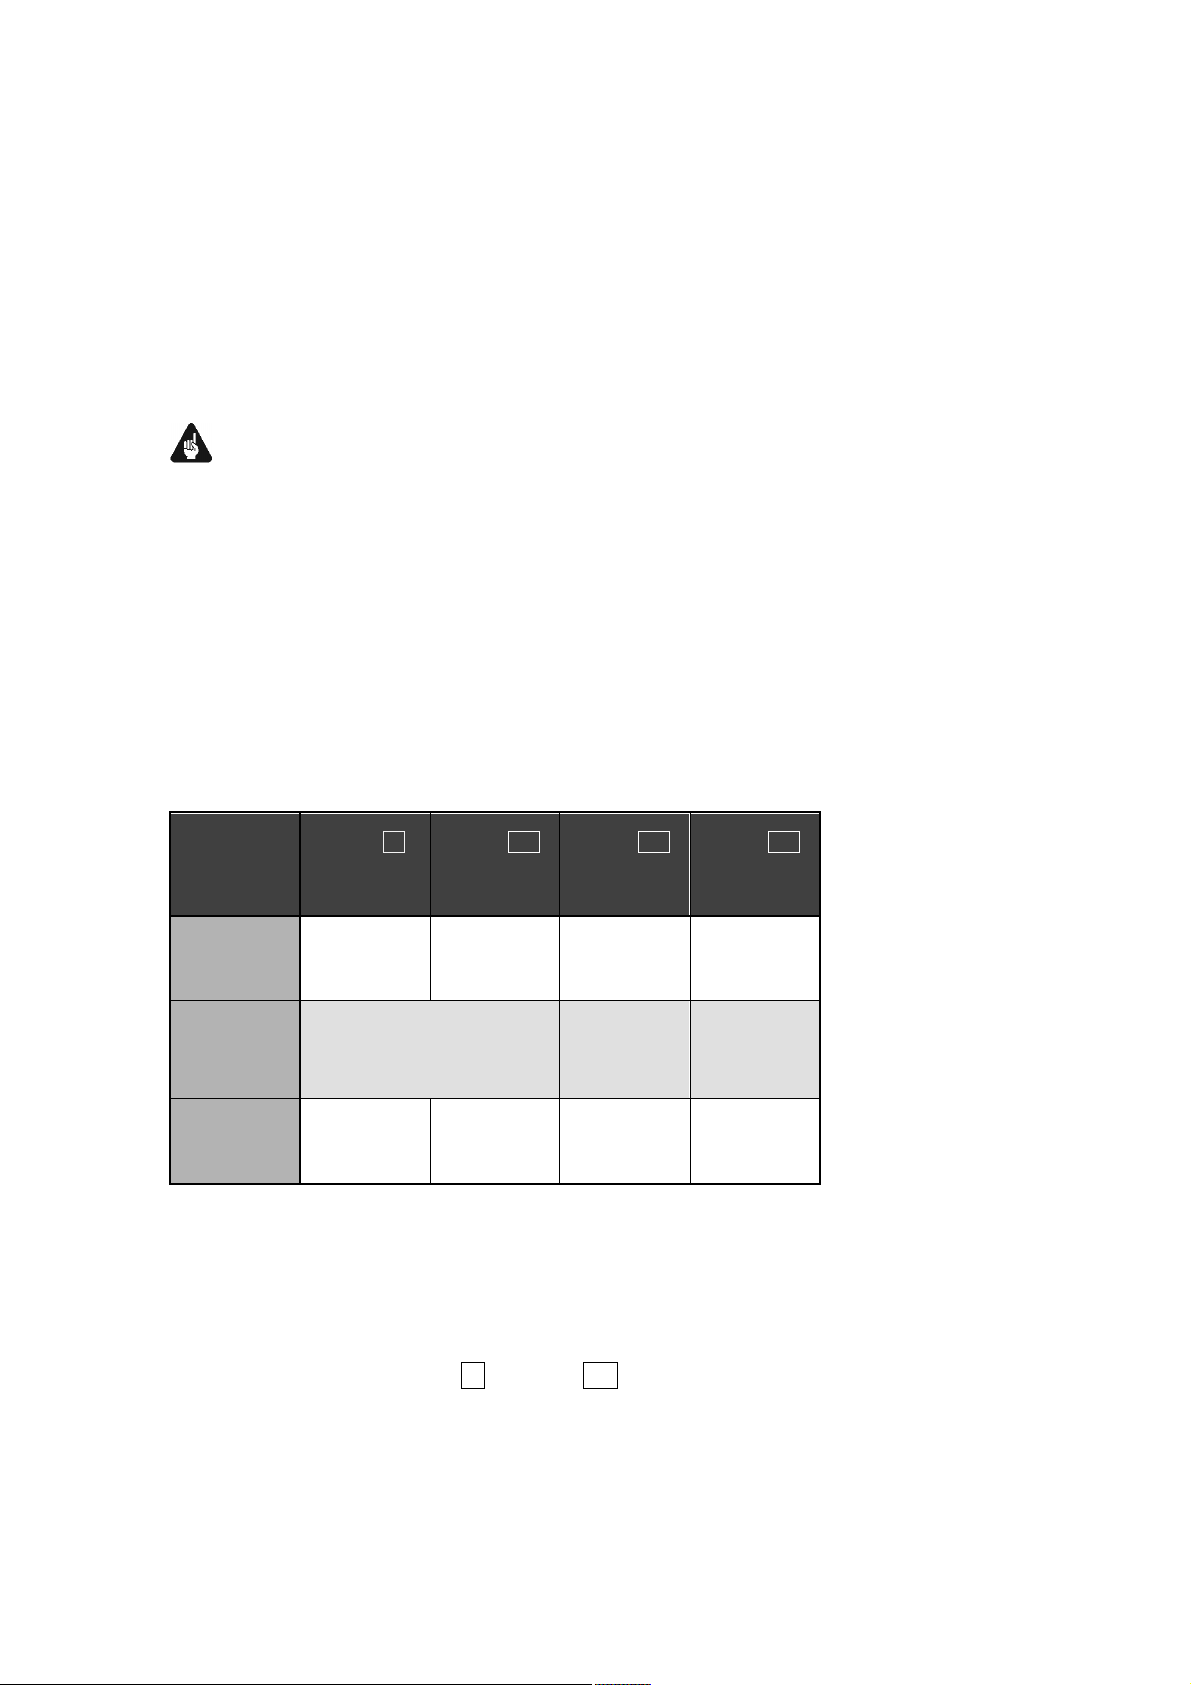
Please refer to the following table to determine which digital format at
which sample rate and resolution is available at the digital audio outputs.
The decision whether to use the HighBit or the LowBit mode depends on
the kind of digital receiver unit your ART G3 is connected to.
Digital Output
Mode
LowBit Mode
HighBit Mode
disabled
OUT 1 9
SPDIF
44.1kHz / 16bit
Stereo
PCM
192kHz / 24bit
Stereo Upsampling
Audionet High Bit Mode
no signal no signal no signal no signal
OUT 2 10
SPDIF
44.1kHz / 16bit
Stereo
PCM
OUT 3 11
AES/EBU
44.1kHz / 16bit
Stereo
PCM
96kHz / 24bit
Stereo
Downsampling
PCM
OUT 4 14
optical
44.1kHz / 16bit
Stereo
PCM
44.1kHz / 16bit
Stereo
PCM
5.3.1 LowBit mode
Use the LowBit mode to connect the ART G3 with a component (digital
receiver) that has no Audionet HighBit-Interface. Referring to the table
below all digital outputs OUT 1 9 to OUT 4 14 transmit a stereo PCM
signal at a sampling rate of 44.1 kHz and with a resolution of 16 bit.
14
5.3.2 HighBit mode
Use the HighBit mode only if you want to transmit digital audio data
from the ART G3 to an Audionet preamplifier compatible to the Audionet HighBit-Interface, e.g. the Audionet DNx (except DNA 1) or Audio-
net MAP 1. Additionally, in the HighBit mode digital output OUT 3 11
transmits a stereo PCM signal at a sampling rate of 96 kHz (downsampled from the Audionet HighBit 192 kHz signal) with a resolution of
24 bit in the AES/EBU format. Digital output OUT 4 14 transmits even
in the HighBit mode a stereo PCM signal at a sampling rate of 44.1 kHz
and a resolution of 16 bit.
Important
· With other devices but HighBit-compatible Audionet preamplifiers a
correct decoding of digital audio data is not possible and can lead to
high-level noise from the speakers, which might damage your ear
and/or equipment.
In order to transmit digital audio data from your ART G3 to an Audionet
preamplifier, you have to connect digital output OUT 1 9 of the
ART G3 to the digital audio input 'Digital In 2' of the MAP V2 or 'Digital
Audio IN 1' of the MAP 1 or DNx (except DNA 1).
Additionally, connect digital output OUT 2 10 of the ART G3 to digital
audio input 'Digital In 3' of the MAP V2 or 'Digital Audio IN 2' of the
MAP 1 or DNx (except DNA 1).
Important
· Only if both connections are in place and the option Set Digital
Output Mode is set to HighBit Mode, you can transmit and re-
ceive digital audio data in HighBit mode (refer to section 'Set Digital
Output Mode' on page 48)!
Important
· If you do not need any of the digital outputs do not use any jumpers
to short-circuit the digital outputs. Instead, select disabled for option Set Digital Output Mode to switch off all digital outputs.
(refer to section 'Set Digital Output Mode' on page 48).
15

5.4 USB/SPDIF digital audio input
5.4.1 Connecting the computer to the USB audio input
With the USB Audio interface you can playback music and sound files
from your computer (PC) using the sophisticated digital-to-analog converters of the ART G3 instead of the soundcard of the PC. The ART G3
is integrated into your computer system as USB Audio device. The installation is done (mostly) automatically via Plug'n'Play, provided a correctly
installed operating system.
Note
· To use the USB Audio function of the ART G3, your computer re-
quires having Microsoft™ Windows™ XP™ or newer, Apple OS X
10.1 or higher or a current Linux version as operating system, with
the latest USB Audio drivers installed. For further information about
the minimum system requirements please refer to the documentation
of your installed operating system.
1. Connect digital input IN 1 15 with a suitable USB cable (plug
type A to plug type B) to a free USB port at your computer that
is compatible with USB 1.1 or above and supports the Full Speed
USB protocol.
2. Start your computer, then switch on the ART G3.
The ART G3 is recognized as newly added hardware by your computer.
Depending on the operating system installed on your computer, it might
occur that at the first connection of the ART G3, the operating system
prompts you to install a driver for the new hardware.
· If necessary, Windows may prompt you to insert its installation
CD/DVD. Please have the disc ready.
· For further information about automatic hardware recognition,
searching for and installing hardware drivers, please refer to the
documentation of your operating system.
· USB Audio is an integral part of up to date operating systems, so no
further software installation is necessary. After installing the necessary hardware drivers the ART G3 will be automatically integrated
into your computer system from now on and is ready to use after
plugging in the USB cable.
Depending on the installed operating system the ART G3 will be automatically setup as standard device for sound playback. In case this is not
done automatically due to your current system configuration, please set
the corresponding option manually:
16
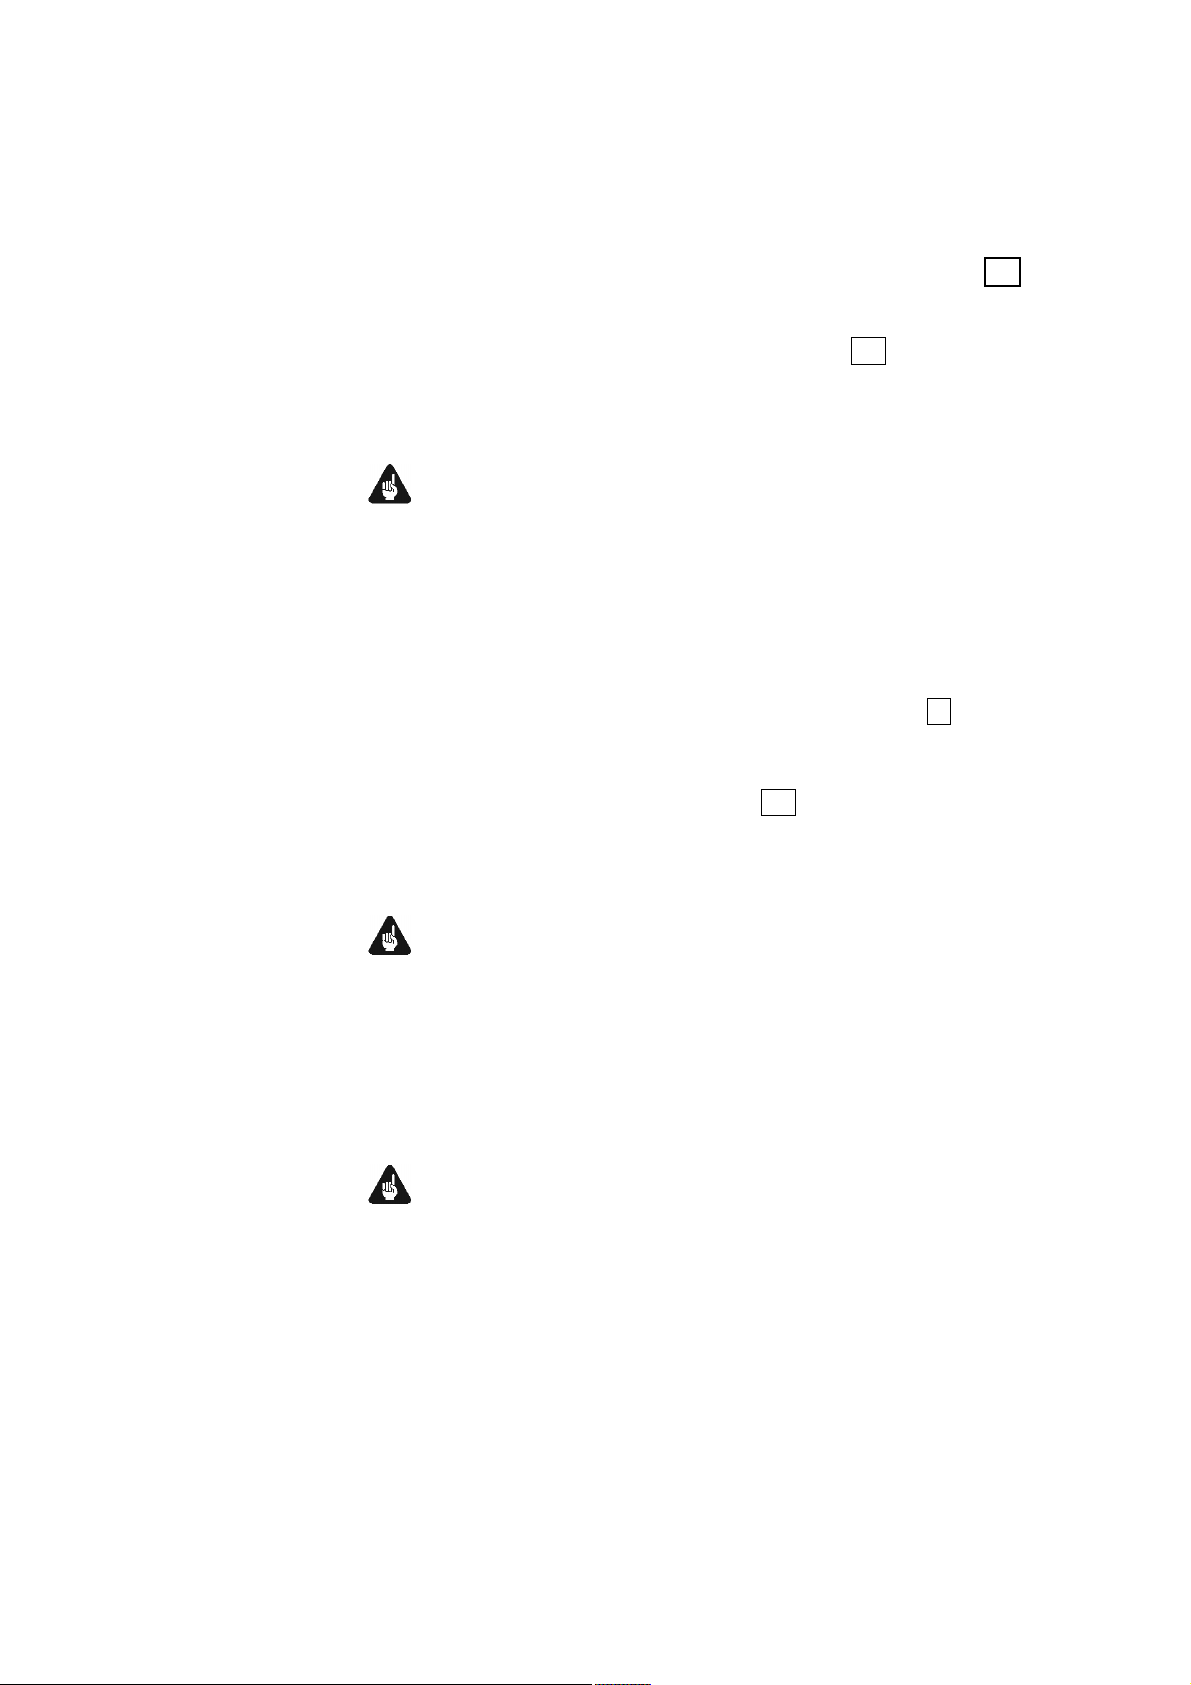
3. Selecting the audio output device
a) Microsoft™ Windows™
Open up the 'Sounds and Audio Devices' dialog of your Windows Settings menu. Click on the tab 'Audio' and select 'Audionet ART G3' from
the list of standard devices (see the following example):
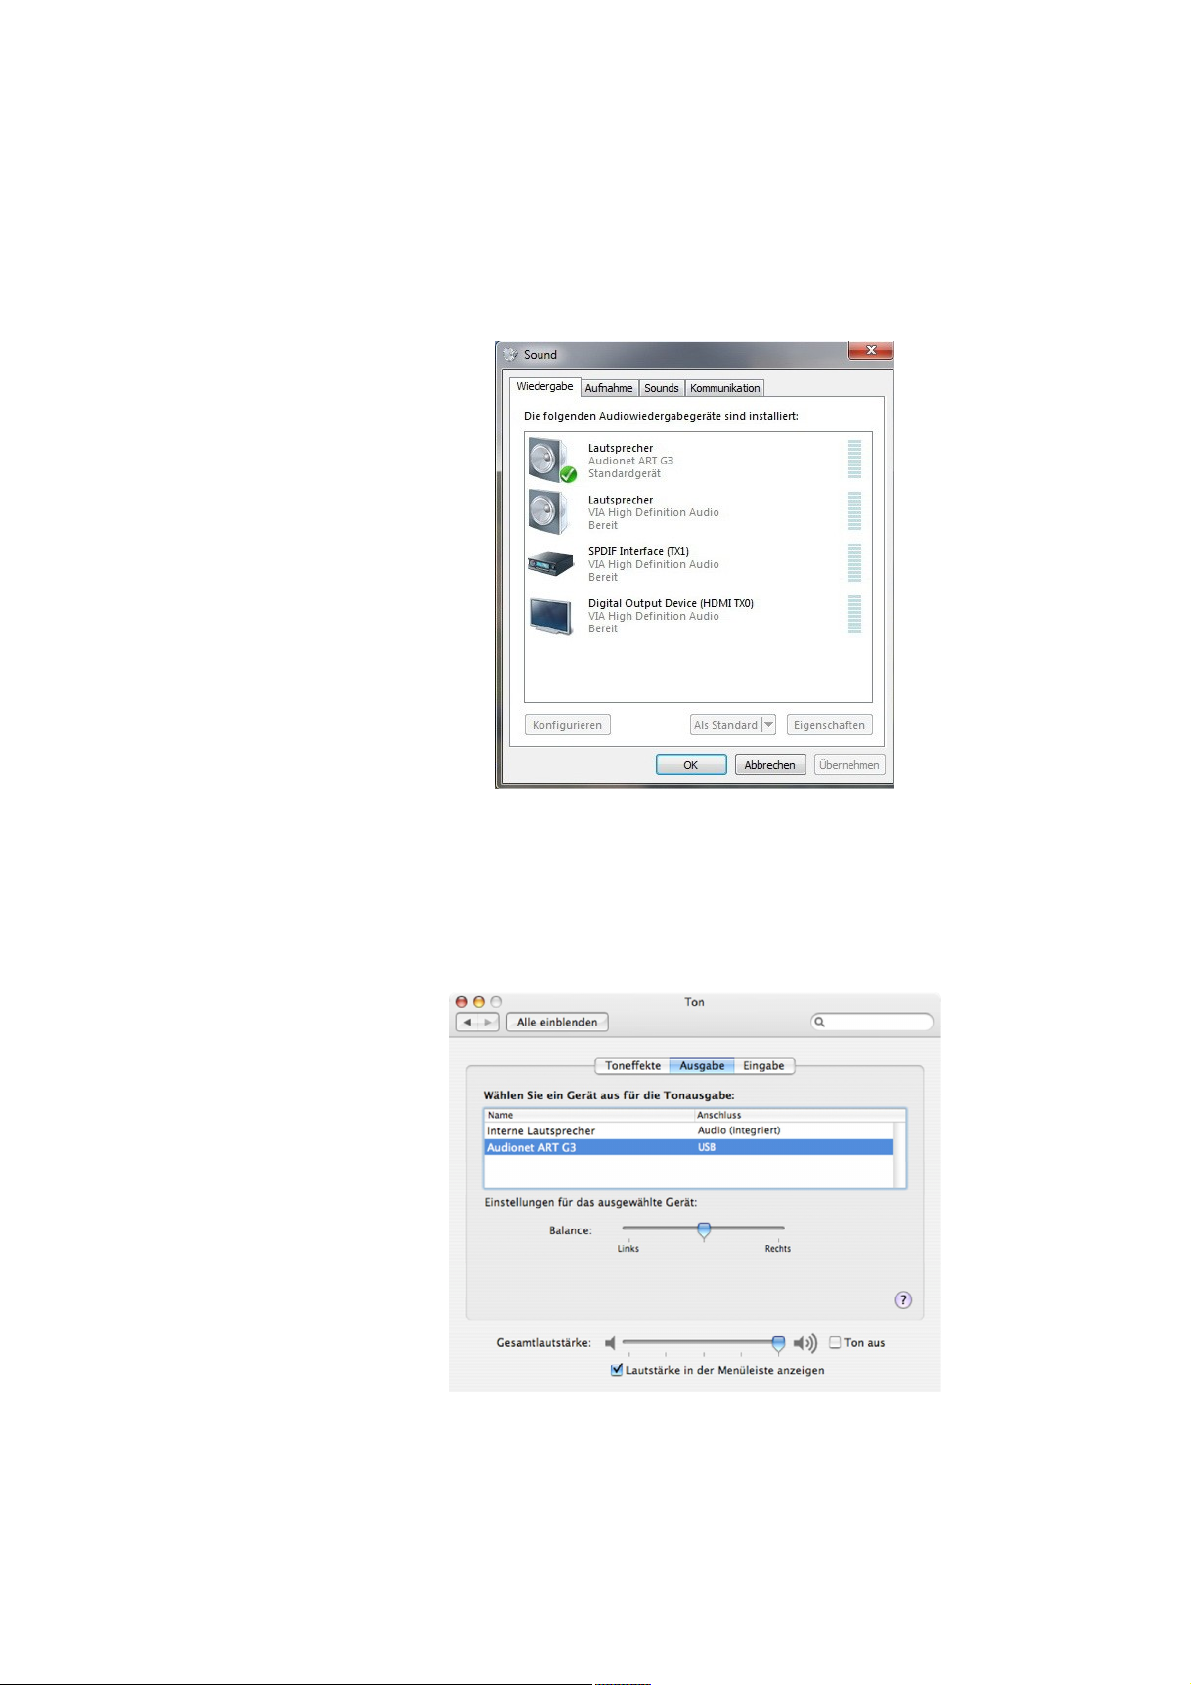
b) Mac OS X
Open the 'System Preferences' and select the preference pane 'Sound'.
Click on the tab 'Output', and select 'Audionet ART G3' as output device.
17
 Loading...