

Page 1
Videoüberwachungsanlage
Video Monitoring Set
Bedienungsanleitung
Operating Instructions
Monitor Set
Page 2

2
Monitor Set
Bedienungsanleitung 3. . . . . . . .
Operating Instructions 19. . . . . .
2
Page 3

− Inhaltsverzeichnis −
1 Allgemeine Hinweise 4. . . . . . . . . . . . . . . . . .
1.1 Bestimmungsgemäße Verwendung 4. . . . . . . . . . . .
1.2 Sicherheitshinweise 4. . . . . . . . . . . . . . . . . . . . . . . . .
1.3 Hinweise zur Entsorgung 6. . . . . . . . . . . . . . . . . . . . .
1.4 Aufladbare Standard−Akkus 6. . . . . . . . . . . . . . . . . .
1.5 Reinigung und Pflege 6. . . . . . . . . . . . . . . . . . . . . . . .
2 Bedienelemente 7. . . . . . . . . . . . . . . . . . . . . . .
2.1 Sender 7. . . . . . . . . . . . . . . . . . . . . . . . . . . . . . . . . . . .
2.2 Empfänger 7. . . . . . . . . . . . . . . . . . . . . . . . . . . . . . . . .
3 Inbetriebnahme 8. . . . . . . . . . . . . . . . . . . . . . .
3.1 Sicherheitshinweise 8. . . . . . . . . . . . . . . . . . . . . . . . .
3.2 Verpackungsinhalt prüfen 8. . . . . . . . . . . . . . . . . . . .
3.3 Sender anschließen (Netzbetrieb) 8. . . . . . . . . . . . .
3.4 Empfänger anschließen (Netzbetrieb) 9. . . . . . . . . .
3.5 Halteclip befestigen 9. . . . . . . . . . . . . . . . . . . . . . . . .
3.6 Wandbefestigung 9. . . . . . . . . . . . . . . . . . . . . . . . . . .
3.7 Betrieb am Fernsehgerät 10. . . . . . . . . . . . . . . . . . . . .
4 Bedienung 11. . . . . . . . . . . . . . . . . . . . . . . . . . . .
4.1 Der Sender 11. . . . . . . . . . . . . . . . . . . . . . . . . . . . . . . .
4.1.1 Sender ein−/ ausschalten 11. . . . . . . . . . . . . . . . . . . . .
4.1.2 Nachtsicht 11. . . . . . . . . . . . . . . . . . . . . . . . . . . . . . . . .
4.2 Der Empfänger 12. . . . . . . . . . . . . . . . . . . . . . . . . . . . .
4.2.1 Empfänger ein−/ ausschalten 12. . . . . . . . . . . . . . . . .
4.3 Bildschirmeinstellungen 12. . . . . . . . . . . . . . . . . . . . . .
4.3.1 Helligkeit / Kontrast / Farbsättigung 12. . . . . . . . . . . .
4.3.2 Auto Funktion ein−/ausschalten 13. . . . . . . . . . . . . . .
4.4 Akkubetrieb 13. . . . . . . . . . . . . . . . . . . . . . . . . . . . . . . .
5 Fehlerbeseitigung 14. . . . . . . . . . . . . . . . . . . . .
6 Wichtige Informationen 16. . . . . . . . . . . . . . . .
6.1 Technische Daten 16. . . . . . . . . . . . . . . . . . . . . . . . . . .
6.2 Garantie 17. . . . . . . . . . . . . . . . . . . . . . . . . . . . . . . . . . .
7 Konformitätserklärung 18. . . . . . . . . . . . . . . . .
3
Page 4

− Allgemeine Hinweise −
1 Allgemeine Hinweise
Bitte lesen Sie diese Bedienungsanleitung sorgfältig durch.
Bei eventuell auftretenden Fragen wenden Sie sich bitte an
unseren Service unter der Service−Hotline 0180 5 00 13 88
(Kosten Telekom bei Drucklegung: 12ct/min). Öffnen Sie die
Geräte in keinem Fall selbst und führen Sie keine eigenen
Reparaturversuche durch. Bei Gewährleistungsansprüchen
wenden Sie sich bitte an Ihren Fachhändler.
Im Zuge von Projektverbesserungen behalten wir uns
technische und optische Veränderungen am Artikel vor.
1.1 Bestimmungsgemäße Verwendung
Das Monitor Set wurde entwickelt zur Überwachung von
Räumen. Der Sender übermittelt von seinem Standort aus
Stimmlaute und Bilder an den Empfänger. Jede andere
Verwendung gilt als nicht bestimmungsgemäß.
Hinweis: Die Verwendung des Gerätes ersetzt die persönliche
Beaufsichtigung z. B. eines Kindes nicht. Der
Anwender wird nicht aus seiner persönlichen Haftung
entlassen.
1.2 Sicherheitshinweise
S Legen Sie den Sender niemals in das Bett oder in
den Laufstall eines Babys.
S Vergewissern Sie sich, dass sich der Sender und das
Netzkabel immer außerhalb der Reichweite von
Babys befinden, d. h. mindestens einen Meter
entfernt.
S Sorgen Sie während des Betriebes für eine
ausreichende Belüftung aller Komponenten. Legen
Sie keine Kissen oder Handtücher auf die Geräte.
4
Page 5

− Allgemeine Hinweise −
S Die Geräte sind nicht für den medizinischen Einsatz
geeignet. Warn− oder Signaltöne von Atmungs− oder
Herztonüberwachungsgeräten können nicht
übertragen werden.
S Verwenden Sie die Geräte nicht in
explosionsgefährdeten Bereichen.
S Die Geräte sind für den Betrieb in geschützten
Räumen mit einem Temperaturbereich von 10 °C bis
30 °C ausgelegt. Die Geräte dürfen nicht in
Feuchträumen wie Bad oder Waschküche aufgestellt
werden.
S Vermeiden Sie die Nähe zu Wärmequellen wie
Heizkörpern und setzen Sie die Geräte keiner
direkten Sonnenbestrahlung aus.
S Der Aufstellort hat entscheidenden Einfluss auf den
einwandfreien Betrieb. Halten Sie einen Abstand von
mindestens einem Meter zu elektronischen Geräten
wie z. B. Mikrowellen oder HIFI−Geräten ein, da es
sonst zu gegenseitiger Beeinflussung kommen kann.
S Verwenden Sie nur die mitgelieferten original
Netzteile, da andere Netzteile das Gerät zerstören
können. Andere Netzteile können die Geräte z.B. in
Brand setzen.
S Achten Sie beim Betrieb mit einem Netzteil auf den
einwandfreien Zustand der Kabel und Stecker.
Abgeknickte oder durchgescheuerte Kabel sind
lebensgefährlich!
Achtung: Stromschlag−, Kurzschluss− und
Brandgefahr!
5
Page 6

− Allgemeine Hinweise −
1.3 Hinweise zur Entsorgung
Die Umsetzung europäischen Rechtes in nationale Gesetze
und Verordnungen verpflichtet Sie zur sachgerechten
Entsorgung von Gebrauchsgütern. Dies dient dem Schutz von
Personen und Umwelt.
Das nebenstehende Symbol bedeutet, dass elektrische und
elektronische Altgeräte und Batterien getrennt vom Hausmüll
zu entsorgen sind.
Alte oder ausgediente Geräte entsorgen Sie bei einer
Sammelstelle eines geeigneten Entsorgungsträgers.
Batterien und Akkumulatoren entsorgen Sie
beim batterievertreibenden Handel sowie
zuständigen Sammelstellen, die entsprechende
Behälter bereitstellen.
Verpackungsmaterialien entsorgen Sie
entsprechend den lokalen Vorschriften.
1.4 Aufladbare Standard−Akkus
Verwenden Sie keine anderen aufladbaren Standard−Akkus
oder Akku−Packs, weil diese möglicherweise einen Kurzschluss
verursachen. Verwenden Sie beim Austauschen immer nur
Akku−Packs des Typs 3x AA Ni−Mh 3,6V 1600 mAh.
Werfen Sie Standard−Akkus oder Akku−Packs nicht ins Feuer
und tauchen Sie sie nicht ins Wasser. Die angegebenen
Betriebszeiten gelten für die mitgelieferten wiederaufladbaren
Akku−Packs bei optimalen Bedingungen. Die Ladekapazität
reduziert sich technisch bedingt im Verlauf der Nutzung oder
durch Lagerung bei sehr hohen oder niedrigen Temperaturen.
1.5 Reinigung und Pflege
Reinigen Sie die Geräte mit einem trockenen, weichen und
fusselfreien Tuch. Niemals Reinigungsmittel oder Lösungsmittel
verwenden.
6
Page 7
− Bedienelemente −
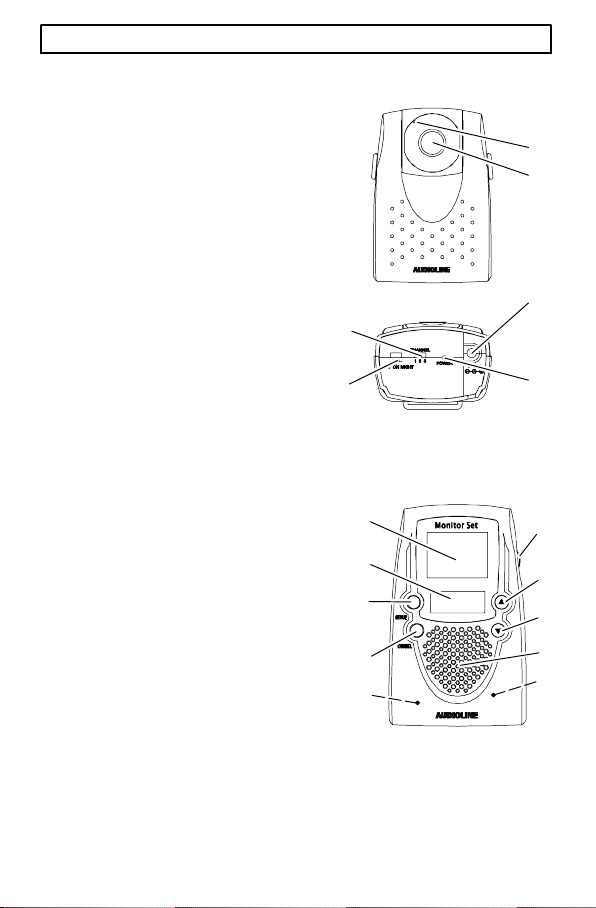
2 Bedienelemente
2.1 Sender
1. Mikrofon
2. Objektiv
3. Anschlussbuchse Netzteil
4. Kontrollleuchte Ein/Aus
5. Betriebsschalter
6. Kanalschalter
2.2 Empfänger
7. Lautstärkeregler
8. Taste Auf"
9. Taste Ab"
10. Lautsprecher
11. TV Ausgangsbuchse
(Rückseite)
12. Anschlussbuchse
Netzteil (Rückseite)
13. Channel Taste
14. Menue Taste
15. Display
16. Bildschirm
1
2
3
6
5
16
15
14
13
12
4
7
8
9
10
11
7
Page 8
− Inbetriebnahme −
3 Inbetriebnahme
3.1 Sicherheitshinweise
Hinweis: Lesen Sie vor der Inbetriebnahme unbedingt die
Allgemeinen Hinweise" in Kapitel 1 dieser
Bedienungsanleitung.
3.2 Verpackungsinhalt prüfen
Zum Lieferumfang gehören:
ein Sender
zwei Netzteile zwei Akku−Packs ein Klettband
ein Audio−/ Videokabel eine Bedienungsanleitung
ein Empfänger ein Halteclip
3.3 Sender anschließen (Netzbetrieb)
Hinweis: Achten Sie auf die Verwendung des richtigen
Netzteils, sonst kommt es zum Defekt des Senders.
Der Sender darf nur mit dem Netzteil betrieben
werden, das eine Ausgangsleistung von 800mA hat
(abgewinkelter Hohlstecker).
1. Öffnen Sie das Batteriefach auf der Rückseite des
Senders. Drücken Sie hierzu die Klemmlasche nach
unten und heben Sie den Deckel ab.
2. Stecken Sie den Stecker des Akku−Packs in die
entsprechende Buchse im Batteriefach.
3. Legen Sie den Akku−Pack in das Batteriefach.
4. Schließen Sie das Batteriefach.
5. Stecken Sie den abgewinkelten Hohlstecker des
Netzteils in die Anschlussbuchse auf der Unterseite
des Senders.
6. Stecken Sie das Netzteil in eine Steckdose (230V).
Die Akku−Packs werden jetzt geladen. Beim
erstmaligen Aufladen des Akku−Packs empfehlen wir
eine Ladezeit von 24 Stunden.
8
Page 9

− Inbetriebnahme −
3.4 Empfänger anschließen (Netzbetrieb)
Hinweis: Achten Sie auf die Verwendung des richtigen
Netzteils. Der Empfänger darf nur mit dem Netzteil
betrieben werden, das eine Ausgangsleistung von
1000mA hat (gerader Hohlstecker).
1. Öffnen Sie das Batteriefach auf der Rückseite des
Empfängers. Drücken Sie hierzu die Klemmlasche
nach unten und heben Sie den Deckel ab.
2. Verbinden Sie den Akkupack mit dem Gerät und
schließen Sie das Batteriefach wie unter 3.3
beschrieben.
3. Stecken Sie den Hohlstecker des Netzteils in die
Anschlussbuchse auf der Rückseite des
Empfängers.
4. Stecken Sie das Netzteil in eine Steckdose (230V).
Beim erstmaligen Aufladen des Akku−Packs
empfehlen wir eine Ladezeit von 24 Stunden.
3.5 Halteclip befestigen
Am Halteclip können Sie den Sender aufhängen.
Schieben Sie den Halteclip bis zu einem hörbaren Einrasten in
die Aussparungen an den Seiten des Senders. Ziehen Sie das
Klettband durch den Schlitz am Halteclip und hängen Sie daran
den Sender auf.
3.6 Wandbefestigung
Hinweis: Bohren Sie nicht in Strom− oder Wasserleitungen!
Stellen Sie sicher, dass am gewünschten
Anbringungsort keine Leitungen verlaufen!
Dübel und Schrauben sind nicht im Lieferumfang
enthalten.
1. Bohren Sie zwei Löcher (Durchmesser 5 mm) im
Abstand von 30 mm horizontal nebeneinander.
9
Page 10

− Inbetriebnahme −
2. Stecken Sie in jedes Bohrloch einen Dübel
(Durchmesser 5 mm).
3. Drehen Sie in jeden Dübel eine Schraube
(Durchmesser 4 mm).
Hinweis: Der Abstand zwischen Schraubenkopf und Wand
sollte ca. 3 mm betragen.
4. Schieben Sie das jeweilige Gerät mit den
Aussparungen über die Schraubenköpfe und ziehen
es leicht nach unten.
3.7 Betrieb am Fernsehgerät
Sie können die Bilder und Töne an einen Fernseher oder ein
Aufnahmegerät weiterleiten. Die Tonübertragung ist mono. Bei
einem Stereogerät hören Sie die Geräusche nur auf einem
Kanal.
1. Stecken Sie den schwarzen Klinkenstecker in die
Buchse TV OUT" auf der Rückseite des
Empfängers.
2. Stecken Sie den gelben und den roten Cinch−Stecker
in die farblich entsprechenden Buchsen an Ihrem
Fernsehgerät bzw. Aufnahmegerät. Weitere
Informationen entnehmen Sie bitte der
Bedienungsanleitung des jeweiligen Gerätes.
10
Page 11

− Bedienung −
4 Bedienung
Hinweis: Überprüfen Sie vor jedem Einsatz die einwandfreie
Funktion von Sender und Empfänger.
4.1 Der Sender
4.1.1 Sender ein−/ ausschalten
Hinweis: Positionieren Sie den Sender außerhalb der
Reichweite von Kindern! Legen Sie das Sendeteil
niemals in das Bett oder in den Laufstall eines Babys!
1. Stellen Sie den Kanalschalter des Senders auf den
gleichen
Kanal (1−3) wie den Empfänger.
2. Stellen Sie den Betriebsschalter in die Position ON".
Die Kontrollleuchte auf der Unterseite leuchtet. Der
Sender ist jetzt betriebsbereit. Er sendet die
Geräusche und Bilder aus dem
Überwachungsbereich an den Empfänger.
3. Stellen Sie den Sender an einem günstigen Ort auf,
richten Sie das Objektiv auf den
Beobachtungsbereich und stellen Sie durch Drehen
des Objektivkopfes den Winkel ein.
4. Zum Ausschalten des Senders stellen Sie den
Betriebsschalter in die Position OFF".
Hinweis: Bei niedriger Akkukapazität des Senders erklingt am
Empfänger ein Piepton.
4.1.2 Nachtsicht
Der Sender ist mit sechs Infrarot−Dioden ausgestattet. Dadurch
ist die Bildübertragung aus unbeleuchteten Bereichen möglich.
1. Zur Aktivierung der Nachtsichtfunktion stellen Sie den
Betriebsschalter in die Position NIGHT".
Hinweis: Bei aktivierter Nachtsichtfunktion ist die
Bildschirmdarstellung am Empfänger Schwarz−Weiß.
11
Page 12

− Bedienung −
4.2 Der Empfänger
4.2.1 Empfänger ein−/ ausschalten
1. Drehen Sie den Lautstärkeregler in Richtung ON",
der Empfänger wird eingeschaltet.
Regeln Sie die gewünschte Lautstärke am
Lautstärkeregler.
2. Drücken Sie mehrmals die Taste Channel", bis der
gleiche Kanal (1−3) wie am Sender ausgewählt ist.
Der aktuelle Kanal wird im Display angezeigt.
Der Empfänger ist nun betriebsbereit. Er empfängt die Bilder
und Geräusche vom Aufstellort des eingeschalteten Senders.
3. Zum Ausschalten drehen Sie den Lautstärkeregler
bis zu einem hörbaren Klicken in Richtung OFF".
Hinweis: Bei niedriger Akkukapazität des Empfängers blinkt
das
Y−Symbol im Display.
4.3 Bildschirmeinstellungen
Sie können Helligkeit, Kontrast und Farbsättigung des
Bildschirms Ihren Bedürfnissen anpassen.
4.3.1 Helligkeit / Kontrast / Farbsättigung
1. Drücken Sie die Taste MENUE". Im Display
erscheint das Symbol
2. Drücken Sie die Taste y oder z um die
Helligkeit zu regulieren. Die gewählte Einstellung wird
durch Balken am unteren Rand der Anzeige
dargestellt.
3. Drücken Sie die Taste MENUE". Im Display
erscheint das Symbol
4. Drücken Sie die Taste y oder z um den
Kontrast zu regulieren.
5. Drücken Sie die Taste MENUE". Im Display
erscheint das Symbol
.
.
.
12
Page 13

− Bedienung −
6. Drücken Sie die Taste y oder z um die
Farbsättigung zu regulieren.
7. Drücken Sie die Taste MENUE". Die Einstellung ist
abgeschlossen.
Hinweis: Wenn Sie im Menü für 15 Sekunden keine Taste
betätigen, wird das Menü geschlossen. Wenn Sie
das Menü vorher verlassen möchten, dann drücken
Sie mehrmals die Taste MENUE", bis die
entsprechenden Symbole nicht mehr im Display
angezeigt werden.
4.3.2 Auto−Modus ein−/ausschalten
Wenn für 15 Sekunden vom Sender kein Geräusch
aufgenommen wird, dann wird im AUTO−Modus der Bildschirm
abgeschaltet. Wird ein Geräusch aufgenommen oder am
Empfangsteil eine Taste gedrückt, wird der Bildschirm wieder
eingeschaltet.
1. Halten Sie die Taste Channel" gedrückt
(4 Sekunden), bis Sie einen kurzen Piepton hören.
Im Display erscheint die Anzeige AUTO".
2. Um den AUTO−Modus zu deaktivieren, halten Sie die
Taste Channel" gedrückt (4 Sekunden), bis Sie
einen kurzen Piepton hören. Die Anzeige AUTO"
erlischt im Display.
4.4 Akkubetrieb
Wenn Sie die Geräte im Akkubetreib nutzen möchten, dann
müssen Sie die Netzteilstecker aus den Buchsen von Sender
und Empfänger entfernen.
Die Akkukapazität wird im Display durch ein Batteriesymbol
angezeigt. Betriebszeit mit geladenem Akku siehe
Kapitel 6.1, Technische Daten".
Hinweis: Bei Stromausfall oder Trennung vom Netz schalten
sich die Geräte ab, wenn sie noch mit dem Netzteil
verbunden sind. Trennen Sie in diesem Fall die
Geräte von den Netzteilen um in den Akkubetrieb zu
wechseln.
13
Page 14

− Fehlerbeseitigung −
5 Fehlerbeseitigung
Haben Sie Probleme mit Ihrem Monitor Set, kontrollieren Sie
bitte zuerst die folgenden Hinweise. Bei technischen
Problemen können Sie sich auch an unsere Hotline unter Tel.
0180 5 00 13 88 (Kosten Telekom bei Drucklegung: 12ct/min)
wenden.
Bei Garantieansprüchen wenden Sie sich bitte an Ihren
Fachhändler. Die Garantiezeit beträgt 2 Jahre.
Fehler
Keine Funktion − Sender und/oder Empfänger sind nicht
Kein Empfang − Sender und Empfänger sind nicht auf
Empfangsstörungen
Pfeifton (Rückkopplung)
Ursache
eingeschaltet.
− Die Akku−Packs sind leer oder defekt.
den gleichen Kanal eingestellt.
− Der Abstand des Senders z. B. zum
Baby ist zu groß. Beachten Sie aber
den Mindestabstand von einem Meter.
− Der Abstand zwischen Empfänger und
Sender ist zu groß.
− Die Lautstärke am Empfänger ist zu
gering eingestellt.
− Der Abstand zwischen Empfänger und
Sender ist zu groß.
− Die Akkuleistung ist zu gering.
− Wählen Sie einen anderen Kanal am
Empfänger und Sender.
− Andere elektronische Geräte stören
das Übertragungsfeld.
− Vergrößern Sie die Entfernung zwischen Empfänger und Sender.
− Verringern Sie die Lautstärke am Empfänger.
14
Page 15

− Fehlerbeseitigung −
Rauschen − Die Akkuleistung ist zu gering.
− Der Sender und der Empfänger sind
nicht auf den gleichen Kanal eingestellt.
Fremdempfang − Ein Gerät in Ihrer Nähe verwendet den
gleichen Kanal. Weichen Sie auf den
anderen Kanal aus.
Bild− aber keine
Tonübertragung
− Die Lautstärke ist zu gering eingestellt.
15
Page 16

− Wichtige Informationen −
6 Wichtige Informationen
6.1 Technische Daten
Merkmal Wert
Reichweite Bis zu 50 Meter unter optimalen Be-
dingungen. In Gebäuden wird die
Reichweite durch Wände, Türen
usw. verringert.
Stromversorgung
Empfänger
Stromversorgung
Sender
Betriebszeit mit
geladenem Akku
Frequenzen Kanal 1 = 2.411 GHz
Sendeleistung 10 mW
Zulässige
Umgebungstemperatur
Zulässige relative
Luftfeuchtigkeit
Netzteil DC 6V/1000mA oder
Akku−Pack 3x AA Ni−Mh 3,6V 1600
mAh
Netzteil DC 6V/800mA oder
Akku−Pack 3x AA Ni−Mh 3,6V 1600
mAh
Empfänger:
bis zu vier Stunden
Sender:
bis zu 8 Stunden im Normalbetrieb
bis zu 5 Stunden im Nachtbetrieb
Kanal 2 = 2.431 GHz
Kanal 3 = 2.451 GHz
10°C bis 30°C
20% bis 75%
16
Page 17

− Wichtige Informationen −
6.2 Garantie
AUDIOLINE − Geräte werden nach den modernsten
Produktionsverfahren hergestellt und geprüft. Ausgesuchte
Materialien und hoch entwickelte Technologien sorgen für
einwandfreie Funktion und lange Lebensdauer. Die Garantie
gilt nicht für die in den Produkten verwendeten Standard−Akkus
oder Akkupacks. Die Garantiezeit beträgt 24 Monate,
gerechnet vom Tage des Kaufs.
Innerhalb der Garantiezeit werden alle Mängel, die auf Material−
oder Herstellungsfehler zurückzuführen sind, kostenlos
beseitigt. Der Garantieanspruch erlischt bei Eingriffen durch
den Käufer oder durch Dritte. Schäden, die durch
unsachgemäße Behandlung oder Bedienung, durch falsches
Aufstellen oder Aufbewahren, durch unsachgemäßen
Anschluss oder Installation sowie durch höhere Gewalt oder
sonstige äußere Einflüsse entstehen, fallen nicht unter die
Garantieleistung. Wir behalten uns vor, bei Reklamationen die
defekten Teile auszubessern oder zu ersetzen oder das Gerät
auszutauschen. Ausgetauschte Teile oder ausgetauschte
Geräte gehen in unser Eigentum über.
Schadenersatzansprüche sind ausgeschlossen, soweit sie
nicht auf Vorsatz oder grober Fahrlässigkeit des Herstellers
beruhen.
Sollte Ihr Gerät dennoch einen Defekt innerhalb der
Garantiezeit aufweisen, wenden Sie sich bitte unter Vorlage
Ihrer Kaufquittung ausschließlich an das Geschäft, in dem Sie
Ihr AUDIOLINE − Gerät gekauft haben. Alle
Gewährleistungsansprüche nach diesen Bestimmungen sind
ausschließlich gegenüber Ihrem Fachhändler geltend zu
machen. Nach Ablauf von zwei Jahren nach Kauf und
Übergabe unserer Produkte können Gewährleistungsrechte
nicht mehr geltend gemacht werden.
17
Page 18

− Konformitätserklärung −
7 Konformitätserklärung
Dieses Gerät erfüllt die Anforderungen der EU−Richtlinie:
1999/5/EG Richtlinie über Funkanlagen und
Telekommunikationsendeinrichtungen und die gegenseitige
Anerkennung ihrer Konformität. Die Konformität mit der o. a.
Richtlinie wird durch das CE−Zeichen auf dem Gerät bestätigt.
Für die komplette Konformitätserklärung nutzen Sie bitte den
kostenlosen Download von unserer Website www.audioline.de.
18
Page 19

− Contents −
1 General Information 20. . . . . . . . . . . . . . . . . . .
1.1 Intended use 20. . . . . . . . . . . . . . . . . . . . . . . . . . . . . . .
1.2 Safety information 20. . . . . . . . . . . . . . . . . . . . . . . . . . .
1.3 Information on disposal 22. . . . . . . . . . . . . . . . . . . . . .
1.4 Rechargeable standard batteries 22. . . . . . . . . . . . . .
1.5 Cleaning and upkeep 22. . . . . . . . . . . . . . . . . . . . . . . .
2 Operating Elements 23. . . . . . . . . . . . . . . . . . .
2.1 Transmitter 23. . . . . . . . . . . . . . . . . . . . . . . . . . . . . . . . .
2.2 Receiver 23. . . . . . . . . . . . . . . . . . . . . . . . . . . . . . . . . . .
3 Starting Up 24. . . . . . . . . . . . . . . . . . . . . . . . . . .
3.1 Safety Information 24. . . . . . . . . . . . . . . . . . . . . . . . . .
3.2 Checking the package contents 24. . . . . . . . . . . . . . .
3.3 Connecting the transmitter (mains operation) 24. . . .
3.4 Connecting the receiver (mains operation) 25. . . . . .
3.5 Fitting the holding clip 25. . . . . . . . . . . . . . . . . . . . . . .
3.6 Wall fixation 25. . . . . . . . . . . . . . . . . . . . . . . . . . . . . . . .
3.7 Operation on a television set 26. . . . . . . . . . . . . . . . .
4 Operation 27. . . . . . . . . . . . . . . . . . . . . . . . . . . . .
4.1 Transmitter 27. . . . . . . . . . . . . . . . . . . . . . . . . . . . . . . . .
4.1.1 Switching the transmitter on /off 27. . . . . . . . . . . . . . .
4.1.2 Nighttime vision 27. . . . . . . . . . . . . . . . . . . . . . . . . . . . .
4.2 Receiver 28. . . . . . . . . . . . . . . . . . . . . . . . . . . . . . . . . . .
4.2.1 Switching the receiver on /off 28. . . . . . . . . . . . . . . . .
4.3 Screen settings 28. . . . . . . . . . . . . . . . . . . . . . . . . . . . .
4.3.1 Brightness / Contrast / Colour intensity 28. . . . . . . . .
4.3.2 Switching the Auto function on/off 29. . . . . . . . . . . . .
4.4 Battery mode 29. . . . . . . . . . . . . . . . . . . . . . . . . . . . . . .
5 Troubleshooting 30. . . . . . . . . . . . . . . . . . . . . .
6 Important Information 32. . . . . . . . . . . . . . . . .
6.1 Technical data 32. . . . . . . . . . . . . . . . . . . . . . . . . . . . . .
6.2 Guarantee 33. . . . . . . . . . . . . . . . . . . . . . . . . . . . . . . . .
7 Declaration of Conformity 34. . . . . . . . . . . . . .
8 Important Notes on the Guarantee 35. . . . . .
19
Page 20

− General Information −
1 General Information
Please read this operating instruction manual thoroughly.
If you have any queries, please contact our service hotline
0180 5 00 13 88 (cost via Telekom at time of going to print:
12 ct/min). Under no circumstances open the devices or
complete any repair work yourself. In the case of claims under
the terms of guarantee, contact your sales outlet.
We reserve the right to make technical and visual modifications
to the product during the course of product improvement.
1.1 Intended use
The monitoring set has been developed to monitor rooms. The
transmitter sends acoustic and image signals from its point of
installation to the receiver. Any other use is considered
unintended use.
Hinweis: The use of this equipment does not substitute
personal supervision, e.g. of a child. Users are not
relieved of their personal liability.
1.2 Safety information
S Never lay the transmitter in a baby’s bed or playpen.
S Ensure that the transmitter and power cable are out
of reach of children, i.e. they are at least one meter
away.
S Pay attention that the components are sufficiently
well−ventilated when in operation. Do not lay a
cushion or towel over the devices.
20
Page 21

− General Information −
S The devices are not intended for medical purposes.
Warning and signal tones from respiratory or
heartbeat monitoring equipment are not transmitted.
S Do not use the equipment in potentially explosive
areas.
S The devices are designed for use in protected rooms
with a temperature range from 10 °C to 30 °C. The
equipment should not be set up in rooms exposed to
moisture, such as bathrooms or laundries.
S Do not locate the devices in the vicinity of sources of
heat such as radiators, and never expose them to
direct sunlight.
S The installation location plays a decisive role in
ensuring proper operation. Maintain a minimum
distance of one meter to other electronic equipment,
such as microwave ovens or hi−fi systems, since they
could cause mutual disturbance.
S Only use the power adapter plug supplied because
other power adapter plugs could damage the
equipment. Other power adapter plugs could cause
the devices to catch fire, for example.
S When using the equipment with a power adapter
plug, pay attention that the plug and cable are in
perfect condition. Kinked or worn cable represents
the risk of a fatal accident.
Caution: Electric shock, short circuit and risk of fire!
21
Page 22

− General Information −
1.3 Information on disposal
The implementation of European law in national laws and
directives obliges you to dispose of consumable goods
appropriately. This serves to protect both persons and the
environment.
The adjacent symbol indicates that electrical and electronic
apparatus no longer required must be disposed of separate
from domestic waste.
Equipment which is old or has outlived its service life
must be disposed of at a suitable collection point
provided by the public waste authorities.
Batteries and power packs must be disposed of at
the point of sale or at the appropriate collection points
provided by the public waste authorities.
Packaging materials must be disposed of according
to local regulations.
1.4 Rechargeable standard batteries
Do not use other rechargeable batteries or power packs
because they could cause a short circuit. When replacing
batteries, only use those of the type 3x AA Ni−Mh 3.6V
1600 mAh.
Do not throw rechargeable batteries or power packs into a fire
or immerse them in water. The operating times specified apply
to the rechargeable batteries supplied used under optimum
conditions. In addition, the charge capacity is reduced for
technical reasons during use or when stored at extremely high
or low temperatures.
1.5 Cleaning and upkeep
Clean the equipment surfaces with a soft, dry, fluff−free cloth.
Never use cleaning agents or solvents.
22
Page 23

− Operating Elements −
2 Operating Elements
2.1 Transmitter
1. Microphone
2. Lens
3. Power adapter plug
connection socket
4. Power control lamp on/off
5. Operating mode switch
6. Channel switch
2.2 Receiver
7. Volume control
8. UP" button
9. DOWN" button
10. Loudspeaker
11. TV output socket
(rear side)
12. Power adaptor plug con−
nection socket (rear side)
13. Channel selection button
14. Menu button
15. Display
16. Screen
1
2
3
6
5
16
15
14
13
12
4
7
8
9
10
11
23
Page 24

− Starting Up −
3 Starting Up
3.1 Safety Information
Hinweis: It is essential to read the General Information" in
Chapter 1 at the beginning of this manual before
starting up.
3.2 Checking the package contents
The package contains:
a transmitter
two power adapter
plugs
an audio/video cable an operating manual
a receiver a holding clip
two battery packs a velcro strip
3.3 Connecting the transmitter (mains
operation)
Hinweis: Ensure to use the correct power adapter plug,
otherwise there is a risk the transmitter could be
damaged. The transmitter may only be operated
using the power adapter plug with an output power of
800 mA (angled plug).
1. Open the battery compartment on the rear side of the
transmitter. To do this, press the clamping clip
downward and remove the cover.
2. Connect the plug leading from the rechargeable
battery pack to the corresponding socket in the
battery compartment.
3. Place the battery pack in the battery compartment.
4. Close the battery compartment cover.
5. Insert the small, angled plug on the power adapter
plug cable in the corresponding socket on the
underside of the transmitter.
24
Page 25

− Starting Up −
6. Connect the power adapter plug to a power outlet
(230 V). The battery pack is then charged. When
charging the battery pack for the first time, we
recommend a charging time of 24 hours.
3.4 Connecting the receiver (mains operation)
Hinweis: Ensure to use the correct power adapter plug. The
receiver may only be operated using the power
adapter plug with an output power of 1000 mA
(straight plug).
1. Open the battery compartment on the rear side of the
receiver. To do this, press the clamping clip
downward and remove the cover.
2. Connect the battery pack to the device and close the
battery compartment as described in Section 3.3.
3. Insert the small plug on the power adapter plug cable
in the corresponding socket on the rear side of the
receiver.
4. Connect the power adapter plug to a power outlet
(230 V). When charging the battery pack for the first
time, we recommend a charging time of 24 hours.
3.5 Fitting the holding clip
The transmitter can be hung on the holding clip.
Slide the holding clip over the sides of the transmitter until it
audibly snaps into place in the recesses. Thread the velcro
strip through the slot of the holding clip and suspend the
transmitter from it.
3.6 Wall fixation
Hinweis: Be careful not to drill into electrical lines or water
pipes! Ensure that no lines or pipes are under the
required installation location!
Dowels and screws are not included in the delivery.
25
Page 26

− Starting Up −
1. Drill two holes (5 mm diameter) 30 mm apart and
horizontal to each other.
2. Insert a dowel (5 mm diameter) in each hole.
3. Insert a screw (4 mm diameter) in each dowel.
Hinweis: Leave approx. 3 mm from the head of the screw to
the wall.
4. Align the recesses on the respective device over the
screw heads and pull the device down lightly.
3.7 Operation on a television set
The audio and video signals can be transmitted to a television
or video recorder. The audio transmission is in mono. In the
case of a stereo unit, the sounds are only transmitted from one
channel.
1. Connect the black phone jack in the TV OUT" socket
on the rear side of the receiver.
2. Connect the yellow and red phone plugs in the
correspondingly coloured sockets in your colour
television or video recorder. For further information,
refer to the operating manual provided with the
respective device.
26
Page 27

− Operation −
4 Operation
Hinweis: Check the transmitter and receiver are working
properly each time before the equipment is put into
operation.
4.1 Transmitter
4.1.1 Switching the transmitter on /off
Hinweis: Position the transmitter out of reach of children!
Never lay the transmitter in a baby’s bed or playpen.
1. Set the channel switch on the transmitter to the same
channel (1−3) as that set on the receiver.
2. Set the operating mode switch to ON". The power
control lamp on the underside lights up. The
transmitter is now ready to operate. It transmits
sounds and pictures to the receiver from the area
being monitored.
3. Place the transmitter in a favourable position, point
the lens to the area to be monitored and turn the lens
head to the necessary angle.
4. To switch the transmitter off, set the operating mode
switch to OFF".
Hinweis: The receiver issues an acoustic signal when the
battery charge is low.
4.1.2 Nighttime vision
The transmitter is equipped with six infra−red diodes. This
enables the transmission of pictures from areas which are not
illuminated.
1. To activate the nighttime vision function, set the
operating mode switch to NIGHT".
Hinweis: When the nighttime vision function is activated, the
screen display on the receiver turns to black and
white.
27
Page 28

− Operation −
4.2 Receiver
4.2.1 Switching the receiver on /off
1. Turn the volume control towards ON", the receiver is
switched on.
Regulate the volume to that required using the
volume control.
2. Press the CHANNEL" button as often as necessary
until the same channel (1−3) is set as that on the
transmitter. The current channel is indicated in the
display:
The receiver is now ready to operate. It receives the sounds
and pictures transmitted by the transmitter activated at the
installation location.
3. To switch the receiver off, turn the volume control
towards OFF" until it audibly clicks.
Hinweis: The
Y icon flashes when the battery charge of the
receiver is low.
4.3 Screen settings
The brightness, contrast and colour intensity of the screen can
be adapted to individual needs.
4.3.1 Brightness / Contrast / Colour intensity
1. Press the MENUE" button. The
the display.
2. Press the y or z button to regulate the
brightness. The setting selected is indicated by bars
at the bottom edge of the display.
3. Press the MENUE" button. The
the display.
4. Press the y or z button to regulate the
contrast.
icon appears in
icon appears in
28
Page 29

− Operation −
5. Press the MENUE" button. The icon appears in
the display.
6. Press the y or z button to regulate the colour
intensity.
7. Press the MENUE" button. The settings are
completed.
Hinweis: If the menu is activated and no input is made for a
period of 15 seconds, the menu is closed. You can
exit from the menu at any time by pressing the
MENUE" button as often as necessary until the
corresponding icons no longer appear in the display.
4.3.2 Switching the Auto mode on/off
If no sound is detected by the transmitter for a period of 15
seconds, the screen switches to AUTO mode and is
deactivated. When a sound is subsequently detected or a
button is pressed on the receiver, the screen is automatically
reactivated.
1. Press and hold the CHANNEL" button (4 seconds)
until a short acoustic signal is issued. AUTO appears
in the display.
2. To switch AUTO mode off, press and hold the
CHANNEL" button (4 seconds) until a short acoustic
signal is issued. AUTO disappears from the display.
4.4 Battery mode
If the equipment is to be used powered by the battery pack,
disconnect the power adapter plug connectors from the sockets
on the transmitter and receiver.
The battery charge capacity is indicated in the display by a
battery icon. Operating time with charged battery refer
to Chapter 6.1, Technical data.
Hinweis: In the case of a power failure or disconnection from
the mains supply, the devices are switched off when
still connected to the power adapter plug. To switch to
battery mode, disconnect the power adapter plug
connectors from the devices.
29
Page 30

− Troubleshooting −
5 Troubleshooting
If you experience problems with the Monitor Set, please refer to
the information below first of all.
In the case of technical problems, you can also contact our
hotline service, tel. 0180 5 00 13 88 (cost via Telekom at time of
going to print: 12 ct/min).
In the case of claims under the terms of guarantee, contact
your sales outlet. There is a 2 year period of guarantee.
Faults
Equipment does
not function
No reception − Transmitter and receiver are not swit-
Reception interference
Beeping noise
(acoustic feedback)
Cause
− Transmitter and/or receiver are not
switched on.
− Battery pack is discharged or defect.
ched to the same channel.
− Transmitter is too far from object being
monitored, e.g. baby. Observe the minimum distance of one meter.
− Distance between the receiver and
transmitter is too large.
− Volume setting of the receiver is too
low.
− Distance between the receiver and
transmitter is too large.
− Battery power is too low.
− Select another channel on the receiver
and transmitter.
− Other electronic devices cause interference in the field of transmission.
− Increase the distance between receiver
and transmitter.
− Reduce the volume on the receiver.
30
Page 31

− Troubleshooting −
Noise − Battery power is too low.
− Transmitter and receiver are not
switched to the same channel.
Reception on
external device
Picture but no
sound transmission
− A device nearby is using the same
channel. Switch to another channel.
− Volume setting is too low.
31
Page 32

− Important Information −
6 Important Information
6.1 Technical data
Feature Value
Range Up to 50 meters under optimum
conditions. Range is reduced in buildings through walls, doors etc.
Power supply
receiver
Power supply
transmitter
Operating time with
charged battery
Frequencies Channel 1 = 2.411 GHz
Transmitting power 10 mW
Permissible ambient
temperature
Permissible relative
humidity
Power adapter plug 6 VDC/1000 mA
or battery pack 3x AA Ni−Mh 3.6V
1600 mAh
Power adapter plug 6 VDC/800 mA
or battery pack 3x AA Ni−Mh 3.6V
1600 mAh
Receiver:
Up to four hours
Transmitter:
Up to 8 hours in normal operation
Up to 5 hours in nighttime operation
Channel 2 = 2.431 GHz
Channel 3 = 2.451 GHz
10°C to 30°C
20% to 75%
32
Page 33

− Important Information −
6.2 Guarantee
AUDIOLINE equipment is produced and tested according to the
latest production methods. The implementation of carefully
chosen materials and highly developed technologies ensure
trouble−free functioning and a long service life. The terms of
guarantee do not apply to the standard batteries or power
packs used in the products. The period of guarantee is 24
months from the date of purchase.
All deficiencies resulting from material or production faults
which occur during the period of guarantee will be eliminated
free of charge. Rights to claims under the terms of guarantee
are annulled following intervention by the purchaser or third
parties. Damage caused as a result of improper handling or
operation, incorrect positioning or storing, improper connection
or installation, Acts of God or other external influence are not
covered by the terms of guarantee. In the case of complaints,
we reserve the right to repair or replace defect parts or provide
a replacement device. Replacement parts or devices become
our property. Rights to compensation in the case of damage are
excluded where there is no evidence of intent or gross
negligence by the manufacturer.
If your equipment shows signs of defect during the period of
guarantee, please return it to the sales outlet in which you
purchased the AUDIOLINE equipment together with the
purchase receipt. All rights to claims under the terms of
guarantee in accordance with this agreement must be asserted
exclusively with regard to your sales outlet. Two years after the
purchase and transfer of our products, claims under the terms
of guarantee can no longer be asserted.
33
Page 34

− Declaration of Conformity −
7 Declaration of Conformity
This device fulfils the requirements stipulated in the EU
directive:
1999/5/EU directive on radio equipment and
telecommunications terminal equipment and the mutual
recognition of their conformity. Conformity with the above
mentioned directive is confirmed by the CE symbol on the
device.
To view the complete Declaration of Conformity, please refer to
the free download available on our web site www.audioline.de.
34
Page 35

Important Notes on the Guarantee
8 Important Notes on the Guarantee
The period of guarantee for the AUDIOLINE product begins on
the date of purchase. Rights to claims under the terms of
guarantee relate to deficiencies resulting from material or
production faults. Rights to claims under the terms of guarantee
are annulled following intervention by the purchaser or third
parties. Damage caused as a result of improper handling or
operation, normal wear and tear, incorrect positioning or
storing, improper connection or installation, Acts of God or other
external influence are not covered by the terms of guarantee.
CLAIMS UNDER THE TERMS OF GUARANTEE MAY ONLY
BE ASSERTED TO THE RETAILER WHERE THE
EQUIPMENT WAS PURCHASED, WHEREBY THE
PURCHASE RECEIPT MUST ALSO BE SUBMITTED.
TO PREVENT UNNECESSARY LONG DELAYS, PLEASE
DO NOT SEND EQUIPMENT UNDER COMPLAINT TO OUR
OFFICE ADDRESS.
IN THE CASE OF QUESTIONS CONCERNING OPERATION
OR THE TERMS OF GUARANTEE, PLEASE REFER TO
THE OPERATING MANUAL OR CONTACT OUR HOTLINE:
0180 500 13 88 (Telekom cost at time of going to print: 12
ct/min)
AUDIOLINE GmbH
Neuss
Service Hotline 0180 500 13 88
(Telekom cost at time of going to print: 12 ct/min)
Internet: www.audioline.de − E−mail: info@audioline.de
35
Page 36

Wichtige Garantiehinweise
Die Garantiezeit für Ihr AUDIOLINE − Produkt beginnt mit dem
Kaufdatum. Ein Garantieanspruch besteht bei Mängeln, die auf
Material− oder Herstellungsfehler zurückzuführen sind. Der
Garantieanspruch erlischt bei Eingriffen durch den Käufer oder
durch Dritte. Schäden, die durch unsachgemäße Behandlung
oder Bedienung, natürliche Abnutzung, durch falsches
Aufstellen oder Aufbewahren, durch unsachgemäßen
Anschluss oder Installation sowie durch höhere Gewalt oder
sonstige äußere Einflüsse entstehen, fallen nicht unter die
Garantieleistung.
BITTE WENDEN SIE SICH IM GARANTIEFALL
AUSSCHLIESSLICH AN DEN HÄNDLER, BEI DEM SIE DAS
GERÄT GEKAUFT HABEN, UND VERGESSEN SIE NICHT,
DEN KAUFBELEG VORZULEGEN.
UM UNNÖTIG LANGE WARTEZEITEN ZU VERMEIDEN,
SENDEN SIE REKLAMATIONSGERÄTE BITTE NICHT
UNSERE BÜROADRESSE.
BEI FRAGEN ZUR BEDIENUNG UND
GARANTIELEISTUNG LESEN SIE BITTE DIE
BEDIENUNGSANLEITUNG ODER WENDEN SIE SICH AN
UNSERE HOTLINE:
AN
0180 500 13 88 (Kosten Telekom bei Drucklegung: 12ct/min)
AUDIOLINE GmbH
Neuss
Service Hotline 0180 500 13 88
(Kosten Telekom bei Drucklegung: 12ct/min)
Internet: www.audioline.de − E−mail: info@audioline.de
Version 1.3 − 07.03.2006
 Loading...