

Page 1

FF895-2
Cordless telephone answering system
with Calling Number Display and speakerphone
This equipment is not designed for making emergency
telephone calls when the power fails. Alternative
arrangements should be made for access to the
User guide
emergency services.
Page 2

AUDIOLINE FF895-2 CONTENTS
LIST OF CONTENTS
Installation .................. 1 Menu Options ...........19
Handset functions ........... 1 Main menu .............19
Base unit functions ........... 2 Enter menu ............19
Parts list ................... 3 Set menu options . . . . ..20
Positioning/installing Base unit . 3
Battery installation ........... 4 Additional Features ......24
Battery care/Low batt indicator .. 5 2 way recording/call screen 24
.......................... Group listening ..........24
Telephone .................. 6 Channel select ..........25
Handset display/setup ........ 6
Standby mode ................ 7 Handset Remote Control . 26
Making a call with h/set ....... 7 Handset remote cont TAM . 26
Making a call with speaker ..... 8 H/set remote cont function . 27
Answering incoming calls ..... 8
Call timer .................. 9 Base Unit Functions .....28
Last number redial .......... 9 Setting clock ..............28
Earpiece volume control ...... 9 Record an OGM ...........29
Range warning .............. 9 Mailbox selection ..........29
Page/find handset ........... 9 OGM playback ............30
.......................... Base unit buttons & LEDs ...31
Memory Numbers .......... 10 Answering machine on/off ...32
Character table ............. 10 Answering mode selection ...32
Store memory number/name .. 11 Silence mode selection .....32
Dial memory No.’s on Handset 12 Incom.call/message playback 33
Dial memory No.’s on Spk/ph .. 12 Memo recording .........33
Editing/deleting a memory .... 13 Delete all old messages ....33
Change a memory call type ... 13 Base unit LED indications ...34
Memory match function ...... 13
Remote Access .............35
Calling Number Display ..14
Calling Number Display ...... 14 Call Types ..............37
View Calling Display numbers . 15
Save a CND in dialling memory 16 System Expansion .......39
Delete a number from CND log 17
Delete all No.’s from CND log . 17 Trouble shooting .......40
Direct dial from call log ....... 17
Playback ICM with CND ...... 18 Other .................42
Page 3
INSTALLATION AUDIOLINE FF895-2
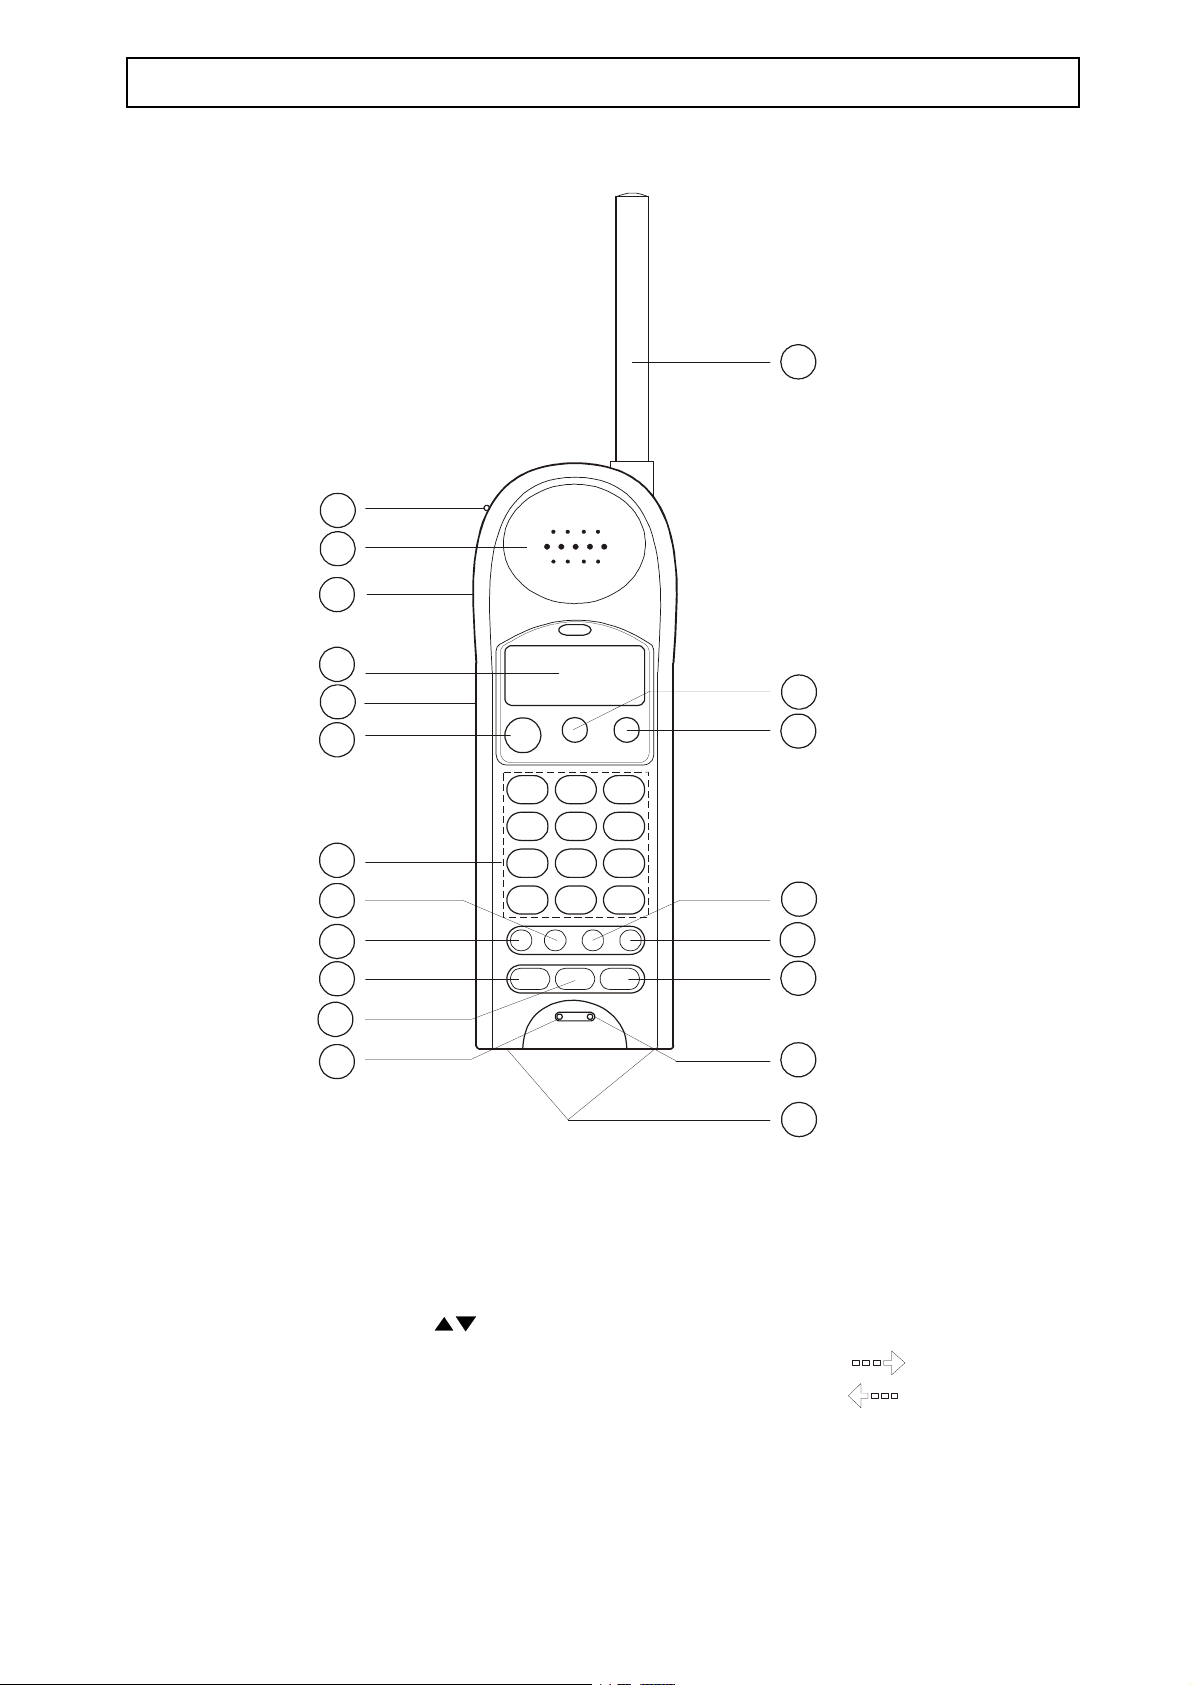
HANDSET FUNCTIONS
20
1
2
3
4
5
6
19
18
2
7
8
9
10
1
ABC
4
JKLGHI
7
TUVPQRS
*
3
DEF
5
6
MNO
8
9
WXYZ
0
#
17
16
15
11
12
14
13
1. New call/message indicator 11. Esc/Delete button
2. Earpiece 12. Microphone
3. Headset connector 13. Charging contacts
4. LCD display 14. Ringer
5. Volume/Scroll Control( ) 15. Menu button
6. Talk button 16. Recall (edit/view)
7. Keypad digits 17. Scan (edit/view)
8. Mem/OK button 18. Intercom button
9. Redial/Pause button 19. Caller Display/Answering System button
10.Call waiting button 20. Aerial
1
Page 4
AUDIOLINE FF895-2 INSTALLATION
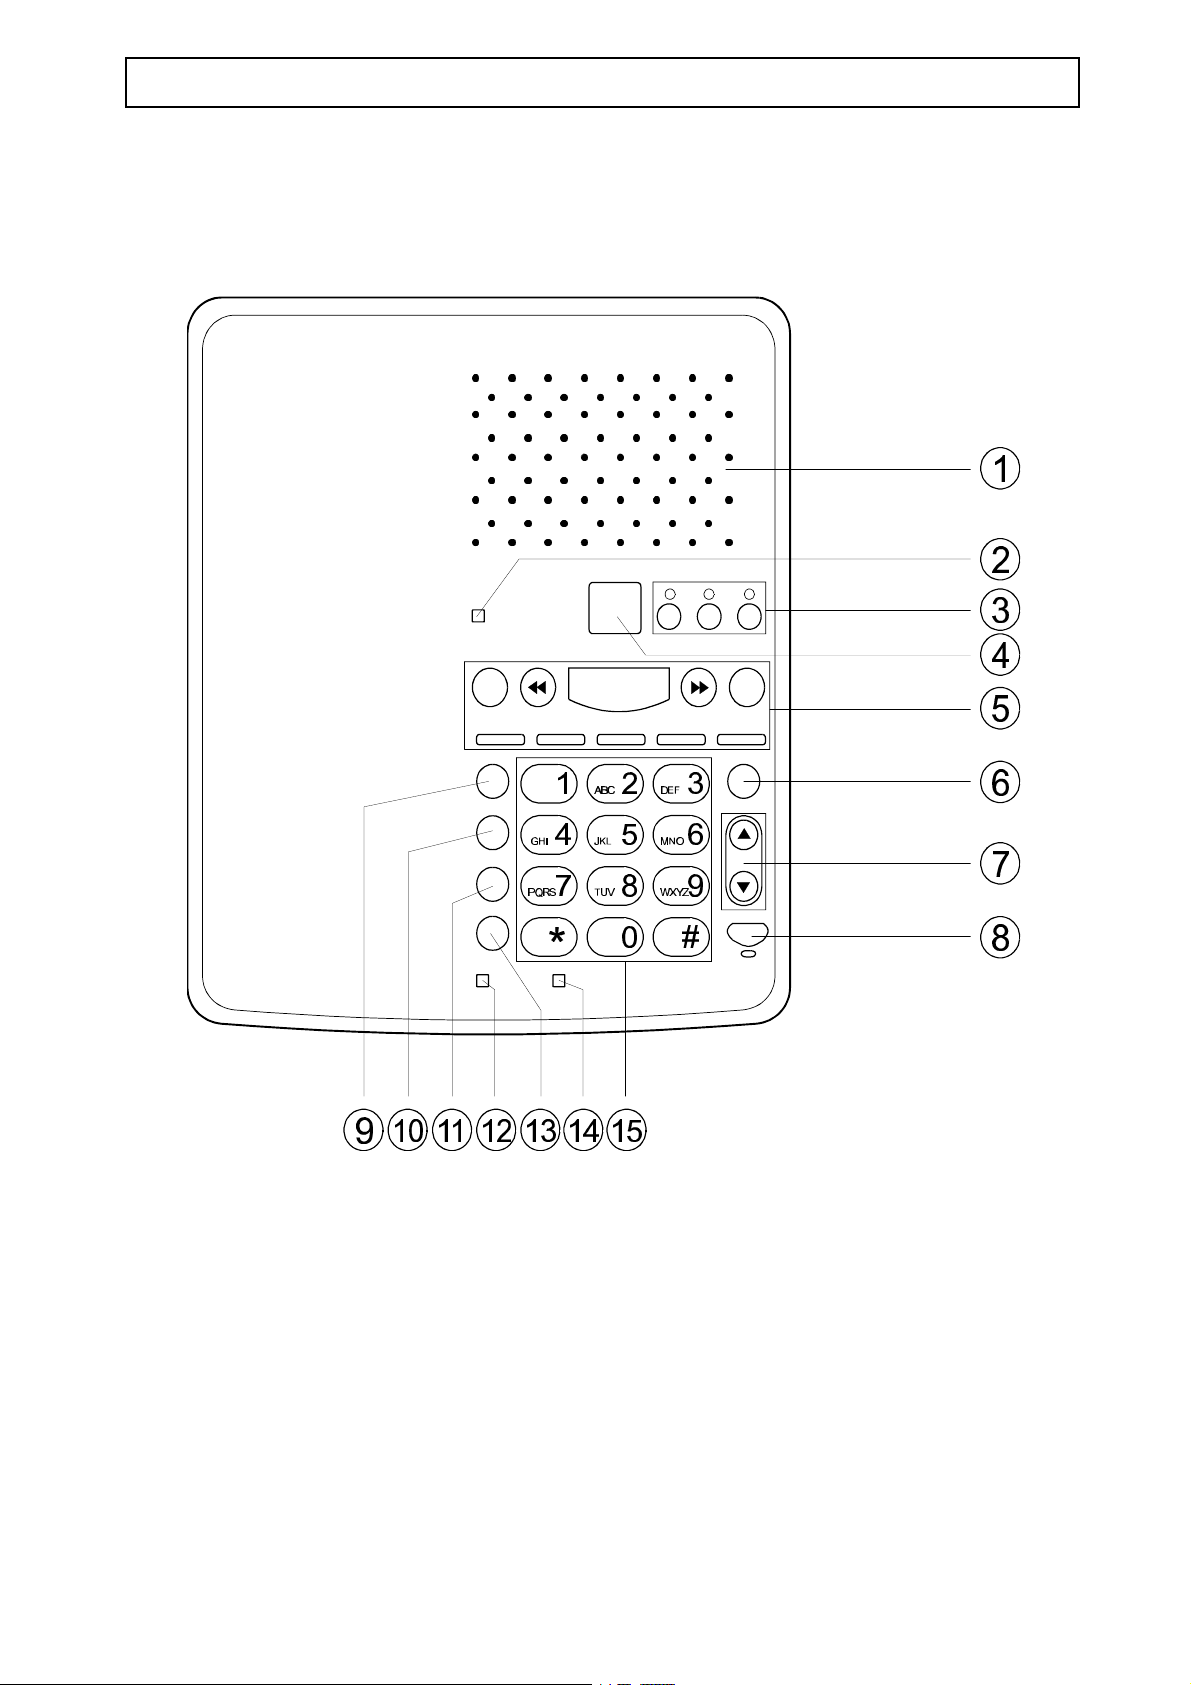
BASE UNIT FUNCTIONS
1. Loud speaker 9. Call waiting button
2. New call/message LED 10. Memory button
3. Mailboxes M1-3 11. Recall button
4. Display 12. In use LED
5. TAM controls 13 Redial/Pause button
6. Intercom button 14. Charge LED
7. Volume control 15. Keypad digits
8. Speakerphone button
2
Page 5

INSTALLATION AUDIOLINE FF895-2
PARTS LIST
In the box you should find the following items:
# Handset • Line cord and adaptor plug
# Base unit • User guide
# NiMH battery (3.6V,600mA/H) • Belt clip
# AC Adaptor •• Wall mount bracket
POSITIONING THE BASE UNIT
It is essential for best performance of the telephone system that the base unit be
positioned properly in your home or office.
Place the base unit close to a telephone network socket and a 230/240 volt mains outlet.
If the range of operation between the handset and the base unit is not satisfactory, try
repositioning the base unit, but:
# Do not position the unit in direct sunlight, damp or high humidity locations.
# Do not position the unit close to: electrical equipment such as TV’s, computers,
fridges, etc., or close to radiators, metal pipes or window frames.
BASE INSTALLATION
Connect the power supply cord to the rear of the base unit and plug into the 230/240 volt
mains outlet.
The LED display on the base unit will count down from 06 to 00 as the system starts up.
The help menu is then heard, “HL” will display. When complete the display will show
“ - - ”.
You can press the or buttons to replay the help menu or press the [STOP]
button to stop the help menu.
If “Lo” shows in the display, back up batteries will need to be installed or replaced.
NOTE: Before installing or replacing the batteries in the base unit, disconnect the
line cord from the telephone.
3
Page 6

AUDIOLINE FF895-2 INSTALLATION
FITTING BACK-UP BATTERIES IN BASE UNIT
To install or change back-up batteries, do the following:
# Four “AAA” size 1.5v Alkaline batteries (not rechargeable type) are required. Note
these batteries are not supplied with the unit.
# Disconnect the line cord from the telephone.
# Locate battery compartment on underside of base unit.
# Insert blunt instrument into small square hole and prise cover gently open.
# Insert batteries observing correct polarity.
# Replace battery cover.
# Reconnect telephone cord.
HANDSET BATTERY INSTALLATION
To install or change the battery do the following:
# Remove the battery cover by applying gentle pressure to the rear of the handset and
slide downwards.
# Insert the battery (supplied), observing correct polarity and replace the battery
cover.
# Place the handset onto the base unit (face up or down) and leave for 14 hours. The
telephone should not be used during this time.
# Connect the telephone line cord to the rear of the base unit and plug into the
telephone network socket.
4
Page 7
INSTALLATION AUDIOLINE FF895-2
HANDSET BATTERY CARE
For maximum life from your battery, do the following:
# After initial charging the base unit must remain connected to the mains power.
# If the telephone is not to be used for a substantial period of time, i.e. holidays,
disconnect the mains power adaptor.
# When power is reconnected you must recharge the handset for 14 hours.
# To maintain optimum condition, discharge the batteries fully every 4 months, and
then recharge for 14 hours.
# The batteries will need replacing if there are signs of leakage, or the batteries will not
hold a charge for more than two hours.
NOTE: From new, the batteries after they have been installed, must be charged for 14
hours without interruption.
Use only AUDIOLINE approved cadmium-free Nickel Metal Hydride (NiMH)
rechargeable batteries. The guarantee will be invalid if any problems arise as a
result of the use of an incorrectly specified battery.
LOW BATTERY INDICATOR
When the handset battery is low, the battery indicator on the display will flash. It
is recommended that you recharge the handset batteries for 14 hours.
5
Page 8
AUDIOLINE FF895-2 TELEPHONE
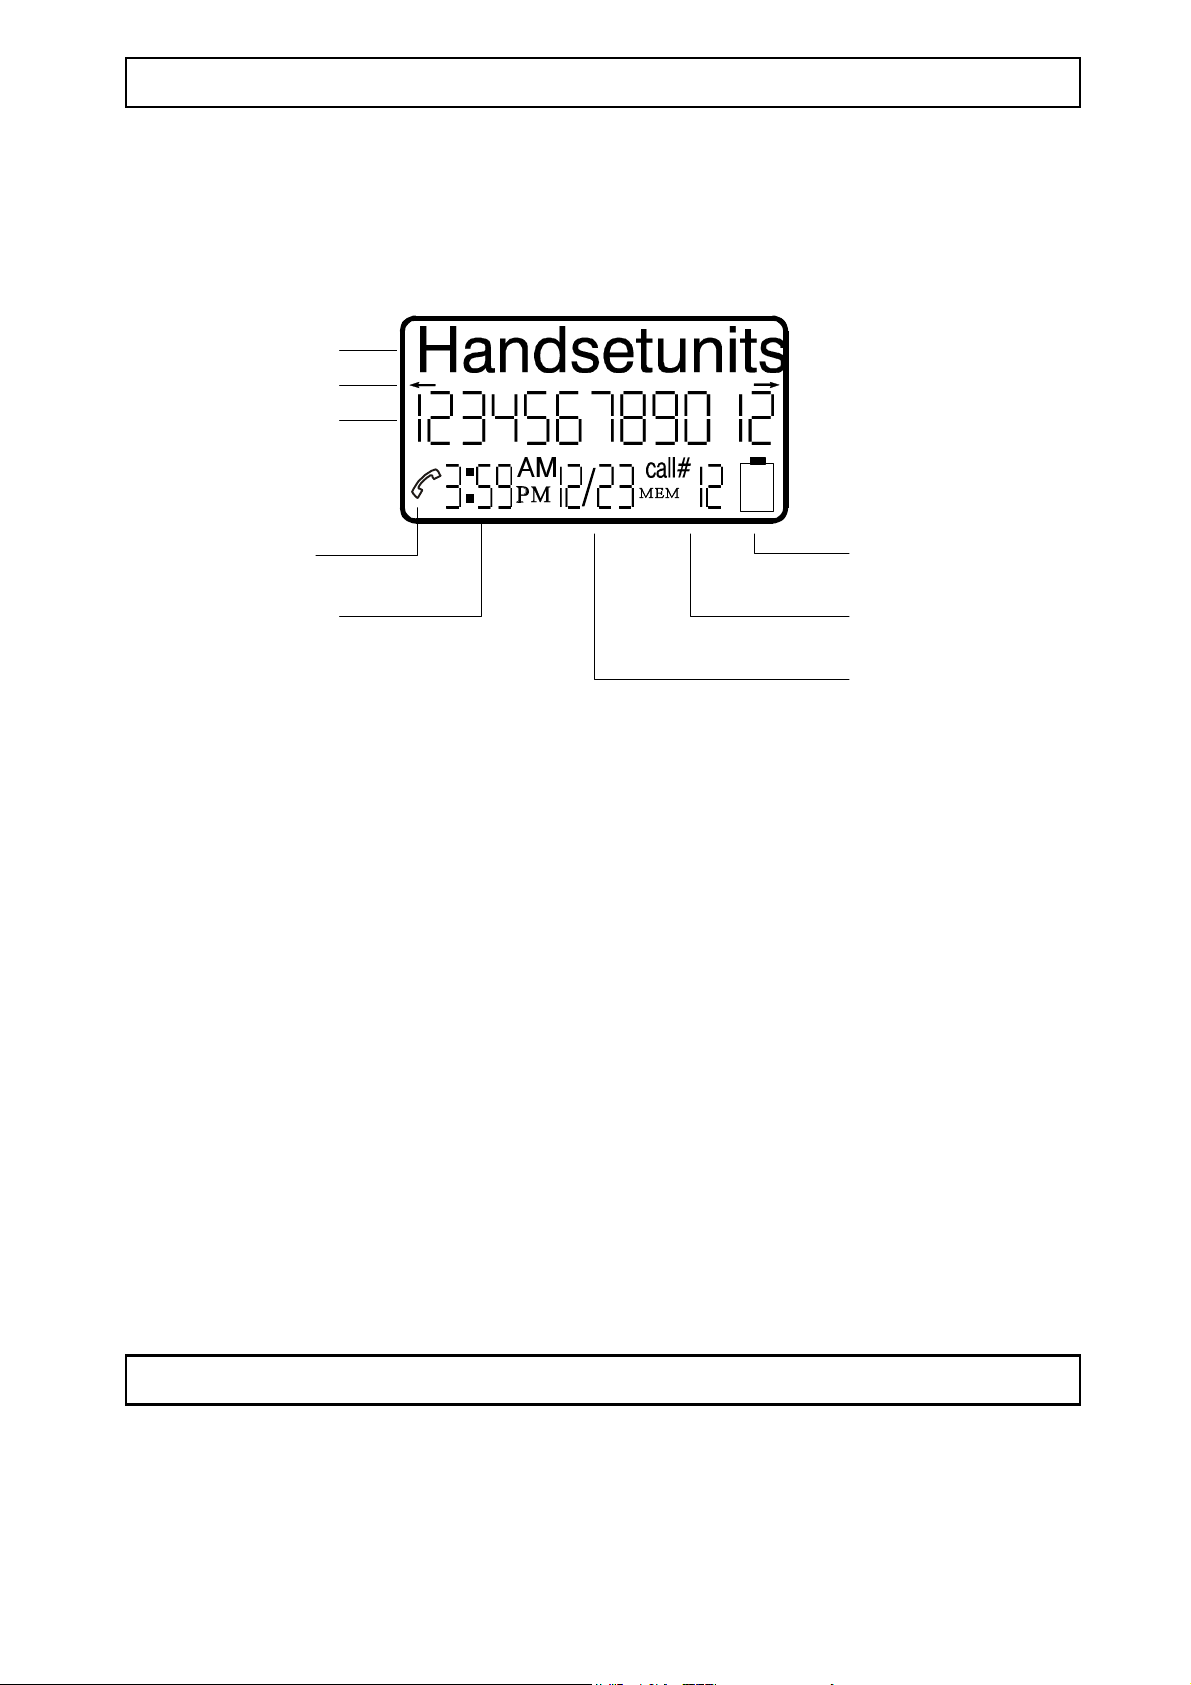
HANDSET DISPLAY
The diagram below shows the 3 lines of characters of the handset display
12 characters
Arrows
12 digits
Line icon Low battery
Time Memory location
Date
Arrow left/right - is ON - when there is more information to view.
Line icon - is ON - when a call is in progress.
Low battery - flashes - when battery needs to be charged.
HANDSET SETUP
If the handset displays "No Access!!!" it cannot be used. Please do the following:
Note: The handset battery must be charged.
## Replace the handset on the base unit (not the charger POD).
## When the display shows "Setup OK" please enter the handset number (1-4). The
handset default number is 1. Enter handset number, a confirmation beep will be heard.
The display then shows “Ringer On” and the number of the handset that was set.
# If the display does not show “Setup OK” ensure that the base unit is standby mode,
lift the handset momentarily and wait for 7 seconds. The display should now show
“Set up OK”. The system is now ready to use and is in the standby mode.
NOTE: Do not use same handset number on more than one handset.
6
Page 9

TELEPHONE AUDIOLINE FF895-2
STANDBY MODE
When the handset is not in use (standby mode) the
display will show the handset identity number and the
ringer status.
NOTE: The display will turn off after a period of time
(screen saver function)
MAKING A CALL WITH THE HANDSET
There are two ways to make a call.
Method 1
# Dial the telephone number that you wish to call (the number will be visible on the
display). If you dial an incorrect digit, press the [ESC/DELETE] button to erase the
digit. To erase a complete number, press and hold the [ESC/DELETE] button.
## Press the [TALK] button (the number will be dialled automatically).
## To terminate the call, press the [TALK] button.
Method 2
## Press the [TALK] button.
## Dial the telephone number (the number will be visible on the display).
## To terminate the call, press the [TALK] button.
.
7
Page 10

AUDIOLINE FF895-2 TELEPHONE
MAKING A CALL WITH THE SPEAKERPHONE
If you wish to make a call using the base unit do the following:
# Press the [SPEAKER] button and wait for dial tone (“SP” will show on the display)
# Dial the telephone number. When the number answers, speak using the microphone
on the base unit.
# To terminate the call, press the [SPEAKER] button.
SPEAKERPHONE VOLUME
You can change the volume of the speakerphone by pressing the Volume UP or Volume
DOWN control buttons on the base unit (the display will show "00" for the lowest setting
and "15" for the maximum setting).
SPEAKERPHONE MUTE
If you wish to converse with a third party privately simply press the [MUTE] button. Press
the [MUTE] again to continue the conversation (“SP”will flash in the display and a beep
will be heard every 15 seconds).
ANSWERING INCOMING CALLS
When an external call is received, the base unit will ring first and the in-use LED will
flash.
# If the handset is on the base unit, you will be connected automatically with your caller
as soon as the handset is lifted. To finish the call, replace the handset on the base unit
or press and release the [TALK] button (APO function must be on). See Page 21.
# If the handset is off the base unit, press the [TALK] button when the handset rings. To
terminate the call, press the [TALK] button or place the handset on the base unit.
# You can also answer the incoming call on the speakerphone by pressing the
[SPEAKER] button on the base unit. To terminate the call press the [SPEAKER] button
again.
8
Page 11

TELEPHONE AUDIOLINE FF895-2
CALL TIMER
The length of time taken for outgoing or incoming calls is displayed on the display shortly
after a call is connected.The total time spent on a call will be indicated on the display at
the end of the call.
LAST NUMBER REDIAL
The last number dialled is stored automatically in the memory. To recall a number do the
following:
# Press the [REDIAL] and then the [TALK] button or the [TALK] button and then the
[REDIAL] button. The number will be dialled automatically.
EARPIECE VOLUME CONTROL
The volume level in the earpiece can be increased or decreased in four levels using the
or arrows (located on the side of the handset) during a call. The display will
show the selected level.
RANGE WARNING
If you are on a call using the handset and move out of range of the base unit, the sound
quality in the handset earpiece will de-grade and the out of range alarm will be heard.
You should move back into range of the base unit to regain good sound quality.
PAGE/FIND HANDSET
To page a handset, or locate a missing handset, press the [INTERCOM] button on the base
unit. The handset will ring for approximately 30 seconds.
To stop this action, press the [INTERCOM] button again on the base unit, or the
[INTERCOM] on the handset.
9
Page 12

AUDIOLINE FF895-2 MEMORY NUMBERS
MEMORY NUMBERS
30 of your most frequently used names and telephone numbers can be stored in the direct
memory. Storing of numbers should be done via the handset/s, the numbers are then
automatically stored in the base unit.
To store names and numbers in the memory use the character table below and follow the
instructions on page 11.
CHARACTER TABLE
Key Character
1 [SPACE] & + ( ) , - . / 1
2 A B C a b c 2
3 D E F d e f 3
4 G H I g h i 4
5 J K L j k l 5
6 M N O m n o 6
7 P Q R S p q r s 7
8 T U V t u v 8
9 W X Y Z w x y z 9
* *
0 0 +
# #
10
Page 13

MEMORY NUMBERS AUDIOLINE FF895-2
STORING MEMORY NUMBERS/NAMES
To store names and numbers in memory do the following:
## Press the [MENU] button on the handset, the display will show “Store Mem”.
## Press the [MEM/OK] button.
## Dial the number you wish to store (max 24 digits). If you wish to insert a
pause in the number, press the [REDIAL] button.
If you insert an incorrect digit, you can edit the phone number by pressing the
and arrow buttons or delete with the [ESC/DELETE] button.
If you want to insert a recall to the memory press and hold the [RECALL] button.
# Press the [MEM/OK] button.
## To enter the name you wish to store, maximum 16 characters, refer to the character
table on page 10.
If you insert an incorrect character, you can edit the name by pressing the
left and right arrow buttons or delete with the [ESC/DELETE] button.
## Press the [MEM/OK] button.
## Press the numbers on the keypad to enter the location required (01-30).
A number location in the memory will be automatically selected if not entered.
## Press the [MEM/OK] button.
## Set the memory type (Normal, VIP or Block call) by pressing [MENU] and follow the
instructions on page 21.
## Press the [MEM/OK] button. The handset will return to stand-by.
NOTE: If the memory location selected has already been used the system will
prompt on the display “OVERWRITE??”. Press [MEM/OK] button to confirm or
press [ESC/DELETE] to cancel.
If you wish to exit memory programming at any time, press and hold
[ESC/DELETE] button.
When storing numbers, if a key is not pressed within 30 seconds the display will
time out and revert to standby mode.
11
Page 14

AUDIOLINE FF895-2 MEMORY NUMBERS
DIALLING MEMORY NUMBERS FROM THE HANDSET
To Search the memory for the number you wish to dial, do the following:
## Press the [MEM/OK] button twice and the first number stored in the memory will
appear on the display.
## If you know the memory location of the number you are calling then press the
appropriate keypad digits (01-30) or use the arrows or to select the required
memory location. If you need to view more information in the memory location scroll
across the display using the or arrow buttons.
## Press the [TALK] button (the number will be dialled automatically).
To search the memory by name, do the following:
## Press the [MEM/OK] button.
## Press the or arrows to review the memory (the first number stored will appear
on the display) or press the [MENU] button to select “name search”.
## Press the [MEM/OK] button to view the first name in the memory, or use the keypad
digits to input the first 2 letters of the name you are searching for.
## Press the [MEM/OK] button to select the memory.
## Press the [TALK] button and the number will be dialled automatically.
DIALLING MEMORY NUMBERS FROM SPEAKERPHONE
To dial memory numbers from the Speakerphone, do the following:
# Press the [MEMORY] button when the system is in the speakerphone mode(to enter
the speakerphone mode press [SPEAKER] button on the base unit). The display shows
“L-”.
## Using the keypad digits enter the memory location (01-30). The phone dials the
stored number.
12
Page 15

MEMORY NUMBERS AUDIOLINE FF895-2
EDITING/DELETING A MEMORY
To edit or delete a name or number from the memory do the following:
## Select the [MEM/OK] button and enter the memory location number(01 - 30 ) using
the keypad digits.
## Press [MENU] button until “Edit??” or “Delete??” appears.
## Press the [MEM/OK] button to start editing/deleting the data. The remainder of the
operation is the same as when storing memories (see page 11).
CHANGE A MEMORY CALL TYPE
To change a memory call type, do the following:
## Select a memory position using the operation described above, ie press the [MEM/OK]
button and enter the memory location using the keypad digits.
## Press the [MENU] button until “Set Mem Type” appears.
## Press the [MEM/OK] button.
# Press the [MENU] button to change the call type (Normal, VIP or Block call)
# Press the [MEM/OK] button to store the information.
NOTE: The different call types that can be selected to determine the type of ring
that the FF895-2 emits when the incoming call numbers have been programmed into
the dialling memories (refer to Menu Options on page 19).
MEMORY MATCH FUNCTION
If you receive a call from a phone number which is already stored in the dialling memory
(Normal, VIP or Block) the ringer sound will change according to the memory type,
normal ring for normal memory, a higher tone for VIP memory and no ringer for block
memory. See page 21 for more information.
The numbers stored into memories must be identical in format to the presentation of the
number sent by the network (for example the area code must be stored even for local
numbers and no spaces etc.).
NOTE: The memory match function will not work for “Out of Area” or numbers
that have been barred. Calls via PBX or from mobiles may also not display CND
information.
13
Page 16

AUDIOLINE FF895-2 CALLING NUMBER DISPLAY
CALLING NUMBER DISPLAY
Calling Number Display allows you to see who is calling before you answer a call and
to see who has called in your absence. The FF895-2 will also allow you to see who is
calling while you are on a call.
Type 1 - When the Calling Number Display is enabled on your telephone line, your
telephone will ring, between the first and second ring the number of the incoming caller
will appear on the display and the “new message” LED will light.
Type 11 - While on a call and the call waiting tone is heard, the speech path will be
muted to allow the number data to be transmitted from the network. After this short mute
period, when the speech path is reopened you can view the caller’s number on the
handset screen.
Up to 30 incoming call numbers can be stored in the call log. When the log is full, the
oldest number will be deleted automatically.
Caller's name*
Caller's phone number
The date and time received
*Presentation of the name depends on the telephone network. This service is not currently
available in Australia.
It is not possible to view the call list and take a new call at the same time.
NOTE: Calling Number Display is an optional telephone network service. This
telephone will display Calling Number Display information provided the service is
available on the telephone Network and the subscription is fulfilled. Check with your
telephone Network operator for full details. If the Calling Number Display service is
not implemented on your telephone line, incoming call information will not be
displayed, you will view “CALL” in the display.
If the handset is registered to a different base unit, any information in the call log will
be lost.
14
Page 17

CALLING NUMBER DISPLAY AUDIOLINE FF895-2
VIEWING CND NUMBERS
The new call/message LED on the base unit and the handset will flash when a new
incoming call has been stored in the call log and not yet reviewed. Once the log has been
reviewed the indicator will stop flashing. To view the call log do the following:
## Press the [CALLER DISPLAY/ANSWERING SYSTEM] button the handset will beep.
The display will show the number of new calls and the total number of calls.
Example:
A total of 12 calls 7 NEW calls in the call log
in the call log
## Press the or arrows to review the log. When an incoming call is received it
is automatically assigned a call sequence number which appears on the right hand
side of the display, commencing with 01 (oldest) and up to 30 (latest).
## If either of the scroll arrows are flashing in the display, they indicate
additional information is accessible. Use or arrow buttons to access
the information.
## Press the or arrows to view previous/next call in the log.. If the number is
a new number the text "call #" will flash.
## To terminate the review procedure, press the [CALLER DISPLAY/ANSWERING
SYSTEM] button again.
15
Page 18

AUDIOLINE FF895-2 CALLING NUMBER DISPLAY
The display will also provide the following information:
End of List The list has been reviewed to the oldest
number
Top of List The list has been reviewed to the newest
number
Out of Area Call information is not available. It could
be an international call or from a PBX.
Private The caller has withheld their number
(barred).
Call Waiting A call from another telephone number is
waiting. In most cases this service
requires a subscription.
Mess.Waiting There is a message waiting. This
information is available only with
compatible telephone network services.
Mobile The call is from a mobile telephone.
Payphone This may be displayed depending on the
telephone network.
SAVING A CND INTO DIALLING MEMORY
The caller's name (if available) and phone number from the CND log can be stored into
the dialling memory. To store this information do the following:
## Ensure the number you want to save is on the display (use the or buttons
to select).
## Press the [MENU] button until the display shows "Edit??".
## Press the [MEM/OK] button. The remainding process is the same as the store memory
operation (refer to store memory operation on page 11).
16
Page 19

CALLING NUMBER DISPLAY AUDIOLINE FF895-2
DELETING A NUMBER FROM THE CND LOG
To delete a number from the CND log do the following:
## Press the [CALLER DISPLAY/ANSWERING SYSTEM] button, you will hear a beep,
use the or arrows to select the number you wish to delete.
## Press the [MENU] button until the display shows "Delete??".
## Press the [MEM/OK] button. The number will be deleted.
DELETING ALL OLD NUMBERS FROM THE CND LOG
To delete all old numbers from the CND log, do the following:
# Press the [CALLER DISPLAY/ANSWERING SYSTEM] button, you will hear a beep
when entering CND mode.
## When the CND numbers are displayed (old and new), press [MENU] button to select
"Del.all Old?".
## Press the [MEM/OK] button, all old phone numbers will be erased.
DIRECT DIALLING FROM THE CALL LOG
To dial any of the numbers stored in the call log quickly and easily do the following:
# Press the [CALLER DISPLAY/ANSWERING SYSTEM] button, you will hear a beep,
when entering the CND mode.
## Ensure the number you want to dial is present on the display. Use the or
arrows to select the number you wish to dial.
## Press the [TALK] button, the number will be dialled automatically.
17
Page 20

AUDIOLINE FF895-2 CALLING NUMBER DISPLAY
PLAYBACK INCOMING MESSAGE(ICM) WITH CND
To playback an incoming message that has been stored in the call log do the following:
## Press the [CALLER DISPLAY/ANSWERING SYSTEM] button, you will hear a beep,
when entering CND mode. Ensure that the number associated with the message you
want to hear is shown in the display. If there is an ICM together with the current
CND, the display shows “Incom. Mess”.
## To play the message press digit 5 (MESSAGE) on the keypad. You can adjust the
volume with the or arrows.
## To stop the message press digit 3 (STOP) on the keypad and to hear the message
again press digit 4 [ ] on the keypad.
# To skip the current message digit 6 [ ] on the keypad.
NOTE: During playback if the ICM is longer than 30seconds, you will need to
press digit '5' before the 30second limit to continue, otherwise the unit will return to
standby mode.
18
Page 21

MENU OPTIONS AUDIOLINE FF895-2
MENUS
The FF895-2 has a comprehensive menu system. Four methods are used to access the
menu information. They are:
# The [MENU] button allows you to enter the menu.
# The and arrows allow you to scroll through the various sub menus.
# The [MEM/OK] button confirms the menu group setting.
# The [ESC/DELETE] button returns the handset to standby mode.
MAIN MENU
In the main menu there are twelve menu options:
Store Mem => Set Ringer => Last Call => Set VIP act. => View VIP => Set BLK
Act.=> View BLK => Set A.P.O => Set CW/CID => Blk Private => MessWait Rst
=> Set HS code.
From new, the handset is pre-programmed. If you wish to change any of the settings suc h
as the ringer level or HS code, see pages 20 to 23.
ENTER MENU
To enter the menu, do the following:
# Press the [MENU] button.
# Using the and arrows, scroll through the various options as listed in the
previous paragraph and follow the instructions.
NOTE: When using the menu, if a key is not pressed within 30 seconds the display
will time out and revert to standby mode.
19
Page 22

AUDIOLINE FF895-2 MENU OPTIONS
SET HANDSET RINGER
This menu option allows you to select the handset ringer on or off. To set the ringer do
the following:
# In the menu use the and arrows to select “Set ringer” in the display
# Press the [MEM/OK] button.
# Press [MENU] to select ringer on/off.
# Press the [MEM/OK] button.
SET BASE RINGER LEVEL
Four levels can be selected.
With system in standby mode, press and hold Vol. or Vol. to see the setting.
Press again to change the base ringer level.
Display Setting
r0
r1
r2
r3
off
low
normal
high
LAST CALL
This main menu option enables you to view the duration of the last call.
# Press the [MENU] button and use the or arrows to ensure “Last Call” is
visible in the display.
# Press the [MEM/OK] button. The display will show the last call duration for 10
seconds.
20
Page 23

MENU OPTIONS AUDIOLINE FF895-2
SET VIP
To enable you to activate or deactivate the VIP call function, do the following:
# Press the [MENU] button and use the or arrows to ensure “Set VIP Act”
is visible in the display.
# Press the [MEM/OK] button.
# Press [MENU] button to select VIP on/off.
# Press the [MEM/OK] button.
SET BLOCK
To enable you to activate or deactivate the “block call” function, do the following:
# Press the [MENU] button and use the or arrows to ensure “Set Blk Act”
is visible in the display.
# Press the [MEM/OK] button.
# Press [MENU] button to select block on/off.
# Press the [MEM/OK] button.
SET AUTO PHONE ON (APO)
To enable you to activate or deactivate the Auto Phone On function do the following:
# Press the [MENU] button and use the or arrows to ensure “Set A.P.O” is
visible in the display.
# Press the [MEM/OK] button.
# Press [MENU] button to select APO on/off.
# Press the [MEM/OK] button.
With APO function active there is no need to press the talk button when lifting the
handset from the base unit on an incoming call, the handset is automatically “ON”.
21
Page 24

AUDIOLINE FF895-2 MENU OPTIONS
SET CALL WAITING WITH CND (CW/CID)
To enable you to activate or deactivate the Call Waiting with CND function (Type 11),
do the following:
# Press the [MENU] button and use the or arrows to ensure “Set CW/CID”
is visible in the display.
# Press the [MEM/OK] button.
# Press [MENU] to select CW/CID on/off.
# Press the [MEM/OK] button.
If you do not subscribe to CND Service provided by your network operator, it is
advisable to turn this function “OFF”.
BLOCK ALL WITHHELD CND
To enable you to activate or deactivate the block "private" on/off function, do the
following:
# Press the [MENU] button and use the or arrows to ensure “Blk Private” is
visible in the display.
# Press the [MEM/OK] button.
# Press the [MENU] to select block "private" on/off.
# Press the [MEM/OK] button
With this function active, incoming calls with no CND information will be directed to
the answering machine and the phone will not ring (answering machine must be on)
MESSAGE WAITING RESET
To enable you to reset the Message Waiting display, do the following:
# Press the [MENU] button and use the or arrows to ensure “Mess Wait
Rst” is visible in the display.
# Press the [MEM/OK] button.
# Wait for the handset to update, “updating” is shown in the display.
# The handset will return to standby and the “Message Waiting” indication will
disappear.
22
Page 25

MENUS AUDIOLINE FF895-2
SET HANDSET NUMBER
To enable you to change the handset number, do the following:
# Ensure that the handset number is only used for one handset.
# Press the [MENU] button and use the or arrows to ensure “Set HS Code”
is visible in the display.
# Press the [MEM/OK] button, display shows “Enter HS No!”.
# Press 1, 2, 3 or 4 to select the new handset number. The handset goes back to standby
and the new number appears.
VIEW VIP/BLOCK CALL
To enable you to view memory, do the following:
# Press the [MENU] button and use the or arrows to ensure “View VIP or
View Blk” is visible in the display.
# Press the [MEM/OK] button until the memories are displayed.
# Use the or arrows to review the entries.
OPTIONS
# Press [TALK] button to call the viewed number.
# To EDIT or DELETE an entry follow the instructions on page 13.
23
Page 26

AUDIOLINE FF895-2 ADDITIONAL FEATURES
2-WAY RECORDING
The FF895-2 offers a 2 way Record option (maximum 3 minutes). To switch it on, do the
following:
# Press [CALLER DISPLAY/ANSWERING SYSTEM] button during conversation.
# The recording will start after the beep, and the display will show "Record On" and
then "*REC 00.00".
# Press [CALLER DISPLAY/ANSWERING SYSTEM] button again to stop the 2-way
recording.
CALL SCREENING
When a call is in progress on the base unit speakerphone it's possible to listen to it from
the handset. To listen in do the following:
# Press and hold [CALLER DISPLAY/ANSWERING SYSTEM] button when handset is in
standby mode.
# When the base is in auto answer mode, the display will show “Call Screen”, then the
handset is able to listen to the call on the handset.
# If you wish to talk to the caller via the handset simply press the [TALK] button.
# Press the [CALLER DISPLAY/ANSWERING SYSTEM] button again to exit the call
screening function. The handset will return to stand-by.
GROUP LISTENING
A conversation between the handset and the caller can also be heard from the
speakerphone. To activate this feature do the following:
# Press and hold [CALLER DISPLAY/ANSWERING SYSTEM] button during the
conversation, group listening will commence after the beep and the LCD shows
“Grp.Lis.On”.
# Press and hold [CALLER DISPLAY/ANSWERING SYSTEM] button again to exit from
this function.
24
Page 27

ADDITIONAL FEATURES AUDIOLINE FF895-2
CHANNEL SELECT
It is possible to optimise the call quality during a call. To change operating channel do the
following:
# Press the [SCAN] button during conversation.
# The display will show "Scanning..." and the search for a clearer channel will
commence. The display will show “Scan OK!!” if a clearer channel is selected.
# The telephone conversation will be briefly interrupted during the search, however the
call will be resumed when a clearer channel is found.
25
Page 28

AUDIOLINE FF895-2 HANDSET REMOTE CONTROL
HANDSET REMOTE CONTROL
The base unit telephone answering machine (TAM) can be remotely controlled through
the handset.
Press the [CALLER DISPLAY/ANSWERING SYSTEM] button for several seconds to enter
the handset remote mode. Refer to the keys below to control the TAM.
HANDSET REMOTE CONTROL FUNCTIONS
To Press
Access general mailbox *0
Access mailbox 1 *1
Access mailbox 2 *2
Access mailbox 3 *3
Playback message 51
Playback new message 52
Stop current message 3
Skip current message 6
Repeat current message 4
Playback OGM1 11
Playback OGM2 21
Record a new OGM1* 12 start recording after beep
Record a new OGM2* 22 start recording after beep
Turn on/off the answering function 8 the system will announce if the status is on/off
Record memo* 7 start recording after beep
Delete message being played back 9 during message playback
Delete all old messages 99 when system is idle
Exit line remote control Caller Display/Answering System
* When the recording is complete press digit number 3 to stop the recording.
When digit 3 is pressed on the OGM record the recorded message will automatically play.
26
Page 29

AUDIOLINE FF895-2 BASE UNIT FUNCTIONS
SETTING THE CLOCK
It is necessary to set the internal clock in the system to the current time. To set the time
do the following:
# Press and hold the [TIME] button until a long beep tone is heard.
# The system will state the weekday currently set. Press [REPEAT] or [SKIP] buttons to
select the day of the week or hold down to automatically advance/reverse.
# Press and release the [TIME] button to set.
# The system will state the hour currently set. Press [REPEAT] or [SKIP] buttons to
select the hour of the day or hold down to automatically advance/reverse.
# Press and release the [TIME] button to set.
# The system will state the minute currently set. Press [REPEAT] or [SKIP] buttons to
select the minute of the hour or hold down to automatically advance/reverse.
# Press and release the [TIME] button again and the clock is set to the current time.
The unit will reset after 20 seconds if no buttons are pressed.
NOTE: The first incoming CND call that leaves a message on the answering
machine will set the correct time, however, it will not set the day, this must be done
manually.
27
Page 30

BASE UNIT FUNCTIONS AUDIOLINE FF895-2
RECORD AN OUTGOING MESSAGE (OGM)
Two outgoing messages can be recorded for each of the mailboxes,
General mail box
Mailbox 1
Mailbox 2
Mailbox 3
As well as the general mailbox a further 3 mailboxes are available for individual users to
receive messages. If you decide to use the mailboxes, your OGM to the callers must
inform them on how to access the appropriate mailbox. A typical message would be:-
“Hello this is the Smith Household. If you wish to leave a general message speak after
the tone. If you wish to leave a message for Adrian press *1 now, if you wish to leave a
message for Marlene press *2 now, if you wish to leave a message for Janelle press *3
now. Thank you for calling.”
MAILBOX SELECTION
When none of the special mailboxes, M1 - M3 are selected you are automatically in the
general mailbox. To access the mailboxes M1 - M3, do the following:
# Press the required mailbox button, eg M1. When selected, the mailbox LED will
light.
# Press [STOP] button to go back to the general mailbox.
TO RECORD OGM’S
To record OGM1 or OGM2 in a mailbox, press the required mailbox button (eg. Mailbox
1, Mailbox 2, Mailbox 3) then follow instructions below.
To record the message (OGM1) do the following:
# Press and hold the [OGM1] button until a long beep tone is heard.
# State your message clearly (maximum 30 seconds).
# To stop recording, press the [STOP] button. The system will then playback the
message for you to check it.
28
Page 31

AUDIOLINE FF895-2 BASE UNIT FUNCTIONS
To record the message (OGM2) do the following:
# Press and hold the [OGM2] button until a long beep tone is heard.
# State your message clearly (maximum 5 minutes).
# To stop recording, press the [STOP] button. The system will then playback the
message for you to check it.
NOTE: If no buttons are pressed for 7 seconds the unit will revert to standby.
The OGM2 message should state that there is no space left in the answering
machine memory for any more messages. OGM2 is used when the memory is full
and also in “announce only” mode.
OGM PLAYBACK
To listen to the outgoing messages that are recorded in the answering machine, do the
following:
TO PLAY OGM1
OGM1 will playback unless the message memory is full.
# Press the [OGM1] button to listen to the OGM1.
# To stop the message, press [SKIP] or [STOP] buttons.
# To pause the message, press [PLAY] button. To resume press [PLAY] button again.
# To erase, press [ESC/DELETE] button.
TO PLAY OGM2
When the memory is full, or when “announce only” mode is selected, OGM2 will play.
OGM2 informs the caller that the memory is full.
# Press the [OGM2] button to check the OGM2.
# To stop the message, press [SKIP] or [STOP] buttons.
# To pause the message, press [PLAY]. To resume press [PLAY] button again.
# To erase, press [ESC/DELETE] button.
NOTE: The pre-recorded messages will be played if you have not recorded your
own OGM’s.
29
Page 32

BASE UNIT FUNCTIONS AUDIOLINE FF895-2
BASE UNIT BUTTONS AND LEDS
Key Function
MAILBOX Access mailbox
TIME Set/Check/Confirm time
REPEAT/REW Playback current message again or play last message, reverse setting, help menu,
silence mode off
PLAY/PAUSE Playback message/Pause playback
SKIP Skip current message, advance setting, help menu, silence mode on
DELETE Delete message/all messages
OGM1 Playback or record outgoing message 1
OGM2 Playback or record outgoing message 2
STOP/ON/OFF Stop current message, answering machine on/off
Remote security code setting
MEMO Memo recording
MUTE Mute mic in speakerphone mode
0 - 9, *, # 12 digits dialling keypad
CALL WAITING Pre-programmed memory
MEMORY Programming mode and memory dialling
RECALL Flash time 100 ms
REDIAL Last number redial
INTERCOM Page/Find handset, intercom function, call transfer
VOLUME Increase/decrease the speaker volume and base ringer volume
SPEAKER Speakerphone
LED Function
NEW CALL Flashing indicates new message in GENERAL mailbox or new CND
/MESSAGE
MAILBOX 1-3 ON - indicates mailbox is selected, FLASH - fast means new message
FLASH - slow means old message
IN USE ON - indicates handset in-use
FLASH - slow means paging, line hold, call transfer
FLASH - fast means incoming call
CHARGE ON - indicates when handset is on the base cradle
SPEAKER ON - indicates when speaker phone is on
FLASH when speaker phone hold/paging
30
Page 33

AUDIOLINE FF895-2 BASE UNIT FUNCTIONS
ANSWERING MACHINE ON/OFF
To switch the machine ON/OFF, do the following:
# In standby mode press and release the [STOP] button to turn the answering machine
on/off. The system will announce “answering functions are ON/OFF”. The display
will indicate “- -” if it is switched off.
ANSWERING MODE SELECTION
To change the answering mode, do the following:
# Press the [STOP] button to turn on the answering machine.
When the display shows the current answer mode, press Vol . or Vol to select
a different answer mode.
If the display shows --, the answering machine function is off.
If the display shows 3r, the answering machine will answer after 3 rings.
If the display shows 6r, the answering machine will answer after 6 rings.
If the display shows “AO”, it indicates announce only mode is on and the caller will
hear the OGM2 which will tell them that the message memory is full.
“Announce only” can only be selected when OGM2 is recorded.
If the display shows “tS”, toll saver is selected and the answering machine will start
after 3 rings (4 rings if CND is associated) if there are new messages recorded. If
there are no new messages, the machine will start after 6 rings (7 rings if CND is
associated)..
SILENCE MODE SELECTION
When the telephone is in auto answer you can hear the OGM and the caller’s message
through the base speaker. To turn off the sound do the following:
# Press the [SKIP] button to turn ON the silence mode, display shows “Si”.
# Press the [REPEAT] button to turn OFF the silence mode.
31
Page 34

BASE UNIT FUNCTIONS AUDIOLINE FF895-2
INCOMING CALL
If the handset is picked-up during the automatic answering mode, the answering system
returns to standby automatically, and you can answer the call normally. If you pick up an
alternative telephone you can disconnect the answering machine by pressing the [#]
button.
MESSAGE PLAYBACK
To playback the messages in any of the mailboxes, do the following:
# Select the mailbox you wish to playback(either the new or all messages). The display
will always show the message number.
# Press the [PLAY] button to play all messages.
# Press and hold [PLAY] for one second to play new messages.
# Press the [STOP] button to stop the playback.
# Press the [SKIP] button to advance to the next message.
# Press the [REPEAT] button to repeat the current message.
# Press and hold the [REPEAT] button to rewind to the previous message.
# Press the [PLAY] button to pause the playback, press again to resume.
# Press the [DELETE] button to erase the current message.
MEMO RECORDING
Instead of writing notes on paper you can inform your office/family by recording a memo.
The family or office staff can access the memo to get your message.
To record a memo message do the following:
# Press and hold the [MEMO] button until a beep is heard.
# Record your memo.
# When you have finished, press the [STOP] button.
DELETE ALL OLD MESSAGES
To delete all old messages after you have listened to them do the following:
# Press the [DELETE] button once, the display will show “EA” press again and hold to
confirm the deletion of all messages.
# The system will announce message/s erased, new messages will not be deleted.
32
Page 35

AUDIOLINE FF895-2 BASE UNIT FUNCTIONS
BASE UNIT LED INDICATIONS
AS answering mode rO base ring off
- - answering function off r1,2,3 base ringer low/med/high
0 answering function on Lo low battery in base
AO announce only Si silence mode
tS toll saver HL help menu
3r answering mode, 3 rings PA playback pause
6r answering mode, 6 rings HS handset remote access
A1 OGM 1 PG page
A2 OGM 2 Ph line in-use
nE memo record In intercom
CL clock setting EA delete
Pr memory mode cd CND mode
Or recall memory programming GP group listening
Op pause memory programming [ ] ringing indicator
L- memory location Tr transfer
PS security code 2u 2 way recording
SP speaker on
33
Page 36

REMOTE ACCESS AUDIOLINE FF895-2
REMOTE ACCESS CODE
When you are away from your home or office and you wish to get your messages, you
can ring your home or office number and enter a code to access your machine.
The access code is a 3 digit number (the default code is 123).To change the remote access
code to a personalised one do the following:
# When the system is in standby, press and hold the [STOP] button until the first digit
is announced.
# Press the [SKIP] or [REPEAT] button to step to the first digit of the security code.
Or press and hold the [REPEAT] or [SKIP] buttons to automatically advance to the
number you wish.
# Press the [STOP] button to confirm the first digit.
# The phone now announces the second digit.
Press [SKIP] or [REPEAT] button to step to the second digit of security code.
Or press and hold the [REPEAT] or [SKIP] buttons to automatically advance to your
chosen number.
# Press the [STOP] button to confirm the second digit.
# The phone now announces the third digit.
Press [SKIP] or [REPEAT] button to step to the third digit of security code.
Or press and hold [REPEAT] or [SKIP] to automatically advance to the next number.
# Press the [STOP] button to confirm the third digit.
# The phone now announces all digits.
To disable remote control, enter 000 as the remote access code.
34
Page 37

AUDIOLINE FF895-2 REMOTE ACCESS
REMOTE ACCESS MODE
To enter the remote access mode, do the following:
# Call your phone from a tone dialling telephone.
# When you hear the greeting, enter the 3-digit security code (default is 123). As a safe
guard the system will only allow a max. of 10 digits to access the machine (no more
than 3 attempts).
# "Please enter next command" will be heard in the earpiece.
# Enter the control code within 10 seconds (from the table below).
# To exit the remote control mode, hang-up the phone or press the [#] button.
REMOTE CONTROL CODES
To Press
Access general mailbox *0
Access mailbox 1 *1
Access mailbox 2 *2
Access mailbox 3 *3
Playback message 51
Playback new message 52
Stop current message 3
Skip current message 6
Repeat current message 4
Playback OGM1 11
Playback OGM2 21
Record a new OGM1 12 start recording after beep
Record a new OGM2 22 start recording after beep
Turn on/off the answering function 8 the system announces if the status is on/off
Record memo 7
Delete message being played back 9 during message playback
Delete all old messages 99 when system is idle
Exit remote control #
NOTE: Approximately every 2 minutes during playback you will need to re-enter your security code.
35
Page 38

CALL TYPES AUDIOLINE FF895-2
INTERCOM CALL
It is possible to call between a handset and the base unit using the intercom function (this
is a free call). When there is more than one handset registered you can call each handset
from the base unit. (It is not possible to call between handsets). To use the intercom,
do the following:
# Press the [INTERCOM] button on either the base or handset. The unit starts to ring,
and “paging” will flash on the handset display.
# Answer the call by pressing the [INTERCOM] button.
# Press [INTERCOM] button again to finish the call.
TRANSFERRING CALLS
An external call can be transferred from one handset to the base unit or another handset
(the handsets must be registered to the same base unit and within operating range of the
base). Calls can also be transferred from the base unit to any registered handset.
HANDSET
## After answering an external call, press and hold the [INTERCOM] button until "Trans
to HS" appears in the display. This will put the caller on hold temporarily.
# Enter the identity number of the handset to which the call is to be transferred. 0 - 4,
where 0 is the number of the base unit/speakerphone.
# The call is now transferred and the handset returns to stand-by.
BASE UNIT
# After answering an external call, press and hold the [INTERCOM] button until “Tr”
appears in the display.
# Enter the identity of the handset to which the call is to be transferred (1- 4).
# The call is now transferred and the base unit returns to stand-by.
NOTE: If the handsets or base unit to which the call has been transferred, do not
take the call, it will transfer back to its point of origin. At this time, if the call is not
picked up, it will be disconnected after 20 seconds.
36
Page 39

AUDIOLINE FF895-2 CALL TYPES
SPEAKERPHONE LINE HOLD INTERCOM
When using the speakerphone on an external call it is possible to speak a handset user.
To do this:
## Press the [INTERCOM] button to page the handset and wait for handset response. The
external call will automatically be put on hold.
# When handset user presses the [INTERCOM] button, you will be able to speak while
the external call remains on hold.
# When you have completed your conversation with the handset user, press the
[INTERCOM] button on the base unit to exit the intercom mode, you will then return
to the external caller automatically.
CALL WAITING
Your telephone lets you take advantage of the Call Waiting service supplied by Telstra
in Australia.
With the call waiting service activated do the following:
# When a call comes in while you are on the phone, you will hear the Call Waiting
beeps.
# Press the [CALL WAITING] button on the handset or base unit. The first caller is put on
hold and you can talk to the second caller.
# To toggle between callers, simply press the [CALL WAITING] button again.
# Press the [TALK] button when you are finished.
With the Type 11 CND service (CW/CID) the speech path will be muted during the
transmission of the data from the network. This will last for 0.5-1second. During this
time, you cannot speak to or hear your caller and vica versa. THIS IS NOT A FAULT
WITH THE UNIT. (Refer to page 14 for more information).
37
Page 40

EXTENDING THE FF895-2 AUDIOLINE FF895-2
SYSTEM EXPANSION
The FF895-2 forms the basis of a multi-handset telephone system which will allow you
to:
# Purchase and use an additional 2 handsets for use with the same base unit (4 handsets
in total).
ADDITIONAL HANDSETS
If an additional handset is added to the system, the batteries must be charged for 14 hours
without interruption.
During the charging period the handset will beep, indicating that the registration
procedure (see page 6) must be performed prior to use.
The registration gives each handset a specific identity number, 1 to 4. This number is used
for the transfer of calls only. From new, the FF895-2 handset is already registered to the
base unit and has been allocated number 1. See “Set handset number” on page 23 for
more information.
NOTE: Do not use the same handset registration number on more than one handset.
38
Page 41

AUDIOLINE FF895-2 TROUBLESHOOTING
TROUBLESHOOTING
All cordless telephones are radio transmitters and receivers and as such are subject to
interference from a wide range of sources.
Re-siting of the base unit can improve reception substantially. An upstairs room is usually
the best location.
Electronic equipment like TV’s, computers, etc., can emit strong electro magnetic fields
which can affect the radio signals. Try not to locate your FF895-2 next to this type of
equipment and ensure that the power and line cords are separated from other electrical
units.
THE TELEPHONE DOES NOT WORK
P Is the power adaptor connected correctly?.
P Is the line cord connected correctly?
P Are the batteries in the handset charged?
P Connect a different telephone to the same wall socket. If the other telephone does not
work, contact your Network operator.
THE BASE UNIT DOES NOT RING
P Check that the ringer is programmed on (see page 20).
P Does the total REN of equipment connected to your line exceed 3? If it does,
disconnect other equipment until 3 is achieved (see page 43).
P Is it connected to a mains power socket and mains power switched on?
WHEN ON A CALL, A WARNING TONE IS HEARD
P The batteries’ power may be low (recharge the handset for 14 hours).
P The handset may be out of range - move closer to the base unit.
WHEN ON A CALL AND THE CALL WAITING TONE IS HEARD
This product is designed to receive CND information from the network while on a call
(Calling Number Display on Call Waiting) The speech path will be muted during the
transmission of the data from the network. This will last for 0.5-1second. During this
time, you cannot speak to or hear your caller and vica versa. THIS IS NOT A FAULT
WITH THE UNIT. (Refer to page 14 & 22 for more information).
39
Page 42

TROUBLESHOOTING AUDIOLINE FF895-2
IF THE CALLER DISPLAY DOES NOT WORK
If the Caller Display does not work, first make contact with your network provider to see
if:
# The service is activated in your area.
# Check that your subscription to the service is up to date.
# Ensure you have followed the instructions in this manual.
# Check that all cords and connections are correct.
NO CALLER DISPLAY INFORMATION ON INCOMING CALL
# Follow the directions above.
# If “OUT OF AREA” shows in the display it means that no information was sent, it
may have been an international call or from a PABX.
# If “PRIVATE” shows in the display it means that the call was from a “silent” number
or the caller had barred their number from being sent (Refer to the table on page 16).
NO DIAL TONE IS HEARD
P Have the handset batteries been charged for 14 hours?
P Is the Base connected to a mains power socket and mains power switched on?
P Is the telephone line cord plugged into a telephone Network wall socket?
THE DISPLAY ON THE HANDSET IS BLANK
P Is the handset battery charged?
THE BASE UNIT RINGS BEFORE THE HANDSET
P This is normal for all cordless telephones.
THE HANDSET WILL NOT CONNECT WITH AN INCOMING CALL WHEN
THE BASE UNIT RINGS
P Because this is a cordless telephone, the ringing signal has to be transmitted to
the handset which can take a few seconds. It is important that a call is not
picked-up on the handset until the handset rings.
THE HANDSET DOES NOT RING
P Is the ringer programmed Off? (see page 20).
MEMORY DIALLING DOES NOT WORK
P Store a new number and try again (see page 11).
40
Page 43

AUDIOLINE FF895-2 OTHER
ADDITIONAL NETWORK SERVICES
Network services such as Call Waiting, CND etc., can be provided by your network. A
subscription may apply. For further information, contact your Network operator.
ACCESSORIES
1. PA894 Power adaptor for base unit
2. Battery pack
3. Handset aerial
4. Additional handset (FF895-2HS)
Note: The FF895-2 can only be supplied power by an Audioline power adaptor PA894
(Approval No. N/12462).
To order accessories or spare parts, contact DORO Australia.
WARNING
In the event of a mains power failure it will not be possible to dial the emergency service
numbers. An alternative line powered telephone should be used in this case.
It is recommended that you disconnect your telephone during a thunderstorm as you can
get a shock from your telephone(and other electrical appliances). We recommend you
follow these simple precautions during a thunderstorm:
# Do not use your telephone unless the call is urgent.
# If you must use your telephone, make the call as brief as possible and keep clear of
electrical equipment and metal fixtures.
# Do not stand in bare feet on uncovered concrete floors.
# Do not touch brick or concrete walls.
NOTE: Do not install your telephone in damp or high humidity locations, such as a
laundry or bathroom. If any damage is caused by such elements it is not covered by
the manufacturers warranty.
41
Page 44

OTHER AUDIOLINE FF895-2
REN (RN for New Zealand)
The REN (Ringer Equivalance Number) or RN is of significance only if you wish to
connect more than 1 telephone to your telephone line. Your telephone line has a
maximum REN capacity of 3 (RN of 5). Your Audioline FF895-2 has a REN of 0.1 (RN
of 0.1), thus it is feasible to connect 2 (4) more telephones of a value of 1 to your system.
You should not exceed a value of 3 (5) on the complete system, otherwise the volume of
the ringer in any phone will decrease and one telephone may not ring at all.
CLEANING
The case should be cleaned by wiping with a damp cloth.
# Do not use abrasives, solvents or spray polish that may enter through holes in the
earpiece and mouthpiece and cause damage.
# Do not place the telephone in direct sunlight or use in extreme humidity.
# The battery contacts on the base and the handset should be cleaned regularly, ie. every
2 months with a pencil eraser and/or a dry soft cloth.
GUARANTEE
If you believe your FF895-2 is malfunctioning, please refer to the relevant section and/or
consult the troubleshooting guide in this manual to ensure that you have followed the
instructions carefully.
The FF895-2 is guaranteed for a period of 12 months from the date of purchase. In the
unlikely event of a fault during this period, please contact us for assistance. If the product
is then found to be faulty you will be asked to return it directly to us with a copy of the
purchase receipt.
AUSTRALIA NEW ZEALAND
DORO Australia Pty Ltd Atlas Gentech (NZ) Limited
PO Box 6760 Private Bag 14927, Panmure
Baulkham Hills BC NSW 2153 Australia Auckland
Helpline Consumer Support
Ph: (02) 8853 8444 Ph: 0900 50-025 (Toll Call)
Fax: (02) 8853-8489 Fax: (09) 574-2722
Email: helpline@doro.com.au Email: support@atlasgentech.co.nz
NOTE: The guarantee does not extend to damage caused by misuse, negligence, excessive
voltage, faults on the telephone line or lightning. This guarantee in no way affects your statutory
rights. DORO is the trademark of DORO AB.
42
Page 45

AUDIOLINE FF895-2 OTHER
NOTES FOR OPERATION IN NEW ZEALAND
ALL PRODUCTS
The grant of a Telepermit for any item of terminal equipment indicates only that Telecom has accepted
that the item complies with the minimum conditions for connection to its network. It indicates no
endorsement of the product by Telecom, nor does it provide any sort of warranty. Above all, it provides
no assurance that any item will work correctly in all respects with another item of Telepermitted
equipment of a different make or model, nor does it imply that any product is compatible with all of
Telecom’s network services.
This equipment shall not be set to make automatic calls to the Telecom “111" Emergency Service.
This equipment may not provide for the effective hand-over of a call to another device connected to the
same line.
CND PRODUCTS
This unit will only work in conjunction with a tone signalling (DTMF) telephone, but some telephones
may not be compatible. Since noise or speech from the telephone can upset dialling from this unit, errors
may result if the devices are used together in other than quiet conditions.
Where it is necessary to dial prefix digits, such as a Caller Display override code (“0196" or “0197"), this
unit will have to be used in conjunction with an associated tone signalling (DTMF) telephone.
Note that some telephones are NOT compatible with this unit and dialling errors may result if the two
devices are used together in other than quiet conditions. The Telecom Faults Service is NOT to be called
should such problems arise. In such cases, it is recommended that the prefix and wanted number are
dialled manually.
If a charge for local calls is unacceptable, the “Dial” button should NOT be used for local calls. Only the
7-digits of the local number should be dialled from your telephone. DO NOT dial the area code digit or
the "0" prefix.
ANSWERING MACHINES
This equipment should not be used under any circumstances which may constitute a nuisance to the other
Telecom customers.
All persons using this device for recording telephone conversations shall comply with New Zealand law.
This requires that at least one party to the conversation is to be aware that it is being recorded. In
addition, the Principles enumerated in the Privacy Act 1993 shall be complied with in respect to the
nature of the personal information collected, the purpose for its collection, how it is used and what is
disclosed to any other party.
IMPORTANT NOTICE
Under power failure conditions, this telephone may not operate. Please ensure that a separate telephone,
not dependent on local power, is available for emergency use.
43
Page 46

 Loading...