

Page 1

FF893
Cordless telephone with
digital answering system
This equipment is not designed for making emergency
telephone calls when the power fails. Alternative
arrangements should be made for access to the
emergency services.
User guide
Downloaded from: http://www.guardianalarms.net
Page 2

AUDIOLINE FF893 SAFETY INFORMATION
IMPORTANT INFORMATION
Use only AUDIOLINE approved cadmium-free NiMH rechargeable battery pack within
the handset. Never use other packs. Your replacement packs are available from DORO
Australia and many leading retailers.
Do not use any power supply except the one provided (Approval No. N/12462).
Connection of any other adaptor could compromise the compliance with Australian/New
Zealand standards.
This is a rechargeable product and it is normal that a certain amount of heat will be
generated during the charging process. Whilst this is safe, it is recommended that this
product is not placed on sensitive surfaces.
PARTS LIST
In the box you should find the following items:
# Handset
# Base Unit
# NiMH battery pack (3.6V 600mA/H)
# Handset antenna
Please contact your retailer if any item is missing or damaged.
• AC Adaptor
• Line cord & adaptor plug
• User guide
• Wall mounting bracket
Page 3

CONTENTS AUDIOLINE FF893
LIST OF CONTENTS
Handset functions . . . . . . . . . . . . . . . . . . . . . . . . . . . . . . . . . . . . . . . . . . . . . . . . . 2
Base Unit functions ............... . . . . . . . . . . . . . . . . . . . . . . . . . . ......3
Installation
Positioning the base unit . . . . . . . . . . . . . . . . . . . . . . . . . . . . . . . . . . . . ....... 4
Base installation . . . . . . . . . . . . . . . . . . . . . . . . . . . ........................ 4
Fitting back-up batteries ........... . . . . . . . . . . . . . . . . . . .. .............. 4
Handset battery installation. . . . . . . . . . . . . . . . . . . . . . . . . . . . . . . . . . . . . ..... 5
Handset battery care. . . . . . . . . . . . . . . . . . . . . . . . . . . ....................5
Using the Telephone
Making a call. . . . . . . . . . . . . . . . . . . . . . . . . . . . . . . . . . . . . . . . . . . . .......... 6
Receiving a call ................. . . . . . . . . . . . . . . . . . . . . . . . . . . . . ..... 6
Last number redial ............... . . . . . . . . . . . . . . . . . . . . . . . . . . . . ..... 6
Handset volume control . . . . . . . . . . . . . . . . . . . . . . . . . . . . . . . . . . . . . . . . . . . .. 6
Range warning .................. . . . . . . . . . . . . . . . . . . . . . . . . . . . . . .... 7
Low battery indicator. . . . . . . . . . . . . . . . . . . . . . . . . . . . . . . . . . . . . . . . . . . . .... 7
Page/find handset ............... . . . . . . . . ......................... 7
Incoming call during paging ........ . . . . . . . . ......................... 7
Ringer On/Off settings . . . . . . . . . . . . . . . . . . . . . . . . . . . . . . . . . . . . . . . . . . .... 7
Storing memory numbers. . . . . . . . . . . . . . . . . . . . . . . . . . . . . . . . . ........... 8
Dialling memory numbers . . . . . . . . . . . . . . . . . . . . . . . . . . . . . . . . . . . . . . . . . .. 8
Mute button . . . . . . . . . . . . . . . . . . . . . . . . . . . . . . . . . . . . . . . . . ............ 8
Pause function. . . . . . . . . . . . . . . . . . . . . . . . . . . . 8
Call Waiting . . . . . . . . . . . . . . . . . . . . . . . . . . . . . . . . . . . . . . . . . . . . .......... 9
Recall button ................... . . . . . . . . . . . . . . . . . . . . . . . . . . . ...... 9
Scan button .................... . . . . . . . . . . . . . . . . . . . . . . . . . . . ...... 9
..........................
Using the Answering Machine
Setting the clock ................ . . . . . . . . . . . . . . . . . . . . . . . ......... 10
Answering system on/off . . . . . . . . . . . . . . . . . . . . . . . . . . . . ............... 10
The outgoing messages (OGM) . . . . . . . . . . . . . . . . . . . . . . . . . . . . . ......... 11
Message playback . . . . . . . . . . . . . . . . . . . . . . . . . . . . . . . . . . . . . . .......... 12
Message counter. . . . . . . . . . . . . . . . . . . . . . . . . . . . . . . .................. 12
Volume control . . . . . . . . . . . . . . . . . . . . . . . . . . . . . . . . . . . . . . . . . . ........ 12
Delete all old message. . . . . . . . . . . . . . . . . . . . . . . . . . . . . . . . . . . . ......... 12
Memo recording . . . . . . . . . . . . . . . . . . . . . . . . . . . . . . . ................... 13
2 way recording. ................ . . . . . . . . . . . . . . . . . . . . . . . . . . . . .... 13
Answering calls. ................ . . . . . . . . . . . . . . . . . . . . . . . . . . . . .... 13
Remote access . . . . . . . . . . . . . . . . . . . . . . . . . . , .14
Memory full ................... . . . . . . . . ........................ 15
LED indications for the answering system . . . . ... 15
Troubleshooting . . . . . . . . . . . . . . . . . . . . . . . . . . . . ..................... 16
Warning ...................... . . . . . . . . ........................ 17
REN, Cleaning & Gurantee ....... . . . . . . . .. 18
Wall bracket installation guide. . . . . . . . . . . . . . . . . . . . ................... 19
Notes for Operation in New Zealand . . . . . . . . ........................ 20
1
Page 4
AUDIOLINE FF893 INSTALLATION
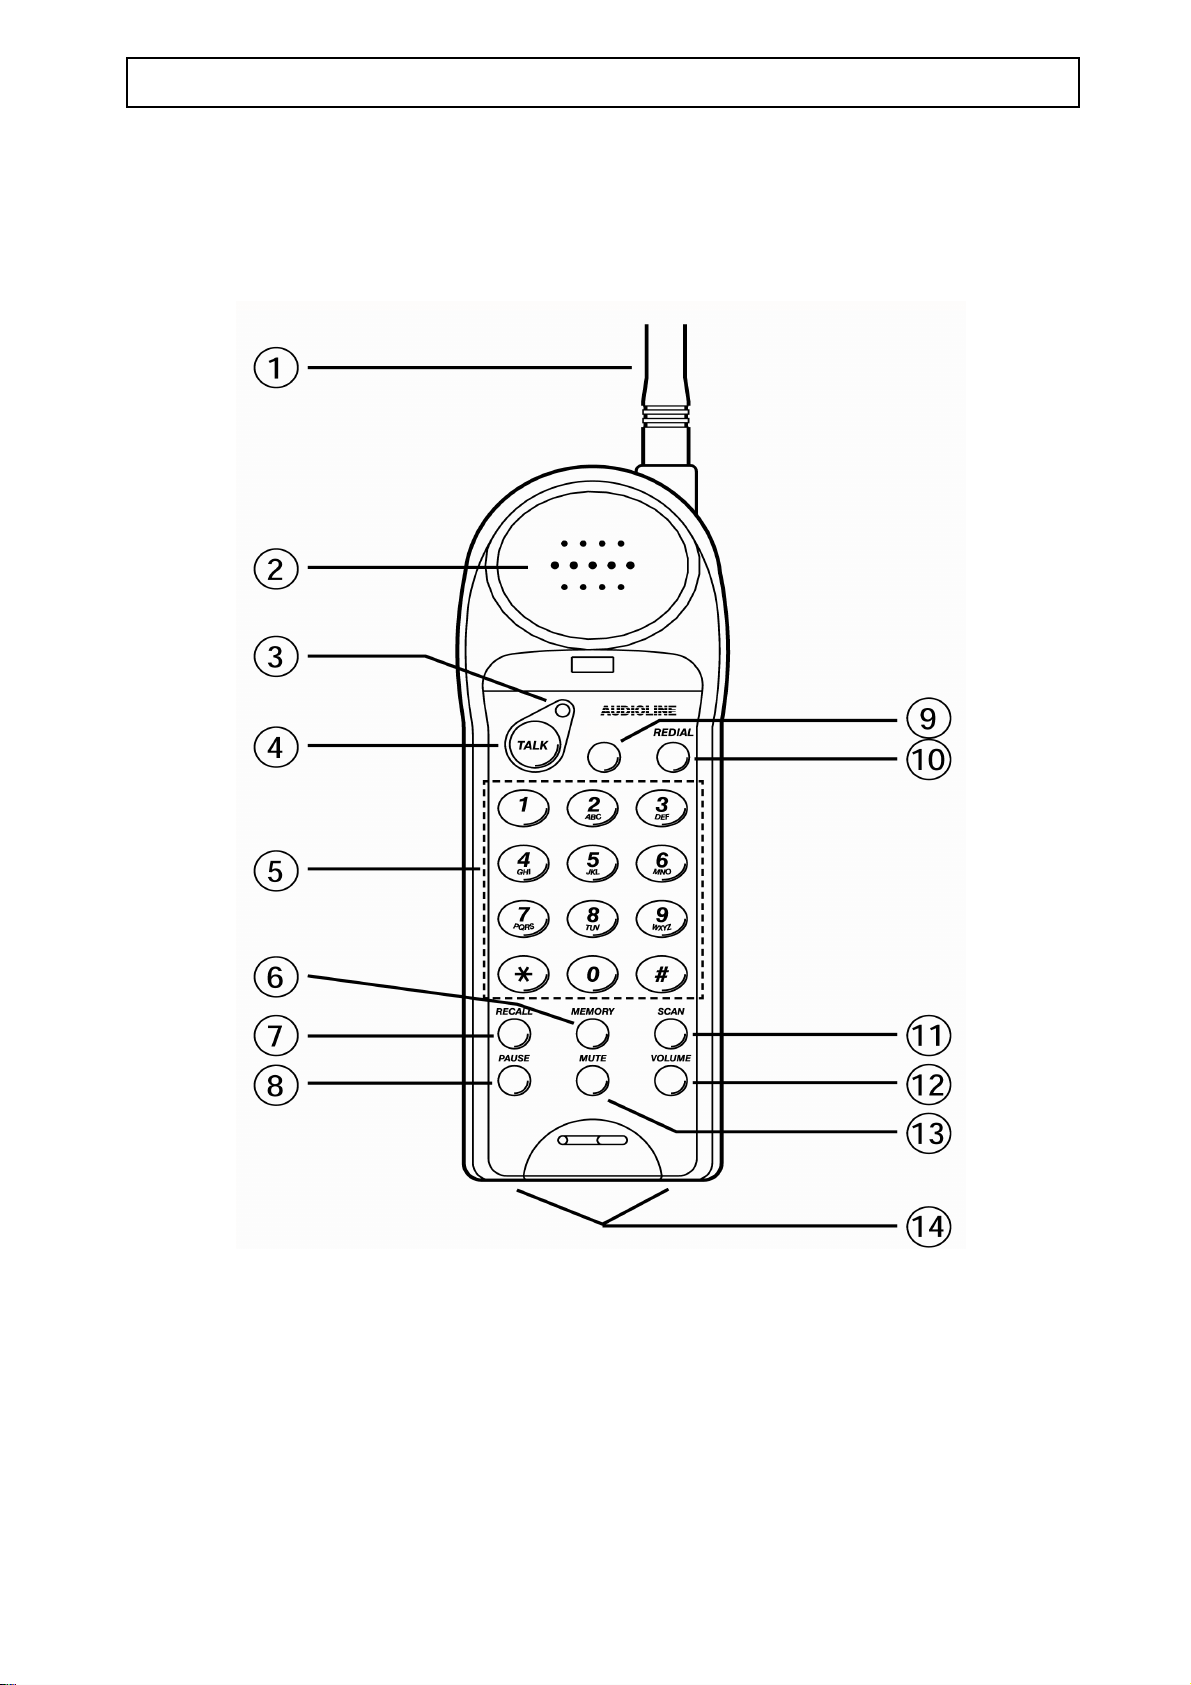
HANDSET FUNCTIONS
1. Antenna 9. Call Waiting button
2. Earpiece 10. Redial button
3. Talk LED 11. Scan button
4. Talk Button 12. Volume button
5. Keypad 13. Mute button
6. Memory button 14. Charging contacts
7. Recall button
8. Pause button
2
Page 5
INSTALLATION AUDIOLINE FF893
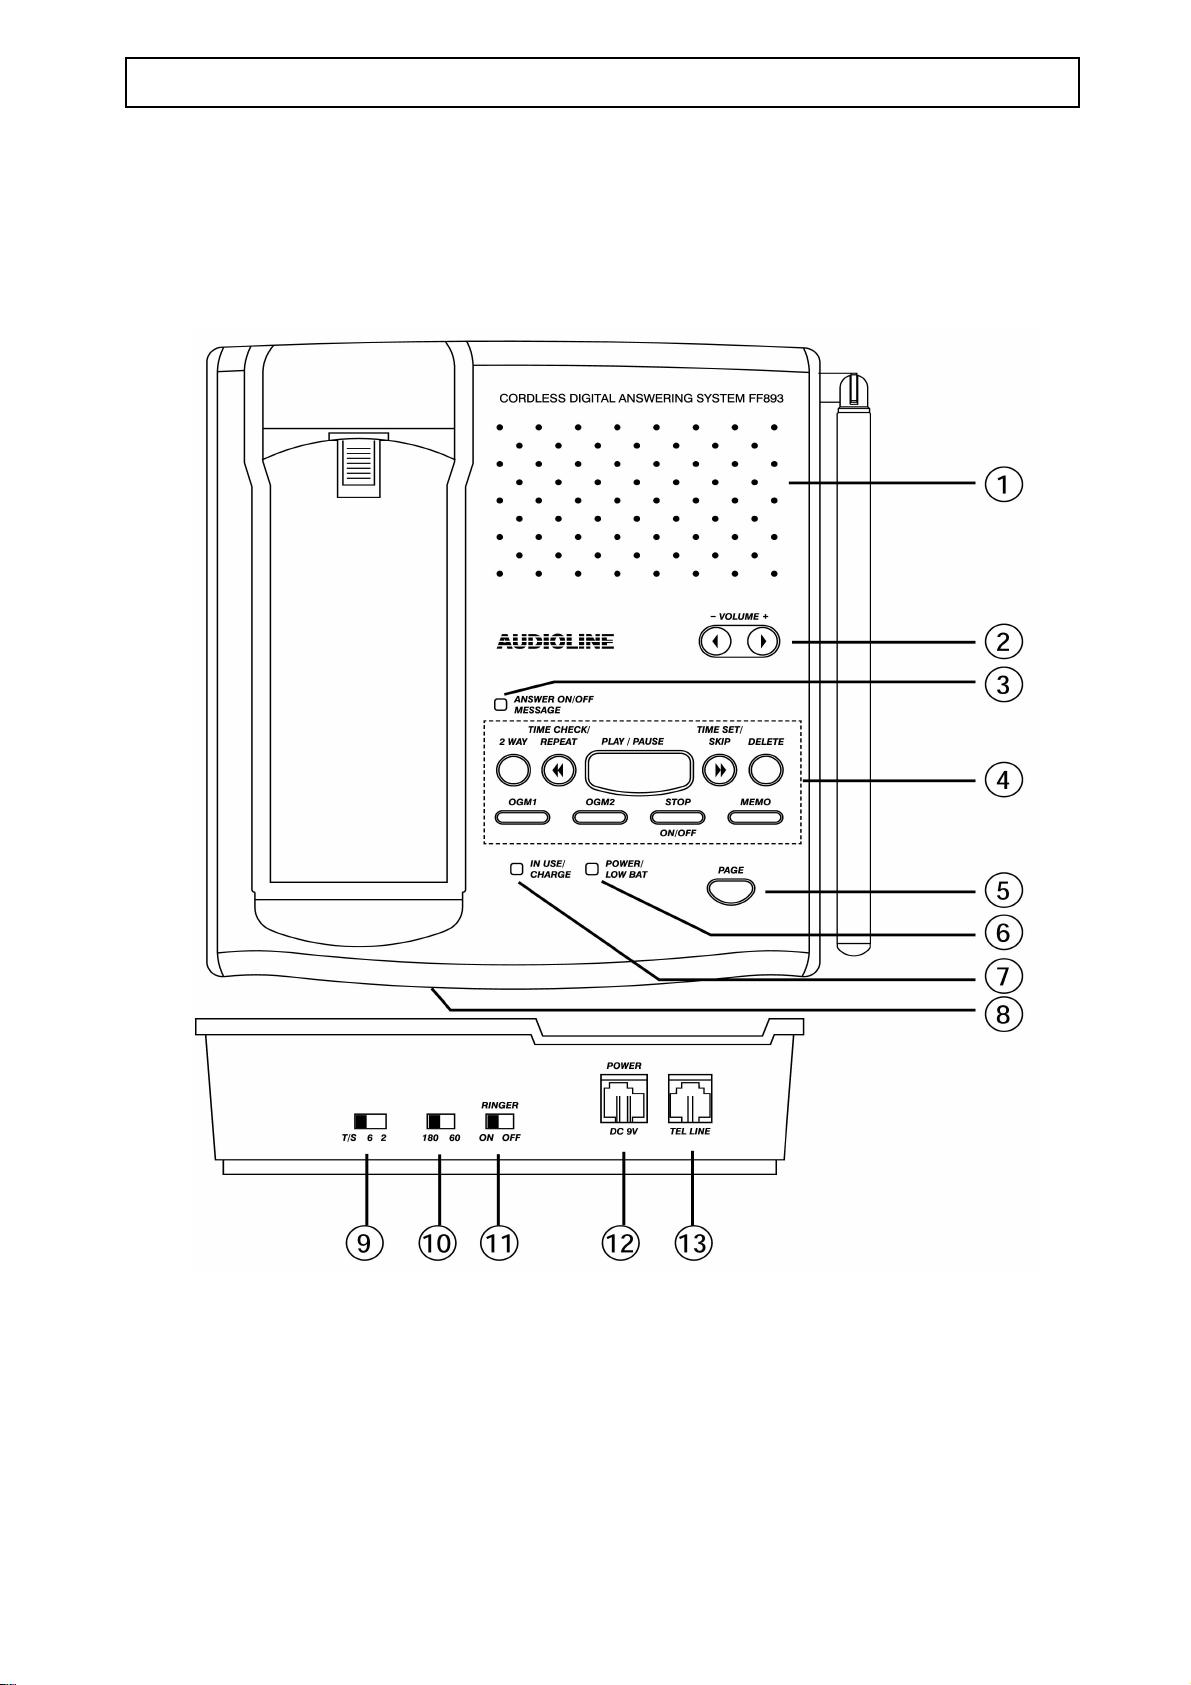
BASE UNIT FUNCTIONS
1. L ou
d speaker 7. In use / Charge LED
2. Speaker Volume control 8. Microphone
3. Answer ON/Off, Message LED 9. T/S, 6, 2 ring select
4. Answering machine function keys 10. 180/ 60 Incoming message time
5. Page button 11. Ringer On/Off switch
6. Power / Low Battery LED 12. Connect to the FF893 power supply
13. Connect to the telephone line
3
Page 6

AUDIOLINE FF893 INSTALLATION
POSITIONING THE BASE UNIT
It is essential for best performance of the telephone system that the base unit be
positioned properly in your home or office.
Place the base unit close to a telephone network socket and a 230/240 volt mains
outlet.
If the range of operation between the handset and the base unit is not satisfactory, try
repositioning the base unit, but:
# Do not position the unit in direct sunlight, damp or high humidity locations
.
# Do not position the unit close to: electrical equipment such as TV’s, computers,
fridges, etc., or close to radiators, metal pipes or window frames.
BASE INSTALLATION
Connect the power supply cord to the rear of the base unit and plug into the 230/240
volt mains outlet.
You will hear “Please wait”and the answer ON/OFF and power LEDs will flash for
around 25 seconds, then a confirmation tone will be heard.
FITTING BACK-UP BATTERIES IN BASE UNIT
It is essential to fit four “AAA” size 1.5v Alkaline batteries (not rechargeable type) to
ensure your messages are not lost during a mains power failure. Note, batteries not
included. To install or replace batteries do the following:
# Disconnect the line cord from the telephone.
# Locate battery compartment on underside of base unit.
# Insert blunt instrument into small square hole and prise cover gently open.
# Insert batteries observing correct polarity.
# Replace battery cover.
# Reconnect telephone cord.
NOTE: The POWER/LOW BAT indicator will flash continuously if back-up
batteries are not fitted or are discharged.
4
Page 7

INSTALLATION AUDIOLINE FF893
HANDSET BATTERY INSTALLATION
To install or change the battery do the following:
# Remove the battery cover by applying gentle pressure to the rear of the handset and
slide downwards.
# Insert the battery (supplied), observing correct polarity (ensure red wire is on left
hand side) and replace the battery cover. FIT the aerial to the handset.
# Place handset onto base unit (face up or down) and charge for 14 hours
telephone should not be used during this time.
# Connect the telephone line cord to the rear of the base unit and plug into the
telephone network socket.
# Your FF893 is now ready for use.
HANDSET BATTERY CARE
For maximum life from your battery, do the following:
# After initial charging the base unit must remain connected to the mains power.
# If the telephone is not to be used for a substantial period of time, i.e. holidays,
disconnect the mains power adaptor.
# When power is reconnected you must recharge the handset for 14 hours.
. The
# To maintain optimum condition, discharge the batteries fully every 4 months, and
then recharge for 14 hours.
# The batteries will need replacing if there are signs of leakage, or the batteries will
not hold a charge for more than two hours.
NOTE: From new, the batteries after they have been installed, must be charged for 14
hours without interruption.
Use only AUDIOLINE approved cadmium-free Nickel Metal Hydride (NiMH)
rechargeable batteries. The guarantee will be invalid if any problems arise as a
result of the use of an incorrectly specified battery.
5
Page 8

AUDIOLINE FF893 TELEPHONE
MAKING A CALL
## Press the [TALK] button.
# Dial the telephone number.
## To terminate the call, press the
[TALK] button or replace the handset on the base
unit.
RECEIVING A CALL
When an external call is received, the base unit will ring first and the in-use LED will
flash.
# If the handset is on the base unit, you will be connected automatically with your
caller as soon as the handset is lifted. The
[TALK] button will be disabled for around
4 seconds after the handset is lifted to prevent accidental operation. To finish the
call, replace the handset on the base unit or press the
# If the handset is off the base unit, press the
To terminate the call, press the
[TALK] button or place the handset on the base unit.
[TALK] button when the handset rings.
[TALK] button.
LAST NUMBER REDIAL
The last number dialled is stored automatically in the memory. To recall a number do
the following:
# Press the
[TALK] button (wait for dial tone) and then the [REDIAL] button. The
number will be dialled automatically.
HANDSET VOLUME CONTROL
The volume level in the earpiece can be increased or decreased (normal or high) using
[VOLUME] button during a call.
the
6
Page 9

TELEPHONE AUDIOLINE FF893
RANGE WARNING
If you are on a call using the handset and move out of range of the base unit, the sound
quality in the handset earpiece will de-grade and the out of range alarm will be heard.
You should move back into range of the base unit to regain good sound quality.
LOW BATTERY INDICATOR
When the handset battery is low, the “Talk” LED will flash and an alert tone will
sound every 30 seconds. The handset will automatically disconnect the line and will
not operate after 3 minutes. If the battery is low in standby mode the unit will not
operate after 5 minutes from the first warning.
It is recommended that you recharge the handset battery for 14 hours.
PAGE/FIND HANDSET
To page a handset, or locate a missing handset, press the [PAGE] button on the base
unit. The handset will ring for approximately 15 seconds.
To stop this action, press the
[PAGE] button on the base unit.
INCOMING CALL DURING PAGING
If an incoming call is received while paging the handset, the base and the handset will
ring, press the
[TALK] button on the handset to connect the call.
RINGER ON/OFF SETTINGS
BASE
# To set the ringer of the base, use the ringer ON/OFF switch on the rear of the base
unit (see page 3).
HANDSET
# To set the ringer of the handset use the following key commands.
Ringer ON (default) press [MEMORY] then [VOLUME] buttons.
Ringer OFF press [MEMORY] then [MUTE] buttons.
7
Page 10

AUDIOLINE FF893 TELEPHONE
MEMORY NUMBERS
Nine of your most frequently used telephone numbers can be stored in the memory.
Storing of numbers should be done via the handset.
STORING MEMORY NUMBERS
To store numbers in memory do the following:
# Press and release the
[MEMORY] button, the Talk LED will flash.
# Press and release the location button (1 - 9) on the keypad where you wish to store
the number.
# Enter the number you wish to store (max 20 digits). If you wish to insert a
pause in the number, press the
[PAUSE] button.
# Press and release the [MEMORY] button.
# A confirmation tone will be heard and the handset will return to standby.
NOTE: If you want to insert a recall in the memory press the [RECALL] button.
DIALLING MEMORY NUMBERS
# Press the
# Press the
[TALK] button (wait for dial tone).
[MEMORY] button.
# Press the appropriate number location (1-9)
# The number will be dialled automatically.
MUTE BUTTON
The [MUTE] button will cut off the handset microphone when pressed. This will allow
you to speak privately to a third party. Press the
[MUTE] button again to switch the
handset microphone back on. While the mute is active the Talk LED will flash and
there will be a double beep every 15 seconds to remind you.
PAUSE FUNCTION
If you need to enter a pause into the dialling sequence eg., on an international or a call
through a switchboard, you can insert a 2 second pause with the [
PAUSE] button.
8
Page 11

TELEPHONE AUDIOLINE FF893
CALL WAITING
Your telephone lets you take advantage of the Call Waiting service supplied by Telstra
(Australia). With the call waiting service activated do the following:
# When a call comes in while you are on the phone, you will hear the Call Waiting
beeps.
# Press the
[CALL WAITING] button on the handset. The first caller is put on hold and
you can talk to the second caller.
# To toggle between callers, simply press the
# Press the
[TALK] button when you are finished.
[CALL WAITING] button again.
REPROGRAMMING CALL WAITING BUTTON
The call waiting button can be reprogrammed as a one-touch memory button (priority).
Follow the storage procedure in Storing Memory Numbers (page 8) and press the Call
Waiting button as the location number.
To revert back to call waiting function, do the following:
# Press
# Press
# Press
[MEMORY] button.
[CALL WAITING] button.
[MEMORY] button.
RECALL
The recall button allows you to access optional features available from your Network
provider and various PBX/PABX facilities.
SCAN BUTTON - CHANNEL SELECT
It is possible to optimise the call quality during a call. To change operating channel do
the following:
# Press the
# The telephone conversation will be briefly interrupted during the search, however
the call will be resumed when a clearer channel is found.
[SCAN] button during conversation.
9
Page 12

AUDIOLINE FF893 ANSWERING SYSTEM
SETTING THE CLOCK
It is necessary to set the internal clock in the system to the current time. To set the
time do the following:
# Press the
# Press
# Press the
# Press the
# Press the
# Press the
# Press the
[TIME/SET/SKIP] button until you hear “Sunday”.
[TIME/SET/SKIP] to forward to the day required.
[STOP] button to confirm the day selected (you will then hear 12.00am).
[TIME/SET/SKIP] button to forward to the required hour.
[STOP] button to confirm the hour selection (you will then hear 0)
[TIME/SET/SKIP] button to forward to the minutes required.
[STOP] button to confirm the minute selection.
# The day/time is now set and the unit will announce the setting (eg. Tuesday,
6.25PM).
The unit will reset after 10 seconds if no buttons are pressed.
NOTE: Use the
[TIME CHECK/REPEAT] to reverse the announcements in the steps
above.
ANSWER ON/OFF
# The answering system is preset to ANSWER ON when power is applied. The
ANSWER ON/OFF LED will illuminate.
# The system setting can be changed to ANNOUNCE ONLY mode by pressing the
[OGM2] button. The system can be set back to answer ON by pressing the [OGM1]
button.
# The system can be turned off by pressing the
# There will be an announcement and a LED indication of the selected mode of
operation (see page 15).
[ON/OFF] button.
10
Page 13

ANSWERING SYSTEM AUDIOLINE FF893
THE OUTGOING MESSAGES (OGM)
OGM1 - PRE-RECORDED MESSAGE
# Your answering system is pre-recorded with the following message to your caller:
‘Please leave your message after the tone’
# To listen to this message, press and release the
[OGM1] button.
NOTE: Once the OGM1 is played, the system will set to “ANSWER ON”.
OGM1 - YOUR OWN RECORDING
You can record your own message, it will replace the pre-recorded message.
# Press and hold the
[OGM1] button until you hear a beep.
# Record your message (minimum 4 seconds, maximum 30 seconds), speaking
clearly towards the microphone at the front of the system.
# Release the
[OGM1] button when finished.
# The system will replay your recording for verification.
# To hear your recording at any time, press and release the
# To revert to the pre-recorded message, press the [
DELETE] button while OGM1 is
[OGM1] button.
playing.
OGM2 - PRE-RECORDED MESSAGE
OGM2 is for the announcement only message which can be used to relay information.
It will also be played when the answering system is full.
# The message “ANNOUNCE ONLY” is pre-recorded.
OGM2 - YOUR OWN RECORDING
To record your own OGM2, follow the OGM1 procedure above using the
[OGM2]
button instead of the [OGM1] button. The maximum recording time is 2 minutes.
NOTE: Once the OGM2 is played, the system will set to ANNOUNCE ONLY
mode. In this mode callers will not be able to leave a message so it is advisable to
instruct your callers to call back later or to contact you at an alternative number.
AUDIOLINE FF893 ANSWERING SYSTEM
11
Page 14

MESSAGE PLAYBACK
# When a message has been received the MESSAGE LED on the base will flash
quickly.
# Press the
# When all the messages are played you will hear a long tone.
# If there are no messages when you press the
beeps (error tone).
NOTE: Your answering system can store messages up to a total of 14 minutes
recording time.
OPTIONS DURING MESSAGE PLAYBACK
# Press STOP to stop.
# Press SKIP to forward to the next message.
# Press REPEAT to repeat the current message.
# Press REPEAT TWICE to return to the previous message.
# Press PLAY/PAUSE while a message is playing to pause playback. Press again to
continue playback. You will hear a tone every second when paused. After pausing
for 2 minutes the FF893 will continue playback automatically.
# Press DELETE while a message is playing to erase the current message.
[PLAY/PAUSE] button to play the messages.
[PLAY/PAUSE] button, you will hear 3
MESSAGE COUNTER
When there are new messages received, the MESSAGE LED becomes a message
counter for the new messages. If there are 3 new messages, the LED will flash 3 times
and then idle for a while, then flash 3 times again.
VOLUME CONTROL
Press the volume +/- buttons on the base unit to adjust the volume.
DELETE ALL OLD MESSAGES
Press and hold the [DELETE] button until you hear a tone. NOTE: New messages will
not be deleted.
12
Page 15

ANSWERING SYSTEM AUDIOLINE FF893
MEMO RECORDING
Instead of writing notes on paper you can inform your family/office by recording a
memo. The family or office staff can access the memo to get your message. To record
a memo message do the following.
# Press and hold the
# Record your memo.
# When you have finished, release the
[MEMO] button until a beep is heard.
[MEMO] button.
2-WAY RECORDING
# Press and hold the [2 WAY] button until you hear a tone.
# The conversation between you and the caller will be recorded.
# Press the
NOTE: The 2 WAY RECORDING will be treated as a new message. Press the
[PLAY/PAUSE] button to playback.
[STOP] button to stop recording.
ANSWERING CALLS
The switch TS/6/2 at the rear of the system determines how the system answers calls.
2 = the system will answer a call after 2 rings
6 = the system will answer a call after 6 rings
T/S = the system will answer a call after 2 rings if new messages are recorded and
after 6 rings if no new message exists.
INCOMING MESSAGE RECORDING TIME
Select 180 or 60 seconds recording time for your callers (see page 3).
13
Page 16

AUDIOLINE FF893 REMOTE ACCESS
REMOTE ACCESS
Your FF893 allows you to control the system from an outside phone.
ENTERING REMOTE CONTROL
To enter the remote control mode, do the following:
# Call your phone from a tone dialling telephone.
# When you hear the greeting, enter the 3-digit security code after the beep (located
on the bottom of the base unit). This must be done within 20 seconds.
# Enter the control codes (from the table below) after the second beep.
# To exit the remote control mode, hang-up the phone or press the
REMOTE CONTROL CODES
To Press
Playback OGM1 1
Playback OGM2 2
Record OGM1 #1 (Press 9 to stop)
Record OGM2 #2 (Press 9 to stop)
Record Memo #3 (Press 9 to stop)
Repeat current message 4
Go back one message 44
Play all messages 5
Skip to next message 6
Change answer mode 8
[*] button.
Stop 9
Delete current message 0
Delete all messages #0
Stop all operations and release the line
14
*
Page 17

ANSWERING SYSTEM AUDIOLINE FF893
REMOTE TURN ON THE SYSTEM
If you forget to switch your system on before leaving home, simply do the following:
# Call your telephone number, the FF893 will answer after 12 rings.
# Enter your 3-digit security code after the beep (you have 20 seconds).
# Enter required command/s after the second beep.
NOTE: If no command is entered within 20 seconds of entering the security code
the system will drop the line.
MEMORY FULL
If the recording memory is full, your answering system will playback OGM2 when
receiving calls. After hearing OGM2, there will be a 10 second time period for entry
of the security code before the system drops the line.
When the memory is full, all the recording functions Incoming Message, OGM1,
OGM2, MEMO and 2 Way are not available.
LED INDICATIONS FOR THE ANSWERING SYSTEM
STATUS POWER/LOW BAT LED ANSWER ON/OFF
MESSAGE LED
Self test & initialisation Flash slowly Flash slowly
Answer ON ON (back up battery OK) ON (no message)
Answer OFF ON (back up battery OK) OFF
System busy ON (back up battery OK) Flash slowly
No message ON (back up battery OK) ON
New message received ON (back up battery OK) Flash with message count
Played message only ON (back up battery OK) ON
Memory full Flash fast Flash fast
B/up Batt low/not installed Flash slowly ON (no message)
15
Page 18

AUDIOLINE FF893 TROUBLESHOOTING
TROUBLESHOOTING
All cordless telephones are radio transmitters and receivers and as such are subject to
interference from a wide range of sources.
Re-siting of the base unit can improve reception substantially.
Electronic equipment like TV’s, computers, etc., can emit strong electro magnetic
fields which can affect the radio signals. Try not to locate your FF893 next to this type
of equipment and ensure that the power and line cords are separated from other
electrical units.
THE TELEPHONE DOES NOT WORK
P Is the power adaptor connected correctly?
P Is the line cord connected correctly?
P Is the battery pack in the handset charged?
P Connect a different telephone to the same wall socket. If the other telephone does
not work, contact your Network operator.
THE BASE UNIT DOES NOT RING
P Check that the ringer is set to ON (see page 7).
P Does the total REN of equipment connected to your line exceed 3? If it does,
disconnect other equipment until 3 is achieved (see page 18).
P Is it connected to a mains power socket and mains power switched on?
WHEN ON A CALL, A WARNING TONE IS HEARD
P The handset battery pack may be low (recharge for 14 hours).
P The handset may be out of range - move closer to the base unit.
NO DIAL TONE IS HEARD
P Has the handset battery pack been charged for 14 hours?
P Is the Base connected to a mains power socket and mains power switched on?
P Is the telephone line cord plugged into a telephone Network wall socket?
THE BASE UNIT RINGS BEFORE THE HANDSET
P This is normal for all cordless telephones.
16
Page 19

OTHERS AUDIOILNE FF893
THE HANDSET WILL NOT CONNECT WITH AN INCOMING CALL WHEN
THE BASE UNIT RINGS
P Because this is a cordless telephone, the ringing signal has to be transmitted to
the handset which can take a few seconds. It is important that a call is not
picked-up on the handset until the handset rings.
THE HANDSET DOES NOT RING
P Is the ringer set to Off? (see page 7).
MEMORY DIALLING DOES NOT WORK
P Store a new number and try again (see page 8).
CALLS ARE NOT ANSWERED
# Check that the system is switched on (see page 10).
# Check that the system is NOT set to announce only (see page 11).
WARNING
In the event of a mains power failure it will not be possible to dial the emergency
service numbers. An alternative line powered telephone should be used in this case.
It is recommended that you disconnect your telephone during a thunderstorm as you
can get a shock from your telephone (and other electrical appliances). We recommend
you follow these simple precautions during a thunderstorm:
# Do not use your telephone unless the call is urgent.
# If you must use your telephone, make the call as brief as possible and keep clear of
electrical equipment and metal fixtures.
# Do not stand in bare feet on uncovered concrete floors.
# Do not touch brick or concrete walls.
NOTE: Do not install your telephone in damp or high humidity locations, such as a
laundry or bathroom. If any damage is caused by such elements it is not covered by
the manufacturers warranty.
17
Page 20

AUDIOLINE FF893 OTHERS
REN (RN for New Zealand)
The REN (Ringer Equivalance Number) or RN is of significance only if you wish to
connect more than 1 telephone to your telephone line. Your telephone line has a
maximum REN capacity of 3 (RN of 5). Your Audioline FF893 has a REN of 1 (RN
of 1), thus it is feasible to connect 2 (4) more telephones of a value of 1 to your
system. You should not exceed a value of 3 (5) on the complete system, otherwise the
volume of the ringer in any phone will decrease and one telephone may not ring at all.
CLEANING
The case should be cleaned by wiping with a damp cloth.
# Do not use abrasives, solvents or spray polish that may enter through holes in the
earpiece and mouthpiece and cause damage.
# Do not place the telephone in direct sunlight or use in extreme humidity.
# The battery contacts on the base and the handset should be cleaned regularly, ie.
every 2 months with a pencil eraser and/or a dry soft cloth.
GUARANTEE
If you believe your FF893 is malfunctioning, please refer to the relevant section and/or
consult the troubleshooting guide in this manual to ensure that you have followed the
instructions carefully.
The FF893 is guaranteed for a period of 12 months from the date of purchase. In the
unlikely event of a fault during this period, please contact us for assistance. If the
product is then found to be faulty you will be asked to return it directly to us with a
copy of the purchase receipt.
AUSTRALIA NEW ZEALAND
DORO Australia Pty Ltd Atlas Gentech (NZ) Limited
PO Box 6760 Private Bag 14927, Panmure
Baulkham Hills BC NSW 2153 Australia Auckland
Helpline Consumer Support
Ph: (02) 8853 8444 Ph: 0900 50-025 (Toll Call)
Fax: (02) 8853-8489 Fax: (09) 574-2722
Email:doro@doro.com.au
Email: support@atlasgentech.co.nz
NOTE: The guarantee does not extend to damage caused by misuse, negligence, excessive voltage, faults on the telephone line or lightning. This
guarantee in no way affects your statutory rights. DORO is the trademark of DORO AB.
18
Page 21

WALL MOUNTING AUDIOLINE FF893
WALL BRACKET INSTALLATION GUIDE
1. Put the telephone mounting bracket template on part of the wall which is free
from obstructions and wiring.
2. Using a pencil, mark the two required fixings. Drill holes if required.
3. Run the cable from the phone through the wall mounting bracket.
4. Screw the mounting bracket to the wall using screws. It may be necessary to use
plastic wall plugs to secure firmly. (Screws and plastic wall plugs not supplied.)
5. Clip one end of the cable into your phone.
6. Carefully align and slide the telephone onto the mounting bracket.
7. Plug the cable into your phone socket.
19
Page 22

AUDIOLINE FF893 OTHERS
NOTES FOR OPERATION IN NEW ZEALAND
ALL PRODUCTS
The grant of a Telepermit for any item of terminal equipment indicates only that Telecom has
accepted that the item complies with the minimum conditions for connection to its network. It
indicates no endorsement of the product by Telecom, nor does it provide any sort of warranty.
Above all, it provides no assurance that any item will work correctly in all respects with another item
of Telepermitted equipment of a different make or model, nor does it imply that any product is
compatible with all of Telecom’s network services.
This equipment shall not be set to make automatic calls to the Telecom “111" Emergency Service.
This equipment may not provide for the effective hand-over of a call to another device connected to
the same line.
ANSWERING MACHINES
This equipment should not be used under any circumstances which may constitute a nuisance to the
other Telecom customers.
All persons using this device for recording telephone conversations shall comply with New Zealand
law. This requires that at least one party to the conversation is to be aware that it is being recorded.
In addition, the Principles enumerated in the Privacy Act 1993 shall be complied with in respect to
the nature of the personal information collected, the purpose for its collection, how it is used and
what is disclosed to any other party.
IMPORTANT NOTICE
Under power failure conditions, this telephone may not operate. Please ensure that a separate
telephone, not dependent on local power, is available for emergency use.
20
Page 23

21
 Loading...