

Page 1
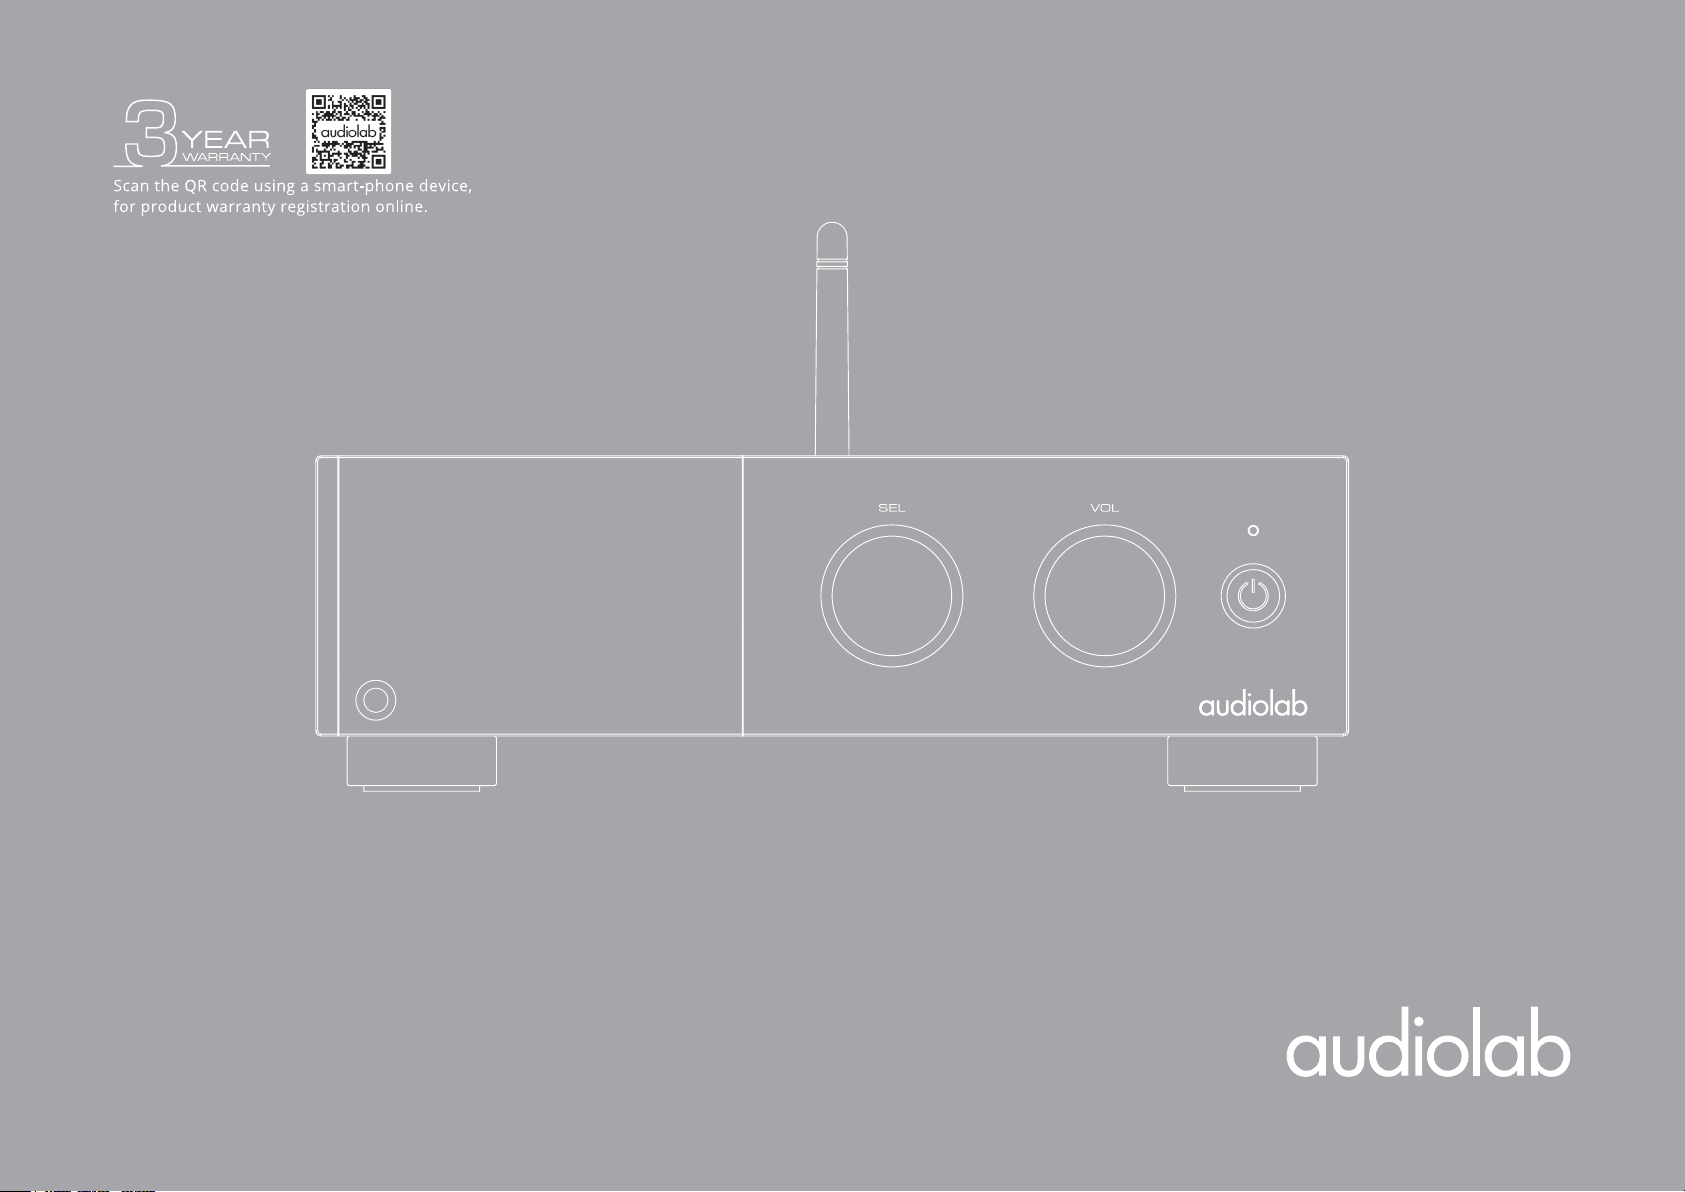
D9
User Manual
Page 2
Important
Safety Information
Important Safety Information
Contents
Getting Started
Controls and Functions
Remote Handset
Connections
Menu Options
System Operations
Playing Operations
Warranty Coverage
be impeded by covering the ventilation openings with items such as newspaper,
tablecloths, curtains etc.
WARNING: Only use attachments/accessories specified or provided by the
manufacturer (such as the exclusive supply adapter, battery etc.).
Specifications
This lightning flash with an arrowhead symbol within an equilateral triangle is
intended to alert the user to the presence of non-insulated “dangerous voltage”
within the product’s enclosure that may be of sufficient magnitude to constitute a
risk of electric shock.
Warning: To reduce the risk of electric shock, do not remove cover (or back) as
there are no user-serviceable parts inside. Refer servicing to qualified personnel.
The exclamation point within an equilateral triangle is intended to alert the user to
the presence of important operating and maintenance instructions in the literature
accompanying the appliance.
Read these instructions. Keep these instructions. Heed all warnings.
Follow all instructions:
Do not use this apparatus near water. Clean only with a dry cloth.
Do not block any ventilation openings. Install under the manufacturer’s instructions.
Do not install near any heat sources such as radiators, heat registers, stoves, or
other apparatus (including amplifiers) that produce heat.
Do not defeat the safety purpose of the polarised or grounding-type plug. A polarised
plug has two blades with one wider than the other. A grounding plug has two blades
and a third grounding prong. The wide blade or the third prong is provided for your
safety. If the provided plug does not fit into your outlet, consult an electrician for the
replacement of the obsolete outlet.
Protect the power cord from being stepped on or pinched, particularly at the plugs,
convenience receptacles, and at the point where they exit from the apparatus.
Unplug this apparatus during lightning storms or when unused for long periods of time.
Refer all servicing to qualified service personnel. Servicing is required when the
apparatus has been damaged in any way, such as power supply cord or plug is
damaged, liquid has been spilt or objects have fallen into the apparatus, the
apparatus has been exposed to rain or moisture, does not operate normally, or
has been dropped.
WARNING: Please refer to the information on the exterior panel of the enclosure
for electrical and safety information before installing or operating the apparatus.
WARNING: To reduce the risk of fire or electric shock, do not expose this apparatus
to rain or moisture. The apparatus shall not be exposed to dripping or splashing and
that objects filled with liquids, such as vases, shall not be placed on the apparatus.
WARNING: The terminals marked with the symbol of “ ” may be of sufficient
magnitude to constitute a risk of electric shock. The external wiring connected to
the terminals requires installation by an instructed person or the use of
ready-made leads or cords.
Ground protection terminal. This product should be connected to a power
outlet with ground protection.
Denmark:
Apparatets stikprop skal tilsluttes en stikkontakt med jord, som giver
forbindelse til stikproppens jord.
Finland:
Norway:
Sweden:
Laite on liitettävä suojakoskettimilla varustettuun pistorasiaan.
Apparatet må tilkoples jordet stikkontakt.
Apparaten skall anslutas till jordat uttag.
WARNING: No naked flame sources, such as lighted candles, should be placed on
the apparatus.
WARNING: Attention should be drawn to environmental aspects of battery
disposal. WARNING: Use of the apparatus in tropical climates.
THE FUSE VALUES ARE: 220 – 240V (UK, China, etc.) T1.0AL 250V Slow Blow
100 – 120V (USA, Japan, etc.) T1.6AL 250V Slow Blow
CAUTION: These servicing instructions are for use by qualified service personnel
only. To reduce the risk of electric shock, do not perform any servicing other than
that contained in the operating instructions unless you are qualified to do so.
Do not install this equipment in a confined or built-in space such as a bookcase or
similar unit, and keep well ventilated in an open space. The ventilation should not
Page 3
Important
Safety Information
Important Safety Information
Contents
Getting Started
Controls and Functions
Remote Handset
Connections
Menu Options
System Operations
Playing Operations
Warranty Coverage
Specifications
The Bluetooth® word mark and logos are registered
trademarks, owned by Bluetooth SIG, Inc. and any use of
such marks by Audiolab is under license. Other trademarks
and trade names are those of their respective owners.
Qualcomm is a trademark of Qualcomm Incorporated,
registered in the United States and other countries. aptX
is a trademark of Qualcomm Technologies International,
Ltd., registered in the United States and other countries.
Being Roon Tested means that Audiolab and Roon have
collaborated to ensure you have the best experience
using Roon, software and IAG Group Ltd equipment
together, so you can just enjoy the music.
MQA (Master Quality Authenticated)
MQA is an award-winning British technology that delivers
the sound of the original master recording. The master
MQA file is fully authenticated and is small enough to
stream or download. Visit mqa.co.uk for more
information. D9 includes MQA technology, which enables
you to playback MQA audio files and streams, delivering
the sound of the original master recording.
The audiolab D9 LED on screen glows green or blue to
indicate that the unit is decoding and playing an MQA
stream or file, and denotes provenance to ensure that
the sound is identical to that of the source material. It
glows blue to indicate it is playing an MQA Studio file,
which has either been approved in the studio by the
artist/producer or has been verified by the copyright
owner.
Page 4
Important
Safety Information
Contents
Audiolab D9
Contents
Getting Started
Controls and Functions
Remote Handset
Connections
Menu Options
System Operations
Playing Operations
Warranty Coverage
Specifications
1. Getting Started
2. Controls and Functions
3. Remote Handset
4. Connections
5. Menu Options
6. System Operations
7. Playing Operations
8. Warranty Coverage
9. Specifications
05
06
07
08
09
12
15
16
18
Page 5
Important
Safety Information
Contents
Getting Started
Controls and Functions
Remote Handset
Connections
Menu Options
System Operations
Playing Operations
Warranty Coverage
Specifications
1: Getting Started
Introduction
Thank you for choosing the Audiolab D9, a cutting-edge high-resolution DAC. It
offers extensive format compatibility and a rich feature set with support for
high-resolution audio files.
Versatile connectivity ensures seamless integration into any setup. Built on
Audiolab’s legacy of digital audio excellence, the D9 employs state-of-the-art DAC
technology and meticulous engineering to offer exceptional clarity, dynamic
range, and musicality.
Please read this manual in order to achieve the best performance and experience
with the Audiolab D9.
Features
• Full DAC and preamp facilities
• Bluetooth aptX, aptX HD, LDAC receiver
• Selectable digital filter settings
• Dedicated headphone amplifier
• 480 x 640px WVGA full view IPS LCD
Inputs
• Two coaxial SPDIF digital inputs
• Two optical SPDIF digital inputs
• One AES/EBU digital input
• Bluetooth 5.1 (aptX/aptX HD/LDAC) input
• USB-A port for USB HDD sources
• USB-B 2.0 port for replaying audio from a compatible host
Page 05
Unpacking the Equipment
The carton should contain:
• The Audiolab D9
• One IEC power cord suitable for your region
• One remote handset
• One instruction manual
• 2 x AAA Batteries (where permitted by local import and transit regulations)
Consult the dealer from whom you purchased the equipment if any item is not
present. Carefully unpack the unit and accessories. Take care not to damage the
surface finish when undoing the protective polythene sleeve. Retain the packing
materials for future use. Retain the user manual and information concerning the
date and place of purchase of your equipment for future reference. If you transfer
the unit to a third party, please pass on this instruction manual along with the
equipment.
Placement
The unit must be mounted on a solid, level and stable surface.
Before you connect the Audiolab D9 to the AC mains power, ensure your AC mains
voltage corresponds to the rating on the rear panel of the product. If in doubt,
consult your dealer. If you move to an area that has a different mains voltage, seek
advice from an Audiolab-appointed dealer or a competent service technician.
Outputs
• One pair of balanced XLR outputs
• One pair of unbalanced RCA outputs
• Headphone output
• 2 x Trigger outputs
• 1 x Optical S/PDIF output
• 1 x COAX S/PDIF output
Page 6
Important
Safety Information
Contents
Getting Started
Controls and Functions
Remote Handset
Connections
Menu Options
System Operations
Playing Operations
Warranty Coverage
Specifications
2: Controls and Functions
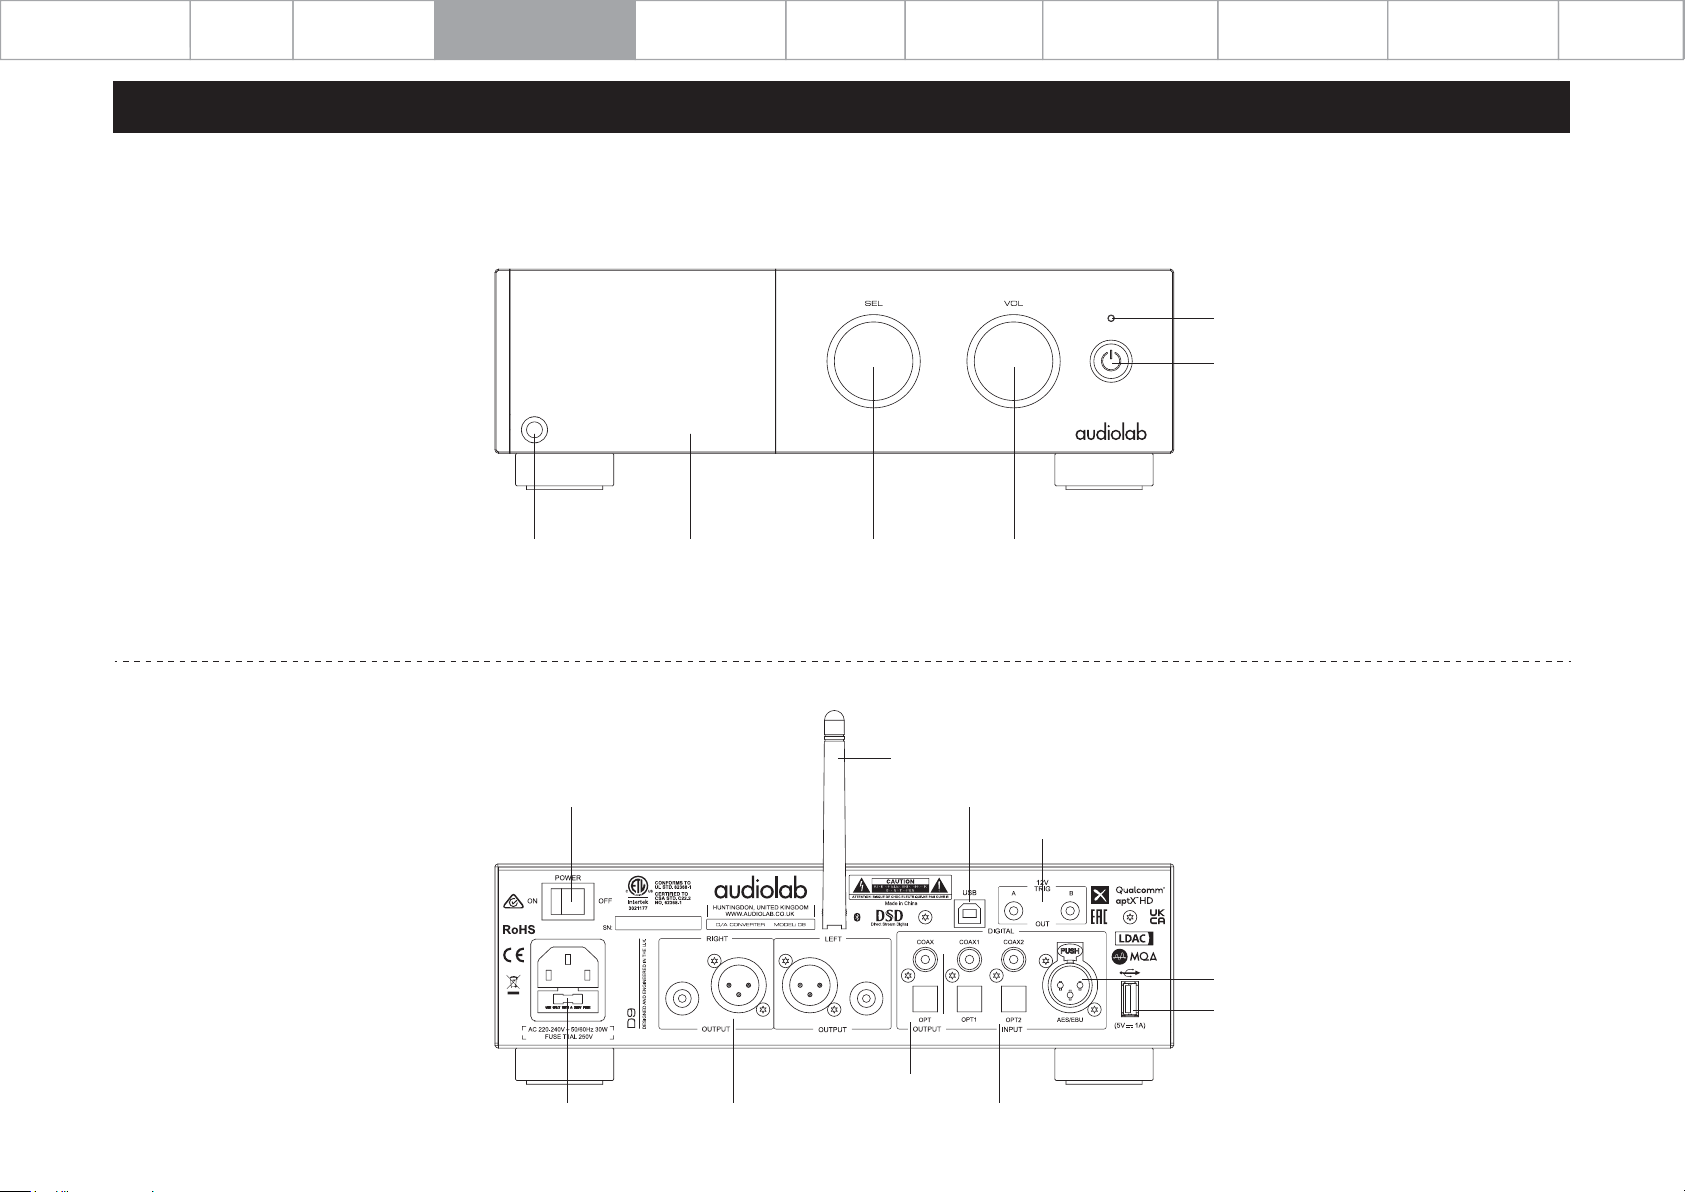
Headphone Jack
Display Source Select Volume Control
Page 06
Power LED
Standby Button
Power Switch
Mains Input Analogue Outputs
BT Antenna
PC USB
12V Triggers
AES/EBU Input
USB HDD Input & USB Firmware Updates
Digital Outputs
Digital Inputs
Page 7
Important
Safety Information
Contents
Getting Started
Controls and Functions
Remote Handset
Connections
Menu Options
System Operations
Playing Operations
Warranty Coverage
Specifications
3: Remote Handset
1
3
7
11
2
4
5
6
8
9
10
12
13
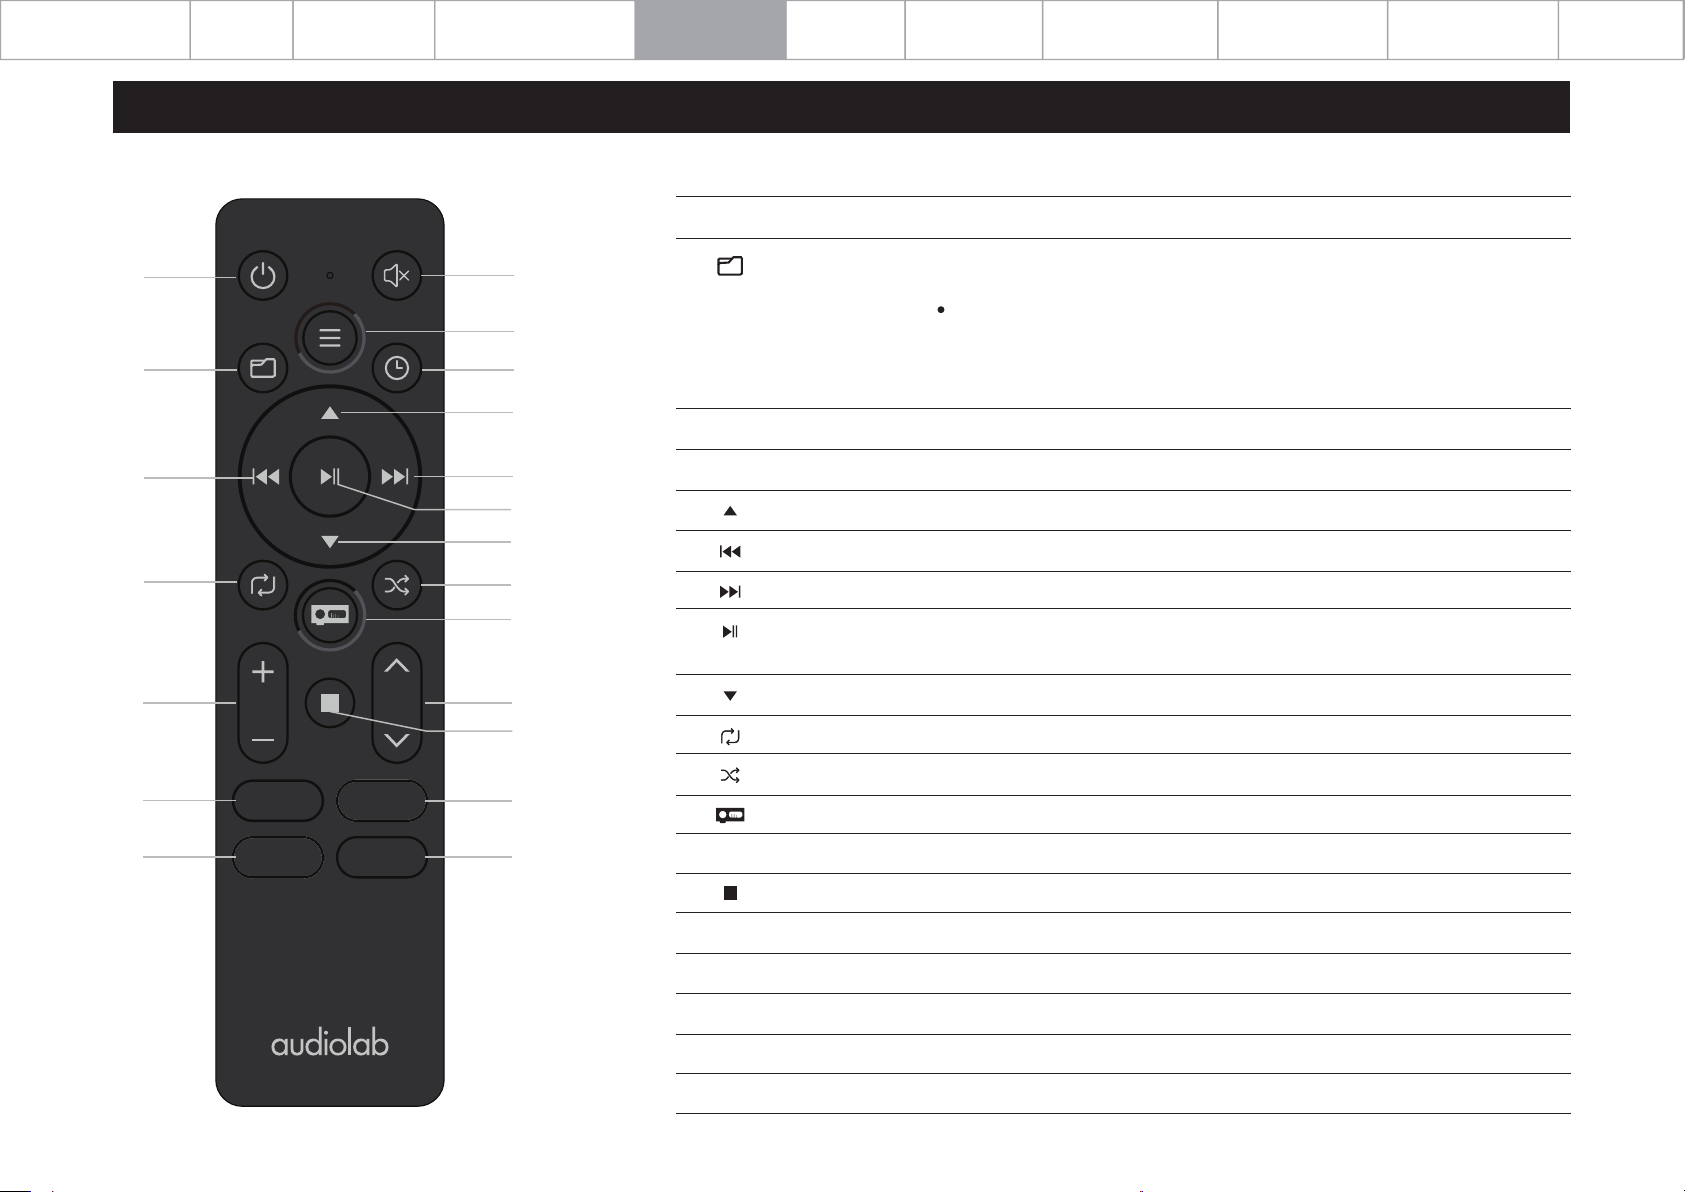
1. Standby
2. Mute
3.
4. Menu
5. Time
6.
7.
8.
9.
Page 07
Press to bring the unit in/out of Standby
Press to mute and unmute the sound
Long Press: Enter Folder Mode selection from the Playing Interface.
Short Press: Access the Folder View.
If you are in a subfolder, continue to short press to return to the previous
level until you reach the root folder.
Long Press (in Folder View): Exit the Folder View immediately, regardless of
your current level.
Press to enter or exit the Menu
Press to toggle 'single track' or 'all' remaining time
Page up
Move to the previous track
Move to the next track
Press to start/pause. Press to confirm setting
selected in menu
14
17
19
PC USB
DIGITAL
USB HDD
BLUETOOTH
16
15
18
20
10.
11.
12.
13.
14. +/-
15.
16. ∧/∨
17. PC USB
18. USB HDD
19. Digital
20. Bluetooth
Page down
Press to select the repeat mode
Press to select the random mode
Press to select the display option
Increase/decrease volume
Press to stop
Press to cycle source inputs
Press to select PC USB input
Press to select USB HDD input
Press to cycle through and select digital inputs
Press to select BT input
Page 8
Important
Safety Information
Contents
Getting Started
Controls and Functions
Remote Handset
Connections
Menu Options
System Operations
Playing Operations
Warranty Coverage
Specifications
4: Connections
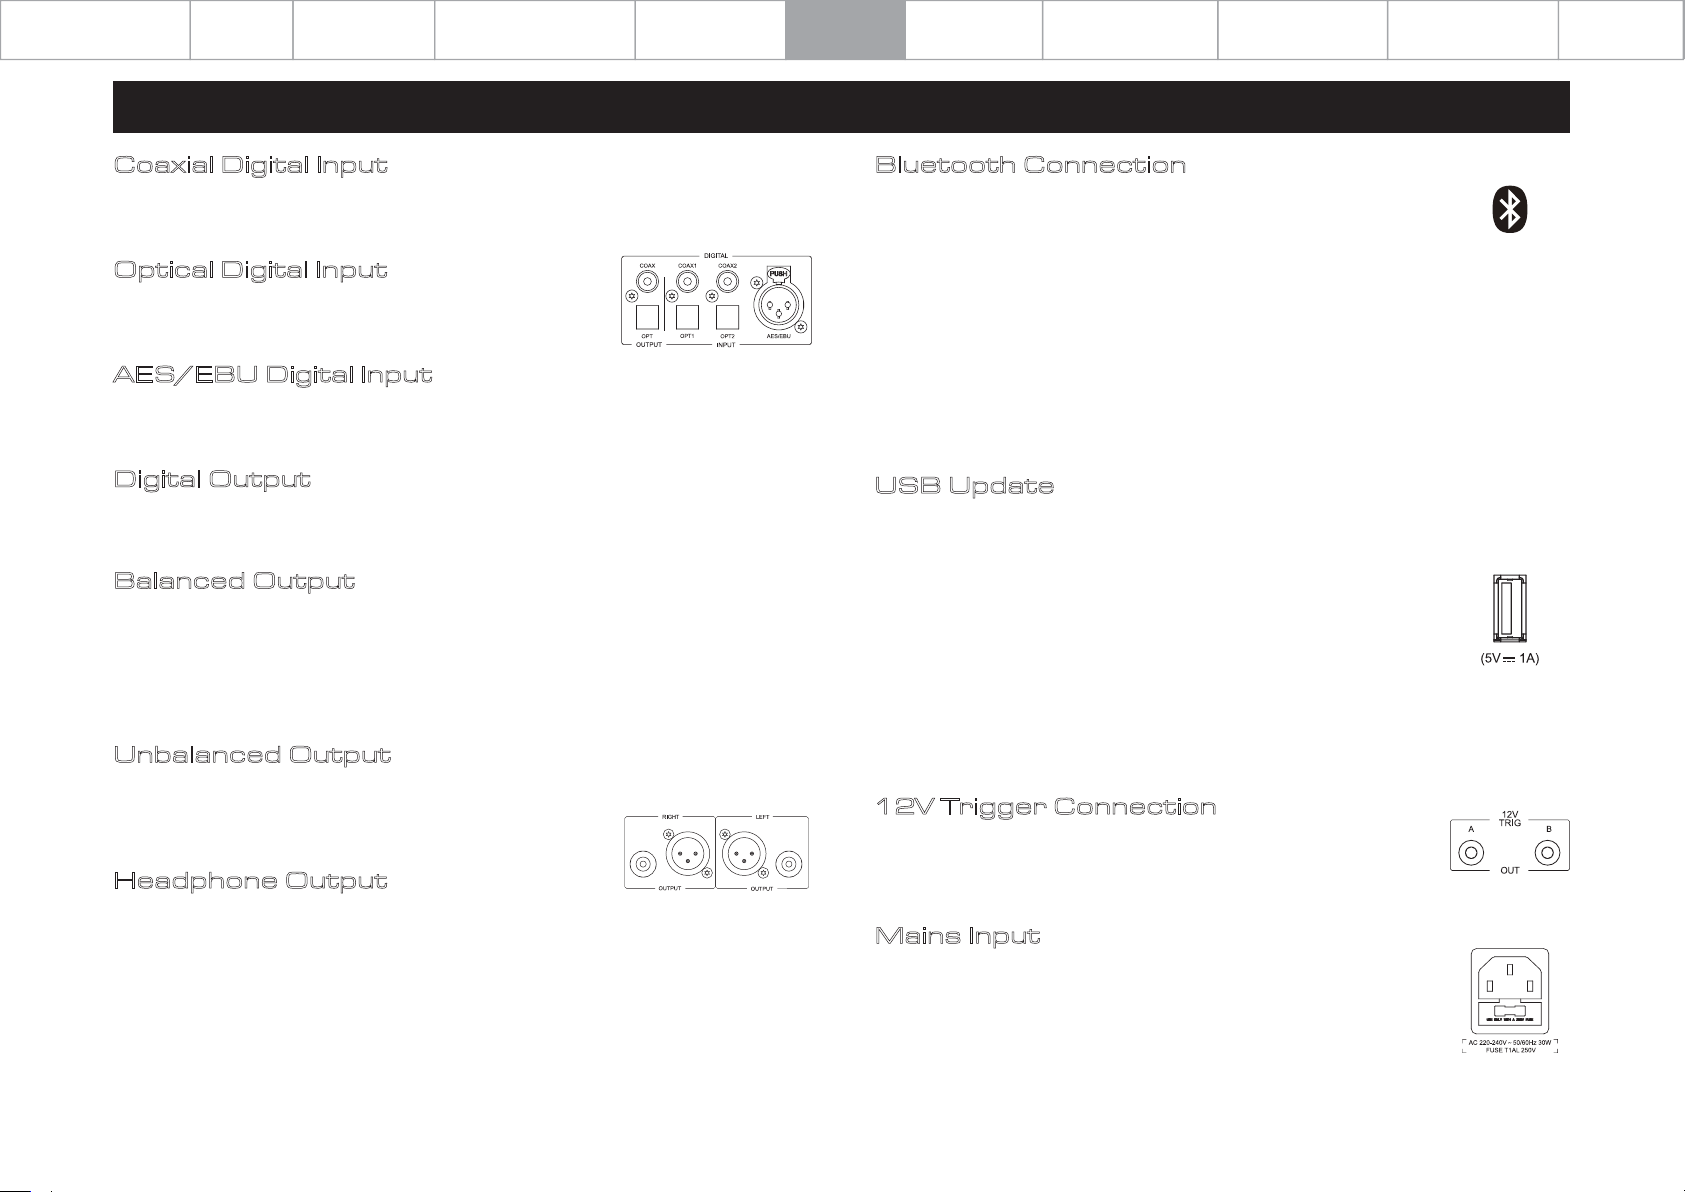
Coaxial Digital Input
nnect your coaxial digital sources to either COAX1 or COAX2.
Co
Optical Digital Input
Connect your optical digital sources to either OPT1 or OPT2.
AES/EBU Digital Input
Connect your AES3/EBU digital sources to the AES/EBU input.
Digital Output
Connect to your DAC or amplifier via coaxial/optical output.
Balanced Output
Balanced connections can provide greater dynamic range
and lower noise. If your amplifier has balanced inputs, please
connect them to the balanced outputs. You will need one XLR
balanced cable per channel.
Page 08
Bluetooth Connection
Select BT source on the D9, on your mobile device search for
'Audiolab D9 BT' and connect.
If you switch to another input on the D9, your mobile device
will be disconnected after 60 seconds. To reconnect, select BT
on the D9, and it will connect to the last paired device or
select 'Audiolab D9 BT' on your mobile device in the
Bluetooth menu, and it will reconnect.
You can disconnect your mobile device by long pressing the
Play/Pause button on the remote control.
USB Update
Copy the update file onto a USB key, following the instructions
included in the update package.
Turn off the D9 at the rear mains switch.
Plug the USB key into the update port. Press and hold the
standby button on the front panel, and then switch on the D9
at the rear mains switch.
Your D9 will then upgrade automatically.
Unbalanced Output
Connect your amplifier to the unbalanced RCA outputs using
a shielded stereo RCA cable.
Headphone Output
A stereo 6.3mm (1/4”) jack is provided on the front panel for
connecting headphones. When headphones are connected,
the audio to the XLR and RCA outputs will be muted.
Once completed, unplug the USB key and restart the device.
12V Trigger Connection
The trigger connections are made using 3.5mm to 3.5mm
mono or stereo jack interconnects (not included).
Mains Input
Before connecting the AC power cord to the D9, please make
sure the Power Switch is in the OFF position. Switch it to the
ON position after connecting the unit to the AC mains.
Page 9
Important
Safety Information
Contents
Getting Started
Controls and Functions
Remote Handset
Connections
Menu Options
System Operations
Playing Operations
Warranty Coverage
Specifications
5: Menu Options
Filter
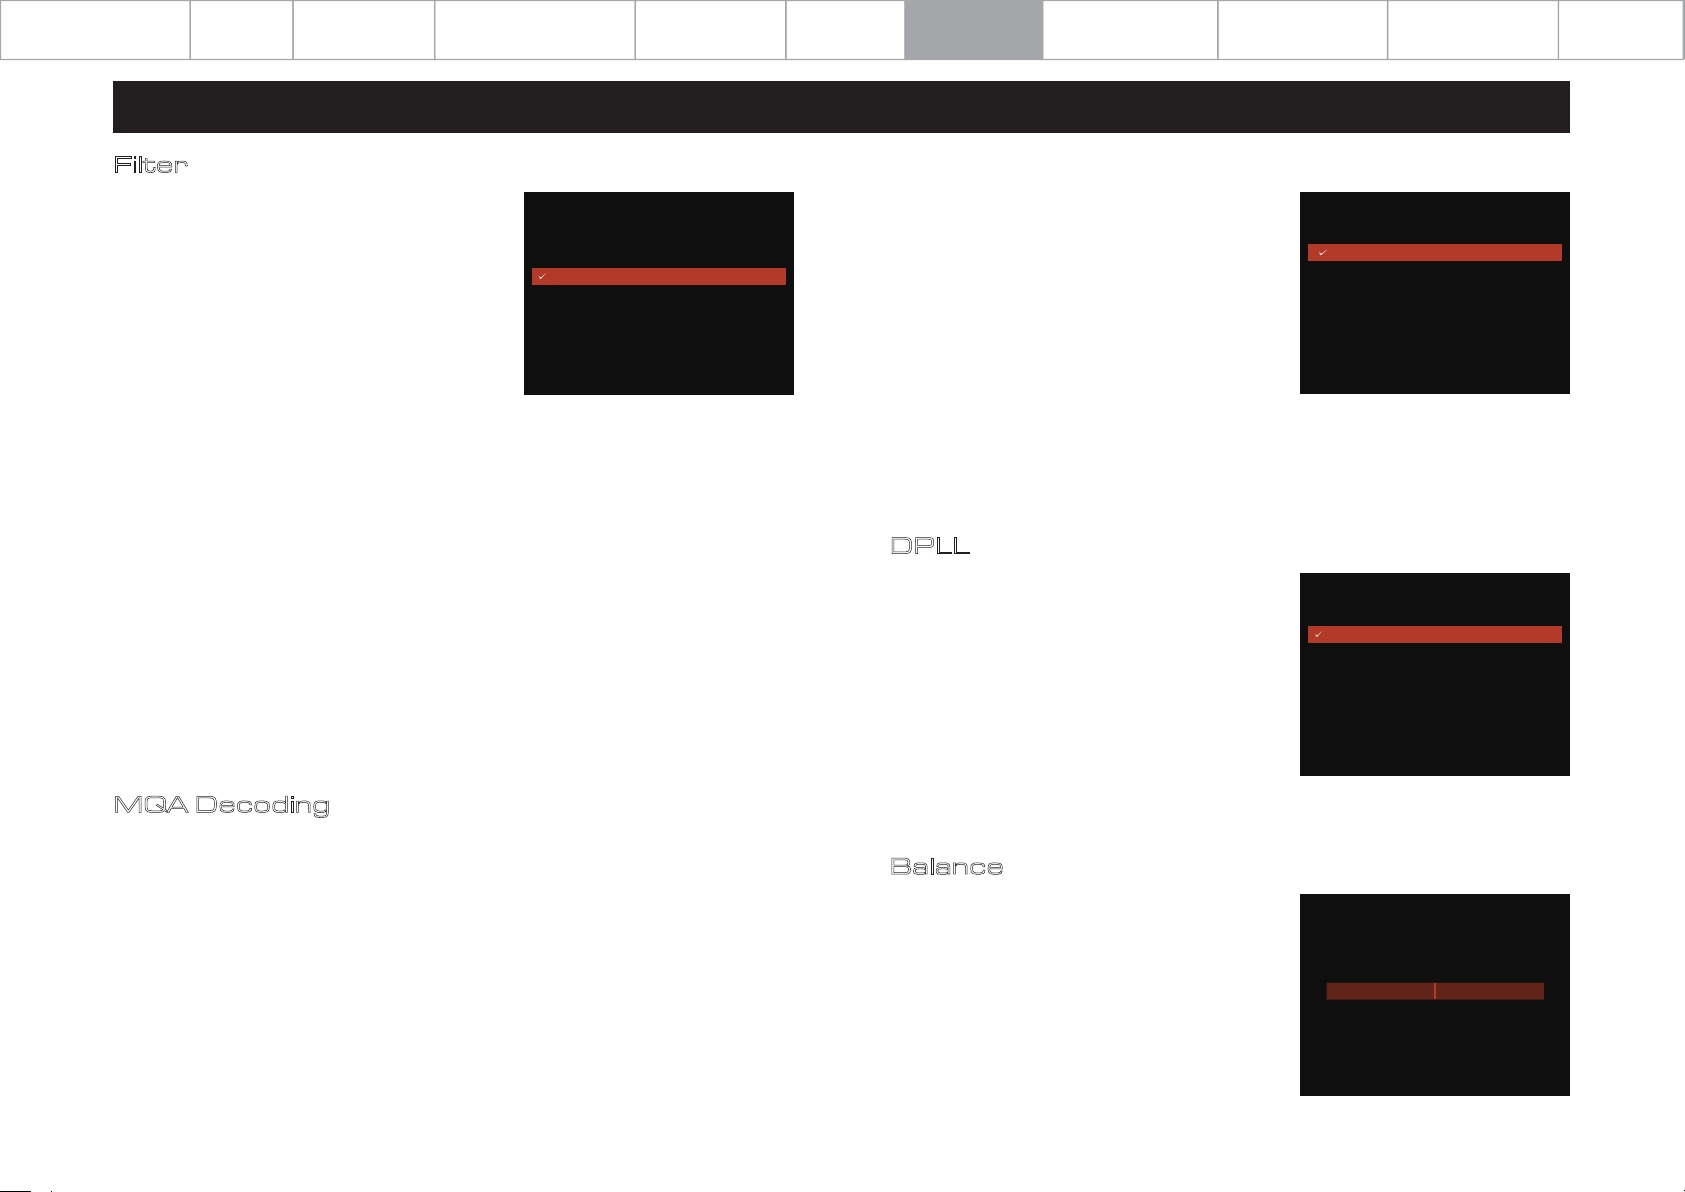
The ESS ES9038PRO SABRE DAC settings allow
for detailed tuning of the audio experience.
The DAC reconstruction filter is a critical aspect
of refining the sound of a system that depends
on listening taste, program material, and
equipment set-up.
Linear Phase (Slow Roll-Off) is the default
setting.
• Linear (Fast): This is the most common filter with clean overall suppression and
excellent rejection, best for music with large transients. Provides crisp clean highs.
• Linear (Slow): A low group delay and symmetrical input response with less
ringing than ‘Linear-phase fast roll-off’. It offers punchier bass than ‘Linear-phase
fast roll-off’ with clean highs. (Default)
• Minimum (Fast): This offers minimal pre-ringing. It is usually preferred for
imaging and sound stages. It offers no aliasing in the frequency domain and
stronger bass than ‘Linear Phase’, with clean highs.
• Minimum (Slow): A Non-Symmetrical filter designed to minimise pre-ringing. It
offers a strong punchy bass with a good transient attack.
• Hybrid: This is the combination of ‘Linear-phase’ and ‘Minimum-phase’. It offers
a fast transient attack, strong punchy bass and crisp highs.
MQA Decoding
There are four MQA decoding options:
• Full Decode A - (PCM Upsampling Off) - This enables the full internal MQA
decoding process of the D9, and simultaneously enables PCM streaming via SPDIF
(COAX or OPTICAL) up to 192kHz. The SPDIF outputs will be switched off when
MQA decoding is taking place, or if the PCM stream sample rate is above 192kHz.
This mode is best for those streaming MQA and using the analogue outputs, or for
streaming PCM (FLAC, WAV etc.) and using either analogue or digital outputs.
• Full Decode B - (PCM Upsampling On) - this enables the full internal MQA
decoding process of the D9, and up-samples both MQA and PCM to 352.8kHz or
384kHz. This mode is for use with the analogue outputs only. The SPDIF outputs
(COAX and OPTICAL) are disabled.
< Filter
Linear
Linear
Minimum
Minimum
Hybrid
(Fast)
(Slow)
(Fast)
(Slow)
(Fast)
Page 09
• Core Decode - this option is suitable for
users connecting to a 3rd party external MQA
renderer via SPDIF, up to a sample rate of
192kHz.
• Passthrough Mode - this will bypass the
MQA decoding stage in the D9 and allow the
full non-decoded signal to pass through the D9
via the digital outputs. This mode is suited to
users who prefer to use a separate DAC within
their system (for example, when using the D9 with the Audiolab 9000A). The MQA
decoding will therefore happen at the external DAC stage, not within the D9.
Default setting is Full Decode A (PCM Upsampling OFF).
DPLL
This setting is used for changing the bandwidth
of the digital phase lock loop of the D/A
converter to accommodate different levels of
jitter on the incoming SPDIF signal. Normal
mode should be selected for signals with low
jitter, while Wide mode should be selected for
signals with abnormal jitter.
For best audio quality, leave this setting at the
default value 'Normal'. Only use 'Wide' use
Wide for a given input if the system is having problems locking onto the source.
Balance
Adjust the Left and Right balance of the D9
audio output.
< MQA Decoding
Full Decode A
Full Decode B
Core Decode
Passthrough Mode
< DPLL
OPT2
COAX2
< Balance
L 0.0dB R 0.0dB
Normal
Normal
Page 10
Important
Safety Information
Contents
Getting Started
Controls and Functions
Remote Handset
Connections
Menu Options
System Operations
Playing Operations
Warranty Coverage
Specifications
5: Menu Options
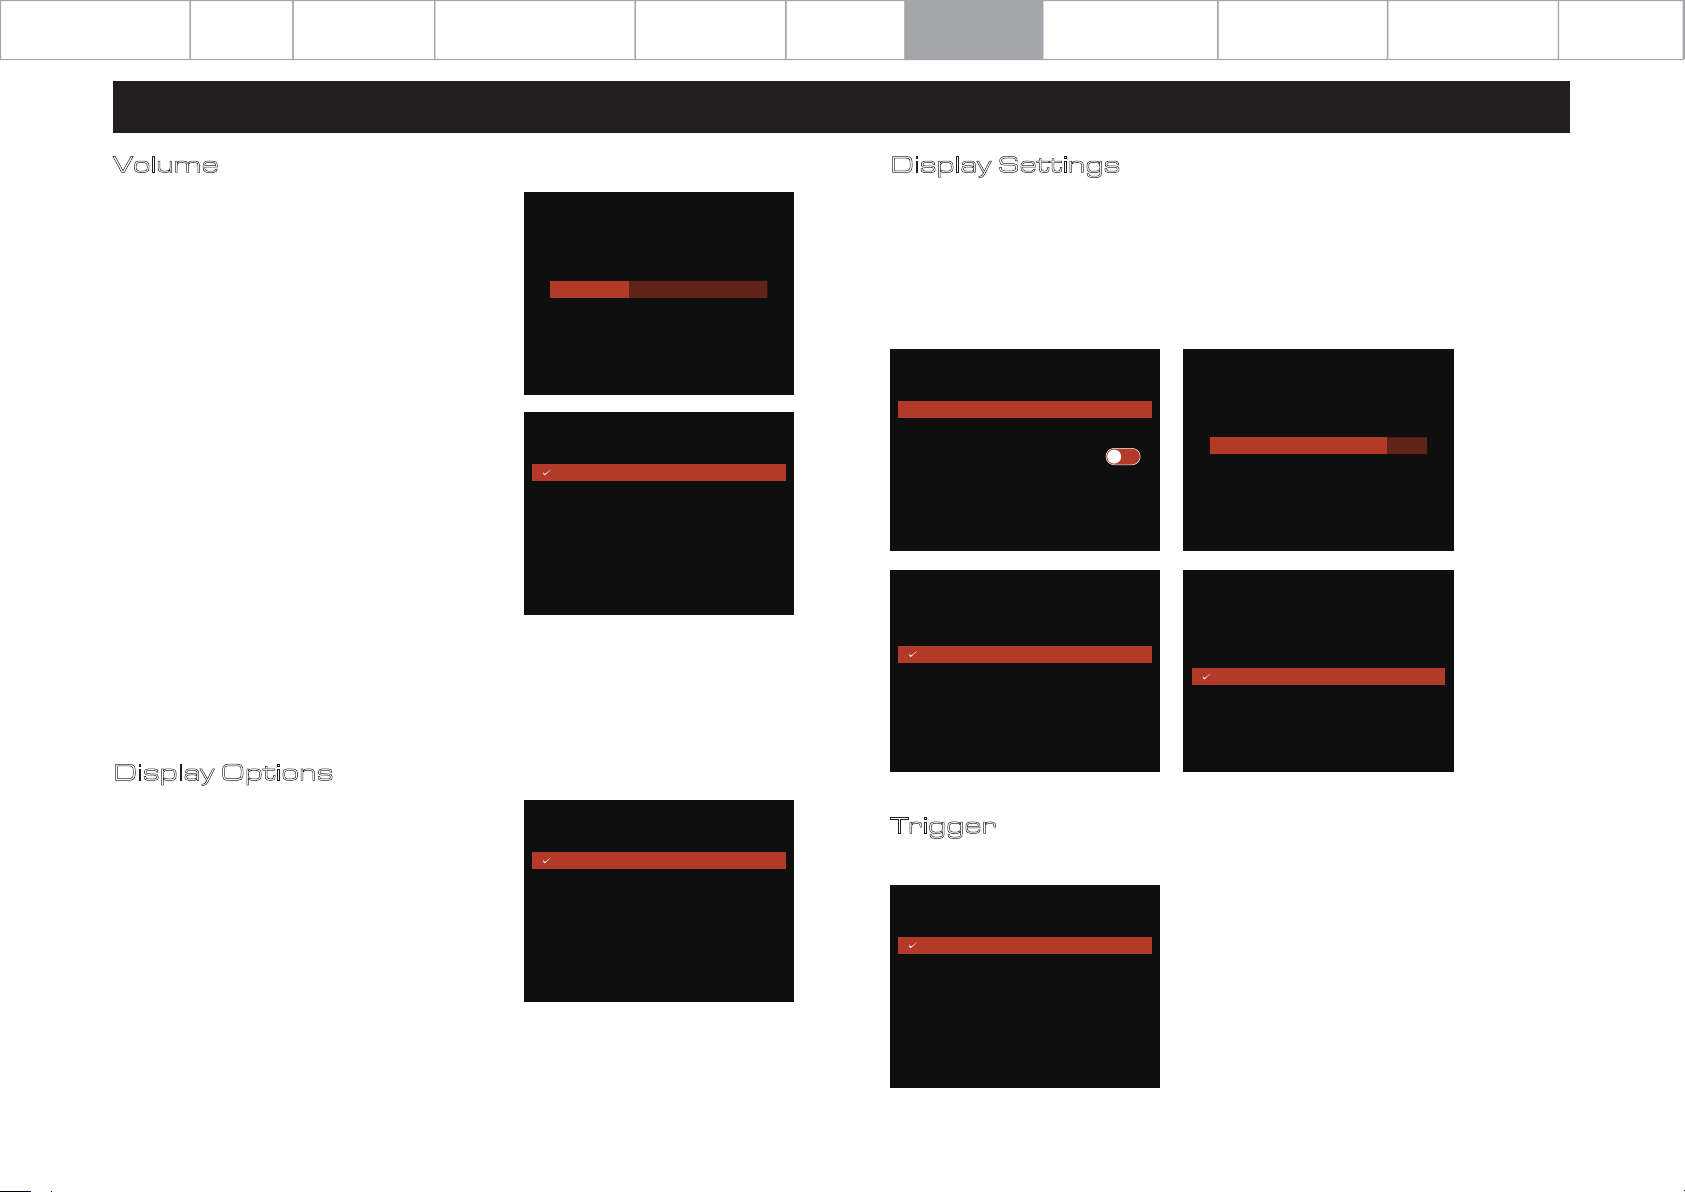
Volume
Power On Limit
Power On Limit sets the maximum volume level
as the unit is switched on. When coming out of
standby, the volume setting will be set to the
level that was used at the end of the previous
operating session OR to the Power On Limit
value set in this menu, whichever is lowest.
This will avoid a sudden loud signal at the
beginning of a new session.
Output
The analogue output level can be switched
between FIXED and ADJUSTABLE.
When set to FIXED mode, the analogue output
level will be fixed to the maximum output. This
can be useful when connecting to an
integrated amplifiers' AUX input, and therefore
using the integrated amplifiers volume control.
When set to ADJUSTABLE, the D9 Volume control is used to adjust the level of the
analogue output. This is required when connecting directly to a power amplifier.
The default setting on the D9 is ADJUSTABLE.
< Volume
Power On Limit -35dB
-35dB
< Volume
Output
Adjustable
Fixed
Page 10
Display Settings
Brightness: Adjust the brightness of the D9 front panel display.
Display Time Out: Adjust the time after which the D9 display will revert to your
chosen display option, from the home screen, after performing volume
adjustments and other operations.
Animation: Turn display animations on or off.
< Display Settings
Brightness
Time Out
Animation
< Display Settings
Time Out
5s
10s
15s
30s
8
5s
ON
< Display Settings
Brightness
108
< Display Settings
Animation
Off
On
Display Options
The D9 has different display modes (Home,
VU Digital, VU Analogue, Audiolab logo &
Display Off).
When 'Display Off' is selected, press any key to
turn on the display. The display will revert to
'off' after 5 seconds of inactivity, by default.
You can change the duration to 10, 15 and 30
seconds from the Display Time Out option in
the menu.
< Display Options
Home
VU Digital
VU Analogue
Audiolab
Display Off
Trigger
Activate or deactivate the 12V trigger function of the D9.
< Trigger
Off
On
Page 11
Important
Safety Information
Contents
Getting Started
Controls and Functions
Remote Handset
Connections
Menu Options
System Operations
Playing Operations
Warranty Coverage
Specifications
5: Menu Options
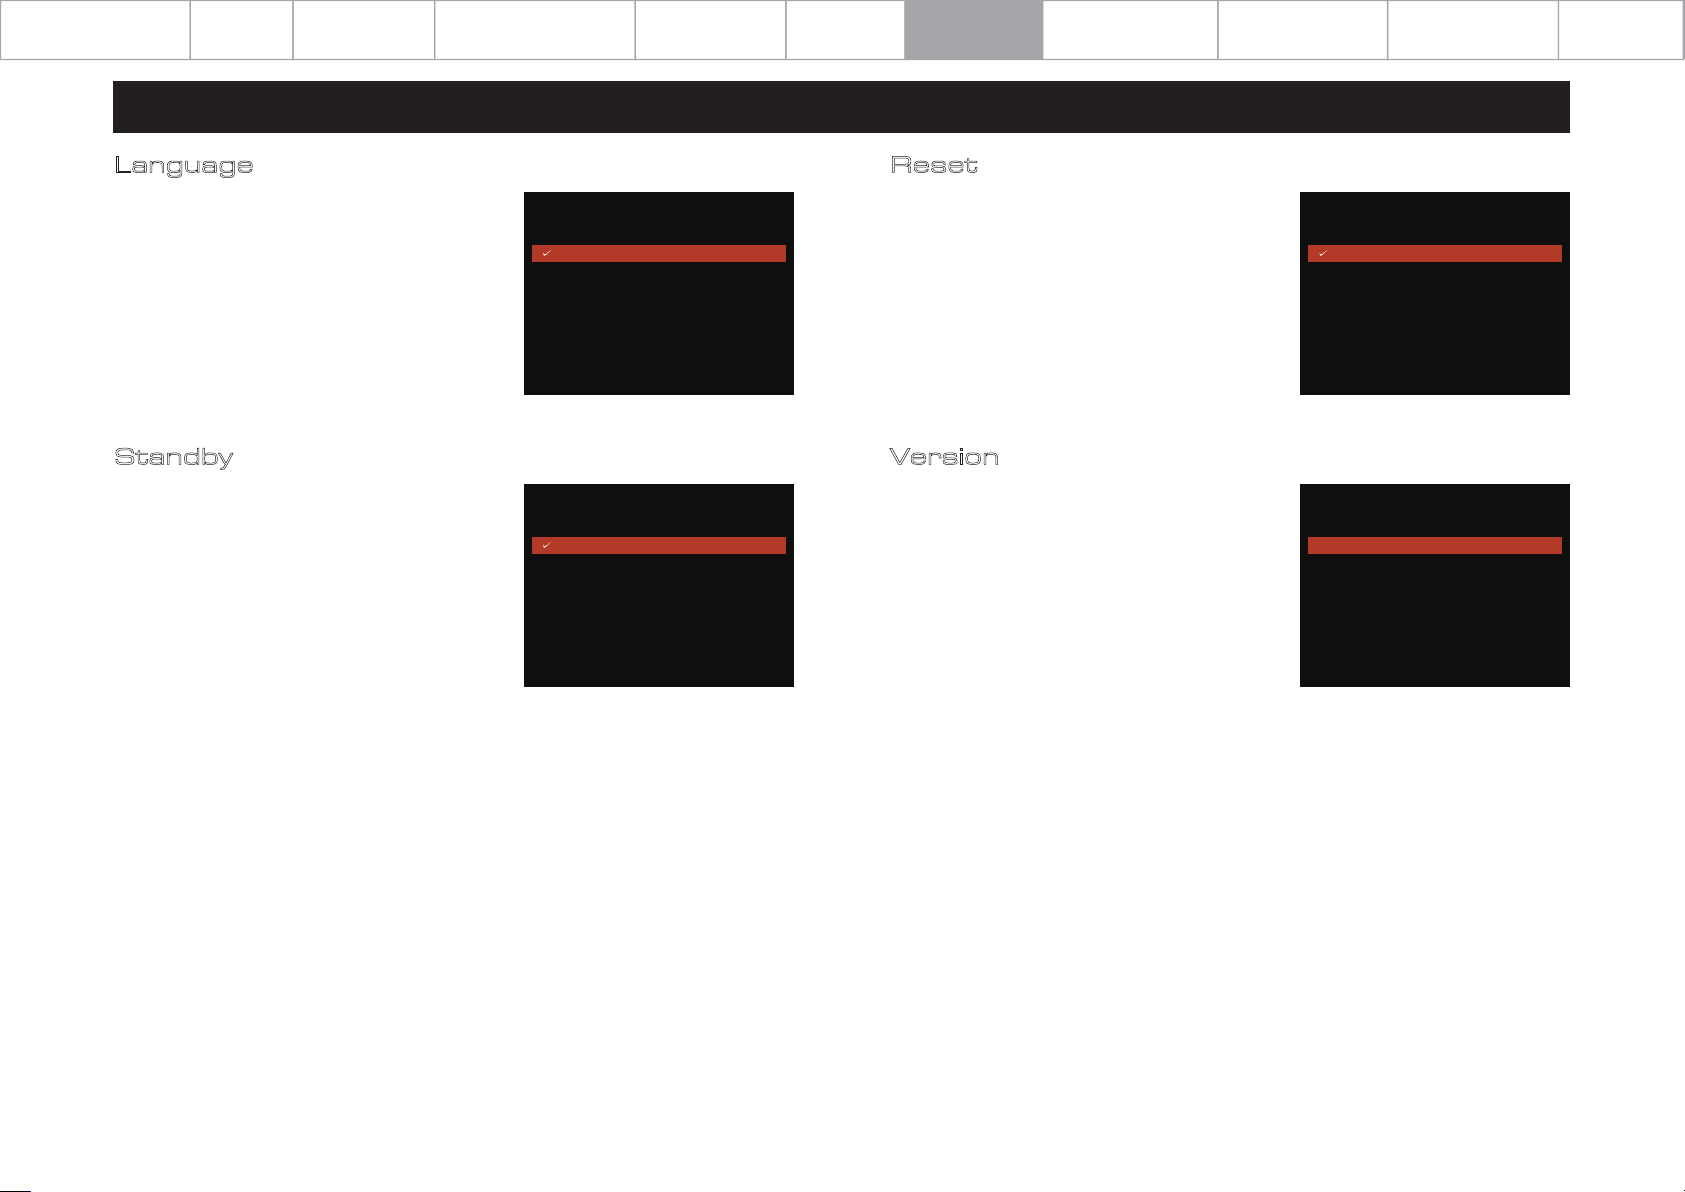
Language
There are multiple different languages you can
choose from to display your system so you can
view information in your preferred language.
Default language is English.
Standby
The auto-standby feature will put the D9 into
standby mode after 20 minutes of inactivity.
This feature can also be user-defined and set
to 20 minutes, 60 minutes or 'Never'. The latter
option means that the D9 will not enter
standby mode without user instruction by way
of the front panel ‘standby’ button or remote
control ‘standby’ button.
< Language
< Standby
English
简体中文
繁体中文
Dansk
Deutsch
Never
20 minutes
60 minutes
Reset
Reset the D9 to the factory default settings.
Version
Check the currently installed firmware version.
Page 11
< Reset
No
Yes
< Version
VER — 1.XX
Page 12
Important
Safety Information
Contents
Getting Started
Controls and Functions
Remote Handset
Connections
Menu Options
System Operations
Playing Operations
Warranty Coverage
Specifications
6: System Operations
Switching on and Off
The D9 should be switched on before the amplification stage in your system.
When switching off your system, turn off the amplifier stage before switching off
the D9.
Standby Mode
The D9 will enter standby mode after being powered on. Press the “Standby”
button to bring the D9 out of standby, the power indicator LED becomes brighter
and the display shows “Audiolab” welcome screen while the unit is getting ready
for operation.
Source Select
Rotate the MODE knob on the front panel or use the source (▼or▲) buttons on
the remote handset to select different source inputs.
Volume Control
To adjust the volume, rotate the VOL knob on the front panel, or use the volume
up/down keys on the remote control. The range is -78dB to 0dB.
Page 12
Mute
Press the VOL knob on the front panel or MUTE button on the remote handset to
mute / un-mute the sound.
Display Options
Press the DISPLAY button on the remote, or use the Display Options in the menu
to choose from VU Digital, VU Analogue, the Audiolab logo, the default home page,
or to turn the display off.
When the display is off, pressing any key on the remote, or any control on the front
panel will turn the display on briefly while you make changes.
When switching on the D9, the volume will be set to the previously used volume
setting.
If your previous volume setting was higher than the assigned power-on volume
limit, then the power-on volume limit will be applied.
Following a factory reset, the volume will be set to -30dB.
Page 13
Important
Safety Information
Contents
Getting Started
Controls and Functions
Remote Handset
Connections
Menu Options
System Operations
Playing Operations
Warranty Coverage
Specifications
6: System Operations
Page 13
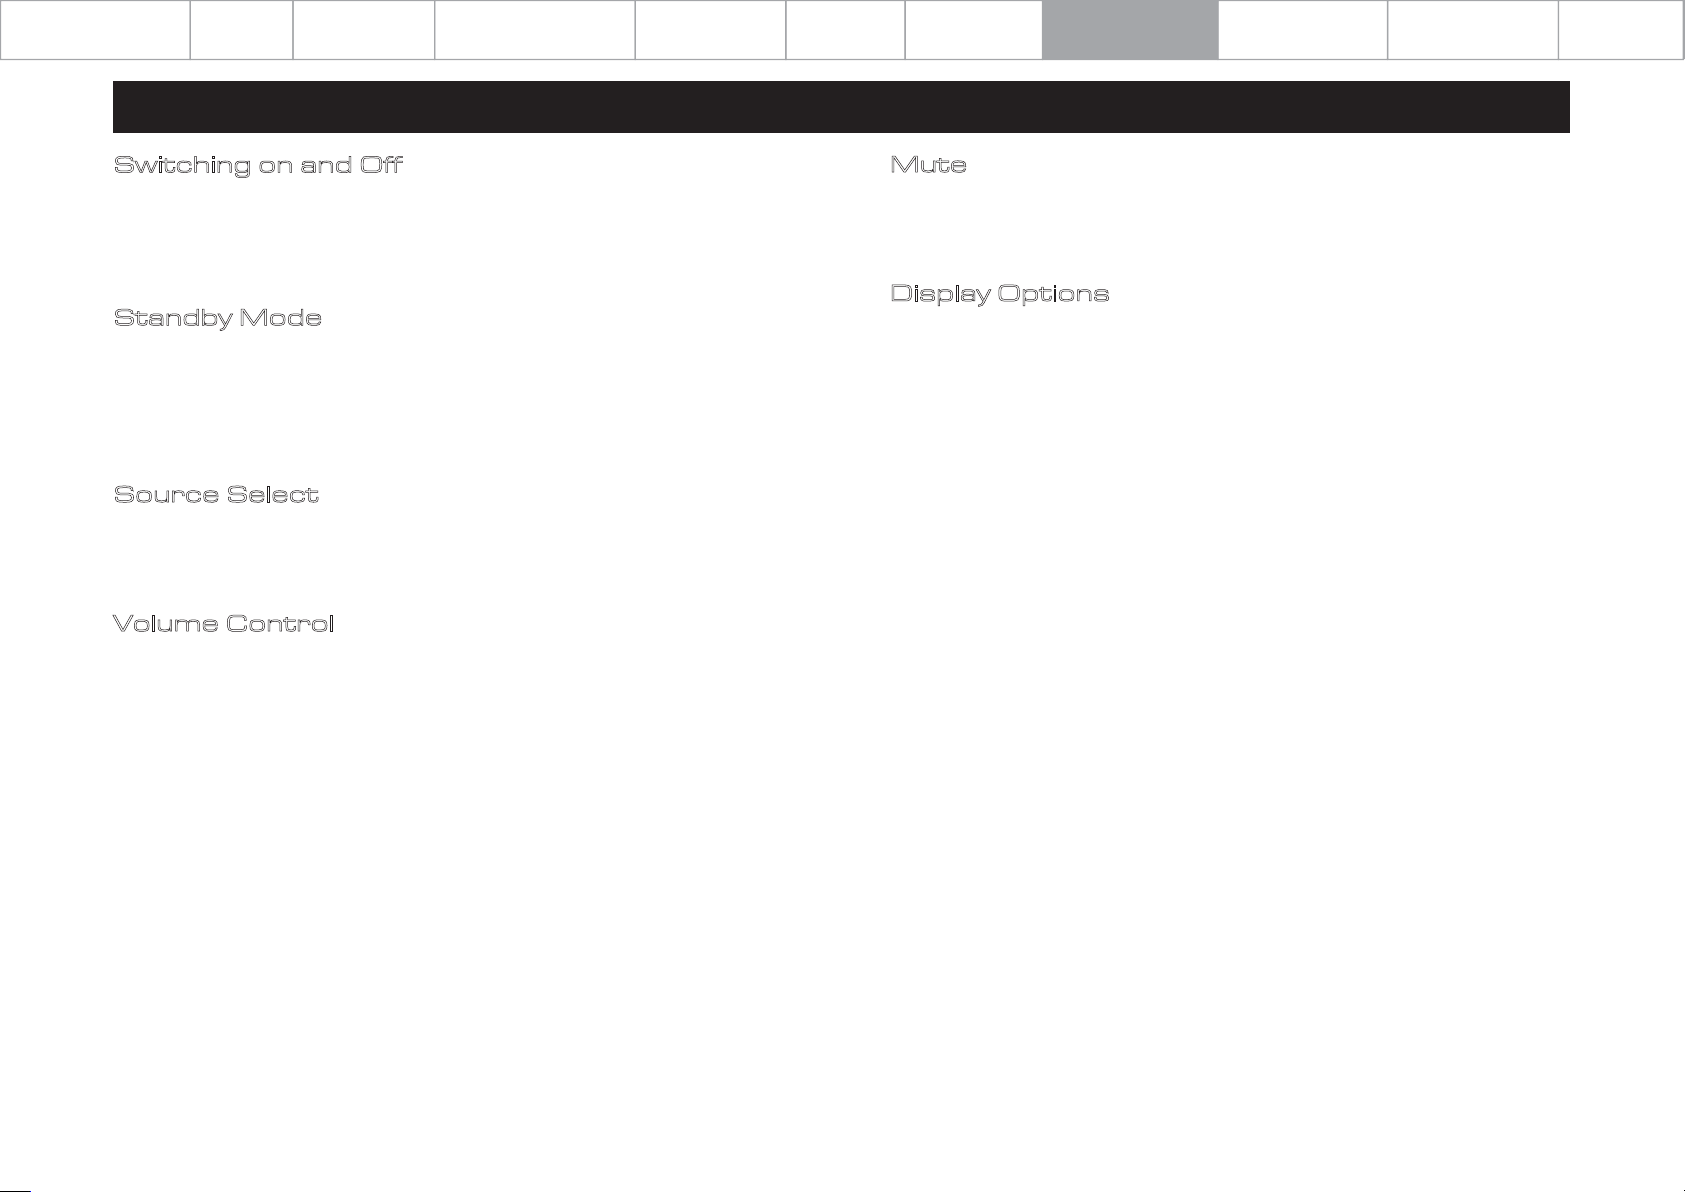
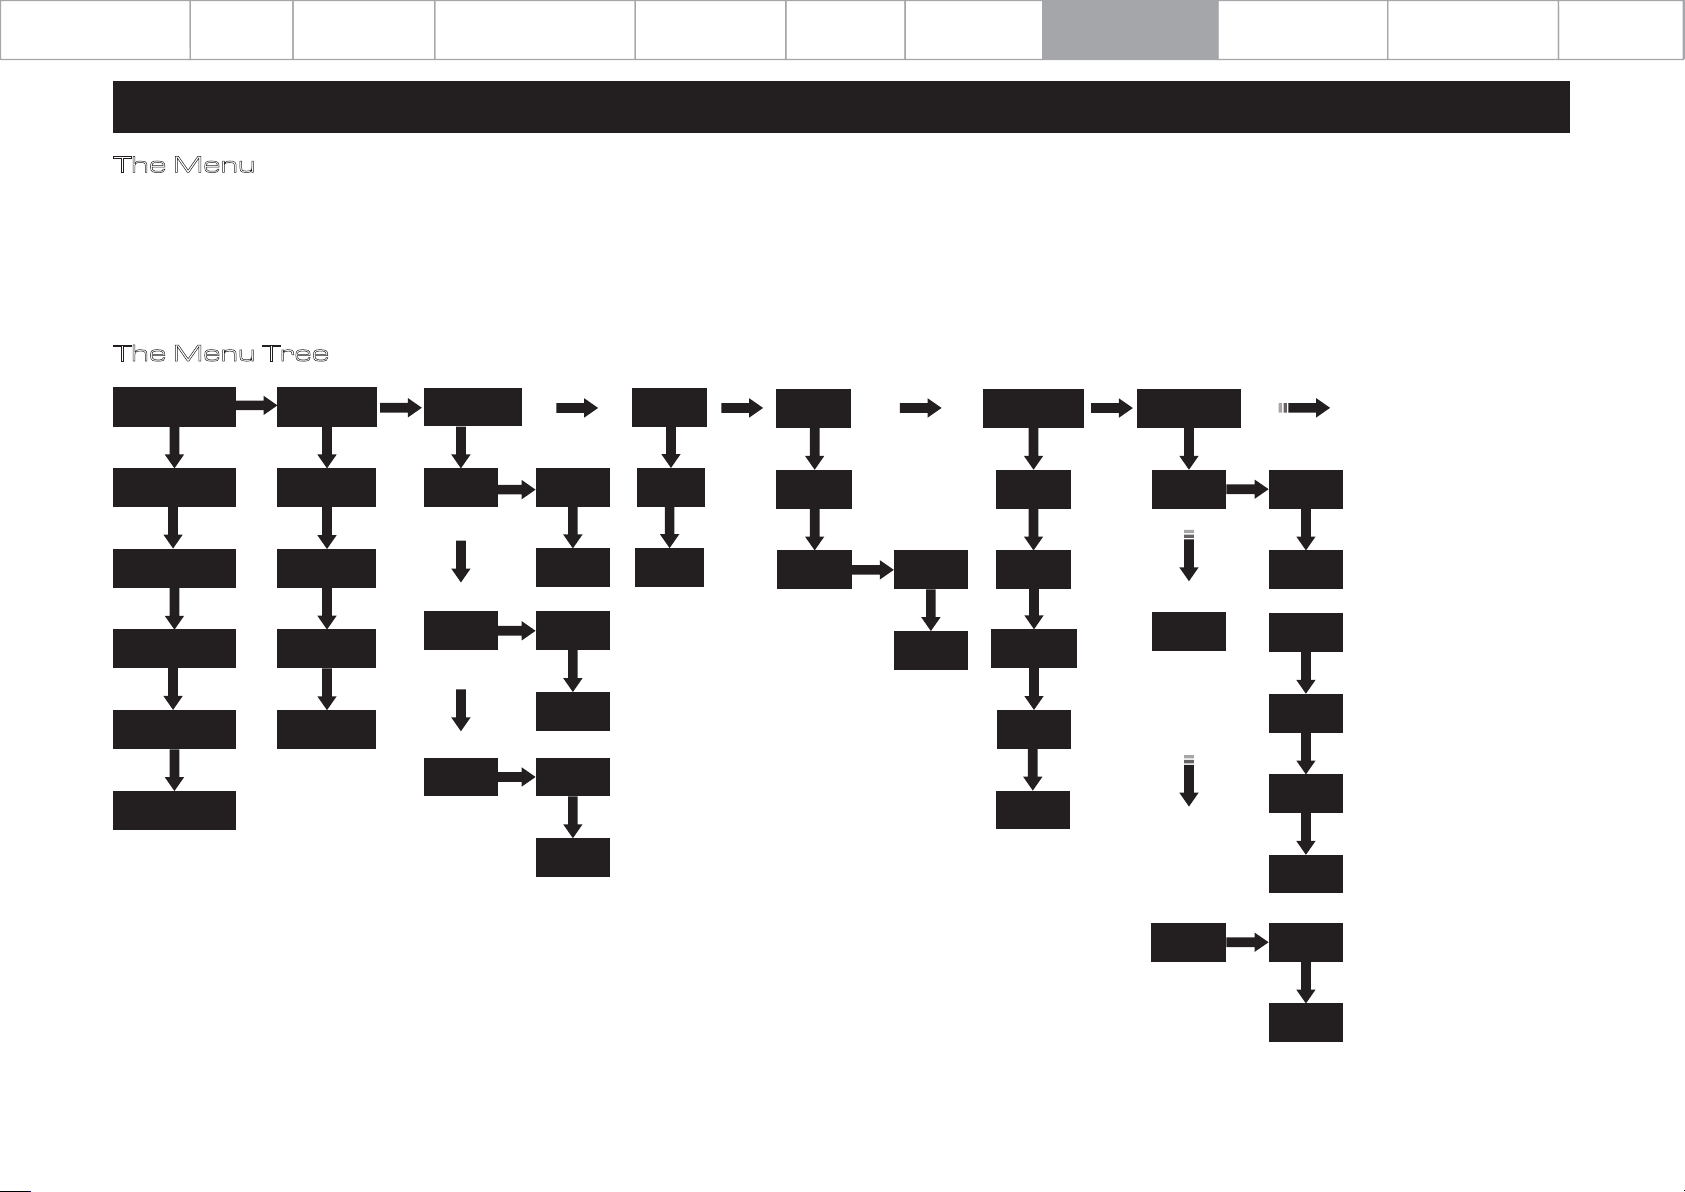
The Menu
The menu enables you to customise the unit and optimise the interface with other equipment in your system.
The D9 has 13 different menu pages. Press the MODE knob on front panel or MENU key on the remote to enter menu mode, and then press VOL- or VOL+ to turn to different
setting, press to the sub menu. You can also press MODE button on the front to enter the menu, then rotate it turn to different setting, press to the sub menu. Press again to
confirm.
The Menu Tree
Filter
Linear (Fast)
Linear (Slow)
Minimum (Fast)
MQA Docoding
Full deconde A
Full deconde B
Core decode
DPLL
OPT2
COAX2
COAX2
Normal
Wide
Normal
Balance
L +3dB
R +3dB
Volume
Power On limit
-40 ~ -20dB
Output Adjustable
Fixed
Display Option
Home
VU Digital
VU Analogue
Display Settings
Brightness
Time out
1
10
5s
Minimum (Slow)
Hybrid (Fast)
Passthrough
COAX2
NormalARC
Wide
Wide
Audiolab
Display Off
Animation
10s
15s
30s
On
Off
Page 14
Important
Safety Information
Contents
Getting Started
Controls and Functions
Remote Handset
Connections
Menu Options
System Operations
Playing Operations
Warranty Coverage
Specifications
6: System Operations
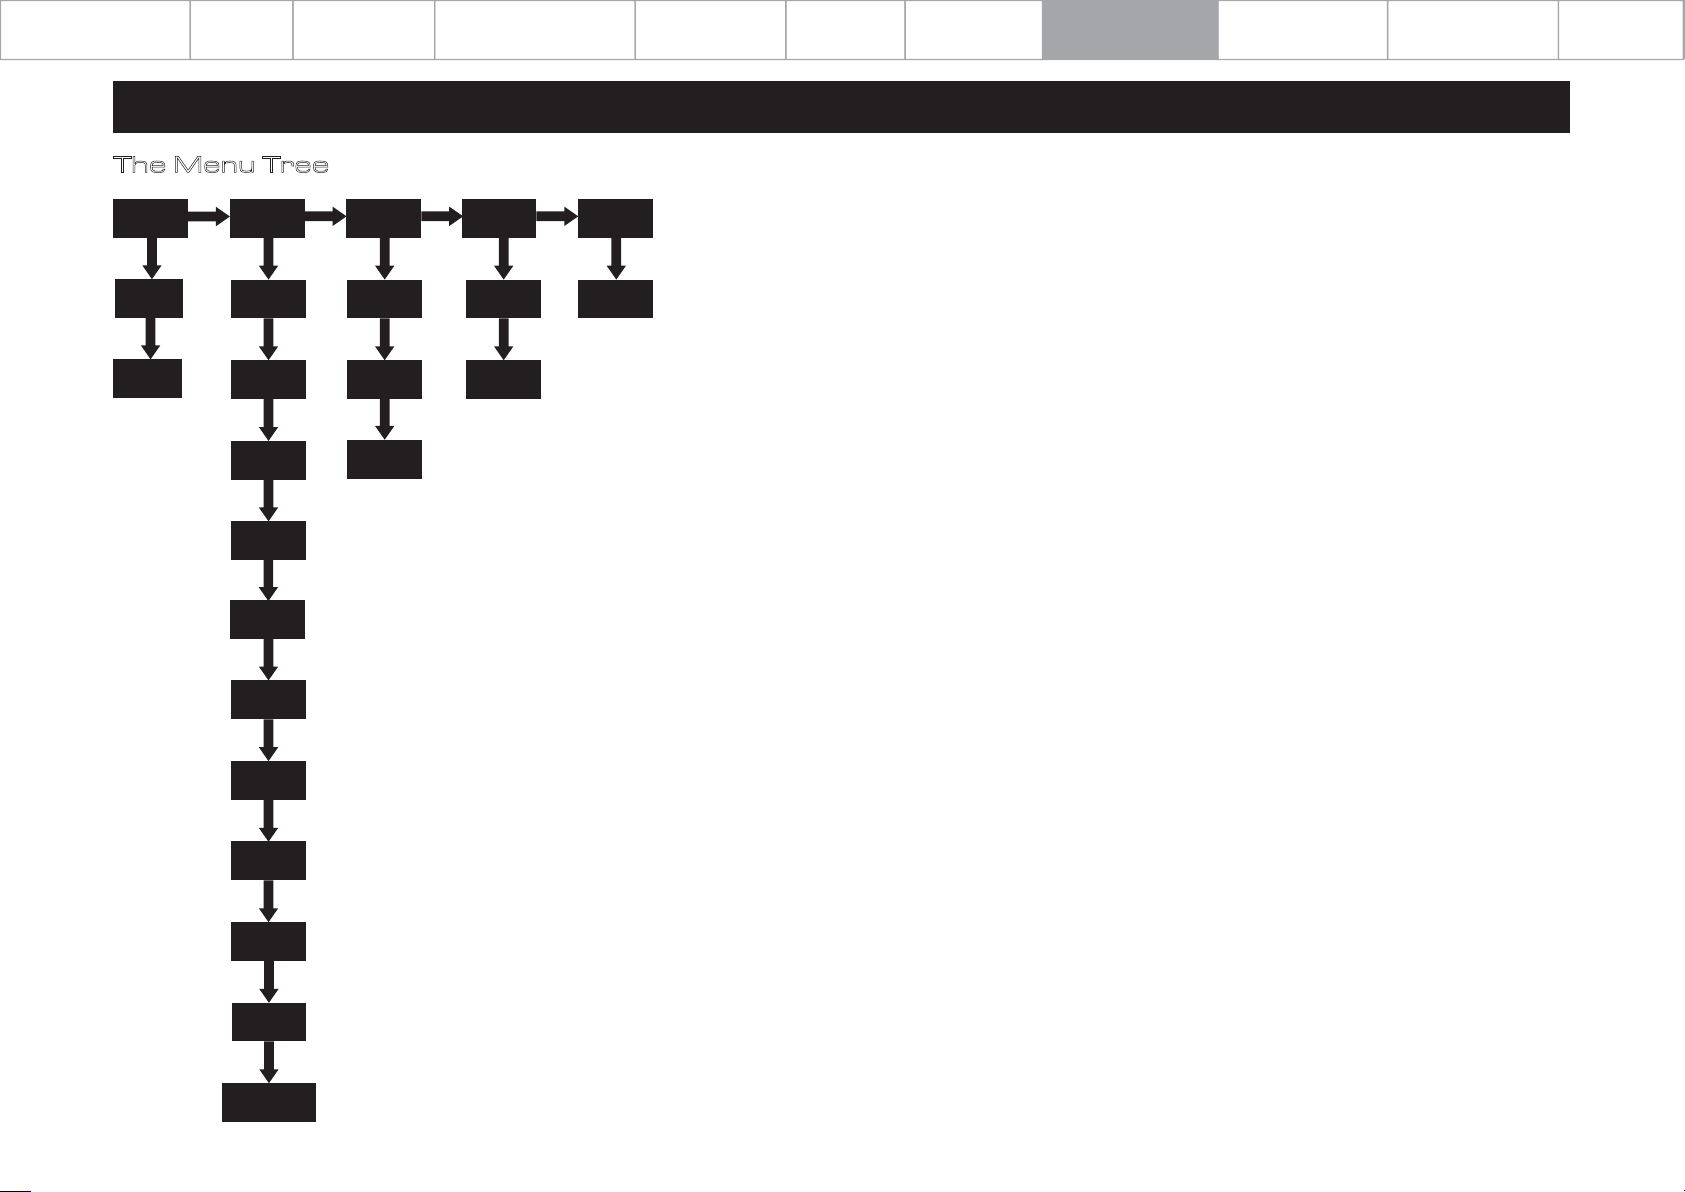
The Menu Tree
Trigger
Off
On
Language
English
简体中文
繁體中文
Dansk
Deutsch
Standby
Never
20min
60min
Reset Version
No
Yes
VER-1.43
Page 14
Español
Francais
Italiano
Nederlands
Polski
Suomalaninen
Page 15
Important
Safety Information
Contents
Getting Started
Controls and Functions
Remote Handset
Connections
Menu Options
System Operations
Playing Operations
Warranty Coverage
Specifications
7: Playing Operations
Page 15
Playing PC USB Input
USB DRIVERS
To download Windows Drivers, please see the USB Guide. Any firmware updates will also be available from www.audiolab.co.uk
Connect your computer to the D9 via USB cable (type A to Type B), change the Play mode to USB input using the handset or the button on the front panel.
'No Input Signal' will be displayed if there is no input signal to the USB input. When you play a file, the digital inputs will lock onto the digital signal or as soon as there is an input
signal for USB. The display screen will then indicate the presence of an 'Active Input' and show the output sampling frequency of the music file in your computer.
Playing Tracks from USB Storage Device
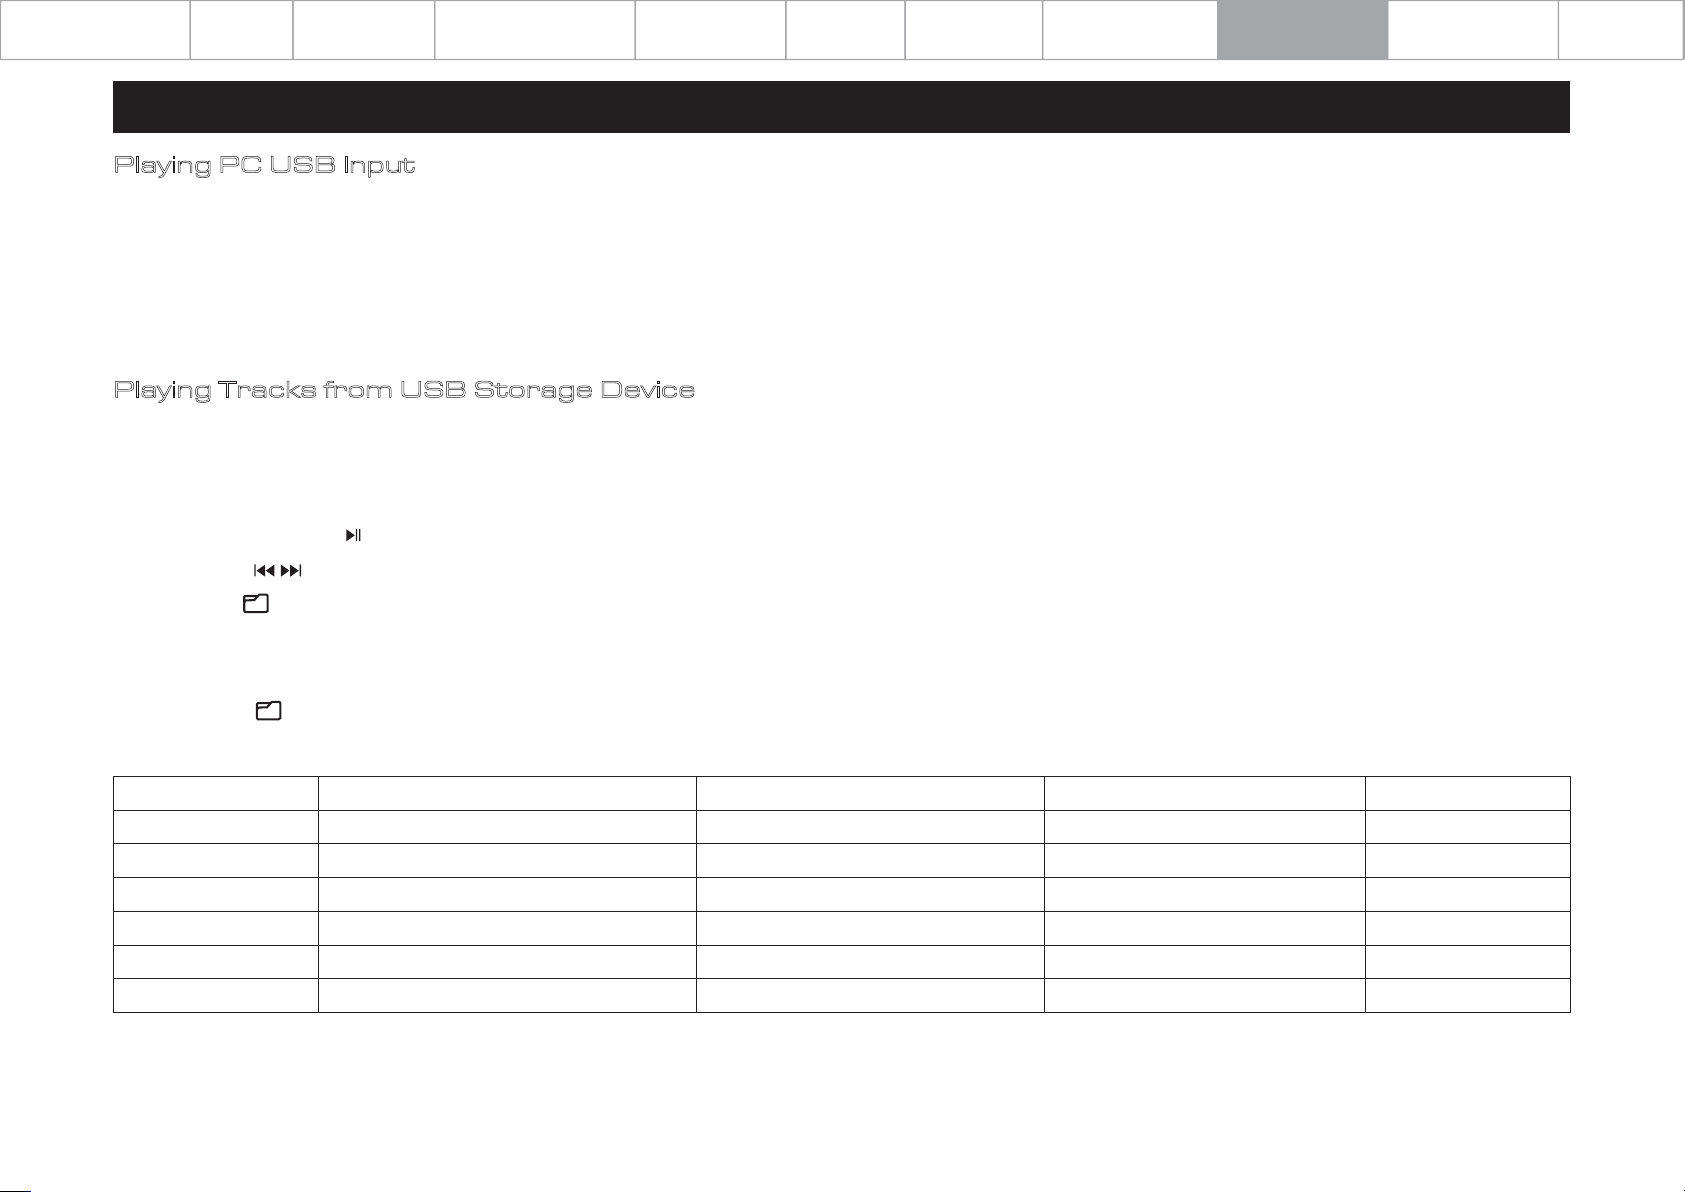
The D9 can play music tracks saved on a USB HDD storage devices and is compatible with USB device that are 'FAT16', 'FAT32' and 'exFAT' formatted.
The D9 supports audio files in the format of WMA, MP3, WAV, FLAC, AAC and APE.
Connect your USB drive to the rear panel USB-A port. Select USB HDD playback input.
Play/Pause by pressing the button on the remote control.
You can use the buttons on the remote control to skip, fast forward and fast reverse tracks.
Long press the button on the remote to enable/disable Folder Play mode.
Enable: All the files in the selected folder are played.
Disable: All the files in all the folders are played.
Briefly press the button on the remote to enter folder browse. When you browse, briefly press to return to previous folder, long press to exit the browse
Compatible Formats
WMA
MP3
WAV
AAC
FLAC
APE
Sampling Frequency
44.1/48kHz
44.1/48kHz
44.1/48/96kHz
44.1/48kHz
44.1/48/96kHz
44.1/48kHz
Bit Rate
32-320kpbs
32-384kbps
64-768kbps
128kbps and above
All bitrates
All bitrates
Bit Length
Up to 32bit
Extension
.wma
.mp3
.wav
.m4a
.flac
.ape
Page 16
Important
Safety Information
Contents
Getting Started
Controls and Functions
Remote Handset
Connections
Menu Options
System Operations
Playing Operations
Warranty Coverage
Specifications
8: Warranty Coverage
Audiolab warrants this product, subject to the terms and conditions below, to be
free from defects in materials and workmanship. During the warranty period
Audiolab will repair or replace (at Audiolab’s option) this product, or any defective
part in this product, if it is found to be defective due to faulty materials,
workmanship or function. The warranty period may vary from country to country.
Online Registration
Scan the QR code using a smart-phone device,
for product warranty registration online.
The three (3) year extended warranty is applicable to items purchased from Jan 1st
2021, onwards. Items purchased prior to this date are not eligible for this extended
warranty service but are subject to statutory warranty claims and all applicable
consumer rights.
To qualify for the extended 3 year warranty, you must register your product within
ninety (90) calendar days from the date of purchase.
Visit audiolab.co.uk/warranty-registration to complete your online registration.
Items not registered online will have a Limited Warranty for one (1) year, or for the
period of your country’s statutory warranty, whichever is longer.
Warranty can only be offered to products registered with proof of purchase with
date, model and details of the authorised dealer clearly stated on the
receipt/invoice. Please keep the original receipt/invoice in case it is required for a
warranty claim.
This Limited Warranty is non-transferable and is offered exclusively to the original
owner.
This Limited Warranty is valid only in the original country of purchase.
Repairs or replacements are provided under this warranty are the exclusive
remedy of the consumer. Audiolab shall not be liable for any incidental or
consequential damages for breach of any expenses or implied warranty with any
product. Except to the extent prohibited by law, this warranty is exclusive and in
lieu of all other warranties whatsoever, both expressed and implied, including but
not limited to the warrant of merchantability and fitness for practical purpose.
Page 16
This warranty provides benefits that are additional to and do not affect your
statutory consumer rights.
This Limited Warranty offer is subject to correct information being submitted in
your application. Incorrect dates or mismatched purchase receipt dates that are
outside of the warranty terms will immediately invalidate any warranty claim.
*Please check with your dealer local distributor for further information.
Exclusions
The following items are excluded from the Audiolab warranty:
Normal wear and tear and cosmetic damage (including but not limited to any wear
from reasonable use, environmental deterioration or neglect)
Products on which the serial number has been removed, altered or otherwise
made illegible.
Products not purchased from an authorised Audiolab dealer.
Products that were not new at the time of original purchase.
Products sold ‘as is’, ‘as seen’ or ‘with faults’
Product not purchased from an Authorised Dealer/Distributor within the region of
the claim (ie parallel imports or grey market products)
Accidental damage or faults caused by commercial use, acts of God, incorrect
installation, incorrect connection, incorrect packaging, misuse or careless
operation or handling which is not in accordance with the user instructions.
Equipment that has been operated in conjunction with unsuitable, inappropriate
or faulty apparatus.
Repairs, alterations or modifications carried out by parties other than Audiolab or
its authorised service partners.
Damage in transit that cannot be attributable to the fault of Audiolab, the
authorised distributor or dealer (ie. claims otherwise covered by transit insurance.)
Faults relating to abnormal or inappropriate power supply voltage or power
surges.
Faults relating to extremities in temperature, exposure to heat, water or other
liquids, insects, excessive moisture, sand, chemicals, battery leakage or any other
contaminants.
Page 17
Important
Safety Information
Contents
Getting Started
Controls and Functions
Remote Handset
Connections
Menu Options
System Operations
Playing Operations
Warranty Coverage
Specifications
8: Warranty Coverage
Any force majeure events, including but not limited to any acts of God, fire,
lightning, typhoon, storm, earthquake, hurricane, natural disaster, tsunami, flood,
war, riot, public disturbance.
Any other causes beyond the reasonable control of either Audiolab and its
Authorised Distributor.
Please note items purchased before 1st Jan 2021 are not eligible for the extended
warranty claim.
How to Claim
To obtain warranty service please contact the authorised dealer from which you
purchased this product and present the limited warranty certificate offered upon
registration of your product’s extended warranty offer.
Do not dispatch goods without the prior agreement of the dealer distributor or
authorised service centre.
If asked to return products for inspection and or repair, please pack carefully
preferably in the original carton or packaging affording an equal degree of
protection and returned via insured, trackable courier service.
The authorised dealer or distributor will offer full return details and instructions.
However, please note if unsuitable packaging is used the warranty may be deemed
void due to improper action in return.
Page 17
than the official distributor or authorised service centre.
Other than the warranty and services set out in this warranty, to the fullest extent
permitted by law, Audiolab shall not be liable to you and/or any third party or entity
whatsoever for:
Any loss, damages and/or malfunction caused to any product(s) which is/are
•
connected to any of the products covered by this warranty.
•
Any damages, loss and liability, whether direct, indirect, incidental, consequential
special, punitive or otherwise, howsoever caused by, arising out of or otherwise,
in relation to the installation, delivery, use, service, repair, replacement and/or
maintenance of the product;
•
Any damages, loss and liability under this warranty in respect of any act,
omission, or negligence of any of their technicians, employees, agents,
representatives or independent contractors relating to the actual or purported
performance of any of the obligations under this warranty.
Service Centre Address
Should a fault occur with your product, please pack it correctly using the original
packing, so you can ship it safely. For technical support, servicing or product
queries and information, please contact either your local retailer or the office
below:
Audiolab or the authorised distributor, dealer or service centre may make a charge
for the supply of new packaging for the return of the repaired item. Please note,
insurance is recommended as goods are returned at the owner’s risk. Authorised
distributors or service centres cannot be held liable for loss or damage in transit.
insurance and freight charges on the return journey will be paid for by Audiolab,
authorised dealer, distributor or service centre if corrective work proves to be
necessary.
In the event of ‘no-fault found’ or ‘no repair necessary’, the return shipping charge
will be the responsibility of the owner.
Repairs
All repairs will be carried out by the appointed distributor (or locally appointed
service centre). Repairs handled or processed without authorisation or approval of
the appointed representative will be excluded from this limited warranty. Please
note, Audiolab is not able to supply parts or replacement items to any other entity
IAG Service Dept.
13/14 Glebe Road
Huntingdon
Cambridgeshire
PE29 7DL
UK
Tel: +44(0)1480 452561
Email: [email protected]
For information on other authorised service centres worldwide contact Audiolab
International, UK.
A worldwide distributors list is available on the Audiolab website: www.audiolab.co.uk
Page 18
Important
Safety Information
Contents
Getting Started
Controls and Functions
Remote Handset
Connections
Menu Options
System Operations
Playing Operations
Warranty Coverage
Specifications
9: Specifications
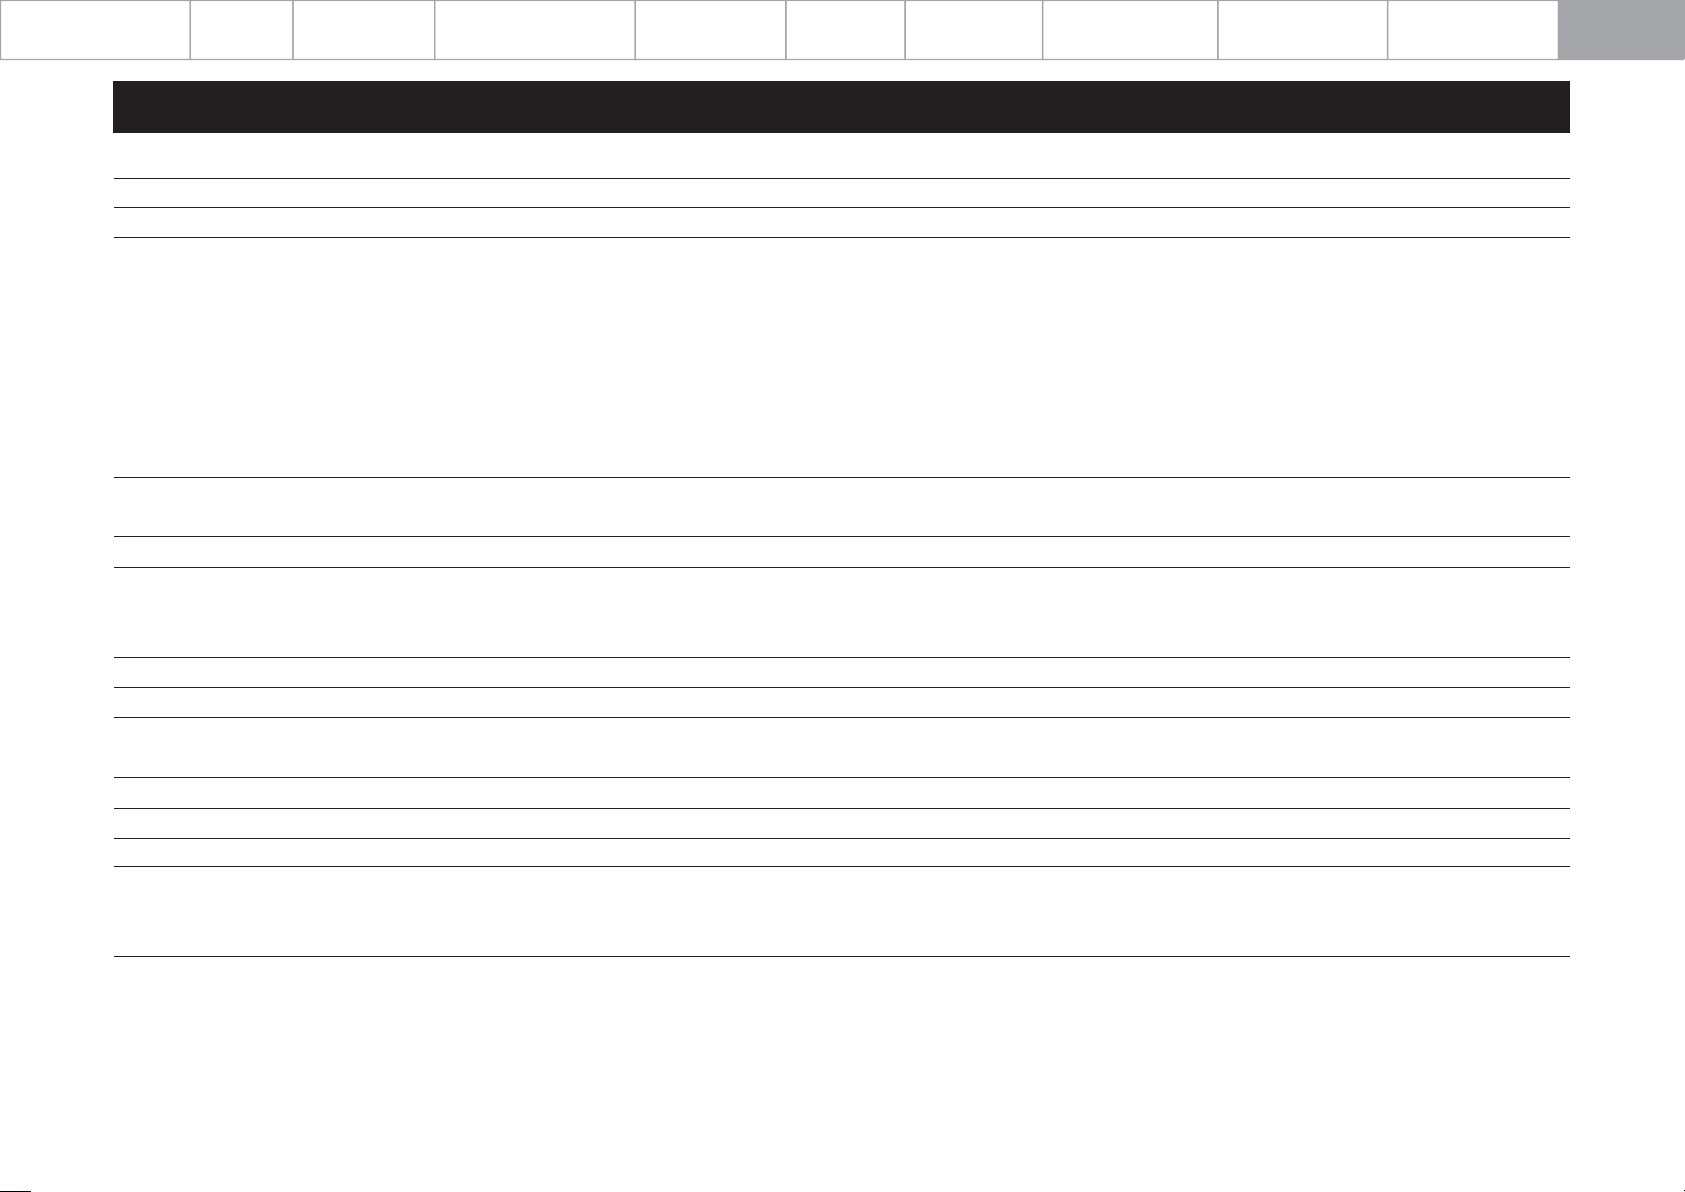
BRAND Audiolab
Model
General Description
Design Philosophy and Core Technology
Inputs
Outputs
Sampling Frequency
DAC
D to A Converter
Output level (0dBFS, 1KHz)
Total Harmonic Distortion (THD)
Frequency Response
Output Impedance
Max. Sampling Frequency
D9
DAC
ES9038Pro 32-bit DAC
MQA Full decoder (PC USB, Coax / Optical)
2.8" 480x640 large size full view IPS LCD
Bluetooth 5.1 (aptX / aptX HD / LDAC) streaming
Dedicated Current-Feedback Headphone Amp
VU Digital / VU Analogue Meter
USB HDD Playback with MP3/WMA/AAC/WAV/FLAC/APE compatibility
USB Firmware Upgrade
2 x SPDIF (Coax), 2 x SPDIF (Optical), 1 x PC USB (USB B)
1 x USB HDD (USB A), 1 x Bluetooth (aptX / aptX HD), 1 x AES3/EBU
1 x RCA,1 x XLR, 1 x Headphone, 2 x 12V Trigger, 1 x Optical and 1 x COAX outputs
Optical/Coaxial: 44.1kHz -> 192kHz
USB HDD: 44.1kHz -> 96kHz
PC USB: 44.1kHz -> 768kHz (PCM) / DSD64, DSD128, DSD256, DSD512
ES9038Pro
2.05Vrms (RCA)
4.1Vrms (XLR)
< 0.001% (1KHz @ 0dBFS)
20Hz-20kHz (+/-0.1dB)
120 ohm
USB HDD: 96KHz
Optical, Coaxial: 192KHz
PC USB: PCM768kHz, DSD512
Page 18
Page 19
Important
Safety Information
Contents
Getting Started
Controls and Functions
Remote Handset
Connections
Menu Options
System Operations
Playing Operations
Warranty Coverage
Specifications
9: Specifications
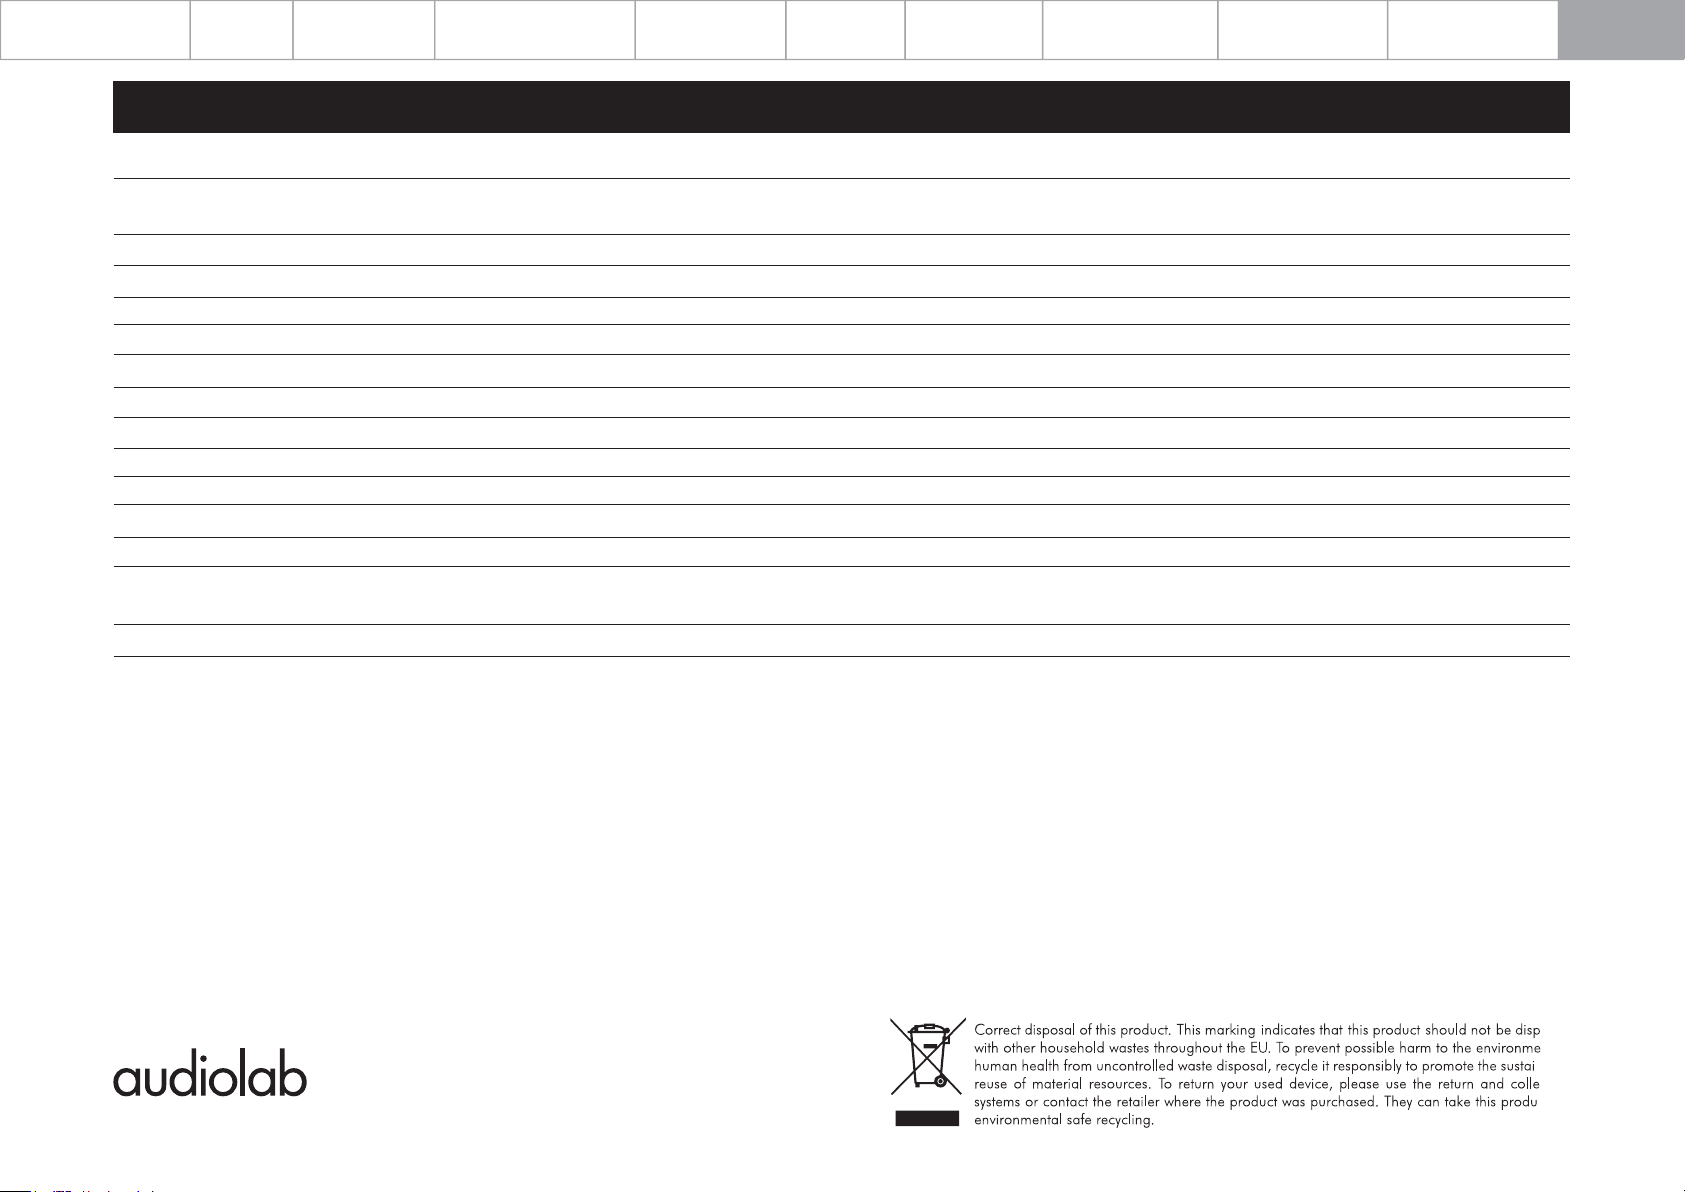
Signal-to-Noise Ratio (S/N)
Headphone Amplifier
Total Harmonic Distortion(THD)
Output Impedance
Load Impedance
General
Standby Power Consumption
Net Weight
Gross Weight
Dimensions (mm) (W x H x D)
Carton Size (mm) (W x H x D)
Finish
Power Requirements
(depending on region)
Standard Accessories
Page 19
> 118dB (A-weighted, RCA)
> 123dB (A-weighted, XLR)
< 0.01% (1kHz, 50mW )
2.35 ohm
20-600 ohm
<0.5W
4.2 kg
5.8 kg
W: 315 x H: 88.3 x D: 277mm
W: 409 x H: 220 x D: 451mm
220-240V ~ 50/60Hz
100-120V ~ 50/60Hz
Power Cord, Remote Control, User Manual, etc.
Page 20

Audiolab
IAG House,
13 /14 Glebe Road,
Huntingdon,
Cambridgeshire,
PE29 7DL,
UK
Telephone: +44(0)1480 452561
Email: [email protected]
http://www.audiolab.co.uk
 Loading...