

Page 1
User Instructions
8300MB
Page 2

Protect the power cord from being walked
on or pi nc he d part ic ularly at the plugs,
convenience receptacles, and at the point
where they exit from the apparatus.
Use only with the cart , stand, tripod, bracket, or table
specified by the manufacturer, or sold with the apparatus.
When a cart or rack is used, use caution when moving the
cart/apparatus combination to avoid injury from tip-over.
Unplu g this appa ratus during lightning storms or when
unused for long periods of time.
Refer all servicing to qualified service personnel. Servicing
is required when the apparatus has been damaged in any
way, such as power supply cord or plug is damaged, liquid
has been spilled or objects have fallen into the apparatus,
the apparatus has been exposed to rain or moisture, does
not operate normally, or has been dropped.
Mains Supply: The mains operating voltage of Audiolab
8300 series units is shown on the rear panel. If this voltage
does not match the mains voltage in your area, consult
your Audiolab dealer about converting the unit.
The mains supply fuse on the rear panel is accessible when
the IEC mains plug has been removed. In the rare event
that it has broken, check for any obvious cause before
replacing the fuse with one of the correct rating and type.
The fuse values are:
220 – 240V (UK, China, etc.) T4.0AL 250V Slow Blow
100 – 120V (USA, Japan, etc.) T8.0AL 250V Slow Blow
WARNING: Only use attachments/accessories specified or
provided by the manufacturer (such as the exclusive supply
adapter, battery etc.).
WARN ING : The mains plug/applian ce coupler/dire ct
plu g-i n adapt er is used as disconn ectio n devic e; the
disconnection device shall remain readily operable.
CAUTION: These servici ng instructions ar e for use by
qualifi ed servic e perso nnel only. To reduce the ri sk of
electric shock, do not perform any servicing other than
that contained in the operating instructions unless you are
qualified to do so.
Do not install thi s equipment in a confi ned or built-i n
space such as a bookcase or similar unit, and keep well
ventilated in open space. The ventilation should not be
impeded by covering the ventilation openings with items
such as newspaper, table-cloths, curtains etc.
WARNING: To reduce the risk of fire or electric shock,
do not expo se this apparatus to rain or moisture. The
apparatus shall not be exposed to dripping or splashing
and ensure that objects filled with liquids, such as vases,
shall not be placed on the apparatus. No naked flame
sources, such as lighted candles, should be placed on the
apparatus.
This equipment is a Class II or double insulated
electrical appliance. It has been designed in such a
way that it does not require a safety connection to
electrical earth.
1: Important Safety Information
AVIS: RISQUE DE CHOC ELECTRIQUE-NE PAS
OUVRIR WARNING: SHOCK HAZARD-DO NOT OPEN
IMPORTANT SAFETY INFORMATION
Read these instructions.
Keep these instructions.
Heed all warnings.
Follow all instructions.
Do not use this apparatus near water.
Clean only with dry cloth.
Do not bl o ck an y ve n til a ti on op eni n gs. Inst a ll in
accordance with the manufacturer’s instructions.
Do not install near any heat sources such as radiators, heat
registers, stoves, or other apparatus (including amplifiers)
that produce heat.
Do not defea t the sa fety purpose of the po larized or
grounding plug. A grounding plug has two blades and a
third grounding prong. The wide blade or the third prong
is provided for your safety. If the provided plug does not fit
into your outlet, consult an electrician for replacement of
the obsolete outlet.
Page 1
Page 3

Operating Features:
•RCA/XLR Line input selector
•250W full power output
•Support 4 ohm or 8ohm loudspeaker
•0.5W ErP standard standby power consumption
•Low THD Hi-end amplifier
•Standby key control function
•True balanced design for high-end sound quality
Unpacking
Unpack the product fully. The carton should contain:
• The Audiolab 8300MB
• One IEC power cord suitable for your area
• This instruction manual
If an item is missing or damaged, report this to your dealer as soon as possible. Remain
the packing for safe transport of your unit. If you dispose of the packing, please do so with
regard to any recycling regulations in your area.
Placement
The unit is designed to run warm during normal operation but ensure you do not block any
ventilation openings.
Place the unit on a sturdy shelf or table. If you use equipment racks, ensure the unit has
adequate ventilation and is on its own shelf.
Ensure your mains voltage corresponds to the rating plate on the rear of the product’s power
supply. If in doubt, consult your dealer. If you move to an area with a different mains voltage,
seek advice from an Audiolab appointed dealer or a competent service technician.
2: Getting Started
Welcome to Audiolab 8300 Series
The 8300MB is a pocket powerhouse, housing 250W of pure, balanced amplification in a
casing no bigger than a shoebox.
8300MB’s full pow er output is delivered into any loudspeaker load – unc onditionally.
Massive reserves of power are available for high current drive capability to power and control
the mightiest of speakers.
This latest development of the Audiolab range now features a fully balanced power stage
making the most of the balanced XLR inputs. This makes 8300MB a perfect match for the
8300CD using its balanced outputs, even over long cables.
If you prefer you can position 8300MB close to each loudspeaker and use long, balanced
cables to transfer the signal from 8300CD or a preamplifier. This puts 8300MB in even
closer contact with your loudspeaker for improved transient starts and stops.
However you use 8300MB we are certain that you will love the pure sound quality and
unrestrained dynamics that this amplifier brings to your hi-fi system.
Please read through this manual to obtain the very best performance from 8300MB.
Inputs:
•Loudspeaker output
•12V trigger in
Outputs:
•Line analog input
•XLR balance analog input
•12V trigger out
Page 2
Page 4
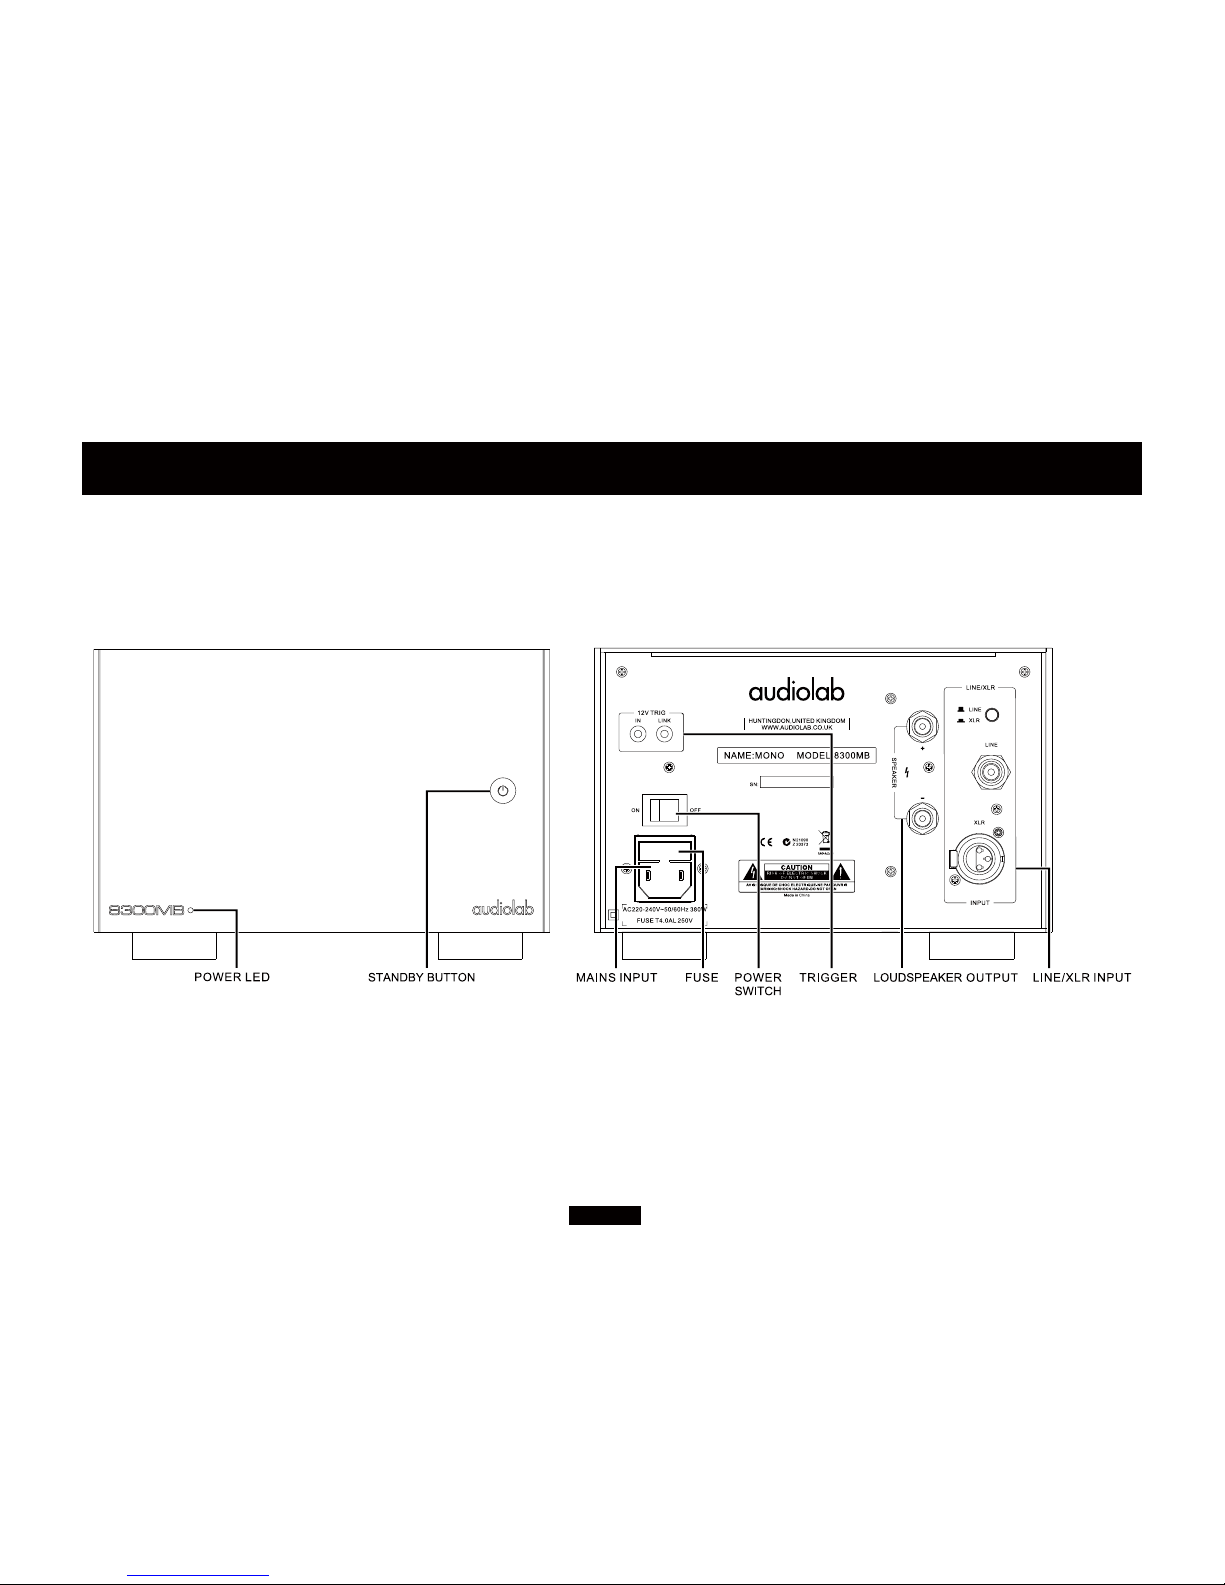
3: Controls and Connectors
Page 3
Page 5

Signal Input Connections
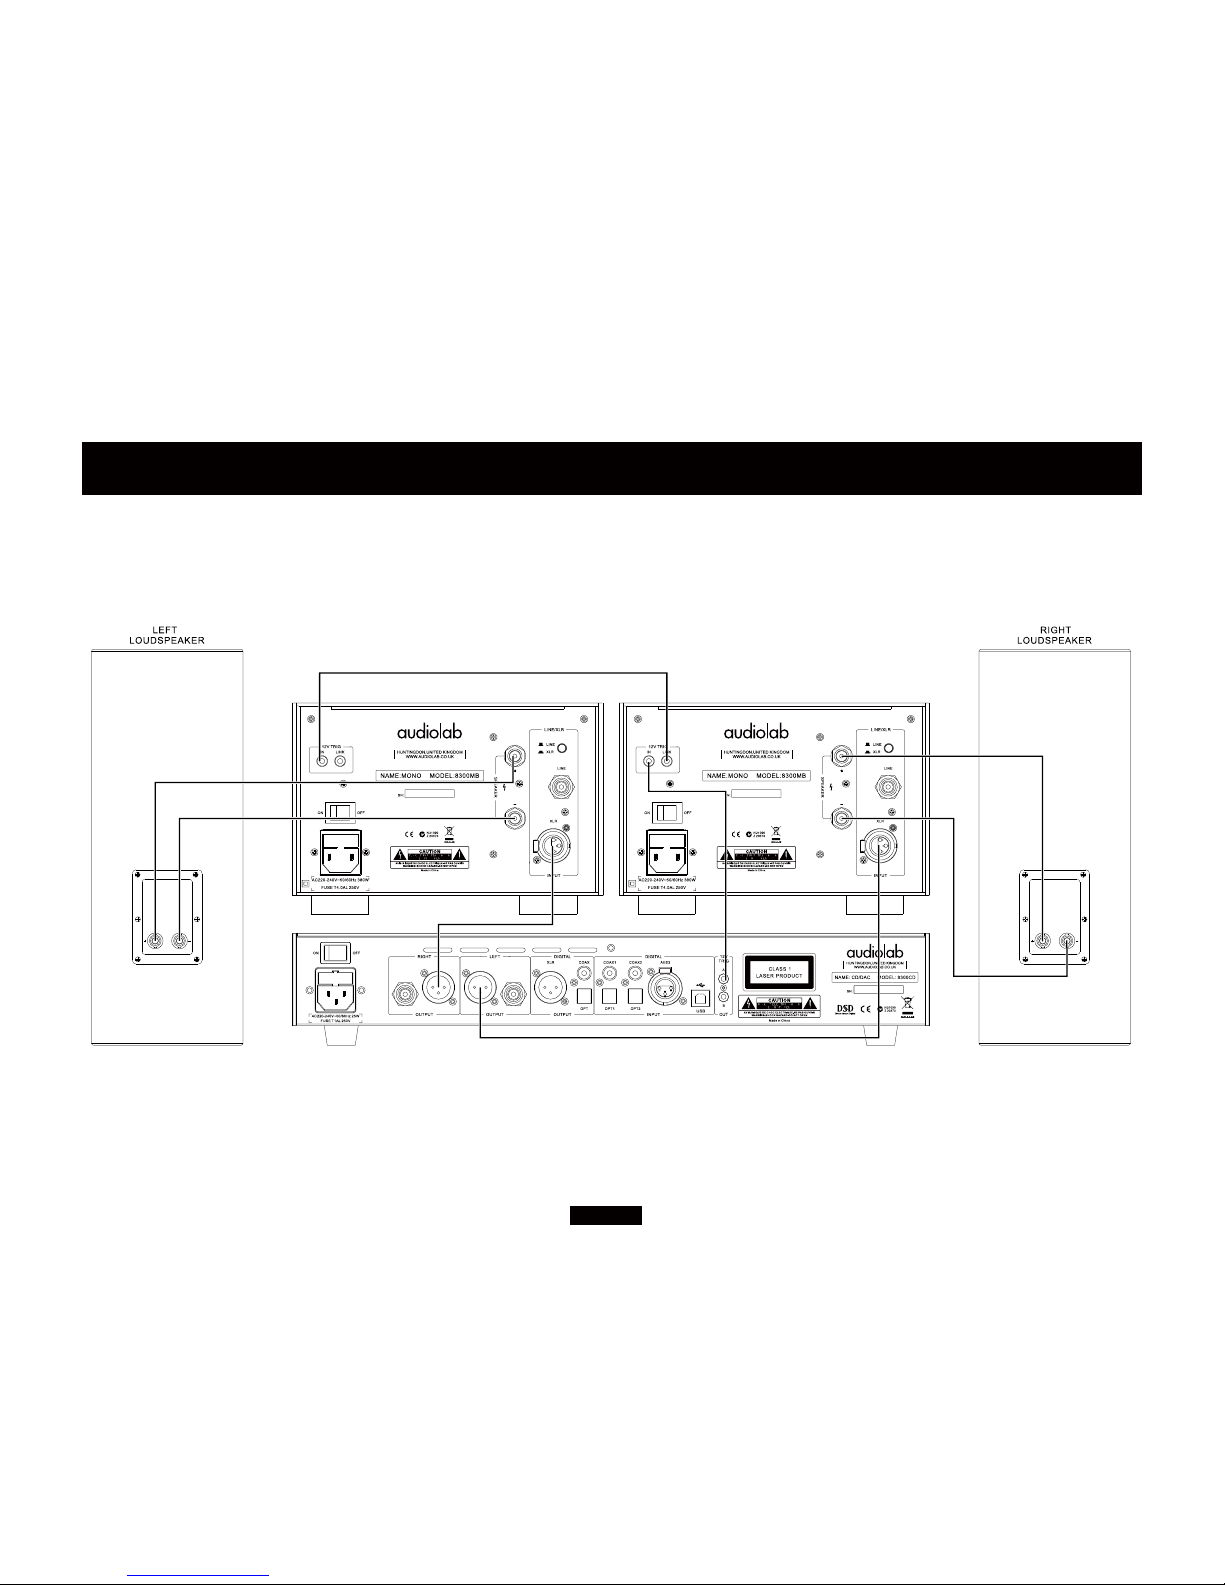
Balanced XLR Connecti ons: If you are connecting a Audiolab 8300MB mono power
amplifier to the Audiolab 8300CD CD player, we strongly advocate the use of the balanced
XLR connections. XLR inputs use 3 conductors, one for ground and two for the voltage plus
and minus signals. In this way the signal transmitted to the amplifier is thus 'cleaner' and free
from earth-induced currents and other air-borne interference.
XLR interconnects should be of screened, twisted pair construction. Refer to your dealer if in
doubt.
Unbalance d Connections: If you cannot use the XLR inputs, connect an RCA phono
interconnect between the unbalanced inputs on the 8300MB rear panel with the matching
output of the source unit.
Input Selector: When connecting the signal input, ensure the Input Selector is switched to
the appropriate input.
• In the normal (extended) position the balanced XLR input is selected.
• Press the selector in for unbalanced RCA phono input.
Trigger Connections
Audiolab 8300MB mono amplifier has one pair trigger connections at the real panel, can
be activated by 8300CD’s or any other source’s trigger output. 8300MB can also bypass the
source’s trigger signal to another 8300MB, then one source can trigger two 8300MB . If you
have a 8300 system, we advise connecting the triggers. This will enable all 8300 units to be
brought in and out of standby along with the trigger connections.
To connect to your control unit, you will need a cable with one end to match the trigger
output of the control unit and other terminating in a 3.5mm jack plug. For Audiolab 8300
series units, this will be a 3.5mm to 3.5mm interconnect.
Connect the either of the trigger of Audiolab 8300MB to the TRIG OUT of 8300CD or any
other control unit having a 12V master trigger out, and then connect the output trigger of
8300MB to another 8300MB’s trigger.
4: Connections - 1
You should read the following useful notes carefully before you begin to install and use the
equipment.
There are no user adjustable parts inside the equipment. You should refer to a qualified
engineer or return the equipment to either the dealer or the Audiolab distributor for any
servicing requirements.
Important notice: Please do not connect loudspeakers or source components to the amplifier
when switched on. Always switch 8300MB off before making connections!
The Audiolab 8300MB mono amplifier will be warm when running, the actual temperature
depending on the power output. A resettable current trip will automatically switch the
amplifier off under gross overload or short circuit output etc. The fins of the heat sink should
be kept clear of obstruction to allow adequate ventilation in normal use.
Connecting to the AC power supply
The Audiolab 8300MB mono amplifier is supplied in four versions suitable for connection to
240V, 230V, 115V or 100V AC power supplies. Before connecting the amplifier check that
you have the correct version. If the amplifier is connected to a lower voltage than marked,
the maximum output power will be lower than specified.
Please check with the dealer if you have any doubt as to the voltage in your area or intend to
use the equipment in regions which use different mains voltages.
The Audiolab 8300MB mon o am pli fier is pro vided with a mains cable fitte d wi th an
appropriate mains plug. This plug should not be cut from the cable. If for any reason, the
plug is removed it must be safely disposed. It must never be plugged into a mains outlet.
Any replacement plug should be wired to the supplied mains cable as follows:
The BROWN wire must be taken to the LIVE terminal
The BLUE wire must be taken to the NEUTRAL terminal
Page 4
Page 6
Page 5
4: Connections - 2
Connecting the 8300MB Mono Amplifier
Page 7

5: Operation
Page 6
The performance of amplifiers tends to stablize
after a period of use due to a number of factors
as so c ia ted w it h the physi cal a nd che mi cal
properties of the components. We recommend
that the system be run with a music signal for
several hours when it is first installed. Although
the changes can be quite subtle, after a few days
the sound quality becomes smoother and more
natural.
Switching On
The Audiolab 8300MB mono am plifier Main s
on/off switch is on the rear panel. Press the switch
to power 8300MB on/off.
The power LED will glow red when the amplifier is
powered on.
The Mains On/Off switch should be switched off
when the amplifier is not in use.
Note: Always switch on the power amplifier after
the rest of the syst em and switch it off before
powering down any source component. Ensure
the system volume control is at minimum when
switching your equipment on or off.
Standby Mode
Aud iol ab 8300M B mono ampli fier will be in
standby mode when powe r on. Pr es s the
but ton to bring 83 00 MB out of stan dby, th e
power indicator LED becomes brighter. You can
activate the ‘auto standby ’ function by holding
the button down for 3 seconds. Using this ‘auto
stan dby ’ function, 8300MB will automa tically
go into standby mode when there is no signal
input or operation for 20 minutes, and the power
indicator LED becomes dim.
6: Specifications
Rated Output Power 255W 8 ohm (<1% THD,1kHz)
Total Harmonic Distortion
<0.005% (100W 1kHz)
<0.01% (100W, 20Hz-20kHz)
Frequency Response
-0.5dB (20Hz-20kHz, ref. 1kHz)
-3dB (0.1Hz-150kHz, ref. 1kHz)
Input Sensitivity 1500mV (RCA line in)
Input Impedance
44 kohm (Balanced)
22 kohm (Unbalanced)
Signal to Noise Ratio (S/N) 115dB (A Weighted, ref. 250W)
Power Requirement
240V~50-60Hz
230V~50-60Hz
115V~50-60Hz
100V~50-60Hz
Maximum Power Consumption 400W
Standby Power Consumption <0.5W
Dimensions(mm) (W x H x D) 216 X 150 X 370
Carton Size(mm) (W x H x D) 350 X 285 X 495
Weight
9.5kg (Net)
11.5kg (Gross)
(Measurement made with 230V supply)
Amplifier Protection Trip
Th e Aud i o la b 8300 M B m ono am pl i f ie r is
protected by a thermal fuse which interrupts the
audio output if the amplifier is grossly overloaded
for a period of time. The LED on front panel will
flash when 8300M B is in protec tion mode. To
restore operation, simply power the unit off for a
while and then power on again.
Loudspeaker Phasing
Make sure that both channels are connected in
phase. The positive (red) output terminal of each
channel should be connected to the positive (red)
terminal of the speaker. Special care should be
taken when bi-wiring as phase becomes critical.
If there is a doubt about the way the loudspeakers
are connected, check their phasing by playing a
mono source - the sound should appear from a
point midway between the two loudspeakers. If
this position is unfocused, reverse the connections
to one of the loudspeakers. Correctly connected
loudspeakers give a defined center sound source
with fuller bodied midrange and bass registers.
Maintenance
The surface of the equipment may be cleaned
with a barely damp cloth provided the power has
been switched off. Solvent based cleaners should
not be used.
Page 8

Audiolab
IAG House,
13/14 Glebe Road,
Huntingdon,
Cambridgeshire,
PE29 7DL,
UK
Tel: +44(0)1480 452561
Fax: +44(0)1480 413403
http://www.audiolab.co.uk
CODE: AH14-MNL0004a
 Loading...