

Page 1
User's & Administrator’s Manual
AudioCodes High Definition IP Phones Series
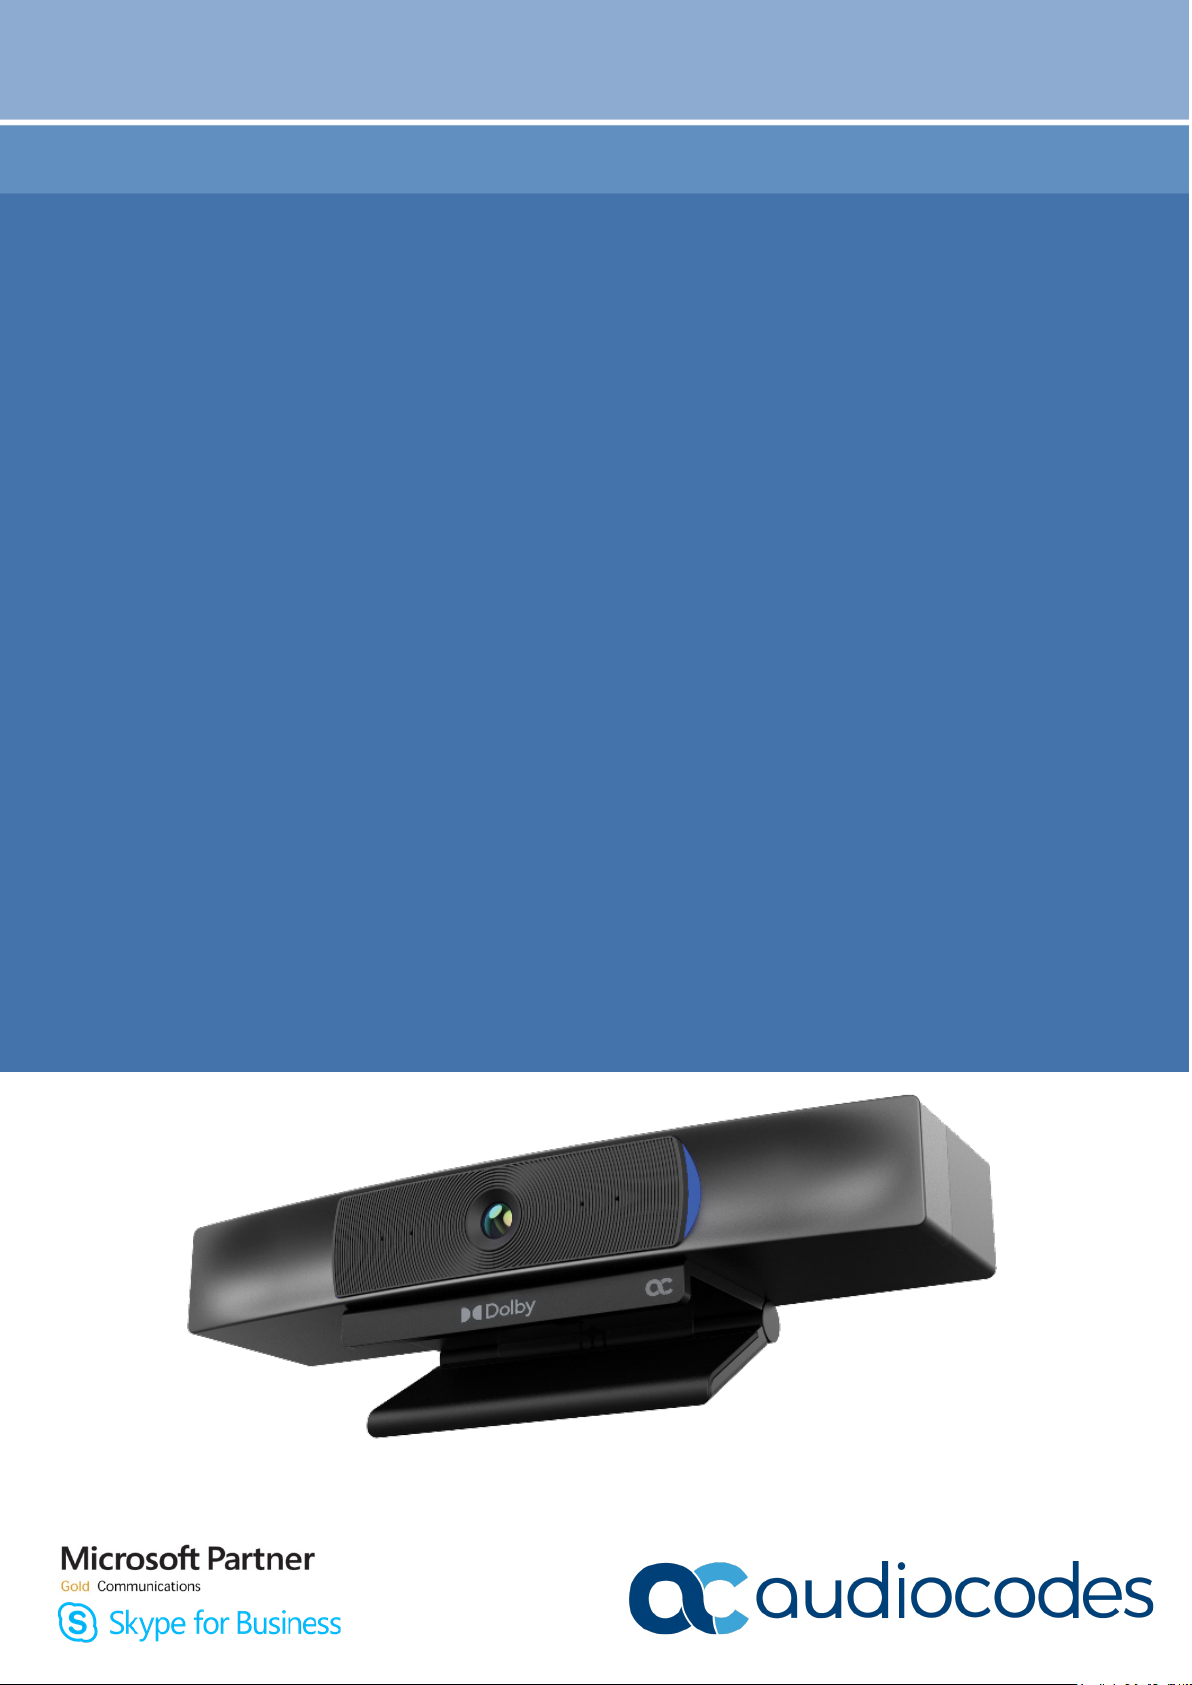
RXV80 Standalone Video
Collaboration Bar
Version 1.9
Page 2

Page 3

User's & Administrator's Manual Contents
Table of Contents
1 Introduction ................................................................................................................. 9
1.1 Highlights ........................................................................................................................ 9
1.2 About AudioCodes’ RX Suite .......................................................................................... 9
1.3 Specifications ................................................................................................................ 10
2 Setting up the RXV80 ................................................................................................ 11
3 Getting Started........................................................................................................... 13
3.1 Modifying Camera Settings ........................................................................................... 13
3.2 Starting a New Meeting ................................................................................................. 14
3.3 Dialing a Number .......................................................................................................... 17
3.4 Enabling Proximity Join ................................................................................................. 18
3.5 About Microsoft Teams ................................................................................................. 19
3.6 Signing out .................................................................................................................... 19
4 Configuring Device Settings..................................................................................... 21
4.1 Configuring Device Admin Settings ............................................................................... 24
4.1.1 Display Settings ............................................................................................................ 24
4.1.2 Date & Time .................................................................................................................. 25
4.1.3 Wi-Fi Settings ................................................................................................................ 26
Configuring Wi-Fi ............................................................................................ 26
4.1.4 Camera ......................................................................................................................... 28
4.1.5 Bluetooth ....................................................................................................................... 29
4.1.6 Security ......................................................................................................................... 29
4.1.7 Languages & input ........................................................................................................ 31
4.1.8 Modify network .............................................................................................................. 32
4.1.9 Calling ........................................................................................................................... 33
4.1.10 Debugging..................................................................................................................... 35
Log Settings | Collecting Logs ......................................................................... 35
Remote Logging ............................................................................................. 38
Diagnostic Data .............................................................................................. 39
Reset configuration ......................................................................................... 40
Restart Teams app ......................................................................................... 40
Company Portal Login .................................................................................... 40
Getting Company Portal Logs ......................................................................... 40
Launch Mobile Teams .................................................................................... 41
Debug Recording............................................................................................ 41
Erase all data (factory reset) ........................................................................... 42
ADB ............................................................................................................... 43
Screen Capture .............................................................................................. 43
Remote Packet Capture ................................................................................. 43
4.2 Configuring User Settings ............................................................................................. 45
4.2.1 Sound ........................................................................................................................... 45
4.2.2 Accessibility .................................................................................................................. 45
4.2.3 Reboot .......................................................................................................................... 45
4.2.4 About ............................................................................................................................ 46
5 Updating Microsoft Teams Devices Remotely ........................................................ 47
6 Replacing Remote Controller Batteries ................................................................... 49
7 Supported Parameters .............................................................................................. 51
Version 1.9 3 RXV80 Standalone Video Collaboration Bar
Page 4

RXV80 Standalone Video Collaboration Bar
List of Figures
Figure 3-1: Home Screen ............................................................................................................................ 13
Figure 3-2: New meeting – Invite someone ................................................................................................. 15
Figure 3-3: New meeting – Enter the name of a person ............................................................................... 15
Figure 3-4: New meeting – Select the name of a person .............................................................................. 15
Figure 3-5: Dial pad .................................................................................................................................... 17
User's & Administrator's Manual 4 Document #: LTRT-18171
Page 5

User's & Administrator's Manual Contents
List of Tables
Table 1-1: Specifications ............................................................................................................................. 10
Table 4-1: Wi-Fi Parameters........................................................................................................................ 26
Table 4-2: Wi-Fi Parameters per Index ........................................................................................................ 27
Version 1.9 5 RXV80 Standalone Video Collaboration Bar
Page 6

RXV80 Standalone Video Collaboration Bar
This page is intentionally left blank.
User's & Administrator's Manual 6 Document #: LTRT-18171
Page 7
User's & Administrator's Manual Notices
omissions. Updates to this document can be downloaded from
Notice
Information contained in this document is believed to be accurate and reliable at the time of printing.
However, due to ongoing product improvements and revisions, AudioCodes cannot guarantee
accuracy of printed material after the Date Published nor can it accept responsibility for errors or
https://www.audiocodes.com/library/technical-documents.
This document is subject to change without notice.
Date Published: March-02-2021
Trademarks
AudioCodes Ltd. All rights reserved. AudioCodes, AC, HD VoIP, HD VoIP Sounds Better,
IPmedia, Mediant, MediaPack, What’s Inside Matters, OSN, SmartTAP, VMAS, VoIPerfect,
VoIPerfectHD, Your Gateway To VoIP, 3GX, VocaNom, AudioCodes One Voice and CloudBond
are trademarks or registered trademarks of AudioCodes Limited All other products or trademarks
are property of their respective owners. Product specifications are subject to change without
notice.
WEEE EU Directive
Pursuant to the WEEE EU Directive, electronic and electrical waste must not be disposed of with
unsorted waste. Please contact your local recycling authority for disposal of this product.
Customer Support
Customer technical support and services are provided by AudioCodes or by an authorized
AudioCodes Service Partner. For more information on how to buy technical support for
AudioCodes products and for contact information, please visit our Web site at
https://www.audiocodes.com/services-support/maintenance-and-support.
Stay in the Loop with AudioCodes
Abbreviations and Terminology
Each abbreviation, unless widely used, is spelled out in full when first used.
Documentation Feedback
AudioCodes continually strives to produce high quality documentation. If you have any comments
(suggestions or errors) regarding this document, please fill out the Documentation Feedback form
on our Web site at http://online.audiocodes.com/documentation-feedback.
Related Documentation
Document Name
RXV80 Standalone Video Collaboration Bar Deployment Guide
RXV80 Standalone Video Collaboration Bar Release Notes
Version 1.9 7 RXV80 Standalone Video Collaboration Bar
Page 8

RXV80 Standalone Video Collaboration Bar
This page is intentionally left blank.
User's & Administrator's Manual 8 Document #: LTRT-18171
Page 9

User's & Administrator's Manual 1. Introduction
1 Introduction
The AudioCodes RXV80 standalone video collaboration bar delivers an intuitive meeting room
experience in video-enabled meeting rooms, and is especially designed for huddle rooms.
Integrated processing capabilities deliver unified communication in a standalone device, enabling
remote participants to see and hear everyone in the room with outstanding video image clarity
and enhanced voice quality.
Developed in partnership with Dolby®, the RXV80 overcomes challenging lighting conditions and
variations in room dimensions to capture every detail as if you were actually there. Intelligent
Acoustics™ enable full room pickup, ensuring incredible voice quality that enhances quiet and
distant voices while isolating every speaker regardless of external disturbances from beyond the
room’s confines. The resulting meeting experience empowers every participant to collaborate unhindered by meeting room shape, size, or wall texture.
1.1 Highlights
RXV80 feature highlights:
Wide-angle 4K Camera & HDR Video Mapping
Covers a 110° viewing angle capturing every seat in the room even in tight spaces with
challenging lighting conditions
Seamless Integration with Leading UC Platforms
Enables quick and easy deployment, installation, and moderation with click-to-join
functionality for both video-enabled collaboration and voice-only conference calls.
Intuitive & Cost-effective Meeting Experience
Leverages touch controller and existing TV speakers without relying on personal devices
such as laptops or phones.
Operational Efficiency
Enhances meeting experience with centralized management, monitoring, and continuous
productivity.
Dynamic Levelling & Intelligent Acoustics™
Boosts quiet or distant voices while distinguishing speech from noise.
1.2 About AudioCodes’ RX Suite
The RX Suite offering initially consisted of a portfolio of meeting room solutions to enhance
meeting productivity through high-quality audio conferencing plus the Meeting Insights app to
handle meeting recording, post-meeting analytics, and action item follow up.
Collaboration Bars for Microsoft Teams provides customers a simple and easy-to-use Teams
meeting experience in more spaces across their organizations. The RX Suite has a line of
conferencing devices that address a wide range of meeting room environments from huddle
rooms to boardrooms.
The RXV80 Collaboration Bar for Microsoft Teams, part of the RX Suite, dramatically enhances
the experience of Teams users seeking next-level experiences.
Jointly developed with Dolby Communications Business Group, the video conferencing solution
integrates Dolby audio and video quality with AudioCodes’ expertise in integrating with Microsoft
Team s.
The RXV80 ensures that users experience exceptional audio and video quality whether they’re in
the meeting room or anywhere else.
Version 1.9 9 RXV80 Standalone Video Collaboration Bar
Page 10
RXV80 Standalone Video Collaboration Bar
Audio range: Super wideband, 160Hz – 16kHz
Encryption: TLS (Transport Layer Security), SRTP encryption for media,
1.3 Specifications
The following table shows the RXV80 specifications.
Feature Details
Table 1-1: Specifications
Video capabilities
Audio
Device Interfaces
Network Provisioning
OS
Ultra HD 4k Image Sensor
1/1.8” CMOS
Super-wide Angle Horizontal Field of View: 110°
Lens: Fixed focus, f/1.8 aperture
HDR video mapping
EPTZ capable
H.264 Baseline and High Profile
Output Resolution: 1080p
Frame Rate: 30 fps
Full duplex, noise suppression, acoustic echo cancellation, voice
separation
Audio output through HDMI (developed in partnership with Dolby)
4X beamforming microphone array
Voice pickup range: 4.5m (15ft)
Audio frequency: G.711a/G.711u/G.722/G.729ab/Opus
Single HDMI output to TV
HDMI input (roadmap)
USB 3.0 host ports (x2)
Wi-Fi (dual band support)
Bluetooth (BLE support)
Network: 10/100/1000 Mb (RJ-45) network interface
Kensington lock
Supports tripod mounting
TCP/IP (IPv4), DHCP/ static IP; Time and date synchronization via
SNTP; VLAN support; QoS support: IEEE 802.1p/Q tagging (VLAN),
Layer 3 TOS and DSCP RTCP support: (RFC 1889)
IP address configuration: TCP/IP (IPv4), DHCP/static IP
Time and date synchronization: SNTP
QoS support: IEEE 802.1p/Q tagging (VLAN), Layer 3 TOS and DSCP
RTCP support: (RFC 1889)
Android 9.0
UC Platform Support
Microsoft Teams
Intuitive meeting experience with calendar integration and click-to-join
(one-touch or proximity join experience)
Security
AES256
Network Access Control: IEEE 802.1x
Built-in certificate
User's & Administrator's Manual 10 Document #: LTRT-18171
Page 11
User's & Administrator's Manual 2. Setting up the RXV80
2 Setting up the RXV80
Note: See the RXV80 Standalone Video Collaboration Bar Deployment Guide shipped with the
product or available from AudioCodes for information related to the hardware of the RXV80,
including:
• Package contents
• Mounting
• Cabling
Version 1.9 11 RXV80 Standalone Video Collaboration Bar
Page 12

RXV80 Standalone Video Collaboration Bar
This page is intentionally left blank.
User's & Administrator's Manual 12 Document #: LTRT-18171
Page 13
User's & Administrator's Manual 3. Getting Started
3 Getting Started
Note: See the RXV80 Standalone Video Collaboration Bar Deployment Guide shipped with
the product or available from AudioCodes for information on how to:
• Synchronize the Remote Controller and the Teams app
• Sign in
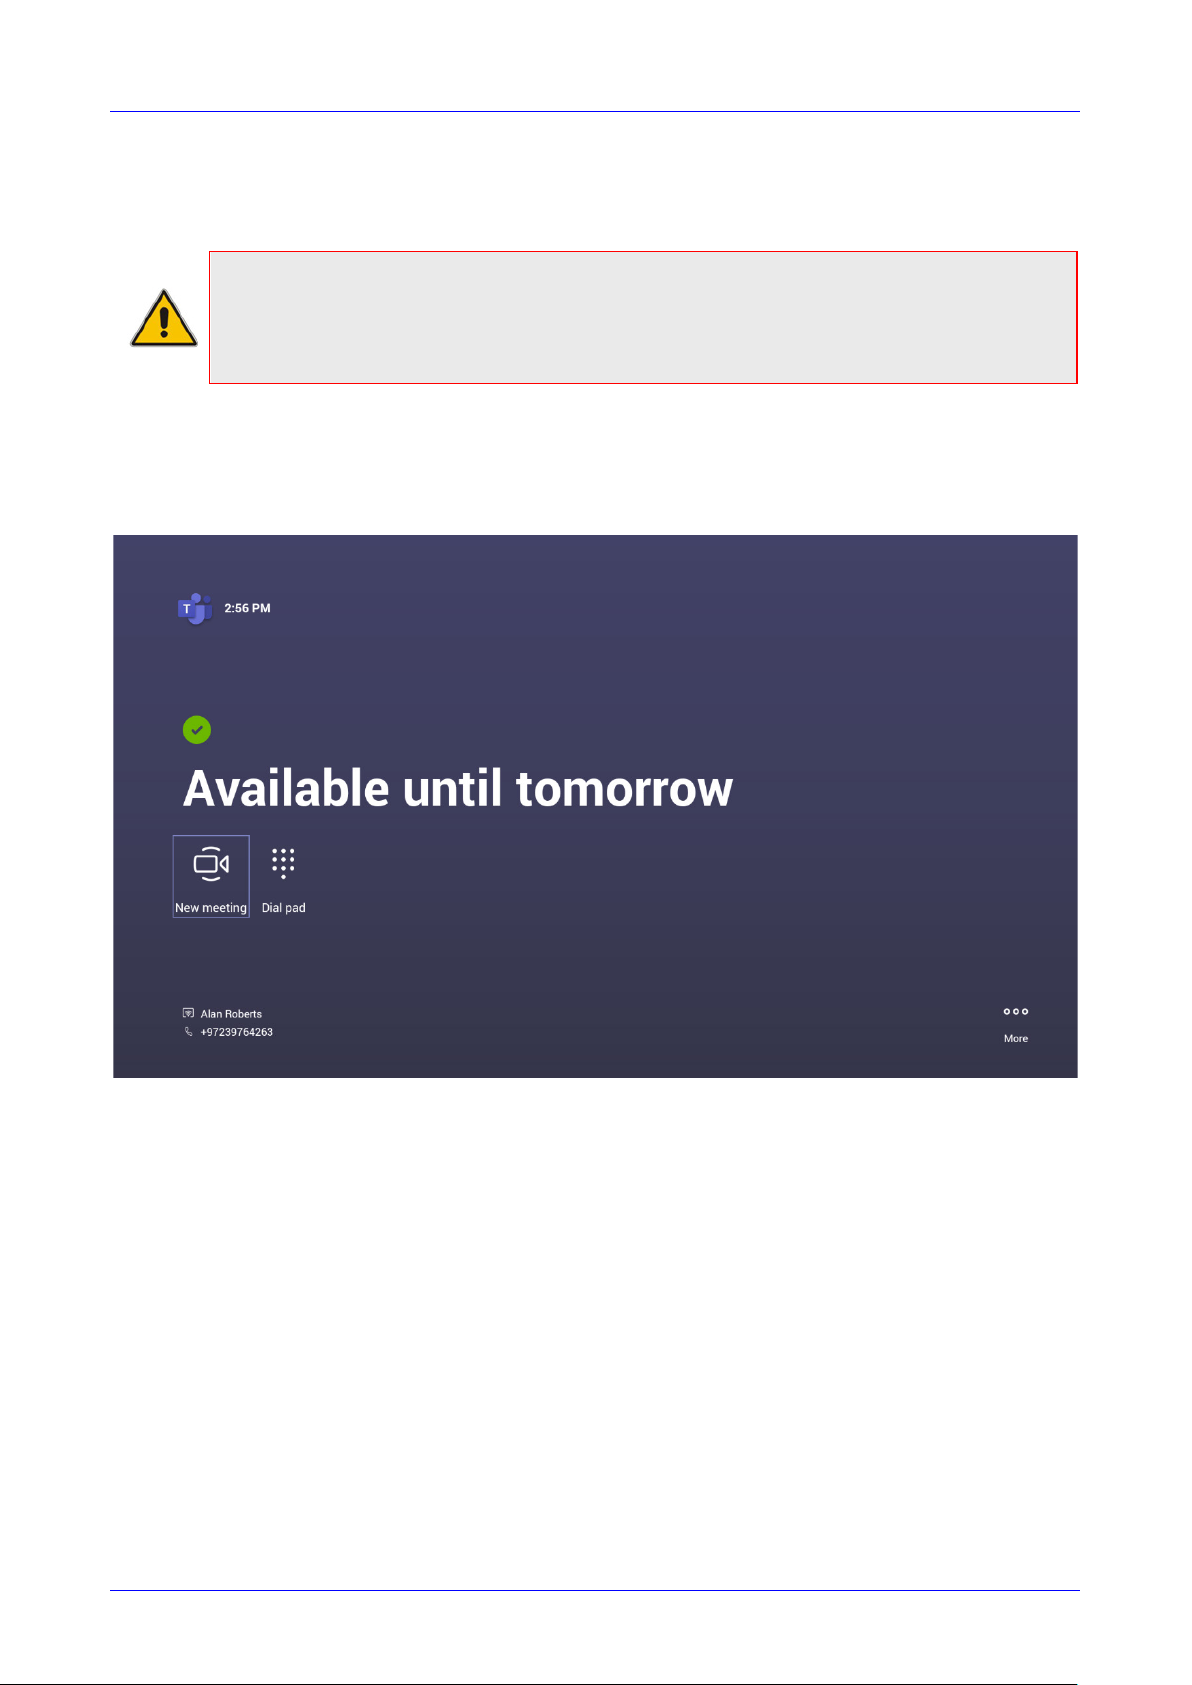
To get started:
1. After signing in, view the RXV80 home page.
Figure 3-1: Home Screen
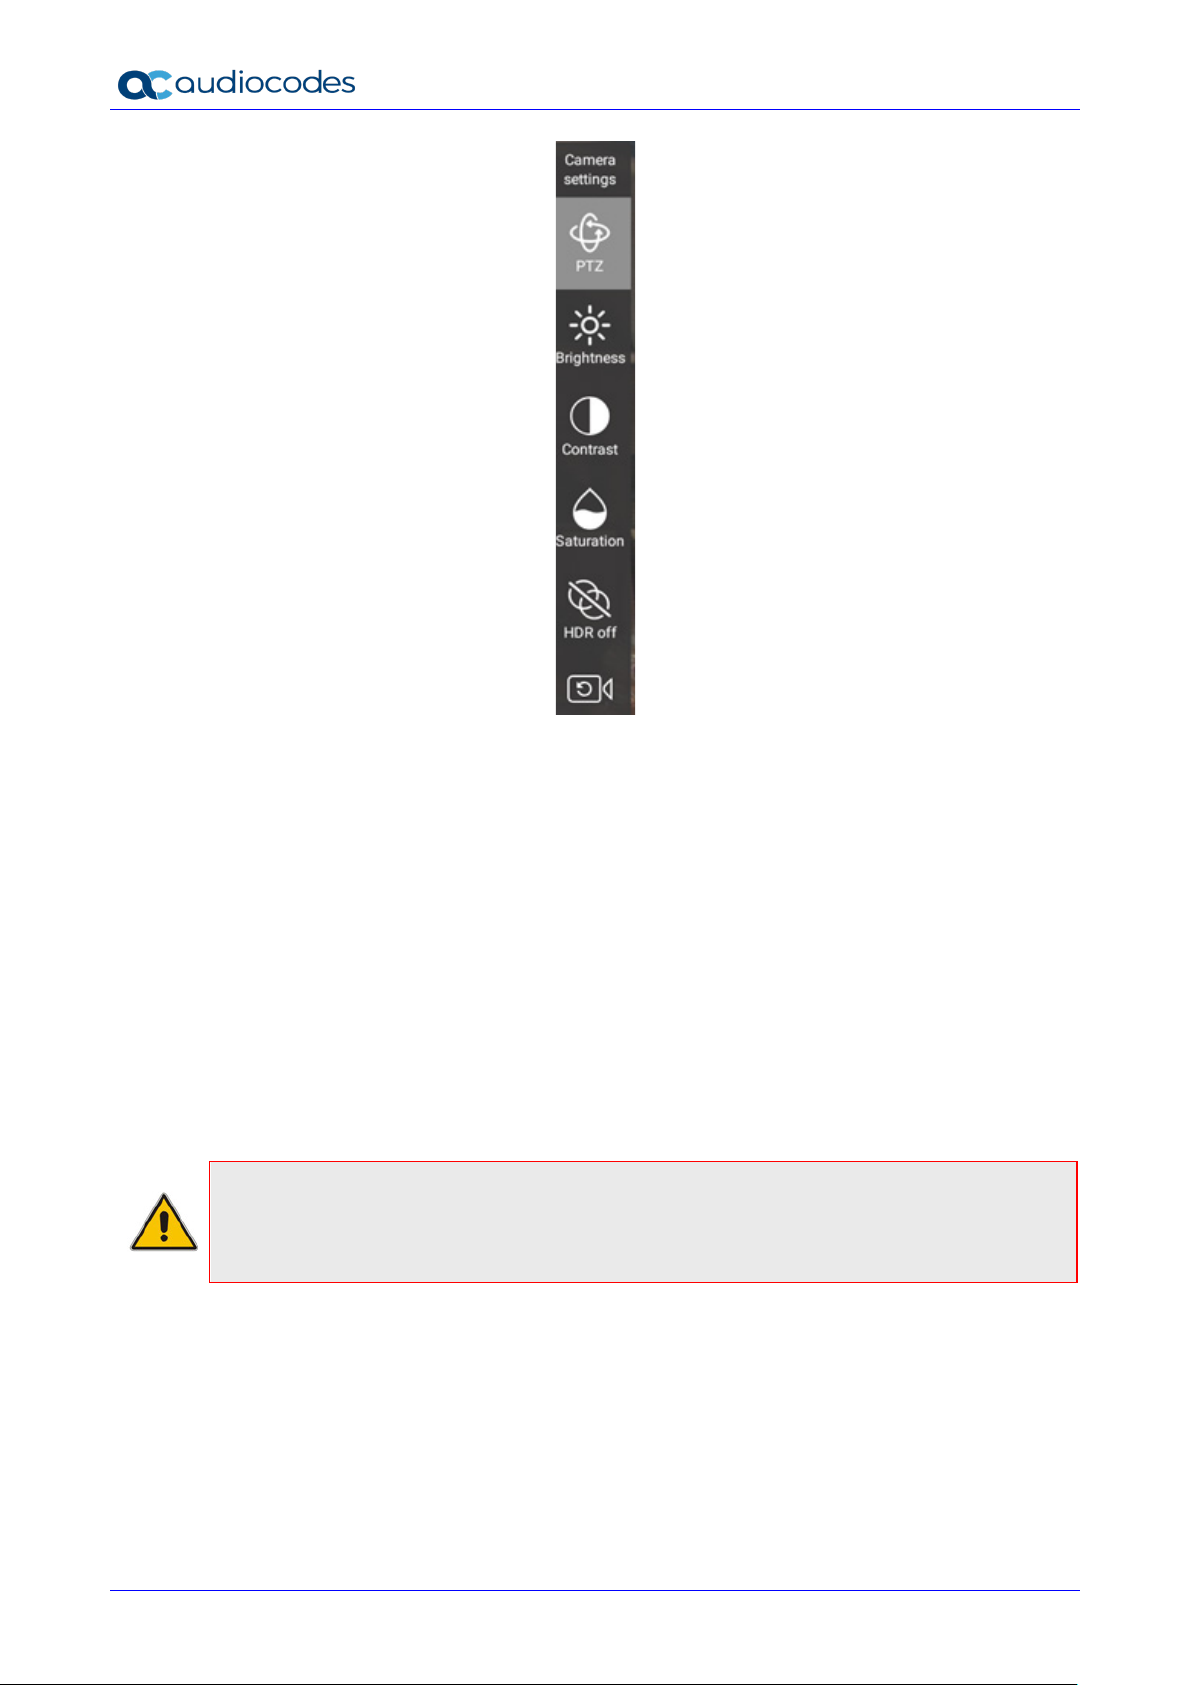
3.1 Modifying Camera Settings
You can modify the camera settings relating to the look and feel of the video user interface, to suit
your preferences.
To access the camera settings:
1. On the Remote Controller, long-press the camera icon.
Version 1.9 13 RXV80 Standalone Video Collaboration Bar
Page 14
RXV80 Standalone Video Collaboration Bar
2. Navigate to and select PTZ to create and edit presets using PTZ control. You can create and
edit up to three presets and assign specific pan, tilt, and zoom settings for each one.
3. Navigate to and select Brightness and then adjust the brightness using the -/+ buttons or
the sliding scale.
4. Navigate to and select Contrast and then adjust the contrast using the -/+ buttons or the
sliding scale.
5. Navigate to and select Saturation (perceived color relating to chromatic intensity) and then
adjust it using the -/+ buttons or the sliding scale.
6. Navigate to and select HDR on or off. High Dynamic Range allows dynamic metadata to be
added on a frame-by-frame basis so viewers will always receive the intended image. HDR is
adapted to the specific abilities of your monitor, allowing for an improved image.
7. Navigate to and select Reset for the camera settings to return to their defaults.
3.2 Starting a New Meeting
Note: You can navigate and select in the RXV80 using the:
• Remote Controller -OR-
• Touch screen
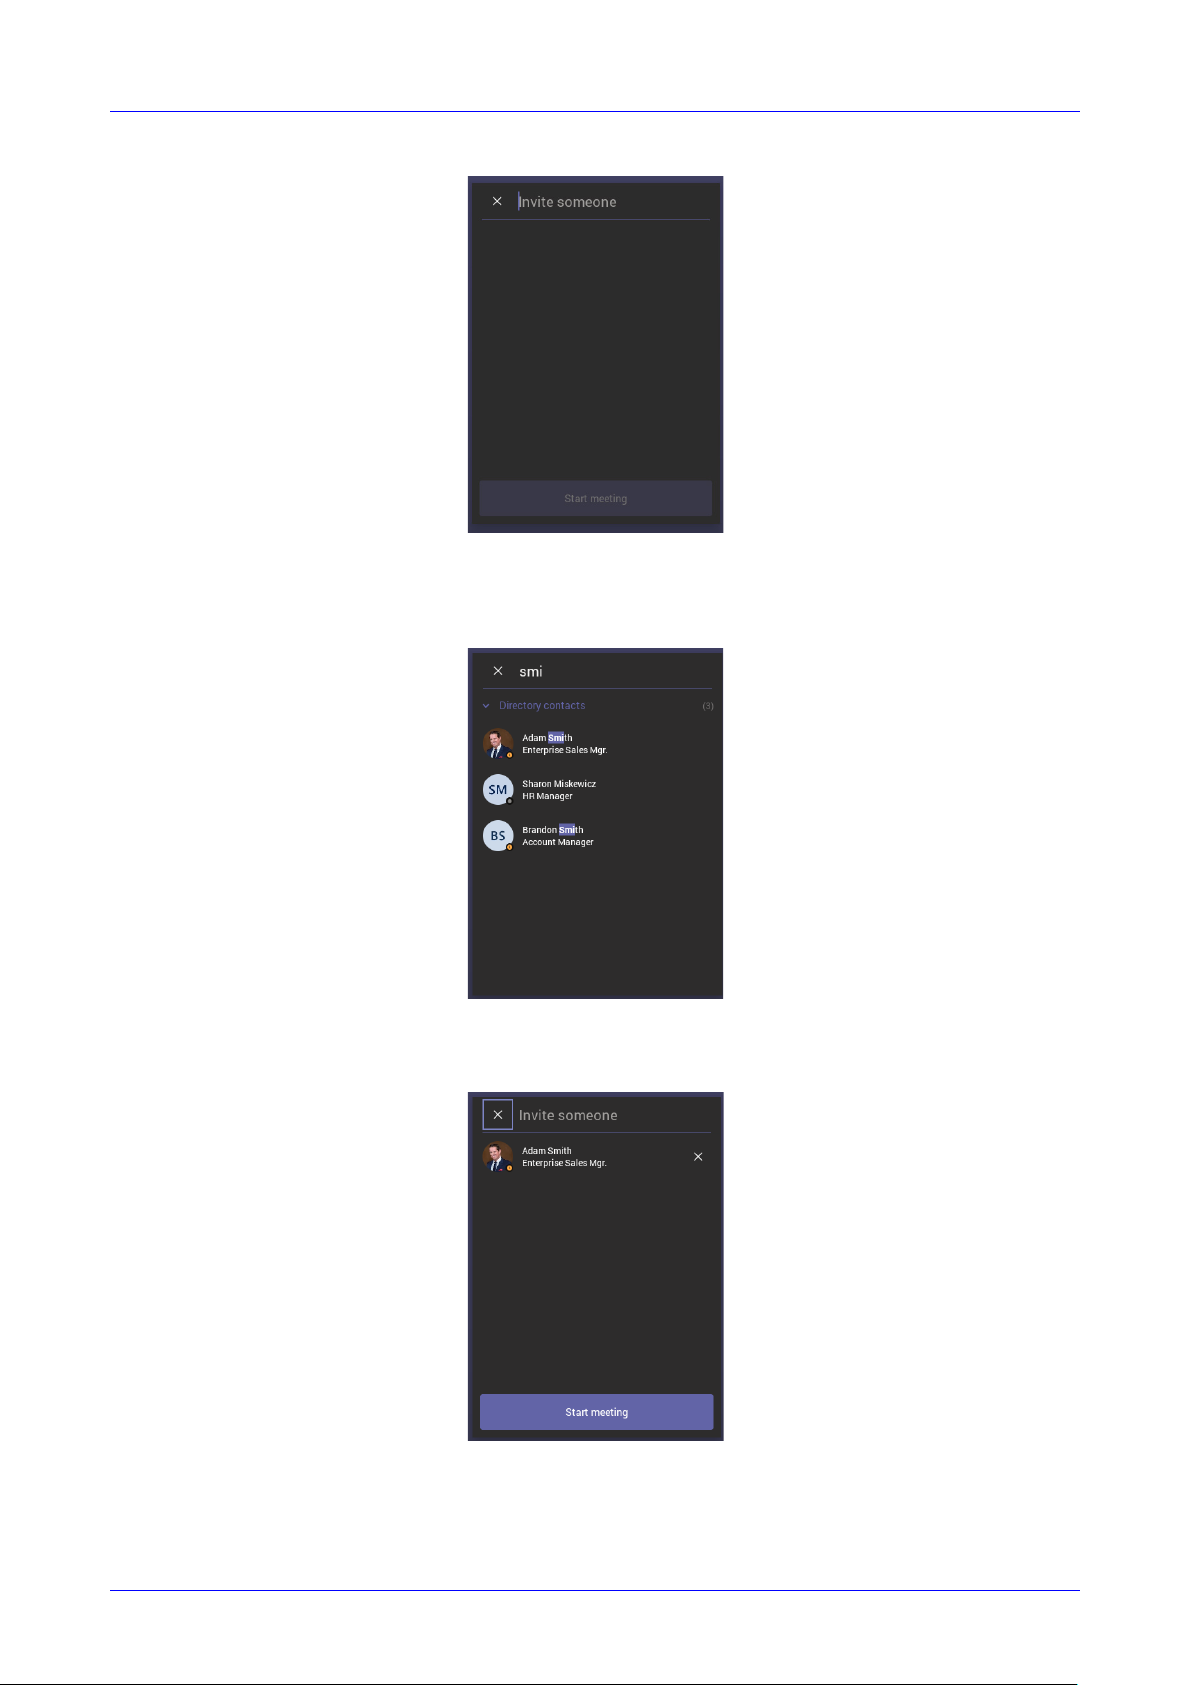
To start a new meeting:
1. In the home screen shown in the preceding figure, navigate to and select the New Meeting
option.
User's & Administrator's Manual 14 Document #: LTRT-18171
Page 15
User's & Administrator's Manual 3. Getting Started
Figure 3-2: New meeting – Invite someone
2. In the ‘Invite someone’ field, enter the name of a person to invite; after entering the first
letters in the name, matching contacts from directory are displayed.
Figure 3-3: New meeting – Enter the name of a person
3. Select the name of the person to invite.
Figure 3-4: New meeting – Select the name of a person
4. Invite someone else – or others – and then select Start meeting.
Version 1.9 15 RXV80 Standalone Video Collaboration Bar
Page 16
RXV80 Standalone Video Collaboration Bar
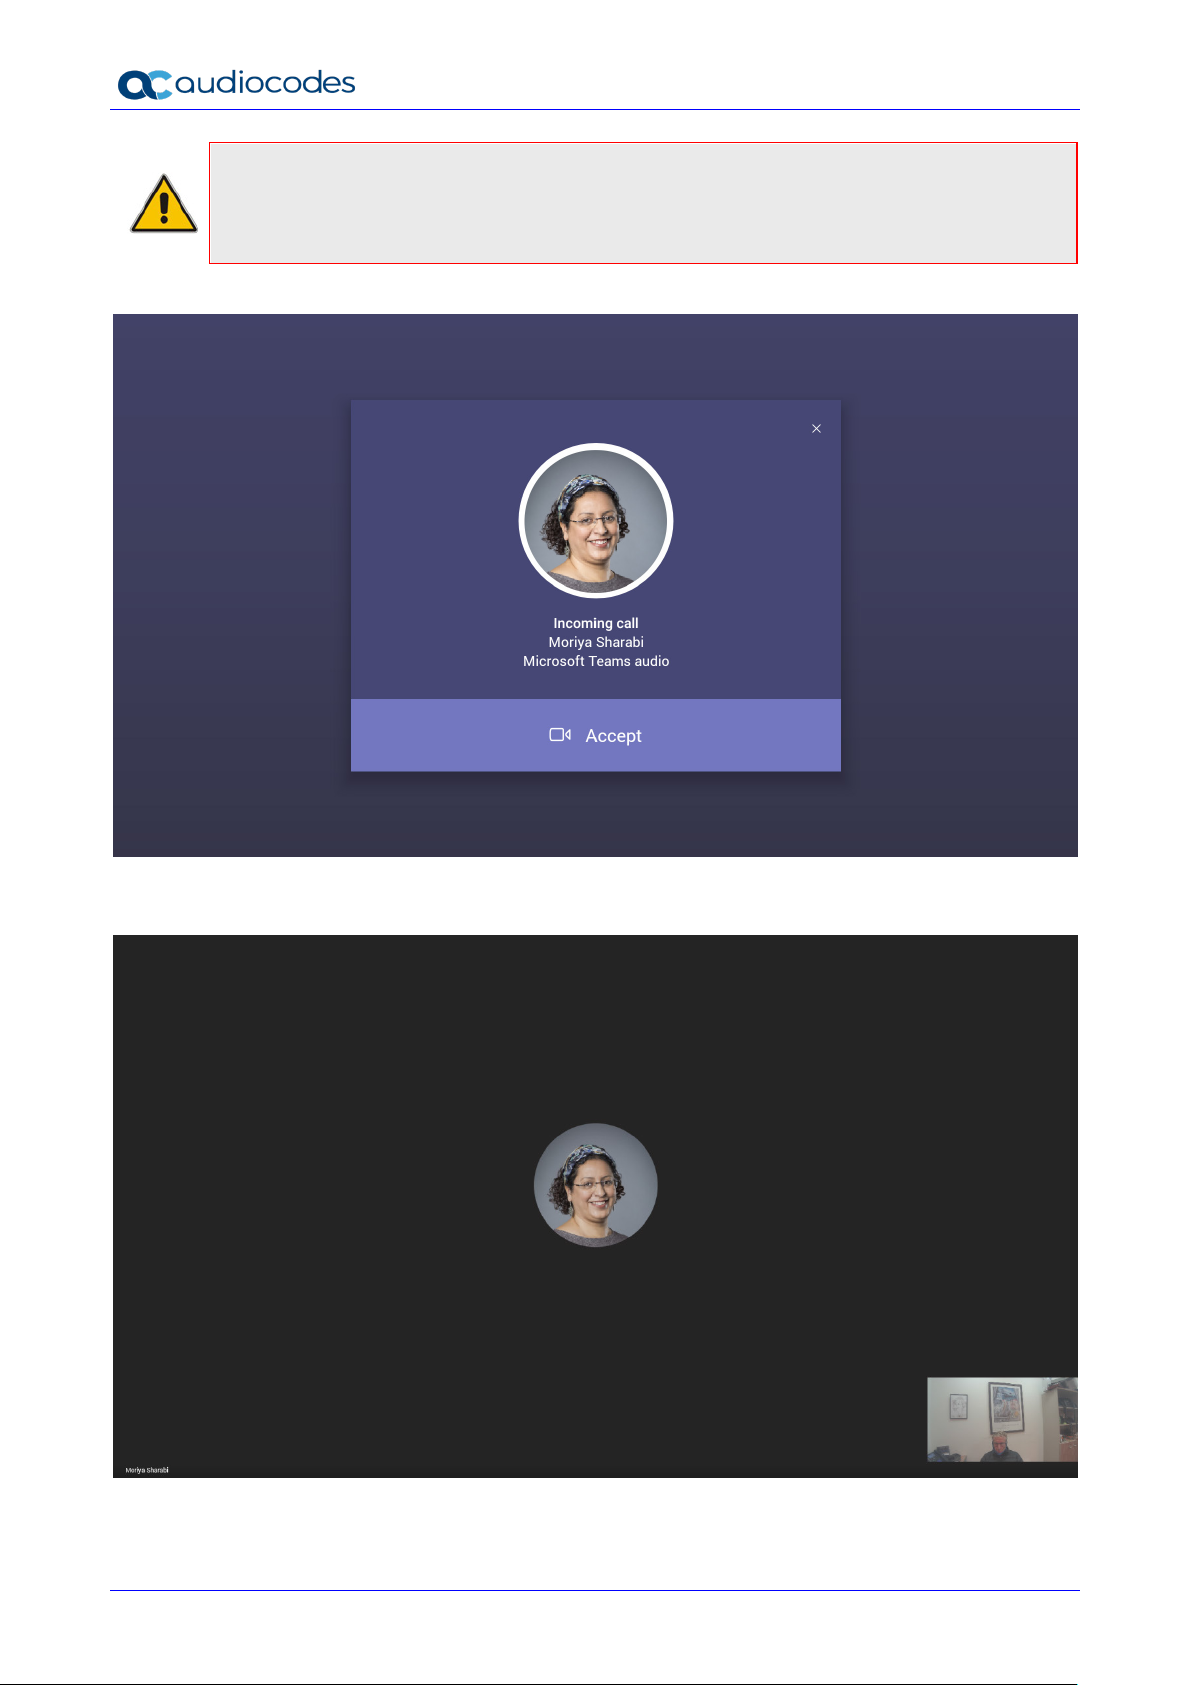
Note: The server allocates a meeting ID number and sends an invite message to all
participant devices. All devices simultaneously indicate an incoming call (the ‘Calling’ screen
is displayed). The serv er manages every aspect of the call.
5. Select Accept. Note that according to the icon in the ‘Incoming call’ screen shown in the
preceding figure, the caller has video capability.
User's & Administrator's Manual 16 Document #: LTRT-18171
Page 17
User's & Administrator's Manual 3. Getting Started
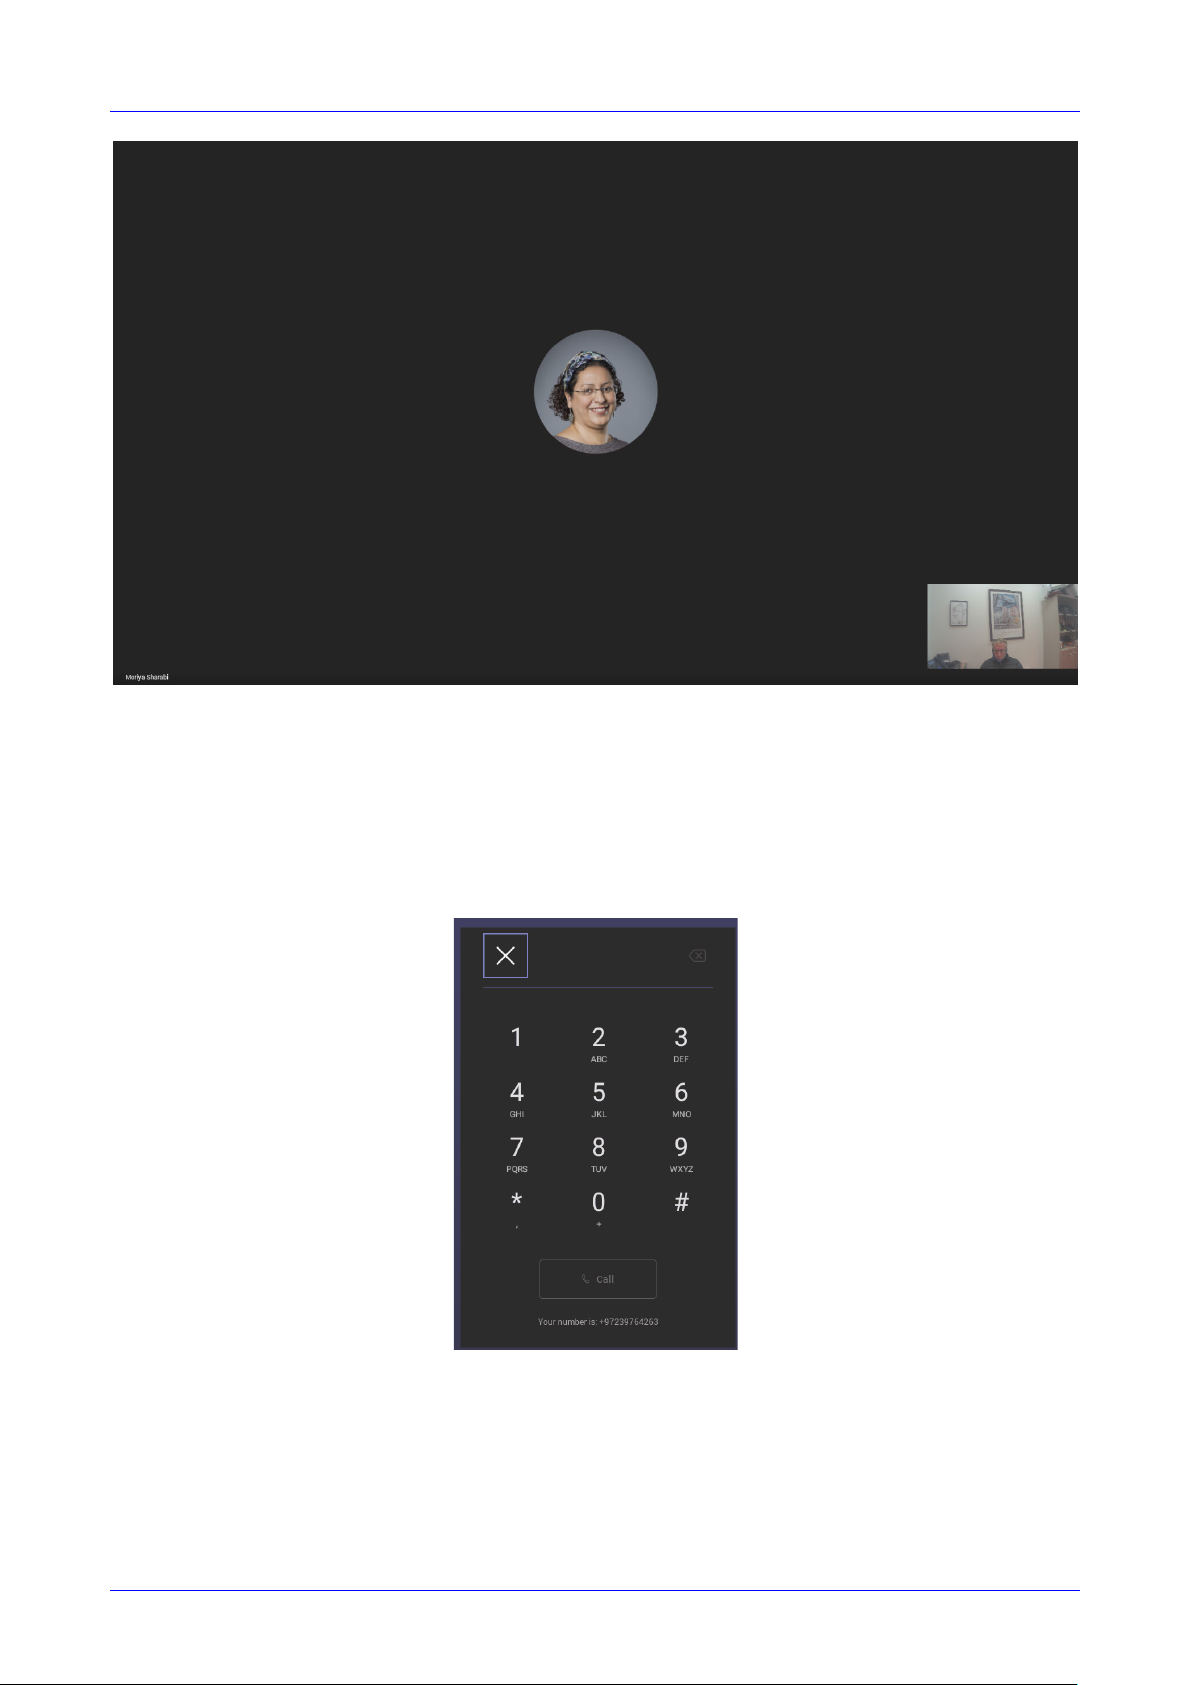
3.3 Dialing a Number
You can manually dial someone’s phone number.
To dial a phone number:
1. In the home screen, navigate to and select the Dial pad option.
Figure 3-5: Dial pad
2. Enter the digits of the destination to call and select Call.
Version 1.9 17 RXV80 Standalone Video Collaboration Bar
Page 18

RXV80 Standalone Video Collaboration Bar
3.4 Enabling Proximity Join
This feature enables a user on a device near a meeting space device, to join a meeting. The
feature functions in combination with Bluetooth and ‘Bluetooth Beaconing’, an integral feature in
Microsoft Teams Rooms (MTRs). The meeting space device here is the RXV80. If you bring a
laptop or a Teams Mobile Client near the RXV80, the Teams Mobile Client will offer the RXV80 as
the room audio dev ice.
The figure below shows how to select the room audio device.
After you select the room audio device, the meeting is opened without any audio device on your
PC client, and then the room meeting device (RXV80) gets a request to join the meeting.
To enable ‘Proximity join’:
In the Settings screen, navigate to and select Proximity join. If it’s disabled, it’ll become
enabled and vice versa.
User's & Administrator's Manual 18 Document #: LTRT-18171
Page 19

User's & Administrator's Manual 3. Getting Started
3.5 About Microsoft Teams
Information about the Microsoft Teams application can be viewed by navigating to and selecting
the Settings screen’s About option shown in the preceding figure.
3.6 Signing out
You can sign out of the application as one user and optionally sign in again as another.
To sign out:
Navigate to and select Sign out in the Settings screen shown in the preceding figure.
Version 1.9 19 RXV80 Standalone Video Collaboration Bar
Page 20

RXV80 Standalone Video Collaboration Bar
This page is intentionally left blank.
User's & Administrator's Manual 20 Document #: LTRT-18171
Page 21

User's & Administrator's Manual 4. Configuring Device Settings
4 Configuring Device Settings
The section familiarizes you with the RSV80’s settings. RSV80s are delivered to customers
configured with their default settings. Customers can customize these settings to suit specific
enterprise requirements.
Note: Navigate and select options using the Remote Controller or Touch screen.
To access device settings:
1. In the home screen, navigate to and select the More option
2. Navigate to and select Settings.
3. Navigate to and select Device settings.
Version 1.9 21 RXV80 Standalone Video Collaboration Bar
Page 22

RXV80 Standalone Video Collaboration Bar
4. Navigate to and select Device Administration.
5. Log in as administrator.
Note: Logging in as Administrator is required for some debugging options. It is password
protected. Default password: 1234. After logging in as an Administrator, you can log out |
change password.
6. Select Login.
7. Enter the password in the 'Enter password' field; use the virtual keyboard to enter the
User's & Administrator's Manual 22 Document #: LTRT-18171
Page 23

User's & Administrator's Manual 4. Configuring Device Settings
password (1234). Note that the virtual keyboard pops up for all ‘Settings’ fields to allow
inputting characters and / or numbers. Two virtual keyboard types can be displayed: Numeric
or QWERTY.
Note: These v irtual keyboards are also displayed when network administrators need to
enter an IP address to debug, or when they need to enter their PIN lock for the security
setting.
After logging in, the Settings screen now also displays the settings under the section
'Device admin settings'.
8. Click OK; the Settings screen now also displays ‘Device admin settings’, in addition to the
‘User’ settings.
Version 1.9 23 RXV80 Standalone Video Collaboration Bar
Page 24

RXV80 Standalone Video Collaboration Bar
4.1 Configuring Device Admin Settings
After logging in as Device Administration as shown in the previous section, you can configure
Device Administration settings: Display, Date & Time, Wi-Fi, Camera.
4.1.1 Display Settings
Modify these settings to suit your preferences related to the look and feel of the user interface.
To configure Display settings:
1.
Under ‘Device admin settings’, navigate to and select
Display
.
2.
Under ‘Display’, navigate to and select
3.
Navigate to and select the time to lapse before the interface ‘goes to sleep’. Default: 10
minutes.
4.
Navigate to and select
Font size
Sleep
.
.
User's & Administrator's Manual 24 Document #: LTRT-18171
Page 25

User's & Administrator's Manual 4. Configuring Device Settings
5.
Navigate to and select
6.
Navigate to and select
4.1.2 Date & Time
Date and time are automatically retrieved from the deployed Network Time Protocol (NTP) server.
To configure Date & Time:
1.
Under ‘Device admin settings’, navigate to and select
Screen saver
Off
to switch it on and then choose the screen saver.
.
Date & Time
.
Version 1.9 25 RXV80 Standalone Video Collaboration Bar
Page 26

RXV80 Standalone Video Collaboration Bar
Enables the Wi-Fi channel mode:
2. Navigate to and select Use 24-hour format [Allows you to select the Time format].
4.1.3 Wi-Fi Settings
The RXV80 can connect to an Access Point via Wi-Fi.
Note: See the Deployment Guide for detailed information on how to set up Wi-Fi.
To configure Wi-Fi settings:
1.
Under ‘Device admin settings’, navigate to and select Wi-Fi.
2. Navigate to and select Use Wi-Fi.
Configuring Wi-Fi
Network administrators can configure Wi-Fi parameters for the phone. The parameters are
concealed from the user's view. Use the following table as reference.
Parameter Description
network/wifi_enabled Enables/disables the Wi-Fi feature.
network/wifi_pc_bridge
network/wifi_ipv4_ method Defines the Dynamic or Static IP address for Wi-Fi.
network/wifi_channel_ mode
User's & Administrator's Manual 26 Document #: LTRT-18171
Table 4-1: Wi-Fi Parameters
Enables network connectivity for the PC behind the phone;
for debugging purposes.
Page 27

User's & Administrator's Manual 4. Configuring Device Settings
WPAPERSONAL • WPA2PERSONAL • WPAENTERPRISE •
authentication methods that need
Defines the WPS method. The phone supports PIN and push
Parameter Description
2.4G only
5G only
2.4G+5G
The following table shows the parameters per index. The phone can currently store 16
connected SSIDs.
Table 4-2: Wi-Fi Parameters per Index
Parameter Description
network/wifi/[0-15]/ssid Saves the Access Point’s SSID.
network/wifi/[0- 15]/password
network/wifi/[0- 15]/security
network/wifi/[0- 15]/auto_reconnect
network/wifi/[0- 15]/identity
network/wifi/[0- 15]/anonymous_ identity
network/wifi/[0- 15]/phase2_ authentication
network/wifi/[0-15]/pin_code
network/wifi/[0- 15]/wps_method
network/wifi/[0- 15]/client_cert
Saves the password for some authentication methods which
need it, e.g., WPAPERSONAL, WPA2PERSONAL
Saves the Access Point’s authentication method: •
WPA2ENTERPRISE
Configure this parameter to reconnect this SSID
automatically.
Saves the identity for some
it, e.g., WPAPERSONAL, WPA2PERSONAL
Saves the anonymous identity for some authentication
methods that need it, e.g., WPAENTERPRISE,
WPA2ENTERPRISE, etc.
Phase 2 authentication for WPAENTERPRISE,
WPA2ENTERPRISE.
The phone supports PAP, MSCHAP, MSCHAPV2, CHAP,
MD5, GTC
Defines the PIN code for the WPS PIN code authentication
method.
button.
Defines the certificate path for WPAENTERPRISE,
WPA2ENTERPRISE certificate authentication.
network/wifi/[0- 15]/private_key
Defines the private key path for WPAENTERPRISE,
WPA2ENTERPRISE certificate authentication.
Version 1.9 27 RXV80 Standalone Video Collaboration Bar
Page 28

4.1.4 Camera
Settings controlling the look and feel of the video UI can be set to suit individual preferences.
To configure Camera settings:
1.
Under ‘Device admin settings’, navigate to and select
RXV80 Standalone Video Collaboration Bar
Camera
.
2. Navigate to and select Camera settings; the video stream is played and the following is
displayed on the right side of the screen:
3. Create and edit presets using PTZ control. For more information, see:
http://firmware.dolbyvoice.com/firmware/docs/DVH_v5.0/HTML/DolbyVoiceHuddle_Administr
ator%27s_Guide_5.0/help_files/topics/t_create_preset_ptzcontrol.html
4. Adjust the camera for lighting conditions. For more information, see:
http://firmware.dolbyvoice.com/firmware/docs/DVH_v5.0/HTML/DolbyVoiceHuddle_Administr
ator%27s_Guide_5.0/help_files/topics/t_adjust_image_quality.html
User's & Administrator's Manual 28 Document #: LTRT-18171
Page 29

User's & Administrator's Manual 4. Configuring Device Settings
4.1.5 Bluetooth
Bluetooth is currently used for the Remote Controller and the ‘Proximity Join’ feature. Bluetooth
speakers (selected types only) will be supported in the future.
Note: The build in Bluetooth can support only one Bluetooth feature at the time (the Remote
Controller or the ‘Proximity join’ feature). To use both RC and ‘Proximity join’ in parallel, a
special External USB to Bluetooth device will be supported in the future.
Bluetooth must be enabled to support use of the Remote Controller and the Proximity Join
feature. For information on how to enable/disable Bluetooth and on how to locate the Remote
Controller manually (without using the popup automatically displayed at the start to pair the
Remote Controller), see the RXV80 Deployment Guide.
To pair a new device:
1. Under ‘Device admin settings’, navigate to and select
2. Navigate to and select
Pair new device
.
Bluetooth
.
4.1.6 Security
As a security precaution, the RXV80 can be locked and unlocked. The setting helps secure
the device against breaches.
To secure the device:
1. Under ‘Device admin settings’, navigate to and select
Version 1.9 29 RXV80 Standalone Video Collaboration Bar
Security
.
Page 30

RXV80 Standalone Video Collaboration Bar
2. Navigate to and select Screen lock [The phone automatically locks after a configured period
to secure it against unwanted use. If left untouched for 10 minutes (default), it automatically
locks and is inaccessible to anyone who doesn't know its lock code.]
3. Navigate to and select PIN.
4. Enter a PIN, click Next and then navigate to and select Password; a screen like the
preceding is displayed. Set the password (must also be at least four characters) and then
again navigate to and select Next. You’ve successfully configured screen lock.
User's & Administrator's Manual 30 Document #: LTRT-18171
Page 31

User's & Administrator's Manual 4. Configuring Device Settings
4.1.7 Languages & input
This setting allows users to customize inputting to suit personal requirements.
To set language and input:
1. Under ‘Device admin settings’, navigate to and select
2. Navigate to and select Physical keyboard.
Languages & input
.
3. Navigate to and select Show virtual keyboard.
Version 1.9 31 RXV80 Standalone Video Collaboration Bar
Page 32

RXV80 Standalone Video Collaboration Bar
4.1.8 Modify network
This setting enables the Admin user to determine network information and to modify network
settings.
To modify network settings:
1. Under ‘Device admin settings’, navigate to and select
2. Navigate to and select:
• IP Address [Read Only]
• IP Settings [DHCP or Static IP]
Modify network
.
• Network state [Read Only]
• Proxy
User's & Administrator's Manual 32 Document #: LTRT-18171
Page 33

User's & Administrator's Manual 4. Configuring Device Settings
Allows you to configure the RSV80 with an HTTP proxy server. Configure the proxy host
name and proxy port and then navigate to and select Done.
• 802.1x Settings [Allows enabling 802.1x]
802.1X Authentication is the IEEE Standard for Port-based Network Access Control
(PNAC). See https://1.ieee802.org/security/802-1x/ for more information.
• VLAN Settings
♦ Allows you to configure ‘VLAN Discov ery mode’ to Manual configuration, Automatic
configuration (CDP), Automatic configuration (LLDP) or Automatic configuration
(CDP+LLDP)]
4.1.9 Calling
This setting enables the user to configure call-associated functionalities to suit personal
preferences.
To configure call settings:
1. From the home page, navigate to and select
Settings.
Cisco Discovery Protocol (CDP) is a Cisco proprietary Data Link Layer protocol
Link Layer Discovery Protocol (LLDP) is a standard, layer two discovery protocol
♦ Allows you to configure ‘VLAN Interval’.
'VLAN interval' refers to CDP/LLDP advertisements' periodic interval. Default: 30
seconds. You can increase or decrease the intervals between the CDP/LLDP packets
that are sent, based on network traffic and topology.
More
and then navigate to and select
2. Navigate to and select Calling.
Version 1.9 33 RXV80 Standalone Video Collaboration Bar
Page 34

RXV80 Standalone Video Collaboration Bar
• In the Calls screen, navigate to and select:
♦ Call forwarding to enable automatically redirecting incoming calls to another
destination.
♦ Also ring to configure other phones to ring on incoming calls; only displayed if Call
forwarding is disabled.
♦ If unanswered to configure the destination to which unanswered calls will be sent;
only displayed if Call forwarding is disabled. Select either Off, Voicemail, Contact
or number.
♦ Calls for you to configure the ringtone played on your phone when calls come in.
♦ Forwarded calls
♦ Delegated calls to configure the ringtone played to delegates.
♦ Block calls with no caller ID to block calls that do not have a Caller ID.
User's & Administrator's Manual 34 Document #: LTRT-18171
Page 35

User's & Administrator's Manual 4. Configuring Device Settings
4.1.10 Debugging
Admin users can perform debugging for troubleshooting purposes.
To perform Debugging:
1. In the Settings screen under ‘Device administration’, select Debugging.
2. Use the following debugging features available to Admin users:
• Log settings (see Log Settings)
• Remote Logging (see under Remote Logging)
• Diagnostic Data (see under Diagnostic Data)
• Reset configuration (see under Reset configuration)
• Restart Teams app (see under Restart Teams app)
• Company portal login (see under Company Portal Login)
• Launch mobile teams (see under Launch Mobile Teams)
• Debug Recording (see under Debug Recording)
• Erase all data (see under Erase all dat)
• ADB (see under ADB)
• Screen Capture (see under Screen Capture)
• Remote Packet Capture (see under Remote Packet Capture)
Log Settings | Collecting Logs
Device diagnostics (Logcat) can be collected using the Microsoft Admin Portal. For support
purposes, general logs can be collected also using the Microsoft Admin Portal. The logs can help
debug Teams application issues and also for issues related to the device.
To configure log settings:
1. In the Debugging screen, select Log settings.
Version 1.9 35 RXV80 Standalone Video Collaboration Bar
Page 36

RXV80 Standalone Video Collaboration Bar
2. Navigate to and select Log Level and then select either
• Verbose, Debug, Info, Warning, Error, Assert -or-None
3. Navigate to and select Log Package Filter and enter the filter.
4. Navigate to and select Log Tag Filter and enter the filter.
5. Navigate to and select Log Buffer Filter.
6. Navigate to and select Current filter for logs.
To collect logs:
1. Reproduce the issue
2. Access Microsoft Admin Portal and under the Devices
tab click the Diagnostics icon.
User's & Administrator's Manual 36 Document #: LTRT-18171
Page 37

User's & Administrator's Manual 4. Configuring Device Settings
Note: The preceding figure is for illustrative purposes. It shows an AudioCodes phone. The same
screen is displayed for the RXV80.
3.
Click the Diagnostics icon.
Version 1.9 37 RXV80 Standalone Video Collaboration Bar
Page 38

RXV80 Standalone Video Collaboration Bar
4. Click Proceed; the logs are uploaded to the server.
5. Click the History
6. Click Download
tab.
to download the logs.
Remote Logging
Remote Logging via Syslog provides the same log level as Device Diagnostics (performed
via the Microsoft Admin Portal) with some additional information that may be relevant to
device issues (not Teams application issues).
Diagnostics via the Microsoft Admin Portal are saved to the device sdcard and collected after
the event. Remote Logging via Syslog is different. The logs are collected in real time.
User's & Administrator's Manual 38 Document #: LTRT-18171
Page 39

User's & Administrator's Manual 4. Configuring Device Settings
To enable Remote Logging via Syslog:
7. Navigate to and select Remote logging.
8. Configure the ‘Remote IP address’ and ‘Remote port’ and enable ‘Remote Logging’; the
device starts sending logs to the Syslog server.
Note: Network administrators can also enable Syslog using Secure Shell (SSH) protocol.
To enable Syslog using SSH protocol, type the following command at the shell
prompt:
setprop persist.ac.rl_address <syslog_server_ip>:<port>.
To disable Syslog using SSH, type the following command at the shell prompt:
setprop persist.ac.rl_address ""
Diagnostic Data
Admin users who need to get logs from the device can dump the logs to the phone’s Secure
Digital (SD) Card and then later collect them using Secure Copy Protocol (SCP) based on Secure
Shell (SSH) protocol. Whenever an issue occurs, the Admin can dump the logs into the SD Card.
To use the tool:
1. Navigate to and select Diagnostic Data.
2. Navigate to and select OK to confirm ‘Copy logs to sdcard’; the RXV80 creates all necessary
logs and copies them to the its SD Card / Logs folder.
3. Get the logs using SCP notation as follows:
scp -r admin@host_IP:/sdcard/logs/ .
Following are the relevant logs (version and ID may be different to those shown here):
dmesg.log
dumpstate-TEAMS_1.3.16-undated.txt
dumpstate_log-undated-2569.txt
logcat.log
Version 1.9 39 RXV80 Standalone Video Collaboration Bar
Page 40

RXV80 Standalone Video Collaboration Bar
Reset configuration
Admin users can opt to ‘clean up’ their configuration history and return the RXV80 to an Out of
Box Experience (OOBE). If the Teams app isn't running well, this might help.
To reset the configuration:
1. Navigate to and select Reset configuration.
2. Navigate to and select OK; all data is erased and default factory settings are restored but
sign-in is retained.
See also:
https://docs.microsoft.com/en-us/MicrosoftTeams/rooms/rooms-operations#microsoft-teamsrooms-reset-factory-restore
Restart Teams app
If the Teams application freezes or malfunctions, a good way to resolve this is to restart the app.
To restart the Teams app:
Navigate to and select Restart Teams app; only the Teams app is restarted.
Company Portal Login
Getting Company Portal Logs
Company Portal logs can be helpful to network administrators when there are issues with
signing in to Teams from the phone.
To get Company Portal logs:
1. Reproduce the issue (logs are saved to the device so you first need to reproduce the
issue and then get the logs).
User's & Administrator's Manual 40 Document #: LTRT-18171
Page 41

User's & Administrator's Manual 4. Configuring Device Settings
2.
Log in to the RXV80 as Administrator and then go back.
3. Navigate to and select the Debugging option.
4. Navigate to and select Company Portal login.
5.
In the Device Details screen that opens, navigate to and select
Settings
:
6.
Navigate to and select
Copy Logs
.
Company portal logs are copied to:
sdcard/Android/data/com.microsoft.windowsintune.companyportal/files/
7.
To pull the logs, use ssh:
scp -r admin@hosp_ ip:/sdcard/android/data/com.microsoft.windowsintune.companyportal/files/
Files are quite heavy so you may need to pull them one by one.
Launch Mobile Teams
‘App not found’. N/A in this release.
Debug Recording
This feature enables Admin users to perform media/DSP debugging.
Note: DSP recording can be activated on the fly without requiring the network administrator to
reset the phone.
Version 1.9 41 RXV80 Standalone Video Collaboration Bar
Page 42

RXV80 Standalone Video Collaboration Bar
To reset the configuration:
1. Navigate to and select Debug Recording.
2. Navigate to and select Voice record to enable the feature.
3. Navigate to and select Remote IP address to input the IP address of the device whose
traffic you want to record.
4. Navigate to and select Remote port and input it (Default: 5000).
5. Start Wireshark on your PC to capture audio traffic.
Erase all data (factory reset)
This option is the equivalent of restore to defaults; including logout and device reboot.
To erase all data (factory reset):
1. Navigate to and select Erase all data (factory reset).
2. Navigate to and select Reset Phone.
User's & Administrator's Manual 42 Document #: LTRT-18171
Page 43

User's & Administrator's Manual 4. Configuring Device Settings
ADB
The Android Debug Bridge is a command-line tool used to debug the Teams app. The setting is
disabled by default; leave it unchanged at the default unless there’s a real necessity to use it.
To enable ADB:
Navigate to and select the option.
Screen Capture
By default, this setting is enabled. If disabled, the phone won't allow its screens to be captured.
Remote Packet Capture
The ‘rpcapd’ (Remote Packet Capture) network sniffer application allows the Admin user to
analyze and debug Android traffic on their desktop PC using the app's integral SSH server.
Traffic is captured using the Android OS feature VpnService. Wireshark sshdump tool is
supported. Traffic is captured as a pcap file. MITM (Man-in-the-Middle) functionality allows
admins to decrypt traffic in Wireshark. Though it’s recommended, others can be used.
To enable Remote Packet Capture:
1. Navigate to and select the option.
2. After 'rpcapd' is enabled on the phone, use Wireshark to connect with it. Follow the steps
to connect to the phone.
below
Version 1.9 43 RXV80 Standalone Video Collaboration Bar
Page 44

RXV80 Standalone Video Collaboration Bar
3. View the phone interfaces. Choose your preferred interface with which to capture packets.
User's & Administrator's Manual 44 Document #: LTRT-18171
Page 45

User's & Administrator's Manual 4. Configuring Device Settings
4.2 Configuring User Settings
In the ‘Settings’ screen you can optionally configure the following User settings: Sound,
Accessibility, Reboot and About (read-only).
4.2.1 Sound
You can customize phone volume for a friendlier user experience.
To configure sound settings:
Under ‘User’, navigate to and select
4.2.2 Accessibility
This option allows users to customize the screen to be reader-friendlier.
To configure the Accessibility setting:
1.
Under ‘User’, navigate to and select
Sound
Accessibility
.
.
2. Adjust the settings to suit personal requirements.
4.2.3 Reboot
Rebooting allows you to exit from and reconnect without needing to sign in again.
To reboot
Under ‘User’, navigate to and select
Version 1.9 45 RXV80 Standalone Video Collaboration Bar
the RXV80
:
Reboot
.
Page 46

4.2.4 About
The ‘About’ screen gives you quick access to information about the RXV80 deployment.
To access the About screen:
1.
Under ‘User’, navigate to and select
2. Navigate to and select Status.
RXV80 Standalone Video Collaboration Bar
About
.
3. View the RXV80’s firmware information.
User's & Administrator's Manual 46 Document #: LTRT-18171
Page 47

User's & Administrator's Manual 5. Updating Microsoft Teams Devices Remotely
5 Updating Microsoft Teams Devices Remotely
For instructions on how to update Microsoft Teams devices remotely, see
https://docs.microsoft.com/en-us/microsoftteams/devices/remote-update.
Version 1.9 47 RXV80 Standalone Video Collaboration Bar
Page 48

RXV80 Standalone Video Collaboration Bar
This page is intentionally left blank.
User's & Administrator's Manual 48 Document #: LTRT-18171
Page 49
User's & Administrator's Manual 6. Replacing Remote Controller Batteries
6 Replacing Remote Controller Batteries
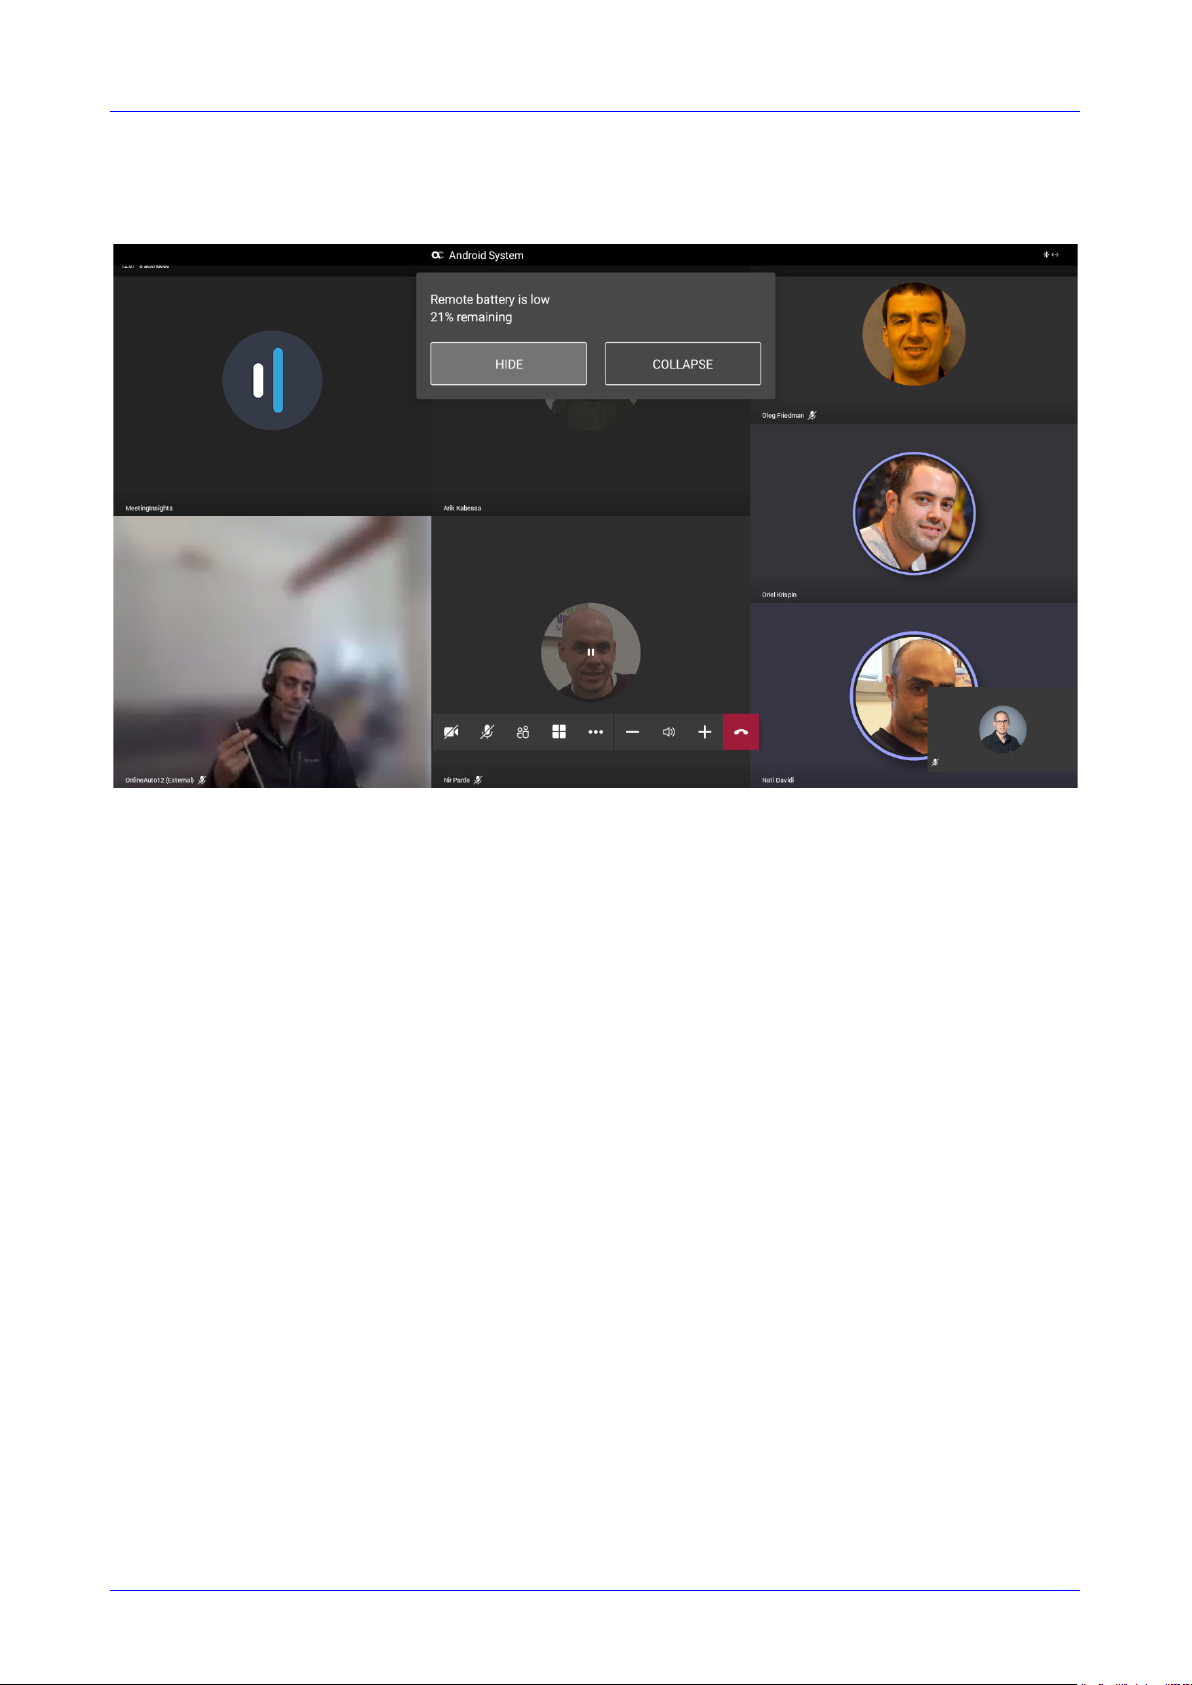
If the Remote Controller batteries run low, the RXV80 application notifies you about the issue.
Select HIDE to conceal the notification.
Version 1.9 49 RXV80 Standalone Video Collaboration Bar
Page 50

RXV80 Standalone Video Collaboration Bar
This page is intentionally left blank.
User's & Administrator's Manual 50 Document #: LTRT-18171
Page 51

User's & Administrator's Manual 7. Supported Parameters
7 Supported Parameters
Listed here are the configuration file parameters currently supported by Android-based
Teams devices. They're in AudioCodes’ UC v ersion format. The parameters are comprised
of Microsoft configuration profile settings and AudioCodes’ device-specific parameters.
general/silent_mode = 0 (default)/1
general/power_saving = 0 (default)/1
phone_lock/enabled = 0 (default)/1
phone_lock/timeout = 900 (default) (in units of seconds)
phone_lock/lock_pin = 123456
display/language = English (default)
display/screensaver_enabled = 0/1
display/screensaver_timeout = 1800 (seconds)
display/backlight = 80 (0-100)
display/high_contrast = 0 (default) /1
date_time/timezone = +02:00
date_time/time_dst = 0 (default) /1
date_time/time_format = 12 (default) / 24
network/dhcp_enabled = 0/1
network/ip_address =
network/subnet_mask =
network/default_gateway =
network/primary_dns =
network/pecondary_dns =
network/pc_port = 0/1
office_hours/start = 08:00
office_hours/end = 17:00
logging/enabled = 0/1
logging/levels = Verbose, Debug, Info, Warn, Error, Assert, None
admin/default_password = 1234
admin/ssh_enabled=0/1 (default)
security/SSLCertificateErrorsMode = IGNORE, NOTIFICATION, DISALLOW (default)
security/ca_certificate/[0-4]/uri – uri to download costumer’s root-ca
provisioning/period/daily/time
provisioning/period/hourly/hours_interval
provisioning/period/type = HOURLY, DAILY (def ault), WEEKLY, POWERUP,
EVERY5MIN, EVERY15MIN
Version 1.9 51 RXV80 Standalone Video Collaboration Bar
Page 52

RXV80 Standalone Video Collaboration Bar
provisioning/period/weekly/day
provisioning/period/weekly/time
provisioning/random_provisioning_time
User's & Administrator's Manual 52 Document #: LTRT-18171
Page 53

7. Supported Parameters
This page is intentionally left blank.
Version 1.9 53 RXV80 Standalone Video Collaboration Bar
Page 54

International Headquarters
1 Hayarden Street,
Airport City
Lod 7019900, Israel
Tel: +972-3-976-4000
Fax: +972-3-976-4040
AudioCodes Inc.
200 Cottontail Lane,
Suite A101E,
Somerset, NJ 08873
Tel: +1-732-469-0880
Fax: +1-732-469-2298
Contact us
Website:
©2021 AudioCodes Ltd. All rights reserved. AudioCodes, AC, HD VoIP, HD VoIP Sounds Better, IPmedia, Mediant,
MediaPack, What’s Inside Matters, OSN, SmartTAP, User Management Pack, VMAS, VoIPerfect, VoIPerfectHD, Your
Gateway To VoIP, 3GX, VocaNom, AudioCodes One Voice and CloudBond are trademarks or registered trademarks of
AudioCodes Limited. All other products or trademarks are property of their respective owners. Product specifications
are subject to change without notice.
:
https://www.audiocodes.com/corporate/offices-worldwide
https://www.audiocodes.com/
Document #: LTRT-18171
 Loading...