

Page 1
MediaPack™ 11x Analog VoIP Gateway
Quick Setup Guide
Welcome
Congratulations on purchasing your AudioCodes MediaPack 11x (MP-11x) Analog Voice-over-IP (VoIP) Media
Gateway (hereafter, referred to as device)!
This document is only intended to provide basic setup instructions for initial access to the device and
connecting it to your network. For advanced configuration and cabling, refer to the User's Manual and
Hardware Manual respectively, which can be downloaded from AudioCodes Website at
https://www.audiocodes.com/library/technical-documents.
Before you begin, please read the Safety Precautions on page 9.
Pour consulter le guide rapide de l’équipement en français, consultez le site web AudioCodes suivant :
https://www.audiocodes.com/library/technicaldocuments?productGroup=1691&docTypeGroup=Quick+Guides.
Package Contents
Make sure that the following items (in addition to any separate-orderable items that you may have purchased)
are included with your shipped device:
4 x anti-slide bumpers for desktop mounting
1 x AC power cable
Regulatory Information document
This document
1 | Page
Page 2
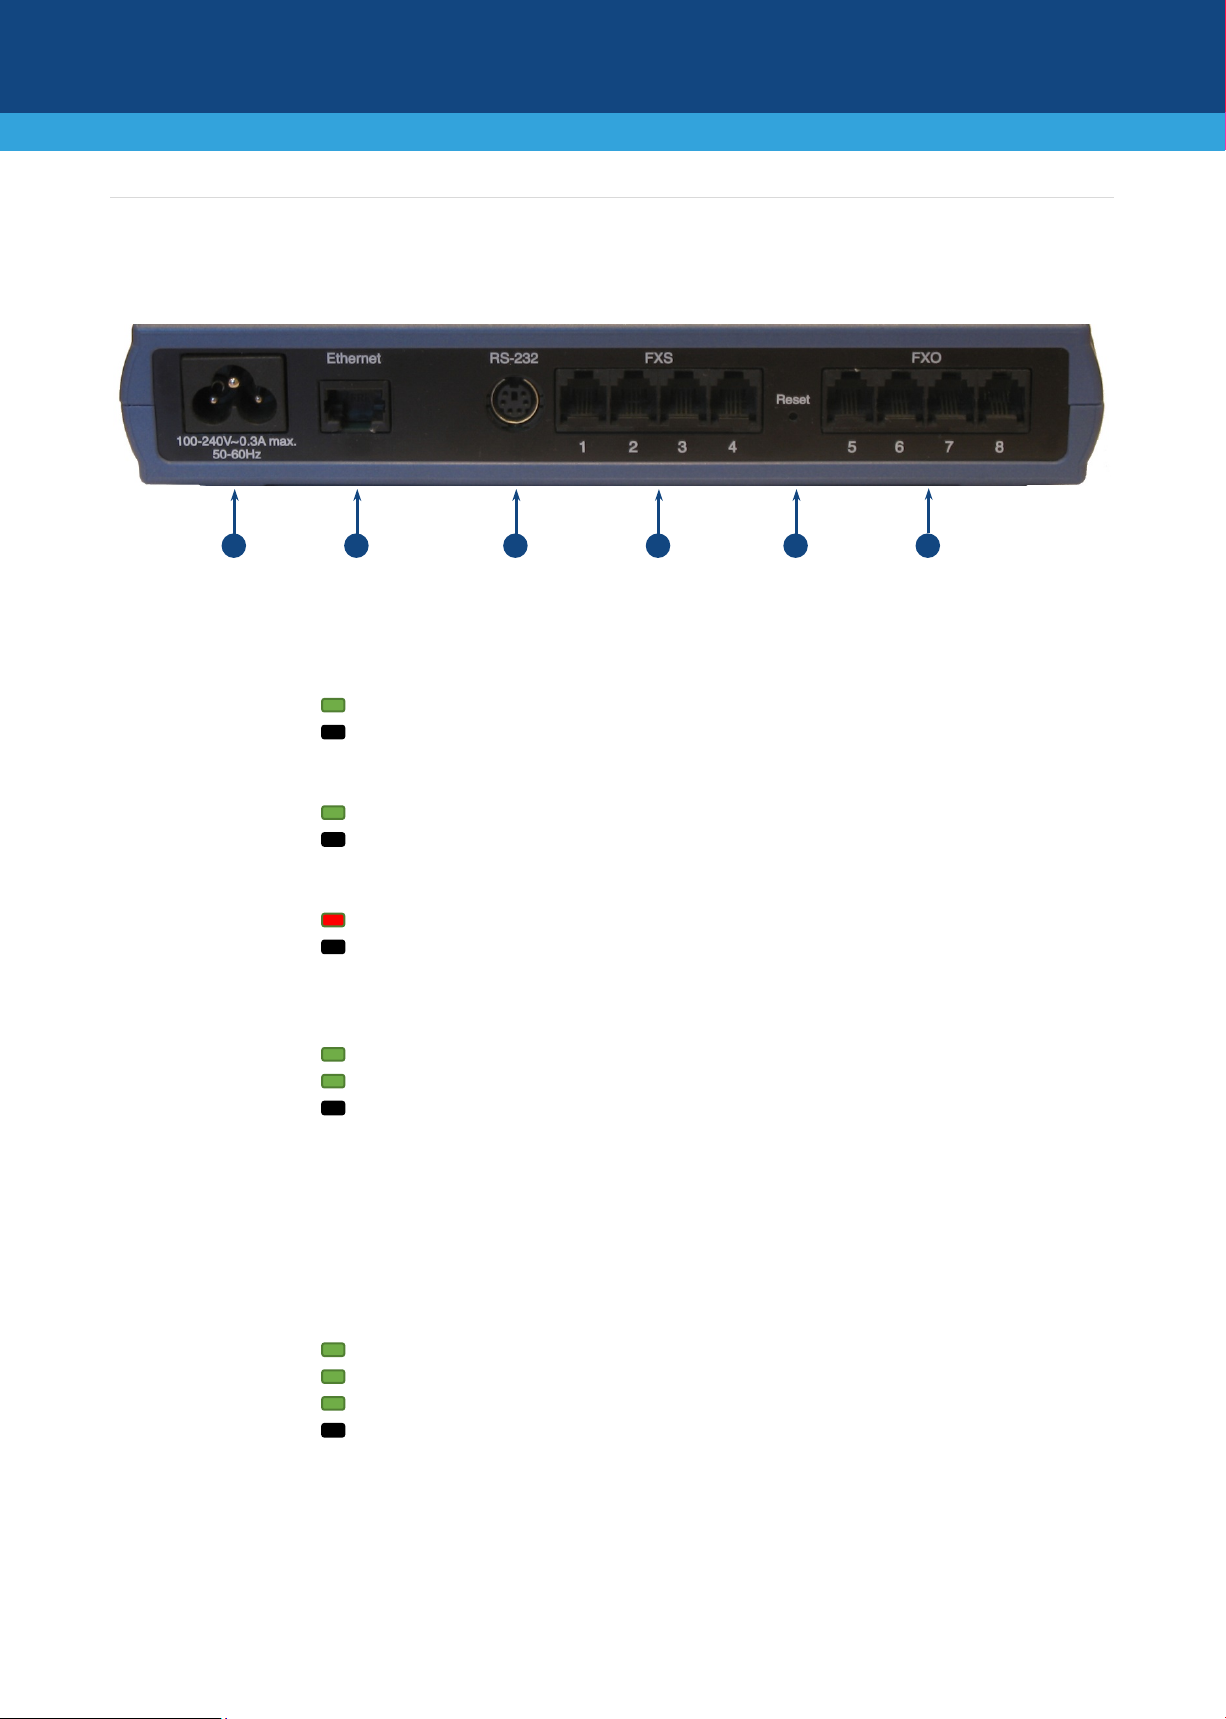
1
100-240V
AC power plug entry.
Power LED (located on front panel):
Green On
Power received by device
Off
No power
Ready LED (located on front panel):
Green On
Device is powered up
Off
Installing software (.cmp file) or device failure
Fail LED (located on front panel):
Red On
Device failure or initializing
Off
Normal operation
2
Ethernet
10/100Base-T Ethernet port (RJ-45) for connecting to the IP network.
Uplink LED (located on front panel):
Green On
Ethernet link established
Green Flashing
Data is being received or transmitted
Off
No Ethernet link
3
RS-232
RS-232 serial interface port (6-pin mini-DIN female - PS/2).
4
FXS and/or
Foreign eXchange Subscriber (FXS) ports (RJ-11) and/or Foreign eXchange Office
Channels Status LED (located on front panel):
Green On
Phone is in off-hook position
Green Slow-Flashing
Phone is ringing
Green Fast-Flashing
Malfunction
Off
Phone is in on-hook position
5
Reset
Reset pinhole button for resetting the device or restoring it to factory defaults. To
button for about six seconds.
4 5 4 3 2
1
Physical Description
[The presence and number of FXS and FXO port interfaces depends on ordered MP-11x model.]
Note: MP-112 does not provide a serial port.
FXO
(FXO) ports (RJ-11). The number and type of ports depends on ordered MP-11x
model.
restore the device to factory defaults: Disconnect the Ethernet cable and then
with a paper clip or any other similar pointed object, press and hold down the
2 | Page
Page 3

Mounting the Device
You can mount the device on a desktop using the four anti-slide bumpers (supplied), which you need to stick in
the grooves (shown below) located on the underside of the device.
You can also mount the device on a wall or in a standard 19-inch rack. For instructions on wall mounting and
19-inch rack mounting, refer to the Hardware Manual
3 | Page
Page 4

Power Cabling the Device
The device is powered from a standard alternating current (AC) electrical wall outlet, using the supplied power
cord.
1. Insert the female connector located on the end of the power cord (supplied) into the device's power
socket located on the rear panel.
2. Insert the male plug located on the other end of the power cord into a standard electrical wall outlet.
The Power LED (located on the front panel) is lit green, indicating that the device is receiving power.
4 | Page
Page 5

Assigning an IP Address to the Device
The default IP address depends on your MP-11x model:
FXS-only models and FXS-with-FXO models: 10.1.10.10
FXO-only models: 10.1.10.11
For all MP-11x models, the default subnet mask is 255.255.0.0 and the Default Gateway IP address is 0.0.0.0.
You can change the IP address using any of the following methods:
Accessing the device's Web-based management interface from a computer using the default IP address
Accessing the device's interactive voice response (IVR) menu, using touch-tone dialing (DTMF tones) on
a standard telephone connected to one of the device's FXS ports
ASSIGNING AN IP ADDRESS THROUGH THE WEB-BASED MANAGEMENT INTERFACE
Use the device's factory default IP address to initially access the device's Web-based management interface
and then change it to suit your network addressing scheme for subsequent connectivity.
1. Using a crossover RJ-45 Ethernet cable, connect the device's Ethernet port located on the rear panel
and labeled Ethernet, to the LAN port of your computer.
2. Change the IP address of your computer to correspond with the device's default IP address and subnet
mask.
5 | Page
Page 6

3. On your computer, open a standard Web browser (for example, Google Chrome), and then in the URL
field, enter the device's default IP address; the Web Login screen appears:
4. Type in the default username (Admin) and password (Admin), and then click Login.
5. Open the IP Settings table (Configuration tab > VoIP menu > Network > IP Interfaces Table).
6. Modify the IP address to suit your network addressing scheme:
In the 'IP Address' field, enter the new IPv4 IP address in dotted-decimal notation.
In the 'Subnet Mask' field, enter the new subnet mask in dotted-decimal notation.
In the 'Default Gateway Address' field, enter the new IP address of the Default Gateway in dotted-
decimal notation.
7. Click Submit to apply your settings.
6 | Page
Page 7

8. Open the Maintenance Actions page (Maintenance tab > Maintenance menu > Maintenance Actions),
and then click BURN to save your settings to the device's flash memory. This process also causes the
device to reset.
As you have changed the device's IP address, your connection to the device's management interface
through your browser is no longer available.
9. Disconnect the device's Ethernet cable from your computer and then connect it to your network.
10. Access the device's management interface using the device's new IP address.
7 | Page
Page 8

ASSIGNING AN IP ADDRESS THROUGH THE VOICE MENU
You can change the IP address through the device's interactive voice response (IVR) menu, using touch-tone
dialing (DTMF tones) on a standard telephone that is connected to one of the device's FXS ports:
1. Connect a telephone to one of the device's FXS ports.
2. Lift the handset off the hook, and then dial ***12345 (three stars followed by the digits 1, 2, 3, 4, and
5). Note that you may hear a fast-busy dial tone when pressing the * key.
3. When you hear the configuration menu voice prompt, continue with the next step.
4. To change the IP address:
a. Press 1 followed by the number key (#); the current IP address of the device is played.
b. Press the # key.
c. Dial the new IP address, using the * key to denote the dots between digits (e.g., 192*168*0*4),
and then press # to finish.
d. Press 1 to save.
5. To change the subnet mask:
a. Press 2 followed by the # key; the current subnet mask of the device is played.
b. Press the # key.
c. Dial the new subnet mask (e.g., 255*255*0*0), and then press # to finish.
d. Press 1 to save.
6. To change the Default Gateway IP address:
a. Press 3 followed by the # key; the current Default Gateway address is played.
b. Press the # key.
c. Dial the new Default Gateway address (e.g., 192*168*0*1), and then press # to finish.
d. Press 1 to save.
7. Hang up (on-hook) the telephone's handset.
8 | Page
Page 9

Safety Precautions
This device is an indoor unit and therefore, must not be installed outdoors.
Ethernet cabling must be routed only indoors and must not exit the building.
The device must be installed and serviced only by qualified service personnel.
Do not open or dismantle the device.
Do not expose the device to water or moisture.
Make sure the device is installed in a well-ventilated location to avoid over heating of internal
components and subsequent damage.
Do not place any object on top of the device and make sure that sufficient clearance from the top and
sides are maintained to ensure proper airflow to avoid over heating of internal components.
Operate the device in an ambient temperature (Tma) that does not exceed 40°C (104°F).
The device must be installed only in restricted access locations.
Use only the supplied AC power cord for connection to the power source.
Installation of the device must be in accordance with national electrical codes and conform to local
regulations.
Ensure that you connect the device to an electrical socket outlet that provides protective earthing
(grounding).
The device is immune against power surge levels of up to 1 Kilovolts (KV) as required by the following
standards: IEC 61000-4-5, EN 55024, and EN 300386. Power surges above protection levels as required
by EN 55024 and EN 300386 may cause damage to the device.
For FXS ports, the device provides only Secondary Protection against power surges. In deployments
where the telephone lines are installed outside, you must install AudioCodes’ approved surge protector
(Circa model 4B3S-75) as the primary protection against lightning and other over-voltages phenomena
which might couple the 2-wire.
For FXO ports, use minimum 26-AWG wiring.
For FXX ports, use minimum 26-AWG wiring if it exits the building.
9 | Page
Page 10

International Headquarters
AudioCodes Inc.
About AudioCodes
AudioCodes Ltd. (NASDAQ, TASE: AUDC) is a leading vendor of advanced communications software, products
and productivity solutions for the digital workplace. AudioCodes enables enterprises and service providers to
build and operate all-IP voice networks for unified communications, contact centers, and hosted business
services. AudioCodes offers a broad range of innovative products, solutions and services that are used by large
multi-national enterprises and leading tier-1 operators around the world.
1 Hayarden Street,
Airport City
Lod 7019900, Israel
Tel: +972-3-976-4000
Fax: +972-3-976-4040
200 Cottontail Lane,
Suite A101E,
Somerset, NJ 08873
Tel: +1-732-469-0880
Fax: +1-732-469-2298
Contact us: https://www.audiocodes.com/corporate/offices-worldwide
Website: https://www.audiocodes.com/
©2020 AudioCodes Ltd. All rights reserved. AudioCodes, AC, HD VoIP, HD VoIP Sounds Better, IPmedia, Mediant, MediaPack,
What’s Inside Matters, OSN, SmartTAP, User Management Pack, VMAS, VoIPerfect, VoIPerfectHD, Your Gateway To VoIP,
3GX, VocaNom, AudioCodes One Voice, AudioCodes Meeting Insights, AudioCodes Room Experience and CloudBond are
trademarks or registered trademarks of AudioCodes Limited. All other products or trademarks are property of their
respective owners. Product specifications are subject to change without notice.
Date Published: 20/08/2020
Document #: LTRT-52915
10 | Page
 Loading...