

Page 1
AUDIO ANALOGUE
Fortissimo CD - DAC
CD PLAYER - DA CONVERTER
OWNER’S MANUAL
MANUALE D’ISTRUZIONI
Manual rev 1.0
Page 2

2
Page 3

3
Dear Audiophile,
Congratulations and thank you for choosing the Fortissimo CD-DAC. As its brother, the Fortissimo Integrated
Amplifier, the Fortissimo CD-DAC perfectly exemplifies our philosophy to design products which can interface different
audio systems at the best audio quality. In fact the Fortissimo CD-DAC is not only a CD player but is also provided with all
the features making it a high performance digital to analog converter.
Main Features:
Output stage: As always for the Audio Analogue products including a Digital to Analog section the output stages is the part
where more experimentation is performed. As first let's see what is usually done. The best DACs (Integrated Circuit) have a current
output type. Therefore a two stage architecture is usually implemented. The first is a current to voltage made by an operational
amplifier while the second is a stage performing the voltage gain and filtering. The second stage is made with a circuit based on an
operational amplifier or on a discrete components circuits. Both the strategies often (almost always) use feedback technique. What
we have realized is a single circuit, all made by discrete components, which performs all the above functions in a zero feedback
topology. Is not our intention entering the debate sometimes coming out in the audio field about the goodness of the feedback
technique. Our goal is instead to find new circuits which could give different sound qualities. So we have decided to completely reinvent the output stage approach. In fact as it is said: "if you always walk on the same streets you will always arrive in the same
places". What we have found is a different sound which has been defined as much more "natural" by the listeners in the tests we
have performed.
USBDAC Section: Because of the increasing importance of music reproduced by a USB connection, we have developed a
technology to play such files both in adaptive and asynchronous mode. The accepted input sample frequency reaches the 192KHz
for a 24bits file stream. The USB data stream is converted in a SPDIF signal that is passed to the Digital to analog conversion
section via a galvanic isolated connection.
Digital Input Selection and SRC (Sample Rate Converter): We use a single component to select the digital input, receive the signal
and change the signal sample rate. Usually there is a SPDIF receiver selecting the digital signal and extracting the data from the
SPDIF selected signal and then a further component, the sample rate converter IC, which works on the extracted signal changing the
sample rate. To have a single component making all the tasks is very important because avoids adding jitter in the communication
between the otherwise two components.
Clock sources and settable output sample frequency: It is known that increasing the signal sample rate not always improves the
audio quality. In fact it seems commonly accepted between the audiophiles that to increase the audio performances the output signal
sample rate has to be an integer multiple of the input sample rate or to be the same of the input sample frequency. Some others
suggest instead that for each digital to analog converter there is an optimum output sample frequency. Anyway because the common
sample rates are integer multiples of two different basic frequencies, that's say: 48KHz and 44.1KHz, to have the best performances
requires having two different clock sources. Such fact is often neglected in DA converters. Instead we have designed two very clean
and jitter free clock oscillators to supply the clock to the Sample Rate Converter and DAC. Of the two, just one oscillator is active
according to the output sample frequency. Also we permits the user a complete control on the output sample rate frequency. In fact
we allow him to change the output sample frequency to find its best set up according to three different output sample frequency
selection criterion: Direct, Automatic, Custom.
DAC Section: We use the Texas Instruments 32-bit, 200KHz Sampling, Advanced Segment, Audio Stereo DAC: PCM1795. That is a
very performing current output digital to analog converter.
CD Mechanism: on the Fortissimo CD-DAC, as on every Audio Analogue CD Players, the Teac CD-5010 has
been mounted, a mechanism specifically designed for high end audio applications. This CD Mechanism is very sturdy and has a very
low Jitter output. The best starting point for a very high performance Player.
Phone Output: using headphones to listen music is becoming more and more popular. This to have a different listening experience
or to don't disturb other people around. Therefore a Phone output, which input is taken directly buffering the output stage, has been
implemented.
Trigger Output: As for all the Audio Analogue last generation products a DC 12V Trigger output is supported. In such way
the user can turn on all the stereo system having just one unit working in stand by, therefore decreasing the standby power
consumption of the chain.
Power supply
: a toroidal transformer is used with secondary stages dedicated to each part. The analog power supply has been
realized using all of Audio Analogue‘s strategies to reduce any interference and kill even the smallest of noise from all of its
components. Regulation stages have been placed in every sensible circuit point and the bypass capacitors have been chosen not
only for their electric performance but also after long and careful listening sessions.
Page 4

4
Caro audiofilo
Congratulazioni e grazie per aver scelto il Fortissimo CD-DAC. Come il Fortissimo Integrated Amplifier il
Fortissimo CD-DAC è un perfetto esempio della nostra filosofia di realizzare prodotti pensati per interfacciarsi con diversi
sistemi audio al fine di ottenere la massima qualità nella riproduzione sonora. Infatti, il Fortissimo CD-DAC non è solo un
lettore CD ma è dotato di caratteristiche tali da farne anche un convertitore DA di altissima qualità.
Caratteristiche Principali:
Stadio di uscita: come sempre per i prodotti Audio Analogue che includono uno stadio di conversione digitale/analogico, lo
stadio di uscita analogico è la parte dove maggiormente si concentrano ricerca e sperimentazione. Vediamo innanzitutto come viene
solitamente realizzata tale sezione. Poiché i migliori convertitori DAC presentano un'uscita in corrente, l'approccio standard prevede
una architettura a due stadi dei quali il primo è un convertitore corrente tensione realizzato con un operazionale mentre il secondo
svolge sia compiti di filtraggio che di amplificazione del segnale. Il secondo stadio può essere realizzato o a componenti discreti o
con un operazionale e si basa generalmente (praticamente sempre) sull'uso della tecnica della reazione. Quello che abbiamo invece
realizzato è un circuito a componenti discreti che svolge tutte e tre le funzioni suddette in una topologia a zero feedback (senza
reazione). Non è nostra intenzione entrare nel dibattito che talvolta si scatena negli ambienti audiofili circa la bontà o meno della
tecnica della reazione nei circuiti audio, il nostro scopo è trovare nuovi circuiti che possano restituire qualità sonore innovative. Per
questo abbiamo deciso di "ri-inventare" lo stadio di uscita. Infatti: "se percorrerai sempre le solite strade arriverai sempre nei soliti
posti". Quello che abbiamo trovato è un suono "diverso" che è stato definito come più "naturale" da chi ha partecipato ai tests di
ascolto svolti sull'apparecchio.
USBDAC: vista l'importanza crescente della musica riprodotta mediante la connessione USB abbiamo sviluppato una tecnologia per
riprodurre tali tipi di files sia in modalità adattiva che asincrona. La frequenza di campionamento accettata arriva fino a 192KHz e 24
bits di risoluzione. Il flusso di dati della porta USB viene convertito in SPDIF e trasferito con isolamento galvanico alla catena di
conversione digitale/analogica.
Digital Input Selection e SRC (Sample Rate Converter): abbiamo utilizzato un singolo componente che esegue sia la selezione del
segnale di ingresso e l'estrazione dei dati audio dal flusso di dati SPDIF sia la conversione della frequenza di campionamento.
Solitamente invece tali funzioni vengono svolte da componenti diversi: il ricevitore che seleziona l'ingresso digitale e estrae i dati e il
sample rate converter (SRC) che esegue le operazioni sulla frequenza di campionamento. Avere un singolo componente per
svolgere le funzioni suddette è invece molto importante perché permette di eliminare il jitter legato alla comunicazione tra i due
integrati che svolgono le diverse funzioni.
Sorgenti di clock e frequenza di uscita configurabile: aumentare la frequenza di campionamento del segnale non porta
necessariamente ad un incremento nella qualità di riproduzione. E' generalmente accettato tra gli audiofili che, per ottenere le
migliori prestazioni da un convertitore digitale analogico, la frequenza di campionamento di uscita venga incrementata di un multiplo
intero della frequenza di campionamento originale o sia pari alla frequenza di campionamento in ingresso. Alcuni sostengono invece
che ogni convertitore è caratterizzato da una specifica frequenza di campionamento di uscita per la quale si ottengono le migliori
performances. In ogni caso poiché le comuni frequenze di campionamento sono un multiplo intero di due frequenze: 48KHz e
44.1KHz, è necessario avere due differenti sorgenti di clock di riferimento. Tale aspetto è spesso trascurato nella realizzazione dei
DA converter. Nel Fortissimo CD-DAC abbiamo implementato due oscillatori a bassissimo rumore e jitter. Dei due oscillatori
solo uno alla volta è attivo a seconda della frequenza di campionamento di ingresso. Inoltre il software di gestione del
Fortissimo CD-DAC permette all'utente di avere il pieno controllo sulla frequenza di campionamento in uscita dal SRC in
modo da ottenere le migliori prestazioni. La frequenza di campionamento di uscita può essere infatti gestita secondo tre criteri:
Diretta, Automatica e Custom rispondenti ciascuno alle tre diverse filosofie di scelta della frequenza di campionamento di uscita.
Sezione DAC: il Fortissimo CD-DAC usa il DAC PCM1795 della Texas Instruments, un DAC a 32 bit che può arrivare fino a
200KHz di frequenza di campionamento. Si tratta di un DAC Advanced Segment ad altissime prestazioni con uscita in corrente.
Meccanica CD: Sul Fortissimo CD-DAC, come per tutti i suoi lettori CD, Audio Analogue ha scelto la TEAC CD5010 una meccanica progettata specificatamente per applicazioni audio high end. Tale meccanica oltre ad essere molto affidabile è
dotata di un’uscita digitale a bassissimo jitter e costituisce attualmente il miglior punto di partenza per la realizzazione di lettori CD ad
alte prestazioni.
Uscita cuffie: l'uso delle cuffie per ascoltare musica si sta diffondendo sempre di più sia per le diverse caratteristiche di ascolto sia
perché permette di ascoltare la musica senza recare fastidio a persone vicine. Pertanto sul Fortissimo CD-DAC abbiamo
implementato l'uscita cuffie il cui ingresso è ottenuto direttamente bufferizzando il segnale dello stadio di uscita analogico.
Trigger Output
: come per tutti gli apparecchi Audio Analogue di ultima generazione il Fortissimo CD-DAC è dotato
di un'uscita Trigger a 12VDC. In tal modo l'utente può accendere tutto il sistema audio stereo avendo solo una unità che resta
accesa in standby. Si riesce in questo modo a ridurre il consumo di potenza in standby della catena audio.
Page 5

5
INTRODUCTION
AF Group srl, AUDIO ANALOGUE distributor, does not take any responsibilities in the following cases:
Whenever the operational procedures related to the use and the maintenance of the equipment as described in this manual are not
respected.
Whenever damages to the equipment occur because of fixing and modifications made form non-authorized staff or because of
normal deterioration of the system.
No part of this manual can be reproduced by any means, transmitted or copied for private or public use without private authorization
from AF Group srl.
The information contained in this manual is related to the data kept by AF Group srl at the moment of the issue o f this
publication; AF Group srl has the right to make changes to this document without prior notice.
The equipment has been projected and manufactured according to the Regulations of the Community 89/336/CEE and is marked CE.
This equipment can’t be used for different purposes other than those for which it has been manufactured.
AF Group srl does not take any responsibilities for accidents or damages due to improper use of the equipment.
WARNING
Please do respect the safety standards contained in this manual before starting to operate the equipment.
Do not open the equipment. No further interventions than those described in this manual should be made. For technical assistance,
please consult a qualified technician or an AF Group srl dealer.
Not respecting the instructions contained in this manual will invalidate the terms and conditions of the guarantee.
NECESSARY PRECAUTIONS FOR SAFETY AND MAINTENANCE
ATTENTION: before starting any operation, use or maintenance of the equipment it is strictly necessary to understand the following
manual.
To avoid any accidents or hazards it is necessary to follow the following regulations.
Activate the equipment only prior checking if the installation has been properly made, and if it is related to the instructions contained
in this manual.
Avoid installing the equipment in places subjected to extremely high temperatures or humidity.
Check that the labels containing information about safety are always visible and in good conditions.
Ensure to not obstruct ventilation, to avoid excessive overheating. The equipment should be kept to a minimal distance of 15 cm
from any object and not to place on carpet or other soft surfaces. Also the installation close to radiators or in close environments
without ventilation should be avoided.
Do not switch on the equipment until it has not been correctly and completely installed.
Only supply the equipment with the kind of the electric supply as stated on the appropriate label. If in doubts about the kind of supply
available, please consult an expert technician for technical assistance.
The equipment needs to be wired to an earth terminal. The external case is metal made; a defective connection with the earth may
be dangerous.
In case damages occurs to the supply cable, it should be immediately replaced with the same kind of cable. This operation should be
only made prior to disconnecting the main supply.
Do not place objects on the supply cable and check that this is not positioned in way through. The cable should not be knotted or
curly.
Replace the fuses always with other of the same kind.
Do not use the equipment close to the water or other liquids. If liquid entered the equipment, the plug should be disconnected from
the socket avoiding to touch the metal parts. Competent technical staff should be asked to check the equipment before operating it
again.
Do not place recipients containing liquids on the equipment. Even when it is switched off.
Keep the equipment far from sources of heat such as the solar light, kitchens, radiators etc…
Always unplug the supply cable during rainy weather.
Always Switch off and unplug the supply cable before cleaning the equipment externally: this operation should be made using a dry
and soft cloth. Never use alcohol based cleaning material.
If the amplifier was carried from an extremely cold environment to and extremely hot one, it could create internal condensation,
causing possible bad functioning.
If this occurs, please wait for at least an hour before using it again, to allow it to gradually reach room temperature.
When not used for long periods, please unplug the equipment.
INSTRUCTIONS TO PUT IT OUT OF SERVICE
Consult qualified staff
Follow the regulations of the current legislation regarding recycling and waste disposal.
Page 6

6
PREMESSA
AF Group srl, distributore AUDIO ANALOGUE, non accetta responsabilità nei casi in cui:
Le procedure operative di utilizzo e manutenzione dell’apparato descritte nel manuale non siano rispettate.
I danni si verifichino in seguito a riparazioni o modifiche dell’apparato eseguite da personale non autorizzato o a seguito di normale
deterioramento dell’apparato.
Nessuna parte del presente manuale può essere riprodotta con alcun mezzo, trasmessa o copiata per usi pubblici e/o privati senza
la previa autorizzazione di AF Group srl. Le informazioni contenute nel presente manuale sono relative ai dati in possesso di
AF Group srl al momento della pubblicazione; AF Group srl si riserva il diritto di apportare cambiamenti al presente
documento senza alcun preavviso.
L’apparato è progettato e realizzato in conformità alle Direttive Comunitarie 89/336/CEE e 72/23/CEE e risulta marcato CE.
L’apparato non può essere utilizzato per scopi diversi da quelli per cui è stato progettato.
AF Group srl non si assume alcuna responsabilità per incidenti o danni causati da un utilizzo improprio dell’apparato.
AVVERTENZA
Prima di compiere qualunque operazione attenersi alle norme di sicurezza contenute all’interno del manuale
Non aprire l’apparecchio. Nessun ulteriore intervento oltre a quelli descritti in questo manuale dovrebbe essere effettuato. Per
l’assistenza tecnica, rivolgersi a un tecnico qualificato o a un rivenditore AF Group srl.
Il mancato rispetto delle prescrizioni del seguente manuale implica il decadimento della garanzia.
PRECAUZIONI PER LA SICUREZZA E MANUTENZIONE
ATTENZIONE: prima dell’utilizzo o manutenzione dell’apparato o di qualsiasi operazione sullo stesso è necessario prendere visione
del seguente manuale.
Al fine di prevenire ogni pericolo di incidente si impongono le seguenti prescrizioni:
Attivare l’apparato solo dopo aver verificato l’adeguatezza dell’installazione e la conformità alle indicazioni contenute nel presente
manuale.
Non installare l’apparecchiatura in luoghi soggetti a sbalzi eccessivi di temperatura e umidità.
Verificare che le etichette contenenti informazioni sulla sicurezza siano sempre ben visibili ed in buono stato.
Le fessure di ventilazione non devono assolutamente essere ostruite per evitare surriscaldamento dell’apparato. A tal fine,
posizionare l’unità ad una distanza minima di 15 cm da ogni altro ostacolo e non su tappeti, moquette o altre superfici morbide.
Evitare inoltre di installarlo nei pressi di caloriferi o in ambienti chiusi, privi di una appropriata ventilazione.
Non accendere l’apparato finché non è completamente installato in maniera corretta.
Alimentare l’apparato con il tipo di alimentazione elettrica riportato sull’apposita targhetta. In caso di dubbi sul tipo di alimentazione
disponibile, consultare il servizio di assistenza tecnica.
L’apparecchio deve essere sempre collegato a terra. Poiché l’involucro è costituito in metallo, una connessione di terra difettosa o
mancante potrebbe essere pericolosa.
In caso di danneggiamenti al cavo di alimentazione, provvedere immediatamente alla sostituzione con un altro dello stesso tipo.
Questa operazione deve essere effettuata dopo aver disconnesso l’alimentazione primaria.
Non posizionare oggetti sul cavo di alimentazione e verificare che questo non si trovi in una zona di passaggio. Il cavo non deve
essere arrotolato o annodato.
Sostituire i fusibili sempre con altri dello stesso tipo.
Non usare l’apparato in prossimità di acqua o altri tipi di liquidi. Se nell’unità dovesse entrare del liquido, scollegare immediatamente
il cavo di rete dalla presa a muro evitando di toccare le parti metalliche dell’apparecchiatura e rivolgersi al personale tecnico per un
controllo prima del riutilizzo.
Non appoggiare recipienti contenenti liquidi di qualsivoglia natura sopra l’apparato. Anche quando questo è spento.
Tenete l’apparecchio lontano da fonti di calore come la luce solare, cucine, radiatori, etc…
Scollegare sempre il cavo di alimentazione dalla presa durante i temporali.
Spegnere e scollegare sempre l’alimentazione prima di effettuare la pulizia esterna dell’apparato: questa operazione deve essere
effettuata utilizzando un panno asciutto e morbido. Non usare mai solventi o detergenti a base di alcool.
Se l’amplificatore viene trasportato da un ambiente freddo ad un altro caldo, si potrebbe formare condensa al suo interno, causando
possibili malfunzionamenti. Se ciò si dovesse verificare, si prega di attendere almeno un’ora prima dell’uso in modo da permettergli
di raggiungere la temperatura ambiente gradualmente.
In caso di lunghi periodi di inutilizzo, staccare la spina dalla presa di rete.
ISTRUZIONI PER LA MESSA FUORI SERVIZIO
Rivolgersi a personale specializzato.
Seguire le prescrizioni della corrente legislazione in materia di riciclaggio e smaltimento dei rifiuti.
Page 7
7
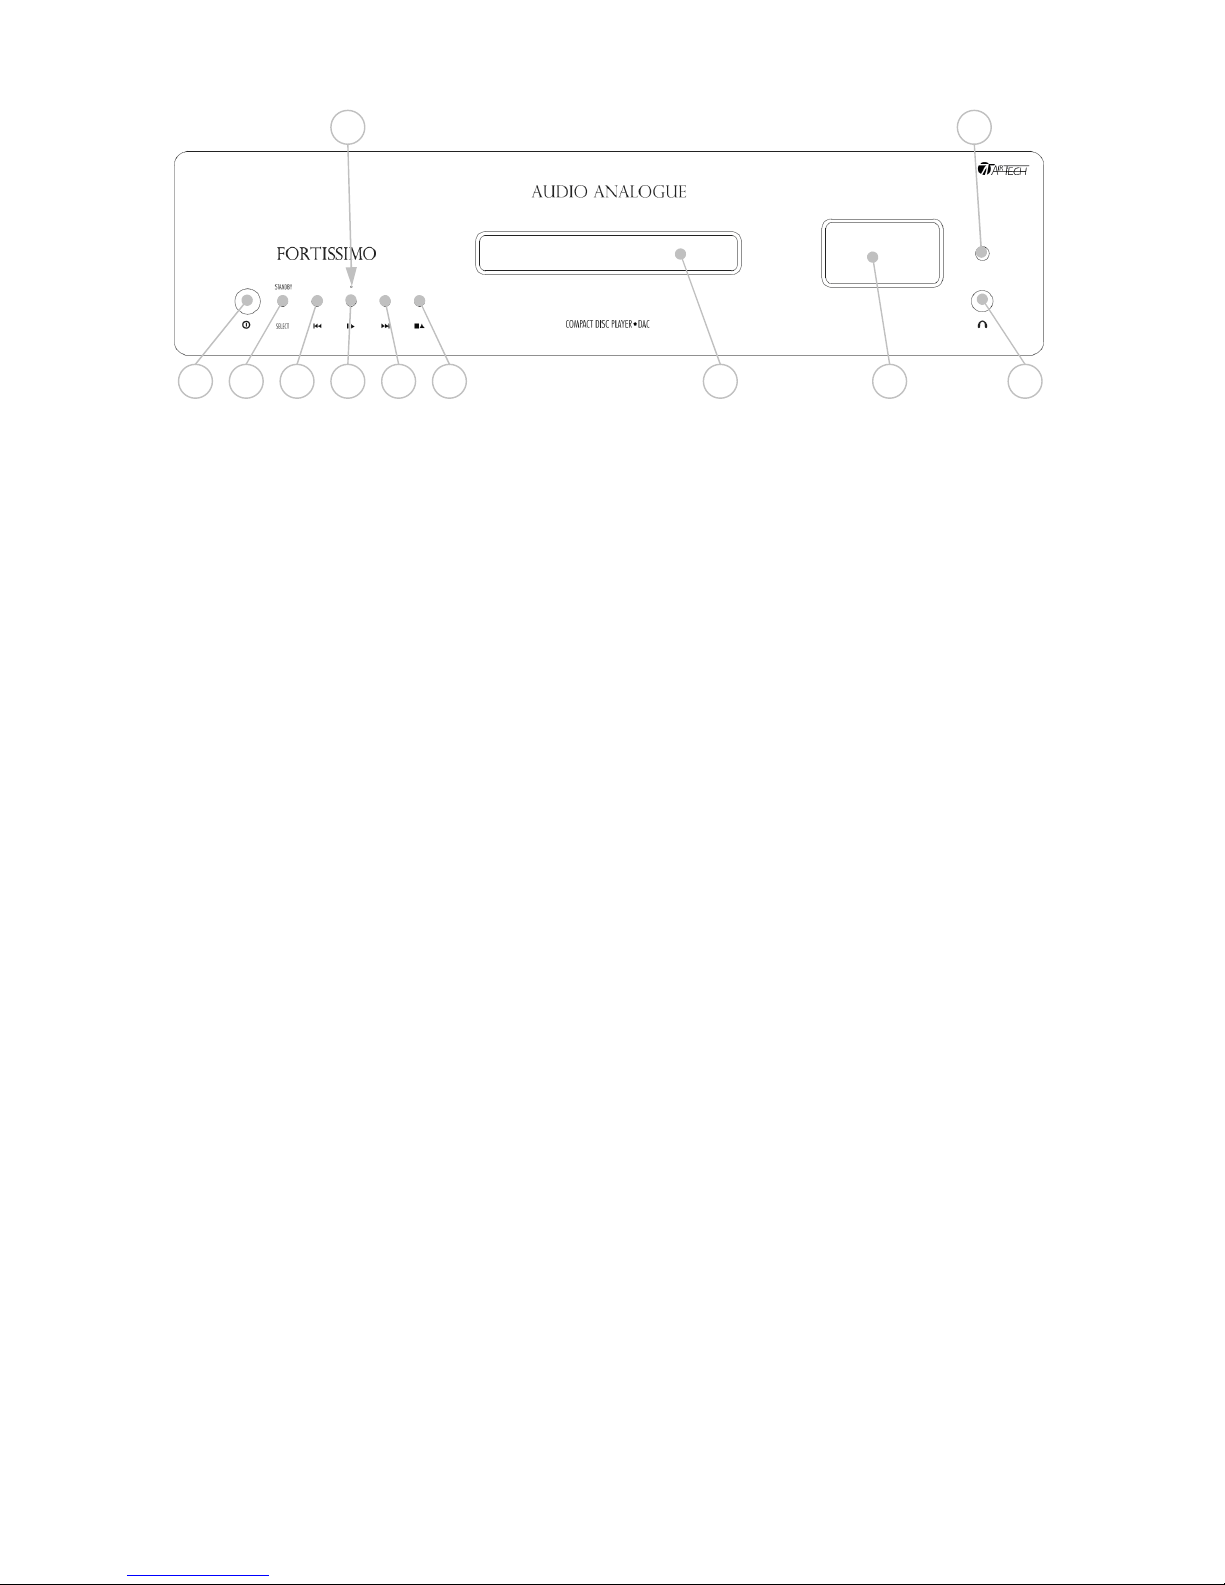
Front panel
1) Power Switch. When in Off position the main voltage is disconnected from the unit.
2) Select/StandBy: when the unit is in StandBy mode pressing and releasing this switch causes the unit to exit the standby mode and entering
normal function mode. When the unit is in normal operation mode pushing and releasing this switch cyclically selects the different audio
sources: CD, Coaxial SPDIF input, Optical SPDIF input, USB input. If the unit is in normal operation mode and the switch is pushed and kept
pushed for about 2 seconds the unit enters into standby mode.
3) PREV/REW. During playback, starts previous CD track playback and a long pressure abilities Fast Rewind search. When playback is
stopped, it allows choosing the CD track from which resuming playback or search CD tracks backward.
4) PLAY/PAUSE. Starts/pauses CD playback.
5) NEXT/FFW. During playback, starts next CD track playback. A long pressure abilities Fast Forward search. When playback is stopped, it
allows choosing the CD track from which resuming playback or search CD tracks forward.
6) STOP/OPEN. When playback is stopped, it allows Opens/closes CD tray. During playback Stops CD playback.
7) Lock/StandBy led: when the unit is in standby mode the led is turned on while if the unit is in normal operation the led is turned on in case an
unlock condition is detected on the selected digital source.
8) CD Tray
9) LCD display.
10) IR receiver
11) Phones output.
Notes:
• In case the equipment is close to certain television sets or lighting systems, is known that malfunction can arise from such systems to the IR transmission.
• When a cable is connected into the Phone output that output is enabled and selected while the Unbalanced and balanced outputs are turned off.
• The display luminosity can be changed with different levels and is also possible to set the unit in a Dark mode operation.
• The unlock condition is detected when there is no source connected at the selected input or if the communication between the source and the Fortissimo
CD - DAC is corrupted for some reason (reflection on the cable, improper signal amplitude, too much jitter...)
Descrizione del pannello frontale
1) Interruttore di alimentazione principale.
2) Select/StandBy: quando l'apparecchio è in modalità Standby la pressione e rilascio del tasto lo fa uscire dallo StandBy ed entrare nella
modalità di normale funzionamento. Quando invece l'apparecchio è in modalità di normale funzionamento la pressione e rilascio del tasto fa
selezionare ciclicamente i vari ingressi: CD, ingresso coassiale SPDIF, ingresso ottico SPDIF, ingresso USB. Durante la modalità di normale
funzionamento la pressione prolungata per circa due secondi del tasto causa l'ingresso dell'apparecchio in modalità di Standby.
3) PREV/REW. Durante la lettura del CD, la pressione di questo tasto provoca il salto immediato alla traccia precedente a quella riprodotta in
quel momento. Tenendo invece il tasto premuto per qualche secondo si attiva la funzione di indietro veloce. Quando il CD è fermo (modalità
stop), è possibile utilizzare questo pulsante per decidere da quale traccia iniziare la riproduzione o per scorrere in ordine decrescente le
tracce presenti nel CD.
4) PLAY/PAUSE. La pressione di questo tasto attiva la riproduzione del disco oppure ne attiva o disattiva la pausa durante la lettura.
5) NEXT/FFW. Durante la lettura del CD, la pressione di questo tasto provoca il salto immediato alla traccia successiva a quella riprodotta in
quel momento. Tenendo invece il tasto premuto per qualche secondo si attiva la funzione di avanti veloce. Quando il CD è fermo (modalità
stop), è possibile utilizzare questo tasto per decidere da quale traccia iniziare la riproduzione o per scorrere in ordine crescente le tracce
presenti nel CD.
6) STOP/OPEN. La pressione di questo tasto interrompe la lettura del disco se il lettore è in modalità play; se invece il lettore è in stop,
premendo il tasto si ha l’apertura o chiusura del cassetto porta CD.
7) Lock/StandBy led: quando l'apparecchio è in StandBy il led è acceso mentre durante la modalità di normale funzionamento, il led si accende
ad indicare la condizione di unlock sull'ingresso digitale selezionato.
8) Cassetto porta CD
9) LCD Display.
10) Ricevitore IR.
11) Uscita cuffie.
Note:
• In caso si usi l'apparecchio vicino a certi sistemi di illuminazione o a certi sistemi televisivi è noto che possono sussistere malfunzionamenti della
trasmissione infrarossa.
• Quando si connette un cavo nell'uscita Phones tale uscita è abilitata e viene selezionata mentre l'uscita sbilanciata e l'uscita bilanciata vengono spente
• La luminosità del display può essere cambiata su diversi livelli ed è anche possibile impostare una modalità di funzionamento "dark mode".
• La condizione di unlock viene rilevata ad esempio se non è connessa alcuna sorgente all'ingresso selezionato, oppure quando la comunicazione tra la
sorgente e il Fortissimo CD - DAC risulta corrotta per qualsiasi ragione (riflessione del cavo, ampiezza del segnale insufficiente, jitter eccessivo).
5
1 2 3 4
7
6
8 9 11
10
Page 8
8
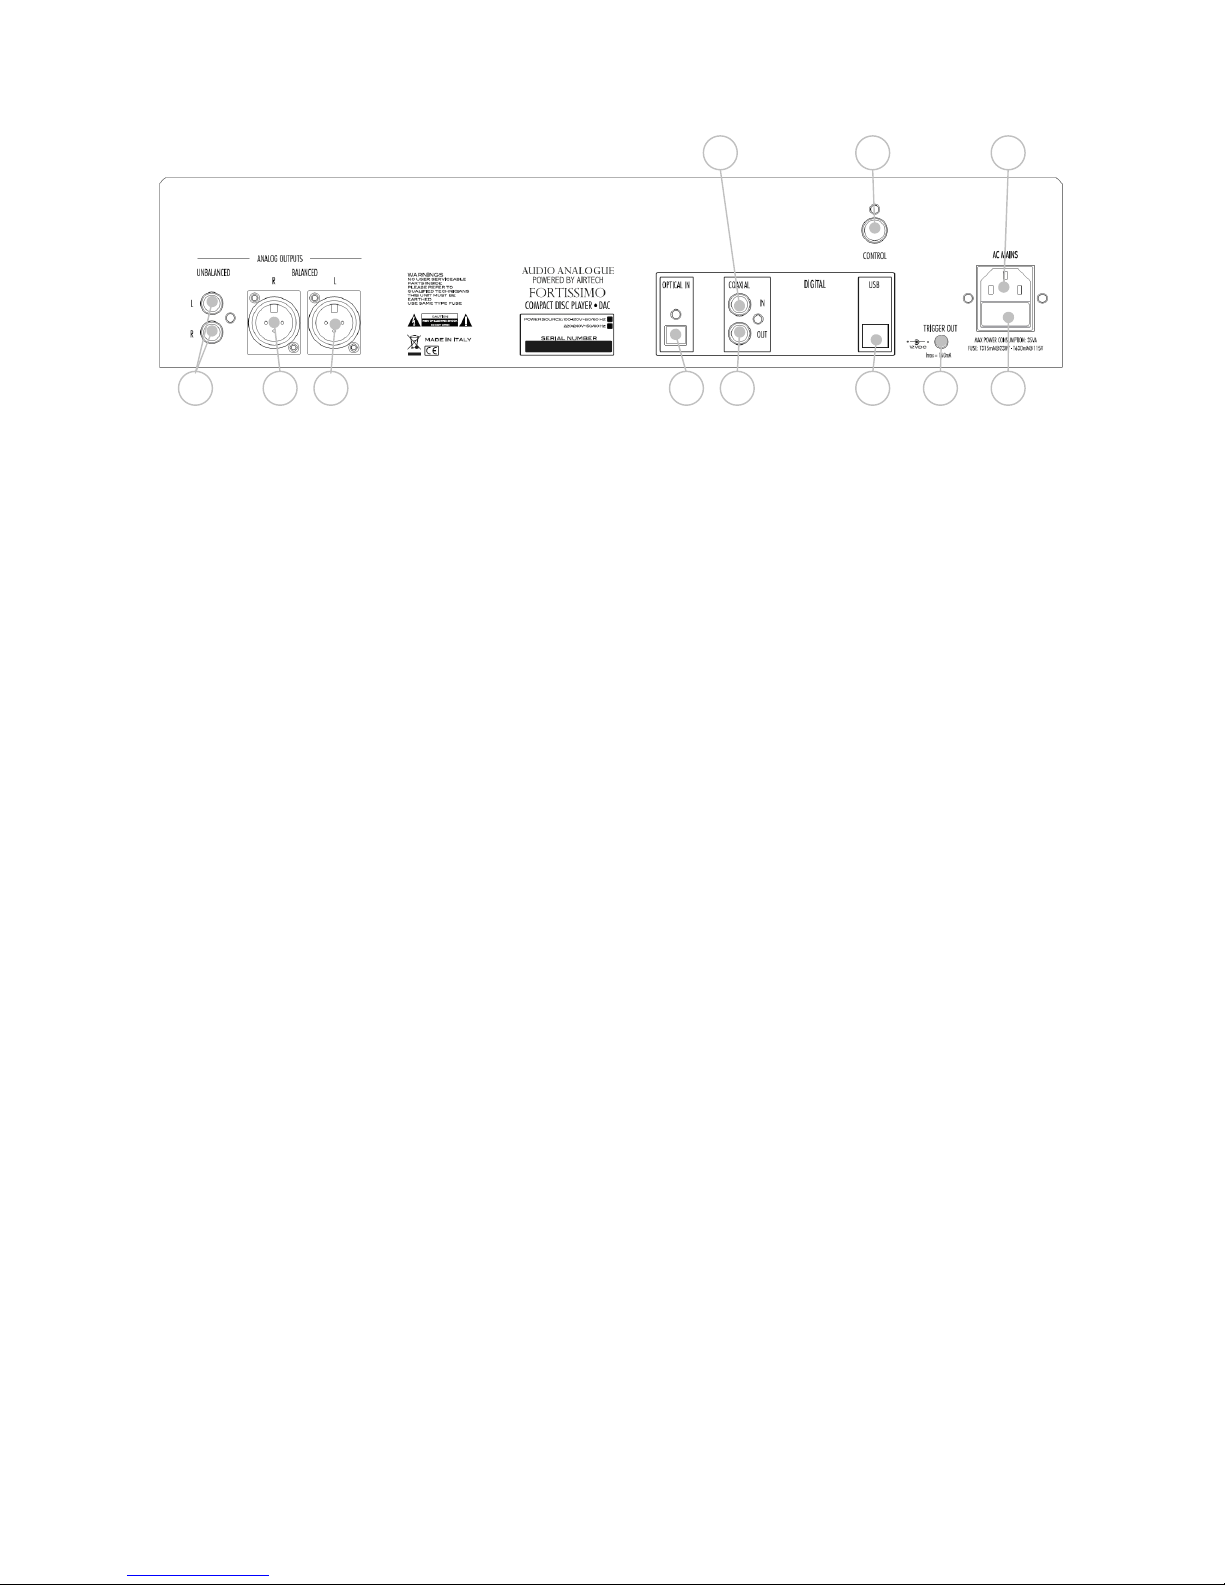
Back Panel
1) Unbalanced analog outputs.
2) Balanced right analog output
3) Balanced Left analog output
4) SPDIF optical digital input.
5) SPDIF coaxial digital input.
6) SPDIF coaxial digital output.
7) USB connector
8) Control
9) Trigger Out connector
10) IEC standard power inlet. Connect here the provided power cord.
11) Fuses. If necessary, replace them with others of the same kind (see back panel).
Notes:
• To avoid unbalanced loads on the output stage sections, only one output type (balanced or unbalanced) can be enabled. When a headphones cable is
inserted into the Phones output both the balanced and unbalanced outputs are disabled.
• 75Ohm coaxial cables are recommended to be connected at the SPDIF coaxial input and output.
• The control connection is not enabled at the moment and is used just for test purposes.
• Please refer to what reported on the back panel for the Trigger values and polarity.
• Note that the fuses are T type!
Descrizione del pannello posteriore
1) Uscite analogiche sbilanciate.
2) Uscita analogica bilanciata Right
3) Uscita analogica bilanciata Left
4) Ingresso ottico digitale SPDIF optical.
5) Ingresso coassiale digitale SPDIF.
6) Uscita coassiale digitale SPDIF.
7) Connettore USB
8) Controllo
9) Connettore Trigger Out
10) Presa IEC. Collegare qui il cavo di alimentazione fornito.
11) Fusibili. Se necessario sostituire con altri di ugual tipo e valore (si veda quanto riportato sul pannello posteriore per i dettagli).
Note:
• Per evitare di avere carichi diversi sulle due sezioni dello stadio di uscita, è possibile abilitare solo un tipo di uscita alla volta: o la sbilanciata o la
bilanciata.
• Quando viene inserito un cavo nel connettore di uscita cuffie entrambi le uscite: sbilanciata e bilanciata sono disattivate.
• Si raccomanda di utilizzare cavi coassiali da 75Ohm per le connessioni all'ingresso e uscita coassiali SPDIF.
• La connessione di "Control" non è al momento attiva e viene utilizzata solo per operazioni di tests.
• Ci si riferisca a quanto riportato sul pannello posteriore per informazioni sulla polarità e tensione del segnale Trigger.
• Si noti che i fusibili sono di tipo ritardato "T".
1
2 3 4
5
6
7
8
9
10
11
Page 9
9
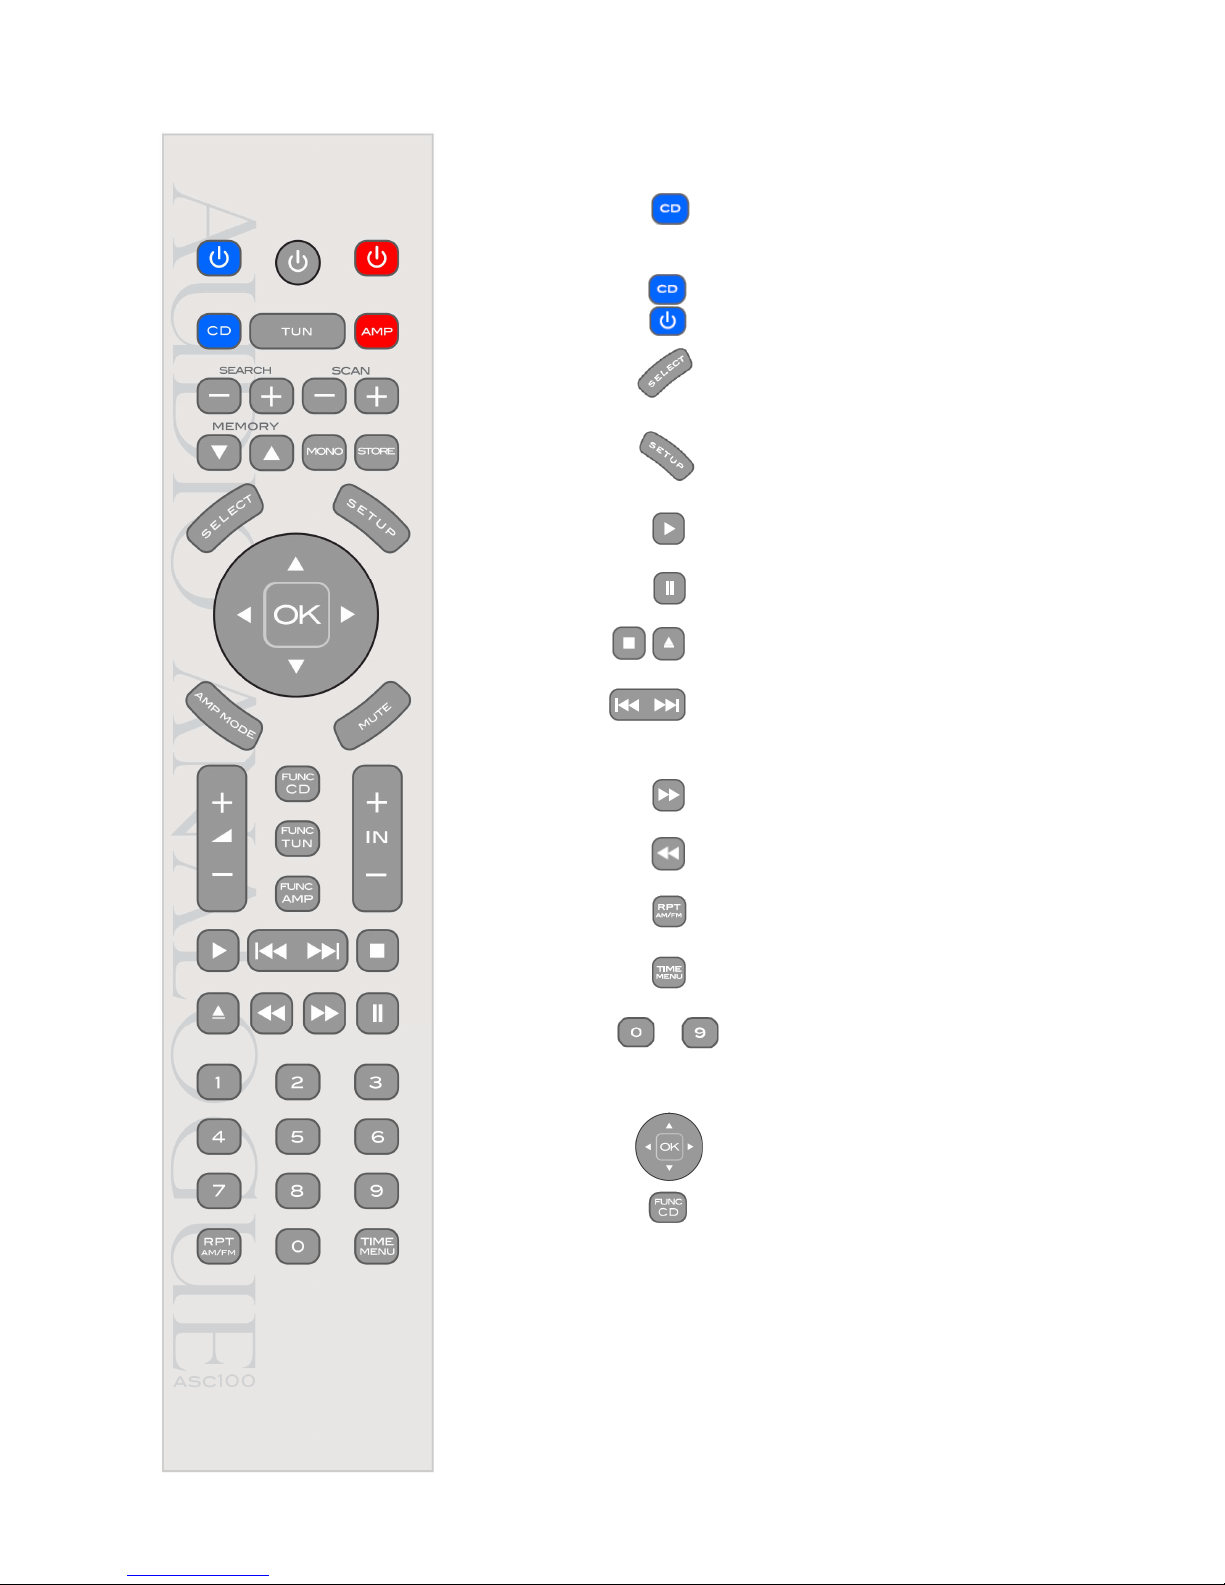
Remote CD-DAC functions
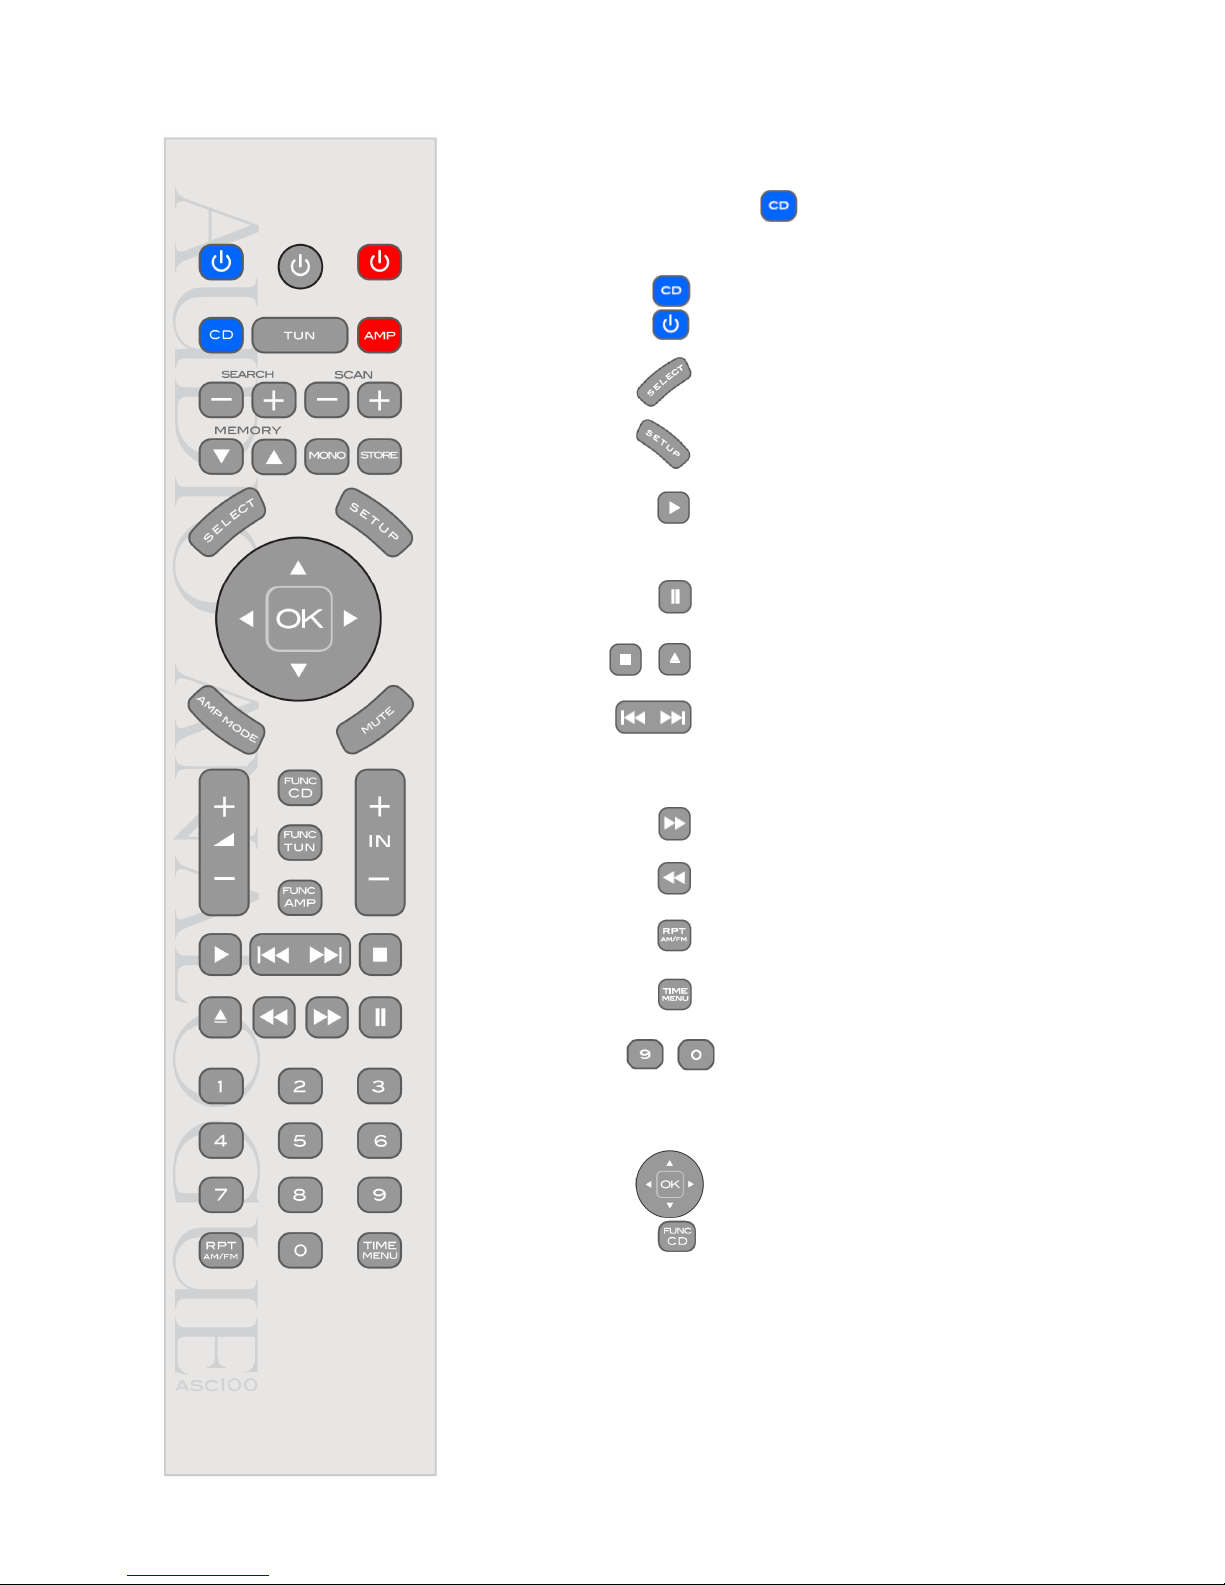
To use the remote with the CD Player - DAC you have to select the CD mode on the remote. For
such purpose simply push the switch on the remote. To check the remote mode just shake
the remote and see if the CD switch at the top left of the remote lights on.
• CD : sets the remote into CD mode.
• CD STANDBY : activates/deactivates standby mode.
• SELECT : cyclically changes the Fortissimo CD - DAC selected
source.
• SETUP : activates the set-up and permits to confirm the values
set during the setup procedure
• PLAY : by pressing this button, you start CD playback or
interrupt/resume CD playback (pause).
• PAUSE : by pressing this button, you interrupt/resume CD
playback.
• STOP/OPEN : by pressing this button, you stop CD playback or
open/close CD tray.
• PREV/NEXT : by pressing this button during playback, you move to
the previous/next CD track. When playback is stopped, you may choose the CD track from
which to resume playback or search backward/forward through the CD tracks.
• FFW : by pressing this button during playback activate fast
forward search.
• REW : by pressing this button during playback activate fast
rewind search.
• RPT : this key has different functions according to the
functioning state of the CD player (repeat function).
• TIME/MENU : if it is pressed while the unit is playing a CD it controls
the TIME functions.
• Numeric Switches .. : when the CD player is stopped it is possible to select a
track pressing the number of the correspondent song (the unit waits for PLAY to be pressed).
When the CD player is playing, pressing the number of the desired song it immediately skips
to the indicated track.
• Cursors switches : permits to scroll the different menu parts when the unit
is in setup mode.
• FUNC CD : this switch pushed together with other specific
switches permits to enter specific parameter configuration. In case this switch is pushed alone
it doesn't make any function.
Note: Please replace the remote batteries in case:
- the remote backlight brightness decreases
- the remote backlight turns off immediately after a switch is pressed.
- the commands from the remote are not correctly received.
Note: the remote switches and the front panel switches to control the CD player functions work only if the input
selected is the CD.
Page 10
10
Funzioni CD-DAC
Per utilizzare il telecomando con il CD-DAC è necessario selezionare sul telecomando la modalità
CD. A tal fine premere semplicemente il tasto: . Per verificare che il telecomando sia in
modalità CD basta scuotere il telecomando e controllare che il tasto CD in alto a sinistra si illumini.
• CD : setta il telecomando in modalità CD.
• CD STANDBY : attiva/disattiva la modalità standby.
• SELECT : commuta ciclicamente l'ingresso selezionato.
• SETUP : richiama il setup e permette di confermare le scelte
effettuate sulle diverse voci del menu.
• PLAY : la pressione di questo tasto attiva la riproduzione del
disco oppure attiva o disattiva il momentaneo arresto della lettura (pausa) quando il CD è già
in riproduzione.
• PAUSE : attiva o disattiva il momentaneo arresto della lettura
(pausa) quando il CD è già in riproduzione
• STOP/OPEN : la pressione di questo tasto arresta la riproduzione del
disco oppure apre o chiude il cassetto porta CD.
• PREV/NEXT : durante la lettura del CD la pressione di questo
pulsante provoca il salto immediato alla traccia precedente/successiva a quella letta in quel
momento. Quando il CD è fermo, è possibile utilizzare questo pulsante per decidere da quale
traccia iniziare la riproduzione, o per scorrere in ordine decrescente/crescente le tracce
presenti nel CD.
• FFW : la pressione di questo tasto attiva la funzione di avanti
veloce.
• REW : la pressione di questo tasto attiva la funzione di
indietro veloce.
• RPT : questo tasto ha differenti funzioni a seconda dello
stato di funzionamento del CD player (funzione repeat)
• TIME/MENU : se premuto durante la riproduzione di un CD seleziona
il comando TIME.
• Numeric Switches .. : quando il CD player è in stop è possibile selezionare
una traccia digitando il numero del brano corrispondente, l’apparecchio rimane in attesa del
comando di riproduzione (PLAY). Quando il CD player è in riproduzione, digitando il numero
del brano desiderato viene effettuato immediatamente il salto alla traccia indicata.
• Tasti cursore : permettono di scorrere le varie voci del menu quando
l'apparecchio è in setup.
• FUNC CD : questo tasto premuto insieme ad altri tasti specifici
permette di accedere a configurazioni ulteriori dell'apparecchio. Nel caso questo tasto venga
premuto da solo non svolge nessuna funzione.
Nota: Sostituire le batterie al telecomando nel caso in cui:
- la retroilluminazione del telecomando si affievolisce.
- la retroilluminazione si spegne immediatamente dopo la pressione di un tasto senza restare illuminata
per almeno un secondo.
- nel caso si verifichino malfunzionamenti o mancata ricezione dei comandi.
Nota: i tasti del telecomando e i tasti sul frontale relativi alla gestione delle funzioni del CD Player sono attivi
solo se è selezionato il CD come ingresso.
Page 11

11
Unpacking and checking the package
Carefully open the package to avoid damaging the content. The package should contain:
•
1 Fortissimo CD-DAC
•
1 remote controller ASC100
•
1 power cord
•
2 AAA batteries
•
1 USB cable
•
1 CD-ROM containing the USB AUDIO Drivers and this user manual.
If one of the items listed above is missing, please contact your Audio Analogue retailer. After extracting the smallest items
from the package, pull out the unit carefully. Separate the package from the anti-shock expanded-foam protections. If batteries are
not already placed in the remote controller battery slot, open the slot, insert batteries according to the indicated polarity, then close
the battery slot.
Apertura e ispezione dell’imballo
Aprire la scatola di cartone con cautela per non danneggiare il contenuto. L’imballo deve contenere:
•
Un Fortissimo CD-DAC
•
Un telecomando ASC100
•
Un cavo di alimentazione
•
Due batterie AAA
•
Un cavo USB
•
1 CD-ROM contenente i drivers audio USB e il manuale utente.
Se qualcuno degli oggetti precedentemente elencati dovesse mancare, contattate il Vostro rivenditore Audio Analogue di
fiducia. Dopo avere estratto le parti di minori dimensioni, estrarre con cautela l’apparecchio dall’imballo. Separare l’imballo dalle
imbottiture antiurto in schiuma espansa. Se le batterie non si trovano già all’interno del telecomando, aprire il coperchio del vano
portapile del telecomando ed inserirle nelle posizioni corrette; quindi richiudere il coperchio del vano portapile.
Where to place the Fortissimo CD-DAC
The Fortissimo CD-DAC is a complex unit that may generate heat. Please locate the unit in a well-ventilated place. In
particular, leave at least 5cm around and above the unit and avoid placing it close to heat sources (radiators, heaters, amplifiers,
television sets).
Scelta del luogo dove collocare il Fortissimo CD-DAC
Il Fortissimo CD-DAC è un apparecchio che può generare calore. Per questo motivo è consigliabile posizionarlo laddove sia
garantita una corretta circolazione d’aria. In particolare, è opportuno garantire uno spazio sufficiente attorno e sopra l’apparecchio
(almeno 5cm), ed evitare posizionamenti vicino a fonti di calore (termosifoni o stufe, amplificatori di potenza, televisori).
Plugging in and connecting up the Fortissimo CD-DAC
Before connecting the Fortissimo CD-DAC to an amplifier, please be sure that they’re both unplugged from wall outlets. First
of all, connect the Fortissimo CD-DAC stereo outputs you are going to use (balanced or unbalanced) to your integrated
amplifier/preamplifier’s input. Please use only high-quality cords with gold plated connectors. At last, check the main switch is in OFF
position and then plug the power cord into the Fortissimo CD-DAC inlet and into the wall outlet. Check the amplifier main
switch is OFF and then plug it also to the wall outlet.
ATTENTION: when connecting or disconnecting the signal cables from the Fortissimo CD-DAC inputs always turn off all the equipment that the audio system is
comprised of to avoid ESD damage.
Collegamento del Fortissimo CD-DAC
Prima di collegare il Fortissimo CD-DAC all’amplificatore, verificare che tutti gli apparecchi siano scollegati dalla rete
elettrica. Per prima cosa, collegare l’uscita stereo del Fortissimo CD-DAC che si intende utilizzare (bilanciata o sbilanciata)
all’ingresso dell’amplificatore o preamplificatore che si desidera utilizzare. Utilizzare solo cavi della migliore qualità, terminati
possibilmente con connettori dorati. Controllare che l’interruttore principale sia in posizione OFF. Infine, collegare il cavo di
alimentazione fornito in dotazione al Fortissimo CD-DAC all’apposita vaschetta.. Controllare che l'interruttore principale
dell'amplificatore/preamplificatore sia su OFF e collegare quindi l'amplificatore alla tensione di rete.
ATTENZIONE: quando si connettono o sconnettono i cavi di segnale da un ingresso del Fortissimo, spegnere sempre tutti gli apparecchi che compongono il
sistema audio per evitare danni da scariche elettrostatiche.
Page 12
12
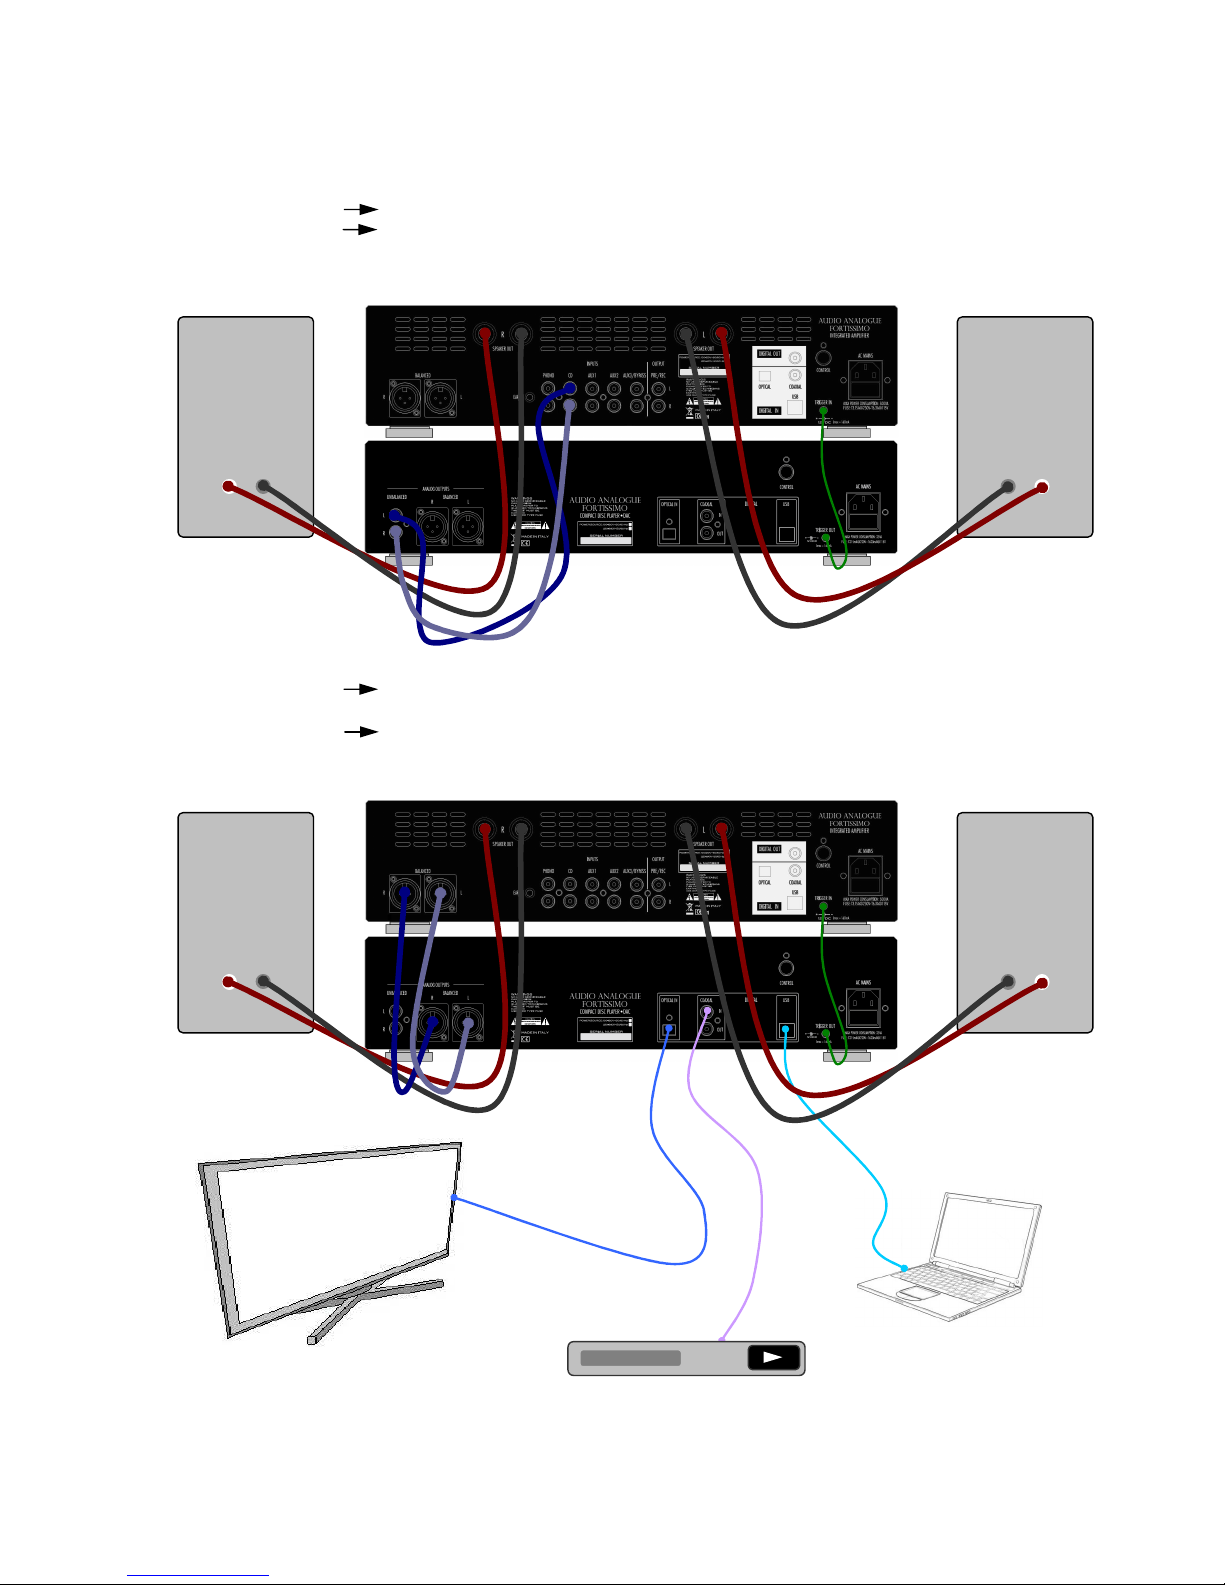
Connection examples
Esempi di connessioni
A)
Fortissimo CD-DAC Fortissimo Integrated Amplifier
Connection via Trigger and Unbalanced connection.
A)
Fortissimo CD-DAC
Fortissimo Intergrated Amplifier
Collegamento con Trigger e Connessione in
Sbilanciato.
B)
Fortissimo CD-DAC Fortissimo Integrated Amplifier
Connection via Trigger connection and Balanced
connection. Digital audio sources examples: PC/MAC, Tv Set, DVD/BlueRay Player
B)
Fortissimo CD-DAC Fortissimo Integrated Amplifier
Collegamento con Trigger. Connessione in bilanciato.
Esempi di connessioni con sorgenti audio digitali: PC/Mac, Tv Set, DVD/BlueRay Player.
USB Cable
Cavo USB
Optical
Cable
Cavo Ottico
TV
Set
PC / Mac
Coaxial
Cable
Cavo Coassiale
DVD/BlueRay Player
Left Channel
Right Channel
Back
View
Visuale Posteriore
Left Channel
Right Channel
Back
View
Visuale Posteriore
Page 13

13
Powering up the Fortissimo CD-DAC
When you plug the Fortissimo CD-DAC into the power outlet and turn on the power switch on frontal panel the blue led on
the front panel turns on showing the unit is connected to the main voltage. Then the unit is in standby mode. To exit the Standby
mode and entering the normal operation mode push the Select/Standby switch on the front panel or the StandBy CD switch on the
remote. The unit will exit the stand by lighting the display and executing the starting procedures. After some seconds it is ready to
receive commands coming from the remote and from the controls placed on the front panel. When the Fortissimo CD-DAC
is active, turn on the integrated amplifier amplifier/preamplifier.
ATTENTION: Please set the unit in STANDBY mode or switched OFF when unused for short periods of time. Unplug it from the outlet when unused for long periods
of time or during lightning and electric storms.
Accensione del Fortissimo CD-DAC
Premere l’interruttore principale anteriore. Il led sul frontale si accende indicando che l'apparecchio è connesso alla rete elettrica.
L'apparecchio è in modalità StandBy. Per entrare nella modalità di normale funzionamento dell'apparecchio premere il tasto
StandBy/Select sul frontale oppure il tasto StandBy CD sul telecomando. L'apparecchio esce dallo standby illuminando il display e
eseguendo le procedure di inizializzazione. Dopo qualche secondo è pronto a ricevere i comandi dal telecomando e dal pannello
frontale. Quando il Fortissimo CD-DAC è in normale funzionamento accendere l'amplificatore integrato o il preamplificatore.
ATTENZIONE: E’ consigliabile tenere l’apparecchio in stand-by o con l'interruttore principale in posizione off quando non lo si utilizza per brevi periodi di tempo, e
rimuovere il cavo di alimentazione in occasione di temporali e tempeste elettriche.
Standby mode
You can put the Fortissimo CD-DAC in standby mode pressing the “STANDBY CD” button on the remote or keeping the
StandBY/Select button on the front panel pushed for some seconds. When in Stand by Mode the Trigger Output voltage is set to
zero and so turns off the connected unit. When the unit is in standby mode to turn it on press the “STANDBY CD” switch on the
remote or press the Select/Standby switch on the front panel.
Stand-by
Il Fortissimo CD-DAC può essere posto in stand-by premendo il pulsante “STANDBY CD” sul telecomando oppure tenendo
premuto il tasto Select/StandBY sul pannello frontale per alcuni secondi. Quando l’apparecchio entra in Standby mode la tensione
dell’uscita Trigger Out viene portata a zero spegnendo l’apparecchio connesso al trigger. Quando l'apparecchio è in standby, per
accenderlo basta premere il tasto “STANDBY CD” sul telecomando o premere il tasto Select/StandbY sul frontale.
Note on Trigger OUT Output
The Fortissimo CD-DAC has a Trigger Out output that gives 12VDC voltage and a 160mA maximum current. Such an output
can be used to switch on a unit that has the a Trigger In input (such as the Fortissimo Integrated Amplifier) with suitable electrical
requirements. The Trigger Out gives 12VDC when the unit is in normal function mode and doesn’t give any voltage when the unit is
in Stand By mode.
Nota sul’ uscita Trigger OUT
Il Fortissimo CD-DAC è dotato di un’uscita Trigger out che fornisce una tensione continua di 12VDC e una corrente
massima di 160mA. Tale uscita può essere utilizzata per accendere un apparecchio che sia dotato di un ingresso trigger (come nel
caso del Fortissimo Integrated Amplifier) con opportune caratteristiche elettriche. L’uscita trigger Out fornisce una tensione di 12VDC
quando l’apparecchio è in modalità di normale funzionamento mentre nessuna tensione è presente sull’uscita quando il Fortissimo
CD - DAC è in Stand By.
Input Selection
The Fortissimo CD-DAC has 4 different input: the CD input , the SPDIF Coaxial input, the SPDIF optical input and the USB
input. To select the input press the Select switch on the remote or press the Select/StandBy switch on the front panel. Pressing such
switches makes the selected input to change cyclically. Note that to use the Select switch on the remote the remote has to be set in
"CD Mode".
Selezione dell'ingresso
Il Fortissimo CD-DAC è dotato di 4 ingressi: ingresso CD, ingresso SPDIF coassiale, ingresso SPDIF ottico e ingresso USB.
Per selezionare l'ingresso da riprodurre premere il tasto Select del telecomando o premere il tasto Select/Standby sul frontale. Si
ricordi che per utilizzare il tasto Select sul telecomando lo si deve settare in modalità CD.
Display brightness
The Fortissimo CD-DAC can change the front display and front led brightness. Two different brightness levels are available
and also the display can be set in "dark mode". The two brightness level and the dark mode are selected by remote pressing
simultaneously the switches: Func CD and Select when the remote is in CD Mode. Each time those switches are pressed the
brightness mode is cyclically changed as reported in the picture below.
The default brightness is the max. While the unit is in "Dark mode" the display and the front led are turned off and are lighted on (the
led is turned on just in case of an unlock condition) for about a second any time the user sends some kind of command to the unit
Page 14

14
such as if the user presses a remote switch or if the user presses the front panel switch. Please note that when changing the
brightness mode no message is shown on the display but the mode change is evident from the change in display brightness.
Luminosità del display
Il Fortissimo CD-DAC può modificare la luminosità del display e del led posti sul frontale. Sono disponibili due livelli di
luminosità diversi e una modalità di funzionamento "dark". I due livelli di luminosità e la modalità dark vengono selezionati da
telecomando premendo simultaneamente il tasto FuncCD e il tasto Select quando il telecomando è in modalità CD. Ogni volta che
tali tasti vengono premuti la luminosità cambia ciclicamente tra le tre diverse opzioni secondo quanto riportato nella figura
sottostante. La luminosità di default è la massima. In modalità dark sia il display che il led sono normalmente spenti. Il display e il
led vengono illuminati (il led viene illuminato solo nel caso si verifichi una condizione di unlock) per circa 1 secondo quando l'utente
invia un comando all'apparecchio premendo ad esempio un tasto del telecomando oppure premendo un tasto sul frontale. Si noti
che quando si cambia questo settaggio non viene visualizzato alcun messaggio sul display ma la modifica risulta evidente dal
cambio di luminosità del display.
- MAX Brightness (maximum brightness) MAX LOW Dark Mode
- LOW Brightness
- Dark Mode (no led lighted)
Notes on the RPT (repeat) function
The RPT command is accessible by the remote when the Fortissimo CD-DAC is in CD mode. The switch on the remote has
different functions according to the functioning state of the CD player:
When the CD player is stopped it is possible to choose to repeat a track or the entire disc by pressing the key
once or twice. To choose to repeat a track you press the keys PREV and NEXT to select the track to repeat or
select the track directly by its number using the numeric keys on the remote.
When the CD player is playing, pressing this key in two different moments determines the initial instant (A) and
final (B) of an arbitrary section to repeat. When this option is active, you can de-activate it by pressing the key
again, and the normal playback of the CD is re-established.
SHUFFLE function: this playing mode is enabled with the unit is in STOP state and permits random playback of
the tracks. While playing you can randomly change the played track with the switches NEXT and PREV on the
front panel or on the remote while you can reproduce an established track using the numeric keys on the remote.
Nota sulla funzione RPT (repeat)
Il comando RPT è accessibile da telecomando quando il Fortissimo CD-DAC è in modalità CD. Il tasto sul telecomando ha
differenti funzioni a seconda dello stato di funzionamento del CD player.
Quando il CD player è in stop è possibile scegliere di ripetere una traccia oppure l’intero disco premendo una o più
volte questo tasto. La scelta della traccia da ripetere si effettua utilizzando i tasti PREV e NEXT oppure digitando
direttamente il numero della traccia utilizzando i tasti numerici da telecomando.
Quando il CD player è in riproduzione, la pressione di questo tasto in due momenti diversi determina l’istante iniziale
(A) e finale (B) di una sezione arbitraria da ripetere. Quando questa opzione è attiva un’ ulteriore pressione del tasto
la disattiva, ripristinando la normale riproduzione del CD.
Funzione shuffle, questa modalità di riproduzione viene abilitata con il lettore in stato di stop. Il lettore riproduce
casualmente tutte le tracce presenti sul CD. Durante la lettura tramite NEXT e PREV si può cambiare, sempre in
modo casuale, la traccia suonata, mentre i tasti numerici permettono, sempre durante la lettura, di saltare ad una
traccia definita.
Note on the TIME function
This function is accessible by remote when the Fortissimo CD-DAC is set in CD Mode. Pressing the Time switch on the
remote when the unit is playing permits to visualize different information on the reproducing time. The alternative modalities are:
- the time that is left until the end of the song, modality “end of track” ( on the display it appears in “_” between the indication
of the minutes and the seconds).
- The time that is left until the end of the CD, modality “end of disc” (on the display it appears in “-“ between the indication of
the minutes and the seconds).
- The time that has gone by since the beginning of the CD, modality “total time” (on the display it appears in “.“ between the
indication of the minutes and the seconds).
Nota sulla funzione Time
Questa funzione è accessibile da telecomando quando il Fortissimo CD-DAC è in modalità CD. La pressione del tasto TIME
sul telecomando permette di visualizzare differenti informazioni sul tempo di esecuzione. Le modalità alternative sono:
- il tempo che rimane fino alla fine del brano, modalità “end of track” (sul display viene visualizzato “_” tra l’indicazione dei
minuti e quella dei secondi).
Page 15
15
- il tempo residuo fino alla fine del CD, modalità “end of disc” (sul display viene visualizzato “·” Tra l’indicazione dei minuti e
quella dei secondi).
- il tempo trascorso dall’inizio del CD, modalità “total time” (sul display viene visualizzato “.” Tra l’indicazione dei minuti e
quella dei secondi).
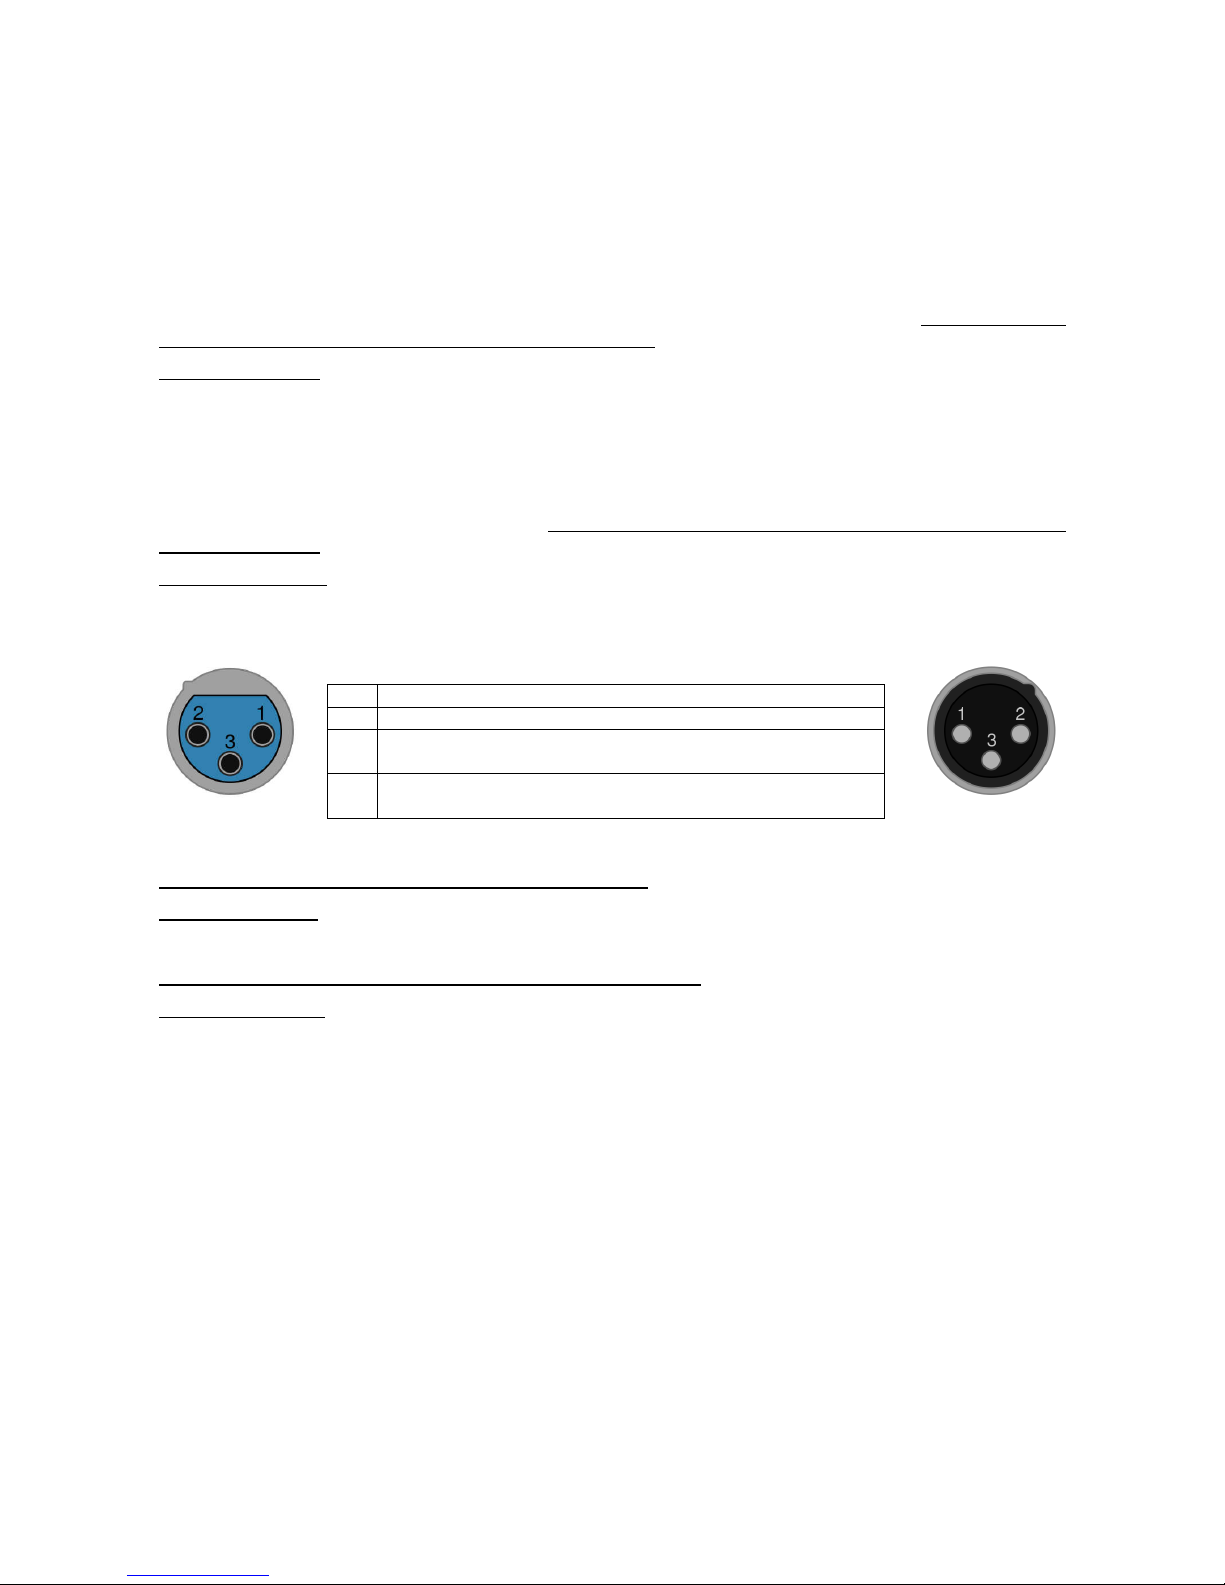
Notes on balanced output
The balanced outputs gives balanced signal according to the standard XLR pinout as reported in the picture below. To avoid creating
ground loop between the power amplifier and the source (which can cause hum problems) use only "true" balanced cables having
the ground pin separated from the shield and the cable shield properly connected to the cable connector. Please note that the
balanced output must be enabled in the proper menu option to be active.
Electrical specifications: The maximum output voltage signal is of: 4.5Vrms differential signal@0dBFS. The output impedance on
each signal output is of 430Ohm.
Note sull'uscita bilanciata.
L'uscita bilanciata del Fortissimo CD-DAC fornisce segnali conformi alla piedinatura standard dei connettori XLR riportata
nella figura sotto. Per evitare loop di massa tra l'integrato e la sorgente (che possono dar luogo a ronzio) si consiglia di usare
sempre cavi bilanciati "veri". Cioè cavi nei quali il piedino della massa di segnale è separato dallo schermo del cavo e lo schermo del
cavo sia correttamente collegato al connettore del cavo. Si ricorda che l'uscita bilanciata deve essere abilitata nella relativa voce del
menu per essere attiva.
Caratteristiche elettriche: La massima tensione di uscita differenziale è di 4.5Vrms@0dBFS. La impedenza di uscita su ciascuna
uscita del segnale è di 430Ohm.
Female / Femmina Male / Maschio
XLR
Notes on unbalanced output
The unbalanced output has to be activated from the proper menu voice.
Electrical specifications: The maximum output voltage signal is of: 2.2Vrms signal@0dBFS. The output impedance is of 430Ohm.
Note sull'ingresso sbilanciato.
L'uscita sbilanciata deve essere attivata accedendo alla relativa voce del menu.
Caratteristiche elettriche: La massima tensione di uscita è di 2.2Vrms@0dBFS. La impedenza di uscita è di 430Ohm.
Note: both the unbalanced and balanced outputs are muted if a headphones is plugged in.
Nota: sia l'uscita bilanciata che la sbilanciata vengono messe in mute se viene inserita la cuffia.
Notes on Digital Optical input
The Fortissimo CD-DAC digital optical input accepts SPDIF digital signals with 16-24 bit and with a sample frequency until
192KHz. If the digital audio signal is correctly working the Blue led indicating the unlock condition is turned off. Instead if there is a
unlock problem with the digital signal or there is no signal at all, the blue front led will be blinking. In case the input signal is not
suitable to be converted a "NOT READY" message is shown on the display while if the signal is suitable to be converted and
managed by the Fortissimo CD-DAC the message "READY" is shown on the display. Compressed digital signals are not
accepted.
Note sull'ingresso ottico digitale
L'ingresso ottico digitale del Fortissimo CD-DAC accetta segnali audio digitali SPDIF da 16-24bit aventi frequenze di
campionamento fino a 192KHz. Se il segnale digitale è corretto il led che indica la condizione di unlock è spento. Se invece il
segnale digitale non viene agganciato o se il segnale è assente il led blu frontale inizierà a lampeggiare. Nel caso il segnale digitale
in ingresso non sia adatto alla conversione sul display verrà visualizzato il messaggio "NOT READY". Viceversa se il segnale risulta
convertibile sul display verrà visualizzato "READY". Segnali di ingresso compressi non sono accettati.
Pin Function / Funzione
1 Ground / Ground
2
"Positive" (in Phase) polarity terminal / Terminale Polarità "Positiva" (in
fase)
3
"Negative" (contro phase) terminal / Terminale "negativo" (in
controfase)
Page 16
16
Notes on digital coaxial input
The Fortissimo CD-DA digital coaxial input accepts SPDIF digital signals with 16-24 bits and with a sample frequency until
192KHz and a voltage level as small as 300mVpp. If the digital audio signal is correctly working the Blue led indicating the unlock
condition is turned off. Instead if there is an unlock problem with the digital signal or there is no signal at all, the blue front led will be
blinking. In case the input signal is not suitable to be converted a "NOT READY" message is shown on the display while if the signal
is suitable to be converted and managed by the Fortissimo CD-DAC the message "READY" is shown on the display.
Compressed digital signals are not accepted.
Note sull'ingresso coassiale digitale
L'ingresso coassiale digitale del FortissimO CD-DAC accetta segnali audio digitali SPDIF da 16-24bits aventi frequenze di
campionamento fino a 192KHz e ampiezze fino a 300mVpp. Se il segnale digitale è corretto il led che indica la condizione di unlock
è spento. Se invece il segnale digitale non viene agganciato o se il segnale è assente il led blu frontale inizierà a lampeggiare. Nel
caso il segnale digitale in ingresso non sia adatto alla conversione sul display verrà visualizzato il messaggio "NOT READY".
Viceversa se il segnale risulta convertibile sul display verrà visualizzato "READY". Segnali di ingresso compressi non sono accettati.
Notes on SPDIF output
The Fortissimo CD-DAC has a SPDIF digital output on which the selected digital input is supplied.
Note sull'uscita SPDIF
Il Fortissimo CD-DAC è dotato di uscita SPDIF digitale sulla quale viene riportato il segnale digitale selezionato.
Notes on the USB connection
The USB connection permits you to connect the Hi-Fi system to the PC or MAC. In this way the PC/MAC sees the Fortissimo CD-DAC as
its audio board and everything which is played on the PC/MAC is reproduced by the Fortissimo CD-DAC. This opens up a wide spread of
possibilities which we think will be soon appreciated by every, also “old style”, audiophile:
• Listening to tracks in any format (MP3, WMA, FLAC, APE and so on…..) which you have in your PC via a software player.
• Listening to an on-streaming tuner. On the web there are a lot of tuner stations which transmit on-streaming, so a lot of stations from
everywhere in the world can be listened to.
• Listening to audio movie tracks which are playing on the PC.
When connecting the Fortissimo CD-DAC to the PC/MAC an initialization is required and this could need some minutes because the
PC/MAC detects the new device and finds and installs the required software drivers.
Note: USB cable connections longer than 3m may result in inconsistent audio performance. For USB Audio 2.0 the cable should be
the ‘Hi-Speed USB’ certified. Always use a certified cable for USB Audio, preferably one that displays an official mark.
NOTE: Before connecting the
Fortissimo CD-DAC
to the PC/MAC you must install the drivers.
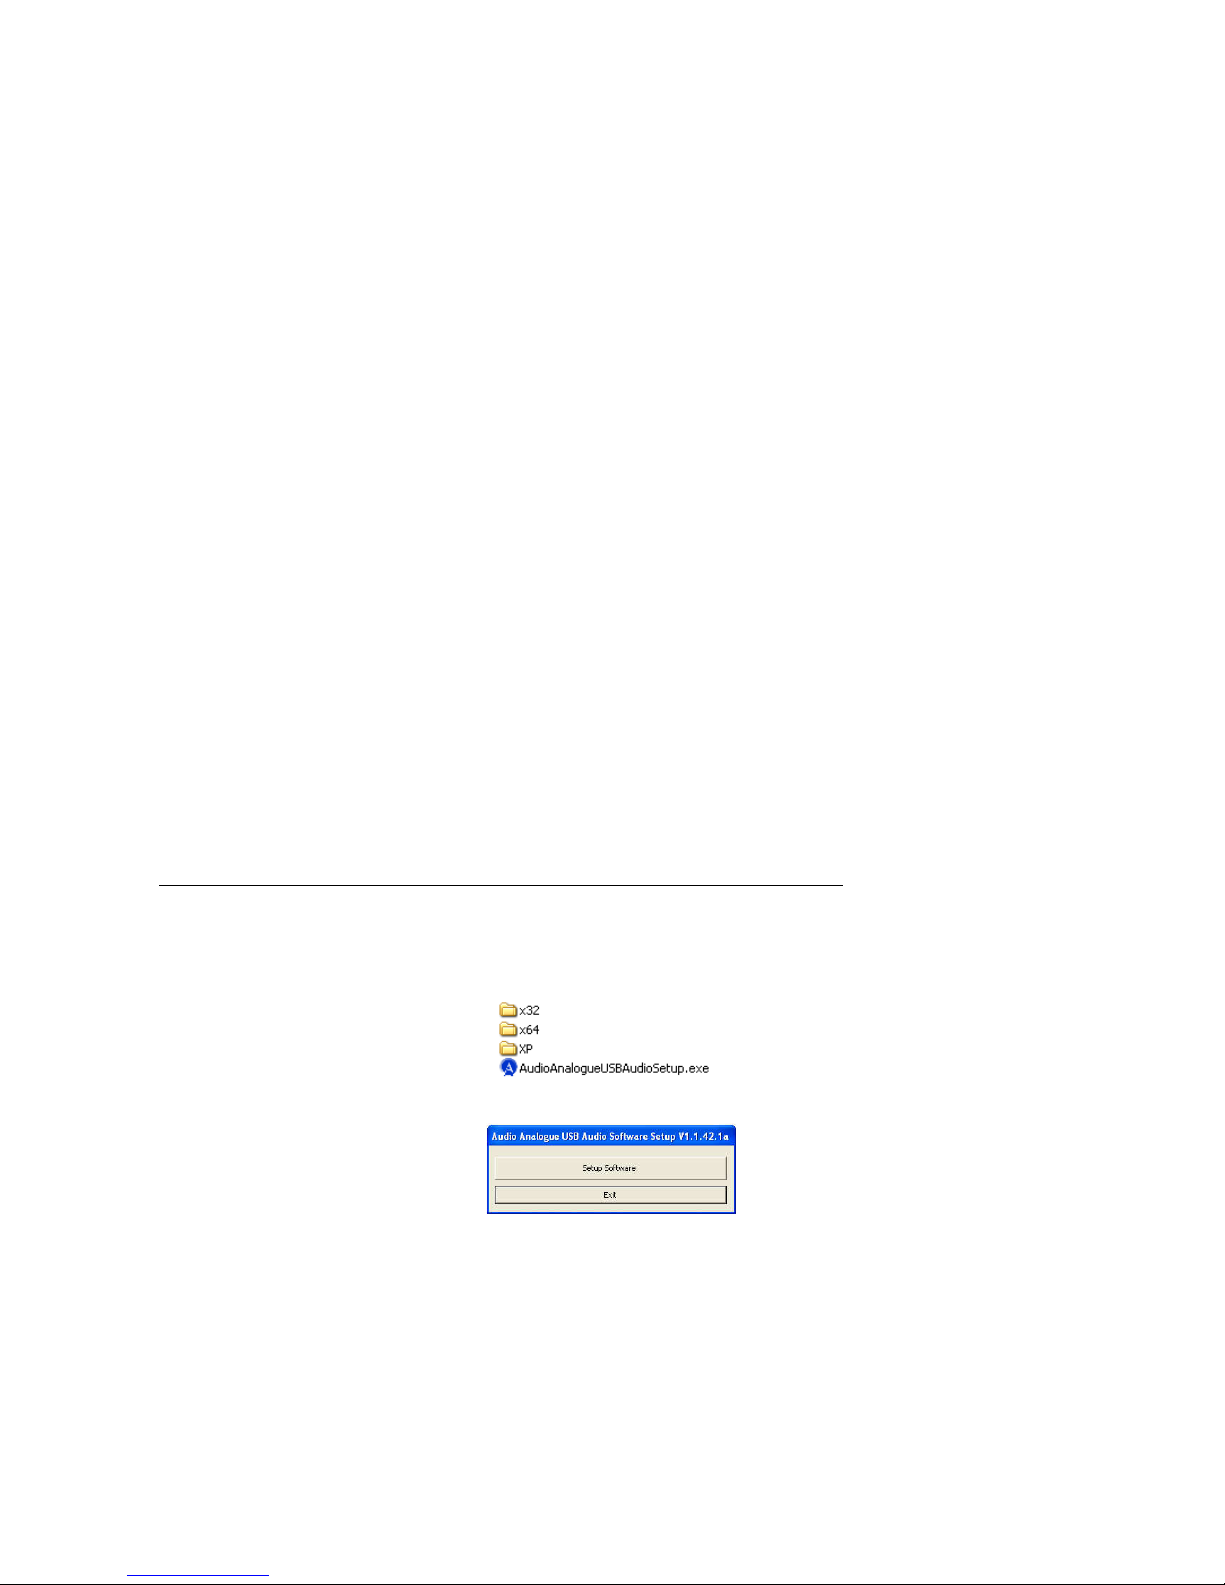
Drivers Installations: (PC – Windows Operative System)
- Insert in your PC the CD-Rom on which the drivers are saved. Otherwise download the drivers from Audio Analogue website and unzip.
- Double click on the file: "AudioAnalogueUsbAudioSetup" and run it. The application will automatically detect the current OS (Operative
system) and the proper drivers installation will start.
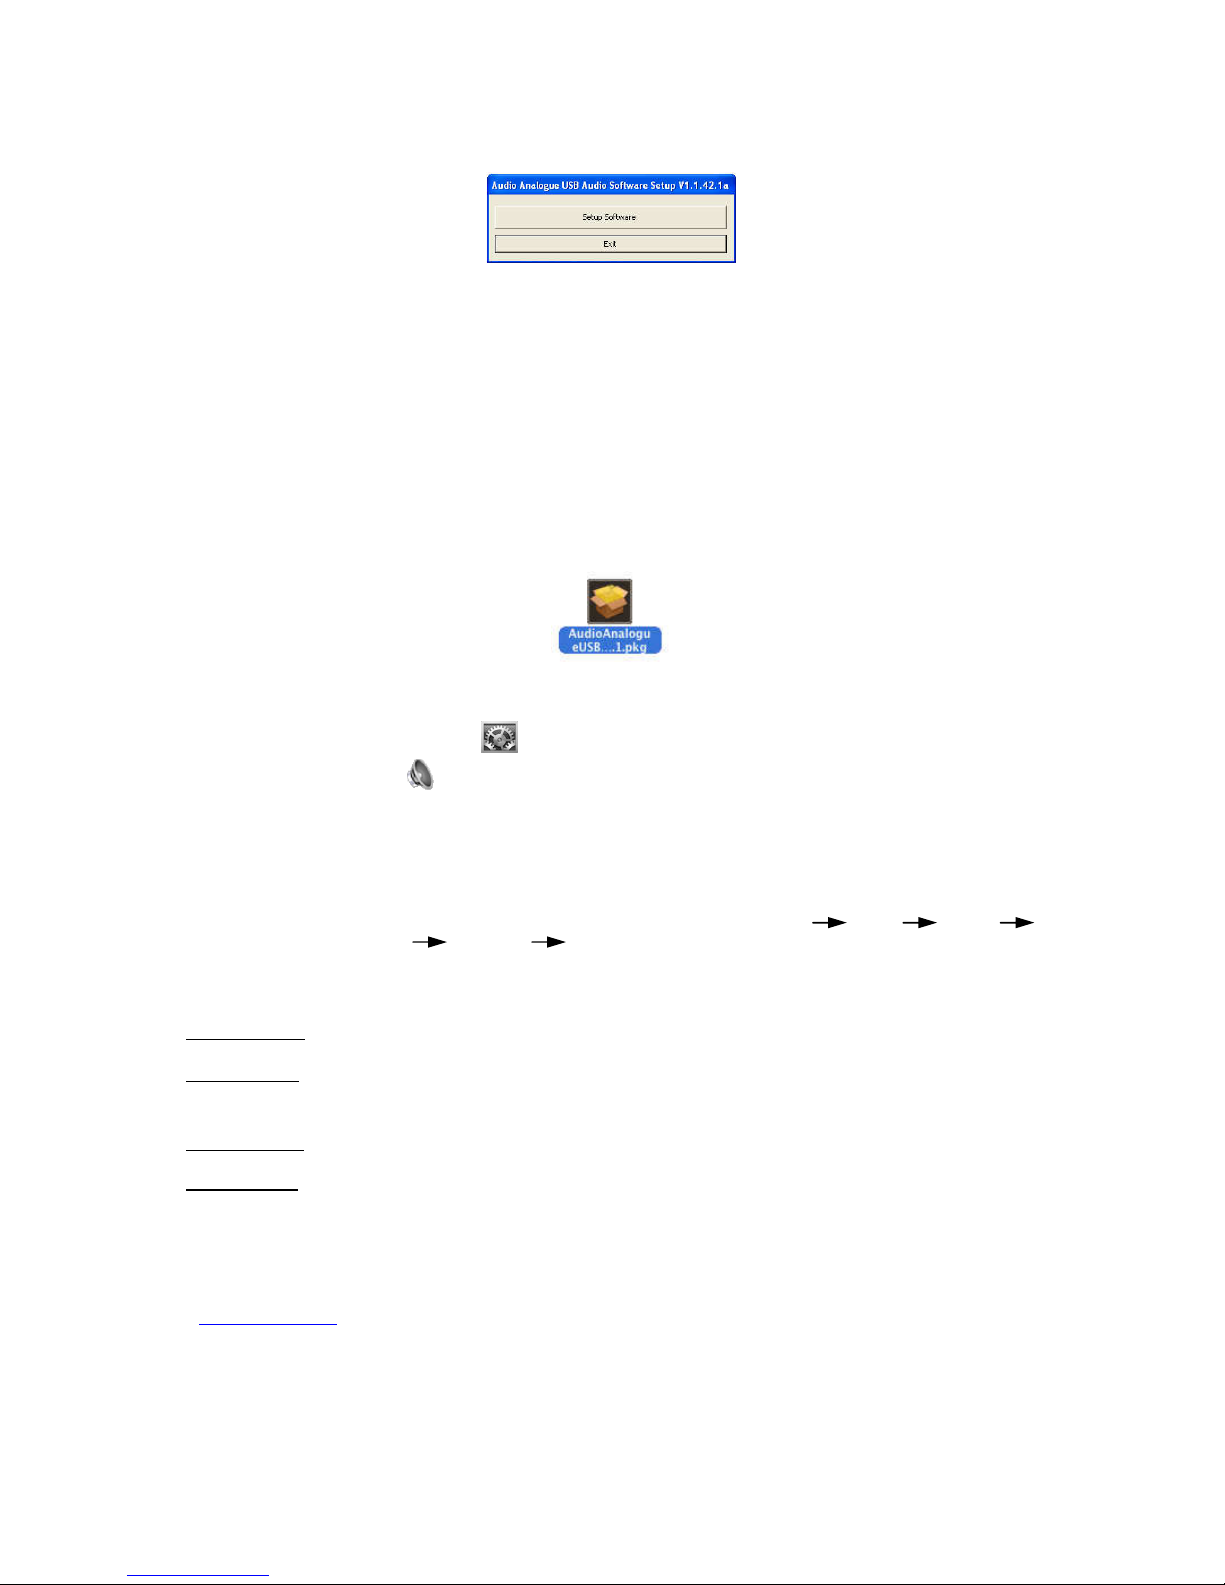
- After clicking AudioAnalogueUsbAudioSetup the windows below will appear. Click on “Setup Software” button.
Note: depending on the operative system the window displayed can be a bit different.
- Then during the installation, follow the instructions reported on the monitor and wait some minutes for the installation to be completed.
NOTE: If the application can't automatically detect the current OS (Operative System), it will run but will not load the drivers.
Then when the Fortissimo CD-DAC will be connected to the PC the OS will ask you to install the proper drivers
and where to find them. Select the proper folder for the drivers to be installed according to your operative system. The
folders are placed in the Fortissimo CD-DAC CDROM or can be downloaded from the Audio Analogue website.
The folder to be indicated are:
x32 for 32 bit Windows OS
x64 for 64 bit Windows OS
XP for Windows XP
Page 17

17
Drivers Installations: (MAC – OSX)
- Insert in your MAC the CD-Rom on which the drivers are saved. Otherwise download the drivers from Audio Analogue website and
unzip.
- Run the file "
AudioAnalogueUSBASY-xxx.x.x.pkg".
- While the installation is running follow the instructions displayed on the monitor and wait for the installation to be completed.
- Re-start the Mac
- Open the “System Preferences”
- Click the Sound icon and select the “Output” tag, then select “Audio Analogue USB Audio” as sound output device.
NOTE: please remind that in case you want to reinstall the drivers or install an upgraded revision of the drivers, you have to
remove the old drivers before!! In such case follow the instructions below:
▪
Mac OSX driver upgrade guide :
o Disconnect the Fortissimo CD-DAC to the MAC.
o Find the old drivers on the MAC and delete them. As an example following the path: Mac Finder
System Library Extensions AudioAnalogueAudio.kext
o Restart the Mac .
o Install the new drivers and restart the Mac again.
o Windows PC System requirements
Hardware requirements: the Fortissimo CD-DAC has been designed to work with any PC having a USB2.0 port and a Windows
operative System. CPU: Intel Core 2 CPU 2.2GHz above or equivalent AMD CPU. RAM : 2G for 32 bits Operative System , 4G for
64bits Operative System.
Software requirements: the USB interface is available for: Windows XP, Windows Vista, Windows Seven and Windows 8 (Tablet not
supported).
o Mac’s requirements:
Hardware requirements: The Fortissimo CD-DAC has been designed to work with any MAC having a USB2.0 port. (G3/G4/G5,
Mini, iMac, iBook, and so on).
Software requirements: the support for the audio USB is available for: MAC OSX 10.6.5 late. OSX 10.7 late is recommended..
o Software you can use with the Fortissimo Cd-DAC:
As an audio player you can use almost any playback software with the Fortissimo CD-DAC to reproduce the audio signal on
your PC or MAC. For example: iTunes, Windows Media Player, Foobar2000.
Note: advice about the Fortissimo Cd-DAC, information about the available resources to legally download music for free and information about the free
software players, are reported at the Audio Analogue website: www.audioanalogue.com in the Fortissimo Cd-DAC section.
Note sulla connessione USB
La connessione USB permette di collegare l’impianto Hi-Fi al PC o al MAC. In questo modo il PC/MAC vede il Fortissimo CD-DAC come la
sua scheda audio. Pertanto, qualunque segnale audio sul PC/MAC, verrà riprodotto dal Fortissimo CD-DAC. Questo approccio apre nuove
e innumerevoli possibilità, che saranno sicuramente apprezzate anche dagli audiofili “vecchio stile”. Ad esempio:
• Riprodurre brani di qualsiasi formato (MP3, WMA, FLAC, APE, ecc…..) che avete nel vostro PC/MAC.
• Ascoltare Web Radio in streaming. Nel web vi sono molte stazioni radio che trasmettono in streaming. Possono pertanto essere
ascoltate stazioni radio da tutto il mondo.
• Riprodurre nell’impianto Hi-Fi brani audio di film in riproduzione sul PC.
Quando si connette il Fortissimo CD-DAC al PC/MAC per la prima volta è necessaria una inizializzazione che può richiedere alcuni minuti
perché il PC/MAC deve riconoscere il nuovo dispositivo e installare i drivers necessari.
Nota: I cavi USB più lunghi di 3 m possono causare prestazioni audio non ottimali. In caso di USB Audio 2.0 il cavo deve essere di tipo “Hi-Speed
USB” certificato. Utilizzare sempre un cavo audio USB certificato e che, preferibilmente, presenti un marchio ufficiale.
NOTA: prima di collegare il Fortissimo CD-DAC al PC / MAC è necessario installare i drivers
Installazione Drivers: (PC – Sistema operativo Windows)
- Inserire il CD-Rom contenente i drivers nel PC oppure scaricare i drivers dal sito Audio Analogue e scompattarli.
- Eseguire un doppio click sul file "AudioAnalogueUsbAudioSetup". La applicazione riconoscerà il sistema operativo ed installerà
automaticamente i drivers.
Page 18
18
- Dopo il doppio click sull'applicazione: AudioAnalogueUsbAudioSetup, verrà visualizzata la finestra sottostante. Cliccare su “Setup
Software” per iniziare la procedura di installazione dei drivers:
Nota: a seconda del sistema operativo la finestra che viene visualizzata potrebbe essere leggermente diversa.
- Durante l’installazione, seguire le istruizioni, attendere alcuni minuti finchè l’installazione dei drivers è completata.
Nota. se l'applicazione non riesce a rilevare automaticamente il sistema operativo, pur andando in esecuzione non riuscirà a
installare correttamente i drivers. Pertanto quando per la prima volta il Fortissimo CD-DAC verrà connesso al
PC il sistema operativo chiederà all'utente di installare i drivers e dove tali drivers si trovino. Le cartelle con i drivers si
trovano nel CD ROM fornito con l'apparecchio e possono in alternativa essere scaricate dal sito Audio Analogue.
Selezionare quindi la cartella per il proprio sistema operativo secondo quanto riportato sotto:
x32 per sistema operativo Windows a 32 bit
x64 per sistema operativo Windows a 64
XP per Windows XP
Installazione Drivers: (MAC – OSX)
- Inserire il CD-Rom contenente i drivers nel MAC oppure scaricare i drivers dal sito Audio Analogue e scompattarli.
- Avviare il file "
AudioAnalogueUSBASY-xxx.x.x.pkg".
- Durante l’installazione, seguire le istruzioni, attendere alcuni minuti finché l’installazione dei drivers è completata
- Riavviare il MAC
- Aprire la cartella “Preferenze di sistema”
- Cliccare sull’icona “Suono” , selezionare il tag “Uscita”, quindi selezionare “Audio Analogue USB Audio” come dispositivo per
l’uscita audio:
NOTA: nel caso si vogliano ri-installare i drivers o se ne voglia caricare di più aggiornati ricordarsi che prima di caricare nuovi
drivers vanno rimossi i vecchi! Fare ad esempio riferimento alla seguente guida:
▪
Guida aggiornamento drivers per MAC OSX :
o Disconnettere il cavo USB dal MAC.
o Cercare I vecchi drivers e cancellarli ad esempio seguendo il path: Mac Finder System
Library Extensions AudioAnalogueAudio.kext
o Riavviare il MAC .
o Installare I nuovi drivers e riavviare il MAC.
o Requisiti per PC Windows
Requisiti Hardware: Il Fortissimo CD-DAC è stato progettato per lavorare con qualsiasi PC con sistema operativo WINDOWS che
abbia una porta USB2.0. CPU: Intel Core 2 CPU 2.2GHz superiore o equivalente AMD CPU. RAM : 2G per 32bit OS , 4G per 64‐bit OS
Requisiti Software: Il supporto per l’USB Audio è disponibile per: Windows XP, Windows Vista, Windows Seven e, Windows 8. (i Tablet non
sono supportati)
o Requisiti per Mac
Requisiti Hardware: Il Fortissimo CD-DAC è stato progettato per lavorare con qualsiasi Mac che abbia una porta USB2.0 (G3/G4/G5,
Mini, iMac, iBook, etc).
Requisiti Software: Il supporto per l’USB Audio è disponibile per: OSX 10.6.5 e superiori. OSX 10.7 o superiore è raccomandato.
o Software che può essere utilizzato con il Fortissimo
CD-DAC:
Come audio player con il Fortissimo CD-DAC può essere utilizzato qualsiasi software in grado di riprodurre files Audio/Video sul
vostro PC o Mac. Ad esempio: iTunes, Windows Media Player, Foobar2000.
Nota: Per suggerimenti sull’utilizzo del Fortissimo CD-DAC, per informazioni circa le risorse disponibili per scaricare musica gratuitamente e legalmente e
per avere informazioni sull’uso di software gratuiti per la riproduzione di musica su PC si prega di consultare il sito Audio Analogue:
www.audioanalogue.com nella sezione dedicata al Fortissimo CD-DAC.
Note on USB audio mode
The Fortissimo Cd-DAC can play the USB audio streaming in two different mode: adaptive and asynchronous. This two modes differs for
the way the clock is derived. To play the audio streaming transmitted by the PC/MAC is necessary to extract the audio data from the stream and
give them to the digital to analog converter with a proper clock for the conversion. The clock given to the DAC must be very precise to avoid Jitter.
In the adaptive mode the transmission clock is decided by the PC/MAC that, according to its clock, sends packets of USB Music data to the
DACUSB. Imagine the computer is sending 1 second of music in a ‘music packet’. Every second, the computer’s clock ticks and a 1 second music
Page 19

19
packet is sent. Because a computer is constantly speeding up / slowing down (Since the computer is handling many tasks at once) and because of
the electrical nature of the USB interface itself, the music packets arrive with poor quality timing and not exactly a second apart: Maybe 1.02 of a
second, then 0.99th of a second, then 1.01 of a second etc. Even though the packets always contain 1 second of music, they’re not being sent at
exactly 1.00 second intervals. They’re not evenly spaced timewise. Looking at this incoming data stream, the USB DAC calculates the correct
timing by taking an average and adapts to this using a synthesized variable frequency clock. Referring to the average clock the clock to be sent to
the DAC is derived.
USB Asynchronous means that the Computer’s clock isn’t synchronized to the receiving USBDAC’s clock. The USBDAC’s clock tells the
computer’s output USB port exactly when to send each frame of music data. An Asynchronous DAC has a high precision fixed clock that it uses to
tell the computer when sending each data packet. This approach greatly reduces the jitter compared to the adaptive mode! In fact Asynchronous
mode Jitter is reduced by a factor of greater than 100 times compared to the adaptive mode!
Because the Asynchronous mode is by far the best transmission mode we suggest the user to set the USB Mode as "asynchronous" which is in
fact the default setting.
To change the USB mode do as described below:
• select the USB input by the Select/Standby switch on the front panel or by pressing the Select switch on the remote (when the remote is
in CD mode).
• enter the setup menu
• select the option about the USB MODE. Select then the desired mode and exit the setup menu pressing the SETUP switch on the
remote.
NOTE: Please note that the USB MODE option in the setup menu is available only if the USB is selected as input.
Nota sulle modalità di funzionamento dell'USB
Il Fortissimo Cd-DAC può riprodurre lo streaming audio ricevuto dall'USB in due modalità differenti: adattiva e asincrona. Queste due
modalità differiscono per il modo nel quale viene ricavato il clock. Per riprodurre i dati audio che vengono trasmessi dal PC/MAC è necessario
estrarre i dati dallo streaming e fornirli al convertitore digitale analogico insieme ad un opportuno clock. Il clock fornito al DAC deve essere
estremamente preciso per evitare jitter. Nella modalità adattiva il clock di trasmissione viene deciso dal PC/MAC che manderà all'USBDAC
pacchetti di musica sulla connessione USB in base al proprio clock interno. Supponiamo che il computer invii 1 secondo di pacchetto musicale.
Pertanto ogni secondo il clock del computer farà si che un pacchetto da un secondo di musica venga inviato all'USBDAC. L'intervallo con il quale
vengono inviati i pacchetti però non sarà esattamente 1 secondo. Infatti il computer esegue più compiti contemporaneamente che
rallentano/anticipano l'istante di invio. Anche a causa dell'implementazione della interfaccia USB i pacchetti arriveranno all'USBDAC non
correttamente intervallati. Ad esempio l'USBDAC potrebbe ricevere i pacchetti al secondo 1.02 o al secondo 1.01 o 0.99, pur contenendo ogni
pacchetto 1secondo di musica. In modalità adattiva l'USBDAC osservando i dati in arrivo ricava il clock di invio dei pacchetti come media tra gli
intervalli di ricezione e in base a quello ricostruisce internamente il clock con il quale mandare i dati al DAC.
In modalità asincrona invece il clock del computer non è sincronizzato con il clock da inviare al convertitore. Infatti in questa modalità è l'USBDAC
che dice al computer quando deve mandare i pacchetti audio. Un USBDAC sarà dotato di un suo clock di riferimento molto preciso che verrà
utilizzato per temporizzare l'invio dei dati da parte del computer. Questo tipo di approccio riduce notevolmente il jitter rispetto al caso adattivo. Infatti
la riduzione del jitter è dell'ordine di 100 volte minore di quello tipico di una conversione adattiva.
Poiché la modalità asincrona ha prestazioni notevolmente superiori alla adattiva consigliamo di utilizzare tale modalità che è infatti quella di default.
L'utente può cambiare la modalità USB seguendo quanto sotto riportato:
• selezionare l'ingresso USB con il tasto Select/StandBy o con la pressione del tasto Select sul telecomando (con il telecomando in
modalità CD)
• accedere al menu di setup
• entrare nella apposita voce del menu che permette di cambiare la modalità di riproduzione dell'USB
• selezionare quella desiderata e uscire dal menu premendo il tasto SETUP su telecomando per memorizzare la nuova modalità.
Nota: Si noti che la voce del menu relativa al cambio della modalità di riproduzione dell'USB è accessibile solo quando è selezionato
l'ingresso USB.
Note on Headphones output
When a jack is inserted in the front headphone connector the balanced and unbalanced outputs are disconnected therefore there is
no sound coming from them. If the Headphones are removed the previously activated output is enabled. When the headphones is
connected the sound is switched to that output and the level is automatically attenuated. To change the headphones sound level
push simultaneously on the remote the "FUNC CD" switch and the "VOL+" switch to increase the level and "FUNC CD" and "VOL-"
to decrease the level. The display will temporally show the changed headphones level on the right top display area (be sure the
remote is in CD mode otherwise such functions will not be active).
Nota sull’uscita cuffie
Quando viene inserito un jack nel connettore cuffie le uscite bilanciate e sbilanciate vengono staccate e quindi non forniscono
segnale all'esterno. Quando il jack cuffie viene rimosso l'uscita precedentemente attivata viene ricollegata nuovamente. Quando
vengono inserite le cuffie il suono viene commutato su quest'ultime e il livello di ascolto viene automaticamente attenuato. Per
aumentare o diminuire il livello di ascolto in cuffia bisogna mantenere premuto il tasto “FUNC CD” e contemporaneamente premere il
tasto “VOL +” per aumentare o” VOL –“ per diminuire. Il display mostra temporaneamente nel riquadro in alto a destra il livello delle
cuffie quando tale livello viene modificato. Affinché tali tasti sul telecomando siano attivi è necessario che il telecomando sia in CD
mode.
Note on output sample frequency selection criterion
Page 20

20
Among the audiophiles there are three different approaches about how choosing the sample output frequency of a digital to analog
converter to reach the best performances. Some says the input and output frequency must be the same. Some others say the output
frequency must be an integer multiple of the input frequency and larger is the multiple and better are the performances. Some others
instead suggest that every equipment seems to have a specific sample output frequency for which the unit performances are the
best. Therefore we have implemented three different operation mode for the Fortissimo CD - DAC by which the customer can decide
which criterion to follow. In fact the Fortissimo CD-DAC can work in "DIRECT" mode, "AUTO" mode and "Custom" mode.
Direct Mode: the output sample frequency is the same of the input one without any oversampling process. The DAC clock oscillator
is chosen to be an integer multiple of the input sample frequency.
Auto mode: the output sample frequency is the largest possible integer multiple of the input frequency. The DAC clock oscillator is
chosen to be an integer multiple of the input sample frequency.
Custom mode: the output frequency is fixed and selected by the user. The DAC clock oscillator is chosen to be an integer multiple of
such desired output frequency.
Nota sul criterio di selezione della frequenza di campionamento di uscita
Nell'ambiente degli audiofili si sono diffusi tre criteri circa la scelta della frequenza di campionamento di uscita di un convertitore
digitale analogico al fine di massimizzarne le prestazioni sonore. Alcuni dicono che frequenza di uscita e frequenza di ingresso
devono essere le stesse. Altri dicono che la frequenza di uscita deve essere il massimo multiplo intero possibile della frequenza di
ingresso. Infine c'è chi sostiene che per ciascun convertitore esiste una particolare frequenza di campionamento di uscita che
massimizza le prestazioni.
Pertanto per venire incontro a tutte le esigenze abbiamo implementato sul Fortissimo CD-DAC tre diversi criteri di scelta
della frequenza di campionamento di uscita:
Modalità diretta: la frequenza di campionamento di uscita è la stessa della frequenza di campionamento di ingresso senza nessuna
elaborazione di sovracampionamento. L'oscillatore del clock del DAC è scelto come multiplo della frequenza di ingresso.
Modalità automatica: la frequenza di campionamento è il massimo possibile multiplo intero della frequenza di campionamento di
ingresso. L'oscillatore del clock del DAC è scelto come multiplo della frequenza di ingresso.
Modalità custom: la frequenza di campionamento di uscita è fissata ad una frequenza di campionamento scelta dall'utente.
L'oscillatore del clock del DAC è scelto come multiplo della frequenza di uscita selezionata.
Note on setting the output sample frequency criterion
Because there are four different digital audio sources for the Digital to analog converter circuit corresponding to the inputs: CD (from
the Cd mechanism), SPDIF coaxial input, SPDIF optical input and USBDAC, we have decided to permits the user to choose a
different output sample frequency selection criterion for each input. This means the user can set the Fortissimo CD-DAC
choosing the best setting for each kind of input according to the expected input sample frequency. So, as an example, the user can
decide: that the CD will work in direct mode (and so the sample output frequency will be the input one, that's say the output
frequency will always be 44.1KHz), that the Optical input will work in Auto mode (therefore the sample output frequency will be
192Khz if the input sample frequency is 48Khz or 96Khz and will be 176.4KHz if the input sample frequency is 44.1Khz or 88.2Khz),
that the SPDIF coaxial input will work in custom mode at the fixed sample output frequency of (as an example) 88.2KHz while the
USB would be made working in custom mode at the sample output frequency of 192KHz.
To choose the sample output frequency criteria for each input:
• select the input which criterion you want to change. To select the input use the Select/StandBy switch on the front panel or
press the switch Select on the remote (while the remote is in Cd mode).
• enter the Setup menu
• access the menu option about the output sample frequency mode.
• select the desired one and exit the setup pressing the SETUP switch on the remote to save the new criteria. In case you
choose the Custom mode you'll be asked to select the desired fixed output sample frequency.
The set mode will be applied on the selected input while the mode for the other inputs will be not affected. The new mode for
the input will be memorized internally and therefore the set will not be lost turning off the unit. The selected criterion will
therefore remain until it will be changed by the user or the default setting will be loaded.
Note: when then unit is working in direct mode or auto mode the control detects the input frequency and then selects the proper
clock oscillator. This requires a very small time and doesn't affect the correct reproduction. But anyway be aware that there are some
audio sources (some DVD players and some Blue Ray players) that in some conditions (as an example when in pause or stopped)
gives an output signal with a sample frequency varying in time. This can create delays in the sound reproduction.
Nota sul settaggio del criterio di scelta della frequenza di campionamento di uscita
Essendo il Fortissimo CD-DAC dotato di 4 ingressi digitali audio diversi: Cd (dalla meccanica CD), ingresso coassiale
SPDIF, ingresso ottico SPDIF e ingresso USBDAC, abbiamo deciso di lasciare all'utente la possibilità di impostare per ciascun
ingresso la modalità di scelta della frequenza di campionamento di uscita. Pertanto l'utente potrà scegliere il settaggio migliore a
seconda dell'ingresso selezionato in base alla frequenza di campionamento prevista in ingresso.
Ad esempio si potrà scegliere di riprodurre i CD in modalità diretta (pertanto la frequenza di uscita sarà uguale alla frequenza di
ingresso e quindi pari a 44.1KHz), l'ingresso Ottico in modalità Auto (pertanto la frequenza di uscita sarà pari a: 192KHz quando la
frequenza di campionamento in ingresso è di 48KHz o 96KHz e pari a 176.4KHz quando la frequenza di campionamento in ingresso
Page 21
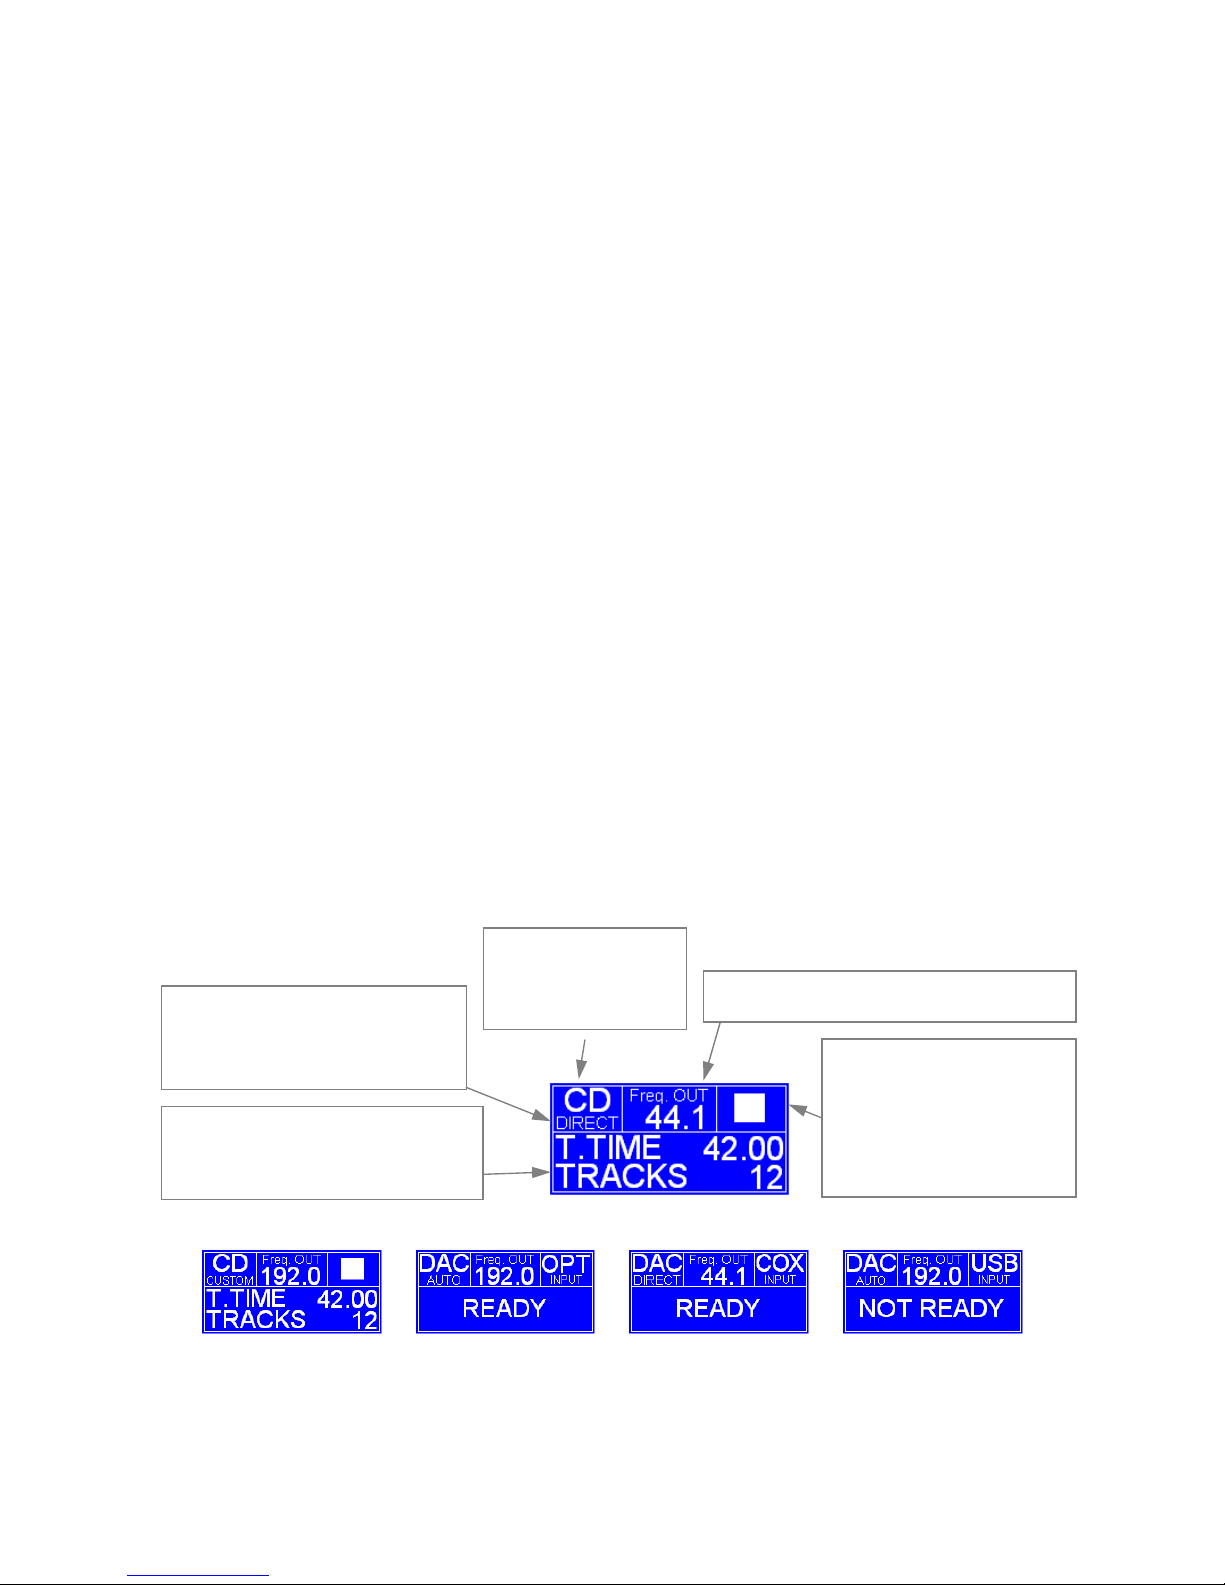
21
è di 44.1KHz o 88.2KHz), l'ingresso coassiale in modalità custom alla frequenza fissa (ad esempio di 88.2KHz) e l'ingresso USB in
modalità Custom alla frequenza fissa (ad esempio) di 192KHz.
Per modificare il criterio di scelta della frequenza di campionamento di uscita di un ingresso basta:
• selezionare l'ingresso del quale si vuole cambiare il criterio di scelta della frequenza di campionamento di uscita. La
selezione dell'ingresso può essere effettuata o mediante il tasto: Select/StandBy sul frontale dell'apparecchio oppure
mediante la pressione del tasto Select sul telecomando (con il telecomando in modalità CD).
• Accedere quindi al menu di setup dell'apparecchio.
• entrare nella voce relativa alla modalità di scelta della frequenza di campionamento di uscita.
• Scegliere il criterio di selezione della frequenza di uscita per quell'ingresso e uscire dal menu dopo aver confermato la
scelta. Nel caso si scelga la modalità Custom si accederà a una ulteriore voce del menu nella quale si chiederà all'utente
di sceglier la particolare frequenza di campionamento di uscita.
Il criterio di scelta (Diretta, Automatico o Custom) scelto per quel dato ingresso verrà adottato tutte le volte che verrà
selezionato l'ingresso, anche dopo lo spegnimento dell'apparecchio, finché il criterio di scelta non verrà rimodificato dall'utente o
si esegua il caricamento delle impostazioni di default.
Nota: quando l'apparecchio sta lavorando in modalità diretta o automatica, il controllo rileva la frequenza di campionamento in
ingresso e provvede a selezionare l'oscillatore adatto per il clock del DAC. Tale processo richiede un tempo molto piccolo e non
influisce sulla corretta riproduzione. E' bene però che l'utente sappia che alcune sorgenti di audio digitale (quali ad esempio alcuni
lettori DVD e alcuni lettori Blue Ray) in certe condizioni (ad esempio in pausa e in stop) forniscono in uscita un segnale con una
frequenza di campionamento che varia continuamente e ciò può causare ritardi nella riproduzione del segnale.
Working modes
The Fortissimo CD-DAC is not just a Cd Player but is also a DAC (Digital to analog converter). Therefore the unit can work
in two different modes: CD MODE and DAC MODE. When the Fortissimo CD-DAC is working in CD Mode it performs the
typical CD Player functions while when in DAC mode the unit becomes a DAC with three different digital inputs: a coaxial SPDIF
input, an optical digital input and a USB input. The Fortissimo CD-DAC changes its mode according to the selected input.
The Fortissimo CD-DAC display is divided into 4 different areas showing all the information about the unit settings and the
working mode enabled at the moment.
Modalità operative
Il Fortissimo CD-DAC è un lettore CD Player ma è anche un DAC (Digital to Analog Convererter) per cui possiamo
distinguere due modalità operative: CD MODE e DAC MODE. Nella modalità CD, il Fortissimo CD-DAC esegue tutte le
funzioni tipiche di un CD Player mentre nella modalità DAC il Fortissimo CD-DAC diventa un DAC con a disposizione tre
ingressi digitali: un ingresso coassiale, un ingresso ottico e un ingresso USB. Il Fortissimo CD-DAC commuta le due
modalità a seconda dell'ingresso selezionato. Il display è suddiviso in 4 aree visuali che permettono di rappresentare tutte le
informazioni relative alle impostazioni e alla modalità operativa dell’apparecchio.
Display messages examples/Esempi di messaggi visualizzati dal display
CD MODE DAC MODE: Optical IN DAC MODE: Coaxial IN DAC MODE: USB IN
Note: when the unit is in "DAC mode" in the low main display area a "READY" message is shown when a correct digital signal is
received while "NOT READY" is shown to tell some error affects the digital input signal. The "Not Ready" message can be displayed
such as an instance when the input is not present or if it is not a SPDIF signal or if there is an unlock condition.
Shows the mode: CD Mode or DAC
mode
Indica la modalità di funzionamento:
CD MODE o DAC MODE
While
the unit is
in CD Mode this area shows
the icon of the performed command
While the unit is in DAC mode it shows the
selected digital input.
In CD MODE visualizza l’icona dei comandi in
esecuzione.
In DAC MODE visualizza la sorgente
digitale
selezionata.
Shows the actual output sample frequency
.
Indica la Frequenza di Campionamento in Uscita
In this
area all the information about the setup and working
mode are showed
In questa area sono visualizzate tutte informazioni relative
alla modalità operativa e al setup
Shows the output sample frequency selection criteria
(DIRECT, AUTO or CUSTOM)
Indica la modalità di selezione della Frequenza di
Campionamento in Uscita (DIRECT, AUTO o CUSTOM)
Page 22
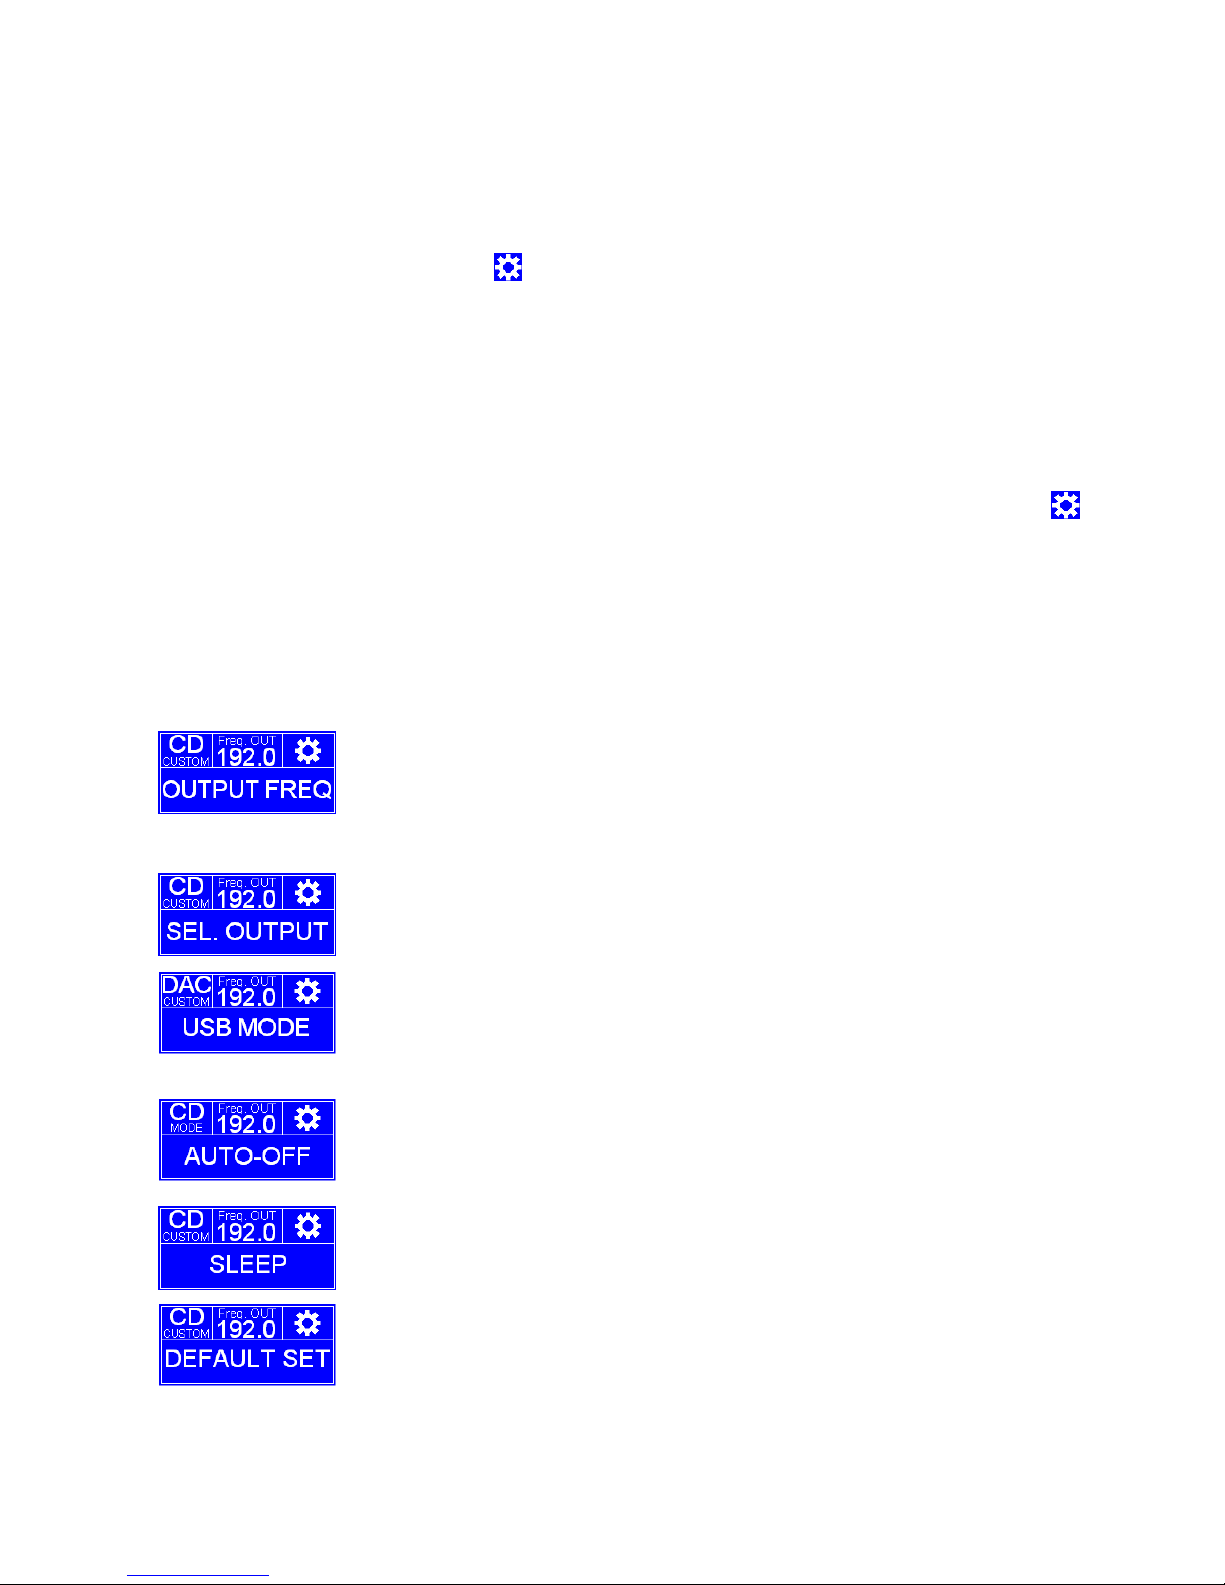
22
Nota: In DAC MODE nel riquadro principale del display viene visualizzato il messaggio “READY” quando il segnale digitale è corretto.
Viene invece visualizzato il messaggio “NOT READY” se il segnale digitale è corrotto da qualche errore (come nel caso in cui il segnale
digitale non sia SPDIF o nel caso si verifichi una condizione di unlock oppure se il segnale digitale è del tutto assente).
How entering the menu
If the CD mode is selected, to enter the menu requires that the unit is not playing. If the unit is in DAC mode the menu can instead
always be entered. In both cases to enter the menu you have to set the ASC100 remote in "CD mode" and then press the SETUP
switch on it. When you enter the menu the icon: will be shown in the right high part of the display.
To scroll the menu options use the ▲ and ▼cursor switches on the remote.
Use the OK switch on the remote to enter the sub menu indicated on the display or to confirm a selected value.
Use the ◄ cursor switch to come back to a previous level menu, in such case the setup values are not changed.
To exit the menu select the “EXIT” option or press the SETUP switch on the remote, in such case the setup values are not changed.
To exit the menu and save a value press OK when the option is shown on the display, a "STORED" message will appear.
Menu Setup
Per attivare il Menu Setup se l’apparecchio è in CD MODE è necessario che l’apparecchio non sia in riproduzione. Viceversa il menu
è sempre attivabile quando l'unità è in modalità DAC. In entrambi i casi per accedere il setup premere il tasto SETUP del
telecomando impostato in modalità CD. Una volta attivato il setup nel riquadro in alto a destra del display viene visualizzata l’icona
Premere i tasti cursori ▲e▼ da telecomando per scorrere le voci del Menu Setup.
Premere il tasto OK da telecomando per entrare in un sotto menu o per confermare una scelta.
Premere il tasto cursore ◄ da telecomando per ritornare al menu precedente, in questo caso il settaggio non viene salvato.
Per uscire dal menu selezionare la voce “EXIT” oppure premere il tasto SETUP sul telecomando, in questo caso il settaggio non
viene salvato.
Per uscire dal menu e salvare una impostazione premere OK sul telecomando, il messaggio "STORED" apparirà sul display.
The menu option list is reported below / Di seguito è riportato l’elenco delle voci del Menu Setup:
FREQUENCY MODE selection submenu: it permits to choose the output sample frequency selection criteria for the input selected
when the menu was entered. Press “OK” to enter the submenu.
NOTE: this option is available only if on the selected input a correct digital signal is received!
Sottomenu di selezione della frequenza: Permette di modificare il criterio di scelta della frequenza di campionamento di uscita per
l'ingresso selezionato al momento nel quale si è entrati nel menu. Premere “OK” per entrare nel sotto menu.
NOTA: questa voce viene visualizzata nel Menu Setup solo se sull’Ingresso selezionato è presente il segnale digitale
corretto!!!
OUTPUT SELECTION submenu: it permits to select which analog output (Unbalanced, balanced) enable. Press “OK” to enter the
submenu.
Sottomenu di selezione dell'uscita: permette di selezionare quali uscite analogiche tra bilanciate e sbilanciate attivare, premere
“OK” per entrare nel sotto menu.
USB MODE submenu: permits to select the USBDAC mode between Adaptive and Asynchronous. Press “OK” to enter the
submenu.
NOTE: this option is available only if the selected input is the USB!
Sottomenu della modalità USB: Permette la selezione della modalità dell’USBDAC tra adattiva e asincrona. Premere “OK” per
entrare nel sotto menu.
NOTA: questa voce viene visualizzata nel Menu Setup solo se è selezionato l’Ingresso USB
AUTO-OFF submenu: this feature automatically turns off the unit after 4 hours of inactivity. Press “OK” to enter the submenu.
NOTE: the Auto Power Off feature is enabled by Default
Sottomenu Auto-Off: questa funzione spegne automaticamente l’apparecchio dopo 4 ore di inutilizzo. Premere “OK” per entrare
nel sotto menu.
NOTA: la funzione Auto Spegnimento è attiva di Default
Sleep submenu: it permits to enable the Sleep Function. Push “OK” to enter the relative submenu.
Sottomenu SLEEP: Permette l’attivazione della Funzione Sleep, premere “OK” per entrare nel sotto menu.
DEFAULT SET submenu: it permits to load the default unit settings.
NOTE: if the default settings are loaded the previously saved settings are lost!
Sottomenu dei settaggi default: permette di ricaricare la configurazione di fabbrica dell’apparecchio..
NOTA: il ripristino della configurazione di fabbrica implica la perdita di tutti i settaggi memorizzati in precedenza!!!
Page 23
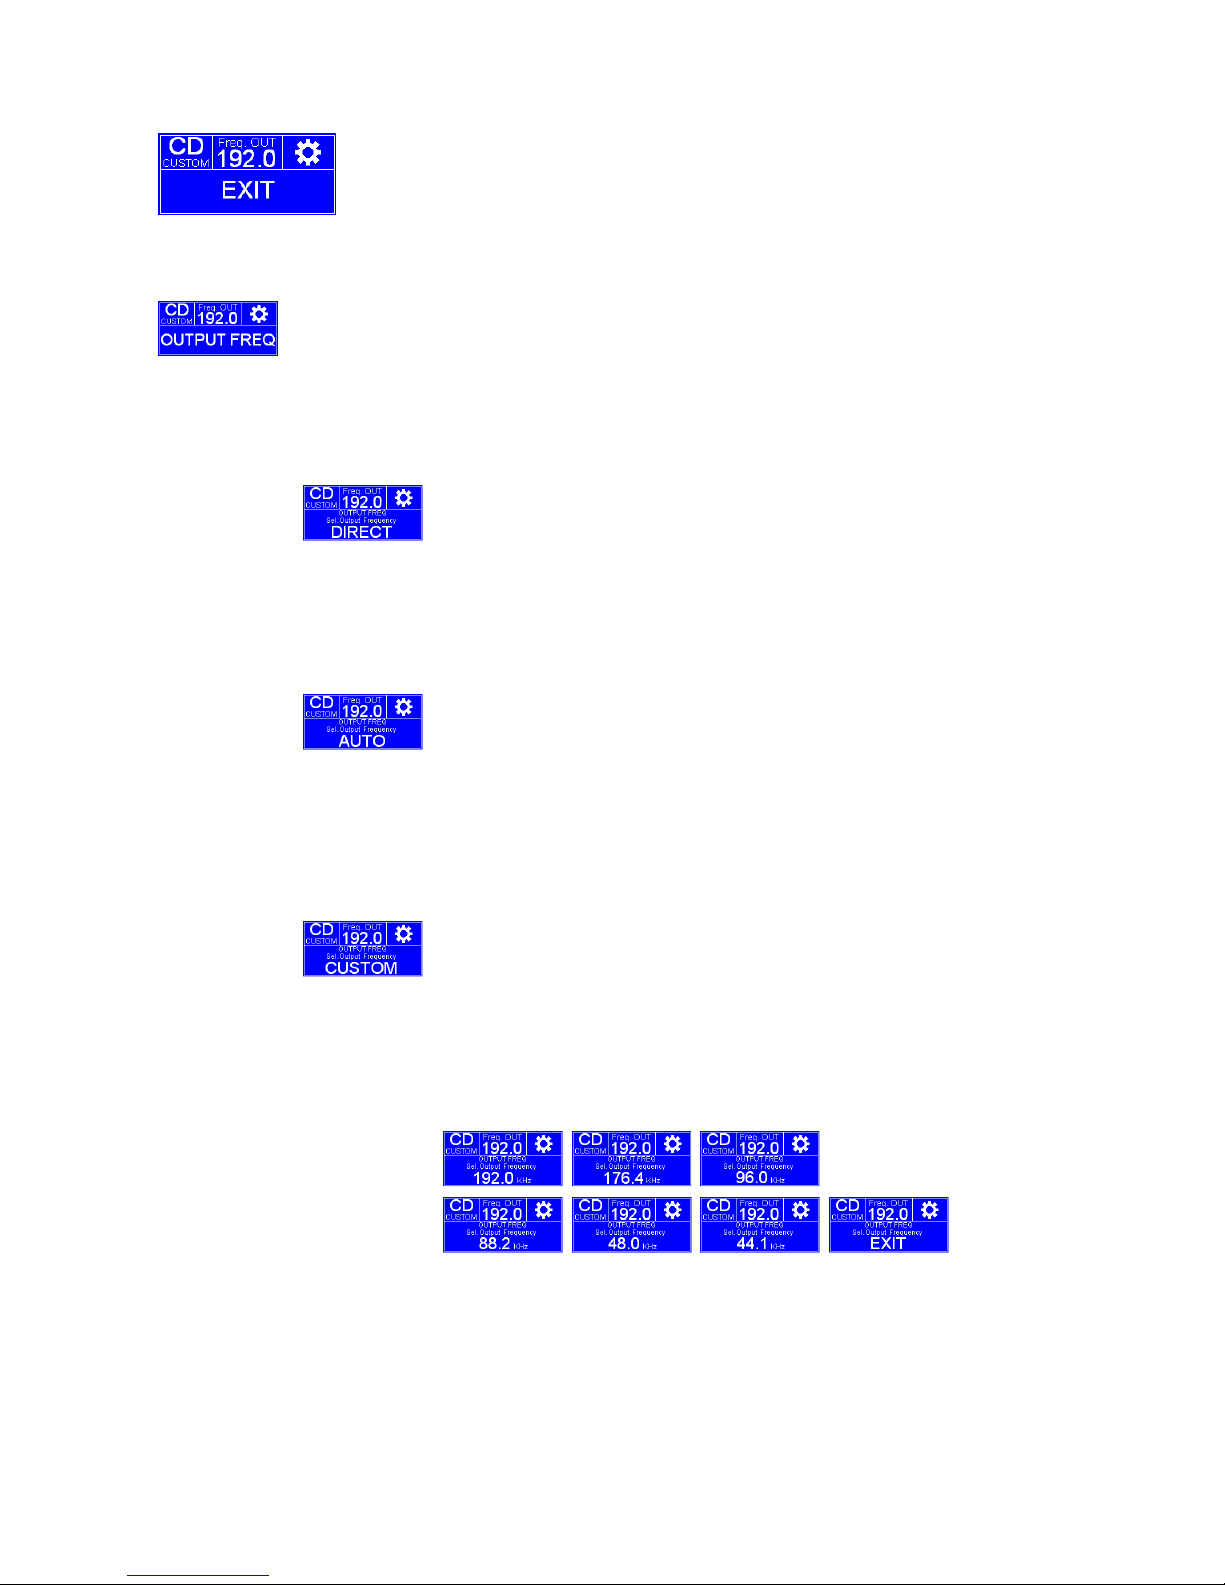
23
It permits to exit the Menu Setup and to return the normal operation mode of the unit.
Permette di uscire dal Menu Setup e di ritornare alle condizioni di normale funzionamento.
Frequency Mode Sub Menu / Sotto Menu Frequency Mode
Entering this submenu you can choose the sample output frequency selection criterion for the input selected at
the time you entered the setup. The possible criterions are: direct, automatic (Auto), custom. Press “OK” to enter
the submenu.
NOTE: this option is available only if a correct digital signal is received on the selected input!
Entrando in questo sottomenu si può cambiare il criterio di scelta della frequenza di campionamento di uscita per
l'ingresso selezionato al momento in cui si è entrati nel setup. I posabili criteri di scelta sono: diretta, Automatica
(Auto) e custom. Premere “OK” per entrare nel sottomenu.
NOTA: questa voce viene visualizzata nel Menu Setup solo se sull’Ingresso selezionato è presente un
segnale digitale corretto!!!
Pressing the “OK” switch on the remote will enable the Direct criterion on the selected input and will exit the
menu returning the normal operation of the unit. The output sample frequency for that input will be the same of
the input sample frequency with no oversampling.
Use the switch
◄
to come back to the previous menu level and use:
▲
and ▼to scroll the different options.
Premendo il tasto “OK” sul telecomando si abilita il criterio di scelta Diretto per la frequenza di campionamento di
uscita sull'ingresso selezionato, si esce dal menu e si torna alla condizione di normale funzionamento
dell'apparecchio. La frequenza di campionamento di uscita per quell'ingresso risulterà uguale alla frequenza di
campionamento in ingresso (senza sovracampionamento).
Premere
◄
sul telecomando per ritornare al livello precedente del menu e usare i tasti cursore
▲e ▼
sul
telecomando per scorrere le varie opzioni.
Pressing the “OK” switch on the remote will enable the Automatic criterion on the selected input and will exit the
menu returning the normal operation of the unit. The output sample frequency for that input will be the maximum
integer multiple of the input sample frequency.
Use the switch
◄
to come back to the previous menu level and use:
▲
and ▼to scroll the different options.
Premendo il tasto “OK” sul telecomando si abilita il criterio di scelta Automatico per l'ingresso selezionato, si
esce dal menu e si torna alla condizione di normale funzionamento dell'apparecchio. La frequenza di
campionamento di uscita per quell'ingresso risulterà la massima frequenza multipla intera della frequenza di
campionamento in ingresso.
Premere
◄
sul telecomando per ritornare al livello precedente del menu e usare i tasti cursore
▲e ▼
sul
telecomando per scorrere le varie opzioni.
Pressing the “OK” switch on the remote will enable the Custom criterion on the selected input and will enter the
submenu where setting the desired sample output frequency. The available output frequency are: 192KHz,
176.4KHz, 96KHz, 88.2KHz, 48KHz and 44.1KHz
Use the switch
◄
to come back to the previous menu level and use:
▲
and ▼to scroll the different options.
Premendo il tasto “OK” sul telecomando si abilita il criterio di scelta Custom per l'ingresso selezionato e si entra
nel sottomenu dove verrà fissata la frequenza di campionamento di uscita desiderata. Le possibili frequenze di
uscita sono: 192KHz, 176.4KHz, 96KHz, 88.2KHz, 48KHz and 44.1KHz.
Premere
◄
sul telecomando per ritornare al livello precedente del menu e usare i tasti cursore
▲e ▼
sul
telecomando per scorrere le varie opzioni.
Pressing the “OK” switch on the remote chooses that output sample frequency for the selected input, exits the
setup menu and returns to the normal operation mode.
Use the switch
◄
to come back to the previous menu level and use:
▲
and ▼to scroll the different options.
Premendo il tasto “OK” sul telecomando si effettua la scelta della frequenza di campionamento di uscita per
l'ingresso selezionato, si esce dal menu di setup e si ritorna al normale funzionamento dell'apparecchio.
Premere
◄
sul telecomando per ritornare al livello precedente del menu e usare i tasti cursore
▲e ▼
sul
telecomando per scorrere le varie opzioni.
Page 24
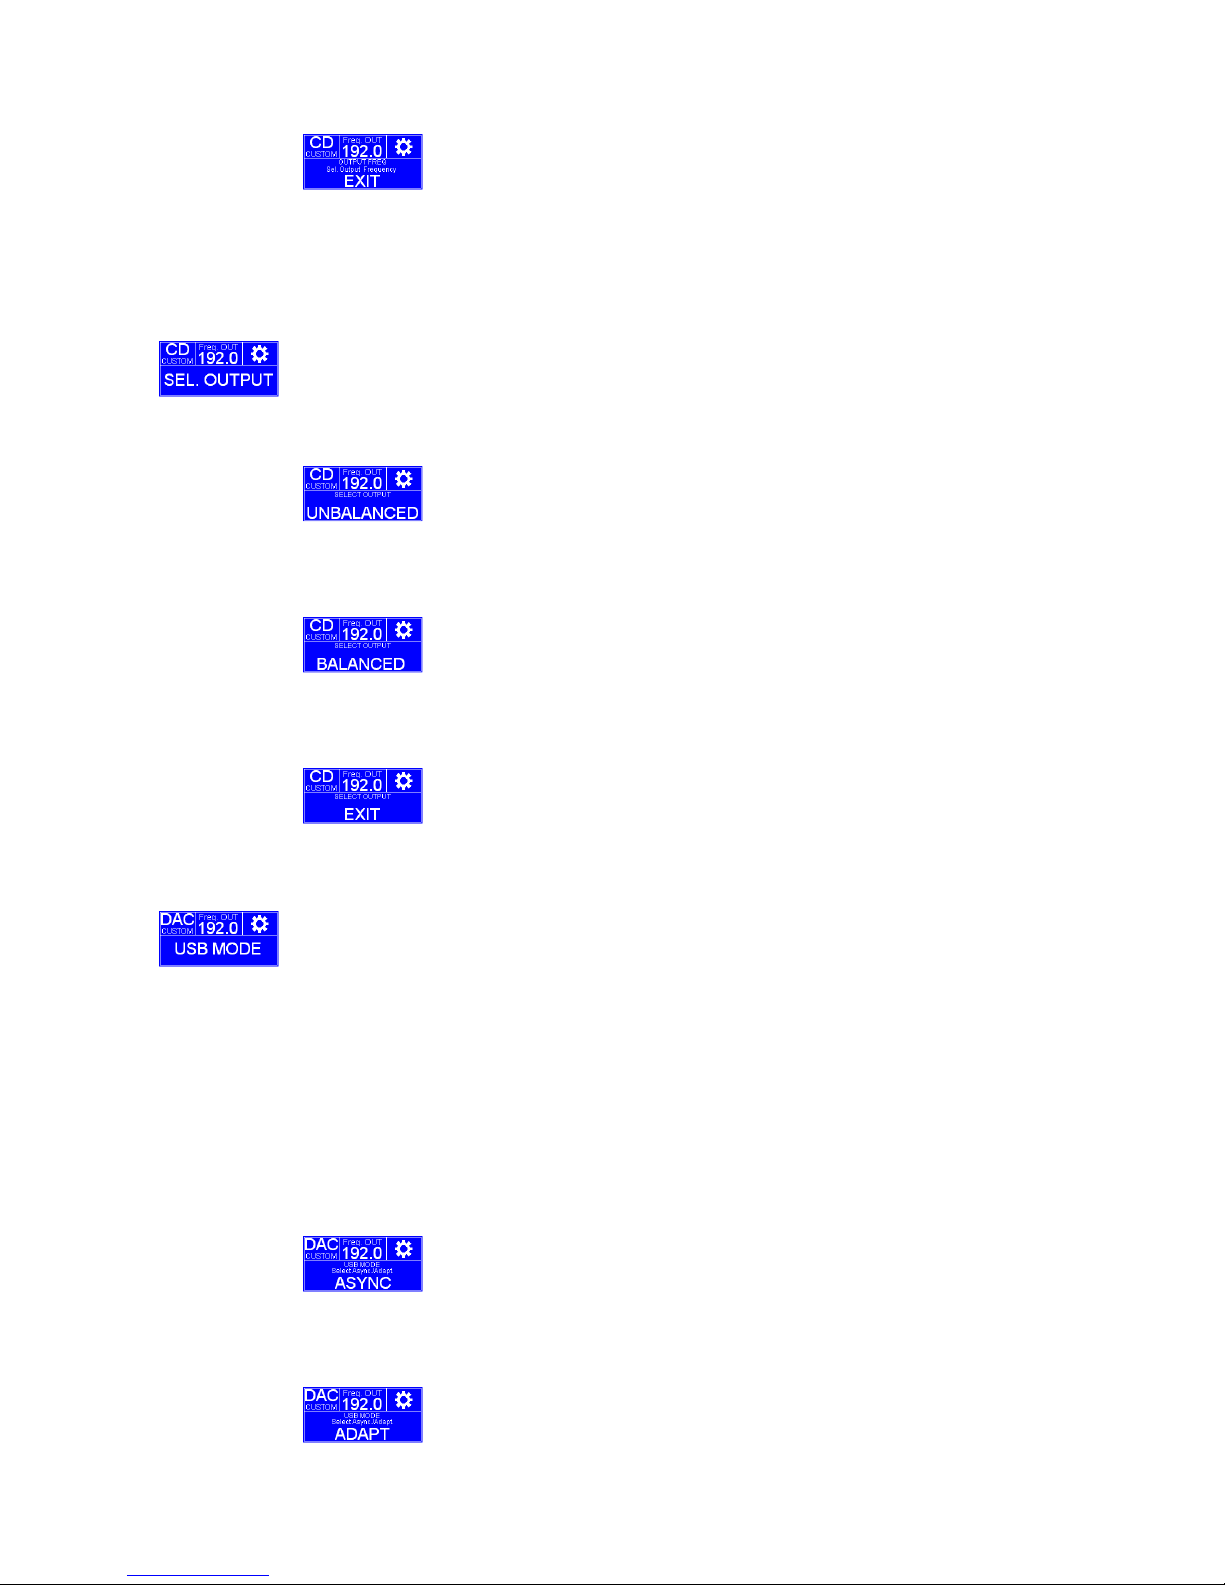
24
Pressing “OK” exits the submenu and comes back to the main menu setup without memorizing any value.
Premendo “OK” si esce dal sottomenu e si ritorna al menu di setup principale senza memorizzare alcun
settaggio.
SELECT OUTPUT Sub Menu / Sotto Menu SELECT OUTPUT
Entering this submenu you can choose which outputs enable. The possible outputs are: balanced and
unbalanced. Please note that the set output is applied for all the inputs. Press “OK” on the remote to enter the
submenu.
Entrando in questo sottomenu si può scegliere quale uscita abilitare. Le possibili uscite sono: bilanciate e
sbilanciate. Si noti che l'uscita scelta verrà abilitata per tutti gli ingressi. Premere “OK” per entrare nel
sottomenu.
Pressing “OK” on the remote enables the Unbalanced outputs, exits the setup menu and returns the unit to the
normal operation mode.
Use the switch
◄
to come back to the previous menu level and use:
▲
and ▼to scroll the different options.
Premendo il tasto “OK” sul telecomando si abilitano le uscite sbilanciate, si esce dal menu di setup e si ritorna al
normale funzionamento dell'apparecchio.
Premere
◄
sul telecomando per ritornare al livello precedente del menu e usare i tasti cursore
▲e ▼
sul
telecomando per scorrere le varie opzioni.
Pressing “OK” on the remote enables the balanced (XLR) outputs, exits the setup menu and returns the unit to
the normal operation mode.
Use the switch
◄
to come back to the previous menu level and use:
▲
and ▼to scroll the different options.
Premendo il tasto “OK” sul telecomando si abilitano le uscite bilanciate (XLR), si esce dal menu di setup e si
ritorna al normale funzionamento dell'apparecchio.
Premere
◄
sul telecomando per ritornare al livello precedente del menu e usare i tasti cursore
▲e ▼
sul
telecomando per scorrere le varie opzioni.
Pressing “OK” exits the submenu and comes back to the main menu setup without memorizing any value.
Premendo “OK” si esce dal sottomenu e si ritorna al menu di setup principale senza memorizzare nessun
parametro.
USB MODE Sub Menu / Sotto Menu USB MODE
Entering this submenu you can choose the USBDAC mode. The possible modes are: adaptive (ADAPT) and
asynchronous (ASYNC). Press “OK” to enter this submenu.
Note: Please note that this menu option is showed on the setup menu only if the input selected when entering
the Setup menu is the USB.
Note: before entering this sub menu please close all the program/applications active on your PC/MAC.
Such as an example if Foobar2000 is playing on the computer, stop and close it before changing the
USBDAC mode.
Entrando in questo sottomenu si può scegliere la modalità dell'USBDAC. Le possibili modalità sono: adattiva
(ADAPT) e asincrona (ASYNC). Premere “OK” per accedere a questo sotto menu.
Nota: si noti che questa voce del menu viene mostrata solo se l'ingresso selezionato quando si entra nel setup
menu era l'USB.
NOTA: prima di cambiare la modalità chiudere tutte le applicazioni/programmi sul PC/MAC che utilizzano
l’USBDAC!! Ad esempio se Foobar2000 è attivo e in riproduzione è necessario fermare la riproduzione e
chiudere il programma Foobar2000 prima di confermare il cambio di modalità sul Fortissimo CD-
DAC!!
Pressing “OK” on the remote enables Asynchronous mode exits the setup menu and returns the unit to the
normal operation mode.
Use the switch
◄
to come back to the previous menu level and use:
▲
and ▼to scroll the different options.
Premendo il tasto “OK” sul telecomando si abilita la modalità asincrona, si esce dal menu di setup e si ritorna al
normale funzionamento dell'apparecchio.
Premere
◄
sul telecomando per ritornare al livello precedente del menu e usare i tasti cursore
▲e ▼
sul
telecomando per scorrere le varie opzioni.
Pressing “OK” on the remote enables Adaptive mode exits the setup menu and returns the unit to the normal
operation mode.
Use the switch
◄
to come back to the previous menu level and use:
▲
and ▼to scroll the different options.
Premendo il tasto “OK” sul telecomando si abilita la modalità adattiva, si esce dal menu di setup e si ritorna al
Page 25
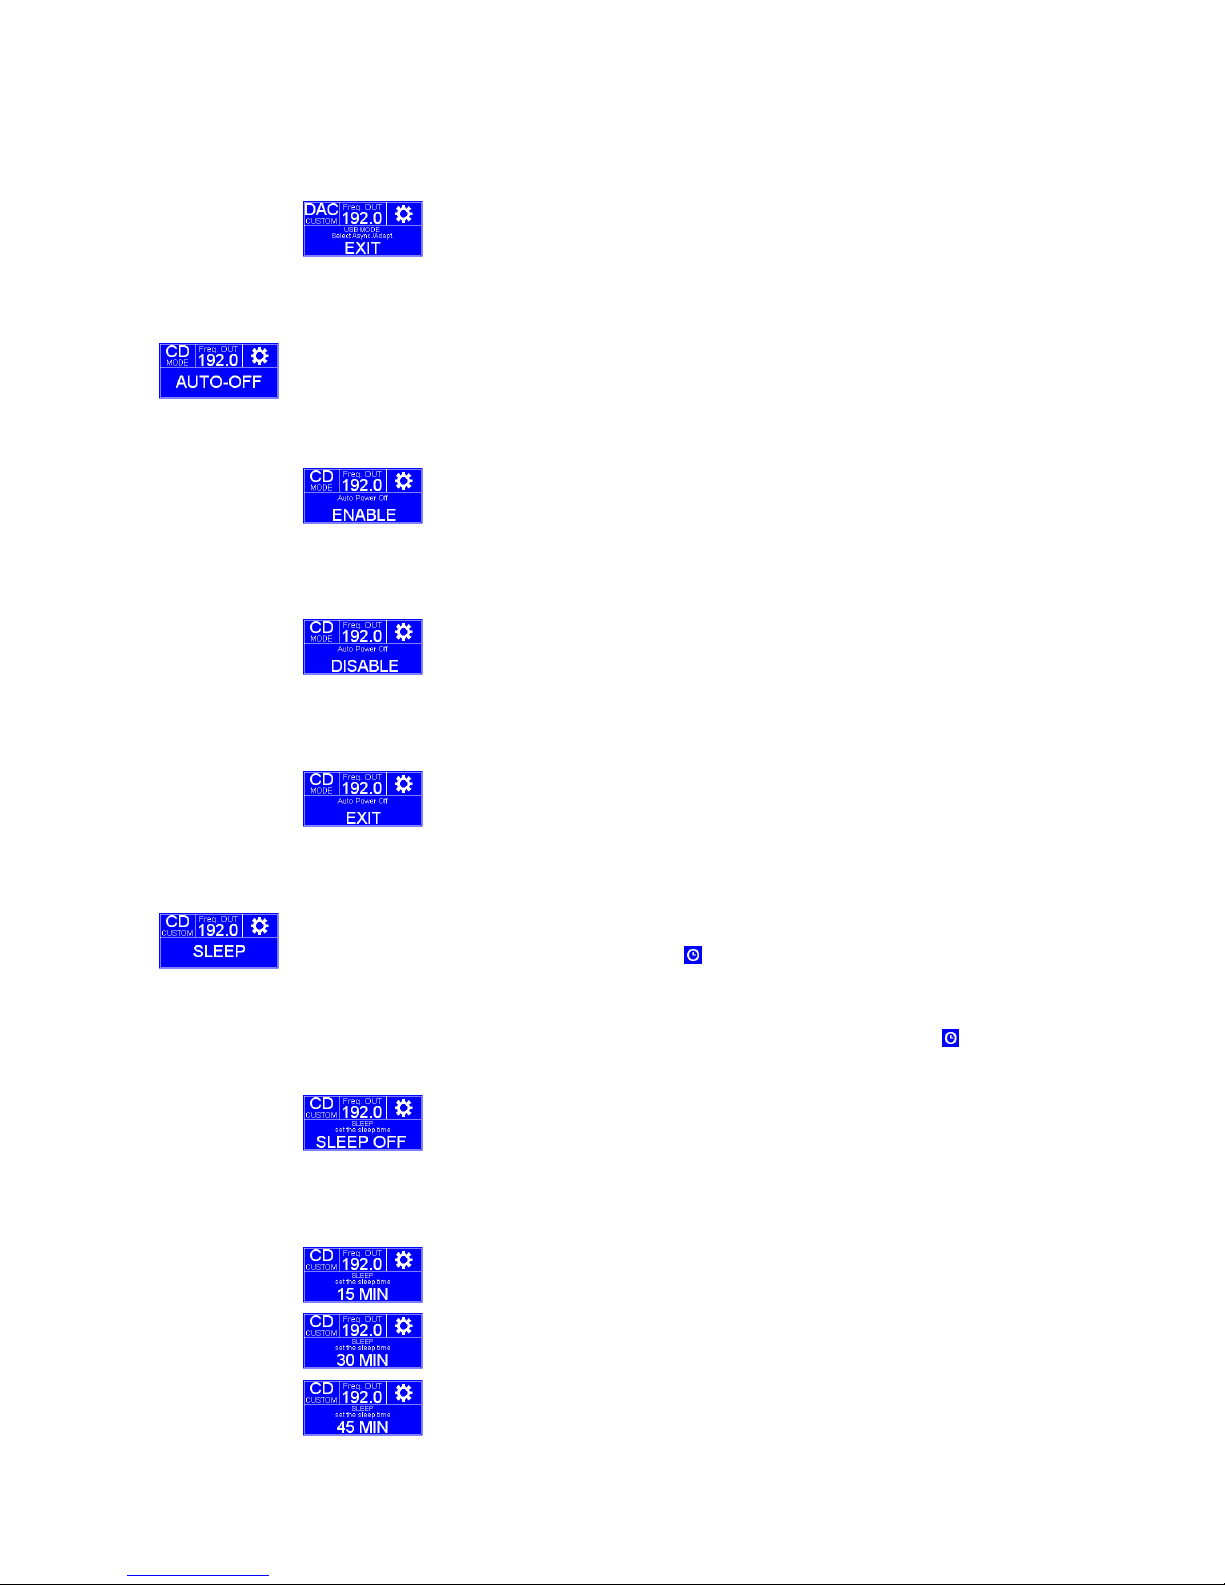
25
normale funzionamento dell'apparecchio.
Premere
◄
sul telecomando per ritornare al livello precedente del menu e usare i tasti cursore
▲e ▼
sul
telecomando per scorrere le varie opzioni.
Pressing “OK” exits the submenu and comes back to the main menu setup without memorizing any values.
Premendo “OK” si esce dal sottomenu e si ritorna al menu di setup principale senza memorizzare alcun
parametro.
AUTO-OFF Sub Menu / Sotto Menu AUTO-OFF
Entering this submenu you can enable/disable the Auto Power Off feature. This feature automatically turns off
the unit after 4 hours of inactivity. Push “OK” to enter the submenu.
NOTE: the Auto Power Off feature is enabled by Default
Entrando in questo sottomenu si può abilitare/disabilitare la funzione "Auto Spegnimento": questa funzione
spegne automaticamente l’apparecchio dopo 4 ore di inutilizzo. Premere “OK” per entrare nel sotto menu.
NOTA: la funzione Auto Spegnimento è attiva di Default
Pressing “OK” on the remote enables the Auto Power Off feature, exits the setup menu and returns the unit to
the normal operation mode.
Use the switch
◄
to come back to the previous menu level and use:
▲
and ▼to scroll the different options.
Premendo il tasto “OK” sul telecomando si abilita la funzione di Auto Spegnimento, si esce dal menu di setup e
si ritorna al normale funzionamento dell'apparecchio.
Premere
◄
sul telecomando per ritornare al livello precedente del menu e usare i tasti cursore
▲e ▼
sul
telecomando per scorrere le varie opzioni.
Pressing “OK” on the remote disables the Auto Power Off feature, exits the setup menu and returns the unit to
the normal operation mode.
Use the switch
◄
to come back to the previous menu level and use:
▲
and ▼to scroll the different options.
Premendo il tasto “OK” sul telecomando si disabilita la funzione di Auto Spegnimento, si esce dal menu di setup
e si ritorna al normale funzionamento dell'apparecchio.
Premere
◄
sul telecomando per ritornare al livello precedente del menu e usare i tasti cursore
▲e ▼
sul
telecomando per scorrere le varie opzioni.
Pressing “OK” exits the submenu and comes back to the main menu setup without memorizing any values.
Premendo “OK” si esce dal sottomenu e si ritorna al menu di setup principale senza memorizzare alcun
parametro.
SLEEP Sub Menu / Sotto Menu SLEEP
Entering this submenu you can enable the sleep function which turns off the unit after a set time. The possible
time passed which the unit enters the standby mode are: 15 minutes, 30 minutes, 45 minutes, 60 minutes. If the
Sleep function has been enabled the icon: will be shown alternatively to the unit mode (CD or DAC). Press
“OK” to enter the submenu.
Entrando in questo sotto menu è possibile attivare la funzione SLEEP che spegne automaticamente
l’apparecchio trascorso un periodo temporale fissato. Sono disponibili 4 intervalli: 15, 30,45 e 60 minuti. Se la
funzione SLEEP è attiva, nel riquadro in alto a sinistra viene visualizzata l’icona alternativamente
all'indicazione della modalità di funzionamento (CD o DAC.)
Premere il tasto “OK” per accedere al sottomenu.
Pressing “OK” on the remote disables the Sleep function if it has been enabled, exits the setup menu and
returns the unit to the normal operation mode.
Use the switch
◄
to come back to the previous menu level and use:
▲
and ▼to scroll the different options.
Premendo il tasto “OK” sul telecomando si disabilita la funzione Sleep qualora fosse stata precedentemente
abilitata, si esce dal menu di setup e si ritorna al normale funzionamento dell'apparecchio.
Premere
◄
sul telecomando per ritornare al livello precedente del menu e usare i tasti cursore
▲e ▼
sul
telecomando per scorrere le varie opzioni.
Pressing “OK” on the remote enables the sleep function (that will turns off the unit after the time shown on the
display) exits the setup menu and returns the unit to the normal operation mode.
Use the switch
◄
to come back to the previous menu level and use:
▲
and ▼to scroll the different options.
Premendo il tasto “OK” sul telecomando si abilita la funzione Sleep (che spegnerà l'apparecchio dopo un tempo
pari a quello visualizzato sul display), si esce dal menu di setup e si ritorna al normale funzionamento
dell'apparecchio.
Premere
◄
sul telecomando per ritornare al livello precedente del menu e usare i tasti cursore
▲e ▼
sul
telecomando per scorrere le varie opzioni.
Page 26
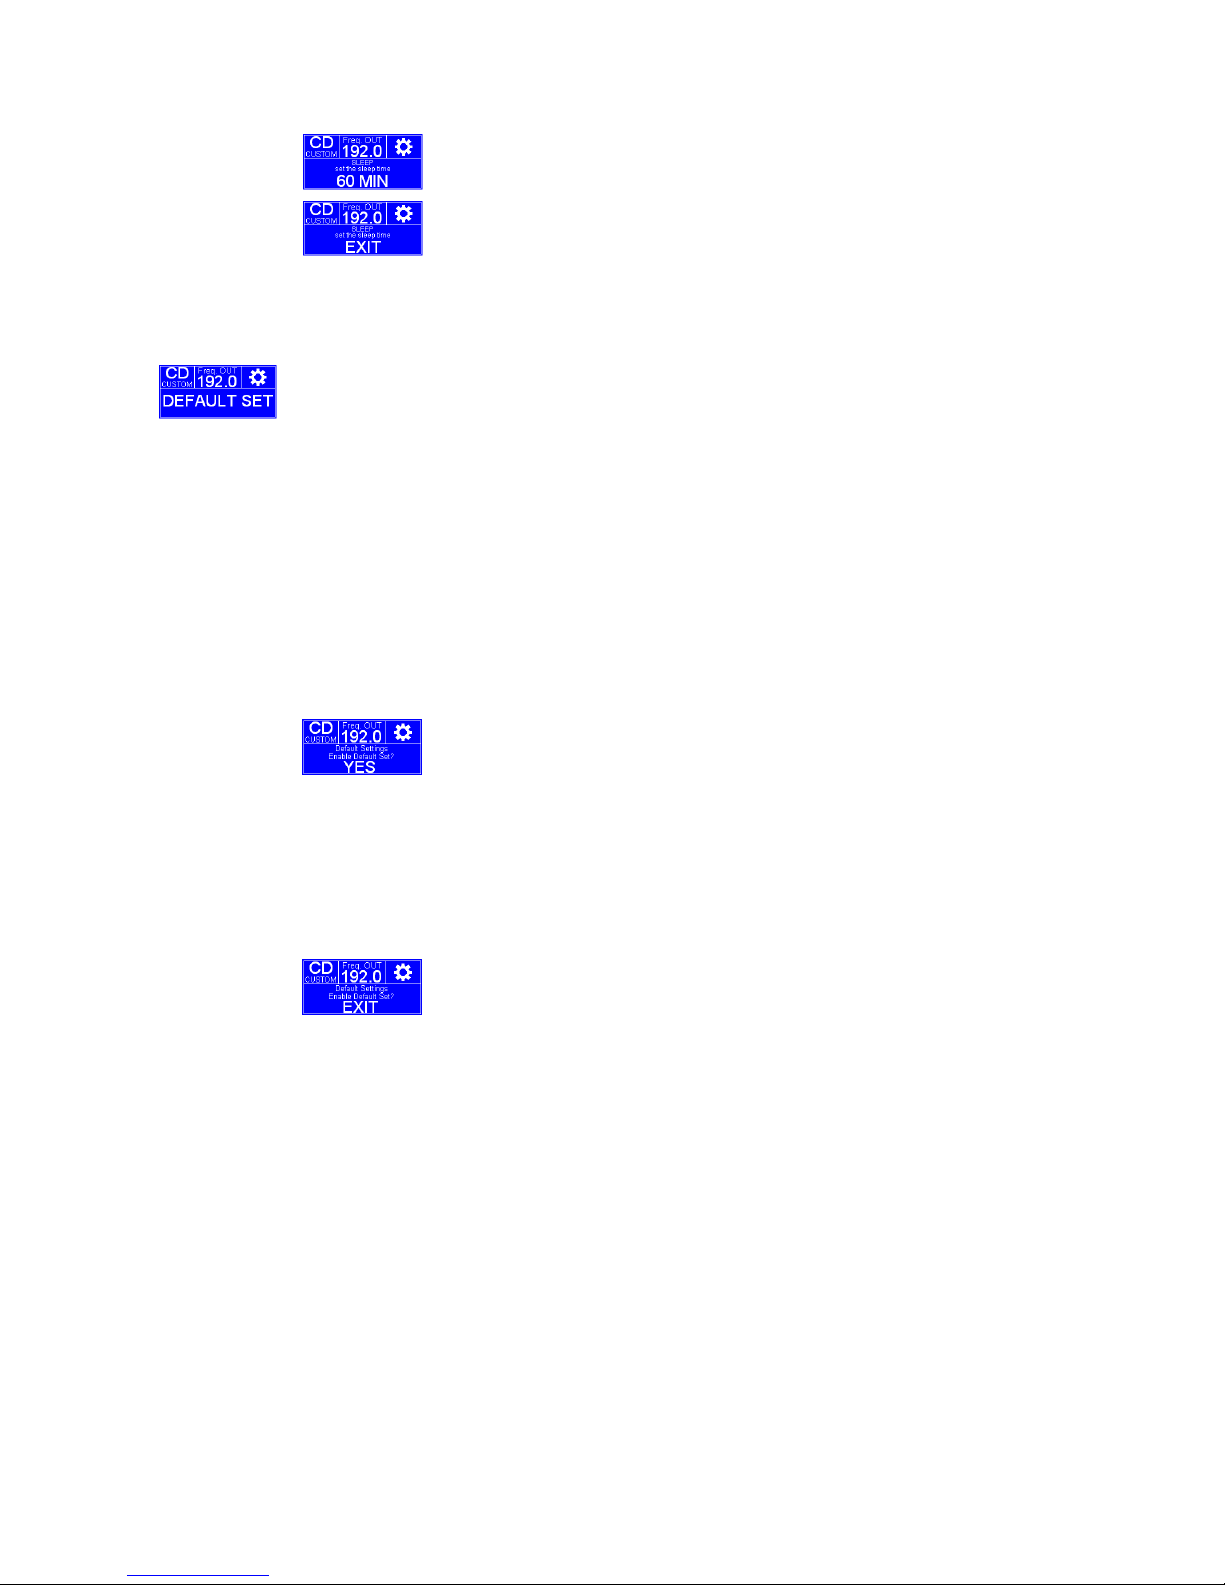
26
Pressing “OK” exits the submenu and comes back to the main menu setup without memorizing any value.
Premendo “OK” si esce dal sottomenu e si ritorna al menu di setup principale senza memorizzare alcun
parametro.
DEFAULT SET Sub Menu / Sotto Menu DEFAULT SET
Entering this submenu you can load the default unit settings. Press “OK” on the remote to enter the submenu.
The default unit settings are:
• Output : Unbalanced output
• Output sample frequency selection criterions:
o CD: Custom, 176.4KHz sample output frequency
o SPDIF Coaxial: Custom, 192KHz sample output frequency
o SPDIF Optical: Custom, 192KHz sample output frequency
o USBDAC: Custom, 192KHz sample output frequency
• USBDAC Mode: asynchronous
Entrando in questo sottomenu si possono caricare le configurazioni di default. Premere “OK” per entrare nel
sottomenu.
I settaggi di default sono:
• uscite : Unbalanced output
• Criterio di scelta della frequenza di uscita:
o CD: Custom, 176.4KHz sample output frequency
o SPDIF Coaxial: Custom, 192KHz sample output frequency
o SPDIF Optical: Custom, 192KHz sample output frequency
o USBDAC: Custom, 192KHz sample output frequency
• USBDAC Mode: asincrono
Pressing “OK” on the remote loads the Default settings exits the setup menu and returns the unit to the normal
operation mode.
Use the switch
◄
to come back to the previous menu level and use:
▲
and ▼to scroll the different options.
Note: when the default sets are loaded, previously setups are lost.
Premendo il tasto “OK” sul telecomando viene caricata la configurazione di default, si esce dal menu di setup e
si ritorna al normale funzionamento dell'apparecchio.
Premere
◄
sul telecomando per ritornare al livello precedente del menu e usare i tasti cursore
▲e ▼
sul
telecomando per scorrere le varie opzioni.
NOTA: il ripristino della configurazione di fabbrica implica la perdita di tutti i settaggi memorizzati in
precedenza!!!
Pressing “OK” exits the submenu and comes back to the main menu setup without memorizing any values.
Premendo “OK” si esce dal sottomenu e si ritorna al menu di setup principale senza memorizzare alcun
parametro..
Page 27

27
Specifications/Characteristics
Parameter Measurement conditions Value
Display Blue Graphic LCD 128X64
Inputs SPDIF COAXIAL, SPDIF OPTICAL, USB
Outputs
Analog Balanced Stereo, Analog
Unbalanced stereo, Headphones output,
SPDIF COAXIAL OUTPUT
Trigger Out 12V DC
Control Control connection
Remote
ASC100 Audio Analogue multiproduct
remote
Display Brightness Mode: High, Low, dark-mode
Analog Balanced (XLR) output voltage Differential signal, 0dBFS 4.5Vrms
Analog Unbalanced output voltage 0dBFS 2.2Vrms
Analog Balanced output impedance On each output 430 Ohm
Analog unbalanced output impedance - 430 Ohm
SPDIF OPTICAL INPUT and SPDIF
Coaxial Input
16-24 bits audio stereo signal; until
192KHz sample frequency
Minimum Vpp SPDIF coaxial input signal Proper 75Ohm standard cable 300mVpp
SPDIF OUTPUT typical peak to peak
voltage
75Ohm cable and input impedance >1.5Vpp
USBDAC mode USB2.0 Port
Adaptive, asynchronous (16-24 bit stereo
until 192KHz sample frequency)
Supported Windows Operative Systems
Windows XP, Windows Vista, Windows Seven
and Windows 8 (Tablet not supported)
Supported MAC Operative System
MAC OSX 10.6.5 late. OSX 10.7 late is
recommended
Output sample frequency selection
criterion
Direct, Automatic, Custom (
192KHz,
176.4KHz, 96KHz, 88.2KHz, 48KHz and 44.1KHz)
Auto Power Off 4 Hours
Sleep function 15Min, 30Min, 45Min, 60Min
Transceiver/SampleRateConverter SRC4392
DAC PCM1795
Output stage
Discrete components, 0 feedback, single
stage
THD+N
0dBFS, unbalanced output, 20Hz - 20KHz
band noise, no A filter
<0.01%
THD+N
0dBFS, balanced output, 20Hz - 20KHz
band noise, no A filter
<0.01%
Frequency response: - 20Hz-20kHz +/-0.5dB
Noise level (balanced and unbalanced
output)
Band limits 0Hz-20kHz -120dBV
Power requirements: +/-10% nominal main voltage 230V 50-60Hz or 115V 50-60Hz
Power consumption: Normal operation 35VA
Page 28
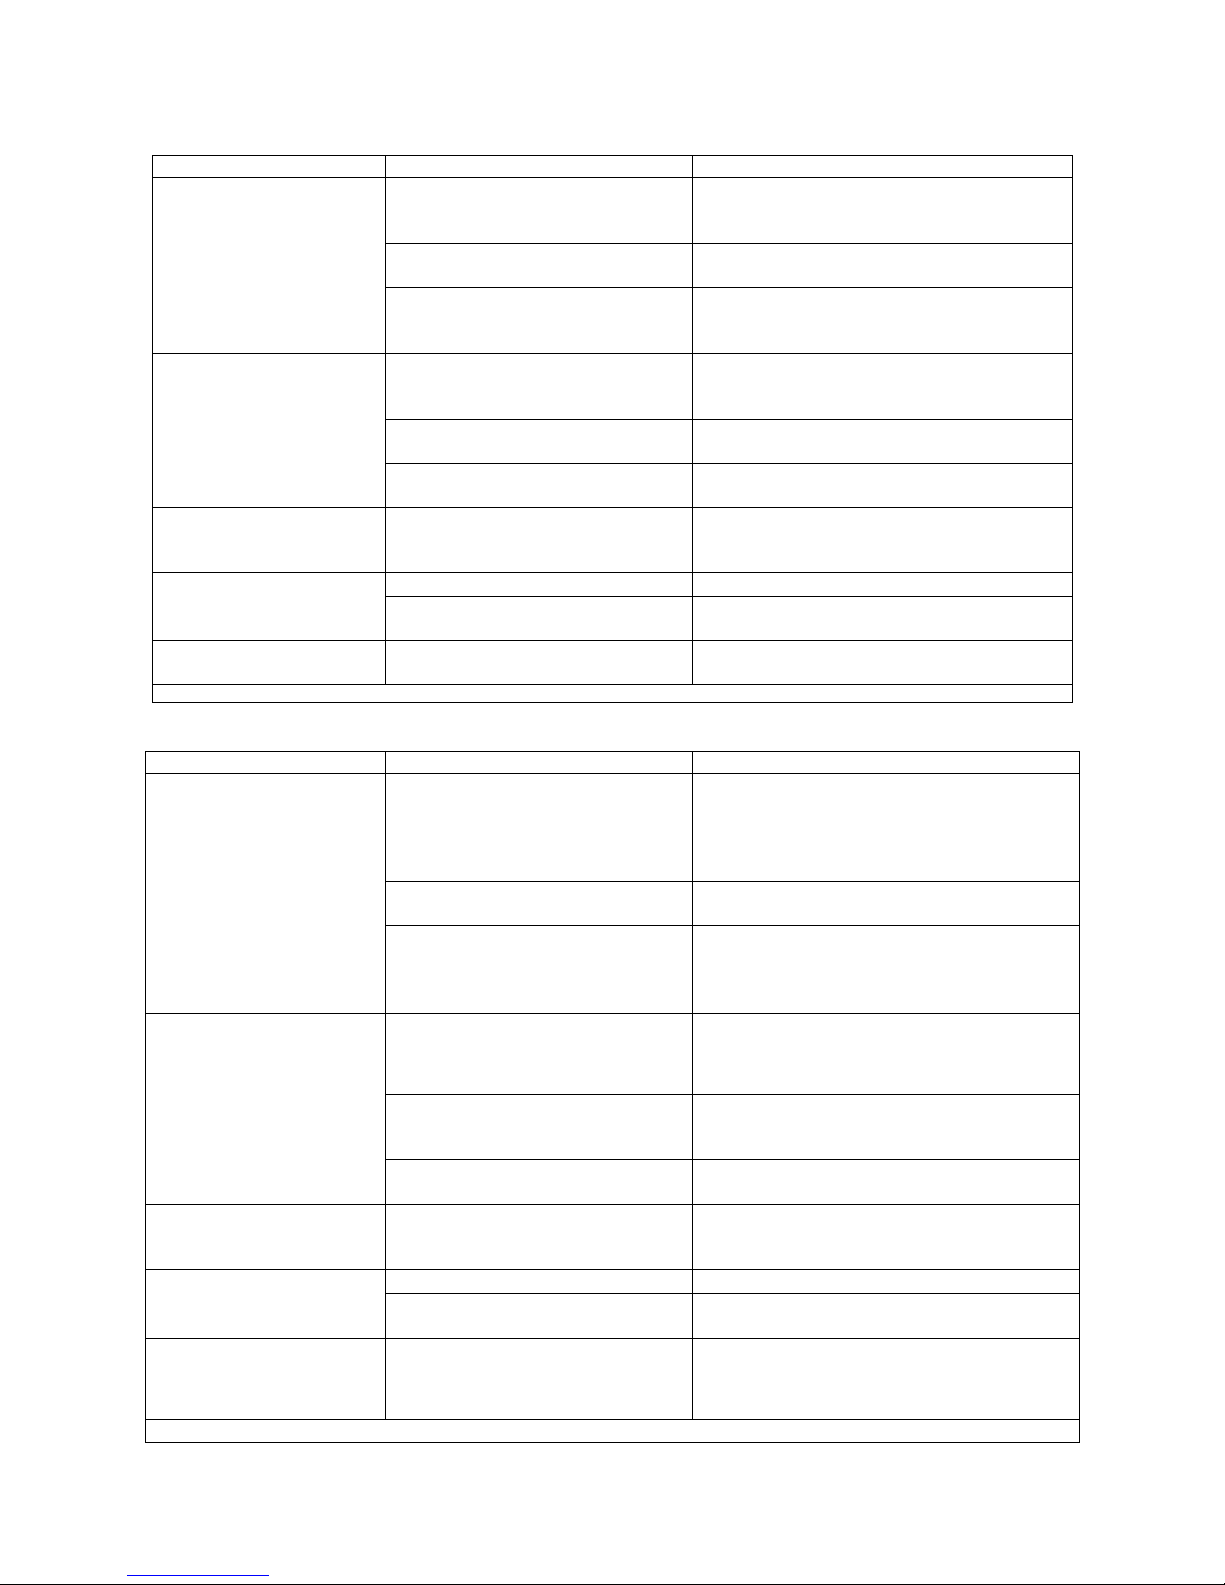
28
TROUBLESHOOTING
Symptoms Cause Remedy
Unit is in stand-by mode
Push STBY button on the remote controller or the
button on the front panel, switch on the main power
supply switch on the front panel
Power cord incorrectly plugged
Make sure the power cord is correctly plugged into
the wall outlet
Display is off
No sound
Burned-out fuses
Check fuses in the fuse panel (after unplugging the
power cord from the wall outlet) above the IEC inlet
and replace them with new ones of the same type
Faulty or incorrectly plugged connectors
between Fortissimo CD – DAC and the
amplifier
Check cords and their connection
Incorrectly selected source on the amplifier
Check that the Fortissimo CD - DAC is correctly
selected through the amplifier inputs
Display is on
No sound
Check the digital source is not coded or
compressed PCM (AC3, DTS...)
CD player is on but the display
is off
Faulty front panel
Contact your Audio Analogue retailer for connections
check and front panel substitution
No battery / worn-out battery Place/replace battery (2 ‘AAA’ batteries)
Remote controller doesn’t work
You’re standing too far or on an exceeding
angle from the front panel
Get closer to the unit or reduce angle
The unit is on but there is no
sound
Contact your Audio Analogue retailer for fuse check
and substitution
If the suggested remedies should not work or the problem is not shown in the list above, please contact your local Audio Analogue retailer.
RICERCA GUASTI
Sintomo Causa Rimedio
L’apparecchio è in stand-by
Togliere l’apparecchio dallo stato di stand-by
premendo il tasto STBY sul telecomando o il tasto sul
pannello frontale, accendere l’apparecchio con
l’interruttore principale sul frontale.
Cavo di alimentazione non correttamente
collegato
Controllare che il cavo di rete sia correttamente
collegato all’apparecchio e alla presa di rete
Display spento
Nessun suono
Fusibili di rete bruciati
Controllare (dopo aver staccato il cavo di
alimentazione dalla presa di rete) i fusibili nel
portafusibili della presa IEC ed eventualmente
sostituire con altri dello stesso tipo
Cavi di segnale tra Fortissimo CD - DAC e
amplificatore non connessi correttamente
oppure difettosi
Controllare lo stato dei cavi e/o la corretta
connessione
Sorgente non selezionata correttamente
sull’amplificatore
Controllare che il Fortissimo CD - DAC sia
selezionato correttamente con il selettore degli
ingressi dell’amplificatore
Display acceso
Nessun suono
verificare che se la sorgente digitale non
sia compressa (AC3, DTS ...)
Il CD player funziona
ma il display è spento
Scheda frontale non collegata
correttamente oppure difettosa
Contattare il vostro rivenditore Audio Analogue per
una verifica dei collegamenti ed eventuale sostituzione
della scheda
Batterie scariche o mancanti Inserire o sostituire le batterie (2 ministilo tipo ‘AAA’)
Il telecomando non funziona
Eccessiva distanza dal pannello frontale
dell’apparecchio o angolo non corretto
Avvicinarsi di più all’apparecchio o cambiare angolo
L’apparecchio risponde ai
comandi ma non si sente alcun
suono
Contattare il vostro rivenditore Audio Analogue per
una verifica ed eventuale sostituzione della valvola
Se i rimedi suggeriti non dovessero funzionare oppure il problema non è riportato nella lista, contattate il vostro rivenditore Audio Analogue
Page 29

29
WARNING!
All of our CD players may not be able to read some specific CD’s manufactured with a unique protection system against
copying. If in doubt, please try to read the CD using a PC CD-ROM drive. When the CD-ROM drive is incapable of accessing
the tracks on the CD, please do not play the CD in question with the our CD players. Although there is generally no problem
with hybrid SACD’s, please check for any copy protection system in the CD layer. Our CD players are able to reproduce
CD’s protected with the IFPI system, whose symbol is made of two circles containing two triangles.
ATTENZIONE!
I nostri lettori CD potrebbero non essere in grado di leggere alcuni CD prodotti con un particolare sistema di protezione
anti-copia. Se in dubbio, si consiglia di provare prima a far leggere il CD dal CD-ROM di un PC. Nel caso in cui il CD-ROM
non riuscisse ad accedere alle tracce del CD, evitare di riprodurlo con i nostri lettori. Non è invece stato riscontrato alcun
problema con i SACD ibridi, che vengono regolarmente letti. Verificare comunque che lo strato CD di un SACD ibrido non
sia stato a sua volta protetto contro la copia. I nostri lettori sono in grado di leggere i CD protetti col sistema IFPI,
rappresentato dal simbolo dei due cerchi contenenti due triangoli.
Page 30
30
Attention: Your product is marked with this symbol. It
means that used electrical and electronic products
should not be mixed with general household waste.
There is a collection system for these products.
Attenzione: il dispositivo è contrassegnato da questo
simbolo, che segnala di non smaltire le
apparecchiature elettriche ed elettroniche insieme ai
normali rifiuti domestici. Per tali prodotti è previsto
un sistema di raccolta a parte.
A. INFORMATION ON DISPOSAL FOR USERS (PRIVATE HOUSEHOLDS)
1. In The European Union
Attention: If you want to dispose of this equipment, please do not use the ordinary dust bin.
Used electrical and electronic equipment must be treated separately and in accordance with legislation that requires
proper treatment, recovery and recycling of used electrical and electronic equipment.
Following the implementation by member states, private households within the EU states may return their used electrical
and electronic equipment to designated collection facilities free of charge*. In some countries* your local retailer may also
take back your old product free of charge if your purchase a similar new one.
*) Please contact your authority for further details.
If your used electrical or electronic equipment has batteries or accumulator, please dispose of these separately before and
according to local requirements.
By disposing of this product correctly you will help ensure that the waste undergoes the necessary treatment, recovery
and recycling and thus prevent potential negative effects on the environment and human health which could otherwise
arise due to inappropriate waste handling.
2. In other countries outside the EU
If you wish to discard this product, please contact your local authorities and ask for the correct method of disposal.
For Switzerland: Used electrical or electronic equipment can be returned free of charge to the dealer, even if you don’t
purchase a new product. Further collection facilities are listed on the home page of www.swisco.ch or www. Sens.ch
B. INFORMATION ON DISPOSAL FOR BUSINESS USERS
1. In the European Union
If this product is used for business purposes and you want to discard it:
Please contact your Audio Analogue dealer who will inform you about the take-back and recycling. Small products (and
small amounts) might be taken back by your local collection facilities.
For Spain: Please contact the established collection system or your local authority for take-back of your used products.
2. In other Countries outside the EU
If you wish to discard this product, please contact your local authorities and ask for the current method of disposal.
A. INFORMAZIONI SULLO SMALTIMENTO PER GLI UTENTI (PRIVATI)
1. Nell’Unione europea
Attenzione: Per smaltire il presente dispositivo, non utilizzare il normale bidone della spazzatura!
Le apparecchiature elettriche ed elettroniche usate devono essere gestite a parte in conformità alla legislazione che
richiede il trattamento, il recupero e il riciclaggio adeguato dei suddetti prodotti.
In seguito alle disposizioni attuate dagli Stati membri, i privati residenti nella UE possono conferire gratuitamente le
apparecchiature elettriche ed elettroniche usate a centri di raccolta designati*.
In alcuni paesi*, anche il rivenditore locale può ritirare gratuitamente il vecchio prodotto se l’utente acquista un altro nuovo
di tipologia simile.
*) Per maggiori informazioni di prega di contattare l’autorità locale competente.
Se le apparecchiature elettriche o elettroniche usate hanno batterie o accumulatori, l’utente dovrà smaltirli a parte
preventivamente in conformità alle disposizioni locali.
Lo smaltimento corretto del presente prodotto contribuirà a garantire che i rifiuti siano sottoposti al trattamento, al
recupero e al riciclaggio necessari prevenendone il potenziale impatto negativo sull’ambiente e sulla salute umana, che
potrebbe derivare da un’inadeguata gestione dei rifiuti.
2 In paesi che non fanno parte dell’UE
Se si desidera eliminare il presente prodotto,contattare le autorità locali e informarsi sul metodo di smaltimento corretto.
Per la Svizzera: Le apparecchiature elettriche o elettroniche possono essere restituite gratuitamente al rivenditore, anche
se non si acquista un prodotto nuovo. Altri centri di raccolta sono elencati sulla homepage www.swiso.ch o di
www.sens.ch.
B. INFORMAZION SULLO SMALTIMENTO PER GLI UTENTI COMMERCIALI
1. Nell’Unione Europea
Se il prodotto è impiegato a scopi commerciali. Procedere come segue per eliminarlo.
Contattare il proprio rivenditore Audio Analogue c he fornirà informazioni circa il ritiro del prodotto. Potrebbero essere
addebitate le spese di ritiro e riciclaggio. Prodotti piccoli e quantitativi ridotti potranno essere ritirati anche dai centri di
raccolta locali.
Per la Spagna: Contattare il sistema di raccolta ufficiale o l’ente locale preposto al ritiro dei prodotti usati
2. In paesi che non fanno parte dell’UE
Se si desidera eliminare il presente prodotto, contattare le autorità locali e informarsi sul metodo di smaltimento corretto
Page 31

31
Page 32

 Loading...