

Page 1
Page 1
Audi A8
Quick reference guide
Dear Audi Driver,
The aim of this quick reference guide is to introduce you to the
main features and controls of your vehicle.
This quick reference guide cannot replace the information
contained in the Owner's Manual; it is therefore important
that you also read the notes and warnings in the Owner's
Manual.
We wish you safe and
enjoyable motoring
with your new Audi.
AUDI AG
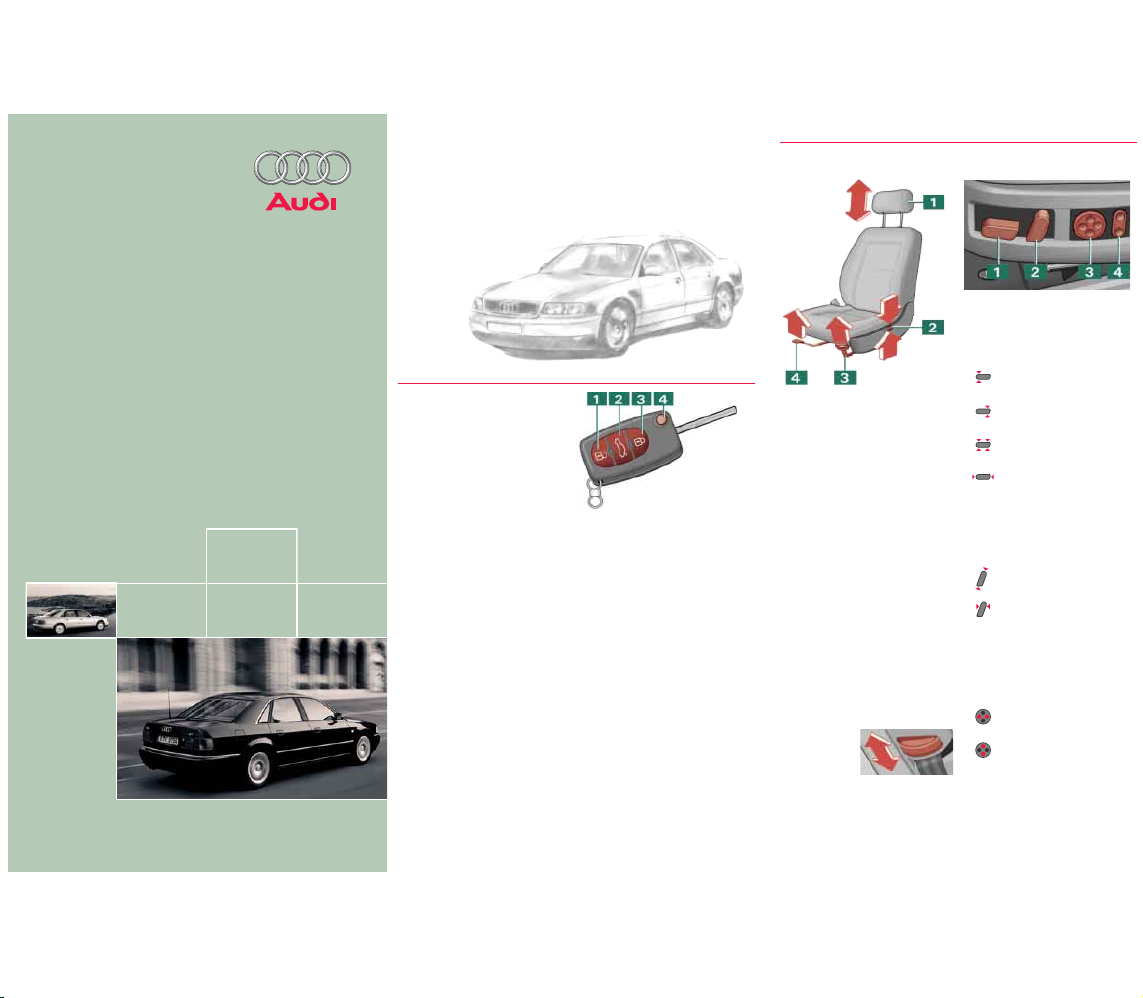
LOCKING AND UNLOCKING THE VEHICLE
The central locking system
locks and unlocks all the
doors, the boot lid and the
tank flap. It can be operated
with the remote control or by
turning the key in the lock.
Operating the radioactivated remote control
Press the appropriate button
for about 1 second.
1 Unlocking button
Open one of the doors or the
boot lid within about 60 seconds, otherwise the vehicle
will lock itself again automatically.
2 Unlocking button
for boot lid
Press the button for at least
1 second.
3 Locking button
The turn signals will flash briefly when the car is locked to
confirm that the doors and the
boot lid are closed properly.
4 Folding out
the master key
Press the release button.
Folding away the
master key
Press the button and fold the
key away.
Note: Press and hold unlocking
button on remote control
(or turn and hold key in
lock on driver’s door) to
open all the windows. Press
and hold locking button on
remote control (or turn and
hold key in lock on driver’s
door) to close all the windows
and the sun roof.
Warning: The doors and windows cannot be opened from
inside the vehicle if it has
been locked from the outside.
Anti-theft alarm
The alarm system is automatically set when the car is
locked. The alarm system is
switched off automatically
when you unlock the vehicle
with the remote control.
Note: If you unlock the vehicle
by inserting the key in the driver’s door, the ignition must
be switched on within 15 seconds, otherwise the alarm will
be triggered. If you unlock the
boot lid by turning the key in
the slot, the alarm will be triggered immediately.
ADJUSTING FRONT SEATS
Mechanically adjustable
front seats
1 Adjusting head restraints
Move the head restraint
up or down.
2 Adjusting angle
of backrest
The backrest is adjusted
electrically. Lift the switch to
recline the backrest; press
the switch to move the
backrest upright.
3 Adjusting seat height
To raise the seat, lean forwards and lift the lever. To
lower the seat, lift the lever
and move down onto the
seat.
4 Moving seat backwards
or forwards
Lift the handle and move the
seat.
Mechanical belt height
adjustment
Slide the
guide up or
down. Tug
the belt to
check that the catch is engaged properly.
Electrically adjustable
front seats
1 Adjusting seat height
and moving seat backwards or forwards
Press the switch in the
appropriate direction:
Raises/ lowers the
seat at the front
Raises/ lowers the
seat at the rear
Raises/ lowers the
whole seat
Moves seat
forward/ back
2 Adjusting head restraints
and angle of backrest
Press the switch in the
appropriate direction:
Head restraint higher/
lower
Backrest further
upright/ further reclined
3 Adjusting lumbar
support (Ergomatic)
Press the appropriate section
of the control to adjust the
seat padding:
Increases/
decreases padding
Raises/ lowers padding
4 Electrical belt
height adjustment
To adjust, press the top or
bottom of the switch.
Page 2
Page 2
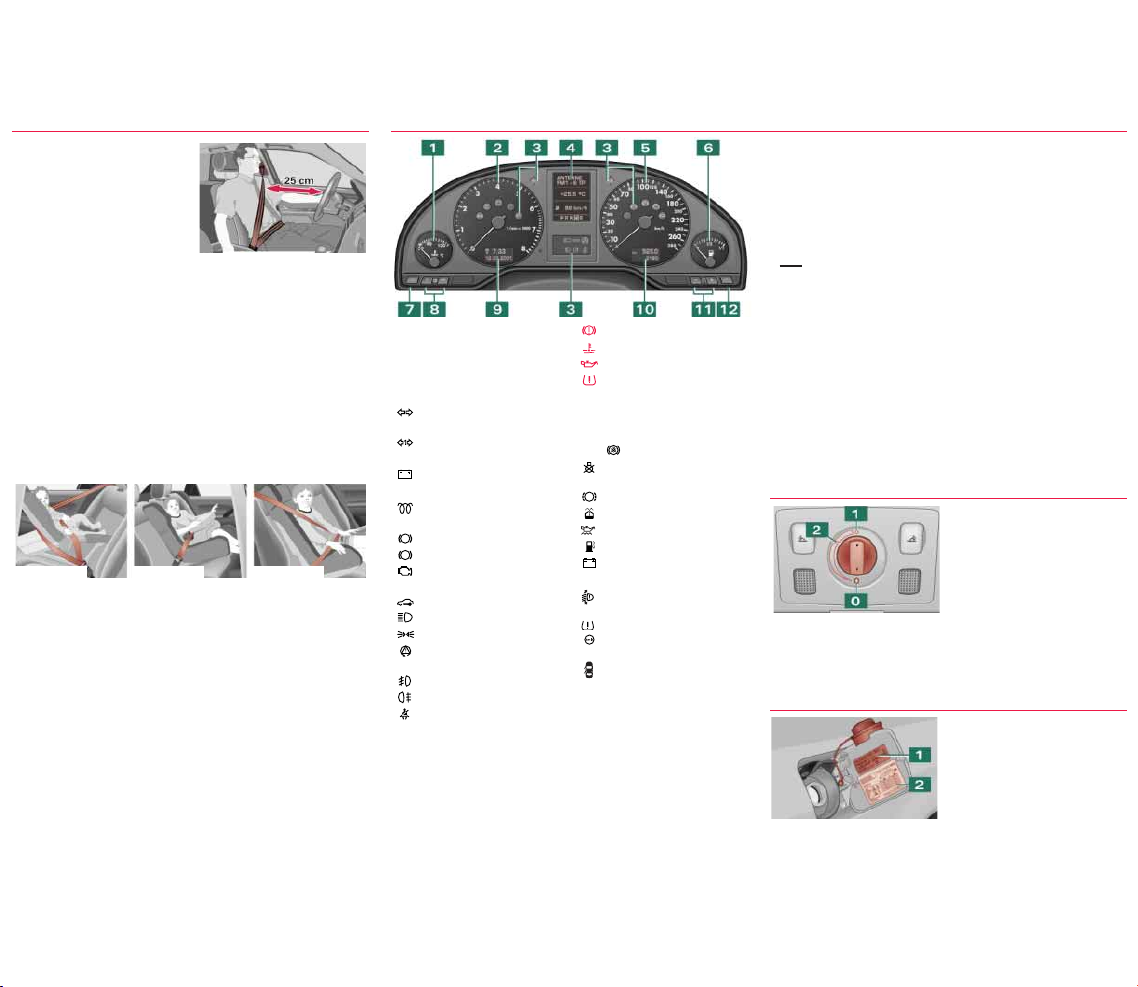
INSTRUMENTS AND WARNING/INDICATOR LAMPS
1 Coolant temperature
gauge
2 Rev counter
3 Warning and
indicator lamps
Turn signals, hazard
warning lights
Tr ailer turn signals
Airbag system
1)
Alternator
1)
Engine management
1)
or
Glow plugs for
diesel models
Anti-lock brake system
1)
Handbrake engaged
Fault in engine
management system
1)
Electronic immobilizer
Main beam headlights
Side lights/ headlights
Electronic stability
program (ESP)
Front fog lights
Rear fog light
Seat belt reminder
4 Driver information
system display:
• Warning symbols and
auto-check control
No faults detected
OK
P
ABS
EPC
AIR
BAG
Fault in brake system
Fault in cooling system
Engine oil pressure too low
Tyre pressure too low
If one of the red symbols lights up
while you are driving, stop the car,
switch off the engine and refer to
the Owner's Manual.
/ Brake light faulty
1)
Bulb failure: dipped headlights or rear lights
1)
Brake pads worn
1)
Washer fluid level low
Check engine oil level
Fuel level low
Battery voltage
too high or too low
1)
Automatic headlight
range control faulty
1)
Check tyre pressure
Speed warning 1 or 2
(km/h or mph)
Door/ boot lid not shut
When a service becomes due,
the service indicator will light
up briefly.
• Radio/ telephone infor-
mation
• Outside temperature
• Menus and navigation/
telematics information
MIN
BREMS-
LICHT
• To call up driver infor-
mation
Press the button if one of
the red symbols flashes.
• To set speed warning 1
Press the button briefly when
the desired speed is reached.
To cancel the speed warning,
press the button for at least
1 second while the vehicle is
moving.
8 Adjuster buttons for
quartz clock
9 Time and date
10 Mileage recorder
Top display: trip recorder
Bottom display: total mileage
11 Adjuster buttons for
instrument lighting
12 Reset button for
trip recorder
1)
If one of these warning symbols lights up while you are driving,
please take the vehicle to an Audi workshop straightaway.
• Selector lever position
(on vehicles with automatic gearbox)
• On-board computer
Instantaneous fuel
consumption
Fuel range
Driving time
Average fuel
consumption
Average speed
5 Speedometer
6 Fuel gauge
7 Control button:
• To call up auto-check
control displays (in turn)
Press button with the ignition
on and the vehicle stationary.
• To activate mileage re-
corder display and clock
Press the button when the
ignition is switched off.
økm/h
100 km
L
ø
h
km
l/100 km
Seat belts must be worn on
every journey, even on short
trips in town. This applies to
the front and rear seats. To
ensure that the seat belts, belt
tensioners and airbags are fully
effective, note the following
points:
SAFETY
Children under 12 should travel on the rear seat. They
must be protected by a child
restraint system which complies with the European standard ECE R 44 and is suitable
for the child’s weight and
height. The safest place for
the child restraint system is
behind the front passenger’s
seat. Make sure that the
system is properly secured.
The retractor mechanism of
the seat belts can be locked
to secure a child safety seat.
Please observe the notes in
the Audi Owner's Manual and
refer to the manufacturer's
instructions for the child seat.
Category 0 or 0+: For babies
up to about 9 months/ 10 kg
and infants up to about
18 months/ 13 kg.
Category 1: For small
children up to about
4 years of age/ 18 kg.
Category 2: For children up
to about 7 years/ 25 kg.
Category 3: Children over
7 years of age but less than
1. 5 metres tall are best protected by a booster cushion
in conjunction with the threepoint seat belt.
Adjust seat and sit in
correct position
The front seats should not be
positioned too close to the
steering wheel or dashboard.
Maintain a distance of at
least 25 cm from the steering
wheel. It is important to sit in
a normal, upright position and
set the backrest so it is fully
against your back. The top of
the head restraint should be
at eye level (or higher). Put
your feet in a comfortable
position in the footwell.
Wear the seat belt
correctly
Make sure that the shoulder
section of the belt is positioned over the centre of the
shoulder, and move the lap
section as far down over the
hips as possible. The belts
should always be worn so
that they fit tightly (see illustration).
Safety of children in the vehicle
Category 1 Category 2Category 0
Kurzanleitung Audi A8 englisch 7.01 221.562.622.20
SUN ROOF
Comfort setting
Tu rn the control until it engages at position
2.
To tilt open
Press the control briefly at
position
0 to tilt the roof all
the way up. Pull the control
briefly to close.
Press and hold the control
to move the roof up to an
intermediate position. Pull
and hold the control to
move the roof down.
FILLING THE TANK
Opening the tank flap
Open the tank flap, unscrew
the tank cap and hook it onto
the flap (see illustration).
Stickers for:
1 Fuel grade
2 Tyre pressures
Opening and closing
Tu rn the control to
1 to slide
open the sun roof and turn it
to
0 to close it (the ignition
must be switched on).
Page 3
Page 3
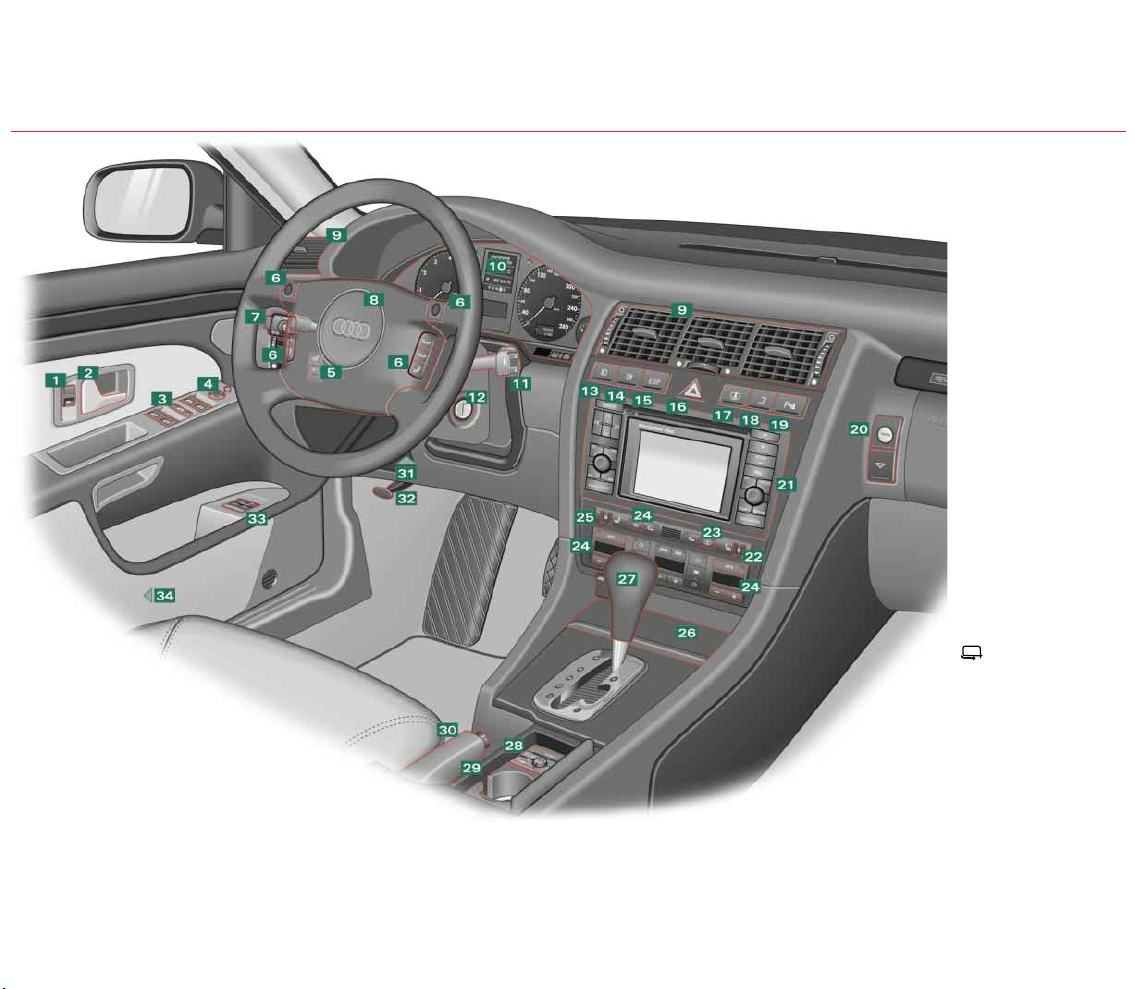
OVERVIEW OF CONTROLS AND EQUIPMENT
5
Headlight
range control
6
Steering-wheel controls for Tiptronic,
radio, CD player
and telephone
2 Door handle
Press the lower half of the
switch to lock the vehicle
centrally from the inside.
Press the top half of the
switch to unlock the vehicle.
1 Central locking switch
Press the switch briefly to
move window all the way
down. Lift the switch briefly
to move the window all the
way up. The window can be
stopped in any position by
briefly pressing the switch
again. The rear windows and
rear cigarette lighter can be
deactivated by pressing the
safety switch (in the centre
of the panel of switches).
3 Electric windows
Selector knob:
L Left exterior mirror
IOff
RRight exterior mirror
Retract both exterior
mirrors
Press the adjuster to move
the mirror surface in the
desired direction. The mirrors are heated when the
ignition is on.
4
Electric adjustment
for exterior mirrors
Page 4
Page 4
© 2001 AUDI AG
AUDI AG reserves the right to alter any part of the vehicle, its equipment and technical specifications. No legal commitment can be implied by the information, illustrations or descriptions in this
publication. No part of this publication may be reprinted, reproduced or translated without the
written permission of AUDI AG. All rights under the laws of copyright are expressly reserved by
AUDI AG. Subject to change. Printed in Germany. Concept and layout: Pfriemer Kataloge GmbH.
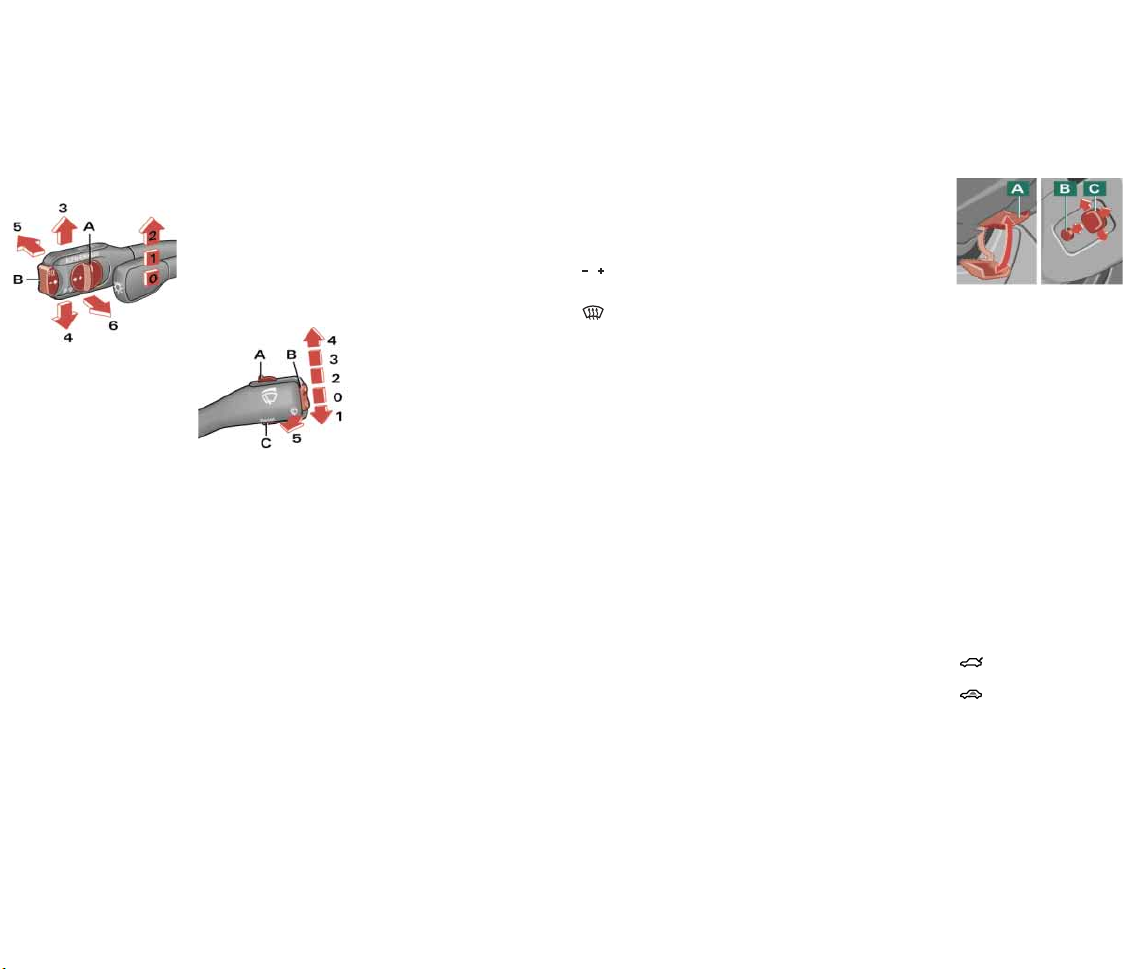
8 Horn
Light switch:
0Lights off
1Side lights
2Main or dipped
beam headlights
Turn signal and
headlight dip lever:
3Right turn signals
4 Left turn signals
5 Main beam headlights
6 Headlight flasher
Cruise control system
To activate the system:
slide control A to ON/ EIN
position. Press button B to
store the current speed
and maintain this speed
constantly.
To switch off cruise control
temporarily: press either
the brake pedal or clutch
pedal, or slide control A to
OFF/ AUS. To resume the
programmed cruising speed,
slide control A to RES/ AUFN.
To s w i t ch off cruise control completely: slide con-
trol A all the way over to
OFF/ AUS until the click stop
engages.
7
Light switch and
Turn signal and
headlight dip lever
9 Air outlets
0Off
1Brief wipe
2Intermittent wipe
The wiper intervals can be
varied in stages by turning
the control A.
3Slow wiper speed
4 Fast wiper speed
5 Automatic wash
and wipe
Pull lever towards you
and hold.
Function selector switch
for on-board computer
Press the top or bottom of
rocker switch B to show the
various displays in turn.
Press and hold button C to
reset display to zero.
Selector button for display modes
Press button C repeatedly to
select the following displays:
on-board computer, navigation system and telematics,
or to switch the display off.
11
Windscreen wiper
and washer lever
See also overleaf.
10
Instruments and
warning/¨indicator
lamps
15
Switch for ESP
(electronic stability
program)
12Ignition lock
13
Switch for front
fog lights
14
Switch for
rear fog light
16
Switch for hazard
warning lights
18
Switch for retractor
function for rear
head restraints
17
Switch for sun blind
for rear window
The parking aid is automatically activated when reverse
gear is engaged. Press the
switch to activate the parking aid manually if you are
driving forwards into a tight
space.
19
Switch for acoustic
parking aid
20 Lockable glove box
21
Radio or Navigation
System Plus
23
Switch for rear
window heater
22
Thumbwheel for
seat heating (front
right seat)
26
Ashtray, cigarette
lighter and electrical
socket
Warn ing: Do not move the selector lever to positions P or R
when the vehicle is moving.
Manual shift program
(Tiptronic)
The Tiptronic program enables you to change gear
manually. To do this, move
the selector lever out of position D into the Tiptronic gate
on the right. Press the selector lever forwards briefly to
shift up a gear, or push the
lever back to shift down a
gear.
Selector lever positions on
vehicles with automatic
gearbox
P -Parking lock
R -Reverse gear
N - Neutral
D -Drive
S - Sport
To move the selector lever
out of position P or N, or
into position P or R, press
the interlock button on the
selector lever handle and the
brake pedal simultaneously.
Note: Use the foot brake to
hold the vehicle when stationary with the engine running
(in all selector lever positions
other than P and N).
27
Gear lever/
selector lever
The temperature can be set
separately for the left and
right sides of the vehicle.
Temperature setting
Automatic mode
Defrost windows
Standard setting for
all seasons:
Select a temperature of
22 °C and switch the
automatic mode on.
AUTO
24
Air conditioner
controls
25
Thumbwheel for
seat heating (front
left seat) and steering wheel heating
30 Handbrake
33
Memory buttons for
driver's seat
Mechanical adjustment:
Pull lever
A down and adjust
the position of the steering
column as required. Then
push the lever back up as far
as it will go.
Electrical adjustment:
Press switch
C in the
appropriate direction to
adjust the position of the
steering column.
Convenient entry function:
Press button
B to switch
on the convenient entry
function.
31
Lever/ switch for
adjustable steering
column
Please refer to Owner's
Manual.
32 Bonnet release lever
Driver information system
menus
To call up the main menu,
press the MENU button
when the vehicle is stationary.
Tu rn the pushbutton to
move the selector arrow
to the option you wish to
select, and press the pushbutton to confirm. This
activates the submenu.
Proceed by turning and
pressing the pushbutton
until the required function
has been performed.
Navigation system or
telematic
Please refer to the
Operating instructions.
28
Controls in storage
compartment for:
Release switch for
tailgate
This switch deactivates the interior
monitor for the antitheft alarm system.
34
Switch in door pillar
(driver’s side)
29 Cup holder
 Loading...