

Page 1

Contents /
Getting Ready
Character Entry
Address Book
Mail
Camera
EZweb
Other Features
If Trouble Occurs
Index
Making and
Answering Calls
Pair Function /
One Touch Keys
Basic
Manual
Page 2
●The typeface and style of character fonts used in screens shown in this manual
may differ from those used in actual screens, and some characters may be omitted.
Thank you for purchasing the A1406PT. Before using your new cell phone,
carefully read this Basic Manual to ensure correct usage. After you have finished reading this manual, keep it in a safe, handy place for future reference.
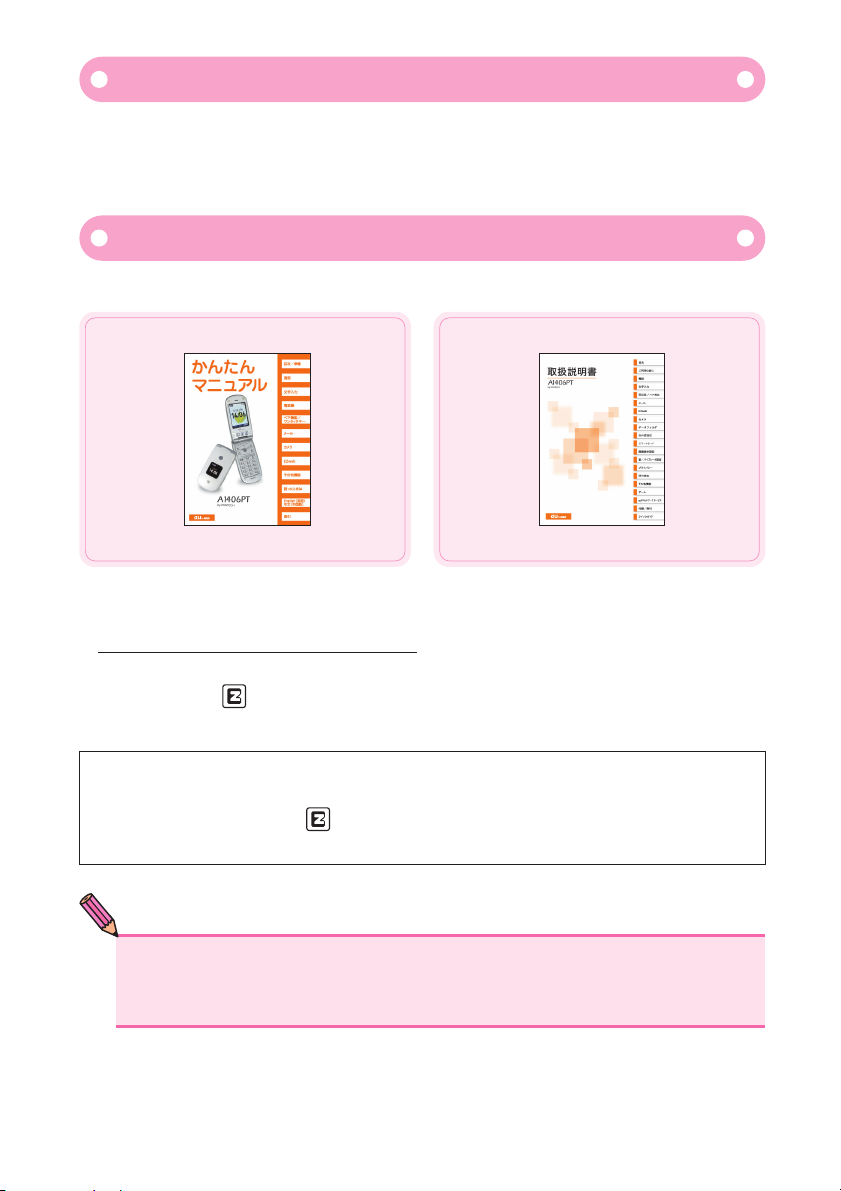
●Basic Manual
This manual is available in English (PDF format only).
●Instruction Manual
This manual is not available in English.
The A1406PT comes with a Basic Manual and an Instruction Manual.
The above manuals are available for download at the au website.
●Manuals available online by keyword search
( www.au.kddi.com/manual/index.html
)
au online manuals are also available via EZweb.
How to access: →[Top Menu]→[料金・申 込・イン フォ ]
(Rates/Applications/Information)→[auオンラインマニュアル](au Online Manual)
If you think something is wrong with your phone, check for your symptoms
on the Pantech & Curitel website.
●From the A1406PT : (Approx. 1 sec or longer) (PANTECH STYLE)
●From a PC : http:// jp.pantech.com/index.html
Introduction
A1406PT Manuals
NOTE
Page 3
1
Cell phones emit weak radio waves when power is on even if you
are not talking to anyone.
Enjoy using your cell phone but remember to be considerate of
others around you.
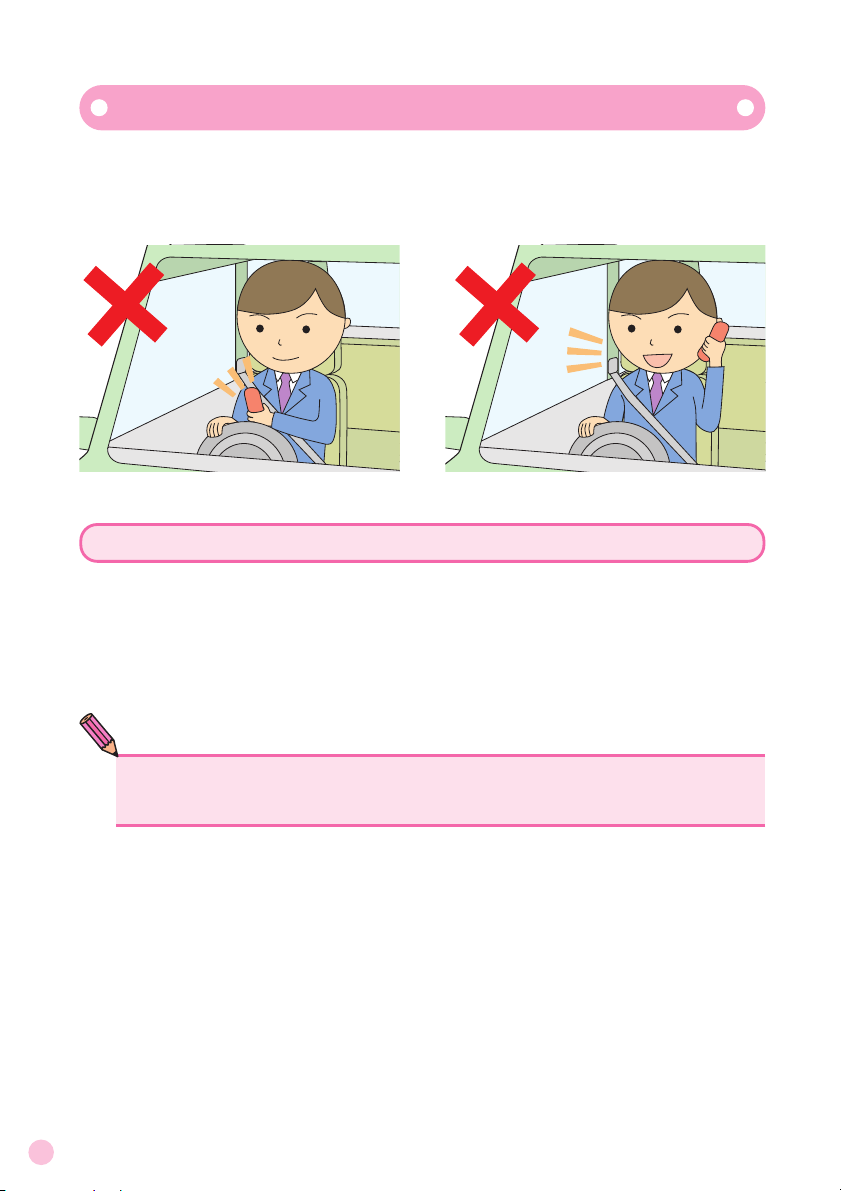
●Do not use your cell phone while driving. It
is both dangerous and against the law.
●It is against the law to use cell phones on
airplanes, so turn your phone off before
boarding.
●Someone close to you on a packed train or
other busy place may be using a pacemaker, therefore turn your phone off.
●Abide by the rules of hospitals and
other medical institutions where it is forbidden to use or carry cell phones.
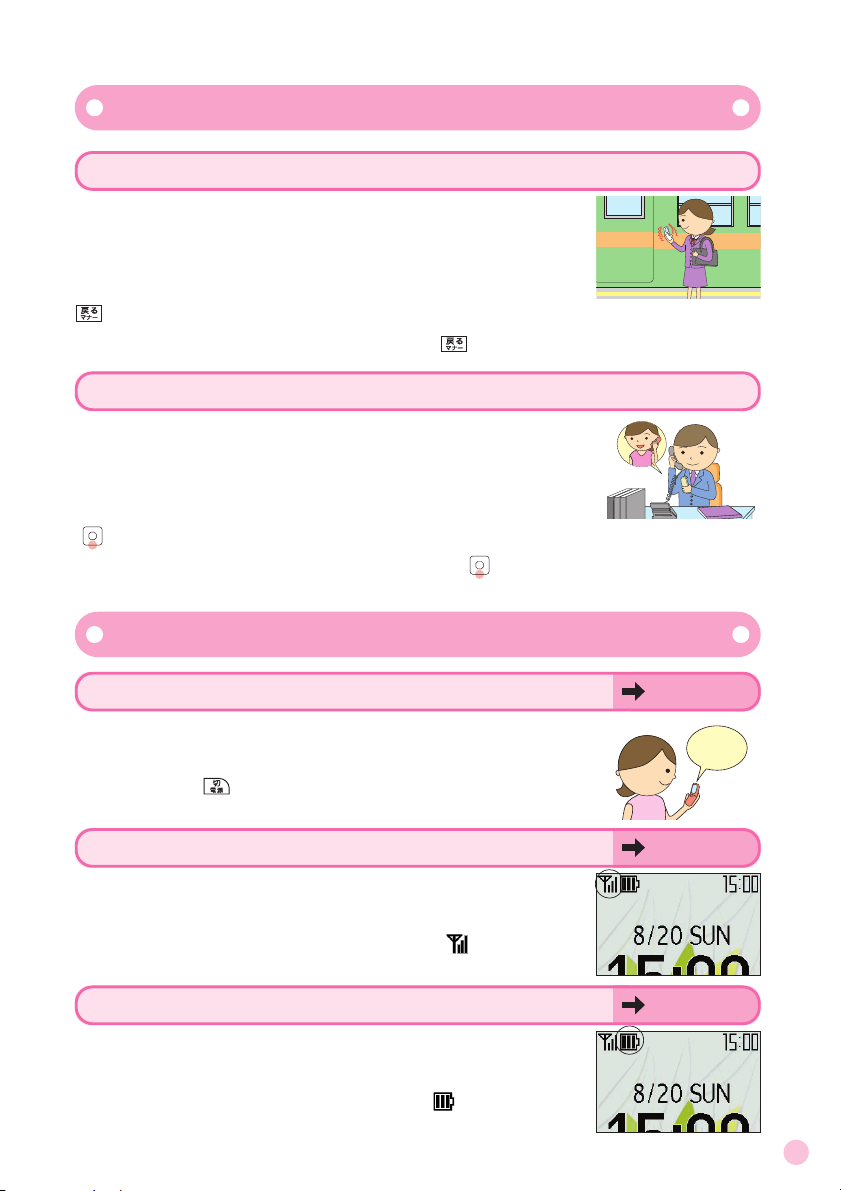
Cell Phone Etiquette
Good Manners when using your Cell Phone
Cell phones cannot be used in some places
Be considerate of where you use your cell phone and how loudly you talk
Radio waves from cell phones may interfere with medical equipment
●Refrain from making calls from cinemas,
theaters, museums, libraries and the like.
Also, either turn your phone off or activate
the manner mode in order not to disturb
others around you with ring tones of incoming calls and E-Mail.
●Do not obstruct the passage of others
by using your cell phone.
●On trains, in hotel lobbies and other crowded places, move to an area where
you will not inconvenience others.
●Be mindful not to talk excessively loud on your cell phone.
●
Ask people for their permission before taking their picture with the cell phone camera.
Page 4

2
How to Use the Smart Mode
The A1406PT is set to the smart mode when you purchase it. The
smart mode makes your phone easier to use by displaying only
often used telephone, E-Mail and camera functions in menus and
displaying larger text.
This manual explains operations in the smart mode.
NOTE
●How to Turn the Smart Mode Off
When the smart mode is off, the phone is in thenormal mode. To turn the smart
mode off, seeBefore setting the display language : Set the phone to the normal
mode(p. 22).
Smart Mode
Oh, it is so
easy,
I love it!
[Smart mode menu]
Page 5
3
How to Use the One Touch Keys
The A1406PT has three one touch keys: , and . Pressing them
automatically dials the telephone numbers registered to those keys.
One Touch Keys
How to Make Calls
How to Register Telephone Numbers in One Touch Keys
SeeRegistering Pair Numbers in One Touch Keys(p. 44).
Registered telephone numbers can be automatically dialed by pressing
and holding (approx. 1 sec or longer) the one touch keys.
Follow the procedure below to confirm the telephone number registered in
the one touch key and dial the telephone number.
① Press a one touch key.
② Confirm the telephone number.
③ Press
(Call).
Page 6
4
You can do this with your A1406PT
You can easily call
numbers registered
under the Pair function by pressing just
one key.
You can send E-Mail
to other cell phones
or PCs.
You can download
Chaku-Uta
R
, wallpaper and other fun
resources.
You can easily call
and send E-Mail to
registered numbers.
You can take still pictures and video,and
attach them to EMails.
You can sound a
loud buzzer if in danger.
Cell Phone Basics
Chaku-Uta…
One Touch keys
p. 44 p. 46 p. 58
Pair Function
E-Mail
Camera
EZweb
Safety Buzzer
p. 42 p. 54 p. 63
Page 7
5
Manner Mode
Manner Mode and Answering Memo
Answering Memo
Normally, leave the cell phone turned on
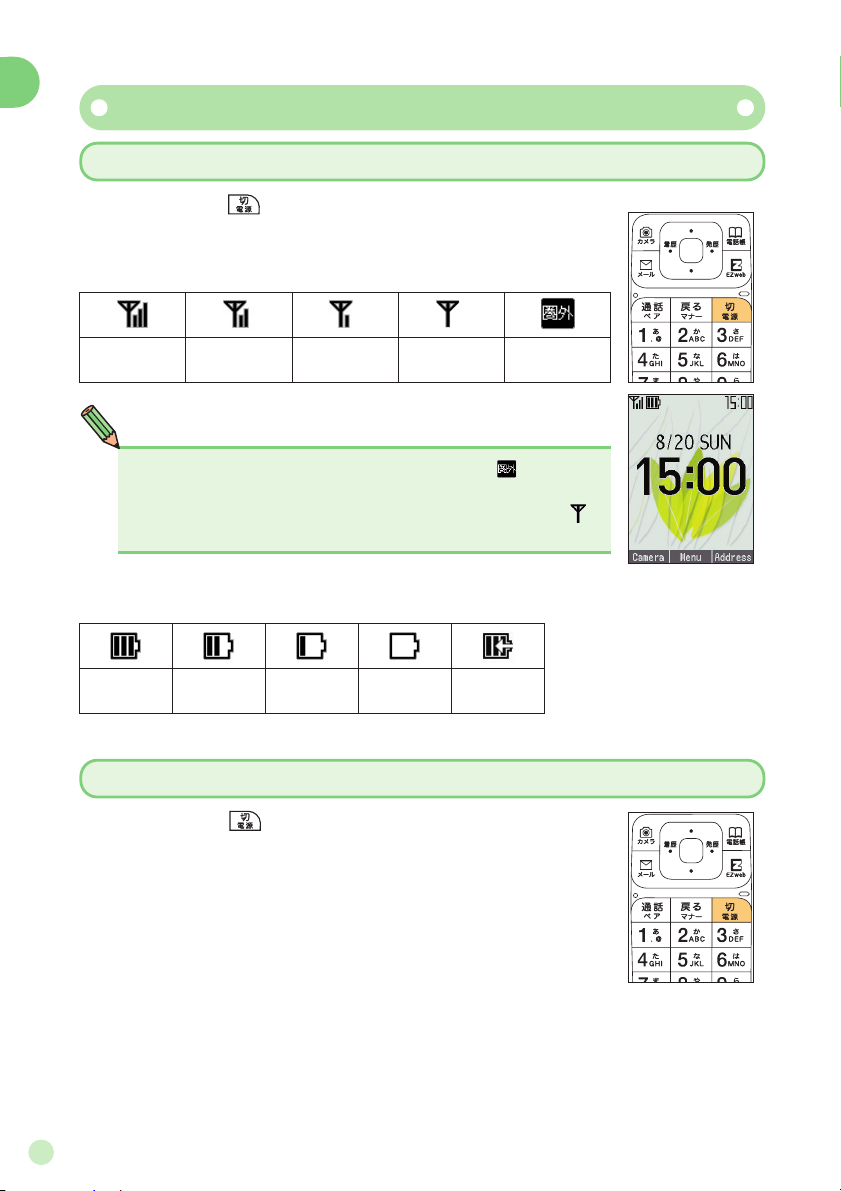
Check Power, Signal Strength and Battery Level!
You cannot talk on the phone if it cannot get a signal
Signals can be weak in some places even you are
within the service area.
Signal strength is indicated on the display as[].
Watch you battery level
The cell phone may not work properly if the battery
is low.
Battery level is indicated on the display as[].
p. 16
p. 16
p. 16
If you cannot answer your phone, the phone will
play a prepared message to advise the caller and
then record the caller's message.
With the standby screen on the display, press and hold
(approx. 1 sec or longer).
The power must be on in order to make and receive
calls.
Press and hold (approx. 1 sec or longer).
The manner mode silences ring tones of incoming
calls and other sounds so as not to disturb others
around you.
With the standby screen on the display, press and hold
(approx. 1 sec or longer).
To turn the manner mode off, press and hold (approx. 1 sec or longer) again.
To turn the answering memo off, press and hold (approx. 1 sec or longer)again.
Power is on!
Page 8
6
Do not use your cell phone while driving
Holding a cell phone, talking on a cell phone or looking at the cell phone display to send E-Mail or perform some other operation while driving is against
the law in Japan.
(Amended Traffic Control Law, effective November 1, 2004)
Turn your cell phone off or set it to the drive mode while driving
●Drive Mode
In the drive mode, the ring tone does not sound if a call or E-Mail comes
in. Calls are answered with a prepared message in Japanese, equivalent to
I am driving now and cannot answer the phone,that instructs the caller
to leave a voice memo.
Looking at E-Mail on the cell phone display
Holding the cell phone in your hand and talking
NOTE
●The drive mode cannot be turned on in the smart mode. To use the drive mode,
first set the normal mode and then turn on the drive mode.
Page 9
7
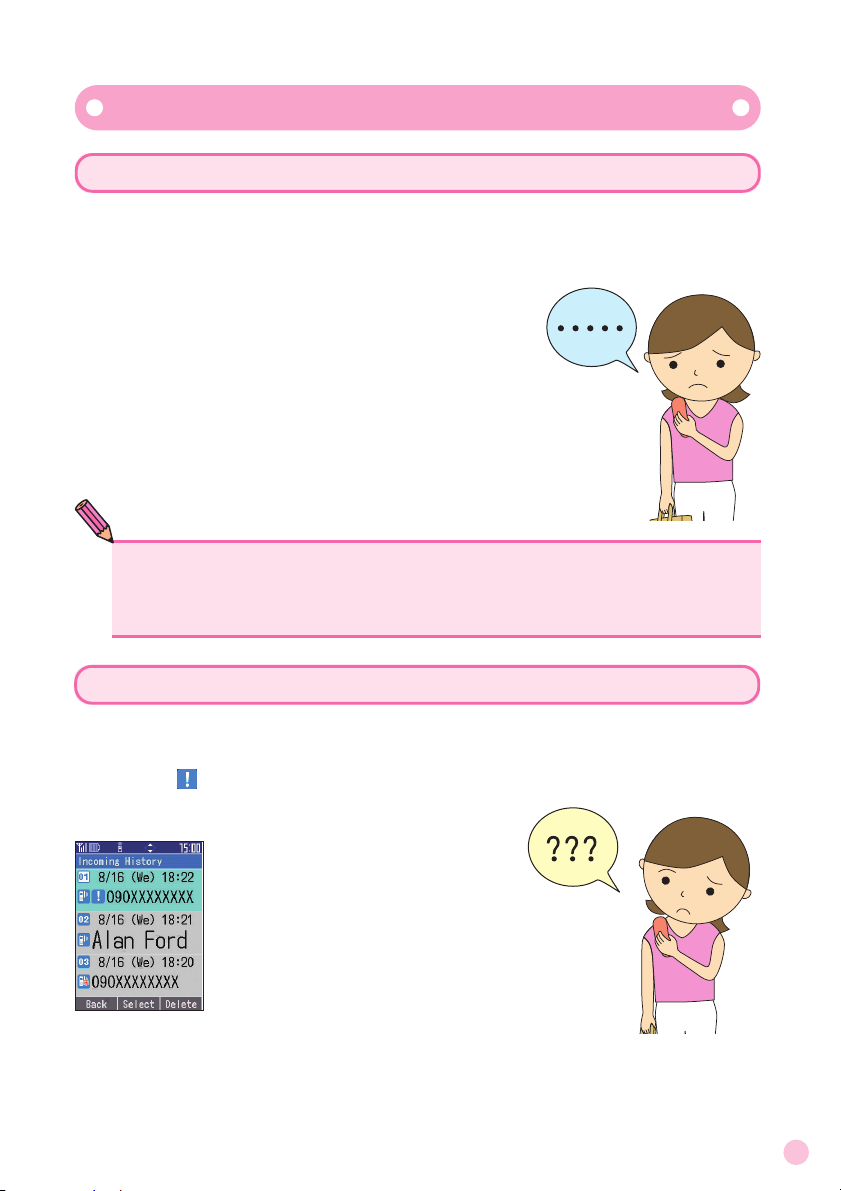
If you receive spam
The E-Mail filters accept E-Mail only from user-set sources and rejects
messages that containunsolicited advertisement ※,which often is
spam.
・Unsolicited mail filter
・Address filters
指定否定設定 To stop receiving messages
from unknown sources
指定受信設定 To receive only messages
from user-set sources
なりすまし規制To stop receiving messages
from pretenders
Spam and One-Ring Calls!
If you receive a call from an unknown number
Be careful because it may be an attempt to get you to call a service with
high rates. Incoming calls that last 3 sec or less (One-Ring call) are indicated with a [ ] in the Incoming history.
NOTE
●Mail filters are set in the normal mode.
●Changing your E-Mail address can prevent spam. To change your E-Mail address,
seeChanging Your E-Mail Address(p. 26).
Page 10
8
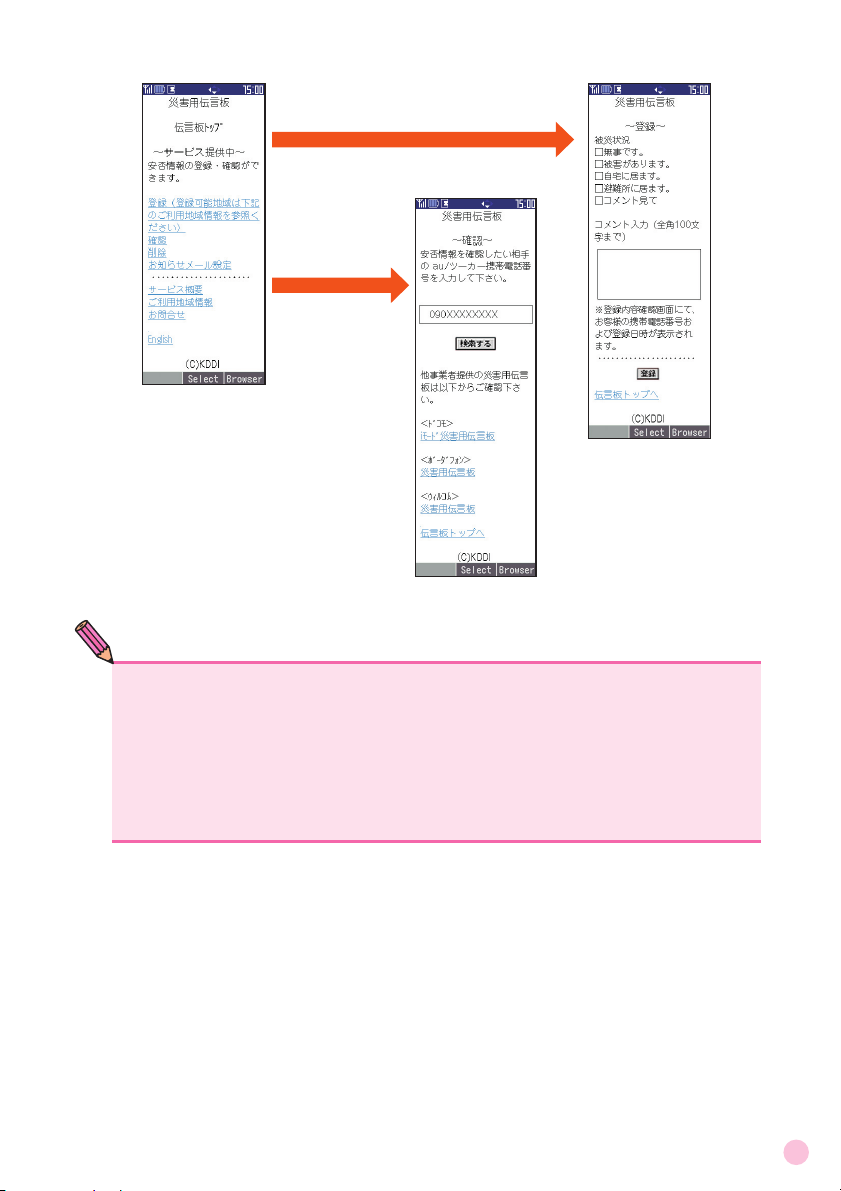
Disaster Message Board Service
In a disaster, you can leave a message explaining your status and location on
this message board. The information you post can be checked from anywhere in Japan via EZweb or the internet.
Posting Disaster Messages
In a disaster, you can call from your au phone and post a message
explaining your status and location on a[災害用伝信板 ](Disaster
Message Board). After posting your message, it is sent via E-Mail to family
members and friends that you register in advance.
Checking Disaster Messages
You can check disaster messages of other persons by entering their telephone numbers from EZweb or the internet.
*:To check disaster messages from a cell phone of another carrier
(excluding TU-KA), PHS or PC, access the below URL.
http://dengon.ezweb.ne.jp/
Accessing the Disaster Message Board
All All Trains Cancelledrains Cancelled
I 'm alright,
so don't worry.
How to access
→[Top Menu]→ [災害用伝言板](DisasterMessageBoard)
http://dengon.ezweb.ne.jp/
Page 11
9
Select [登録](Post)
Posting
Checking
Select [確認](Check)
<
Top page of Disaster Message Board
>
<
Screen for checking messages
>
<
Screen for registering messages
>
NOTE
●Posted messages are kept for a maximum of 72 hours.
●Up to 10 messages can be posted per telephone number. New messages after the
tenth overwrite existing messages in the order of the oldest message first.
●A demo can be viewed at any time by selecting[Top Menu]→[ 料 金・申込・イ
ンフォ](Rates/Applications/Information)→[災害用伝信板 (デモ版) ](Disaster
Message Demo) .
● Select[English]to view the disaster message board in English.
Page 12

10
Contents
●
Cell Phone Etiquette
…………………………………………… 1
●
Introduction
●
Smart Mode
……………………………………………………… 2
Contents
Good Manners when using your Cell Phone ………………… 1
How to Use the Smart Mode
……………………………………… 2
●
One Touch Keys
………………………………………………… 3
●
Cell Phone Basics
……………………………………………… 4
How to Use the One Touch keys ………………………………… 3
●
Character Entry
……………………………………………… 31
How to Switch Character Entry Mode ………………………… 31
Making Calls
…………………………………………………………… 28
Answering Calls
……………………………………………………… 29
Returning Calls
(Incoming history/Outgoing history)
…………………………… 30
●
Making and Answering Calls
…………………………… 28
Checking Package Contents ……………………………………… 12
Names of Parts
………………………………………………………… 13
Charging Your Cell Phone
………………………………………… 14
Turning the Power On/Off
………………………………………… 16
Key Assignments
……………………………………………………… 17
Reading the Display
………………………………………………… 18
Basic Operation
………………………………………………………… 19
Security Code and Passwords
…………………………………… 21
Switching the Display Language to English
………………… 22
Activating E-Mail and EZweb
…………………………………… 24
Checking Your Telephone Number
and E-Mail Address
…………………………………………………… 25
Changing Your E-Mail Address
………………………………… 26
●
Contents
………………………………………………………… 10
●
Getting Ready
………………………………………………… 12
You can do this with your A1406PT ……………………………… 4
Manner Mode and Answering Memo
…………………………… 5
Check Power, Signal Strength and Battery Level!
………… 5
Do not use your cell phone while driving
……………………… 6
Spam and One-Ring Calls!
………………………………………… 7
Disaster Message Board Service
………………………………… 8
Page 13

Sounding the Safety Buzzer ……………………………………… 63
Remote Auto Lock
…………………………………………………… 64
Infrared Communications
………………………………………… 65
11
Contents
Character-Key Assignment ……………………………………… 32
How to Enter Characters
…………………………………………… 33
Entering Characters
………………………………………………… 34
●
If Trouble Occurs
……………………………………………… 66
●
Index
……………………………………………………………… 67
●
Other Features
………………………………………………… 63
●
EZweb
…………………………………………………………… 58
Accessing the EZweb Top Menu ………………………………… 59
Accessing Information Sites
……………………………………… 60
Downloading Chaku-Uta
®
………………………………………… 61
●
Camera
…………………………………………………………… 54
What You Can Do with This Camera …………………………… 54
How to Take Pictures and Movies
……………………………… 55
Taking Still Pictures
………………………………………………… 56
Attaching Photos or Movies to E-Mail …………………… 57
●
Mail
………………………………………………………………… 46
E-Mail ……………………………………………………………………… 46
Composing and Sending E-Mail
………………………………… 47
Viewing E-Mail in the Inbox
……………………………………… 49
C-Mail
……………………………………………………………………… 51
Composing and Sending C-Mail …………………………… 52
●
Pair Function/One Touch Keys
………………………… 42
Registering Pair Numbers ………………………………………… 42
Calling Pair Numbers
………………………………………………… 43
Sending E-Mail to Pair Numbers
………………………………… 43
Registering Pair Numbers in One Touch Keys
…………… 44
Calling from One Touch Keys
…………………………………… 45
Checking and Calling Pair Numbers
from One Touch Keys
……………………………………………… 45
●
Address Book
………………………………………………… 36
Saving Address Book Entries …………………………………… 36
Making Calls from the Address Book
………………………… 40
Page 14
12
Getting Ready
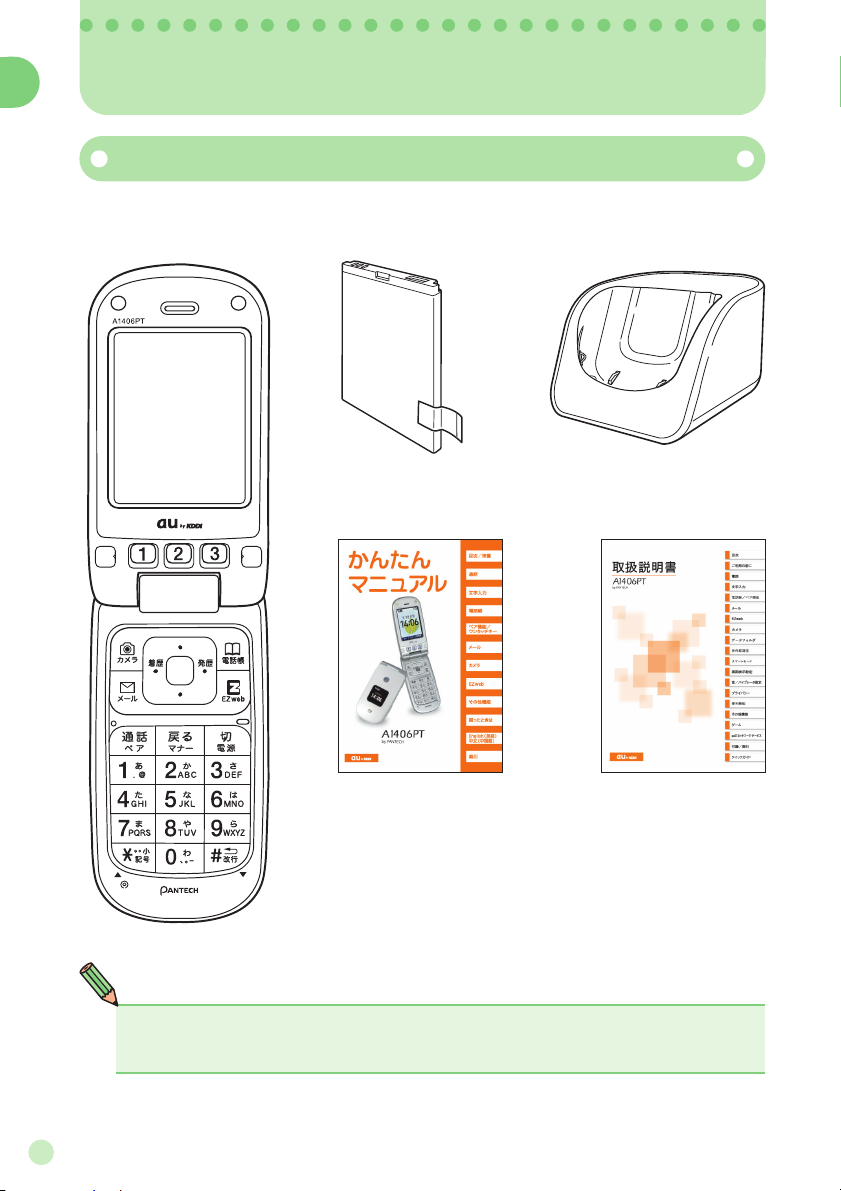
Checking Package Contents
Getting Ready
●A1406PT cell phone ●Battery
●Warranty
●Safety Precautions
●Desktop holder
●Instruction Manual
(Japanese)
NOTE
●The cell phone package does not include an AC adapter.
Purchase a separately sold AC Adapter 01.
●Basic Manual
(Japanese)
Page 15
13
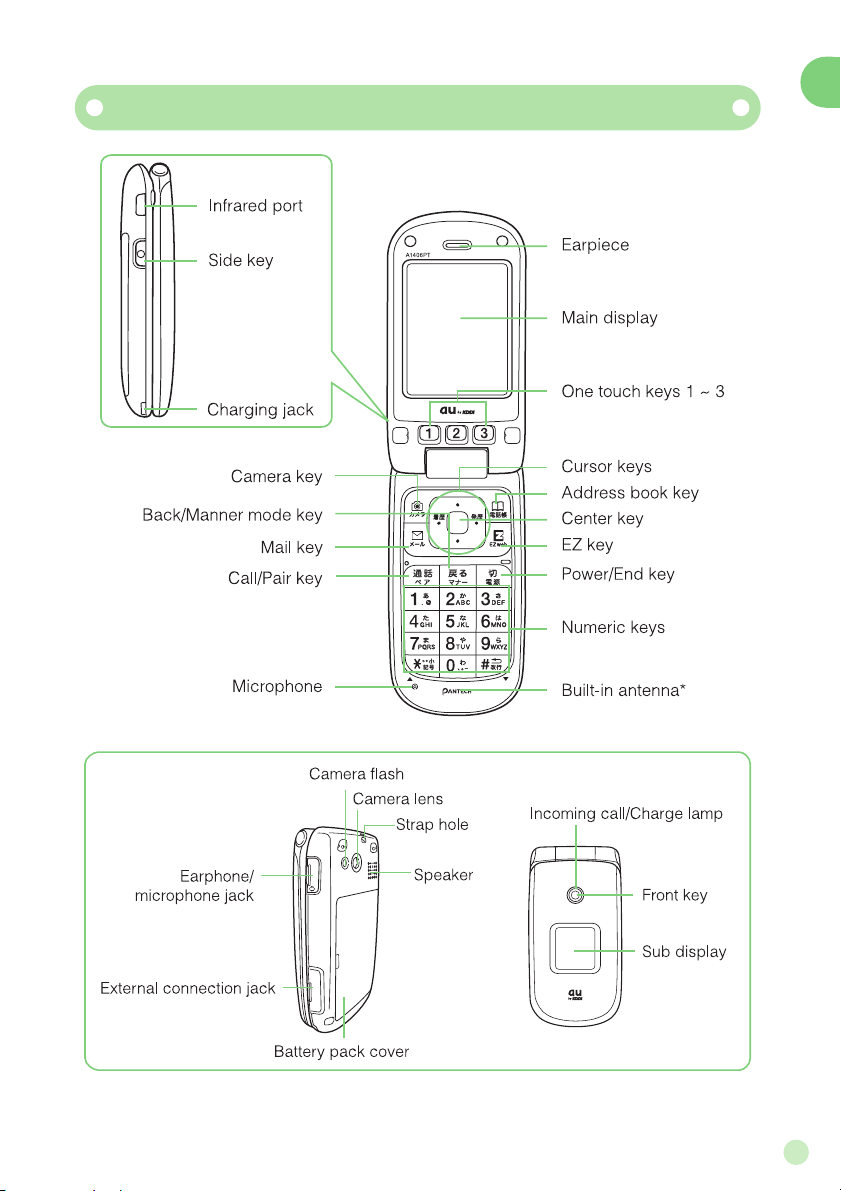
Getting Ready
メモ/ライト
Names of Parts
* Do not cover the antenna area with your hands while calling or using EZweb.
Page 16
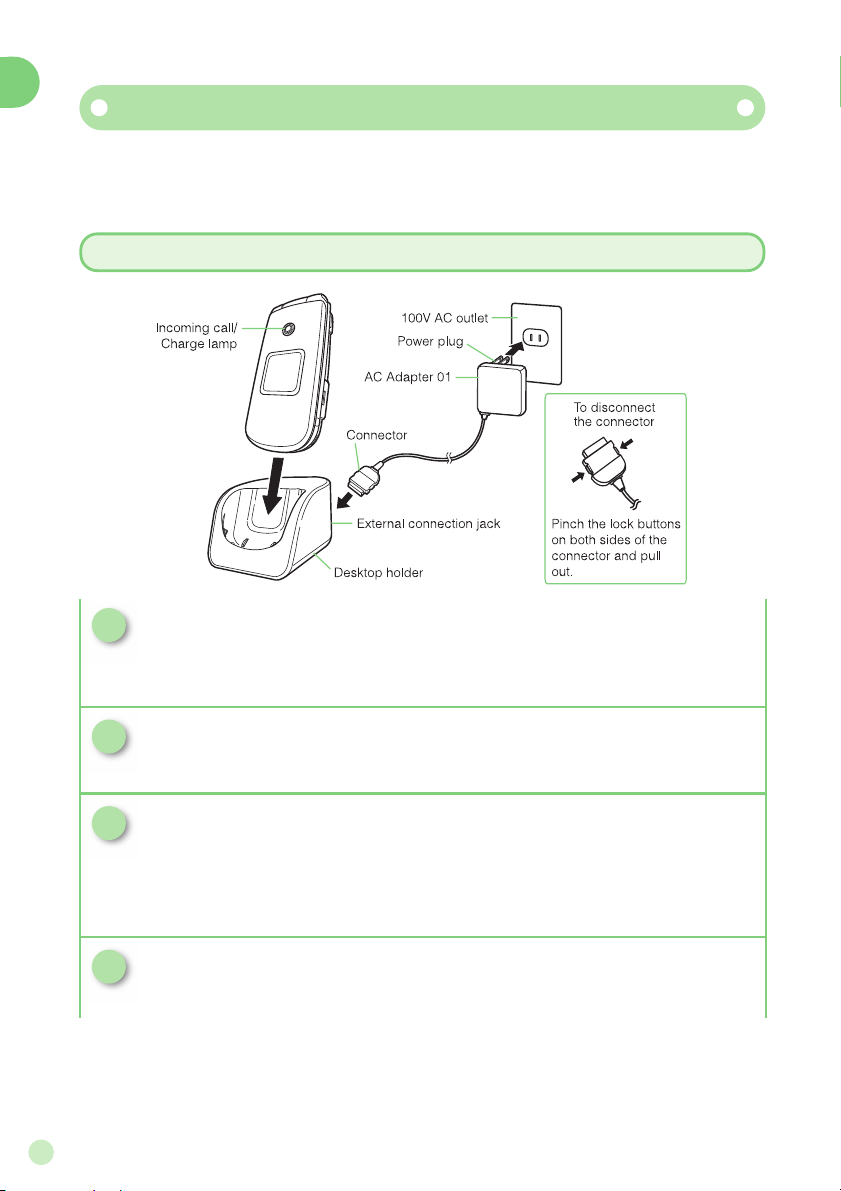
14
Getting Ready
Charging Your Cell Phone
The battery is not fully charged when you purchase the cell phone.
Therefore, charge it before using it for the first time and whenever
the battery gets low.
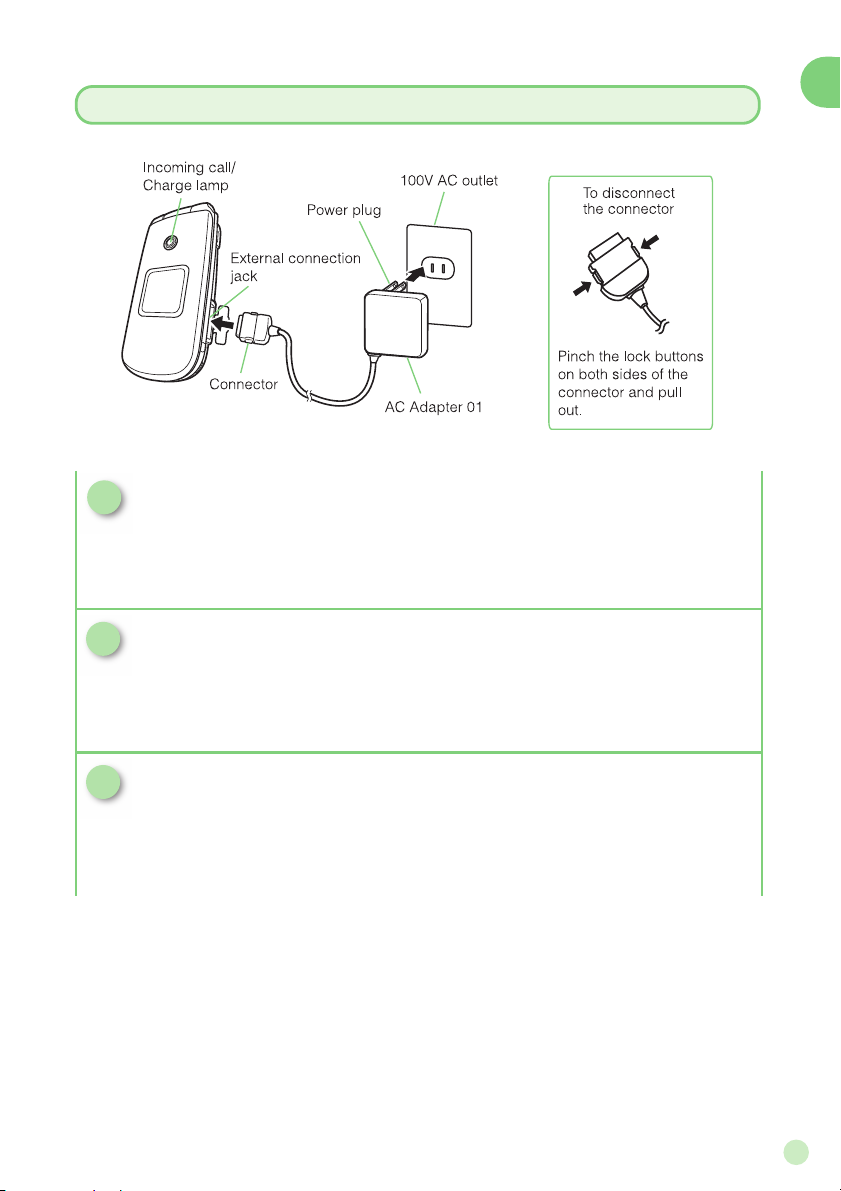
Charging in the Desktop Holder
1
Connect the AC Adapter 01 to the desktop holder.
Check the configuration of the connector from the adapter before
inserting it into the desktop holder.
Check that the incoming call/charge lamp on the A1406PT lights up.
It goes out when charging ends.
2
Plug the plug from the AC Adapter 01 into a
100V AC outlet.
3
Set the A1406PT in closed posture with the
battery mounted into the desktop holder.
4
Once charged, remove the A1406PT from the desktop
holder and unplug the AC Adapter 01 from the outlet.
* Caution
・The AC Adapter 01 (sold separately) is required to charge the A1406PT.
The adapter in the illustrations may differ from some actual adapters.
・Keep the connector of the AC Adapter 01 (sold separately) in a horizontal posture when
inserting into and removing from the jack on the desktop holder.
Page 17
15
Getting Ready
Charging Directly via the AC Adapter 01
1
Insert the connector of the AC Adapter 01 into
the external connection jack of the A1406PT.
Check the configuration of the connector from the adapter before
inserting it into the cell phone.
2
Insert
the plug from the AC Adapter 01 into a
100V AC outlet.
3
Once charged, unplug the AC Adapter 01 from
the outlet and disconnect the connector of the
AC Adapter 01 from the A1406PT.
Check that the incoming call/charge lamp on the A1406PT lights up.
It goes out when charging ends.
Page 18
16
Getting Ready
Turning the Power On/Off
Turning the Power On
Press and hold (approx. 1 sec or longer).
Turning the Power Off
Press and hold (approx. 2 sec or longer).
Signal strength
Strong Medium Weak Very weak
Out of range
Battery level
Full Low
Charging
required
Empty Charging
NOTE
●You cannot talk on the cell phone when []appears
on the display.
●You may not be able to talk on the cell phone when []
appears on the display.
Page 19
17
Getting Ready
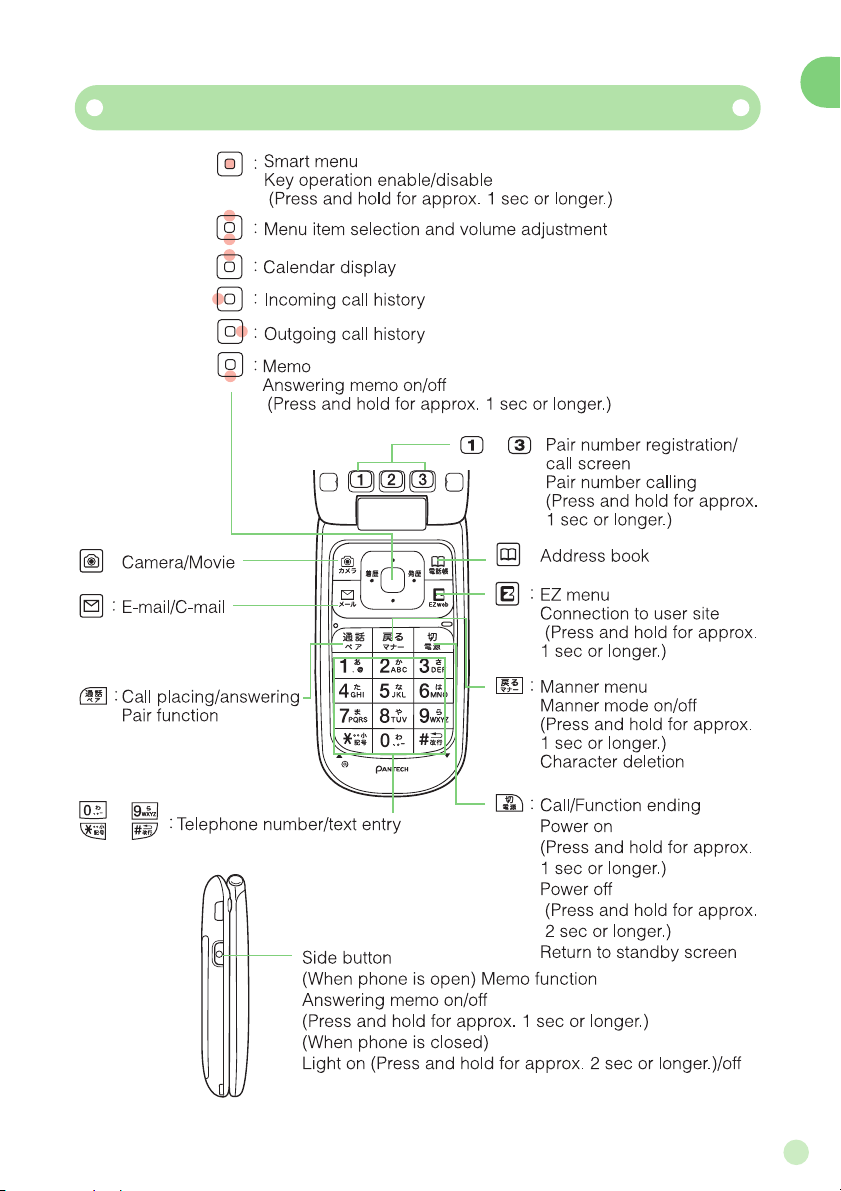
Key Assignments
〜
:
:
〜
、
:
メモ/ライト
Page 20
18
Getting Ready
Reading the Display
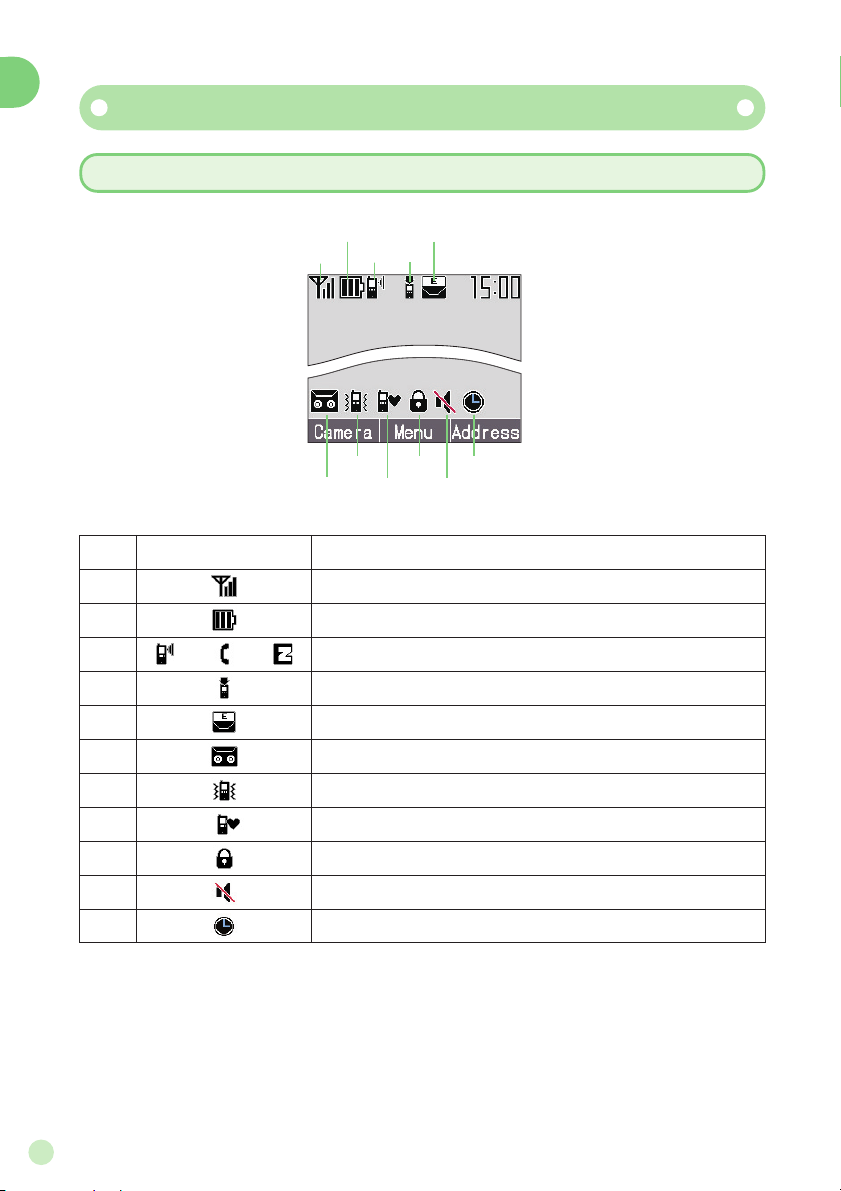
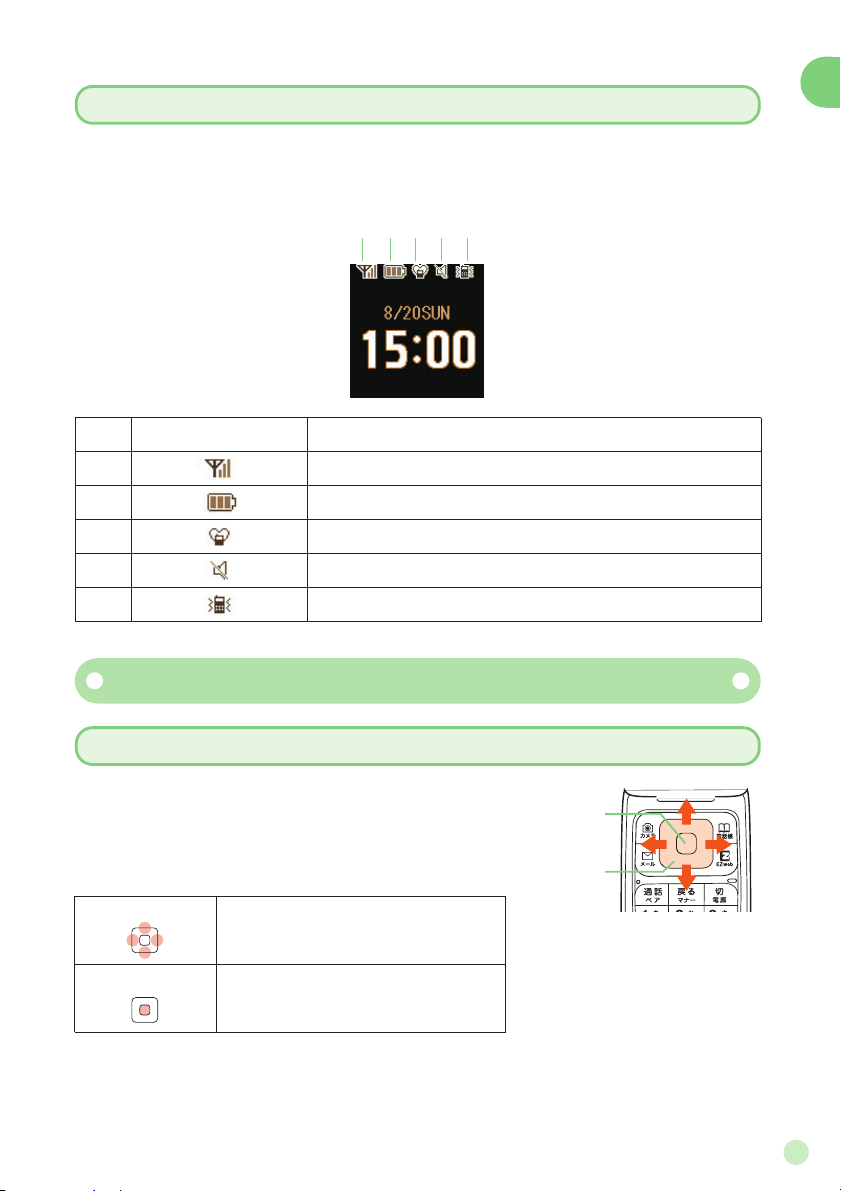
Icons Appearing on the Main Display
①
⑦ ⑨
⑪
⑥
⑧ ⑩
③
⑤
②
④
Meaning
Signal strength
Remaining battery power (Reference only)
Call coming in/Placing call or talking/EZweb starting up
Unanswered call
Unread E-Mail
Answering memo on
Vibrator on
Manner mode on
Key operation is disabled
Incoming ring tone off
Alarm on
Icon
①
②
③
④
⑤
⑦
⑧
⑨
⑩
⑪
⑥
//
Page 21
19
Getting Ready
Icons Appearing on the Sub Display
The sub display displays incoming call information, date, time and icons.
Pressing the front key switches the displayed information.
①②③④⑤
Meaning
Signal strength
Remaining battery power (Reference only)
Manner mode on
Incoming ring tone off
Vibrator on
Icon
①
②
③
④
⑤
Basic Operation
How to Use the Cursor and Center Keys
Cursor keys are used to select items on
menus and to move the cursor through text
input screens.
Cursor keys
Center key
Menu items selection
Scrolling through E-Mails, etc.
Selecting, entering and executing
items
Center key
Cursor keys
Page 22
20
Getting Ready
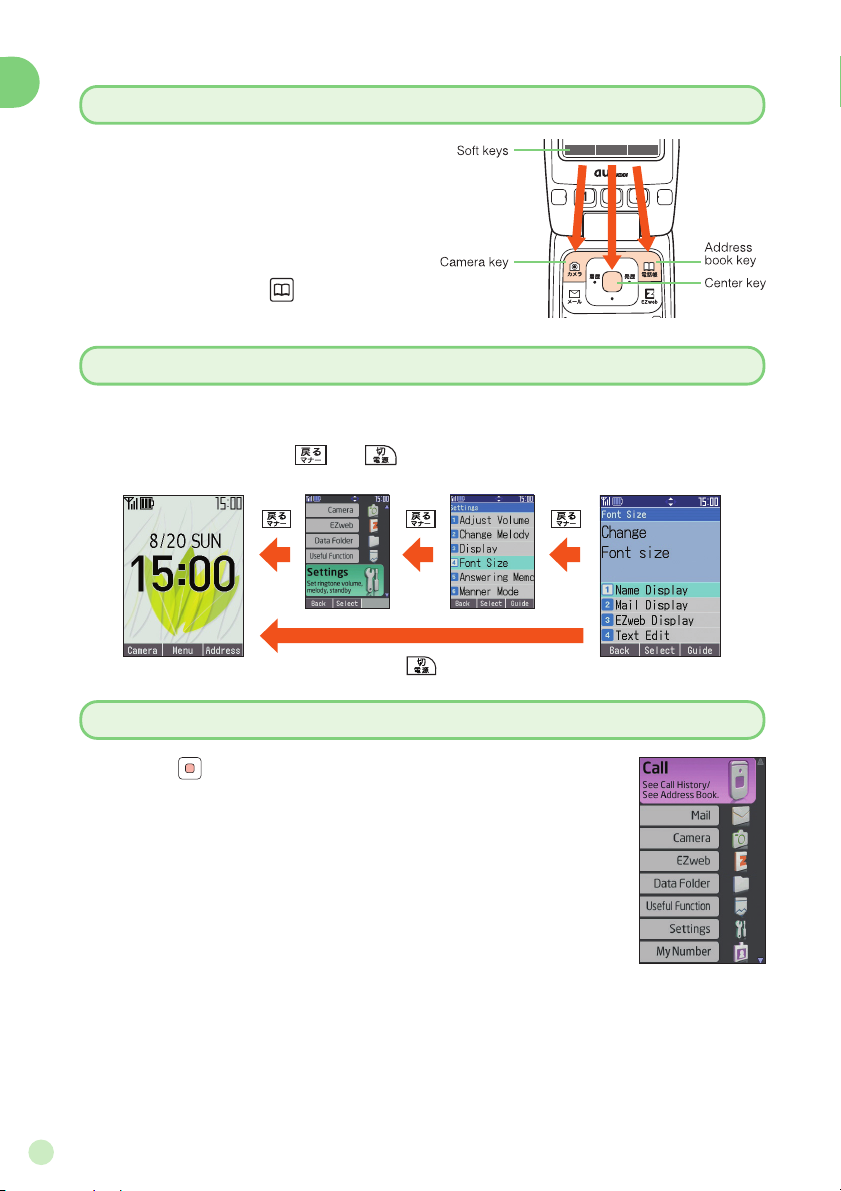
How to Use Soft Keys
The functions appearing along the bottom of screens are calledsoft keys.
They are operated by pressing the cell
phone keys corresponding to the displayed positions of the soft keys.
For example, press to display the
address book.
To Return to the Standby or Previous Screen
If you operate the phone in the wrong way and want to return to the previous screen or if you want to stop the current operation and return to the
standby screen, press or .
Camera
Menu
Address
Smart Mode Menu
Pressing (Menu) with the standby screen on the
display opens the smart mode menu. The following
functions can be accessed from the smart mode menu.
Page 23

21
Getting Ready
How to Use the Smart Mode Menu
Standbymenu Smartmodemenu Itemselection
or
or
1
To remotely access answering or forwarding service from ordinary phones
2
To make inquiries, apply for or make changes using the automated
guidance of the au Customer Service Center, au website or EZweb
3
To change settings under Other Settings in E-Mail Setup
4-digit number you entered on your service application
Example use
Initial setting
Security Code
Subscribing to or canceling EZweb paid services
4-digit number you set when subscribing to paid services the first time
Example use
Initial setting
EZ password
1
Subscribing to or canceling EZweb paid services using
「まとめてau支払い」
(Combined au Payment Service)
2
Purchasing products on the EZweb site using
「まとめてau支払い」
(Combined au Payment Service)
4 to 8-digit number you set the first time you use「まとめてau支払い」(Combined au Payment Service)
Example use
Initial setting
Premium EZ password
1
Silencing the safety buzzer
1234
Example use
Initial setting
Lock No.
You can use the security code and passwords described below to restrict
use of your A1406PT.
Take care not to forget the security code and passwords, because they are
required for performing various operations and using subscription services.
Security Code and Passwords
NOTE
●
Passwords for new subscribers and new EZweb options as of September 2006 are
the 4-digit number set by the user on his/her application.
Page 24

4
3
2
1
22
Getting Ready
Switching the Display Language to English
The display language can be switched so that menus and other
indications appear in English.
Before setting the display language : Set the phone to the normal mode
The display language is selected from the normal mode.
Therefore, the first thing to do is to turn the smart mode off and set the
normal mode as follows.
1
When the normal mode
standby screen is displayed,
press (
メニュー
).
2
Select [
設定
] (Settings)
with and press
(
選択
).
1
With the standby screen on the display, press
(
メニュー
).
2
Select [
設定
] (Settings) with and press
(
選択
).
3
Select [
スマートモード解除
] (Release smart mode)
with the and press (
選択
).
4
Select [
解除する
] (Release) with and press
(
選択).
A confirmation message appears on the display followed by the normal mode menu.
Page 25

3
2
1
23
Getting Ready
Returning to the Smart Mode
1
With the standby screen on the display, press
(Menu).
2
Select [Smart Mode]with and press
(Select).
3
Select [Yes]with and press (Select).
A warning on changing the setting appears on the display,
therefore press (OK) or wait a moment.
A confirmation message appears on the display followed by the smart
mode menu.
3
Select [
画面表示
] (Display)
with and press
(
選択
).
4
Select [Set Language]
with and press
(
選択
).
5
Select [English] with
and press (
確定
).
The menus and soft key indications
will appear in English.
Page 26

24
Getting Ready
Activating E-Mail and EZweb
It is necessary to apply for the service to use E-Mail and EZweb. If
you did not apply at the time of purchase, direct your inquiries to
an au store or an au Customer Service Center. Also, activate the
service before attempting to use it the first time. Your E-Mail
address is automatically set when you activate the service.
1
With the standby screen
on the display, press .
2
Press (OK).
3
Press (OK).
The A1406PT connects to the server
to activate the service. Wait a moment.
NOTE
●You may change your E-Mail address to a preferred address.
To do so, seeChanging Your E-Mail Address(p. 26).
●The service can be activated also by pressing with the standby screen on the
display.
Page 27

25
Getting Ready
Checking Your Telephone Number and E-Mail Address
1
With the standby screen
on the display,
press (Menu).
2
Select [My Number] and
press (Select).
Your phone number and E-Mail
address appear on the display.
Page 28

26
Getting Ready
Changing Your E-Mail Address
1
With the standby screen
on the display, press
(Menu).
2
Select [Mail] and press
(Select).
3
Select [E-Mail] and press
(Select).
4
Select [Addr Change]
and press (Select).
5
Select [Eメールアドレスの
変更
] (Change E-Mail
address) and press
(Select).
With the connection confirmation
screen on the display, select
[Connect] and press (Select).
You can change the user name (
△△△
) in your E-Mail address
(
△△△
@ezweb.ne.jp).
Page 29

27
Getting Ready
6
Input your Security Code,
press (OK),
select [
送信
] (Send) and
press (Select).
Your Security Code is the 4-digit number
you entered on your service application.
7
Select [
承諾する
] (Accept)
and press (Select).
8
Select the input area, press (Edit), enter the
new E-Mail address and press (OK).
9
Select [
送信
] (Send) and
press (Select).
10
Select [OK]and press (Select).
1. Enter only 1-byte alphanumeric characters left of the @ mark.
2. User names can be up to 30 characters long.
3.
The only acceptable symbols are-(hyphen),.(dot) and_(underbar).
4. User names cannot begin with a.(dot) or0.
NOTE
●
If you enter an E-Mail address that is already used by someone else, an error
message appears on the display. Set another E-Mail address in such a case. E-Mail
addresses are more readily accepted if you take the following into consideration.
・ Use a-(hyphen),.(dot) and_(underbar) between characters.
・ Mix alphabet with numbers.
・ Make user names as long as possible (max. 30 characters).
● Once you change your E-Mail address, you cannot go back to the old address.
● E-Mail l may not be received for a short period of time immediately after changing
your E-Mail address.
Page 30

28
Making and Answering Calls
1
With the standby screen
on the display, enter the
other party's telephone
number using ~ .
The area code is needed for calling
ordinary numbers.
Pressing (Call) gives you the choice
of sending your telephone number to
the other party as a caller ID (add 186)
or blocking your caller ID (add 184).
Making Calls
Making and Answering Calls
2
Press .
3
When finished with the
call, press .
Page 31

29
Making and Answering Calls
2
Press to answer the
call.
3
When finished with the
call, press .
1
A call comes in.
NOTE
●When calls go unanswered,[Missed Call △]appears on the
standby screen. You can check the incoming call history for
the originating telephone number by pressing (Check).
To call that person back, seeReturning Calls (Incoming
history/Outgoing history)(p. 30).
Answering Calls
If the caller is registered in your address book by
name and telephone number, his/her name appears
on the display.
If there is no caller ID from the caller, the following
information is displayed.
ID unsent :
Reject Not Support
:
Payphone :
The caller did not send his/her telephone number.
The call is coming from an area or
telephone that cannot send a caller ID.
The call is coming from a public
telephone.
Page 32

30
Making and Answering Calls
1
With the standby screen
on the display, press
(Menu).
Returning Calls(Incoming history/Outgoing history)
2
Select [Call] and press
[Select].
3
Select [Outgo History] or
[Incom History], and
press (Select).
4
Select a telephone number to call using , and
press .
NOTE
●The outgoing and incoming histories each hold 20 numbers. New calls after the
twentieth overwrite existing calls in the order of the oldest call first.
Page 33

31
Character Entry
1
2
Select a character entry mode using ,
and press (OK).
How to Switch Character Entry Mode
Character Entry
NOTE
● Pressing on a character entry screen enables entry of pictograms,
1-byte symbols and 2-byte symbols.
● Some character entry modes cannot be selected with some functions.
Entries are made in the address book and E-Mail is composed
using ~ , and . This manual refers to the screens
where text and numbers are entered as “character entry screens”.
Kanji
2-byte Katakana
2-byte Roman
alphabet
2-byte Numerals
2-byte Symbols
Pictogram
1-byte Katakana
1-byte Roman
alphabet
1-byte Numerals
1-byte Symbols
With the character entry
screen on the display,
press .
Page 34

32
Character Entry
Line break entry
Pictogram/Symbol screen switching
Capital/Small case letter switching
Character-Key Assignment
Multiple characters are assigned to a single key. Repeatedly pressing the same key displays the assigned characters in turn.
● 1-byte alphabet
※To switch between capital and small case letters, enter the letter and then press .
Key
Number of times to press the key
123456789
.
a b c ABC2
de fDEF3
gh i GH I 4
j k l JKL5
mnoMNO6
pq r sPQRS7
tuvTUV8
wx y zWXYZ9
0 , . ! ? space
@- / :
〜
1
Displays candidate characters in reverse order (back) during character entry
-
Page 35

33
Character Entry
Basic Character Entry
The characters displayed on each key top can be entered.
For
In a 2-byte or 1-byte alphanumeric entry mode
Example : When is pressed 1 time → 2 times → 3 times → 4 times →
5 times → 6 times → 7 times ...
a → b → c → A → B → C → 2 ...
How to Enter Characters
If you pass the targeted character (Back)
Pressing during character entry returns the cursor to the previously
entered character.
Example : If you wanted to entercbut enterAby mistake, press
to return the entry toc.
To enter the letters assigned to the same key
Press to move the cursor to the right and enter the character.
Example : To enterab, press →→(2 times).
To switch between capital and small case letters
Enter the letter, then press .
Example : To enterA, press → .
To delete characters
Move the cursor to the targeted character using , and press .
Pressing and holding (approx.1sec or longer), all characters at and
right of the cursor are deleted.
Placing the cursor at the end of the text then pressing and holding
(approx.1sec or longer) deletes all of the text.
To enter a line break
Enter the characters and press (if during character entry).
Press or (if not during character entry).
* Line breaks are not available for C-Mail.
Page 36

34
Character Entry
Entering Characters
1
Display the recipient entry screen as explained
in steps 1 ~ 4 of “Composing and Sending
E-Mail” (p. 47).
2
Select [Manual Input] and
press (Select).
Entering E-Mail Addresses
Example : To enter alan-f00@ezweb.ne.jp
3
Press (once),
(3 times, (once),
(2 times), (4 times),
(3 times), (once),
and (once).
Then, input “@ezweb.ne.jp”.
Page 37

35
Character Entry
Characters Available for E-Mail Addresses
The following characters can be used for E-Mail addresses.
Key
Times to press
123456789
.@-/ : ˜ 1
ab c ABC 2
defDEF3
gh i GH I 4
jklJKL5
mnoMNO6
pqr sPQRS7
tuvTUV8
wx y zWXYZ9
0,. - ˜ !?
Note : The characters in the shaded boxes cannot be used when changing your own
address.
Page 38

36
Address Book
1
With the standby screen
on the display, press
(Menu).
2
Select [Call] and press
(Select).
3
Select [Addressbook] and
press (Select).
4
Press (New).
Saving Address Book Entries
Address Book
The address book can hold up to 700 entries between oftencalled telephone numbers and E-Mail addresses.
Page 39

37
Address Book
5
Select [Input] and press
(Select).
6
Enter the name and press
(OK).
8
Correct yomi (reading)
and press (OK).
The yomi (reading) is automatically
saved when the name is input.
Example:Alan Ford
9
Select [Direct input] and
press (Select).
7
Select [Edit] and press
(Select).
Page 40

38
Address Book
Example: 090XXXXXXXX
If saving an ordinary telephone number,
enter the area code.
Example:alan-f△△ @ezweb.ne.jp
10
Enter the telephone number and press (Save).
11
Select [Do not input] and
press (Select).
12
Select [Direct input] and
press (Select).
13
Enter the E-Mail address
and press (OK).
14
Select [Do not input] and
press (Select).
Page 41

39
Address Book
NOTE
15
Select [No Image] and
press (Select).
16
Press (Save).
●For instructions on character entry, seeHow to Enter Characters(p. 33).
●Each address book entry may have 3 telephone numbers and 3 E-Mail addresses.
●Address book entries are numbered from 000 to 699. New information is saved
in the lowest available number.
●To save telephone numbers from the incoming history or outgoing history
Select history in step 3 ofReturning Calls (Incoming history/Outgoing history)
(p. 30), press (Select) and press (Reg.) on the small screen that appears.
Page 42

40
Address Book
1
With the standby screen
on the display, press
(Menu).
2
Select [Call] and press
(Select).
3
Select [Addressbook] and
press (Select).
Making Calls from the Address Book
4
Select a party to call and
press .
Page 43

41
Address Book
6
When finished with the
call, press .
Call method
Call:According to the call method
setting, sets whether to send
your telephone number or not.
184+Call:
Blocks your telephone
number from being seen by
the call recipient.
186+Call:
Sends your telephone
number to the call recipient.
5
Select a call method and
press (Select).
Page 44

Up to three numbers in your address book can be registered for
speed dialing or speed mailing. Simply pressing the one touch
keys calls those numbers.
42
Pair Function/One Touch Keys
1
With the standby
screen on the display,
press .
2
Press (Add).
3
Select a number for the pair,
and press (Reg.).
Registering Pair Numbers
Pair Function/One Touch Keys
NOTE
●Numbers must be saved in the address book in order to be registered as a pair.
●To cancel a pair number, do as follows.
With the standby screen on the display, press , select the number to cancel,
press (Release), and select [Yes].
●If a pair number is deleted from the address book, it is also deleted from the pair
function.
●Pair numbers 1 ~ 3 correspond to one touch keys ~ , respectively.
If multiple telephone numbers and
E-Mail addresses are saved for the
selected number, a screen for selecting
which to use as the pair appears.
Example : Pair 1
Page 45

43
Pair Function/One Touch Keys
1
With the standby
screen on the display,
press .
2
Select a number using ,
select [Call] using and
press (Select).
Calling Pair Numbers
1
With the standby
screen on the display,
press .
For E-Mail
For the rest of the procedure, see
step 5 and beyond of “Composing
and Sending E-Mail” (p. 47).
For C-Mail
For the rest of the procedure, see
step 5 and beyond of “Composing
and Sending C-Mail” (p. 52).
2
Select a number using ,
select [E-Mail] or [C-Mail] using
and press (Select).
Sending E-Mail to Pair Numbers
Example : Pair 1
Example : Pair 1
Page 46

44
Pair Function/One Touch Keys
1
Press a one touch key
( ~ ).
2
Select [Add] and press
(Select).
Registering Pair Numbers in One Touch Keys
In addition to “Registering Pair Numbers” (p. 42), pair numbers can
be registered by pressing the one touch keys.
3
Select a number for the pair,
and press (Reg.).
NOTE
●Numbers must be saved in the address book in order to be registered as a pair.
●Pair numbers cannot be canceled from the one touch keys.
To cancel a pair number, do so from .
Page 47

45
Pair Function/One Touch Keys
For example, to call the number registered as pair 1, pressing and holding (approx. 1 sec or longer) one
touch key calls that number.
Calling from One Touch Keys
1
Press and hold
(approx. 1 sec or longer)
the one touch key of the
pair number.
1
With the standby
screen on the display,
press the one touch
key of the pair number.
2
Check the recipient and
telephone number,
and press (Call).
Checking and Calling Pair Numbers from One Touch Keys
For example, to call the number
registered as pair 1, press .
Page 48

46
Mail
NOTE
You must subscribe to EZweb to use E-Mail with your phone. If you
did not apply for the service when you purchased your phone, contact an au store or an au Customer Service Center.
Before attempting to use the E-Mail feature, activate the service as
explained inActivating E-Mail and EZweb(p. 24).
E-Mail can be exchanged with cell phones and PCs that support EMailing. You can send and receive a maximum of 5,000 2-byte
characters (10,000 1-byte characters) at a time, as well as send
photos and movies.
●You can send a maximum of 1,000 E-Mails per day.
●E-Mail with attachments may require time to send and receive.
●E-Mails may require time to send and receive in some areas because of signal con-
ditions.
Page 49

47
Mail
1
With the standby
screen on the display,
press (Menu).
2
Select [Mail] and press
(Select).
Composing and Sending E-Mail
3
Select [E-Mail] and press
(Select).
4
Select [Create New] and
press (Select).
5
Select [AddressBook] and
press (Select).
Destination E-Mail addresses can be
selected from the outgoing/incoming
histories or directly entered.
Page 50

48
Mail
6
Select a destination EMail address and press
(Select).
7
Select [Input], press
(Select), enter the subject
and press (OK).
1-byte kana and line breaks cannot
be entered.
If multiple E-Mail addresses are
saved for the selected address, a
screen for selecting which to use
appears on the display.
Select [Input], press
(Select), enter the message and press (OK).
8
1-byte kana cannot be entered.
Select [Do not attach],
press (Select) and
press (Send).
9
When the E-Mail is sent, a
Sending Completed message
appears on the display. The sent
E-Mail is stored in the outbox.
To attach data, select [Data
Folder] and press (Select).
Page 51

49
Mail
1
With the standby screen
on the display, press
(Menu).
2
Select [Mail] and press
(Select).
Viewing E-Mail in the Inbox
3
Select [E-Mail] and press
(Select).
4
Select [Inbox] and press
(Select).
5
Select an E-Mail and press
(Select).
The message of the selected E-Mail
appears on the display.
A list of received E-Mails appears on
the display.
:Unread E-Mail
:Already read E-Mail
Page 52

50
Mail
How to Read E-Mail
NOTE
●To save the sender of an E-Mail in the address book, do the follows.
Press (Add) on the received E-Mail small screen (displaying E-Mail text).
●The previous and next E-Mails can be viewed by pressing and , respective-
ly.
Pressing returns the screen to the inbox.
●Photo and movie files may appear directly instead of just the name depending on
the file size. In such cases, the photo or movie can be viewed by selecting the file
using and pressing (Play).
Page 53

51
Mail
C-Mail Block allows you to block C-Mails with messages that include
URLs (http://
□□□ or https://□□□) or telephone numbers. The feature is
on when you start using the service, but you can turn it off if you want to
receive C-Mails with URLs or telephone numbers in the message.
C-Mail
The C-Mail Service allows au telephones that support the feature to
exchange short Mails of up to 50 2-byte characters (100 1-byte characters) at
a time.
C-Mail Block
Page 54

52
Mail
1
With the standby screen
on the display, press
(Menu).
2
Select [Mail] and press
(Select).
Composing and Sending C-Mail
3
Select [C-Mail] and press
(Select).
4
Select [Create New] and
press (Select).
5
Select [AddressBook]
and press (Select).
Destination telephone number can be
selected from the outgoing/incoming
histories or directly entered.
Page 55

If multiple telephone number are
saved for the selected address, a
screen for selecting which to use
appears on the display.
53
Mail
When the C-Mail reaches the recipient,
a Sending C-Mail Success! message appears on the display. The sent
C-Mail is stored in the outbox.
6
Select a destination telephone number and press
(Select).
7
Press (OK) and press
(Select).
8
Enter the message and
press (OK).
9
Press (Send).
Page 56

54
Camera
Camera
What You Can Do with This Camera
The A1406PT has a built-in camera of an effective 1.35 million pixels
that can be used to take still pictures and movies. Captured
images can be used as wallpaper for the standby screen or
attached to E-Mails.
Captured photos can be used with the A1406PT
Captured photos can be used as wallpaper for
the standby screen, set to appear when calls
come in and saved in the address book.
Captured photos and movies can be attached to E-Mails
Photos and movies of 300 KB or less can be attached to E-Mails.
*
E-Mails may require time to send and receive in some areas because of signal conditions.
Page 57

55
Camera
How to Take Pictures and Movies
* The number of pictures is for reference only; the actual capacity will differ according
to shooting conditions and the amount of available space in the data folder.
* A maximum of 15 sec of video footage can be recorded.
How to Hold
Hold the cell phone firmly with both hands, being careful
not to cover the lens or flash. Keep your elbows tucked
in to prevent shaking. When taking still photos, stay still
for a short while after hearing the shutter release.
Because VGA or SXGA size pictures are saved in landscape format, hold the camera in a horizontal position.
Sizes and Capacity
●Still Picture Sizes, Applications and Capacities
●Movie Sizes
To take beautiful pictures and movies …
②
④
③
①
Photomail size
(120 x 160)
①
②
③
④
Wallpaper size
(240 x 320)
VGA size
(640 x 480)
SXGA size
(1280 x 960)
Attachments to E-Mail for
sending to cell phones
Approx. 8 KB
(Approx. 1076 pictures)
Approx. 28 KB
(Approx. 639 pictures)
Approx. 80 KB
(Approx. 243 pictures)
Approx. 270 KB in normal mode
(Approx. 75 pictures)
Wallpaper for standby screen,
etc.
High quality prints
Size (dot) Application
File size (Number of pictures)
Approx. 150 KB
(Approx. 130 clips)
Size (dot)
File size (Number of pictures)
Viewing on large PC monitor
High quality L size
(176 x 144)
Page 58

56
Camera
Taking Still Pictures
1
With the standby screen
on the display,
press (Menu).
2
Select [Camera] and
press (Select).
3
Select [Photo] and press
(Select).
4
Press (Shot).
The shutter releases, which you can
hear, and the picture is taken.
5
Press (Save).
The captured photo is saved in the
data folder.
To take it again, press .
Page 59

57
Camera
NOTE
Attaching Photos or Movies to E-Mail
1
With the photo or movie
on the display
(preview screen),
press (E-Mail).
2
Compose and send the E-Mail.
For instructions on composing and sending E-Mail,
see step 4 and afterComposing and Sending E-Mail(p. 47).
NOTE
●
E-Mails may require time to send and receive in some areas because of signal conditions.
●The shutter sound is heard even in the manner mode.
●The captured photo is saved in the [My photo] data folder under the date and time
of the photo, as follows.
A picture taken at 10:30 on August 12, 2006 is named :
・Photomail size, Wallpaper size : 060812_1030~01.
(01 is the first serial number of pictures taken at the same time.)
・VGA size, SXGA size : 08120001
(0001 is the first serial number of pictures taken on the same day.)
●The minimum shooting distance is 30 cm.
Page 60

58
EZweb
EZweb
EZweb allows you to use Chaku-Uta®(ring tone service) and get
the latest news using your cell phone. You must subscribe to
EZweb to use the service. If you did not apply for the service when
you purchased your phone, contact an au store or an au Customer
Service Center.
Before attempting to access EZweb, activate the service as
explained inActivating E-Mail and EZweb(p. 24).
Page 61

59
EZweb
NOTE
Accessing the EZweb Top Menu
You can access convenient fun sites from the EZweb top menu.
austyle
Keywordsearch
とくする情報
最新情報
EZサービスで探す
カテゴリで探す
ビジネス&ニュース
エリア
ショッピ ング&オークション
ライフ
ホビー&カルチャー
料金・申込・インフォ
カンタンアクセス・
オープンサイト
Intro to easy access open
sites
災害用伝言板
English
Intro to info and
sites recommended by au
Search for info
by keyword input
Presents and info provided
free-of-charge to EZweb
subscribers
Easy to view featured info,
weather reports, daily info
such as horoscopes, etc.
Recommended convenient
and fun EZweb services
Site searches by category
Latest info such as news,
weather and stocks,
plus business info
Regional info such as weather, maps, etc.
Shopping info for cell phones,
plus auction info on exhibiting
and bidding
Info useful towards lifestyles
Games, horoscopes, music,
books and other info on hobbies and entertainment trends
Rating info, application for
services, au online manual,
au notices
Posting and checking info in a disaster
Intro to English sites
●Some information sites charge for connection and information.
●Only one example of display layout and content is shown.
Layouts and content will differ according to site.
●T he [料 金・申 込・インフォ] (Rates/Applications/Information) title will change
in September 2006.
Page 62

60
EZweb
1
With the standby screen
on the display,
press (Menu).
Accessing Information Sites
2
Select [EZweb] and
press (Select).
Some pages require time to
appear on the display.
The EZ menu appears on the
display.
3
Select [Top Menu] and
press (Select).
4
Select a site and press (Select).
NOTE
●You can scroll up and down through sites using and , respectively.
[ ニュース・天気][カテゴリで探す]
Select
Pressandhold or(approx.1secorlonger).
andpress
Press
or
Select
andpress
(Select)
(Select)
Press
or
Page 63

61
EZweb
Download the Chaku-Uta®as
instructed by the information site.
The downloaded Chaku-Uta
®
is
stored in the [Sound] folder.
1
Display the EZweb top menu as
explained in steps 1~3 ofAccessing
Information Sites(p. 60).
2
Select [ カテゴリで探す ]
(Search by category) and
press (Select).
3
Select [ 着うた ] (ChakuUta) and press (Select).
4
Select an item and press
(Select).
Downloading Chaku-Uta
®
Page 64

62
EZweb
NOTE
● To set a downloaded Chaku-Uta®as the incoming ring tone
1. With the standby screen on the display, press , select [Settings], press ,
select [Change Melody], press , select [Ring Tone] and press .
2. Select [Data Folder], press , select [Sound], press ,
select a Chaku-Uta
®
to set and press .
● The download procedures are for reference only. Actual procedures may differ.
Follow the instructions appearing on the display.
●
An EZ password or Premium EZ password is required to access paid information sites.
・
EZ password : 4-digit number you set when subscribing to paid services the first time
・Premium EZ password : 4 to 8-digit number you set the first time you
use [まとめてau支払い] (Combined au Payment Service). Input one password or
the other as instructed by the service.
・These passwords are set when using the services for the first time. Memorize
your passwords for future reference.
・Passwords for new subscribers and new EZweb options as of September 2006
are the 4-digit number set by the user on his/her application.
● Connection and information fees are charged when downloading paid content
such as Chaku-Uta
®
.
● Wallpaper is downloaded and set as the standby screen by following the proce-
dure above.
Page 65

63
Other Features
Sounding the Safety Buzzer
Other Features
The A1406PT has a built-in safety buzzer for use when you are in
danger. The buzzer sounds at the loudest volume level.
The buzzer sounds at the loudest volume level when the front button is
pressed and held for about 3 sec or longer with the phone closed and the
standby screen on the display. To silence the buzzer, open the phone and
enter the lock No.
NOTE
●The safety buzzer is OFF when the cell phone is purchased. To turn it on, it must be
set in advance in the normal mode.
●The safety buzzer sounds only when the standby screen is on the display.
●The safety buzzer continues to sound until silenced, the battery is detached or the
battery runs down.
Page 66

64
Other Features
NOTE
●The remote auto lock does not work if power to the A1406PT is off, if the phone is
outside the service area or if the emission off mode is set to on.
Remote Auto Lock
If your cell phone is lost or misplaced, someone else can see and
steal your personal information. To prevent that from happening,
other people can be kept from operating the cell phone by setting
the Remote Auto Lock.
Trigger Condition of the Remote Auto Lock
The auto lock is set by calling the A1406PT from a registered telephone
number within a preset time frame from the time the phone went missing.
The trigger condition for the auto lock is set in the normal mode.
Triggering the Remote Auto Lock
1
Call the A1406PT from a registered phone within the time frame set inTrigger Condition of
the Remote Auto Lock.
The remote auto lock triggers and a message about the auto lock
scrolls across the display when the set number of calls come in.
Page 67

65
Other Features
NOTE
●Only data reception via infrared communications is possible in the smart mode.
Switch to the normal mode to send data.
●Infrared communications are not possible with some devices even though they may
support infrared communications.
●Data transmission and reception may not be successful under direct sunlight or flu-
orescent light.
●Data transmission and reception may be interrupted if the two facing infrared ports
are moved during infrared communications.
In infrared communications, both the sender and recipient must be
set up for infrared communications before the sender can send any
data. During communications, face the infrared ports toward one
another, no more than 20 cm apart, and hold them still.
メモ/ライト
Infrared Communications
Page 68

66
If Trouble Occurs
If Trouble Occurs
Trouble Check Action to take
See page
Power does
not come on.
The phone
does not ring.
Calls do not
come in.
The phone
does not
respond to
key input.
A warning sounds and
the power shuts off.
The phone answers
calls on its own.
I cannot hear the
other party's voice?
Is the battery properly
mounted?
Is the battery charged?
Did you press and hold
(approx. 1 sec or
longer).
Is[]on the display?
Did you enter the telephone number, area
code first?
Did you press .
Is[]on the display?
Is the power on?
Is the power on?
Are the keys locked?
The battery has run
out.
Is the answering memo
on?
Is the volume level too
low?
Properly mount the battery.
Charge the battery.
Press and hold (approx.
1 sec or longer).
Move the phone to a location where
[]disappears from the display.
Enter the area code first when
calling numbers that are not
cell phone numbers.
Press .
Move the phone to a location where
[]disappears from the display.
Press and hold (approx.
1 sec or longer).
Press and hold (approx.
1 sec or longer).
Press and hold (approx. 1 sec
or longer), to turn the key lock off.
Charge the battery.
Press and hold (approx. 1 sec or
longer), to turn the answering memo off.
Press during a call. This
increases the volume.
ー
14
16
ー
28
ー
ー
16
16
ー
14
5
ー
Page 69

C
Camera ………………………………… 54
Movie sizes ………………………… 55
Photo sizes ………………………… 55
Taking pictures …………………… 56
Calling …………………………………… 28
Answering calls …………………… 29
Making calls ………………………… 28
Returning calls ……………………… 30
Character entry ………………………… 31
Character entry modes …………… 31
Character-Key assignment ……… 32
Charging the battery pack ……………… 14
C-Mail …………………………………… 51
C-Mail Block ……………………… 51
General information ……………… 51
Sending …………………………… 52
Cursor keys/Center key
How to use ……………………………… 19
67
Index
A
Activating E-Mail and EZweb …………… 24
Address book …………………………… 36
Making calls from the
address book ……………………… 40
Saving address book entries ……… 36
Answering memo ………………………… 5
Battery level ……………………………… 16
Battery pack …………………………… 12
E-Mail …………………………………… 46
Mail filter ……………………………… 7
Receiving …………………………… 49
Sending …………………………… 47
Spam ………………………………… 7
E-Mail address ………………………… 25
Changing …………………………… 26
Viewing ……………………………… 25
EZweb …………………………………… 58
Chaku-Uta ………………………… 61
EZweb top menu ………………… 59
Manner mode …………………………… 5
Index
B
Desktop holder ………………………… 12
Directly charging the battery pack …… 15
Disaster bulletin board …………………… 8
Drive mode ………………………………… 6
D
E
Icons ………………………………… 18,19
If trouble occurs ………………………… 66
If you pass the targeted
character (Back) ………………………… 33
Incom history …………………………… 30
Infrared Communications ……………… 65
I
Key assignments ……………………… 17
Key names ……………………………… 13
K
M
One-ring calls ……………………………… 7
One touch keys ……………………… 3,13
Calling from one touch keys ……… 45
Registering pair numbers in
one touch keys …………………… 44
Outgo history …………………………… 30
O
Page 70

68
Index
Pair function ……………………………… 42
Making calls to pair numbers …… 43
Turning the pair function off ……… 42
Registering pair numbers ………… 42
Sending E-Mail to pair numbers … 43
Remote auto lock ……………………… 64
P
R
Shutting the power off ………………… 16
Signal level ……………………………… 16
Smart mode …………………………… 2,20
Sounding the safety buzzer …………… 63
S
Turning the power on …………………… 16
T
Page 71

Cell phone and PHS operators collect and
recycle unused telephones, batteries and
battery chargers at stores bearing the
logo regardless of brand and manufacturer
to protect the environment and reuse
valuable resources.
Sales: KDDI Corporation / Okinawa Cellular Telephone Company
Manufactured by: Pantech&Curitel Communications, Inc.
First Edition issued in August 2006
For inquiries, call:
au Customer Service Center (General Information)
From EZweb:
From regular phones:
From au cell phones:
area code not required
Easy access
toll free
toll free
or
EZ→[Topmenu]→[
料金・申込・インフォ]
→[
お問い合せ]
※Themenuconfigurationissubjectto
changewithoutpriornotice.
 Loading...