

Page 1
400-070-000-A ENG.fm Page 1 Thursday, December 13, 2007 1:37 PM
n
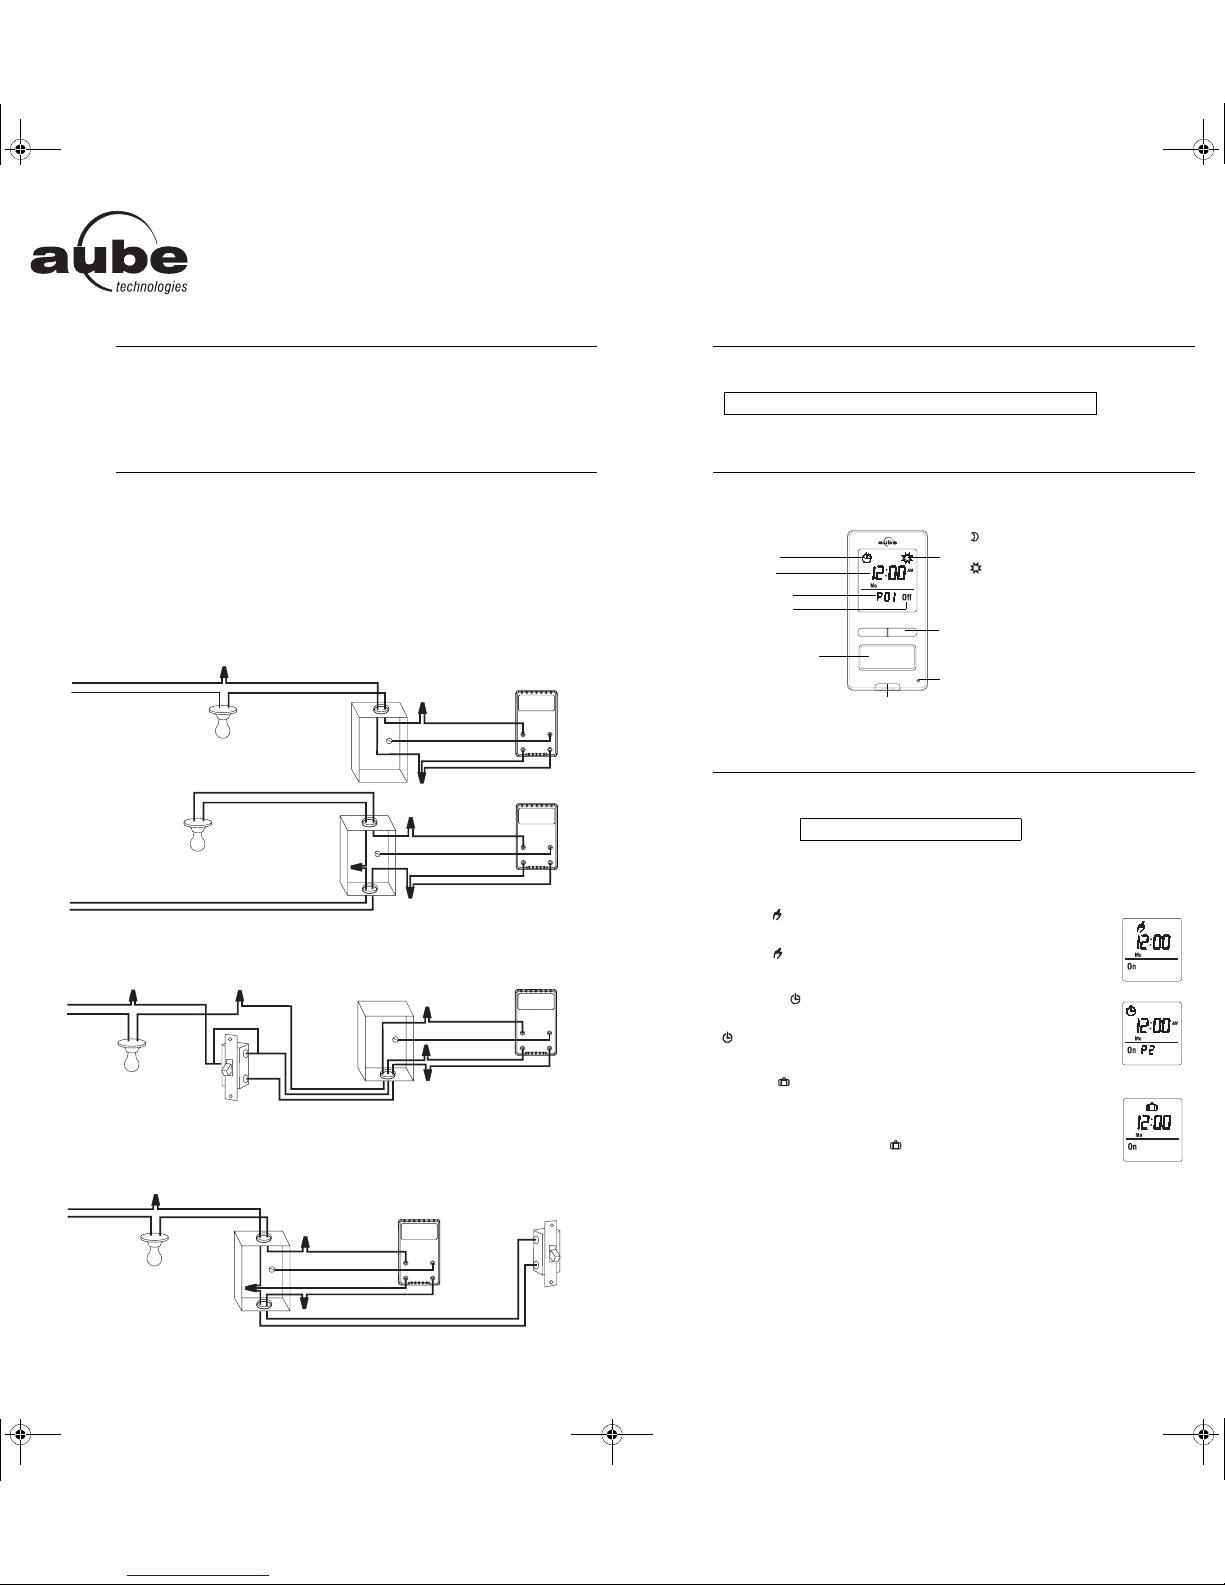
The TI070 programmable wall switch can be used in a single-switch or 3-way installation with the following
types of lighting:
• Incandescent • Halogen • Low-voltage halogen with transformer • Fluorescent
The TI070 switch cannot be used with a load of less than 40 W or more than 500 W.
o
Applications
Installation
n Cut power at the circuit breaker to avoid electric shock.
o Remove the existing switch. (For a 3-way installation, identify and label the wire connected to the
“common” screw.)
p Install the new switch.
q Apply power at the circuit breaker.
WARNING: Disconnect power to the switch when replacing a light bulb (see section 4).
SINGLE-SWITCH INSTALLATION
black
white
black
white
black
white
white
black
black
white
three-way
switch
black
white
120
VAC
120
VAC
Connect the LINE and 3 WAY wires to the line (120 V) wire and LOAD wire to the load. Connect the GND
wire to a ground screw inside the electrical box.
EXISTING 3-WAY INSTALLATION
120
VAC
Connect the LOAD wire on the TI070 to the “common” wire, which you identified when removing the old
switch. Connect the GND wire to a ground screw inside the electrical box. Connect the LINE and 3 WAY
wires to the two remaining wires. At the other 3-way switch, connect the jumper wire between the “common”
screw and the screw where the LINE wire of the TI070 is connected.
NEW 3-WAY INSTALLATION
120
VAC
jumper
black
black
white
black
white
white
black (LOAD)
green (GND)
black (LINE)
purple (3 WA Y )
black (LOAD)
green (GND)
black (LINE)
purple (3 WAY)
red
black (LOAD)
green (GND)
black (LINE)
purple (3 WAY)
black (LOAD)
green (GND)
black (LINE)
purple (3 WAY)
white
black
single-pole
switch
User guide
7-day Solar Programmable Wall Switch
1.
p
The TI070 will turn the lights on at sunset and turn them off at 11:00 pm by default. If these settings are
appropriate for you, you only need to set the time and date (see shaded zone in programming flowchart).
The switch is now ready to go.
2.
q
Indicates the mode of
operation (see Section 5.1)
Indicates the time and day
Indicates the current program
Indicates the load on/off state
Briefly press this button to turn the
lights on or off. See “Temporary
Override” in Section 5.1.4.
r
5.1 Mode Menu
You can use the Mode menu to select one of the three modes of operation (see sections 5.1.1 to 5.1.3).
5.1.1 Manual Mode
In Manual mode, the TI070 operates like a regular swit ch. To t urn t he l ights on or off, briefly
press the main button. The icon appears when the switch is in Manual mode.
5.1.2 Automatic Mode
In Automatic mode, the TI070 turns the lights on or off according to the set programs (see
Section 5.4). The icon as well as the current program number are displayed.
5.1.3 Random Mode
In Random mode, the TI070 has no specific times to turn the lights on or off. This mode is
designed to give the impression the house is occupied during your absence. It is similar to
the Automatic mode except there is no fixed program. The programs are automatically set
to different times by the TI070 every day. The icon appears when the switch is in
Random mode.
The first “On” program occurs at sunset. Each “On” program lasts between 1 hour and 1
hour and 30 minutes; each “Off” program lasts between 15 and 30 minutes. The last “Off”
program occurs between 10:30 pm and midnight.
5.1.4 Temporary Override
When the TI070 is in Automatic or Random mode, you can press the main button at any time to override the
default state for the current program. The light will turn off if they are on and vice versa. The icon (On or Off)
of the new state flashes to indicate that the state is temporary. The new state is maintained until you press
the main button again or till the next “On” or “Off” program.
Quick Start-up
Set the time and date before using the switch for the first time.
Operation
The icon indicates the current program
has been activated at sunset.
The icon indicates the current program
has been activated at sunrise.
You can change the mod e of operation by
pressing this button for 1 second.
The LED illuminates when the load state is on.
Before replacing a light bulb, pull out to disconnect power to the switch.
This prevents, while the bulb is out, any possible short circuit which will
damage the switch. Push back in after the light bulb is replaced.
Safety switch
Programming
Refer to the programming flowchart.
TI070
3.
4.
5.
TI070 400-070-000-A 2007-12-13 1/2
Page 2
400-070-000-A ENG.fm Page 2 Thursday, December 13, 2007 1:37 PM
5.2 Time Menu
The time display flashes on the screen when the time has n ot yet be en
set or after a 4-hour power outage. Use the Time menu to select the
time format (12-hour or 24-hour) and to set the clock and date.
NOTE: The date is used to determine the sunset and sunrise times.
5.3 Configuration Menu
Use the Configuration menu to set the following parameters (see
sections 5.3.1 to 5.3.4).
5.3.1 Backlight mode (SCRN)
The screen is lit at high intensity for 8 seconds when you press any
button. The rest of the time, depending on the backlight mode
selected, the screen behaves as follows:
Scrn Off: The screen is not lit.
Scrn On HI: The screen is lit at high intensity.
Scrn On LO: The screen is lit at low intensity (default mode).
5.3.2 Automatic Daylight Savings Time Changeover (
When automatic daylight savings time changeover is on (DLS On), the
Ti070 changes to daylight savings time (summer time) at 2:00 on the
second Sunday of March and changes back to normal time (winter
time) at 2:00 on the first Sunday of November. This function is
enabled (DLS On) by default.
5.3.3 Longitude and Latitude Coordinates (
The coordinates are used to turn the lights on at sunset and off at sunrise. The longitude is set to -75 and the latitude to +45 by default.
These settings provide approximate sunset and sunrise times for most
North American cities. To obtain your city’s coordinates (or those of a
nearby city), see the coordinates table. You can also obtain this information at www.aubetech.com/timer or with a Global Positioning Sys-
tem (GPS) device. The accuracy of the sunset and sunrise times
depends on the accuracy of the coordinates you enter for your city.
NOTE: Enter a negative value for a south latitude or a west longitude.
LONG
and
DLS
LAT
5.3.4 Correction Factor (ADJ)
If your city’s time zone is based on political or economic boundaries
instead of its coordinates, your light s mig ht swit ch on o r o f f to o e arly or
too late with respect to sunrise and sunset. In this case, apply a
correction factor (+1 or -1 hour; refer to addendum). Otherwise, leave
it at 0 (default value).
5.4 Program Menu
Use the Program menu to set the programs; i.e. the times you want
the lights to turn On or Off when the switch is in Automatic mode. To
set a program, proceed as follows:
n Select a program number (see section 5.4.1)
o Set the day(s) of the program (see section 5.4.2)
p Set the program start time (see section 5.4.3)
5.4.1 Selecting a program number
You can set up to 7 “On” programs
(“P01 On” to “P07 On”) and 7 “Off”
programs (“P01 Off” to “P07 Off”).
Select an “On” program to set when to
turn the lights on. Select an “Off”
program to set when to turn the lights
off.
5.4.2 Setting the day(s) of the program
After selecting a program, set the day(s) of the program. You can
select a specific day, all 7 days or “none”. Choose “none” for any
unused program.
5.4.3 Setting the program start time
After setting the day(s) of the program, set its start time. You can
select either a specific time, the sunset time or the sunrise time:
• T o select a specific time:
(1) Advance to the hour setting and select the hour.
(2) Advance to the minutes setting and select the minutes.
“P01 On” “P01 Off”
• To select sunset or sunrise time:
(1) Advance to the hour setting and select the sunset or sunrise
When you scroll, the sunset time and sunrise time
time. (
appear between 11 pm and 12 am
(2) To enter an offset (from -70 to +70 minutes in 10-minute
increments) between the sunset or sunrise time and the
program start time, advance to the minutes setting and change
the minutes.
• EXAMPLE: If the sunset time is 6:13 pm and you change the
minutes to display 6:43 pm, you have entered a delay of 30
minutes. If, later in the year, the sunset time is 4:01 pm, the
program will start at 4:31 pm.
• NOTE: When you enter an offset, appears along with
or when you display the sunset or sunrise time. To
remove the offset, display the sunset or sunrise time and
change the minutes until disappears.
.)
5.4.4 Examples
Example 1: The lights turn on at sunset and off at 11:00 pm every day
(default setting).
)
Program Days Time Program Days Time
P01 On All 7
P02 On to
P07 On
Example 2: The lights turn on at sunset and off at sunrise every day.
)
Program Days Time Program Days Time
P01 On All 7
P02 On to
P07 On
Example 3: The lights turn on at 8:00 pm every day and turn off at
10:00 pm every day except on Saturday night when they turn off at
1:00 am.
Program Days Time Program Days Time
P01 On All 7 days 8:00 pm P01 Off Sunday (Su) 10:00 pm
P02 On None — P02 Off Monday (Mo) 10:00 pm
P03 On None — P03 Off Tuesday (Tu) 10:00 pm
P04 On None — P04 Off Wednesday (We) 10:00 pm
P05 On None — P05 Off Thursday (Th) 10:00 pm
P06 On None — P06 Off Friday (Fr) 10:00 pm
P07 On None — P07 Off Sunday (Su) 1:00 am
If you set “P01 Off” at 10:00 pm for all 7 days and set “P02 Off” to
11:00 pm for Saturday. On Saturday, the lights will turn off at 10:00
pm, not 11:00 pm since “P01 Off” is set to an earlier time than “P02
Off”.
Reset to Factory Settings
s
To erase all programs and return to factory settings,
simultaneously press both main and left buttons and
hold. The software version will appear for 5 seconds.
RST will appear for the next 5 seconds. Release the
buttons when all segments appear on the screen. The
switch is now reset (see factory settings in
programming flowchart).
Troubleshooting
t
The screen is blank. • A light bulb is burned out.
The display is faded
or irregular.
The metal plate is hot. This is normal with high loads (maximum
sunset P01 Off All 7
days
None — P02 Off to
days
None — P02 Off to
Be careful about overlapping!
P07 Off
sunset P01 Off All 7
P07 Off
• The safety switch is pulled out (see
section 4).
• The load is less than 40 W.
• The ambient temperature is either
below or above switch’s operating
temperature.
of 500 W).
days
None —
days
None —
11:00
pm
sunrise
The sunset or sunrise
time is inaccurate.
Specifications
u
Supply: 120 VAC, 60 Hz
Minimum load: 40 watts
Maximum load: 500 watts
Operating temperature range: -15 °C to 50 °C (5 °F to 122 °F)
Storage temperature range: -40 °C to 60 °C (-40 °F to 140 °F)
Power outage: The screen is blank. Only the time must be set if the
outage lasts more than 4 hours; all other settings and programs are
permanently saved
Latitude range: from -65° to +65°
Solar table precision: +/- 11 min. (wi thin ±60° latitude)
Certification: UL (c UL us)
Warranty
;
AUBE warrants this product, excluding battery , to be free from defe cts in the workmanship or materials, under normal use and service, for a period of three (3)
years from the date of purchase by the consumer. If at any time during the warranty period the product is determined to be defective or malfunct ions, AUBE shall
repair or replace it (at AUBE's option).
If the product is defective,
(i) return it, with a bill of sale or oth er dated proof of purchase, to the place
from which you purchased it, or
(ii) contact AUBE. AUBE will make the determination whether the pr oduct
should be returned, or whether a replacement produ ct ca n be sen t to you .
This warranty does not cover removal or reinstallation costs. This warranty shall
not apply if it is shown by AUBE that the defect or malfunction was caused by
damage which occurred while the produc t was in the possession of a consumer.
AUBE's sole responsibility shall be to repair or replace the product within the
terms stated above. AUBE SHALL NOT BE LIABLE FOR ANY LOSS OR DAMAGE OF ANY KIND, INCLUDING ANY INCIDENTAL OR CONSEQUENTIAL
DAMAGES RESULTING, DIRECTLY OR INDIRECTLY, FROM ANY BREACH OF
ANY WARRANTY, EXPRESS OR IMPLIED, OR ANY OTHER FAILURE OF THIS
PRODUCT. Some provinces, states or regions do not allow the exclusion or limitation of incidental or consequential damages, so this limitation may not apply to
you.
THIS WARRANTY IS THE ONLY EXPRESS WARRANTY AUBE MAKES ON
THIS PRODUCT. THE DURATION OF ANY IMPLIED WARRANTIES, INCLUDING THE WARRANTIES OF MERCHANTABILITY AND FITNESS FOR A PARTICULAR PURPOSE, IS HEREBY LIMITED TO THE THREE-YEAR DURATION
OF THIS WARRANTY. Some provinces, states or regions do not allow limitations
on how long an implied warranty lasts, so the above limitation may not apply to
you.
This warranty gives you specific legal rights, and you may have other rights which
vary according to the province, state or region.
6.
Technical Assistance
If you have any questions on the product installation or operation, contact us at:
705 Montrichard Avenue
Saint-Jean-sur-Richelieu, Quebec
J2X 5K8
Canada
Tel.: (450) 358-4600
Toll-free: 1-800-831-AUBE
7.
Fax: (450) 358-4650
Email: aube.service@honeywell.com
For more information on our products, go to
• The date or time is wrong
(see section 5.2).
• The longitude or latitude is wrong
(see section 5.3.3).
• The correction factor is wrong
(see section 5.3.4).
• You have entere d an offset
(see section 5.4.3).
www.aubetech.com
8.
9.
10.
TI070 400-070-000-A 2007-12-13 2/2
Page 3

400-070-003-A EFS.fm Page 1 Thursday, December 13, 2007 10:07 AM
(3 sec.)
Mode menu
Menu de mode
Menú de modo
Auto/Manual/Random
Auto/Manuel/Aléatoire
Auto/Manual/Aleatorio
(sec. 5.1)
Flowchart below shows factory settings.
Le diagramme ci-dessous contient les réglages en usine.
El diagrama siguiente contiene los ajustes de fábrica.
Briefly press this button to go to preceding menu or setting.
Appuyer brièvement sur ce bouton pour passer au menu ou réglage précédent.
Presionar brevemente este botón para ir al menú o ajuste precedente.
Briefly press this button to go to next menu or setting.
Appuyer brievement sur ce bouton pour passer au menu ou réglage suivant.
Presionar brevemente este botón para ir al menú o ajuste siguiente.
Briefly press this button to accept setting and display next parameter.
Appuyer brievement sur ce bouton pour accepter le réglage et afficher le prochain paramètre.
Presionar brevemente este botón para aceptar el ajuste y visualizar el parámetro siguiente.
Press this button at any time for 3 seconds to start or end programming.
Appuyer sur ce bouton pendant 3 secondes pour débuter ou terminer la programmation.
Presionar este botón durante 3 segundos para comenzar o terminar la programación.
Minimum settings for quick start-up
Réglages minimaux pour démarrage rapide
Ajustes mínimos para el encendido rápido
Clock starts.
L’horloge commence à compter.
El reloj comienza a contar.
TI070 / TI071 / TI072
Programming flowchart
Diagramme de programmation
Diagrama de programación
Legend / Legende / Leyenda
Time menu
Menu de l’heure
Menú de la hora
Configuration menu
Menu de configuration
Menú de configuración
Program menu
Menu de programme
Menú de programa
Press the main button for 3 seconds at any time to end programming.
Appuyer sur la touche principale pendant 3 secondes pour terminer la programmation.
(3 sec.)
Presionar el botón principal durante 3 segundos para terminar la programación.
24H / 12H
Backlight
Rétroéclairage
Retroiluminación
(sec. 5.3.1)
Program number
No. du programme
Nº del programa
(sec. 5.4.1)
Hour
Heure
Hora
Automatic Daylight Savings Time
Passage automatique à l’heure avancée
Cambio automático a la hora de verano
(sec. 5.3.2)
Program day(s)
Jour(s) du programme
Días del programa
(sec. 5.4.2)
Minutes
Minutes
Minutos
None selected
Nul (None) sélectionné
Ninguno (None) seleccionado
Day(s) selected
Jour(s) sélectionnés
Días seleccionados
Longitude
Longitude
Longitud
(sec. 5.3.3)
Year
Année
Año
Month
Mois
Mes
Latitude
Latitude
Latitud
(sec. 5.3.3)
Hour setting
Réglage de l’heure
Ajuste de la hora
or/ou
Sunset or sunrise selection
Sélection du coucher/lever du soleil
Selección de la puesta o salida del sol
Correction factor
Facteur de correction
Factor de corrección
(sec. 5.3.4)
Program start time
Heure du début du programme
Hora de comienzo del programa
(sec. 5.4.3)
Day
Jour
Día
Minutes setting
Réglages des minutes
Ajuste de los minutos
or/ou
Offset setting
Réglage de l’écart
Ajuste de la desviación
TI070 / TI071 / TI072 400-070-003-A 2007-12-13 1/2
Page 4

400-070-003-A EFS.fm Page 2 Thursday, December 13, 2007 10:07 AM
Longitude/Latitude/Correction factor
Longitude/Latitude/Facteur de correction
Longitud/Latitud/Factor de corrección
CANADA
City / Ville Long. Lat. Adj.
ABBOTSFORD -122 49 0
BANFF -115 51 1
BARRIE -80 44 0
BURNABY -122 49 0
CALGARY -114 51 1
CAPE BRETON -60 46 0
CHICOUTIMI -71 48 0
DAWSON -139 64 1
EASTMAIN -78 52 0
EDMONTON -113 53 1
FORT SEVERN -87 56 1
HALIFAX -63 44 0
HAMILTON -112 49 0
IQALUIT -68 63 0
INUKJUAK -78 58 0
KELOWNA -119 50 0
KITCHENER -80 43 0
LONDON -81 42 0
MISTASSINI -73 50 0
MONTREAL -73 45 0
NIAGARA -79 43 0
OSHAWA -78 43 0
OTTAWA - GATINEAU -75 45 0
QUEBEC -71 46 0
REGINA -104 50 1
RICHMOND -123 49 0
ROUYN-NORANDA -79 48 0
SASKATOON -106 52 1
SEPT-ILES -66 50 -1
SHERBROOKE -71 45 0
ST. ANTHONY -55 51 0
ST CATHARINES -79 43 0
SAINT JOHN (NB) -66 45 0
ST. JOHN'S (NFLD) -52 47 0
SUDBURY -81 46 0
THUNDER BAY -89 48 1
TORONTO -79 43 0
TROIS-RIVIÈRES -72 46 0
VANCOUVER -123 49 0
VICTORIA -123 49 0
WHITEHORSE -135 60 1
WINDSOR -83 42 1
WINNIPEG -97 49 0
YELLOWKNIFE -114 62 1
City Long. Lat. Adj.
USA
ABILENE -99 32 1
ALBUQUERQUE -106 35 0
ALLENTOWN -75 40 0
AMARILLO -101 35 1
ANCHORAGE -149 61 1
ATLANTA -84 33 1
AUSTIN -97 30 0
BAKERSFIELD -119 35 0
BALTIMORE -76 39 0
BATON ROUGE -91 30 0
BEAUMONT -94 30 0
BILLINGS -108 45 0
BIRMINGHAM -86 33 0
BOISE -116 43 1
BOISE CITY -102 36 1
BOSTON -71 42 0
BROWNSVILLE -97 25 0
BUFFALO -78 42 0
CEDAR RAPIDS -91 41 0
CHARLOTTE -80 35 0
CHATTANOOGA -85 35 1
CHEYENNE -104 41 0
CHICAGO -87 41 0
CINCINNATI -84 39 1
CLEVELAND -81 41 0
COLOMBUS -82 39 0
COLORADO SPRINGS -104 38 0
CORPUS CHRISTI -97 27 0
DALLAS -96 32 0
DENVER -104 39 0
DES MOINES -93 41 0
DETROIT -83 42 1
DULUTH -92 46 0
EL PASO -106 31 0
ERIE -80 42 0
EUGENE -123 44 0
EVANSVILLE -87 37 0
FLINT -83 43 1
FORT LAUDERDALE -80 26 0
FORT WAYNE -85 41 1
FRESNO -119 36 0
GRAND RAPIDS -85 42 1
GREAT FALLS -111 47 0
GREENSBORO -79 36 0
HAMPTON -76 37 0
HARTFORD -72 41 0
HONOLULU -157 21 0
HOUSTON -95 29 0
HUNTSVILLE -86 34 0
INDIANAPOLIS -86 39 1
JACKSON -90 32 0
JACKSONVILLE -81 30 0
KANSAS CITY -94 39 0
KNOXVILLE -83 35 1
LAKEWOOD -105 39 0
If your city is not listed below, use a nearby city or refer to the website “www.aubetech.com/timer”.
Si votre ville n’est pas dans la liste, utiliser une ville avoisinante ou consulter le site web «www.aubetech.com/minuterie».
Si su ciudad no figura en la lista, buscar una ciudad vecina o consultar el sitio web “www.aubetech.com/timer”.
City Long. Lat. Adj.
USA
LANSING -84 42 1
LAREDO -99 27 1
LAS VEGAS -115 36 0
LEXINGTON -84 38 1
LINCOLN -96 40 0
LITTLE ROCK -92 34 0
LONG BEACH -118 33 0
LOS ANGELES -118 34 0
LOUISVILLE -85 38 1
LUBBOCK -101 33 1
MACON -83 32 1
MADISON -89 43 0
MEMPHIS -90 35 0
MIAMI -80 25 0
MILWAUKEE -87 43 0
MINNEAPOLIS -93 44 0
MOBILE -88 30 0
MODESTO -120 37 0
MONTGOMERY -86 32 0
NASHVILLE -86 36 0
NEW ORLEANS -90 29 0
NEW YORK -74 40 0
NORFOLK -76 36 0
OKLAHOMA CITY -97 35 0
OMAHA -95 41 0
ORLANDO -81 28 0
OVERLAND PARK -94 38 0
OXNARD -119 34 0
PEORIA -89 40 0
PHILADELPHIA -75 40 0
PHOENIX -112 33 0
PITTSBURG -79 40 0
PLANO -96 33 0
PORTLAND -122 45 0
PROVIDENCE -71 41 0
RALEIGH -78 35 0
RAPID CITY -103 44 1
RENO -119 39 0
RICHMOND -77 37 0
ROANOKE -79 37 0
ROCHESTER -77 43 0
ROCKFORD -89 42 0
SACRAMENTO -121 38 0
SALT LAKE CITY -111 40 0
SAN ANTONIO -98 29 1
SAN DIEGO -117 32 0
SAN FRANCISCO -122 37 0
SANTA ROSA -122 38 0
SAV ANNAH -81 32 0
SEATTLE -122 47 0
SHREVEPORT -93 32 0
SOUTH BEND -86 41 0
SPOKANE -117 47 0
SPRINGFIELD (IL) -89 39 0
SPRINGFIELD (MA) -72 42 0
City Long. Lat. Adj.
SPRINGFIELD (MO) -93 37 0
ST. LOUIS -90 38 0
SYRACUSE -76 43 0
TALLAHASSEE -84 30 1
TAMPA -82 27 0
TOLEDO -83 41 1
TOPEKA -95 39 0
TUCSON -110 32 0
TULSA -95 36 0
VIRGINIA BEACH -75 36 0
WACO -97 31 0
WASHINGTON DC -77 38 0
WICHITA -97 37 0
WINSTON-SALEM -80 36 0
YONKERS -73 40 0
YOUNGSTOWN -80 41 0
Ciudad Long. Lat. Adj.
TIJUANA -117 32 0
NOGALES -111 31 0
CIUDAD JUAREZ -106 31 0
MATAMOROS -97 26 0
NUEVO LAREDO -99 27 1
MONTERREY -100 25 1
CHIHUAHUA -106 28 0
MAZATLÁN -106 23 0
TAM PICO -98 22 1
ZACATECAS -102 22 1
LÉON -101 21 1
LA PAZ -110 24 0
MEXICO CITY -99 19 1
PUEBLA -98 19 1
GUADALAJARA -103 20 1
OAXACA -96 17 0
ACAPULCO -100 16 1
CANCUN -86 21 0
MERIDA -89 21 0
Ciudad Long. Lat. Adj.
SAN JUAN -66 18 0
REPÚBLICA DOMINICANA
Ciudad Long. Lat. Adj.
SANTO DOMINGO -70 18 1
USA
MÉXICO
PUERTO RICO
TI070 / TI071 / TI072 400-070-003-A 2007-12-13 2/2
 Loading...