

Page 1
маЙЛМ
ࠠ࠹࠼ࡄ߽ ࡇ࠹ࡂ࠵ ߰ ࠠࡂ࠷ࡂ࠱ ࠽࠽࠵ࡂ
I nsta l l ati on an d User G u i deI nsta l l ati on an d User G u i deI nsta l l ati on an d User G u i deI n stal l a tion a nd U ser Gu i d eIn stal l a tion an d U ser Gu i d e
I nsta l l ati on an d User G u i de
I nsta l l ati on an d User G u i deI n stal l a tion an d U ser Gu i d e
I nsta l l ati on an d User G u i deI nsta l l ati on an d User G u i de
TH134 is an electronic six-order pilot-wire programmer that allows
separate temperature control of three zones using four programs
per day. The TH134 programmer has three pilot-wire outputs can
be connected to thermostats or controller that accept pilot-wire signals.
The TH134 programmer has a remote input to which a telephone
controller (such as Aube’s CT240), a home automation system
(HAS) or an energy manager can be connected. When a signal is
received from any of these devices, TH134 forwards the order to
the heating units.
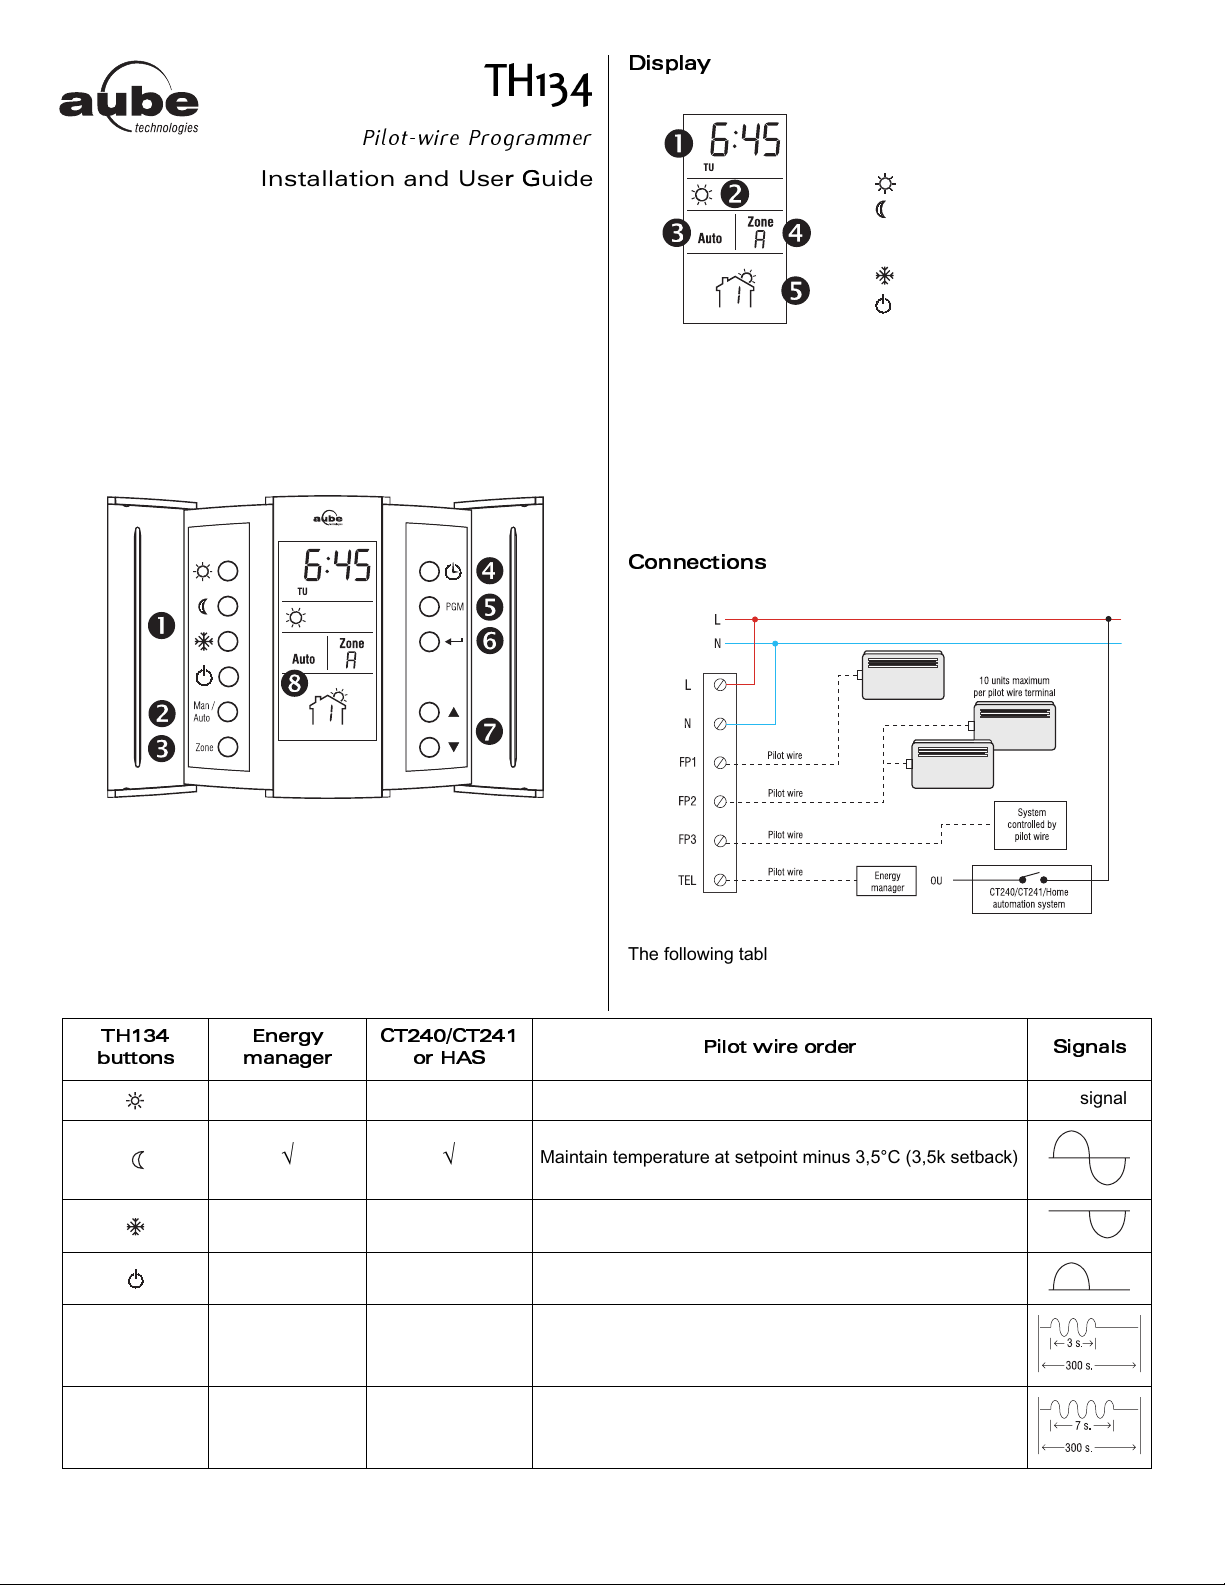
'LVSOD\
&RQQHFWLRQV
n Time
o Heating modes
:Comfort mode
: Setback modes
(icon is steady in 3,5k setback;
flashes in 1k and 2k setbacks)
: Frost protection
: Off
p Operating modes
- Manual mode
- Auto mode
q Zone selected (the letter A
appears when all 3 zones are
selected)
r Current program (applicable to
automatic mode only)
n Order buttons
o Mode selection button
p Zone selection button
q Time/day setting button
࿗࿋ ྴ ྶ ྷ ྣ
࿈ྣ
√√
√
√
√
r Program button
s Return button
t Selection button
u Display
࿆࿗ྵྷླྲ࿆࿗ྵྷྴ ྣ
ྣ ࿋ ࿄࿖
The following table shows the different means of initiating an order.
࿓ ྣ ྣ ࿖
Maintain temperature at setpoint (Comfort) No signal
Maintain temperature at setpoint minus 3,5°C (3,5k setback)
Maintain temperature at 7°C (frost protection)
Turn heating Off (Off)
Maintain temperature at setpoint minus 1°C (1k setback)
√
TH134 400-134-000-A 1/27/05 1/4
Maintain temperature at setpoint minus 2°C (2k setback)
Page 2
InstallationInstallationInstallationInstallationInstallation
Installation
Installation
InstallationInstallation
InstallationInstallation
InstallationInstallation
Powe r-u pPowe r-u pPowe r-u pPo wer-u pPowe r-u p
Powe r-u p
Powe r-u p
Powe r-u pPowe r-u p
Powe r-u pPowe r-u p
Powe r-u pPowe r-u p
ᎬᎿᎿᎰᎹ ᎿᎴ ᎺᎹ Ꭵ ᎋ Ꭽ ᎰᎱᎺᎽᎰᎋ ᎻᎽᎺᎮᎰᎰᎯᎴᎹ Ꮂᎋ ᏂᎴᎿᎳᎋ ᎿᎳ Ꮀᎋ Ꮄ ᎹᎾᎿᎬᎷᎷᎬ᎘
ᎿᎴ ᎺᎹ ᎗ ᎋ ᎮᏀ Ꮏᎋ Ꮋ ᎺᏂᎰ Ꮍᎋ ᎿᎺᎋ ᎿᎳ Ꮀᎋ Ꮃ Ꮀ ᎬᎿᎴ Ꮉ Ꮂᎋ Ꮎ ᏄᎾᎿᎰᎸ ᎋ ᎿᎺᎋ ᎬᏁᎺᎴ Ꭿ
ᎬᎹ Ꮔᎋ ᎽᎴ ᎾᎶᎋ ᎺᎱ ᎋ Ꮀ ᎷᎰ ᎮᎿᎽᎴ Ꭾᎋ ᎾᎳ ᎺᎮᎶ᎙
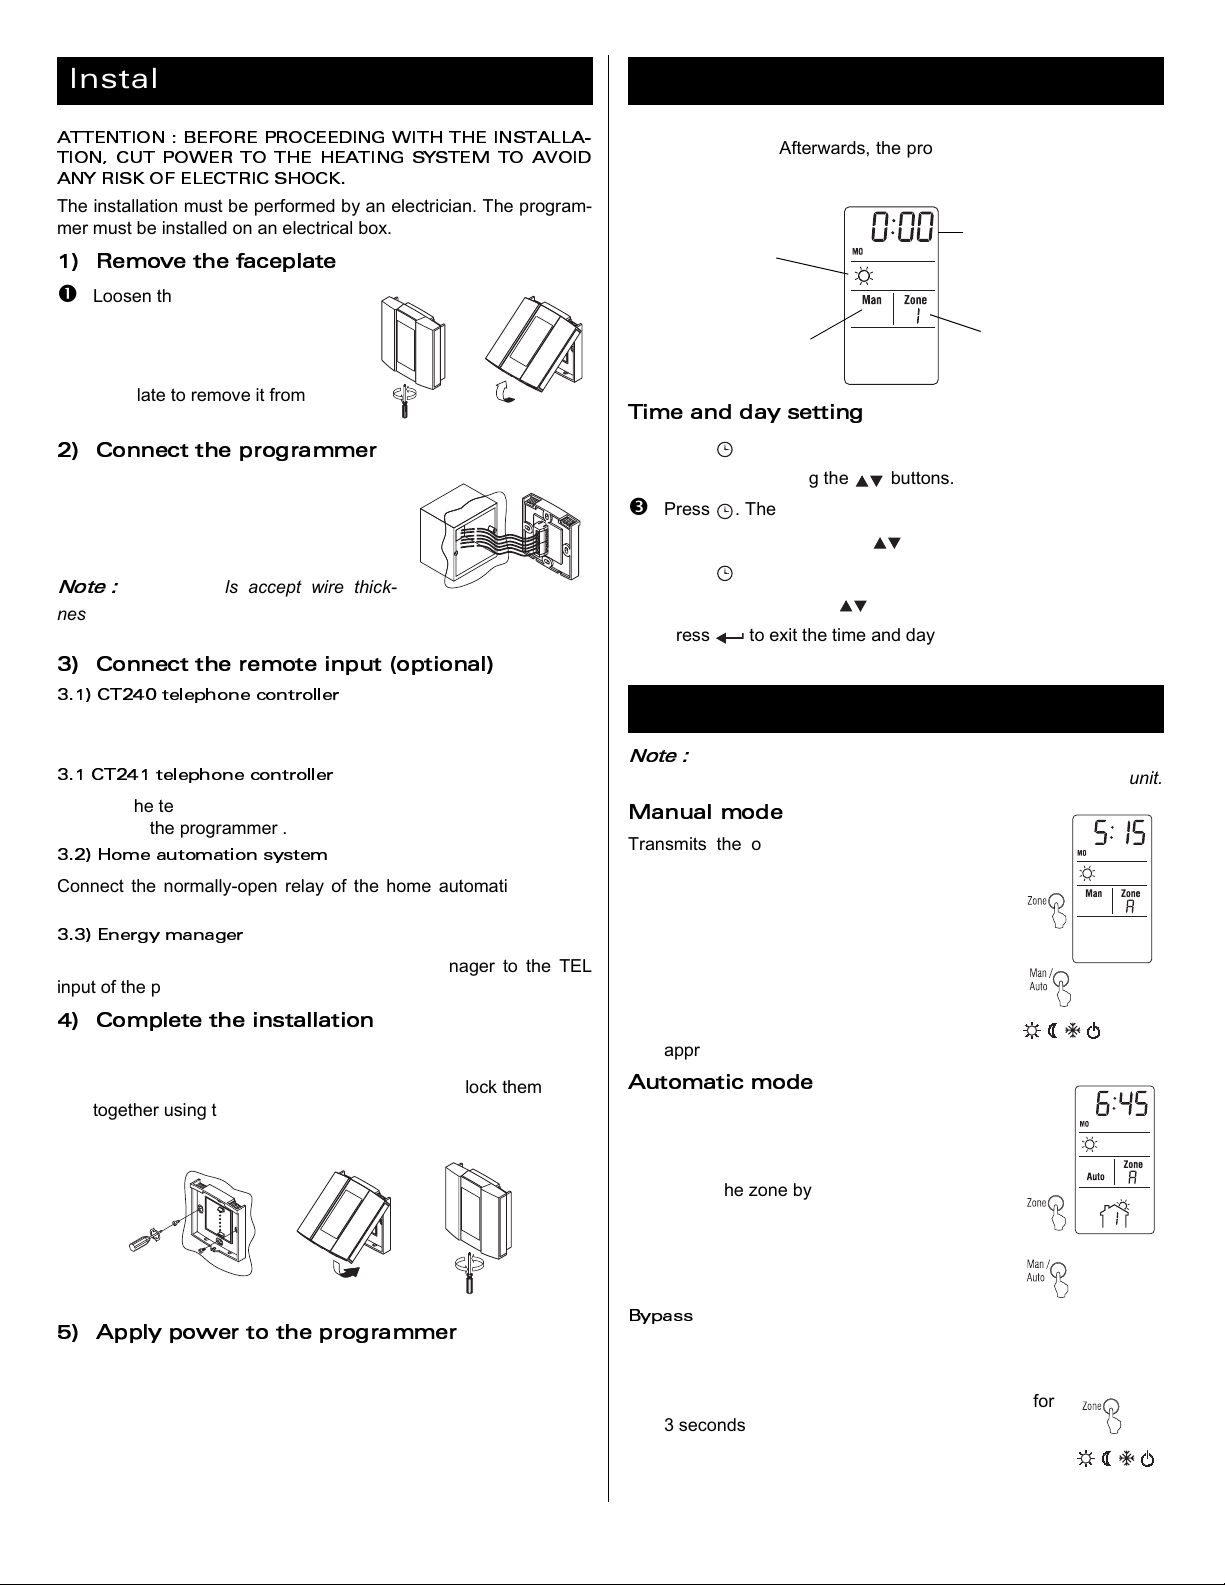
The installation must be performed by an electrician. The programmer must be installed on an electrical box.
5HPRYH WKH IDFHSODWH
n Loosen the locking screw (the
screw is captive and cannot be
completely removed).
o Pull and lift the bottom of the
faceplate to remove it from its
mounting plate.
&RQQHFW WKH SURJUDPPHU
Connect power to terminals L (line) and N
(neutral).
Connect the pilot wire inputs of the thermostats to terminals FP1, FP2 and FP3.
ឡែះី ឍ
nesses between 0,32 and 2,1 mm
&RQQHFW WKH UHPRWH LQSX W RSWL RQDO
᎙ ᎔ᎋ ᎮᎿᎋ ᏟᏐᏗᏐᏛᏓᏚᏙᏐᎋ ᏎᏚᏙᏟᏝᏚᏗᏗᏐᏝ
Connect terminals 2 and 1 of the CT240 to terminals L and TEL of
the programmer respectively.
᎙ ᎋ ᎮᎿ ᎋ ᏟᏐᏗᏐᏛᏓᏚᏙᏐᎋ ᏎᏚᏙᏟᏝᏚᏗᏗᏐᏝ
Connect the terminals of one of the outputs of CT241 to terminals L
and TEL of the programmer .
᎙ ᎔ᎋ Ꮃ ᏚᏘ Ꮠᎋ Ꮜ Ꮰ ᏟᏚᏘᏌ ᏟᏔᏚᏙ ᎋ ᏞᏤᏞᏟᏐᏘ
Connect the normally-open relay of the home automation system
terminals L and TEL of the programmer.
᎙ ᎔ᎋ ᎰᏙ ᏐᏝᏒᏤᎋ Ꮨ ᏌᏙᏌᏒᏐᏝ
Connect the pilot wire output of the energy manager to the TEL
input of the programmer.
&RPSOHWH WKH LQVWDOODWLRQ
The terminals accept wire thick-
2
.
n Fix the mounting plate to the wall.
o Install the faceplate on the mounting plate and lock them
together using the locking screw.
$SSO\ SRZHU WR WKH SURJUDPPHU
During power-up, the TH134 perform a series of test for approximately 5 seconds. Afterwards, the programmer displays the following:
All three zones
are in comfort
mode.
The programmer is
in manual mode.
7LPHDQGGD\VHWWLQJ
Flashes to indicate
that the time and day
must be set.
Zone 1 is selected.
n Press . The hours display flashes.
o Set the hours using the buttons.
p Press . The minutes display flashes.
q Set the minutes using the buttons.
r Press . The day display flashes.
s Set the day using the buttons.
t Press to exit the time and day settings
OperationOperationOperationOperationOperation
Operation
Operation
OperationOperation
OperationOperation
OperationOperation
ឡែះី ឍ
are reversed, reverse the “Ph” and the “N” wires on the heating unit.
0DQXDO PRGH
Transmits the order selected via one of the
order buttons. To use this mode:
.If the “setback” and “off’ orders received by a heating unit
n Select the zone by pressing the Zone but-
ton. (Press for 3 seconds to select all 3
zones.)
o Select the manual (Man) mode by press-
ing the Man/Auto button.
p Select the order by pressing the
appropriate order button.
$XWR P DWL F P RG H
The orders are sent to each zone according to
the schedule programmed for that zone. To
use this mode:
n Select the zone by pressing the Zone but-
ton. (Press for 3 seconds to select all 3
zones.)
o Select the Auto mode by pressing the
Man/Auto button.
ᎭᏤᏛᏌᏞᏞ
You can bypass the automatic mode for 2 hours. At the end of the 2
hours, the programmer returns to the automatic mode.
n Select the zone using the Zone button. (Press for
3 seconds to select all 3 zones.)
o Press the desired order button.
The auto mode icon flashes during the bypass.
TH134 400-134-000-A 1/27/05 2/4
Page 3

5HPRWH LQSXW
Whenever an order is received via the remote input, it becomes the
active order for all 3 zones. To know which orders can be initiated
by the energy manager, the phone controller or the home automa-
tion system, see the table on page 1. The is displayed when
signals are received via the remote input.
ᎭᏤᏛᏌᏞᏞ
Orders received via the remote input have priority over orders initiated via the TH134 programmer. However, you can bypass the
remote input order for each zone for 2 hours. At the end of the 2
hours, the remote input order becomes active again.
n Select the zone using the Zone button. (Press for 3
seconds to select all 3 zones.)
o Press the desired order button.
The icon flashes during the bypass.
Preprogra mm ed Sched ul ePreprogra mm ed Sched ul ePreprogra mm ed Sched ul ePreprogram m ed Sched ul ePreprogra mm ed Sched ul e
Preprogra mm ed Sched ul e
Preprogra mm ed Sched ul e
Preprogra mm ed Sched ul ePreprog ram m ed Sched ul e
Preprogra mm ed Sched ul ePreprogra mm ed Sched ul e
Preprogra mm ed Sched ul ePreprogra mm ed Sched ul e
The same schedule is used by default for all 3 zones as shown
below.
o Select the zone using the Zone button. (Press for 3
seconds to select all 3 zones.)
p Select the program using the PGM button.
q Set the program start time.
r Select the mode by pressing the corresponding button.
s Repeat steps 3 to 5 for the remaining programs for the selected
zone.
t Go to step 2 if you wish to select another zone.
u Press to exit programming.
ឡែះី ឍ
pressed for the last 60 seconds.
When selecting the number of programs,
TH134 will automatically exit programming if no button is
n Press the MAN/AUTO button for 3 seconds
until PPd is displayed.
o Select the zone using the ZONE button.
(Press for 3 sec. to select all 3 zones.)
p Press MAN/AUTO until the desired day is
displayed.
q
Set the number of programs for the selected
day using the buttons.
• 4 (to select all 4 programs)
• 2 (to select program 1 and 4 only)
• 0 (no program is selected for that day)
The options are:
Wake-up time
Every day
ᮕ᮪ᮩ ᮠ ᮫ᮢᮨ ᮏᮤᮨᮠ
⌼⍁⍅⌻⌻
⌽⍃⍅⌾⌻
⍌
⌾⌼⍂⍅⌻⌻
⌿⌽⌾⍅⌻⌻
⍙⎀⍸⍭⍰⍽⌫ ⍺⍱⌫ ⍻⍽⍺⍲⍽⍬⍸⍾⌫ ⍻⍰⍽⌫
᭬ ᭩ ᭾᮪ᮨᮡ᮪ᮭᮯ᭛ ᭣᭾᭤᭧᭛ ᭮᭩ ᭰ᯛ᭾᭛ ᮮᮠᮯᮝᮜᮞᮦ᭛ ᭣ᮎ᭤
Schedule customizationSchedule customizationSchedule customizationSchedule customizationSchedule customization
Schedule customization
Schedule customization
Schedule customizationSchedule customization
Schedule customizationSchedule customization
Schedule customizationSchedule customization
Use the following procedure to select the order and the start time for
each of the 4 programs for each zone. The settings of each program will be the same for each day. However, you can then select
which programs to be executed for each day and for each zone.
⍯⍬⎄ ⍅
Leave for work
Monday to
Friday
ὔ
ᮊᮭᮟᮠᮭ
C
S
C
S
Return home
Monday to
Friday
ᮈ᮪ᮩ ᮏ᮰ ᮠ ᮒᮠᮟ ᮏᮣ᮰ ᮁᮭᮤ ᮎᮜᮯ ᮎ᮰ᮩ
√√√√√√√
√√√√√
√√√√√
√√√√√√√
4 4 4 4 4 2 2
Sleep time
Every day
n Press the PGM to start programming.
ឡែះី ឍ
the order of the last program until the start of the next program.
If no program is selected for a particular day, TH134 uses
r Repeat steps 3 and 4 for the each remaining day.
s Go to step 2 if you wish to select another zone.
t Press to exit.
Enter your settings in the following table.
ᮕ᮪ᮩ ᮠ ᮫ᮢᮨ ᮏᮤ ᮨ ᮠ
⌼
⌽
⌼
⌾
⌿
ᮉ᮰ ᮨᮝᮠᮭ᭛ ᮪ᮡ᭛ ᮫ᮭ᮪ᮢᮭᮜᮨᮮ᭛ ᮫ᮠᮭ᭛ ᮟᮜ᮴᭵
⌼
⌽
⌽
⌾
⌿
ᮉ᮰ ᮨᮝᮠᮭ᭛ ᮪ᮡ᭛ ᮫ᮭ᮪ᮢᮭᮜᮨᮮ᭛ ᮫ᮠᮭ᭛ ᮟᮜ᮴᭵
⌼
⌽
⌾
⌾
⌿
ᮉ᮰ ᮨᮝᮠᮭ᭛ ᮪ᮡ᭛ ᮫ᮭ᮪ᮢᮭᮜᮨᮮ᭛ ᮫ᮠᮭ᭛ ᮟᮜ᮴᭵
᭬ ᭩ ᭾᮪ᮨᮡ᮪ᮭᮯ᭛ ᭣ ᭾᭤᭧ ᭛ ᭮᭩ ᭰ ᯛ᭾᭛ ᮮᮠᮯᮝᮜᮞᮦ᭛ ᭣ᮎ᭤᭧ ᭛ ᮁᮭ᮪ᮮᮯ᭛ ᮫ᮭ᮪ᮯᮠᮞᮯᮤ᮪ᮩ᭛ ᭣ ᮁᮋ᭤ ᭧᭛ ᮊᮡᮡ᭛ ᭣ᮊ᭤
ᮊᮭᮟᮠᮭ
ὔ
ᮈ᮪ᮩ ᮏ᮰ᮠ ᮒᮠᮟ ᮏᮣ᮰ ᮁᮭᮤ ᮎᮜᮯ ᮎ᮰ᮩ
TH134 400-134-000-A 1/27/05 3/4
Page 4

Tec h ni c a lTec h ni c a lTec h ni c a lTe chn ica lTec h ni c a l
Tec h ni c a l
Tec h ni c a l
Tec h ni c a lTe chn ica l
Tec h ni c a lTec h ni c a l
Tec h ni c a lTec h ni c a l
ᎸᏚᏏᏐᏗ
: TH134
ᎻᏚᏢᏐᏝᎋ ᏞᏠ ᏛᏛ Ꮧ Ꮴ
ᎮᏚᏙ ᏞᏠ ᏘᏛ ᏟᏔᏚ Ꮩ
ᎻᏔᏗᏚᏟᎋ ᏢᏔᏝᏐᎋ ᏚᏠᏟᏛᏠᏟ
ᎸᏌᏣᏔᏘᏠᏘᎋ ᏗᏚᏌᏏ
ᎺᏛᏐᏝᏌᏟᏔᏙ Ꮢᎋ ᎿᏐᏘᏛᏐᏝᏌᏟᏠᏝᏐ
ᎾᏟᏚᏝᏌᏒᏐᎋ ᏟᏐᏘ ᏛᏐᏝᏌᏟᏠ ᏝᏐ
ᎻᏝᏚᏟᏐᏎᏟᏔᏚᏙ
ᎻᏝᏚᏟᏐᏎᏟᏔᏚᏙ ᎋ ᏔᏙ Ꮟ ᏐᏣ
ᎬᏠᏟᏚ Ꮨ ᏌᏟ Ꮤ Ꮞᎋ ᏌᏎ ᏟᏔ ᏚᏙ
ᎰᏙ ᏡᏔᏝᏚᏙ Ꮨ ᏐᏙ Ꮯ
ᎾᏚᏑᏟᏢᏌᏝᏐ
ᎸᏐᏘᏚᏝᏤᎋ ᏟᏤᏛᏐ
ᎽᏐᏘᏚᏟᏐᎋ ᏔᏙᏛᏠᏟ
ᏂᏔᏝᏐᎋ ᏟᏓ Ꮤ ᏎᏖᏙᏐᏞᏞ
Wa rra n tyWa rra n tyWa rra n tyWa rra ntyWa rra n t y
Wa rra n ty
Wa rra n ty
Wa rra n tyWa rra n t y
Wa rra n tyWa rra n ty
Wa rra n tyWa rra n ty
: class 2
: normally polluted
: class A
SpecificationsSpecificationsSpecificationsSpecificationsSpecifications
Specifications
Specifications
SpecificationsSpecifications
SpecificationsSpecifications
SpecificationsSpecifications
: 230 VCA / 50 Hz
: 25 mA maximum
: 60 mA per output / 230 VCA
: 10 units per pilot wire output (FP)
: -20 - 50°C
: IP20
: 1Y type
: program settings are permanently saved
time settings are saved for 4 hours during power
outage
: universal relay (230 VCA / 500 µA) or pilot wire
: 0,32 - 2,1 mm2.
: 0 - 50°C
AUBE TECHNOLOGIES INC. THREE (3) YEAR LIMITED WARRANTY
This product is guaranteed against workmanship defects for a
three-year period following the initial date of purchase. During this
period, AUBE Technologies Inc. will repair or replace, at our option
and without charge, any defective product which has been used
under normal conditions.
The warranty does not cover delivery costs and does not apply to
products poorly installed or randomly damaged following installation. This warranty cancels and replaces any other manufacturer's
express or implied warranty as well as any other company commitment. AUBE Technologies Inc. cannot be held liable for related or
random damages following the installation of this product.
The defective product as well as the purchase invoice must be
returned to the place of purchase or mailed, prepaid and insured, to
the following address.
Tec h ni c a lTec h ni c a lTec h ni c a lTe chn ica lTec h ni c a l
Tec h ni c a l
Tec h ni c a l
Tec h ni c a lTe chn ica l
Tec h ni c a lTec h ni c a l
Tec h ni c a lTec h ni c a l
For any questions regarding the product installation or operation,
contact our technical support team at:
࿆࿄࿑࿄࿇ ࿄
705, Montrichard
Saint-Jean-sur-Richelieu, Québec
J2X 5K8
Canada
Tel. : (450) 358-4600
1-800-831-AUBE
service@aubetech.com
࿉࿕࿄࿑࿆࿈
10, rue Ampère
95500 Gonesse, France
Tel. : 33 (0) 1 34 07 99 00
Fax : 33 (0) 1 34 07 99 19
advaube@comintes.com
SupportSupportSupportSupportSupport
Support
Support
SupportSupport
SupportSupport
SupportSupport
TH134 400-134-000-A 1/27/05 4/4
 Loading...