

Page 1
11 12
Setting Guide
Introduction
Thank you for buying the "URBANO V01" (simply called the "product" from here on). In this guide, settings and precautions for
using the product are described.
For explanations of basic functions, refer to "Basic Manual".
■ Basic operation
Describes the basic operations.
■ Initial settings
Make initial settings when you turn the
power on for the first time.
■ au Easy Setting
Sets au ID
■ E-mail
Make initial settings for @ezweb.ne.jp
etc.
Company names and product names referred to in this manual are trademarks or registered trademarks of respective companies.
The TM, ® marks may be omitted in this manual.
Screen illustrations shown in this manual may look different from the actual screens. In some cases, minor details or a part of a screen may be omitted.
■ Making a call
Adds a contact as a new and makes a
call.
■ Receiving a call
Describes how to receive a call.
■ Saving battery power
Describes the setting to save battery
consumption using "E-saving settings".
■ Setting Wi-Fi
Describes how to connect Wi-Fi®
network.
®
■ Viewing/playing data
Describes how to view/play still images
or video data.
■ Infrared communication
Describes how to send/receive data
between the product and another
device using infrared communication
function.
November 2014, 1st Edition
Sold by: KDDI CORPORATION,
OKINAWA CELLULAR TELEPHONE COMPANY
Manufactured by: KYOCERA Corporation
Basic operation
For detailed operation method, refer to "Basic Manual".
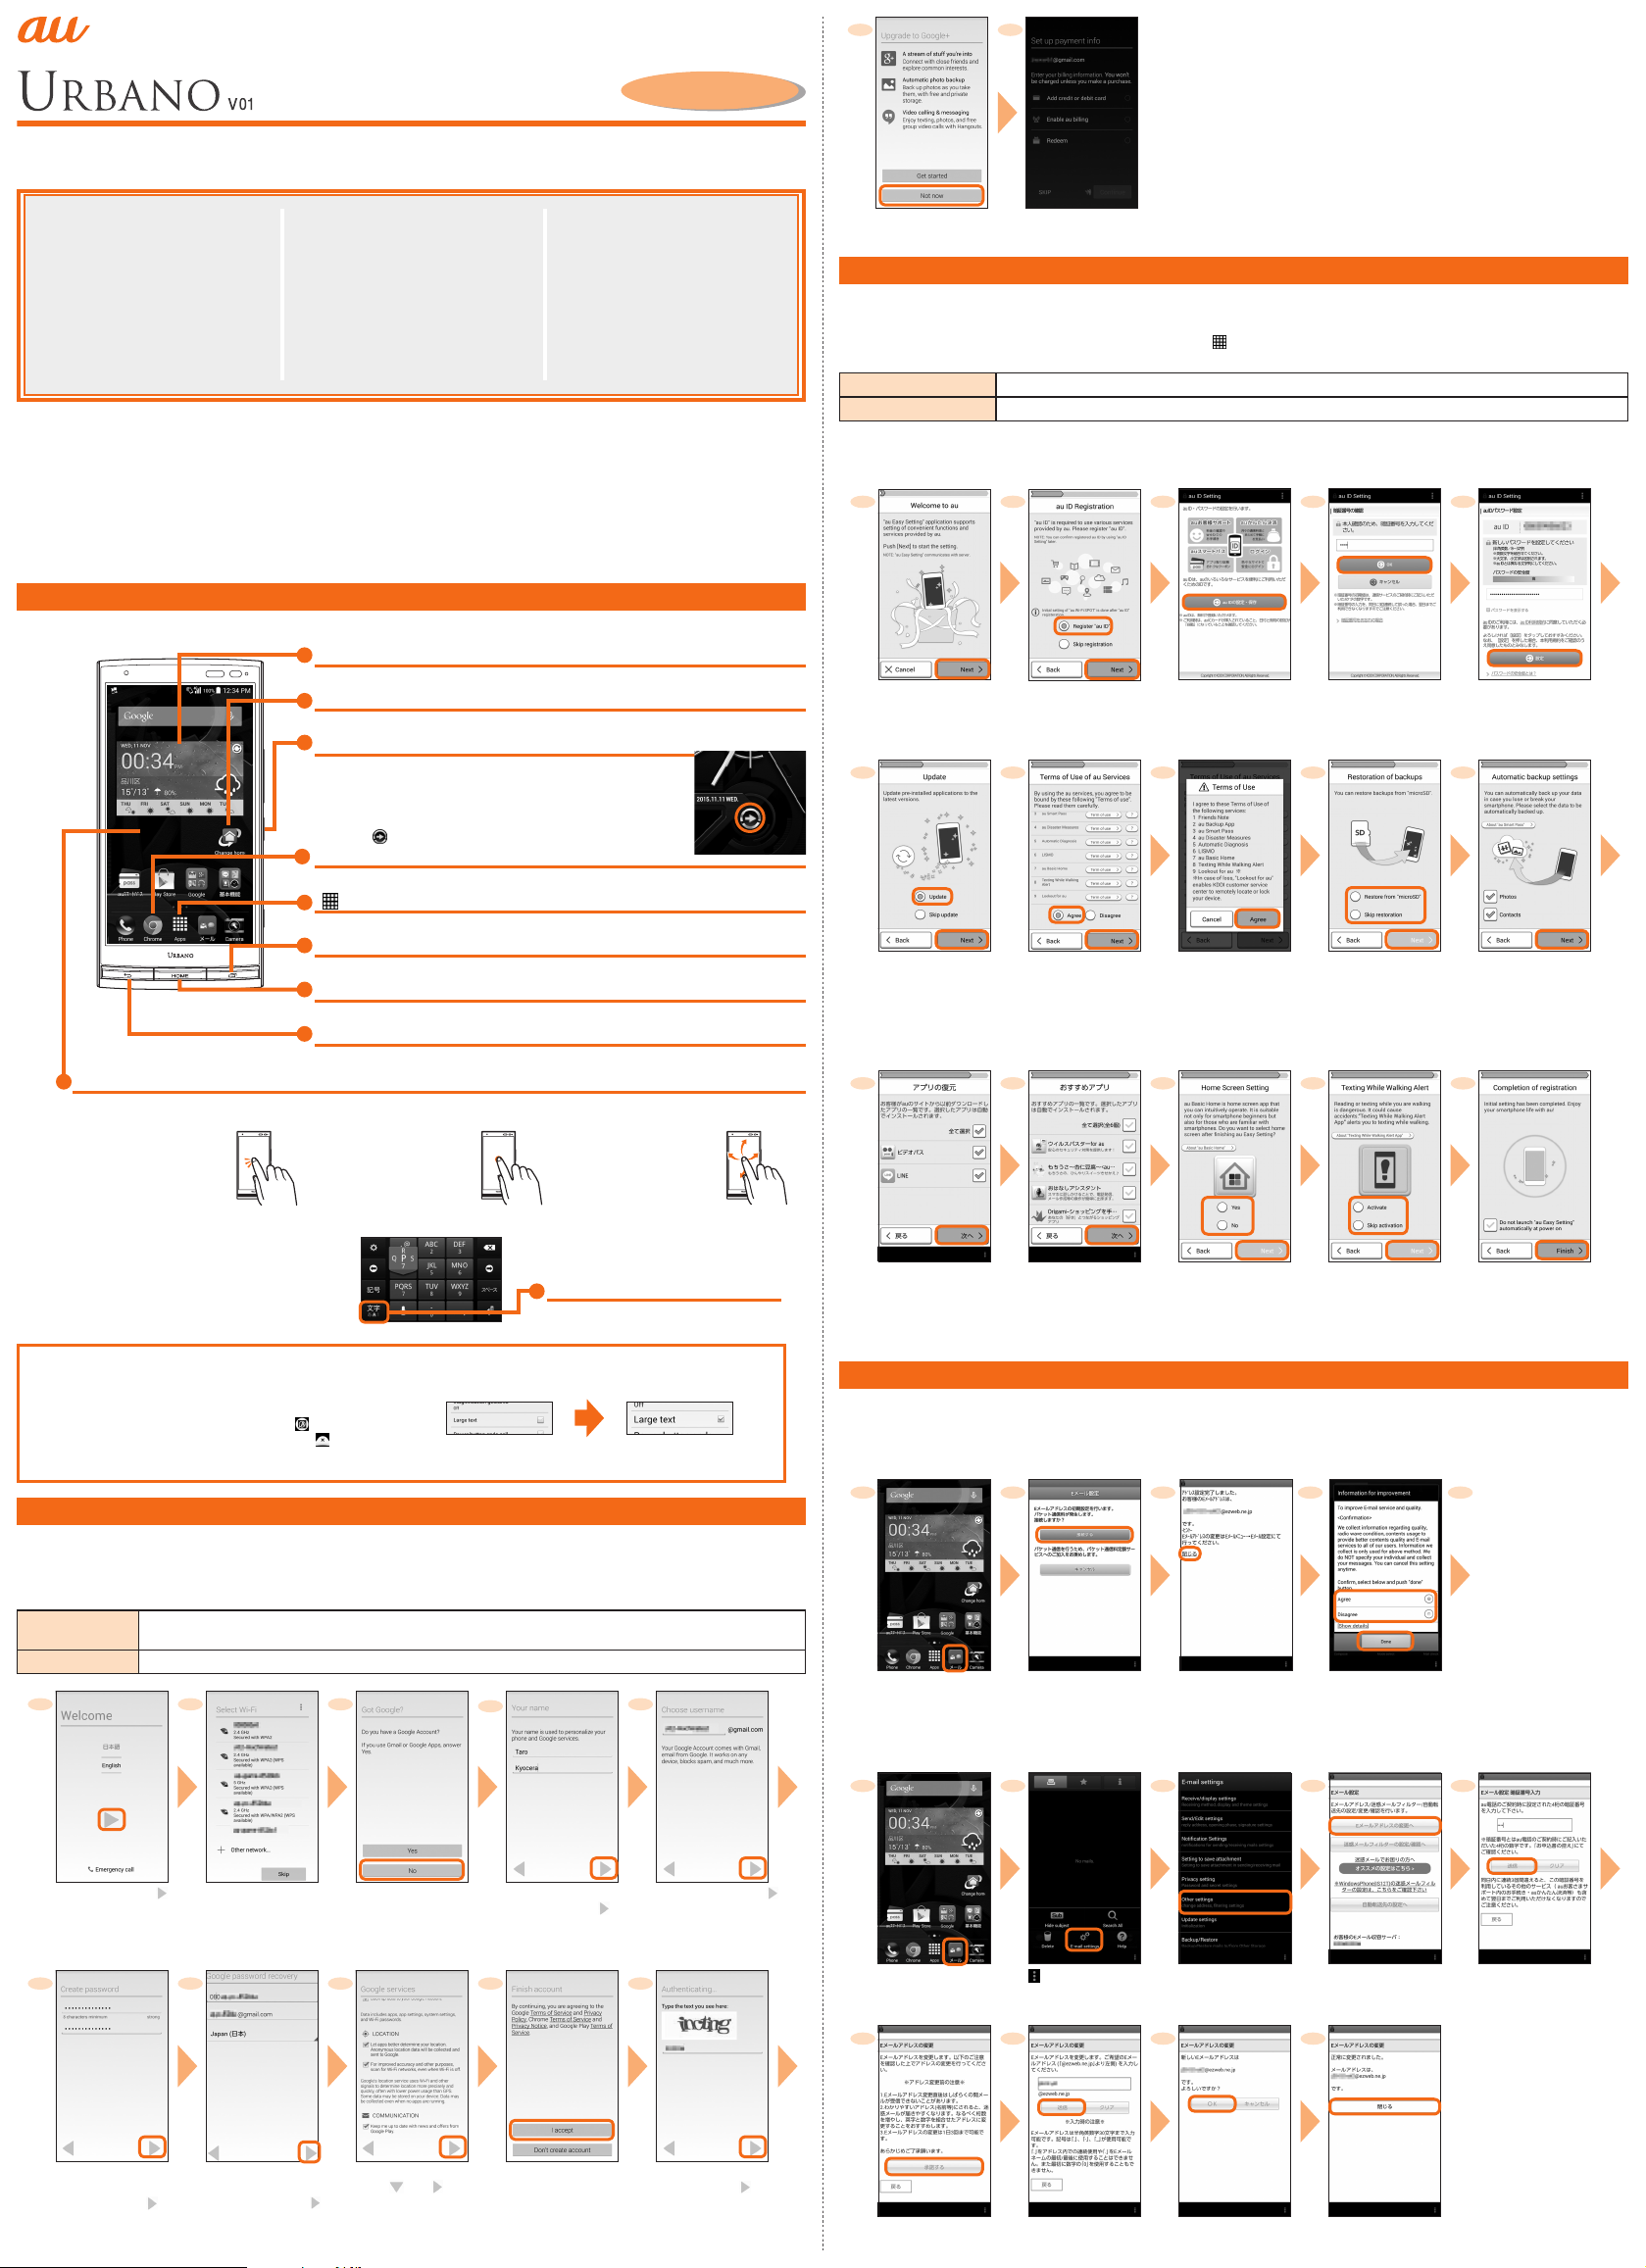
≪ Home screen (Standard home) ≫
天気 (Weather) widget
Display the weather information. When you activate for the first time, tap and select an area.
Change home
Switch the home app.
Power key
F
Power ON
Press and hold F until the incoming light turns on.
Disabling Security
Slide " " to disable security
Chrome
You can browse websites using Google Chrome.
[ (Apps)] Apps list
Display the Apps list.
RECENTS key
N
Display the recently-used apps.
HOME key
H
Display the Home screen or use for canceling sleep mode.
BACK key
C
Tap to return to the previous screen.
Display
Operate directly touching with your finger.
Tap
Lightly touch a screen and
then immediately release
your finger.
Long-touch
Keep touching an item or
key.
Flick
Quickly move (flicking)
your finger up, down, right,
or left.
■ Character entry
Enter character by flick input or tapping key repeatedly.
Flick input
Long-touch a key to display input candidates
for flick input as right screen. Flick to the
direction of character to enter.
《Character entry screen (10-key)》
Character entry mode switch key
Tap to switch character type.
Enlarging characters
You can display large and sharp characters on menu items etc. For change of character size, make settings as follows.
Apps list → [Settings] → [Accessibility] → [Large text]
• Alternatively, press and hold N then tap " " to magnify and see
the desired area with " 拡大鏡 (Magnifier)". Tap "
Magnifier to close.
" at the top of
《After change of the
character size》
Initial settings
When you turn on the product for the first time, follow the onscreen instructions to set the language, functions, services, etc.
■ Setting up Google account
Set up Google account to use Google apps such as "Gmail", "Play Store", "Hangouts". Setting items are as below (besides the items below,
register "First" name, "Last" name).
User name
Password Register password for the Google account.
1 2 3
Register your Google account (user ID) and any character string for mail address. You can register a desired
name, but a registered name by another user cannot be set.
4
5
Select if you join Google+
Tap "Not now" to go to the next.
Make purchase settings of
Google Play as required
au Easy Setting
By setting au ID, you can use various services provided by au such as "au Simple Payment Service" which allows you to purchase
applications from the au スマートパス (au Smart Pass) or Google Play. Main setting items as follows.
The first time the product turns ON, "au へようこそ (Welcome to au)" appears to help you make Initial settings for "au かんたん設定 (au Easy
Setting)" etc. Press
input)] → [言語(Language)] → "English" to switch language, then set au Easy Setting. From the Home screen → [Apps] → [au Easy Setting].
au ID* Register your au phone number or any character string for au ID (user ID).
au ID password Register password for using au ID.
* Username which is already used by another user cannot be set.
• If you skip the operation of "au かんたん設定 (au Easy Setting)" when you purchased the product, you can set au ID later. In that case,
Apps list → Tap "au かんたん設定 (au Easy Setting)" or "au ID 設定 (au ID Setting)".
twice and then from the Home screen → [ ( アプリ一覧 (Apps))] → [ 設定 (Settings)] → [ 言語と入力 (Language &
C
1 2 3 4 5
Welcome to au screen
→ [Next]
6 7
[Update] → [Next] Check the terms and
[Register "au ID"]
→ [Next]
conditions (reading
required), [Agree] → [Next]
[au ID の設定・保存
(Set/save au ID)]
8 9
[Agree]
* Pre-configuration of Lookout
for au is complete.
Enter the security code →
* Default value is a four-digit
* If no data to restore, the
* When a screen different from
[OK]
number written at subscription.
Select whether to
restore data → [Next]
screen does not appears.
the above appears, follow
the onscreen instructions.
Enter a security
password → [ 設
定 (Settings)] →
[Exit ( 終了 )]
10
Select a service to use → [Next]
11 12 13 14 15
Select apps to restore
→ [次へ (Next)]
* It is displayed only if
you downloaded from
au website before.
Select apps to install →
[次へ (Next)] → [OK]
* When a screen different
from the above
appears, follow the
onscreen instructions.
E-mail
To use E-mail (@ezweb.ne.jp), subscription to LTE NET is required.
If you did not subscribe it when you purchased the product, contact an au shop or Customer Service Center
Your E-mail address is determined automatically after initial settings. You can change the E-mail address later.
■ Initial settings
[Yes]/[No] → [Next]
[Activate]/[Skip
activation] → [Next]
[Finish]
.
1 2 3 4 5
When the
description screen
for E-mail function
appears, confirm
the content and tap
[Close].
Home screen → [ メール
(Mail)] → [E-mail]
Check the contents,
then [接続する
(Connect)]
After E-mail initial settings,
your E-mail address appears.
Check E-mail address and
tap " 閉じる (Close)".
Check the content
of "Information for
improvement" → [Agree]/
[Disagree] → [Done]
■ Changing your e-mail address
1 2 3 4 5
Select language, [ ] Set up the Wi-Fi network
to connect as required
* If you do not set up, tap
"Skip".
On the Google account
setting screen → [No]
→ [Get an account]
If you have Google account,
tap "Yes".
6 7 8 9
Enter a password, and
reenter the password for
confirmation → [
]
[Set up recovery options] → Enter
spare mail address* in case you
forgot the password → [ ]
* If you have no another mail
address, leave the area blank.
Check the contents,
then [
] → [
]
Enter "First" name and
"Last" name → [ ]
Check the contents,
then [I accept]
Enter a user name → [ ]
Checking registration of
username starts.
10
Enter text displayed on
screen → [ ]
* This screen may not be
displayed.
Home screen → [ メール
(Mail)] → [E-mail]
[ ] → [E-mail settings] [Other settings]
→ [接続する (Connect)]
6 7 8 9
Check the contents, then
[承諾する (I accept)]
Enter E-mail
address → [送信 (Send)]
[OK] [ 閉じる (Close)]
[Eメールアドレスの変
更へ (To Change E-mail
address)]
Enter the security
code → [送信 (Send)]
Page 2
■ Backing up E-mail
You can back up E-mail.
Backed up data is saved on a microSD
attached. If a microSD
TM
memory card is not attached, data is saved on the internal storage (/storage/emulated/0/private/au/email/BU/).
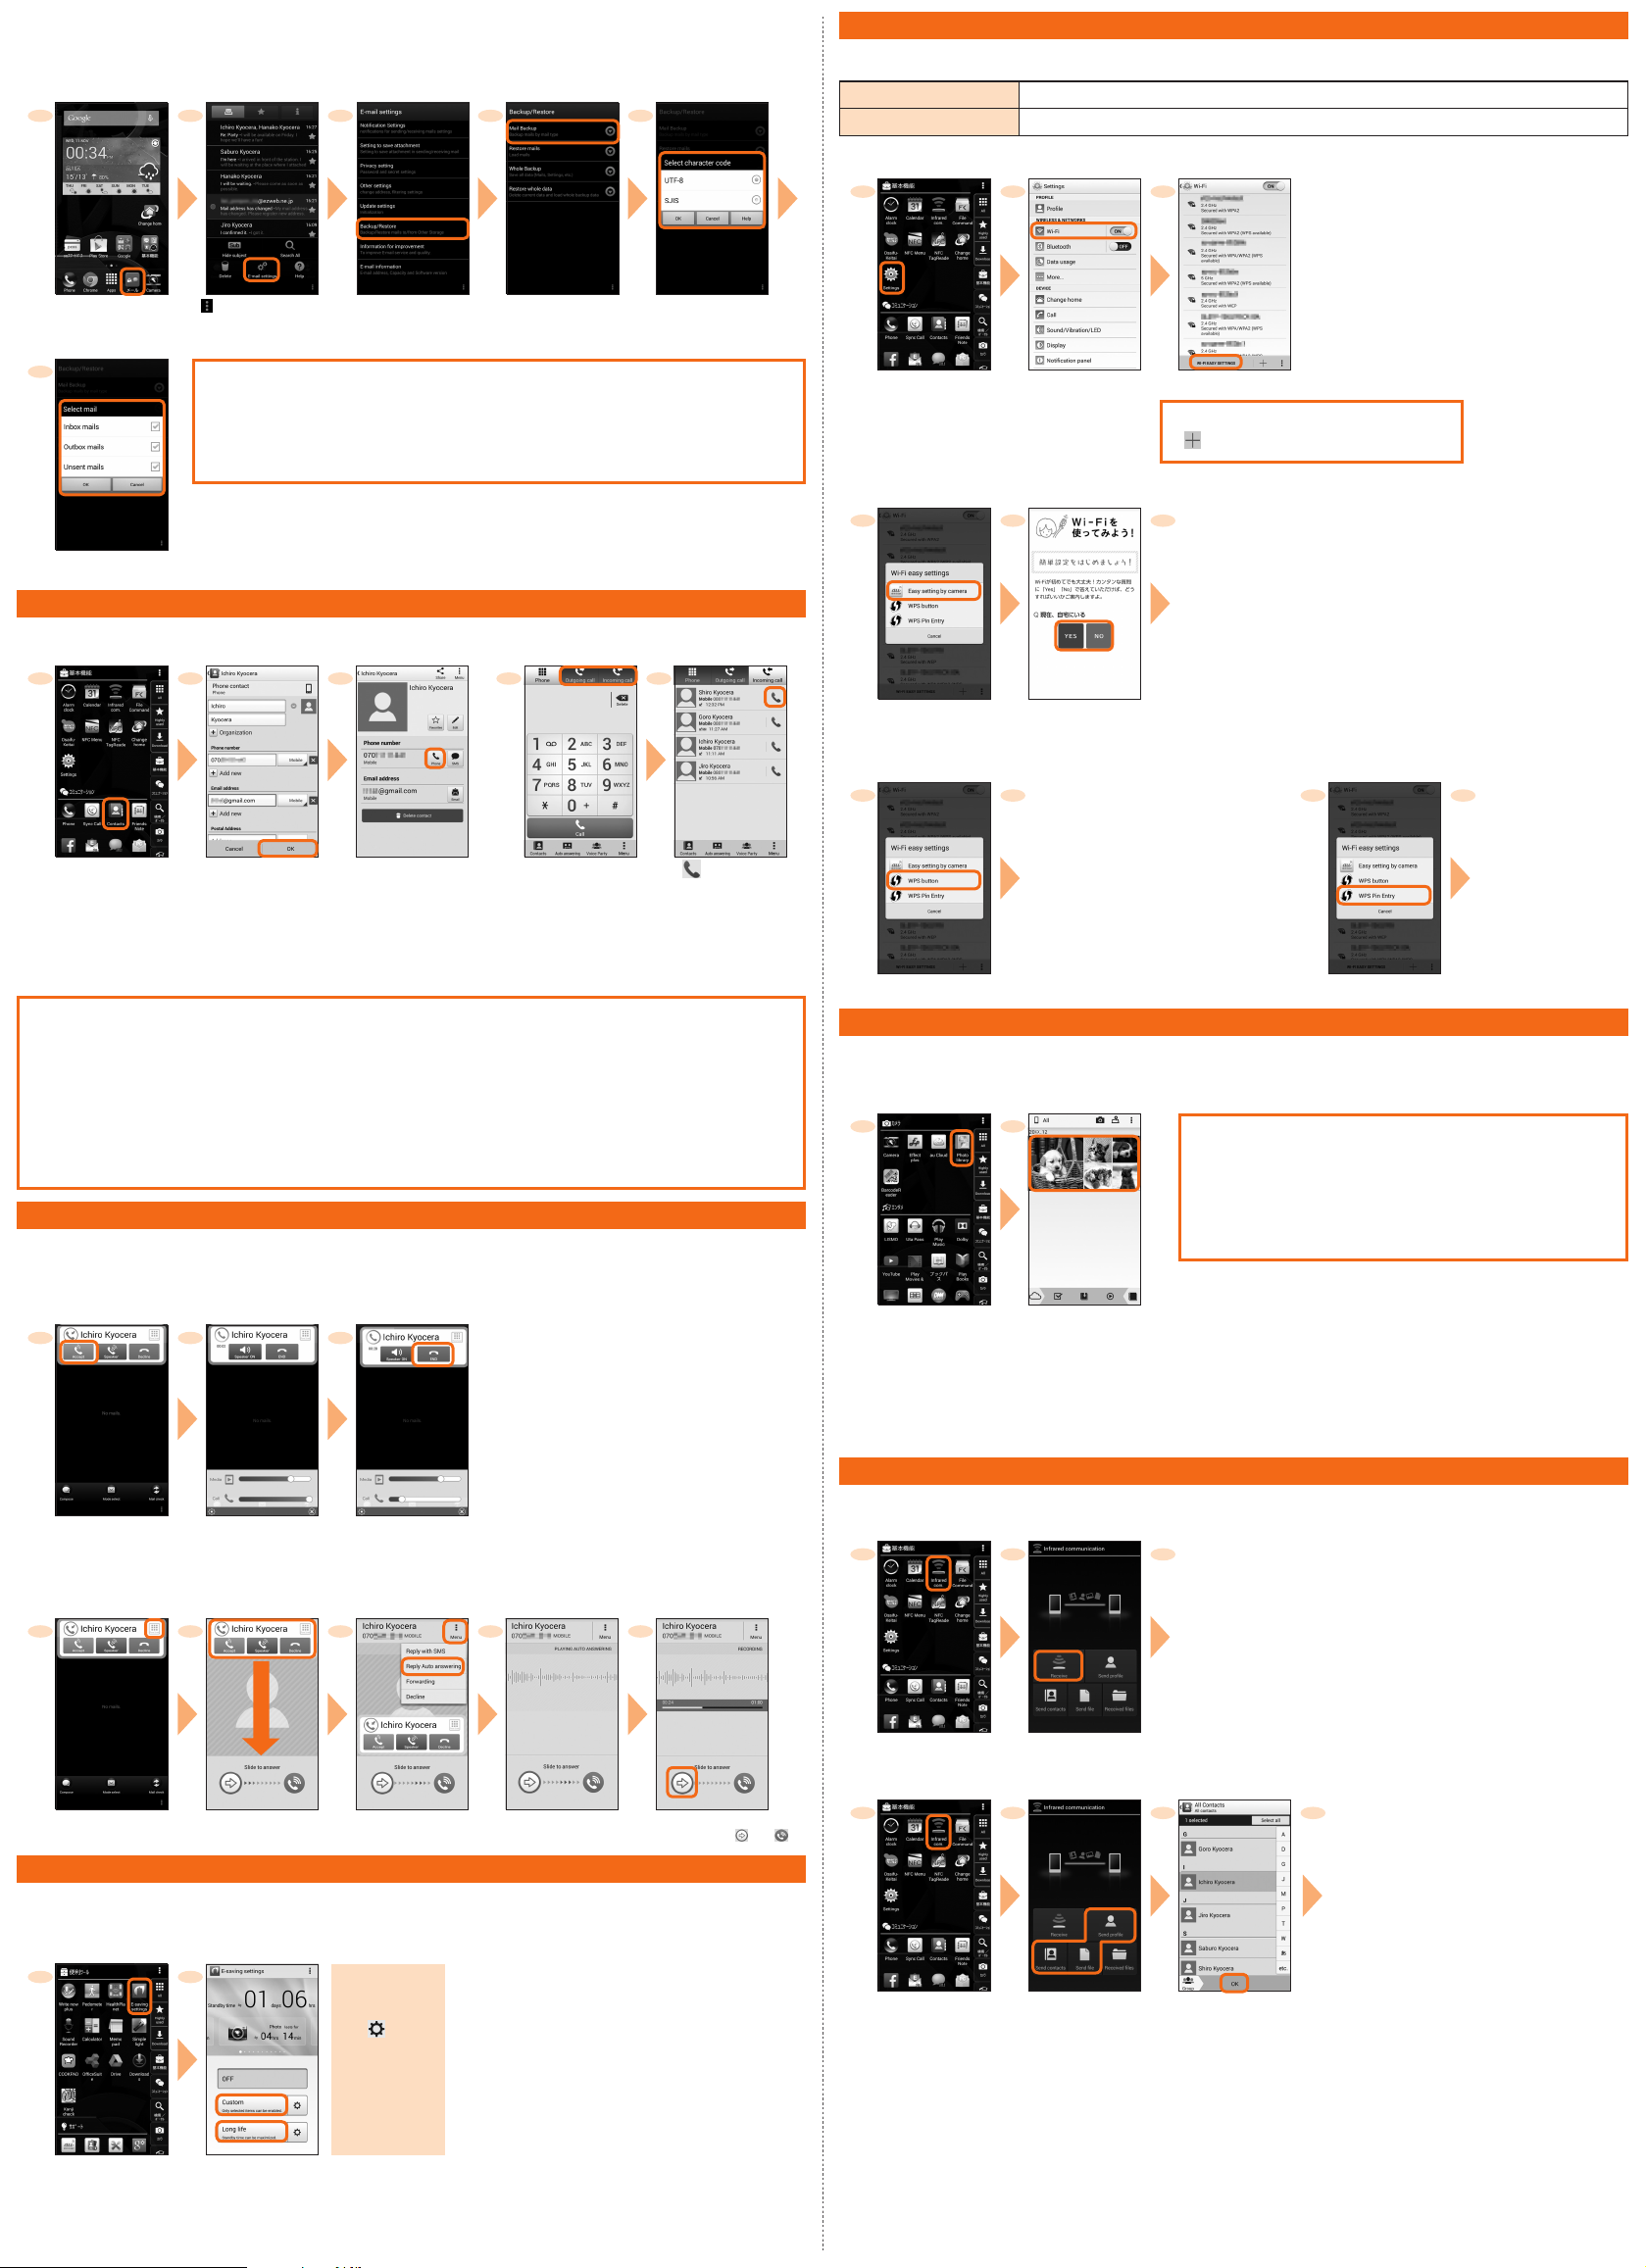
1 2
TM
memory card (/storage/sdcard1/private/au/email/BU/) when a microSDTM memory card is
3 4 5
Setting Wi-Fi
Use your home Wireless LAN (Wi-Fi®) or public wireless LAN to connect internet.
Main settings are as follows.
Easy setting by camera Use for registration of access point compatible with "Easy setting by camera".
WPS system Use for registration of access point compatible with Wi-Fi Protected Setup™ with WPS mark.
* If you turn on wireless LAN (Wi-Fi®) function, battery consumption increases. You are recommended to tur n wireless LAN (Wi-Fi®) function to OFF
when not using wireless LAN (Wi-Fi
®
®
) function.
1 2 3
Home screen → [ メール
(Mail)] → [E-mail]
6
[ ] → [E-mail settings] [Backup/Restore] [Mail Backup] →
Confirm the notes
and [OK]
Select a character code
to make backup data →
PC-mail settings
You can use mail addresses except for E-mail (@ezweb.ne.jp).
You need to set up a PC-mail account to use PC-mail. For the first time use, make settings as follows.
Apps list → [PC mail] → Enter E-mail address and password → [Next] →
Set account → [Next] → Enter account name etc. → [Next]
Select a mail type to
back up → [OK]
Making a call
■ Adding new contact and making a call
■
Making a call from incoming/outgoing history
1 2 3 1 2
Apps list → [Contacts] [Create a new
contact] → [Keep local]/
[Add account] → Enter
necessary item → [OK]
If you tap "Add account",
follow the onscreen
instructions to set an account.
When All Contacts screen
appears, tap "Create contact".
[Phone] Home screen →
[Phone] → Tap [Outgoing
call]/[Incoming call] tab
[OK]
[ ] of a par ty to call
Apps list → [Settings] [Wi-Fi]
Available Wi-Fi
networks are
detected
automatically and
their SSIDs appear in
the Wi-Fi networks.
[WI-FI EASY SETTINGS]
When access point is not detected, tap
"
" to add access point manually.
■ Using Wi-Fi connection tool by the camera
4 5 6
Follow the
onscreen
instructions
to register an
access point.
[Easy setting by camera]
■ Using WPS system access point
WPS button WPS Pin Entry
4 5
[WPS button] [WPS Pin Entry]
Select the set place
4 5
Keep pressing WPS
button of access point
to set to WPS mode.
An access point is
automatically detected
and registration starts.
Enter displayed PIN
code for access point,
then registration starts.
Checking your own phone number (Profile)
Operate as follow to check your own phone number.
Apps list → [Settings] → [Profile] → Profile screen appears.
Checking your E-mail address
Your E mail address can also be checked on profile screen.
If you make initial settings for [E-mail] app as follows, the E-mail address of E-mail (@ezweb.ne.jp) can be automatically registered to
profile screen.
Home screen → [ メール (Mail)] → [E-mail] → [Connect] → [ 閉じる (Close)] → Registered to profile screen.
Receiving a call
You can receive a call in the following steps.
*"Display the popup on an incoming call" is set to ON in Sync Call settings by default. When it is set to OFF, while sleep mode is activated
or while the start screen is displayed, follow the onscreen instructions.
■ Calling
1 2 3
Receiving
screen → [Accept]
■ Answering with answering memo
Answer by the answering memo message and record a message of the party when you cannot answer calls.
Start calling To end the call, [End]
1 2 3 4 5
Receiving screen →
[Phone Screen]
Saving battery power
Use "E-saving settings" to set sleep time of backlight and screen brightness to the minimum value or to enable/disable auto rotation
of screen, Wi-Fi
Data communication, etc. so that you can save the battery power. When the battery power is low, set "Auto data control" to OFF and limit
communications only for calling to extend standby time.
®
, Auto data control, Bluetooth®, GPS satellites, Reader/Writer, P2P, Voice Wake Up, Pedometer, CPU clock restriction,
Drag the operation
panel downwards
[Menu] → [Reply Auto
answering]
The caller hears the
guidance
To answer the call, slide to
the right from " " to " "
1 2
Tap " " by
"Custom"/"Long
life" to check and
change items to
save power.
Apps list →
[E-saving settings]
[Custom]/[Long life]
Viewing/playing data
By transferring data from the previously used au phone to a microSD™ memory card, you can view/play* still images, movie data, etc.
using "Photo library" in the product.
* Copyrighted data on the previously used au phone cannot be transferred to the product. However, some 着うたフル®, ビデオクリップ , 着うたフル
®
may be able to be transferred and played on the product with the same phone number by backing up with LISMO Port Ver 4.2 or later.
プラス
1 2
Backing up by au Backup App
You can back up/restore various data saved on your smartphone to
microSD™ memory card by downloading au Backup App.
Backup data of your old terminal can be completely migrated. Also,the
contacts on a feature phone can be migrated easily. For details about
downloading etc., refer to au homepage.
http://www.au.kddi.com/mobile/service/smartphone/safety/backup/
Apps list → [Photo
library]
When you activate
for the first time, an
explanation screen
appears. Follow the
onscreen explanations,
[Next] → [Next] →
[Exit] to complete.
Tap a category and tap a
data to be displayed
Data is played.
Infrared communication
You can send/receive profiles or various data between the product and another device using infrared communication.
■ Receiving data
1 2 3
Apps list →
[Infrared com.]
[Receive]
Point the infrared
data port of the
product to the
infrared data
port of the other
device.
When the
authentication
code entry screen
appears, enter
authentication code
(four-digit number)
→ [OK].
■ Sending data
1 2 3 4
Point the infrared
data port of the
product to the
infrared data
port of the other
device.
Apps list → [Infrared
com.]
[Send profile]/[Send
contacts]/[Send file]
If you tap "Send profile",
data transfer starts.
Select a data item to
send → [OK]*
When authentication
code entry screen
appears, enter
authentication code (fourdigit number) → [OK].
* In the case of data
transmission with File
Commander, tapping
[OK] is not required.
 Loading...