

Page 1
Basic Manual
memo
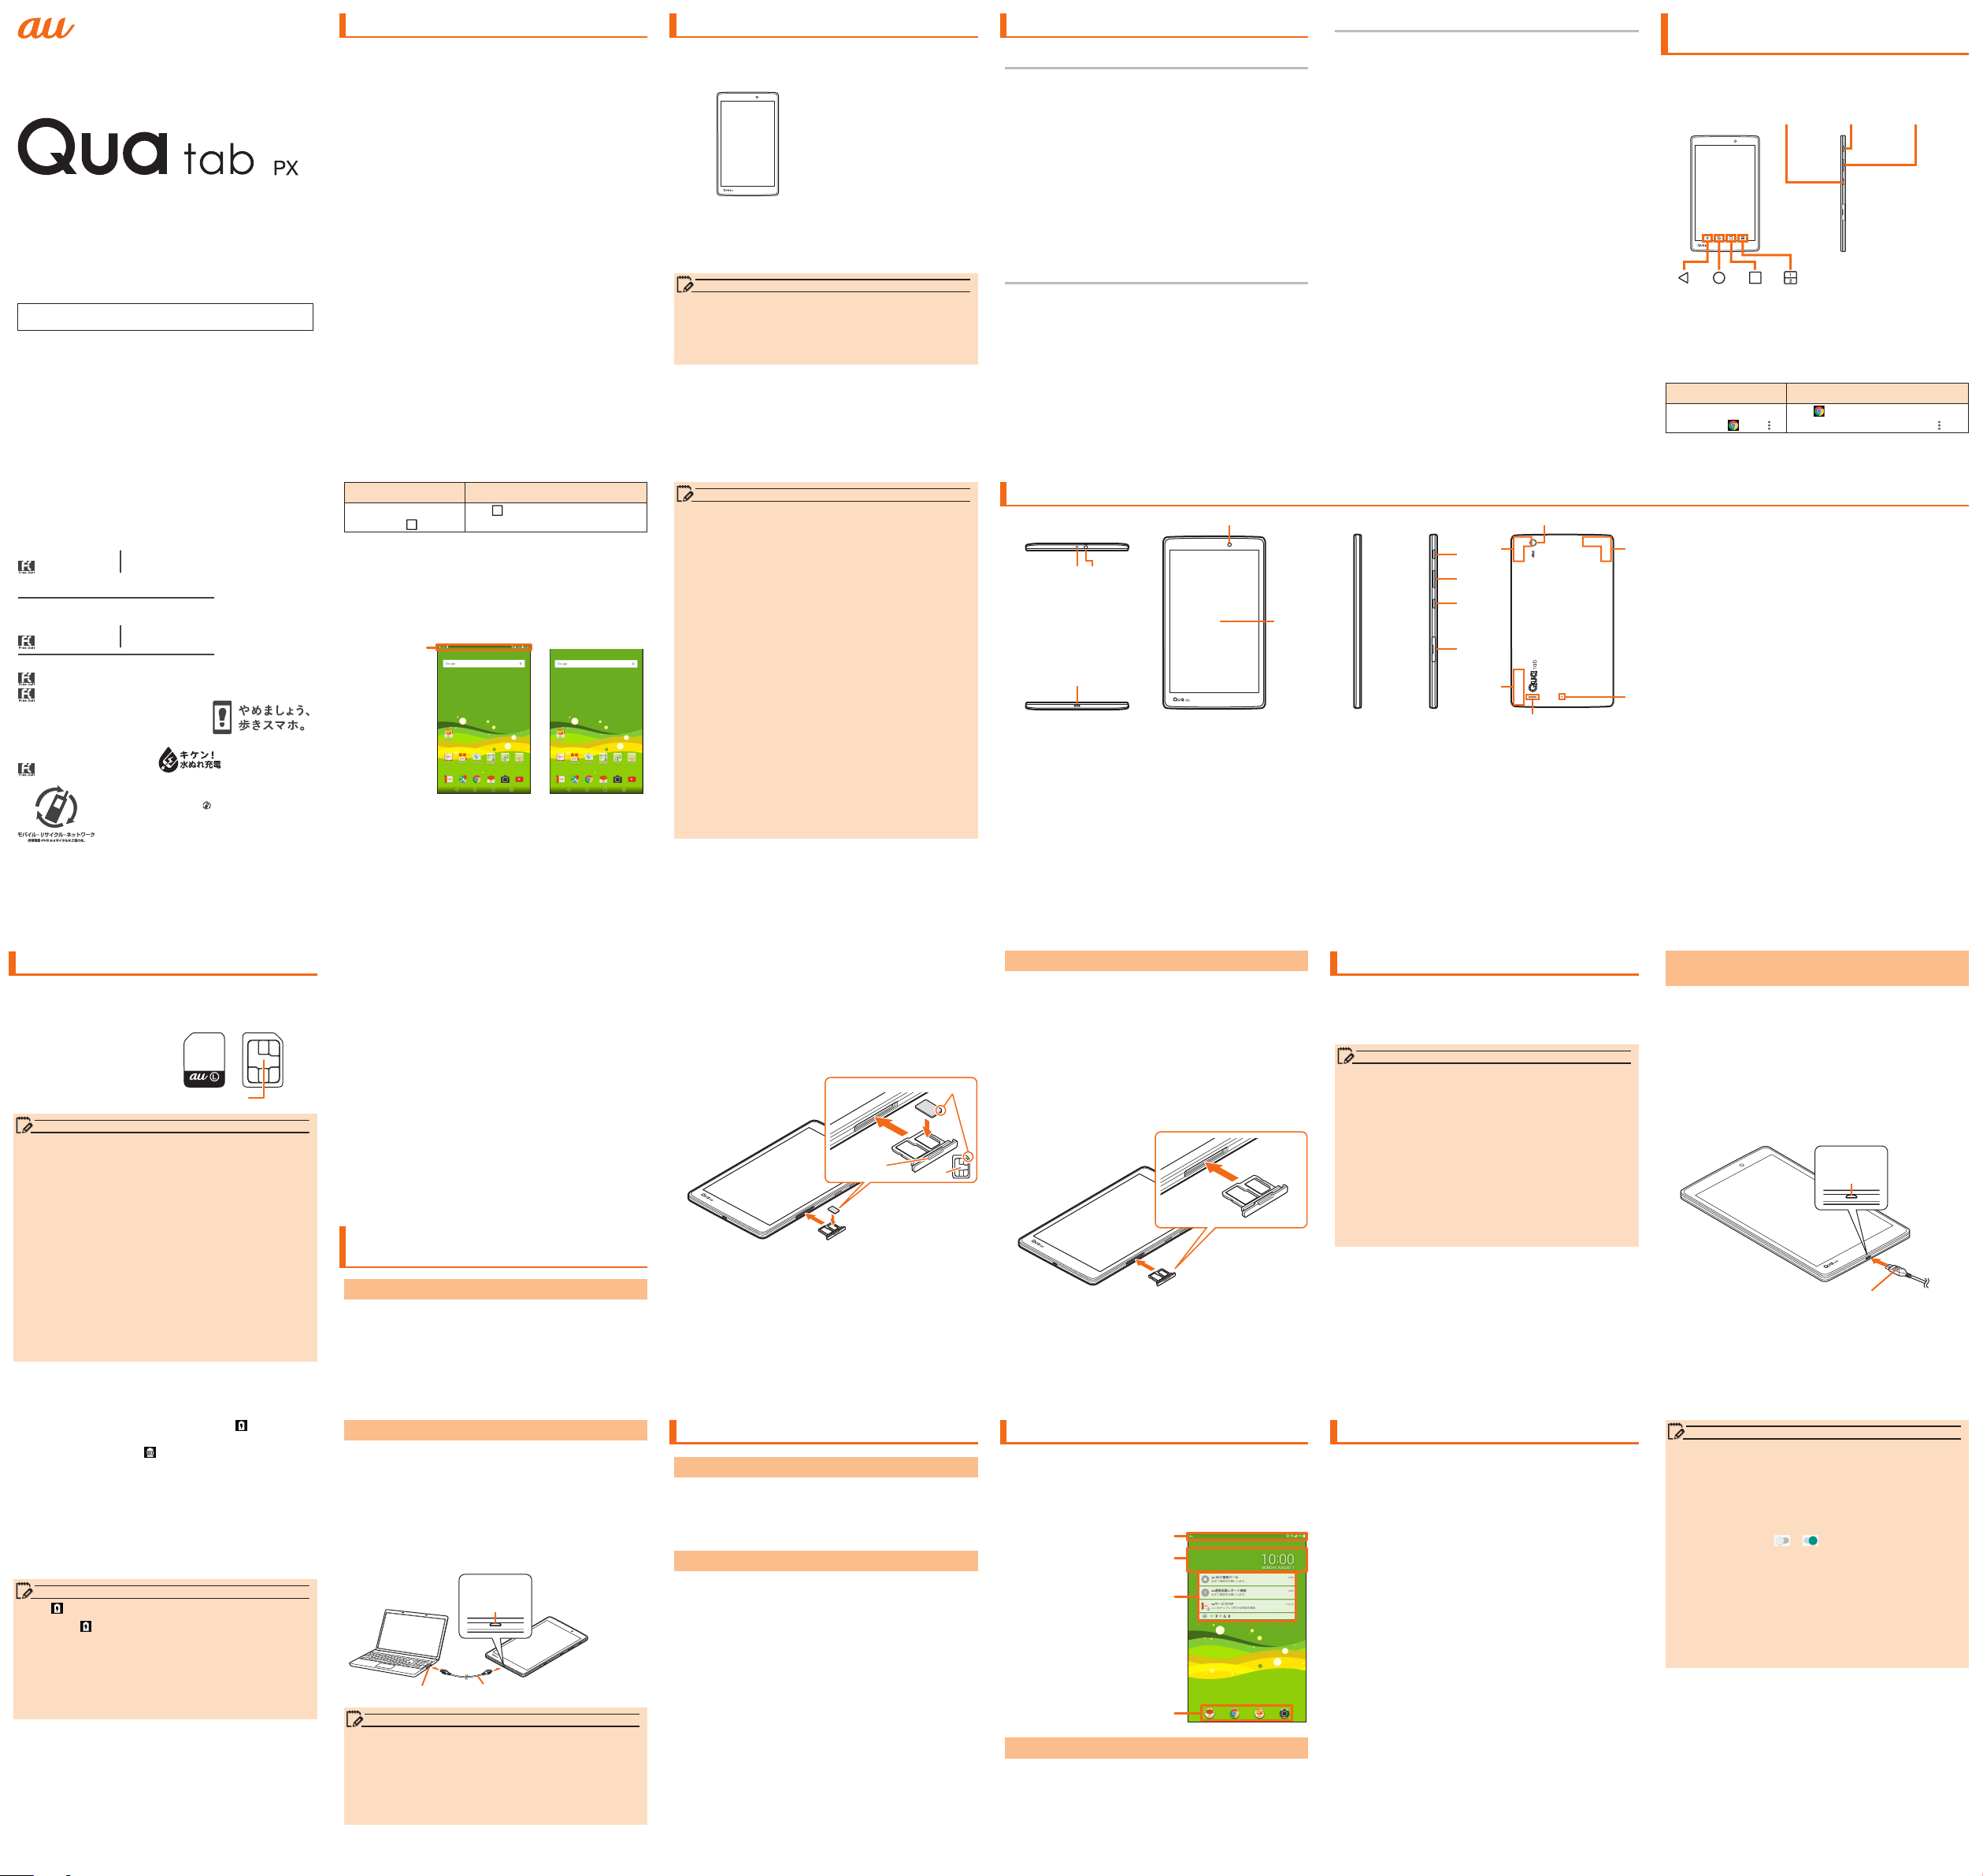
Q button Volume keyPower key
Actual screen Screen in this
manual (example)
In this manual,
icons, etc. of
a screen are
omitted.
e
d
《Bottom side》 《Front side》
j
m
l
《Back side》《Left side》《Right side》
IC (metal) part
《au Nano IC Card 04 LE》
memo
Notch
memo
memo
USB port of a PC
microUSB cable (sold separately)
External
memo
a
c
d
b
memo
memo
For detailed operation methods, refer to "Basic Manual" application installed on
the product.
May 2016, 1st Edition
MBM65345002(1.0)
Preface
Thank you for purchasing the "Qua tab PX" (simply
called the "product" from here on).
Before using the product, be sure to read the supplied
"Setting Guide", "Notes on Usage", "Basic Manual"
(this manual) or "User Guide 取扱説明書 詳細版 (Full
Instruction Manual)" (Japanese) available on the au
homepage to ensure correct use. After you have
nished reading this manual and the printed manuals
supplied, be sure to store them in safe places so that
you can retrieve them whenever needed. If you lose
the printed manuals (supplied), contact an au shop or
Customer Service Center.
- 1 -
List of Packaged Items
Before your start using the product, make sure that
you have all the following packaged with the product.
●Main unit
The following items are not included in the package.
●microUSB cable
●microSD memory card
●Earphone
• Purchase a specied charger (sold separately).
• The battery is built into the product.
• The illustrations in the manual are used only for
explaining. They may dier from the actual product.
● 設定ガイド (Setting
Guide) (Japanese)
●
ご利 用に あ たって の注 意 事
項
(Notes on Usage)
(Japanese)
● 取扱説明書 (Basic
Manual) (Japanese)
● 保証書 (Warranty)
(Japanese)
●AC adapter
- 2 - - 3 - - 4 - - 5 -
About Operating Instructions
●取扱説明書 (Basic Manual) (Japanese)
Handles only basic operations for main features.
For detailed descriptions on various functions,
refer to the "Basic Manual application" installed on
the product or "User Guide 取扱説明書 詳細版 (Full
Instruction Manual)" (Japanese) available on the au
homepage.
http://www.au.kddi.com/support/mobile/guide/
manual/
• All company names and product names in this
manual are either trademarks or registered
trademarks. The
manual.
Basic Manual application
You can use the "Basic Manual application" on the
product to conrm detailed operational procedures.
Certain functions can be directly activated from the
application screens on which their operations are
described.
On the Home screen u [au Supports] u [Basic
a
Manual]
• When you activate for the rst time, follow the
onscreen instructions to download and install the
application.
TM, ®
marks may be omitted in this
Downloading Manuals
You can download the English version of the
Basic Manual from the au website (available from
approximately one month after the product is released).
You can nd "Basic Manual" (English excerpts from
Instruction Manual) on au homepage.
Download URL: http://www.au.kddi.com/support/
mobile/guide/manual/
*
You can use the English version of the manual from
the Basic Manual application.
Regarding Notations Used in This
Manual
■■ Key/button■indications
In this manual, keys/buttons are represented by
simplied illustrations as shown below.
■■ Description■of■operations■for■selecting■item/icon/
button■etc.
The notations used for operation procedures in this
manual are as follows.
Tap means to lightly touch and release the button or
icon shown on the display to select it.
Description Explanation
Tap
On the Home
screen u [
] u [ ]
(Chrome) on the bottom
of Home screen. And tap
.
For inquiries, call:
Customer Service Center
For general, charge, operations (toll free)
Business hours 9:00 – 20:00
From fixed-line phones:
0077-7-111
PRESSING ZERO WILL CONNECT YOU TO AN OPERATOR
AFTER CALLING 157 ON YOUR au CELL PHONE
For service canceling procedure in case of loss or theft
Business hours 24-hour (7 days a week)
From fixed-line phones:
0077-7-113
In case above numbers are not available,
0120-977-033 (except Okinawa)
0120-977-699 (Okinawa)
Keitai Guarantee Service Center
For loss, theft or damage (toll free)
Business hours 9:00 – 20:00 (7 days a week)
From fixed-line phones/au cell phones,
0120-925-919
(7 days a week)
From au cell phones:
157
area code not required
From au cell phones:
113
area code not required
Cell phone and PHS operators collect and
recycle unused telephones, batteries and
battery chargers at stores bearing the
logo regardless of brand and manufacturer
to protect the environment and reuse
valuable resources.
Sold by: KDDI CORPORATION,
OKINAWA CELLULAR TELEPHONE COMPANY
Imported by: LG Electronics Japan Inc.
Manufactured by: LG Electronics Inc.
(toll free)
It is very dangerous to charge
the product in a wet state,
this could cause abnormal
heat generation or a burnout.
Description Explanation
On the Home
screen u [
]
Tap
on the bottom of Home
screen.
■■ Illustrations■and■screen■displays
Illustrations and screens shown in this manual may
look dierent from the actual product or screen.
In some cases, minor details or a part of a screen
may be omitted.
- 6 - - 7 - - 8 - - 9 - - 10 -
• In this manual, screenshots for body color "White"
are provided as examples.
• In this manual, except as specied, the descriptions
of operation procedures are those with keys/
buttons.
• Descriptions in this manual are based on the
operations of portrait screen. Menu items/icons/
buttons on a screen may be dierent from the
ones in the horizontal display.
• In this manual, operation procedures are described
based on au Basic Home. When the home
application is changed by "Select Home" etc.,
operation procedures may be dierent.
• Items, title levels, and icons in this manual may look
dierent based on dierent functions you use or
dierent conditions, etc.
• In this manual, "microSD™ memory card",
"microSDHC™ memory card" or "microSDXC™
memory card" is called "microSD memory card" or
"microSD" for short.
• All of the indicated amounts exclude tax unless
otherwise specied.
Names and Functions of Parts
ba
《Top side》
c
Microphone
a
Earphone■jack
b
k
f
g
h
i
l
n
External■connection■terminal
c
Inward-facing■camera■(lens)
d
Display■(Touch■panel)
e
Power■key
f
Volume■key■(UP/DOWN)
g
Q■button
h
Activates a set application.
Tray
i
Stores the au Nano IC Card 04 LE/microSD memory card.
Outward-facing■camera■(lens)
j
Built-in■antenna■(Wi-Fi
k
Built-in■antenna■(Internet)
l
Vent■hole
m
Combines inner and external pressures.
Speaker
n
* Do not cover the built-in antenna with your hand or put
stickers etc. Data communication quality becomes
worse.
®
,■Bluetooth®,■GPS)
*
*
au Nano IC Card 04 LE
The■au■Nano■IC■Card■04■LE■contains■a■phone■number■
and■other■information.
• The product is
compatible with au
Nano IC Card 04 LE.
• Note the following points, which may cause
malfunction or damage, when handling the au Nano
IC Card 04 LE.
- Do not touch the IC (metal) part of the au Nano
IC Card 04 LE.
- Insert in the correct direction.
- Do not use force to attach or remove the IC
card.
• When the au Nano IC Card 04 LE is not attached
properly or the au Nano IC Card 04 LE is abnormal,
an error message appears.
• Do not lose the au Nano IC Card 04 LE after it has
been removed.
• Do not insert the au Nano IC Card 04 LE with a
conversion adapter. Doing so may cause a fault.
- 11 - - 12 - - 13 - - 14 - - 15 - - 16 -
■■ When■au■Nano■IC■Card■04■LE■is■not■inserted
When the au Nano IC Card 04 LE is not inserted, the
following operations are not available.
• Receiving/sending and initial settings of e-mail (@
ezweb.ne.jp)
• Receiving/sending SMS
Checking the phone number and mail address of this
•
product.
• Setting up SIM card lock
Besides the above, some functions requiring your
phone number might not be available.
■■ Restriction■settings■with■PIN
You can set the product to restrict the use of the
product by others through changing the PIN code
or locking the SIM card in order to protect your
important private information while you are using your
au Nano IC Card 04 LE.
Attaching/Removing au Nano IC
Card 04 LE
Attaching■au■Nano■IC■Card■04■LE
Before attaching the au Nano IC Card 04 LE, make
sure to turn the product o.
Hook the groove of the tray with your
a
ngernail and pull it out straight to remove the
tray from the main unit.
Put the au Nano IC Card 04 LE into the tray
b
with the IC (metal) part downwards, insert the
tray into the main unit, and then push it rmly
all the way straight into the slot.
• Note the direction of the notch.
• Insert the au Nano IC Card 04 LE so that it is tightly
attached to the tray.
• Make sure that there is no gap between the tray and
the main unit.
Groove
IC
Removing■au■Nano■IC■Card■04■LE
Before removing the au Nano IC Card 04 LE, make
sure to turn the product o.
Hook the groove of the tray with your
a
ngernail and pull it out straight to remove the
tray from the main unit.
Remove the au Nano IC Card 04 LE, insert the
b
tray into the main unit, and then push it rmly
all the way straight into the slot.
• Make sure that there is no gap between the tray and
the main unit.
Charging
When■you■purchase■your■tablet,■the■internal■battery■
is■not■fully■charged.■Charge■the■internal■battery■when■
you■use■it■for■the■rst■time■or■when■its■battery■is■not■
enough.
• While charging, the product and its internal battery
might become hot (when activating camera or
communicating data while charging, the internal
battery becomes hot).
• It may take longer to charge the internal battery
when you use camera function, etc. while charging
the battery.
• Operating with the specied charging equipment
(sold separately) being connected might cause
short-time charge/discharge repeatedly. Life of
the internal battery becomes shorter when you
repeatedly charge it frequently.
Charging with the Specied AC Adapter
(Sold Separately)
Describe how to charge by using the common AC
adapter 05 (sold separately).
For details on the specied AC adapter (sold
separately), refer to "Introduction of Related
Accessories".
Insert the microUSB connector of the common
a
AC adapter 05 (sold separately) straight into
the external connection terminal of the product
• Insert the microUSB connector straight with the "▲"
mark facing up.
External
connection
terminal
microUSB connector
("▲" mark facing up)
Insert the power plug of the common AC
b
adapter 05 (sold separately) into a 100 V AC
power outlet
On the status bar of the screen top, is displayed
to show the charging is starting. When the
charging is nished,
When charging is completed, remove the
c
is displayed.
microUSB connector of the common AC
adapter 05 (sold separately) straight from the
external connection terminal of the product
Remove the power plug of the common AC
d
adapter 05 (sold separately) from power
outlet
When■ ■is■not■displayed
• Wait until
the top screen. Bad connection is assumed if it
does not appear after a while. Check if Common
is displayed on the status bar of
AC adapter 05 (sold separately) is securely
connected. If it still does not appear, stop charging
and contact an au shop or a Keitai Guarantee
Service Center.
- 17 - - 18 - - 19 - - 20 - - 21 - - 22 -
Charging■with■a■PC
Insert the microUSB connector of the
a
microUSB cable (sold separately) directly into
the external connection terminal of the product
• Insert the microUSB connector straight with the "B"
mark facing up.
Insert the microUSB connector of the
b
microUSB cable (sold separately) straight into
the USB port of the PC
connection
terminal
b
a
• Although charging with the power of the product
on is available, it takes longer.
• It may take longer to charge with USB than the
specied AC adapter (sold separately).
• When the "Start new hardware search wizard"
window appears, select "Cancel".
Turning the Power On/O
Turning■the■Power■On
Power key (Press and hold for more than 2
a
seconds)
The lock screen appears.
Swipe the screen to unlock.
Turning■the■Power■O
Power key (Press and hold for more than 2
a
seconds)
[Power o] u [POWER OFF]
b
Lock Screen
This■screen■is■displayed■when■turning■the■power■on■
or■sleep■mode■is■canceled.
On■the■Lock■screen,■you■can■check■the■date■and■
time,■and■notication■information■as■well■as■use■
application■shortcuts.
Status■bar
a
Date■&■time
b
Notication■information
c
New informaiton such
as a received mail,
auシェアリンク (au
ShareLink). etc.
Application■shortcut
d
Swipe to launch an
application.
* The application
shortcuts to display
can be changed.
Unlocking■the■Lock■screen
Swipe on the lock screen
a
The Home screen appears.
• The unlock method differs depending on the screen
lock settings.
Setting Application Authority
When■activating■the■applications/functions■that■
access■the■functions■or■information■of■the■product■
for■the■rst■time,■the■conrmation■screen■appears■to■
request■the■permission■for■the■access■authority.
When■the■conrmation■screen■appears,■conrm■the■
content■and■tap■"DENY"■or■"ALLOW".
Example:■To■activate■Photo
On the Home screen u [Google] u [Photos] u
a
[ALLOW]
The application launches.
• If the application authority is not allowed,
applications/functions may not be activated or
using functions may be restricted.
• To change the authority setting, on the Home
screen u [基本機能 (Basic functions)] u [Settings]
u
[Apps] u select the application to be changed u
[Permissions] u [
]/[ ].
• The explanation screen may be displayed
depending on the application/function.
Also, the conrmation screen may be displayed
several times or the display may be dierent.
Carefully check the displayed content and follow
the onscreen instructions.
• In this manual, description of the conrmation
screens may be omitted.
Page 2
Using the Home Screen
f
c
a
e
d
b
memo
memo
memo
memo
memo
memo
memo
memo
Viewing■Home■Screen
At the time of purchase, the setting for the Home
screen is set to "au Basic Home" where you can use
frequently used applications in a single operation.
The Home screen can be switched.
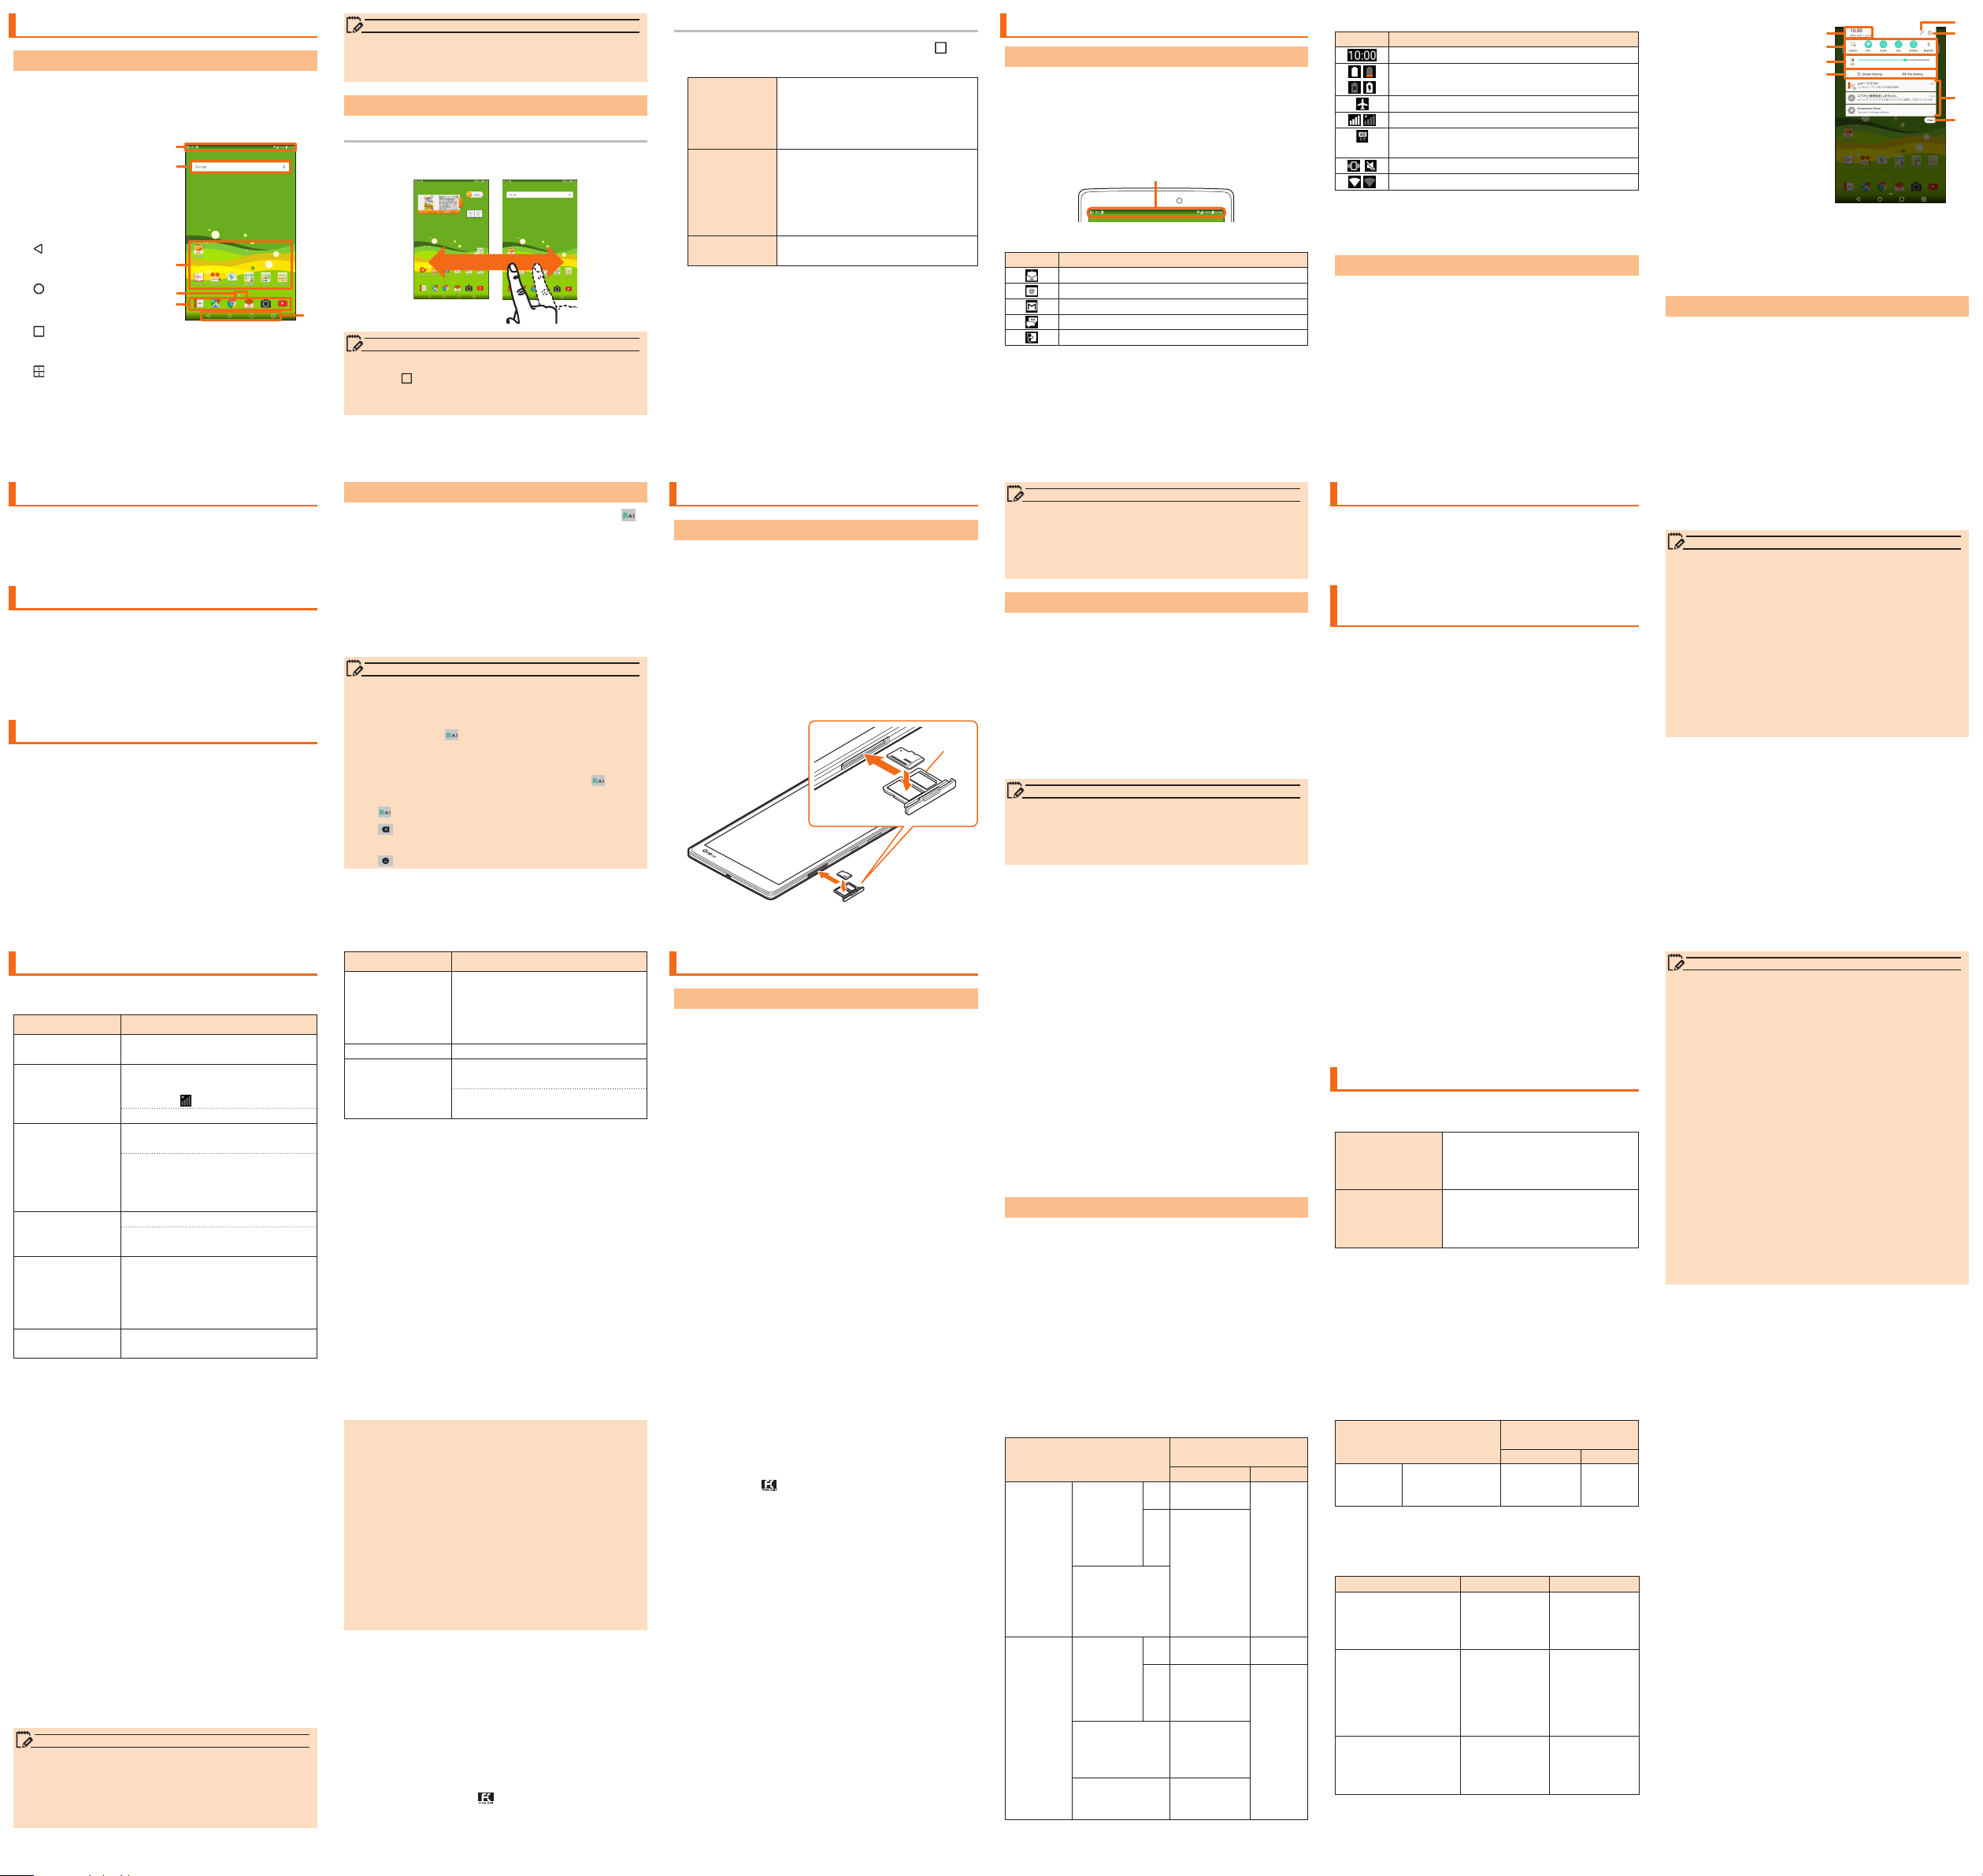
Status■bar
a
Quick■search■box■
b
(widget)
Application/Folder
c
Indicator
d
Quick■launch■area
e
Home■touch■button
f
■
Back■button
■
Returns to the
previous screen.
■
■
Home■button
Displays Home
screen.
■ ■
Task■button
Check running applications list. Touch and hold to
make settings such as wallpaper, widgets, etc.
■ ■Dual■window■button
Divides the screen and uses two applications at
one time.
- 23 - - 24 - - 25 - - 26 - - 27 - - 28 -
• When you tap an icon to use its functions,
communication fee may be charged depending on
the function.
Using■the■Home■Screen
Switching the Home Screen
The Home screen consists of multiple screens.
Slide/ick right or left to switch them.
• Thumbnails can be displayed by touching and
holding "
" on the Home screen to perform
operations such as switching the Home screen,
etc.
Setting Wallpaper/Widget
On the Home screen u Touch and hold "
a
Tap an item shown below
b
WALLPAPERS Select from the wallpaper gallery,
images, etc.
[Pick■image]/[Wallpaper■gallery]■
u
■select■a■wallpaper■u■[SET■
WALLPAPER]
WIDGET You can add widgets such as
calendar, etc. You can add
shortcut of settings menu also.
Touch■and■hold■widgets/
shortcuts■u■drug■to■the■area■to■
add■widgets/shortcuts
SETTINGS Set the grid number, loop scroll,
etc.
■■ Adding■a■folder
On the Home screen u touch and hold the
a
application to be stored into a folder
Drag onto another application and release your
b
nger.
Application is stored into the folder.
Checking The Product State
"
Understanding■Icons
Notication icons appear on the left of the status
bar, showing new mail, operations in progress, etc.,
and status icons appear on the right, showing the
status of the product.
Also slide the status bar downwards to display the
notication panel.
Status bar
■■ Major■notication■icons
Icon
New mail message (E-mail)
New mail message (PC mail)
New Gmail message (Gmail)
New SMS message
Enable screenshot setting
Description
■■ Major■status■icons
Icon Description
Time
Battery level
Airplane mode
Signal reception (signal reception area)
4G (LTE/WiMAX 2+)* data communication
status
Vibrate only/Silent
/
Wi-Fi® signal strength
* In Japan, you can use "LTE" and "WiMAX 2+" networks.
"4G" is displayed for both networks. According to the
signal congestion etc., the product is connected to
the less congested network.
Notication■Panel
When a notication icon appears on the status bar,
slide the status bar down to open the notication
panel to check the notication or launch the
application.
Slide the status bar downwards
a
Date■&■time
a
Quick■Settings
b
Brightness
c
Screen■sharing/File■
d
sharing
Share images, voices,
etc. with another
device by using the
Miracast function or
Bluetooth Low Energy
function.
Notication■panel■
e
editing
Settings
f
Notication■
g
information
Clear
h
Clear notication
information and
notication icons.
a
b
c
d
Checking■Your■Phone■Number
On the Home screen u [基本機能 (Basic
a
functions)] u [Settings] u [About tablet] u
[Status]
e
f
g
h
Status screen appears and your phone number is
shown in Tablet phone number eld.
Setting Silent mode
Set■the■Silent■(Sound■prole)■not■to■inconvenience■
people■around■you■in■a■public■place.
Open the notication panel u [Sound]/
a
[Vibrate]/[Silent]
Setting Airplane mode
When■Airplane■mode■is■set,■wireless■functions■are■
disabled■(packet■transmission,■wireless■LAN■(Wi-Fi
Bluetooth
a
®
).
Power key (Press and hold for more than 2
seconds)
u
[Turn on Airplane mode] u [TURN
ON]
®
Entering Text
Use■the■software■keyboard■to■enter■characters.
To■display■the■software■keyboard,■tap■a■character■
input■box■in■the■character■input■screen■when■adding■
contacts,■creating■a■message,■etc.
- 29 - - 30 - - 31 - - 32 - - 33 - - 34 -
Switching■the■Software■Keyboard
Character input screen u Touch and hold [
a
[Keyboard type] u [10-key keyboard]/
b
[QWERTY keyboard]/[50-key keyboard]
• On the QWERTY keyboard or 50-key keyboard, tap
the key of your desired character to enter. Romaji
input is applied for "Hiragana-Kanji" mode of the
QWERTY keyboard.
• On the 10-key keyboard, tap the same key repeatedly
),■
or flick up/down/left/right to enter the desired
character.
• "Japanese keyboard" is initially installed as an
input software.
• To switch input mode, character input screen u
touch and hold [
] u [Input mode] to select the
input mode.
• To set ringtone and vibration for key operations,
character input screen u touch and hold [
[Keyboard settings] u [Key operation].
to switch Input Mode.
• Tap
to delete the selected character or
• Tap
characters on the left side of cursor.
to enter pict/symbol/smiley.
• Tap
] u
Using a microSD Memory Card
]
Attaching■microSD■Memory■Card
Before attaching a microSD memory card, make sure
to turn the product o.
Hook the groove of the tray with your
a
ngernail and pull it out straight to remove the
tray from the main unit.
Put the microSD memory card into the tray
b
with the logo upwards, insert the tray into the
main unit, and then push it rmly all the way
straight into the slot.
• Make sure that there is no gap between the tray and
the main unit.
Tray
• Make sure that the front and back/top and bottom
of the microSD memory card are facing correctly.
Trying to force a wrongly oriented card into the
slot could make it impossible to remove the card
and result in damage.
Removing■a■microSD■Memory■Card
Before removing the microSD memory card, make
sure to turn the product o.
Hook the groove of the tray with your
a
ngernail and pull it out straight to remove the
tray from the main unit.
Remove the microSD memory card, insert the
b
tray into the main unit, and then push it rmly
all the way straight into the slot.
• Make sure that there is no gap between the tray and
the main unit.
• Do not touch connector part of microSD memory
card.
• microSD memory card might become warm after
using a long time. It is not malfunction.
Viewing the Setting Menu
Dispaly■the■setting■menu■of■the■product■such■as■
communication■settings,■device■settings,■etc.
On the Home screen u [基本機能 (Basic
a
functions)] u [Settings]
Introduction of Related
Accessories
■■ AC■Adapter■(sold■separately)
• Common AC adapter 03 (0301PQA)
• Common AC adapter 03 Navy (0301PBA)
• Common AC adapter 03 Green (0301PGA)
• Common AC adapter 03 Pink (0301PPA)
• Common AC adapter 03 Blue (0301PLA)
• Common AC adapter 05 (0501PWA)
• AC Adapter JUPITRIS (White) (L02P001W)
• AC Adapter JUPITRIS (Red) (L02P001R)
• AC Adapter JUPITRIS (Blue) (L02P001L)
• AC Adapter JUPITRIS (Pink) (L02P001P)
• AC Adapter JUPITRIS (Champagne Gold)
(L02P001N)
■■ Common■DC■adapter■03■(0301PEA)■(sold■
separately)
■■ microUSB■Cable■(sold■separately)
• microUSB cable 01 (0301HVA)
• microUSB cable 01 Navy (0301HBA)
• microUSB cable 01 Green (0301HGA)
• microUSB cable 01 Pink (0301HPA)
• microUSB cable 01 Blue (0301HLA)
■■ Portable■Charger■02■(0301PFA)■(sold■separately)
• Portable charger 02 (sold separately) might not
fully charge the product.
• For the latest information on accessories, visit the
au homepage (http://www.au.kddi.com/) or contact
the Customer Service Center.
• This product does not support ASYNC/Fax
transmission.
• You can purchase accessories on this page from
au online shop.
Some accessories may not be purchased due to
the availability.
http://auonlineshop.kddi.com/
Troubleshooting
Before■you■assume■that■the■product■is■
malfunctioning,■check■the■following:
Symptom Check Item
Cannot charge
the battery.
Battery usage
time is short.
Cannot operate
touch panel as
intended.
Cannot operate
the keys/touch
panel.
Screen response
is slow when
you tap on the
screen/press the
keys.
"No SIM card" is
displayed.
Is the AC adapter securely
plugged into an outlet?
Do you use this product more
in the places without signal
reception
(out of service)?
Is the internal battery end-of-life?
Are you operating with gloved
hands?
Make sure you are not operating
with your nger tip or there is no
foreign object in the middle of
the panel.
Is the screen lock set?
Turn o the power and turn it on
again.
Screen response may slow down
when a large amount of data is
stored in the product or being
transmitted between the product
and a microSD memory card.
Is your au Nano IC Card 04 LE
inserted?
- 35 - - 36 - - 37 - - 38 - - 39 - - 40 -
Symptom Check Item
"Phone is
SIM Network
Is a card other than au Nano IC
Card 04 LE inserted?
Subset locked
is displayed" is
displayed.
Display is dark. Is "Brightness" set to dark?
Cannot recognize
a microSD
memory card.
Is a microSD memory card
inserted properly?
Is the microSD memory card
unmounted?
If the symptom does not improve after checking the
above items, contact the below au website or au
customer support.
http://www.au.kddi.com/support/mobile/trouble/repair
Updating Software
Notes■on■Software■Update
• You are charged for data communication when
connecting to the Internet from the product by
using packet communication.
• When software update is necessary, you will be
informed on au homepage, etc.
an au shop or Customer Service Center (
toll-free). In addition, users of this product will receive
a notice from au, when software update is necessary
to improve the functionality of the product.
• Make sure to charge your phone before software
update. If battery is not enough, software update
may fail.
• Check out the signal reception. Software update
may fail if you are at a place with bad signal
reception.
• Data registered on the product (Contacts, mail,
still images, music, etc.) and setting information
will not be changed even after software is updated.
However, note that data might not be protected
depending on the state of the product (malfunction,
damage, getting wet, etc.).
You are recommended to back up your data before
updating software.
For details, contact
157/call
• If software update has failed or stopped, update
the software again.
Do■not■conduct■the■following■operations■during■
software■update.
• Do not move this product during software update.
The■following■operations■are■not■available■during■
software■update
• Operations are not available during software
update.
Also, alarm, etc. cannot be used.
When■software■update■has■failed,■etc.
• If you fail to update software, it may become
impossible to operate the product. In that case,
bring the product to an au shop or PiPit (not
accepted by some shops).
Downloading■and■Updating■Software
On the Home screen u [基本機能 (Basic
a
functions)] u [Settings] u [About tablet] u
[Update Center] u [Software Update]
[Check now for update]
b
Check if there is new software.
Software update screen is displayed when
software update s available.
Select a communication method to download
c
Select a communication method to download
software.
[Download]
d
A new software download starts.
[Install now]
e
Software update starts.
The product will restart a couple of times during the
software update.
[OK]
f
After-sales Service
■■ When■asking■for■repair
For repair, contact a Keitai Guarantee Service Center.
During■the■
warranty■period
Outside■the■
warranty■period
Repairs will be done based on the
terms of services of the free-ofcharge repair warranty described
on the warranty card.
We shall repair the product for
a charge as requested by the
customer if repair renders it
usable.
• Before handing in the product for repair, make a
backup of the contents of memory since they may
disappear during repair. Note that the Company
shall not be liable for any damages and loss of
income should the contents of memory be altered
or lost.
• Recycled parts that meet the Company's quality
standards are sometimes used for repair.
• Collected au mobile devices by Replacement
mobile phone delivery service which you used
before are recycled to mobile devices for
replacement after repairs. Also replaced parts by
au after-sales service are collected and recycled
by KDDI. They are not returned to customers.
• For the products that are processed, modied,
analyzed (including altering the software,
analyzing (including rooting), reverse-engineering,
engineering, decompiling, and disassembling) or
repaired by repair oces other than the ones the
company specied, they are not covered by the
warranty or repair may be refused.
■■ Performance■parts■for■repair
The Company retains performance parts for repair
of the Qua tab PX main unit and its peripherals
for 4 years after discontinuation of production.
"Performance parts for repair" refers to parts required
for maintaining the functions of the product.
■■ Warranty■card
At the store of purchase, thoroughly check and read
the name of the retailer, date of purchase and other
necessary details lled in on the warranty card, and
be sure to keep it in a safe place.
■■ Keitai■Guarantee■Service■Plus■LTE
An after-sales service membership program on a
monthly basis called "Keitai Guarantee Service Plus
LTE" (monthly fee: 380 yen, tax excluded) is available
for using your au mobile device for a long time
without worries. This service expands coverage for
many troubles including malfunction, theft and loss.
For details of this service, refer to au homepage or
contact a Keitai Guarantee Service Center.
• You can apply for membership only at the time of
purchasing your au mobile device.
• Once you cancel the membership, you cannot
reapply for it until you purchase an au mobile
device next time.
• Note that when changing the model or purchasing
an extra mobile device, this service only covers the
most recently purchased au mobile device.
• When an au mobile device is handed over to you
or someone else, the Keitai Guarantee Service
Plus LTE membership is also handed over to the
successor of the mobile device.
• When you get a new au mobile device by changing
the model or purchasing an extra mobile device,
the "Keitai Guarantee Service Plus"/"Keitai
Guarantee Service Plus LTE" membership for the
old au mobile device is automatically canceled.
• Service contents are subject to change without
notice.
■■ au■Nano■IC■Card■04■LE
The au Nano IC Card 04 LE is lent to you by au. In
case of loss or damage, the card will be replaced at
your expense. When a malfunction is suspected, or in
case of theft or loss, contact an au shop or PiPit.
■■ After-sales■Service
If you are unsure about anything regarding after-sales
service, contact the following service contact.
Customer■Service■Center■(for■service■canceling■
procedure■in■case■of■loss■or■theft)
From a land-line phone, 0077-7-113 (toll free)
From an au mobile phone, 113 without area code (toll
free)
- 42 - - 43 - - 44 - - 45 - - 46 -- 41 -
Business hours 24-hour (7 days a week)
Keitai■Guarantee■Service■Center■(for■loss,■theft,■
damage)
From a land-line phone/From an au cell phone,
0120-925-919 (toll free)
Business hours 9:00 ~ 20:00 (7 days a week)
Online■Replacement■Desk■(24■hours■a■day■over■the■
Internet)
* Only available from PCs or smartphones
https://cs.kddi.com/support/n_login.html
• The Application for the Internet acceptance, if
"damage", "wet", "theft" and "loss" are eligible. In
the case of spontaneous failure (not the cause
damage, such as water wet, but does not power
on, the screen does not function or other), it will be
accepted by phone for interview is required.
• To apply for the Internet, you need the e-mail
address.
■■ au■after-sales■service■information
Service Contents
Replacement
cell phone
delivery
service
Holding over
and repair
Spontaneous
failure
Partial damage,
water stained,
irreparable
damage, theft, or
loss
Spontaneous
failure
Partial damage Customer
Water stained,
irreparable damage
Keitai Guarantee Service
1st
year
2nd
year
or
delivery service"
later
(Member) Refer
of the service
1st
year
2nd
year
year warranty)
or
later
Plus LTE
Member
Free N/A
"Replacement
mobile phone
to the table
charge
Free Free
Free (three-
charge
Upper limit:
5,000 yen
Customer
charge
10,000 yen
Nonmember
Actual
cost
Keitai Guarantee Service
Service Contents
Holding over
and repair
Theft, loss N/A N/A
Plus LTE
Member
* Charge amounts are all tax excluded
"Replacement mobile phone delivery service"
(Member) Service charge
Applied condition 1st 2nd
Normal 5,000 yen/
Long
*1
Benet
3,000 yen
*3
*2
4,000 yen/
Long
*1
Benet
2,000 yen
4,500 yen/
Long
*1
Benet
2,500 yen
Applied both "WEB
割引 (Discount for
web application)"
and "代用機なし割引
(Discount for nonuse
of substitute)"
Applied only "代用機
なし割引 (Discount
for nonuse of
substitute)"
*3
8,000 yen/
Long
Benet
6,000 yen
7,000 yen/
Long
Benet
5,000 yen
7,500 yen/
Long
Benet
5,500 yen
* Charge amounts are all tax excluded
Nonmember
(model
change)
*1
*1
*1
*1 This discount applies to customers who have used
au for 3 years (25 months) or more, and all the
lines within that customer's Family Discount. For
customers using a data communication device
or tablet, this discount applies to customers who
are subscribed to a set discount (WIN Single Set
Discount or Smartphone Set Discount) and have
been under the contract of the line eligible for the
set discount for 3 years or more.
*2 WEB割引 (Discount for web application): If you apply
"Replacement mobile phone delivery service" from
the au homepage, 500 yen will be discounted from
service charge.
"No substitution discount" is applied automatically as
the substitution is not available for "WEB discount".
*3 代用機なし割引 (Discount for nonuse of substitute):
If you do not use the substitution when using
"Replacement mobile phone delivery service", 500
yen will be discounted from service charge.
For details, refer to au homepage.
Page 3
memo
Replacement■mobile■phone■delivery■service
memo
• When you have trouble with your au mobile device,
replacement mobile device (same model, same
*
) is delivered by calling to. Return your
color
damaged mobile device within 14 days after
replacement mobile device is delivered.
* If the provision of same model and same color is
dicult, specied model and colored replacement
mobile device will be oered.
• Available up to twice in a year from the day you
use this service as a start day. If you do not use
this service in the past year for the subscription to
this service, it will be 1st time and if you use, it will
be the 2nd.
* For details, refer to au homepage.
Holding■over■and■repair
• Damages and malfunctions intentionally caused by
the customer as well as those due to modication
(e.g. disassembly, change of parts, painting, etc.)
by the customer are not covered by this service.
• You cannot receive a refund for replacement of
the outer casing due to stains, scratches, paint
removal, etc. on the outer casing.
• When the service is used and au IC Card is
reissued due to theft, loss, etc., 1,900 yen is
required for reissuing au IC Card.
- 47 - - 48 - - 49 - - 50 - - 51 -
SIM Unlock
The■product■supports■SIM■unlock.■By■unlocking■SIM■
lock,■you■can■use■non-au-SIM■cards.
• SIM unlock service is provided at the au homepage
and au shops.
• When using non-au SIM card, some services,
functions, etc. may be unavailable. The Company is
not liable for any operations.
• To operate SIM unlock, on the Home screen u [基
本機能 (Basic functions)] u [Settings] u [About
tablet] u [SIM card]
• For details, refer to au homepage.
https://cs.kddi.com/support/simcard/
Main Specications
Display Approx. 8.0 inches, Approx.
Weight Approx. 310g (including
Size■(W■x■H■x■D)
CPU
Internal■memory
(Storage/RAM)
Continuous■stand-by■
*
time
Continuous■tethering■
time
Number■of■
concurrent■
connections■with■
tethering
Charging■
time
AC■
adapter
DC■
adapter
* Continuous standby times are measurements in a
static state.
16.77 million colors, IPS liquid
crystal
1920 × 1200 (WUXGA)
internal battery)
Approx. 124 × 211 × 7.8 mm
MSM8952 (1.5GHz × 4, 1.2GHz
× 4 )
Storage: 16GB, RAM: 2GB
Approx. 800 hours
Approx. 730 minutes
®
13 devices (Wi-Fi
8, Bluetooth
tethering;
®
tethering; 4 and
USB tethering; 1)
Approx. 150 minutes (When
using Common AC adapter 05
(sold separately))
Approx. 650 minutes (When
using Common DC adapter 03
(sold separately))
■■ Wireless■LAN■(Wi-Fi®)
Compatible■
Networks
IEEE802.11a/b/g/n/accompliant
Frequency■bands 2.4 GHz/5 GHz
■■ Bluetooth
Compatible■
Networks
Output Bluetooth
®
Bluetooth® standard Ver.4.2
BLE
®
standard Power
Class1
Communication■
*1
range
Supported■
Bluetooth■prole
Within 10 m with no obstacles
in the range
GATT, Android Bluetooth Low
*2
Energy Improvements, A2DP
(Advanced Audio Distribution
Prole), AVRCP (Audio/Video
Remote Control Prole), HDP
(Health Device Prole), HID
(Human Interface Device
Prole), HSP (Headset Prole),
OPP (Object Push Prole), PAN
(Personal Area Networking
Prole), PAN NAP, PAN U,
SPP (Serial Port Prole), apt-X,
Bluetooth SSP, DI (Device ID),
GAVDP (Generic Audio/Video
Destribution), HOGP (HID over
GATT Prole)
Parameters Prole)
*3
, ScPP (Scan
Frequency■bands 2.4 GHz band
*1 Changes according to objects obstructing devices
and signal reception.
*2 Specications provided in Bluetooth
for making communication between Bluetooth
compatible devices in accordance with their intended
use.
*3 A prole compatible with Bluetooth
Ver.4.0.
®
standards
®
standard
®
-
• The continuous standby time may drop to less
than half depending on the battery charging
status, usage environment such as temperature,
reception condition at the location where the
product is used, and the function settings.
■■ Outward-facing■camera
Image■pickup■
CMOS
device
Number■of■eective■
Approx. 5 million pixels
pixels
■■ Inward-facing■camera
Image■pickup■
CMOS
device
Number■of■eective■
Approx. 5 million pixels
pixels
 Loading...