

Page 1

aFrame
electrorganic percussion
EN
JA
Quick Start Guide
Page 2
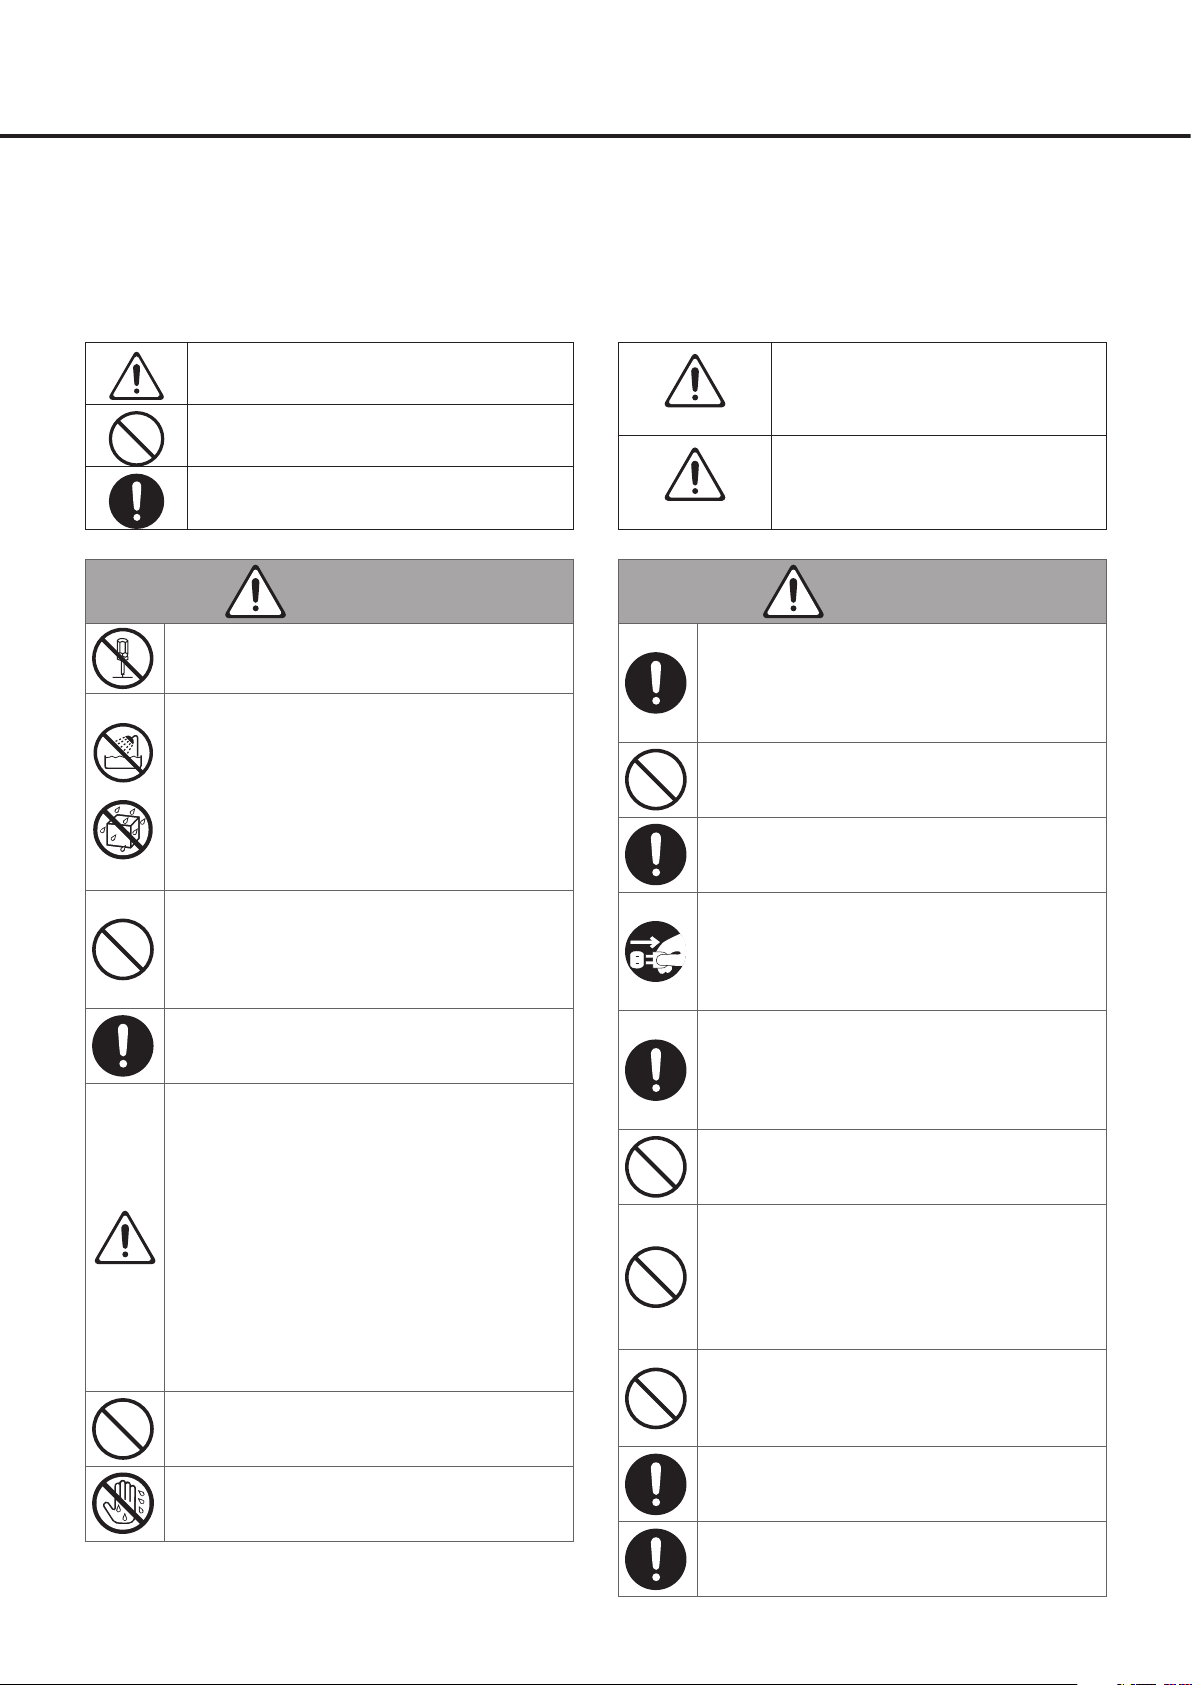
Important safety information
Failure to observe the following safety directives may result in fire, electric shock, injury, or damage to the aFrame or
to other items or property.
You must read all the following safety information before you use the aFrame.
About the symbols
"Caution": Calls your attention to a point of
caution
"Do not ...": Indicates a prohibited action
"You must ...": Indicates a required action
WARNING
Do not disassemble or modify
Do not disassemble or modify this product.
Do not use or store in the following location
• Locations of high temperature (such as direct
sunlight, near heating equipment)
• Moist or humid locations (near a bath or shower, or on a wet floor)
• Locations subject to salt damage
• Locations subject to water or rain
• Excessively dusty locations
Do not damage the power cord
Do not excessively bend the power cord or damage it. Do not place heavy objects on top of the
power cord. Doing so may damage the power
cord, causing fire or electric shock.
Use the included AC adapter
Use only the included AC adapter. Always use the
adapter with the specified voltage.
Turn off the power if an abnormality or accident occurs
In the following situations, immediately turn off
the power, disconnect the AC adapter from the
AC outlet, and contact your dealer or ATV for servicing.
• If the AC adapter, power cord, or plug is damaged
• If smoke is emitted or an abnormal odor is noticed
• If liquid or a foreign object enters the unit
• If an abnormality or malfunction occurs in the
unit
Do not drop or subject to strong impact
Do not drop this product or subject it to strong
impact.
Do not plug or unplug the AC adapter with
wet hands
You risk electric shock by doing so.
About warnings and cautions
Indicates a hazard that could result in
death or serious injury
WARNING
Indicates a hazard that could result in
injury or property damage
CAUTION
CAUTION
Grasp the power plug when connecting or
disconnecting
When connecting or disconnecting the AC adapter
from the unit, you must grasp the plug rather than
pulling the power cord.
Don’t use AC outlet multipliers
Doing so will cause the outlet to become hot,
causing a fire hazard.
If the power plug is dusty, wipe it off
Dust on the power plug can cause electric shock or
short circuits.
Disconnect the power plug from the AC outlet
if not using the unit for an extended period,
or if lightning is expected
Failure to do so may cause electric shock, fire, or
malfunction.
Disconnect all connections before moving the
unit
Failure to do so may cause damage to the power
cord or cables, or may cause people to trip over the
cables.
Don’t place the unit in an unstable location
Doing so may cause the unit to overturn, causing
personal injury.
Don’t sit or stand on the unit, or place heavy
objects on it
Doing so may damage the unit.
You should also avoid applying excessive force to
the buttons, knobs, and input/output jacks. Doing
so will cause malfunctions.
Don’t use the unit at high volume for an extended time
Using speakers or headphones at high volume for
an extended time will damage your hearing.
Handle the unit with care
Take care that your hands or fingers are not injured by corners or openings in the unit.
Place small parts out of reach of children
Place small parts out of reach of children who
might accidentally swallow them.
22
Page 3

Important information about use
Placement
• Do not use this unit near other electrical products such as
televisions, radios, stereos, or mobile phones. This unit may
cause noise in these devices.
• Do not use this unit in locations where extremely high tem-
peratures might occur, such as in direct sunlight, in a car in
direct sunlight, or near a stove. Doing so may cause the unit
to deform, discolor, or internal components to malfunction.
Power supply
• A small amount of current flows even when the power is
turned off. If you will not be using this unit for an extended
period, you must unplug the AC adapter from the AC outlet.
Cleaning
Copyright
• Duplication or reuse of the music and sound data provided by
ATV Corporation and third parties without permission from
the copyright holder is forbidden (with the exception of copy-
ing for personal use as permitted by copyright law).
• Copyright for the content (sound data, phrase data, audio
data, image data, computer programs, etc.) contained in or
included with this product is the property of ATV Corporation.
Copyright law forbids you to use the above content without
permission of ATV Corporation for any purpose other than
personal use.
• The above content that is contained in or included with this
product may not be resold, distributed, or published, neither
in its existing form nor in any way that resembles it. However,
this prohibition does not apply to sound data exported from
this product and distributed free of charge.
• Use a soft dry cloth to clean the unit. Do not use benzene,
thinner, detergent, or chemically treated cloth, since these
can cause deformation or discoloration.
Data
• Please be aware that the manufacturer bears no responsibility
for any consequences that may arise from damage to or loss
of data.
• In some cases, equipment malfunction or incorrect operation
can cause the contents of the memory to be lost. Please make
a backup of any important memory data.
This document
• All illustrations and screens appearing in this document are
for the purpose of explaining operation, and may differ from
the actual specifications.
• Company names and product names appearing in this docu-
ment are the registered trademarks or trademarks of their
respective corporate owners.
33
Page 4

Contents
Important safety information ·································································································································2
Important information about use ··························································································································3
Packing List ·······························································································································································5
Panel descriptions ····················································································································································6
Before you start playing ··········································································································································7
Connections ···························································································································································7
How to press the buttons ········································································································································7
Turning the power on ·············································································································································7
Turning the power off ·············································································································································8
Auto power-off ·······················································································································································8
Mute function ·························································································································································8
Adjusting the sensor levels ······································································································································9
Viewing the display (Play mode) ······························································································································9
Selecting tones ······················································································································································ 10
How tones are organized ····································································································································· 10
Selecting a tone ··················································································································································· 12
Checking the current instrument and effect ········································································································· 12
Editing the instrument/effect ································································································································ 13
Editing the tone ···················································································································································· 13
Saving your edits ··················································································································································· 14
Overwrite-saving an edited instrument ················································································································· 14
Overwrite-saving an edited effect ························································································································· 14
Initializing all parameters ······································································································································ 15
Initializing while preserving edited instruments and effects ··················································································· 15
Initializing while preserving edited system parameters ·························································································· 15
Restoring the factory settings ······························································································································ 15
Specifications ························································································································································ 16
Support ······························································································································································· 17
44
Page 5
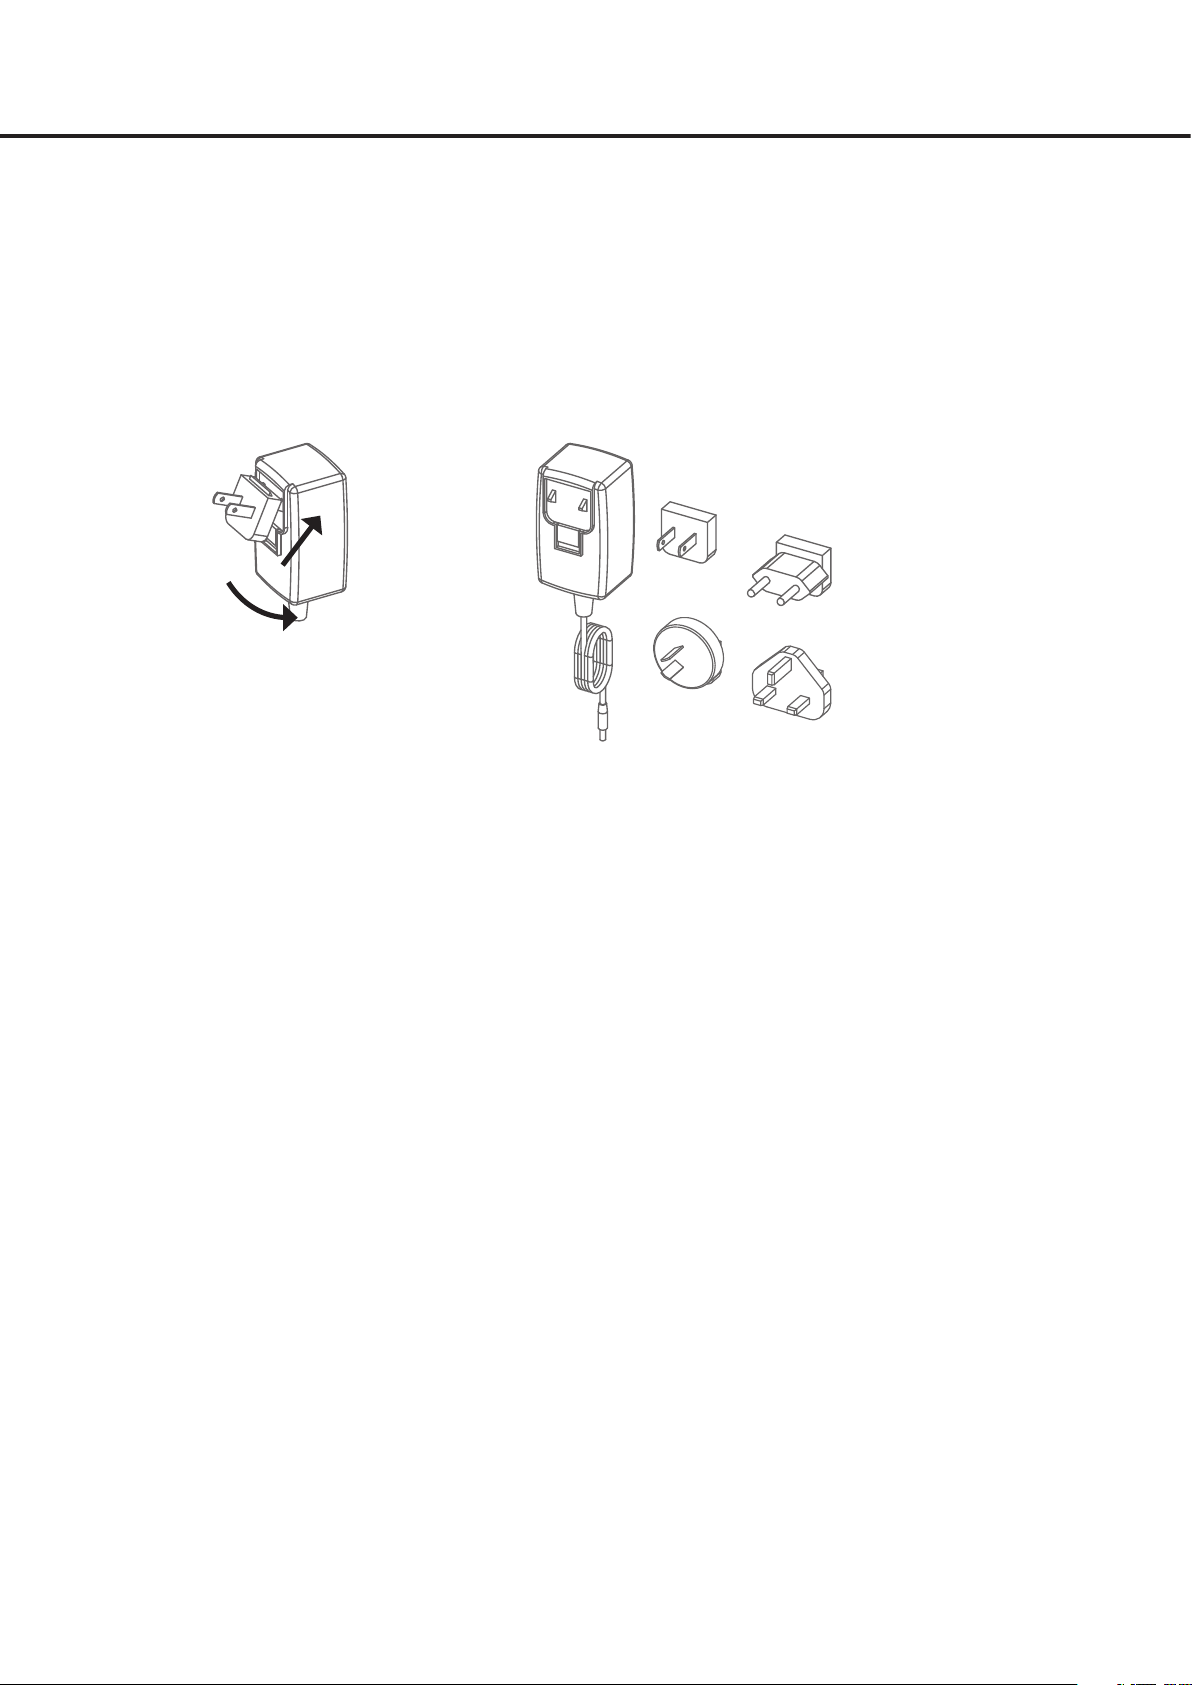
Packing List
• aFrame
• AC adapter
The AC adapter can be used worldwide.
Attach the included plug that is suitable for the type of outlet in your country.
You must use only the included AC adapter and plug.
1
2
• Quick Start Guide (this book)
55
Page 6
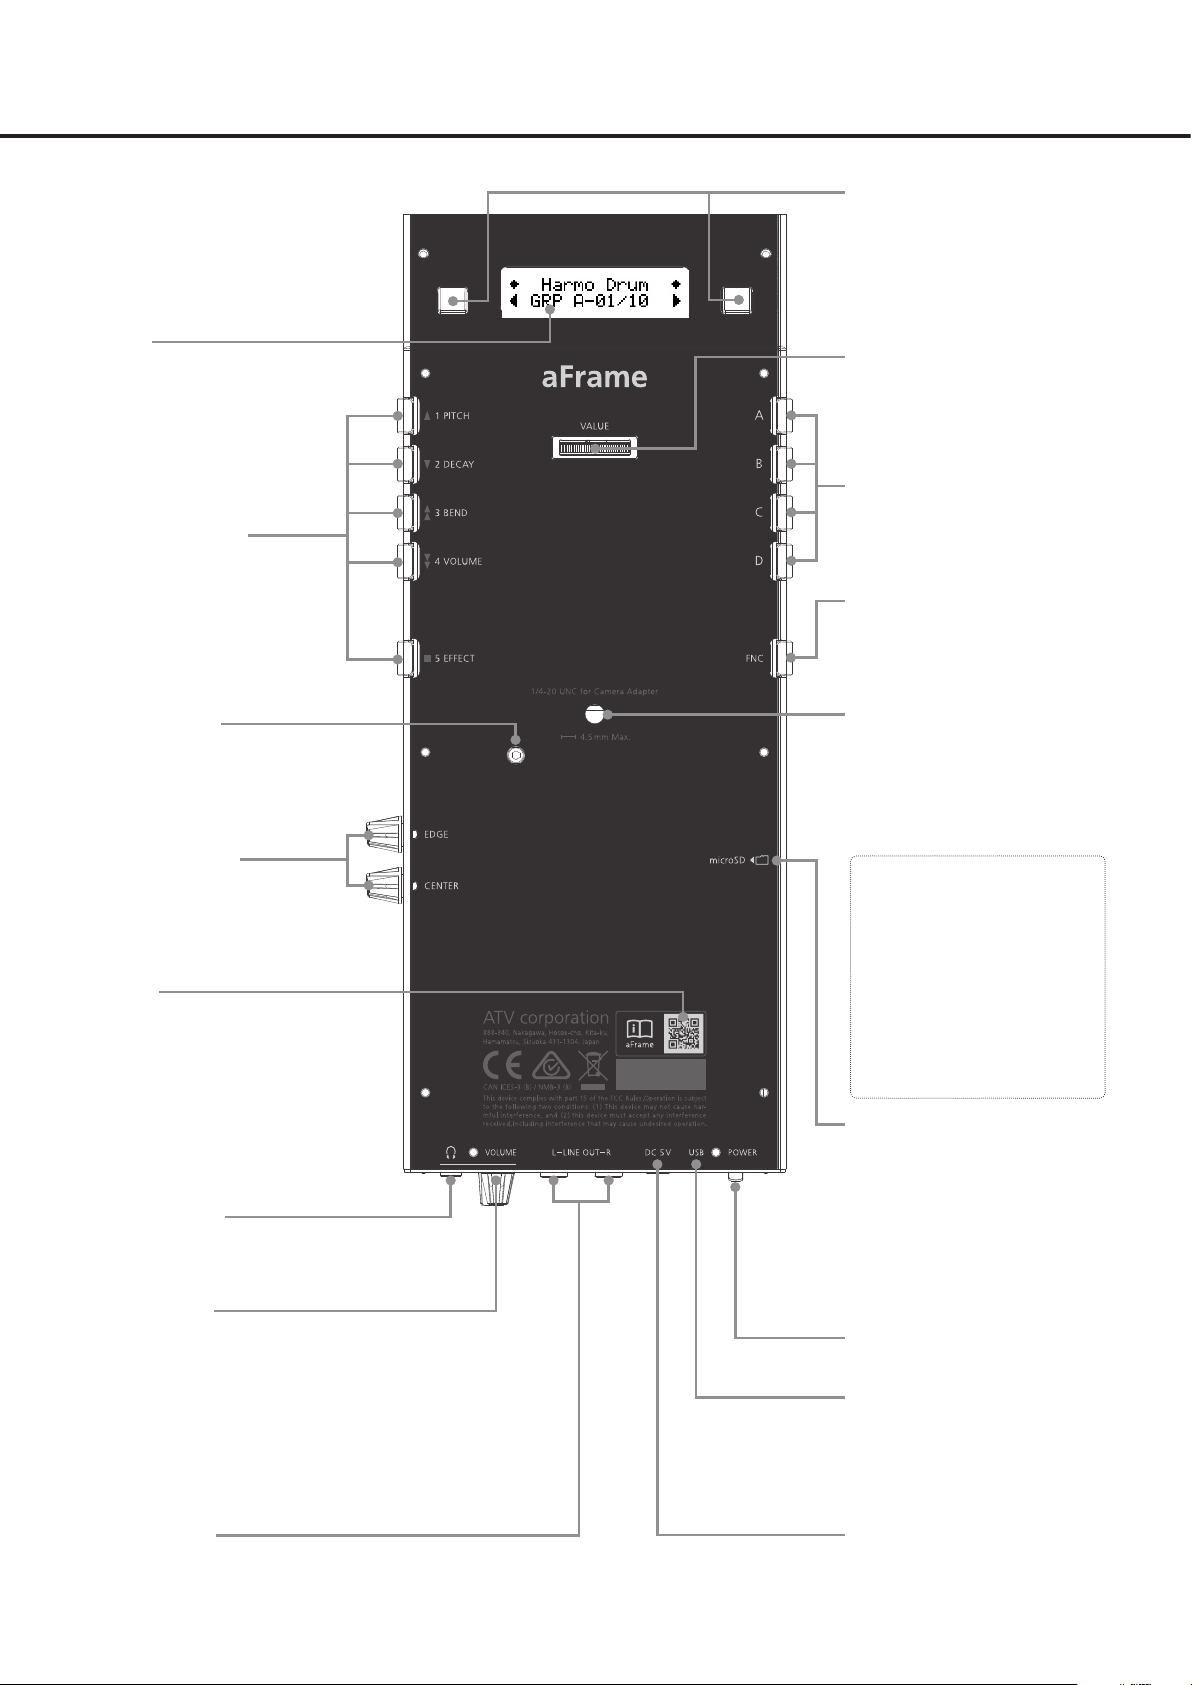
Panel descriptions
◀button /▶button
Select a tone number within the
group.
Display
Shows information.
1 PITCH button
2 DECAY button
3 BEND button
4 VOLUME button
5 EFFECT button
Edit instruments and effects
(P.13).
Pressure sensor
adjustment screw
This is adjusted at the factory.
Do not change the setting.
Sensor sensitivity
adjustment knobs
Adjust the sensitivity of the
sensors located at the edge
and the center (P.9).
QR code
Use this QR code to download
the reference guide (PDF) or a
multi-lingual version of this
document. You can also obtain
information about the latest
firmware.
Headphone jack
Connect headphones here.
VOLUME knob
Adjusts the volume of the headphones. Turning the knob to the
right increases the volume, and
turning it to the left decreases the
volume. This does not affect the
LINE OUT level.
LINE OUT jacks
Output the audio signal (P.7).
Encoder
Modifies the value of a setting.
A – D buttons
Select a group.
FNC button
Switches groups.
Adapter attachment hole
A camera strap or battery holder
can be attached here.
* Do not attach the aFrame to a
stand. The aFrame might be
damaged if you do so.
Size of usable screw : 1/4–20
(1/4 inch, 20 threads per inch),
maximum length 4.5 mm (3/16”)
• 1/4" adapters designed for
cameras can be used.
• Use a 4.5 mm or shorter screw.
* Using a screw longer than 4.5
mm might damage the interior of
the unit and cause malfunctions.
microSD slot
A microSD card can be inserted
here and used to save or load
aFrame data.For details, refer to
“Reference Guide” (PDF). For
instructions on how to download
the reference guide, refer to the
end of this manual.
POWER button
Turns the power on/off (P.7, 8).
USB
Instead of the included AC
adapter, you can connect a
mobile battery here to supply
power (P.7).
DC IN
Connect the included AC adapter here (P.7).
66
Page 7
Before you start playing
Connections
To supply power, connect the included AC adapter to the DC IN jack or connect a mobile battery to the USB port.
To hear the sound, connect headphones to the headphone jack or connect the line-out jacks to a powered speaker or
PA (P.6).
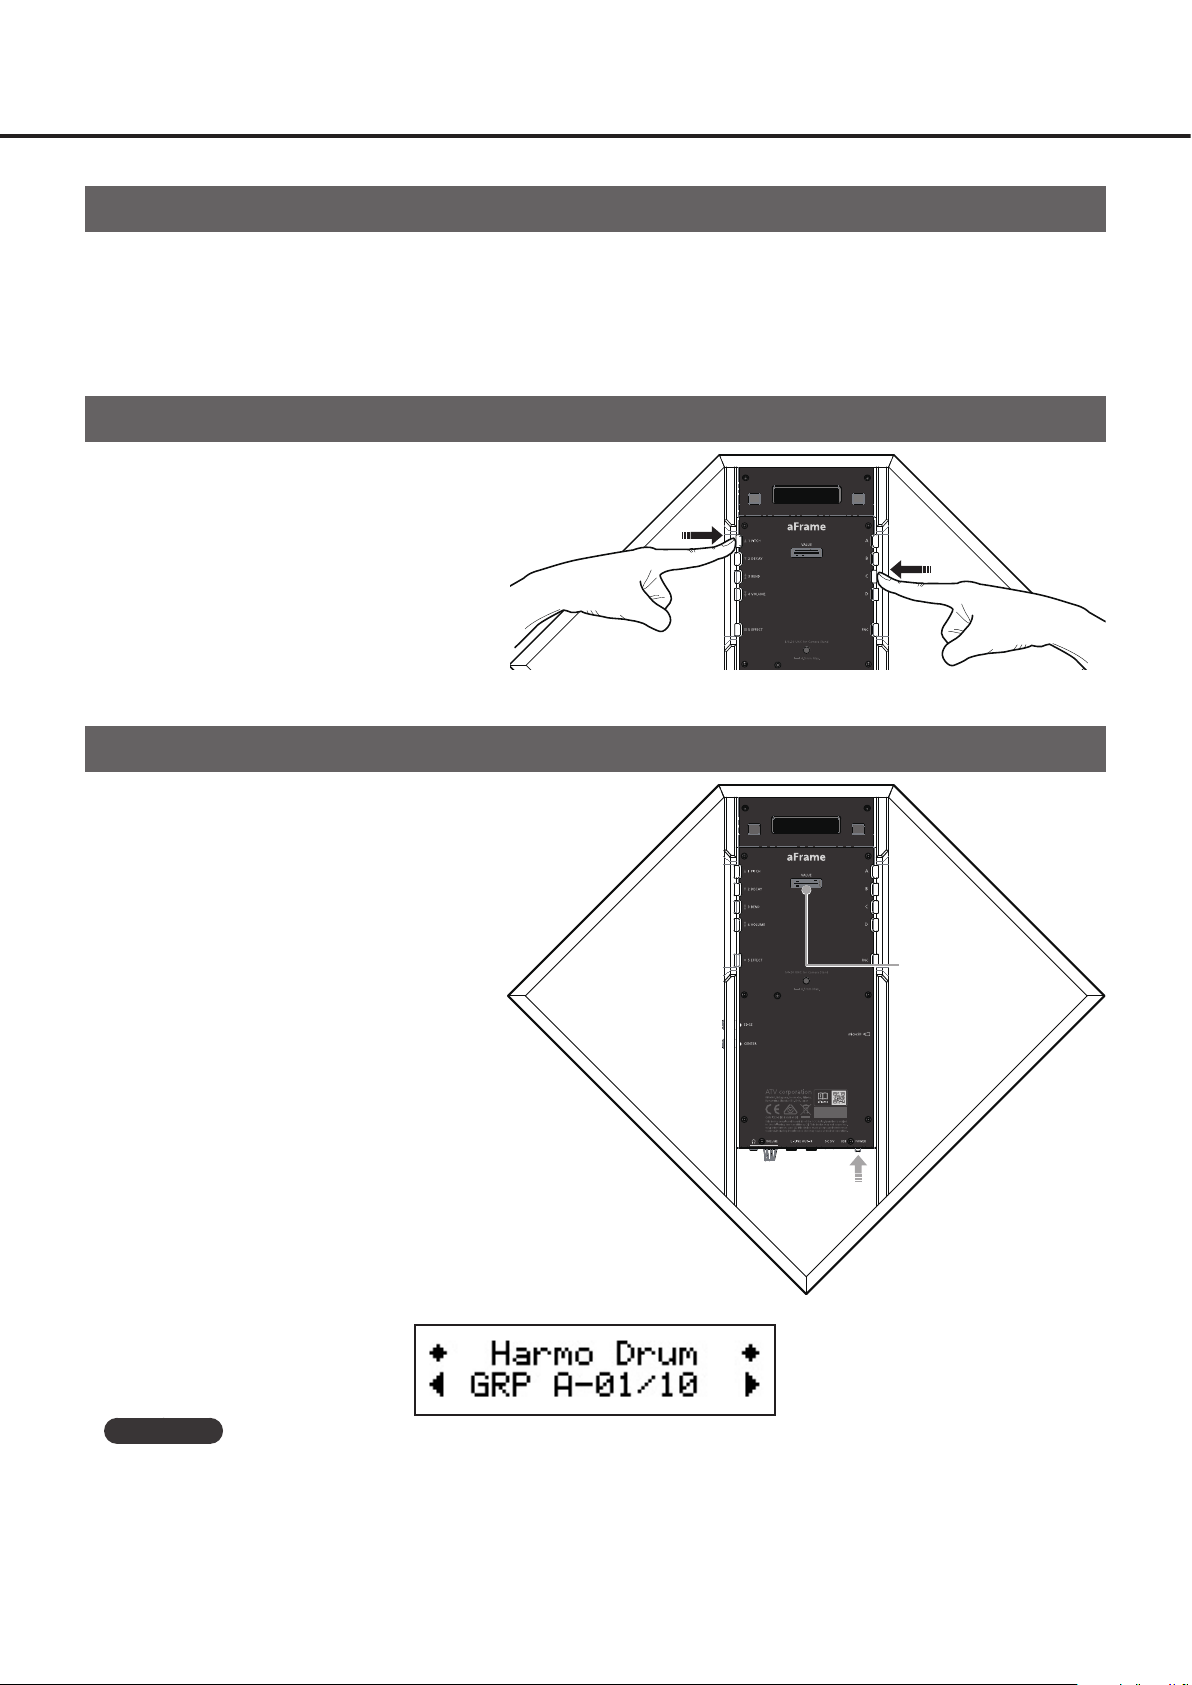
How to press the buttons
When pressing the panel buttons, press
lightly inward from the outside of the
panel (right or left) in the direction of the
arrows (toward the inside of the panel).
Turning the power on
Place the aFrame in the orientation in
which you want to play it, then hold down
the POWER button until the circumfer-
ence of the encoder in the middle of the
panel is lit green. Once it is green, release
the POWER button and the power-on pro-
cess will complete.
When the following screen appears in the display,
the aFrame is ready to play (Play mode).
Hold down
the POWER button
until this is lit green,
then release.
POWER button
Important
• During the power-on process, the "zero-point" of the pressure sensor is calibrated. Hold the aFrame in the desired
playing position and don’t touch the striking surface until the instrument is in Play mode.
• If you continue holding down the POWER button, all LEDs are lit yellow, the display shows the aFrame's version
number, and operation halts. Normally you should release the POWER button when the circumference of the encod-
er is lit green.
77
Page 8
Before you start playing
Turning the power off
Hold down the POWER button for approximately two seconds.
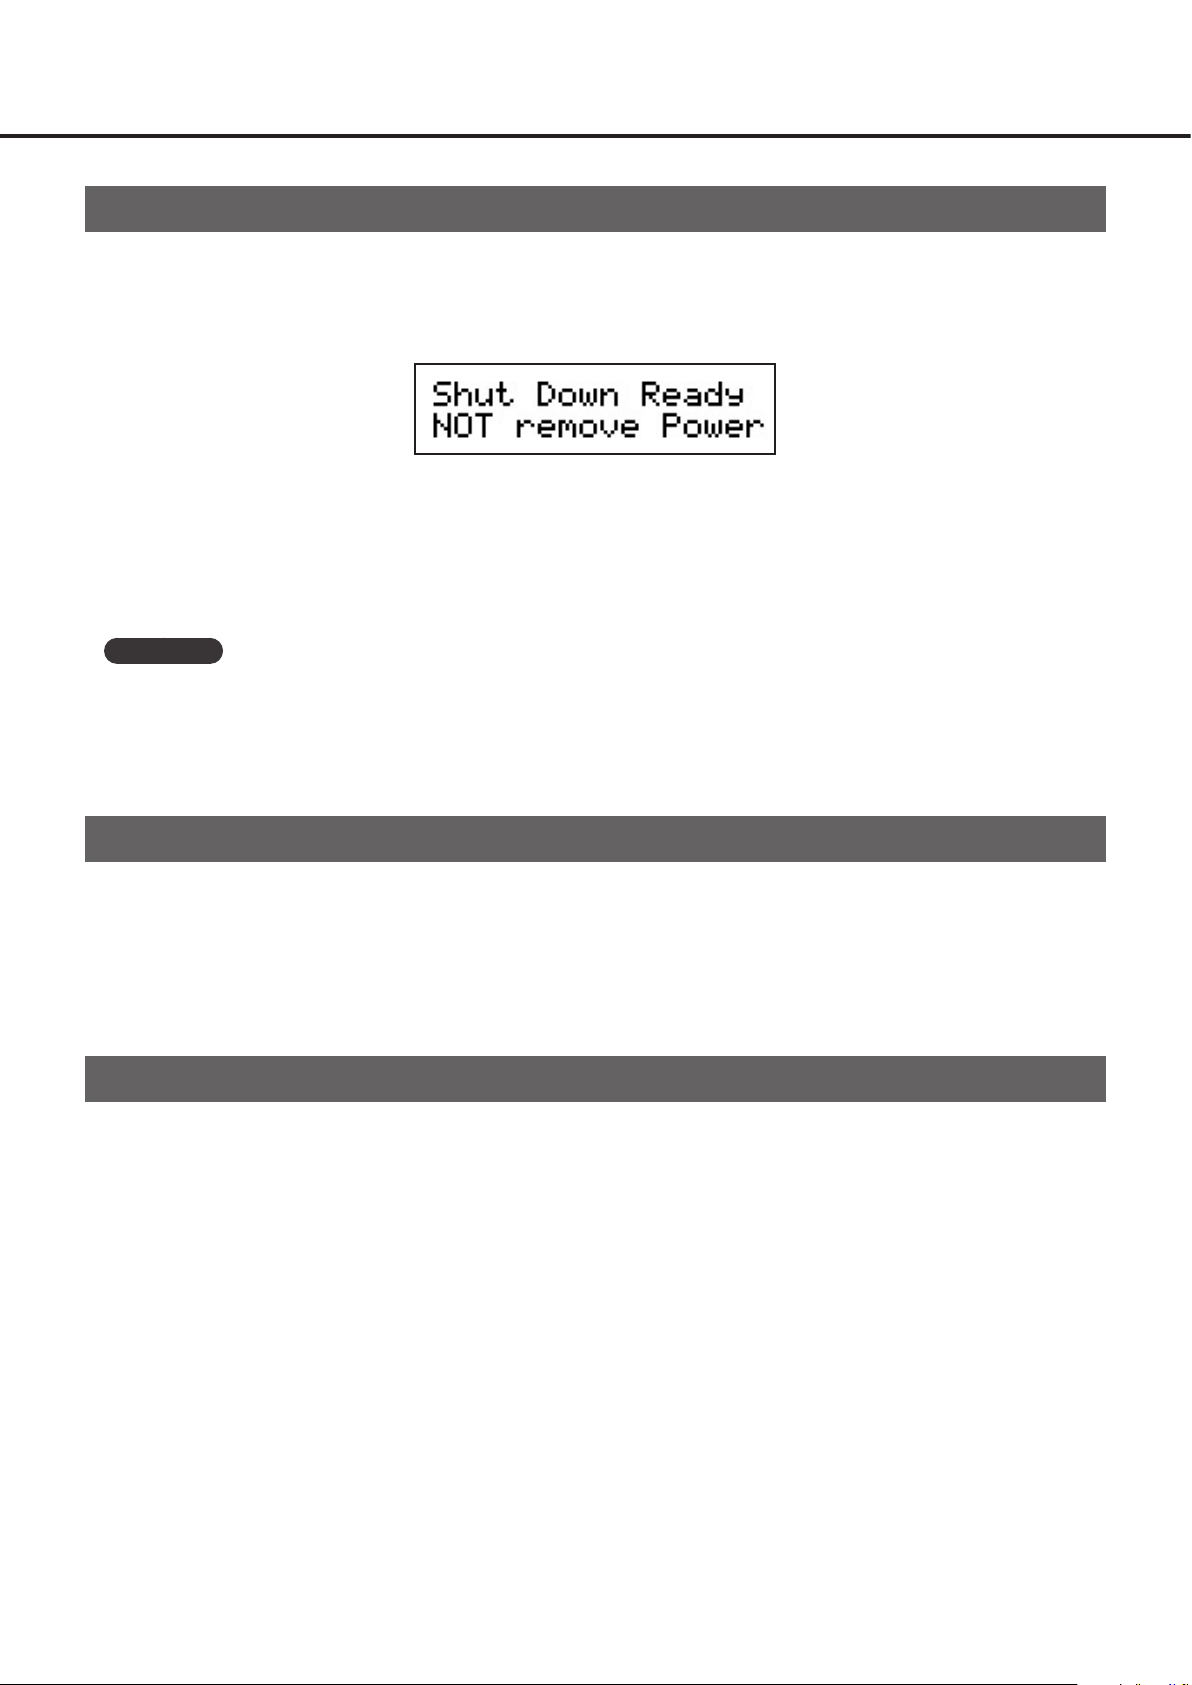
When the following screen appears in the display, release the POWER button.
The shutdown screen appears, and the aFrame begins writing the instrument, effect, group, and tone data. Do not
disconnect the power cable until the data has finished being written.
When the data has finished being written, the display and the LEDs go dark and the power turns off.
Important
• Since the edited data is written to internal memory after you release the POWER button, don't disconnect the pow-
er cable until the display and LEDs go dark. If you disconnect the power cable without turning the power off (i.e.,
without shutting-down), data might be lost.
Auto power-off
If the aFrame is not played or operated for 30 minutes or longer, the power turns off automatically.
If you want to disable this auto power-off function, refer to the “Reference Guide” (PDF). For instructions on how to
download the reference guide, refer to the end of this manual.
Mute function
If acoustic feedback occurs while you play, or if you don't want the aFrame to inadvertently produce sound, you can
mute the aFrame.
Press and immediately release the POWER button. The encoder blinks red,and sound is no longer output from the
1.
aFrame.
Once again press and immediately release the POWER button to cancel muting.
2.
88
Page 9
Before you start playing
Adjusting the sensor levels
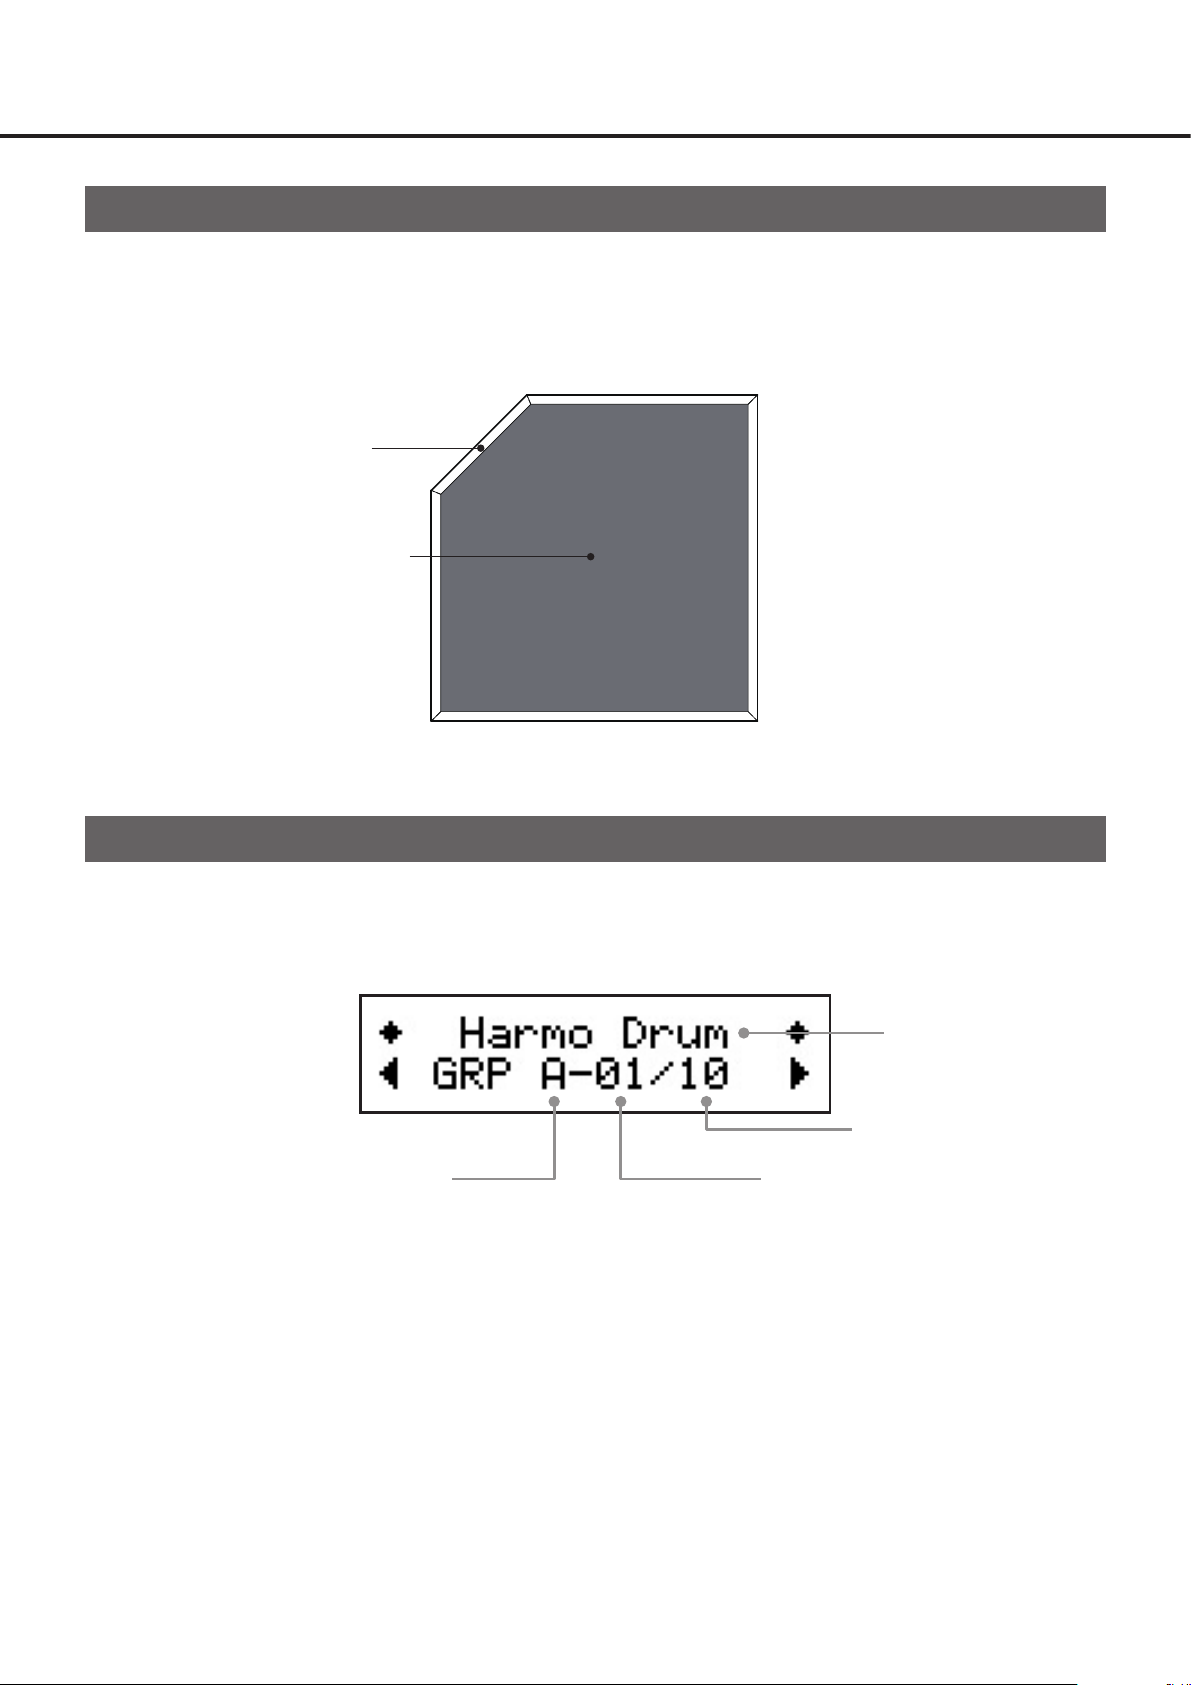
You can adjust the sensitivity of the signals that are received from the edge and the center.
Turning the sensor adjustment knob (P.6) clockwise raises the sensitivity. Turning it counterclockwise lowers the
sensitivity.
Adjust the sensitivity as appropriate for your playing style.
EDGE
CENTER
Viewing the display (Play mode)
"Play mode" is the state in which you can play the aFrame.
In Play mode, the display shows information such as the instrument name, the group, and tone numbers.
Instrument name
Number of tones you can
select in this group
Tone numberGroup
99
Page 10
Selecting tones
instrument and effect
How tones are organized
Instruments and effects
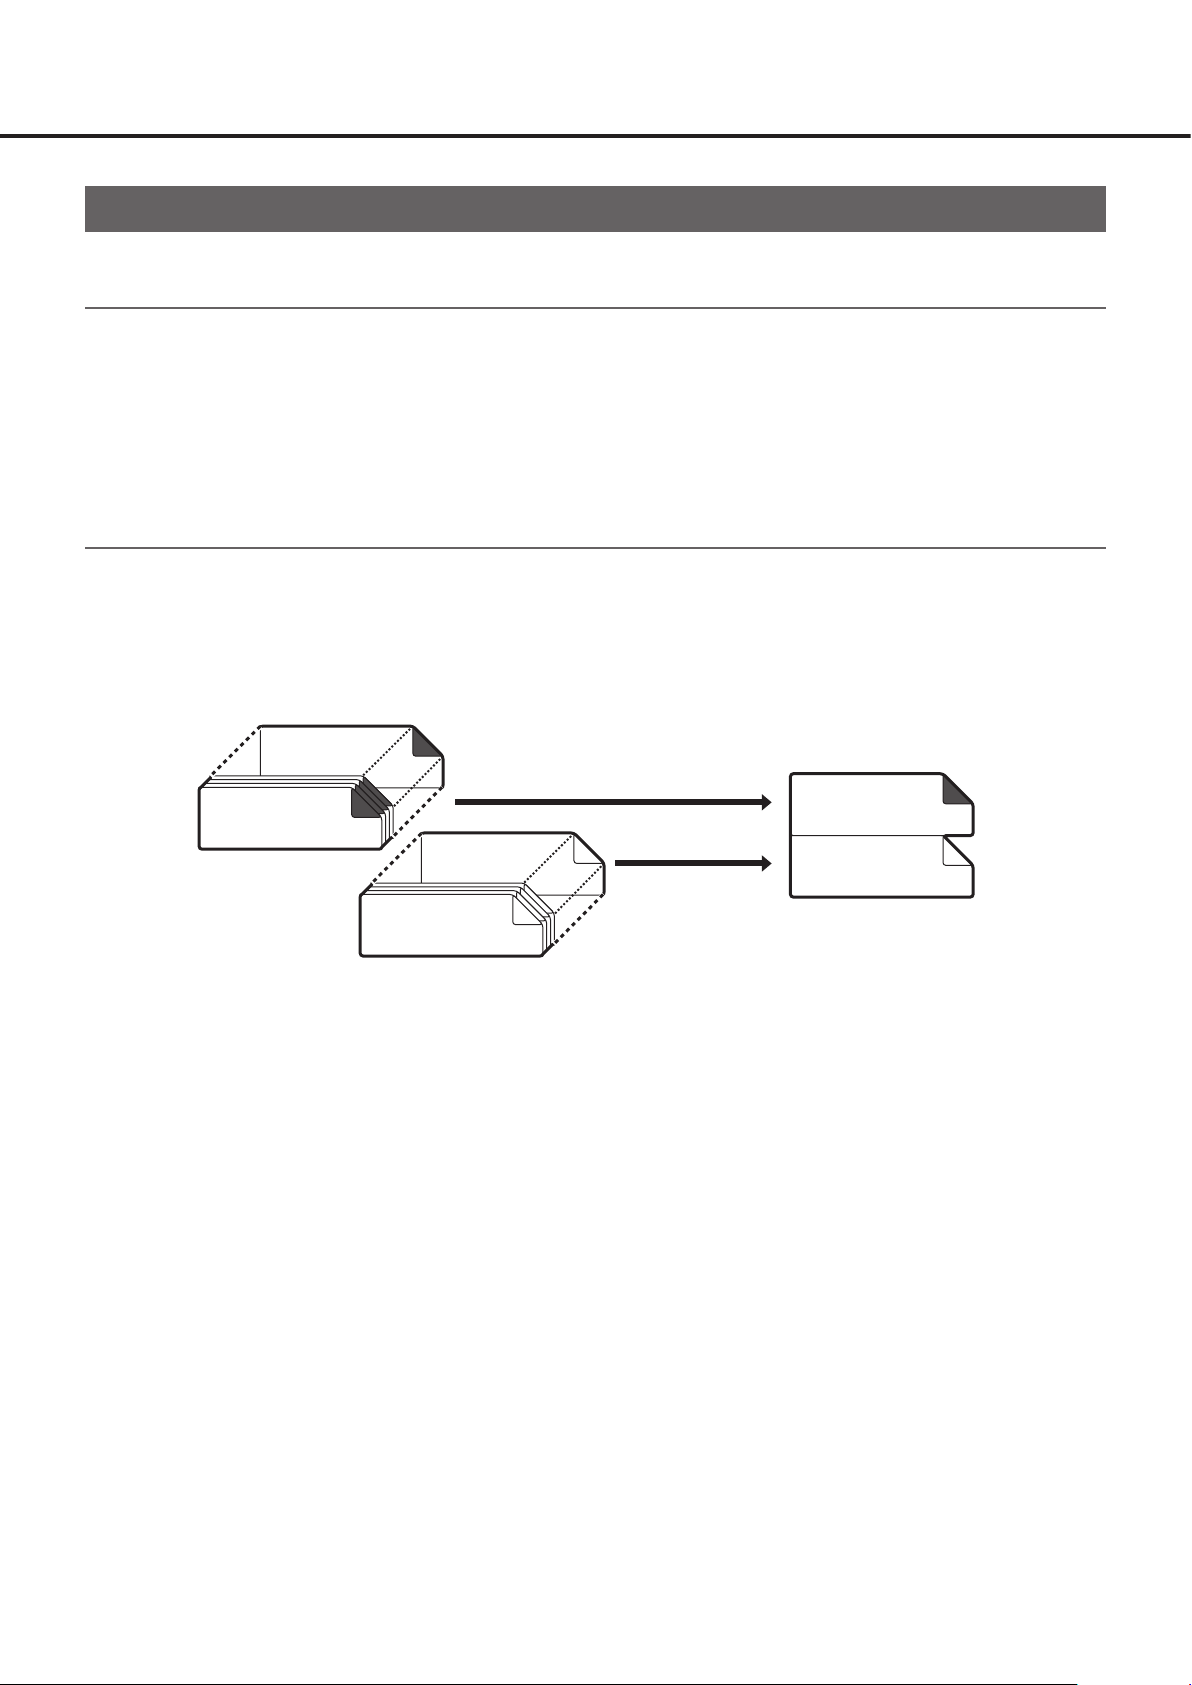
The aFrame has instrumental sounds called "instruments" and effects called "effects."
The aFrame's internal memory contains 80 instruments and 80 effects.
Instrument and effect parameters can be edited (P.13).
Tones
Each of the aFrame's tones is a combination of an instrument and an effect.
Instrument 80
Instrument 01
Effect 80
Effect 01
Tone
Instrument
number
Effect number
A combination of
1010
Page 11
Selecting tones
GRP A-01
GRP A-01
Groups
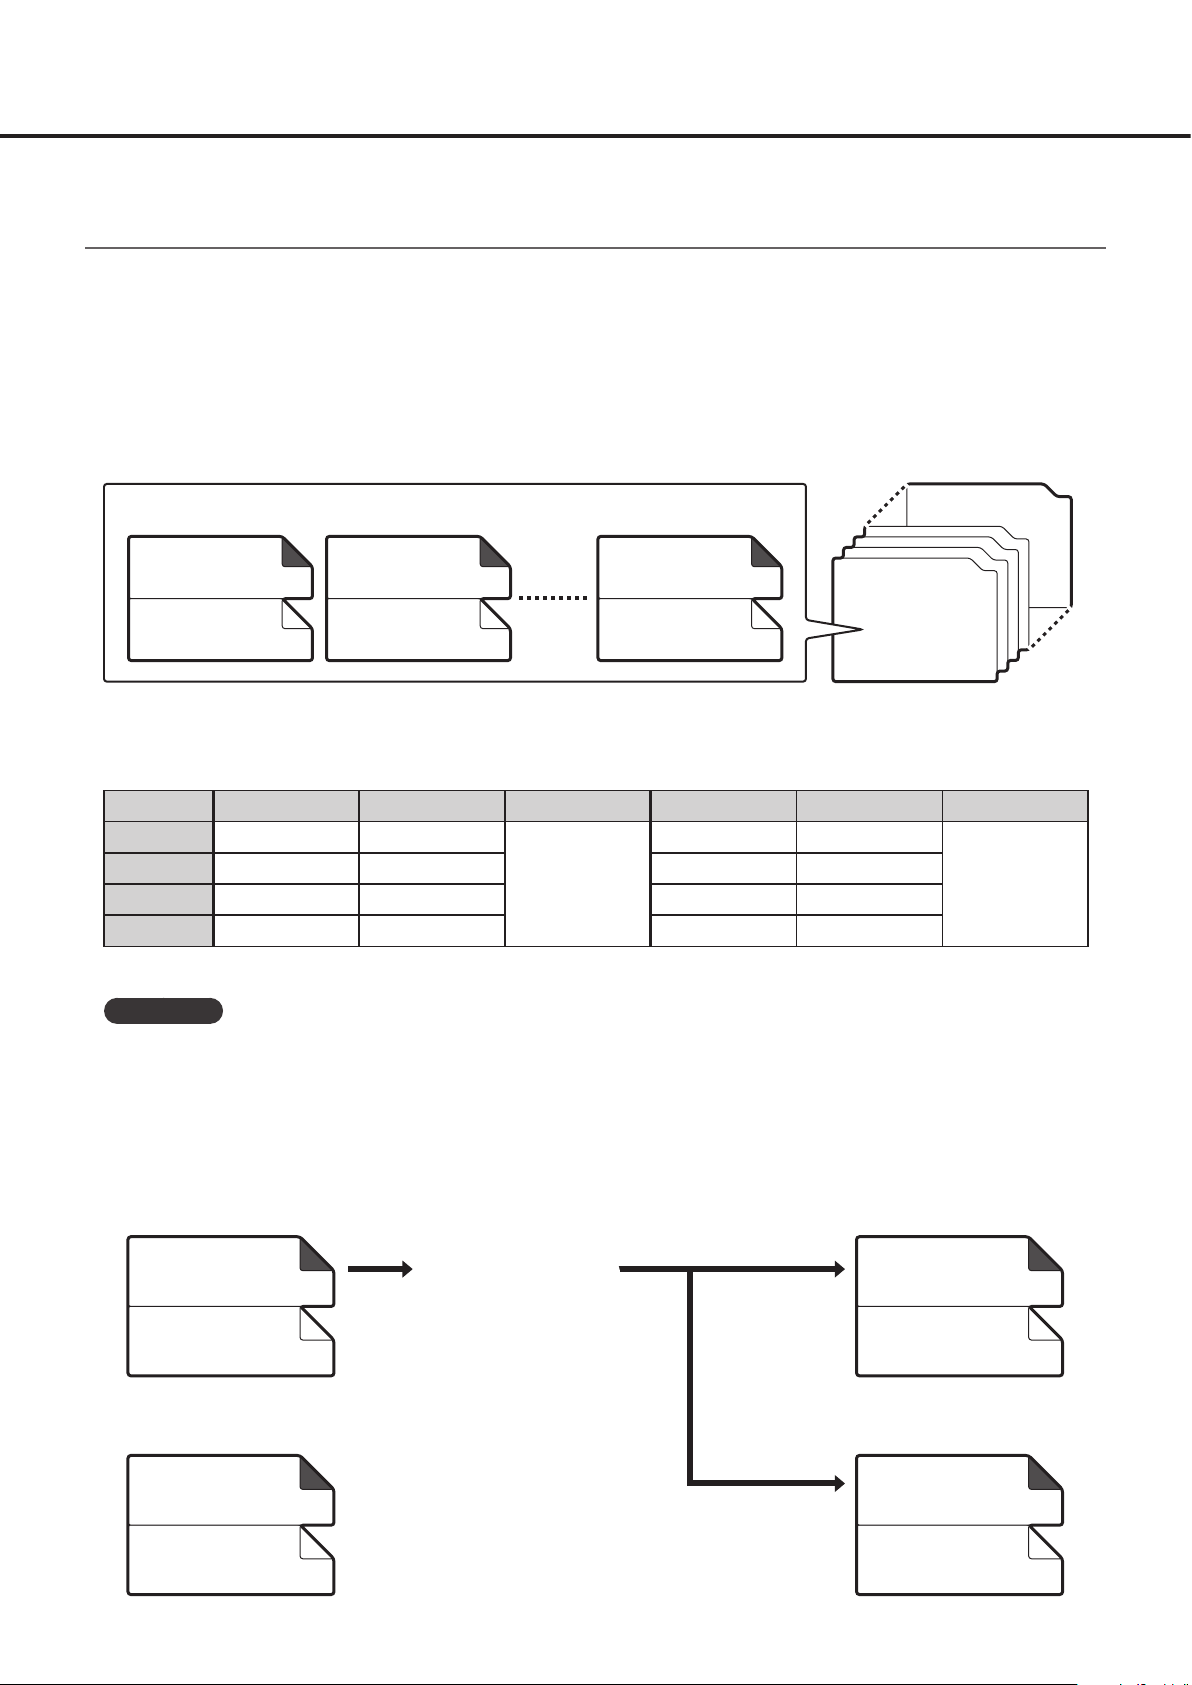
To help you quickly recall tones (combinations of an instrument and an effect), there are eight groups into which you
can organize the tones that you save in the aFrame's internal memory. A group can hold up to 40 tones, and you can
change the number of tones that can be recalled from each group. For details on how to change this, refer to “Refer-
ence Guide” (PDF). For instructions on how to download the reference guide, refer to the end of this manual.
To recall groups, use the A, B, C, and D buttons located at the right side of the aFrame. To switch between groups
A- – D- and groups A' – D', use the FNC button.
Tone number 1
Instrument
number
Effect number
When shipped from the factory, the aFrame is set as follows.
Button Group Tone number LED color Group Tone number LED color
A A- 01–10
B B- 01–10 B’ 01–10
C C- 01–10 C’ 01–10
D D- 01–10 D’ 01–10
Important
• The parameters are contained in the instruments and effects. This means that if you edit the parameters of an instru-
ment or an effect, the change will also modify the parameters of tones that use the same instrument and/or effect.
Every instance of an instrument and an effect is changed.
• For example if the same instrument is assigned to GRP A-01 and GRP A-02, and you edit the instrument parameters
of GRP A-01, the instrument parameters of GRP A-02 are also changed.
Tone number 2
Instrument
number
Effect number
▲–––––––––– Use the FNC button to switch ––––––––––▲
Tone number 40
Instrument
number
Effect number
Green
Group A-
A’ 01–10
Group D’
Yellow
Instrument 01
(Volume : 100)
Effect 01
GRP A-02
Instrument 01
(Volume : 100)
Effect 01
For instrument 01,
change the Volume
value to 20
The same change
occurs for other tones
that use instrument 01
Instrument 01
(Volume : 20)
Effect 01
GRP A-02
Instrument 01
(Volume : 20)
Effect 03
1111
Page 12
Selecting tones
Selecting a tone
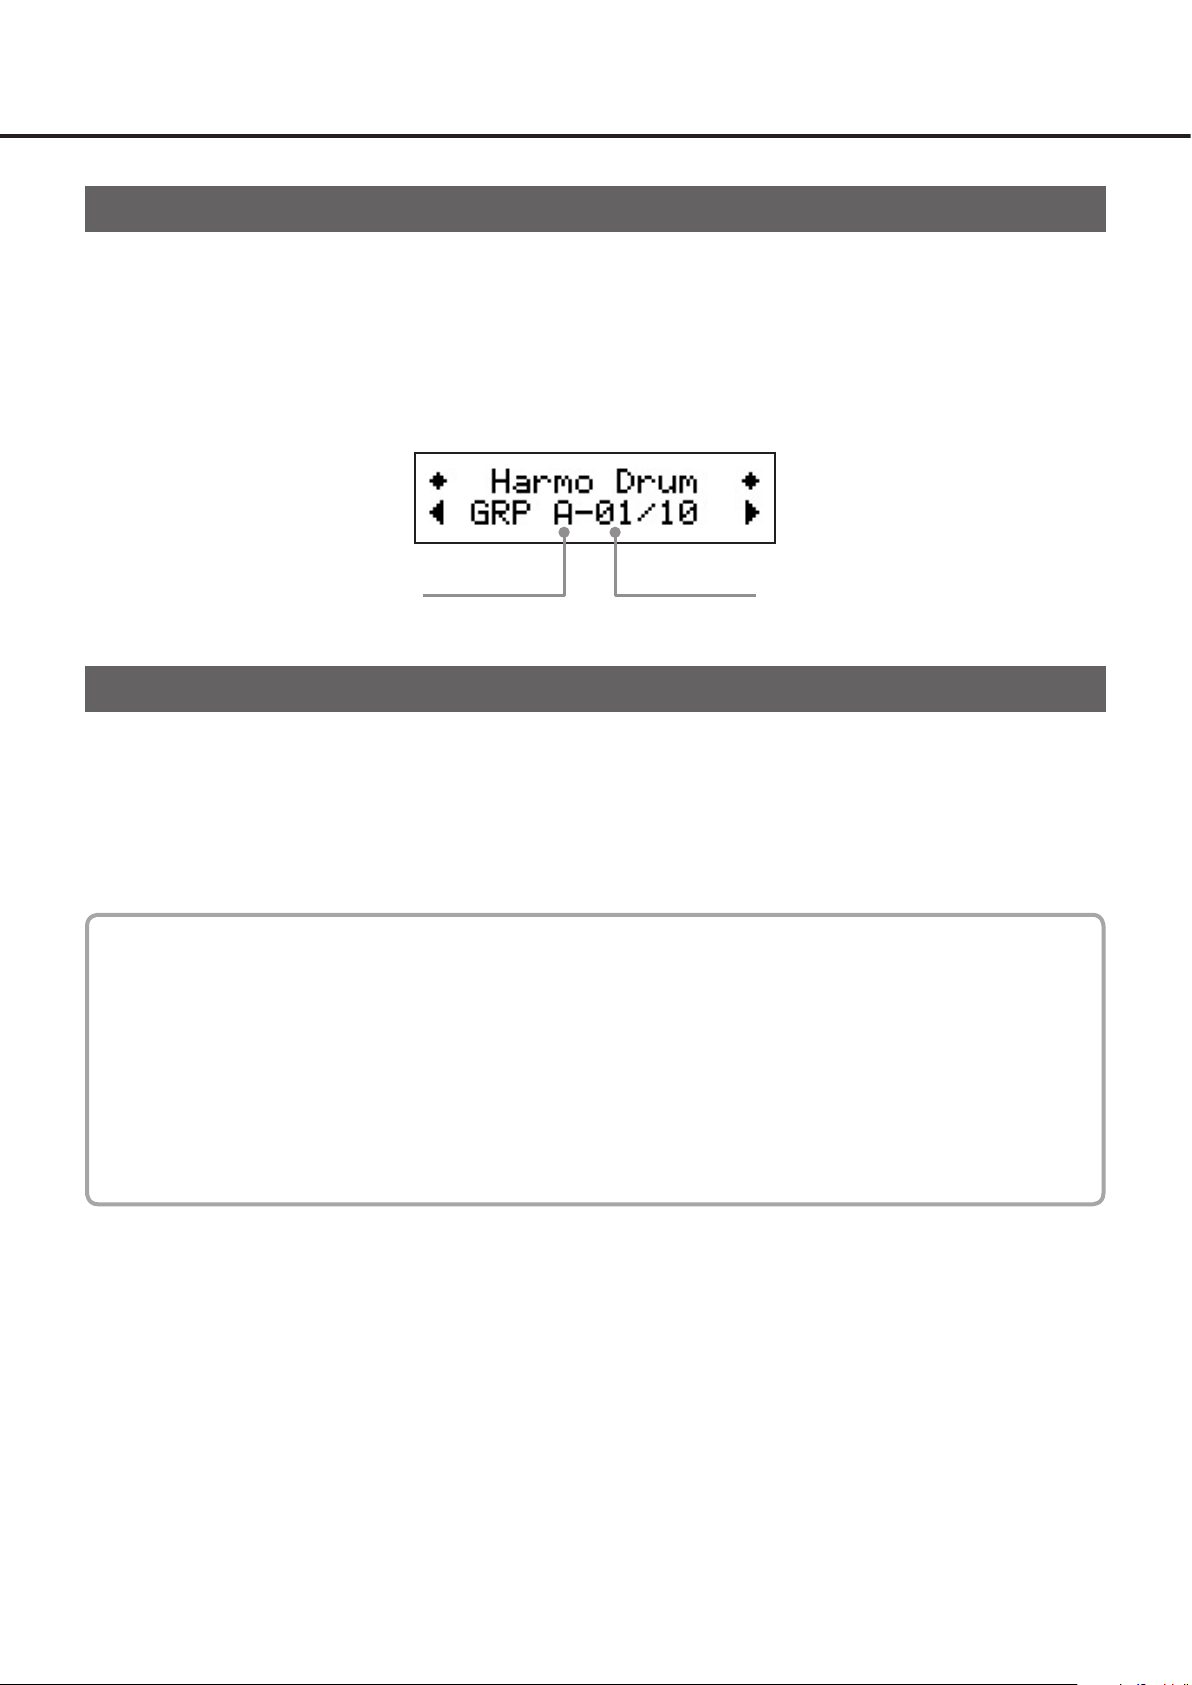
Press an A – D button to select the group. You can use the FNC button to switch between groups A- – D- and A’ – D’.
1.
The LED of the button you select is lit green if groups A- – D- are selected, or lit yellow if groups A' – D' are selected.
Use the ◀ or ▶ to select a tone number.
2.
Tone numberGroup
Checking the current instrument and effect
Press and hold the encoder. While holding down the encoder, the display shows the instrument and effect that are
assigned to the currently selected tone.
In some cases, you might inadvertently press a button, entering a mode other than Play mode (P.9).
If this occurs, you can return to Play mode as follows:
▶If the display indication is other than Play mode (P.9) :
Hold down the [5 EFFECT] button until the display returns to Play mode (P.9).
▶If the display indication is Play mode, but the instrument stops producing sound:
The Mute function (P.8) might be on. Defeat the Mute function (P.8).
1212
Page 13
Editing the tone
Editing the instrument/effect
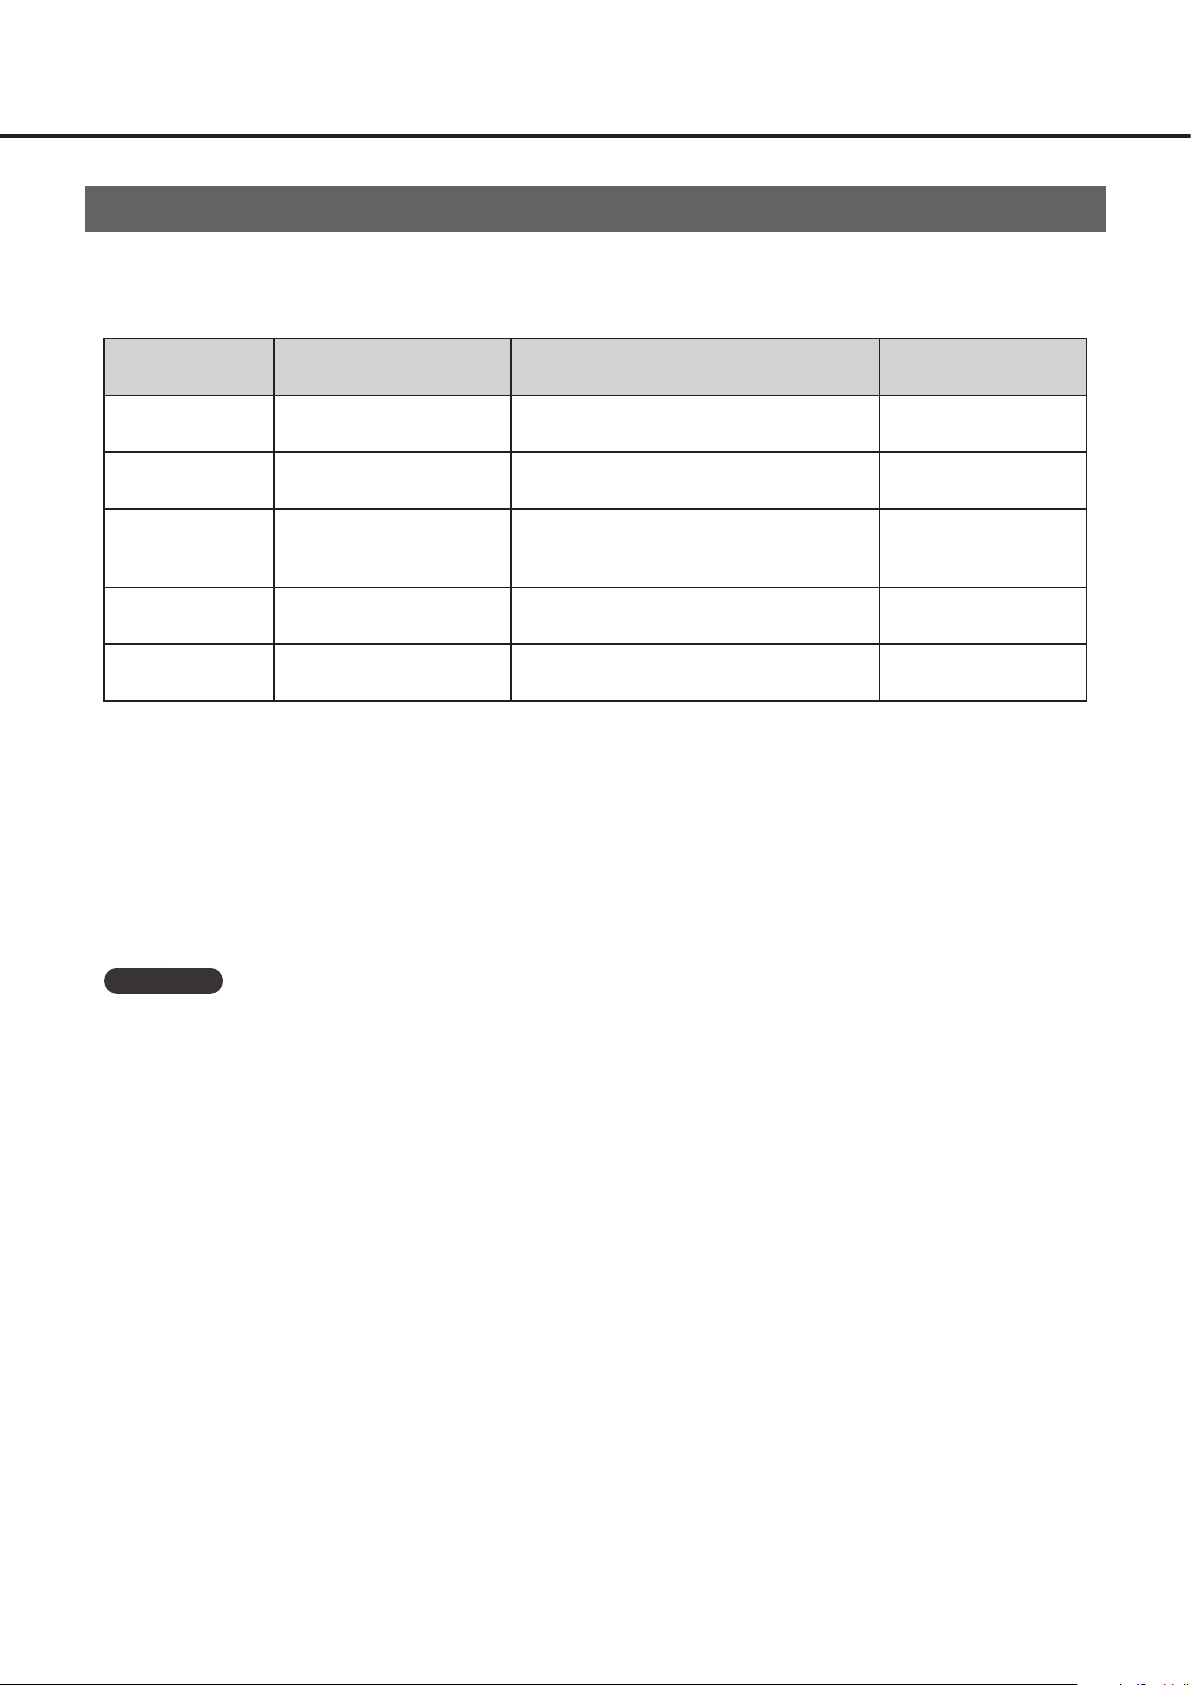
Hold down the button of the number corresponding to the parameter that you want to edit.
1.
The button you press and the encoder are lit.
Button Parameter Setting item Setting value
1 PITCH Pitch Pitch 20〜10000(Hz)
2 DECAY Decay Decay time 0.1〜10.0(sec)
3 BEND Bend Range
4 VOLUME Master Volume Volume 0〜127
5 EFFECT Effect Effect output level 0〜100
Continue holding down the button, and turn the encoder to edit the value.
2.
Release the button to return to Play mode.
3.
Important
• When you edit an instrument or effect, the change affects all tones to which the edited instrument or effect is as-
signed.
Amount of pitch change caused by
pressing the striking surface Volume
0〜100
1313
Page 14

Saving your edits
Your edits are not saved in the instrument or effect unless you specifically save them.
If you want to save the changes you made, proceed as follows.
Overwrite-saving an edited instrument
Simultaneously press the [1 PITCH] button and the [2 DECAY] button. The [1 PITCH]–[4 VOLUME] buttons and the
1.
encoder are lit green, and the [5 EFFECT] button is lit red.
Press the [5 EFFECT] button. The encoder blinks red.
2.
To overwrite-save the changes you made, press the encoder.
3.
If you decide to cancel without overwriting, long-press the [5 EFFECT] button.
Overwrite-saving an edited effect
Simultaneously press the [3 BEND] button and the [4 VOLUME] button. The [1 PITCH]–[4 VOLUME] buttons and the
1.
encoder are lit yellow, and the [5 EFFECT] button is lit red.
Press the [5 EFFECT] button. The encoder blinks red.
2.
To overwrite-save the changes you made, press the encoder.
3.
If you decide to cancel without overwriting, long-press the [5 EFFECT] button.
You can also save your edits to a different instrument number or effect number. For details, refer to “Reference
Guide” (PDF). For instructions on how to download the reference guide, refer to the end of this manual.
1414
Page 15
Restoring the factory settings
Initializing all parameters
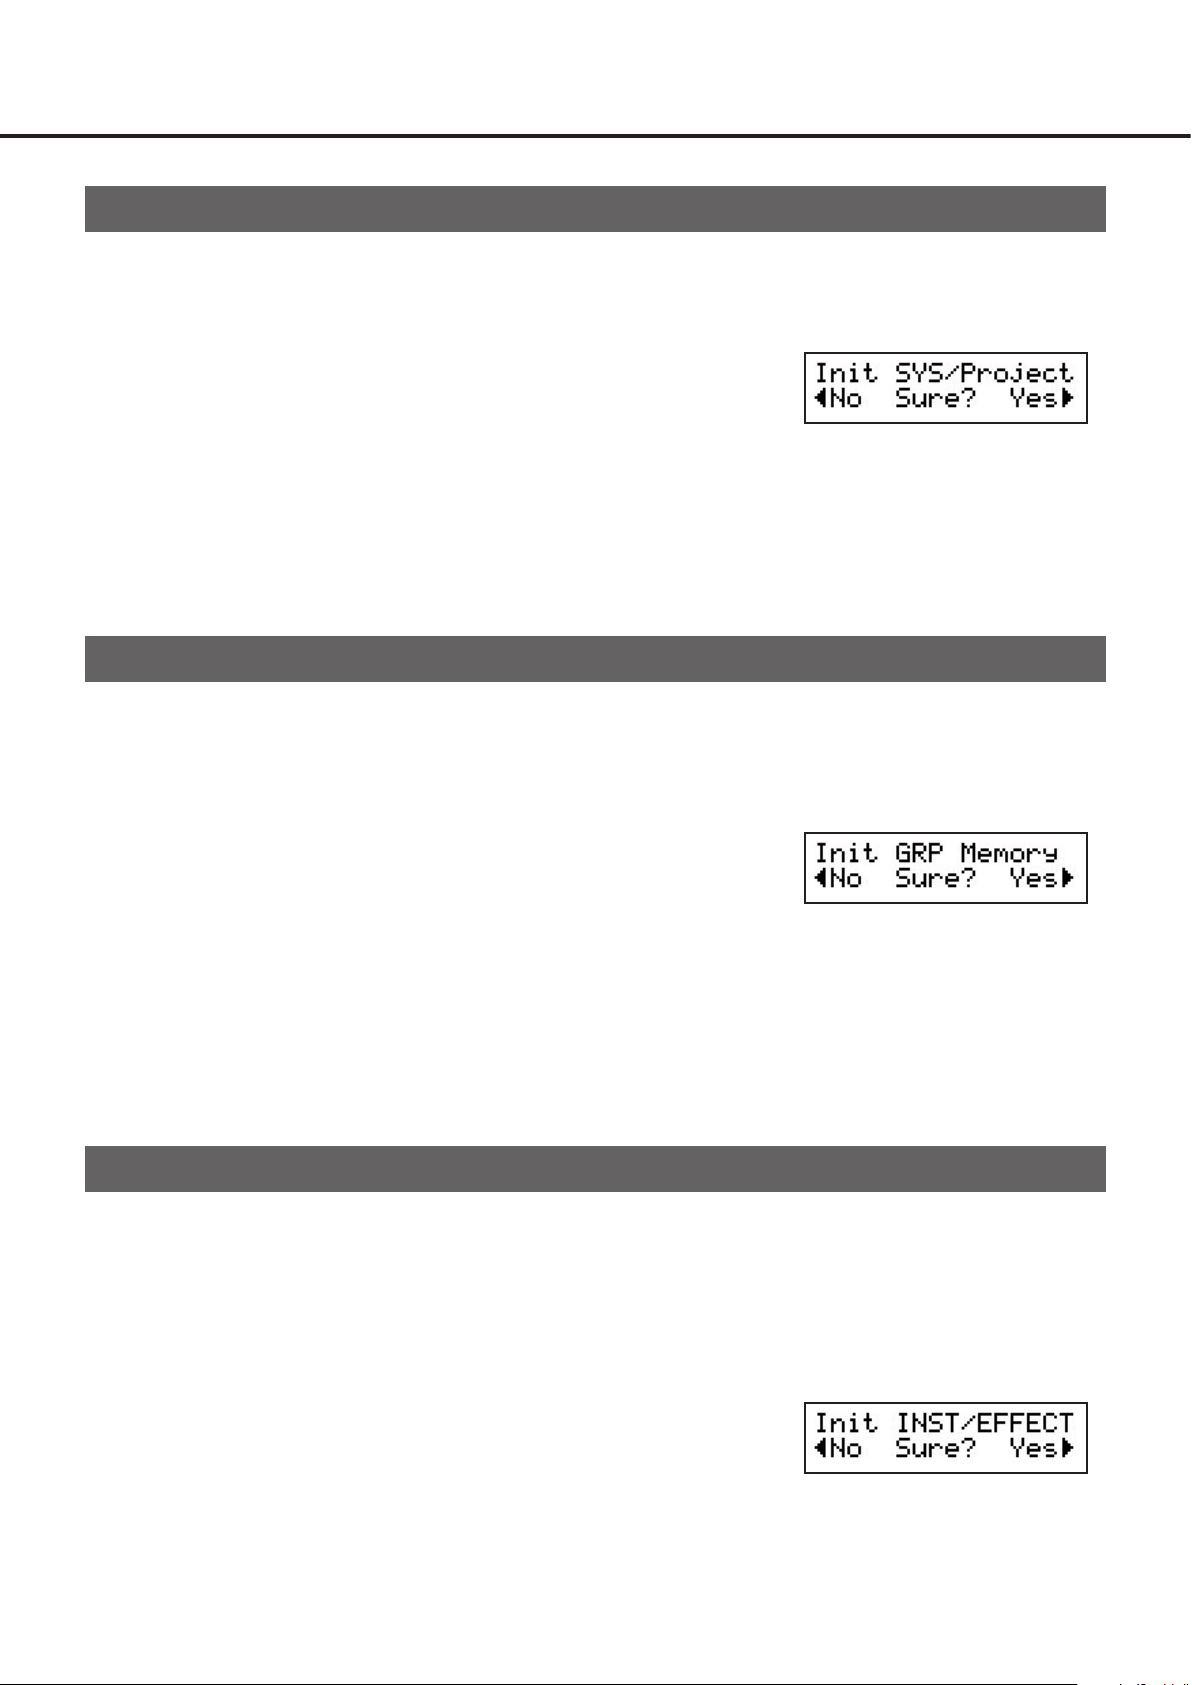
Here's how to return the aFrame to the factory-set condition.
Power-off the aFrame (P.8).
1.
While holding down the encoder, hold down the POWER button.
2.
When the display shown at right appears, release the encoder and the POWER button.
3.
Press the ▶ button. All settings return to their factory-set condition: system settings, instruments, effects, groups,
4.
and tones. If you decide to cancel initialization, press the ◀ button.
Initializing while preserving edited instruments and effects
Here's how to return the groups and the combinations of instruments and effects to the factory-set condition, while
preserving the instrument and effect settings that you edited.
Power-off the aFrame (P.8).
1.
While holding down the FNC button, hold down the POWER button.
2.
When the display shown at right appears, release the FNC button and the POWER button.
3.
Press the ▶ button. Edited groups and edited tones—combinations of instruments and effects—return to their
4.
factory-set condition. Edited instruments, edited effects, and edited system parameters are not initialized. If you
decide to cancel initialization, press the ◀ button.
Initializing while preserving edited system parameters
Here's how to initialize while preserving any changes made to system parameters, such as the LCD contrast and the
auto power-off time setting.
Instrument parameters, effect parameters, groups, and tones—combinations of instruments and effects—are initial-
ized.
Power-off the aFrame (P.8).
1.
While holding down the [5 EFFECT] button, hold down the POWER button.
2.
When the display shown at right appears, release the [5 EFFECT] button and the POWER button.
3.
Press the ▶ button. Settings other than system parameters return to their factory-set condition. If you decide to
4.
cancel initialization, press the ◀ button.
1515
Page 16

Specifications
Electrorganic Percussion
Model : aFrame
HEADPHONE : stereo mini-phone
LINE OUT L/R : mono phone
Connection jacks / Interfaces
Power supply DC 5V
Current consumption 500mA
Dimensions 380 (H) × 380 (W) × 44 (D) mm, 15(H) x 15(W) x 1-3/4(D) inch
Weight 1.6 kg, 3 lb 8-1/2 oz
* Specifications and appearance of this product are subject to change without notice.
DC IN : only for the included AC adapter
USB : micro type B connector
microSD : SD/SDHC card
1616
Page 17

Support
• Refer to the following URL for frequently asked questions, firmware updates,
and other information.
• For detailed information and a detailed explanation of the functions, refer to the
“Reference Guide” PDF.You can download the “Reference Guide” PDF from the
following URL:
• You can download a multi-lingual version of this document from the following
URL:
http://www.atvcorporation.com/support/perc/aframe/
17
Page 18
www.atvcorporation.com
© 2017 ATV Corporation All rights reserved.
2017 Rev.01
 Loading...