

Page 1

Before installation:
Do not attempt to install your
services prior to your service
activation date. You can find this
date on your packing slip.
Before you begin:
Get started Approximate installation time: 45 minutes
In the box:
ATT110900766
(IP-DS L Motorola VoIP Gui de)
FPO
1 data cable
Terms of Service
Quick Guide
1 Ethernet cable
Terms of Service
Quick Guide
Packing slip
(includes service activation date)
Terms of Service
Quick Guide
AT&T U-verse
Battery Backup Unit (BBU) will provide
you with backup power in the event of
a power outage.
1. Check your service activation date.
You can only activate your U-verse Voice service
on or after your service activation date. This date
is located on your packing slip.
2. Do you have a monitored home security system
or health alarm?
See “Specific Issues” on the back of this guide.
911 Acknowledgment form, Terms of Service,
AT&T U-verse Voice User Guide, 911 stickers
911
Acknowledgment
Terms of Service
User Guide
Wireless Gateway
(Wireless Gateway will replace your
existing modem.)
Images are not to scale.
SelfInStallatIon
GuIde
AT&T U-verse® Voice
Page 2
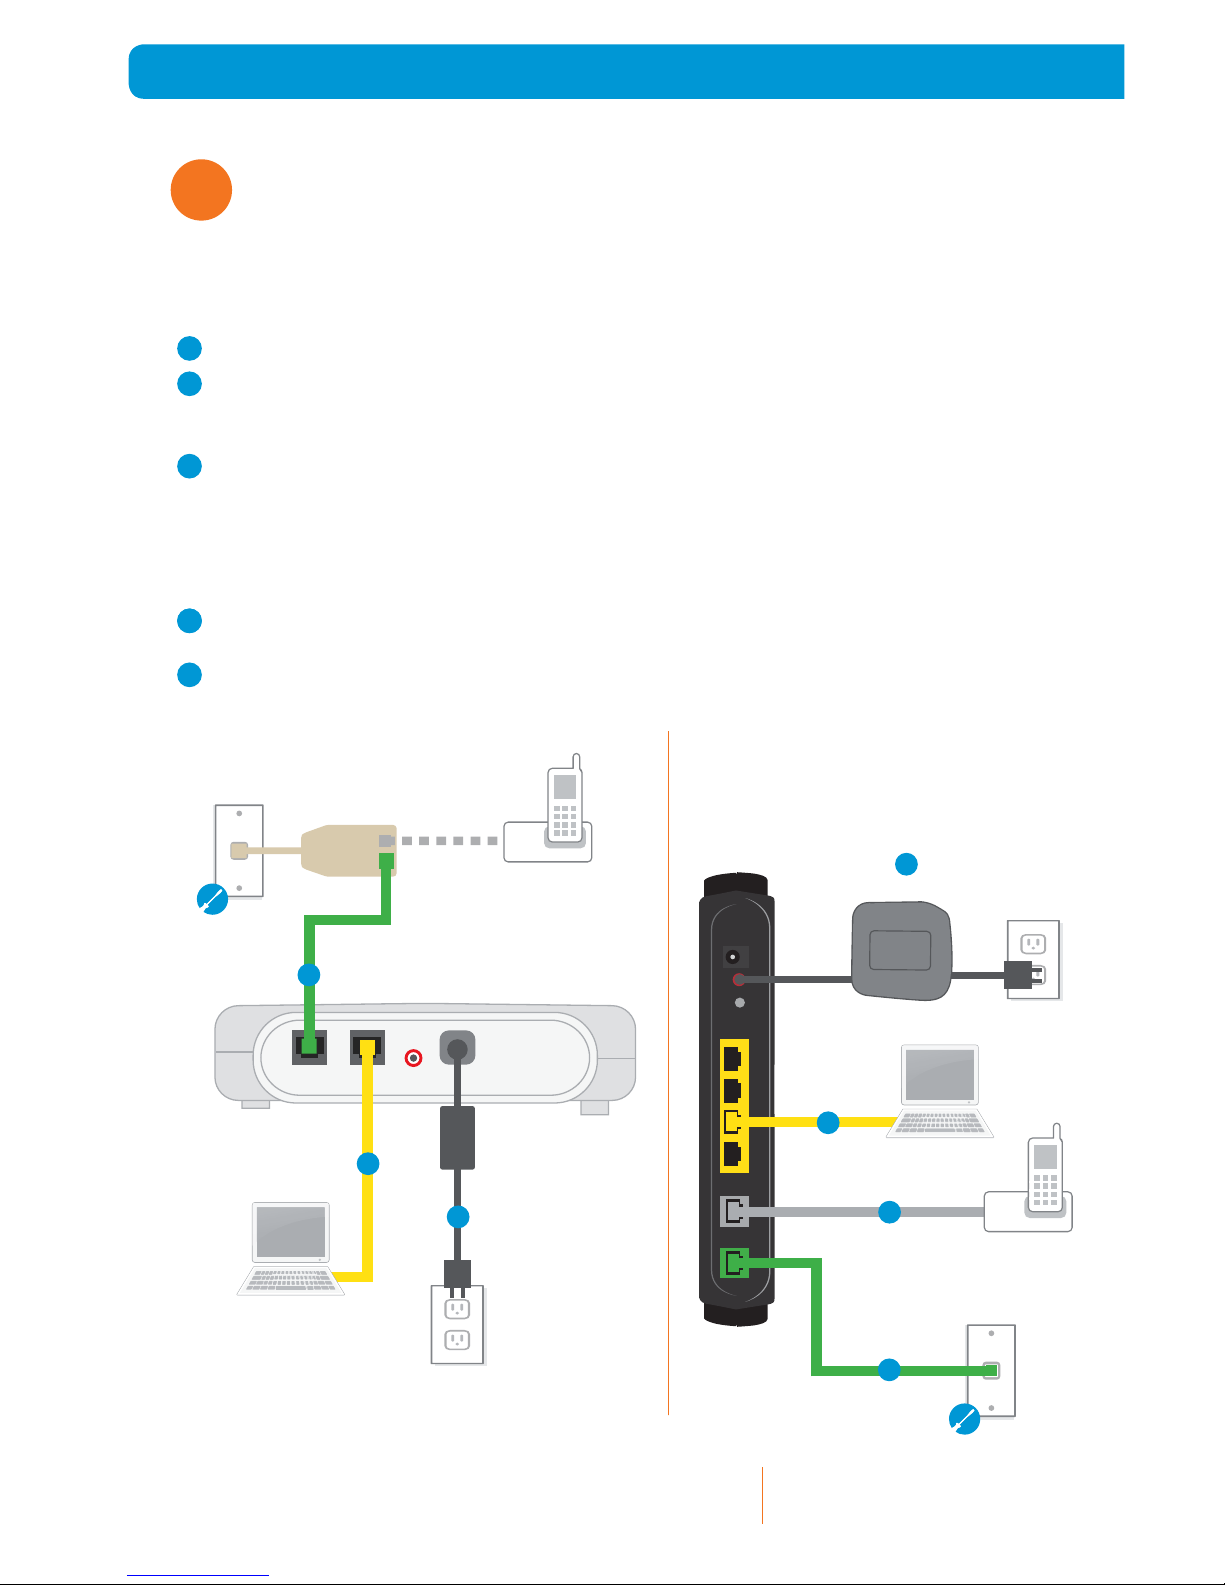
Wall jack
Phone port
DSL/H PNA
port
Existing
phone cable
Dual-port filter
Phone
AT&T U-verse Voice
service is not required for
an Internet connection.
Images are not to scale.
DSL port Ethernet port Power port
Modem
DSL ETHERNET RESET POWER
Set up Approximate time: 15 minutes
1
A
B
C
D
For an online installation tutorial, go to att.com/installhelp.
Note: If you already have a phone connected to your AT&T U-verse Voice service and want
to add a second line, skip to “Adding a second line” under step 3.
Power down your computer and existing modem by removing the power cord from the electrical outlet.
Disconnect the data cable from the DSL port in your existing modem and from the dual-port filter. This cable
will not be used in the new setup. Plug one end of the new provided green data cable into the DSL port on
the new Wireless Gateway and plug the other end into the wall jack.
Disconnect the Ethernet cable from the Ethernet port on your existing modem and from the Ethernet
port on your computer or router. This cable will not be used in the new setup. If you’ll be using a wired
connection from your computer to the Gateway, plug one end of the provided yellow Ethernet cable into the
Ethernet port on the new Wireless Gateway and plug the other end into the Ethernet port on your computer.
Now that you have disconnected your old modem or router, you may set that equipment aside, as it will no
longer be needed.
Remove the sticker covering the Power port. Connect the provided Battery Backup Unit (BBU) to the
Wireless Gateway’s Power port. Plug the BBU into a standard electrical outlet.
Connect one end of your phone cable into the Wireless Gateway’s phone line 1 and 2 port, and connect the
other end to a standard phone or cordless base station.
Questions?
See the “Having trouble?” and “Specific
issues” sections on the back of this guide
for tips and answers to common questions.
To learn more about the benefits and
features of your AT&T U-verse service,
visit att.com/u-verse/newcustomer.
Electrical
outlet
Electrical
outlet
Power cord
A
Data cable
B
Existing setup: New setup:
BBU
D
Computer
or router
Ethernet cable
C
Ethernet
cable
C
Wall jack
You can find more detailed installation instructions online at att.com/installhelp.
Data cable
B
Phone cable
E
Computer
Wireless Gateway
ETHERNET
RESET
POWER
E
D
Page 3

Move the switch on the back of the BBU to the “on” position.
Note: The BBU must be charged to be fully operational;
however, installation of your service may continue while
charging the BBU. While the BBU is charging, it may emit
a short beeping sound. Charging of the BBU will take
approximately 18 hours.
Your Wireless Gateway is now powering up. During this time,
the Broadband light will turn red. Wait up to five minutes for
the indicator lights for Broadband and Service to turn solid
green and the Ethernet indicator light to start blinking green.
Power up Approximate time: 15 minutes
2
Stay connected on the go! AT&T Wi-Fi Basic is included with your AT&T U-verse
High Speed Internet service, so you can access the Internet at thousands of AT&T Wi-Fi Hot
Spots across the country . Visit www.attwifi.com to learn more.
Battery Backup Unit (BBU)
Wireless Gateway indicator lights
ON
OFF
Adding a second line
A. Disconnect the phone cord from your primary phone
and connect a voice line splitter to the Gateway.
B. Connect the phone cables of both phones to the first
and second ports of the splitter.
C. Complete the mandatory activation call (step 3 above)
from the phone you just connected.
If you ordered a second AT&T U-verse Voice service line (with
a different phone number), follow the instructions below:
Line 2
Line 1
Note: If you ordered two separate lines with your initial installation,
connect the first as explained in step 1 and the second as described above.
Congratulations! You’ve successfully installed AT&T U-verse Voice.
Call 1.877. 377.0016 from the phone you set up in step 1, and follow
the voice instructions to complete the activation.
Upon successful activation you will hear the following: “Your telephone
number XXX.XXX.XXXX has been successfully activated.”
Register (required)
3
Approximate time: 5 minutes
During this time, do not unplug the BBU or green data
cable, as this can damage the Gateway.
•
If the Broadband and Service lights do not turn solid
green after 10 minutes, see the “Having trouble?”
section on the back of this guide.
Important: You will have a dial tone after
completing step 2, but will only be able to make
emergency and toll-free calls until you activate
your service in step 3.
Refer to enclosed AT&T U- verse
Voice User Guide.
Page 4

Having trouble? Many issues can be resolved in two simple steps:
Specific issues
I have a monitored home security system or health alarm.
You will need an AT&T technician to install your service. Call
1.800.288.2020 to schedule an appointment.
My Power indicator light turns orange during the power
up sequence.
Don’t worry. This is a normal part of the power up sequence—
just remember not to unplug the BBU or green data cable when
the light is still orange. At the end of power up, the DSL and
Internet lights will be solid green.
Where can I go for further installation assistance or to download
the online support tool?
For further installation assistance or to download the online
support tool for features configuration, such as wireless
networking, go to uverseactivation.att.com.
Every time I try to browse to a Web page, I get a message
stating “Detecting Proxy Settings.”
In Internet Explorer, under Tools > Internet Options > Connections
> Settings, uncheck any checked boxes, then click OK.
Additional AT&T U-verse information
•
Check out the User Guide
Now that you have successfully installed
AT&T U-verse, check out the User Guide for more
information about your AT&T U-verse voice features.
This guide is also available online at
att.com/userguides.
•
Go online
To manage your AT&T U-verse account and voice
features, go to:
att.com/uversecentral.
•
¿Habla español?
Para las guías en español, por favor visitar
att.com/u-verseguias.
Need more help?
Go online: Visit att.com/uversesupport.
Call us: Dial 1.800.288.2020 and ask for “U-verse technical support.”
©2011 AT&T Intellectual Property. http://www.att.com/gen/privacy-policy?pid=2587 All rights reserved. AT&T, the AT&T logo and all other AT&T marks contained herein are trademarks of AT&T Intellectual Property and/or AT&T affiliated companies.
Go Wi-Fi (optional) Approximate time: 10 minutes
4
Write down your Network Name (SSID) and Wireless Network Key (WPA) to configure a Wi-Fi device.
This information is on the side of your Wireless Gateway. The Network Name consists of “ATT” plus
the last three digits of the Gateway’s serial number. Be sure to record this information in the form below.
Now configure your wireless network:
• Go to your computer’s “Wireless Network Settings”
and refresh the network list.
• Select your Network Name (SSID) from the list. You
may need to scroll through the list to find your SSID.
• Enter the 10-digit Wireless Network Key (WPA) in
the Password field to connect to your network.
Congratulations! You should now be
wirelessly connected to the Internet.
Network Name (SSID)
10-dig it Wireless N etwork Key (W PA)
WPA
A T T
Note: Label is removable for safekeeping. Please update
with Wireless Netwrok Key and keep for reference.
1. Check your connections.
Verify that all cables and cords are securely connected to the Wireless Gateway. Cables usually make an
audible click when secure. If you are still unable to connect to the Internet, try a different wall jack.
2a. Power down, power up.
Shut down your computer, and power down the
BBU and any other devices connected to the
Wireless Gateway. Wait 15 seconds, then power
up the devices. Verify that the Wireless Gateway’s
Power light is on, (If the light does not turn on,
try a different outlet.) then turn your computer on.
2b. Wait for blinking indicator lights.
Wait for blinking indicator lights on the Wireless
Gateway to turn solid green (may take up to two
minutes) before attempting to access the Internet.
 Loading...