

Page 1

IMPORTANT: PLEASE
READ AND FOLLOW
THESE INSTRUCTIONS
STEP BY STEP
Telephone Adapter
Install Guide
i
Page 2

WELCOME TO
AT&T
CALLVANTAGE
This guide will enable you to
install the equipment needed to use
your AT&T CallVantageSM Service.
SERVICE
AT&T does not represent or warrant that installation by you or a third party
chosen by you will enable you to successfully access or use this service,
nor that any such installation will not cause damage or modifications
to, or loss of, any of your software, hardware, files, data, or peripherals.
AT&T and our employees, agents, contractors, and representatives will have
no liability whatsoever for any damages or service problems (including
telephone service) resulting from your, or a third party’s, failure to properly
install, access, or use the equipment, software or services.
ii
For instructions on how to use
AT&T CallVantage Service features
once set up is complete, refer to the
Desk/Reference Guide also included in
the kit, or download a complete guide
to features at www.callvantage.att.com
(click User Guide).
Page 3

CONTENTS
Check Your Package Contents 2
Telephone Adapter Front and Back Illustration 3
Step 1: Gather Information 5
Step 2: Shut off All Equipment 6
Step 3: Connect Equipment 8
Step 4: Turn on Equipment in Order 10
Step 5: Verify Your Connection 12
Step 6: Activate your Telephone Adapter 16
Appendix A: Configuration for Static IP 18
Appendix B: Activating a Replacement TA 19
Appendix C: Troubleshooting 20
Appendix D: Warranty Information 27
Appendix E: Glossary 28
Technical Support 29
1
Page 4
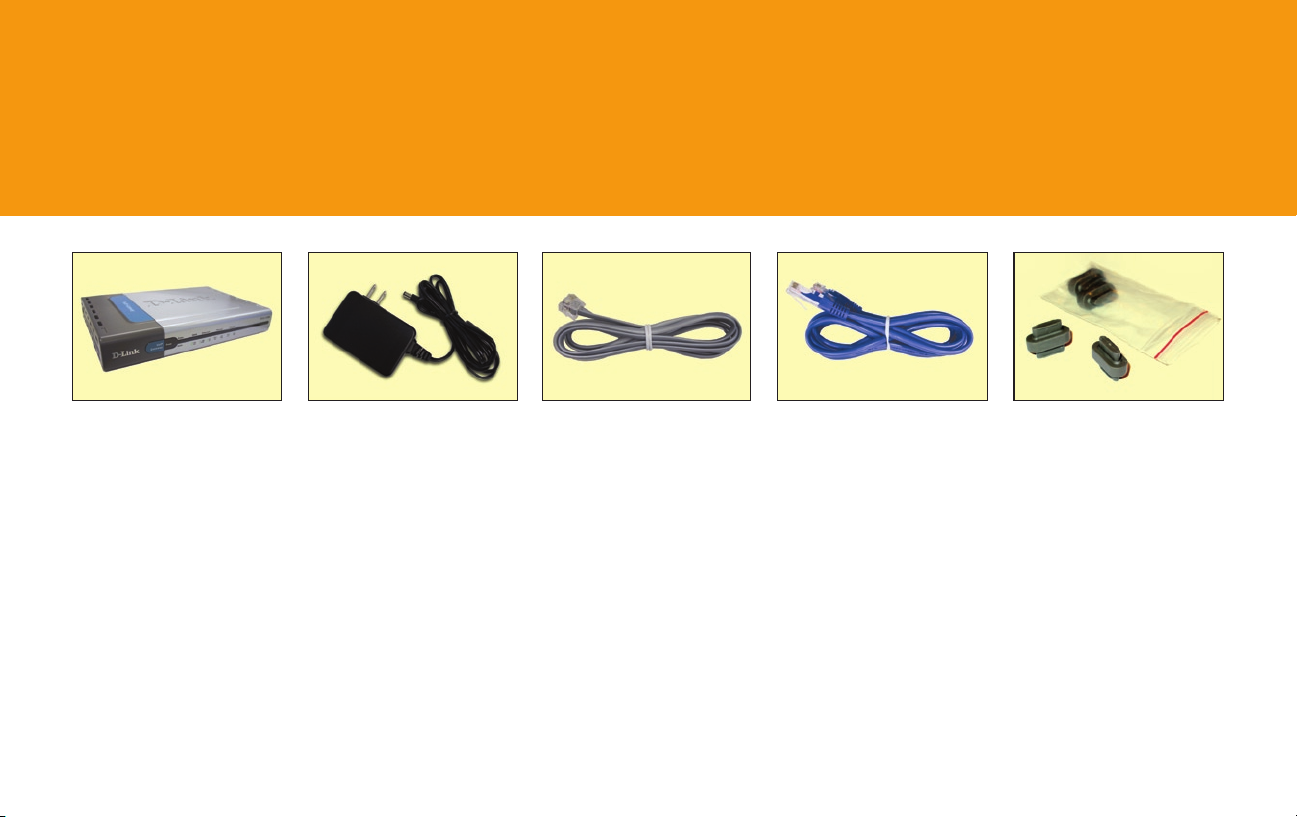
CHECK YOUR PACKAGE CONTENTS
D-Link Telephone Adapter
This will be referred to as the TA
from this point forward.
22
12V 1A DC Power Adapter
Using a power supply with
a different voltage rating will
damage and void the warranty
of this product.
Telephone Cord (Grey)
You can use this to connect
your telephone to the TA.
Ethernet Cable (Blue)
You can use this to connect
your TA to your computer or
router.
Rubber Feet
You can use these on the
bottom of your TA.
Page 5
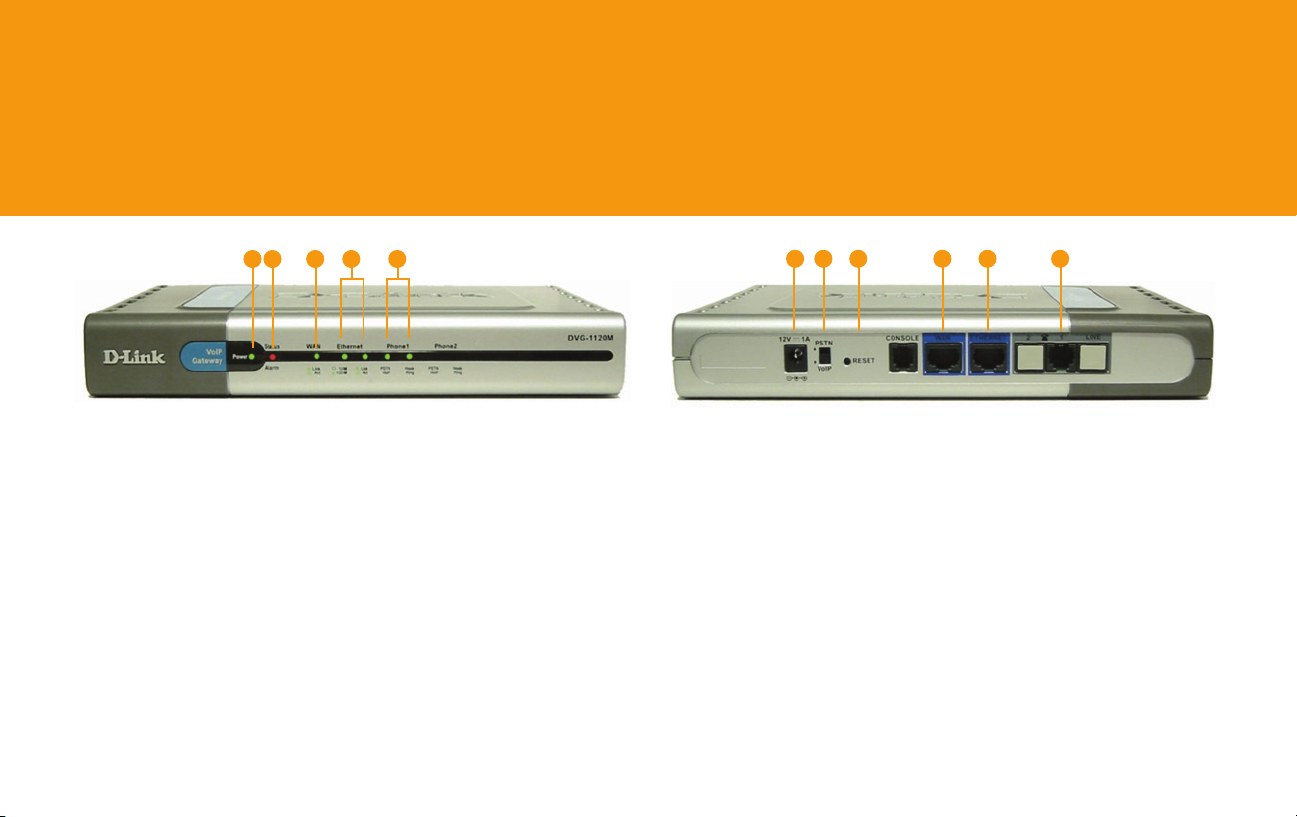
TELEPHONE ADAPTER FRONT AND BACK ILLUSTRATION
1 Power LED
A solid green light indicates that the unit
is powered correctly.
2 Status LED
The red status light will
blink until the TA has
been activated. Once the
TA has been successfully
connected with the AT&T
CallVantageSM Service,
it will light solid green.
4
3
2
1
The Status light will also
turn a blinking amber
color while downloading
the TA configuration
file or firmware updates.
IMPORTANT: DO NOT
power off your TA if the
Status LED light is amber.
3 WAN LED
A solid green light indicates connection on the
WAN port. This LED blinks
during data transmission.
This light will blink while
downloading a configuration file.
5
4 Ethernet LEDs
10M / 100M
A solid green indicates
a 100 Mb connection.
When this light is
off but the Link/Activity
light is green you have
a 10 Mb connection.
Link / Activity
Blinks during data transmission. Off indicates no
connection.
5 Phone LED
PSTN/VoIP
This light is inactive
with the PSTN/VoIP
switch in the default
“VoIP” setting.
Hook / Ring
A solid green light indicates that the phone is off
hook. When the light is
off this indicates that your
phone is on hook.
6 Receptor for Power
Adapter.
7 PSTN/VoIP Switch
By default, the switch
is set to VoIP.
8 Reset Button
Pressing this button restores the TA to its original
factory default settings.
Note: To reset the TA, hold
the reset button down
WHILE you power up the
box, then continue to
HOLD the reset button.
9876
1110
9 WAN Port
This port is for the connection of an Ethernet
cable to the cable or DSL
modem.
10 Ethernet Port
This port is for the connection of an Ethernet
cable to your computer.
11 Phone Port
This port is for the
connection for an
RJ-11 telephone cord
to a phone.
33
Page 6

!
IMPORTANT
Follow the instructions in this guide step by step
and in the exact order presented.
Prior to proceeding:
– Read through this guide thoroughly.
– Make sure you have a cable or DSL Internet connection
(not dial-up or satellite).
– Make sure your cable/DSL Internet connection is working
(i.e. you can browse to a known website like www.att.com)
If your cable/DSL Internet connection is not working,
you must contact your cable/DSL service provider to resolve
the issue prior to installing your TA.
4
Page 7

GATHER
1
INFORMATION
A Note whether you have a single computer
connected directly to your cable/DSL
modem, or one or more computers
connected through a home router.
Follow the instructions under
this icon if you have a single
computer connected directly to
your cable/DSL modem.
Follow the instructions under
this icon if you have one or more
computers connected through a
home router.
For Static IP, see Appendix A ,page 18.
To activate a replacement TA, see Appendix B, page 19.
For integrated modem/home routers, see Troubleshooting, page 25.
B Make sure you have the following information
before you start your TA installation:
For all users
AT&T CallVantage Service
User ID
Your 10-digit AT&T
CallVantage Service
number (provided in your
order confirmation e-mail)
If you have DSL
DSL Provider (PPPoE)
username
You must get this from your
DSL provider
If you have a home router
Home router user manual
The user manual you received along with your home
router. Many manufacturers let you download this from
their website.
AT&T CallVantage Service
password
You selected this when
you ordered the service;
if you forgot it, go to
www.callvantage.att.com
and click “Forgot your
password?”
DSL Provider (PPPoE)
password
You must get this from
your DSL provider
C Proceed to Step 2.
5
Page 8
ETHERNET
PORT
E
T
HE
R
N
ET
POWER
OFF
OFF
Cable/DSL
Jack
Personal ComputerCable/DSL
Modem
SHUT OFF ALL
2
EQUIPMENT
FOR SINGLE COMPUTER CONNECTED
DIRECTLY TO CABLE/DSL MODEM
IMPORTANT! Shut down and unplug each
!
device separately (i.e. don’t simply shut off
your powerstrip.)
6
A Shut down your computer. If your cable/
DSL modem has a power switch, turn it off.
B Unplug your cable/DSL modem from its power
outlet. (You should perform this step even if
you set its power switch to off.)
C Leave your modem powered down for at least
5 minutes.
D Proceed to Step 3, page 8.
Page 9
ETHERNET
PORT
E
TH
E
R
N
E
T
POWER
OFF
OFF
ETHERNET
PORT
OFF
OFF
WAN/
UPLOAD
PORTS
ETHERNET
PORT
E
T
HER
N
E
T
POWER
OFF OFF
Cable/DSL
Jack
Personal ComputerCable/DSL
Modem
Cable/DSL
Jack
Personal Computer(s)RouterCable/DSL
Modem
FOR ONE OR MORE COMPUTERS
CONNECTED THROUGH HOME ROUTER
IMPORTANT! Shut down and unplug each
!
device separately (i.e. don’t simply shut off
your powerstrip.)
A Shut down all computers connected to your
home router (including those connected
wirelessly). If your cable/DSL modem and home
router have power switches, turn them off.
B Unplug your cable/DSL modem and home router
from their power outlets. (You should perform this
step even if you set their power switches to off.)
C Leave your modem powered down for at least
5 minutes.
D Proceed to Step 3 (for one or more computers
connected via home rounter), page 9.
7
Page 10
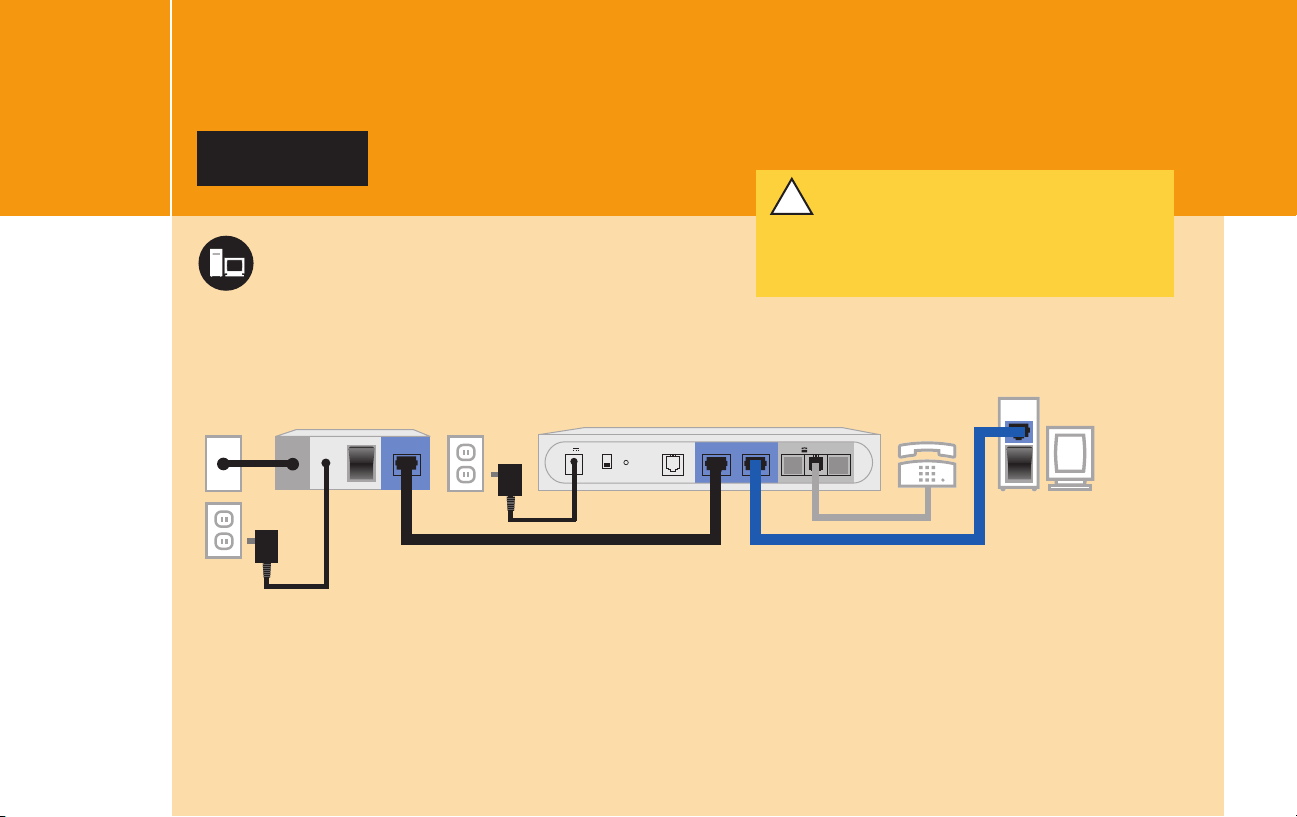
3
RESET
CONSOLEPSTN
VoIP
WAN ETHERNET
12V 1A
2 1 LINE
ETHERNET
PORT
E
T
HER
N
E
T
POWER
OFF OFF
Cable/DSL
Jack
Telephone Adapter Personal ComputerTelephoneCable/DSL
Modem
( US E E X IS T I N G C A B L E )
( US E N E W C A BL E )
Telephone Cord
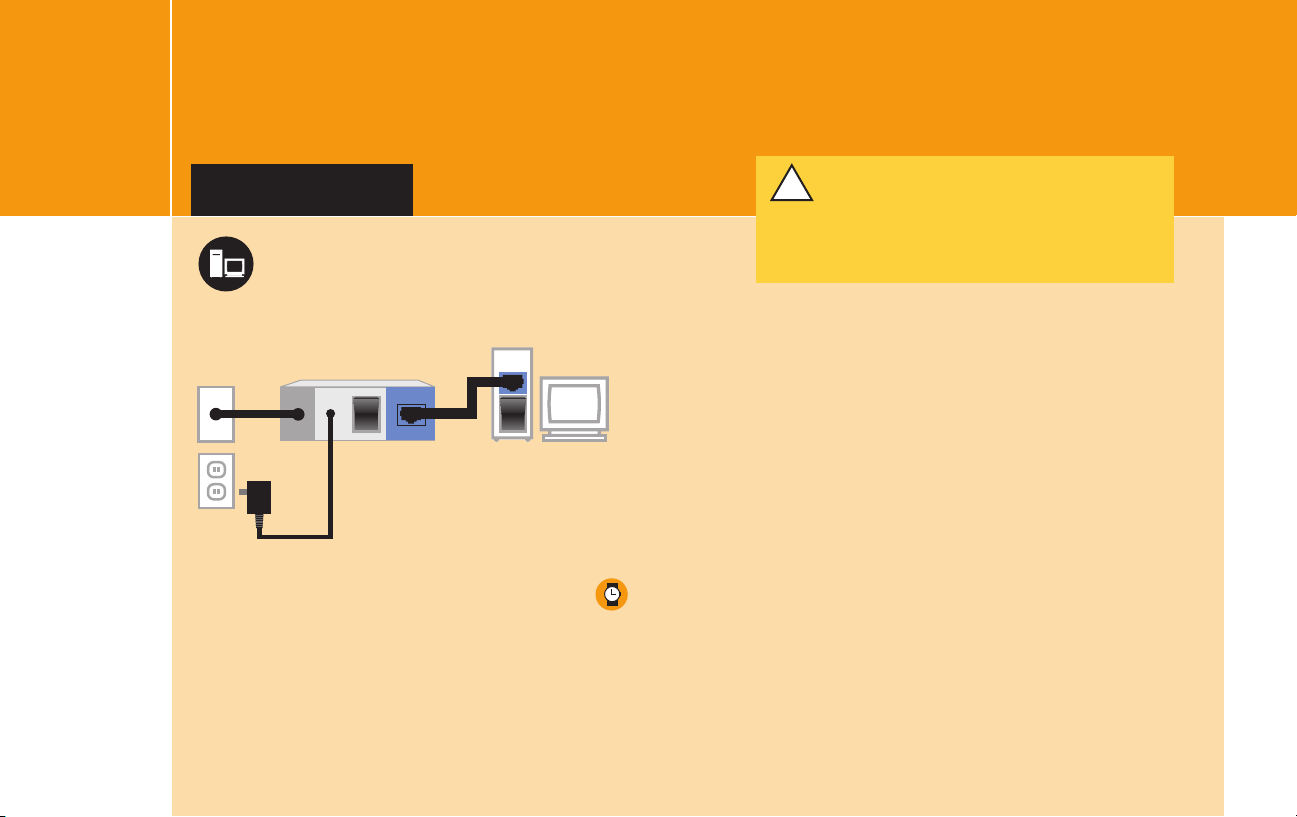
CONNECT
EQUIPMENT
FOR SINGLE COMPUTER CONNECTED
DIRECTLY TO CABLE/DSL MODEM
NOTE The connection between the cable/DSL modem
and the cable/DSL jack should remain unchanged.
IMPORTANT! Your existing Ethernet cable should
!
be between your cable/DSL modem and your TA.
This will ensure any special cabling you received
from your Internet Service Provider is between
your modem and your TA.
A Set up your cabling as shown in the diagram above.
8
B Make sure the PSTN/VoIP switch on the back of the TA is set to “VoIP.”
C Proceed to Step 4, page 10.
Page 11

OFF
WAN/
UPLOAD
RESET
CONSOLE
PSTN
VoIP
WAN ETHERNET
12V 1A
2 1 LINE
E
T
H
E
R
N
E
T
POWER
OFF
ETHERNET
PORT
OFF
PORTS
ETHERNET
PORT
OFF
RESET
CONSOLE
PSTN
VoIP
WAN ETHERNET
12V 1A
2 1 LINE
ETHERNET
PORT
E
T
HE
R
N
ET
POWER
OFF
OFF
Cable/DSL
Jack
Telephone Adapter Personal ComputerTelephoneCable/DSL
Modem
Cable/DSL
Jack
Personal Computer(s)RouterTelephoneTelephone AdapterCable/DSL
Modem
( US E E X IS T I N G C A B L E )
( US E N E W C A BL E )
Telephone Cord
( US E E X IS T I N G C A B L E )
( US E N E W C A BL E )
Telephone Cord
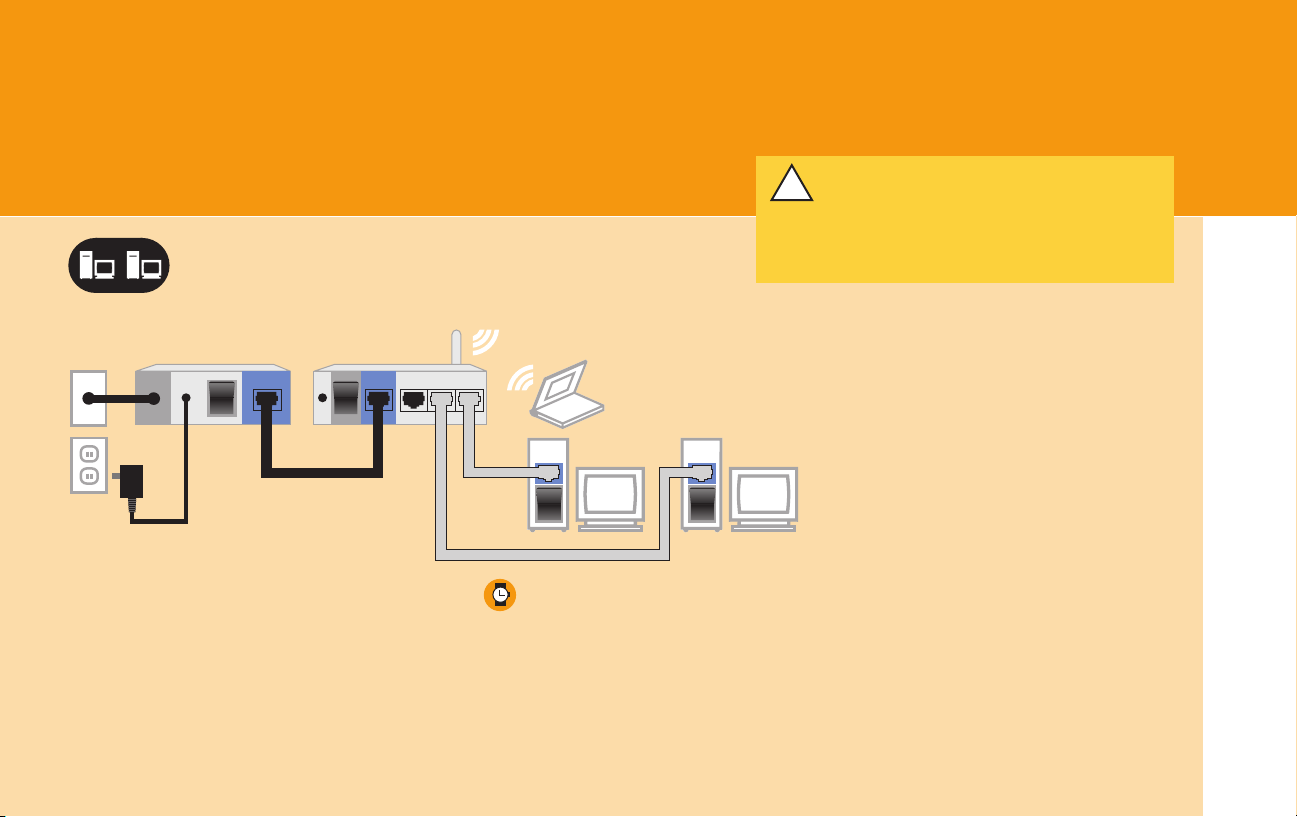
FOR ONE OR MORE COMPUTERS
CONNECTED THROUGH HOME ROUTER
NOTE The connection between the cable/DSL modem
and the cable/DSL jack should remain unchanged.
IMPORTANT! Your existing Ethernet cable should
!
be between your cable/DSL modem and your TA.
This will ensure any special cabling you received
from your Internet Service Provider is between
your modem and your TA.
A Set up your cabling as shown in the diagram above.
B Make sure the PSTN/VoIP switch on the back of the TA is set to “VoIP.”
C Proceed to Step 4 (for one or more computers connected via home router),
page 11.
If you have a wireless router there
may be no cabling between the
router and computer.
The connection(s) between your
home router and your personal computers should remain unchanged.
9
Page 12

TURN ON EQUIPMENT
RESET
CONSOLE
PSTN
VoIP
WAN ETHERNET
12V 1A
2 1 LINE
ET
HE
R
N
E
T
POWER
ETHERNET
PORT
ON
ON
Cable/DSL
Jack
Telephone Adapter Personal ComputerTelephoneCable/DSL
Modem
Wall Outlet
RESET
CONSOLE
PSTN
VoIP
WAN ETHERNET
12V 1A
2 1 LINE
ETHERNET
PORT
ON
Telephone Adapter Personal ComputerTelephoneCable/DSL
Wall Outlet
ETHERNET
PORT
ON
IN ORDER
4
FOR SINGLE COMPUTER CONNECTED
DIRECTLY TO CABLE/DSL MODEM
IMPORTANT! You must turn on your equipment
!
IN THE ORDER INDICATED for your service to
work correctly.
A
B
A Ensure your cable/DSL modem was off
for at least 5 minutes. Power up your
cable/DSL modem.
B Wait about 2 minutes for the modem to
synchronize with your cable/DSL provider,
until all appropriate indicator lights are lit.
10
C Power up your TA by plugging it into a
power outlet, then wait 30 seconds.
D Make sure your telephone is connected
(if necessary).
to your TA and plugged into a power outlet
E Turn on your computer.
F Proceed to Step 5, page 12.
C
D
E
Page 13

WAN/
UPLOAD
RESET
CONSOLE
PSTN
VoIP
WAN ETHERNET
12V 1A
2 1 LINE
E
T
H
E
R
N
E
T
POWER
ON
ON
PORTS
OFF
RESET
CONSOLE
PSTN
VoIP
WAN ETHERNET
12V 1A
2 1 LINE
ET
HE
R
N
E
T
POWER
ETHERNET
PORT
ON
ON
Cable/DSL
Jack
Telephone Adapter Personal ComputerTelephoneCable/DSL
Modem
Wall Outlet
Cable/DSL
Jack
Telephone Adapter Router Personal Computer(s)TelephoneCable/DSL
Modem
Wall Outlet
WAN/
UPLOAD
RESET
CONSOLE
PSTN
VoIP
WAN ETHERNET
12V 1A
2 1 LINE
ON
PORTS
OFF
RESET
CONSOLE
PSTN
VoIP
WAN ETHERNET
12V 1A
2 1 LINE
ETHERNET
PORT
ON
Telephone Adapter Personal ComputerTelephoneCable/DSL
Wall Outlet
Telephone Adapter Router Personal Computer(s)TelephoneCable/DSL
Wall Outlet
WAN/
UPLOAD
ON
PORTS
OFF
ETHERNET
PORT
OFF
ETHERNET
PORT
ON
OFF
ETHERNET
PORT
OFF
FOR ONE OR MORE COMPUTERS
CONNECTED THROUGH HOME ROUTER
IMPORTANT! You must turn on your equipment
!
IN THE ORDER INDICATED for your service to
work correctly.
A
B
A Ensure your cable/DSL modem was off
for at least 5 minutes. Power up your
cable/DSL modem.
B Wait about 2 minutes for the modem to
synchronize with your cable/DSL provider,
until all appropriate indicator lights are lit.
C Power up your TA by plugging it into a
power outlet, then wait 30 seconds.
C
D
D Make sure your telephone is connected
to your TA and plugged into a power
outlet (if necessary).
E Plug your home router into a power
outlet and turn it on.
F Turn on your computer(s).
G Proceed to Step 5, page 12.
E
F
11
Page 14

VERIFY YOUR
1234567
890
qwert uio
1234567
890
qwert uio
CONNECTION
5
NOTE WHETHER YOU HAVE A CABLE
MODEM OR DSL.
CABLE MODEM
IF YOU HAVE A CABLE MODEM,
FOLLOW THE INSTRUCTIONS TITLED
“CABLE MODEM” IN GREEN.
DSL
IF YOU HAVE DSL, FOLLOW
THE INSTRUCTIONS TITLED “DSL”
IN BLUE.
12
VERIFY YOUR CONNECTION
CABLE MODEM
FOR SINGLE COMPUTER CONNECTED
DIRECTLY TO A CABLE MODEM, OR ONE OR
MORE COMPUTERS CONNECTED TO A
CABLE MODEM THROUGH A HOME ROUTER
A Verify that you can browse to a known Web site
(e.g. www.att.com). If you cannot, see
“I get a Page Not Found error when attempting
to browse the Web with my computer” in
Troubleshooting, page 21.
B Proceed directly to Step 6, page 16.
Page 15

1234567
890
qwert uio
p
asdfghjk
l
xcvbnm,
1234567
890
qwert uio
p
asdfghjk
l
xcvbnm,
VERIFY YOUR CONNECTION
DSL
FOR SINGLE COMPUTER CONNECTED DIRECTLY TO DSL MODEM
NOTE Most DSL providers use PPPoE to provide customers access to their network.
This section assumes like most DSL customers you have PPPoE; however, if you
are certain you don’t have PPPoE and instead have DHCP or Static IP, follow the steps
in blue for cable modem users (for DHCP) or Appendix A (for Static IP).
A Make sure your computer is configured to obtain
IP address automatically. (For most customers, your
computer should already be set to obtain IP address
automatically.) Please refer to your computer’s online
help for how to do this. (Instructions for common
computers are provided in Troubleshooting, page 22.)
You will no longer need to activate the software installed
by your DSL provider to access the Internet; the TA
will handle this. For additional information see “I have
DSL and am getting the message ‘can’t connect to
the Internet’ even though I can see the Internet” in
Troubleshooting, page 23.
Continue with Step B.
FOR ONE OR MORE COMPUTERS CONNECTED TO DSL MODEM THROUGH HOME ROUTER
A Make sure your home router is configured to obtain IP address automatically.
Please refer to your home router’s user manual (for most routers, go to WAN
settings in the router configuration tool and set “obtain IP address automatically”;
this puts your router into what is known as DHCP mode. It may also be called
“cable” or “Internet” mode).
Continue with Step B.
Sample: Your router’s control
panel may look different
13
Page 16

1234567
890
qwert uio
p
asdfghjk
l
xcvbnm,
1234567
890
qwert uio
p
asdfghjk
l
xcvbnm,
5
VERIFY YOUR CONNECTION
DSL, continued
B Open your web browser and
B
C
14
D
type http://192.168.15.1.
If you receive a page not found
error, see “I have DSL and
I cannot access my TA setup
Web page” in Troubleshooting,
page 23.
C Click “Login to the web-based
management module”
D Click “Configure WAN/LAN
Access,” then click “Configure
WAN Port”
E
F
G
E Select PPPoE from the drop-down
menu labeled “Get IP From”
F Enter your DSL provider username
(PPPoE username), enter your
DSL provider password (PPPoE
password) twice and click “Save”
at the bottom of the screen.
This was part of the information to
gather in Step 1
G Click “Save changes and reboot
system now.” Click “Save”
to reboot your TA (this will not
reboot your PC).
.
Page 17

J1
J2
H Wait thirty seconds for the TA
to reboot.
I After the reboot is complete,
IN THE FOLLOWING ORDER:
unplug your router and then plug
it back in. Wait thirty seconds
and then restart your PC.
J Verify that the status light on
your TA is solid amber or
blinking amber (J1) and that you
can browse to a known website
(e.g. www.att.com) (J2)
If you cannot browse or your
status light is red, see the
note to the right “If the status
light is red.”
NOTE
If your status light is red in Step J, you
may have problems connecting with your
DSL service.
Recommended actions:
– Check to see if your PPPoE username
and password are correct. (You may
need to contact your DSL Service
provider to verify your PPPoE username
and password.)
– Make sure your cabling is correct
according to Step 3.
– Power all devices down and unplug
your DSL modem and home router.
Leave them off for at least 15 minutes.
Power up your DSL modem, wait until
all appropriate indicator lights are lit.
Plug your TA into a power outlet.
Power up your router (if you have one).
Turn on your computer(s).
– You may have an integrated modem/router.
If so, see Troubleshooting, page 25.
NOTE
A few DSL customers have
what is known as static IP,
in which their computer
has a permanent IP address
that never changes. Most
customers instead have
PPPoE or DHCP, and should
use the instructions above;
however if you are sure you
have a static IP address and
not PPPoE or DHCP, see the
configuration instructions
in Appendix A, page 18.
For additional info see
“I may have a static IP
address but I am not sure”
in Troubleshooting, page 24.
15
Page 18

ACTIVATE
6
16
YOUR TELEPHONE ADAPTER
B
C
IMPORTANT! If you are
!
using a VPN service/client,
disable it while you follow
these steps.
A Go to your Personal Call
Manager Web site at
www.callvantage.att.com
B Login using your User ID
(your 10-digit AT&T
CallVantage
number) and password.
This was part of the information to gather in Step 1.
SM
Service
.
C You should see the screen
at left. Click “Activate TA”
and follow the instructions
on the screen.
This process may take
5-30 minutes and you may
hear some clicking sounds
on your TA. DO NOT turn the
TA off while this sequence
is underway.
D When the online sequence
is complete you should
hear a single short ring on
the phone connected to
your TA.
E Pick up your telephone
handset and listen for a
dial tone. If you don’t hear
a dial tone, hang up, wait a
few seconds, and try again.
If you don’t get a dial tone
on your phone, see “I just
finished installation and
cannot get a dialtone” in
Troubleshooting, page 21.
NOTE
If you are using a VPN, you can
re-enable it now.
Page 19

CONGRATULATIONS!
SETUP IS NOW COMPLETE
You can start making calls by dialing
the 10-digit number from the phone
connected to your Telephone Adapter.
You can also use the new advanced features
available on your Personal Call Manager
Web site at www.callvantage.att.com
If you experience any problems with the
service, please refer to Troubleshooting,
page 20.
17
Page 20

APPENDIX A
CONFIGURATION FOR STATIC IP
A small number of cable modem/DSL
customers have static IP, in which they
are assigned a permanent IP address
that never changes. Most customers
instead have DCHP or PPPoE and
should follow the steps in sections 1-6;
however, if you are certain you have
static IP and not PPPoE or DHCP, use
the following steps to install your TA.
For additional info see “I may have a
static IP address but I am not sure” in
Troubleshooting, page 24.
A Follow steps 1-4 at the
beginning of this guide until
you have finished Step 4:
Turn on Equipment in Order.
18
B Make sure your computer is
B Make sure your router is config-
FOR SINGLE COMPUTER CONNECTED
DIRECTLY TO CABLE/DSL MODEM
configured to obtain IP address
automatically. Refer to your
computer’s online help or see
Troubleshooting for instruc
tions for common computers.
Proceed with Step C.
FOR ONE OR MORE COMPUTERS
CONNECTED TO CABLE/DSL
MODEM THROUGH HOME ROUTER
ured to obtain IP address auto
matically. Refer to your home
router’s user manual (for most
routers, go to WAN settings in
the router configuration tool and
set “obtain IP address automati
cally”; this puts your router into
what is known as DHCP mode,
Internet mode, or cable mode).
Proceed with Step C.
C Open your web browser and
type in http://192.168.15.1
into the URL address box.
D Click “Login to the web-based
management module” on the
TA configuration screen.
E Click “Config WAN/LAN
Access,” then click “Config
WAN Port.”
F Select “Manual” from the drop
down menu labeled “Get IP
From.”
G Enter your Static IP address,
DNS address (if your provider
gave you two DNS addresses,
enter them both), Subnet Mask
-
and Default Gateway informa
tion and click “Save”. If you
do not have this information,
you will need to get it from your
cable/DSL provider.
H On the next screen, select
“Save changes and reboot
system now.” Click “Save”
to reboot your TA. After the
reboot, you will be taken to the
main TA interface screen.
I Verify that you can browse to
a known Web site (e.g. www.
att.com). If you cannot, see
“I get a Page Not Found error
when attempting to browse
the Web with my computer in
Troubleshooting, page 21.
J Follow step 6, Activate your TA.
-
Page 21

APPENDIX B
ACTIVATING A REPLACEMENT TA
A Follow Steps 1-5 at the
beginning of this guide until
you have finished Step 5:
Verify Your Connection.
B Go to your Personal Call
C Login using your User ID (your
IMPORTANT! If you are
!
using a VPN service/client,
disable it while you follow
steps B-I.
Manager Web site at
www.callvantage.att.com
10-digit AT&T CallVantage
.
SM
Service number) and password.
This was part of the information
to gather in Step 1.
D Click “Help” at the top of the
Web site.
E Once you are on the help page
click “Telephone Adapter (TA)
Activation.”
F You should see the TA
Activation “Begin” screen.
Click “Continue.”
G The next screen should prompt
you to wait while your TA is
talking to our network. Follow
the instructions on the screen.
This process may take
5-30 minutes and you may
hear some clicking sounds
on your TA. DO NOT turn
the TA off while the sequence
is underway.
H When the online sequence is
complete you should hear a
single short ring on the phone
connected to your TA.
I Pick up your telephone hand-
set and listen for a dial tone.
If you don’t hear a dial tone,
hang up, wait a few seconds,
and try again. If you don’t get
a dial tone see “I just finished
installation and cannot get a
dialtone” in Troubleshooting,
page 21.
Congratulations! Setup is now
complete! You can start making calls
by dialing the 10-digit number
from the phone connected to your
TA. You can also use the new
advanced features available on your
Personal Call Manager Web site at
www.callvantage.att.com
NOTE
If you are using a VPN, you can
re-enable it now.
19
Page 22

APPENDIX C
TROUBLESHOOTING
Troubleshooting topic Page Troubleshooting topic Page Troubleshooting topic Page
I just finished installation and cannot get
a dial tone on my phone.
I had a dial tone before, but do not receive
a dial tone now.
I can surf the Internet but have a blinking
red status light and do not have dial tone.
I get a Page Not Found error when attempting
to browse the Web with my computer.
I need help getting my computer to “obtain
IP address automatically.”
I need help cloning my MAC address. 22
I am connected via a home router and
my real time/gaming applications are not
working correctly.
I have DSL and I cannot access my TA setup
Web page.
I have DSL and am getting the message
“can’t connect to the Internet” even though
I can see the Internet.
20
21
21
21
22
23
23
23
I keep getting “activation fail” during the TA
Activation process.
I forgot my PPPoE username and password.
Where can I find it?
I may have a static IP address but I’m
not sure.
I have DSL and keep getting “authentication
fail” for connecting status.
I may have an integrated modem/home router.
How can I find out?
I have an integrated modem/home router.
I don’t know which section to use in this
guide.
I have a USB DSL modem.
I have a satellite broadband Internet
connection.
I have a private IP address. 25
I can’t get this to work with my company’s
VPN.
24
24
24
24
25
25
25
25
25
My data service is lost every once in a
while, but I still have a dial tone.
I am using a home router and have to reboot
everything to get the data to work again.
My TA Status and WAN lights sometimes
blink green or amber for no apparent reason.
Should I be concerned?
I am having voice quality problems with
my phone.
I cannot use this line in any other room.
I cannot hook multiple phones to the TA.
I cannot use my existing phone
jacks throughout the house for my
AT&T CallVantage Service.
I can’t get this to work with my home
security system.
25
26
26
26
26
26
26
Page 23

PROBLEM RESOLUTION PROBLEM RESOLUTION
I just finished
installation and
cannot get a dial
tone on my phone.
I had a dial tone
before, but do
not receive a dial
tone now.
1. Verify that the switch on the back of the TA is set to VoIP.
2. Make sure you follow the instructions step by step.
3. Check that you do not have a router between the TA and
cable/DSL modem.
4. Make sure your phone is plugged into the jack of the TA (Line
1) and your phone is appropriately charged and in working or
der. One way to make sure is to try connecting your phone into
any working telephone jack and see if you get a dial tone.
5. Check your connection between your TA and cable or
DSL modem. The connectors on the Ethernet cable look like
a regular phone connector, but wider. Make sure that these
connectors “click” into place when they are plugged in.
6. See if your cable/DSL Internet service is operational. You
should be able to access the Web with browsing software.
7. Power all devices down and unplug your cable/DSL modem
and home router. Leave them off for at least 15 minutes.
Power up your cable/DSL modem and wait until all appropriate
indicator lights are lit. Plug your TA into a power outlet. Power
up your router (if you have one). Turn on your computer(s).
8. If you still cannot get a dial tone, try a hard reset of your
TA to restore it to its factory default settings. Power all devices
down and unplug your cable/DSL modem and home router.
Follow the power-up sequence above, but when powering up
the TA, HOLD down the reset button at the back, then HOLD
the reset button down for about 10 seconds.
9. If you still do not get a dial tone, contact technical support.
I can surf the
Internet but have a
blinking red
status light and do
not have dial tone.
-
I get a Page Not
Found error when
attempting to
browse the Web with
my computer.
1. Your TA may be connected to the Ethernet port of your router
and not directly to your cable/DSL modem. Confirm that your
cabling is correct according to Step 3.
2. You may have a private IP address. If so, see “I have a private
IP address” on page 25.
3. You can also try a hard reset of your TA to restore it to its
factory settings. See resolution step #8 under “I just finished
installation and cannot get a dial tone” to the left on this page.
If the problem persists, call Technical Support
1. Re-read the instructions and make sure you followed them
step by step. Make sure the Ethernet cables are “clicked” into
place.
2. Power all devices down and unplug your cable/DSL modem
and home router. Leave them off at least 15 minutes. Power up
your cable/DSL modem and wait until all indicator lights are lit.
Plug your TA into a power outlet. Power up your router (if you
have one). Turn on your computer(s).
3. If you still can’t browse, your computer may not be set to
“Obtain IP address automatically”. See “I need help getting my
computer to obtain IP address automatically”, below.
4. Some cable users need to clone their MAC
address to be fully functional with their operator’s network.
See “I need help cloning my MAC address”, below.
21
Page 24

APPENDIX C
TROUBLESHOOTING, CONTINUED
PROBLEM RESOLUTION
I need help getting
my computer to
“obtain IP address
automatically.”
22
If you have a single computer connected to your cable/DSL
modem , try the following (if you have a router, you must set
this on your router, not your computer):
For Windows 95, 98, or ME
1. Go to “Start”, select “Settings”, then “Control Panel.”
Double Click “Network”
2. Highlight “TCP/IP” and click the “Properties” button.
3. Make sure “Obtain an IP address automatically” is selected.
4. Click OK several times to return to the desktop, and if your
computer asks you to, restart your computer.
For Windows 2000
1. Go to “Start”, select “Settings”, then “Network and Dial Up
Connections.”
2. Double click the “Local Area Connection” icon and click
the “General” tab.
3. Highlight “Internet Protocol (TCP/IP)” and click the
“Properties” button.
4. Make sure “Obtain an IP address automatically” is selected.
5. Click OK several times to return to the desktop, and if your
computer asks you to, restart your computer.
PROBLEM RESOLUTION
(Continued)
I need help cloning
my MAC address.
For Windows XP
1. Go to “Start”, select “Control Panel.” Double click “Network
Connections”
2. Highlight the “Local Area Connection” icon and click
“Change settings of this connection.”
3. On the “General” tab, highlight “Internet Protocol (TCP/IP)”
and click the “Properties” button.
4. Make sure “Obtain an IP address automatically” is selected.
5. Click OK several times to return to the desktop, and if your
computer asks you to, restart your computer.
Connect to the TA via 192.168.15.1 through a Web browser.
Click “Configure WAN IP.” If your cable Internet service
requires a Host name enter it in the following area. Clone the
MAC address on the computer that is registered on the cable
provider’s network.
NOTE If MAC cloning is required, please use the original computer
that was registered onto the cable network. If you don’t have access to that
computer, please call your cable provider to register your new computer’s
MAC address on their network.
Page 25

PROBLEM RESOLUTION
PROBLEM RESOLUTION
I have DSL and I
cannot access my
TA setup Web page.
I have DSL and am
getting the message
“can’t connect to
the Internet” even
though I can see the
Internet.
1. First check to ensure you have an up to date browser.
You will need IE 5.5 or higher on Windows, IE 5.X on Mac OS 9
or OS X, or Apple Safari 1.0 or higher on Mac OS X.
2. Power all devices down. Leave them off for at least 15
minutes. Power up your cable/DSL modem and wait until all
appropriate indicator lights are lit. Power up your TA
by plugging it into a power outlet. Power up your router (if you
have one). Turn on your computer(s).
3. If you still cannot access the TA setup Web page you may
need to perform a hard reset of your TA to restore it to its
factory settings. To do this, power all devices down and unplug
your cable/DSL modem and home router. Follow the powerup sequence above, but when powering up the TA, HOLD
down the reset button on the back of the TA WHILE you power
up the box, then HOLD the reset button down for about 10
seconds.
This is likely because your DSL provider installed communications software on your computer that is no longer used to
connect to the Internet.
Contact your DSL provider for assistance in deinstalling or re
configuring this software, and to see if you need to update your
browser settings.
-
I am connected via
a home router and
my real time/gaming
applications are not
working correctly.
Your home router acts as a NAT (Network Address
Translation) device. After installing the TA, there are now
two NAT devices connected to each other. All Internet traffic
is now going through double NAT. This is not a problem for
most applications, but some, especially real time gaming
applications, will not work correctly.
To eliminate double NAT, use the home router as a switch
by connecting the TA’s Ethernet port to the home router’s
LAN (Ethernet) port, instead of the WAN port. This way NAT
functions are bypassed in the home router and Internet traffic
is only passing through single NAT (that of the TA). A crossover
cable may have to be used between the TA and router.
23
Page 26

APPENDIX C
TROUBLESHOOTING, CONTINUED
PROBLEM RESOLUTION PROBLEM RESOLUTION
I keep getting
“activation fail”
during the TA
Activation process.
I forgot my PPPoE
username and
password. Where
can I find it?
I may have a static
IP address but I’m
not sure.
Make sure that prior to beginning the TA Activation process
you have disconnected from any secure client such as a
VPN client and that you are connecting to the Internet through
your cable/DSL Internet provider.
This information should have been provided by your DSL
service provider. If you cannot find the information, please
contact your DSL service provider to obtain this information.
Chances are you have dynamic IP addressing.
If you have a home router, you can check whether or
not your router is set up for static or dynamic IP using
your router configuration Web page (see your home
router’s documentation).
If you don’t have a router, you should find your TCP/IP
properties (in the Network Settings area of your computer
– see your computer’s online help or page 22 of this
guide if you do not know where this is). If “obtain IP
address automatically” is checked, you have dynamic
IP; if “specify an IP address” is checked, you have static
IP. To be sure, you can also check with your cable/DSL
service provider.
I have DSL and
keep getting
“authentication
fail” for
connecting status.
1. Make sure your cabling is correctly set up according to this
guide.
2. Power all devices down and unplug your cable/DSL modem
and home router. Leave them off for at least 15 minutes.
Power up your cable/DSL modem and wait until all appropriate
indicator lights are lit. Power up your TA by plugging it into a
power outlet. Power up your router (if you have one). Turn on
your computer(s).
3. Check to see that your PPPoE username and password are
correct (you may need to contact your DSL provider for this
information.)
4. Check to see whether you have an integrated modem/home
router (if you do, see “I have an integrated modem/home
router” below).”
24
Page 27

PROBLEM RESOLUTION PROBLEM RESOLUTION PROBLEM RESOLUTION PROBLEM RESOLUTION
I may have an
integrated modem/
home router. How
can I find out?
I have an integrated
modem/ home router.
I don’t know which
section to use in this
guide.
I have a USB DSL
modem.
I have a satellite
broadband Internet
connection.
If you have a single device that plugs directly into your
cable/DSL jack and that you can connect multiple
computers into (allowing each to access the Internet),
you have an integrated modem router.
While integrated modem/home routers are not explicitly
supported, you can typically get the service to work if you put
the integrated modem/router in bridge mode.
Check with your cable/DSL provider to see if it supports
putting integrated modem/routers in bridge mode, and if so,
how to put your device into bridge mode.
DSL modems with only a USB interface are not supported.
Satellite broadband connections are not supported.
I can’t get this to
work with my
company’s VPN.
My data service is
lost every once in a
while, but I still have
a dial tone.
I am using a home
router and have to
reboot everything to
get the data to work
again.
AT&T CallVantageSM Service supports most VPN clients.
Check the settings on your VPN Client to verify that “keepalive”
messages are disabled. Also, select “allow VPN to pass
through NAT”, if this option is available. You may have to disable (uncheck) “negotiate UDP encapsulation with VPN tunnel
server”, if this option is available. You may also have to contact
your network administrator to understand what other settings
may need to be modified for your setup.
If you are using a home router, make sure your device has the
most up-to-date software available from the manufacturer.
Software updates are readily available from the manufacturer’s
Web site. Check their site for your model, and compare the
most recent version they are offering against the version your
device is running. If they are not the same, follow the upgrade
instructions on the Web site or in your router’s manual.
I have a private IP
address.
While private IP addresses are not explicitly supported, you
can typically get the device to work if you put your router into
what is known as bridge mode.
Check with your router’s owner’s manual to see if it supports
bridge mode and how to do so.
25
Page 28

APPENDIX C
TROUBLESHOOTING, CONTINUED
PROBLEM RESOLUTION PROBLEM RESOLUTION
My TA Status and
WAN lights some
times blink green or
amber for no appar
ent reason. Should
I be concerned?
I am having voice
quality problems
with my phone.
I cannot use this line
in any other room.
I cannot hook multiple phones to the
TA.
26
You should not be concerned; this is normal. This indicates
your TA is automatically receiving firmware upgrades from our
-
network.
-
You can place a call while this is happening but you MUST
NOT unplug your TA while these lights are blinking or you may
damage your TA. If you are on a call when a firmware update
occurs your call will not be affected.
Check your cable/DSL speed at:
http://www.broadbandreports.com/stest. Your cable/DSL
provider’s connection speed can vary; if your speed does not
meet the minimum requirements of 90Kbps uplink and
downlink at this time, you may want to try again later. You can
also try disconnecting the phone and using a different corded
or cordless phone.
You can connect a cordless phone base station into “Line 1”
on the TA in order to use the phone throughout your home.
AT&T CallVantage Service supports a single line. You can
connect a cordless phone base station into “Line 1” on
the TA in order to use the phone in any other room. You can
also use a cordless phone with two or more handsets.
I cannot use my
existing phone
jacks throughout
the house for my
AT&T CallVantage
Service.
I can’t get this to
work with my home
security system.
You cannot use your existing phone jacks with AT&T
CallVantage Service. If you want to use AT&T CallVantage
Service in other rooms, you can use a cordless phone.
Home security or alarm systems are not supported by this
service.
Page 29

APPENDIX D
WARRANTY INFORMATION
AT&T warrants to the holder of a valid proof of
purchase (“Consumer” or “you”) that the Telephone
Adaptor contained in this package (“Product”) is free
from material defects in material and workmanship,
pursuant to the following terms and conditions, when
installed and used normally and in accordance with
operation instructions. This limited warranty extends
only to the consumer for Products purchased and used
in the United States of America.
During the limited warranty period, which is ninety
(90) days from the date of the Product purchase,
AT&T or its authorized service representative will repair
or replace, at its option, without charge, a Product
which is found to be materially defective. AT&T may
use new or refurbished replacement parts in a Product
repair. The Product may be replaced with a new or
refurbished product of the same or similar design.
AT&T will return repaired or replacement products to
you in working condition. An additional ninety (90)
day warranty period will apply to replaced or repaired
Products. Repair or replacement of Product, at
AT&T’s option, is your exclusive remedy.
This limited warranty does not cover:
a. Product that has been subjected to misuse,
accident, shipping or other physical damage,
improper installation, abnormal operation or
handling, neglect, inundation, fire, water, or other
liquid intrusion; or
b. Product that has been damaged due to repair,
alteration, or modification by anyone other than an
authorized service representative of AT&T; or
c. Product to the extent that the problem experienced
is caused by signal conditions, network reliability or
cable or antenna systems; or
d. Product whose identifying information has been
removed, altered or rendered illegible; or
e. Product purchased, used, serviced, or shipped for
repair from outside the United States; or Product
returned without valid proof of purchase.
f. To obtain warranty service, call 1-866-596-8464 for
instructions, including where to return the Product.
This warranty is the complete and exclusive warranty
agreement for the Product between you and AT&T.
It supersedes all other written or oral communications
related to this Product. No one is authorized to make
modifications to this limited warranty and you should
not rely on any such modification. If your state does not
allow certain of the limitations we have placed on this
warranty, those limitations will not apply to you.
In no event shall AT&T be liable for any indirect,
special, incidental, consequential, or similar damages
(including, but not limited to lost profits or revenue,
inability to use the Product, or other associated
equipment, the cost of substitute equipment, and
claims by third parties) resulting from the use of the
Product. If your state does not allow the exclusion
or limitation of incidental or consequential damages,
the above limitation or exclusion will not apply to you.
27
Page 30

APPENDIX E
GLOSSARY
What is my User ID?
Your UserID consists of the
10-digit assigned AT&T
CallVantageSM Service phone
number. This information was
provided in your order confirmation e-mail.
What is IP?
IP, or Internet Protocol, is the
language used to exchange data
over the Internet.
What is an IP address?
Every computer or device on the
Internet has what is known as
an IP address, which uniquely
defines that device and enables
devices to find each other on the
Internet. The IP address format
is a string of four numbers, each
from 0 to 255, separated by periods, for example, 192.168.15.1.
28
What is a cable modem? What is
a DSL modem?
Your cable or DSL modem is
the device that enables your
computer to make a broadband
Internet connection.
What is a router?
A router is a device that
enables multiple devices such
as computers and printers to
communicate with each other.
It also enables multiple devices
to share an Internet connection.
If you have two or more
computers sharing a cable/DSL
connection, chances are they
are doing so through a router.
You may also hear routers
referred to as “switches” or
“hubs”.
What is USB? What is a USB
modem?
USB, or Universal Serial Bus,
is a technology used to connect
computers and other devices
to each other. You can recognize
USB cables or ports through
their distinctive square cable
connections and sockets.
A USB modem is a cable
modem or DSL modem that
uses a USB connection to link
to a computer or router.
What is DHCP?
DHCP, or Dynamic Host
Control Protocol, is part of your
computer’s Operating System.
Your computer may use DHCP
to obtain an IP Address from
your cable/DSL provider so that
you can access the Internet.
DHCP may also be used to allow
multiple computers on a home
LAN to share a single cable/DSL
Internet connection.
What is PPPoE?
PPPoE, or Point-to-Point
over Ethernet, is a technology
standard adopted by most DSL
service providers to recognize
their customers and give
them permission to get on
their network. Your computer
may use PPPoE to connect
to your DSL service provider.
A username and password
are usually used with PPPoE.
Following authentication of the
username and password, an IP
Address is obtained from your
DSL service provider so that you
can access the Internet.
What is a MAC address?
Each computer on a home
network has a unique MAC, or
Media Access Control, address.
It is used by your home network
to route information from the
Internet specifically to the
computer that requested it, and
not to other computers on the
network.
What is static IP?
Some cable/DSL Internet
customers have what is known
as static IP, in which their
computer has a permanent IP
address that never changes.
Some users have this because
their cable/DSL service provider
doesn’t support dynamic
addressing (or didn’t at the time
they set up the service) while
others opt for static IP address.
Page 31

TECHNICAL SUPPORT
What is VPN?
Some employers use a VPN, or
Virtual Private Network, to give
their employees secure access
to their corporate network over
a home Internet connection.
Employees usually have special
VPN client software on their
computers and use special secure means to log onto the VPN.
What is WAN?
WAN stands for Wide Area
Network. The WAN port on your
TA is the port that plugs into your
cable/DSL modem.
What is a private IP address?
A private IP address is an
address that reflects certain
numeric addresses set by
the Internet industry. Some
cable/DSL service providers
may assign Private IP addresses
from their network for your
cable/DSL service. Also,
home routers and the TA
assigns Private IP addresses to
computers, laptops and other
devices on your home network.
The following are the reserved IP
address blocks:
10.x.x.x
192.168.x.x
172.16.x.x through 172.31.x.x
For additional information and support,
please check our online FAQ by visiting your
Personal Call Manager Web site at
www.callvantage.att.com and clicking “Help.”
You may also e-mail technical support
queries via our online e-mail form by visiting
your Personal Call Manager Web site at
www.callvantage.att.com, and clicking “Help”
and then “E-mail an Agent.”
If you require over-the-phone support, you
may call us at 1-866-596-8464.
For the latest updates and information,
please visit www.callvantage.att.com
and click “Help”.
29
Page 32

©2004 AT&T. All rights reserved.
Trademarks or registered trademarks
are the property of their respective
holders. Software and specifications
subject to change without notice.
30
ACS IG 0604
 Loading...