

Page 1

AT&T
555-104-730
Issue 1
June 1989
DEFINITY
Communications
TM
System Generic 2
and System 85
Attendant Console User’s Guide
Page 2

Copyright © 1989 AT&T
All Rights Reserved
Printed in USA
Notice
Every effort was made to ensure that the information in this document was complete and accurate at the time of
printing. However, information is subject to change.
Remote Access Feature Security Considerations
AT&T has designed the Remote Access Feature incorporated in this produce that, when properly administered by the
customer, will enable the customer to minimize the ability of unauthorized persons to gain access to the network. It is
the customer’s responsibility to take the appropriate steps to properly implement the features, evaluate and administer
the various restriction levels, protect access codes, and distribute them only to individuals who have been advised of the
sensitive nature of the access information.
handling of access codes.
In rare instances, unauthorized individuals make connections to the telecommunications network through use of remote
access features.
cannot be responsible for such changes, and will not make any allowance or give any credit for charges that result from
unauthorized access.
In such event, applicable tariffs require that the customer pay all network charges for traffic. AT&T
Each authorized user should be instructed concerning the proper use and
FCC Warning
This equipment generates, uses, and can radiate radio frequency energy and if not installed and used in accordance with
the instruction manual, may cause interference to radio communications.
the limits for a Class A computing device pursuant to Subpart J of Part 15 of FCC Rules, which are designed to provide
reasonable protection against such interference when operated in a commercial environment.
Operation of this equipment in a residential area is likely to cause interference, in which case the
expense will be required to take whatever measures may be required to correct the interference.
It has been tested and found to comply with
user at his/her own
Trademarks
DEFINITY is a trademark of AT&T. In this document, DEFINITY Communications System
abbreviated to DEFINITY Generic 2 or Generic 2. Other trademarked terms may
They are marked on first usage.
appear in this document as well.
Generic 2 is often
Ordering Information
The ordering number for this document is 555-104-730. To order this document,
Center at 1-800-432-6600 (in Canada, 1-800-255-1242). For more information about AT&T documents, refer to the
Business Communications Systems Publications Catalog (555-000-010).
call AT&T Customer Information
Comments
To comment on this document, return the enclosed comment card or call the AT&T Documentation Management
Organization hotline at 1-800-334-0404 (in North Carolina, 919-727-3167).
Prepared by
The AT&T Documentation Management Organization
Winston-Salem, North Carolina
Page 3

Contents
CHAPTER 1.
General
Use of This
Organization of This Guide
INTRODUCTION
Guide
CHAPTER 2. DESCRIPTION
Terms You Need To Know
Tones
Attendant
Attendant
Console
Console Functional Areas
CHAPTER 3. FACTORY-PROVIDED SPECIAL FEATURES
CHAPTER 4. OPERATING PROCEDURES
Incoming Calls
Outgoing Calls
Attendant-Originated Calls
Operation of Features
1-1
1-1
1-1
1-1
2-1
2-1
2-1
2-2
2-6
3-1
4-1
4-1
4-14
4-17
4-22
Centralized Attendant Service (CAS)
System Status Indicators at the Main Location
System Status Indicators (SSI) at the Branch Locations
Power Failure
CHAPTER 5. REFERENCE CONSOLE
Legend
ILLUSTRATION AND LEGEND
CHAPTER 6. LIST OF DIAL CODES .
CHAPTER 7. REFERENCES
4-73
4-75
4-85
4-87
5-1
5-2
6-1
7-1
-i-
Page 4

CHAPTER 8. TROUBLESHOOTING PROCEDURES FOR VOICE
TERMINALS
Simple Failures
Testing
Alarms
Maintenance Features
System Parameters
8-1
8-1
8-1
8-6
8-7
8-11
CHAPTER 9. GLOSSARY
CHAPTER 10. INDEX
Figure 2-1.
Figure 2-2.
Figure 2-3.
Figure 2-4.
Figure 2-5.
Figure 2-6.
Figure 4-1.
Figure 4-2.
Figure 4-3.
Basic Console
Direct Extension Selection (DXS) With Busy Lamp Field (BLF)
Console
Trunk Group Select Area
Touch-Tone Dialing and Loop Button and Lamp Area
Attendant Control Area
Direct Extension Selection (DXS) With Busy Lamp Field (BLF)
System Status Indicators Used at a Main Location
Backup Telephone/Voice Terminal With Handset/Headset
System Status Indicators Used at a Branch Location
Figures
/
9-1
10-1
2-4
2-5
2-7
2-9
2-11
2-14
4-76
4-78
4-86
-ii-
Page 5

CHAPTER 1. INTRODUCTION
CHAPTER 1. INTRODUCTION
General
This guide on the operation of DEFINITY™ Communications System Generic 2 and System
85 consoles equipped with Direct Extension Selection (DXS) and Busy Lamp Field (BLF). is
intended for use by console attendants who have completed training.
Use of This Guide
To make the best use of
organization. The operating
step-by-step, and to tell you
This guide will answer most
more information than this guide contains, ask your System Manager for help.
this guide, you must become familiar with its contents and
procedures are written to “walk you through” each procedure,
what the various system responses are.
of the questions on the use of the console. If you should need
Organization of This Guide
The rest of this guide is divided into nine chapters:
◆ DESCRIPTION — This chapter defines certain terms associated with the console,
and describes the tones that you will hear while operating the console. For easy
reference, the terms and tones are listed alphabetically. This chapter also describes
and illustrates both the basic console and the DXS/BLF console.
◆
FACTORY-PROVIDED SPECIAL FEATURES
factory-provided special features.
◆
OPERATING PROCEDURES
using the console. Instructions are provided for the DXS/BLF console only. No
instructions are provided for the basic console. The instructions for the most
common procedures, such as handling incoming or outgoing calls, or handling calls
you originate at the console, are located in the front of this chapter. The procedures
for using specific features of the system follow and are arranged alphabetically by
feature name. The last part of the chapter gives instructions for Centralized Attendant
Service (CAS). (The Table of Contents gives the exact location for each set of
instructions.)
— This chapter contains step-by-step instructions for
— This chapter provides information on
REFERENCE CONSOLE ILLUSTRATION AND LEGEND — This detailed illustration
◆
and accompanying legend identify the attendant console.
1-1
Page 6

CHAPTER 1. INTRODUCTION
◆
LIST OF DIAL CODES
◆
REFERENCES
◆
TROUBLESHOOTING PROCEDURES
isolating, diagnosing, and correcting console troubles before calling for outside help.
It is intended for voice terminal and console users, and the System Manager. In
general, the troubles covered are simple and limited to small equipment areas.
Understanding the information in this chapter requires no specialized maintenance
knowledge beyond what a System Manager is expected to have. Most of the
procedures can be done at the users station. . The troubles that cause alarms are
beyond the scope of this chapter.
maintenance technicians at remote locations or on site. The information in this
chapter is divided into the following parts:
— This chapter provides instructions for
Alarm troubles are the responsibility of trained
1.
Simple failures—
2. Testing—How to test lamps and ringing
3. Alarms—How to interpret alarm lamps
4. Maintenance features—How to troubleshoot using special features
5.
System parameters—
System Management Terminal (SMT) (System 85) or the DEFINITY
Manager™ II (Generic 2).
◆ GLOSSARY
◆ INDEX.
How to troubleshoot simple voice terminal failures
How to monitor the system parameters using the
1-2
Page 7

CHAPTER 2. DESCRIPTION
CHAPTER
2. DESCRIPTION
Terms You Need To Know
Certain terms used in this guide have meanings unique to DEFINITY Generic 2 and System
85 console operation.
Audible Ring— The ring you hear at the console when an incoming call has been connected
to an idle loop and the call is waiting to be answered.
Extension Number— The number assigned to a voice terminal within the system.
Feature— A specifically defined function or service provided by the system.
Loop— An appearance button on the console.
answer or originate calls. A loop gets you “into the system.”
Console— A voice terminal equipped with several appearance buttons for the same extension
number. This terminal allows the user to handle more than one call, on that extension
number, at the same time.
Queue— An ordered sequence of calls waiting to be processed.
Trunk Group—
Telecommunications channels assigned as a group for certain functions.
For your convenience, these terms are defined here.
An idle loop button must be depressed to
Tones
You will hear the following tones when you are operating the console:
ATTENDANT RELEASE LOOP (ARL) TIMED-REMINDER TONE
A high-pitched tone, on for about 1/3 second and off for about 1 second—an ARL call has
been held off the console for longer than the timed interval established for your system.
RINGBACK TONE
A low-pitched tone repeated 15 times a minute—
signal you hear when the telephone you have dialed is ringing.
AUTOMATIC ROUTE SELECTION (ARS) WARNING TONE
A short burst of tone—the call is being completed on a toll trunk.
the electronic version of the conventional
2-1
Page 8

CHAPTER 2. DESCRIPTION
BUSY TONE
A low-pitched tone repeated 60 times a minute
CALL WAITING TONE
An on-off, high-pitched tone—the number of incoming calls waiting equals or exceeds the
limit set for the attendant console.
CONFIRMATION TONE
Three short bursts of tone—the action you took to activate or cancel a feature has been
accepted by the system.
DIAL TONE
A continuous steady tone—you may begin dialing or may activate a feature.
INTERCEPT TONE
An alternating high and low tone—either a dialing error or a denial of the service requested.
RECALL DIAL TONE
Three short bursts of tone followed by dial tone
accepted and you may begin dialing.
—the extension number you dialed is in use.
—the feature you requested has been
REORDER TONE
A fast busy tone repeated 120 times a minute—
TIMED REMINDER TONE
A high-pitched tone, on for about 1/3 second and off for about 1 second—a call has been on
hold at the console for 30 seconds or an Attendant Release Loop (ARL) call has been held
on the console for longer than a preestablished interval.
all trunks or other facilities are busy.
Attendant Console
The attendant console is an electronic device used to handle incoming and outgoing calls.
You can also use the console to manage your communications network. Any one system can
support up to 40 attendant consoles.
2-2
Page 9

CHAPTER 2. DESCRIPTION
The attendant console is available in two models:
◆
Basic console
◆
Direct Extension Selection (DXS) With Busy Lamp Field (BLF) console.
The models are identical except for the DXS/BLF option.
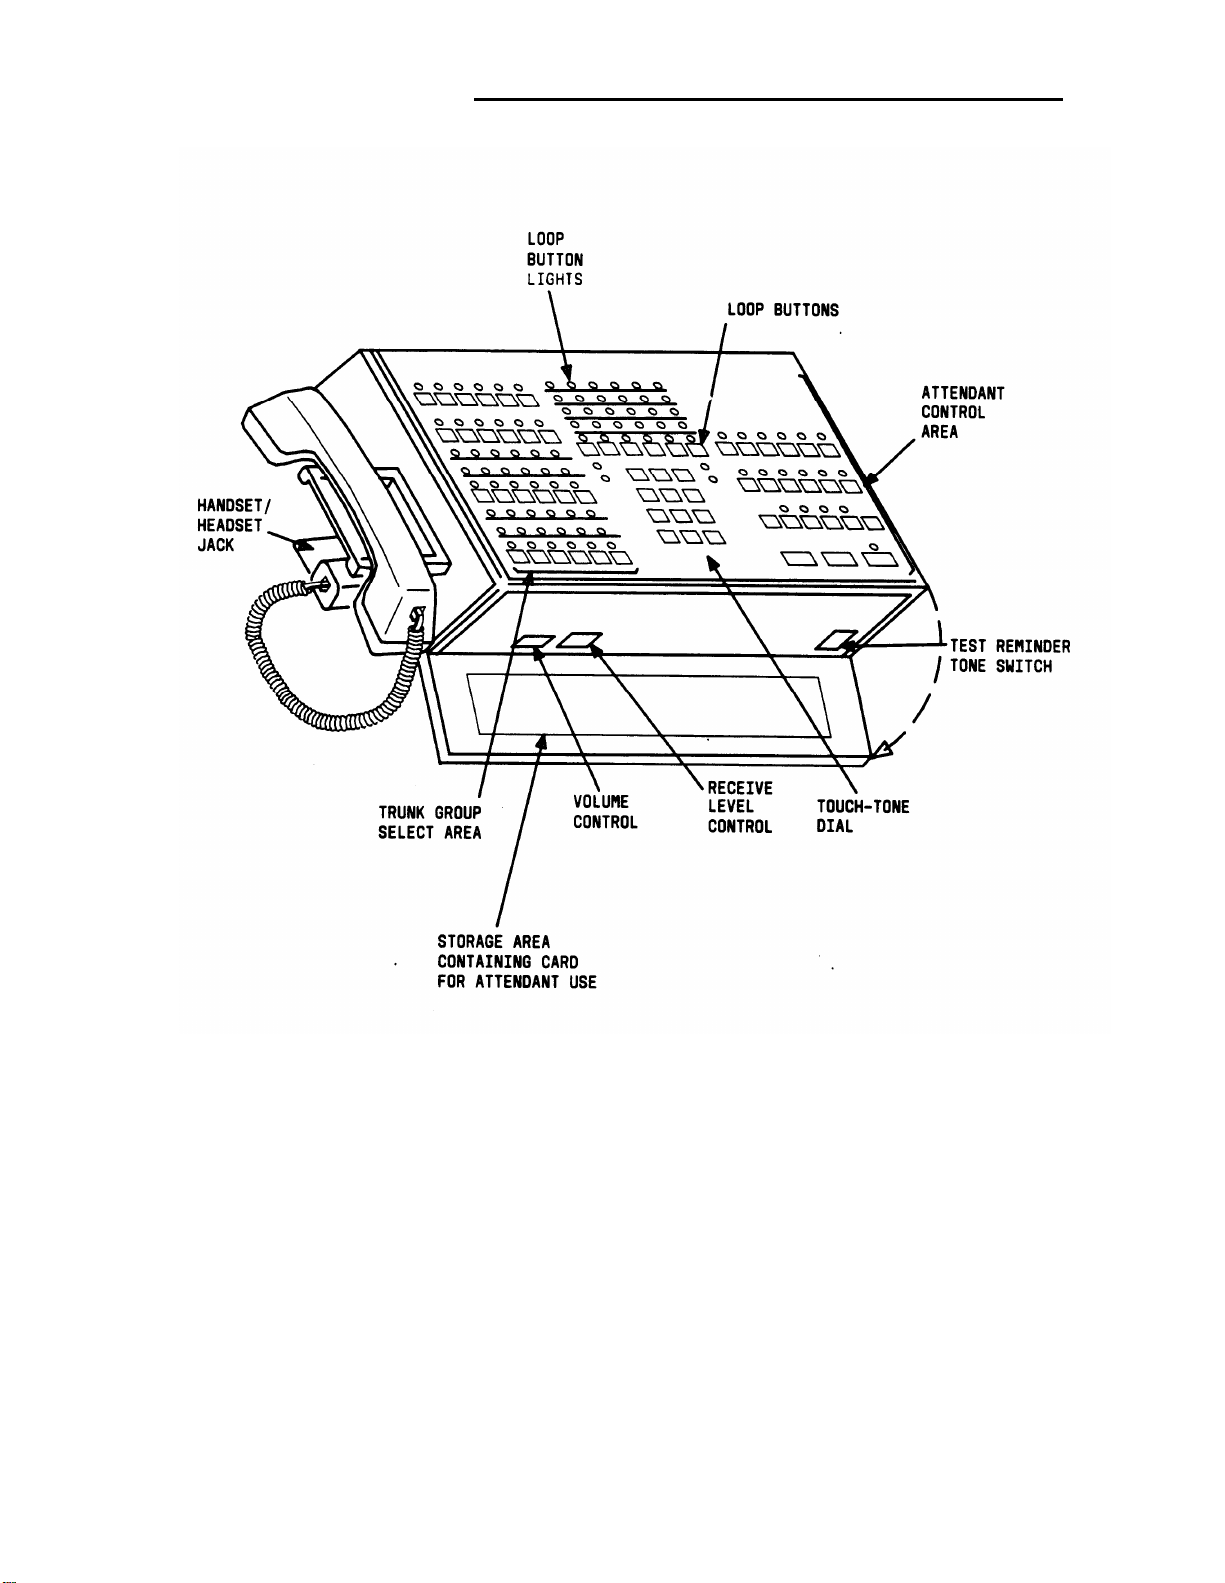
Basic Console
The basic console (Figure 2-1) is designed for “switched loop” operation; that is, the calls
are put in a queue and automatically switched to the first available idle loop. The basic
console includes the following:
◆
Two handset/headset jacks—
Located on the right and left sides of the console. To
move the handset cradle from one side to the other, unscrew the knurled knob, and
move the cradle to the opposite side. When the handset or headset is disconnected,
power is removed from the console, taking it out of service. If a continuous audible
tone occurs when the handset or headset is connected, operate the TEST switch
located in front of the console to turn off the tone.
◆
Touch-tone dial
◆
6 loop buttons and 30
BUSY, RING, and ANS
status lights (five for each loop)— HOLD, ATND (attendant),
(answer). The loop buttons are used to process or originate
calls.
◆
24 trunk group select
buttons (and indicator lights)—Customer-designated buttons
that provide direct trunk access by pressing a button.
◆
Test-reminder tone switch—Used to test console lights and to turn off audible
signals.
◆
Volume control wheel—Adjusts the level of audible signals on the console.
◆
Receive level control wheel—Adjusts the volume in the earpiece as an aid for
hearing-impaired attendants.
◆
Storage area—Contains a plastic card for you to write codes or other reference
information that might be needed quickly.
You can complete calls to extension numbers on the basic console by pressing an idle loop
button, pressing
[START] and dialing the extension number.
2-3
Page 10
CHAPTER 2. DESCRIPTION
.
Figure 2-1. Basic Console
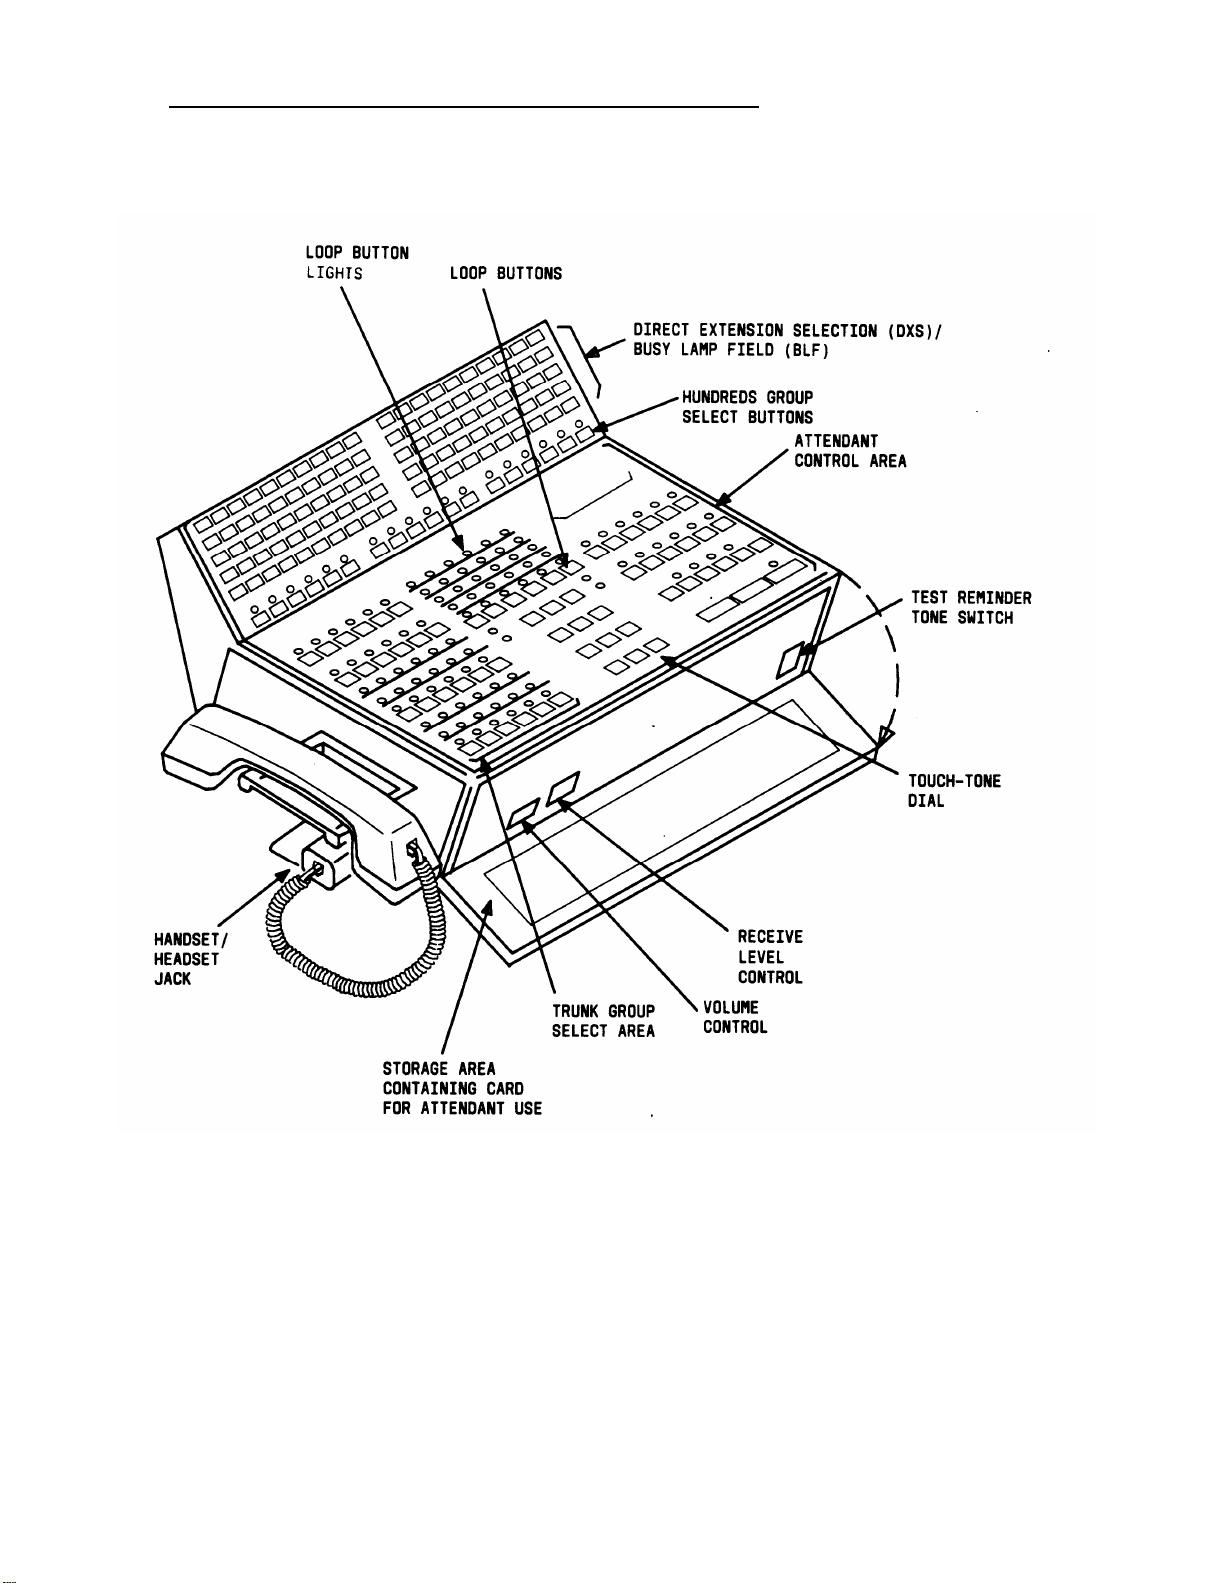
DXS/BLFConsole
The DXS/BLF console (Figure 2-2) is identical to the basic console except for the DXS/BLF
option and the hundreds group select buttons.
You can complete calls to extension numbers on the DXS/BLF console by pressing the
appropriate hundreds group select button, an idle loop button, and the desired DXS button.
2-4
Page 11
CHAPTER 2. DESCRIPTION
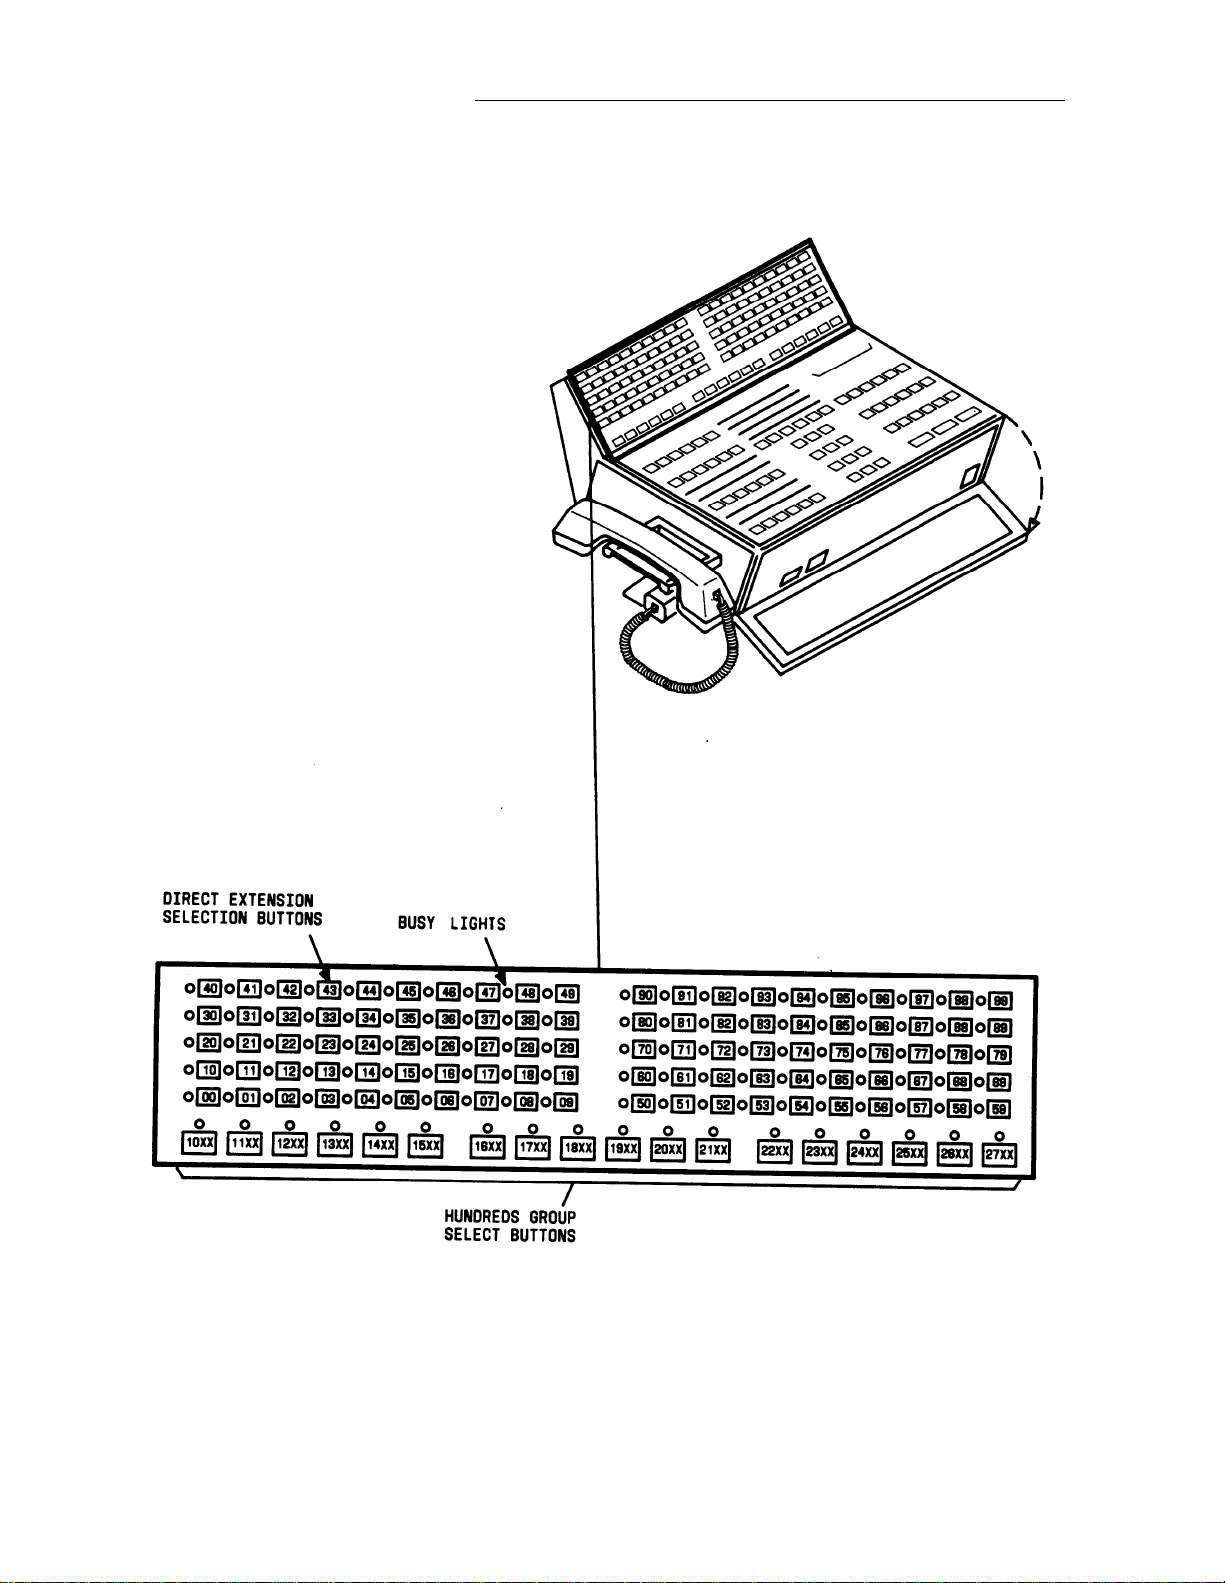
Figure 2-2.
Direct Extension Selection (DXS) With Busy Lamp Field (BLF) Console
2-5
Page 12

CHAPTER 2. DESCRIPTION
Attendant Console Functional Areas
Both console models have three identical functional areas:
◆ Trunk group select area
◆ Touch-tone dial and loop button and light area
◆ Attendant control area.
Trunk Group Select Area
This area (Figure 2-3) contains 24 trunk group buttons and associated lights. A trunk group
may be assigned to each button. Twelve trunk group buttons have control, warning, and
busy lights; the other 12 have only busy lights. These lights indicate the status of each trunk
group assigned. The functions of the buttons and lights are as follows:
◆
Direct group select buttons—
Provide a way to directly select an outgoing trunk group
for an outgoing call. The buttons are labeled to indicate the assigned trunk group.
◆
BUSY lights—
◆ CONT (control) lights—
Indicate that all the trunks in a trunk group are busy.
Indicate that a feature has been activated to control a trunk
group.
WARN (warning) lights—indicate that a preestablished number of trunks are busy in
◆
the associated trunk group.
2-6
Page 13

CHAPTER 2. DESCRIPTION
Figure 2-3.
Trunk Group Select Area
2-7
Page 14

CHAPTER 2. DESCRIPTION
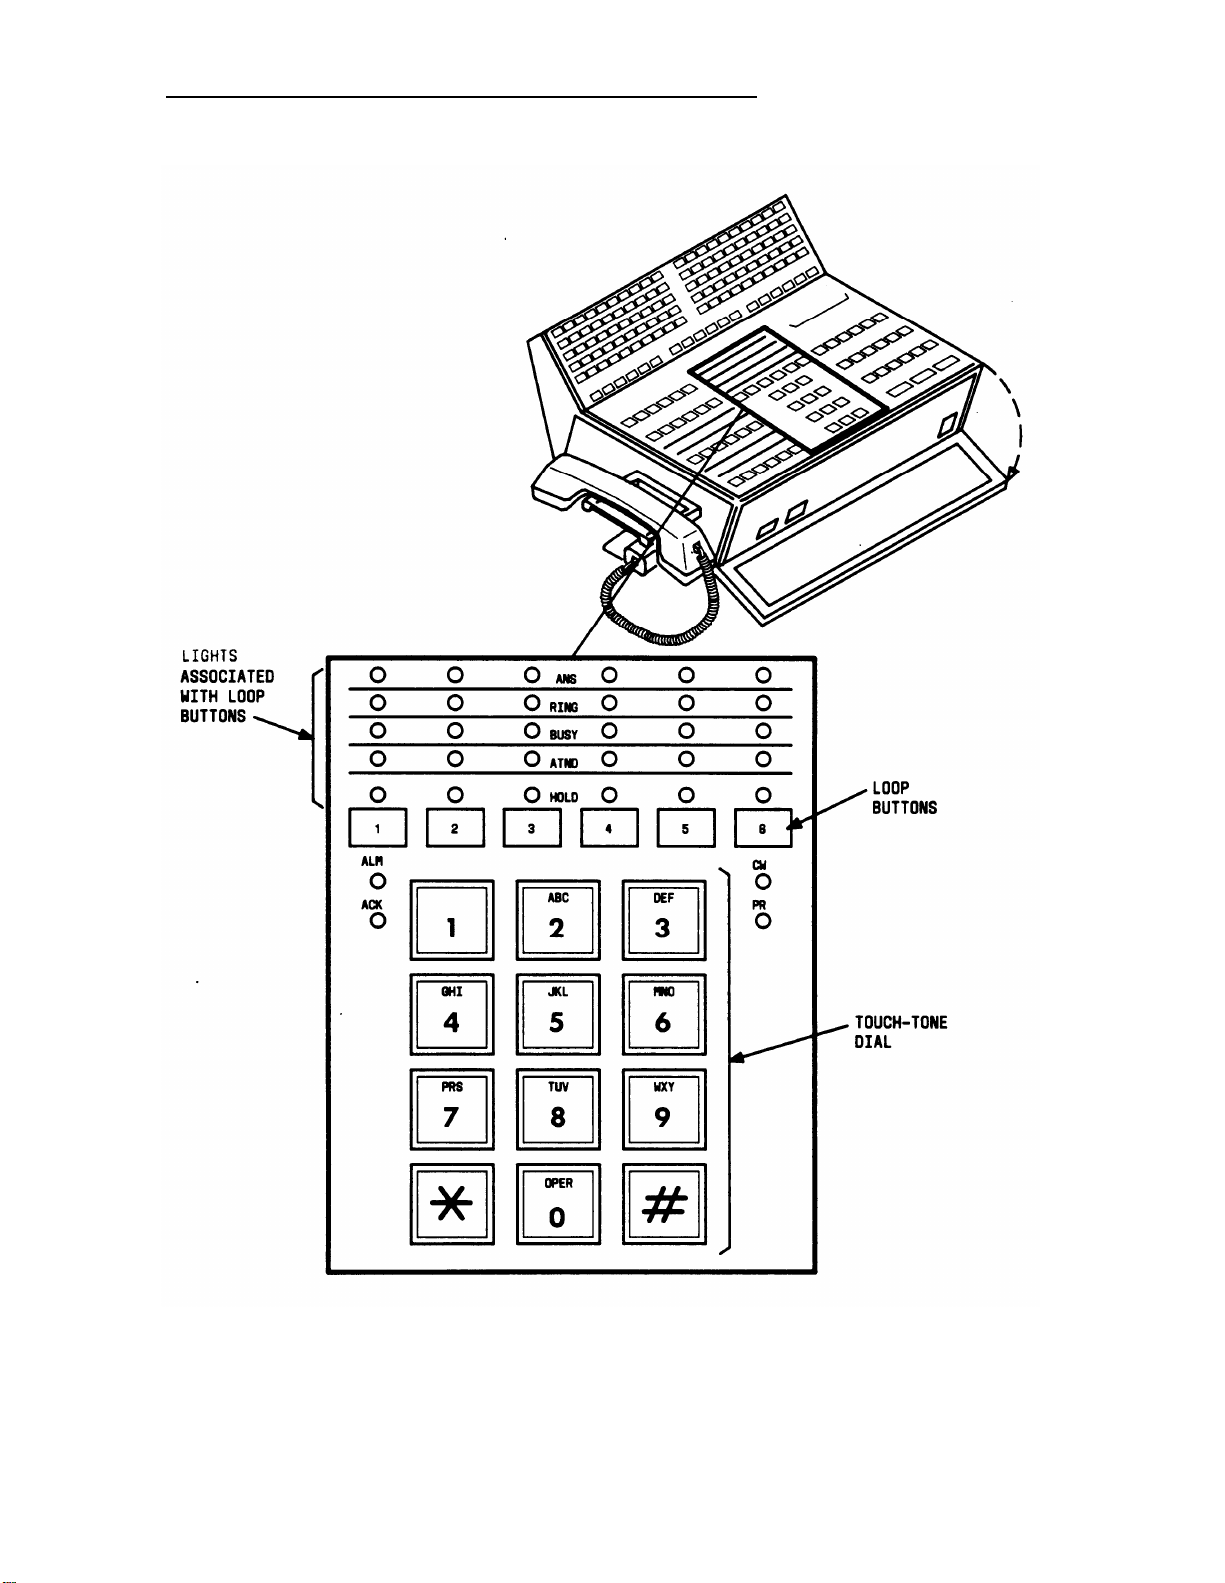
Touch-Tone Dial and Loop Button and Lamp Area
This area (Figure 2-4) contains a touch-tone dial, 6 loop buttons, and 5 status lights
associated with each of the loop buttons. The loop buttons are numbered 1 through 6 (from
left to right). Incoming calls are switched to loop button number 1, if it is idle. Otherwise,
calls are switched sequentially to loop button numbers 2 through 6.
Incoming calls, including calls in queue, are uniformly distributed to all of the active consoles.
The functions of the loop buttons and associated lights are as follows:
Loop button—
◆
HOLD light (when lighted steadily)—A call on the associated loop is on hold. When
◆
Processes or originates calls.
flashing, it reminds you that a call has been held for at least 30 seconds.
ATND (attendant) light (when lighted steadily)—You are busy on the loop. When
◆
flashing, it indicates that an incoming call is on the loop waiting to be answered.
BUSY light (when on)—The called number is busy, or that you have placed a call to a
◆
busy extension with call waiting assigned. When flashing, it indicates that the caller
has been waiting for at least 30 seconds.
RING light (when on)—The called number is being rung. When flashing, it indicates a
◆
timed reminder on a call waiting call or an attendant recall.
ANS (answer) light (when on)—A called party has answered or a trunk has been
◆
connected. When flashing, it indicates a recall from a 2-party connection.
The following four lights are not associated with specific loop buttons:
ALM (alarm) light (when on)—A trouble condition has been detected in the switch.
◆
ACK (acknowledge) light (when on)—A trouble condition exists and has been
◆
acknowledged by a maintenance center.
When flashing, it indicates a trouble
condition that has not been acknowledged. The attendant should report the trouble.
2-8
Page 15
CHAPTER 2. DESCRIPTION
Figure 2-4.
Touch-Tone Dialing and Loop Button and Lamp Area
2-9
Page 16

CHAPTER 2. DESCRIPTION
◆
CW (calls waiting) light (when on)—One or more calls are waiting to be switched to
an idle loop on the console. When flashing, it indicates that the number of calls
waiting equals or exceeds the established limit set for the console.
◆
PR (priority) light (when on)—A call from another attendant is waiting or an Automatic
Circuit Assurance (ACA) referral call is waiting.
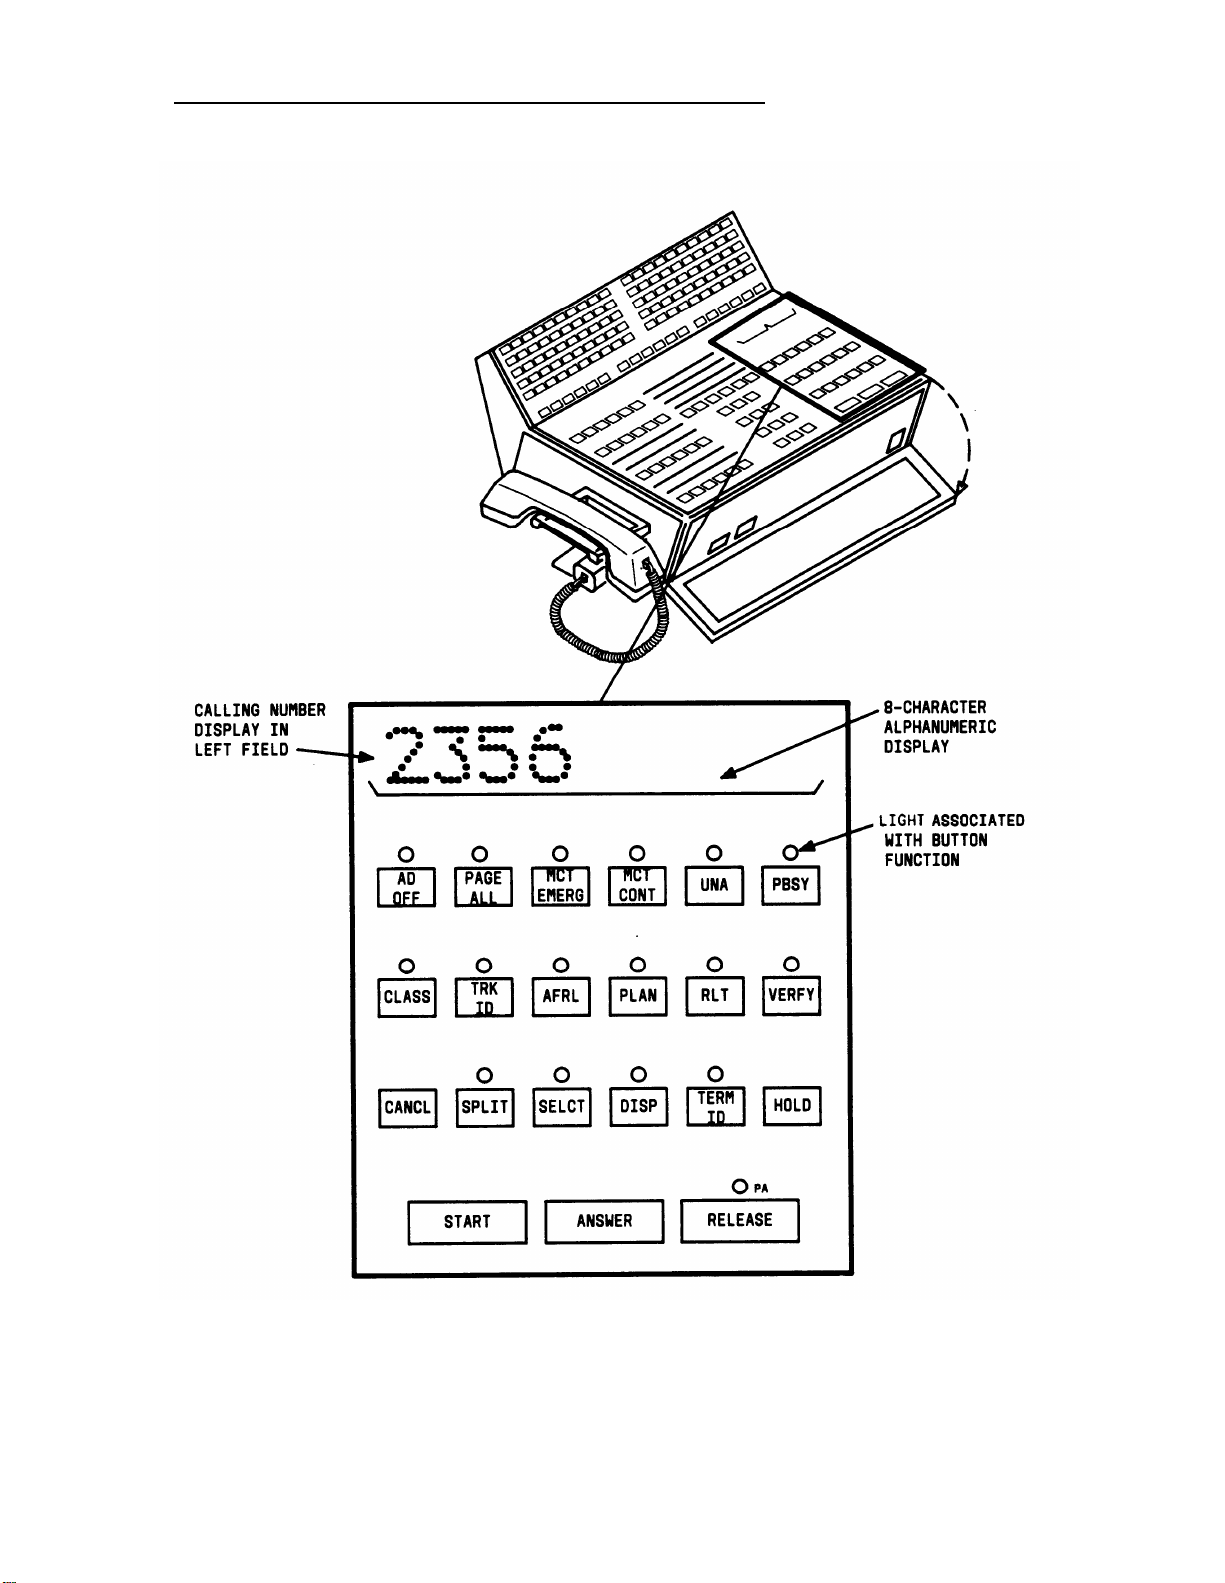
Attendant Control Area
This area (Figure 2-5) contains buttons, lights, and an 8-character alphanumeric display. The
buttons are used to process calls and activate features. Each light indicates the status of its
associated button.
Three of the buttons (START, ANSWER, and RELEASE) are always assigned as shown in
Figure 2-5. The CANCL (cancel) and HOLD buttons are usually assigned to the two buttons
without lights. The AD OFF, PBSY, CLASS, UNA, VERFY, CANCL, and TERM ID buttons are
assigned to the locations shown in Figure 2-5. The remaining buttons and their locations are
customer designated.
The alphanumeric display provides call identification and class-of-service (COS) information.
Buttons and Lamps
A description of the functions of the various buttons and the PA (position available) light
follows:
◆
AD OFF (audible off)—Controls the console audible signal.
◆
PAGE ALL— Provides access to loudspeaker paging equipment in all zones.
◆
MCT EMERG— Activates the malicious call trace feature.
◆
MCT CONT— Traces a malicious call.
◆
UNA (unattended)—Places the console in the unattended console service mode.
Calls are then routed to telephones/voice terminals designated for answering
incoming calls.
◆
PBSY (position busy)—Places the console in a busy mode so incoming calls cannot
be received. You can, however, originate calls.
◆
CLASS— Shows the COS of an incoming call (from an extension number) on the
alphanumeric display.
2-10
Page 17
CHAPTER 2. DESCRIPTION
Figure 2-5.
Attendant Control Area
2-11
Page 18

CHAPTER 2. DESCRIPTION
TRK ID (trunk identification)—Identifies a specific trunk used on an incoming or
◆
outgoing call. Also used to identify a faulty trunk.
AFRL (alternate facilities restriction level)—Activates alternate FRL.
◆
PLAN— Displays or changes the plan for ARS.
◆
RLT (release link trunk)—Releases the Centralized Attendant Service (CAS) position
◆
from a RLT.
VERFY (verify)—Allows you to check a busy line. To safeguard their privacy,
◆
telephone/voice terminal users will hear a tone before you can check the line.
CANCL (cancel)—Releases a called extension number or trunk. Also, used to
◆
silence a tone or deactivate a feature.
◆
SPLIT— Temporarily separates a caller from the connection.
SELCT— Selects the hundreds group (first two digits of an extension number) when
◆
extended DXS is used to call an extension user.
DISP— Displays the last selected hundreds group in the alphanumeric display when
◆
extended DXS is used to call an extension number.
◆
TERM ID (terminal identification)—Shows the called extension number on the
alphanumeric display when a timed-reminder call is returned to the console. Used
only when the attendant release loop feature is active.
◆
HOLD— Puts a call on hold.
◆
START— Obtains dial tone.
◆
ANSWER— Automatically connects an incoming call to the console.
◆
RELEASE— Releases the console from a call, readying it for the next call.
◆
PA (position available) light (when on)—The console is available for calls.
2-12
Page 19

CHAPTER 2. DESCRIPTION
Alphanumeric Display
The alphanumeric display shows up to eight letters or numbers to identify the following types
of calls or COS.
Incoming Call Identification (lCl)— Up to 63 different displays show the type of call, as
a.
in the following examples:
◆
INC (Incoming)—incoming call from a trunk group.
◆
ATND (Attendant)-intercepted incoming call that has been routed to the
console.
◆
RCL (Recall)—A recall by a system user.
◆
WATS (Wide Area Telecommunications Service)—Incoming call from a WATS
trunk group.
◆
ACTG (Attendant Control of Trunk Group)—Incoming call intercepted by you
because you have activated control of trunk groups.
◆
CONF (Conference)—A recall by a conferee active on a conference.
◆
TIME—incoming call that has exceeded a preestablished time limit. Your
System Administrator can designate other letters or numbers, if desired, for
this type of call.
b.
Calling Number Display—Shows the extension number of the calling party.
c.
COS Display—Shows the COS of the calling extension number. Some examples
meanings are:
◆
NON-Unrestricted terminal.
◆
TOLL—Toll-restricted terminal.
◆
REST (Restricted)—Outward-restricted terminal.
◆
FULL— Fully restricted terminal.
◆
1 - 63—Number displayed denotes COS. Consult records to determine
privileges.
d.
CAS Display—Displays up to 40 branch location codes. The customer selects
codes.
and
users
these
Direct Extension Selection (DXS) With Busy Lamp Field (BLF)
This area (Figure 2-6) contains the hundreds group select buttons, the DXS buttons, and the
BLF.
2-13
Page 20
CHAPTER 2. DESCRIPTION
2-14
Figure 2-6.
Direct Extension Selection (DXS) With Busy Lamp Field (BLF)
Page 21

CHAPTER 2. DESCRIPTION
A 4-digit extension number contains two pairs of numbers, a hundreds pair and a tens and
unit pair. For example, the extension number 4321 contains a 43 hundreds pair and a 21 tens
and unit pair.
The 18 group select buttons on the console are labeled with up to 18 different hundreds
pairs. if the system has more than 1800 different hundreds pairs (1800 lines), refer to the
operational procedure entitled
“Extended Direct Extension Selection (DXS)" that is listed
under the feature “Attendant DXS With BLF” for step-by-step instructions on how to call
extension numbers by pressing DXS buttons.
The 100 buttons in the DXS/BLF are labeled 00 to 99.
To determine the idle/busy status of extension 1121, press the group select button labeled
11xx. Then, look at the light to the left of the DXS button labeled 21. If the light is dark, the
extension is idle. Now, you can extend or complete a call to extension number 1121.
If the BLF is lighted and extension number 1121 is assigned to a multi-appearance voice
terminal, you can still forward the call by pressing the appropriate DXS button. Extension
number 1121, in this case, may be active, but another call appearance of extension number
1121 may be idle.
The DXS buttons and the BLF are inoperative in a Distributed Communication System (DCS)
except when the attendant originates or extends calls within the local system.
RECORDING CALL INFORMATION
If the Call Detail Recording and Reporting (CDRR) feature or the Station Message Detail
Recording (SMDR) feature is assigned on a trunk group basis in your system, you may be
required to charge outgoing calls on certain trunks to an account number. You can charge to
an account number by dialing a CDRR or SMDR account number access code and an
account charge number. The procedure is the same for either feature.
Instructions in this guide are written for CDRR.
b
2-15
Page 22

CHAPTER 3. FACTORY-PROVIDED SPECIAL FEATURES
CHAPTER 3.
FACTORY-PROVIDED SPECIAL FEATURES
Privacy
The console comes
entering an established connection being held on the console unless you are recalled by a
telephone/voice terminal user. Attendant Recall Privacy prevents an incoming trunk caller
from hearing your conversation with an extension user; for example, when you are
announcing a call. Your System Manager can consult with the service representative to
remove the Privacy feature if your company so desires.
processing of calls and operation of features with and without the Privacy feature.
equipped with the Privacy feature.
This feature prevents you from
This guide is written to include
Attendant Release Loop (ARL)
The console comes equipped with the ARL feature.
the console (releasing the loop) until the timed-reminder interval expires or the call is
answered. Such calls may be those you have extended and released to busy telphones/voice
terminals or telphones/voice terminals with Call Waiting assigned. This feature benefits
customers with a high volume of incoming calls to the attendant. Your System Manager can
consult with the service representative to deactivate the ARL feature if your company so
desires, or your System Manager can deactivate the ARL using the System Management
Terminal (SMT) (System 85) or DEFINITY Manager™ II (DEFINITY Generic 2) if your
company is administering your own system. When the feature is deactivated, calls you have
extended and released to busy telphones/voice terminals or telphones/voice terminals with
Call Waiting assigned are held on the console loop until the timed-reminder interval expires
or the call is answered. This guide includes the processing of calls both with and without the
ARL feature.
This feature allows calls to be held off
Note:
With the Call Coverage feature, the ARL feature is disabled on attendant-
extended calls to telphones/voice terminals with a coverage path assigned
where the coverage criteria applies to that call. When the attendant extends
such a call, and releases from the loop, the call follows the coverage path to
Message Center or Audio Information Exchange (AUDIX) and does not return
to the attendant queue when the ARL timed-reminder interval expires.
3-1
Page 23

CHAPTER 4. OPERATING PROCEDURES
CHAPTER 4. OPERATING PROCEDURES
The operating instructions in this guide are written for the DXS/BLF console only.
Incoming Calls
An incoming call is indicated by an audible ring, a dark PA (position available) light, and a
flashing ATND (attendant) light above one of the loop buttons. Calls may come in on any of
the six loops.
If the call is placed from within the system, the alphanumeric display shows the extension
number of the caller.
If the call is placed from outside the system, the alphanumeric display will show INC
(incoming), the city of origin, or some other identification code.
Answering an Incoming Call
To answer a call:
1.
Press [ANSWER] .
Audible ring stops. ATND light goes on.
2.
Answer the call in accordance with your company policy.
3.
Press
[RELEASE]
Display and ATND lights go off. PA light goes on.
.
Extending an Incoming Trunk Call to an Extension Number
Incoming trunk calls can be extended to a multi-appearance telephone/voice terminal even
though the BLF light for the requested extension number is lighted. To determine if a call
can be extended to an extension number when the BLF light for that number is lighted, you
must know that the requested extension number is assigned to a multi-appearance
telephone/voice terminal.
To extend a call:
1.
Press the appropriate hundreds group select button.
4-1
Page 24

CHAPTER 4. OPERATING PROCEDURES
Group select light goes on.
2.
Check the BLF to see if the desired extension light is off.
If Call Detail Recording and Reporting (CDRR) is assigned and calls are to be
3.
charged to an account number, do Steps 4 and 5; if not assigned, go to Step 6.
4.
Press
Listen for dial tone.
Dial CDRR account
5.
Listen for
Press the
6.
Listen for
[START] .
SPLIT light goes on. Caller is separated from the connection.
number access code and Account Charge Number.
dial tone.
DXS button for the requested extension number.
ringback tone, and check that BLF (requested extension number) and RING
lights go on.
7.
Press
Display, ATND, RING, and
on BLF remains lighted for
[RELEASE] .
SPLIT lights go off, PA light goes on. Extension number
duration of the call.
Handling an Extended Call to an Extension Number That Does Not Answer When
Attendant Release Loop (ARL) Feature Is Activated
If the call you extended is not answered and you have pressed the RELEASE button, the
ARL feature allows the call to be held off the console (releasing the loop). The call remains
off-loop until the ARL timed reminder interval expires or until the call is answered. The
interval can be set using the System Management Terminal (SMT). The RING light goes off
when you press the RELEASE button.
If the call is not answered before the ARL timed-reminder interval expires, the call goes to
the first available console. The RING light flashes, and you hear timed-reminder tone.
To answer a call:
1.
Press the loop button below the flashing RING light.
Display shows call identification. ATND light goes on. RING light goes on. PA light
goes off.
TERM
Press button if you need to identify the called extension number. The original
2.
ID
call may have been answered by another attendant.
4-2
Page 25

Display shows the called extension number.
3. Report to the caller over the ringback tone,
or
CHAPTER 4. OPERATING PROCEDURES
Press
4. If the caller wishes to wait and you did not press the CANCL button, press
[CANCL] to silence the tone and report to the caller.
[RELEASE] .
Display, ATND, and RING lights go off. PA light goes on.
If the caller wishes to wait and you pressed the CANCL button, you must make the
connection again for the caller before pressing the RELEASE button.
5. If the caller does not wish to wait, press
[RELEASE] .
Display, ATND, and RING lights go off. PA light goes on.
At the end of every ARL timed-reminder interval, the RING light flashes and ARL timedreminder tone sounds. This sequence continues until the caller is connected unless the call
is for a voice terminal with a coverage path assigned. Refer to Note under “Factory-Provided
Special Features,” Section 3.
Handling an Extended Call to an Extension Number That Does Not Answer When
Attendant Release Loop (ARL) Feature Is Not Activated
If the call you extended is not answered and you have pressed the RELEASE button, the call
is held on the console. The call remains on the loop until the timed-reminder interval (30
seconds) expires or until the call is answered.
RELEASE button.
The RING light stays on when you press the
If the call is not answered before the timed-reminder interval expires, the RING light flashes.
You hear timed-reminder tone.
To answer a call:
1.
Press the loop button below the flashing
Display shows call identification. ATND
RING light.
light goes on. RING light goes on. PA light
goes off.
2.
Report to the caller over ringback tone,
or
[CANCL] to silence the tone and report to the caller.
Press
4-3
Page 26

CHAPTER 4. OPERATING PROCEDURES
If the caller wishes to wait and you did not press the CANCL button, press
3.
[RELEASE] .
Display and ATND lights go off. PA light goes on.
4.
If the caller wishes to wait and you pressed the CANCL button, you must make the
connection again for the caller before you press the RELEASE button.
5.
If the caller does not wish to wait, press
[RELEASE] .
Display, ATND, and RING lights go off. PA light goes on.
At the
end of every timed-reminder interval (30 seconds), the RING light flashes and timed-
reminder tone sounds. This sequence continues until the caller is connected.
Placing a Caller in Call Waiting
When the extension number requested is busy, you can place a caller in call waiting.
However, an extension number assigned to a multi-appearance telephone/voice terminal
cannot be placed in call waiting; these call must be extended.
To place a caller in call waiting:
1.
If Call Detail Recording and Reporting (CDRR) is assigned and calls are to be
charged to an account number, do Steps 2 and 3. If CDRR is not assigned, go to
Step 4.
2.
Press
[START] .
Listen for dial tone. SPLIT light goes on. Caller is separated from the connection.
3.
Dial CDRR account number access code and Account Charge Number.
Listen for dial tone.
4.
Press DXS button for the desired extension.
Listen for tone:
Confirmation tone— BUSY light goes on. Caller is reconnected.
Busy tone—call waiting is denied. Go to Step 7.
5.
Press
[RELEASE] .
PA light goes off. The called party hears two beeps of tone when the attendant
presses the RELEASE button. The caller waits to be connected.
.
Refer to “Handling a Call Placed to a Busy Extension Number With Call Waiting
6.
Assigned When ARL Is or Is Not Activated” for information on how to handle Call
Waiting Recall calls.
4-4
Page 27

7.
Press
[CANCL]
.
Busy tone stops. BUSY light goes off.
Tell the caller that the extension number is busy.
8.
CHAPTER 4. OPERATING PROCEDURES
If the caller wishes to wait, press
9.
[HOLD] .
HOLD light goes on.
10.
After 30 seconds, the HOLD light flashes as a reminder that the caller is waiting. Do
Step 11.
11.
Press the loop button below the flashing HOLD light, and try the number again.
Every 30 seconds the HOLD light flashes and timed-reminder tone sounds. This
sequence continues until the caller is connected.
If the caller does not wish to wait, press
12.
[RELEASE] .
PA light goes on. RING light goes off when the caller hangs up.
Handling a Call Placed to a Busy Extension Number With Call Waiting. Assigned
When Attendant Release Loop (ARL) Feature Is Activated
The ARL feature allows a call that you have placed in call waiting (after pressing the
RELEASE button) to be held off the console (releasing the loop) until the ARL timed-reminder
interval expires or until the call is answered.
RELEASE button.
If the call is not answered before the ARL timed-reminder interval
to the first available console. The BUSY light flashes, and you hear
The BUSY light goes off when you press the
expires, the call is routed ,
timed-reminder tone.
To answer a call:
1.
Press the loop button below the flashing BUSY light.
Display shows call identification. ATND light goes on. BUSY light goes on. PA light
goes off.
2.
Press if you want to identify the called extension number. The original call
may have been placed in call waiting by another attendant.
Display shows the called extension number.
3.
Tell the caller that the extension number is busy.
TERM
ID
4-5
Page 28

CHAPTER 4. OPERATING PROCEDURES
4.
If the caller wishes to wait, press [RELEASE] .
Display and ATND lights go off. PA light goes on. The called party hears two beeps
of tone as a reminder that the call is still waiting.
5. If the caller does not wish to wait, press
[CANCL] , [RELEASE] .
Display, ATND, and BUSY lights go off. PA light goes on.
At the end of every ARL timed-reminder interval, the RING light flashes and ARL timed-
reminder tone sounds. This sequence continues until the caller is connected unless the call
is for a telephone/voice terminal with a coverage path assigned. Refer to Note under
“Factory-Provided Special Features,” Section 3.
Handling a Call Placed to a Busy Extension Number With Call Waiting Assigned
When Attendant Release Loop (ARL) Feature Is Not Activated
When you have placed a call in call waiting (after pressing the RELEASE button), the call
remains on the loop until the timed-reminder interval (30 seconds) expires or the call is
answered. The BUSY light stays on when you press the RELEASE button."
If the call is not answered before the timed-reminder interval expires, the BUSY light flashes.
You hear timed reminder tone.
To answer a call:
1.
Press the loop button below the flashing BUSY light,
Display shows call identification. ATND light goes on. BUSY light goes on. PA light
goes off.
2. Tell the caller that the extension number is busy.
3. If the caller wishes to wait, press
[RELEASE] .
Display and ATND lights go off. PA light goes on. The called party hears two beeps
of tone as a reminder that the call is still waiting.
At the end of every timed-reminder interval (30 second), the RING light flashes and timedreminder tone sounds. This sequence continues until the caller is connected.
Holding a Call on the Console
If an extension number is busy and call waiting is not available, you can hold a call on the
console. Every 30 seconds the timed-reminder tone sounds. Then, check to see if the caller
wishes to continue holding.
4-6
Page 29

To hold a call:
1.
Press [HOLD] .
HOLD and PA lights go on. Display and ATND lights go dark.
2.
After 30 seconds, you hear timed-reminder tone. HOLD light flashes.
3.
Press the loop button below the flashing HOLD light to reenter the connection.
Display and ATND lights go on. PA light goes off.
CHAPTER 4. OPERATING PROCEDURES
4.
[CANCL] to stop the tone while you are talking with the caller on hold.
Press
At the end of every timed-reminder interval (30 second), the HOLD light flashes and
timed-reminder tone sounds. This sequence continues until the caller is connected.
[RELEASE] when the caller is connected, or if the caller wishes to call back later.
Press
5.
Display and ATND lights go off. PA light goes on.
Transferring an Incoming Trunk Call
When a voice terminal user recalls you to request that you transfer an incoming call to
another extension number, you will hear an audible ring.
identifies the calling extension. ATND light above the associated loop button flashes. PA light
goes off.
To answer a recall:
1.
Press the loop button below the flashing ATND light.
Audible ring stops. ANS light goes on. ATND light goes on.
2.
Acknowledge the request to transfer the call.
Then, the alphanumeric display
User who requests the transfer and the incoming caller can hear you. User who
requests the transfer hangs up. ANS light and associated BLF light goes off.
To transfer a call:
1.
Press the appropriate hundreds group select button.
Group select light goes on.
2.
Check the BLF to see if the requested extension number light is off. If the
associated BLF light is on but the extension number is assigned to a multiappearance telephone/voice terminal, go to Step 3.
4-7
Page 30

CHAPTER 4. OPERATING PROCEDURES
If Call Detail Recording and Reporting (CDRR) is assigned, do Steps 4 and 5; if not
3.
assigned, go to Step 6.
Press
[START] .
4.
Listen for dial tone. SPLIT light goes on. Caller is separated from the connection.
5.
Dial CDRR account number access code and Account Charge Number.
Listen for dial tone.
Press DXS button for the desired extension number.
6.
Listen for ringback tone. Associated BLF and RING lights go on.
Press
7.
[RELEASE]
.
Display, ATND, and SPLIT lights go off. PA light lights. When the called extension
answers, RING light goes off. Caller is transferred.
Announcing an Incoming Trunk Call
To screen calls, you may be asked to announce calls to certain system users.
To announce a call:
1.
Press the appropriate hundreds group select button.
Group select light goes on.
2.
Check the BLF to see if the requested extension light is off. If the associated BLF
light is on and the extension number is assigned to a multi-appearance
telephone/voice terminal, go to Step 3.
If Call Detail Recording and Reporting (CDRR) is assigned and calls are to be
3.
charged to an account number, do Steps 4 and 5; if not assigned, go to Step 6.
Press
4.
[START]
.
Listen for dial tone. SPLIT light goes on. Caller is separated from the connection.
Dial CDRR account number access code and Account Charge Number.
5.
Listen for dial tone.
Press DXS button for the desired extension number.
6.
Listen for ringback tone. Associated BLF and RING lights go on.
4-8
Page 31

7.
When the called party answers, announce the call.
ANS light goes on. RING light goes off.
CHAPTER 4. OPERATING PROCEDURES
If the called party wishes to talk to the caller, press
8.
Display, ANS, ATND, and SPLIT lights go off.
[RELEASE] .
PA light goes on. Caller and called
party are connected.
If the called party does not wish to talk with the
9.
ANS and SPLIT lights go off. BLF light goes off
10.
Report to the caller.
Press
11.
[RELEASE]
.
caller, press
when called party hangs up.
[CANCL] .
Display and ATND lights go off. PA light goes on.
Extending an Incoming Trunk Call to an Outside Number
To reach an outside number, you must connect the incoming trunk to an outgoing trunk. You
can make this connection in one of three ways, depending on what features are available in
your system.
To make a private network call, dial an access code. Automatic Alternate Routing (AAR)
and Automatic Route Selection (ARS) features, if available, automatically route calls over
the most desirable trunks and the least expensive routes.
To make a public network call when you have the Direct Trunk Group Select feature, press
the proper trunk group select button. To make a public network call when you do not have
the Direct Trunk Group Select feature, dial a Trunk Group access code.
To extend a call:
1.
If Call Detail Recording and Reporting (CDRR) is assigned and calls are to be
charged to an account number, do Steps 2 and 3; if not assigned, go to Step 4.
2.
Press
[START]
.
Listen for dial tone, and check that SPLIT light goes on.
3.
Dial CDRR account number access code and Account Charge Number.
Listen for dial tone.
4.
If the call is to be placed on a private network and AAR and/or ARS features are
active, do Step 5 to connect a trunk; if ARS/AAR is not active, go to Step 6.
4-9
Page 32

CHAPTER 4. OPERATING PROCEDURES
Press [START] , and dial AAR/ARS access code.
5.
Listen for dial tone or audio.
Dial tone—trunk is connected. Go to Step 9.
Audio (music or recorded announcement)—call is placed in queue because no
outgoing trunks are available. Refer to “Queuing” under “Outgoing Calls” for
information on how to handle the call.
If you use direct trunk group selection to select a trunk, do Step 7. If you do not use
6.
direct trunk group selection, go to Step 8.
7.
Press direct trunk group select button.
Listen for dial tone or audio.
Dial tone—trunk is connected. ANS light goes on. Go to Step 9.
Audio (music or recorded announcement)—call is placed in queue because
outgoing trunks are available. Refer to “Queuing” under “Outgoing Calls”
information on how to handle the call.
8.
Press
[START] , and dial Trunk Group access Code.
Listen for dial tone or audio.
Dial tone—trunk is connected. ANS light goes on.
Audio (music or recorded announcement)—call is placed in queue because
outgoing trunks are available. Refer to “Queuing” under “Outgoing Calls”
information on how to handle the call.
Dial the outside number.
9.
Listen for ringback tone. ANS light goes on at this point if you used AAR/ARS to
connect a trunk.
10.
Press
[RELEASE] .
Display light goes off. PA light goes on. Caller is connected to the outside number.
Extending an Incoming Trunk Call to an Automatic Call Distribution (ACD) Queue
no
for
no
for
If your company has a high volume of incoming calls, ACD can give your company balanced
distribution of calls. This feature allows incoming calls to be routed directly to specific
groups of voice terminals called splits. You may be asked to extend a call to an ACD group.
Calls to an ACD group are queued until an agent in the group is available to answer.
4-10
Page 33

To extend a call:
1.
If Call Detail Recording and Reporting (CDRR) is assigned and calls are to be
charged to an account number, do Steps 2 and 3; if CDRR is not assigned, go to
Step 4.
2.
Press
Listen for dial tone. SPLIT light goes on. Caller is separated from the connection.
Dial CDRR account number access code and Account Charge Number.
3.
Listen for dial tone.
4.
Press appropriate hundreds group select button.
Group select light goes on.
5.
Press DXS button for the extension number assigned to the ACD group if it is not in
a 5-digit dial plan. Dial the extension number if the ACD group is in a 5-digit dial plan.
[START]
CHAPTER 4. OPERATING PROCEDURES
.
You will hear ringback tone until the call is answered or busy tone after 4 seconds.
If your hear busy tone, all terminals in the ACD group are busy. Go to Step 7.
If you release within 4 seconds—
6.
Display, ATND, and SPLIT lights go off. PA light goes on. The caller is placed in the
ACD queue.
7.
8.
[CANCL] , and report to the caller.
Press
If the caller does not wish to wait, press
[RELEASE] .
Display, ATND, and SPLIT lights go off. PA light goes on.
9.
If the caller wishes to wait, press
[HOLD] .
HOLD light goes on.
At the
end of every timed-reminder interval (30 second), the HOLD light flashes and timed-
reminder tone sounds. This sequence continues until the caller is connected.
Note:
Call Vectoring, available with System 85 R2V4 and DEFINITY Generic 2, is a
highly flexible way of processing incoming ACD calls (and other calls). Calls
terminating at vectors use VDNs.
To extend a call:
1.
If Call Detail Recording and Reporting (CDRR) is assigned and calls are to be
charged to an account number, do Steps 2 and 3; if CDRR is not assigned, go to
Step 4.
4-11
Page 34

CHAPTER 4. OPERATING PROCEDURES
Press
[START]
2.
.
Listen for dial tone.
Dial CDRR account
3.
SPLIT light goes on. Caller is separated from the connection.
number access code and Account Charge” Number.
Listen for dial tone.
Press appropriate hundreds group select button.
4.
Group select light goes on.
In a 3- or 4- digit dialing plan, press the DXS button for the VDN.
5.
Associated BLF light does not go on.
in a 5-digit dialing plan, dial the VDN.
Within 4 seconds, press
6.
7.
Stay on connection after 4 seconds.
[RELEASE] . Calling party commences vector processing.
Listen for tone:
Ringing—attendant ringing available ACD agent. Release caller to connect with
agent.
Busy tone—
no ACD agent is available. Go to Step 7 of previous procedure.
[CANCL] , and report to the caller.
Press
8.
If the caller does not wish to wait, press
9.
[RELEASE] .
Display, ATND, and SPLIT lights go off. PA light goes on.
If the caller wishes to wait, press
10.
[HOLD] .
HOLD light goes on.
At the end of every timed-reminder interval (30 second), the HOLD light flashes, and timedreminder tone sounds. This sequence continues until the caller is connected.
Extending a Call to a Data Communications Access (DCA) Port
You may be requested to extend a call to a DCA port if you are controlling trunks assigned
to DCA ports.
4-12
Page 35

To extend a call:
1.
If you use direct trunk group selection to select trunks, do Step 2. If you do not use
direct trunk group selection, go to Step 3.
2.
Press direct trunk group select button.
Listen for dial tone or audio:
CHAPTER 4. OPERATING PROCEDURES
Dial tone— SPLIT and RING lights go on.
Caller is separated from the connection.
Go to Step 4.
Busy tone—no trunk available, and queuing is not available. Go to Step 5.
Audio (music or recorded announcement)—call is placed in off-hook queue. Go to
Step 7.
[START] , and dial the Trunk Group access code.
Press
3.
Listen for dial tone or audio:
Dial tone— SPLIT and RING lights go on. Caller is separated from the connection.
Busy tone—no trunk available, and queuing is not available. Go to Step 5.
Audio (music or recorded announcement)—call is placed in off-hook queue.
Step 7.
4.
Press
[RELEASE] .
ATND, SPLIT, and RING lights go off. Caller hears ringback tone followed by
“computer ready” indication.
[CANCL] , and tell the caller to place the call again later.
Press
5.
Press
6.
[RELEASE]
.
Go to
Display and ATND lights go off. PA light goes on.
7.
Press
[SPLIT] .
SPLIT light goes on. Caller is added to the queue.
Press
8.
[RELEASE]
.
Display, ATND, and SPLIT lights go off. PA light goes on.
4-13
Page 36

CHAPTER 4. OPERATING PROCEDURES
Outgoing Calls
You can place two types of outgoing calls:
Outgoing calls from system users who request connection to a trunk (outside line) so they
can dial an outside number.
Outgoing calls from system users who request that you complete an outside call” for them.
The procedure consists of connecting to a trunk, then dialing the requested outside
number. This type of call handling assists users who are not allowed to make outgoing
calls, or users with very busy schedules.
When you receive either request, the calling number is displayed. You hear an audible ring.
ATND light flashes, and PA light goes off.
To answer a caller:
1.
Press [ANSWER] . Ask the caller to stay on the line.
Ringing stops. ATND light goes on.
2.
Ask the caller for instructions.
If it is necessary to determine if a caller has permission to make outgoing calls (local
3.
or toll), do Step 4.
4.
[CLASS] . Restrictions, if any, will be displayed. Press [CLASS] again to restore the
Press
calling number.
Connecting a Voice Terminal User to a Trunk
To connect a caller to a trunk:
1.
If Call Detail Recording and Reporting (CDRR) is assigned and calls are to be
charged to an account number, do Steps 2 and 3; if CDRR is not assigned, go to
Step 4.
2.
Press
[START]
.
Listen for dial tone.
3.
Dial CDRR account
Listen for dial tone.
SPLIT light goes on. Caller is separated from the connection.
number access code and Account Charge Number.
4-14
4.
If the call is to be placed on a private network and Automatic Alternate Routing (AAR)
and/or Automatic Route Selection (ARS) features are active, do Step 5 to connect a
trunk; if AAR/ARS is not active, go to Step 6.
Page 37

CHAPTER 4. OPERATING PROCEDURES
Press [START] , and dial AAR/ARS access code.
5.
Listen for dial tone, busy tone, or audio:
Dial tone—trunk is connected. Go to Step 9.
Busy tone—no trunk available, and queuing is not available. Go to Step 10.
Audio (music or recorded announcement)—call is placed in queue because no
outgoing trunks are available. Refer to “Queuing” under “Outgoing Calls” for
information on how to handle the call.
If you use direct trunk group selection to select a trunk, do Step 7. If you do not use
6.
direct trunk group selection, go to Step 8.
Press direct trunk group select button.
7.
Listen for dial tone, busy tone, or audio.
Dial tone—trunk is connected. ANS light goes on. Go to Step 9.
Busy tone—no trunk available, and queuing is not available. Go to Step 10.
Audio (music or recorded announcement)—call is placed in queue because
outgoing trunks are available. Refer to “Queuing” under “Outgoing Calls”
information on how to handle the call.
[START] , and dial the Trunk Group access code.
Press
8.
Listen for dial tone, busy tone, or audio:
Dial tone—trunk is connected. ANS light goes on. Go to Step 9.
Busy tone—no trunk available, and queuing is not available. Go to Step 10.
Audio (music or recorded announcement)—call is placed in queue because
outgoing trunks are available. Refer to “Queuing” under “Outgoing Calls”
information on how to handle the call.
Press
9.
[RELEASE]
.
Display, ANS, ATND, and SPLIT lights go off. PA light goes on. Caller is connected
to the trunk, and dials the outside number to complete the call.
Press
10.
[CANCL]
.
no
for
no
for
Busy tone stops. ANS and SPLIT lights go off.
4-15
Page 38

CHAPTER 4. OPERATING PROCEDURES
Report to the caller.
11.
12.
If the caller wishes to cancel the call, press [RELEASE] .
Display, ANS, ATND, and SPLIT lights go off. PA light goes on.
Completing an Outgoing Call
Once a voice terminal user is connected to an outgoing trunk, complete the call by doing the
following steps:
1.
Dial the outside number.
Listen for ringback tone.
2.
Press
[RELEASE]
.
Display, ANS, ATND, and SPLIT lights go off. PA light goes on. User is connected
to the outside number.
Queuing
All trunks may be busy when you are attempting to connect to an outgoing trunk. If queuing
is available, the call will be placed in queue. Then, you will hear music or a recorded
announcement, depending on the choice your company has made. You can put a queued
call on
idle.
To let a
hold so you can process other calls rather than stay off-hook until a trunk becomes
caller know when a call is placed in queue:
Press
[SPLIT]
1.
.
SPLIT light goes off. Audio stops. Caller is connected.
If the caller wishes to wait, press
2.
[SPLIT] . Remain off-hook until a trunk becomes idle,
or go to Step 1 under “To put a queued call on hold. ” If the caller does not wish to
wait, go to Step 5.
Listen for music or recorded announcement. SPLIT light goes on.
When audio stops and dial tone starts, dial the desired number.
3.
4-16
Listen for ringback tone.
Press
4.
[RELEASE]
.
PA light goes on. Caller is connected to the outside number.
Page 39

5.
If the caller does not wish to wait, press
Display, ATND, and SPLIT lights go off. PA light goes on.
To put a queued call on hold:
1.
Press
[HOLD]
.
HOLD light goes on. ATND light goes off. Audio stops.
2.
When RING light flashes and audible ring starts, press the loop button below the
flashing RING light.
HOLD light goes off. ATND light goes on. RING light continues to flash.
Listen for dial tone. RING light goes off. ATND light goes on.
3.
Dial the desired number.
[RELEASE]
CHAPTER 4. OPERATING PROCEDURES
.
Press
[HOLD]
.
Listen for ringback tone.
4. Press
[RELEASE]
.
PA light goes on. Caller is connected to the outside number.
Attendant-Originated Calls
You can originate calls from the console to extension numbers and to numbers outside the
system; and you can make trunk-to-trunk connections.
Attendant Call to an Extension Number
To originate a call to any extension number within the system:
1.
Press the appropriate hundreds group select button.
Group select light goes on.
2.
Check the associated BLF light to see if the desired extension light is off or if the
associated BLF light is on and the extension number is assigned to a multiappearance telephone/voice terminal.
3.
Press an idle loop button.
ATND light goes on. PA light goes off.
4-17
Page 40

CHAPTER 4. OPERATING PROCEDURES
4.5.Press DXS button for the desired extension number.
Listen for ringback tone. RING light and associated BLF light goes on (if not already
on for multi-appearance telephone/voice terminals). When extension answers, ANS
light goes on. RING light goes off.
At the end of the conversation, press
ANS and ATND lights go off. PA light goes on.
user hangs up.
Attendant Call to an Outside Number
To originate an outgoing call:
1.
Press an idle loop button.
ATND light goes on. PA light goes off.
2.
If Call Detail Recording and Reporting (CDRR) is assigned and calls are to be
charged to an account number, do Steps 3 and 4; if CDRR is not assigned, go to
Step 5.
3.
Press
Listen for dial tone.
4.
Dial CDRR account number access code and Account Charge Number.
Listen for dial tone.
[START] .
[RELEASE] .
BLF light goes off when extension
4-18
If the call is to be placed on a private network and Automatic Alternate Routing (AAR)
5.
and/or Automatic Route Selection (ARS) features are active, do Step 6 to connect a
trunk; if not active, go to Step 7.
6.
Press [START] , and dial AAR/ARS access code.
Listen for dial tone, busy tone, or audio:
Dial tone—trunk is connected. Go to Step 10.
Busy tone—no trunk available, and queuing is not available. Go to Step 13.
Audio (music or recorded announcement)—call is placed in queue because no
outgoing trunks are available. Go to Step 12; do a, b, or c.
Page 41

CHAPTER 4. OPERATING PROCEDURES
7.
If you use direct trunk group selection to
select trunks, do Step 8. If you do not use
direct trunk group selection, go to Step 9.
8.
Press direct trunk group select button.
Listen for dial tone, busy tone, or audio:
Dial tone—trunk is connected. ANS light goes on. Go to Step 10.
Busy tone—no trunk available, and queuing is not available. Go to Step 13.
Audio (music or recorded announcement)—
call is placed in queue because no
outgoing trunks are available. Go to Step 12; do a, b, or c.
9.
[START] , and dial Trunk Group access code.
Press
Listen for dial tone, busy tone, or audio:
Dial tone—trunk is connected. ANS light goes on. Go to Step 10.
Busy tone—no trunk available, and queuing is not available. Go to Step 13.
Audio (music or recorded announcement)—call is placed in queue because no
outgoing trunks are available. Go to Step 12; do a, b, or c.
10.
Dial the outside number.
Listen for ringback tone until called party answers. ANS light goes on at this point if
you used AAR/ARS to connect a trunk.
11.
At the end of the conversation, press [RELEASE] .
ANS and ATND lights go off. PA light goes on.
12. Do a, b, or c.
a.
Stay on the line, and wait for a trunk.
b.
press
[CANCL] to cancel the queued call. Press [START] , and place the call
again.
Press
c.
[RELEASE]
.
ATND and ANS ligths go off. PA light goes on.
13.
Press
d.
Press
[RELEASE] .
[HOLD] to put the queued call on hold.
ATND and ANS lights go off. PA light goes on.
4-19
Page 42

CHAPTER 4. OPERATING PROCEDURES
Attendant Trunk-to-Trunk Connection
You can connect one outside number to another outside number by connecting two outgoing
trunks. The Privacy feature, if available, is automatically disabled so you can monitor calls
for disconnect. A warning tone is applied to the trunk to alert the talking parties before you
can monitor the call. The tone (1/2 second duration) is heard by all parties every 15 seconds
while you remain on the connection.
To originate a call:
1.
Press an idle loop button.
ATND light goes on. PA light goes off.
If Call Detail Recording and Reporting (CDRR) is assigned and calls are to be
2.
charged to an account number, do Steps 3 and 4; if CDRR is not assigned, go to
Step 5.
Press
[START]
3.
.
Listen for dial tone.
Dial CDRR account number access code and Account Charge Number.
4.
Listen for dial tone.
If the call is to be placed on a private network and Automatic Alternate Routing
5.
(AAR)/Automatic Route Selection (ARS) feature is active, do Step 6 to connect a
trunk; if AAR/ARS is not active, go to Step 7.
[START] , and dial AAR/ARS access code.
Press
6.
Listen for dial tone.
If you use direct trunk group selection to select trunks, do Step 8. If you do not use
7.
direct trunk group selection, go to Step 9.
Press direct trunk group select button.
8.
Listen for dial tone. ANS light goes on. Go to Step 10.
[START] , and dial Trunk Group access code.
Press
9.
Listen for dial tone. ANS light goes on.
4-20
Page 43

10.
Dial the outside number.
Listen for ringback tone until called party answers. ANS light goes on at this point if
you used AAR/ARS to connect a trunk.
11.
Ask the called party to wait to be connected.
To connect the second outgoing trunk:
1.
If the call is to be placed on a private network and AAR/ARS feature is active, do
Step 2 to connect a trunk; if AAR/ARS is not active, go to Step 3.
CHAPTER 4. OPERATING PROCEDURES
2.
Press
[START] , and dial AAR/ARS access code.
Listen for dial tone. SPLIT light goes
on. First called party is split from the
connection.
If you use direct trunk group selection to
3.
select trunks, do Step 4. If you do not use
direct trunk group selection, go to Step 5.
4.
Press direct trunk group select button.
Listen for dial tone. ANS light goes on.
SPLIT light goes on. First called party is
separated from the connection. Go to Step 6.
[START] , and dial Trunk Group access code.
Press
5.
Listen for dial tone. ANS light goes on. SPLIT light goes on. First called party is split
from the connection.
6.
Dial the outside number.
Listen for ringback tone until called party answers.
7.
Ask the second called party to wait to be connected.
Press
[HOLD]
8.
.
HOLD and PA lights go on. ATND and SPLIT lights go off. Both outside parties are
connected.
Periodically press the loop button (on which the call is held) to check if both trunks
9.
are still in use.
10.
When both parties have disconnected, press
[CANCL] , [RELEASE] .
Display and ATND lights go off. PA light goes on.
4-21
Page 44

CHAPTER 4. OPERATING FEATURES
Operation of Features
This part of the “Operating Procedures” section provides an alphabetical listing of console
features. These features can be activated or cancelled by pressing the designated buttons in
the attendant control area of the console or by dialing certain access codes.
Alphanumeric Display for Attendant Position
Allows you to identify incoming trunk calls from outside the system, or incoming calls from
extension users inside the system.
Incoming trunk call identification may be displayed by:
◆
Trunk Group
WATS, CCSA
NY, WASH, PHIL (geographic source for tie or Foreign Exchange calls)
◆
Call Type
LDN 1—Telephone directory number of the company
ATND—intercepted incoming call that has been routed to your console.
Incoming calls from extension users are displayed by the calling number.
To check the class of service (COS) of the calling number:
1.
Press
[CLASS]
.
The COS information is displayed.
2.
Press
[CLASS]
.
The COS information is removed. Calling number is displayed.
Alphanumeric Display for Attendant Position in a Distributed Communication
System (DCS) Environment
Allows you to identify incoming DCS calls from a distant system. The trunk group
identification of the tie trunk used for the call is displayed. If the call was routed to your
console because of an intercept condition, the intercept message is displayed.
4-22
Page 45

If the call is an intercept call:
Press
1.
[CLASS]
.
Incoming tie trunk group is displayed to identify the distant system.
CHAPTER 4. OPERATING FEATURES
2.
Press
[CLASS] .
Calling number is displayed if the call is from a voice terminal in a distant system.
Trunk group number is displayed for a trunk call.
3.
Press
[CLASS]
.
The COS is displayed if the call is from a voice terminal in a distant system. Trunk
number within the trunk group is displayed for a trunk call.
If the call is not an intercept call:
Press
1.
[CLASS]
.
Calling number is displayed if the call is from a voice terminal in a distant system.
Trunk group number is displayed for a trunk call.
Press
[CLASS]
2.
.
The COS is displayed if the call is from a voice terminal in a distant system. Trunk
number within the trunk group is displayed for a trunk call.
Attendant Auto-Manual Splitting
Allows you to announce calls privately and identify callers to voice terminal users. This
gives them the option of accepting or not accepting the call.
To extend an incoming call to an idle telephone/voice terminal:
1.
Press DXS button for the desired extension number.
Listen for ringback tone. Caller is separated from the connection. SPLIT, BLF, and
RING lights go on. ANS light goes on.
RING light goes off when terminal user
answers. See Note.
Note:
If you activate Malicious Call Trace while a caller is split from the
console, the split condition is disabled. SPLIT light goes off. The
internal caller hears dial tone. The outside caller is disconnected.
2.
Announce the call.
4-23
Page 46

CHAPTER 4. OPERATING FEATURES
3.
Press
[SPLIT] .
SPLIT light goes off.
4.
Report to the caller.
5.
Press
[RELEASE] .
Display, ATND, and ANS lights go off. PA light goes on. Caller and called party are
connected.
To place an outgoing trunk call at the request of a voice terminal user:
If you use direct trunk group selection to select trunks, press direct trunk group select
button. Listen for dial tone. Go to Step 3.
Press
1.
[START]
Listen for
light goes
Note:
.
dial tone. Voice terminal user is separated from the connection. SPLIT
on. See Note.
If you activate Malicious Call Trace while a caller is split from the
console, the split condition is disabled. SPLIT light goes off. The
internal caller hears dial tone. The outside caller is disconnected.
2.
Dial Trunk Group dial code.
Listen for dial tone. ANS light goes on.
3.
Dial the outside number.
Listen for ringback tone. Called party answers.
4.
Announce the call.
Press
[SPLIT]
5.
.
SPLIT light goes off (3-way connection).
Tell the caller that the called party is on the line.
6.
Press
7.
[RELEASE]
.
Display, ATND, and ANS lights go off. PA light goes on. Caller and called party are
connected.
4-24
Page 47

Attendant Control of Trunk Group Access
CHAPTER 4. OPERATING FEATURES
Allows you to control access to a maximum of
users to the trunk groups under your control
display shows ACTG (Attendant Control of Trunk
To activate Attendant Control of Trunk Group Access:
1.
Press an idle loop button.
ATND light goes on. PA light goes off.
2.
Press
[START]
,
and dial Activate Code.
Listen for dial tone.
If you use direct trunk group selection to select trunks, do Step 4. If you do not use
3.
direct trunk group selection, go to Step 5.
4.
Press direct trunk group select button of trunk group to be controlled.
Listen for tone:
Confirmation tone—you control the trunk group. CONT light goes on four the specified
trunk group. Go to Step 6.
Intercept tone
—trunk group is already controlled by you. Go to Step 6.
12 trunk groups. Calls from voice terminal
are routed to your console. Alphanumeric
Group).
5.
Dial Trunk Group access code of trunk group to be controlled.
Listen for tone:
Confirmation tone—you control the trunk group. CONT light goes on for specified
trunk group.
Intercept tone—
Press
6.
[RELEASE]
trunk group is already controlled by you.
.
ATND light goes off. PA light goes on. CONT light goes on as long as you have
control of the trunk group access.
To cancel Attendant Control of Trunk Group Access:
Press an idle loop button.
1.
ATND light goes on. PA light goes off.
4-25
Page 48

CHAPTER 4. OPERATING FEATURES
2.
[START] , and dial Cancel Code.
Press
Listen for dial tone.
3.
If you use direct trunk group selection to select trunks, do Step 4. If you do not use
direct trunk group selection, go to Step 5.
4.
Press direct trunk group select button of trunk group for which
control is to be
canceled.
Listen for tone:
Confirmation tone—control of trunk group is canceled. CONT light
for the specified
trunk group goes off. Go to Step 6.
Intercept tone—
incorrect dialing or control of trunk group is already
canceled. Go to
Step 6.
5.
Dial Trunk Group access code of trunk group for which control
is to be canceled.
Listen for tone:
Confirmation tone—control of trunk group is canceled. CONT
light for the specified
trunk group goes off.
Intercept tone—
incorrect dialing or control of trunk group is already canceled.
6.
Press
[RELEASE]
.
PA light goes on. ATND light goes off.
Attendant Control of Trunk Group
Access in a Distributed Communication System
(DCS) Environment
Access to trunk groups used at one
distant system by the attendant.
Feature operation is the same as previously described except for the following:
◆
A direct trunk group select button must be assigned on your console and on the
console at the distant system for any trunk groups you are controlling at the distant
system.
◆
When busy or warning levels are exceeded for a trunk group with a direct trunk
group select button assigned, the BUSY or WARN lights on all consoles, in the DCS
with an appearance of that trunk group, go on.
system in a DCS environment may be controlled at a
4-26
Page 49

CHAPTER 4. OPERATING FEATURES
Attendant Direct Extension Selection (DXS) With Busy Lamp Field (BLF)
Allows you to extend calls to voice terminal users by pressing a hundreds group select
button and a tens and units (DXS) button. See Figure 2-6 for the location of these buttons on
the console.
To answer and extend an incoming call using attendant DXS with BLF:
1.
Press
[ANSWER]
Audible ring stops. ATND light goes on. PA light goes off.
2.
Press group select button for the requested hundreds group (first two digits of the
extension number).
Group select light goes on.
3.
Check the BLF to see if the telephone/voice terminal is idle (associated light is off).
.
4.
Press the DXS button for the tens and units digits (second two digits of the extension
number).
Listen for ringback tone. SPLIT, BLF, and RING lights go on. ANS light goes on, and
RING light goes off when called party answers.
Press
5.
[RELEASE]
.
ATND, ANS, and SPLIT lights go off. On BLF, associated light stays on for the
duration of the call.
Extended DXS
Allows you to extend calls to voice terminal users when the system has more than 1800
hundreds pairs (1800 lines). Even though the hundreds group select buttons are inactive on
your console, this feature gives you the capability of extending calls by using the hundreds
group select (SELCT) and display (DISP) buttons and the DXS button.
To answer and extend an incoming call to a voice terminal using extended DXS:
Press [ANSWER] .
1.
Audible ring stops. ATND light goes on. SELCT light lights. PA light goes off.
4-27
Page 50

CHAPTER 4. OPERATING FEATURES
2.
Press [SELECT] , and dial the first two digits of the extension number (hundreds group).
SELCT light goes off. Lamps to the left of the DXS buttons light for all busy voice
terminals in the hundreds group selected. Alphanumeric display shows the hundreds
group dialed followed by two asterisks (example: 11** for extension number 1121).
3.
Check the BLF to see if the telephone/voice terminal is idle (associated light is off).
4.
Press the DXS button for the tens and units digits.
Listen for ringback tone. SPLIT, BLF, and RING lights go on. Caller is split from the
connection. Alphanumeric display shows a repeat of the display (hundreds group
followed by two asterisks). ANS light goes on, and
terminal user answers.
[ANSWER] .
Press
5.
RING light goes off when voice
ATND, ANS, and SPLIT lights go off. PA light goes
on. Associated BLF light stays
on for the duration of the call.
press
[DISP]
If it is necessary to display the last hundreds group selected,
.
Attendant Interposition Calling and Transfer
Allows you to place calls to, and receive calls from, other attendants. If you are in a Tenant
Services environment, you can only place calls to attendants in the same partition or in
partition 0 (zero).
When you are called, and if you are busy on another call, the interposition call is held waiting
in a priority queue. The PR (priority) light on your console lights. When your console
becomes available, the interposition call takes precedence over the other calls in queue, and
is switched to the first idle loop. You can make interposition calls when no call is connected
to your console, or when a call is connected and the caller wishes to have the call
transferred to another attendant.
To consult with another attendant when you have a call on your console and you want to transfer the
call:
Press
1.
[START]
Listen for dial tone. SPLIT light goes on. Caller is separated from the connection.
Display shows incoming call identification.
.
4-28
2.
Dial Interposition Calling access code.
Listen for dial tone.
Page 51

3. Dial Console Position Number.
Listen for ringback tone. RING light goes on.
CHAPTER 4. OPERATING FEATURES
4.
5.
Consult with the other attendant.
[RELEASE] .
Press
Display, ATND, and SPLIT lights go off. You are released, and caller is connected to
the other attendant console.
To consult with another attendant when you do not have a call on your console:
1.
Press an idle loop button.
ATND light goes on. PA light goes off.
Press
2.
[START]
.
Listen for dial tone.
Dial Interposition Calling access code.
3.
Listen for dial tone.
Dial Console Position Number.
4.
Listen for ringback tone.
5.
Consult with the other attendant.
Press
6.
[RELEASE]
.
ATND and ANS lights go off. PA light goes on. You and the other attendant are
released from the call.
To answer an interposition call:
When you are called by another attendant, ATND light flashes. PR light goes on (priority
call). You hear an audible ring. Alphanumeric display shows
INTP . If you are the controlling
attendant on a malicious call trace, you will not receive a display. Trace information is
displayed.
1.
Press
[ANSWER]
.
Audible ring stops. ATND light goes on. PR light goes off.
2.
Consult with the calling attendant.
If a call is transferred, display changes from INTP to incoming call identification.
4-29
Page 52

CHAPTER 4. OPERATING FEATURES
Attendant Release Loop (ARL) Timed-Reminder Interval Change
Allows you to change the ARL timed-reminder interval. The interval can be set, using the
System Management Terminal (SMT) (System 85) or the Manager II terminal (Generic 2),
from 2 through 98 seconds. You can change the length of the interval in 2-second
increments.
To change the ARL timed-reminder interval:
1.
Press an idle loop button.
ATND light goes on. PA light goes off.
2.
Press
[START]
Listen for dial tone.
Dial Timed-Reminder Interval Change Code.
3.
.
Listen for dial tone. Display shows the current timed-reminder interval.
4.
If interval is less than 10 seconds, dial new timed-reminder interval
(leading zero
must be entered).
Listen for confirmation tone. Display shows the new timed-reminder interval.
Press
5.
[RELEASE]
.
Display and ATND lights go off. PA light goes on.
Automatic Call Distribution (ACD)—Attendant
Attendant Release Loop (ARL) feature is disabled on attendant-extended calls to voice
terminals with coverage path assigned where the coverage criteria applies to the call.
When ACD is the coverage point and the attendant does not release a call within 4 seconds,
the attendant is connected to an idle agent position (with the proper connect message). The
call will not queue to the split if all positions are busy. Attendant Call Waiting will wait on the
supervisor position (position 0). If the attendant releases a call within 4 seconds, the call is
placed in queue.
An attendant may be designated as a system supervisor. The system supervisor can
activate/deactivate Call Forwarding on the console for any split (group) of ACD agents.
4-30
Page 53

CHAPTER 4. OPERATING FEATURES
Automatic Circuit Assurance (ACA)
Provides you with better service through early detection of faulty trunks. You can activate
ACA by dialing the ACA Start Code. Once you have activated ACA; the system begins to
measure the duration of calls on the trunk groups assigned to the ACA feature. If you are in
a Tenant Services environment and you are an attendant in any partition other than partition
0 (zero), you are not allowed to activate, deactivate, or answer ACA referral calls.
When a large number of very short calls are made, due perhaps to callers hanging up
because of a noisy trunk, a referral call is made to your console. Alphanumeric display
shows
When a trunk remains busy for a long period, a referral call is made to your console.
Alphanumeric display shows
You can immediately identify the faulty trunk by pressing during a referral call.
To activate ACA:
TBLS (trouble short holding).
TBLL (trouble long holding).
TRK
ID
1.
Press an idle loop button.
ATND light goes on. PA light goes off.
2.
Press
Listen for dial tone.
3.
Dial ACA Start Code.
Listen for confirmation
4.
Press
ATND light goes off. PA light goes on.
To cancel ACA:
1.
Press an idle loop button.
ATND light goes on. PA light goes off.
2.
Press
Listen for dial tone.
[START] .
[RELEASE]
[START]
.
tone.
.
3.
Dial ACA Stop Code.
Listen for confirmation tone.
4-31
Page 54

CHAPTER 4. OPERATING FEATURES
4. Press
[START]
.
ATND light goes off. PA light goes on.
To answer a referral call and identify the faulty trunk using TRK ID button:
1.
Press
[ANSWER]
.
Audible ring stops. ATND light goes on.
2.
Press
TRK
ID
Display shows Trunk Dial access code.
3.
Press
TRK
ID
Display shows the trunk number.
4.
Press
[RELEASE]
Display and ATND lights go off. PA light goes on.
question to someone who can test the trunk. Remove
.
Refer the trunk number in
the faulty trunk from service
using the Trunk Verification by Voice Terminal feature.
Automatic Circuit Assurance (ACA) in a Distributed Communication System (DCS)
Environment
In a DCS environment, all consoles may be at one system location. When an attendant at
this location activates or deactivates the ACA feature, the feature is activated or deactivated
for all systems in the DCS. Each system in a DCS can arrange for referral calls to be routed
to the attendant at the” Centralized Attendant Service (CAS) main location when CAS is active
in the system. In a DCS with multiple systems (each system having attendants), any
attendant can activate or deactivate ACA for the local system and at customer option receive
referral calls. Operation of ACA in a DCS environment is similar to ACA in a non-DCS
environment except that the initial alphanumeric display is different. The display initially
shows the trunk dial access code of the tie trunk used for calling between the systems.
When the TRK ID button is pressed, the faulty trunk data is displayed.
Automatic Route Selection (ARS) (With Time of Day Routing)
Provides routing of long distance calls over the most economical route available based on
the time of day and day of week.
The ARS provides you with three different preestablished plans of call routing. You can place
any one of these three plans in operation by pressing the PLAN button or by dialing an ARS
Network Change Code.
4-32
Page 55

CHAPTER 4. OPERATING FEATURES
Display the ARS plan first to see what the current route plan is. PLAN light is always lighted
when the ARS plan is under your control.
To display ARS plan:
1.
Press, and hold [PLAN] .
Display shows current route plan.
2.
Release
Display goes off.
To place ARS route plan under your control or to change ARS route plan:
1.
Press an idle loop button.
ATND
Press
2.
Listen for dial tone. Display shows current route plan.
Dial 1, 2, or 3.
3.
Listen for confirmation tone.
Display shows
4.
Press
Display and ATND lights go off. PA light goes on.
To return ARS route plan to automatic control:
[PLAN]
.
light goes on.
[PLAN]
, or
[START]
A1, A2,
[RELEASE]
.
PA
light goes off.
. Dial ARS Network Change Code.
or
A3.
The letter A indicates attendant control.
1.
Press an idle loop button.
ATND light goes on. PA light goes off.
2.
3.
[PLAN] , or [START] . Dial ARS Network Change Code.
Press
Listen for dial tone. Display shows current route plan.
Dial 0 .
❑
Listen for confirmation tone.
ARS returns to automatic control. Display shows 1, 2, or 3. PLAN light goes off.
4-33
Page 56

CHAPTER 4. OPERATING FEATURES
4. Press
[RELEASE]
.
Display and ATND lights go off. PA light goes on.
Busy Verification of Lines
Allows you to check a busy extension number to determine if the extension is really busy or
appears busy because of a trouble condition.
terminals, the verification attempt is directed toward the in-use appearance on the primary
voice terminal associated with the extension. Primary means the first voice terminal to which
an extension number is assigned.
checking busy lines.
When you are in a Tenant Services environment, you can only verify
When Privacy is provided, you are prevented from
extensions in your partition or partition 0 (zero). If you attempt to verify extensions in other
partitions, intercept tone is returned.
To busy verify an extension number of a single-line telephone/voice terminal:
1.
Place the caller requesting verification on hold.
2.
Press an idle loop button.
ATND light goes on. PA light goes off.
3.
Press
[VERFY] .
On multi-appearance telephone/voice
VERFY light goes on.
4.
Press appropriate hundreds group select button.
Group select light goes on.
Press DXS button for the extension
5.
number.
Listen for tone:
Warning tone—starts before connection to a busy extension to ensure user privacy.
Extension is busy if you hear conversation after the tone. Extension may be out of
order or holding a call if you do not hear conversation after the tone.
Ringback tone—extension is idle and is being rung. Busy verification is canceled.
VERFY light goes off.
Reorder tone— BUSY light goes on. Feature is temporarily denied because a call is
being held or the telephone/voice terminal is in some other transient state.
Intercept tone
—feature is permanently denied, or the extension number is a Vector
Directory Number (VDN).
4-34
Page 57

CHAPTER 4. OPERATING FEATURES
6.
Report to the caller.
Press
7.
[RELEASE]
.
ATND and VERFY lights go off. PA light goes on.
To busy verify an extension number of a multi-appearance telephone/voice terminal:
1.
Put the caller requesting verification on hold.
Press an idle loop button.
2.
ATND light goes on. PA light goes off.
Press appropriate hundreds group select button.
3.
Group select light goes on.
4.
Press the DXS button for the extension number.
Listen for tone:
Warning tone—all appearances are busy (extension busy). Tone starts before
connection to the busy in-use appearance to ensure user privacy. Extension is busy
if you hear conversation after the tone. Extension may be out of order or holding a
call if you do not hear conversation after the tone.
3-Burst ringing—one or more but not all appearances of the extension are busy
(extension active), and an idle appearance is receiving priority ringing.
Ringback tone—all appearances of the extension are idle, and an idle appearance is
being rung.
Reorder tone— BUSY light goes on. Feature is temporarily denied
Intercept tone
—feature is permanently denied.
Busy Verification of Lines in a Distributed Communication System (DCS)
Environment
Allows you to check a busy extension number within the DCS cluster to determine if the
extension is really busy or appears busy because of a trouble condition.
To busy verify an extension number of a single-line telephone/voice terminal in a local or distant
system using 5-digit dialing:
Put the caller requesting verification on hold.
1.
4-35
Page 58

CHAPTER 4. OPERATING FEATURES
Press an idle loop button.
2.
ATND light goes on. PA light goes off.
Press
[VERFY]
3.
.
VERFY light goes on.
Press
[START]
4.
.
Listen for dial tone.
Dial the 5-digit extension number,
5.
Listen for tone:
Warning tone—starts before connection to a busy extension to ensure user privacy.
Extension is busy if you hear conversation after the tone. Extension may be out of
order if you do not hear conversation after the tone.
station, the attendant may hear music and can busy verify.
If station is on hold by another
Ringback tone—
extension is idle and is being rung. Busy verification is canceled.
VERFY light goes off.
Reorder tone— BUSY light goes on. Feature is temporarily denied because a call is
being held or the telephone/voice terminal is in some other transient state.
Intercept tone—feature is permanently denied.
Report to the caller.
6.
[RELEASE] .
Press
7.
ATND and VERFY lights go off. PA light goes on.
To busy verify an extension number of a multi-appearance telephone/voice terminal in a local or
distant system using 5-digit dialing:
1.
Place the caller on hold.
Press an idIe loop button.
2.
ATND light goes on. PA light goes off.
[VERFY] .
Press
3.
VERFY light goes on.
4-36
Press
4.
[START]
Listen for dial tone.
.
Page 59

CHAPTER 4. OPERATING FEATURES
5.
Dial the 5-digit extension number.
Listen for tone:
Warning tone—all appearances are busy (extension busy). Tone starts before
connection to the busy in-use appearance to ensure user privacy. Extension is busy
if you hear conversation after the tone. Extension may be out of order or holding a
call if you do not hear conversation after the tone.
3-Burst ringing—one or more but not all appearances of the extension are busy
(extension active), and an idle appearance is receiving priority ringing.
Ringback tone—all appearances of the extension are idle, and an idle appearance is
being rung.
Reorder tone— BUSY light goes on. Feature is temporarily denied.
Intercept tone—
To busy verify an extension number of a single-line telephone/voice terminal in a distant system
using a specific route (tie trunk access code and extension number):
1.
Put the caller on hold.
2.
Press
[VERFY] .
feature is permanently denied.
VERFY light goes on.
3.
Press
[START] .
Listen for dial tone.
4.
Dial the tie trunk access code for the distant system.
5.
Press
[VERFY] .
Listen for recall dial tone (three short bursts of tone followed by dial tone).
Dial the 5-digit extension number.
6.
Listen for tone:
Warning tone—starts before connection to a busy extension to ensure user privacy.
Extension is busy if you hear conversation after the tone. Extension may be out of
order or holding a call if you do not hear conversation after the tone.
Ringback tone—
extension is idle and is being rung.
VERFY light goes off.
Busy verification is canceled.
4-37
Page 60

CHAPTER 4. OPERATING FEATURES
Reorder tone— BUSY light goes on. Feature is temporarily denied because a call is
being held or the teiephone/voice terminal is in some other transient state.
Intercept tone
7.
Report to the caller.
8.
Press
[RELEASE]
—feature is permanently denied.
.
ATND and VERFY lights go off. PA light goes on.
To busy verify an extension number of a multi-appearance telephone/voice terminal in a distant
system using a specific route (tie trunk access code and extension number):.
1.
Put the caller on hold.
[VERFY] .
Press
2.
VERFY light goes on.
[START] .
Press
3.
Listen for dial tone.
Dial the tie trunk access code for the distant system.
4.
5.
Press
[VERFY] .
Listen for recall dial tone (three short bursts of tone followed by dial tone).
4-38
Dial the 5-digit extension number.
6.
Listen for tone:
Warning, tone—
all appearances are busy (extension busy). Tone starts before
connection to the busy in-use appearance to ensure user privacy. Extension is busy
if you hear conversation after the tone. Extension may be out of order or holding a
call if you do not hear conversation after the tone.
3-Burst ringing—one or more but not all appearances of the extension are busy
(extension active), and an idle appearance is receiving priority alerting.
Ringback tone—
all appearances of the extension are idle, and an idle appearance is
being rung.
Reorder tone— BUSY light goes on. Feature is temporarily denied.
Intercept tone—
feature is permanently denied.
Page 61

CHAPTER 4. OPERATING FEATURES
Call Forwarding-Follow Me
Allows you to redirect calls for an unrestricted extension number to another unrestricted
extension number.
To activate Call Forwarding—Follow Me:
1.
Press an idle loop button.
ATND light goes on. PA light goes off.
Press
[START]
2.
Listen for dial tone.
Dial Call Forwarding Activate access code.
3.
Listen for dial tone.
.
4.
Press the appropriate hundreds group select button.
Group select light goes on.
Press DXS button for the extension number from which calls are to be forwarded.
5.
Listen for dial tone.
Press the appropriate hundreds group select button.
6.
Group select light goes on.
7.
Press DXS button for the extension number to which calls are to be forwarded.
Listen for tone:
Confirmation tone—Call Forwarding is activated.
Intercept tone
Press
8.
[RELEASE]
—called extension number already has Call Forwarding activated.
.
ATND light goes off. PA light
To cancel Call Forwarding—Follow Me:
goes on.
1.
Press an idle loop button.
ATND light goes on. PA light
goes off.
4-39
Page 62

CHAPTER 4. OPERATING FEATURES
2.
Dial Call Forwarding Cancel Code.
Listen for dial tone.
Press the appropriate hundreds group select button.
3.
Group select light goes on.
Press DXS button of the extension number for which you have been forwarding calls.
4.
Listen for confirmation tone. Call forwarding is canceled.
[RELEASE] .
Press
5.
ATND light goes off. PA light goes on.
Call Forwarding—
Busy and Don’t Answer
Allows you to redirect calls for any unrestricted extension number to another unrestricted
extension number when the extension number is busy or does not answer.
To activate Call Forwarding-Busy and Don’t Answer
1.
Press an idle loop button.
ATND light goes on. PA light goes off.
2.
Press
[START]
.
Listen for dial tone.
Dial Call Forwarding
3.
—Busy and Don’t Answer Activate access code.
Listen for dial tone.
Press the appropriate hundreds group select button.
4.
Group select light goes on.
4-40
Page 63

CHAPTER 4. OPERATING FEATURES
Press DXS button for the extension number from which calls are to be forwarded.
5.
Listen for dial tone.
Press the appropriate hundreds group select button.
6.
Group select light goes on.
7.
Press DXS button for the extension number to which calls are to be forwarded.
Listen for tone:
Confirmation tone—Call Forwarding
Intercept tone—
8.
Press
[RELEASE]
called extension number already has Call Forwarding activated.
.
—Busy and Don’t Answer is activated.
ATND light goes off. PA light goes on.
To cancel Call Forwarding-Busy and Don’t Answer
1.
Press an idle loop button.
ATND light goes on. PA light goes off.
2.
Dial Call Forwarding cancel code.
Listen for dial tone.
Press the appropriate hundreds group select button.
3.
Group select light goes on.
4.
Press DXS button of the extension number for which you have been forwarding calls. ,
Listen for confirmation tone. Call Forwarding is canceled.
Press
5.
[RELEASE]
.
ATND light goes off. PA light goes on.
Call Forwarding
—Follow Me and Call Forwarding Busy and Don’t Answer in a
Distributed Communication System (DCS) Environment
Feature operation is the same as in a non-DCS environment except that when you activate
call forwarding for an extension number at a distant system, the forwarded to extension is
not checked for restrictions unless it is in the same distant system as the forwarding
extension number.
4-41
Page 64

CHAPTER 4. OPERATING FEATURES
Code Calling Access
Allows you access to loudspeaker paging equipment by dialing an access code and a Called
Party Code. The called party hears the Electronic Chime Code.
To access and page:
1.
Press an idle loop button.
ATND light goes on. PA light goes off.
Press
2.
[START]
Listen for dial tone.
Dial Code Calling access code.
3.
Listen for tone:
.
Dial tone— ANS light goes on. Do Steps 4, 5, and 6.
Busy tone—code calling circuit is busy. Go to Step 7.
4.
Dial the Called Party Code.
Listen for confirmation tone. Then listen for the Called Party
three times. Then listen for ringback tone (System 85 only).
5.
If an answer is required, stay on the line until the called party is
[RELEASE] .
Press
6.
ANS and ATND lights go off. PA light goes on.
7.
Press
[RELEASE] .
ATND light goes off. PA light goes on.
To access and page for a caller who is on the line:
1.
Ask the caller to wait for an answer.
2.
If Call Detail Recording and Reporting (CDRR) is assigned and calls are to be
charged to an account number, do Steps 3 and 4; if CD-RR is not assigned, press
[START] , listen for dial tone, and go to Step 5.
Code to be repeated
connected.
4-42
3.
Press
[START] .
Listen for dial tone. SPLIT light goes on. Caller is separated from the connection.
Page 65

CHAPTER 4. OPERATING FEATURES
4.
Dial CDRR account number access code and Account Charge Number.
Listen for dial tone.
5.
Dial Code Calling access code.
Listen for tone:
Dial tone— ANS light goes on. Do Steps 6 and 7.
Busy tone—code calling circuit is busy. Go to Step 8.
6.
Dial Called Party Code.
Listen for confirmation tone. Then listen for the Called Party Code to be repeated
three times. Then listen for ringback tone.
Press
[HOLD] .
7.
Display and ATND lights go off. HOLD and PA lights go on. Caller is connected to
the paged party.
Remove the caller from hold, and report the busy condition.
8.
Press
9.
[RELEASE]
.
Display and ATND lights go off. PA light goes on.
Conference—Attendant 6-Party
Allows you to arrange a conference call for up to six conferees including voice terminal users
inside the system and individuals outside the system.
To stay within FCC requirements, the sum of the number of Central Office (CO) and Direct
Inward Dialing (DID) trunks connected in an Attendant Conference should not be more than
two. The number of tie trunks that may be added in an Attendant Conference is not
restricted.
Only one CONF button per console is provided, but several conference circuits may be
provided, depending on the size of your system.
To start a new conference, you must release from the conference on which you are active, or
you can place the active conference on hold. The BUSY light above the CONF button goes
on when all conference circuits are busy.
The CONT light above the CONF button goes on each time you press the CONF button. You
may add conferees even though the CONF BUSY light is on. (Specific conference may not
yet have six conferees active.) When you add a sixth conferee to a conference, the WARN
light above the CONF button goes on.
4-43
Page 66

CHAPTER 4. OPERATING FEATURES
To arrange a conference requested by a telephone/voice terminal user:
1.
Acknowledge the request, and verify that the CONF BUSY light is off. If you are
requested to add an additional conferee to an existing conference, go to Step 3.
2.
Press
[CONF]
.
Associated CONT light goes on. Display light goes off. Voice
connected to the conference circuit.
3.
To add each conferee (voice terminal user), do a, b, and c. To add
go to Step 1 under “To add an outside party”.
Press the appropriate hundreds group select button,
a.
Group select light goes on.
b. Check the BLF to see if desired extension is idle (associated
Press DXS button for the desired extension number.
c.
Listen for ringback tone. SPLIT light, associated BLF and RING lights go on.
When called user answers, ANS light goes on. RING light goes off.
Announce the conference, and do a or b.
4.
To add the conferee, press [CONF] .
a.
ANS and SPLIT lights go off.
b.
If unable to add the conferee, press [CANCL] .
Extension is released. You have reestablished a connection with the
conference. Advise the conferees.
terminal user is
an outside party,
light is off).
To add an outside party:
1.
If you want to add an outside party and if Call Detail Recording and Reporting
(CDRR) is assigned and calls are to be charged to an account number, do Steps 2
and 3; if (CDRR) is not assigned, go to Step 4.
[START] .
Press
2.
Listen for dial tone. SPLIT light goes on. Other conferees are separated from the
connection.
Dial CDRR account number access code and Account Charge Number.
3.
Listen for dial tone.
4-44
Page 67

CHAPTER 4. OPERATING FEATURES
4.
If the call is to be placed on a private network and Automatic Alternate Routing
(AAR)/Automatic Route Selection (ARS) feature is active, do Step 5 to connect a
trunk; if AAR/ARS is not active, go to Step 6.
[START] , and dial AAR/ARS access code.
Press
5.
Listen for dial tone. SPLIT light goes on. Go to Step 9.
6.
If you use direct trunk group selection to select trunks, do Step 7. If you do not use
direct trunk group selection, go to Step 8.
Press direct trunk group select button.
7.
Listen for dial tone. ANS light goes on. Go to Step 9.
8.
[START] , and dial Trunk Group access code.
Press
Listen for dial tone. ANS light goes on. SPLIT light goes on. Other conferees are
separated from the connection.
9.
Dial the outside number.
Listen for ringback tone until called party answers. If you used AAR/ARS to connect
a trunk, ANS light goes on.
Announce the conference to the called party, and do a or b.
10.
To add the conferee, press [CONF] .
a.
ANS and SPLIT lights go off.
b. If unable to add the conferee, press
[CANCL] .
Called party is released. You have established a connection with the
conference. ‘Advise the conferees.
To release from the conference, press [RELEASE] . However,
11.
sure one conferee is an extension number user and is
before releasing, make
local to the attendant.
Otherwise outside parties will be disconnected.
If you are recalled by the conference, the ATND light flashes. You hear an audible
12.
ring. Press the loop button below the flashing ATND light.
ATND light goes on. Audible ring stops. Display shows CONF.
13.
Give information or assistance as necessary.
4-45
Page 68

CHAPTER 4. OPERATING FEATURES
To arrange a conference requested by an outside party:
1.
Acknowledge the request for a conference, and verify that conference BUSY light is
off. (BUSY light is on only when all conference circuits are busy.)
[CONF] .
Press
2.
Associated CONT light goes on. Display light goes off.
If Call Detail Recording and Reporting (CDRR) is assigned and calls are to be
3.
charged to an account number, do Steps 4 and 5; if CDRR is not assigned, go to
Step 6.
4.
Press
[START]
.
Listen for dial tone.
Dial CDRR account
5.
SPLIT light goes on. Caller is separated from the connection.
number access code and Account Charge Number.
Listen for dial tone.
If an outside party is the first added-on conferee, you do not have to activate CDRR
6.
again. The added-on trunk will be automatically recorded. Do a, b, or c to connect a
trunk:
a.
Dial AAR/ARS access code.
Listen for dial tone.
b.
Press direct trunk group select button.
Listen for dial tone. ANS light goes on.
c.
Press [START] , and dial Trunk Group access code.
Listen for dial tone. ANS light goes on.
Other conferee is separated from the
connection.
Dial the outside number.
7.
Listen for ringback tone until called party answers. If you used AAR/ARS to connect
a trunk, ANS light goes on.
4-46
Announce the conference, and do a or b.
8.
To add the conferee, press [CONF] .
a.
ANS and SPLIT lights go off.
Page 69

CHAPTER 4. OPERATING FEATURES
b.
If unable to add the conferee, press
Called party is released.
conference. Advise the conferees.
To add voice terminal users as requested, press the appropriate group select button
9.
and the DXS button for the desired extension number.
10.
To release from the conference, press
sure one conferee is an extension number user and is local to the attendant.
Otherwise, outside parties will be disconnected.
When a conference recall occurs after. you have released, press loop button
11.
associated with the flashing ATND light.
ATND light goes on. Audible ring stops. Display shows CONF .
Give information or assistance as necessary.
12.
To place a conference on hold:
1.
Press
[HOLD]
.
ATND and conference CONT lights go off. PA and HOLD lights go on.
To reenter a conference on hold, press loop button associated
2.
conference.
[CANCL] .
You have reestablished a connection to the
[RELEASE] . However, before releasing, make
with the held
ATND and conference CONT lights go on. PA and HOLD lights go off.
If you are recalled by the conference that is on hold, the HOLD light flashes. You
3.
hear timed-reminder tone. Press the loop button below the flashing HOLD light.
Ringing tone stops. ATND and conference CONT lights go on. PA and HOLD lights
go off.
To handle an outgoing conference call placed in queue:
If queuing is available and all outgoing trunks are in use, the system places the conference
call in queue. You hear audio (music or recorded announcement).
To inform conferees that the trunks are busy, press [SPLIT] .
1.
SPLIT light goes off. Audio stops. Connection is reestablished with conferees.
2.
Give report.
3.
To cancel the queued call, press
[CANCL] .
4-47
Page 70

CHAPTER 4. OPERATING FEATURES
4.
To be reconnected to the conference, press [SPLIT] .
SPLIT light goes on.
To release from the conference, press
5.
[RELEASE]. However, before releasing, make
sure one conferee is an extension number user and is local to the attendant.
Otherwise outside parties will be disconnected.
6.
If you are recalled by the conference, the ATND light flashes. You hear an audible
ring. Press the loop button below the flashing ATND light.
ATND light goes on. Audible ring stops. Display shows
7.
Give information or assistance as necessary.
To arrange a conference requested by an outside party:
1.
Acknowledge the request for a conference, and verify that conference BUSY light is
off. (BUSY light is on only when all conference circuits are busy.)
2.
Press
[CONF] .
Associated CONT light goes on. Display light goes off.
If CDRR is assigned and calls are to be charged to an account number, do Steps 4
3.
and 5; if CDRR is not assigned, go to Step 6.
4.
Press
[START]
Listen for dial tone.
.
SPLIT light goes on. Caller is separated from the connection.
CONF.
4-48
5.
Dial CDRR account
number access code and Account Charge Number.
Listen for dial tone.
If an outside party is the first added-on conferee, you do not have to activate CDRR
6.
again. The added-on trunk will be automatically recorded. Do a, b, or c to connect a
trunk:
Dial AAR/ARS access code.
a.
Listen for dial tone.
b.
Press direct trunk group select button.
Listen for dial tone. ANS light goes on.
Press [START] , and dial Trunk Group access code.
c.
Listen for dial tone. ANS light goes on. Other conferee is separated from the
connection.
Page 71

CHAPTER 4. OPERATING FEATURES
7.
Dial the outside number.
Listen for ringback tone until called party answers. If you used AAR/ARS to connect
a trunk, ANS light goes on.
Announce the conference, and do a or b.
8.
To add the conferee, press [CONF] .
a.
ANS and SPLIT lights go off.
If unable to add the conferee, press
b.
Called party is released.
conference. Advise the conferees.
9.
To add
voice terminal users as requested, press the appropriate group select button
and the DXS button for the desired extension number.
To release from the conference, press
10.
sure one conferee is an extension number user and is local to the attendant.
Otherwise, outside parties will be disconnected.
11.
When a conference recall occurs after you have released, press loop button
associated with the flashing ATND light.
ATND light goes on. Audible ring stops. Display shows
Give information or assistance as necessary.
12.
To place a conference on hold:
1.
Press
[HOLD]
.
ATND and conference CONT lights go off. PA and HOLD lights go on.
To reenter a conference on hold, press loop button associated
2.
conference.
[CANCL] .
You have reestablished a connection to the
[RELEASE] .
However, before releasing, make
CONF.
with the held
ATND and conference CONT lights go on. PA and HOLD lights go off.
If you are recalled by the conference that is on hold, the HOLD light flashes. You
3.
hear timed-reminder tone. Press the loop button below the flashing HOLD light.
Ringing tone stops. ATND and conference CONT lights go on. PA and HOLD lights
go off.
4-49
Page 72

CHAPTER 4. OPERATING FEATURES
To handle an outgoing conference call placed in queue:
If queuing is available and all outgoing trunks are in use, the system places the conference
call in queue. You hear audio (music or recorded announcement).
1.
To inform conferees that the trunks are busy, press [SPLIT] .
SPLIT light goes off. Audio stops. Connection is reestablished with conferees.
2.
Give report.
To cancel the queued call, press
3.
4.
To be reconnected to the conference, press
[CANCL] .
[SPLIT] .
SPLIT light goes on.
Distributed Communication System (DCS)
Provides the ability to connect two or more switching systems together to operate as one
large switching system. Each individual switching system is referred to as a node. The DCS
environment consists of all the different nodes connected together.
Feature transparency is provided for a limited number of attendant, voice terminal, and
Applications Processor (AP) features. Feature transparency means that the use of the feature
is the same whether it is being activated within a node (system) or between nodes (systems).
The following attendant features are transparent in a DCS environment:
◆
Alphanumeric display for attendant position
◆
Attendant control of trunk group access
◆
Automatic circuit assurance (not totally transparent—ACA call from a remote switch
initially displays the trunk access code of trunk connecting the two switches; then the
TRK ID button is used to display failing trunk data)
◆
Busy verification of lines
◆
Call forwarding—follow me
◆
Call forwarding
◆
Trunk verification by attendant.
—busy and don’t answer
Operation of the features listed is described at the end of the specific feature operation
under “Operating Procedures” in this section.
4-50
Page 73

CHAPTER 4. OPERATING FEATURES
Enhanced Uniform Call Distribution (EUCD)—Attendant
Attendant Release Loop (ARL) feature is disabled on attendant-extended calls to
telephones/voice terminals with coverage path assigned where the coverage criteria applies
to the call.
When EUCD is the coverage point and the attendant does not release a call within 4
seconds, the attendant will be connected to an idle agent position (with the proper connect
message). The call will not queue to the split if all positions are busy. Attendant Call Waiting
will wait on the supervisor position (position 0). If attendant releases within 4 seconds, the
call will queue.
An attendant may be
activate/deactivate Call
Facilities Restriction
Allow you to determine
designated as a
Forwarding on the
Levels (FRLs)
the
numbers. You can activate
To activate FRL:
1.
Press
[AFRL]
.
AFRL light goes
To deactivate:
1.
Press
AFRL light goes
[AFRL]
on.
.
off .
system supervisor. The system supervisor
console for any split (group) of EUCD agents.
trunk groups that can be used by callers from specific extension
alternate FRLs to change the calling privileges of a user.
can
Intercept Treatment
Allows you to provide information and assistance to callers on all incoming calls that cannot
be completed as dialed from public or private networks.
Calls that cannot be completed may be routed to your console. You hear an audible ring, and
the alphanumeric display identifies the type of intercept call (wrong number, recent
disconnect, restricted). The ATND light flashes, and the PA light goes off.
To answer
1.
Press
[ANSWER]
.
Audible ring stops. ATND light goes on.
4-51
Page 74

CHAPTER 4. OPERATING FEATURES
2.
Consult with the caller.
3.
Attendant diversion to recording:
[RELEASE] .
Press
Display and ATND lights go off.
PA light goes on.
This option, which is part of the Intercept Treatment feature, allows you to divert all calls
routed to your console to the recording specified for the 60-second special recording.
To activate diversion of all incoming calls:
1.
Press an idle loop.
[START] .
Press
2.
Listen for dial tone.
Dial the feature access code.
3.
Listen for tone:
Confirmation tone—all incoming calls are diverted to the recording. Alphanumeric
display shows customer-designated letters assigned to indicate feature activation.
Intercept tone—you cannot activate this feature.
If you place outgoing calls during diversion, the display is removed. Dial the feature
4.
access code to restore the display.
To cancel diversion of all incoming calls:
1.
Press an idle loop.
2.
Press [START] .
Listen for dial tone.
3.
Dial the feature cancellation code.
Listen for confirmation tone. Display is removed. Your console may now receive
calls.
4-52
Page 75

CHAPTER 4. OPERATING FEATURES
Loudspeaker Paging Access
Allows you access to loudspeaker paging equipment. You can page individuals by using an
appropriate page zone button, if you have page zone buttons assigned on your console, or
by dialing an access code.
You can get an answer when you dial an access code. When you use an
must dial a Paging Zone Number and an Answer-Back Channel Number.
Channel Numbers that you should dial are listed as follows:
Answer-back not required—Channel number 0
Answer-back for priority paging—Channel number 1
You cannot get an answer-back when you use a page button.
access code, you
The Answer-Back
Answer-back for paging
—Channels 2 through 9.
The system provides 18 paging ports. You can access an all-paging zone to page throughout
the entire system.
You can access zones 1 through 6 by using a page button. Zones 7
through 18 can be accessed by dialing an access code.
To page using a page button:
1.
Press, and hold appropriate page zone button.
Buttons are labeled ZONE plus the
number; for example, ZONE 1, ZONE 2, up through ZONE 6.
Page light for selected zone goes on. All-zone light (if provided) also goes on. If
PAGE ALL (all-zone button) is pressed, all page lights go on.
2.
Speak into handset to transmit announcement.
3.
Release the page button.
Page light(s) goes off. All-zone light (if provided) also goes off.
To page by dialing an access code and waiting for an answer
1.
Press an idle loop button.
ATND light goes on. PA light goes off.
2.
Press
[START] .
Listen for dial tone.
Dial Loudspeaker Paging access code.
3.
Listen for dial tone.
4-53
Page 76

CHAPTER 4. OPERATING FEATURES
4.
Dial Paging Zone Number and appropriate Answer-Back Channel Number.
Listen for tone:
Confirmation tone—paging circuit is available. Answer-back channel is idle. RING
light goes on.
Busy tone—
answer-back channel is busy. Press
[CANCL] , and repeat the procedure
using a different Answer-Back Channel Number.
5.
Speak into handset to transmit announcement. Announce the Answer-Back Channel
Number. If answer-back is requested, go to Step 6. If answer-back is not required,
go to Step 10.
[HOLD] .
Press
6.
HOLD and PA lights go on. ATND light goes off.
Listen for ringback tone.
7.
HOLD light flashes. Paged party answers.
Press loop button below the flashing HOLD light.
8.
ATND light goes on. PA, HOLD, and RING lights go off. You are connected to the
paged party.
Talk with the paged party.
9.
Press
[RELEASE] .
10.
PA light goes on. ATND light goes off.
To connect a caller to a paged party:
Press [START] , and dial Loudspeaker Paging access code.
1.
Listen for dial tone. Caller is separated from the connection.
Dial Paging Zone Number and Paging Answer-Back Channel Number.
2.
Listen for tone:
Confirmation tone—paging circuit is available. Answer-back channel is idle. ANS light
goes on.
Busy tone—answer-back channel is busy. Press
a different Answer-Back Channel Number.
4-54
[CANCL] , and repeat procedure using
Page 77

CHAPTER 4. OPERATING FEATURES
3.
Speak into handset to transmit announcement and Answer-Back Channel Number.
4. Press
[RELEASE]
.
SPLIT, ANS, and ATND lights go off. PA light goes on. Caller hears ringback tone.
Paged party can dial Answer-Back Code and Answer-Back Channel Number from
any telephone/voice terminal in the system. Caller and paged party hear
confirmation tone and are connected.
Malicious Call Trace (MCT)
Allows your company to obtain information that may identify the calling party of a malicious
call. If the call is internal, the calling number is displayed. If the call is incoming on a trunk,
equipment location is shown.
When you activate this feature on your console (available with System 85 R2V4 and
DEFINITY Generic 2), every attendant console in the system is alerted to receive the call.
Trace information is stored, and a voice recorder is connected to the conversation. You (as
the first attendant to respond to the alert) are the “controlling attendant.” You will receive
trace information on the alphanumeric display of your console.
To activate Malicious Call Trace:
1.
Be sure you are active on a malicious call.
2.
Press
MCT
EMERG
PBSY light goes on.
Attendants are alerted to trace the call.
Voice recorder is activated.
You have three options on how to handle the trace:
Option 1 (This is the recommended option.)
MCT
Have another attendant press to act as the “controlling attendant.”
1.
CONT
Activating attendant has a talking connection with the malicious caller; the controlling
attendant does not.
2.
Continue to monitor the malicious call.
3.
Option 2
1.
When the caller disconnects, press
MCT
Press to act as both the activating and controlling attendant.
CONT
[RELEASE]
.
4-55
Page 78

CHAPTER 4. OPERATING FEATURES
2. While tracing the malicious calI, continue to monitor the call.
3.
When the caller disconnects, press
4.
After tracing the call, deactivate the Malicious Call Trace feature.
Option 3
Press [RELEASE] , [PBSY] to return to normal attendant activity.
1.
Caller is disconnected.
PBSY light goes off.
To trace a malicious call:
1.
Press
MCT
CONT
Audible signal stops.
MCT CONT light continues to flash.
PBSY light goes on.
First ICI message is displayed.
No talking connection is made with the caller unless you are the attendant who
activated the feature.
[RELEASE] .
Record ICI display.
2.
MCT
To receive each subsequent display, press
3.
CONT
This process is finished when ICI display shows
If the call is an incoming trunk call, dial the central office or the distant private
4.
network node to continue the trace at that location.
If you are the activating attendant, put the MCT loop on hold. Press an idle loop.
5.
When the trace is finished, and the information is recorded, dial the code to
6.
deactivate the MCT feature.
Deactivating the MCT feature disconnects the voice recorder and all talking parties.
To deactivate a Malicious Call Trace (controlling attendant):
Press an idle loop button.
1.
ATND light goes on.
. Record the displayed information.
END .
4-56
Page 79

CHAPTER 4. OPERATING FEATURES
2.
Press
[START]
.
Listen for dial tone.
3.
Dial the MCT deactivate access code.
MCT CONT goes off.
Voice recorder is deactivated.
PBSY light goes off.
To
deactivate a Malicious Call Trace (activating and controlling attendant):
Put the MCT loop on hold.
1.
2.
Press an idle loop.
3.
When the trace is finished and the information is recorded, dial the code to deactivate
the MCT feature.
Music-On-Hold Access
Provides music to a held party. The System Manager should
to only the music source is provided with the system.
When Attendant Call Waiting and Music-On-Hold Access are
attendant to a busy single-line telephone/voice terminal is connected to music until the called
party answers or the attendant reconnects to the waiting call after the timed-reminder interval
expires.
Refer to “Placing a Caller in Call Waiting” under
“Incoming Calls” for the actual procedure.
select the music source. Access
provided, a call extended by the
Radio Paging Access
Allows you to page individuals carrying pocket radio receivers by dialing codes to access
paging equipment and then paging individuals by voice or tone.
To access radio paging:
1.
Press an idle loop button.
ATND light goes on. PA light goes off.
4-57
Page 80

CHAPTER 4. OPERATING FEATURES
If you use direct trunk group selection to select radio paging trunks, do Step 3. If you
2.
do not use direct trunk group selection, go to Step 4.
Press direct trunk group select button.
3.
Listen for dial
Press
4.
Listen for dial
Dial individual
5.
[START]
tone. ANS light goes on.
,
and dial Radio Paging access code.
tone. ANS light goes on.
Page Number.
Listen for ringback tone until paging signal has been transmitted. If voice paging is
available, go to Step 6; if tone paging only is available, go to Step 10.
Announce paging message.
6.
If a caller is waiting to talk to the paged party, go to
Step 9. If a caller is not waiting, do Steps 7 and 8.
If an answer is expected, stay on the line until the called party is connected.
7.
At the end of conversation, press
8.
[RELEASE] .
ANS and ATND lights go off. PA light goes on.
[HOLD] .
Press
9.
HOLD and PA lights go on. Display and ATND lights go off. Caller is connected to
the paged party.
10.
Press
[RELEASE] .
Display and ATND lights go off.
PA light goes on.
Remote Access
Allows users on a public network to access the services of your system by dialing a single
security code (barrier code) or an individual authorization code. You may have to change the
barrier code (same code for all remote access users) from time to time for security reasons.
To change the barrier code:
Press an idle loop button.
1.
PA light goes off. ATND light goes on.
4-58
Page 81

Press
2.
[START]
.
Listen for dial tone.
Dial the Remote Access Change barrier code.
3.
Listen for dial tone.
4.
Dial new barrier code.
Listen for tone:
Confirmation tone—barrier code is changed.
CHAPTER 4. OPERATING FEATURES
Intercept tone—invalid code dialed. Press
Press
5.
[RELEASE]
.
[RELEASE] , and repeat the procedure.
ATND light goes off. PA light goes on.
Restrictions—Attendant Control of Voice Terminals
You can assign any one of the following six kinds of restrictions to selected extension
numbers or groups of extension numbers:
Outward: Denies direct-dialed calls to the public and private networks. Calls to the
attendant, calls to other telephones/voice terminals, and incoming calls are not affected.
Restricted calls will be routed to intercept tone.
Terminal-to-terminal: Denies incoming calls from other telephones/voice terminals.
Origination of calls is not affected. Restricted calls are routed to intercept tone.
Outward and terminal-to-terminal: Combines both of these restrictions.
Total: Denies all service to an extension number. An attempted call origination or a call from
another telephone/voice terminal will be routed to intercept tone. An incoming direct-dialed
call will be routed to the attendant or to a recorded announcement, depending on your
system.
Termination: Denies all received (incoming) calls to provide a form of “do-not-disturb”
service. Incoming direct-dialed calls will be routed to the attendant or to a recorded
announcement, depending on your system. Other restricted calls will be routed to intercept
tone.
Outward and termination: Combines both of these restrictions.
You can restrict an extension number by dialing the Controlled Restriction access code for
one extension number and by dialing a code number for the specific restriction to be
assigned.
4-59
Page 82

CHAPTER 4. OPERATING FEATURES
You can restrict a group of extension numbers by dialing the Controlled Restriction access
code for the group and a code number for the specific restriction to be assigned. You can
cancel restrictions by dialing 0 (zero).
You can control restrictions on telephones/voice terminals on a per-position basis when
Enhanced Uniform Call Distribution (EUCD) is provided in your system.
The Controlled Restriction access codes to be dialed for each of the six types of restrictions
are:
Outward restriction = 1
Terminal-to-terminal restriction = 2
Outward and terminal-to-terminal restriction = 3
Total restriction = 4
Termination restriction = 5
Outward and termination restrictions = 6.
To activate a restriction for an individual extension number
Press an idle loop button.
1.
ATND light goes on. PA light goes off.
2.
Press
[START]
.
Listen for dial tone.
Dial the Restriction—Attendant Control of Single Voice Terminal access code
3.
followed by the appropriate Restriction Code Number. Activate only one restriction at
one time.
Listen for dial tone.
4.
Press the appropriate hundreds group select button.
Group select light goes on.
Press the DXS button for the extension number to which the restriction is to be
5.
applied.
Listen for tone:
4-60
Confirmation tone—restriction is assigned.
Page 83

lntercept tone—terminal alreadv restricted or invalid code dialed. If an invalid code
was dialed, press
Press
6.
[RELEASE]
[RELEASE] , and ‘repeat the procedure.
.
ATND light goes off. PA light goes on.
To cancel a restriction for an individual extension number
1.
Press an idle loop button.
ATND light goes on. PA light goes off.
Press
[START]
2.
.
Listen for dial tone.
CHAPTER 4. OPERATING FEATURES
3.
Dial the Restriction—Attendant
Control of Single-Voice
dial 0 (zero).
Listen for dial tone.
4.
Press the appropriate hundreds
5.
Press the DXS button for the extension number for which the restriction is to be
group select button.
canceled.
Listen for tone:
Confirmation tone—restriction is canceled.
Intercept tone
6.
Press
[RELEASE]
—invalid code dialed. Press
.
[RELEASE] , and repeat the procedure.
ATND light goes off. PA light goes on.
To activate a restriction for a group of extension numbers:
1.
Press an idle loop button.
ATND light goes on. PA light goes off.
Terminal access code, and
2.
Press
[START]
Listen for dial tone.
.
4-61
Page 84

CHAPTER 4. OPERATING FEATURES
Dial the Restriction—Attendant Control of a
3.
followed by the appropriate Restriction Code
a time for a group.
Listen for dial tone.
Dial the group number to which the restriction is to be applied.
4.
Listen for tone:
Confirmation tone—restriction assigned to the group.
Intercept tone—group already restricted or invalid code dialed. If an invalid code
was dialed, press
[RELEASE].
Press
5.
[RELEASE] , and repeat the procedure.
ATND light goes off. PA light goes on.
To cancel a restriction for a group of extension numbers:
1.
Press an idle loop button.
ATND light goes on. PA light goes off.
[START] .
Press
2.
Group of Voice Terminals access code
Number. Activate only one restriction at
Listen for dial tone.
Dial the Restriction—Attendant Control of a Group
3.
and dial 0 (zero).
Listen for dial tone.
Dial the group number for which the restriction is to
4.
Listen for tone:
Confirmation tone—restriction canceled for the
restriction within the group if necessary.
Intercept tone—
Press
5.
[RELEASE]
ATND light goes off. PA light goes on.
invalid code dialed. Press
.
[RELEASE] ,
of Voice Terminals access code,
be canceled.
group. Cancel an individual
and repeat the procedure.
4-62
Page 85

CHAPTER 4. OPERATING FEATURES
Serial Calls
Allows you to extend a call to several extension numbers in succession without the outside
caller having to redial your number between each call. Each called party recalls you before
hanging up at the end of the call. This recall eliminates the 30-second waiting time between
calls.
To place the first in a series of calls requested by an outside caller:
1.
Press group select button for the appropriate hundreds group.
Group select light goes on.
2.
Check the BLF to see if the desired extension number is idle (associated light is off).
If the associated light in the BLF is on and the extension number is assigned to a
multi-appearance telephone/voice terminal, go to Step 3.
If Call Detail Recording and Reporting (CDRR) is assigned and calls are to be
3.
charged to an account number, do Steps 4 and 5; if CDRR is not assigned, go to
Step 6.
4.
Press
[START] .
Listen for dial tone. SPLIT light goes on. Caller is separated from the connection.
5.
Dial CDRR account number access code and Account Charge Number.
Listen for dial tone.
6.
Press DXS button for the desired extension.
Listen for ringback tone. Associated BLF and RING lights go on.
7.
Announce the call.
ANS light goes on. RING light goes off.
To eliminate the 30-second waiting period between calls, ask the called party before
8.
hanging up to recall you at the end of the call.
Press
[HOLD]
9.
.
Display, ATND, and SPLIT lights go off. HOLD and PA lights go on.
When HOLD light flashes, the telephone/voice terminal user (called party) has
10.
recalled you and has hung up. The outside caller is waiting for you to connect the call
to the next extension number.
4-63
Page 86

CHAPTER 4. OPERATING FEATURES
11.
Press the loop button below the flashing HOLD light.
Display and ATND lights go on. HOLD and PA lights go off. Outside caller is
connected.
12.
Connect outside caller to next extension number.
13.
When last serial call has been placed, press [RELEASE] .
ATND light goes off. PA light goes on.
Tenant Services
Allows a large Generic 2 Communications System to appear to users as many small
independent systems. Such a large system, known as a partioned system, can be shared
among a wide assortment of user groups referred to as “tenants.” A partitioned Generic 2
Communications System can contain as many as 40 attendant consoles numbered 0 through
40 (41 attendant partitions). An attendant in a partition is allowed to place or extend calls
(using an extension number) to any telephone/voice terminal assigned to the attendant’s
partition. An attendant is not allowed to place or extend calls to voice terminals in other
partitions. Only the attendant in attendant partition 0 (zero) or the System Manager can place
calls to any extension on the switch.
Timed Recall on Outgoing Calls
Alerts you whenever outgoing calls exceed the preestablished time interval allowed in your
system for calls on certain trunk groups. Such calls are routed to your console. You hear an
audible ring. The ATND light flashes. PA light goes off. Alphanumeric display shows
or some other identification designated by your System Manager. This feature is deactivated
during a malicious call trace.
To respond to a timed recall:
1.
Press
[ANSWER]
.
Audible ring stops. Display goes dark. ATND and ANS lights go on. You are
connected with the call in progress in a 3-way conference.
If the call is to be continued with timing, press
2.
[RELEASE] .
ANS and ATND lights go off. PA light goes on. Call continues for another timing
interval.
If the call is to be continued without timing, press
3.
[HOLD] .
Call continues without timing. You are dropped from the connection.
TIME
4-64
Page 87

CHAPTER 4. OPERATING FEATURES
4.
If the call is to be terminated, press
ANS and ATND lights go off.
[CANCL] , [RELEASE] .
PA light goes on.
Trunk Identification by Attendant
Allows you to identify a specific trunk that is connected by you (the attendant) “on any
incoming or outgoing call. Generally, you can use this feature in conjunction with the
Automatic Circuit Assurance (ACA) feature so that you can identify faulty trunks when you
receive referral calls.
To determine the identity of the trunk:
TRK
TRK
ID
TRK
ID
ID
Press
1.
Display shows Trunk Group Dial access code.
Press
2.
Display shows Trunk Index Number.
3.
Press
Display resets to initial identification.
4.
Press
[RELEASE]
.
Display and ATND lights go off. PA light goes on.
Trunk Verification by Attendant
Allows you to access individual trunks in a trunk group to verify status. You can determine if
a trunk signals busy because of a trunk fault or if the trunk has poor transmission.
To activate the feature:
Press an idle loop button.
1.
ATND light goes on.
2.
3.
[VERFY] .
Press
VERFY light goes on.
Press [START] .
Listen for dial tone.
4-65
Page 88

CHAPTER 4. OPERATING FEATURES
4.
Dial desired Trunk Group access code or Attendant Identification Code.
5.
Dial the trunk dial access code (1-, 2-, 3-, or 4-digit) number.
Listen for tone:
Warning tone
—starts before connection to a busy number to ensure user privacy.
Trunk is busy if you hear conversation after the tone. Trunk may be out of order or
holding a call if you do not hear conversation after the tone.
Reorder tone— BUSY light goes on. Feature is temporarily denied because the trunk
is being held or is in some other transient state.
Intercept tone—
6.
Press
[RELEASE]
feature is permanently denied.
.
ATND and VERFY lights go off. PA light goes on.
Trunk Verification by Attendant in a Distributed Communication System (DCS)
Environment
Allows you to access individual trunks in a trunk group at a local or distant system to verify
their status. Verification of trunks in a local system is the same as previously described. This
feature can be used by an attendant to assist in tracing malicious calls from distant switches.
The attendant can enter the call at the distant end using this feature and can activate
Malicious Call Trace.
To verify operation of a trunk at a distant system:
4-66
1.
Press an idle loop button.
ATND light goes on.
2.
Press
[VERFY]
.
VERFY light goes on.
3.
[START] , and dial the access code for the tie trunk to the distant system.
Press
Listen for dial tone.
or
Press a direct trunk group select button if one is assigned.
Listen for dial tone.
Page 89

CHAPTER 4. OPERATING FEATURES
4.
Press [VERFY] .
Listen for recall dial tone (three short bursts of tone, then dial tone).
Dial the trunk group access code for the trunk to be verified.
5.
Dial the trunk number.
6.
VERFY light may or may not go off. ANS light goes on if the trunk you are connected
to is other than a tie trunk. RING light goes on if you are connected to a tie trunk.
Listen for tone:
Warning tone—
starts before connection to a busy number to ensure user privacy.
Trunk is busy if you hear conversation after the tone. Trunk may be out of order or
holding a call if you do not hear conversation after the tone.
Reorder tone— BUSY light goes on. Feature is temporarily denied because the trunk
is being held or is in some other transient state.
Intercept tone—
[RELEASE] .
Press
7.
ATND and VERFY lights go off.
feature is permanently denied.
PA light goes on.
Unattended Console Service
Allows you to route incoming calls to an alternate console whenever your console is
unattended. Also allows you to route incoming trunk calls, intended for your console, to
several designated extension numbers, or to one specific extension number.
To activate or cancel routing of calls to an alternate console:
1.
Push the external alternate console switch.
All calls are routed to the alternate console, or calls are no longer routed to the
alternate console.
To set up trunk-to-telephone/voice terminal assignments:
You can route calls on an incoming trunk to a designated extension number when you set up
trunk-to-telephone/voice terminal assignments.
Press an idle loop button.
1.
ATND light goes on.
4-67
Page 90

CHAPTER 4. OPERATING FEATURES
Press
2.
[START]
.
Listen for dial tone.
Dial Trunk-to-Voice Terminal Assignment access code.
3.
Listen for dial tone.
Press DXS button for terminal to be assigned.
4.
Listen for dial tone. Only one telephone/voice terminal can be assigned per trunk.
Dial Trunk Group access code.
5.
Listen for dial tone.
Dial the 2-digit trunk number to be assigned to the terminal.
6.
Listen for confirmation tone. More than one trunk can be assigned to a terminal.
7.
Press
[RELEASE]
.
ATND light goes off.
To cancel trunk-to-telephone/voice terminal assignments:
1.
Press an idle loop button.
ATND
2.
Press [START] .
light goes on.
Listen for dial tone.
3.
Dial Trunk-to-Telephone/Voice
Listen for confirmation tone.
Terminal Assignment Clear code.
Calls are no longer routed to
terminal.
Press
[RELEASE] .
4.
ATND light goes off.
the telephone/voice
4-68
Page 91

CHAPTER 4. OPERATING FEATURES
To activate routing of calls to a common service terminal:
You can route all calls, intended for your console, to a specific extension number when you
activate the common service terminal.
Press an idle loop button.
1.
ATND light goes on.
2.
Press
[START]
.
Listen for dial tone.
3.
Dial the Common Service Terminal access code.
Listen for dial tone.
4.
Press DXS button for the telephone/voice terminal to receive routed calls.
Listen
5.
Press
ATND
To cancel routing of calls to a common service terminal:
1.
Press an idle loop button.
for confirmation tone. Calls are now routed to the common service terminal.
[RELEASE]
.
light goes off.
ATND light goes on.
2.
Press
[START]
.
Listen for dial tone.
Dial Common Service Terminal Clear code.
3.
Listen for confirmation tone. Calls are no longer routed to the common service
terminal.
4.
Press
[RELEASE]
.
ATND light goes off.
To override routing of calls to a common service terminal:
You can route “after hours” calls to a night security desk (default service terminal) when you
override routing of calls to a common service terminal. However, only your System Manager
can assign the default service terminal.
4-69
Page 92

CHAPTER 4. OPERATING FEATURES
Press an idle loop button.
1.
ATND light goes on. PA light goes off.
2.
Press
[START] .
Listen for dial tone.
3.
Dial the Common Service Terminal Override access code.
Listen for confirmation tone. Calls are now routed to the night security desk.
4.
Press
[RELEASE]
.
ATND light goes off. PA light goes on if no calls are waiting.
To activate Unattended Console Service after terminal assignments have been set up or after
common or default service telephone/voice terminals have been assigned:
Press [UNA] .
1.
UNA light flashes.
Calls are routed to common or default service telephone/voice
terminals.
To cancel Unattended Console Service:
Press [UNA] .
1.
UNA light goes off. If no calls are waiting, PA light goes on. Calls are no longer
routed to common or default service telephone/voice terminals.
Unattended Console Service in a Tenant Services Environment
Tenant services allows unattended console service to be divided by attendant partitions.
These partitions, and not the individual consoles themselves, are marked as being in
unattended console mode. When a call comes into a particular attendant partition, that is in
unattended console mode, that call is routed to the night extension for that partition.
If trunk-to-voice terminal assignments are set up, the incoming call is routed to the assigned
telephone/voice terminal without regard to the trunk’s attendant partition (trunk-to-terminal
assignments are not affected by partitioning).
If no direct trunk-to-terminal assignment is set up, the call routes to the common night
terminal for the incoming call’s particular attendant partition (set up by the attendant).
4-70
Page 93

CHAPTER 4. OPERATING FEATURES
If the partition has no common night terminal, the call routes to the default night terminal for
that partition (set up by System Manager). If no telephone/voice terminal is found or the
voice terminal is busy with a call waiting, the call activates a common signal (gong, bell, or
chime) and can be answered by any user who dials the Call Answer from Any Voice Terminal
(CAAVT) access code. If none of the possibilities described are assigned, the call is placed in
the attendant queue.
With Tenant Services, a specific attendant console controls the Unattended Console feature
for each attendant partition except Attendant Partition 0 (zero). The controlling attendant is
assigned by the System Manager. A partition can only have one “controlling” attendant.
Any console in Attendant Partition 0 can control the Unattended Console Service feature.
To activate Unattended Console Service for every partition, an attendant in partition 0 (zero) does
the following:
1.
Presses an idle loop button.
PA light goes off.
2.
Presses
[START]
.
Listens for dial tone.
Dials the Unattended Console Service activate code.
3.
Listens for a second dial tone.
Dials the fictitious partition number “99.”
4.
Listens for confirmation tone.
UNA light goes on at all consoles.
Presses
5.
To deactivate Unattended Console Service in every partition, an attendant in partition 0 does the
following:
1.
Presses an idle loop button.
Presses
2.
[RELEASE] .
[START]
.
Listens for dial tone.
3. Dials the Unattended Console Service deactivate code.
Listens for a second dial tone.
4-71
Page 94

CHAPTER 4. OPERATING FEATURES
Dials the fictitious partition number ’’99.”
4.
Listens for confirmation tone.
UNA light goes off on all consoles.
5.
Presses
[RELEASE]
.
PA light goes on.
To activate Unattended Console Service for a partition, the partition’s controlling attendant does the
following:
Presses an idle loop button.
1.
PA light goes off.
2.
Presses
[START]
.
Listens for dial tone.
Dials the Unattended Console Service activate code.
3.
Listens for a second dial tone.
Dials the appropriate 2-digit partition number.
4.
Listens for confirmation tone.
5.
Presses
[RELEASE]
.
PA light goes on if the attendant is associated with another attendant position.
To deactivate Unattended Console Service for a partition, that partition’s controlling attendant does
the following:
Presses an idle loop.
1.
PA light goes off.
2.
Presses
[START]
.
Listens for dial tone.
Dials the Unattended Console Service deactivate code.
3.
Listens for a second dial tone.
Dials the appropriate 2-digit partition number.
4.
Listens for confirmation tone.
4-72
Page 95

5.
Presses
PA light goes on.
[RELEASE]
CHAPTER 4. OPERATING FEATURES
.
Note:
Any attendant in partition 0 can activate or deactivate Unattended
Console Service for any attendant partition in the system.
To activate Unattended Console Service for a partition using the UNA button, the partition’s
controlling attendant (who is a member of only one attendant partition) does the following:
1.
Presses [UNA] .
UNA light goes on.
PA light goes off.
Note:
To deactivate Unattended Console Service for a partition using the UNA button, the partition’s
controlling attendant (who is a member of only one attendant partition) does the following:
Presses
1.
An attendant in partition 0 can do this operation for partition 0.
[UNA]
.
UNA light goes off. PA light goes on.
Note:
An attendant in partition 0 can do this operation for partition 0.
Operation of the UNA button is limited for consoles in a partitioned system. If the console
involved is allowed to activate Unattended Console Service for more than one attendant
partition, pressing the UNA button is ignored. In this case, an access code must be dialed for
activation and deactivation of Unattended Console Service.
Centralized Attendant Service (CAS)
Allows system users, served by separate systems, at two or more locations to concentrate
attendant positions at one location. Incoming trunk calls to unattended (branch) locations are
routed to the centralized (main) attendant over Release Link Trunks (RLTs).
CAS Operation at the Main Location
You hear an audible ring. ATND light flashes.
the branch location of the call.
PA light goes off. Alphanumeric display shows
4-73
Page 96

CHAPTER 4. OPERATING FEATURES
To answer a CAS call:
Press
1.
[ANSWER]
.
Audible ring stops. ATND light goes on. Listen for three bursts of tone identifying a
public network call. Associated RLT status light on SSI goes on. Display shows the
branch location calling.
To extend the CAS call to the originating branch location:
1.
Press
[START]
.
Listen for dial tone from the originating branch system. Caller is separated from the
connection.
2.
Dial the requested extension number.
Listen for an immediate burst of tone followed by normal ringing at any point in the
cycle.
Press [RLT] .
3.
Ringing stops. Caller is reconnected to the system at the originating branch location
and hears ringback tone. Associated RLT status light on SSI goes off. RLT returns to
idle. ATND light goes off. If no calls are waiting, PA light goes on.
To extend the CAS call to another branch location:
1.
Press
[START]
.
Listen for dial tone from the originating branch system. Caller is separated from the
connection.
2.
Dial the trunk access code for the branch location being called.
Listen for dial tone from other branch location.
Dial the extension number of the other
3.
Listen for an immediate burst of tone
cycle.
[RLT] .
Press
4.
Ringing stops. Caller is reconnected to the system at the originating
and hears ringback tone from the other branch location over that
trunk. Associated RLT status light on SSI goes off. RLT returns to
goes off. If no calls are waiting, PA light goes on.
branch location.
followed by normal ringing at
any point in the
branch location
branch location
idle. ATND light
4-74
Page 97

To answer a recall:
1.
When the ATND light flashes and you hear an audible ring, press [ANSWER] .
Audible ring stops. ATND light goes on. PA light goes off.
CHAPTER 4. OPERATING FEATURES
2.
3.
If the caller wishes to be connected to another extension number, press
[CANCL] , and report to the caller.
Press
the extension number.
4.
Press
[RELEASE] .
Display and ATND lights go off. PA light goes on.
5.
If the caller does not wish to wait, press
[RELEASE] .
Display and ATND lights go off. PA light goes on.
To answer a terminal-to-attendant call from a branch location:
1.
When the ATND light flashes and you hear audible ring, press [ANSWER] .
Audible ring stops. ATND light goes on.
PA light goes off. Display shows branch
location. Two bursts of tone identify the call as a terminal-to-attendant call.
System Status Indicators at the Main Location
At the main location, System Status Indicators (SSIs) (Figure 4-1)
of up to 110 Release Link Trunks (RLTs). The table in Figure 4-1
and the system status associated with each light.
[START]
.
Dial
show the busy/idle status
shows the light conditions
To test SSI light
1.
Press
ATND
2.
Press
Listen
3.
Dial Light Test code.
Listen for confirmation
operation.
an idle loop button.
light goes on. PA light goes off.
[START]
.
for dial tone.
tone. All lights on the SSI should go on to indicate proper
4-75
Page 98

CHAPTER 4. OPERATING FEATURES
LIGHT
RLT ( )
Figure 4-1.
LIGHT CONDITION
Off
On
Idle RTL
Busy RL or associated backup
SYSTEM STATUS
telephone/voice terminal
handling CAS call
Winking Maintenance busy
System Status Indicators Used at a Main Location
4-76
Page 99

CHAPTER 4. OPERATING FEATURES
To cancel SSl Light Test
Press
1.
[START]
.
Listen for dial tone.
2.
Dial Light Test Cancel code.
Listen for confirmation tone. All lights on the SSI return to the normal state.
3.
Press [RELEASE] .
ATND light goes off. PA light goes on.
CAS Operation at Branch Locations
Backup facilities:
Two backup facilities are available to answer calls at branch locations.
For users at the branch, an attendant console, that provides
a.
that the main CAS attendants cannot provide. Non-CAS calls
only special services
from telephone/voice
terminal users are the only calls routed to the special services console. The special
services console is provided, optionally, in addition to backup terminals normally
provided at branch locations.
A branch telephone/voice terminal user can call the
special services console attendant by dialing a 1-, 2-, or 3-digit code.
A backup telephone/voice terminal (Figure 4-2) that is used to answer calls in the
b.
backup mode when the Release Link Trunks (RLT) between the main and branch
locations are out of service. These telephone/voice terminals are equipped with an
auxiliary handset or headset and a turnkey.
4-77
Page 100

CHAPTER 4. OPERATING FEATURES
HANDSET
Figure 4-2.
/
TURNKEY
Backup Telephone/Voice Terminal With Handset/Headset
Modes of Operation
There are three modes of operation to answer calls at branch locations:
1.
CAS mode (normal mode)
2.
Call Answer From Any Voice Terminal (CAAVT) mode
3.
Backup mode.
You can change the mode of operation from the backup
telephone/voice
the required code.
To change mode of operation:
1.
Turn the turnkey fully counterclockwise.
terminal by dialing
4-78
 Loading...