

Page 1

Page 2

Ogo Manual
Legal Disclaimer
This document and the information contained herein (collectively, the "Information") is provided to you (both the individual receiving this document and
any legal entity on behalf of which such individual is acting) ("You" and "Your") by AT&T Wireless Services, Inc. ("AWS") for informational purposes only.
AWS is providing the Information to You because AWS believes the Information may be useful to You. The Information is provided to You solely on the
basis that You will be responsible for making Your own assessments of the Information and are advised to verify all representations, statements and
information before using or relying upon any of the Information. Although AWS has exercised reasonable care in providing the Information to You, AWS
does not warrant the accuracy of the Information and is not responsible for any damages arising from Your use of or reliance upon the Information. You
further understand and agree that AWS in no way represents, and You in no way rely on a belief, that AWS is providing the Information in accordance
with any standard or service (routine, customary or otherwise) related to the consulting, services, hardware or software industries.
AWS DOES NOT WARRANT THAT THE INFORMATION IS ERROR-FREE. AWS IS PROVIDING THE INFORMATION TO YOU "AS IS" AND "WITH
ALL FAULTS." AWS DOES NOT WARRANT, BY VIRTUE OF THIS DOCUMENT, OR BY ANY COURSE OF PERFORMANCE, COURSE OF
DEALING, USAGE OF TRADE OR ANY COLLATERAL DOCUMENT HEREUNDER OR OTHERWISE, AND HEREBY EXPRESSLY DISCLAIMS, ANY
REPRESENTATION OR WARRANTY OF ANY KIND WITH RESPECT TO THE INFORMATION, INCLUDING, WITHOUT LIMITATION, ANY
REPRESENTATION OR WARRANTY OF DESIGN, PERFORMANCE, MERCHANTABILITY, FITNESS FOR A PARTICULAR PURPOSE OR NONINFRINGEMENT, OR ANY REPRESENTATION OR WARRANTY THAT THE INFORMATION IS APPLICABLE TO OR INTEROPERABLE WITH ANY
SYSTEM, DATA, HARDWARE OR SOFTWARE OF ANY KIND. AWS DISCLAIMS AND IN NO EVENT SHALL BE LIABLE FOR ANY LOSSES OR
DAMAGES OF ANY KIND, WHETHER DIRECT, INDIRECT, INCIDENTAL, CONSEQUENTIAL, PUNITIVE, SPECIAL OR EXEMPLARY, INCLUDING,
WITHOUT LIMITATION, DAMAGES FOR LOSS OF BUSINESS PROFITS, BUSINESS INTERRUPTION, LOSS OF BUSINESS INFORMATION, LOSS
OF GOODWILL, COVER, TORTIOUS CONDUCT OR OTHER PECUNIARY LOSS, ARISING OUT OF OR IN ANY WAY RELATED TO THE
PROVISION, NON-PROVISION, USE OR NON-USE OF THE INFORMATION, EVEN IF AWS HAS BEEN ADVISED OF THE POSSIBILITY OF SUCH
LOSSES OR DAMAGES.
Intellectual Property Restrictions
All Intellectual Property, as defined below, which is owned by or licensed to AT&T Wireless, its affiliates, partners or suppliers, relating to the Device,
including but not limited to accessories, parts or software relating thereto (the “Device System”), is proprietary under federal laws, provincial laws and
international treaty provisions. Intellectual Property includes, but is not limited to, inventions (patentable or un-patentable), patents, trade secrets,
copyrights, software, computer programs, and related documentation and other works of authorship.
You may not infringe or otherwise violate AT&T Wireless rights with respect to the Intellectual Property. Moreover, you agree that you will not (and will
not attempt to) disassemble, decompile, reverse engineer, prepare derivative works from, modify or make any other effort to create source code from the
software. No title to ownership in the Intellectual Property is transferred to you through purchase or possession of the Device System or its components.
All applicable rights related to the Intellectual Property shall remain with AT&T Wireless, its affiliates, partners or suppliers. AT&T Wireless will have no
liability with respect to any claim of patent infringement, which is based upon the combination of the Device System or parts furn ished hereunde r with
software, apparatus or devices not furnished by AT&T Wireless, nor will AT&T Wireless have any liability for the use of ancillary equipment or software
not furnished by AT&T Wireless which is attached to or used in connection with the Device System. The foregoing states the entire liability of AT&T
Wireless with respect to infringement of patents by the Device System or any parts thereof. Copyright Laws in the United States and other countries
preserve for AT&T Wireless certain exclusive rights for copyrighted AT&T Wireless software, such as the exclusive rights to reproduce and distribute
copies of such AT&T Wireless software. AT&T Wireless software may be used only in the Device System in which the software was originally embodied
when purchased, and such software in such Device System may not be replaced, copied, distributed, modified in any way, or used to produce any
derivate thereof. No other use including, without limitation, alteration, modification, reproduction, distribution, or reverse engineering of such AT&T
Wireless software or exercise of right in such AT&T Wireless software is permitted. No license is granted by implication, estoppel or otherwise under
AT&T Wireless software is permitted. No license is granted by implication, estoppel or otherwise under AWS patent rights or copyrights.
Note: All marks, trademarks, and product names used in this manual are the property of their respective owners.
14295 Rev. 1.4 9/24/04 2
Page 3

Ogo Manual
Table of Contents
1. Welcome!..........................................................................................................................................................................6
1.1. Corporate Information ...........................................................................................................................................6
1.2. Conventions Used in This Manual ........................................................................................................................7
2. Ogo Device.......................................................................................................................................................................8
2.1. Ogo Device Specifications ....................................................................................................................................8
3. Ogo Keyboard and Key Functions.................................................................................................................................. 10
3.1. Ogo Keyboard.....................................................................................................................................................10
3.2. Ogo Key Functions..............................................................................................................................................10
3.2.1. Ogo Shortcut Key .................................................................................................................................12
3.2.2. 8-Way Navigation Key..........................................................................................................................13
3.2.3. ALT Key................................................................................................................................................13
4. Home Screen..................................................................................................................................................................14
4.1. Taskbar ...............................................................................................................................................................15
5. Getting Started................................................................................................................................................................17
5.1. Box Contents.......................................................................................................................................................17
5.2. Preparing Your Ogo ............................................................................................................................................ 17
5.2.1. Installing or Removing the Battery........................................................................................................17
5.2.2. Connecting the Charger .......................................................................................................................18
5.2.3. Charging the Battery.............................................................................................................................18
5.3. Powering On Your Ogo.......................................................................................................................................18
5.4. Activation and Messaging Wizards.....................................................................................................................19
5.4.1. Activation Wizard.................................................................................................................................. 19
5.4.2. Messaging Wizard................................................................................................................................27
6. My Status........................................................................................................................................................................31
6.1. Logging On/Off or Signing In/Out........................................................................................................................31
6.2. Changing Your IM Status....................................................................................................................................31
6.3. Adding a New Community or ISP E-mail Account .............................................................................................. 32
7. Setting Up Banner Events .............................................................................................................................................. 33
8. Instant Messaging (IM)...................................................................................................................................................34
8.1. Reading and Composing Chat Messages...........................................................................................................34
8.1.1. Accessing Chat Messages Using the Ogo Shortcut Key......................................................................34
8.1.2. Sending an Instant Message (Starting a Chat Session)....................................................................... 34
8.1.3. Adding Emoticons to Your Chat ...........................................................................................................35
8.1.4. Closing a Chat Session........................................................................................................................35
14295 Rev. 1.4 9/24/04 3
Page 4

Ogo Manual
8.2. Managing IM Contacts ........................................................................................................................................36
8.2.1. Adding an IM Contact...........................................................................................................................36
8.2.2. Deleting an IM Contact.........................................................................................................................37
8.2.3. Block an IM Contact (AIM and MSN)....................................................................................................38
9. Mailbox ...........................................................................................................................................................................39
9.1. Using Mailbox Options ........................................................................................................................................40
9.2. Mail and SMS Icons ............................................................................................................................................ 40
9.3. Using the Find Function ......................................................................................................................................41
9.4. E-mail Attachments.............................................................................................................................................42
10. E-mail and SMS..............................................................................................................................................................43
10.1. Sending an E-mail or SMS Message..................................................................................................................43
10.1.1. Choosing an E-mail Address in the From Field....................................................................................44
10.1.2. Changing Your Default E-mail Address for Sending Messages........................................................... 44
10.1.3. Sending SMS Messages ......................................................................................................................45
10.2. Replying to an E-mail or SMS Message ............................................................................................................. 45
10.3. Forwarding an E-mail or SMS Message .............................................................................................................45
10.4. Saving a Draft of a Message...............................................................................................................................45
10.5. Deleting a Draft of a Message.............................................................................................................................46
10.6. Addressing a Message........................................................................................................................................46
10.6.1. Adding Multiple Recipients to the Same Field......................................................................................46
10.6.2. Sending a Message to a New Recipient (Address Clipboard) ............................................................. 47
10.6.3. Clearing and Editing Addresses in Messages......................................................................................49
11. Contacts..........................................................................................................................................................................50
11.1. Creating a Contact..............................................................................................................................................50
11.2. Contact Profile Fields.......................................................................................................................................... 51
11.3. Alerticons.............................................................................................................................................................51
11.3.1. Choosing Alerticons for IM Contacts ....................................................................................................52
11.3.2. Choosing Alerticons for E-mail/SMS Contacts.....................................................................................52
11.4. Creating or Removing a Group...........................................................................................................................53
11.5. Number of Contacts Available.............................................................................................................................54
12. QuickText........................................................................................................................................................................55
12.1. Inserting QuickText.............................................................................................................................................55
12.2. Editing QuickText................................................................................................................................................56
13. Settings........................................................................................................................................................................... 57
13.1. IM.........................................................................................................................................................................57
13.2. E-mail..................................................................................................................................................................58
13.3. Device .................................................................................................................................................................58
14295 Rev. 1.4 9/24/04 4
Page 5

Ogo Manual
13.4. Sounds................................................................................................................................................................60
13.4.1. Volume/Vibration Shortcuts..................................................................................................................60
13.5. Time & Date ........................................................................................................................................................61
13.6. Network...............................................................................................................................................................62
13.7. Personal Mobility Gateway (PMG)......................................................................................................................62
13.8. System ................................................................................................................................................................62
14. Battery Charging and Low Battery Warning ................................................................................................................... 64
14.1. Battery Charging Level........................................................................................................................................64
14.2. Low Battery Warning...........................................................................................................................................65
14.3. Battery Life..........................................................................................................................................................65
15. Ogo Help.........................................................................................................................................................................66
15.1. Live Support Chat................................................................................................................................................66
15.2. Technical Support Information............................................................................................................................66
16. Emoticon Reference Tables—By IM Community.............................................................................................................67
17. Contact Profile Field Characteristics .............................................................................................................................. 73
18. Important Safety Information ..........................................................................................................................................74
18.1. Radio Frequency (RF) Energy............................................................................................................................74
18.1.1. RF Interference/Compatibility...............................................................................................................74
18.2. Potentially Explosive Atmospheres.....................................................................................................................74
18.3. Using Device Safely While Driving...................................................................................................................... 75
18.4. Accessories.........................................................................................................................................................75
18.4.1. Batteries and Battery Chargers ............................................................................................................75
18.5. Repetitive Motion Injuries....................................................................................................................................75
18.6. Caring for Your Device and Charger...................................................................................................................75
18.7. Device Service ....................................................................................................................................................76
18.8. Radio Frequency Signals....................................................................................................................................76
18.9. FCC Compliance Statement ............................................................................................................................... 76
18.10. Battery Safety Precautions.................................................................................................................................. 77
18.11. RF Exposure .......................................................................................................................................................78
18.12. Health and Safety Information.............................................................................................................................78
18.12.1. Exposure to Radio Frequency (RF) Signals.........................................................................................78
18.12.2. SAR Information ...................................................................................................................................79
14295 Rev. 1.4 9/24/04 5
Page 6

Ogo Manual
1. Welcome!
Welcome! Thank you for purchasing Ogo. Ogo gives you the opportunity to stay in touch
with family, friends, business contacts, and others while on the go. Ogo consolidates a wide
array of electronic messaging features into one easy-to-use mobile device.
Ogo’s features include:
Instant Messaging (IM): Chat with your AIM, MSN, and Yahoo! contacts using Ogo. It’s
easy to add contacts, just as you do on your PC. You can even use emoticons in your
chat sessions.
E-mail: Check your e-mail on the go and access multiple e-mail accounts. Ogo can help
you compose important messages that just can’t wait until you are back in the office or at
home.
SMS: Read and write text messages, using a full keyboard instead of your phone’s
numeric keypad.
Ogo shortcut key: Press just one key to get all your unread instant messages, e-mail,
and SMS messages.
1.1. Corporate Information
AT&T Wireless Services, Inc.
P. O. Box 68055
Anaheim Hills, CA 92817-8055
(correspondence only, not for payment)
Telephone numbers:
Customer Care: 866-896-9434
General care, billing questions: 866-293-4634
Activations: 800-684-2390
Web site address: www.attws.com
Ogo-specific information: www.attws.com/ogo
Caution: Changes or modifications made in the radio device not expressly approved by
AT&T Wireless will void the user’s authority to operate the equipment.
14295 Rev. 1.4 9/24/04 6
Page 7

Ogo Manual
1.2. Conventions Used in This Manual
Item Definition
Navigation
Key Physical key on the keyboard. The command
physical keys.
Button Onscreen button that performs an action when you select it and press
Enter.
Actions
Press Unless otherwise indicated, press always refers to a short press (half a
second or less). Where a long press of a key (over half a second) has a
specific result, the term
Select Move the focus onscreen to a tab, a field, a button, or an option.
You select items using the 8-Way Navigation key (see Section 3.2.2).
Use the inner ring of the 8-Way Navigation key to move from one item to
an adjacent item (field, button, or option); use the outer ring to move from
one tab to another or from one page to another.
Scroll Move the focus up or down to select items in an Options menu or to
move through onscreen text, using the inner ring of the 8-Way Navigation
key.
Contacts Two types of contacts are described in this manual:
• Contacts refers to stored contact profile information about the people
to whom you send e-mail or SMS messages. You can also store
general information, such as home address and phone numbers for
people you know.
• IM Contacts refers to the stored screen identification names for the
people with whom you exchange instant messages. IM contacts are
stored by the IM service providers, AOL, MSN, and Yahoo!
long press
Terminology
is used.
Press
always refers to
AOL/AIM AOL refers to the name of the premium portal provider. AIM refers to AOL
Instant Messenger.
Text/SMS SMS messages may be referred to as Text messages; your SMS number
may also be referred to as your Text number.
Note:
what is displayed on your Ogo.
14295 Rev. 1.4 9/24/04 7
All screens shown in this manual are for reference only, and may differ slightly from
Page 8
Ogo Manual
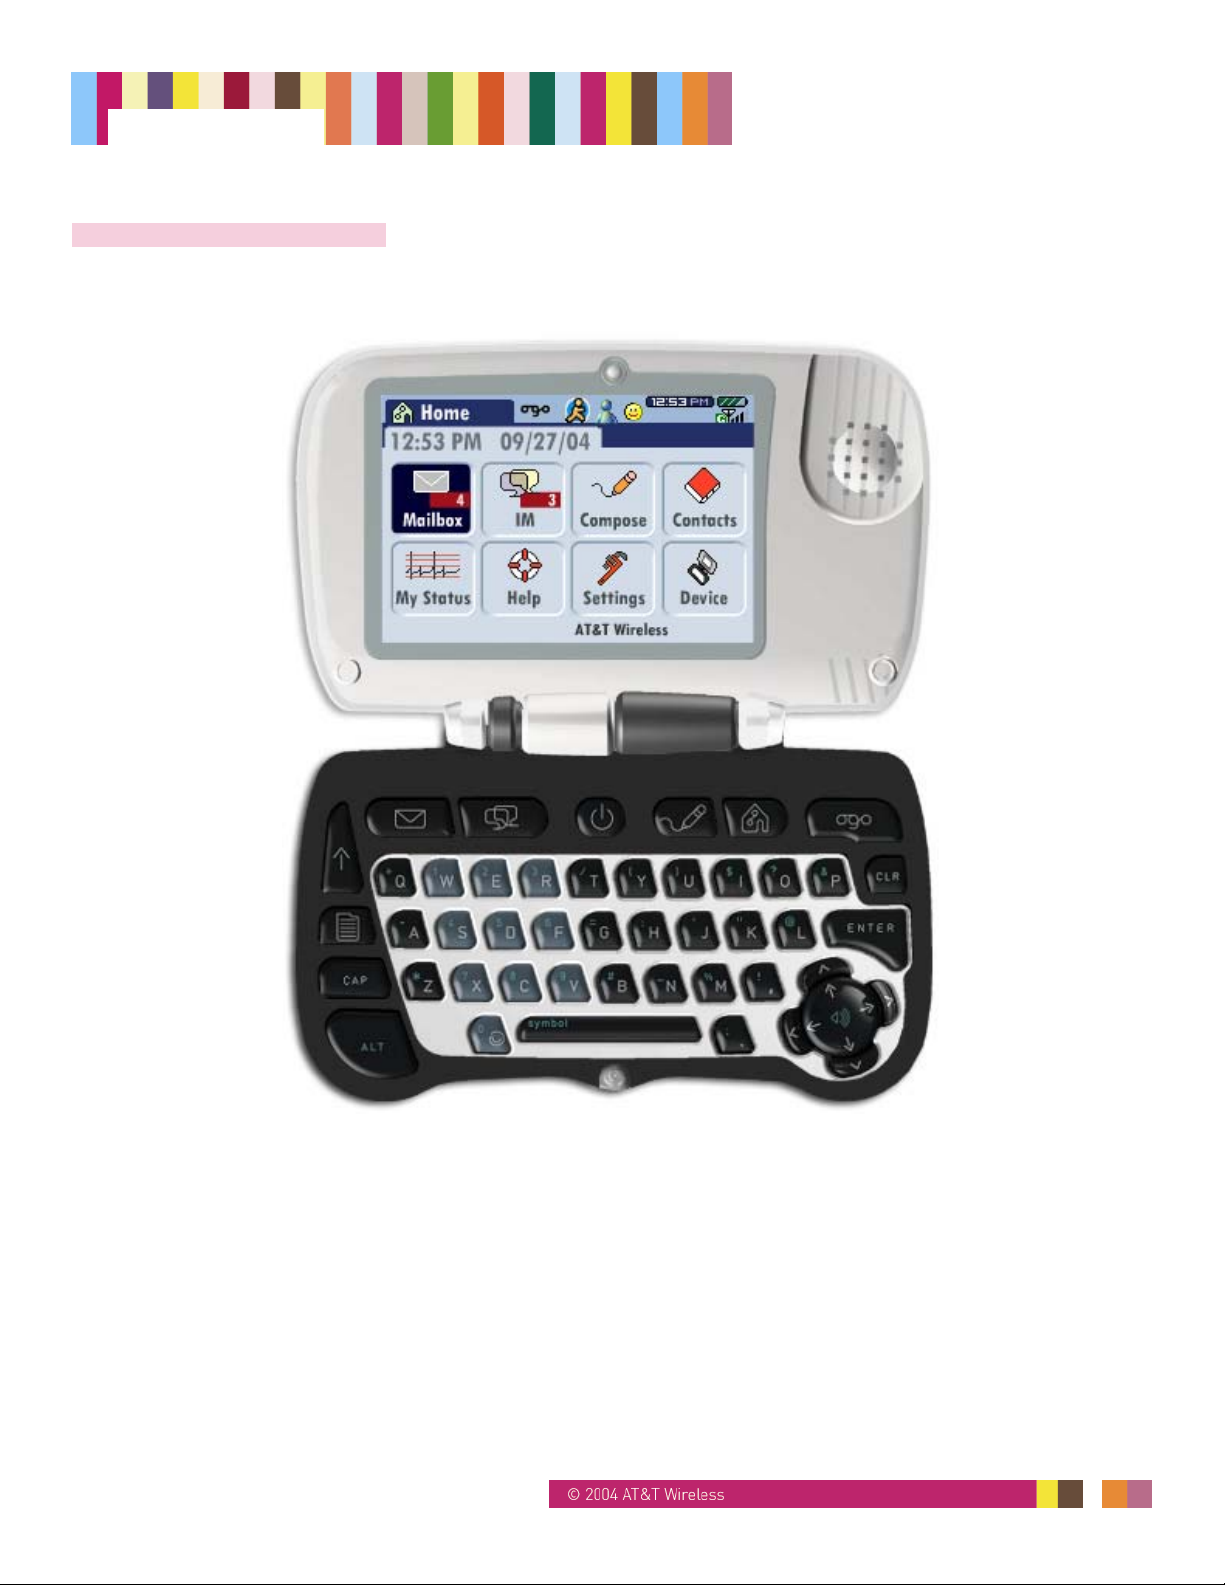
2. Ogo Device
Figure 1: Ogo Device
2.1. Ogo Device Specifications
Features
Articulating clamshell with free-stop hinge
Full QWERTY keyboard
CSTN transflective display, 240x160px, 1/8 VGA, 4k color
Mono speaker, 0.75 inch diameter, 0.8 watts at 8 ohms
GSM/GPRS dual band radio, 850/1900 MHz, min class 10
14295 Rev. 1.4 9/24/04 8
Page 9

Ogo Manual
Hotkey function buttons (shortcut keys)
8-Way Navigation control (key)
Hard reset
Open/Close switch automatically changes IM presence
Three-color LED indicates network connection, battery alerts, and new messages
Backlight for keyboard and display
Note:
Ogo's backlight timeout has been preset to optimize Ogo's battery life. This
setting is not adjustable. You can always turn the backlight on by pressing any key.
Dimensions
Closed: 11.5 cm x 7.5 cm x 2.5 cm
Weight: 5.7 ounces (162 grams)
Included accessories
850mA Li-ion battery, 120 hours standby, 2.5 hours usage
3V SIM card
GSM built-in antenna
Charger with mini-USB connection
14295 Rev. 1.4 9/24/04 9
Page 10
Ogo Manual
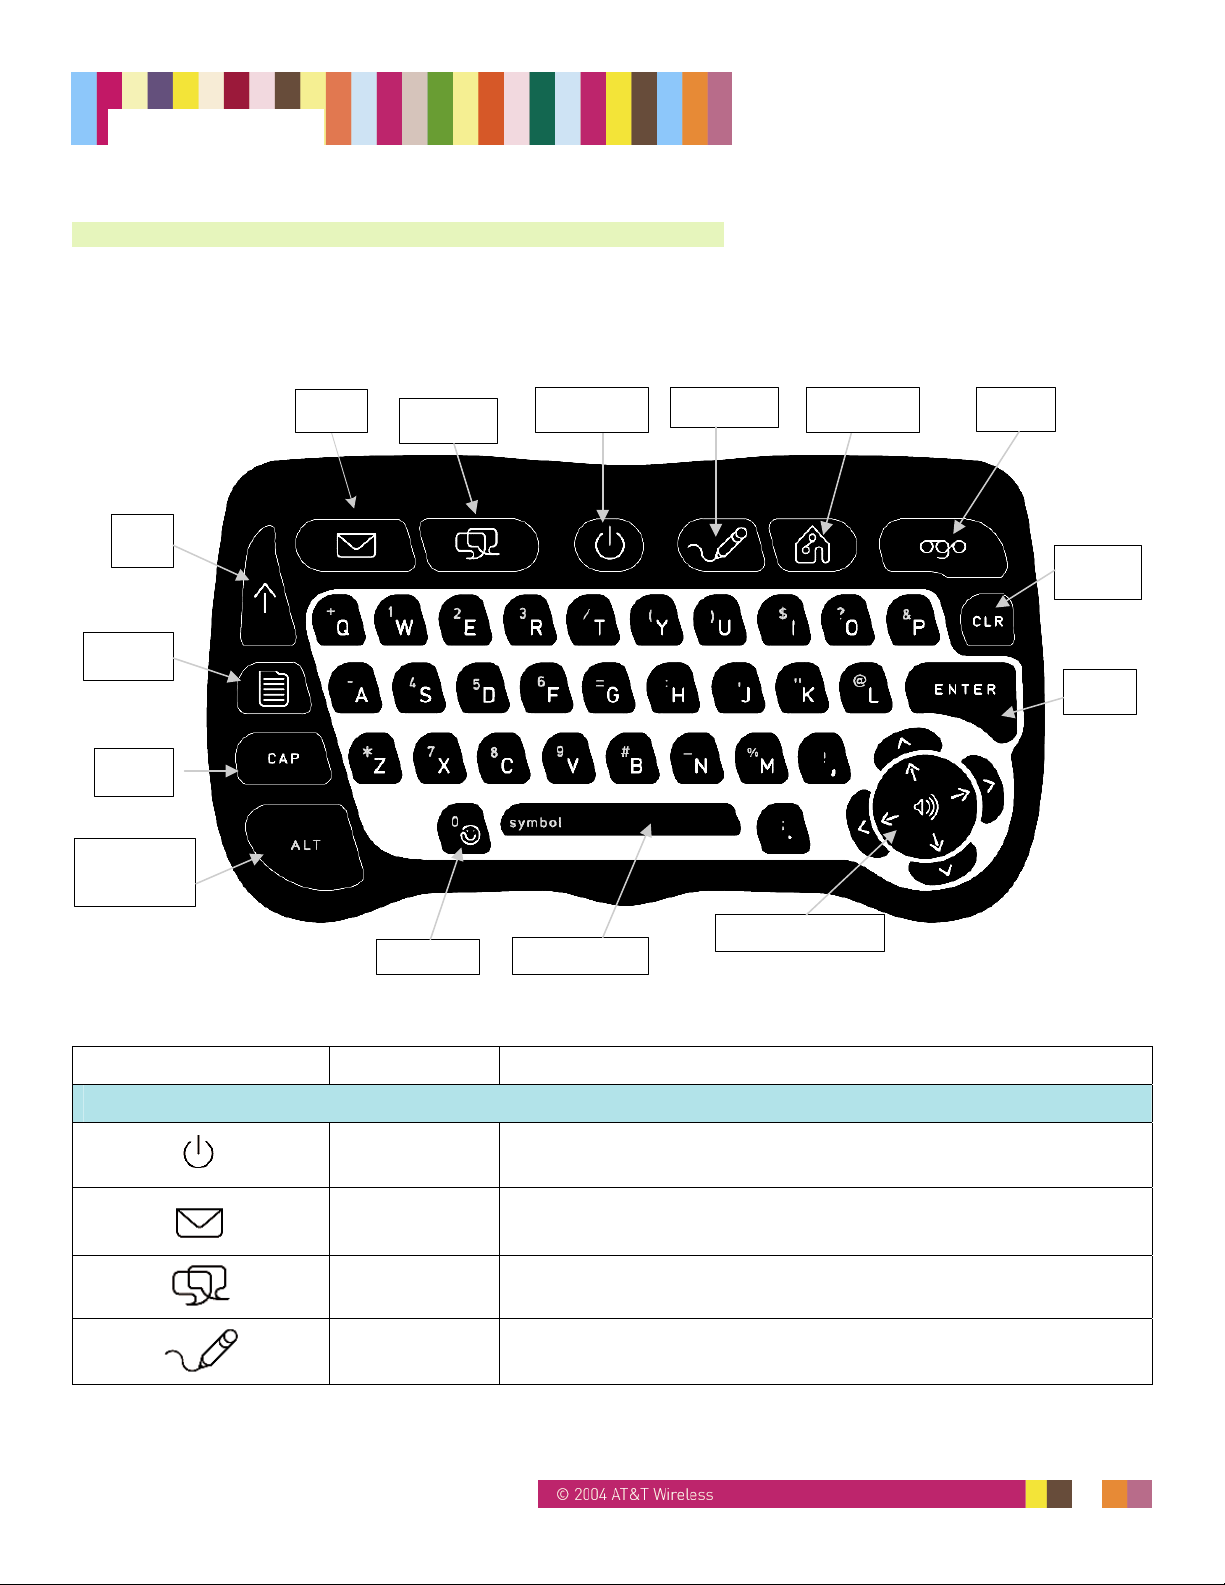
3. Ogo Keyboard and Key Functions
3.1. Ogo Keyboard
Figure 2: Ogo Keyboard
Up
Options
Capital
Letters
Alternate
Characters
Mailbox Instant
Messaging
Emoticon
Spacebar
Compose
8-Way Navigation
Home OgoPower On/Off
Clear
Enter
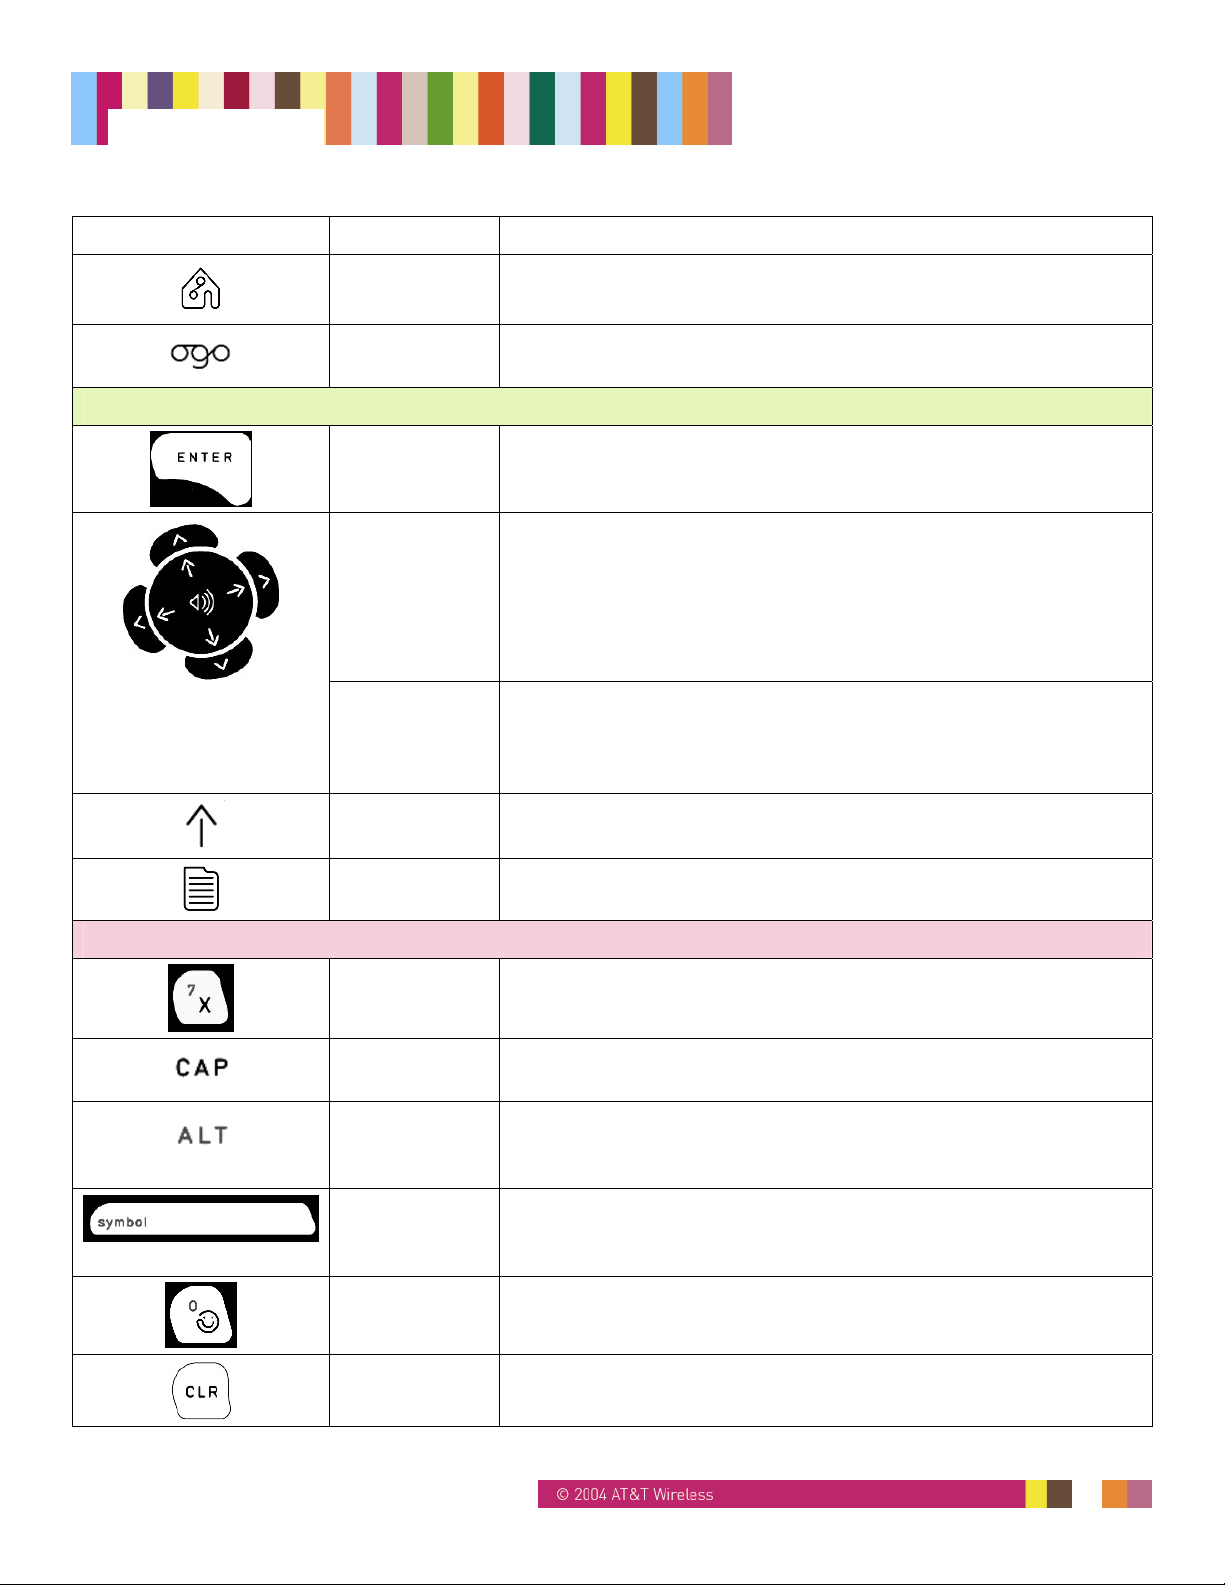
3.2. Ogo Key Functions
Key Name What it Does
Shortcut Keys
Power On/Off Powers your Ogo on and off.
Mailbox Shortcut to your e-mail inbox, where you can see incoming
Instant
Messaging
Compose Opens a screen where you can write a new e-mail or SMS
14295 Rev. 1.4 9/24/04 10
e-mail and text messages.
Shortcut to the Instant Messaging screen, where you can chat
with your contacts over AIM, MSN, or Yahoo!
message.
Page 11
Ogo Manual
Key Name What it Does
Home Returns to the Home screen.
Ogo Opens a screen displaying current chats, unread SMS and
Enter Activates a selected item on the screen.
Outer arrows The outer ring of arrows of the 8-Way Navigation key. Left and
Inner arrows The inner ring of arrows of the 8-Way Navigation key. Left and
e-mail messages, and draft messages.
Navigation Keys
right arrows move between tabs. Up and down arrows scroll one
page at a time (page up/down).
In message text, left and right arrows move to the beginning and
end of a line of text; up and down arrows move to the beginning
and end of the message.
right arrows scroll left and right within a screen or line of text. Up
and down arrows move between lines in a screen or lines of text
in a message.
Up Takes you to the screen above the one you are currently in (if
Options Opens the Options menu for the current screen, if available.
Letter keys Used to insert letters, numbers, or other symbols.
Capitalize Shifts the letter keys to capitals. For example, press CAP and
Alternate Shifts the letter keys to the symbol located above the letter on
ALT, Spacebar Pressing ALT, then Spacebar, opens a symbol palette that
Emoticon Opens an emoticon palette that allows you to insert emoticons
Clear Deletes the last character or emoticon inserted in a text field.
available). This key also closes an open Options menu.
Text Keys
then press D to type the capital letter D.
the key. For example, press the ALT key and then the D key to
insert the number 5.
allows you to insert special characters into your e-mail, SMS, or
instant messages.
into your instant messages.
14295 Rev. 1.4 9/24/04 11
Page 12
Ogo Manual
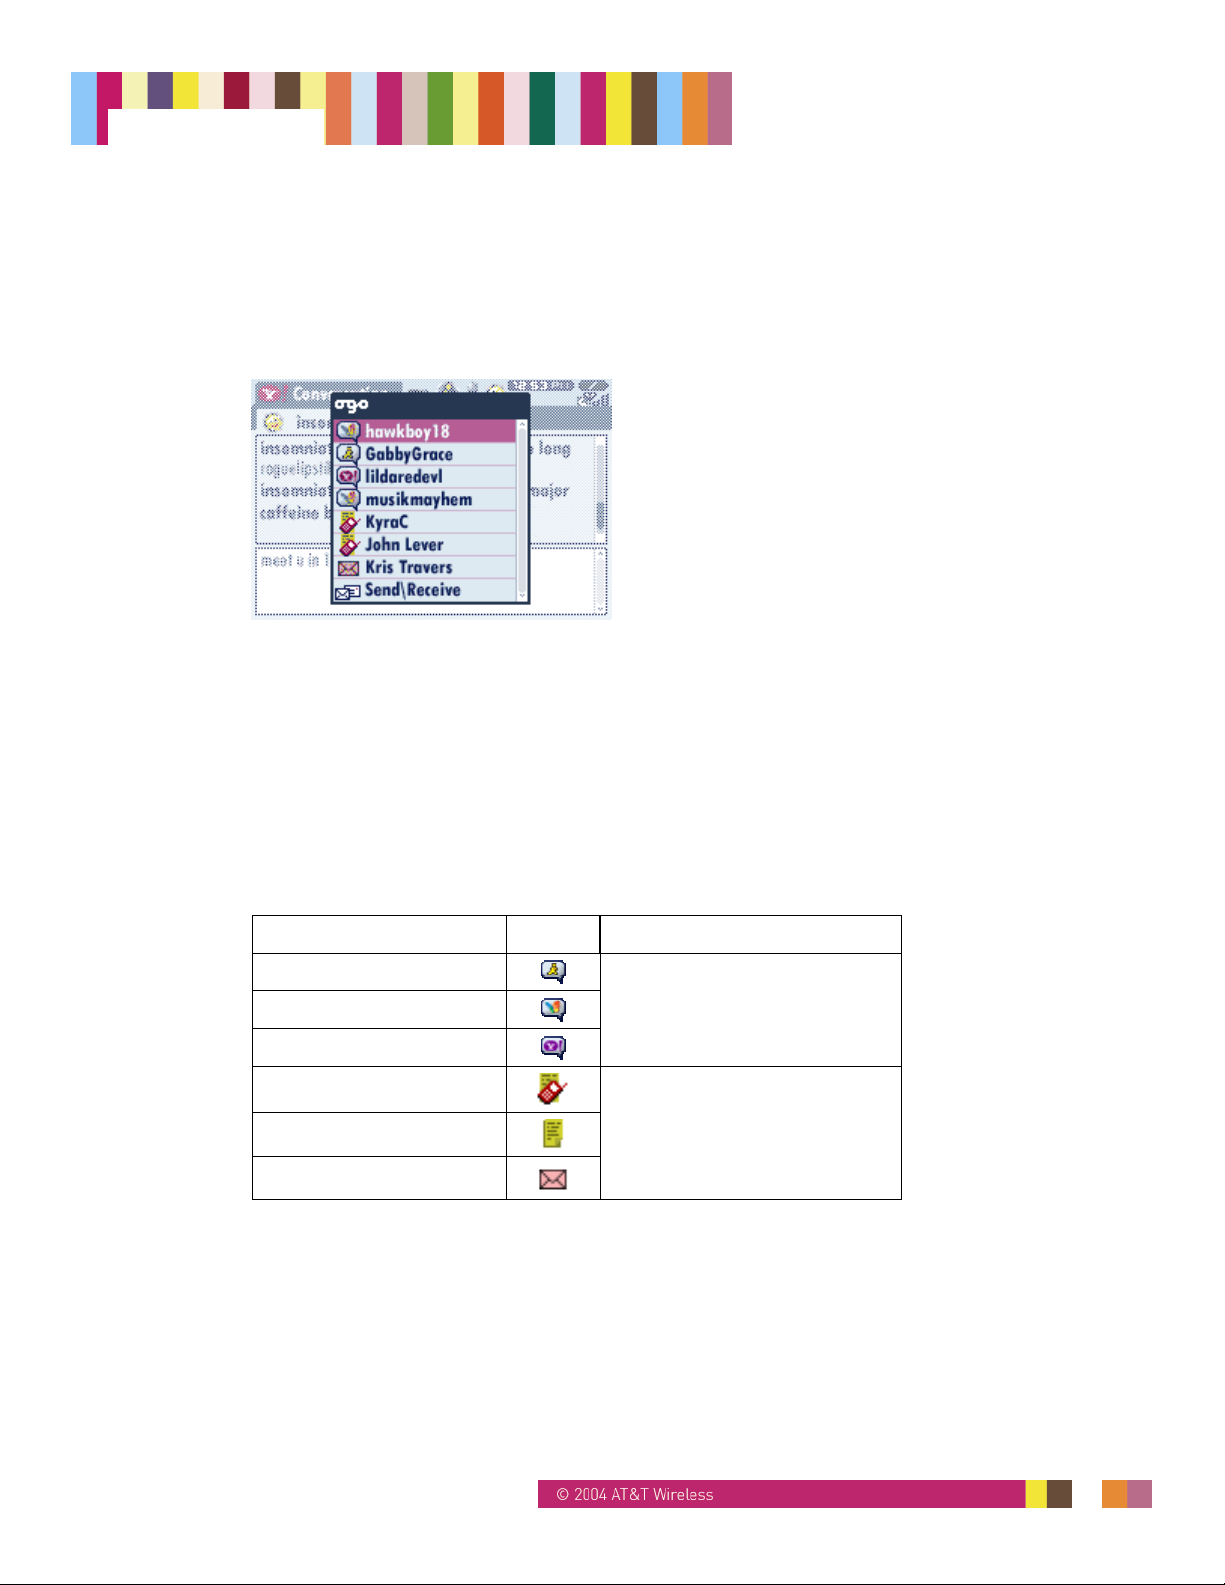
3.2.1. Ogo Shortcut Key
You can press the Ogo shortcut key at any time to display a list of all recent e-mail and SMS
messages, open IM chat sessions, and drafts of messages you have not yet sent.
Figure 3: Ogo Pop-up
Select the message or chat session you want to view and press Enter.
You can also quickly check for new e-mail from all e-mail providers set up on your Ogo.
Select Send/Receive at the bottom of the Ogo pop-up and press Enter.
Note:
Send/Receive will be selected by default in the pop-up if there are no new e-mail
messages, SMS messages, or active chats.
Table 1 shows the icons that appear in the Ogo pop-up to indicate different types of
messages.
Table 1: Message Icons
Type Icon Description
Conversation AIM
Chat MSN
Conversation Yahoo!
Unread SMS
Draft message
Unread e-mail
Animates if unread
Static icons
14295 Rev. 1.4 9/24/04 12
Page 13
Ogo Manual
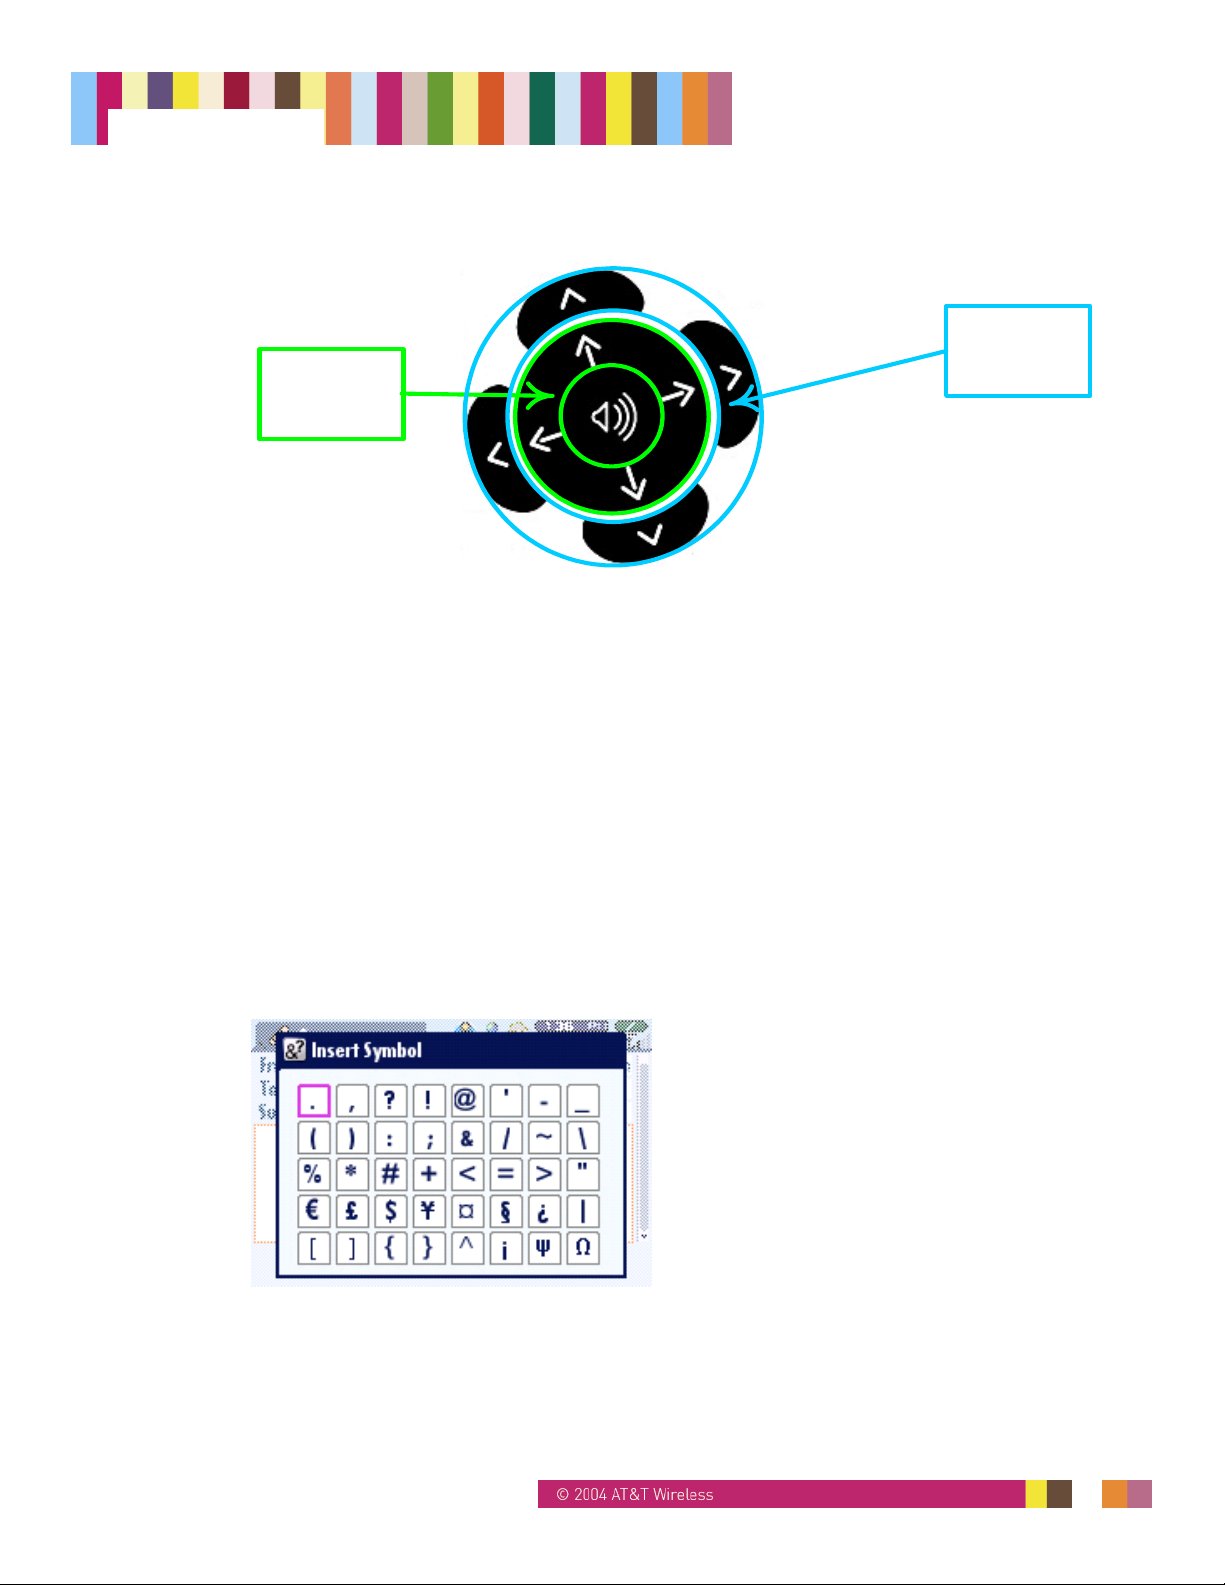
3.2.2. 8-Way Navigation Key
Inner Ring
Outer Ring: Left and right arrows move between tabs. Up and down arrows scroll one page
at a time (page up/down). In message text, left and right arrows move to the beginning and
end of a line of text; up and down arrows move to the beginning and end of the message.
Inner Ring: Left and right arrows scroll left and right within a screen or line of text. Up and
down arrows move between lines in a screen or lines of text in a message.
Outer Ring
3.2.3. ALT Key
Insert special characters using keys: Special characters and numbers are marked on the
keys above the standard characters. When you want to insert a special character or number,
press ALT, and then press the key for the character or number you want.
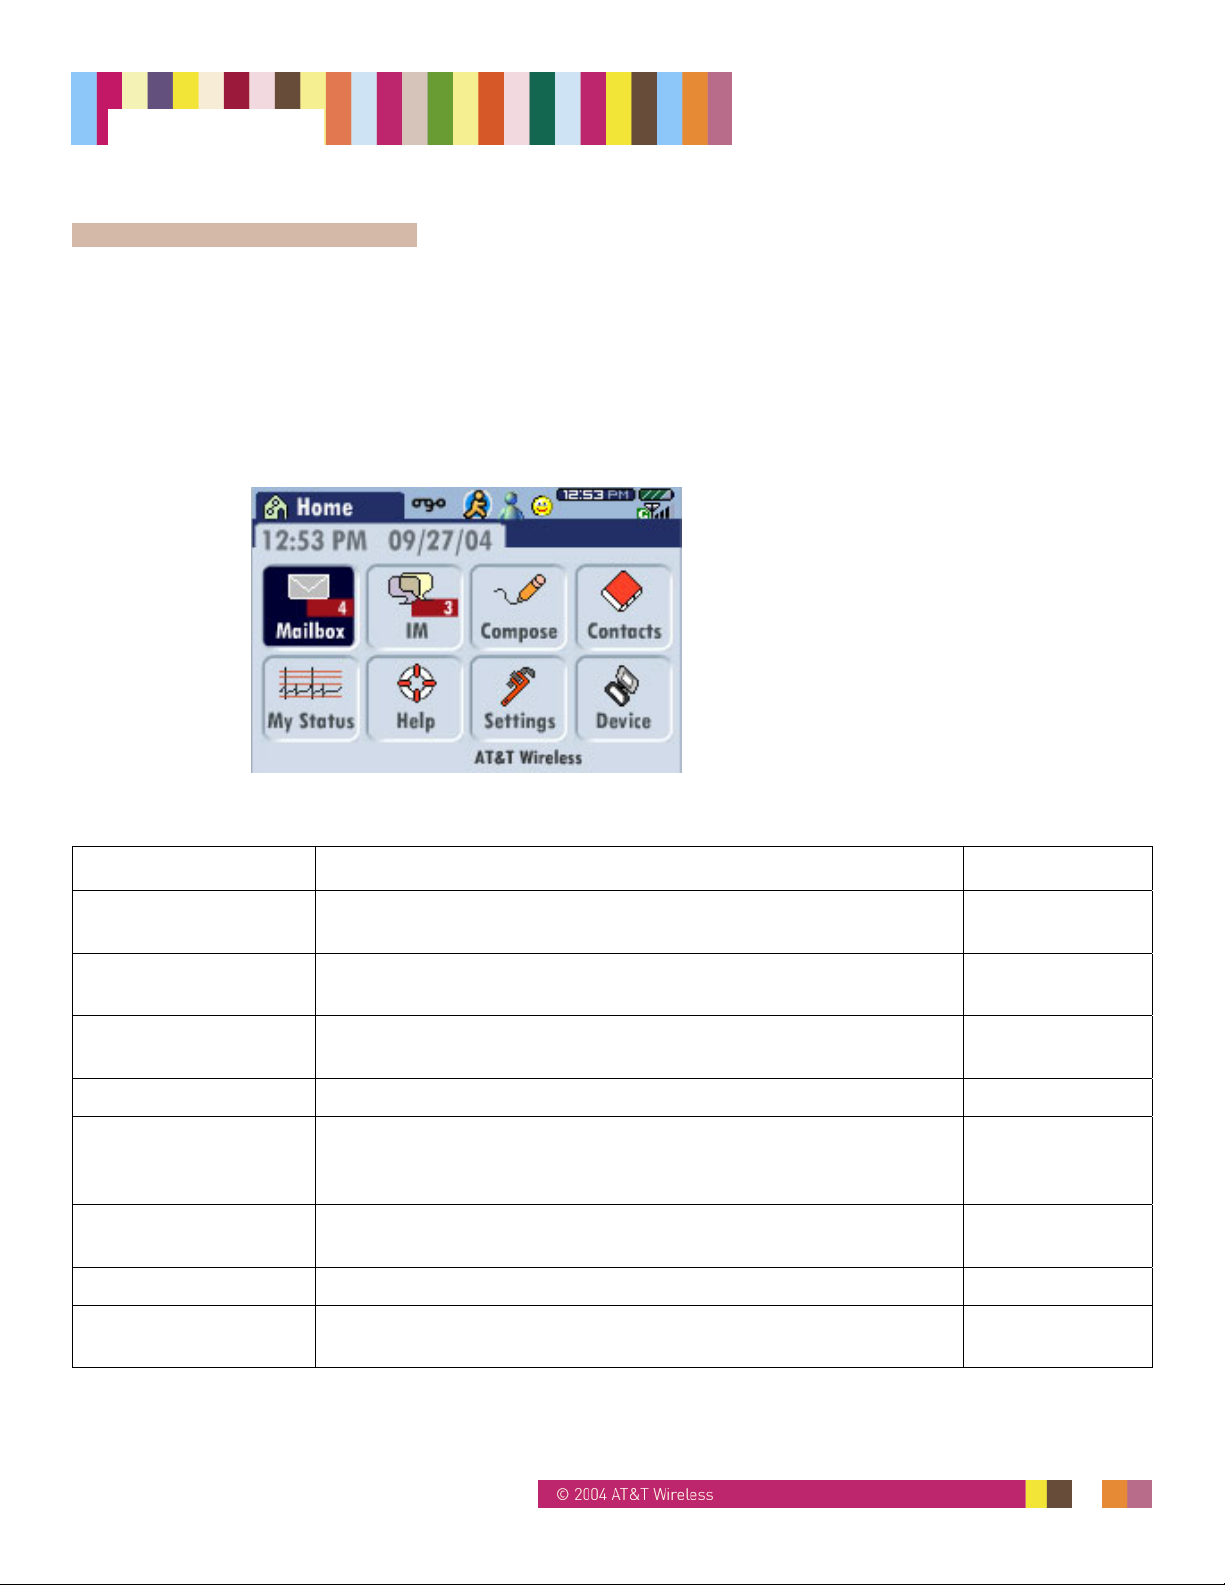
Insert Symbol palette: When in any messaging screen or text field, press ALT, then
Spacebar, to open the Insert Symbol palette. Select the symbol you want and press Enter to
insert the symbol into your message.
Figure 4: Insert Symbol Palette
14295 Rev. 1.4 9/24/04 13
Page 14
Ogo Manual
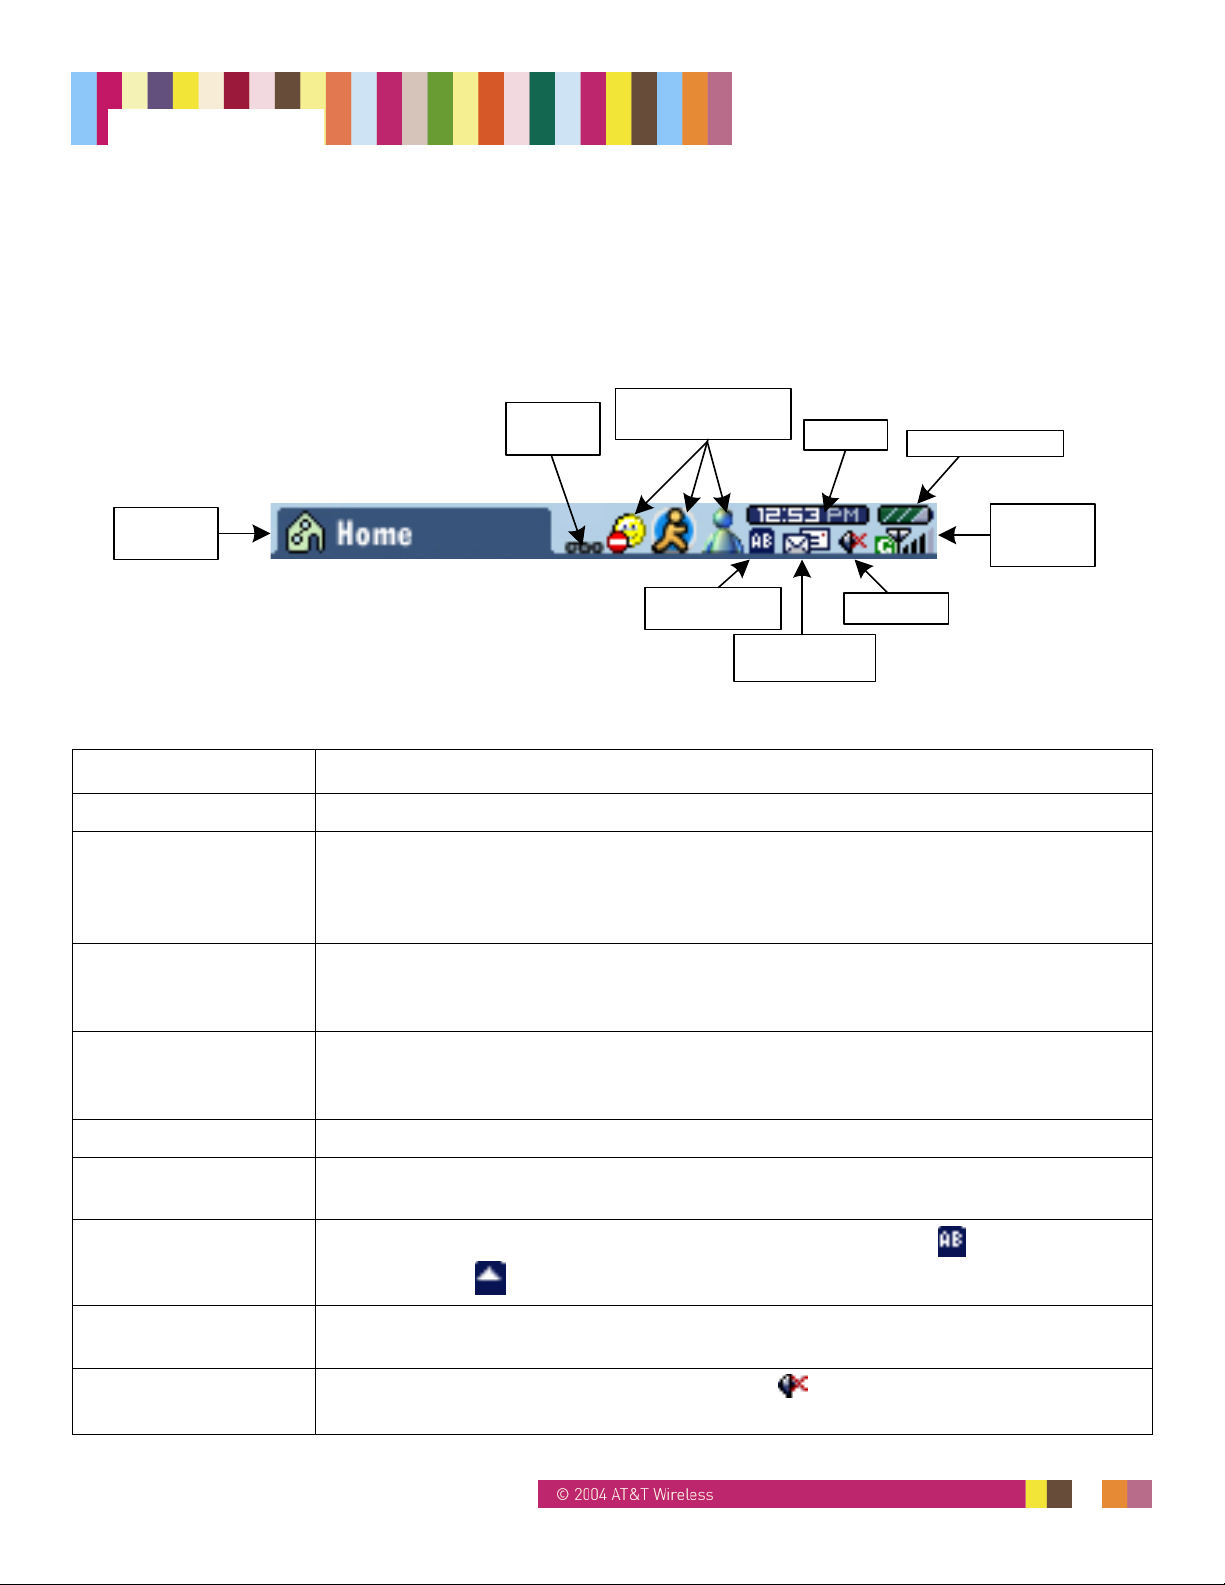
4. Home Screen
Ogo’s Home screen is what you see each time you power on. Select IM to start a chat
session with a friend, or Compose to send an e-mail or SMS message. Find Contacts and
see your IM and e-mail status. You can also customize Ogo’s settings and get Help if you
need it.
You can always return to the Home screen by pressing the Home shortcut key.
Figure 5: Home Screen
Table 2: Home Screen Items
Home Screen Item Description More information
Taskbar See current message and status information in the Taskbar that
is displayed at the top of each screen.
Mailbox View and respond to e-mail and SMS messages; also manage
received messages.
Instant Messaging
(IM)
Compose Select Compose to write an e-mail or an SMS message. Section 10.1
Contacts Set up contacts and contact information for e-mail and SMS.
My Status See which IM communities you are logged onto. You can also
Help Access live Help chat and other information resources. Section 15
Settings and Device Set the date and time and choose settings for pop-ups, sounds,
Send instant messages and chat with your IM contacts. Section 8
You can also add contacts that do not have e-mail or SMS
addresses. Contacts for IM are separate.
send and receive e-mail.
and other display items.
Section 4.1
Section 9
Section 11
Section 6
Section 13
Section 13.3
14295 Rev. 1.4 9/24/04 14
Page 15
Ogo Manual
4.1. Taskbar
The top of every screen is dedicated to the Taskbar. The Taskbar displays information about
system status, new messages, IM status, and keyboard CAP and ALT functions.
Figure 6: Taskbar
Ogo
Indicator
Screen
Indicator
Yahoo!, MSN, and
AOL Status
Cap/Alt Icon
Position
Send/Receive
Icon
Time
Battery Status
Signal
Strength
Mute Icon
Table 3: Taskbar Items
Taskbar Item Description
Screen indicator Indicates which screen your Ogo is in (Home, IM, Compose, etc.).
Ogo indicator Actively animates (spins and flips) when you have new unread messages (e-mail,
SMS, or IM). If you have pressed the Ogo shortcut key to check new messages but
leave some unread, the Ogo indicator will gently animate up and down. (See
Section 3.2.1 for more information about the Ogo shortcut key.)
AOL, MSN, and
Yahoo! status
For each of these IM providers (premium portals), your status appears here (Online,
Not Available, Offline, etc.). For AOL, MSN, and Yahoo! status icons and
descriptions, see Table 4.
Time When your Ogo is powered on, it automatically synchronizes with the current time
from the AT&T Wireless network. (See Section 13.5 for more information on setting
the time and date.)
Battery status Diagonal bars show the battery charge level. (See Section 14 for more information.)
Signal strength Vertical bars indicate the strength of Ogo’s network connection. If a G appears in
the status, GPRS service is on.
CAP/ALT icon status
The CAP and ALT icons share the same space in the Taskbar.
CAP selection.
is the icon for the ALT selection.
is the icon for
Send/Receive icon Appears as an animation during any send/receive action, and disappears from the
Taskbar upon completion of the send/receive event.
Mute icon
Appears only when your Ogo’s audio is muted
. (See Section 13.4 for information
about muting Ogo.)
14295 Rev. 1.4 9/24/04 15
Page 16
Ogo Manual
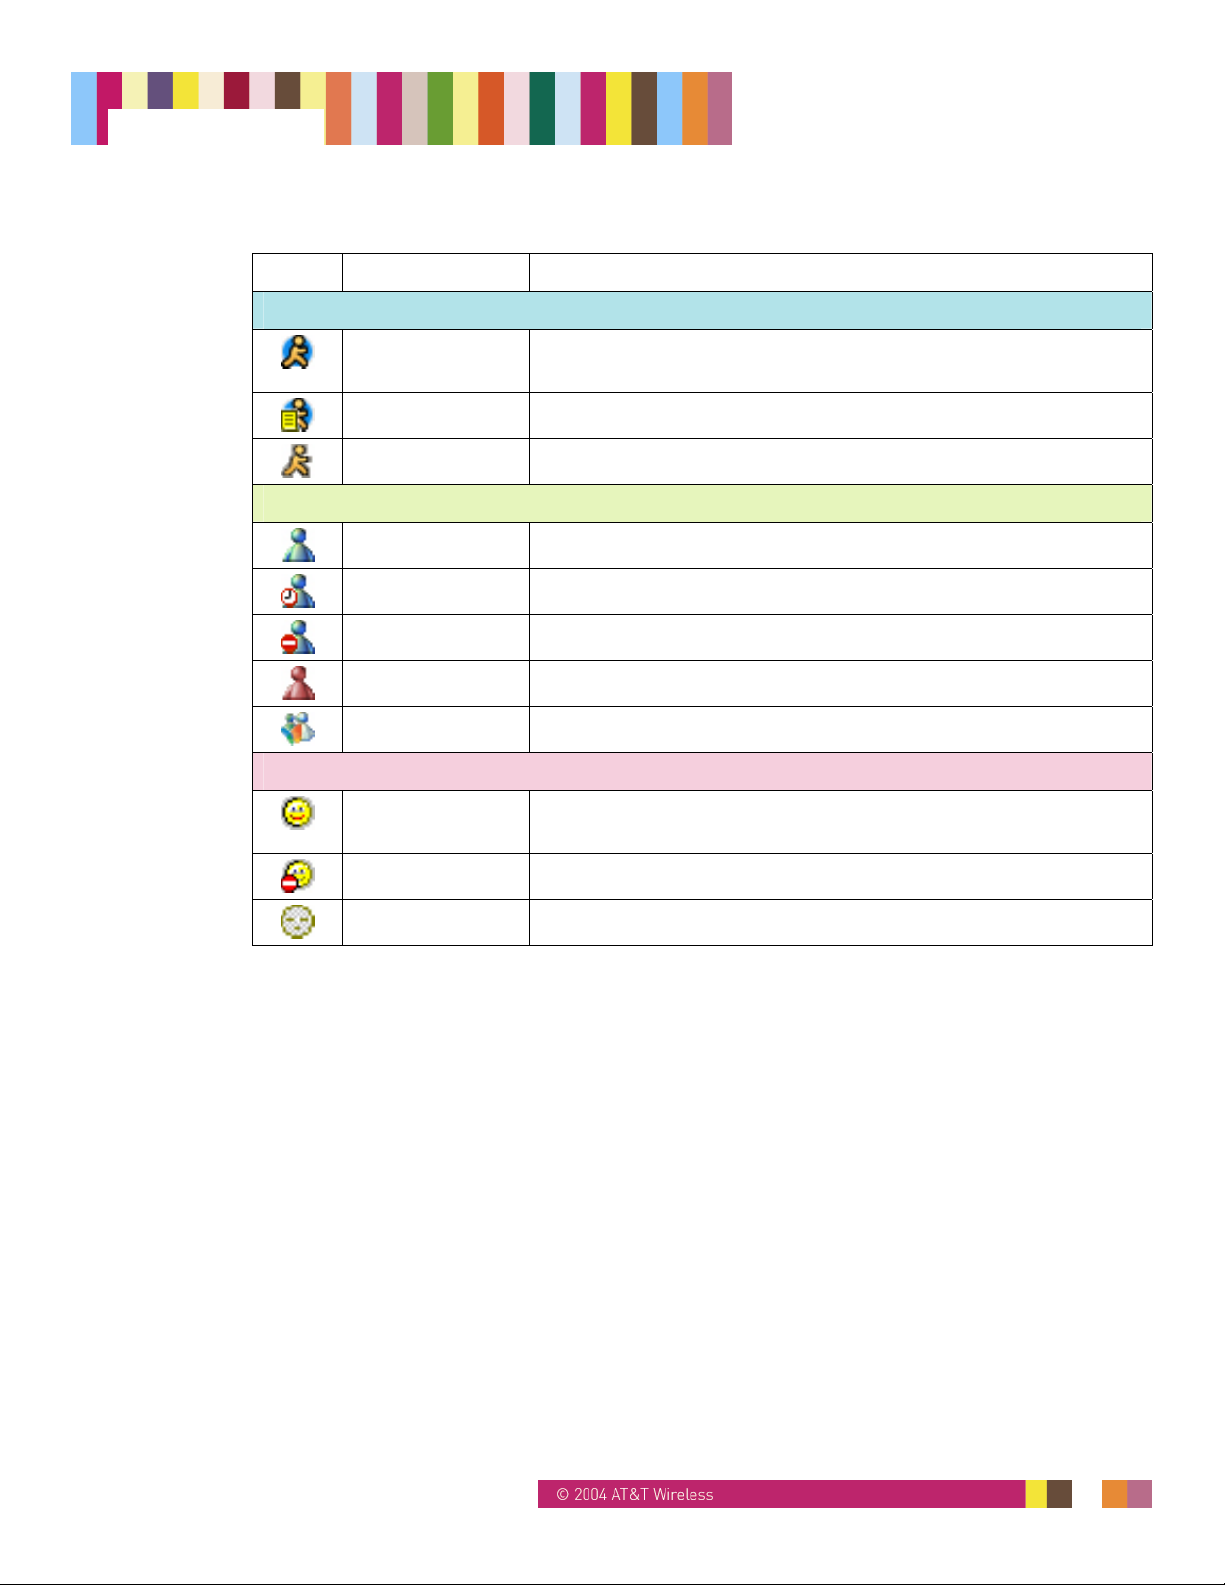
Table 4: AOL, MSN, and Yahoo! IM Status Icons
Icon Name Description
AOL
Online During sign-in, this icon will alternate with the signed-off icon
Away Busy, be right back, or new away message.
Offline
Online
Be right back Away or out to lunch.
Busy On the phone.
Offline
Signing on This icon is animated when signing on.
at half-second intervals.
MSN
Yahoo!
Available During sign-in, this icon will alternate with the Offline icon at
Not available For any reason.
Offline
half-second intervals.
14295 Rev. 1.4 9/24/04 16
Page 17
Ogo Manual
5. Getting Started
5.1. Box Contents
Ogo with SIM card installed
Battery and charger
Quick Start Guide
Terms of Use booklet (
What You Need to Know
5.2. Preparing Your Ogo
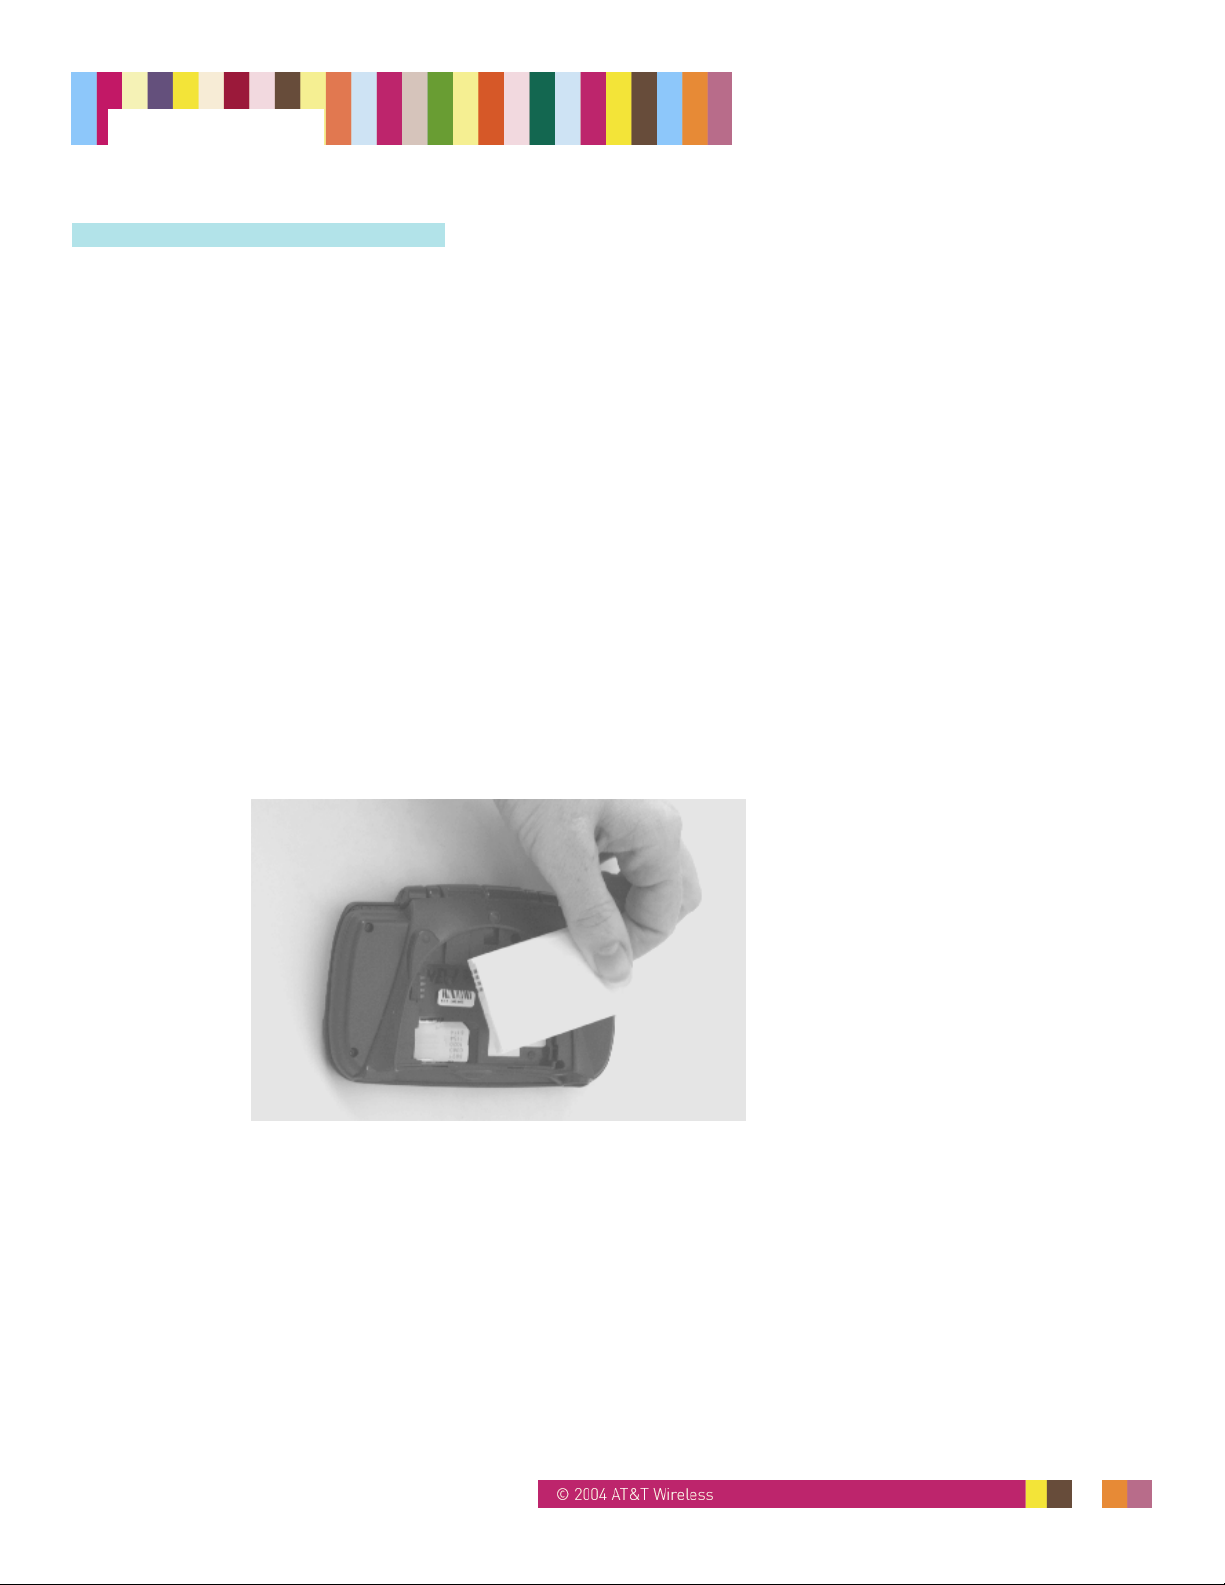
5.2.1. Installing or Removing the Battery
To install the battery:
1. Turn your Ogo over and slide off the back cover.
2. Match the battery contacts with the contacts in the battery slot. Push the battery in,
contacts side down first (Figure 7).
Figure 7: Insert Battery
)
3. Push the other side down to slide the battery into place.
4. Replace the back cover.
5. Make sure that the battery has been properly installed before powering on your Ogo.
To remove the battery:
1. Power off your Ogo.
2. Turn your Ogo over and slide off the back cover.
3. Remove the battery, lifting it gently from the side opposite the contacts.
14295 Rev. 1.4 9/24/04 17
Page 18
Ogo Manual
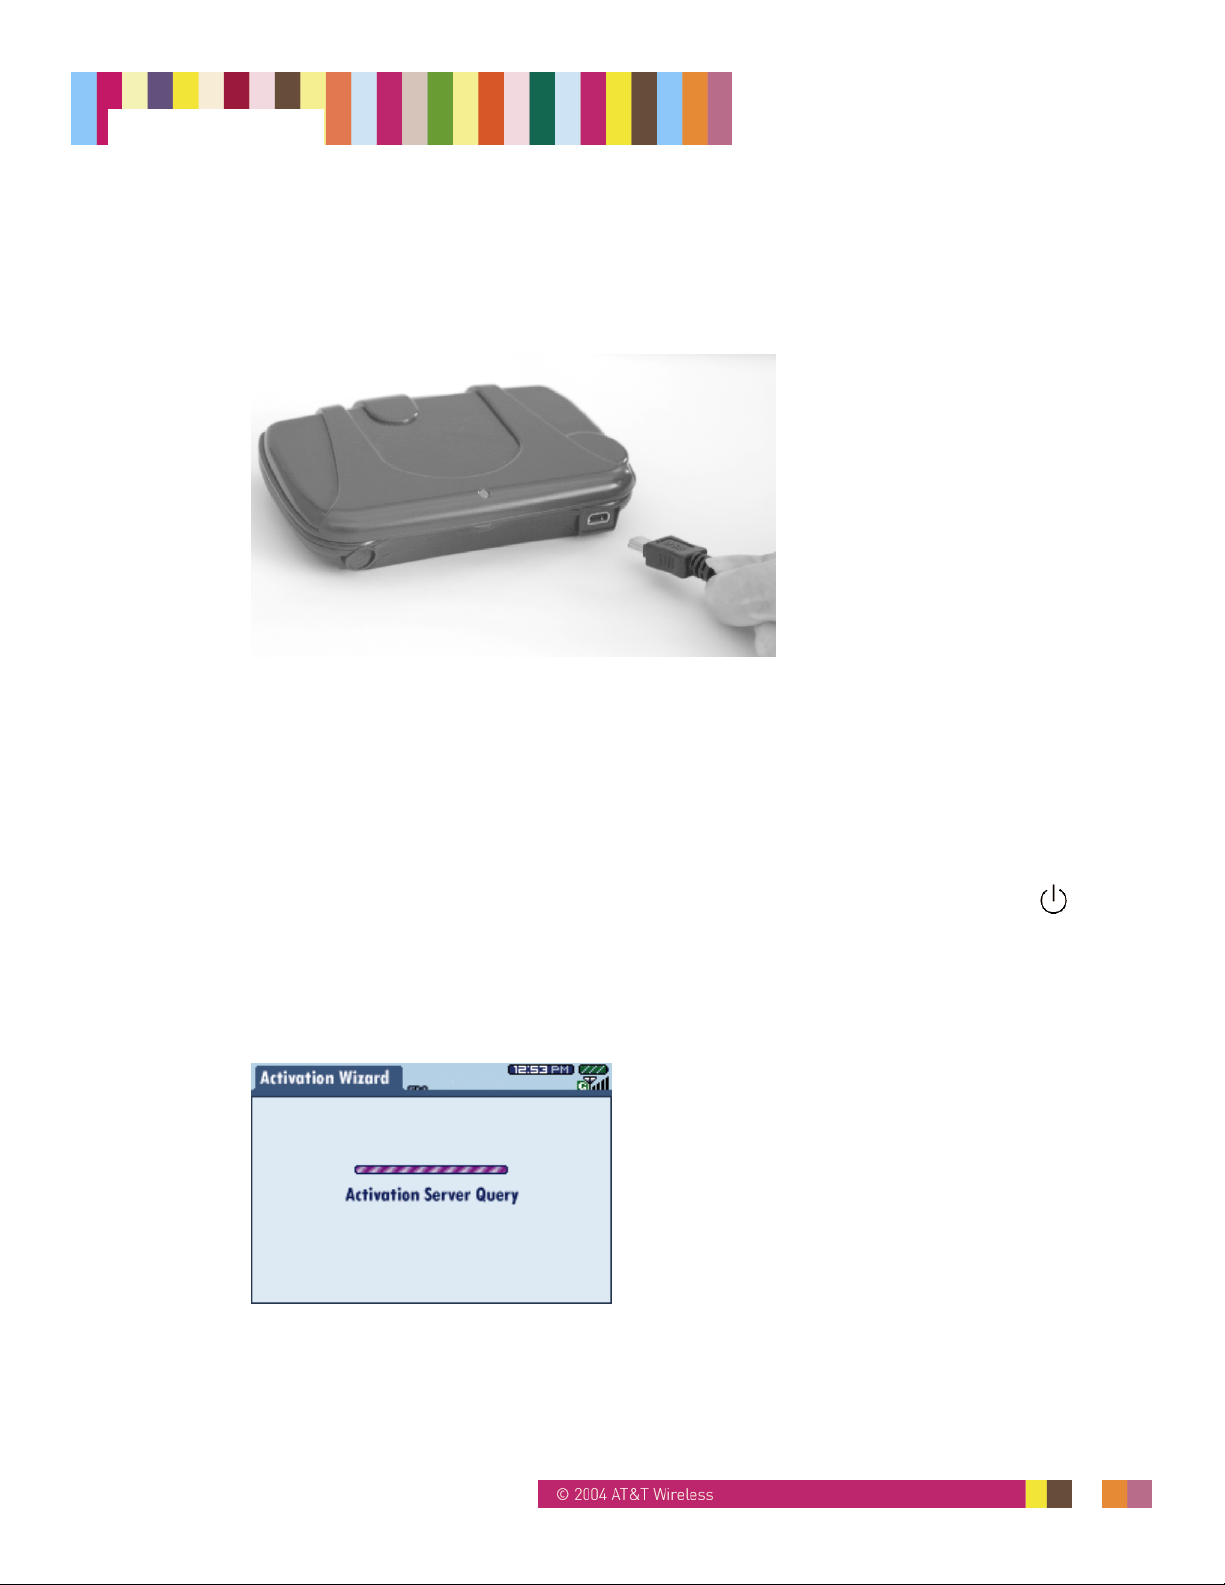
5.2.2. Connecting the Charger
Connect the charger’s power plug to the charging socket on the front of your Ogo (Figure 8).
Figure 8: Connect Charger
5.2.3. Charging the Battery
Charge your Ogo for twelve consecutive hours. For more information on Ogo’s battery
status, see Section 14.
Note:
You can begin the Activation Wizard while your Ogo is being charged.
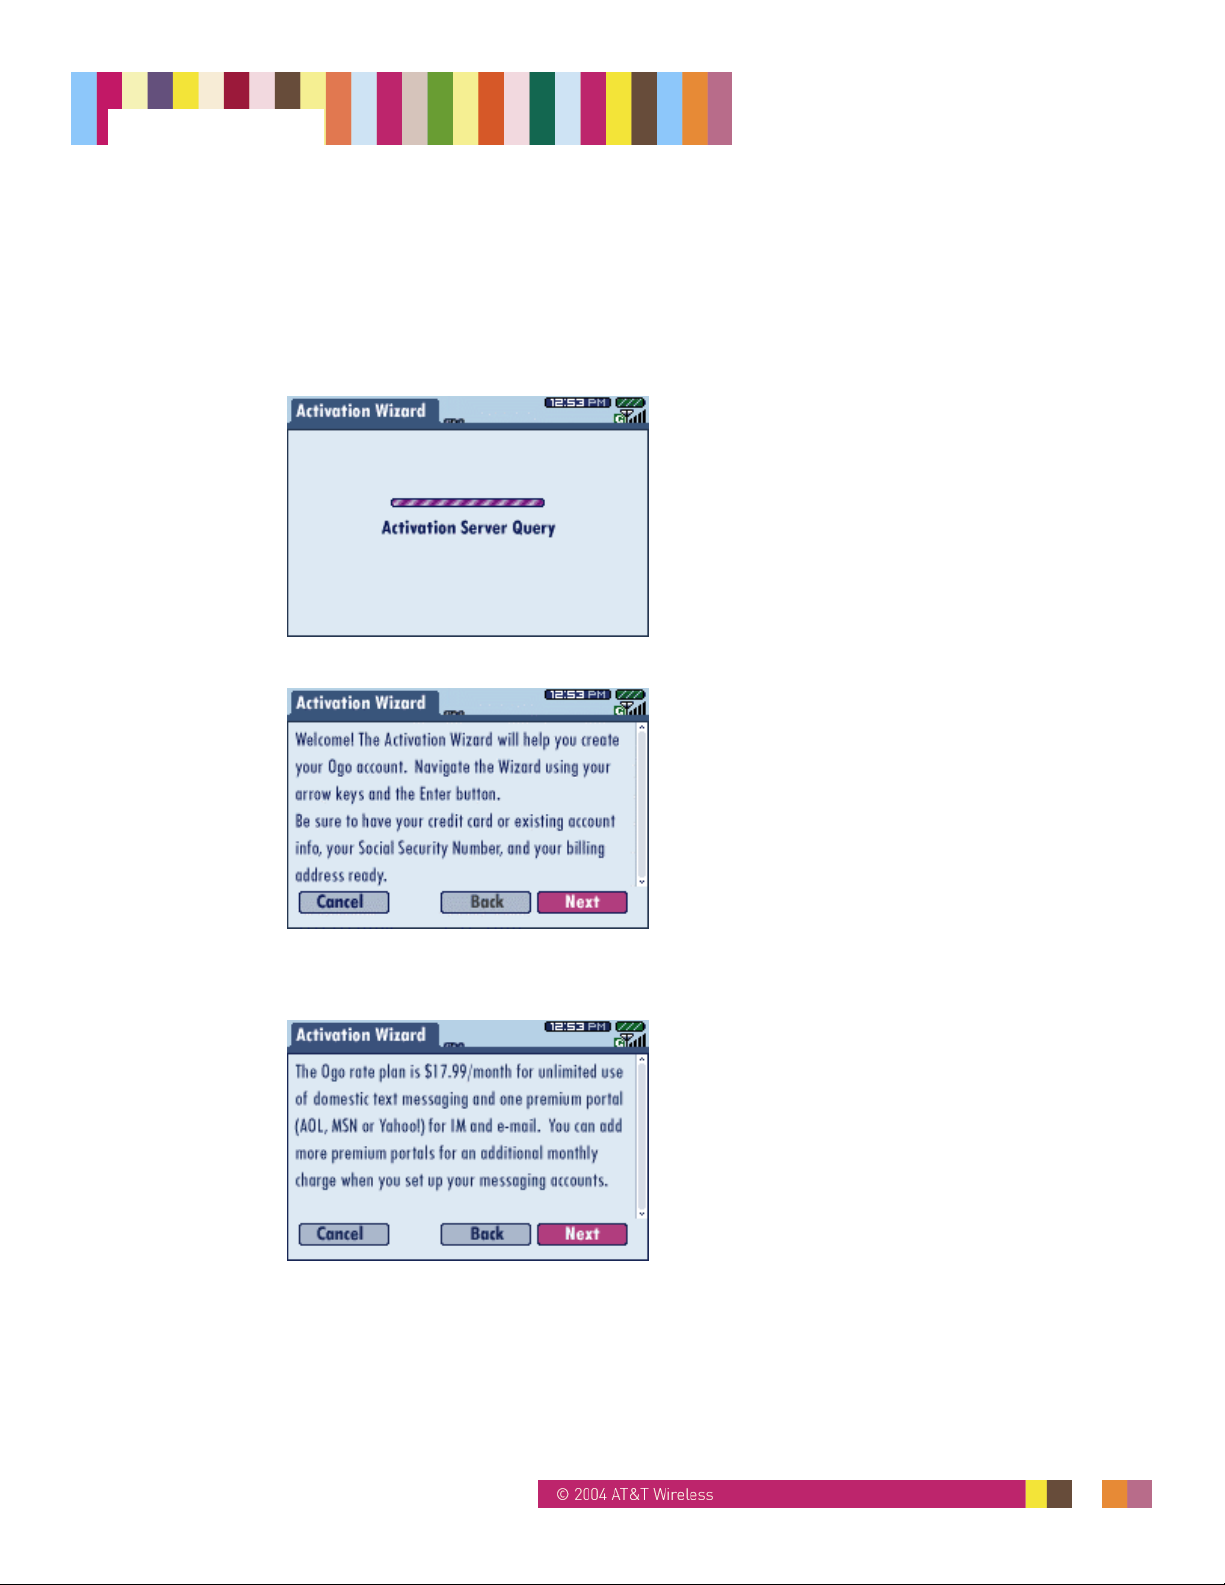
5.3. Powering On Your Ogo
Now that your Ogo is charging (or is fully charged), press the Power On/Off key:
When your device is powered on, you will see the screen shown in Figure 9. When your Ogo
connection is established, the Activation Wizard welcome screen appears.
Figure 9: Connection Status
14295 Rev. 1.4 9/24/04 18
Page 19

Ogo Manual
5.4. Activation and Messaging Wizards
5.4.1. Activation Wizard
This section summarizes the steps that take you through the Activation Wizard.
Once you have powered on your Ogo, follow the steps in the Activation Wizard to confirm
your rate plan and activation fee, and to select a payment method.
Ogo offers the following payment methods:
Credit card: You will be asked for your credit card number. The activation fee will be
charged to this card and the usage fees will be charged to this card on a monthly basis .
Existing AT&T Wireless GSM Account: If you have an AT&T Wireless GSM account, you
can pay using your existing account. Ogo charges will appear as an additional charge on
your AT&T Wireless bill.
When working with the Activation Wizard, use the inner ring of the 8-Way Navigation key to
move between onscreen buttons and press Enter to activate a selected button or option.
Note:
All screens shown in this manual are for reference only, and may differ slightly from
what is displayed on your Ogo.
5.4.1.1. Preparing for Activation
Before beginning the Ogo activation process, make sure that you have the following
information available:
Your credit card or existing AT&T Wireless GSM account information
Your Social Security Number
Your billing address
Your usage address (where you will be using your Ogo)
5.4.1.2. Overview of Activation
The activation process includes the following sections:
Welcome and rate plan information
Selection of one of the following payment methods (you will see a different series of
screens depending on the payment method you select):
− Setting up credit card payments
− Adding Ogo service to your existing AT&T Wireless GSM account
Usage address information
Terms of use
Submitting the activation request and confirming your activation
14295 Rev. 1.4 9/24/04 19
Page 20
Ogo Manual
5.4.1.3. Activating Your Ogo
The activation sequence should be performed with Ogo connected to its charger. You should
keep your Ogo powered on until the activation sequence is complete.
1. Power on your Ogo.
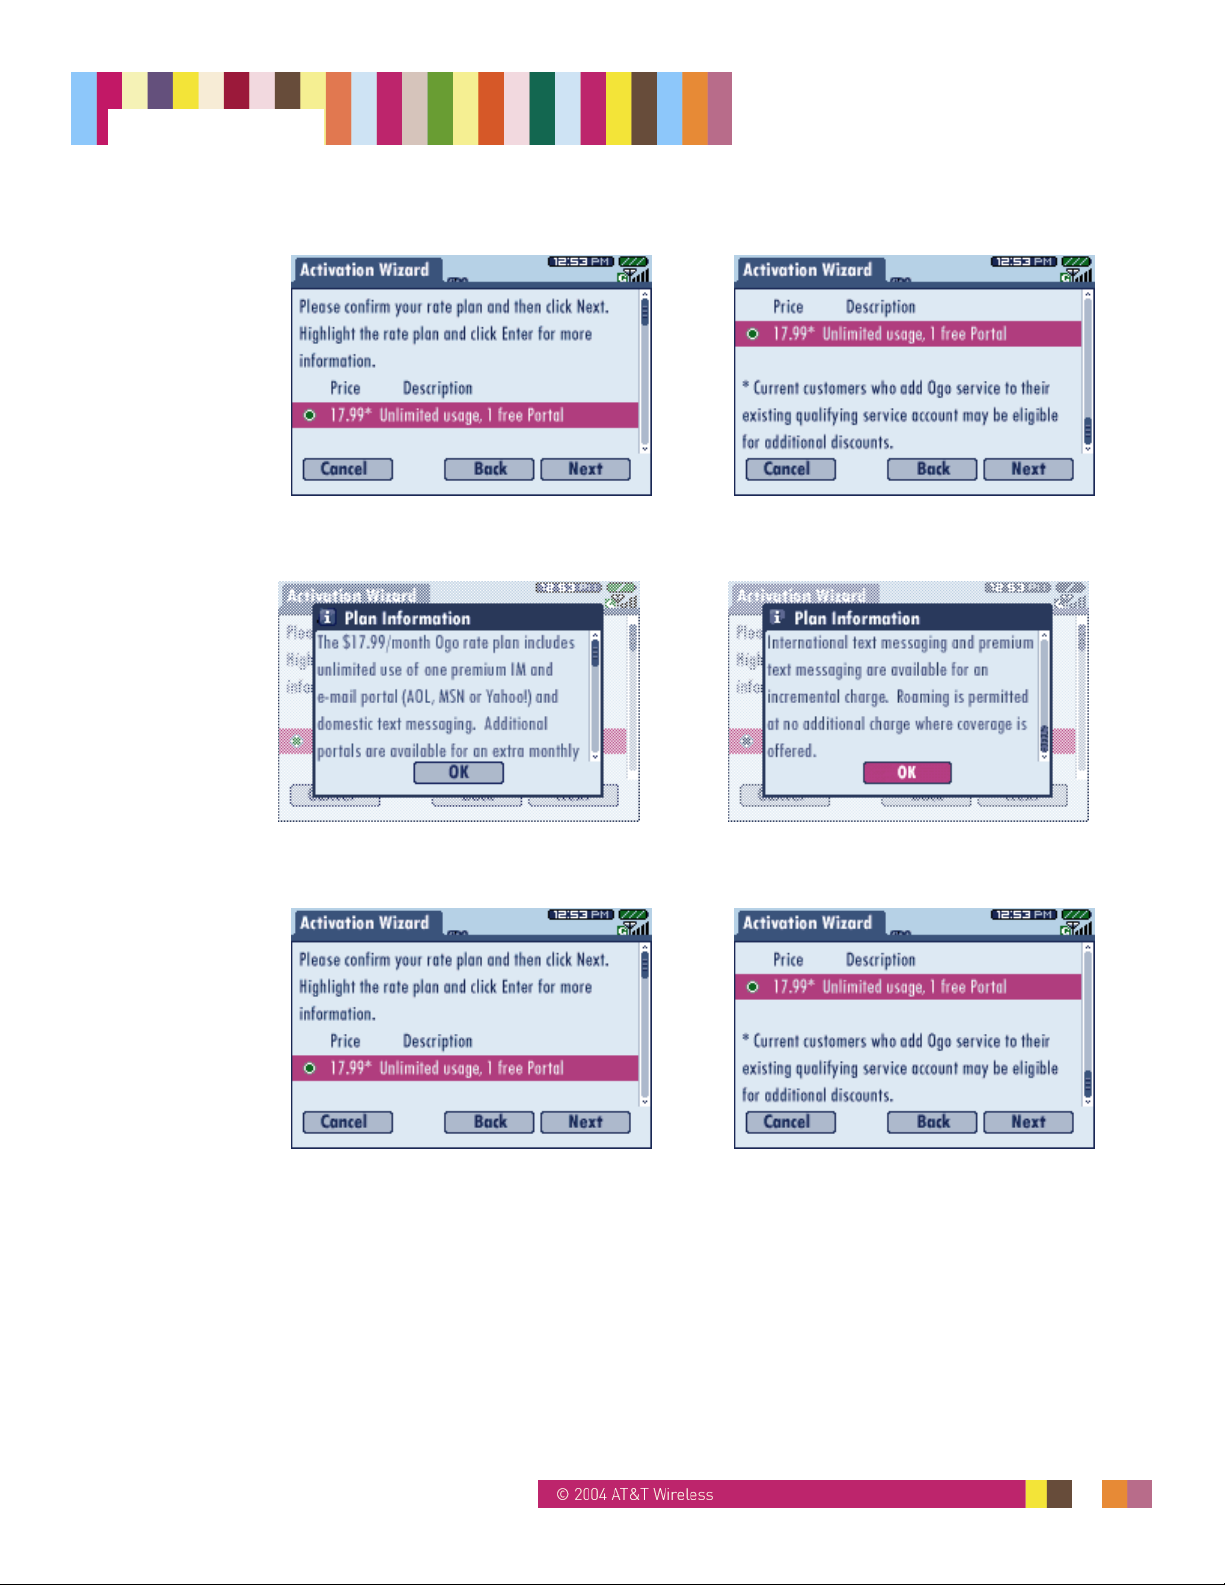
2. An Activation Server Query screen appears.
3. The next screen that appears is the Activation Wizard welcome screen.
Select Next and press Enter to continue.
4. The next screen explains payment options.
Select Next and press Enter to continue.
14295 Rev. 1.4 9/24/04 20
Page 21
Ogo Manual
5. The available rate plan screen appears.
6. With the 17.99 rate plan selected, press Enter. A message box appears, listing details
about the plan.
7. After scrolling to read all the information, select OK and press Enter to continue. This
returns you to the available rate plan screen.
Scroll to read the rest of the service plan information, then with Next selected, press
Enter.
14295 Rev. 1.4 9/24/04 21
Page 22
Ogo Manual
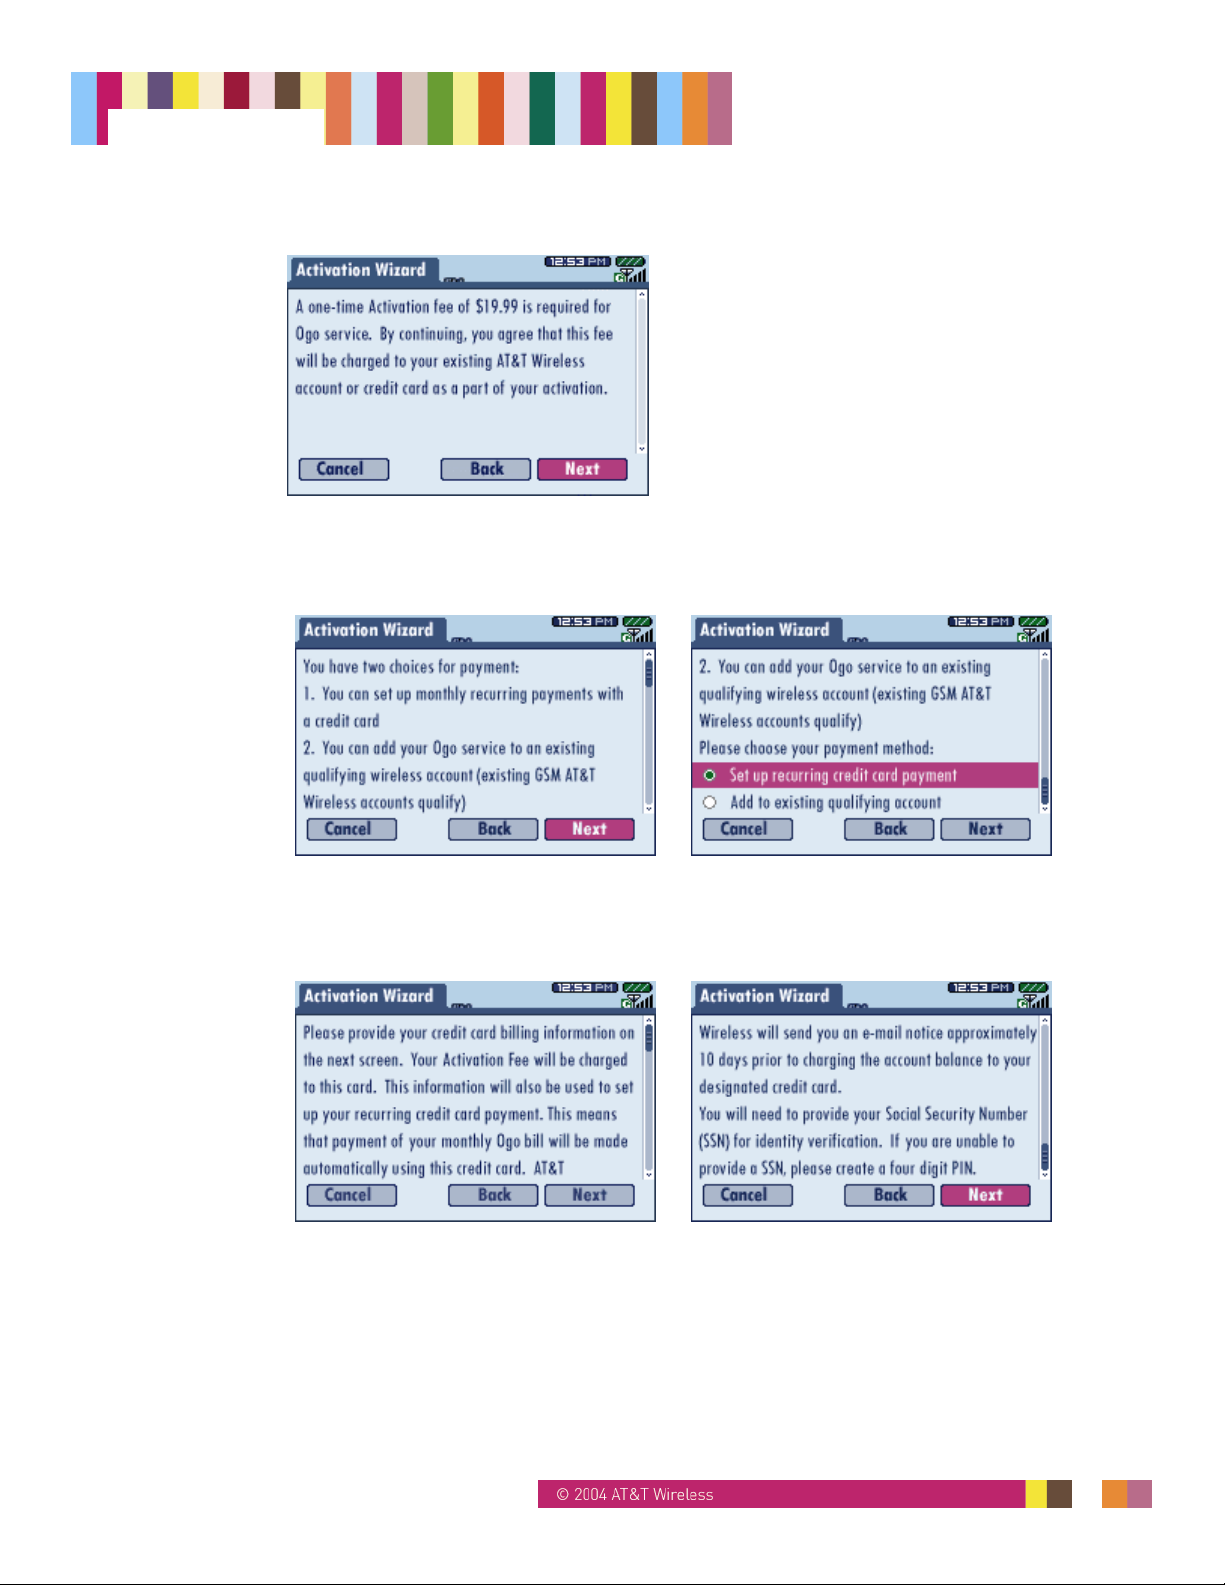
8. The next screen explains the activation fee.
Select Next and press Enter to continue.
9. A screen offering two choices for payment appears. Be sure to scroll to read all the
information. Select one of the two payment methods.
When you have chosen the method you want, select Next and press Enter to continue.
10. If you selected Set up recurring credit card payment, you will see the following
introduction screen. If you selected Add to existing qualifying account, go to Step 13.
Scroll to read all the information about credit card billing, then select Next and press
Enter to continue.
14295 Rev. 1.4 9/24/04 22
Page 23
Ogo Manual
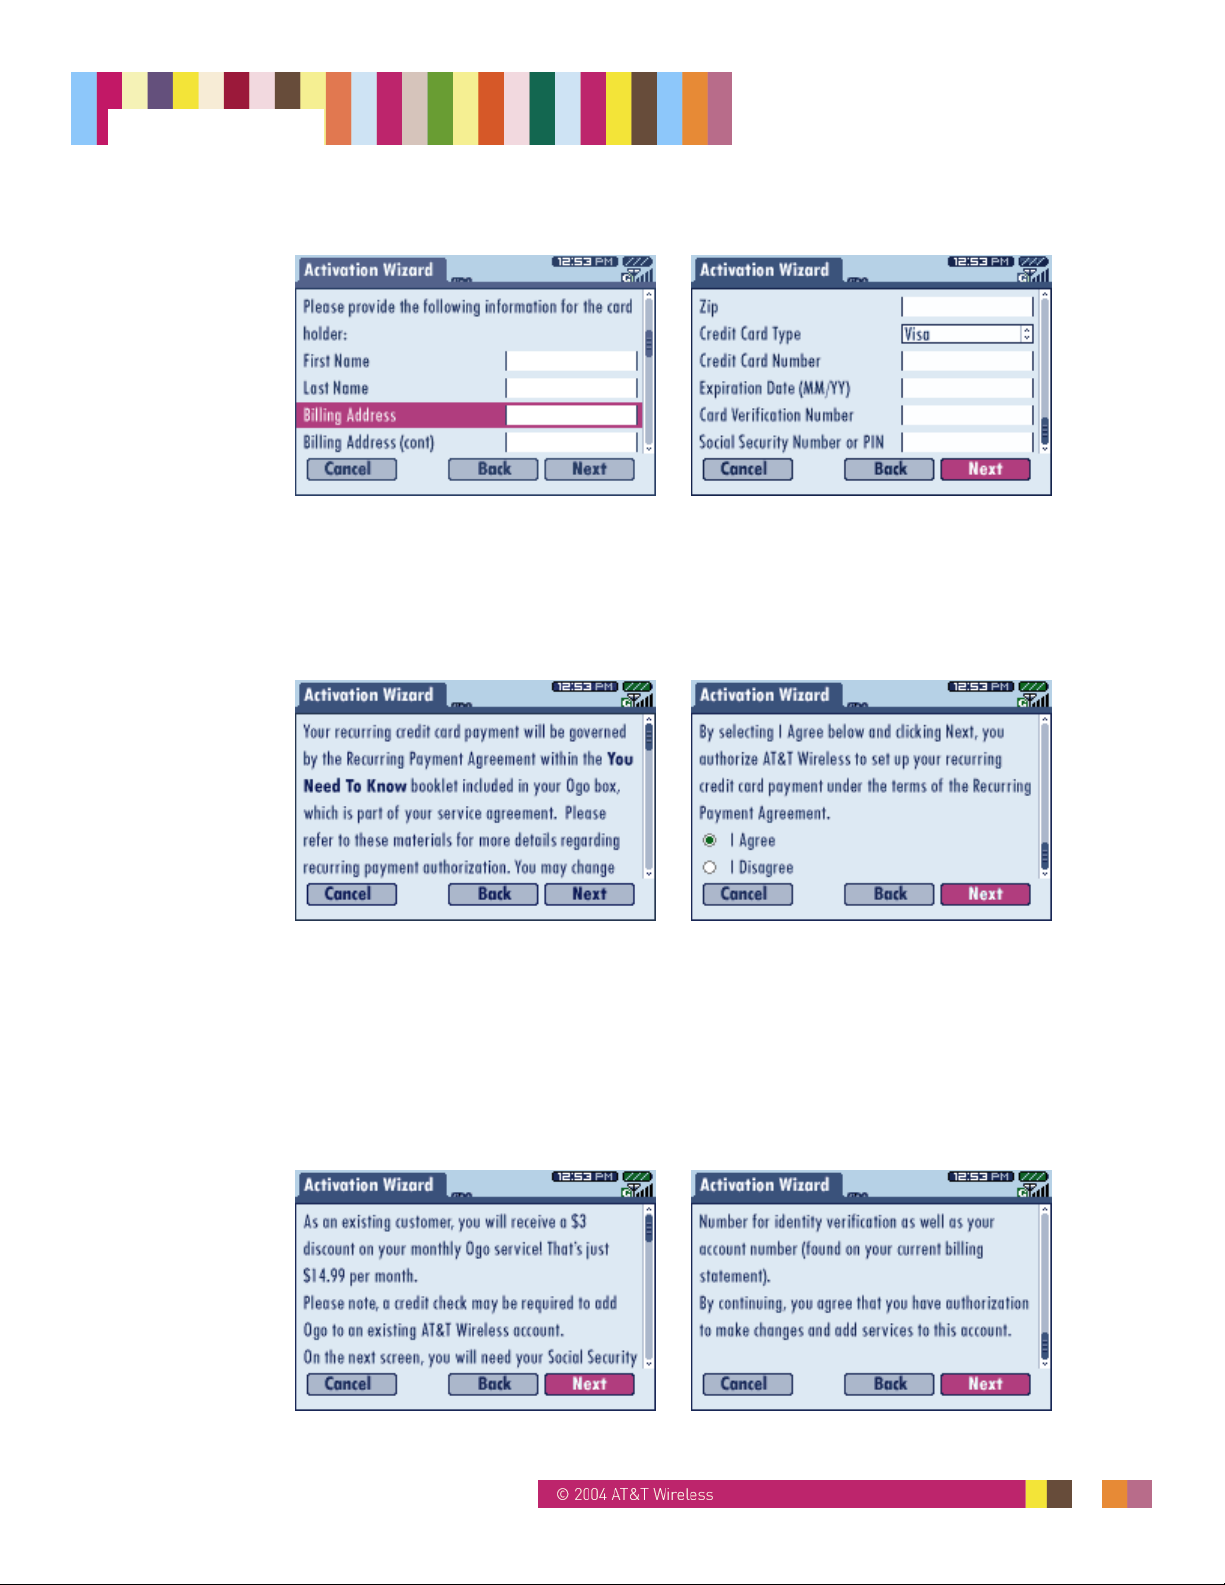
11. Type the details for your credit card. Be sure to scroll down and fill in all the details.
Select Next and press Enter to continue.
Note:
To make a selection from a field that contains a pop-up, select the field and press
Enter to open the pop-up, then select an item from the list (you can also type the first
letter of the item to select it) and press Enter again.
12. The recurring payment agreement screen appears.
Review the Recurring Payment Agreement, select I Agree, then select Next, and press
Enter to continue.
This completes the sequence of screens that apply specifically to credit card billing. The
next screens will ask you to provide information about your usage address (see Step 15).
13. If you selected Add to existing qualifying account (in Step 10), you will see the following
sequence of screens that apply specifically to billing through an existing AT&T Wireless
GSM account, starting with the following introductory screen.
14295 Rev. 1.4 9/24/04 23
Page 24

Ogo Manual
Scroll to read all the information, then select Next and press Enter to continue.
14. Type the details for your existing AT&T Wireless GSM account. Be sure to scroll down
and fill in all the details.
Select Next and press Enter.
15. The next screen asks you if your usage address is the same as your billing address. The
usage address is the location from which you will be using your Ogo.
• If this address is the same as your billing address, select Same and press Enter.
• If this address is different from your billing address, select Different and press Enter.
16. If you selected Different, a screen appears where you can enter your usage address
information.
Note:
To select your state, first select the State field and press Enter to open the pop-
up. You can type the first letter of your state to select it from the list, or scroll within the
14295 Rev. 1.4 9/24/04 24
Page 25

Ogo Manual
list. With your state selected, press Enter again. When typing your phone number, do not
include dashes.
After you have typed all the information, select Next and press Enter.
17. The next screen shows the Terms of Use information.
Scroll to read all the information, then select I Agree and press Enter to continue.
18. The following screen appears, indicating that your Ogo account activation is about to
begin.
This screen offers a final opportunity to change the address and billing information you
have provided. If you want to make changes, select Back and press Enter.
When you are satisfied that the information is correct, select Next and press Enter to
begin activation of your account.
19. The following screen indicates that activation is in progress.
14295 Rev. 1.4 9/24/04 25
Page 26

Ogo Manual
Activation may take several hours. Check back occasionally to see if your account has
been activated.
Note:
You should keep your Ogo powered on until the activation sequence is complete.
20. When your account has been successfully created, the following activation success
screen appears, providing you with the SMS number of your Ogo.
Write down this number and give it to your friends so they can send SMS (Text)
messages to your Ogo!
To look up your SMS number at any time:
1. From the Home screen, select Settings and press Enter.
2. Use the 8-Way Navigation key to select the Network tab.
The activation sequence should be performed with Ogo connected to its charger.
Your SMS number is located on the MSISDN line in this tab.
14295 Rev. 1.4 9/24/04 26
Page 27

Ogo Manual
5.4.2. Messaging Wizard
This section summarizes the steps that take you through the Messaging Wizard.
After you successfully activate your Ogo, the Messaging Wizard starts. This wizard allows
you to enter the details of your instant messaging and e-mail accounts.
When working with the Messaging Wizard, use the inner ring of the 8-Way Navigation key to
move between onscreen buttons and press Enter to activate a selected button or option.
Note:
All screens shown in this manual are for reference only, and may differ slightly from
what is displayed on your Ogo.
5.4.2.1. Preparing for Messaging Accounts Setup
To use Ogo for instant messaging, you must have at least one existing IM account with AOL,
MSN, or Yahoo!. You can sign up for an account by visiting one or more of the following
sites:
AOL: www.aim.com
MSN: www.msn.com
Yahoo!: www.yahoo.com
5.4.2.2. Overview of Messaging Accounts Setup
The messaging accounts setup process includes the following sections:
Choosing premium portals (for IM and e-mail)
Adding ISP e-mail accounts (if desired)
5.4.2.3. Setting Up IM and E-mail Accounts
1. If the Messaging Wizard does not start automatically (after the Activation sequence),
from the Home screen, select My Status and press Enter. This screen will indicate that
you have no IM accounts set up.
Press the Options menu key, select Add IM Account, and press Enter. The following
Messaging Wizard welcome screen appears.
14295 Rev. 1.4 9/24/04 27
Page 28

Ogo Manual
Scroll to read all the information in the welcome screen, then select Next and press Enter
to continue.
2. The next screen provides information about the available premium portals.
Scroll to the Select pop-up and press Enter to view the list of available portals. Select
your IM provider (AOL, MSN, or Yahoo!) and press Enter. Then select Next and press
Enter to continue.
3. Depending on the IM service you selected, one of the screens shown below appears,
allowing you to set up your account.
AOL MSN Yahoo!
• AOL: If you choose AOL IM and e-mail, you will need to set up your IM and e-mail
accounts in two separate screens. When you are finished, select Next and press
Enter.
• MSN: Review the MSN agreement, select I Agree, select Next and press Enter. In
the next screen you will type your MSN/Hotmail e-mail address, then your password.
You can also set up your MSN mailbox by selecting the e-mail check box. Press
Enter to select or clear the check box. When you are finished, select Next and press
Enter.
• Yahoo!: Type your Yahoo! ID, then type your password. You can also set up your
Yahoo! mailbox by selecting the e-mail check box. Press Enter to select or clear the
check box. When you are finished, select Next and press Enter.
4. After you have set up your IM and e-mail options for one of the premium portals (AOL,
MSN, or Yahoo!), the Sign In Option screen appears. From this screen you can choose
14295 Rev. 1.4 9/24/04 28
Page 29

Ogo Manual
to automatically sign in to your IM account when you power on your Ogo. Press Enter to
select or clear the check box, then select Next and press Enter.
5. If you want to add another premium portal, repeat Steps 2 through 4. You can add more
than one premium portal, and you can use more than one portal at the same time.
Note:
Ogo account.
6. If you are finished adding premium portals and do not want to add an ISP e-mail account,
select Next and press Enter. The Account Summary screen will appear (see Step 11).
7. If you do want to add an ISP e-mail account, from the pop-up where you selected
premium portals, select Other E-mail and press Enter, then select Next and press Enter
(see Step 2).
8. The next screen is E-mail Account Setup, where you can begin the process for adding
ISP e-mail accounts.
To define an ISP e-mail account, select Yes and press Enter, then select Next and press
Enter. (Otherwise, select No and press Enter, then select Next and press Enter).
Note:
charges on your Ogo account.
9. Select the pop-up and press Enter, then select an ISP from the pop-up and press Enter
(or select Other if your e-mail provider is not listed). Type the requested information,
select Next, and press Enter.
If you selected Other from the e-mail ISP list, the next screen prompts you for server
details (these should be provided by your ISP). Type the information, select Next, and
press Enter.
Adding more premium portals will result in additional monthly charges on your
Adding additional ISP e-mail accounts will not result in additional monthly
10. You can continue adding ISP e-mail accounts from the E-mail Account Setup screen. To
add accounts, select Yes and press Enter, then select Next and press Enter (repeat
Step 9).
When you have finished adding e-mail accounts, select No and press Enter, then select
Next and press Enter.
11. The next screen is the Account Summary screen. Here you can review all of the
premium portals and other e-mail accounts you have set up on your Ogo.
At this point, you can choose to remove an IM or e-mail service by selecting the service
and pressing Enter to clear the check box for that service. When you are finished, select
Next and press Enter.
12. The next screen is the Billing Summary screen. It shows the basic monthly charge and
the charges to be added to your account if you selected more than one premium portal.
Select Next and press Enter to begin the registration process.
14295 Rev. 1.4 9/24/04 29
Page 30

Ogo Manual
13. After the registration process is complete, review the registration complete screen, select
Finish, and press Enter to return to the Home screen. You’re done!
Note:
If you decide to add IM or e-mail accounts at a later date, see Section 6.3.
14295 Rev. 1.4 9/24/04 30
Page 31

Ogo Manual
6. My Status
From the My Status screen you can log on/off or sign in/out, change your IM status, and add
a new community. You can also globally set the status that will show for all communities
when your Ogo is closed.
The My Status screen shows whether you are online and available in the different
communities.
6.1. Logging On/Off or Signing In/Out
To log on/off or sign in/out of a community:
1. Select the community you want.
2. Press the Options menu key, select the action you want, and press Enter.
6.2. Changing Your IM Status
To change your IM status:
1. From the Home screen, select My Status and press Enter.
2. Select the community where you want to change your status, and press Enter.
3. From the status pop-up, select the status you want and press Enter.
Figure 10: My Status Screen
AIM MSN Yahoo!
14295 Rev. 1.4 9/24/04 31
Page 32

Ogo Manual
To change your IM status for all communities when your Ogo is closed:
1. From the Home screen, select My Status and press Enter.
2. Select When Closed and press Enter. The selections include:
• No Change (default setting)
• Away
• Busy
• Be Right Back
3. Scroll to select the status you want and press Enter.
6.3. Adding a New Community or ISP E-mail Account
To add a new community or ISP e-mail account:
1. From the Home screen, select My Status and press Enter.
2. Select either the IM tab or the E-mail tab.
3. Press the Options menu key, then select Add IM (or E-mail) Account.
4. Provide the requested information to set up your new account. See Section 5.4.2.3 for
step-by-step information.
14295 Rev. 1.4 9/24/04 32
Page 33

Ogo Manual
7. Setting Up Banner Events
Banners appear onscreen to notify you when your contacts come online or when new
messages have arrived (see Figure 11). Banners are for information only and disappear
after a few seconds.
To specify events when a banner will appear:
1. From the Home screen, select Device and press Enter.
2. Select Banner Settings and press Enter.
3. On the Banner Settings screen, you can select the following events:
• SMS, IM
• E-mail events
• Contact online
Select an event, and then press Enter to select or clear the check box for that event.
4. When you have chosen the settings you want for all events, select Done and press
Enter.
Figure 11: IM Banners
IM Contact Online New IM Chat Message Multiple New
E-mail/SMS Messages
Banner Icons are shown in Table 5.
Table 5: Banner Icons
Icon Definition Icon Definition
E-mail message
SMS message
Multiple e-mail
messages
Chat/Conversation
14295 Rev. 1.4 9/24/04 33
Page 34

Ogo Manual
8. Instant Messaging (IM)
The IM screen allows you to chat with your contacts in the premium portals (AOL, MSN, and
Yahoo!) for which you are registered. You can go to the IM screen at any time by pressing
the Instant Messaging shortcut key. You may be prompted to log on or sign in if you have not
already done so.
The IM screen shows your IM contacts and the status of each contact. You can chat with an
IM contact by pressing Enter on an IM contact’s name.
You can navigate between the IM community tabs using the outer ring of the 8-Way
Navigation key. For example, selecting the MSN tab switches to the MSN Messenger
community.
When you select a community tab (AIM, MSN, or Yahoo!), your contacts from that
community are displayed (see Figure 12). Each line shows the contact’s nickname and IM
status (Away, Online, etc.). Each community has its own status icons.
Note:
Figure 12: IM Screen
Community Tabs
When one of your contacts sends you an IM, you will receive a chat alert next to that
contact’s online status indicator. Chat alerts are animated if the chat message is unread.
The maximum number of active chats is 20.
8.1. Reading and Composing Chat Messages
8.1.1. Accessing Chat Messages Using the Ogo Shortcut Key
An easy way to read and respond to chat messages is to use the Ogo shortcut key. You can
press this key at any time to access a list of your current chats as well as recent e-mail and
SMS messages. For more information about the Ogo shortcut key, see Section 3.2.1.
Chat Alert
IM Status
Contact’s
Nickname
8.1.2. Sending an Instant Message (Starting a Chat Session)
To send an instant message or start a chat session:
1. Press the Instant Messaging shortcut key or, from the Home screen, select IM.
14295 Rev. 1.4 9/24/04 34
Page 35

Ogo Manual
2. Use the outer ring of the 8-Way Navigation key to navigate to the community tab you
want (log on or sign in if necessary).
3. Select the nickname of the contact with whom you want to chat. Make sure that the
contact is available.
4. Press Enter. A chat window opens.
5. Type your message, select Send, and press Enter.
Note:
contact on AIM or Yahoo!, a pop-up informs you that you cannot send an IM. For MSN, a
Compose message screen opens so that you can e-mail the offline contact.
You cannot chat with a contact who is offline. If you attempt to chat with an offline
8.1.3. Adding Emoticons to Your Chat
You can use the sets of emoticons supported by your selected community to personalize
your chat messages. Emoticons can only be used in IM community chat sessions.
To insert an emoticon into a chat session:
1. Press the Emoticon key. An emoticon palette appears (for example, as shown in
Figure 13).
2. Using the 8-Way Navigation key, select the emoticon you want and press Enter to insert
it. You can also insert the selected emoticon by pressing the corresponding letter key on
Ogo’s keyboard.
Emoticons will appear in the view message section (upper portion) of your chat screen.
Figure 13: Sample Emoticon Palette (MSN)
Note:
palettes.
For a list of emoticons by IM community, see Section 16.
For MSN and Yahoo! emoticons, ALT toggles between two different emoticon
8.1.4. Closing a Chat Session
You can close chat sessions in the following ways:
Ogo pop-up: Select the chat session and press CLR.
14295 Rev. 1.4 9/24/04 35
Page 36

Ogo Manual
Options menu: While in a chat session, press the Options menu key, select Close
Conversation or Close Chat, and press Enter.
Log Off/Sign out: Log off or sign out of an IM community from the Options menu to close
all open chat sessions for that community.
Power off: Power off your Ogo to close all open chat sessions.
Chat sessions are automatically closed when:
There is no chat activity from either IM contact in a 24-hour period.
The maximum number of active chats (20) is reached.
8.2. Managing IM Contacts
You can manage your IM contacts information via the IM Options menu. You can access the
IM Options menu by going to an IM community, signing in, and pressing the Options menu
key.
From the IM Options menu you can:
Add an IM contact (see Section 8.2.1)
Delete an IM contact (see Section 8.2.2)
Block an IM contact (see Section 8.2.3)
Personalize your MSN or Yahoo! contacts with alerticons (see Section 11.3.1)
From the IM Options menu, you can also:
Create a new message/chat session (see Section 8.1.2)
Log Off/Sign Out (signs you out of a selected IM community)
8.2.1. Adding an IM Contact
You can add a new IM contact only from within a specific community, using the Options
menu.
To add a new IM contact:
1. Go to the IM community where you want to add an IM contact (if you have not signed in
to the IM community, do so).
2. Press the Options menu key, select Add a Buddy, Add IM Contact, or Add a Friend, and
press Enter (Figure 14).
14295 Rev. 1.4 9/24/04 36
Page 37

Ogo Manual
Figure 14: IM Options Menu
AIM MSN Yahoo!
3. Enter the IM contact screen name or e-mail address as appropriate (Figure 15), then
press Enter.
Figure 15: Add a New IM Contact
AIM MSN Yahoo!
8.2.2. Deleting an IM Contact
Ogo allows only a limited number of IM contacts, so removing a contact you no longer chat
with is a good idea.
To delete an IM contact:
1. Go to the IM community where you want to remove an IM contact (if you have not signed
in to the IM community, do so).
2. Select the IM contact you want to remove.
3. Press the Options menu key, select Delete Buddy, Delete IM Contact, or Delete Friend,
and press Enter (Figure 14).
4. A confirmation pop-up appears, asking you to confirm that you want to remove the
contact (Figure 16). Select Yes and press Enter.
14295 Rev. 1.4 9/24/04 37
Page 38

Ogo Manual
Figure 16: Remove an IM Contact Confirmation Screen
AIM MSN Yahoo!
8.2.3. Block an IM Contact (AIM and MSN)
Selecting this option from the IM Options menu allows you to restrict a contact’s ability to
contact you directly. Blocked IM contacts will not know you have blocked them. You will
appear to be offline to a blocked contact, and will not receive messages from blocked
contacts.
To block an IM contact:
1. Go to the IM community where you want to block an IM contact (if you have not signed in
to the IM community, do so).
2. Select the IM contact you want to block.
3. Press the Options menu key, select Block IM Buddy or Contact, and press Enter.
Note:
and un-block that contact.
If you want to un-block a contact later, go to the Options menu for that IM community
14295 Rev. 1.4 9/24/04 38
Page 39

Ogo Manual
9. Mailbox
From the Mailbox screen, you can see and manage your e-mail and SMS messages. To
access the Mailbox screen, press Home, and select Mailbox (see Figure 17), or press the
Mailbox shortcut key.
Figure 17: Accessing the Mailbox
The Mailbox screen (Figure 18) displays one or more tabs, depending on the services to
which you subscribe. The Inbox tab is selected by default; this tab shows all of your e-mail
and SMS messages. Each of the other tabs displays a single category of messages—all
messages for a single e-mail provider, all SMS messages, all outgoing messages, etc.
Active Tab
Number Indicates
Unread Messages
Message Type
and State
Contact Full Name
Figure 18: Mailbox Tabs
Text View Toggle Indication
Toggles between Subject/Message
and Date/Time sent
Tab Navigation Indication
Displays when hidd e n Ta bs are
present
Scroll Indicator
Message or Subject
Text Field
14295 Rev. 1.4 9/24/04 39
Page 40

Ogo Manual
9.1. Using Mailbox Options
From the Mailbox screen, press the Options menu key to see the selections listed in Table 6.
Table 6: Mailbox Options
Option More Information
Reply (to the selected e-mail or
SMS)
Delete this Message Removes the message from Ogo’s Mailbox and the
Forward (the selected e-mail or
SMS)
Sort by Sender
Sort by Date/Time
Reply to All Opens a Compose message addressed to the sender
Delete Locally Removes the message from Ogo’s Mailbox. The
New Msg to Sender Opens a blank Compose message addressed to the
Delete all Read Messages Removes all opened e-mail messages from both Ogo’s
9.2. Mail and SMS Icons
Opens a Compose message addressed to the sender
of the original message.
provider’s server.
Opens a Compose message with a blank address line
where you can type or insert new e-mail address(es).
Sorts messages by the Sender field (alphabetically) or
by the Date/Time field. When you sort by one option,
the other option becomes available on the menu.
and all recipients of the original message.
message will remain on the provider’s server.
sender of the original message.
Mailbox and the provider’s server.
Table 7 lists the e-mail and SMS icons that may appear in your Inbox.
Note:
When you mark a message to be saved on the AOL server, it will be saved on the AOL
server the next time your Ogo synchronizes with the AOL server. The Save on AOL option is
also provided on the View E-mail screen.
Table 7: Mail and SMS Icons
14295 Rev. 1.4 9/24/04 40
The Save on AOL option will appear only when you are in the AOL mailbox folder.
Icon Definition
Unread e-mail
Read e-mail
Sent e-mail
Page 41

Ogo Manual
Icon Definition
Outgoing e-mail
Sent failure
Unread partial e-mail
Read partial e-mail
Unread SMS
Read SMS
Sent SMS
Outgoing SMS
Sent SMS failure
Draft
Marked to save on AOL Server (unread)
Saved on AOL Server (unread)
Marked to save on AOL Server (read)
Saved on AOL Server (read)
9.3. Using the Find Function
You can search in your Mailbox for a particular e-mail or SMS message by using the Find
function. The Find function searches on the following fields:
Address fields
Subject
Message body
To search for a message:
1. From the Mailbox screen, select the Find tab.
2. Type the search text and press Enter. You can search for up to 32 characters (including
symbols).
The Find results will be displayed until you initiate a new Find or until you select Clear
Results on the Options menu. To sort the search results, press the Options menu key and
choose a sorting option.
14295 Rev. 1.4 9/24/04 41
Page 42

Ogo Manual
9.4. E-mail Attachments
When an attachment is received in an e-mail message, a notice is included at the end of the
message stating that the attached file cannot be delivered to your Ogo. The file name of the
attachment will be shown in the e-mail.
14295 Rev. 1.4 9/24/04 42
Page 43

Ogo Manual
10. E-mail and SMS
Before you can send an e-mail message, you must first set up an e-mail account with a
premium portal provider. If you have not set up an e-mail account during registration, you’ll
see “SMS Only” in the From line on the Compose screen.
For information about setting up an e-mail account, see Section 5.4.2.3.
Note:
be referred to as your Text number.
SMS messages may be referred to as Text messages; your SMS number may also
10.1. Sending an E-mail or SMS Message
To send an e-mail or SMS message:
1. Press the Compose shortcut key, or from the Home screen, select Compose.
Figure 19: Compose Screen
2. Add an address to the To field. Do one of the following:·
• Type the e-mail or SMS address in the To field.
• With the cursor in the To field, long-press Enter and then select the desired contact
and address from your contact list.
3. Use the inner ring of the 8-Way Navigation key to move to the Subject field, then type the
subject of your message.
4. Move to the Message text box and type your message.
Note:
5. Select Send and press Enter.
Note:
14295 Rev. 1.4 9/24/04 43
SMS messages have a limit of 640 characters.
You can also press the Options menu key and select Send (see Figure 20).
Page 44

Ogo Manual
Figure 20: Sending a Message from the Options Menu
For more information on addressing e-mail or SMS messages, see Section 10.6.1.
Note:
this limit will result in the following pop-up message: “This message exceeds the maximum
allowed text limit and will be trimmed accordingly.”
An e-mail message can include up to 4000 characters. E-mail messages that exceed
10.1.1. Choosing an E-mail Address in the From Field
If you have more than one e-mail account, you can choose the address you want to send
your message from:
1. On the Compose screen, select the From field and press Enter.
2. Select the e-mail address for the message and press Enter.
Your message will now reflect the new address in the From field.
10.1.2. Changing Your Default E-mail Address for Sending Messages
When composing an e-mail message, your default e-mail address (in the From field) will be
the address of the
If you have more than one e-mail account and wish to change your default e-mail address:
1. From the Home screen, select Settings and press Enter.
2. Select the Email tab.
3. Select the name of the e-mail account you want to make your default account and press
Enter.
first
(or the only) e-mail account you originally set up on your Ogo.
4. In the Mailbox Settings screen, scroll down to select the Default Account check box.
5. Press Enter to select the check box.
6. Scroll down to select Done and press Enter.
Your Compose e-mail screen will now list the new default address in the From field.
14295 Rev. 1.4 9/24/04 44
Page 45

Ogo Manual
10.1.3. Sending SMS Messages
If all of the recipient addresses of your message are mobile phone numbers, your message
will be sent as an SMS. The From address that the recipients will see will be your SMS
number (MSISDN). The From address you will see when sending the message from your
Ogo will be your default e-mail address.
10.2. Replying to an E-mail or SMS Message
To reply to an e-mail or SMS message:
1. Open the message and do one of the following:
• Press Enter to select Reply.
• Press the Options menu key, select Reply, and press Enter.
2. Type the subject of your message (SMS only).
3. Move to the message text box and type your reply.
4. Select Send and press Enter.
Note:
You can also press the Options menu key and select Send.
10.3. Forwarding an E-mail or SMS Message
To forward an e-mail or SMS message:
1. Open the message, press the Options menu key, and select Forward.
2. Do one of the following:
• Type the e-mail or SMS address in the To field.
• With the cursor in the To field, long-press Enter and then select the desired contact
and address from your contact list.
3. Type the subject of your message (SMS only).
4. Move to the message text box and type your reply.
5. Select Send and press Enter.
Note:
You can also press the Options menu key and select Send.
10.4. Saving a Draft of a Message
After composing a message, if you want to save it as a draft, press the Options menu key,
select Save as draft, and press Enter.
You can find your draft later by pressing the Mailbox shortcut key.
In the Mailbox’s message list, drafts are indicated by the draft icon:
14295 Rev. 1.4 9/24/04 45
Page 46

Ogo Manual
Note:
You can also quickly save your draft while in the Compose screen by pressing the
UP key. You will see a pop-up that asks you if you want to save changes to the draft (see
Figure 21).
Figure 21: Save Draft Pop-up
10.5. Deleting a Draft of a Message
If you decide not to keep a draft message, do one of the following:
While composing a message, press the Options menu key and select Delete this
message.
You will see a pop-up asking you to confirm that you want to delete the message.
From the Mailbox screen, select the message, press the Options menu key, and select
Delete this Message.
Press the Ogo shortcut key, select the draft message to be deleted and press Clear.
10.6. Addressing a Message
10.6.1. Adding Multiple Recipients to the Same Field
If you want to address an e-mail or SMS message to more than one recipient in the To, CC,
or BCC fields:
1. Press the Options menu key, then select the field where you would like to add a
destination address.
14295 Rev. 1.4 9/24/04 46
Page 47

Ogo Manual
Figure 22: Adding Additional E-mail or SMS Addresses
2. Press Enter to access your contacts.
3. Choose the e-mail address or mobile phone number of the next recipient.
Each time you want to add another recipient, you will need to repeat steps 1 through 3.
10.6.2. Sending a Message to a New Recipient (Address Clipboard)
When you send an e-mail or SMS to an address that is not already in your contact list, a
pop-up appears asking if you want to add that address to your contact list before sending the
message.
Figure 23: Update Contacts
1. If you select Skip and press Enter, your message will be sent, but the recipient’s address
will not be saved to your contact list. Selecting Save and pressing Enter takes you to the
Address Clipboard.
Figure 24: Address Clipboard
14295 Rev. 1.4 9/24/04 47
Page 48

Ogo Manual
2. Select the address you want to save and press Enter.
Figure 25: Address Designation (E-mail or SMS)
3. From the Address Designation screen, you can add the address to an existing contact,
create a new contact, or close.
E-mail Designation Mobile Phone Designation (SMS)
Note:
address will not be saved to your contact list.
4. Create Contact takes you to the Contact Profile screen (for more information, see
Section 11.2).
Add to Contact activates a pop-up that shows you a list of your existing contacts to which
the address can be added.
Figure 26: Contact List
5. Select the contact to which you want to add this address and press Enter. A confirmation
screen appears, indicating that the e-mail address or mobile phone number has been
added to the contact profile.
If you select Close and press Enter, your message will be sent, but the recipient’s
When you are finished adding e-mail addresses and/or mobile phone numbers in the
Address Clipboard to your contacts (or when you select Close and press Enter), your
message will be sent.
14295 Rev. 1.4 9/24/04 48
Page 49

Ogo Manual
10.6.3. Clearing and Editing Addresses in Messages
To quickly delete an address from a message, use a long press on CLR. This deletes the
entire address from the field. (You can delete a whole message in the message field using
this method.)
You can also use the 8-Way Navigation key to place the cursor to the right of the last
character in the recipient address. You can then edit, delete, or type new address text.
14295 Rev. 1.4 9/24/04 49
Page 50

Ogo Manual
11. Contacts
Contacts lets you set up, find, and manage contact information for people with whom you
exchange e-mail and SMS messages. Contacts for IM are separate. For more information on
IM contacts, see Section 8.2.
All Tab
Contact’s Alerticon
Note:
You can quickly compose a message to a contact by selecting the contact’s name,
pressing the Options menu key, and selecting Compose Message.
The Contacts screen (Figure 27) has several tabs. In the All tab, each line shows a contact
name and an alerticon.
You can also create groups for your contacts.
Figure 27: Contacts Screen
Group Tab
Community or
Address Type
Contact’s Name
Address of Contact
(E-mail or SMS)
11.1. Creating a Contact
To create a contact:
1. From the Home screen, select Contacts and press Enter.
2. Press the Options menu key, select New Contact, and press Enter.
3. A Contact Profile screen appears (Figure 28).
14295 Rev. 1.4 9/24/04 50
Page 51

Ogo Manual
Figure 28: Contact Profile Screen
4. Type your contact’s name (you must type either the first or last name).
5. To add additional fields, select Add Field and press Enter, or press the Options menu
key and select Add Field.
6. A pop-up appears, showing a list of fields such as Mobile Phone, Main Phone, and
E-mail Address. Select the desired field and press Enter.
7. The field is added to your contact’s profile. Type the text that you want in the new field.
8. To add more fields, repeat steps 5 through 7.
9. When you have added all the information you want into the contact profile, select
Save & Close and press Enter.
11.2. Contact Profile Fields
A contact profile must include a first or a last name, and can also include the types of
information listed in Table 8.
Table 8: Contact Profile Fields
Alerticon E-mail Address2
Nickname Fax Number
Mobile Phone Page Number
Main Phone Company
Home Phone Postal Address
Work Phone Notes
E-mail Address1 Web Address
For more information about contact profile field characteristics, see Section 17.
11.3. Alerticons
Alerticons are used to personalize your IM contacts and e-mail/SMS contacts.
14295 Rev. 1.4 9/24/04 51
Page 52

Ogo Manual
11.3.1. Choosing Alerticons for IM Contacts
A picture of the alerticon you choose for an IM contact appears next to their name on your IM
contacts list. When a contact sends you a message or comes online, the alerticon animation
plays as the message alert banner is displayed.
Note:
AOL alerticon.
To assign an alerticon to an IM contact:
1. You must be signed in to an IM community.
2. Select the contact. Press the Options menu key, then select View IM Contact ID, and
3. Select the Alerticon field and press Enter to access the alerticon palette (see Figure 29).
4. Select an alerticon to play the animation associated with it.
5. When you have selected the alerticon you want to associate with a contact, press Enter.
6. Select Close and press Enter.
Figure 29: Alerticon Palette
You cannot choose alerticons for your AIM Buddies. AIM Buddies always use the
press Enter.
11.3.2. Choosing Alerticons for E-mail/SMS Contacts
A picture of the alerticon you choose for an e-mail or SMS contact appears next to their
name in your contacts list. When that contact sends you a message, the alerticon animation
plays as the message alert banner is displayed.
To assign an alerticon to an e-mail/SMS contact:
1. From the Home screen, select Contacts and press Enter.
2. Select a contact and press Enter to access the profile.
3. Select the Alerticon field and press Enter.
4. Select an alerticon to play the animation associated with it.
14295 Rev. 1.4 9/24/04 52
Page 53

Ogo Manual
5. When you have selected the alerticon you want to associate with the contact, press
Enter.
6. Select Save & Close and press Enter.
11.4. Creating or Removing a Group
Groups are useful when you want to send an SMS or e-mail message to several contacts at
the same time. In the Group tab, each line contains the contact’s alerticon and name, the
community or e-mail/SMS icon, and the address of the contact for this group.
Note:
disabled.
To create a group:
1. From the Contacts screen, press the Options menu key.
2. Select New Group from the Options menu. You will see the New Group pop-up (Figure
Figure 30: New Group Pop-up
3. Insert a name into the New Group field in the screen, select OK, and press Enter. This
You can define up to 10 groups. When you reach 10 groups, this option becomes
30).
action creates a new tab in your contacts.
4. Press the Options menu key, select Add Contact to Group, and press Enter. This brings
up a list of all of your contacts. Contacts that have more than one SMS or e-mail address
will have an arrow symbol > next to the name of the contact.
5. Select the e-mail or SMS address for each of the contacts you want to add to your newly
created group and press Enter.
6. Press the Options menu key and select Add Contact to Group to select additional
contacts.
You can add contacts to a group at any time, and a single contact can be assigned to
multiple groups.
14295 Rev. 1.4 9/24/04 53
Page 54

Ogo Manual
To remove a group:
1. Go to the tab of the group that you want to remove.
2. Press the Options menu key and select Remove Group.
A pop-up appears, asking you to confirm that you want to delete that group.
Note:
select the group from your list of contacts. Groups appear in the list with the rest of your
contacts, with a group icon displayed next to them.
When in the Compose screen, if you want to send a message to a group, you can
11.5. Number of Contacts Available
Ogo can hold approximately 500 contact profiles. The total number of contacts you can have
depends on the number of fields you use in each contact profile (or record).
To determine the approximate number of contact records you currently have and to see an
estimate of how many more contact records you can store:
1. From the Home screen, select Settings.
2. Using the outer ring of the 8-Way Navigation key, select the System tab.
3. On the Contact Records line, you will see the number of contacts in use and an estimate
of how many additional contacts you can store.
As you add new contacts, Ogo recalculates how many additional contact records can be
stored.
14295 Rev. 1.4 9/24/04 54
Page 55

Ogo Manual
12. QuickText
QuickText messages are a fun and fast way to communicate at the touch of a key. Use
Ogo’s predefined messages or customize messages with your favorite phrases.
There are eight predefined QuickText messages available for quick insertion into any IM
message or message text field (E-mail or SMS):
1. What's your number?
2. Where should we meet?
3. When should we meet?
4. Talk to you soon.
5. Where are you?
6. I'm running late.
7. No problem.
8. Call me when you get this.
Note:
QuickText messages can have a maximum of 60 characters.
12.1. Inserting QuickText
To insert QuickText:
1. While chatting or composing a message, place your cursor in the message text field.
2. Press the Options menu key, select QuickText, and press Enter.
3. The Insert QuickText pop-up appears, listing the available QuickText messages. Select
the QuickText message you want to insert and press Enter, or press ALT and then the
number of the QuickText message.
The Insert QuickText pop-up closes, and the QuickText is inserted into the IM message or
e-mail or SMS message text field.
14295 Rev. 1.4 9/24/04 55
Page 56

Ogo Manual
12.2. Editing QuickText
To edit a QuickText message:
1. While chatting or composing a message, place your cursor in the message text field.
2. Press the Options menu key, select Edit QuickText, and press Enter.
3. The Choose QuickText to Edit screen appears, listing your current QuickText messages.
Select the QuickText message you want to edit and press Enter, or press ALT and then
the number of the QuickText message.
4. Edit the message by typing your changes into the QuickText edit pop-up. (Use CLR to
delete extra characters.)
5. Select Save and press Enter.
Your new QuickText message is ready to use!
14295 Rev. 1.4 9/24/04 56
Page 57

Ogo Manual
13. Settings
You can control many aspects of how your Ogo looks, sounds, and behaves by customizing
your settings.
From the Home screen select Settings, then press Enter.
The Settings screen includes the following tabs:
IM
E-mail
Device
Sounds
Time & Date
Network
Personal Mobility Gateway (PMG)
System
13.1. IM
Use settings on the IM tab to manage your IM accounts.
Auto delete chat To control whether chat sessions are automatically deleted when
Add IM account To add an IM account, select Add IM account, then press Enter.
Remove IM
account
IM Provider
options
Option Description
you check other messages, select Auto delete chat, then press
Enter to select or clear the check box.
To remove an IM account, select Remove IM account, then press
Enter.
If you subscribe to one or more IM providers, the IM tab will include
Sign In options for each of your providers:
• AIM Sign On
• MSN Sign In
• Yahoo! Sign In
14295 Rev. 1.4 9/24/04 57
Page 58

Ogo Manual
13.2. E-mail
Use settings on the E-mail tab to manage your e-mail accounts and the stored e-mail
messages you have sent.
Add E-mail account To add an e-mail account, select Add E-mail account and press
Option Description
Enter.
Remove E-mail
account
Brand
autosignature
Sent items to keep To tell Ogo how many sent items you want to keep, select Sent
13.3. Device
Use the settings on the Device tab to control the look of your Ogo screen and how it will
display alerts when messages are received, sent, or deleted.
Note:
Contrast To set the contrast level for your Ogo screen, select Contrast, and
You can get to the Device tab directly from the Home screen.
Option Description
To remove an e-mail account, select Remove E-mail account and
press Enter.
When this box is checked, the following message will be inserted at
the end of your e-mail messages:
These words brought to you by Ogo. Find out more at
www.ogo.com
items to keep and press Enter, then from the pop-up select the
number of items (from 10 to 50), and press Enter again.
then use the inner ring of the 8-Way Navigation key and press left or
right to decrease or increase the level. The contrast level of Ogo’s
screen changes immediately as you move from one level to the next.
Six levels of contrast are available.
Message font size To choose a font size for messages, select Message font size and
press Enter, then from the pop-up choose either Normal or Large,
and press Enter.
• Normal text mode: Five lines of text fit into the view area of the
chat screen and three lines of text fit into the typing area of the
chat screen. Eight lines of text fit in an e-mail message screen.
• Large text mode: Four lines of text fit in the view area of a chat
screen and two lines of text fit in the typing area. Seven lines of
text fit in an e-mail message screen.
14295 Rev. 1.4 9/24/04 58
Page 59

Ogo Manual
SIM PIN required For security purposes, enabling this option prompts you to enter a
Change PIN Code Use this option to change your PIN code from the default setting
Banner Settings Use this setting to control whether banners appear when new
Reset Device The Reset Device option allows you to remove all personal and
Option Description
PIN when the device is powered on. The initial SIM PIN for all SIMs
is 1111.
WARNING! If you forget your SIM PIN, you will have only three
opportunities to remember it. After three failed attempts, your device
will be locked and you must contact Ogo Customer Care to
reactivate your SIM.
(1111). Be sure to keep a record of your new code in a safe place.
messages are received or IM contacts come online. See Section 7
for more information.
account information from your Ogo permanently (for example, if you
are preparing to give the device to someone else). This option
deletes all IM and e-mail accounts and all contact information, and
restores all default settings (for sounds, alerts, etc.).
To reset the device, from the pop-up select OK and press Enter.
The message displayed in the confirmation pop-up is as follows:
Resetting this device will return it to the original factory settings.
All e-mail and IM accounts will be deleted along with your
contacts. Resetting the device does not cancel your Ogo service,
please contact customer care at 866-293-4634 if you need to
make changes to your account.
NOTE: THE DEVICE WILL RESTART AFTER RESETTING.
Confirm msg. delete To have Ogo ask you for confirmation when you delete a message,
select Confirm msg. delete, then press Enter to select or clear the
check box.
Prompt to add
contacts
Restore canceled
pop-ups
14295 Rev. 1.4 9/24/04 59
When you send an e-mail or SMS to an address that is not already in
your contacts list, you can have Ogo ask whether you want to add
that address to your contacts list before sending the message.
To be prompted to add new addresses to your contacts, select
Prompt to add contacts, then press Enter to select or clear the check
box.
To restore canceled pop-ups, select Restore canceled pop-ups, then
press Enter to select or clear the check box.
Page 60

Ogo Manual
13.4. Sounds
Use the settings on the Sounds tab to control the different kinds of sounds your Ogo makes.
Volume To set the volume level for all of Ogo’s sounds, select Volume, then
Mute To make Ogo operate silently, select Mute, then press Enter to
Vibration To turn vibration on or off, select Vibration, then press Enter to select
Key tones To turn on or off the sounds Ogo makes whenever you press a key,
Option Description
use the inner ring of the 8-Way Navigation key to move the level up
or down. The volume level of Ogo’s sounds changes immediately as
you move from one level to the next. Nine volume levels are
available.
select the check box.
or clear the check box.
select Key tones, then press Enter to select or clear the check box.
Note:
When you select Mute, all of Ogo’s sounds are muted,
including key tones.
Alerticon sounds To turn on or off the sounds associated with alerticons, select
Alerticon sounds, then press Enter to select or clear the check box.
Message events To turn on or off the sounds Ogo makes when messages are
received, select Message events, then press Enter to select or clear
the check box.
Presence events To turn on or off the sounds Ogo makes when IM contacts come
online, select Presence events, then press Enter to select or clear
the check box.
System sounds To turn on or off the sounds Ogo makes when you power on, or
when you open or close the two halves of the device, select System
sounds, then press Enter to select or clear the check box.
13.4.1. Volume/Vibration Shortcuts
You can set the volume, choose mute/un-mute, or turn on/off vibration for your Ogo from the
Volume/Vibration pop-up. You can activate the Volume/Vibration pop-up (see Figure 31 and
Figure 32) from any screen by pressing ALT and any portion of the 8-Way Navigation key at
the same time.
Note:
After the Volume pop-up appears, it will remain visible for two seconds.
With the Volume/Vibration pop-up activated:
To increase or decrease the volume (with audio tone), use the inner ring of the 8-Way
Navigation key, and press up or down.
To mute your Ogo, press down on the outer ring of the 8-Way Navigation key. To
un-mute, press up.
14295 Rev. 1.4 9/24/04 60
Page 61

Ogo Manual
To turn vibration on or off, use the inner ring of the 8-Way Navigation key, and press left
or right.
Figure 31: Volume/Vibrate Pop-up
Vibrate On Indicator
13.5. Time & Date
When your Ogo is powered on, it automatically synchronizes with the current time from the
AT&T Wireless network. If for some reason the network is not available, you can set the time
and date manually using the settings on the Time & Date tab.
Option Description
Device Time Device Time shows the time as it is currently set on your Ogo.
Network time Network Time shows the current time on the AT&T Wireless
network.
Vibrate
Figure 32: Volume/Vibrate Pop-up
Mute Indicator
Mute
Set time You can set the time manually or copy the network time. In most
cases you will want to copy the network time.
To set the time by copying the network time:
1. Select Set time and press Enter.
2. Select Copy network time and press Enter.
3. Select Done and press Enter.
To set the time manually:
1. Select Set time and press Enter.
2. Select Time.
3. Type numbers for the hour and minute.
Note:
Only numbers can be typed in the hour and minute fields,
so using the ALT key to type numbers is not necessary.
4. Select the AM/PM pop-up and press Enter. Select either AM or
PM and press Enter again.
After you set the time, you can toggle to select AM or PM.
14295 Rev. 1.4 9/24/04 61
Page 62

Ogo Manual
Set date You can set the date manually or copy the date from the network. In
13.6. Network
Network settings are primarily used by Customer Care to help troubleshoot issues with your
Ogo.
Option Description
most cases you will want to copy the network date.
To set the date by copying the network date:
1. Select Set date and press Enter.
2. Select Copy network date and press Enter.
3. Select Done and press Enter.
To set the date manually:
1. Select Set date and press Enter.
2. Type numbers in the Date fields (for example, 8/24/2004).
3. Select Done and press Enter.
Option Description
Active network Shows the number of the active network.
Network Selection Select Network Selection, then press Enter. From the pop-up, select
Auto or Manual, then press Enter.
Scan for networks To scan for available networks, select Scan for networks and press
Enter.
MSISDN Shows the number that people can use to send SMS messages to
your Ogo.
Messaging center Customer Care uses the messaging center number to troubleshoot
your device.
Edit SMSC
number
GPRS status Customer Care uses this indicator of GPRS connection to
Customer Care uses the SMSC number to troubleshoot your device.
troubleshoot your device.
13.7. Personal Mobility Gateway (PMG)
Your Ogo is capable of Bluetooth connections. Information regarding Bluetooth functionality
will be added as peripherals become available.
13.8. System
System settings show capacities and identifying characteristics for your Ogo.
14295 Rev. 1.4 9/24/04 62
Page 63

Ogo Manual
Available RAM Shows percentage of memory available.
File storage Shows percentage of storage capacity available.
Contact Records Shows percentage of storage available for contact records.
Software Info Shows the version number of the software on your Ogo (for
Device Version Shows the device version (for example, 1.1.69.2240).
IMSI This is the International Mobile System Identity number for your Ogo.
IMEI This is the International Mobile Equipment Identification number for
Battery Shows battery level as a percentage (for example, 56% of full
Option Description
example, 1.0.70.2750).
your Ogo.
charge).
14295 Rev. 1.4 9/24/04 63
Page 64

Ogo Manual
14. Battery Charging and Low Battery Warning
When your Ogo is powered off and the charger is connected, the screen will indicate that the
battery is charging. The charging indicator shows one of two states: Battery Charging
(Figure 33) or Battery Fully Charged (Figure 34). These screens do not indicate the
percentage of battery charging completed.
Figure 33: Battery Charging Screen
Figure 34: Battery Fully Charged Screen
14.1. Battery Charging Level
To check battery-charging level when Ogo is powered on:
1. From the Home screen, select Settings and press Enter.
2. Using the outer ring of the 8-Way Navigation tab, select the System tab.
3. Select Battery to read the battery level (percentage of full charge).
14295 Rev. 1.4 9/24/04 64
Page 65

Ogo Manual
14.2. Low Battery Warning
Pop-ups will appear to warn you when battery level is low. If the battery level becomes
critically low, the Battery Low screen will appear (Figure 35).
Figure 35: Low Battery Warning
Press Enter to shut down the device. Connect the charger to recharge your Ogo (see
Section 5.2.2).
When the battery life remaining drops to approximately 17%, the battery will need to be
recharged before you can continue to use Ogo. Ogo will power down to conserve enough
battery life to save your contacts, settings, and other information. Once Ogo shuts down, you
will need to recharge its battery before using it again.
14.3. Battery Life
Ogo’s battery life is dynamically calculated based on your current usage. For example, when
you are sending a lot of e-mails or participating in numerous chat sessions, the battery will
drain faster than when your device is inactive but powered on.
You may see the battery status icon on the taskbar fluctuate (minimally) when you go from
frequent activity to no activity.
To determine the approximate remaining percentage of battery life:
1. From the Home screen, select Settings.
2. Using the outer ring of the 8-Way Navigation key, select the System tab.
3. Scroll down to Battery to see the remaining percentage of battery life.
Again, this battery life percentage may fluctuate based on current activity.
14295 Rev. 1.4 9/24/04 65
Page 66

Ogo Manual
15. Ogo Help
If you have questions about using Ogo, from the Home screen, select Help.
The Help screen includes two tabs: one for live support via IM, and the other for technical
support resources available by phone and for FAQ information available on the Internet.
15.1. Live Support Chat
Live Support functions as a normal chat, but you will not see the Help contact’s online status
because Help chat is always online. Your status is also always online with respect to Help
chat.
Figure 36: Live Support Chat Screen
Note:
not appear when the Ogo shortcut key is pressed. However, you will see a number indicating
new unread Help chat messages both on the Help icon on the Home screen and on the Live
Support tab of the Help screen. You will be alerted to newly received Help chat messages by
a banner.
Because online help is considered a separate community, Help chat messages do
15.2. Technical Support Information
This screen displays Ogo’s technical support phone number and Internet contact
information.
Figure 37: Technical Support Information
14295 Rev. 1.4 9/24/04 66
Page 67

Ogo Manual
16. Emoticon Reference Tables—By IM Community
Table 9 through Table 11 list the emoticons currently available for each IM community.
Check with your provider for updates.
Emoticon palettes are arranged according to the keyboard layout. To insert an emoticon, you
can press the corresponding key on the keyboard. The following tables identify which key
you would press to insert each emoticon.
If there is no key listed in the Key column, you will need to type the sequence of keys listed
in the Shortcut column to insert the emoticon.
If a key is preceded by ALT In the Key column, to insert the emoticon you must first press
the Emoticon key, then ALT, and then the corresponding letter or symbol.
Table 9: AOL Emoticons
Icon Name Shortcut Key
Innocent O:-) A
Crying :'( D
Embarrassed :-[ E
Frowning :-( or :( F
Foot-in-mouth :-! G
Cool 8-) H
Money-mouth :-$ I
Surprised =-O J
Kissing :-* K
Laughing :-D L
Lips-are-sealed :-X R
Happy :-) or :) S
Sticking-out-tongue :-P T
Undecided :-/ or :-\ U
Wink ;-) or ;) W
Yelling >:O Y
14295 Rev. 1.4 9/24/04 67
Page 68

Ogo Manual
Table 10: MSN Emoticons
Icon Name Shortcut Key
Angel (A) or (a) A (angel)
Secret telling :-* B
Baring teeth 8o| C
Crying :'( D
Embarrassed :-$ or :$ E
Sad :-( or :( F (frown)
Angry :-@ or :@ G
Hot (H) or (h) H
Sick +o( I
Surprised :-O or :O or :-o or
:o
J
Red lips (K) or (k) K (kiss)
Open-mouthed :-D or :D or:-d or
I don't know :^) M
Nerd 8-| N (nerd)
Eye-rolling 8-) O
Thinking *-) P (ponder)
Disappointed :-| or :| Q
Don't tell :-# R
Smile :-) or :) S (smile)
Tongue out :-P or :P or :-p or
Confused :-S or :S or :-s or
Red heart (L) or (l) V
Wink ;-) or ;) W
Devil (6) X
Sarcastic ^o) Y
:d
:p
:s
L (laugh)
T (tongue)
U
14295 Rev. 1.4 9/24/04 68
Page 69

Ogo Manual
Icon Name Shortcut Key
Sleepy |-) Z
Cat face (@) ALT ,
Auto
Beer mug (B) or (b) ALT B
Coffee cup (C) or (c) ALT C
Martini glass (D) or (d) ALT D
E-mail
Red rose (F) or (f) ALT F
Gift with a bow (G) or (g) ALT G
Mobile Phone
Light bulb (I) or (i) ALT I
Island with a palm
Birthday cake
Dog face (&) ALT L
MSN Messenger
Thumbs down (N) or (n) ALT N
Clock
Right hug (}) ALT P
Left hug ({) ALT Q
Airplane (ap) ALT R
Sleeping half-moon
Telephone receiver (T) or (t) ALT T
Broken heart (U) or (u) ALT U
Pizza
Wilted rose (W) or (w) ALT W
Star
Thumbs up (Y) or (y) ALT Y
Sun (#) ALT Z
(au) ALT A
(E) or (e) ALT E
(mp) ALT H
(ip) ALT J
(^)
(M) or (m) ALT M
(O) or (o) ALT O
(S) ALT S
(pi) ALT V
(*) ALT X
ALT K
14295 Rev. 1.4 9/24/04 69
Page 70

Ogo Manual
Icon Name Shortcut Key
Girl (X) or (x)
Boy (Z) or (z)
Vampire bat :-[ or :[
Camera (P) or (p)
Filmstrip (~)
Note (8)
Snail (sn)
Black Sheep
Plate (pl)
(bah)
Bowl
Soccer ball
Umbrella
Computer
Stormy cloud
Lightning
Money
Party <:o) ,
(||)
(so)
(um)
(c o)
(st)
(li)
(mo)
14295 Rev. 1.4 9/24/04 70
Page 71

Ogo Manual
Table 11: Yahoo! Emoticons
Icon Name Shortcut Key
Angel O:-) A
Batting eyelashes ;;) B
Applause =D> C
Crying :(( or :-(( D
Blushing :"> E
Sad :( or :-( F
Angry X-( or X( G
Cool B-) H
Sick :-& I
Shock :O or :-O J
Kiss :* K
Laughing :)) or :-)) L
Talk to the hand =; M
Nerd :-B N
Rolling eyes 8-| O
Thinking :-? P
Big grin :D :-D Q
Not talking [-( R
Happy :) or :-) S
Tongue :p T
Confused :-/ or :-\ U
Love struck :x or :-x V
Wink ;) or ;-) W
Devilish >:) X
Raised eyebrow /:) Y
Sleepy |-) Z
Liar :^O ALT Z
Clown :o) ,
Sigh :-< ALT A
14295 Rev. 1.4 9/24/04 71
Page 72

Ogo Manual
Icon Name Shortcut Key
Drooling =P~ ALT D
Silly 8-} ALT E
Straight face :| or :-| ALT F
Broken heart =(( ALT G
Hug >:D< ALT H
Waiting :-w ALT I
Party <:-P ALT J
Cowboy <):) ALT K
Loser L-) ALT L
Nail biting :-SS ALT O
phbbbt! >:P ALT P
Smug :> or :-> ALT Q
Rolling on the floor
laughing
shhh :-$ ALT S
Tired (:| ALT T
Whew! #:-S ALT U
Worried :-s ALT W
Hypnotized @-) ALT X
D'oh! #-o ALT Y
=)) ALT R
14295 Rev. 1.4 9/24/04 72
Page 73

Ogo Manual
17. Contact Profile Field Characteristics
Table 12: Contact Profile Fields
Field Name Number
Allowed
First Name 1 25 The following characters cannot be used in this field <> , ;
Last Name 1 25 The following characters cannot be used in this field <> , ;
Alerticon 1 N/A N/A
Nickname 1 25 All characters can be used
Mobile Phone 2 25 Fields will be named Mobile Phone 1, Mobile Phone 2. The
Main Phone 1 25 The following characters can be used 0 – 9 * +
Home Phone 1 25 The following characters can be used 0 – 9 * +
Work Phone 1 25 The following characters can be used 0 – 9 * +
E-mail Address 2 50 Fields will be named E-mail Address 1, E-mail Address 2.
Characters
Allowed
Notes
@
@
following characters can be used 0 – 9 * +
The following characters can be used:
a-z
A-Z
0-9
@
_
-
.
Fax Number 1 25 The following characters can be used 0 – 9 * +
Page Number 1 25 The following characters can be used 0 – 9 * +
Company 1 50 All characters can be used
Postal Address 1 50 All characters can be used
Notes 1 50 All characters can be used
Web Address
(URL)
14295 Rev. 1.4 9/24/04 73
1 50 All characters can be used
Page 74

Ogo Manual
18. Important Safety Information
18.1. Radio Frequency (RF) Energy
When your device is powered on, it receives and transmits RF energy. While this device
complies with U.S. regulatory requirements concerning exposure of human beings to RF
energy, you always want to minimize exposure. To minimize your exposure to this RF
energy, follow these procedures:
Use only the antenna supplied with the device or an approved replacement.
For body-worn operation, place the device in a supplied or approved clip, holder, holster,
case, etc.
Use AT&T Wireless-approved accessories.
For more information on RF, see www.fda.gov/cellphones
18.1.1. RF Interference/Compatibility
In some instances, your device will cause interference with other electronic devices. Here
are a few rules to follow:
Power off your device in any facility or a r e a , such as hospitals or in blasting area s, where
posted notices instruct you to do so. This includes notices saying, “Turn off two-way
radio.”
Follow instructions from airline crew for use of this device on an airplane.
If you use a pacemaker, hearing aid or other medical device that may be affected by RF,
consult your health care provider or the manufacturer’s recommendations before using
this device. Generally, they recommend that you hold a device that is ON more than six
inches from the pacemaker and do not carry it in your breast pocket.
Check your vehicle owner’s manual or your dealer to be sure that you can use this
device in your vehicle and it will not interfere with any of your vehicle’s electronic
systems. For any equipment added to your vehicle, check with the equipment
manufacturer or where you purchased it.
18.2. Potentially Explosive Atmospheres
In rare cases, your device can emit a spark that could cause an explosion or fire. To
minimize this risk, do the following:
.
Do not use your device and do not remove, replace or charge batteries when you are in
an area with a potentially explosive atmosphere. Such areas are not always marked and
include fueling areas like gas stations, below deck on boats, fuel or chemical transfer or
storage facilities, vehicles using LP gas, or areas where the air contains chemicals or
particles such as grain, dust, or metal powders.
Do not transport or store flammable gas, liquids, or explosives in your vehicle, especially
if you plan to use your device.
14295 Rev. 1.4 9/24/04 74
Page 75

Ogo Manual
18.3. Using Device Safely While Driving
Note to Parents: Review this section with your child and establish guidelines for their use of
this device when they are driving.
Using your device while driving can distract you and could result in an accident.
Consider your alternatives:
Let device receive your messages and then respond to them at your convenience.
Ask a passenger to view your messages.
Pull off road and park in a safe location before using device.
18.4. Accessories
Only use AT&T Wireless-approved accessories. Using unapproved accessories may cause
the device to not operate properly resulting in property damage or even injury.
18.4.1. Batteries and Battery Chargers
Lithium ion batteries can become very hot and cause serious injury or property damage if the
battery terminals touch metal objects such as jewelry, keys or chains.
Be careful when putting a charged battery that is separated from the device inside a pocket,
purse, or other container that may have metal objects.
Follow all safety information on the battery. Do not puncture battery or place battery or
device in a fire and dispose of the battery and device in accordance with local regulations.
Keep battery away from children.
Only use AT&T Wireless-approved batteries and battery chargers. Use of unapproved
batteries and chargers could result in damage to the battery or charger, and, in extreme
circumstances, to a battery explosion.
Only use charger indoors and with an acceptable power source. See Section 5.2 for more
information on using the battery charger.
18.5. Repetitive Motion Injuries
Your fingers, thumbs, and hands, arms, shoulders or neck may start to hurt if you use this
device, either for messaging or for games, for a long time.
To minimize this discomfort, take a 15-minute break for each hour of device use, and stop
for several hours if any part of your body starts to hurt. If you still have discomfort after
stopping for a few hours, see your doctor.
18.6. Caring for Your Device and Charger
Do not allow foreign objects or liquids to get in your device. These can cause a short and
result in fire, electrical shock or damage to your device or its battery.
Unplug the charger before cleaning the device or charger. Do not use liquid or aerosol
cleaners or solvents to clean. Use only a dry cloth.
14295 Rev. 1.4 9/24/04 75
Page 76

Ogo Manual
Place the device and the charger on a stable, level surface so it doesn’t fall, possibly
causing damage or injury. Do not place on or near a heat source or on an electrical
product that produces heat.
18.7. Device Service
Bring your device, charger or accessories to the AT&T Wireless authorized service facility if
any of these have been dropped or damaged or have been exposed to liquid/water or
extreme heat.
Also, bring it in for service if any of these become very hot to the touch or do not operate
normally after following the instructions.
Do not disassemble the device, charger, or any accessories. Doing so could cause
further damage and could void the warranty.
18.8. Radio Frequency Signals
A wireless phone operates by sending and receiving Radio Frequency (RF) signals, and
therefore emits low levels of RF energy when the phone is on. Many studies have been
conducted concerning RF exposure.
Based on these studies, the U.S. Food and Drug Administration (FDA) has concluded that
the available scientific evidence doesn’t show that any health problems are associated with
using wireless devices, although there is no proof that they’re absolutely safe. Further
scientific research is ongoing, and AT&T Wireless supports this research. For more
information, you can review the FDA’s Consumer Update on Wireless Phones, which is
available from the FDA at 1 888 463-6332. Additional consumer information on wireless
phones and RF safety is available online at the joint FDA FCC Web site, Cell Phone Facts,
at www.fda.gov/cellphones
.
The Federal Communications Commission (FCC) has established guidelines setting limits
for RF exposure from wireless phones (these limits are called the Specific Absorption Rate
or SAR). AT&T Wireless sells only those phones and devices that have been certified by the
manufacturers as complying with FCC guidelines. For more information about FCC
guidelines and SAR limits, you can visit the FCC’s Web site at www.fcc.gov/cellphones
contact the FCC at 1 202 418-2464.
18.9. FCC Compliance Statement
This device complies with Part 15 of the FCC Rules. Operation is subject to the following two
conditions: (1) this device may not cause harmful interference, and (2) this device must
accept any interference received, including interference that may cause undesired operation.
FCC ID: SOW-0411CT10
Statement according to FCC part 15.21.
Modifications not expressly approved by CMCS could void the user’s authority to operate the
equipment.
or
Statement according to FCC part 15.105.
14295 Rev. 1.4 9/24/04 76
Page 77

Ogo Manual
This equipment has been tested and found to comply with the limits for a Class B digital
device, pursuant to Part 15 of the FCC Rules. These limits are designed to provide
reasonable protection against harmful interference in a residential installation. This
equipment generates, uses and can radiate radio frequency energy and, if not installed and
used in accordance with the instructions, may cause harmful interference to radio
communications. However, there is no guarantee that interference will not occur in a
particular installation. If this equipment does cause harmful interference to radio or television
reception, which can be determined by turning the equipment off and on, the user is
encouraged to correct the interference by one or more of the following measures:
Reorient or relocate the receiving antenna.
Increase the separation between the equipment and the receiver.
Connect the equipment into an outlet that is on a circuit different from the receiver.
Consult the dealer or an experienced radio/TV technician for help.
18.10. Battery Safety Precautions
For the safe use of lithium ion batteries always follow the instructions provided below.
Improper handling of lithium ion batteries may result in injury or damage from electrolyte
leakage, heating, ignition, or explosion.
Danger!
Never use the batteries with anything other than specifically designed equipment.
Always use the battery charger provided with the device.
Never impact, pierce or crush the battery.
Handle a damaged or leaking battery with extreme care. If you come in contact with the
electrolyte, wash the exposed area with soap and water. If it contacts the eye, flush the
eye with water for 15 minutes and seek medical attention.
When discarding a battery, contact your local waste disposal provider regarding local
restrictions on the disposal or recycling of batteries.
Never disassemble or modify the battery. The battery contains a circuit designed to
enhance safety. Damaging this circuit may cause overheating, fire or bursting.
Never expose or charge a battery under high temperature conditions, such as near a fire
or in the direct sunlight. If the ambient temperature is too high, the protection circuit may
be actuated, preventing further charging, or damaged.
Never short-circuit the battery by connecting the positive and negative terminals with a
metal material. Do not store or carry the battery where it could come into contact with
metal objects such as a key chain or necklace.
Never allow the battery to get wet or be immersed in water.
Do not place the battery in a microwave oven or high-pressure container.
Stop charging if the battery is not charged after the prescribed charge time.
If leakage of the electrolyte occurs, or if there is an offensive odor, immediately keep the
battery away for any source of fire or spark.
14295 Rev. 1.4 9/24/04 77
Page 78

Ogo Manual
If you become aware of any abnormal phenomena, such as odor, discoloration, or
deformation, during use, while charging or when storing the battery, remove the battery
from the device or charger and stop using.
In the event the electrolyte comes into contact with the eyes, flush thoroughly with clean
water, without rubbing. Consult with a physician immediately.
18.11. RF Exposure
Tests for Specific Absorption Rate (SAR) are conducted using standard operating positions
specified by the FCC with the device transmitting at its highest certified power level in all
tested frequency bands. Although the SAR is determined at the highest certified power level,
the actual SAR level of the device while operation can be well below the maximum value.
This is because the device is designed to operate at multiple power levels so as to use only
the power required to reach the network. In general, the closer you are to a wireless base
station antenna, the lower the power output. Before a device model is available for sale to
the public, it must be tested and certified to the FCC that it does not exceed the limit
established by the government-adopted requirement for safe exposure. The tests are
performed in positions and locations (e.g., at the ear and worn on the body) as required by
the FCC for each model. (Body-worn measurements may differ among device models,
depending upon available accessories and FCC requirements). While there may be
differences between the SAR levels of various devices and at various positions, they all
meet the government requirement for safe exposure. For body worn operation, to maintain
compliance with FCC RF exposure guidelines, use only accessories that contain no metallic
components and provide a separation distance of 1.5cm (0.6 inches) to the body. Use of
other accessories may violate FCC RF exposure guidelines and should be avoided.
18.12. Health and Safety Information
18.12.1. Exposure to Radio Frequency (RF) Signals
Your wireless device is a radio transmitter and receiver. It is designed and manufactured not
to exceed the emission limits for exposure to radio frequency (RF) energy set by the Federal
Communications Commission of the U.S. Government. These limits are part of
comprehensive guidelines and establish permitted levels of RF energy for the general
population. The guidelines are based on the safety standards previously set by both U.S.
and international standards bodies:
American National Standards Institute (ANSI) IEEE. C95.1-1992
National Council on Radiation Protection and Measurement (NCRP). Report 86.1986.
International Commission on Non-Ionizing Radiation Protection (ICNIRP) 1996.
Ministry of Health (Canada), Safety Code 6. The standards include a substantial safety
margin designed to assure the safety of all persons, regardless of age and health.
The exposure standard for wireless mobile devices employs a unit of measurement
known as the Specific Absorption Rate, or SAR. The SAR limit set by the FCC is
1.6W/kg*.
14295 Rev. 1.4 9/24/04 78
Page 79

Ogo Manual
*In the U.S. and Canada, the SAR limit for mobile devices used by the public is 1.6 watts/kg
(W/kg) averaged over one gram of tissue. The standard incorporates a substantial margin of
safety to give additional protection for the public and to account for any variations in.
18.12.2. SAR Information
THIS MODEL DEVICE MEETS THE GOVERNMENT’S REQUIREMENTS FOR EXPOSURE
TO RADIO WAVES.
Your wireless mobile GSM device is a radio transmitter and receiver. It is designed and
manufactured not to exceed the emission limits for exposure to radio frequency (RF) energy
set by the Federal Communications Commission of the U.S. Government. These limits are
part of comprehensive guidelines and establish permitted levels of RF energy for the general
population. The guidelines are based on the safety standards previously set by both U.S.
and international standards bodies:
American National Standards Institute (ANSI) IEEE. C95.1-1992.
National Council on Radiation Protection and Measurement (NCRP). Report 86.1986.
International Commission on Non-Ionizing Radiation Protection (ICNIRP) 1996.
Ministry of Health (Canada), Safety Code 6. The standards include a substantial safety
margin designed to assure the safety of all persons, regardless of age and health.
The exposure standard for wireless mobile GSM device employs a unit of measurement
known as the Specific Absorption Rate, or SAR. The SAR limit set by the FCC is 1.6W/kg*.
This device was tested for typical body-worn operations. To comply with FCC RF exposure
requirements, a minimum separation distance of 1.5 cm must be maintained between the
user’s body and the terminal, including the antenna. Third-party belt-clips, holsters, and
similar accessories used by this device should not contain any metallic components. Bodyworn accessories that do not meet these requirements may not comply with FCC RF
exposure requirements and should be avoided.
The FCC has granted an Equipment Authorization for this model device with all reported
SAR levels evaluated as in compliance with the FCC RF exposure guidelines. SAR
information on this model device is on file with the FCC and can be found under the Display
Grant section of http://www.fcc.gov/oet/fccid
after searching on FCC ID SOW-0411CT10.
Additional information on Specific Absorption Rates (SAR) can be found on the Cellular
Telecommunications and Internet Association (CTIA) Web site at http://www.devicefacts.net
*In the U.S. and Canada, the SAR limit for mobile GSM device used by the public is 1.6
watts/kg (W/kg) averaged over one gram of tissue. The standard incorporates a substantial
margin of safety to give additional protection for the public and to account for any variations
in.
.
14295 Rev. 1.4 9/24/04 79
 Loading...