

Page 1

User Manual (Part 2)
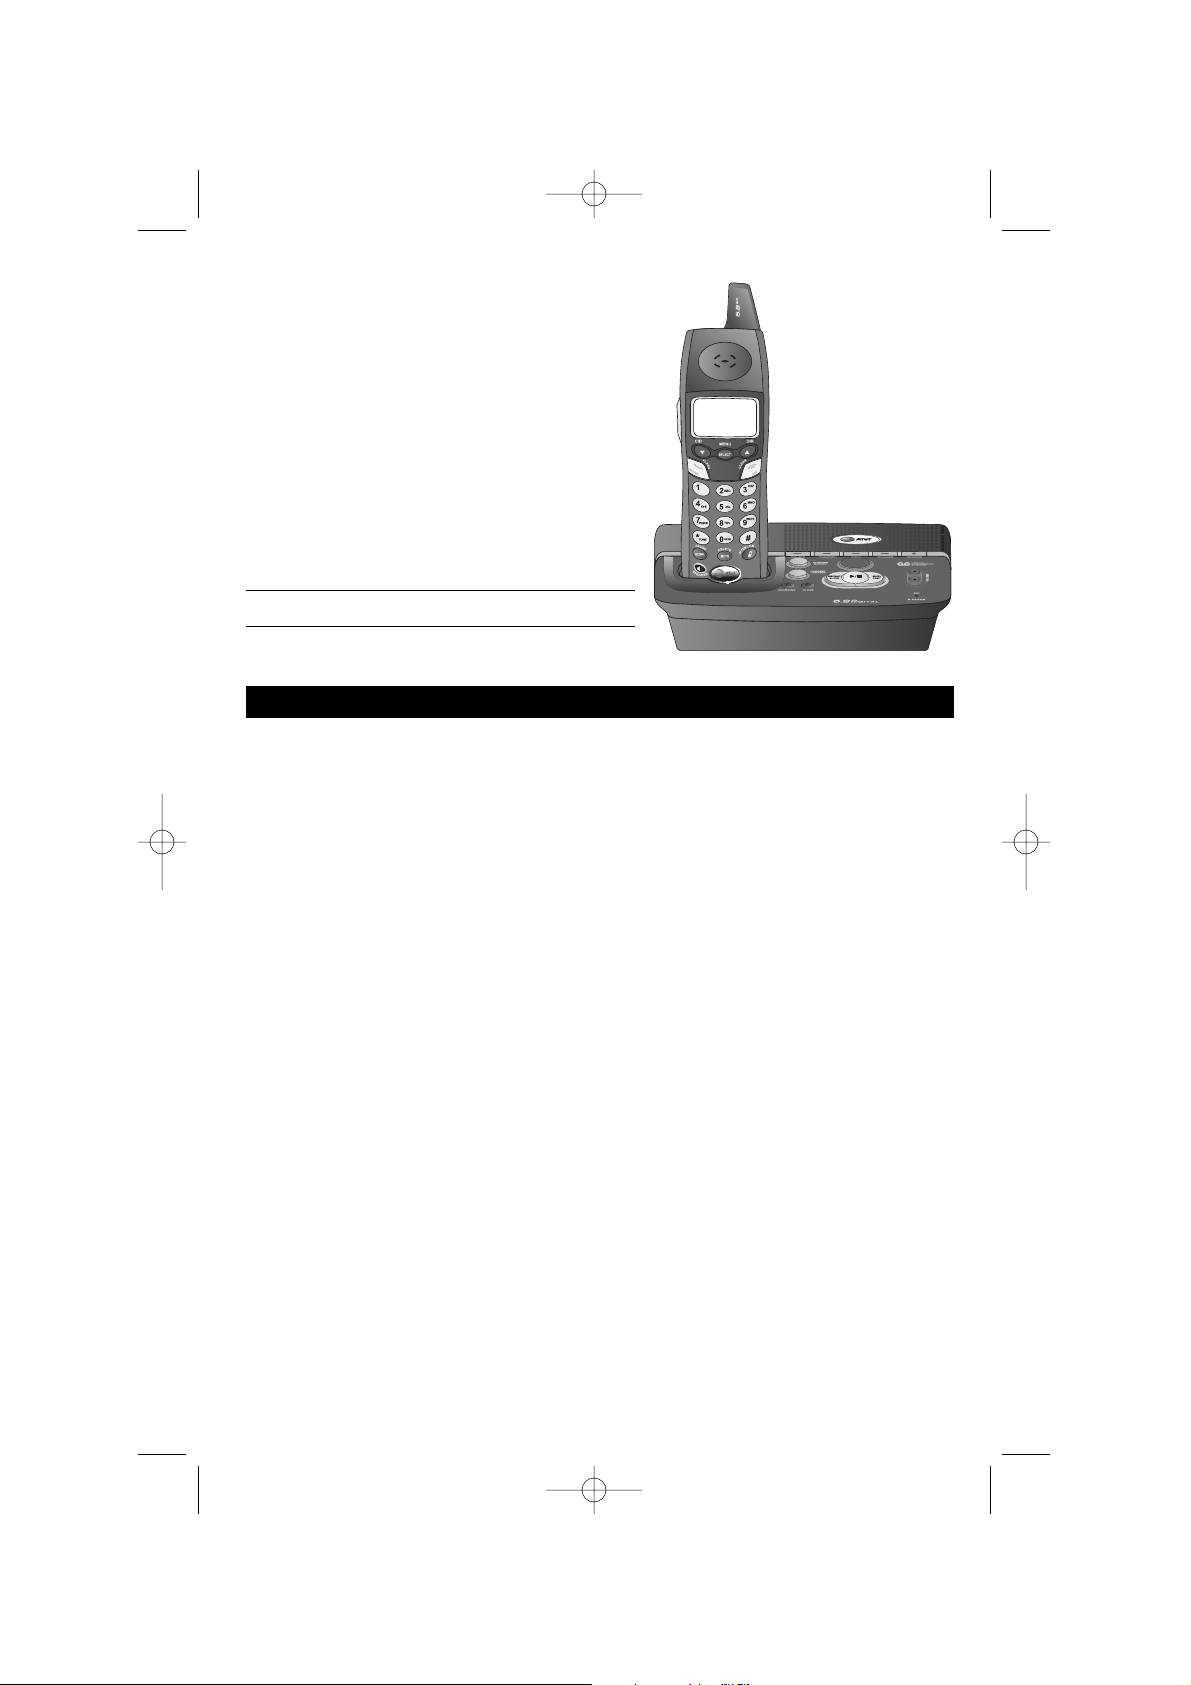
5.8 GHz Cordless
Telephone/Answering
System E5925B
with Caller ID & Call Waiting
91-000197-020-000_E5925B_R0.qxd 2/13/1950 7:21 PM Page 1
Page 2

Copyright © 2004 Advanced American Telephones. All Rights Reserved.
AT&T and the Globe Design are trademarks of AT&T Corp.,
licensed to Advanced American Telephones.
STOP!
See page 7
for easy instructions.
You must install and
charge battery before
using the telephone.
Please also read
Important Product Information
Enclosed in product package.
For customer service or product
information, visit our web site at
www.telephones.att.com
or call 1-800-222-3111.
CAUTION: To reduce the risk of fire or injury to persons or damage
to the telephone, read and follow these instructions carefully:
• Use only replacement battery 2420 (SKU 00578. Part number 80-5542-00-00).
• Do not dispose of the battery in a fire, it could explode. Check with local
codes for special disposal instructions.
• Do not open or mutilate the battery. Released electrolyte is corrosive and may
cause damage to the eyes or skin. It may be toxic if swallowed.
• Exercise care in handling batteries in order not to short the battery with con-
ducting materials such as rings, bracelets, and keys. The battery or conductor
may overheat and cause harm.
• Charge the battery provided with or identified for use with this product only in
accordance with the instructions and limitations specified in this manual.
• Observe proper polarity orientation between the battery and battery charger.
Do not disassemble your telephone. There are no user-serviceable parts inside.
Refer for servicing to qualified service personnel.
91-000197-020-000_E5925B_R0.qxd 2/13/1950 7:21 PM Page 2
Page 3
1
Table of contents
Getting Started
Quick reference guide ........................2
Parts checklist .......................................4
Before you begin ..................................5
Telephone base installation................6
Battery installation & charging ..........7
Wall mounting ......................................8
Belt clip & optional headset...............9
Telephone Operation
Basic operation...................................10
Options while on calls ......................11
Intercom calls .....................................12
Call Forward and Call Transfer......13
Handset settings.................................14
Phone book
About the phone book.....................16
New phone book entries.................17
Phone book search............................18
To dial, change or delete entries ...19
Caller ID Logs
How Caller ID works .......................20
To review your call log.....................21
Answering System Operation
Answering system operation ..........22
Day and time announcements ........23
Outgoing announcements................24
Announce Only mode ......................25
Changing feature options.................26
Message playback ...............................27
Recording and playing memos ........28
Message window displays.................29
Remote access....................................30
Appendix
Screen icons, indicator lights & tones...31
In case of difficulty .............................32
Technical specifications ....................34
Index .....................................................35
Remote access wallet card ..............36
User Manual (Part 2)
5.8 GHz Cordless
Telephone/Answering
System E5925B
with Caller ID & Call Waiting
91-000197-020-000_E5925B_R0.qxd 2/13/1950 7:21 PM Page 1
Page 4
2
Getting Started
Off/Clear
During a call, press to hang up.
While using menus, press to cancel an
operation, back up to the previous
menu, or exit the menu display.
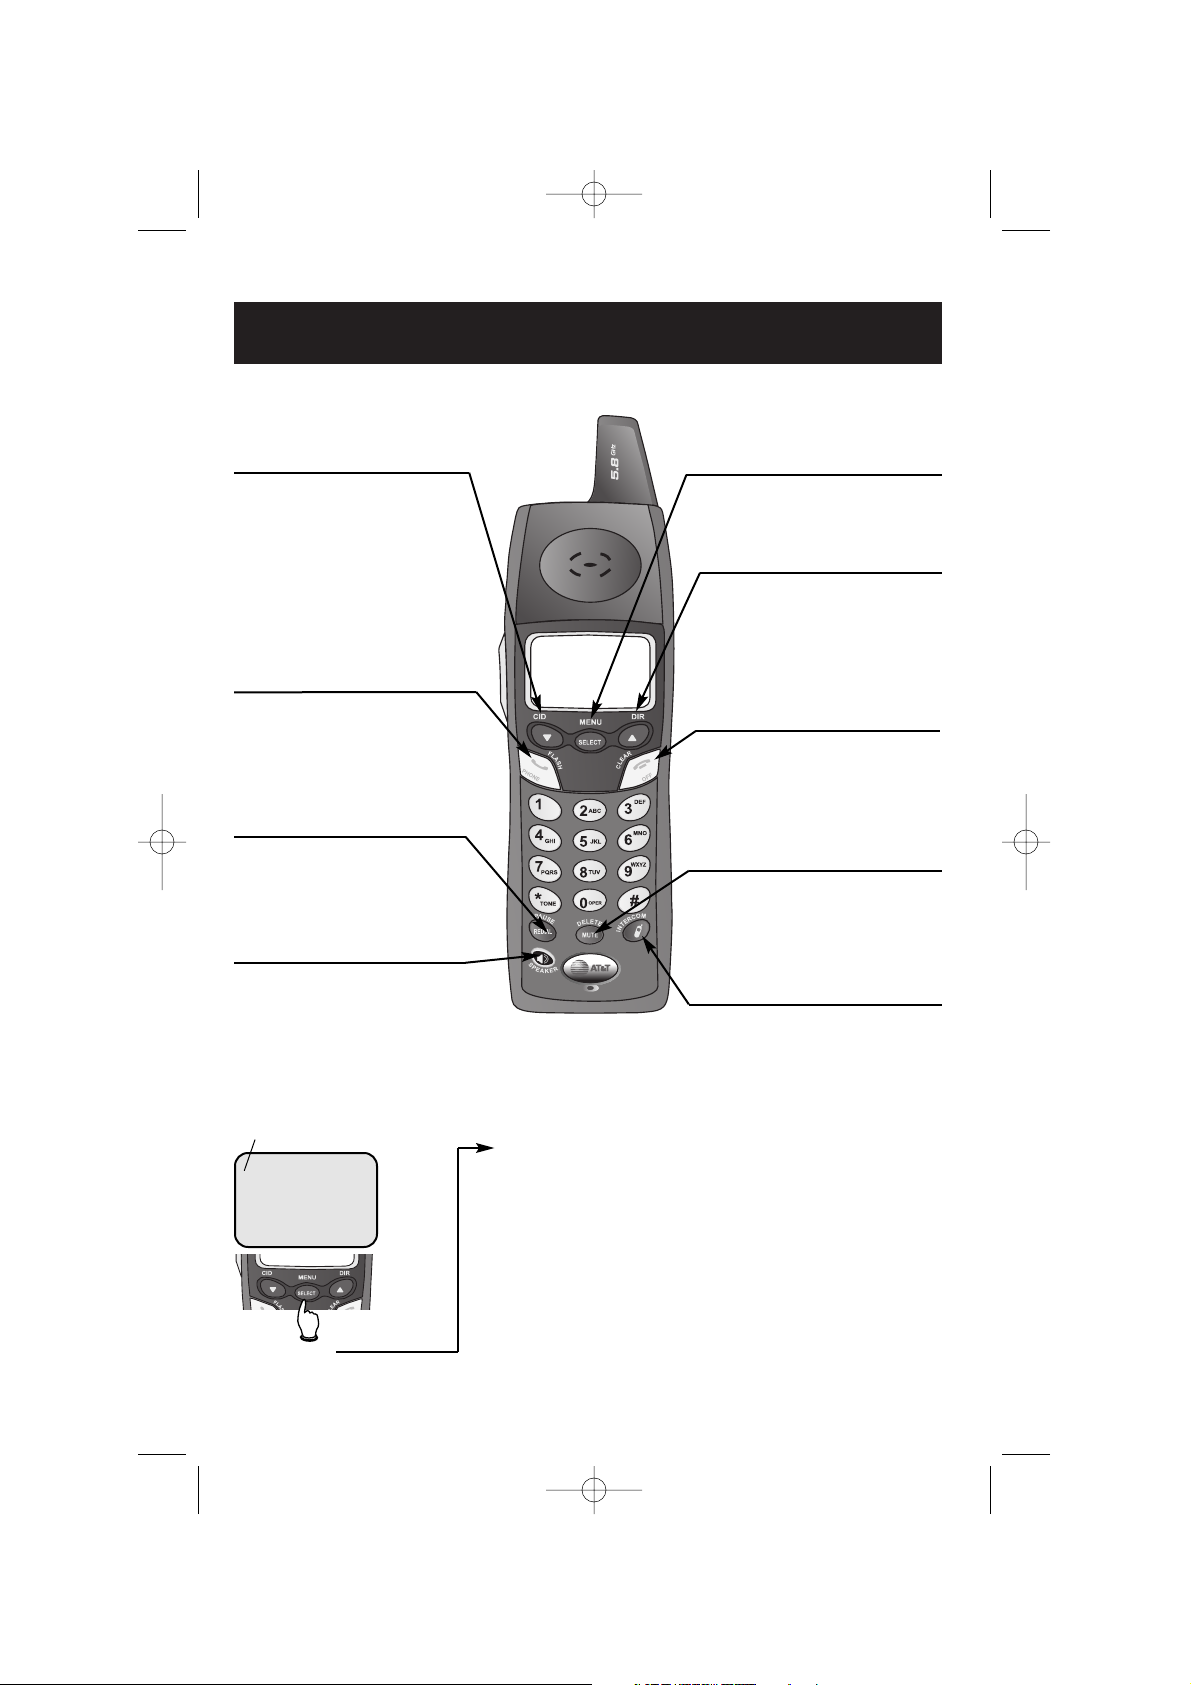
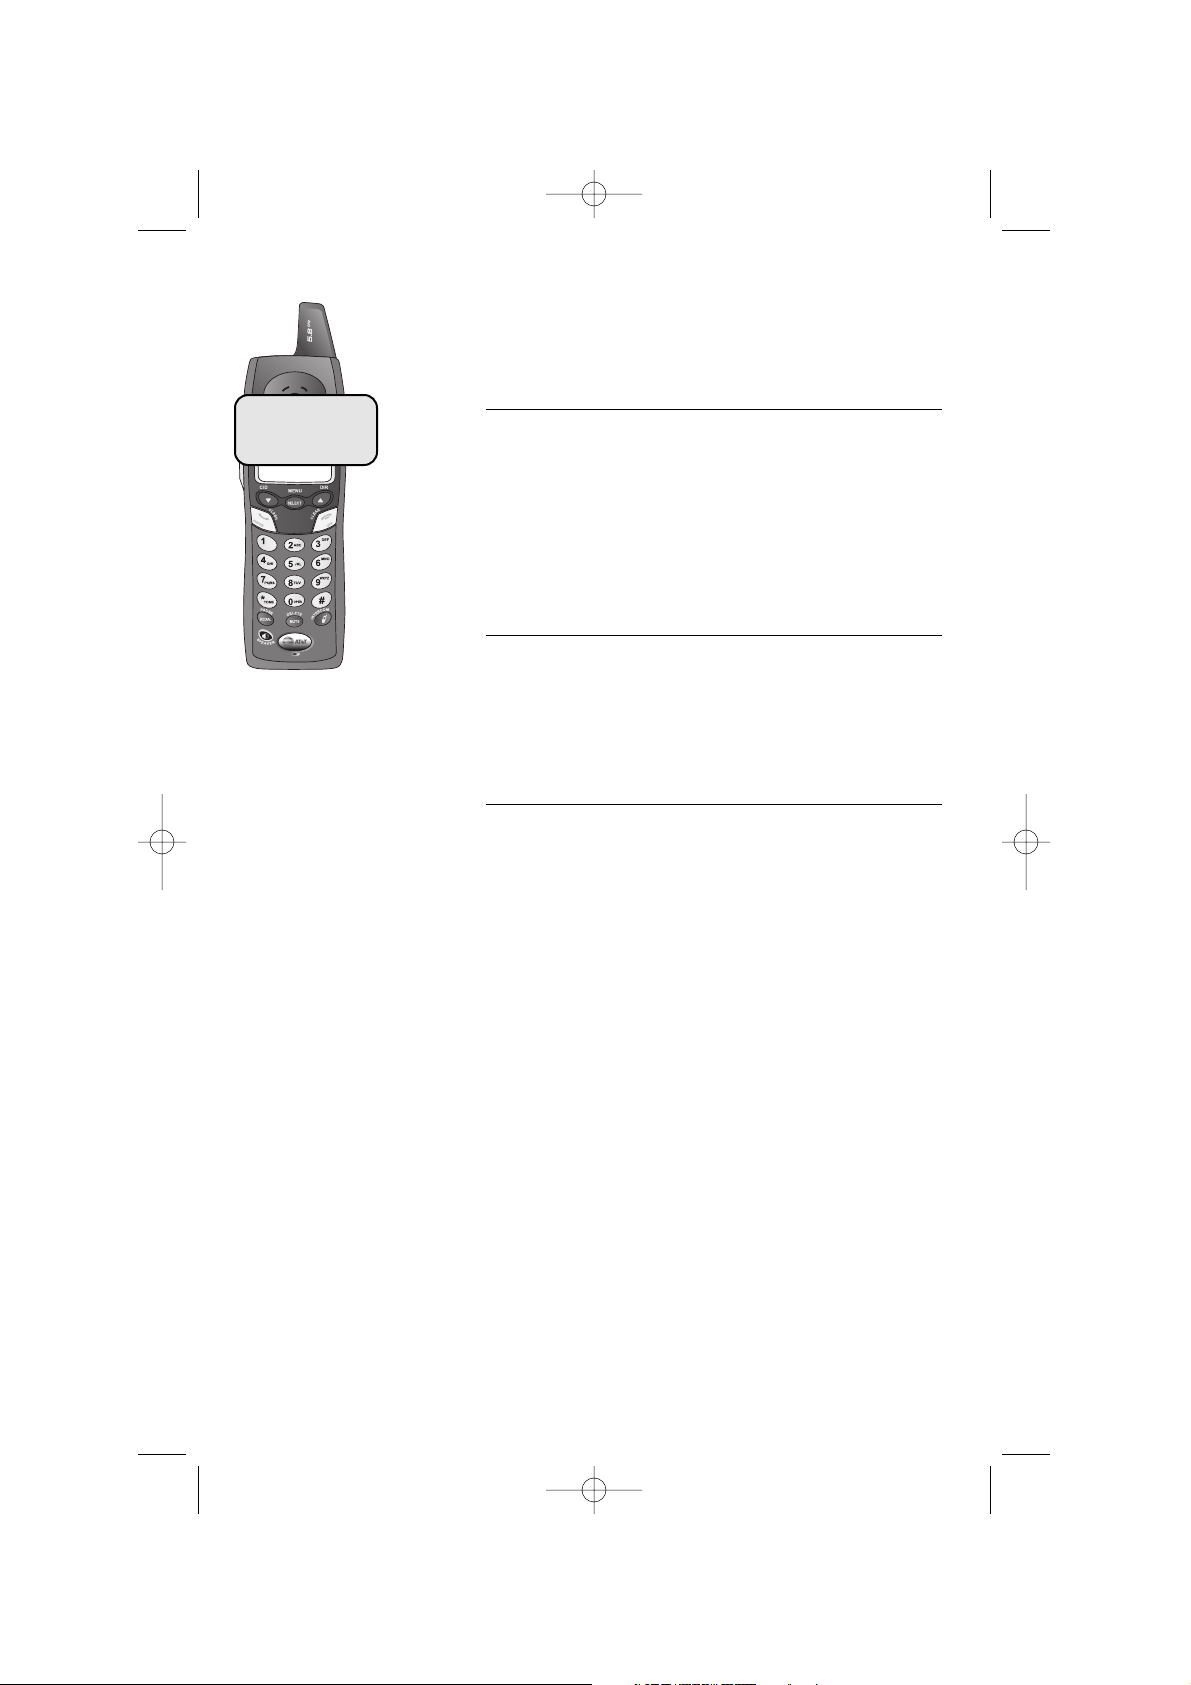
Quick reference guide
Redial/Pause
Press to view redial memory (see page
10). While entering numbers, press and
hold to insert a dialing pause (see page
17).
V CID
Press to scroll down in menus.
Press when phone is not in use to display
Caller ID information (see page 21). While
entering names, press to move the cursor
to the left.
Speaker
Press to activate handset speakerphone.
Press again to resume normal handset use
(earpiece) (see page 10).
^ DIR
Press to scroll up in menus.
Press when phone is not in use to display
phone book entries (see page 16). While
entering names, press to advance cursor.
Phone/Flash
Press to begin a call, then dial a number.
During a call, press to receive an incoming
call, if Call Waiting is activated (see page 11).
Mute/Delete
Press to mute microphone (see page
11). While reviewing call log, press and
hold to clear Caller ID log (see page 21).
Intercom
Press to transfer a call or initiate an intercom conversation. Press and hold to forward a call (see page 12-13).
Handset
Feature menu
>DIRECTORY
CALL LOG
Menu
Feature Menu
Directory ................See page 16
Call Log ..................See page 20
Ringer Volume ........See page 14
Ringer Tone ............See page 14
Key Tone ................See page 14
Handset Name........See page 15
Language................See page 15
CLR Voice Mail ......See page 15
Dial Type ................See page 15
Press ^or Vto scroll
through menu items.
Press SELECT to select or
modify a highlighted item.
Press OFF to cancel an operation, back up to the previous
menu, or exit the menu display.
Select/Menu
Press to display menu, or to select
highlighted item from menu.
> shows highlighted item
91-000197-020-000_E5925B_R0.qxd 2/13/1950 7:21 PM Page 2
Page 5

Answering System Controls (see pages 22-30)
ON/OFF ..................Press to turn answering system on or off.
DELETE ..................Press to delete message. Hold to delete all old messages.
TIME SET................Press to review or set the answering system clock.
MENU......................Press to review or change answering system options.
CHANGE ................Press to change a menu option.
RECORD ................Press to record a memo or outgoing announcement.
3
Getting Started
Quick reference guide
Telephone Base
In Use
On when handset is in use. Flashes when another phone
is in use on the same line, or answering system is
answering an incoming call.
Charging
On when handset battery is
charging.
Volume
Press to adjust message
playback volume.
Handset Locator
Press to locate handset if lost (see page 10).
Press to play or stop playing messages.
Press to repeat message.
Hold to slow playback.
Press twice to hear
previous message.
Press to skip to next
message. Hold to speed
up playback.
91-000197-020-000_E5925B_R0.qxd 2/13/1950 7:21 PM Page 3
Page 6

4
Getting Started
Parts checklist
Remember to save your sales receipt and original packaging in case you ever need to
ship your telephone for warranty service. Check to make sure the telephone package
includes the following:
Telephone base
Telephone handsets
Charger
Power
adapters
Belt clips
Batteries
Telephone line cord
Wall mount bracket
91-000197-020-000_E5925B_R0.qxd 2/13/1950 7:21 PM Page 4
Page 7

5
Getting Started
Before you begin
About Caller Identification
Caller ID with Call Waiting features in
this telephone let you see who’s calling
before you answer the phone, even
when you’re on another call. These
features require services provided by
your local telephone company.
Contact your telephone service
provider if:
• You have both Caller ID and Call
Waiting, but as separate services
(you may need combined service)
• You have only Caller ID service, or
only Call Waiting service
• You don’t subscribe to any Caller
ID or Call Waiting services.
You can use this phone with regular
Caller ID service, and you can use its
other features without subscribing to
either Caller ID or combined Caller ID
with Call Waiting service. There may
be fees for these services, and they
may not be available in all areas.
Caller ID features will work only if
both you and the caller are in areas
offering Caller ID service, and if both
telephone companies use compatible
equipment.
See Caller ID Operation, beginning on
page 20, for more details about how
these features work.
Telephone operating range
This cordless telephone operates with
the maximum power allowed by the
Federal Communications Commission
(FCC). Even so, the handset and base
can communicate over only a certain
distance — which can vary with the
locations of the base and handset, the
weather, and the construction of your
home or office.
If you receive a call while you are
out of range, the handset might not
ring — or if it does ring, the call might
not connect when you press PHONE.
Move closer to the base, then press
PHONE to answer the call.
If you move out of range during a
phone conversation, you might hear
noise or interference. To improve
reception, move closer to the base.
If you move out of range without
pressing OFF, your phone will be left
off the hook. To hang up properly,
walk back toward the telephone base,
periodically pressing OFF until the call
is disconnected.
91-000197-020-000_E5925B_R0.qxd 2/13/1950 7:21 PM Page 5
Page 8
NOTE:
Use only the power cord supplied with this product. If you need a replacement, call 1-800-222–3111.
Be sure to use an electrical outlet not controlled by a wall switch.
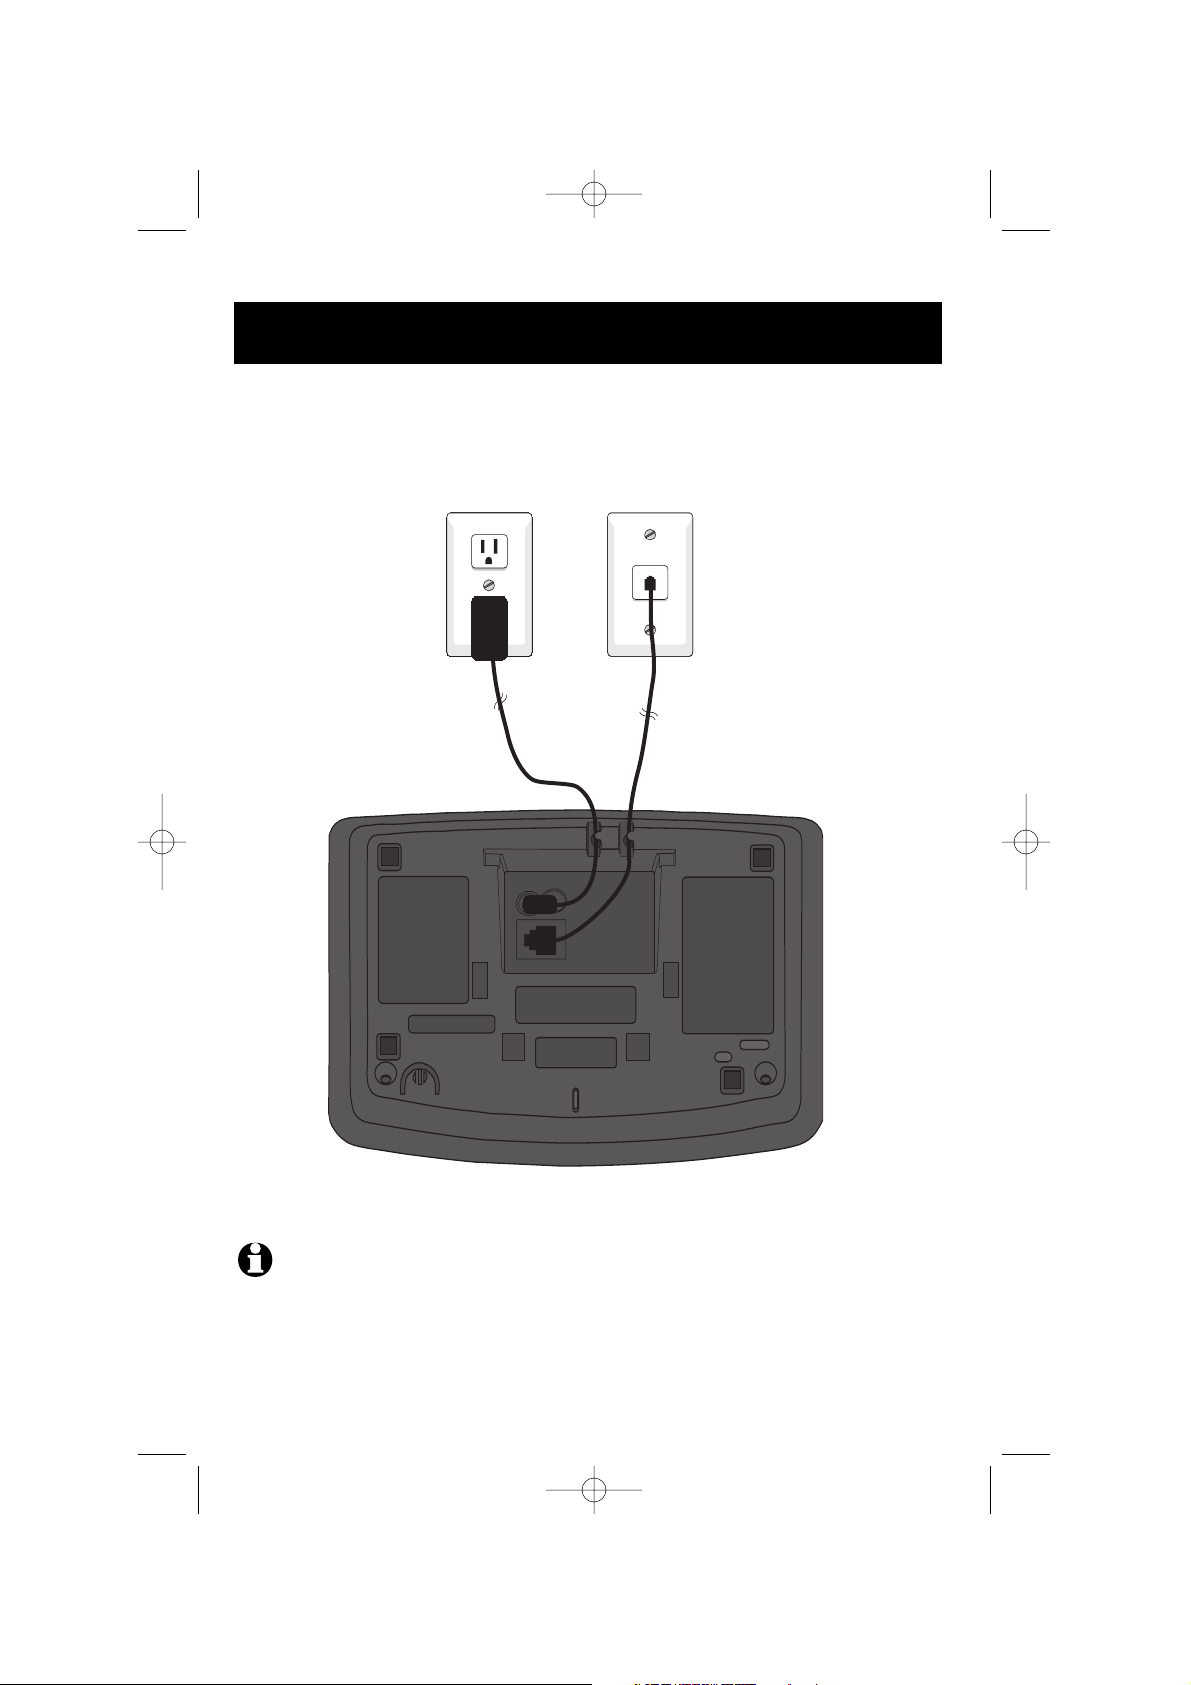
6
Getting Started
Telephone base installation
Install the telephone base as shown below. Choose a base location away from
electronic equipment, such as personal computers, television sets or microwave ovens.
Avoid excessive heat, cold, dust or moisture.
Plug power cord
transformer into
electrical outlet.
Plug telephone
line cord into
telephone jack.
91-000197-020-000_E5925B_R0.qxd 2/13/1950 7:21 PM Page 6
Page 9

7
Getting Started
Battery installation & charging
After battery installation, place the handsets in their base unit or charger and allow to
charge for 15 hours before use. You can keep the batteries charged by returning the
handsets to their base unit or charger after each use. When the battery is fully depleted, a
recharge takes about 12 hours. Average talk time on a fully charged battery is about eight
hours depending on environmental conditions, standby time is approximately four days.
Insert supplied
battery.
Place handset in base or charger
to charge for 15 hours before
first use.
Plug charger power
cord into jack on underside of charger, then
plug transformer into
electrical outlet.
Low battery indicator
Return handset to base or
charger to recharge when
this symbol flashes.
(Handset will beep when
battery is low.)
Caution: Use only supplied rechargeable battery or AT&T replacement battery model 2420 (SKU 00578. Part
number 80-5542-00-00).
LOW BATTERY
Press tab to open
battery compartment.
Replace compartment cover.
91-000197-020-000_E5925B_R0.qxd 2/13/1950 7:21 PM Page 7
Page 10
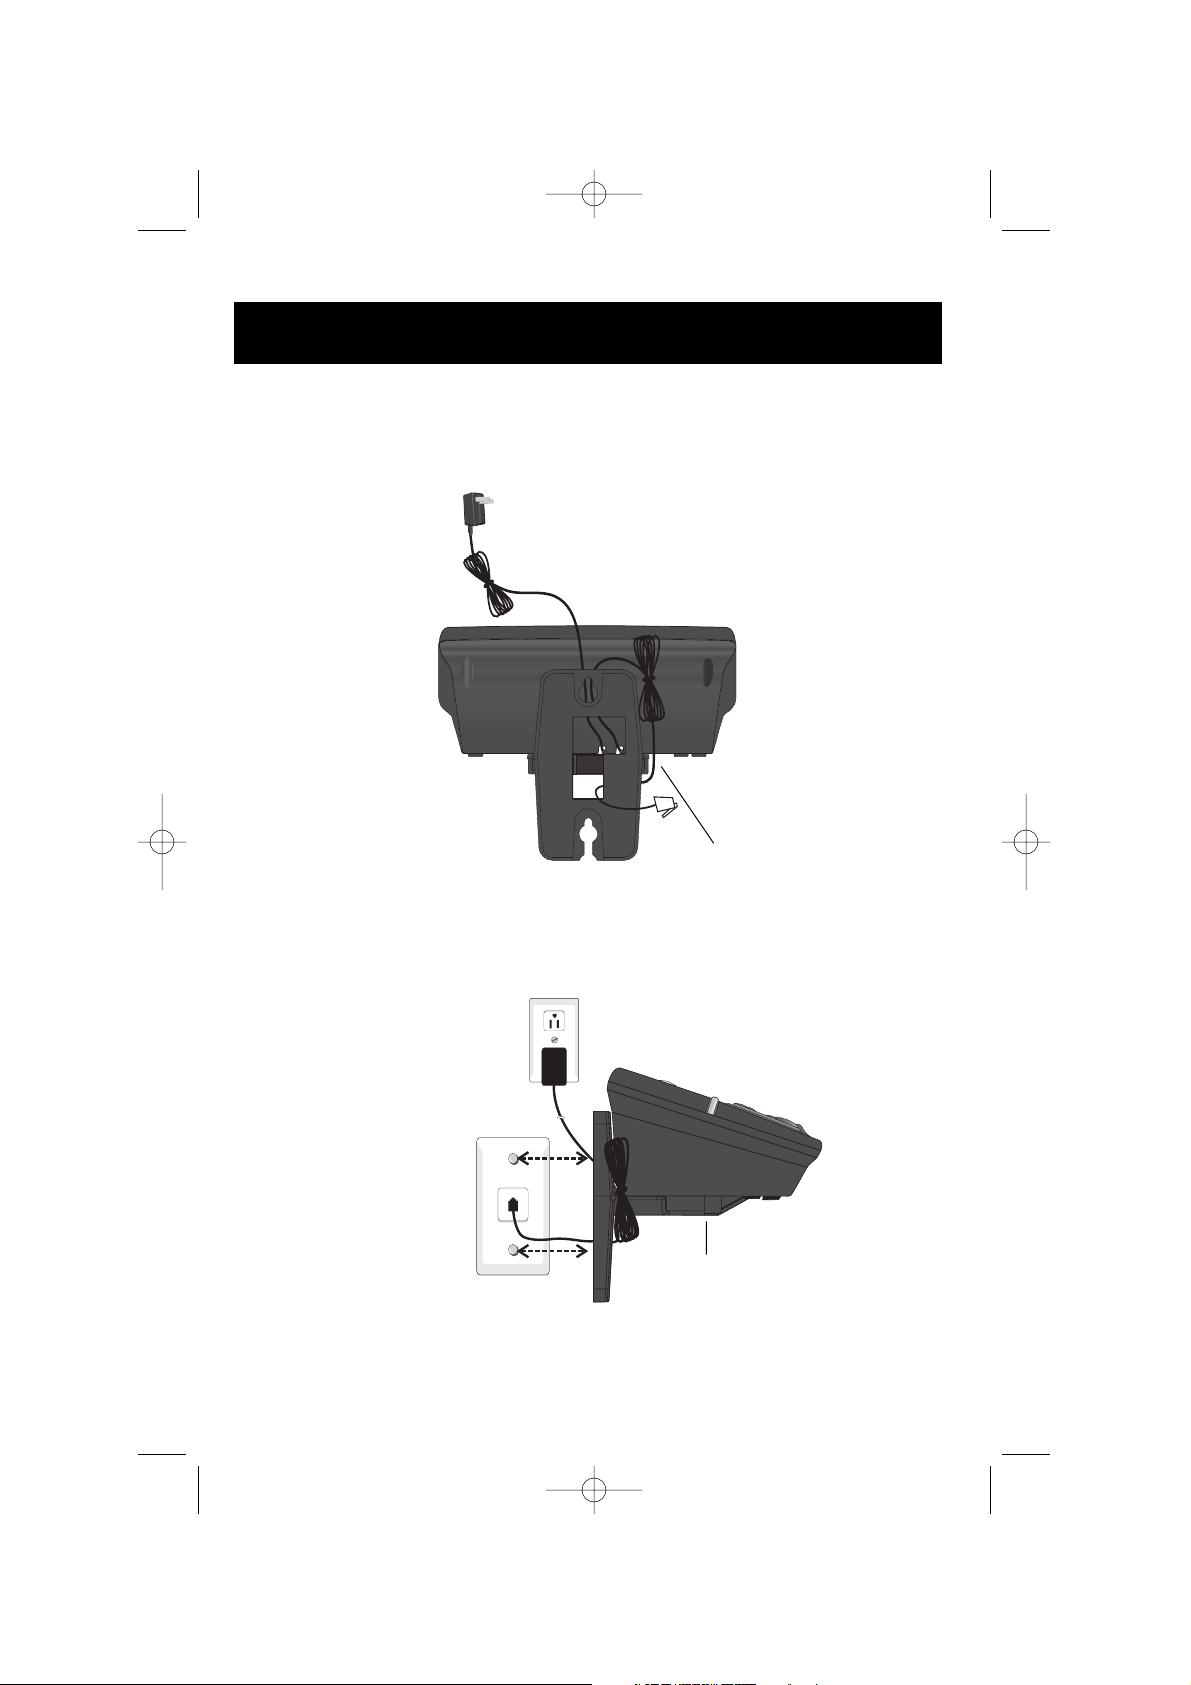
8
Getting Started
Wall mounting
The base can be installed on any standard wall-phone outlet as shown below. Choose
a location away from electronic equipment, such as personal computers, television sets
or microwave ovens. Avoid excessive heat, cold, dust or moisture.
Connect cords as shown on page 6, then press and slide down
firmly so base is held securely on outlet mounting pegs.
Plug power cord
transformer into
electrical outlet.
Plug telephone line
cord into telephone jack.
Clip wall-mount bracket
securely into notches on
underside of base.
Install the line cord as
shown in the diagram.
91-000197-020-000_E5925B_R0.qxd 2/13/1950 7:21 PM Page 8
Page 11
9
Getting Started
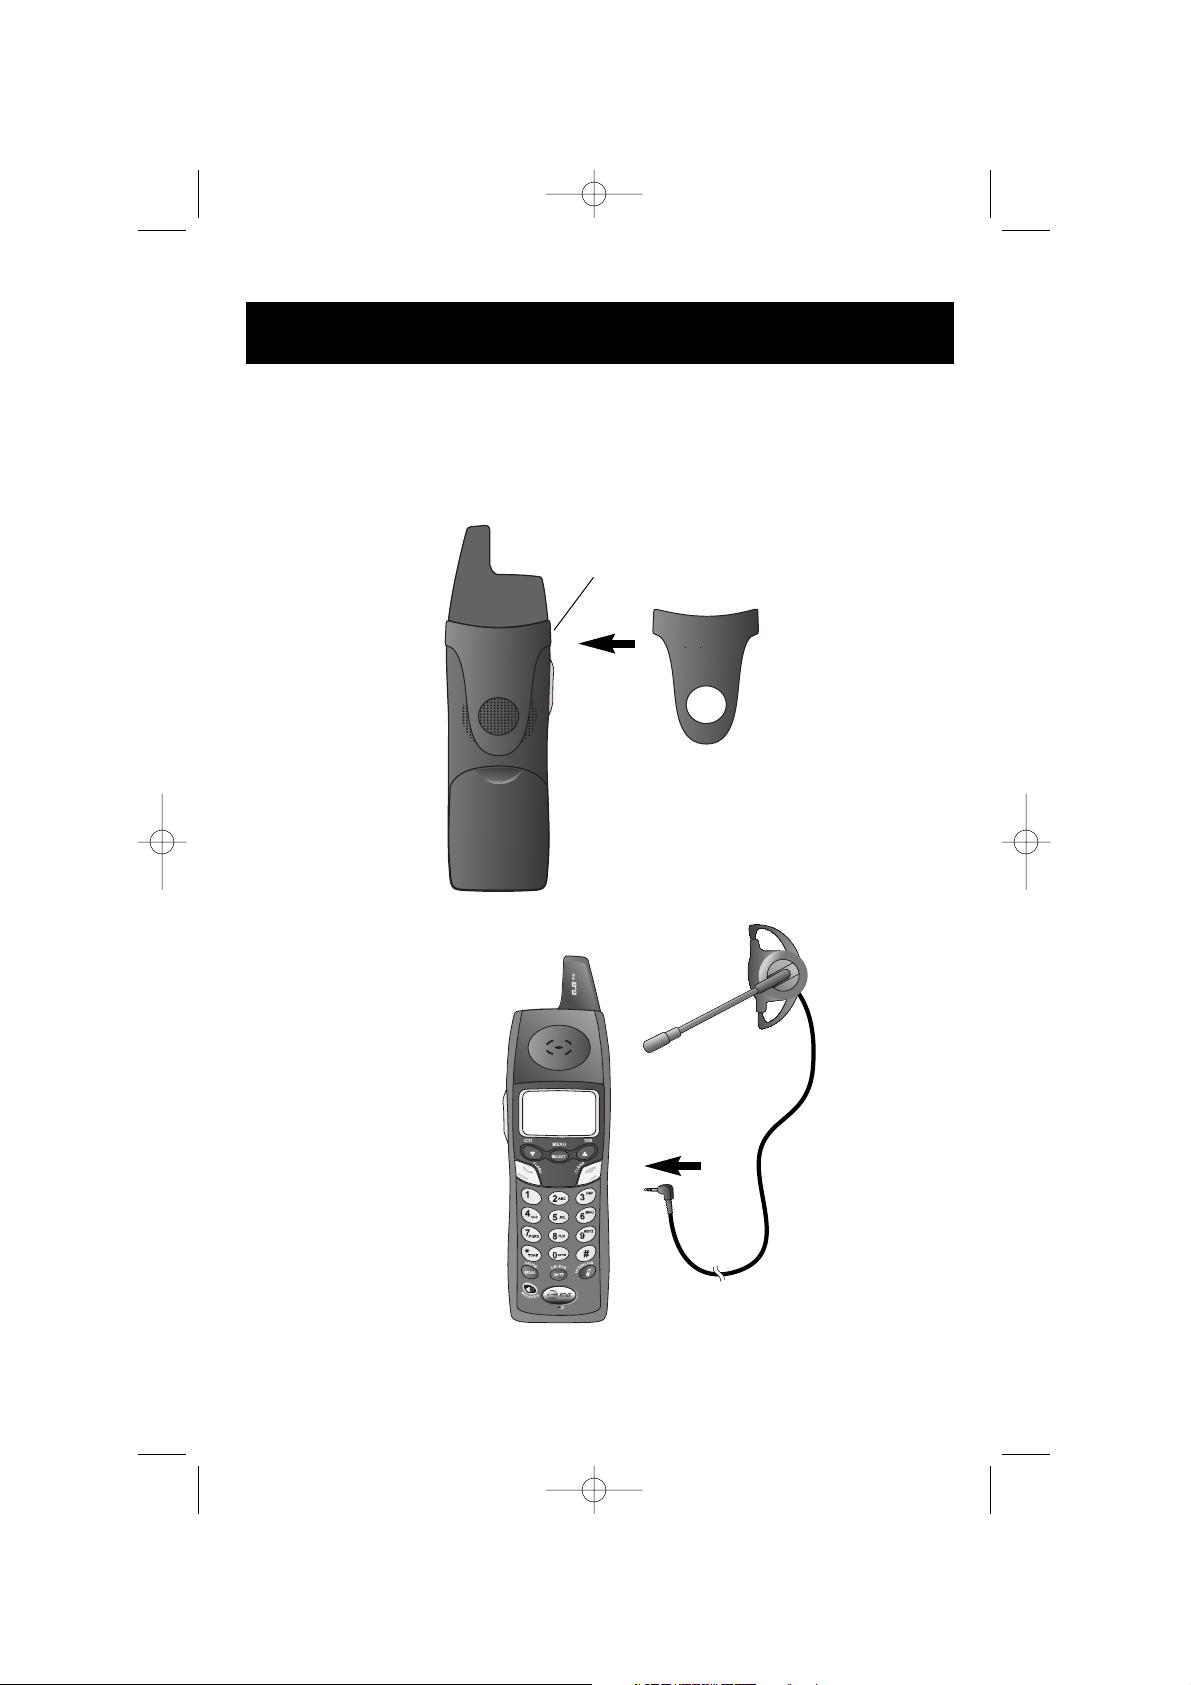
Belt clip & optional headset
Install belt clip as shown below if desired.
For hands-free telephone conversations, you can use any industry standard 2.5 mm
headset (purchased separately). For best results use an AT&T 2.5 mm headset.
Snap belt clip into notches on
side of handset. Rotate and pull
to remove.
Plug 2.5 mm headset
into jack on side of
handset (beneath
small rubber cap).
91-000197-020-000_E5925B_R0.qxd 2/13/1950 7:21 PM Page 9
Page 12
10
Telephone Operation
Basic operation
Making and answering calls
To answer an incoming call, press PHONE (or SPEAKER,
or any dial pad key). To make a call, press PHONE or
SPEAKER, then dial a number. Press OFF to hang up.
To preview numbers before dialing, enter numbers first,
then press PHONE or SPEAKER to dial. Press DELETE
or CLEAR at any time to make corrections as you are
entering numbers.
The screen displays the elapsed time as you talk (in
hours, minutes and seconds).
Hands-free speakerphone calls
To answer a call, press SPEAKER. To make a call, press
SPEAKER, then dial a number. During a call you can
press SPEAKER to toggle between hands-free speakerphone and normal handset use. Press OFF to hang up.
Last number redial
Press REDIAL to display the most recent called number
(up to 32 digits). Use the ^V buttons to view up to
five other recently called numbers. The handset will beep
twice at the beginning or end of the list.
Press PHONE to redial any displayed number. Press
DELETE to delete the number from the redial memory.
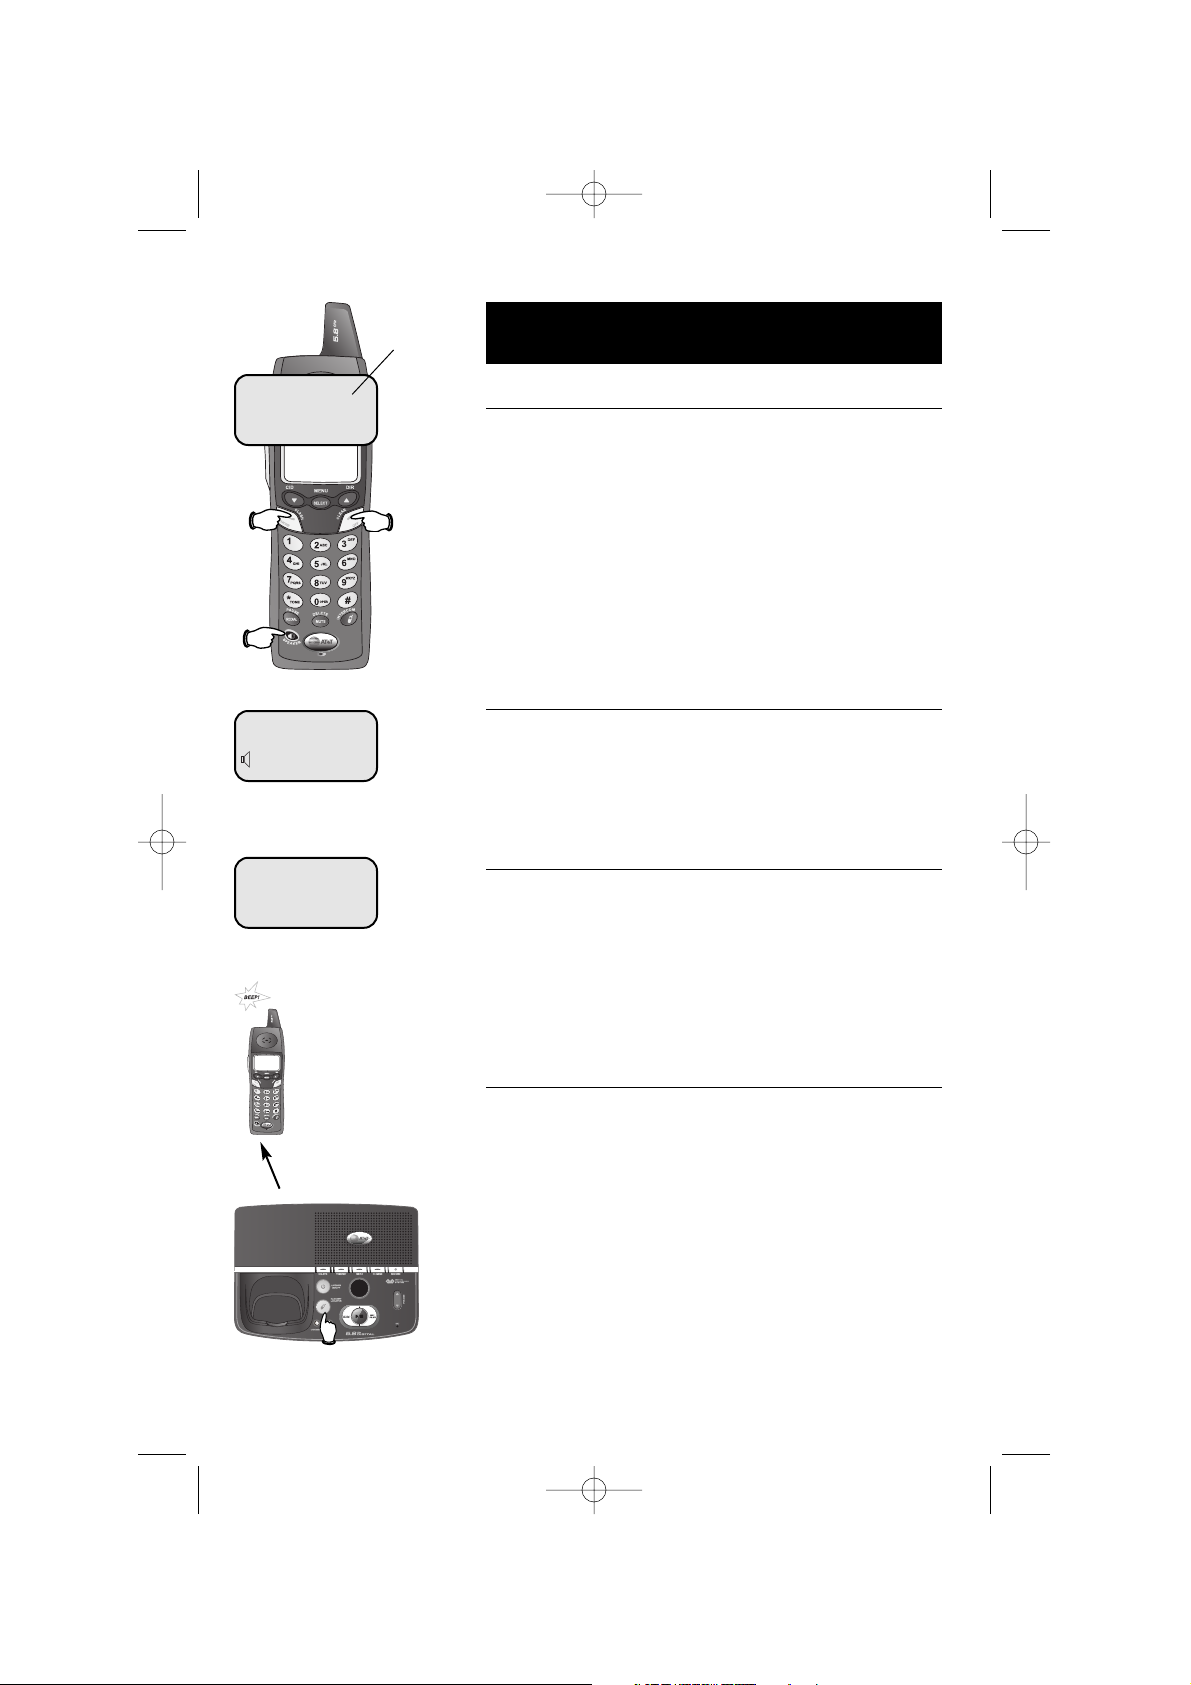
Handset locator
If you misplace the handset, press HANDSET LOCATOR
at the base. The handset will beep for 60 seconds to
help you locate it. To stop the beeping, press PHONE,
SPEAKER, or any dial pad button at the handset, or
press HANDSET LOCATOR at the base.
Elapsed time
PHONE 00:00:12
SPEAKER 00:00:12
REDIAL
555-1234
91-000197-020-000_E5925B_R0.qxd 2/13/1950 7:21 PM Page 10
Page 13

11
Telephone Operation
Options while on calls
Volume control
Press the VOLUME buttons on the side of the handset
to adjust listening volume. Each button press raises or
lowers volume by one level.
When you change the volume level, the new setting
becomes the default. The new volume level will be
applied each time you use the handset, speakerphone
or headset.
Call waiting
If you have Call Waiting service, you will hear a beep if
someone calls while you are already on a call. Press
FLASH to put your current call on hold and take the new
call. You can press FLASH at any time to switch back
and forth between calls.
3-way conference calls
During an outside call, you can use two system handsets
for a three-way conversation.
While a call is in progress, others can press PHONE or
SPEAKER to join the conference call. Others can press
OFF or place the handset in the base or charger to drop
out of the conference call, but the call will not be terminated until all handsets hang up.
Mute
Press MUTE to silence the microphone. You will be able
to hear, but your caller will not be able to hear you
until you press MUTE again and resume speaking.
Ring silencing
Press OFF or MUTE while the phone is ringing to silence
the ringer.
Temporary tone dialing
If you have dial pulse (rotary) service, you can switch to
touch tone dialing during a call by pressing *. This
can be useful if you need to send tone signals for access
to answering systems or long-distance services.
Volume
Flash
MUTE
MICROPHONE MUTED
PHONE 00:00:12
Mute
Tone
Off
91-000197-020-000_E5925B_R0.qxd 2/13/1950 7:21 PM Page 11
Page 14
12
Telephone Operation
Intercom calls
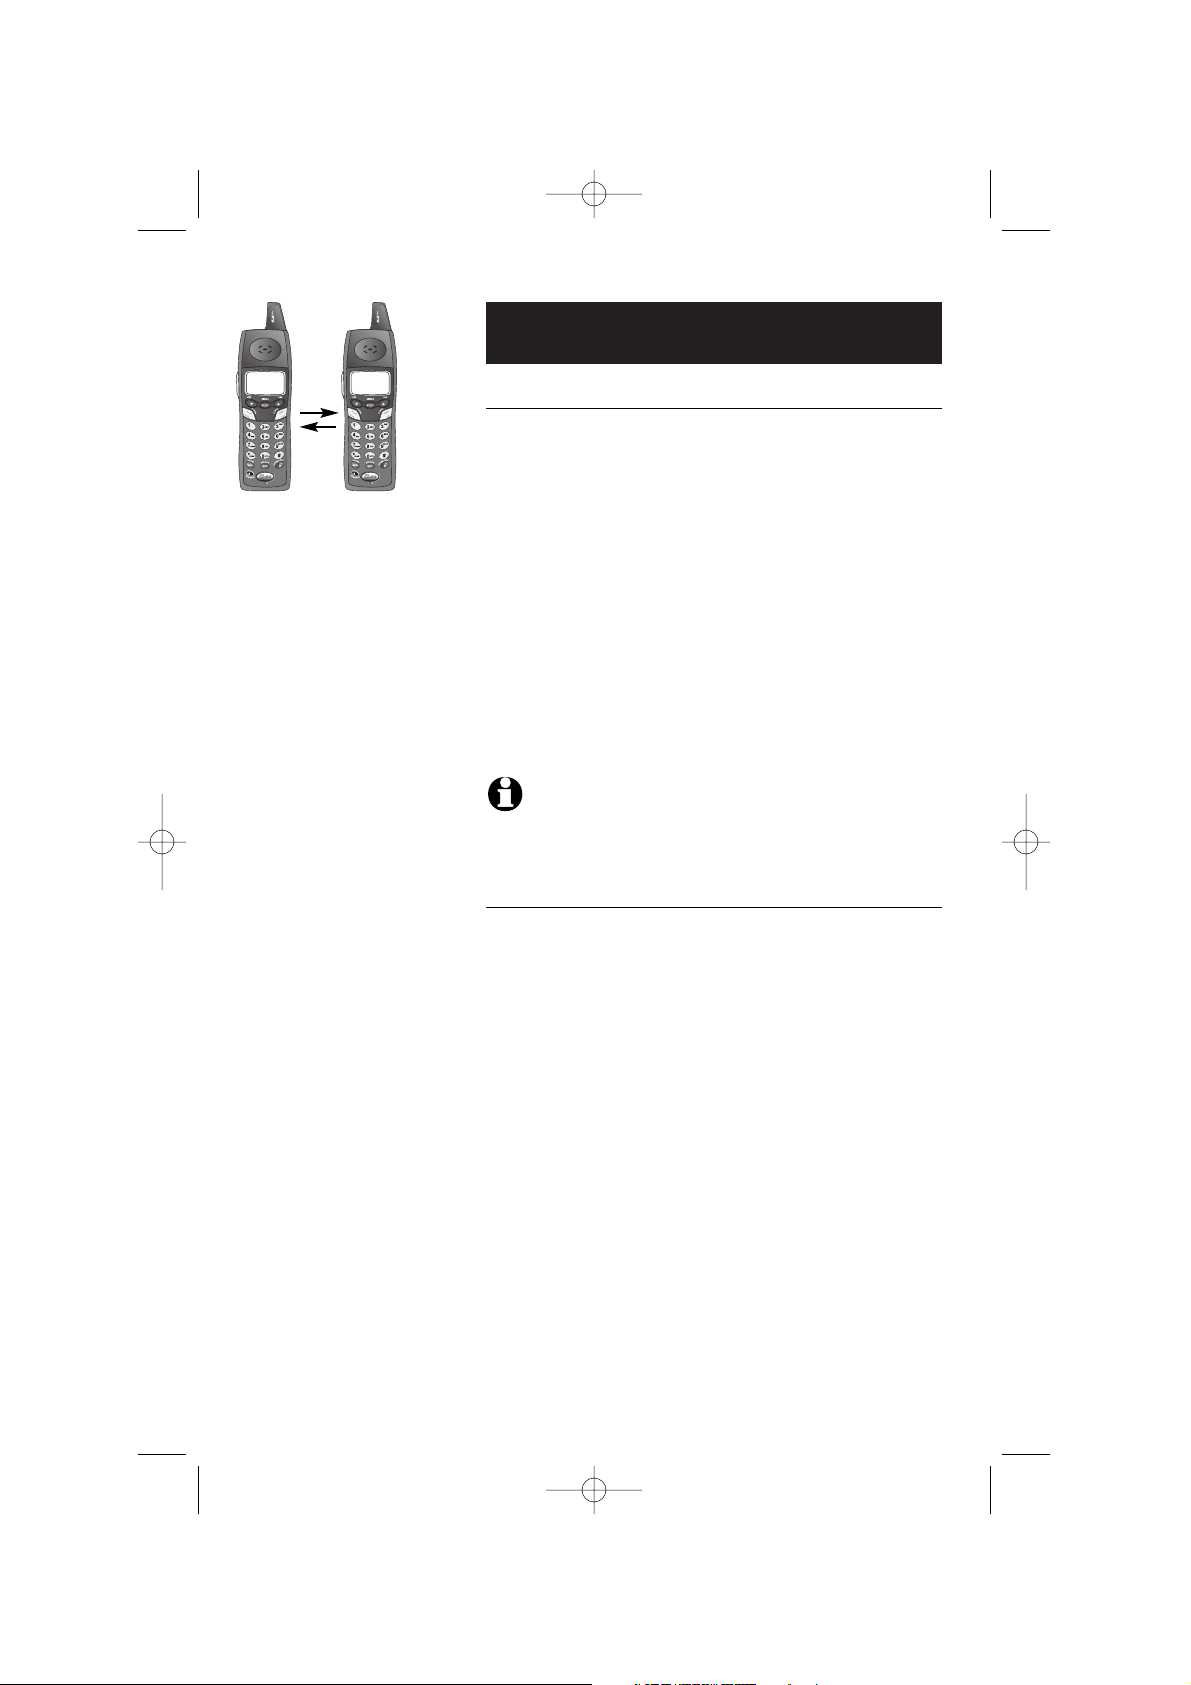
Intercom calls
Use the intercom feature to have conversations
between the handsets.
Press the INTERCOM button on a handset to initiate an
intercom call. This handset will call the other handset.
Press PHONE, INTERCOM, SPEAKER or any dial pad key
on the handset being paged to enter intercom mode
with the first handset.
To end the intercom call:
• Press OFF or INTERCOM at the handset.
• Place the handset in the charger or base.
NOTE:
The intercom feature cannot be utilized while either handset is
in the phone book or call log.
Handling incoming calls
The phone will beep if you receive an outside call during
an intercom conversation. You can either:
• Press PHONE to end the intercom call and answer
the incoming call.
OR
• Press INTERCOM or OFF to disconnect the intercom
connection without answering the incoming call. The
incoming call will continue to ring.
91-000197-020-000_E5925B_R0.qxd 2/13/1950 7:21 PM Page 12
Page 15

13
Telephone Operation
Call Forward and Call Transfer
Call Forward and Call Transfer
An external call can be forwarded or transferred from
one handset to the other. The difference between forward and transfer depends on if the sending handset
needs to talk with the receiving handset before the
external call is sent to the other handset.
Call Forward
• The first handset (HS1) can forward an external call
to the other handset (HS2) by pressing and holding
the INTERCOM key. HS1 will display CALL FOR-
WARDED
.
• To answer the call, HS2 can press PHONE, SPEAKER
or any dial pad key.
NOTE:
If HS2 does not respond within 30 seconds, the external call
will be returned to HS1 and its display will show CALL BACK. If the returned
call is not answered within 30 seconds, the external call will end automatically.
Call Transfer
• HS1 can transfer an external call to HS2, by pressing
the INTERCOM key.
NOTE:
The external call is put on hold automatically.
• HS2 will ring, showing an intercom call.
• Press PHONE, INTERCOM, SPEAKER or any dial pad
key on HS2 to answer the intercom call.
• HS1 and HS2 can discuss the external call.
NOTE:
Press
INTERCOM
to switch back and forth between the
intercom and outside call.
• Press OFF on HS1 to transfer the call. HS2 is now on
the external call. CALL TRANSFERRED will display
on HS1.
NOTE:
If there is no answer on HS2 within approximately 1.5 minutes,
HS1 will automatically reconnect to the external call.
91-000197-020-000_E5925B_R0.qxd 2/13/1950 7:21 PM Page 13
Page 16

Handset settings
At the feature menu you can change settings to
customize how the telephone works.
Press MENU, then use the ^V buttons to scroll to
the feature you want to change. As you scroll through
the menu, the top menu item is always highlighted with
a > symbol. Press SELECT to select the highlighted item.
Press OFF at any time to cancel an operation, back up
to the previous menu, or exit the menu display.
Ringer volume
At this menu you can set a default ring volume level
(1-6), or turn the ringer off. Use the ^V buttons to
hear an example of each volume level, then press
SELECT to select the one you prefer.
Ringer volume can also be adjusted by pressing VOL-
UME on the side of the handset during incoming ringing.
Ringer tone
This feature allows you to choose one of 10 ringing
tones. Use the ^V buttons to hear an example of
each ringer tone, then press SELECT to select the one
you prefer.
Key tone
The handset is factory programmed to beep at each key
press. Use the ^V buttons to select ON or OFF,
then press SELECT to save your preference.
Highlighted
menu item
> DIRECTORY
CALL LOG
RINGER VOLUME
OUTSIDE TONE
1
KEY TONE
ON
14
Telephone Operation
91-000197-020-000_E5925B_R0.qxd 2/13/1950 7:21 PM Page 14
Page 17
15
Telephone Operation
Handset settings
Handset name
At this menu you can customize the name that appears
on the handset screen when the phone is idle. Press
DELETE to erase letters, then replace them with a
name of your preference, up to 16 characters long (see
page 17 to enter letters). Press SELECT to confirm.
Language
At this menu you can select the language used in all
menus and screen displays. Use the ^V buttons to
select English, Spanish or French, then press SELECT to
save your preference.
Dial Type
At this menu you can choose Tone or Pulse dialing. The
factory default setting is TONE. Change this to PULSE
only if you do not have touch-tone dialing service.
Use the ^V buttons to select TONE or PULSE, then
press SELECT to save your preference.
CLR Voice Mail
If you subscribe to voice mail services provided by your
local telephone company, you will receive a text message on the handset when you have new voice mail. To
manually remove the voice mail message on the display:
• Press MENU.
• Press the ^ or V button to highlight CLR VOICE
MAIL is selected.
• Press SELECT.
• Press SELECT again to remove the displayed mes-
sage, or press OFF to exit.
NOTE:
This only turns off the displayed message on the handset, it
does not delete your voice mail message(s).
HANDSET NAME
AT&T_
LANGUAGE
ENGLISH
DIAL TYPE
TONE
>DIRECTORY
CALL LOG
>CLR VOICE MAIL
DIAL TYPE
TURN INDICATOR
OFF?
>CLR VOICE MAIL
DIAL TYPE
91-000197-020-000_E5925B_R0.qxd 2/13/1950 7:21 PM Page 15
Page 18
16
Phone book
Shared phone book directory
The phone book directory is stored in the base, and is
shared by both handsets. Changes made at either handset will be reflected in both.
Only one handset at a time can use the phone book. If a
second handset attempts to use the phone book, the
screen will display NOT AVAILABLE AT THIS TIME.
Memory capacity
The phone book directory can store up to 50 entries.
Each entry can contain a number up to 32 digits, and a
name up to 16 letters long. A convenient search feature
can help you find and dial numbers quickly (see page 18).
Timeouts and error messages
If you pause for too long while making an entry, the
procedure will time out and you will have to begin again.
If all memory locations are in use, the screen will
display DIRECTORY IS FULL. You will not be able to
store a new number until you delete an existing one.
Pat Williams
555-1234
91-000197-020-000_E5925B_R0.qxd 2/13/1950 7:21 PM Page 16
Page 19

17
Phone book
New phone book entries
To create a new phone book entry
Press MENU twice to select DIRECTORY. Press V to
highlight STORE. Press SELECT, then enter the
telephone number when prompted.
Use the dial pad to enter up to 32 digits, then press
SELECT. You will be notified if the number is already in
your phone book.
To insert a number from your redial list, press REDIAL,
then ^V to find the number, then press SELECT.
• Press DELETE to erase numbers if you make a mistake.
• Press and hold PAUSE to enter a 3-second dialing pause.
To enter a name
Press dial pad buttons once for the first letter, twice for
the second, three times for the third. Continue for
lower-case letters or numerals.
The cursor moves to the right when you press another
dial pad button or the ^ button. Press V to move
the cursor to the left. Press 1 to enter a space, or
press twice to enter “1”.
• Press DELETE to erase letters if you make a mistake.
• Press * repeatedly to enter an asterisk (*),
question mark (?), exclamation point (!), slash (/) or
parentheses.
• Press # repeatedly to enter a pound sign (#),
apostrophe ('), comma (,) hyphen (-), period (.), or
ampersand (&).
Storing the entry
Press SELECT to store your new phone book entry. To
change it later, see page 19.
Press once
to enter “A” (5 times for “a”).
Press twice
to enter “B” (6 times for “b”).
Press 3 times to enter “C” (7 times for “c”).
Press 4 times
to enter “2”.
2
AT&T
> DIRECTORY
CALL LOG
> STORE
REVIEW
ENTER NUMBER
555-1234_
ENTER NAME
Pat Williams_
Pat Williams
555-1234
91-000197-020-000_E5925B_R0.qxd 2/13/1950 7:21 PM Page 17
Page 20

18
Phone book
Phone book search
Press DIR to display the first listing in the phone book.
You can then use the ^ or V to browse through the
phone book, or search to find a specific entry. Press
OFF at any time to exit the directory.
To browse through the directory
To browse, press ^ or V to scroll through all
entries one by one. Entries will be displayed alphabetically by the first letter in the name.
To search by name
When any entry is displayed, you can press a dial pad
button to display the first name beginning with a letter
associated with that key.
Press dial pad buttons once for the first letter, twice for
the second, three times for the third, as shown on the
previous page.
For example, press 5 (JKL) once to find Jennifer, twice
to find Kevin, or three times to find Linda.
To call a displayed number
When you find the entry you want, press PHONE (or
SPEAKER) to dial. Or press SELECT to modify the entry
(see next page).
Viewing long numbers
The screen can display only 16 digits at a time. To view
numbers longer than this, press * or # to display
the remaining digits.
5
7
AT&T
Andrew
555-6789
Barbara
555-9876
Jennifer
555-4321
Pat
555-1234
91-000197-020-000_E5925B_R0.qxd 2/13/1950 7:21 PM Page 18
Page 21

19
Phone book
To dial, change or delete entries
To dial a number
When any phone book entry is displayed, press PHONE
(or SPEAKER) to dial the displayed number.
To delete an entry
When any phone book entry is displayed, press DELETE
to delete the displayed entry from the phone book.
Once deleted, an entry cannot be recovered.
To change a listing
When any phone book entry is displayed, press SELECT
to modify the entry. (See page 17 for help in modifying
the name or number.)
Change the number as needed, then press SELECT.
Change the name as needed, then press SELECT to
save the modified entry.
AT&T
Andrew
555-6789
EDIT NUMBER
555-6789_
EDIT NAME
Andy_
Andy
555-6789
91-000197-020-000_E5925B_R0.qxd 2/13/1950 7:21 PM Page 19
Page 22

20
Caller ID Logs
How Caller ID works
If you subscribe to Caller ID service provided by your
local phone company, information about each caller will
be displayed after the first ring.
Information about the last 50 incoming calls is stored in
your call log. You can review the call log to find out
who has called, return the call without dialing, or copy
the caller’s name and number into your phone book.
When the call log is full, the oldest entry is deleted to
make room for new incoming call information.
If you answer a call before the information appears on
the screen, it will not be saved in your call log.
NOTE
: Only one handset can review the call log at a time. If the other
handset attempts to enter the call log, will display NOT AVAILABLE AT THIS
TIME.
About names
Names of callers will be displayed only if this information
is provided by your local telephone company.
If the telephone number of the person calling matches a
number in your phone book, the name that appears on
screen will match the name as you entered it into your
phone book.
(Example: If Christine Smith calls, her name will appear
as Chris if this is how you entered it into your phone
book.)
Caller’s name Caller’s number
Appears when
new call is
received
Time of call
Date of call
CHARLIE JOHNSON
1-800-222-3111
NEW
11/23 10:01
AM
CHARLIE JOHNSON
1-800-222-3111
NEW
11/23 10:01
AM
91-000197-020-000_E5925B_R0.qxd 2/13/1950 7:21 PM Page 20
Page 23

21
Caller ID Logs
To review your call log
To review your call log
Press CID to review your call log. The most recent call
is displayed first. Use the arrow buttons to scroll
through the list as shown at left.
To return a call
Press PHONE (or SPEAKER) to call the number as
displayed.
To change the number before calling, press # repeatedly to see a list of dialing options (you can choose to
dial with or without the area code), then press PHONE
(or SPEAKER) to place the call.
Example:
CID
..............................Number displayed as 908-555-0100
#
(twice) ................Number changes to 555-0100 (drops “1” + area code)
PHONE/
SPEAKER
..................Dials 555-0100
Other options
• Press DELETE to delete this entry from your call log.
• Press and hold DELETE to delete all entries from
your call log. When asked to confirm, press SELECT
to clear your call log of all entries, or OFF to exit
and leave all call log entries intact.
• Press SELECT to copy this entry into your phone
book. If the name or number is not provided, you
will be prompted to enter them.
AT&T
6 NEW CALLS
NEW
Pat Williams
555-1234
NEW
11/23 10:31
AM
Chris Thompson
908-555-0100
NEW
11/23 10:21
AM
Jeffrey Adams
555-9876
NEW
11/23 10:11
AM
91-000197-020-000_E5925B_R0.qxd 2/13/1950 7:21 PM Page 21
Page 24

22
Answering System
Operation
Message capacity
The answering system can record up to 99 messages,
depending on the length of each message. Individual
messages can be up to four minutes long, but total
maximum recording time is 15 minutes. Messages will
remain available for replay until you delete them.
14
Message counter
Number of messages (or,
during playback, message
number currently playing).
Press repeatedly to hear
menu options (see page 26).
Press to select or change a
menu option (see page 26).
Press to review or set clock
(see page 23).
Press to record memo (see page 28)
or outgoing announcement (page 24).
Press to delete message currently playing; hold to delete all
old messages (see page 27).
Press to repeat message;
hold to slow playback,
press twice to play previous
message (see page 27).
Press to skip message;
hold to speed up playback
(see page 27).
Press to start or stop message
playback (see page 27).
Press to turn answering
system on or off.
91-000197-020-000_E5925B_R0.qxd 2/13/1950 7:21 PM Page 22
Page 25

23
Answering System Operation
Day and time announcements
To set day and time
Before playing each message, the answering system
announces the day and time the message was received.
Before using the answering system, you should follow
the steps at left to set the day and time, so messages
are dated correctly.
The system uses voice prompts to guide you. Each time
you press CHANGE, the day, hour, minute or year
advances by one. When you hear the correct setting,
press TIME SET to move to the next setting.
To check day and time
You can press TIME SET at any time to hear the
current day and time without changing it.
NOTE:
Press and hold
CHANGE
to advance the minute or year by incre-
ments of 10 (the year can be set from 2000 to 2039).
NOTE:
After you set the time once, it will thereafter be set automatically
with incoming Caller ID information. The time will be set automatically only if you
subscribe to Caller ID service provided by your local telephone company (see
page 5).
1.
Make sure the answering
system is on.
2.
Press
TIME SET
The system will announce the current clock setting, then announce
is
“To change clock, Press TIME
SET!¨
3.
Press
TIME SET
4.
Press
CHANGE
5.
Press
CHANGE
Press
CHANGE
until the system announces the correct hour, then press
TIME SET
.
until the system announces the correct minutes, then press
TIME
SET
.
NOTE:
You can press and
hold
CHANGE
to advance
the minutes in increments of ten.
until the system announces the correct day, then press
TIME SET
.
6.
7.
Press
CHANGE
until the system announces the correct
year, then press
TIME SET
. The
system announces the current
clock setting.
91-000197-020-000_E5925B_R0.qxd 2/13/1950 7:21 PM Page 23
Page 26

24
Answering System Operation
Outgoing announcements
Outgoing announcements are the messages callers hear
when calls are answered by the answering system.
The phone is pre-programmed with an announcement
that answers calls with “Hello. Please leave a message
after the tone.” You can use this announcement, or
replace it with a recording of your own voice.
To record your outgoing announcement
Press MENU until you hear "Change announce-
ment." Then press RECORD and begin speaking after
you hear "Now recording." Speak facing the telephone
base from about nine inches away. Press PLAY/STOP
when you are done.
Elapsed time (in seconds) will be shown in the message
window as you record. You can record an announcement up to 90 seconds long. Announcements less than
three seconds long will not be recorded.
To delete your outgoing announcement
Press MENU until you hear “Change announcement,”
then press PLAY/STOP to begin playback. Press DELETE
during playback to delete your announcement.
When your announcement is deleted, calls will be
answered with the pre-programmed announcement
described above.
1.
MENU
“Change
announcement”
2.
(Plays announcement
previously recorded).
2.
RECORD
“Now recording...”
3.
4.
(Announcement is
played back).
Speak into microphone.
Microphone
Or
14
Elapsed
recording time
(seconds).
Press to stop
recording.
(Play/Stop)
(Play/Stop)
91-000197-020-000_E5925B_R0.qxd 2/13/1950 7:21 PM Page 24
Page 27

25
Answering System Operation
Announce Only mode
In announce only mode, callers hear an announcement
but cannot leave messages. This option is useful, for
example, to notify callers that you will be away for an
extended period and request that they call back after a
certain date.
To turn Announce Only on or off
Press MENU repeatedly until you hear “Change
announce only.” Then press CHANGE until you hear
the option you want (on or off). Press PLAY/STOP to
store your selection and exit, or press MENU again to
modify other features (see page 26).
To record your outgoing announcement
When announce only is turned on, calls are answered
with a pre-recorded announcement that says “We’re
sorry, messages to this number cannot be accepted.”
You can use this announcement, or replace it with a
recording of your own voice.
After turning on the announce only feature, follow the
steps on page 24 to record your announcement. Callers
will hear this announcement only when the announce
only feature is turned on. Otherwise they will hear the
standard announcement asking them to leave a message.
1.
MENU
“Change
Announce Only”
2.
CHANGE
“Off”
3.
CHANGE
“On”
4.
Beep
(Option selected).
A
“A” is displayed when Announce
Only is activated.
(Play/Stop)
91-000197-020-000_E5925B_R0.qxd 2/13/1950 7:21 PM Page 25
Page 28

26
Answering System Operation
Changing feature options
Menu features can be changed to customize how the
answering system operates. Press MENU repeatedly to
hear each feature. Press CHANGE when you hear the
feature you want to modify.
Feature options (Default settings underlined).
System announces: Feature description:
1.
MENU
3.
MENU
Or
Press until desired feature
is heard (see list at right).
Press until desired selection
is heard.
Press to set selection and
move to next menu option.
Press to set selection and
exit menu.
2.
CHANGE
“Change announcement”
Options: [record announcement]
“Change remote access code”
Options: [enter 2-digit code] 19
“Change message alert”
Options: On / Off
“Change announce only”
Options: On / Off
“Change base ringer”
Options: On / Off
“Change number of rings”
Options: 2 / 4 / 6 /Toll Saver
Record your outgoing announcement
(see page 24).
Enter a two-digit number (10-99) for remote
access from another phone (see page 30).
When on, the telephone beeps every 10
seconds when you have new messages.
When on, callers hear an announcement
but cannot leave messages (see page 25).
Choose this option to turn the base ringer
on or off (does not affect handset).
Choose number of rings before the system
answers a call. When Toll Saver is active,
the system answers after 2 rings if you
have new messages, and after 4 rings if
you have no new messages.
NOTE:
Press and hold
CHANGE
to advance the remote access code
number by 10.
(Play/Stop)
91-000197-020-000_E5925B_R0.qxd 2/13/1950 7:21 PM Page 26
Page 29

27
Answering System Operation
Message playback
Press PLAY/STOP to hear messages. The system
announces the number of messages, then begins playback.
If you have new messages waiting, you will hear only the
new messages (oldest first). If there are no new messages,
the system will play back all messages (oldest first).
Announcements
• When playback begins, you will hear the total
number of messages.
• Before each message, you will hear the day and time
it was received.
• After the last message, you will hear “End of mes-
sages.” If the system has less than 5 minutes of
recording time left, you will hear time remaining.
Options during playback
• Press VOLUME button to adjust speaker volume.
• Press SKIP to skip to next message (or hold down
to
speed up message playback).
• Press
REPEAT to repeat message currently playing.
Press twice to hear previous message. (Hold down
to slow message playback).
• Press
DELETE to delete message being played back.
• Press
PLAY/STOP to stop playback.
To delete all messages
To delete all messages, press and hold DELETE while
the phone is idle (not during a call, or during message
playback).
1.
“You have [xx] new
messages and [xx] old
messages”
Number of messages waiting
(or, during playback, message
number currently playing).
14
Message playback begins. See
options at right.
2.
Message playback ends.
NOTE:
If “F” is flashing in
the message window, memory is
full. You will have to delete some
messages before new ones can
be received.
NOTE:
New (unheard)
messages cannot be deleted.
Press PLAY/STOP to begin or
end message playback.
(Play/Stop)
(Play/Stop)
91-000197-020-000_E5925B_R0.qxd 2/13/1950 7:21 PM Page 27
Page 30

28
Answering System Operation
Recording and playing memos
Memos are messages you record yourself. They are
saved, played back and deleted exactly like incoming
messages. You can record a memo as a reminder to
yourself, or leave a message for someone else if others
in your household use the answering system.
To record a memo
Follow the steps at left to record a memo. Elapsed time
(in seconds) are shown in the message window as you
record. You can record a memo up to 4 minutes long.
Memos less than 1 second long will not be recorded.
To play back a memo
Press PLAY/STOP to hear messages and memos (see
page 27 for other options).
1.
RECORD
“Now recording...”
3.
Beep
(Memo has been
recorded).
14
Elapsed
recording time
(seconds).
Press to stop
recording.
2.
Speak into microphone.
(Play/Stop)
Microphone
91-000197-020-000_E5925B_R0.qxd 2/13/1950 7:21 PM Page 28
Page 31

29
Answering System Operation
Message window displays
The message window usually displays the total number of
memos and incoming messages. See the list below for
explanations of other displays in this window.
Message window displays
0
No messages.
1-98
Number of messages/memos, or message number
currently playing (flashes if you have new messages).
10-99
Current remote access code while setting
(see page 26).
1-8
Current volume level while adjusting.
1-99
(counting)
Elapsed time while recording a memo (see page 28)
or announcement up to 90 seconds (page 24).
99
(flashing)
Memo recording exceeded maximum time of 99
seconds.
F
(flashing)
Memory is full. Messages must be deleted before
new messages can be received.
CL
(flashing)
Clock needs to be set (see page 23).
A
Announce only mode is on (see page 25).
--
System is answering a call, or being accessed
remotely.
--
(flashing)
System is being programmed or initialized.
On
(or)
OF
Displayed for one second when any answering
system setting is turned on or off.
Message window
14
91-000197-020-000_E5925B_R0.qxd 2/13/1950 7:21 PM Page 29
Page 32

30
Answering System Operation
1.
Remote access
A two digit security code is required to access your
answering system from any touch-tone phone. This
code is 19 by default; see page 26 to change it.
Dial your telephone number from
any touch-tone phone.
2.
When system answers, enter two
digit remote access code (19
unless you have changed it).
3.
Enter remote commands
(see list at right).
4.
Hang up to end call and save all
undeleted messages.
Play messages
#2
Repeat or go back
#4
Skip to next message
#6
Stop
#5
Delete message
#9
Review announcement
#7
Record announcement
*7
to begin recording
#5
to stop recording
Record memo
*8
to begin recording
#5
to stop recording
Turn system off
#0
Turn system on
#0
Help Menu
#1
Exit
*0
Press to hear new messages (if none are
new, all play back).
Press to repeat current message. Press
twice (# 4 # 4) to hear previous message.
Press to skip current message and
advance to next message.
Press to stop any operation
(stop playback, stop recording).
Press during playback to delete current
message.
Press to review current outgoing
announcement.
Press * 7, wait for beep, then begin
speaking. Press # 5 to stop recording and
hear playback of new announcement.
Press * 8, wait for beep, then begin
speaking. Press # 5 to stop recording.
Press to turn off answering system.
Incoming calls will no longer be answered.
If off, system will answer after 10 rings. Enter
your access code, then press # 0 to turn on.
Press to hear list of features & commands.
End remote access call (or hang up).
NOTE:
If you pause for
more than 10 seconds during
remote access, you will hear a
help menu listing all features &
commands. If you issue no
command for another 20 seconds,
the call will end automatically.
91-000197-020-000_E5925B_R0.qxd 2/13/1950 7:21 PM Page 30
Page 33

31
Appendix
Screen icons, indicator lights & tones
Handset screen icons & alert tones
Speakerphone in use.
Ringer off.
Battery charging (animated display).
Low battery (flashing); place handset in base or charger to
recharge.
MUTE
Microphone is muted.
NEW
New calls (press CID to review call log).
Happy tone
Programming command completed successfully.
two beeps
Programming error (or last record in list displayed).
Indicator lights
In Use
On when handset is in use. Flashes
when another phone is in use on the
same line, or answering system is
answering an incoming call.
Charging
On when handset battery is charging.
Answer On/Off
On when answering system is activated and
ready to receive calls.
Speaker
On when speakerphone is in use.
Screen icons
Alert tones
AT&T
NEW
MUTE
11/23 10:01
AM
91-000197-020-000_E5925B_R0.qxd 2/13/1950 7:21 PM Page 31
Page 34

32
Appendix
In case of difficulty
If you have difficulty with your phone, please try the suggestions below. For Customer
Service, visit our web site at www.telephones.att.com, or call 1-800-222–3111.
Telephone does
not work at all
• Make sure battery is installed and charged correctly (see page 7).
• Make sure the AC adapter is plugged into an outlet not controlled by
a wall switch.
• Make sure the telephone line cord is plugged firmly into the base unit
and the modular jack.
• If you have dial-pulse telephone service, make sure the dial mode is
set to pulse (see page 15).
• If these suggestions do not work, unplug the base, remove and reinsert the battery, then place the handset in the base to re-initialize.
Phone does not
ring
• Make sure the ringer is on (see page 14).
• Make sure the telephone line cord and AC adapter are plugged in
properly (see page 6).
• Move the handset closer to the base.
• You might have too many extension phones on your telephone line to
allow all of them to ring. Try unplugging some of them.
If you hear
noise or
interference
during a call
• You may be out of range. Move closer to the base.
• Appliances plugged into the same circuit as the base can cause
interference. Try moving the appliance or base to another outlet.
• The layout of your home or office might be limiting the operating
range. Try moving the base to another location, preferably on an
upper floor.
• If the buttons don’t work, try placing the handset in the base for at
least 15 seconds.
• Disconnect the base from the modular jack and plug in a corded telephone. If calls are still not clear, the problem is probably in your
wiring or local service. Call your local telephone service company.
91-000197-020-000_E5925B_R0.qxd 2/13/1950 7:21 PM Page 32
Page 35

33
Appendix
Incomplete
messages
• If a caller leaves a very long message, part of it may be lost when the
system disconnects the call after 4 minutes.
• If the caller pauses for more than 7 seconds, the system stops
recording and disconnects the call.
• If the system’s memory becomes full during a message, the system
stops recording and disconnects the call.
Difficulty hearing messages
• Press ^ on the base to increase speaker volume.
System does
not answer
after correct
number of rings
• Make sure that the answering system is on.
• If Toll Saver is activated, the number of rings changes to 2 when you
have new messages waiting (see page 26).
• In some cases, the system may be affected by the ringing system
used by the local telephone company.
• If the memory is full or the system is off, the system will answer after
10 rings.
“CL” flashes in
message window
• You need to reset the answering system clock (see page 23).
Announcement
message is not
clear
• When you record your announcement, make sure you speak in a
normal tone of voice, about nine inches from the base.
• Make sure there is no background noise (TV, music, etc.) while you
are recording.
System does
not respond
to remote
commands
• Make sure to enter your remote access code correctly (see page 30).
• Make sure you are calling from a touch-tone phone. When you dial a
number, you should hear tones. If you hear clicks, the phone is not a
touch-tone telephone and cannot activate the answering system.
• The answering system may not detect the remote access code while
your announcement is playing. Try waiting until the announcement is
over before entering the code.
• There may be noise or interference on the phone line you are using.
Press dial-pad buttons firmly.
In case of difficulty
91-000197-020-000_E5925B_R0.qxd 2/13/1950 7:21 PM Page 33
Page 36

Technical specifications
RF Frequency Band
(Handset to base)
2400 MHz — 2483.5 MHz
Output Power 20 dBm
Sensitivity -96 dBm
Modulation GFSK
RF Frequency Band
(Base to handset)
5725 MHZ — 5850 MHz
Channels 95
Channel Spacing 864 KHz
Operating Temperature 32°F — 122°F
0°C — 50°C
Base Unit Voltage
(AC Voltage, 60Hz)
96 — 130 Vrms
Base Unit Voltage
(AC Adapter Output)
9VDC @600mA
Handset Voltage 3.2 — 4.7 VDC 700mAH
Charger Voltage
(AC Adapter Output)
9VDC @150mA
34
Appendix
91-000197-020-000_E5925B_R0.qxd 2/13/1950 7:21 PM Page 34
Page 37

35
Appendix
A
AC adapter, 6
Alert tones, 31
Answering calls, 10
Answering system, 22-30
B
Battery charging, 7
Battery installation, 7
Belt clip, 9
C
Call Forward, 13
Call Transfer, 13
Caller ID, 20
add entries to phone directory, 21
delete entries, 21
dial entries, 21
CID, 20
D
Delete Call Log entries, 21
Delete redial entries, 10
Dialing,
from a CID record, 21
phone book dialing, 19
E
Elapsed time, 10
Ending calls, 10
F
Flash (switchhook flash), 11
H
Hands-free use, 10
Handset locator, 10
Headset, 9
I
Incoming call log, 20
Incoming calls, answering, 10
Indicator lights, 31
L
Last number redial, 10
Low battery, 7
M
Making calls, 10
Menus, 2
Messages, 22-30
Mute, 11
N
Names,
enter into phone book, 17
search for, 18
O
Operating range, 5
P
Phone book, 16
dial number, 19
edit entries, 19
name search, 18
new entries, 17
Problems, 32
Q
Quick reference guide, 2-3
R
Receiving calls, 10
Recharging, 7
Redial, 10
Ring silencing, 11
Ring tone options, 14
S
Search for name, 18
Speakerphone, 10
Switchhook flash, 11
T
Technical specifications, 34
Troubleshooting, 32
V
Volume controls, 11
Index
91-000197-020-000_E5925B_R0.qxd 2/13/1950 7:21 PM Page 35
Page 38

Appendix
Use the wallet card below to help you remember commands to control your
answering system from any touch tone telephone.
Remote access wallet card
Fold here.
Cut along dotted line.
Action Remote Command
Voice help menu ......................#1
Play messages ............................#2
Repeat message ........................#4
Skip message ..............................#6
Stop..............................................#5
Save messages............................Hang up
.
Delete message ........................#9 while message plays
.
Review announcement ............#7
Record announcement ............*7 speak after beep
.
#5 to stop
.
Record memo............................*8 speak after prompt
.
#5 to stop
.
End remote access call ............*0 (or hang up)
.
Turn system off ........................#0 (enter again to turn on)
.
Turn system on ........................If off, system answers after 10 rings.
Enter your access code, then press
# 0 to turn system on.
Call your phone number, then enter
your 2-digit access code (preset to 19).
5.8 GHz Cordless Telephone/Answering System E5925B
Copyright © 2004 Advanced American Telephones. All Rights Reserved.
AT&T and the Globe Design are trademarks of AT&T Corp.,
licensed to Advanced American Telephones. Printed in China.
91-000197-020-000_E5925B_R0.qxd 2/13/1950 7:21 PM Page 36
Page 39

Copyright © 2004 Advanced American Telephones. All Rights Reserved.
AT&T and the Globe Design are trademarks of AT&T Corp.,
licensed to Advanced American Telephones. Printed in China. Issue 2 AT&T 02/05.
91-000197-020-000
www.telephones.att.com
91-000197-020-000_E5925B_R0.qxd 2/13/1950 7:21 PM Page 37
Page 40

CORDLESS Troubleshooting TAGS
250 De-register and register
De-register handset from the E2525, E2600B and E2555
Please take the Handset out of the Base before de-registering. Using the [SOFT] Keys on
the Base, press MENU, then press the Down arrow twice until BASE SETTINGS is
highlighted. Press OK, then press MUTE 3 times and FLASH twice. This will deregister
the unit, please see more info to re-register.
Adding Handsets / Registering Handsets
Your telephone can accommodate up to 8 cordless Handsets. You can add new Handsets
(Model E250, sold separately) at any time, but each must be registered with the Base
before use.
Before using a new Handset, you must register it with the Base. There will be an R in the
upper left hand corner of the display. The Display will read "ENTER BASE ID". Use the
keypad on the Handset to enter Base ID. (To find this number, go to the Base, press
[MENU], scroll down to select DISPLAY BASE ID, then press OK.) Once you have
entered the Base ID number, press OK (middle key under the display). The unit will
display "SEARCHING FOR BASE" and then "FOUND BASE". Your Handset will then
be ready to use.
The Handset provided with your telephone is automatically registered as Handset 1.
Additional Handsets will be assigned numbers in the order the are registered (2, 3, 4, etc.)
up to a maximum of eight.
De-register 250 from the E2520 Base
Take the Handset out of the Base, press [*] [*] [3] [3] [5] [7] [8] [2] on the Base. This
will de-register all of the Handsets at one time. See more inform ation to register them
again.
NOTE: The Base ID code is located on the bottom of the Base.
Adding new Handsets / registering the Handset
Your telephone can accommodate up to 8 cordless Handsets. You can add new Handsets
(Model E250, sold separately) at any time, but each must be registered with the Base
before use.
Before using a new Handset, you must register it with the Base. There will be an R in the
upper left hand corner of the Display. The Display will read "ENTER BASE ID". Use the
keypad on the Handset to enter the Base ID. (To find this number, go to the Base, on the
bottom of the Base will be a white sticker that reads BS ID CODE. The code will start
with a 36. Once you have entered the Base ID number, press OK (middle key under the
display). The unit will display "SEARCHING FOR BASE" and then "FOUND BASE".
Your Handset will then be ready to use.
Page 41

The Handset provided with your telephone is automatically registered as Handset 1.
Additional Handsets will be assigned numbers in the order the are registered (2, 3, 4, etc.)
up to a maximum of eight.
Keypad Tone Feature - Vtech Telephones
When the Keypad Tone Feature is ON but the handset is OFF (i.e. in standby):
You will hear loud tones being emitted through the external speaker on the back of the
handset when you press any handset button except for the volume key.
When the Keypad Tone Feature is ON and the handset is ON (i.e. you pressed the
[PHONE] button to make a call, you have dial tone and you are NOT on the
Speakerphone):
1.You will hear the tones from the number buttons ([0] - [9]), the asterisk ([*]), the pound
([#]), and the [SOUND SELECT] button ONLY through the earpiece on the handset (the
receiver / internal speaker).
a) The earpiece on the handset (the receiver / internal speaker) is where you hear the dial
tone. The above key tones will have the same approximate volume as the dial tone.
b) You WILL NOT hear these tones loudly through the external speaker on the back of
the handset.
2.You will hear the loud tones from the [PHONE/FLASH] button, the [OFF] button, the
[SOFTKEY] buttons ( the 2 unnamed buttons under the display), and the [SPEAKER]
button being emitted through the external speaker located on the back of the handset.
When the Keypad Tone Feature is OFF and the handset is OFF (i.e. in standby):
You will not hear any key tones from any handset buttons.
When the Keypad Tone Feature is OFF and the handset is ON (i.e. you have pressed the
[PHONE] button to make a call, you have dial tone and you are NOT on the
Speakerphone):
1.You WILL hear the tones from the number buttons ([0] - [9]), the asterisk ([*]), the
pound ([#]), and the [SOUND SELECT] button through the earpiece on the handset (the
receiver/internal speaker). This is NORMAL operation.
a) The above key tones will have the same approximate volume as the dial tone.
b) You WILL NOT hear these tones being emitted through the external speaker located
on the back of the handset.
c) You will not hear any tones from the [SOFTKEY] buttons (the two unnamed buttons
under the display), or the [SPEAKER] button.
When the Keypad Tone Feature is OFF and the Speakerphone on the handset is ON:
1.You WILL hear the tones from the number buttons ([0] - [9]) emitted through the
external speaker on the back of the handset.
a) When the speakerphone is on, this is also where you hear the dial tone emitted.
b) The above key tones will have the same approximate sound and volume as the dial
tone.
2.You will not hear any tones from the [SOUND SELECT] button, the [SOFTKEY]
buttons (the two unnamed buttons under the display), or the [SPEAKER] button.
When the Keypad Tone Feature is ON and the Speakerphone on the handset is ON:
1.You will hear the tones from the number buttons ([0] - [9]), the [SOFTKEY] buttons
(the two unnamed buttons under the display), the [SPEAKER] button, the [PHONE]
Page 42

button, and the [OFF] button emitted through the external speaker on the back of the
handset.
2.You will not hear any tone when you press the [SOUND SELECT] button.
Keypad Tone Feature
When the Keypad Tone Feature is ON but the handset is OFF (i.e. in standby):
You will hear loud tones being emitted through the external speaker on the back of the
handset when you press any handset button except for the volume key.
When the Keypad Tone Feature is ON and the handset is ON (i.e. you pressed the
[PHONE] button to make a call, you have dial tone and you are NOT on the
Speakerphone):
1.You will hear the tones from the number buttons ([0] - [9]), the asterisk ([*]), the pound
([#]), and the [SOUND SELECT] button ONLY through the earpiece on the handset (the
receiver / internal speaker).
a) The earpiece on the handset (the receiver / internal speaker) is where you hear the dial
tone. The above key tones will have the same approximate volume as the dial tone.
b) You WILL NOT hear these tones loudly through the external speaker on the back of
the handset.
2.You will hear the loud tones from the [PHONE/FLASH] button, the [OFF] button, the
[SOFTKEY] buttons ( the 3 unnamed buttons under the display), the
[XFER/INTERCOM] button and the [SPEAKER] button being emitted through the
external speaker located on the back of the handset.
When the Keypad Tone Feature is OFF and the handset is OFF (i.e. in standby):
You will not hear any key tones from any handset buttons.
When the Keypad Tone Feature is OFF and the handset is ON (i.e. you have pressed the
[PHONE] button to make a call, you have dial tone and you are NOT on the
Speakerphone):
1.You WILL hear the tones from the number buttons ([0] - [9]), the asterisk ([*]), the
pound ([#]), and the [SOUND SELECT] button through the earpiece on the handset (the
receiver/internal speaker). This is NORMAL operation.
a) The above key tones will have the same approximate volume as the dial tone.
b) You WILL NOT hear these tones being emitted through the external speaker located
on the back of the handset.
c) You will not hear any tones from the [SOFTKEY] buttons (the three unnamed buttons
under the display), the [XFER/INTERCOM] button or the [SPEAKER] button.
When the Keypad Tone Feature is OFF and the Speakerphone on the handset is ON:
1.You WILL hear the tones from the number buttons ([0] - [9]) emitted through the
external speaker on the back of the handset.
a) When the speakerphone is on, this is also where you hear the dial tone emitted.
b) The above key tones will have the same approximate sound and volume as the dial
tone.
2.You will not hear any tones from the [SOUND SELECT] button, the [SOFTKEY]
buttons (the three unnamed buttons under the display), the [XFER/INTERCOM] button,
or the [SPEAKER] button.
Page 43

When the Keypad Tone Feature is ON and the Speakerphone on the handset is ON:
1.You will hear the tones from the number buttons ([0] - [9]), the [SOFTKEY] buttons
(the three unnamed buttons under the display), the [XFER/INTERCOM] button, the
[SPEAKER] button, the [PHONE] button, and the [OFF] button emitted through the
external speaker on the back of the handset.
2.You will not hear any tone when you press the [SOUND SELECT] button.
5860 Ringer On/Melody Selection
Turn Ringer On
1.Press any [NavKey] button to get to the Handset Menu.
2.Press the left, right, up or down [NavKey] button to highlight Sounds and Alerts
(handset with musical note icon), then press the center [NavKey] button to select.
3.Press the left, right, up or down [NavKey] to highlight Ringer Control (the bell icon),
then press the center NavKey button to select.
4.Press the down [NavKey] button to highlight RINGER.
5.Press the left or right [NavKey] button to change the ringer status from Off to On.
6.Press the [SOFT] Key under SAVE.
Choose Ringer Melodies
1.Press any [NavKey] button to get to the Handset Menu.
2.Press the left, right, up or down [NavKey] button to highlight Sounds and Alerts
(handset with musical note icon), then press the center [NavKey] button to select.
3.Press the left, right, up or down [NavKey] to highlight Ringers (the musical note icon),
then press the center [NavKey] button to select.
4.Press the up or down [NavKey] button to highlight the different melodies. You will
hear a sample of the melody you have highlighted.
5.Press the [SOFT] Key under SAVE when you have chosen the melody you want.
Adjust Ringer Volume
1.Press any [NavKey] button to get to the Handset Menu.
2.Press the left, right, up or down [NavKey] button to highlight Sounds and Alerts
(handset with musical note icon), then press the center [NavKey] button to select.
3.Press the left, right, up or down [NavKey] button to highlight RINGER CONTROL
(the bell icon), then press the center button of the [NavKey] to select.
4.Press the left or right [NavKey] button to select the volume level. With each press of
the button a sample of the volume is played.
5.Press the [SOFT] Key under SAVE.
To access the complete owner's manual. Click on the Red Top icon (located in the upper
right hand corner of this page).
2256/1256 - 2325/2365 Replace
This process is only to be used for the models 2256/1256, 2325, 2365 on the symptoms
below:
·Every call customer hears pause in conversation, other end hears beeps.
Page 44

·Every call conversation cuts in and out, other end hears beeps.
1.Advise the customer that you (the rep) will place a no charge replacement order that
will be shipped via UPS service, which should arrive within 14 days. Advise the
customer that they will also receive a prepaid ARS label sent via US Mail to return their
original unit (no charge will be incurred by the customer).
2.The rep will be responsible for placing the order for the unit using the EXCHANGEIW promo code in COPS and changing the shipping method to Free Shipping.
3.After placing the order, send an internal referral commitment to the [AAT ARS
LABEL] team.
If you have any questions regarding this information, please see your supervisor. It is
very important that every one understands this process and begins using it immediately.
NOTE: THE CUSTOMER MAY RECEIVE A 2256 FOR A 1256. THE TWO MODELS
ARE IDENTICAL.
NOTE: THE CUSTOMER MAY RECEIVE A 2325 FOR A 2365. THE TWO MODELS
ARE IDENTICAL.
T-Switch
A standard hearing aid consists of a high gain amplifier between a microphone and
receiver. If you put a cup over the ear such as a telephone handset, there is serious
feedback and squealing. The remedy is to add a "T-Switch" in the hearing aid that
disconnects the microphone and replaces it with a coil of wire. The phone receiver also
has a coil of wire (HAC coil), and so these two coils form a transformer when they are in
close proximity. Transformers transmit the signal magnetically rather than acoustically.
The T-Coil in the hearing aid picks up any magnetic energy in close proximity. Spread
spectrum phones produce a magnetic field when the RF transmitter turns on and off
repeatedly. This magnetic energy can be picked up as static or hum in a hearing aid, but
is usually a much lower level than the intended audio transmitted from the HAC coil.
Generally, non-spread spectrum phones will perform better with hearing aids.
process for T2406 calls
If the customer has had his or her unit longer than 45 days:
1. Advise the customer to mail his or her entire product to the San Antonio Returns
Center using the normal in warranty repair shipping and return process.
2. Advise the customer that upon receiving his or her telephone product at our San
Antonio Returns Center, he or she will receive a similar or upgraded replacement model
within 3 business days.
If the customer has had his or her unit less than 45 days or refuses to pay shipping costs
to return their product for in warranty service:
Do not send the customer back to the retailer. Offer to issue a replacement order and
send a prepaid ARS label via US Mail for him or her to ship their original product back at
no charge to them.
· If this is the case, it will be necessary for you to place an order for the VTech T2406
using the EXCHANGE-IW promo code in COPS and use regular standard shipping. (The
customer will receive the replacement within 3-Business days.)
Page 45

· After placing the order, send an internal referral commitment to the [VTECH ARS
LABEL] team for a prepaid UPS ARS Label to be sent to the customer.
NOTE: DO NOT SEND THESE CUSTOMERS BACK TO THE RETAILER FOR
REPLACEMENT (EVEN IF THEY ARE WITHIN THE FIRST 30 DAYS OF
PURCHASE). IT IS IMPORTANT THAT YOU FOLLOW THIS PROCESS.
Process for gz2434 Calls
If customers call with the one or more of the following symptoms: Static/Noise; Five
Beeps; Call is Fading or Cutting In and Out; No Connect and the final resolution is
repair, follow the below steps:
1.Advise the customer that you will place a no charge replacement order that will be
shipped via express service, which should arrive within 1-3 business days. Advise the
customer that they will also receive a prepaid UPS ARS label sent via US Mail to return
their original unit (no charges will be incurred by the customer).
2.You will need to place a no charge replacement order for the VTech GZ2434 using the
CSAT promotion code in COPS and change the shipping method to Free ShippingOvernight (manager use only) $0.
3.After placing the order, it will be necessary to send an internal referral commitment to
the [VTECH ARS LABEL] team requesting an ARS label be sent to the customer.
If the customer is not satisfied with the express shipped replacement, offer to extend their
manufacture's warranty for 6 months (this is different than a Protection Plan; Protection
Plans should never be given out as a negotiation method).
Turning Message Light Off
If the Message Light on the Base does not go off even after you've listened to voice mail
messages:
1.Press [PROG/CHAN].
2.Press [>] until the screen displays: MESSAGES WAITING.
3.Press [SELECT]. The screen displays: LIGHTS OFF: YES.
4.Press [SELECT] again to turn off the Message Waiting Light on Base.
2600 De-Register
2600 registered to a 2651
·In the idle mode, at the Base Unit keypad, press [*] [*] [3] [3] [5] [7] [8] [2].
2600 registered to a 2656 or 2670
·Unplug power from the Base.
·Hold down [PAGE] while reconnecting power. When the In Use Light blinks, release the
[PAGE] key.
·Hold down [PAGE] for 5 seconds. When the In Use Light begins to flash, release the
[PAGE] key.
·The Handset Charging Light will blink 5 times. Within 5 seconds from when it stops
blinking, press [PAGE] once
Registration of the 2600
·After charging the Handset, remove it from its Charge Cradle. If the screen displays
SEARCHING FOR BASE, Press NEW. If the screen displays ENTER BASE ID, go to
step 2.
Page 46

·Enter the 15 digit Base ID Code, located on the underside of the Base Unit. The ID Code
can include numbers (0-9) and characters (*,#).
·Press OK. The Handset will display: PLEASE WAIT!
·Wait approximately 15 seconds. The Handset will display FOUND BASE.
NOTE: Occasionally, it will take longer than 15 seconds for the Handset to find the Base
Unit. This is normal.
If the Handset displays: BASE BUSY TRY LATER, this indicates that the system is in
use. Wait until the Base Unit is in the idle (on hook) mode, and repeat steps 2 to 4.
Explanation of Why the TeleZapper Should Be Set On
'BASIC' to avoid interference with an Answering System
Once the Answering System picks up the line, the TeleZapper also seizes the line and
generates the tones which 'zap' telemarketers. When the TeleZapper is in 'advanced'
mode, the tones can stay on the line long enough that the Answering System may think
that an extension phone has been picked up (depending on the Answering System). If this
happens, the Answering System's Call Intercept/Interrupt feature will stop the recording
of the message, and since no extension has actually been picked up, the call will be
disconnected.
Twisted Pair Cords
Twisted pair cords are a type of phone cord wires used to reduce interference/crosstalk
between lines. Twisted pair cords consist of two insulated copper wires which are twisted
around each other to reduce interference from one wire to the other. The twisting of the
wire pairs is what reduces the interference.
Dual-Band Frequency
Our unit does utilize both the 5.8 and 2.4 GHz frequency bands simultaneously. The
dual-band technology provides a clear advantage over existing cordless phones in its
ability to avoid interference and provide optimal clarity in both received and transm itted
audio.
Since transmitting in the 5.8 GHz frequency requires more power, the Base station
transmits with the 5.8 GHz band (since it remains plugged to a power outlet all the time),
while the battery-operated Handset transmits in the 2.4 GHz band, so it can yield
optimum talk-time performance between battery charges.
Language Conversion
VT5831 LANGUAGE CONVERSION OF HANDSET MENUS
ENGLISH
SPANISH
FRENCH
CALLS LOG
GUIA DE LLAMADAS
REGISTRE D'APPEL
INTERCOM
INTERCOMUNICADOR
INTERPHONE
HANDSET SETTINGS
CONFIG AURICULAR
REGLAGES COMBINE
Page 47

SET TIME
PONER TIEMPO
REGLER L'HEURE
CLOCK MODE
MODO RELOJ
MODE HORLOGE
REGISTER
REGISTRAR
REGISTRE
RINGER VOLUME
TIMBRE VOLUMEN
SONNERIE VOLUME
RINGER MELODY
TIPO DE TIMBRE
SONNERIE MELODIE
VIBRATE CONTROL
CTRL VIBRACION
MODE VIBRATION
LOW BATT TONE
TONO DE BAT BAJA
SON PILE FAIBLE
RANGE TONE
TONO DE RANGO
SON DE PORTEE
KEYPAD TONE
TONO DE DECLADO
SON DU CLAVIER
CONTRAST
CONTRASTE
CONTRASTE
LANGUAGE
IDIOMA
LANGUE
TO CHANGE HANDSET MENU FROM SPANISH:
Press MENU.
Scroll down to CONFIG AURICULAR. Press OK.
Scroll down to IDIOMA. Press OK.
Scroll up to INGLES (English) or scroll down to FRANCES (French). Press OK.
TO CHANGE HANDSET MENU FROM FRENCH:
Press MENU.
Scroll down to REGLAGES COMBINE. Press OK.
Scroll down to LANGUE. Press OK.
Scroll up to ANGLAIS (English) or ESPAGNOLE (Spanish). Press OK.
LANGUAGE CONVERSION OF BASE MENUS
ENGLISH
SPANISH
Page 48

FRENCH
CALLS LOG
GUEA DE LLAMADAS
REGISTRE D'APPEL
BASE SETTINGS
CONFIG BASE
REGLAGES BASE
DISPLAY BASE-ID
NUMERO DE BASE
NUMERO DE BASE
RINGER VOLUME
TIMBRE VOLUMEN
SONNERIE VOLUME
RINGER MELODY
TIPO DE TIMBRE
SONNERIE MELODIE
KEYPAD TONE
TONO DE DECLADO
SON DU CLAVIER
TONE/PULSE
TONOS/PULSOS
TONALITE/IMPUL
CONTRAST
CONTRASTE
CONTRASTE
LANGUAGE
IDIOMA
LANGUE
TO CHANGE BASE MENU FROM SPANISH:
Press MENU.
Scroll down to CONFIG BASE. Press OK.
Scroll down to IDIOMA. Press OK.
Scroll up to INGLES (English) or scroll down to FRANCES (French). Press OK.
TO CHANGE BASE MENU FROM FRENCH:
Press MENU.
Scroll down to REGLAGES BASE. Press OK.
Scroll down to LANGUE. Press OK.
Scroll up to ANGLAIS (English) or ESPAGNOL (Spanish). Press OK.
2461 De-register
There are 2 different versions of this unit. If the customer has a tone/pulse switch on the
bottom of the Base, please use on of the procedures for Mk1. If they do not have a
tone/pulse switch on the bottom of the set, please use the procedure for Mk2a.
VT2461 Mk1 DEREGISTER ALL HANDSETS
1.Unplug power from the Base. Remove spare battery pack.
2.Hold down [PAGE] while reconnecting power. When the POWER light begins to
blink, release the [PAGE] key.
Page 49

3.Hold down [PAGE] key for 5 seconds. When the LINE IN USE light begins to flash,
release the [PAGE] key.
4.The HANDSET CHARGING light will blink 5 times. Within 5 seconds from when it
stops blinking, press [PAGE] once.
VT2461 Mk1 DEREGISTER A SINGLE HANDSET
1.Unplug power from the Base. Remove spare battery pack.
2.Hold down [PAGE] while reconnecting power. When the POWER light begins to
blink, release the [PAGE] key.
3.Press [PAGE] 1 to 4 times, corresponding to the Handset you wish to deregister.
4.Once you complete step #3, the HANDSET CHARGING light will blink back to you
the number of times corresponding to the Handset you wish to deregister. Within 5
seconds from when it stops blinking, press [PAGE] once.
VT2461 Mk2a
1.Unplug power from the Base. Remove spare battery pack.
2.Hold down [PAGE] while reconnecting power. When the Base Display says 'Pr',
release [PAGE].
3.Press [MENU]. The Display will say 'rh'.
4.Press [SELECT] to choose h1, h2, h3, h4 or AL (all).
5.Press [TIME/SET] to confirm.
Unplug power from the Base, then reconnect power to complete deregistration.
2455 De-register
DEREGISTER ALL HANDSETS
1.Unplug power from the Base. Remove spare battery pack.
2.Hold down [PAGE] while reconnecting power. When the POWER light begins to
blink, release the [PAGE] key.
3.Hold down [PAGE] for 5 seconds. When the LINE IN USE light begins to flash,
release the [PAGE] key.
4.The HANDSET CHARGING light will blink 5 times. Within 5 seconds from when it
stops blinking, press [PAGE] once.
DEREGISTER A SINGLE HANDSET
1.Unplug power from the Base. Remove spare battery pack.
2.Hold down [PAGE] while reconnecting power. When the POWER light begins to
blink, release the [PAGE] key.
3.Press [PAGE] 1 to 4 times, corresponding to the Handset you wish to deregister.
4.Once you complete step #3, the HANDSET CHARGING light will blink back to you
the number of times corresponding to the Handset you wish to deregister. Within 5
seconds from when it stops blinking, press [PAGE] once.
8 inch 4 conductor line cord
Perform the following:
-Advise the customer that we will send him a replacement 8 inch 4 conductor line cord.
-Inform the customer that he or she will receive the new replacement cord in U.S. Mail.
-Verify and update the customer's profile with all address and telephone information.
-Place an internal referral request via CRSS to Research Advisor to place an order for the
replacement line cord.
Perform the following:
Page 50

- Advise the customer that you are sending him or her a brand new replacement set
(Cordless 2230 or 2255 whichever the customer has). If the customer does not want the
replacement, advise him or her to return their unit to the place of purchase. Stop! If the
customer accepts the replacement 2230/2255 continue....
- Inform the customer that he or she will receive the new replacement set(s) within 14
business days. Explain that you will also send an ARS label (via US Mail) for him or
her to return his or her original unit.
- Verify and update the customer's profile with all address and telephone information.
- Access DES and enter a replacement order for the customer.
- You will then need to place another commitment (via the internal referral team [OSG-to
place an SAP order]) requesting an ARS Label be sent to the customer.
Deregistration process for V2421
1.If base is plugged in, disconnect the DC connector from it and wait at least 10 seconds
before proceeding.
2.Hold down the [PAGE] button while reconnecting the DC cord to the base. Continue
to hold down the [PAGE] button for 5 seconds after reconnecting power.
3.Release the [PAGE] button.
4.Press the [PAGE] button from 1 to 5 times, depending on the handsets you wish to
deregister:
1 press deletes HS1: 2 presses deletes HS2; etc. 5 presses deletes all.
The Base LED will flash with each key press.
5.After entering the handset(s) to delete, the base will flash back the number of key
presses entered.
6.Once the LED stops flashing, press [PAGE] once. Your mission is complete.
Access to SoundCard
Access to SoundCard
1.Press start
2.Programs
3.Accessories
4.Entertainment/multimedia
5.Volume control ( this will open the master volume control)
6.Go to Options and select Properties
Select Line In
1.Press start
2.Programs
3.Accessories
4.Entertainment/multimedia
5.Volume control ( this will open the master volume control)
6.Go to Options and select Properties
7.There will be an option to adjust Recording or playback volume control. Choose
Recording.
8.There is another section under recording where you pick which volume controls you
want to show on the bar. Make sure there is a check next to "line". If there is not, please
check it
Page 51

9.Hit "Ok". Now "line or Line In" should show up in the master volume control for
Recording. Please make sure that there is a check mark in the Select box under the "Line
or Line IN
10.Go to Options and Select Properties.
11.There should be an option to adjust Recording or playback volume control. Choose
Playback.
12.There is another section under playback where you pick which volume controls you
want to show on the bar. Make sure there is a check next to "line or Line in". If there is
not, please check it.
13.Hit "Ok". Now "line or Line in " should show up in the master volume control for
Playback. Please make sure that there is a check mark in the MUTE box under the "line
or line in". (it is possible that you may not have a MUTE option, it might be "SELECT".
If you have a choice to SELECT then do not check SELECT under LINE")
14.Now close the Master Volume Control.
Operating Range General
This cordless telephone operates within the maximum power allowed by the Federal
Communications Commission (FCC). Even so, this handset and base can communicate
over only a certain distance --- which can vary with the locations of the base and handset,
the weather, and the construction of your home or office. For best performance, keep the
base antenna fully upright.
If you receive a call while you are out of range, the handset might not ring --- or if it does
ring, the call might not connect when you press [PHONE]. Move closer to the base, then
press [PHONE] to answer the call.
If you move out of range during a phone conversation, you might hear noise or
interference. To improve reception, move closer to the base.
If you move out range without pressing[OFF], your phone will be left "off the hook." To
hang up properly, walk back into range, periodically pressing [OFF].
Handset De-Registration (2455/2461)
1.Disconnect power to the Base (either unplug the DC connector from the bottom of the
Base or unplug the power supply from the outlet). Remove spare battery, if applicable.
2.Hold down the base PAGE key while applying power back to the Base. When the
POWER LED begins to blink, release the PAGE key.
THE USER HAS 15 SECONDS TO BEGIN THE NEXT STEP;OTHERWISE, THE
BASE WILL EXIT PROGRAM MODE.
3.Hold down the PAGE key for 5 seconds. The HANDSET CHARGING LED will be
lit, and after 5 seconds, the LINE IN USE LED will start to flash. Now release the PAGE
key.
4.The HANDSET CHARGING LED will blink 5 times and then go out. Within 5
seconds from when it stops blinking, press and release the PAGE key.
All handsets should now be deregistered.
Conference calls
When call is conferenced, two lines are being bridged through one telephone. The normal
loss that occurs between a station to station call is doubled when using the conference
call feature. The quality of transmission depends on many variables including the amount
Page 52

of line voltage available at the phone and the distance of miles between the two other
parties. Customer may consider 3-way calling service (if available through local telco) as
alternative. Customer is less likely to experience volume loss due to more direct routing
of conference.
Caller Id after 2nd ring
Most Telco's send out the Caller ID information between the 1st and 2nd ring. Some
Telco's send out this information later. If the machine answers the call before the
information is received, the Caller ID information will be lost. Please set the number of
rings to a number higher than 2. The customer may want to turn the machine off and
then let a call come in to see when the information arrives. You need to set the answering
system to answer the ring after the caller ID information arrives. Do not set it for the
same ring. If you have voice mail service, set it to answer at 6 rings.
Operating Range 2.4
This cordless operates in the 2.4 Gigahertz frequency band. Radio signals in this band
can penetrate small openings and reflect around obstructions more effciently than those
of conventional cordless telephones. This alows the unit to operate in areas that are
typically difficult for cordless phones.
Your cordless telephone operates at the maximum power allowed by the Federal
Communications Commission (FCC). Even so, your handset and base can communicate
only over a certain distance which can vary with the locations of the base and handset,
the weather, and the construction of your home or office.
Spread Spectrum Echo
This unit employs state-of-the-art frequency hopping spread spectrum (FHSS) technology
to achieve one of the longest ranges in the consumer cordless telephone industry. FHSS
is a digital technology that is also found in much more expensive cellular telephones.
Just as it is common to experience echo in some cellular telephone systems, some users
will experience occasional echo while using this phone. The presence and/or level of
echo will depend on the electrical characteristics of the connection between the phone
and user's local central office. This is normal operation. The customer can lower the
volume on the handset and this will decrease the echo.
Caller ID/Call Waiting Services
It may not be enough that the users subscribe to both services, they may also need to ask
the local phone company to combine Caller ID with Call Waiting, so that their Caller ID
product will be able to recognize names and numbers for a Call Waiting call, as well as,
for regular calls. There may be an additional charge for this combined feature. Their
phone company may use names for this combined feature that are not on this list, but
listed below are some of the more generally used names for this combined Caller ID with
Call Waiting service:
·Call Waiting ID, Caller ID/Call Waiting ID - Bell Atlantic
·Wait and See - Ameritech
·Call Waiting ID - PacBell, SW Bell
·Caller ID with Name on Call Waiting - SNET
in.
Operating Range 900
Page 53

This cordless operates in the 900 megahertz frequency band. Radio signals in this band
can penetrate small openings and reflect around obstructions more effciently than those
of conventional cordless telephones. This alows the unit to operate in areas that are
typically difficult for cordless phones.
Your cordless telephone operates at the maximum power allowed by the Federal
Communications Commission (FCC). Even so, your handset and base can communicate
only over a certain distance which can vary with the locations of the base and handset,
the weather, and the construction of your home or office.
Cardiac Pacemakers
THE FOLLOWING INFORMATION IS LOCATED AT THE BEGINNING OF THE
CIB
Cardiac Pacemakers (applies only to 900 MHz Digital Cordless Telephones):
Preliminary studies performed at the U.S.. Food and Drug Administration (FDA) and
elsewhere have shown that when digital wireless telephones using technology similar to
900 MHz Cordless Telephones are placed very close to implanted cardiac pacemakers,
interference with the operation of the pacemaker can occur. These preliminary studies
show that interference is not likely to occur when there is a reasonable distance between
the telephone and the implanted pacemaker and stops when the phone is set in the
"battery save mode" or moved so that it is more than 3 inches from the pacemaker.
Based on these preliminary studies, the FDA has concluded that digital wireless
telephones "do not seem to pose a significant problem for pacemaker wearers.
Until more is known, the FDA suggests that people with pacemakers may want to take
some simple precautions when using or carrying digital wireless telephones to ensure that
there is ample distance between the digital cellular telephone and the pacemaker -- by not
placing the phone next to the pacemaker implant (for example, in a shirt or coat pocket
directly over the pacemaker implant) when the phone is turned on ready to receive a call
and holding it to the ear opposite the side of the body where the pacemaker is implanted
when using the phone. Consult your physician or medical device manufacturer to
determine if additional precautions are necessary.
Volume Controls
Both the base unit and the handset have digital volume controls. The volume controls for
the speakerphone are located on the front face of the base unit. Press the volume up side
to increase the speaker volume and the volume down side to decrease the volume.
Holding either side down will continuously change the volume setting.
The volume controls for the handset are located on the side of the unit. Press the [^] (up)
or [v] (down) keys to increase or decrease the volume.
Date Code Sticker
The date code sticker can be found inside the handset battery compartment, on the bottom
of the base, or on the pretty box. It specifically indicates where and when the product
was manufactured.
Following is an example of what is shown on the sticker:
940101 B
2/7
CPS 2A
Note: If inputting the date code in the FCC field, use the following format:
Page 54

940101B2-7CPS2A (CRS will not accept a slash.)
The battery save feature will deactivate the ring approximately 60 seconds af ter being set.
After 60 seconds, the phone will enter "sleep mode". The phone will not ring or display
"incoming call" when the extension phones are ringing. If any button on the phone is
pressed, this will "wake up" the phone. If there is an incoming call within 60 seconds of
a button being pressed, the phone will ring. Once nothing has been pressed for another
60 seconds, the phone will go back into "sleep mode" and will not ring.
ToneLength
Tone length for most cordless telephones is 80-100 milliseconds.
Some services may require longer tones. You need to look for a phone that will continue
to produce a tone signal for as long as a digit is held down. We have many phones with
long tones.
Handset Warmth
It is normal to feel heat near the battery compartment on the cordless handset once the
battery has been fully charged. There is a component in the battery known as a
"separator" which converts excess energy to heat.
Relocate Phone In Home EMI + Sep/Phns
Interference generated by some radio equipment and electrical appliances and machinery
may travel through the air, affecting other types of equipment in close proximity.
Filters cannot help in this situation. Separating the objects may be the only solution.
Split Line w/Triplex + Verify 2 cond cord on line 1
If single line telephone equipment is also experiencing crosstalk, the customer may try
the following remedies:
1.Use shortest line cords possible.
2.Use 2 conductor line cords to connect all single line equipment.
3.Disconnect line 2 wires on any jack where not needed.
Crosstalk
If crosstalk occurs while phones are plugged into the network interface, inside wiring is
NOT the problem. Plug separate phones into the individual interfaces for each line.
Both lines will need to be in use at the same time to get valid test results.
TWO SINGLE LINE JACKS
Verify that 2 conductor line cord is connected to L1/L2 port on telephone. 4 conductor
cord may be used at L2 port.
SINGLE LINE TELEPHONE EQUIPMENT
If single line telephone equipment is also experiencing crosstalk, customer may try the
following remedies:
1.Use shortest line cords possible.
2.Use 2 conductor line cords to connect all single line equipment.
3.Disconnect line 2 wires on any jack where not needed.
TWO-LINE JACKS
·Use triplex adapter and 2 line cords at each affected two-line set.
·Connect cords to L1 and L2 on adapter (not L1+L2) cannot use wall phones with triplex
adapter.
Suggestions for reducing local telephone line recordings:
Page 55

·If possible advise your callers to leave a message.
·Check with the local telephone company and advise them 7-10 seconds of silence is
required for the answering system to disconnect.
NOTE: Charges may apply
Call Waiting disconnects answering system
Answering System senses a fluctuation in line voltage caused by the Call Waiting signal
and disconnects.
Contact Local Telephone Company for possible solutions.
External Antennas
Additional external antennas are not recommended for the following reasons:
·AT&T cordless telephones are designed to ensure that the power output of the set does
not exceed standards set by the FCC. The maximum power output allowed is .1 watt (or
100 milliwatts).
·Any attachment to a cordless telephone which increases the power output is in violation
of FCC regulations.
·Once the product is opened in order to connect the external antenna, the warranty is
voided.
Hearing Aid Compatibility
This product is compatible with inductively coupled hearing aids.
Use of any other amplification devices near or on the cordless product may produce
squealing, whistling, or feedback.
·If you use a hearing aid in only one ear, cradle the handset to the other ear to try to avoid
microphone feedback.
·Remove or turn off the hearing aid when using the handset.
·Use a different extension telephone if you are unable to use the product without
assistance of a hearing aid.
Information regarding inductively coupled hearing aids:
·This type of hearing aid is usually equipped with a T (telephone ) switch, specifically
installed for improved amplification with telephone use.
·Flip the T switch to the telephone position to turn off the hearing aid microphone and
turn on the inductive pickup coil that receives voice signals through a magnetic field
generated by some telephone handset.
·Not all telephones generate a sufficiently strong magnetic field to couple to these hearing
aids.
·Those that do are labelled Hearing Aid Compatible by AT&T.
Hearing Aid Compatibility
This product is compatible with inductively coupled hearing aids.
Clean Charging Contacts
·Each month clean handset and base charging contacts using a pencil eraser or a cloth to
eliminate deposit accumulation.
·Charge light should come on when handset is cradled in base.
·Charge handset for 10 hours.
Page 56

Calling in same Area Code
Many LTCO's are changing their dialing sequence to 0 +, or 1 +, 10-digit dialing (0 + 0r
1 + area code + seven-digit phone number) for all long distance calls that are made within
the same area code. All 0 +, or 1 +, 7-digit dialing within the same area code will be
eliminated. This also means that local credit card and operator assistance calls that
traditionally have been 0 + 7 dialed calls will now require 0 + 10 dialing. You will
continue 0 + or 1 + 10 digit dialing for long distance calls into other area codes as you do
today.
Recradle unplug AC
1.Unplug the AC adapter from the wall outlet.
2.Remove battery cover on handset.
3.Unplug batteries from back of handset.
4.Wait 15 seconds and reinstall batteries securely.
5.Replace battery cover.
6.Recradle handset in base, replug AC adapter and wait 15 seconds.
7.Pick up handset and press phone.
NOTE: Be sure batteries have been charged recently.
Recradle unplug AC
1.Unplug the AC adapter from the wall outlet.
2.Remove battery cover on handset.
3.Unplug batteries from back of handset.
4.Wait 15 seconds and reinstall batteries securely.
5.Replace battery cover.
6.Recradle handset in base, replug AC adapter and wait 15 seconds.
7.Pick up handset and press phone.
NOTE: Be sure batteries have been charged recently. If not, charge batteries fully for 16
Hours.
Handset Locked Up (Battery ) :
1.Remove battery cover on handset.
2.Unplug battery from back of handset.
3.Wait 15 seconds.
4.Reinstall battery securely.
5.Replace battery cover.
6.Recradle handset in base for 15 seconds.
7.Pick up handset and press phone.
NOTE: Be sure batteries have been charged recently.
Handset Locked Up (Battery ) :
1.Remove battery cover on handset.
2.Unplug battery from back of handset.
3.Wait 15 seconds.
4.Reinstall battery securely.
Page 57

5.Replace battery cover.
6.Recradle handset in base for 15 seconds.
7.Pick up handset and press phone.
NOTE: Be sure batteries have been charged recently. If not, charge batteries fully for 16
hours.
Common Cure
If the unit does not seem to be responding normally, then try putting the handset in the
base to reinitialize the unit. If it still does not seem to respond after doing this a few
times, do the following (in the order listed):
1.Unplug the power cord.
2.Remove the handset battery.
3.Wait a few minutes.
4.Plug the power cord into an electrical outlet.
5.Install the handset battery.
6.Put the handset in the base to reinitialize.
Base Unit Locked Up:
1.Recradle handset in base.
2.Unplug AC adapter from wall outlet.
3.Wait 15 seconds.
4.Reconnect AC adapter.
5.Wait 15 seconds.
6.Pick up handset and press PHONE button.
Single Audio Path Mutes
Ringing from another line may briefly mute a conversation since this product is designed
with a single audio path. This is a normal occurence.
Chirping Sounds
If chirping sounds are detected from the handset or base, check the following possible
causes:
·Smoke detectors
·Other cordless telephones
·Alarm clocks
To enable the unit to work with business systems:
·Install the unit at the control box, or
·Wire a jack around the system.
NOTE: Unit will not have business system features if installed in this manner.
Check with the local telephone company to inquire as to possible low line voltage.
NOTE: The recommended voltage is 24 to 48 on hook.
Due to reduced line voltage, avoid having additional extension telephones "off the hook"
during a call.
Wet Handset
A handset dropped in water may still operate if left out to dry.
1.Empty any residual water.
2.Leave handset face down on a towel to dry for 72 hours.
3.If handset does not operate after 72 hours, send it in for repair.
Page 58

To determine if telephones ring separately or together:
1.Remove telephones from line.
2.Replace one at a time.
·Line 1 has a higher pitched ring that helps differentiate it from the ring of Line 2.
·Have someone call on each line.
·Let the telephone ring approximately five times and listen to the difference.
·Try using 2 two conductor cords or purchase a 267C adapter.
·Try a Triplex adapter and use a two cord connection.
Ringer Volume Not Adjustable
Ringer volume cannot be adjusted.
If the volume is too loud, the ringer switch may be shut off.
NOTE: This will turn the ringer off completely and you will lose line lights.
4 Conductor Line Corfd
To determine if the unit's cord is four pin or two pin:
·Take another telephone "off the hook."
·Remove and inspect the telephone line cord.
Low Battery indicator
The Low Battery indicator does not appear if:
·The unit is completely charged.
·The handset has completely discharged.
If the handset is normally kept in the base, the light should not appear.
Unplug excessive telephones or adjuncts or disconnect the telephones needed to bring
ringer equivalence below total ringer equivalence.
Check with the local telephone company to inquire as to possible low line voltage.
NOTE: The recommended voltage is 24 to 48 on hook.
·Unplug both ends of the line cord.
·Plug in both ends of the line cord.
·Replace the line cord if the connections are loose.
Explain Call Waiting
Explanation to Call Waiting customers:
·The unit picks up the first call after the preset number of rings.
·The second caller hears the telephone ring until the unit resets and is ready to answer the
next call.
·There is no reset time.
More Than One Cordless
If more than 1 cordless installed, have customer check to see if handsets are cradled on
the correct base unit.
.
Page 59

.
Ringer Equivalence
On the bottom of each telephone or adjunct is a Ringer Equivalence.
1.Find this number for everything connected to your telephone line.
2.Add up all the numbers to get the total Ringer Equivalence.
Julian Date
NOTE: Contact the telephone company, if required.
The Julian date for this unit is found on the bottom of the unit.
TAS units are manufactured in:
·Mexico (M)
·Taiwan (H)
·China (G)
·Thailand (L)
The Julian date (XX XXX X) is read as follows:
·The first two numbers (XX XXX X) represent the year (00 - 99) of manufacture.
·The next three numbers (XX XXX X) represent the day of the year (1 - 365) of
manufacture.
·The last letter (XX XXX X) represent the place (M, H, G, L) of manufacture.
So, for example, 92291G was built in 1992, on the 291st day, in China.
When asked if a Julian date is after 92291G, 922209H, or 92168M, compare the Julian
date the customer gives you with the Julian date above for the same manufacturing site.
For example, if the customer said,"93005G," you would compare it to 92291G and
answer, "Yes."
Digital Voice
The difference between the electronic and human voice:
The electronic voice is a digital reproduction of a human voice which is analog.
 Loading...