

Page 1

User’s manual
E598-1
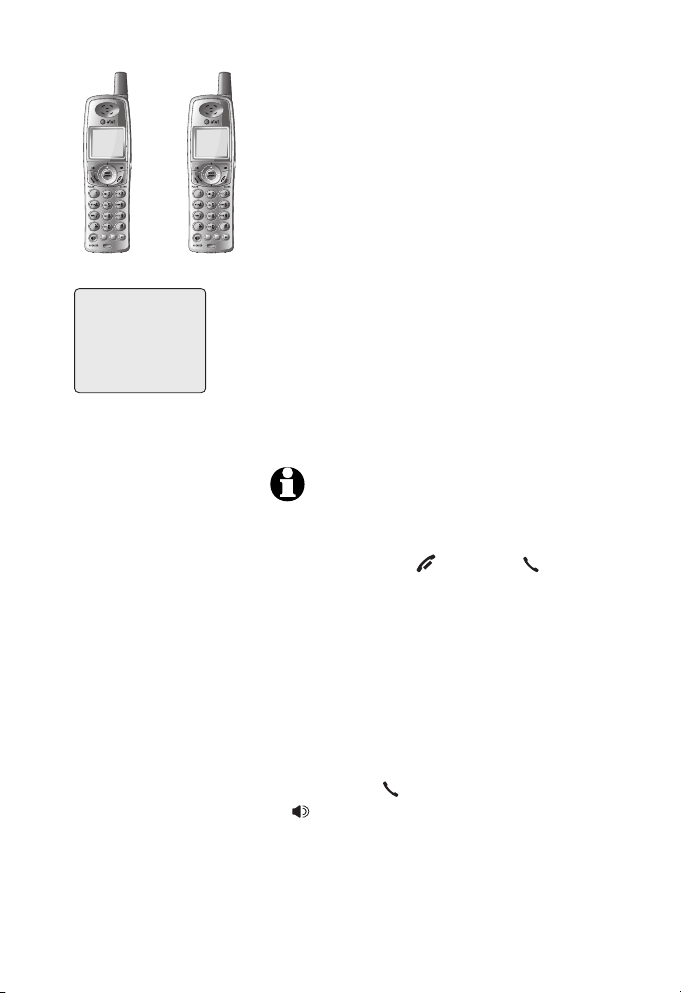
5.8 GHz expansion handset for
use with AT&T models E5901/
E5902B/E5903B/ E5911/
E5912B/E5913B/E5914B/
E5921/E5922B/E5923B/
E5924B/E6001/E6002B/
E6012B/E6013B/E6014B/
E3813B
Page 2

Congratulations
on purchasing your new AT&T product.
Before using this AT&T product, please
read the Important safety instructions
on pages 51 to 54 of this manual
Please thoroughly read the user’s
manual for all the feature operation
and troubleshooting information you
need to install and operate your new
AT&T product. For customer service
or product information, please visit
our website at www.telephones.att.com
or call 1 (800) 222-3111.
In Canada dial 1 (866) 288-4268.
Model #: E598-1
Product name: 5.8GHz expansion handset
Serial #:
(found on the bottom of the charger)
Purchase date:
Place of purchase:
The ENERGY STARR program (www.energystar.gov) recognizes and
encourages the use of products that save energy and help protect
our environment. We are proud to mark this product with the ENERGY
STARR label indicating it meets the latest energy efficiency guidelines.
© 2007 Advanced American Telephones. All rights reserved.
AT&T and the AT&T logo are trademarks of AT&T Knowledge Ventures,
licensed to Advanced American Telephones. Printed in China.
Page 3

You must charge the battery and register the handset before use.
Table of contents
STOP!
See pages 3-5
for easy instructions.
Quick reference guide ...............1
Parts checklist ...............................2
Battery installation
& charging .................................3
Adding and registering
handset .......................................4
Replacing a handset ...................6
Belt clip & optional headset ...7
Handset operation .......................8
Options while on calls ............10
Intercom ......................................... 15
Intercom call transfer ..............17
Handset settings ........................ 19
Directory ........................................ 27
New directory entries .............. 28
Directory search ......................... 30
To dial, delete or change
entries ....................................... 32
For customer service or product information, please visit our
website at www.telephones.att.com or call 1 (800) 222-
Caller ID ......................................... 34
To review the call log ............. 38
Screen icons, indicator lights
& tones...................................... 40
Handset display screen
messages ................................ 41
Troubleshooting ......................... 43
Important safety
instructions............................. 51
FCC Part 68 and ACTA............ 55
FCC Part 15 .................................. 57
Limited warranty ........................ 58
Technical specifications ......... 63
Index ................................................ 64
3111. In Canada dial 1 (866) 288-4268.
NOTE: Your product may be shipped with a protective sticker covering the
handset or base display, remove it before use.
Page 4
Getting started
TONE
DELETE
PAUSE
MUTE
REDIAL
Quick reference guide
For complete instructions, please refer to the manual provided with your
E5901/E5902B/E5903B/E5911/E5912B/E5913B/E5914B/E5921/
E5922B/E5923B/E5924B/E6001/E6002B/E6012B/E6013B/E6014B/
E3813B telephone. If you are unable to find your manual, you may
read and/or download the manual at www.telephones.att.com.
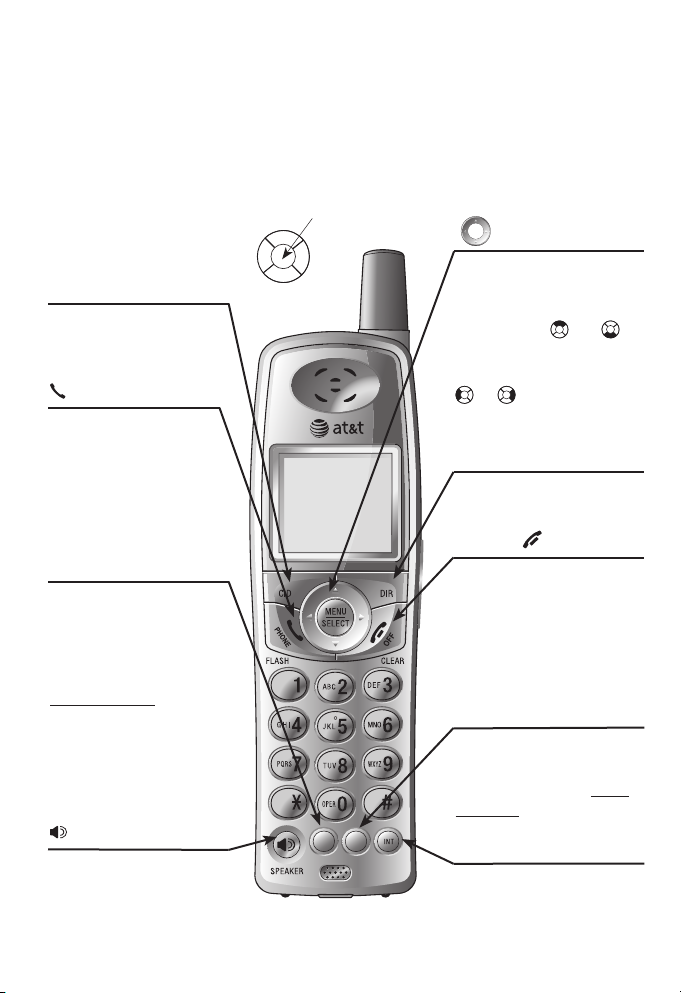
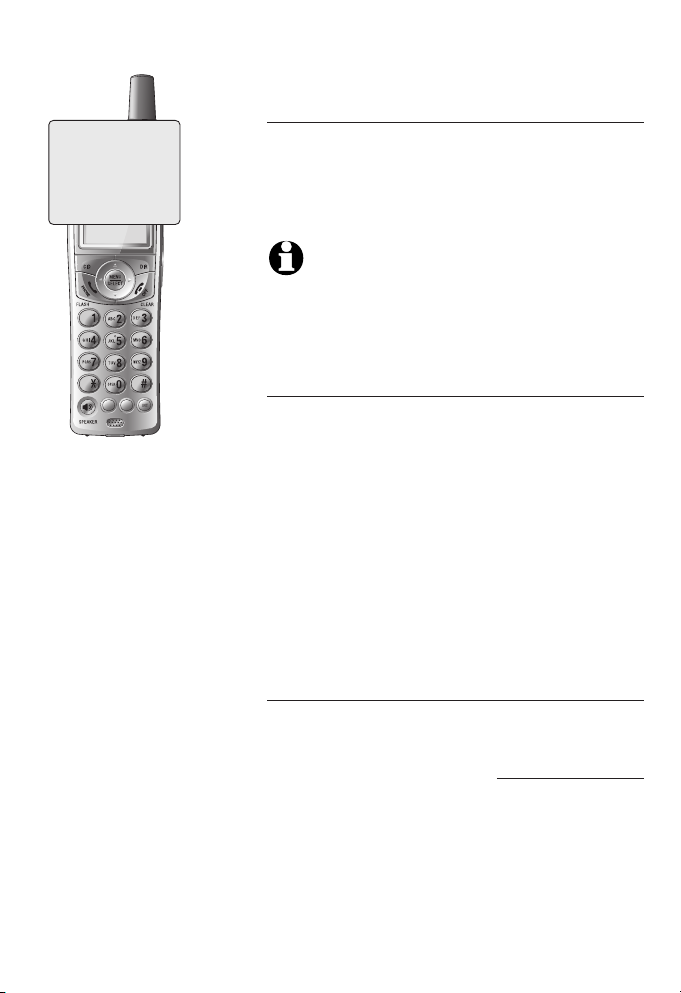
CENTER
LEFT
UP
DOWN
RIGHT
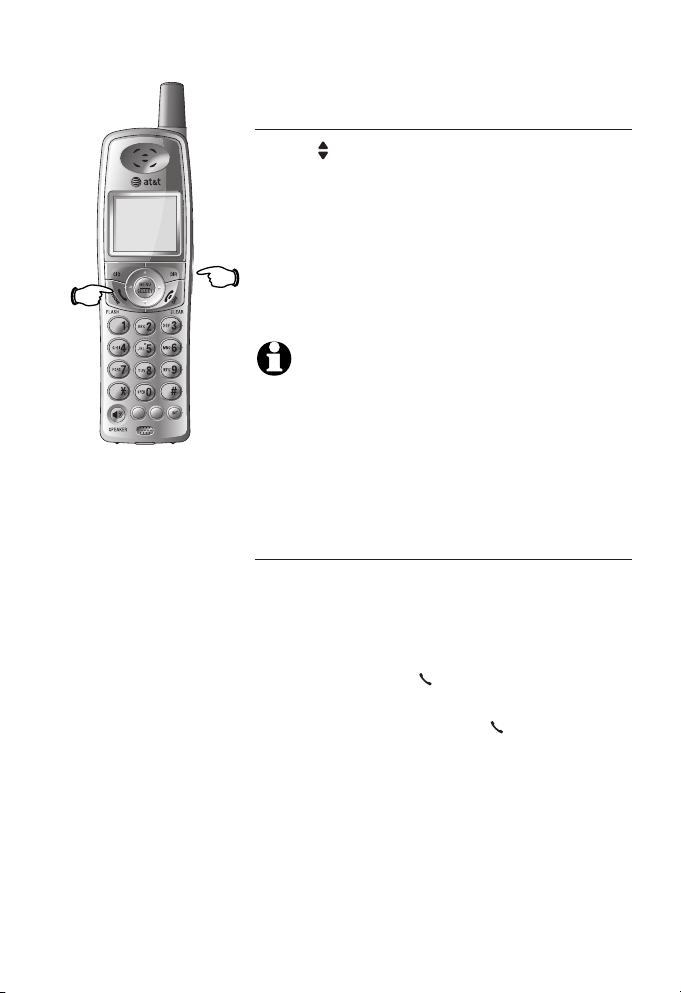
MENU/SELECT
Press MENU /SELECT
to d isplay menu, or to
select a highlighted item
from menu or save an
entry. Press or to
scroll up or down while
in menus. While entering
names or numbers, press
or to move the cur-
sor to the left or right.
Press to display directory
entries (page 30).
OFF/CLEAR
During a call, press to
hang up. While using
menus, press to cancel
an operation, back up to
the previous menu, or
exit the menu display.
REDIAL/PAUSE
Press to view redial
memory (page 9). While
entering numbers, press
and hold to insert a dialing pause (page 28).
Press to initiate an
intercom conversation
or transfer a call (page
1
15-18)
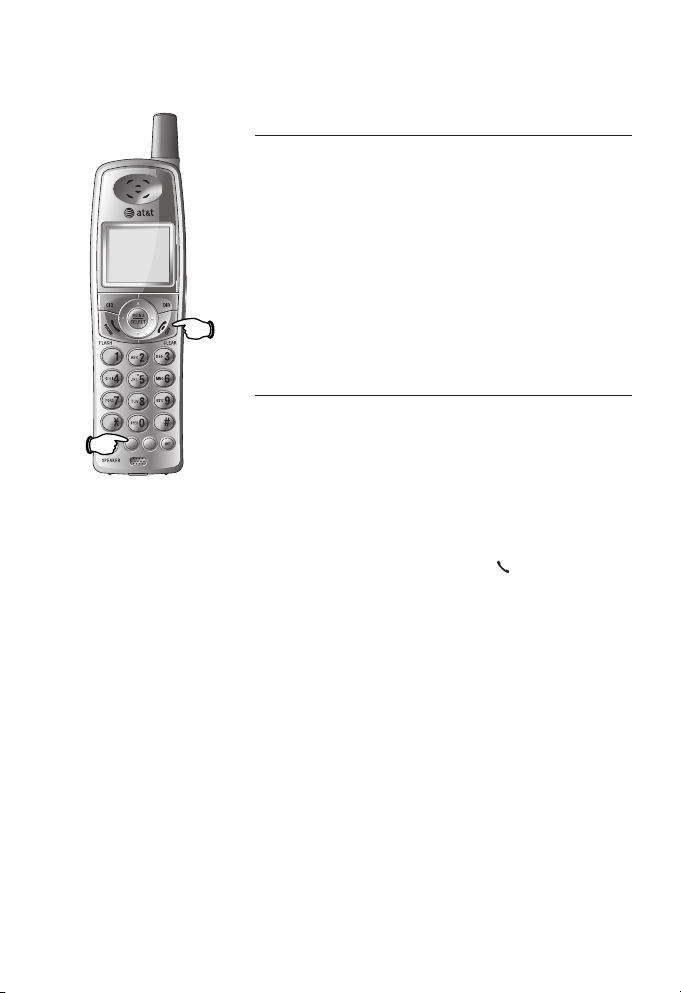
Handset
CID
Press to display caller
ID information (page
38).
PHONE/FLASH
Press to make or
answer a call.
During a call, press to
receive an incoming call
if call waiting is activated
(page 10).
MUTE/DELETE
While on a call, press to
mute microphone (page
12). While reviewing the
call log, press to delete
an individual entry, or
press and hold to clear
the caller ID log (page
39).
While predialing, press
to delete digits from a
string (page 8).
SPEAKER
Press to activate handset speakerphone. Press
again to resume normal
handset use (page 8).
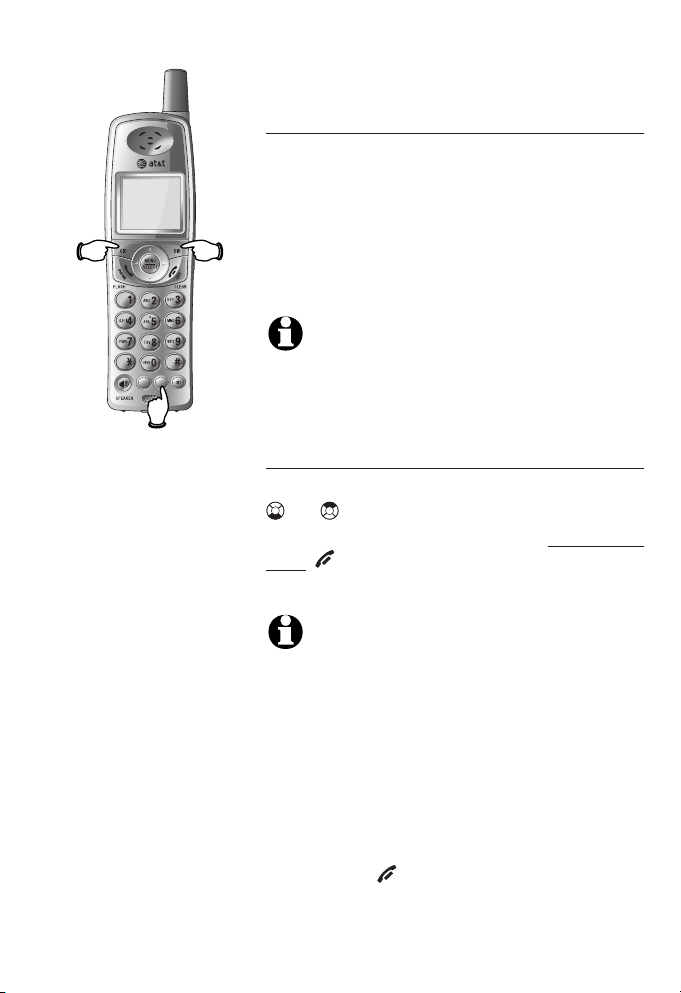
NavKeys
DIR
INT
Page 5
Getting started
TONE
DELETE
PAUSE
MUTE
REDIAL
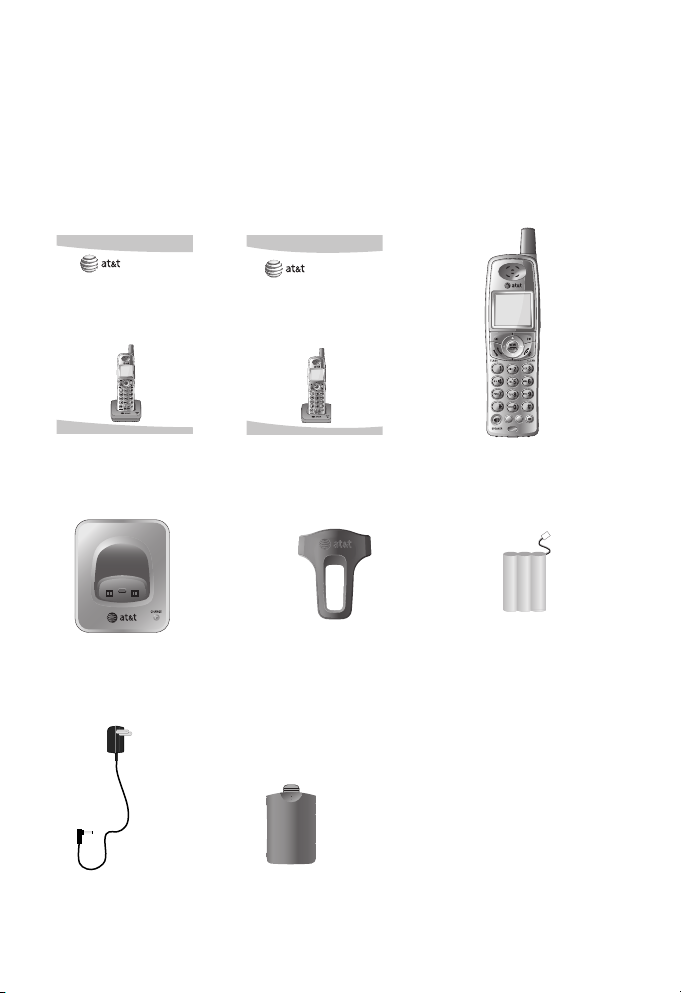
Parts checklist
Save your sales receipt and original packaging in case you need
to ship your telephone for warranty service.
Check to make sure the telephone package includes the
following:
Quick start guide
E598-1
5.8 GHz expansion handset
for use with AT&T models
E5901/E5902B/E5903B/
E5911/E5912B/E5913B/
E5914B/ E5921/E5922B/
E5923B/E5924B/E6001/
E6002B/E6012B/E6013B/
E6014B/E3813B
Quick start guide
Charger for cordless
handset
User's manual
E598-1
5.8 GHz expansion handset
for use with AT&T models
E5901/E5902B/E5903B/
E5911/E5912B/E5913B/
E5914B/ E5921/E5922B/
E5923B/E5924B/E6001/
E6002B/E6012B/E6013B/
E6014B/E3813B
User's manual
Belt clip for cordless
handset
Cordless handset
Battery for cordless
handset
Power adapter for
handset charger
Battery compartment
cover
2
Page 6
Getting started
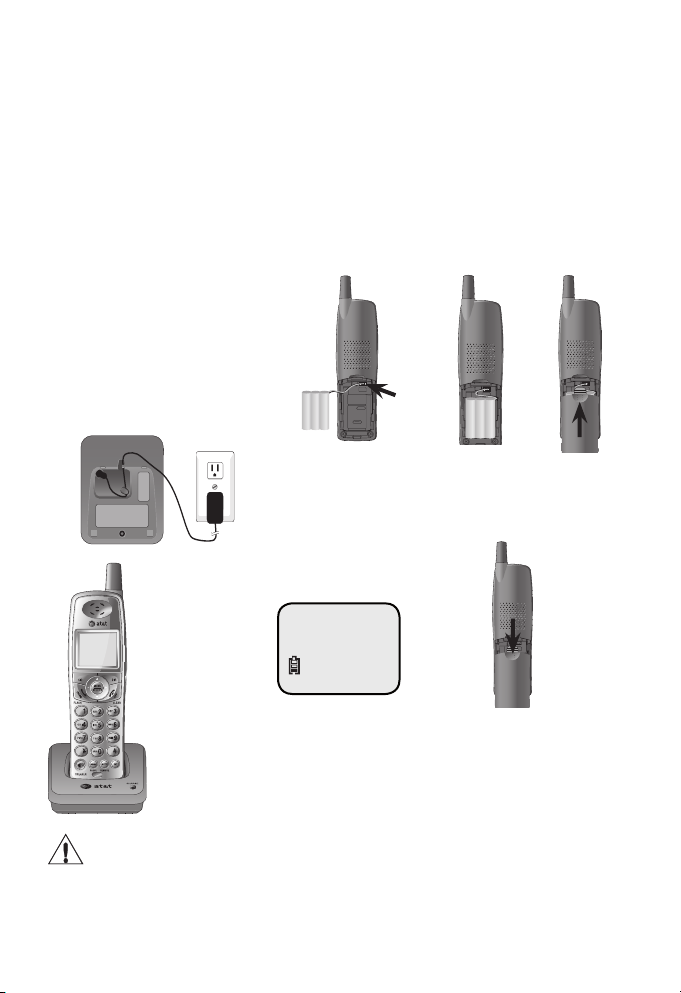
Battery installation & charging
After battery installation, the battery may have enough charge to allow
you to make a short call. For best performance, place the handset in the
charger or telephone base and allow it to charge for 16 hours before use.
You can keep the battery charged by returning the handset to the
charger or the telephone base after each use. When the battery is fully
depleted, a recharge takes about 12 hours. The average talk time on a
fully charged battery is about eight hours depending on environmental
conditions, and the standby time when idle is approximately five days.
1. Plug the small
end of the smaller power adapter
into the jack on
the underside
of charger, then
route the cord
through the slot
as shown.
2. Plug the
large end of
the smaller
power
adapter into
an electrical
outlet.
6. The battery may have
enough charge
to allow you
to make a short
call. For best
performance,
place handset in
the telephone
base or charger
to charge for at
lease 16 hours
before first use.
3. Plug the battery
securely into the
plug inside the
handset battery
compartment, matching the color-corded
label.
LOW BATTERY
Low battery indicator
Return handset to the
telephone base or charger to recharge when
this symbol flashes.
(Handset will beep
when battery is low.)
4. Place the
battery and
wires neatly
inside the
compartment.
5. Slide battery
compartment
cover towards
the center
until it clicks
closed.
To replace the battery, press
in and downward on the tab
to open the battery compartment cover. Then lift out
the old battery and disconnect. Follow the instructions
on this page to install and
charge the new battery.
Caution: Use only the supplied rechargeable battery or AT&T replacement
battery model 27910 (part number 89-0099-00-00). To purchase a replacement
battery, visit our website atvisit our website at www.telephones.att.com or callcall
1 (800) 222-3111. In Canada dial 1 (866) 288-4268.
3
Page 7

Getting started
Adding and registering handsets
Before using a new E598-1 handset, you must register it with the
E5901/E5902B/E5903B/E5911/E5912B/E5913B/E5914B/E5921/
E5922B/E5923B/E5924B/E6001/E6002B/E6012B/E6013B/
E6014B/E3813B telephone base (purchased separately). The E5901/
E5902B/E5903B/E5911/E5912B/E5913B/E5914B/E5921/E5922B/
E5923B/E5924B/E6012B/E6013B/E6014B/E3813B telephone can/E3813B telephone can telephone can
accommodate up to four cordless handsets.
• The handset provided with the E5901/E5911/E5921/E6001 is
automatically registered as handset 1. Additional handsets will be
assigned numbers in the order they are registered (handset 2, handset 3, or handset 4). You can register a maximum of four handsets.
• The E5902B/E5912B/E5922B/E6002B/E6012B has two handsets
automatically registered as handset 1 and 2. You can register two
additional handsets, which will be assigned number 3 and 4.
• The E5903B/E5913B/E5923B/E6013B/E3813B has three handsets automatically registered as handset 1, 2 and 3. You can register
one additional handset, which will be assigned number 4.
• The E5904B/E5914/E5924B/E6014B has four pre-registered
handsets, so you cannot register any additional handset to it.
Before using a new E598-1 handset,
you must register it with the telephone
base. Each handset must be registered
seperately.
To register a handset to your telephone
base
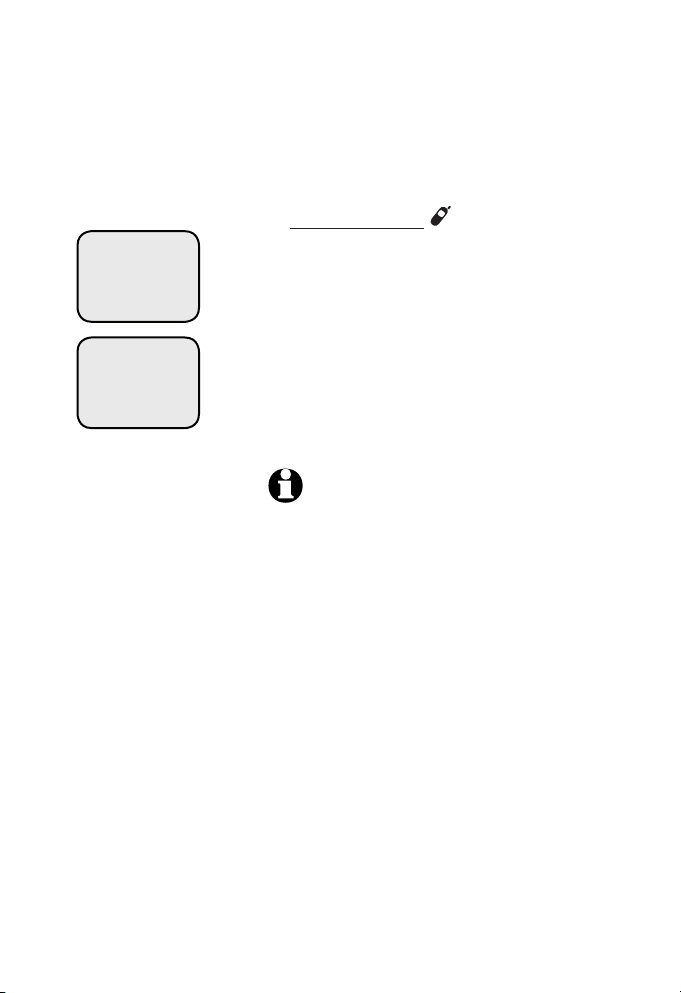
NOT REGISTERED
PRESS HNDST LOC
4 SEC ON BASE
• When first purchased, all optional
accessory handsets show NOT
REGISTERED on the screen. The new
handset may need to be charged for
five minutes before registering to the
telephone base.
• Make sure your handset battery is
properly installed and charged (page
3).
4
Page 8
Getting started
Adding and registering handsets
• Place the unregistered handset into
the telephone base. After a few
PLEASE WAIT...
HS X REGISTERED
12:00PM
seconds
BASE
• Press and hold HANDSET LOCATOR
on the main telephone base until the
IN USE light comes on (about four
seconds), then release the button.
• The handset will show PLEASE WAIT...
for a while.
• The handset will show HS X REGISTERED
and will beep if the registration was
successful.
1. If you are on a call, using the call log or
directory, or another telephone phones on at the
same line, you cannot register a handset.
2. If the registration is not successful, the display
will show NOT REGISTERED. Reset the handset
by lifting the handset out of the telephone
base and then place the handset back in the
telephone base. Now try the registration process
again.
PRESS HNDST LOC 4 SEC ON
will be shown on the screen.
NOTES:
5
Page 9
Getting started
Replacing a handset
If you are replacing a handset on a system that has the maximum number of registered handsets (four) or wish to change the
assigned handset number of your registered handsets, you must
first follow the below steps to de-register the handsets, then register all handsets again (page 4-5).
To de-register all handsets
• Press and hold HANDSET LOCATOR on the main telephone
base E5901/E5902B/E5903B/E5911/E5912B/E5913B/E5914B/
E5921/E5922B/E5923B/E5924B/E6001/6002B/E6012B/E6013B/
E6014B/E3813B until the IN USE light starts to turn on then flash
(about 10 seconds), then release the HANDSET LOCATOR but-
ton.
• Press and release HANDSET LOCATOR again. The IN USE
light will turn off and in a few seconds, all handsets will be
de-registered.
• All handsets will show NOT REGISTERED if de-registration was
successful.
NOT REGISTERED
• To re-register the handset to the telephone base, follow the
registration instructions on page 4-5.
NOTES:
1. If the de-registration process was not successful, you may need to reset the
system and try again. To reset: pick up any registered handset and press the
PHONE/FLASH button, then press the OFF/CLEAR button and place the
handset back into the telephone base.
2. You can only de-register handsets when the handsets and the telephone base
are not being used.
6
Page 10
Getting started
TONE
DELETE
PAUSE
MUTE
REDIAL
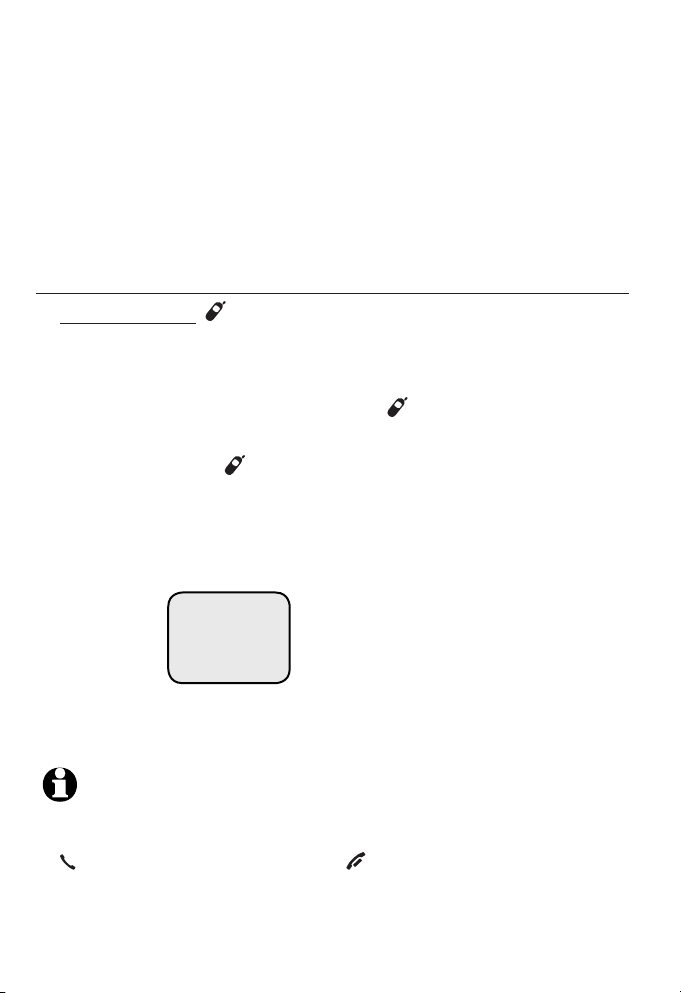
Belt clip & optional headset
Install belt clip as shown below if desired.
To release belt clip,
pull and unlock one
flap from the notch
Snap belt clip
into notches
on both sides
of handset.
For hands-free telephone conversations, you can use any industry
standard 2.5 mm headset (purchased separately). For best results,
use an AT&T 2.5 mm headset. To purchase a headset, visit ourTo purchase a headset, visit our
website at www.telephones.att.com or call 1 (800) 222-
3111. In Canada dial 1 (866) 288-4268.
first before detaching the whole belt
clip from handset.
Plug 2.5 mm
headset into
jack on side of
handset (beneath
small rubber flap).
7
Page 11
Telephone operation
TONE
DELETE
PAUSE
MUTE
REDIAL
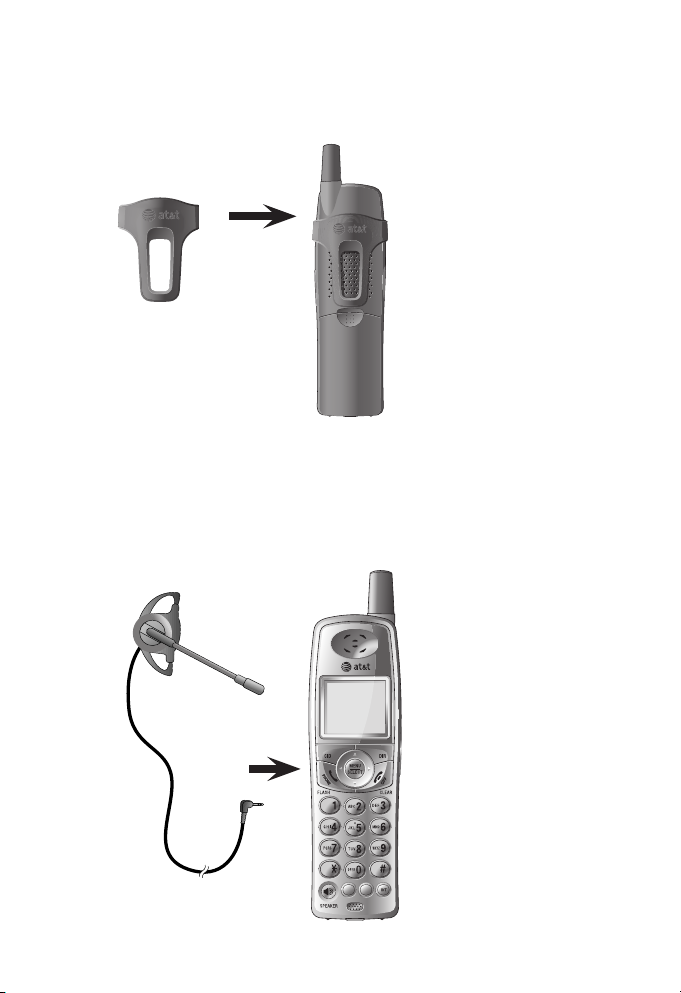
Handset operation
PHONE 00:00:12
Press to
make a
call
Press to
turn on the
speakerphone
SPEAKER 00:00:12
Elapsed
time
Press to
end a call
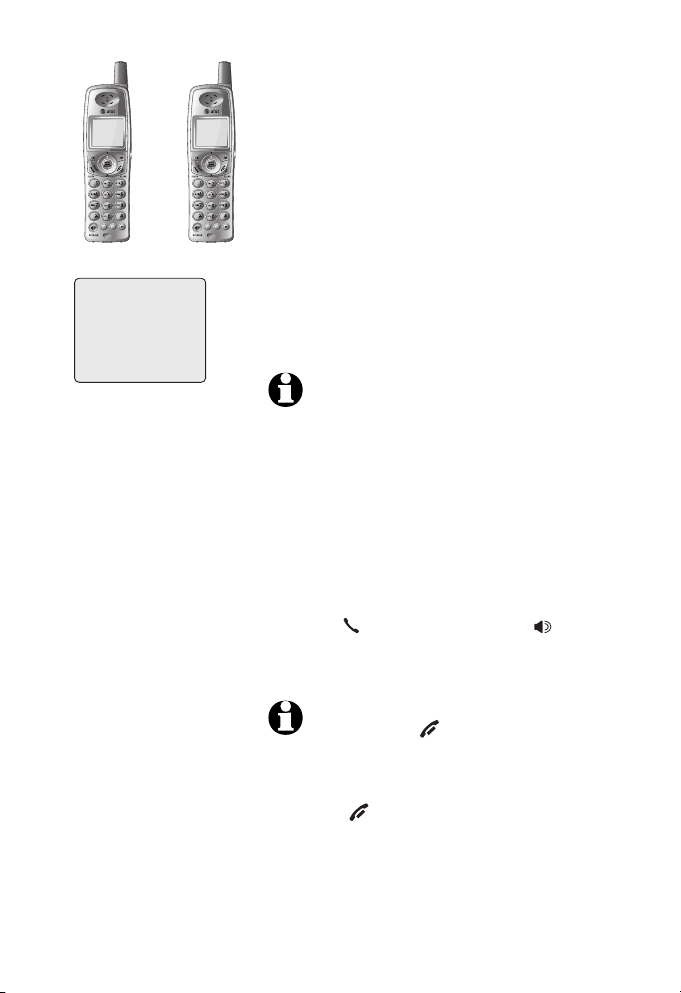
Making and answering calls
To answ er an incomin g call , pres s
PHONE/FLASH, SPEAKER, or any dial
pad key (0-9, * or #). To make a call,
press PHONE/FLASH or SPEAKER,
then dial a number. Press OFF/CLEAR to
hang up.
On-hook dialing
To predial (preview numbers before
dialing), enter numbers first, then press
PHONE/FLASH or SPEAKER to dial.
Press MUTE/DELETE or OFF/CLEAR at
any time to make corrections as you are
entering numbers.
The screen displays the elapsed time as
you talk (in hours, minutes and seconds).
NOTE: Pressing PHONE/FLASH to access
services from your local telephone service pro vider will not affect the elapsed time.
Auto off
A call will be terminated automatically
by placing the handset in the telephone
base or charger.
NOTE: If a headset is
plugged into the
handset, you will
not be able to use
the handset
speakerphone.
Hands-free speakerphone calls
To answer a call, press SPEAKER. To
make a call, press SPEAKER, then dial
a number. During a call you can press
SPEAKER to alternate between hands-
free speakerphone and normal handset
use. Press OFF/CLEAR to hang up.
8
Page 12
Telephone operation
TONE
DELETE
PAUSE
MUTE
REDIAL
Handset operation
REDIAL
555-1234
Last number redial
Pre s s RE DIAL/PAUS E to display the
most recently called numbers (up to
32 digits). Press , or REDIAL/PAUSE
repeatedly to view up to five recently
called numbers. The handset will beep
twice at the beginning or end of the
list. Press OFF/CLEAR to exit.
Press PHONE/FLASH or SPEAKER
to redial any displayed number or press
PHONE /FLASH or SPEA KER then
REDIAL/PAUSE to call the most recently
called number (up to 32 digits).
Pres s MUT E/DELET E to delete the
displayed number from the redial memory.
Handset locator
If you misplace the handset(s), press
HANDSET LOCATOR at the telephone
base. This starts the paging tone at the
handset(s) for 60 seconds to help you
locate the handset(s). To stop the paging
tone, press PHONE/FLASH, SPEAKER,
or any dial pad key (0-9, *, or #) on
handset(s), or press HANDSET
LOCATOR
the
on the telephone base.
NOTES:
1. The handset ringer volume also determines the
level of the paging tone. If the handset ringer
volume level is set to off (0), that handset will be
silenced for all calls and paging (see page 20).
2. During a page, if you press OFF/CLEAR or
MUTE/DELETE on a handset, the ringer of that
handset will be silenced. But the page will not
be cancelled.
9
Page 13
TONE
DELETE
PAUSE
MUTE
REDIAL
Press to
switch
between
calls
Press to
adjust
the listening
volume
Telephone operation
Options while on calls
Volume control
Press VOLUME keys on the side of
the handset to adjust listening volume.
Each press of the button increases or
decreases the volume.
When you change the volume level, the
new setting is saved.
NOTES:
1. All volume settings, (normal handset, speakerphone, and headset) are independent.
2. When you adjust the volume to highest or lowest,
you will hear twice beeps.
Call waiting
If you subscribe to call waiting service
with your local te l e p h o n e s e r v i ce
provider, you w i l l h e ar a b e e p i f
someone calls while you are already
on a call. Press PHONE/FLASH to put
your current call on hold and take the
new call. You can press PHONE/FLASH
at any time to switch back and forth
between calls.
10
Page 14

Telephone operation
Options while on calls
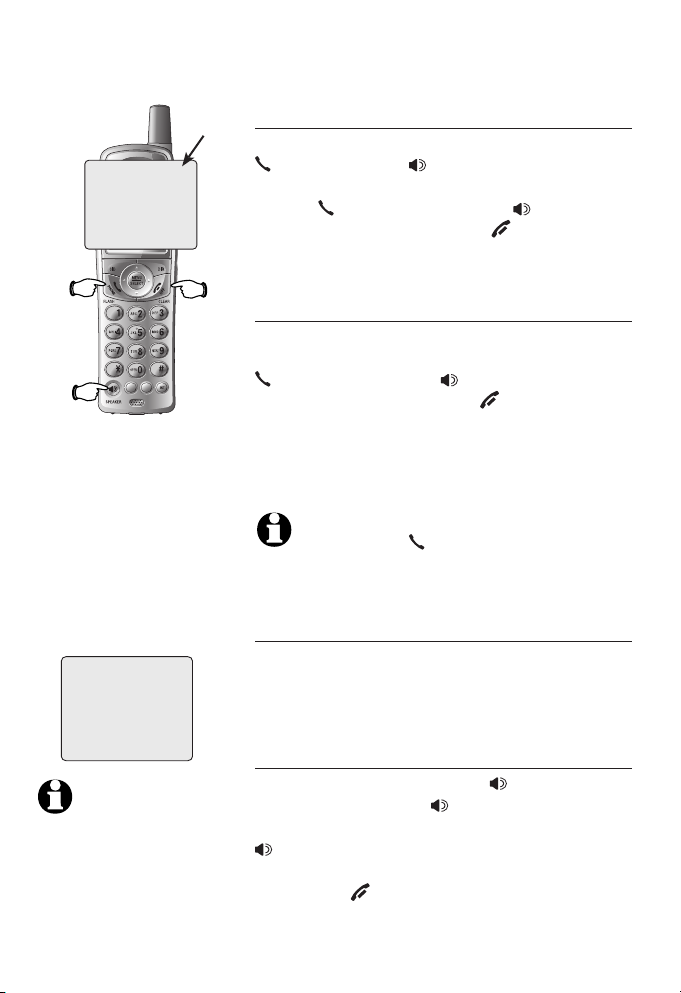
Multiple handset use
Whil e o n a c all, a perso n o n t he
ringing destination handset can press
PHONE/FLASH or SPEAKER to join
the conversation.
The person on either handset can press
OFF/CLEAR, or place the handset in
the telephone base or charger to drop
out of the call, but the call will not be
terminated until all handsets hang up.
NOTE: A maximum of two handsets can be
used on an outside call, and the other two
handsets can be used on an intercom call.
11
Page 15
TONE
DELETE
PAUSE
MUTE
REDIAL
Press to
silence the
microphone
Ringer
silenced
Telephone operation
Options while on calls
Mute
Pre s s M UTE/D ELE TE to sile n c e t he
microphone. When mute is on, MUTED will
show in the handset screen. You will be
able to hear the caller, but your caller will
not be able to hear you until you press
MUTE/DELETE again and resume speaking.
When mute is turned off, MICROPHONE
ON will show temporarily on the handset
screen.
Temporary tone dialing
If you only have dial pulse (rotary service),
you can temporarily switch to touch tone
dialing during a call by pressing *. This
can be useful if you need to send tone
signals for access to answering systems
or long distance services.
After you hang up or press PHONE/FLASH
(to receive a call waiting call), the phone
automatically returns to dial pulse (rotary)
service.
12
Page 16
TONE
DELETE
PAUSE
MUTE
REDIAL
Press to
review
the call
log
Press to
review
the
directory
Press to review
the redial
numbers
Telephone operation
Options while on calls
Last number redial
Wh i l e on a c a ll, y o u can p r e ss
REDIAL/PAUSE to review the most recently
called number. To return to your call, press
REDIAL/PAUSE. To call the most recently
called number displayed, wait for two
seconds. The number will be dialed out
automatically.
NOTE: While on a call, only the most recently
called number can be reviewed, and erasing
the entry is not allowed. For more details
about the redial memory, see page 9.
Directory
While on a call, you can press DIR then
or to review the directory. To clear
the entry from the display, press and
hold OFF/CLEAR. To dial the displayed
number, press MENU/SELECT.
NOTES:
1. While reviewing the directory on a call, searching by name to find a specific entry, editing
or deleting an entry is not allowed. For more
details about the directory, see page 27.
2. While reviewing the call log on a call, storing
the caller ID log number in the directory, changing dialing options or deleting is not allowed.
For more details about the call log, see page 35.
3. While accessing redial memory, directory or
caller ID log during a call, the call will be ended
by pressing OFF/CLEAR.
13
Page 17

Telephone operation
Options while on calls
Caller ID log
While on a call, you can press CID then or
to review the caller ID log. To dial the
displayed number, press MENU/SELECT.
To clear the entry from the display, press
and hold OFF/CLEAR.
NOTE: While reviewing the call log on a call,
storing the caller ID log number in the direc-
tory, changing dialing options or deleting is
not allowed. For more details about the call
log, refer to page 35.
14
Page 18
TONE
DELETE
PAUSE
MUTE
REDIAL
TONE
DELETE
PAUSE
MUTE
REDIAL
INTERCOM TO:
Telephone operation
Intercom
Use the intercom feature for conversations
between handsets.
1. Press INT. The screen of the originating
handset will show INTERCOM TO:.
2. Enter the handset number of the
destination handset. The display will
sho w CALLING HANDSET X. The
destination handset will ring, and
its screen will show HANDSET X IS
CALLING.
NOTES:
• Before the intercom call is answered, you can
cancel the intercom call by pressing OFF/CLEAR
or INT.
• If the destination handset is not answered within
100 seconds or if it is in the directory or call log
mode, or out of range, the originating handset
will show the message UNABLE TO CALL TRY
AGAIN.
3. On ringing the destination handset,
press PHONE/FLASH, INT, SPEAKER,
or any dial pad key (0-9, * or #) to
answer the intercom call.
NOTE: Pressing OFF/CLEAR or MUTE will
temporarily silence the intercom ringer.
To end the intercom call:
• Press OFF/CLEAR or INT on either
handset.
-OR-
• Place either handset in the charger or
telephone base.
15
Page 19

Telephone operation
Intercom
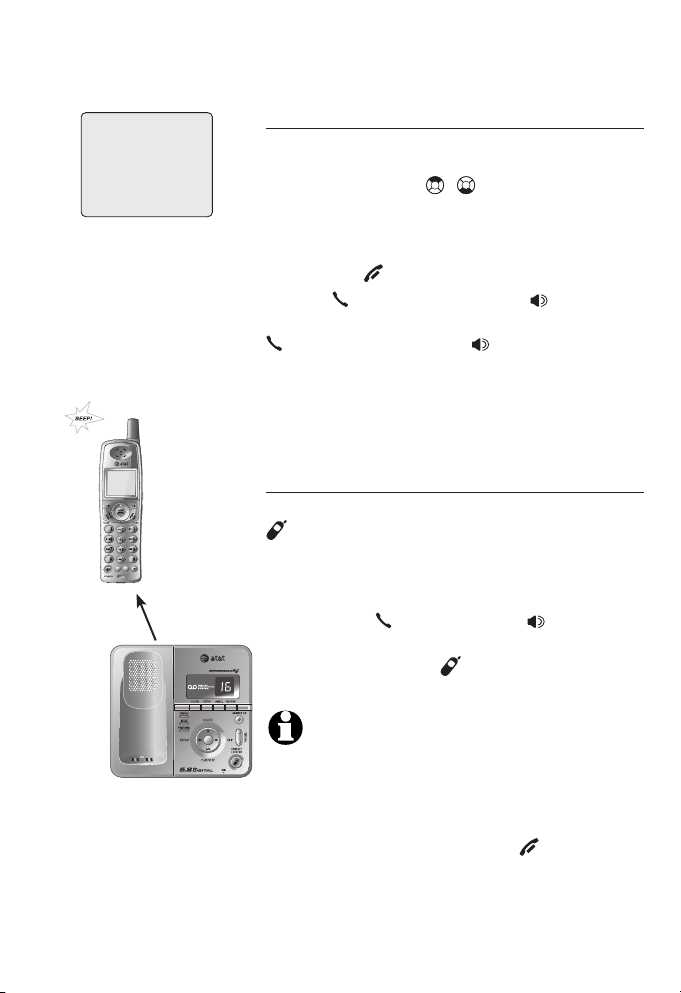
Handling incoming calls
The telephone will beep if you receive
an outside call during an intercom
conversation. You can either:
• Press PHONE/FLASH to end the
intercom call and answer the incoming
call.
-OR-
• Press INT or OFF/CLEAR to disconnect
the interco m con nection wi thou t
answering the incoming call. The
incoming call will continue to ring.
16
Page 20
TONE
DELETE
PAUSE
MUTE
REDIAL
TONE
DELETE
PAUSE
MUTE
REDIAL
TRANSFER TO:
Telephone operation
Intercom call transfer
Use the intercom feature to transfer
an external call from one handset to
another.
1. During a conversation with an external
call, press INT. The external call is
automatically placed on hold and
TRANSFER TO: is displayed on the
screen.
2. Enter the destination handset number
(1, 2, 3 or 4). The originating handset’s
screen will show CALLING HANDSET
X.
3. The destination handset will ring, and
its screen will show HANDSET X IS
CALLING.
NOTES:
• Before the intercom call is answered, you can
cancel the transfer and return to the external
call by pressing OFF/CLEAR, PHONE/FLASH,
or INT.
• If the destination handset does not answer the
intercom call within 100 seconds, or if the other
handset is in the directory or call log mode, or
out of range, the originating handset will show
UNABLE TO CALL TRY AGAIN on its screen and
will automatically return to the external call.
4. On the ringing destination handset,
p r e s s P H O N E / FL A SH , I N T ,
SPEAKER, or any dial pad key (0-9,
* or #) to answer the intercom call.
You can now talk without the external
caller hearing the conversation.
17
Page 21

Telephone operation
Intercom call transfer
NOTES:
• You can alternate between the intercom call and
the outside call by pressing INT on the originating
handset. The display will alternate between
INTERCOM and OUTSIDE to indicate which party
is active.
• You can end the intercom call and return to the
external call by pressing PHONE/FLASH on the
originating handset.
• The person on the ringing destination handset can
join the external call by pressing PHONE/FLASH,
connecting both handsets to the outside call.
5. Complete the transfer by pressing
OFF/C L EAR o n the o r i g i n a t ing
handset or placing that handset in the
telephone base or handset charger.
The originating handset’s screen will
show CALL TRANSFERRED and the
other handset will automatically be
connected to the external call.
18
Page 22

Telephone operation
Handset settings
Using the feature menu, you can change
settings to customize how the telephone
works.
To enter the settings menu:
1. Press MENU/SELECT in idle mode to
enter the feature menu.
2. Use the up or down NavKey, or
to scroll to the feature to be changed.
When scrolling through the menu, the
top menu item is always highlighted
with a > symbol.
3. Press MENU/SELECT to select the
highlighted item.
After a setting has been saved or set,
you will hear a confirmation tone and the
display will return to the settings menu.
While in the settings menu, press
OFF/CLEAR to return to a previous
menu and press and hold OFF/CLEAR
to return to idle mode.
To exit the settings menu:
• Press and hold OFF/CLEAR.
19
Page 23
>
DIRECTORY
CALL LOG
Telephone operation
Handset settings
Ringer volume
Using this menu, you can set a ring volume
level (1-6), or turn the ringer off (0). When
the ringer is turned off, the will appear
on the handset screen.
>
RINGER VOLUME
RINGER TONE
RINGER VOLUME
To adjust the RINGER VOLUME:
1. Press MENU/SELECT in idle mode to
enter the feature menu.
2.
Use the up or down NavKey or
to scroll to the RINGER VOLUME menu,
press MENU/SELECT to enter the menu
when it is highlighted with a > symbol.
3. Press the left or right NavKey or to
sample each volume level.
4. Press ME NU /SELECT to save your
preference.
-OR-
When the handset is in idle mode, press the
VOLUME buttons on the right side of
the handset to change ringer volume.
NOTE: The ringer volume level also
determines the ringer levels of intercom calls
(pages 15-16) and the paging tone when initi ating the handset locator feature (page 9). If
the handset ringer volume level is set to off
(0), that handset is silenced for all incoming
calls and paging.
20
Page 24

>
DIRECTORY
CALL LOG
>
RINGER TONE
KEY TONE
RINGER TONE
1
Telephone operation
Handset settings
Ringer tone
This feature allows you to choose one of
10 ringer tones.
To choose a ringer tone:
1. Press MENU/SELECT in idle mode to
enter the feature menu.
2. Use the up or down NavKey or
to scroll to the RINGER TONE menu,
press MENU/SELECT to enter the menu
when it is highlighted with a > symbol.
3. Use the up or down NavKey or to
sample each ringer tone.
4. Press MENU/SELECT to save yo ur
preference.
21
Page 25

>
DIRECTORY
CALL LOG
>
KEY TONE
LANGUAGE
KEY
TONE
ON
Telephone operation
Handset settings
Key tone
The handset is factory programmed to
beep with each key press. If you turn off
the KEY TONE, there will be no beeps
when keys are pressed.
To turn the KEY TONE on or off:
1. Press MENU/SELECT in idle mode to
enter the feature menu.
2. Use the up or down NavKey or
to scroll to the KEY TONE menu, press
MENU/SELECT to enter the menu when
it is highlighted with a > symbol.
3. Use the up or down NavKey or
to select ON or OFF.
4. Press MEN U/S ELEC T t o s a ve t he
preference.
22
Page 26

>
DIRECTORY
CALL LOG
>
LANGUAGE
CLR VOICE MAIL
LANGUAGE
ENGLISH
Telephone operation
Handset settings
Language
In this menu, you can select the language
used in all screen displays.
To select a language:
1. Press MENU/SELECT in idle mode to
enter the feature menu.
2. Use the up or down NavKey or
to scroll to the LANGUAGE menu,
press MENU/SELECT to enter the menu
when it is highlighted with a > symbol.
3. Press the up or down NavKey or
to select ENGLISH, FRANCAIS or
ESPANOL.
4. Press MENU/SELECT to save your prefer-
ence.
Clear voice mail indication
If you subscribe to voice mail services
provided by your local telephone company, the VOICEMAIL light on the telephone base will flash and NEW VOICE
MAIL and the icon will appear on all
handset screens when you have new
voice mail.
To manually turn off the NEW VOICE
MAIL me s s a ge, t h e i c o n and
VOICEMAIL light:
1. Press MENU/SELECT in idle mode to
enter the feature menu.
23
Page 27

Telephone operation
Handset settings
>
DIRECTORY
CALL LOG
>
CLR VOICE MAIL
DIAL TYPE
TURN INDICATOR
OFF?
2. Use the up or down NavKey or
to scroll to the CLR VOICE MAIL
menu, press MENU/SELECT to enter the
menu when it is highlighted with a >
symbol.
3. Press MENU/SELECT.
4. Press MENU/SELECT again to remove
the displayed mes sage, or press
OFF/CLEAR to exit.
NOTES:
1. This only turns off the displayed NEW VOICE MAIL
message, icon and VOICEMAIL light; it does
not delete your voice mail message(s). Use this
feature when the telephone indicates there is voice
mail when there is none or you have accessed
your voice mail from a different telephone line
(while away from home). If there actually is a new
voice mail message, your local telephone company
will continue to send the message which turns the
displayed NEW VOICE MAIL message, icon and
the VOICEMAIL light back on.
2. Telephone company voice mail may alert you to
new messages with stutter, (broken) dial tone.
Contact your telephone company for more details.
24
Page 28

>
DIRECTORY
CALL LOG
>
DIAL TYPE
DIRECTORY
DIAL TYPE
TONE
Telephone operation
Handset settings
Dial type
Using this function, you can choose TONE
or PULSE (rotary) dialing. The factory
default setting is TONE. Change this to
PULSE only if you do not have touch-tone
dialing service.
1. Press MENU/SELECT in idle mode to
enter the feature menu.
2. Use the up or down NavKey or
to scroll to the DIAL TYPE menu, press
MENU/SELECT to enter the menu when
it is highlighted with a > symbol.
3. Press the up or down NavKey or
to select TONE or PULSE.
4. Press ME NU /SELECT to save your
preference.
NOTE: If you have more than one handset
registered, dial type change made on any one
handset will apply to all.
25
Page 29

Telephone operation
Handset settings
Temporary ring silencing
Press OFF/CLEAR or MUTE/DELETE while
the telephone is ringing to silence the
ringer temporarily. This will silence the
ringer without disconnecting the call. The
next incoming call will ring normally at
the pre-set volume.
NOTE: If there is more than one handset in
use, all handsets ring with an incoming call
except those with the volume turned off. Press
OFF/CLEAR or MUTE/DELETE on one handset
will only silence the ringer of that particular
handset but the other handset(s) will continue
to ring.
26
Page 30
TONE
DELETE
PAUSE
MUTE
REDIAL
Pat Williams
555-1234
Telephone operation
Directory
Shared directory
The directory is stored in the telephone
base, and is shared by all handsets.
Changes made to the directory at any
one handset will be reflected in all.
NOTE: When one handset is offhook and
another handset is in idle mode, both hand-
sets can view caller ID log and directory at
the same time.
Memory capacity
The directory can store up to 50 entries.
Each entry can contain a number up to 32
digits, and a name up to 16 letters long.
A convenient search feature can help you
find and dial numbers quickly (page 30).
If all memory locations are in use, the
screen will display LIST FULL. You will
not be able to store a new number until
an existing one is deleted.
Exiting the directory
Press OFF/CLEAR to cancel an operation, back up to the previous menu, or
exit the menu display. Press and hold
OFF/CLEAR to return to the idle mode.
If you pause for too long while creating
an entry, the procedure will time out and
you will have to begin again.
27
Page 31

>
DIRECTORY
CALL LOG
>
REVIEW
STORE
Telephone operation
New directory entries
To create and store a new directory
entry
1. Press MENU/SELECT in idle mode to
enter the feature menu.
2. Press MENU/SELECT again to enter the
DIRECTORY when it is highlighted with
a > symbol.
3. Press the up or down NavKey to
highlight STORE.
>
STORE
REVIEW
ENTER NUMBER
555-1234_
4. Press MENU/SELECT
5. Enter the telephone number when
prompted.
• Use the dial pad to enter up to 32
digits.
– Press or to move the
cursor to the left or right.
– Press MUTE/DELETE to erase num-
bers.
–
Press and hold REDIAL/PAUSE to
enter a three-second dialing pause.
-OR-
• Copy a number from redial by
pressing REDIAL/PAUSE then press
or to locate the number to copy.
Press MENU/SELECT to copy the
number.
6. Pre ss MEN U/S ELEC T to save the
number in the display. The display will
show ALREADY SAVED if the number
is already in the directory.
28
Page 32

Dial
Key
Characters by number of key presses
1
2
3
4
5
6
7
8
9
0 0
#
# , .- &‘
? ! / ( )
@
1
1
A B C 2
a b c
3 d e f
4 g h i
5 j k l
6 m n o
S 7 p q
8
t u v
Z 9 w xrysz
D E F
G H
I
J K
L
M N O
P Q R
T U V
W
space
X Y
2
3 4 5 6 7 8 9
ENTER NAME
Williams_
Pat
Telephone operation
New directory entries
NOTE: Each line can hold 16 digits, so if you
enter a number longer than 16 digits, the
numbers will be displayed in the following
line.
7. Enter the name when prompted.
• Use the dial pad to enter a name (up
to 16 characters). Each time a key
is pressed, the character on that
key will be displayed. Additional key
presses will produce other characters
on that key. See the chart below.
– Press or to move the
cursor to the left or right.
– Press MUTE/DELETE to erase
letters.
Pat
Williams
555-1234
8. Press MENU/SELECT to store your new
directory entry. The name and the telephone number will then be shown on
the screen. To change it later, see page
33.
29
Page 33

Andrew
5556789
Barbara
5559876
Telephone operation
Directory search
To browse through the directory
1. Press DIR in idle mode to display the
first listing in the directory. DIRECTORY
EMPTY will be displayed if there are
no directory entries.
2. Press or to browse through the
directory. Entries will be displayed
alphabetically by the first letter in the
name.
NOTES:
1. Press OFF/CLEAR at anytime to exit the directory.
2. You can also display the first listing in the
directory by first pressing MENU/SELECT, press
MENU/SELECT to choose DIRECTORY, then press
MENU/SELECT again to choose REVIEW.
To search by name
1. Press DIR in idle mode to display the
first listing in the directory. DIRECTORY
EMPTY will be displayed if there are
no directory entries.
2. When a name entry is displayed, press
a dial pad keys (2-9) to start a quick
name search.
The directory will display the first
name beginning with the first letter
associated with the dial pad key, if
there is an entry in the directory that
begins with that letter.
30
Page 34

NOTE:
Press OFF/CLEAR at
anytime to exit the
directory.
Telephone operation
Directory search
3. To see other names that start with
the letters on the dial pad key, keep
pressing the key. The names will be
shown in alphabetical order.
For example, if you have name entries
Jennifer, Jessie, Kevin and Linda in your
directory:
• If you press 5 (JKL) once, you will see
Jennifer.
• If you press 5 (JKL) twice, you will see
Jessie.
• If you press 5 (JKL) three times, you
will see Kevin.
• If you press 5 (JKL) four times, you
will see Linda.
• If you press 5 (JKL) five times, you will
see Jennifer again.
NOTES:
1. If there is no name entry matching the first letter of the key you press, you will see a name
entry that matches the second letter of the key.
2. If you press a key (2-9) and there is no name
entry to match those letters, the directory will
show the entry that matches the next available
letter in the directory.
31
Page 35

Telephone operation
To dial, delete or change
entries
To dial, delete or change a directory entry
(name and number), the entry must be
displayed on the handset. Use directory
search (pages 30-31) to display an entry.
To dial a displayed number
When a directory entry is displayed, press
PHONE/FLASH or SPEAKER to dial the
displayed number.
To delete an entry
When a directory entry is displayed, press
MUTE/DELETE to delete the displayed entry
from the directory. Once deleted, an entry
cannot be retrieved.
32
Page 36

DIRECTORY
DIRECTORY
Andrew
Andrew
5556789
5556789
DIRECTORY
EDIT NUMBER
555-6789
DIRECTORY
EDIT NAME
Andy
DIRECTORY
Andy
5551234
Caller ID operation
To dial, delete or change
entries
To change an entry
When a directory entry is displayed:
1. Press MENU/SELECT to modify the entry.
You will be prompted to EDIT NUMBER.
• Press the dial pad keys to add digits.
• Press MUTE/DELETE to erase digits.
• Press or to move the cursor.
• Press and hold REDIAL/PAUSE to add a
three-second pause if desired.
•
Press REDIAL/PAUSE, then or to
scroll to a previously dialed number.
Press MENU/
number to the entry.
2. Press MENU/SELECT. You will beYou will be
prompted to EDIT NAME.
• Press the dial pad keys to add char-
acters (page 29).
• Press MUTE/DELETE to erase charac-
ters.
• Press or to move the cursor.
SELECT
to add the redial
3. Press MENU/SELECT to confirm.
33
Page 37

TONE
DELETE
PAUSE
MUTE
REDIAL
CHRISTINE SMITH
908-555-0100
AM
11/23
10:01
NEW
Caller ID operation
Caller ID
Information about caller ID with call
waiting
This product has a caller ID with call waiting
feature that works with service from your
local telephone service provider.
Caller ID with call waiting lets you see
who is calling before answering the phone,
even when you’re on another call.
You may need to change your telephone
service to use this feature.
telephone service provider if:
• You h ave both caller ID and call
waiting, but as separate services (you
may need combined service).
• You have only caller ID service, or only
call waiting service.
• You don’t subscribe to any caller ID or
call waiting services.
You can use this product with regular caller
ID service, or you can use this product’s
other features without subscribing to
either caller ID or combined caller ID with
call waiting service.
There are fees for caller ID services, and
they may not be available in all areas.
Depending on your service, you may see
the caller’s number, or the caller’s name
and number. This product can provide
information only if both you and the
caller are in areas offering caller ID
service, and if both telephone companies
use compatible equipment. The time and
date are sent by the service provider
along with the call information.
34
Contact your
Page 38

TONE
DELETE
PAUSE
MUTE
REDIAL
CHRISTINE SMITH
908-555-0100
NEW
11/23
10:01
AM
Caller ID operation
Caller ID
Shared caller ID log
The c aller I D log is s tored in the
telephone base, and is shared by all
handsets. Changes made at any one
handset will be reflected in all.
NOTE: When one handset is offhook and
another handset is in idle mode, both hand-
sets can view caller ID log and directory at
the same time.
Caller’s name
CHRISTINE SMITH
908-555-0100
NEW
AM
10:01
11/23
Caller’s number
Appears when the
call is missed and
un-reviewed.
Date of call
Time of call
How caller ID works
If you subscribe to caller ID service
prov i d e d b y your local t e l e p h one
company, information about each caller
will be displayed between the first and
second ring. Information about the last
50 incoming calls is stored in the call log.
You can review the call log to find out
who has called, easily return the call, or
copy the caller’s name and number into
your directory.
35
Page 39

TONE
DELETE
PAUSE
MUTE
REDIAL
Chris
908-555-0100
NEW
AM
10:01
11/23
Caller ID operation
Caller ID
When the call log is full, the oldest
entry is deleted to make room for new
incoming call information.
If you a nswer a c all before t he
information appears on the screen, it will
not be saved in the call log.
NOTE: Caller ID features will work only if both
you and the caller are in areas offering caller
ID service, and if both telephone companies
use compatible equipment.
Memory match
Names of callers will be displayed only if
the information is provided by your local
telephone company.
If the incoming telephone number exactly
matches a telephone number in your
directory, the name that appears on the
screen will match the corresponding name
as you entered it into your directory.
For example, if Christine Smith calls, her
name will appear as Chris if this is how
you entered it into your directory.
NOTE: The number shown by your caller ID will
be in the format sent by the phone company.
The phone company usually delivers ten-digit
phone numbers (area code plus phone number).
If the telephone number of the person calling
does not exactly match a number in your direc tory, the name will appear as delivered by the
phone company. For example if the phone com pany includes the area code and the directory
number does not, the name will appear as deliv ered by the phone company.
36
Page 40

TONE
DELETE
PAUSE
MUTE
REDIAL
HANDSET 1
6 MISSED CALLS
Caller ID operation
Caller ID
Missed calls
When a handset is in idle mode and has
calls that have not been reviewed, its
screen will show XX MISSED CALLS.
Any entries which h ave n o t been
reviewed will be counted as MISSED
CALLS when the phone is idle. Each time
a call log entry marked NEW is reviewed,
the number of missed calls decreases by
one.
If you have too many missed calls and
you don’t want to review them one by
one, but you still want to keep them
in the call log, you can press and hold
OFF/CLEAR for four seconds when the
handset is idle. All the entries in the
caller ID log will be considered old (have
been reviewed), and the missed calls
counter is reset to 0.
37
Page 41

Caller ID operation
HANDSET 1
6 MISSED CALLS
Pat Williams
555-1234
NEW
AM
11/23 10:31
Chris Thompson
908-555-0100
NEW
AM
10:21
Jeffrey Adams
10:11
11/23
555-9876
AM
11/23
NEW
To review the call log
To review the call log
Press CID to review the call log. The
call log displays the caller ID entries in
reverse chronological order. The most
recent call is displayed first. Press or
to scroll through the list as shown at left.
To return a call
Press PHONE/FLASH or SPEAKER to
call the number as displayed.
Caller ID numbers may appear with an
area code that may not be required for
local calls, or without a 1 that may be
needed for long distance calls. If the
number displayed is not in the correct
format, you can change how it is dialed.
To change the number before calling,
press # repeatedly to see different dialing options (you can choose to dial with
or without an area code, and with or without the 1), then press PHONE/FLASH or
SPEAKER to place the call.
The various dialing options are:
880-8808
1-880-8808
808-880-8808
1-808-880-8808
38
Page 42

Caller ID operation
To review the call log
Other options
•
Press MUT E/DELETE to delete the
displayed entry from the call log.
• Press and hold MUTE/
all entries from the call log. When
asked to confirm, press MENU/SELECT
to clear the call log of all entries, or
press OFF/CLEAR to exit and leave
all call log entries intact.
• Press MENU/SELECT to copy this entry
into your directory. If the name or
number is not provided, you will be
prompted to enter them (page 29).
NOTE: If both the name and number are not
provided, UNABLE TO SAVE will be displayed.
DELETE
to delete
39
Page 43

Appendix
TONE
DELETE
PAUSE
MUTE
REDIAL
TONE
DELETE
PAUSE
MUTE
REDIAL
Screen icons, indicator lights & tones
Screen icons & alert tones
Screen icons
Speakerphone is in use.
New voice mail messages are received.
HANDSET 1
25 MISSED CALLS
MUTE
NEW
10:21AM11/23
Handset alert tones
Two short beeps
Four short beeps
Two beeps
Confirmation
tone
Telephone base tones
One beep every
10 seconds
A series of
beeps
Ringer off.
Microphone is muted.
Missed and un-reviewed calls.
Battery charging (animated display).
Low battery (flashing); place handset in telephone base or charger to recharge.
When you attempt to change the
volume when it is already at its highest or lowest setting.
Low battery warning.
Out of range during off-hook.
Command completed successfully.
Message alert
When you attempt to change the
volume when it is already at its highest or lowest setting.
CHARGE
On when handset
is charging in the
telephone base or
charger.
SPEAKER
On when speakerphone is in use.
40
Page 44

Appendix
TONE
DELETE
PAUSE
MUTE
REDIAL
Handset display screen messages
Screen display messages
PHONE
ENDED
CALL LOG EMPTY
DIRECTORY EMPTY
LIST FULL
MUTED
SPEAKER
LOW BATTERY
INCOMING
The handset is in use.
You have just ended a call.
You are accessing an empty call log.
You are accessing an empty directory.
You are saving to a full directory.
The call is on mute.
The handset speakerphone is in use.
The battery needs to be recharged.
There is a call coming in.
CALL
NEW VOICE MAIL
XX MISSED CALLS
CONNECTING ...
** PAGING **
HANDSET X
There are new voice mail messages.
There are new calls in the caller ID
log.
The handset has lost communication with the telephone base.
The telephone base is paging
handset(s).
Another handset is calling.
IS CALLING
LINE IN USE
NO LINE
ALREADY SAVED
An extension phone is in use.
There is no telephone line connected.
The telephone number you have
entered is already stored in the
directory.
SAVED
PLACE
IN CHARGER
The call log entry is saved to the
directory successfully.
The battery is very low. The handset
should be placed in the telephone
base or charger.
41
Page 45

Appendix
TONE
DELETE
PAUSE
MUTE
REDIAL
Handset display screen messages
Screen display messages
CHARGING
A handset with a low battery has
been placed in the telephone base
or charger.
UNABLE TO CALL
TRY AGAIN
NOT AVAILABLE
AT THIS TIME
MICROPHONE ON
Failed intercom or conference call
(there are already two handsets
being used).
Someone else is already using the
directory or call log when you try
to do so.
The call switches from being on
mute to normal call.
INTERCOM TO:
The handset is to initiate an intercom call to another handset. (You
have to press the handset number
of the destination handset.)
INTERCOM ENDED
The intercom call has just been
ended by you or the receiver of the
call.
CALLING
HANDSET X
TRANSFER TO:
The handset is calling another
handset (for intercom calls).
The handset is to transfer a puton-hold external call to another
handset.
NO SIGNAL,
CALL ENDED
WARNING
CHECK BATTERY!
The handset is out of range while
on a call.
The battery is not installed or not
installed properly in the handset.
-OR-
The battery needs to be replaced.
-OR-
An incorrect battery has been
installed by mistake. Use only the
supplied rechargeable battery or
replacement battery (model 27910,
part number 89-0099-00-00)
42
Page 46

Appendix
Troubleshooting
If you have difficulty with your phone, please try the suggestions below.
For Customer Service, visit our website at www.telephones.att.com
or call 1 (800) 222-3111. In Canada dial 1 (866) 288-4268.
My phone doesn’t
work at all
I cannot get a
dial tone
• Make sure the power cord is securely plugged in.
• Make sure that the battery pack connector is securely
plugged into the cordless handset.
• Make sure the telephone line cord is securely and
firmly plugged into the telephone base and the telephone wall jack.
• Charge the battery pack in the cordless handset for
at least 16 hours. For optimum daily performance,
return the cordless handset to its telephone base
when not in use.
• Reset the telephone base. Unplug the unit’s electrical
power. Wait for approximately 15 seconds, then plug
it back in. Allow up to one minute for the cordless
handset and telephone base to reset.
• You may need to purchase a new battery pack,
please refer to page 3 of this user’s manual.
• First try all the suggestions above.
• Move the cordless handset closer to the telephone
base. You might have moved out of range.
• Your line cord might be malfunctioning. Try installing
a new line cord.
• If the previous suggestions don’t work, disconnect
the telephone base from the telephone jack and connect to a different phone. If there is no dial tone on
that phone either, the problem is in your wiring or
local service. Contact your local telephone company.
43
Page 47

Appendix
Troubleshooting
I cannot dial out
My cordless
handset isn’t
performing
normally
• First try all the suggestions above.
• Make sure you have a dial tone before dialing. The
cordless handset may take a second or two to find
the telephone base and produce a dial tone. This is
normal. Wait an extra second before dialing.
• Make sure your phone is set to the correct dial mode
for the type of service that you have (pulse or touch
tone).
• If the other phones in your home are having the
same problem, the problem is in your wiring or
local service. Contact your local telephone company
(charges may apply).
• Eliminate any background noise. Noise from a television, radio or other appliances may cause the phone
to not dial out properly. If you cannot eliminate the
background noise, first try muting the cordless handset before dialing, or dialing from another room in
your home with less background noise.
• Make sure the power cord is securely plugged into
the telephone base. Plug the unit into a different,
working electrical outlet not controlled by a wall
switch.
• Move the cordless handset closer to the telephone
base. You might have moved out of range.
• Reset the telephone base. Unplug the unit’s electrical power. Wait for 15 seconds then plug it back in.
Allow up to one minute for the cordless handset and
telephone base to reset.
• Other electronic products can cause interference to
your cordless phone. Try installing your phone as
far away from these types of electronic devices as
possible: wireless routers, radios, radio towers, pager
towers, cell phones, intercoms, room monitors, televisions, personal computers, kitchen appliances and
other cordless phones.
44
Page 48

Appendix
Troubleshooting
CONNECTING...
displays on my
cordless handset
The batteries will
not hold a charge
• Ensure that the telephone base is powered up.
• Place the cordless handset in telephone base for one
minute to allow the cordless handset and telephone
base to resynchronize channels.
• Move the cordless handset closer to the telephone
base. You might have moved out of range.
• If the cordless handset is in its telephone base and
the charging light does not come on, refer to The
charge light is off in this troubleshooting guide.
• Reset the telephone base. Unplug the unit’s electrical power. Wait for 15 seconds then plug it back in.
Allow up to one minute for the cordless handset and
telephone base to reset.
• Other electronic products can cause interference
with your cordless phone. Try installing your phone
as far away from these types of electronic devices as
possible: wireless routers, radios, radio towers, page
towers, cell phones, intercoms, room monitors, televisions, personal computers, kitchen appliances and
cordless phones.
• Charge the battery in the cordless handset for at
least 16 hours. For optimum daily performance, return
the cordless handset to its telephone base when not
in use.
• You may need to purchase a new battery, please
refer to the Battery section of this user’s manual.
• Your phone might be malfunctioning. Please refer to
the Limited warranty section of this user’s manual
for further instruction.
• If the cordless handset is in its telephone base and
the charging light does not come on, refer to The
charge light is off in this troubleshooting guide.
45
Page 49

Appendix
Troubleshooting
I get noise, static,
or weak signal
even when I’m
near the telephone base
• Other cordless phones and 802.11 wireless routers
that are used for home computer networks both
use internal radios to communicate. The radios may
interfere with one another. You can improve the
performance of your cordless phones and your router
by:
a. Positioning your new phone as far away as possible
from any other existing cordless telephone system
that is already installed in your home to avoid the
two systems from interfering with each other.
b. Positioning your telephone base as far as possible
from your router, computer or any other computer
devices.
c. Selecting channels 4 through 10 for your router
(refer to your router’s user’s manual for more
information).
• Other electronic products can cause interference to
your cordless phone. Try installing your phone as far
away from the following electronic devices as possible:
wireless routers, radios, radio towers, pager towers, cell
phones, intercoms, room monitors, televisions, personal
computers, kitchen appliances and other cordless
phones.
• Microwaves operate on the same frequency as your
phone. It is normal to experience static on your phone
while the microwave oven is operating. Do not install
this phone in the same outlet or near a microwave
oven.
• If your phone is plugged in with a modem or a surge
protector, plug the phone (or modem/surge protector)
into a different location. If this solves the problem, relocate your phone or modem farther apart from one
another, or use a different surge protector.
• Relocate your phone to a higher location. The phone
will likely have better reception when not installed in a
low area.
• If the other phones in your home are having the same
problem, the problem is in your wiring or local service.
Contact your local telephone company (charges may
apply).
46
Page 50

Appendix
Troubleshooting
I hear other calls
while using my
phone
I hear noise in
the cordless
handset, and
none of the keys
or buttons work
• If you subscribe to DSL service and if you hear noise
during conversations and/or your caller ID features
are not functioning properly, install a DSL filter to
the telephone line between the telephone base and
the telephone line jack. Contact your DSL provider to
obtain a DSL filter.
• Disconnect the telephone base from the telephone
jack, and plug in a different telephone. If you still
hear other calls, the problem is probably in your wiring or local service. Call your local telephone company.
• Make sure the power cord is plugged in securely.
My cordless
handset does
not ring when I
receive a call
• Make sure that the ringer is not turned off.
• Make sure the telephone line cord is plugged securely
into the telephone base and the telephone jack. Make
sure the power cord is securely plugged in.
• The cordless handset may be too far from the
telephone base.
• Charge the battery in the cordless handset for at least
16 hours. For optimum daily performance, return the
cordless handset to its telephone base when not in
use.
• You may have too ma ny extens ion phones on
your telephone line to allow all of them to ring
simultaneously. Try unplugging some of the other
phones.
• The layout of your home or office might be limiting
the operating range. Try moving the telephone base to
another location, preferably on an upper floor.
• If the other phones in your home are having the same
problem, the problem is in your wiring or local service.
Contact your local telephone company (charges may
apply).
47
Page 51

Appendix
Troubleshooting
• Test a working phone at the phone jack. If another
phone has the same problem, the problem is the
phone jack. Contact your local telephone company
(charges may apply).
• Other electronic products can cause interference
with your cordless phone. Try installing your phone
as far away as possible from electronic devices like
wireless routers, radios, radio towers, pager towers,
cell phones, intercoms, room monitors, televisions,
personal computers, kitchen appliances and other
cordless phones.
• Your line cord might be malfunctioning. Try installing
a new line cord.
• Re-install the battery pack, and place cordle ss
handset in telephone base.
• Wait for the cordless handset to re-establish its
connection with the telephone base. Allow up to one
minute for this to take place.
My calls fade out
or cut in and out
while I’m using
my cordless
handset
• Other electronic products can cause interference
with your cordless phone. Try installing your phone
as far away from the following electronic devices
as possible: wireless routers, radios, radio towers,
pager towers, cell phones, intercoms, room monitors,
televisions, personal computers, kitchen appliances
and other cordless phones.
• Microwaves operate on the same frequency as your
phone. It is normal to experience static on your
phone while the microwave oven is operating. Do
not install this phone in the same outlet or near the
microwave oven.
• If your phone is plugged in with a mo de m or
surge protector, plug the phone (or modem/surge
protector) into a different location. If this solves the
problem, re-locate your phone or modem farther
apart from one another, or use a different surge
protector.
48
Page 52

Appendix
Troubleshooting
The charge light
is off
• Relocate your telephone base to a higher location. The phone will have better reception when not
installed in a low area.
• If the other phones in your home are having the
same problem, the problem is in your wiring or
local service. Contact your local telephone company
(charges may apply).
• Clean the cordless handset and telephone base
charging contacts each month using a pencil eraser
or cloth.
• Make sure the power and line cords are plugged in
correctly and securely.
• Unplug the unit’s electrical power. Wait for 15 seconds, then plug it back in. Allow up to one minute for
the cordless handset and telephone base to reset.
• Your phone might be malfunctioning. Please refer to
the Limited warranty section of this user’s manual
for further instruction.
My caller ID isn’t
working
System does not
receive caller ID
or system does
not display caller
ID during call
waiting
• Caller ID is a subscription service. You must subscribe
to this service from your local telephone company for
this feature to work on your phone.
• Your caller must be calling from an area that supports caller ID.
• Both you and your caller’s telephone companies must
use caller ID compatible equipment.
• Make sure you subscribe to caller ID with call waiting
features services provided by your local telephone
company. Caller ID features will work only if both you
and the caller are in areas offering caller ID service,
and if both telephone companies use compatible
equipment.
49
Page 53

Appendix
Troubleshooting
Common cure for
electronic equipment
If the unit does not seem to be responding normally, try
putting the cordless handset in its telephone base. If it
does not seem to respond, do the following (in the order
listed):
1. Disconnect the power to the telephone base.
2. Disconnect the cordless handset battery, and spare
battery, if applicable.
3. Wait a few minutes.
4. Connect power to the telephone base.
5. Re-install the battery pack, and place the cordless
handset into the telephone base.
6. Wait for the cordless handset to re-establish its connection with the telephone base. Allow up to one
minute for this to take place.
50
Page 54

Appendix
Important safety instructions
This symbol is to alert you to important operating or servicing instructions
that may appear in this user’s manual. Always follow basic safety precau tions when using this product to reduce the risk of injury, fire, or electric
shock.
Safety information
• Read and understand all instructions in the user’s manual.
Observe all markings on the product.
• Avoid using a telephone during a thunderstorm. There may
be a slight chance of electric shock from lightning.
• Do not use a telephone in the vicinity of a gas leak.
If you suspect a gas leak, report it immediately, but use a telephone away from the area where gas is leaking. If this product is a cordless model, make sure the telephone base is also
away from the area.
• Do not use this product near water, or when you are wet.
For example, do not use it in a wet basement or shower, or
next to a swimming pool, bathtub, kitchen sink, or laundry tub.
Do not use liquids or aerosol sprays for cleaning. If the product
comes in contact with any liquids, unplug any line or power
cord immediately. Do not plug the product back in until it has
dried thoroughly.
• Install this product in a protected location where no one can
trip over any line or power cords. Protect cords from damage
or abrasion.
• If this product does no t operate normally, read the
Troubleshooting section in the user’s manual. If you cannot
solve the problem, or if the product is damaged, refer to the
Limited warranty. Do not open this product except as may be
directed in your user’s manual. Opening the product or reassembling it incorrectly may expose you to hazardous voltages
or other risks.
51
Page 55

Appendix
Important safety instructions
• If this product has user-replaceable batteries, replace batteries only as described in your user’s manual. Do not burn
or puncture batteries — they contain caustic chemicals.
• If this product has a three-prong (grounding) plug or a
polarized plug with one wide prong, it may not fit in nonpolarized outlets. Do not defeat the purpose of these plugs. If
they do not fit in your outlet, the outlet should be replaced by
an electrician.
• The power unit is intended to be correctly oriented in a ver-
tical or floor mount position. The prongs are not designed to
hold the plug in place if it is plugged into a ceiling or an underthe-table/cabinet outlet.
CAUTION: Use only the power adapter provided with this
product. To obtain a replacement, visit our website at
www.telephones.att.com or call 1 (800) 222-
3111. In Canada dial 1 (866) 288-4268.
Especially about cordless telephones
• Privacy: The same features that make a cordless phone convenient create some limitations. Telephone calls are transmitted between the telephone base and the handset by radio
waves, so there is a possibility that your cordless phone conversations could be intercepted by radio receiving equipment
within range of the cordless handset. For this reason, you
should not think of cordless phone conversations as being
as private as those on corded phones.
• Electrical power: The telephone base of this cordless telephone must be connected to a working electrical outlet. The
electrical outlet should not be controlled by a wall switch.
Calls cannot be made from the handset if the telephone
base is unplugged or switched off, or if the electrical power
is interrupted.
52
Page 56

Appendix
Important safety instructions
• Potential TV interference: Some cordless telephones operate
at frequencies that may cause interference to TVs and VCRs.
To minimize or prevent such interference, do not place the
telephone base of the cordless telephone near or on top of a
TV or VCR. If interference is experienced, moving the cordless
telephone farther away from the TV or VCR will often reduce or
eliminate the interference.
• Rechargeable batteries: This product contains either nickel-cad-
mium or nickel-metal hydride rechargeable batteries. Exercise
care in handling batteries in order not to short the battery with
conducting material such as rings, bracelets, and keys. The battery or conductor may overheat and cause harm. Observe prop-conductor may overheat and cause harm. Observe proper polarity between the battery and the battery charger.
• Nickel-cadmium rechargeable batteries: Must be recycled or
disposed of properly. Do not dispose of in household garbage.
Do not burn or puncture. Like other batteries of this type, if
burned or punctured, they could release caustic material which
could cause injury.
• Nickel-metal hydride rechargeable batteries: Dispose of
these batteries in a safe manner. Do not burn or puncture. Like
other batteries of this type, if burned or punctured, they could
release caustic material which could cause injury.
The RBRC™ Seal means that the manufacturer is voluntarily participating in an industry program to collect and recycle Nickel-cadmium
rechargeable batteries when taken out of service within the United
States. These batteries may be taken to a participating local retailer
of replacement batteries or recycling center. Or you may call 1 (800)
8 BATTERY for locations accepting spent nickel-cadmium Batteries.
The RBRC™ Seal means that the manufacturer is voluntarily participating in an industry program to collect and recycle Nickel-metal
rechargeable batteries when taken out of service within the United
States. These batteries may be taken to a participating local retailer
of replacement batteries or recycling center. Or you may call 1 (800)
8 BATTERY for locations accepting spent nickel-metal Batteries.
53
Page 57

Appendix
Important safety instructions
Precautions for users of implanted cardiac pacemakers
Cardiac pacemakers (applies only to 900 MHz digital cordless telephones):
Wireless Technology Research, LLC (WTR), an independent
research entity, led a multidisciplinary evaluation of the interference between portable wireless telephones and implanted cardiac
pacemakers. Supported by the U.S. Food and Drug Administration,
WTR had recommended to physicians that:
Pacemaker patients
• Should keep wireless phones at least six inches from the pace-
maker.
• Should NOT place wireless phones directly over the pacemaker,
such as in a breast pocket, when it is turned ON.
• Should use the wireless phone at the ear opposite the pace-
maker.
WTR’s evaluation did not identify any risk to bystanders with
pacemakers from other persons using wireless phones.
Especially about telephones answering systems
Two-way recording: This unit does not sound warning beeps to
let the other party know that the call is being recorded. To ensure
that you are in compliance with any federal or state regulations
regarding recording a telephone call, you should start the recording process and then inform the other party that you are recording the call.
SAVE THESE INSTRUCTIONS
54
Page 58

Appendix
FCC Part 68 and ACTA
This equipment complies with Part 68 of the FCC rules and with
technical requirements adopted by the Administrative Council for
Terminal Attachments (ACTA). The label on the back or bottom of
this equipment contains, among other things, a product identifier
in the format US: AAAEQ##TXXXX. This identifier must be provided to your local telephone company upon request.
The plug and jack used to connect this equipment to premises
wiring and the telephone network must comply with applicable
Part 68 rules and technical requirements adopted by ACTA. A
compliant telephone cord and modular plug is provided with this
product. It is designed to be connected to a compatible modular jack that is also compliant. An RJ11 jack should normally
be used for connecting to a single line and an RJ14 jack for two
lines. See Installation Instructions in the user’s manual.
The Ringer Equivalence Number (REN) is used to determine how
many devices you may connect to your telephone line and still
have them ring when you are called. The REN for this product is
encoded as the 6th and 7th characters following the US: in the
product identifier (e.g., if ## is 03, the REN is 0.3). In most, but
not all areas, the sum of all RENs should be five (5.0) or less. For
more information, please contact your local telephone company.
This equipment may not be used with party lines. If you have specially wired alarm dialing equipment connected to your telephone
line, ensure the connection of this equipment does not disable
your alarm equipment. If you have questions about what will
disable alarm equipment, consult your telephone company or a
qualified installer.
If this equipment is malfunctioning, it must be unplugged from
the modular jack until the problem has been corrected. Repairs to
this telephone equipment can only be made by the manufacturer
or its authorized agents. For repair procedures, follow the instructions outlined under the limited warranty.
55
Page 59

Appendix
FCC Part 68 and ACTA
If this equipment is causing harm to the telephone network, the
telephone company may temporarily discontinue your telephone
service. The telephone company is required to notify you before
interrupting service. If advance notice is not practical, you will be
notified as soon as possible. You will be given the opportunity toYou will be given the opportunity to
correct the problem and the telephone company is required to
inform you of your right to file a complaint with the FCC. Your
telephone company may make changes in its facilities, equipment,
operation, or procedures that could affect the proper functioning
of this product. The telephone company is required to notify you
if such changes are planned.
If this product is equipped with a corded or cordless handset, it is
hearing aid compatible.
If this product has memory dialing locations, you may choose to
store emergency telephone numbers (e.g., police, fire, medical)
in these locations. If you do store or test emergency numbers,
please:
• Remain on the line and briefly explain the reason for the call
before hanging up.
• Perform such activities in off-peak hours, such as early morning or late evening.
56
Page 60

Appendix
FCC Part 15
This equipment has been tested and found to comply with the
requirements for a Class B digital device under Part 15 of the
Federal Communications Commission (FCC) rules. These requirements are intended to provide reasonable protection against
harmful interference in a residential installation. This equipment
generates, uses and can radiate radio frequency energy and, if not
installed and used in accordance with the instructions, may cause
harmful interference to radio communications. However, there
is no guarantee that interference will not occur in a particular
installation. If this equipment does cause harmful interference to
radio or television reception, which can be determined by turning
the equipment off and on, the user is encouraged to try to correct the interference by one or more of the following measures:
• Reorient or relocate the receiving antenna.Reorient or relocate the receiving antenna.
• Increase the separation between the equipment and receiver.
• Connect the equipment into an outlet on a circuit different
from that to which the receiver is connected.
• Consult the dealer or an experienced radio/TV technician
for help.
Changes or modifications to this equipment not expressly
approved by the party responsible for compliance could void the
user’s authority to operate the equipment.
To ensure safety of users, the FCC has established criteria for the
amount of radio frequency energy that can be safely absorbed
by a user or bystander according to the intended usage of the
product. This product has been tested and found to comply with
the FCC criteria. The handset may be safely held against the ear
of the user. The telephone base shall be installed and used such
that parts of the user’s body other than the hands are maintained
at a distance of approximately 20 cm (8 inches) or more. If you
choose to use a clipping device, please make sure to only use the
supplied AT&T belt clip.
57
Page 61

Appendix
Limited warranty
The AT&T brand is used under license - any repair, replacement or
warranty service, and all questions about this product should be
directed to: In the United States of America visit our website atvisit our website at
www.telephones.att.com or call 1 (800) 222-3111. In
Canada dial 1 (866) 288-4268.
1. What does this limited warranty cover?
The manufacturer of this AT&T-branded product warrants to the
holder of a valid proof of purchase (“CONSUMER” or “you”) that
the product and all accessories provided in the sales package
(“PRODUCT”) are free from defects in material and workmanship,
pursuant to the following terms and conditions, when installed
and used normally and in accordance with the PRODUCT operating instructions. This limited warranty extends only to the
CONSUMER for products purchased and used in the United States
of America and Canada.
2. What will be done if the PRODUCT is not free from defects in
materials and workmanship during the limited warranty period
(“materially defective PRODUCT”)?
During the limited warranty period, the manufacturer’s authorized
service representative will repair or replace at the manufacturer’s option, without charge, a materially defective PRODUCT. If
the manufacturer repairs the PRODUCT, they may use new or
refurbished replacement parts. If the manufacturer chooses to
replace the PRODUCT, they may replace it with a new or refurbished PRODUCT of the same or similar design. The manufacturer will retain defective parts, modules, or equipment. Repair
or replacement of the PRODUCT, at the manufacturer’s option,
is your exclusive remedy. The manufacturer will return repaired
or replacement products to you in working condition. You should
expect the repair or replacement to take approximately 30 days.
58
Page 62

Appendix
Limited warranty
3. How long is the limited warranty period?
The limited warranty period for the PRODUCT extends for ONE (1)
YEAR from the date of purchase. If the manufacturer repairs or
replaces a materially defective PRODUCT under the terms of this
limited warranty, this limited warranty also applies to repaired or
replacement PRODUCT for a period of either (a) 90 days from the
date the repaired or replacement PRODUCT is shipped to you or
(b) the time remaining on the original one-year limited warranty;
whichever is longer.
4. What is not covered by this limited warranty?
This limited warranty does not cover:
• PRODUCT that has been subjected to misuse, accident, ship-
ping or other physical damage, improper installation, abnormal operation or handling, neglect, inundation, fire, water, or
other liquid intrusion; or
• PRODUCT that has been damaged due to repair, alteration,
or modification by anyone other than an authorized service
representative of the manufacturer; or
• PRODUCT to the extent that the problem experienced is
caused by signal conditions, network reliability or cable or
antenna systems; or
• PRODUCT to the extent that the problem is caused by use
with non-AT&T accessories; or
• PRODUCT whose warranty/quality stickers, PRODUCT serial
number plates or electronic serial numbers have been
removed, altered or rendered illegible; or
• PRODUCT purchased, used, serviced, or shipped for repair
from outside the United States of America or Canada, or
used for commercial or institutional purposes (including but
not limited to products used for rental purposes); or
59
Page 63

Appendix
Limited warranty
• PRODUCT returned without valid proof of purchase (see item
6 below); or
• Charges for installation or setup, adjustment of customer
controls, and installation or repair of systems outside the
unit.
5. How do you get warranty service?
To obtain warranty service in the United States of America, visit
our website at www.telephones.att.com or call 1 (800)
222-3111. In Canada dial 1 (866) 288-4268.
NOTE: Before calling for service, please review the user’s manual
- a check of the PRODUCT controls and features may save you a
service call.
Except as provided by applicable law, you assume the risk of loss
or damage during transit and transportation and are responsible
for delivery or handling charges incurred in the transport of the
PRODUCT(s) to the service location. The manufacturer will return
repaired or replaced PRODUCT under this limited warranty to you,
transportation, delivery or handling charges prepaid. The manufacturer assumes no risk for damage or loss of the PRODUCT
in transit. If the PRODUCT failure is not covered by this limited
warranty, or proof of purchase does not meet the terms of this
limited warranty, the manufacturer will notify you and will request
that you authorize the cost of repair prior to any further repair
activity. You must pay for the cost of repair and return shipping
costs for the repair of products that are not covered by this limited warranty.
60
Page 64

Appendix
Limited warranty
6. What must you return with the PRODUCT to get warranty service?
You must:
a. Return the entire original package and contents including
the PRODUCT to the service location along with a description of the malfunction or difficulty; and
b. Include “valid proof of purchase” (sales receipt) identifying
the PRODUCT purchased (PRODUCT model) and the date of
purchase or receipt; and
c. Provide your name, complete and correct mailing address,
and telephone number.
7. Other limitations
This warranty is the complete and exclusive agreement between
you and the manufacturer of this AT&T branded PRODUCT. It
supersedes all other written or oral communications related to
this PRODUCT. The manufacturer provides no other warranties
for this PRODUCT. The warranty exclusively describes all of the
manufacturer’s responsibilities regarding the PRODUCT. There are
no other express warranties. No one is authorized to make modifications to this limited warranty and you should not rely on any
such modification.
State/Provincial Law Rights: This warranty gives you specific legal
rights, and you may also have other rights which vary from state
to state or province to province.
61
Page 65

Appendix
Limited warranty
Limitations: Implied warranties, including those of fitness for a
particular purpose and merchantability (an unwritten warranty
that the PRODUCT is fit for ordinary use) are limited to one year
from date of purchase. Some states/provinces do not allow limitations on how long an implied warranty lasts, so the above limitation may not apply to you. In no event shall the manufacturer
be liable for any indirect, special, incidental, consequential, or
similar damages (including, but not limited to lost profits or revenue, inability to use the PRODUCT or other associated equipment,
the cost of substitute equipment, and claims by third parties)
resulting from the use of this PRODUCT. Some states/provinces
do not allow the exclusion or limitation of incidental or consequential damages, so the above limitation or exclusion may not
apply to you.
Please retain your receipt as your proof of
purchase.
62
Page 66

Appendix
Technical specifications
RF frequency band
(handset to telephone
RF frequency band
(telephone base to handset)
Channels
Operating temperature
Telephone base voltage
(AC voltage, 60Hz)
Handset voltage
Charger voltage
(AC adapter output)
Replacement battery
5.8 GHz digital spread spectrum frequency hopping technology
This technology digitally transmits your voice across multiple channels in both the
5.8GHz and 2.4GHz frequencies to provide enhanced range, ultimate sound clarity
and advanced privacy against eavesdropping on your calls, while not interfering
with wireless routers.
Telephone operating range
This cordless telephone operates within the maximum power allowed by the Federal
Communications Commission (FCC). E ve n so, this handset and b ase can
communicate over only a certain distance — which can vary with the locations of
the base and handset, the weather, and the construction of your home or office.
2400 MHz — 2483.5 MHz
5725 MHz — 5850 MHz
95
32°F — 122°F
0°C — 50°C
96 — 130 Vrms
3.2 — 4.7 VDC 600mAh
9VDC @200mA
3.6V 600mAh
63
Page 67

Appendix
Index
A
AC adapter, 3
Alert tones, 40
Answering calls, 8
Auto off, 8
B
Battery charging, 3
Battery installation, 3
Belt clip, 7
C
Call waiting, 10
Call transfer, 17
Caller ID, 34
add entries to phone
directory, 39
delete entries, 39
dial entries, 38
CID, 34
Clear voice mail indication, 23
D
Delete call log entries, 39
Delete redial entries, 9
Dialing,
from a CID record, 38
directory dialing, 32
Directory, 27
dial number, 32
edit entries, 33
name search, 30
new entries, 28-29
E
Elapsed time, 8
Ending calls, 8
F
Flash (switchhook flash), 10
H
Hands-free use, 8
Handset locator, 9
Headset, 7
I
Intercom, 15-16
Incoming call log, 38
Incoming calls, answering, 8
Indicator lights, 40
L
Last number redial, 13
Low battery, 3
M
Making calls, 8
Memory match, 36
Mute, 12
N
Names,
enter into directory, 29
search for, 30
O
On-hook dialing, 8
64
Page 68

Appendix
Index
Q
Quick reference guide, 1
R
Receiving calls, 8
Recharging, 3
Redial, 9
Replacing a handset, 6
Ring silencing, 26
Ring tone options, 21
Ringer Volume, 10, 20
S
Search for names, 30
Speakerphone, 8
Switchhook flash, 10
T
Technical specifications, 63
Telephone operating range, 63
Troubleshooting, 43-50
V
Volume controls, 10
65
Page 69

www.telephones.att.com
© 2007 Advanced American Telephones. All rights reserved.
AT&T and the AT&T logo are trademarks of AT&T Knowledge Ventures,
licensed to Advanced American Telephones. Printed in China. Issue 4 07/07.
91-001109-010-100
 Loading...