

Page 1

Installation guide
4-Line small business system
1080 with digital answering system and
caller ID/call waiting
1070 with caller ID/call waiting
1040 speakerphone
Page 2

Congratulations
on purchasing your
new AT&T product.
Before using this AT&T product, please
read the Important product information
in your User’s manual.
Please thoroughly read the installation
guide for all the installation
and troubleshooting information you
need to install and setup your new
AT&T product. You can also visit our
website at www.telephones.att.com
or call 1 (800) 222-3111.
In Canada, dial 1 (866) 288-4268.
The form on the next page helps you to inventory your
new sets. Please have this with you if you need to call
customer service.
© 2007-2009 Advanced American Telephones. All Rights Reserved. AT&T and
the AT&T logo are trademarks of AT&T Intellectual Property licensed to
Advanced American Telephones, San Antonio, TX 78219.
Page 3

4-line small business system
Model,
(circle one)
1080 1070 1040
1080 1070 1040
1080 1070 1040
1080 1070 1040
1080 1070 1040
1080 1070 1040
1080 1070 1040
1080 1070 1040
1080 1070 1040
Location Serial number,
(found on the bottom of
the telephone base)
Purchase date
and place
1080 1070 1040
1080 1070 1040
1080 1070 1040
1080 1070 1040
1080 1070 1040
1080 1070 1040
1080 1070 1040
Page 4

STOP!
Do you receive DSL (digital subscriber line) service for highspeed Internet access through your telephone line(s) from your
telephone company? If so, you will need to add either DSL
splitters and/or microfilters to your installation. See page 9.
For customer service or product information, visit our website at
www.telephones.att.com or call 1 (800) 222-3111. In Canada, dial
1 (866) 288-4268.
CAUTION: To reduce the risk of fire or injury to persons or damage to
the telephone, read and follow these instructions carefully:
• Use only alkaline 9V batteries (size 1604A, purchased separately).
• Do not dispose of the battery in a fire. Like other batteries of this type, it could
explode if burned. Check with local codes for special disposal instructions.
• Do not open or mutilate the battery. Released electrolyte is corrosive and may
cause damage to the eyes or skin. It may be toxic if swallowed.
• Exercise care in handling batteries in order not to create a short circuit. Do not
allow conductive materials such as rings, bracelets, or keys to touch the battery.
The battery or conductor may overheat and cause harm.
• Use the battery identified for use with this product only in accordance with
the instructions and limitations specified in this manual.
• Observe proper polarity orientation between the battery and metallic contacts.
• Do not disassemble your telephone. There are no user-serviceable parts inside.
Refer to qualified service personnel for servicing.
Page 5

Table of contents
Planning your system .......................................................................................................................1
System planner ....................................................................................................................................4
Parts checklist (1040/1070/1080) ...........................................................................................5
Important information for DSL users ........................................................................................6
Professionally installed splitter for DSL lines ...................................................................... 9
Table/desktop installation .......................................................................................................... 10
Wall mounting .................................................................................................................................. 14
Directory card ................................................................................................................................... 16
Optional headset (purchased separately) ........................................................................... 17
Feature menu ....................................................................................................................................18
DTAD feature menu (1080 only) .............................................................................................. 25
Menu operation ................................................................................................................................28
Phone settings .................................................................................................................................. 29
LANGUAGE .....................................................................................................................................29
One touch ...........................................................................................................................................30
PREFERENCE .................................................................................................................................. 30
PROGRAM .......................................................................................................................................30
Phone settings .................................................................................................................................. 32
EXTENSION NUMBER .................................................................................................................32
RINGER ON/OFF .......................................................................................................................... 33
RINGER TYPE ................................................................................................................................. 33
DELAY RING ................................................................................................................................... 34
AUTO-MUTE .................................................................................................................................... 35
TONE/PULSE.................................................................................................................................. 36
HOLD REMINDER ......................................................................................................................... 36
Time/date .......................................................................................................................................... 37
Special options ................................................................................................................................. 39
PRIME LINE ..................................................................................................................................... 39
AUTOMATIC MODE ..................................................................................................................... 39
SCROLL RATE ................................................................................................................................40
LCD CONTRAST ............................................................................................................................ 40
COVM ON/OFF, 1080 and 1070 only ............................................................................... 41
AREA CODE, 1080 and 1070 only ......................................................................................42
LINE GROUP .................................................................................................................................. 43
RESET ALL ....................................................................................................................................... 45
AUTO ATT SETUP (1080 only) ................................................................................................... 46
EVERY 1080=AA........................................................................................................................... 47
NO 1080=AA ................................................................................................................................. 47
PER 1080=AA ................................................................................................................................ 48
AUTO ATT DELAY ......................................................................................................................... 49
DAY/NIGHT TIMES ....................................................................................................................... 50
RESET AUTO ATT, (1080 only) ............................................................................................... 51
SYS EXT mailbox (1080 only) .................................................................................................... 52
About system extension mailboxes ................................................................................... 52
System Extensions ...................................................................................................................... 52
AUTO SETUP .................................................................................................................................. 53
CUSTOM SETUP ............................................................................................................................ 53
UNASSIGN MBOXES ................................................................................................................... 54
REMOVE EXT MSGS..................................................................................................................... 55
To delete all messages from one SYS EXT telephone .............................................. 55
To delete all messages of all SYS EXT phones ............................................................ 56
DTAD setup (1080 only) ...............................................................................................................57
ANSWER STATUS ......................................................................................................................... 57
ANSWER DELAY ...........................................................................................................................58
TOLL SAVER ................................................................................................................................... 58
Page 6

REMOTE CODE .............................................................................................................................. 59
MESSAGE LENGTH.......................................................................................................................60
MESSAGE ALERT .......................................................................................................................... 61
CALL SCREENING ........................................................................................................................ 62
DTAD INTERCEPT ......................................................................................................................... 62
DTAD FEATURE MENU (1080 only) ......................................................................................... 63
Outgoing announcements for auto attendant ............................................................. 65
Outgoing daytime announcement ...................................................................................... 66
Outgoing nighttime announcement .................................................................................. 68
Directory announcement.........................................................................................................70
Share system announcements ............................................................................................. 72
Download system announcements .................................................................................... 73
Centrex ................................................................................................................................................. 74
CONSOLE ........................................................................................................................................ 74
CSL DELAY RING .......................................................................................................................... 75
Language ............................................................................................................................................. 76
Centrex operation ........................................................................................................................... 77
Set ring delay duration ............................................................................................................ 78
About a fax machine ..................................................................................................................... 79
Adding a fax machine ............................................................................................................... 79
Using a fax switch ...................................................................................................................... 79
Technical specification ................................................................................................................. 80
Appendix A, Glossary .................................................................................................................... 81
Appendix B, Optional spare battery (purchased separately) ..................................... 84
Troubleshooting ............................................................................................................................... 86
Index ...................................................................................................................................................... 97
Page 7
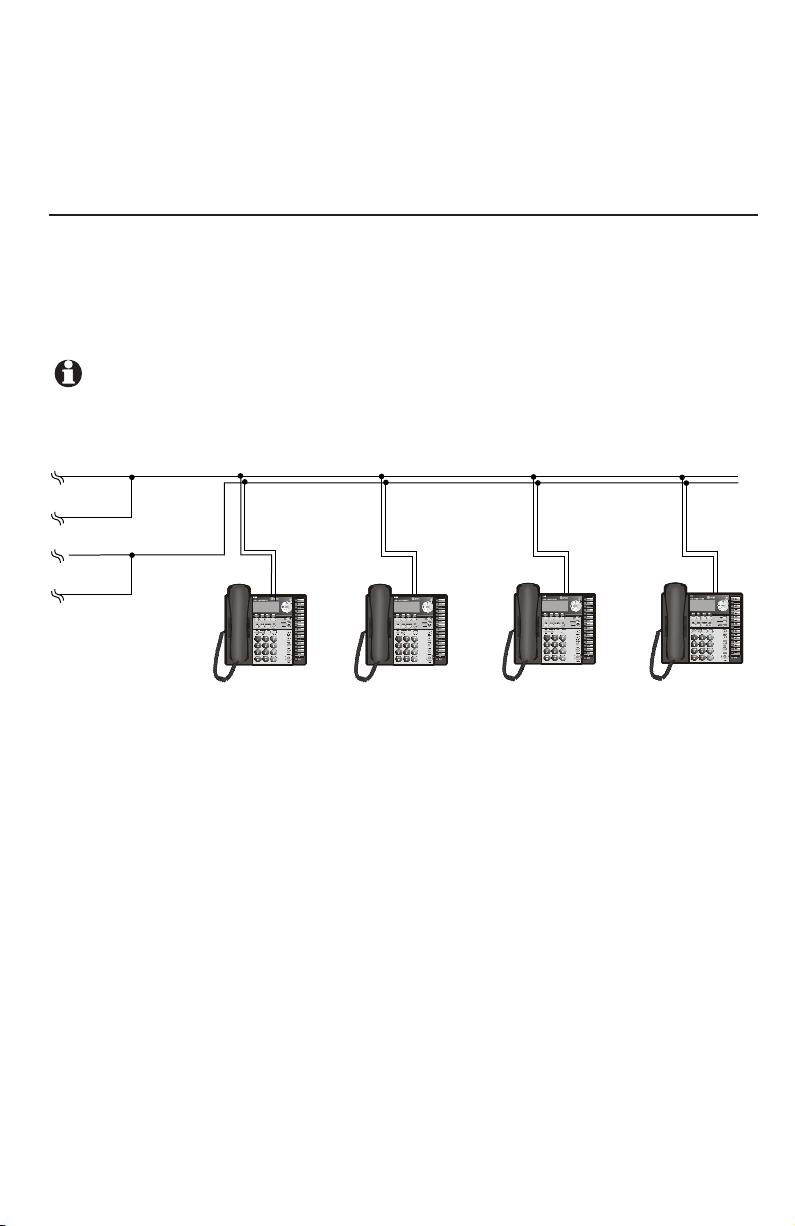
Planning your system
Line 1
Line 2
Line 3
Line 3, 4
System
telephone
System
telephone
System
telephone
System
telephone
Line 1, 2
Line 4
Your system can have up to 16 telephones (models 1040, 1070 or 1080,
purchased separately) and up to 19 telephone numbers. Your system can
have all the system features (intercom call, voice page, call transfer, multiple
telephone conference call, DTAD mailbox, and auto-attendant).
To set up a small business system
Purchase your telephones (model 1040, 1070 or 1080), arrange for your
telephone lines, and purchase any line outlet adapters and additional
telephone line cords you might need. To order them, visit our website at
www.telephones.att.com
, or call
1 (800) 222-3111
1 (866) 288-4268.
NOTES:
• All connected phones must have the same line 1 phone number for the
intercom and paging features to work.
. In Canada, dial
• The total length of telephone wiring used for Line 1 MUST NOT be more
than 600 feet as it may cause interference with the advanced features of
this telephone.
• You must have modular telephone jacks and electrical outlets not
controlled by wall switches near where you are installing the phones.
• To use the auto-attendant function (see the Auto attendant operation
section on the 1080 user’s manual), you must purchase at least one
1080 telephone, and we recommend it be set up as Extension 11 (see the
EXTENSION NUMBER section on page 32).
• If a 1080 extension is an active auto attendant and its auto attendant is
answering or directing a call, playing or recording an announcement or
message, the LINE light will flash continuously (two short flashes followed
by one long flash). To interrupt the auto attendant, press the flashing LINE
button on this 1080 telephone to talk to the caller on that line, or press
any other LINE button to disconnect this call and make a new call on
another line.
Continued on next page
1
Page 8

Planning your system
Continued from previous page
• If your establishment has single-line phone jacks (page 11), you must purchase
two-line adapters (model 16598, part number 89-0071-00).
If you have two or three phone lines, you will need one two-line adapter for
each phone. If you have four phone lines, you will need two two-line adapters
for each phone.
If you have one-line phone jacks, and four phone lines, you will also need to
purchase one short telephone line (model 51920, part number 89-0052-00)
or equivalent for each phone. If some phones are being wall mounted, you
may need more short telephone line cords. To order them, visit our website at
www.telephones.att.com, or call 1 (800) 222-3111. In Canada, dial
1 (866) 288-4268.
If you have DSL (digital subscriber line) service and if you have more
•
than three telephones, you probably need to have a DSL splitter installed
at your location by your DSL provider. Please see page 9 of this guide.
• Assign a different system extension number EXT XX to each system telephone
(see the EXTENSION NUMBER section on page 32). We recommend assigning
EXT 11 to an auto-attendant telephone. Every individual phone in your
telephone system MUST be assigned a unique extension number for the
intercom feature to work. If you try to assign the same extension number
to a second phone, you will hear a repeating short ring and the screen
displays ASSIGN NEW EXT #. See the EXTENSION NUMBER section on
page 32 for directions.
• If you subscribe to Centrex service provided by your local telephone
company, assign that 1080 telephone as a console (see the Centrex section
on page 74 for directions).
• Your telephone probably shares its telephone lines with other extensions.
Each telephone line button has LEDs (lights) to show the line status (in
use, on hold, or ringing). To have an accurate line status indication, all units
MUST have their Line 1 jacks connected to the same telephone line (i.e. L1),
Line 2 jacks connected to the same telephone line (L2), and Line 3 jacks
connected accordingly to (L3).
• System telephones have their own private telephone numbers, or several
extensions can share the same number, and be part of a line group.
• Only Line 4 can be a private line. Select
menu on that telephone (see the LINE GROUP section on page 43).
PRIVATE LINE in the LINE GROUP
Continued on next page
2
Page 9

Planning your system
Continued from previous page
• All extensions that share the same line should share the same line group
number (4-15).
• You can connect fax machines or other non-system devices to
AUXL4 on the back of the telephone (also called data ports), so they can
access line 3 or 4.
• See
Optional spare battery, page 84 for information about installing spare
batteries to maintain basic telephone features in case of a power failure.
AUXL3 or
• Refer to the
telephone.
•
The chart on the following page will help you plan your system.
- List the extension number, location, and model for each phone.
- For each 1080, decide whether you want it to be an auto attendant.
- Decide which phone numbers each extension should have.
- Plan your line groups. This is necessary only if all telephone lines are not
attached to all telephones. See LINE GROUP, page 43, for more information.
- Decide which 1070 and 1040 extensions will be assigned to which 1080
system extension mailbox (see the Forwarding to DTAD mailbox section
on the 1070 or 1040 user’s manual).
- Decide if any phones will have private lines. A private line only appears on
one set.
- Write your phone numbers in the spaces at the top of the chart.
You may want to make copies of this chart, in case your needs change.
Feature menu section, page 18, to customize each system
3
Page 10
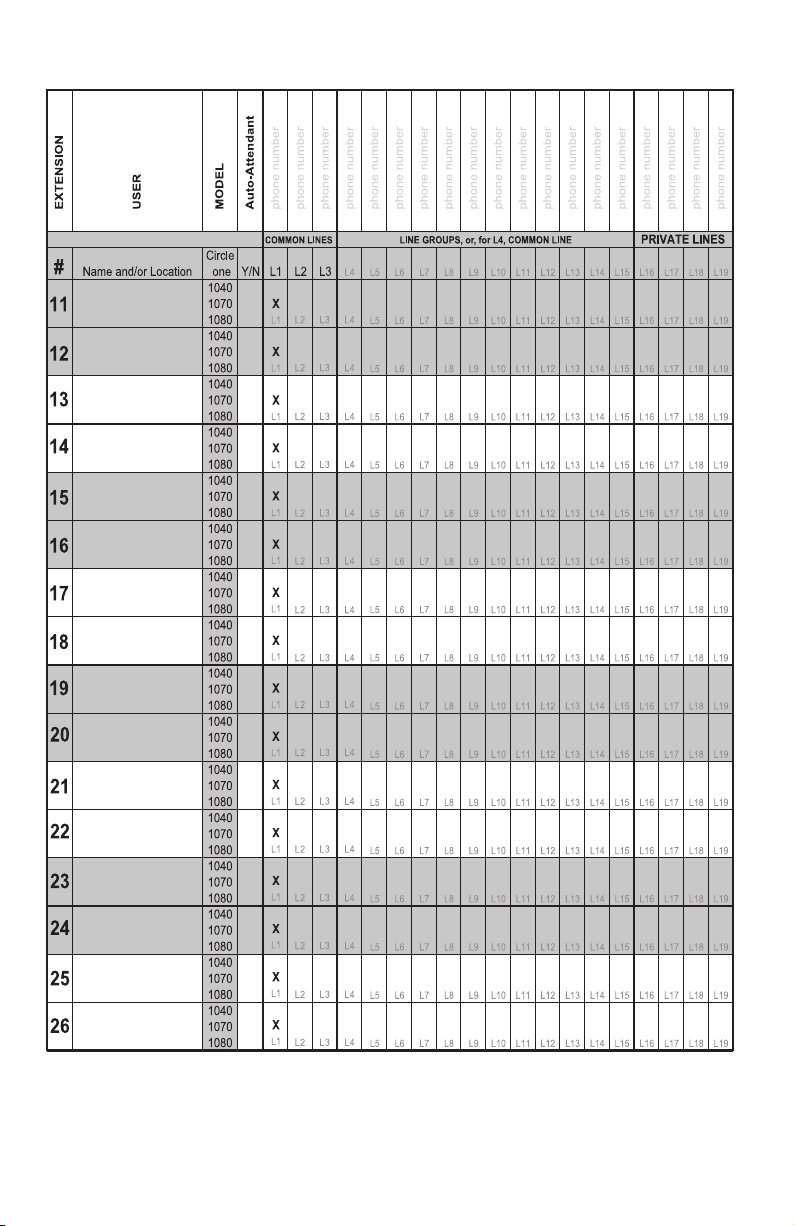
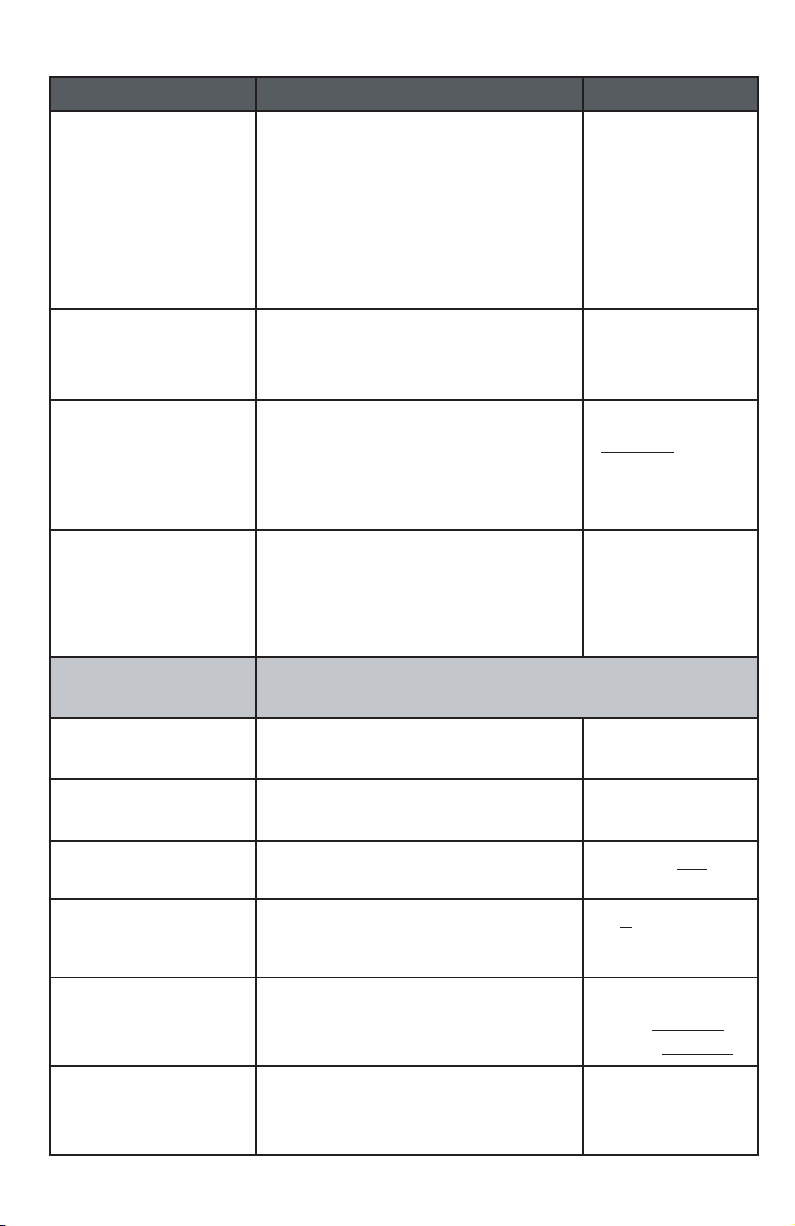
System planner
4
Page 11
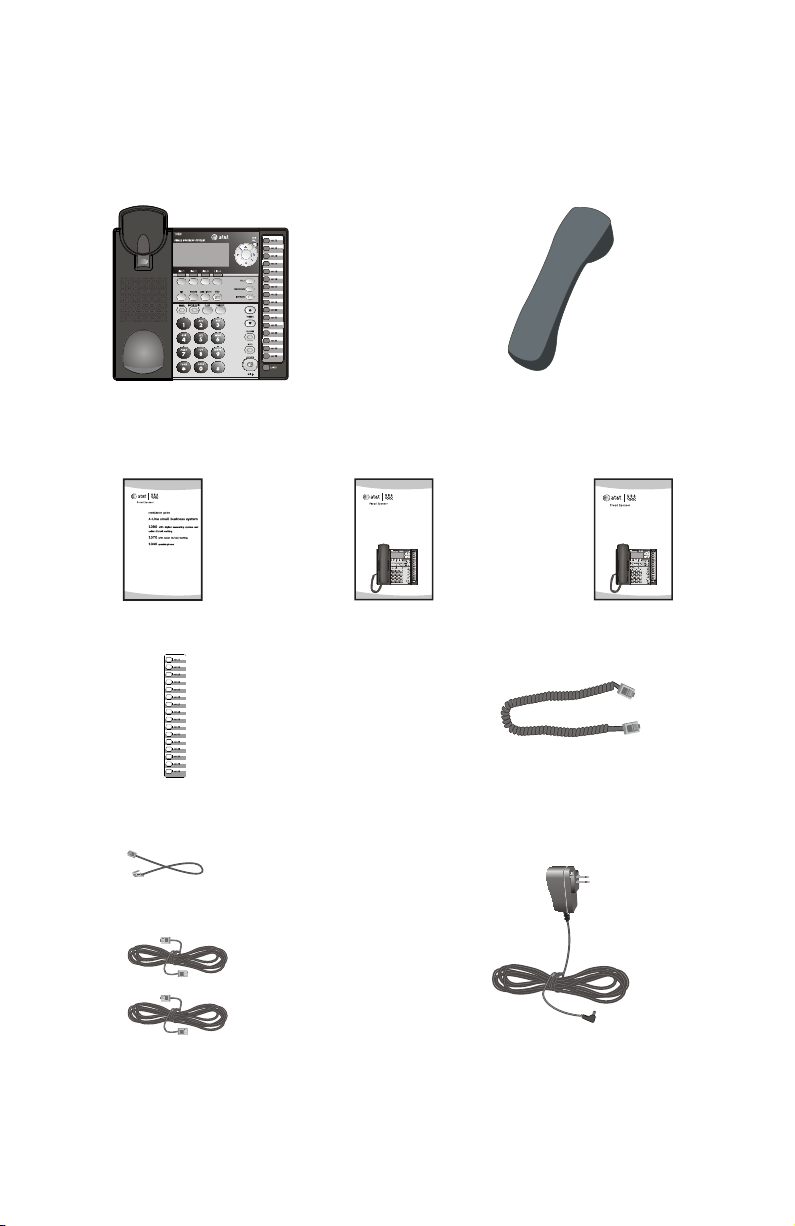
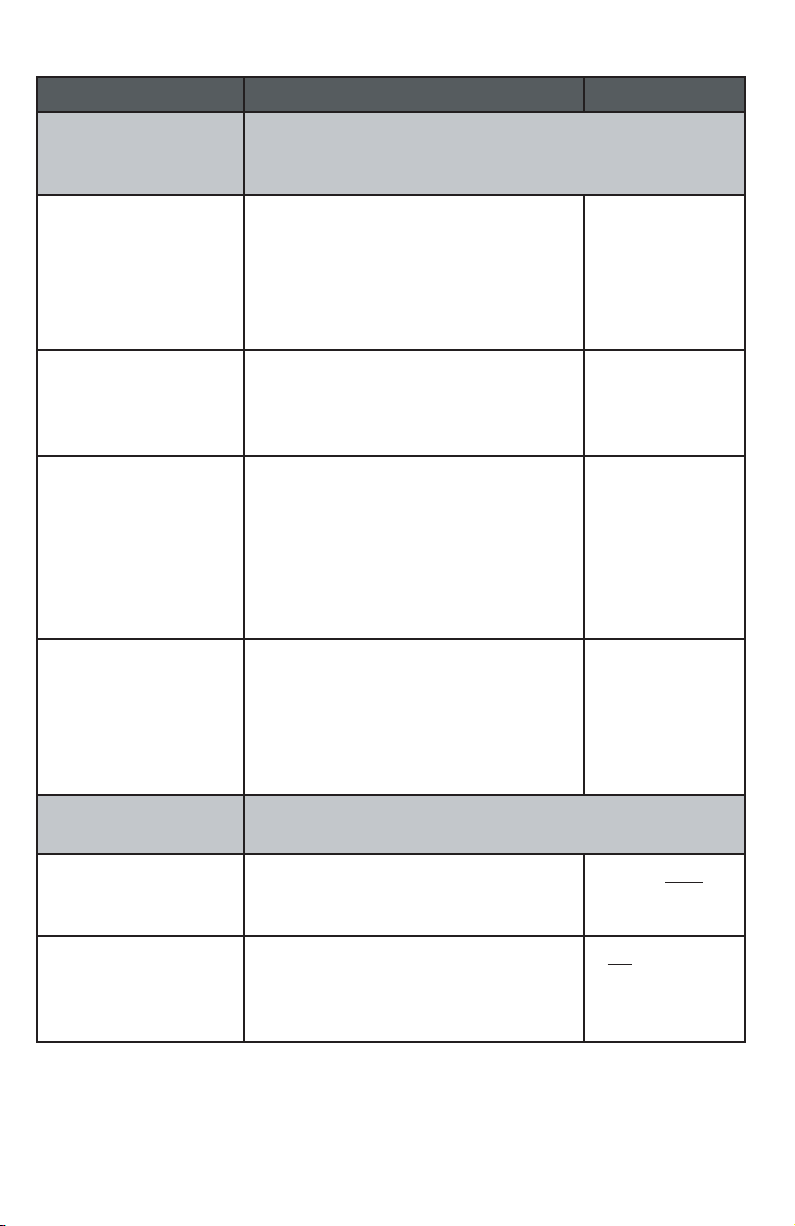
Parts checklist (1040/1070/1080)
Quick reference guide
1080
4-Line small business
system with digital
answering system and
caller ID/call waiting
User’s manual
1080
4-Line small business
system with digital
answering system and
caller ID/call waiting
Save your sales receipt and original packaging in case it is necessary to ship
your telephone for warranty service.
The box should include:
Telephone base with wall
mount bracket attached
Installation guide
Replacement directory card (In
bag with user’s manual)
One short telephone line cord
User's manual
Handset
Quick reference guide
Handset coiled cord
Two long telephone line cords
Power adapter
Tool needed (optional)
You will need a Phillips screwdriver to install your optional backup battery.
5
Page 12

Important information for DSL users
Do you receive DSL (digital subscriber line) service for high-speed Internet
access through your telephone line(s) from your telephone company? If
so, add either DSL splitters and/or microfilters to your installation. Without
these DSL splitters and/or microfilters, your telephone service will interfere
with your data reception, and your data reception will interfere with your
telephone sound quality and the advanced features that work by sending data
signals over Line 1 (such as intercom, hold, and line privacy).
If you have fewer than four telephones, if Line 1 can be a non-DSL line, and
if there is no alarm system, you can use microfilters between each telephone
and each telephone wall jack.
If your system meets any of the following three criteria, you will need DSL
splitter(s) installed near where the telephone lines come into the building.
You will need one for each DSL line. This usually requires a professional
installer.
1) If you have more than three telephones in your system, you probably
need the help of a professional installer. For each telephone line connected
to more than three telephones of any type or brand, you will need to install
a DSL splitter near where the phone lines come into the building. This usually
requires a professional installer.
2) If you need line 1 to be a DSL line, you probably need the help of a
professional installer. The telephone system information is carried on Line
1. Therefore, you must connect the same telephone line to the Line 1 jacks
of all telephone sets. This telephone information and the Internet access
information cannot coexist on the same telephone line without a DSL splitter
that should be installed near where the phone lines come into the building.
This usually requires a professional installer. Do not use microfilters on Line
1 as they interfere with telephone operation.
3) If you have an alarm system, you probably need the help of a professional
installer. Alarm systems use telephone lines. This telephone system and the
alarm system cannot share the same telephone line.
Other DSL information: Voice and high-speed data access can share your
telephone lines because the Internet modems use high-frequency data signals
and telephones use low-frequency voice signals. However, to provide high
quality voice and to enable the telephones to work as an integrated system,
most telephones need to have the high frequency signals removed. You will
need either DSL splitters or filters to remove these signals.
Continued on next page
6
Page 13

Important information for DSL users
Continued from previous page
Use splitters to separate the high-frequency DSL signals from the lowfrequency signals used by the telephone equipment. Although some splitters
can be installed by end users, most DSL splitters are installed by the
telephone company.
You can use microfilters at each individual phone jack or telephone set.
Telephone service providers typically supply them for free to self installers.
However, if you install more than three microfilters on system phones, the
sound quality and advanced features’ operation may suffer. If you have
more than three telephones, you will probably need to have your telephone
company install the DSL splitter near where your telephone lines come into
the building.
For only one or two DSL lines, install the DSL filter into the L3/L4 jack on the
back of the telephone.
If your system will only use two or three telephone lines, plug a single nonDSL telephone line into the L1/L2 jack. If the lines have DSL, be sure to use
the microfilter(s) on lines 3 and/or 4.
If there are two telephone lines, one of which is DSL, and both appear at a
single wall jack, use a triplex adapter to separate the lines at the wall jack. If
you need help doing this, visit our website at www.telephones.att.com
or call 1 (800) 222-3111. In Canada, dial 1 (866) 288-4268.
If you must install a DSL line into the L1/L2 jack on the back of the
telephone, use a DSL splitter.
Lines 1 and 2 share a telephone jack. If it is necessary to install a DSL line
for telephone line 1 or line 2, you will need additional equipment to avoid
interference. Any telephone line connected to the L1/L2 jack cannot have
a microfilter. It must have a DSL splitter. A DSL splitter allows the data and
voice signals to use the same telephone line without interfering with each
other. Use a dual-line DSL splitter or a two-line DSL filter. If you need help
doing this, visit our website at www.telephones.att.com or call
1 (800) 222-3111. In Canada, dial 1 (866) 288-4268.
Installing a DSL splitter (not a microfilter) as close as possible to the
protection block or network interface (where the telephone line enters the
house or building) may resolve DSL interference. (It may be necessary to use a
DSL splitter intended for outdoor use.)
Continued on next page
7
Page 14

Important information for DSL users
Continued from previous page
AT&T cannot supply the DSL splitter. Please contact your DSL service provider
or professional contractor for details about obtaining and installing a DSL
splitter. Your DSL service provider may require you to bear any installation
costs. AT&T and the manufacturer of this product have no affiliation with your
DSL provider and the type or quality of services they offer. Installation must
be performed at your own expense. AT&T cannot provide installation or after
sale support.
NOTE: If your DSL service provider cannot supply a DSL splitter, it is
possible to purchase an outdoor DSL splitter over the Internet.
If you are a new DSL customer, your DSL service provider will probably
ask you whether you have more than one telephone line in your home or
business, or whether you are installing a telephone system. If you answer
yes, your DSL service provider will probably advise you that you will need
a splitter. In most cases, your DSL service provider will supply you with the
proper splitter for your specific situation. When installed properly, the DSL
filter helps eliminate any interference between the DSL signal and the signals
sent by your telephone system.
AT&T shall not be responsible for the cost of installation, any damages, lost
business, direct or indirect expenses accrued or associated with installation,
or other compatibility issues that may arise as a result of using this product
while you subscribe to DSL service.
8
Page 15
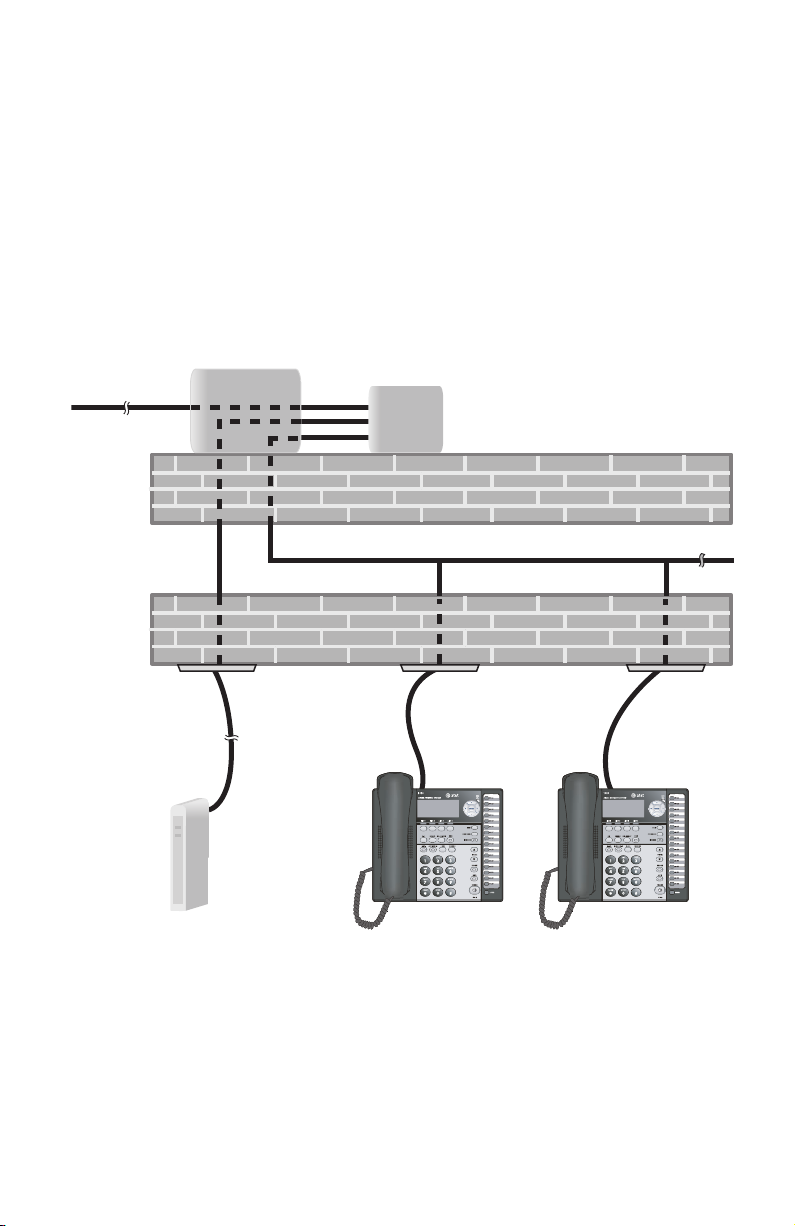
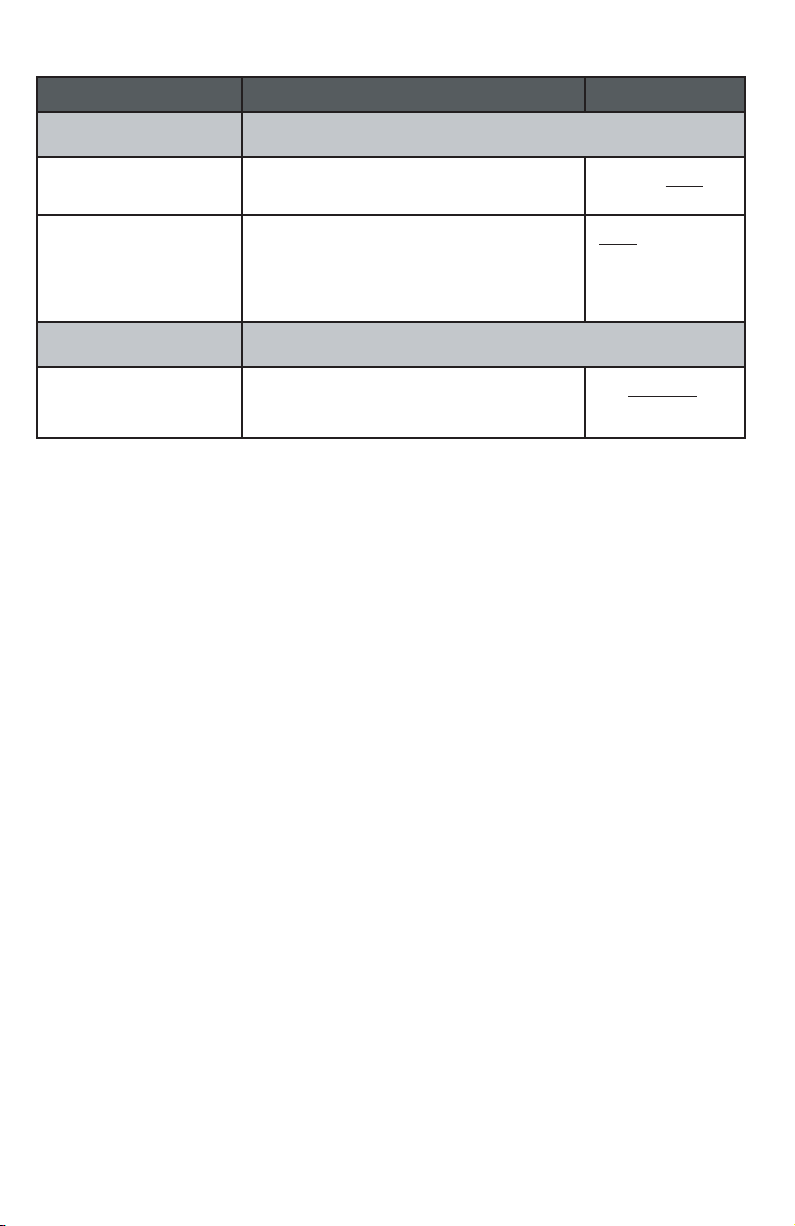
Professionally installed splitter for DSL lines
DSL telephone lines that are used in the system must have either DSL splitters
or microfilters. If you are using the DSL line for line 1, or if you have more
than three telephones, or if you have an alarm system, you probably need a
DSL splitter. Install this splitter (also known as the network interface device
or NID) near where the telephone lines enter the building. This will allow the
DSL telephone line to be split into two different lines, one for your system
telephones, and the other for your data device. Please seek the assistance of
your DSL service provider or professional contractor to do this installation.
Network Interface
From Telco
Central Office
(Network)
Device (NID)
DSL Splitter
Line
Data
Voice
Outside Wall
OUTDOORS
To DSL modem
only
DSL Modem
To all phones (voice only)
Inside Wall
INDOORS
9
Page 16

Table/desktop installation
Connect the two long telephone line cords to the telephone. How
1.
you connect the telephone line cords to the wall is determined by your
telephone service. Determine if you have one or two-line telephone wall
jacks and if you receive DSL (digital subscriber line) service. If one or more
of the telephone lines has DSL service, see Important information for DSL
users, pages 6-8. Use only the line cords that come with the phones. If you
need additional cords, visit our website at www.telephones.att.com
or call 1 (800) 222-3111. In Canada, dial 1 (866) 288-4268.
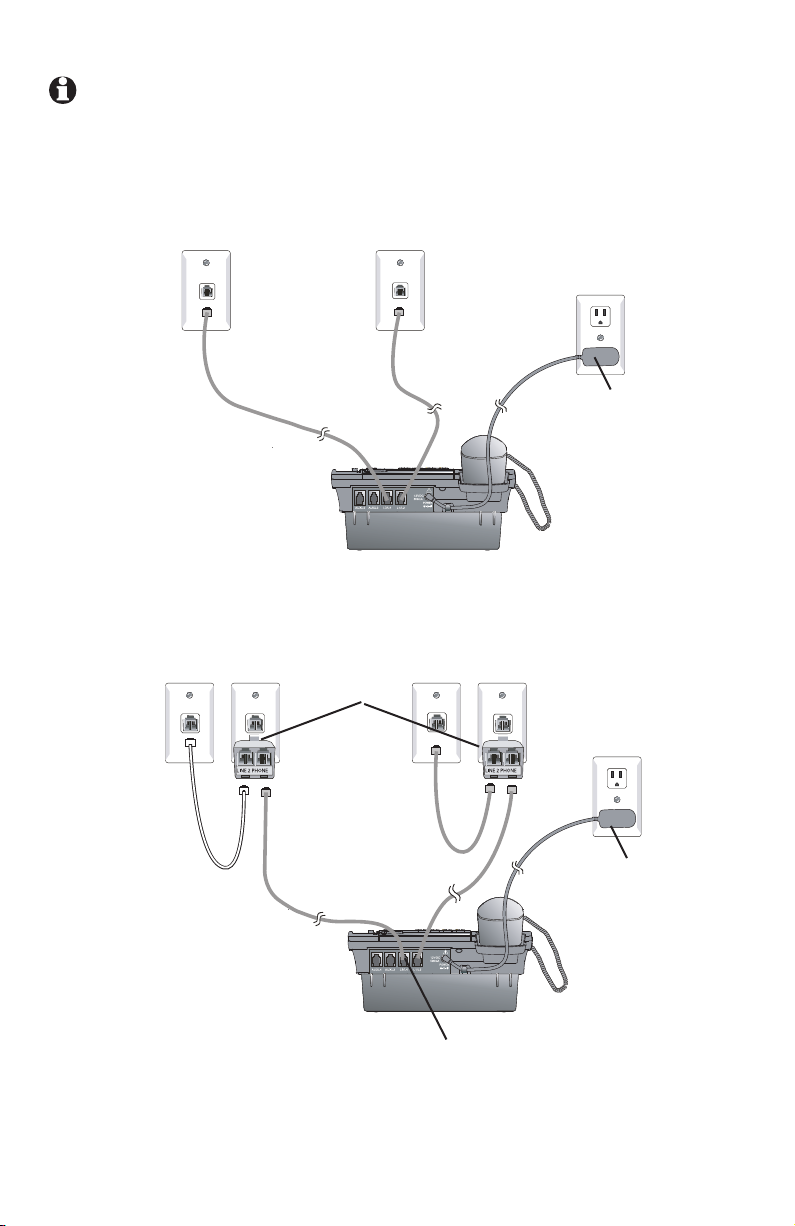
If you have two-line wall jacks, you can just plug the line cords into the
•
wall jacks. Use Illustration A on page 11.
If you have one-line wall jacks, you need to purchase one or two two-
•
line adapters. Adapters are available at retail stores, by visiting our
website at www.telephones.att.com or by calling
1 (800) 222–3111. In Canada, call 1 (866) 288-4268.
You need two adapters if you have four telephone lines and use
—
the AUX jacks (on the back of the telephone) for equipment like fax
machines. You will also need an additional short 2- or 4- conductor
telephone line cord for this installation. Use Illustration B on page 11.
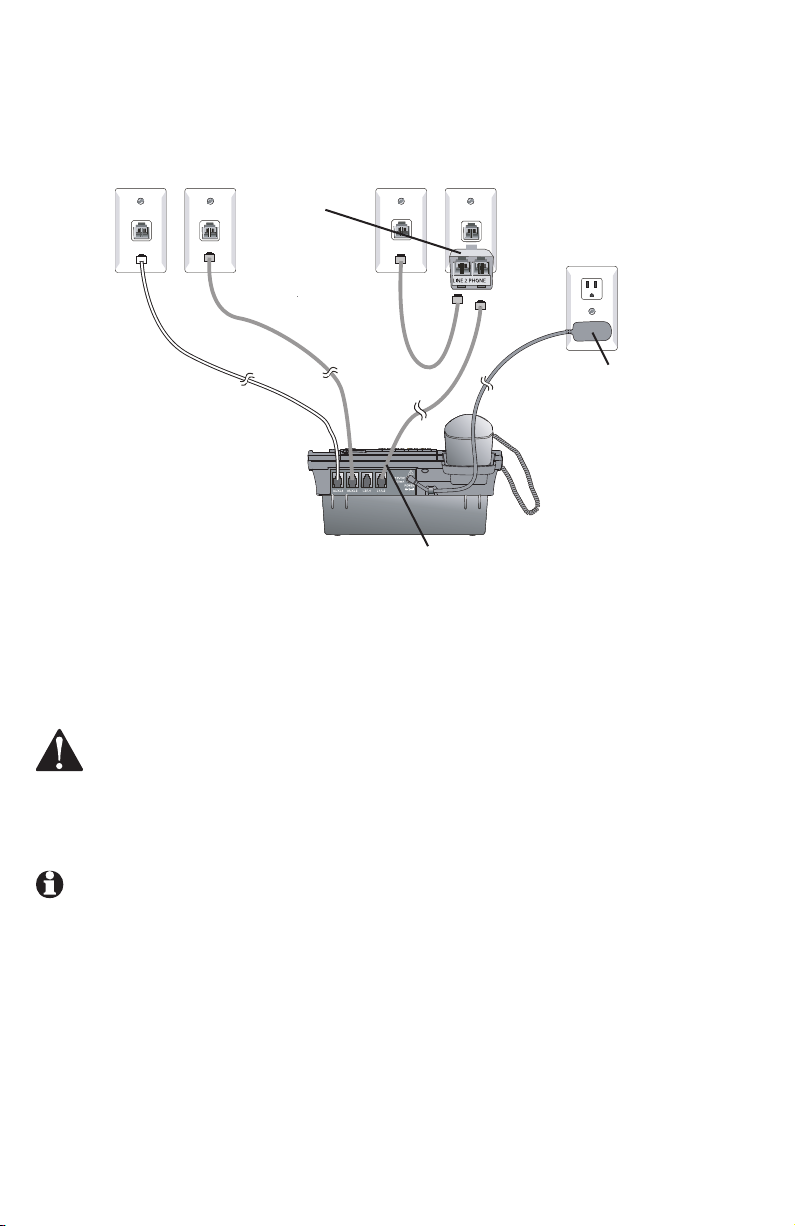
You need one adapter if you use both AUX jacks for installing your
—
phones. Use Illustration C on page 12.
NOTE: To purchase 2-line adapters (model 16598, part # 89-0071-00),
you can visit our website at www.telephones.att.com or call
1 (800) 222-3111. In Canada, dial 1 (866) 288-4268. You can
purchase 2-line adapters at some electronic and hardware stores.
10
Page 17
Table/desktop installation
NOTE: If one or more of your telephone lines is using DSL service, see
Important information for DSL users, pages 6-8.
A: Two 2-line wall jacks
Line 2 + Line 1Line 4 + Line 3
Electrical outlet not
controlled by a wall
switch
Power adapter
B: Four one-line wall jacks with two 2-line adapters.
Line 1Line 2Line 3Line 4
Two-line adapter
Electrical outlet not
controlled by a wall
switch
Power adapter
In this installation, four-conductor telephone line cord (RJ 14) is gray.
The long cords supplied with the phone are four-conductor cords.
11
Page 18
Table/desktop installation
C: Four one-line wall jacks with one 2-line adapter using the
telephone AUX jacks.
Line 1Line 2Line 3Line 4
Two-line adapter
In this installation, four-conductor telephone line cord (RJ 14) is gray.
The long cords supplied with the phone are four-conductor cords.
Electrical outlet not
controlled by a wall
switch
Power adapter
2. Connect the power adapter to the telephone. Plug the small end of the
power adapter into the jack labeled POWER on the back of the phone.
Plug the large end into a standard electrical outlet not controlled by a wall
switch.
Use only the power adapter provided with this product. To obtain a
replacement, visit our website at www.telephones.att.com or call
1 (800) 222-3111. In Canada, dial 1 (866) 288-4268.
NOTES:
1. The phone runs through initialization any time it is reconnected to AC
power if a working battery is not installed (for example, after a power
failure or when the unit has been unplugged). See page 84, Optional
spare battery.
2. Connect power to each telephone sequentially so that each set is
assigned a unique extension number. If all sets are powered up at the
same time, the same extension numbers could be assigned to more
than one set. Please see page 32 for information on assigning extension
numbers.
12
Page 19

Table/desktop installation
3. Check the extension number. Once you have attached the Line 1 telephone
line and AC power to the set and the wall outlets, the set automatically
assigns the next available extension number, and shows it in the second
line of the display. Plug in the phones in the same order as the extension
numbers you assigned on the system planner, (see page 4).
4. Connect the handset cord. Plug one end of the coiled handset cord into
the HANDSET jack on the left side of the phone. Plug the other end into
the handset and hang up.
Check for dial tone. Lift the handset and listen for a dial tone. If you
5.
cannot hear a dial tone, please see Troubleshooting beginning on page 86
for details.
6. Identify lines. To identify the telephone lines, press [ SPEAKER], then
the [LINE 1] key. Call one of the telephone numbers. If there is a busy
signal, it confirms that line 1 is the number called. If line 2 rings, line 2 is
the number called. Use the same steps to identify the other two telephone
lines.
AT&T shall not be responsible for the cost of installation, any damages, lost
business, direct or indirect expenses accrued or associated with installation,
or other compatibility issues that may arise as a result of using this product
while you subscribe to DSL, Fiber optic, VoIP (Voice over Internet Protocol), or
cable telephone service.
13
Page 20
Wall mounting
Getting started
Spare battery installation
The telephone base comes with the bracket mounted for table/desktop
use. To mount the telephone on a wall, you will need a telephone outlet
wall mounting plate with mounting studs. This mounting plate is available for
purchase from many hardware and consumer electronics retailers and may
require professional installation.
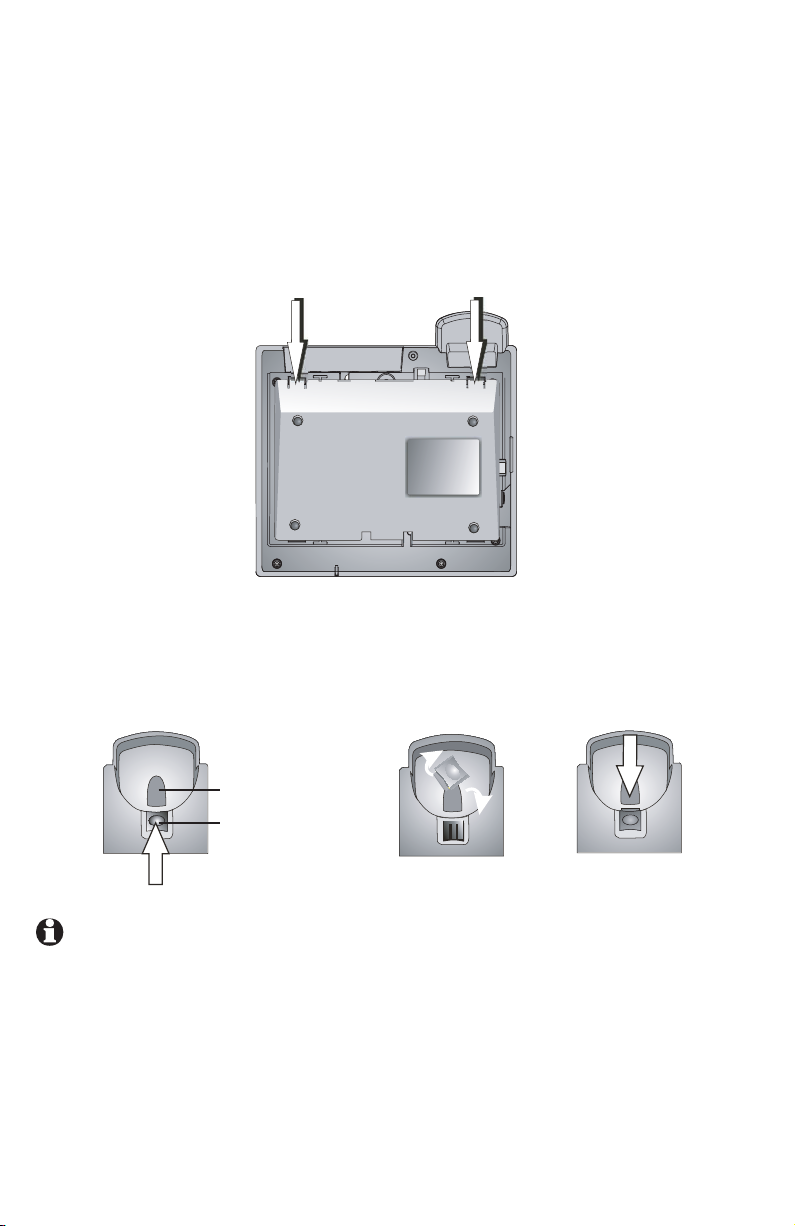
1. Press on the tabs in the direction of the arrows and pull the bracket away
from the telephone base. You do not need the bracket for wall mounting.
2. Reverse the handset tab.
Hold down the switch hook, then pull out the handset tab and rotate it 180
degrees. Push the handset tab down into the grooves so it settles into position.
Switch hook
NOTE: If you receive DSL service for high-speed Internet access through
your telephone line(s) from your telephone company, see Important
information for DSL users, pages 6-8.
Handset tab
14
Page 21
Wall mounting
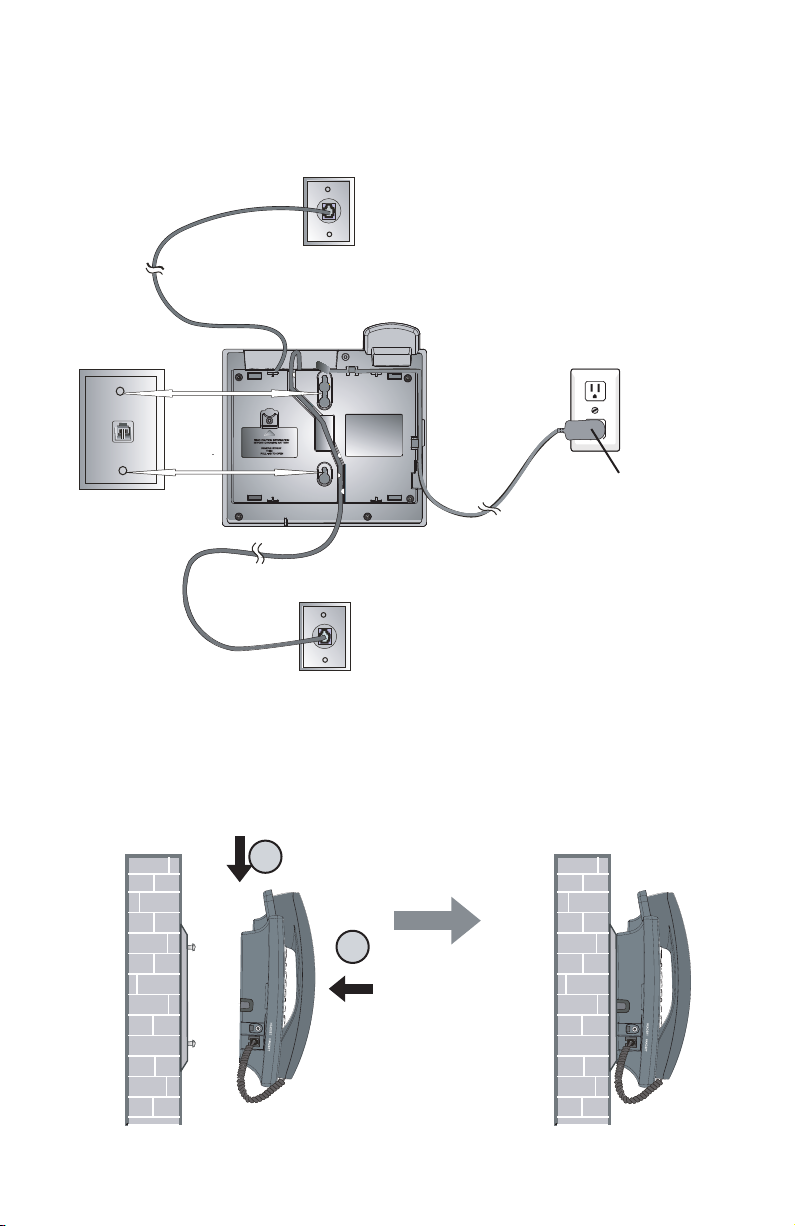
3. Route the telephone line cords and the power cord through slots. (You can
use a shorter telephone line cord.)
Line 3 + Line 4
Modular telephone line jack
Wall mount plate
Line 1 + Line 2
Electrical outlet not controlled by
a wall switch
Power adapter
4. Place the telephone base mounting plate (a) just above the mounting studs,
then slide the telephone base (b) down until it is secured.
a
b
15
Page 22
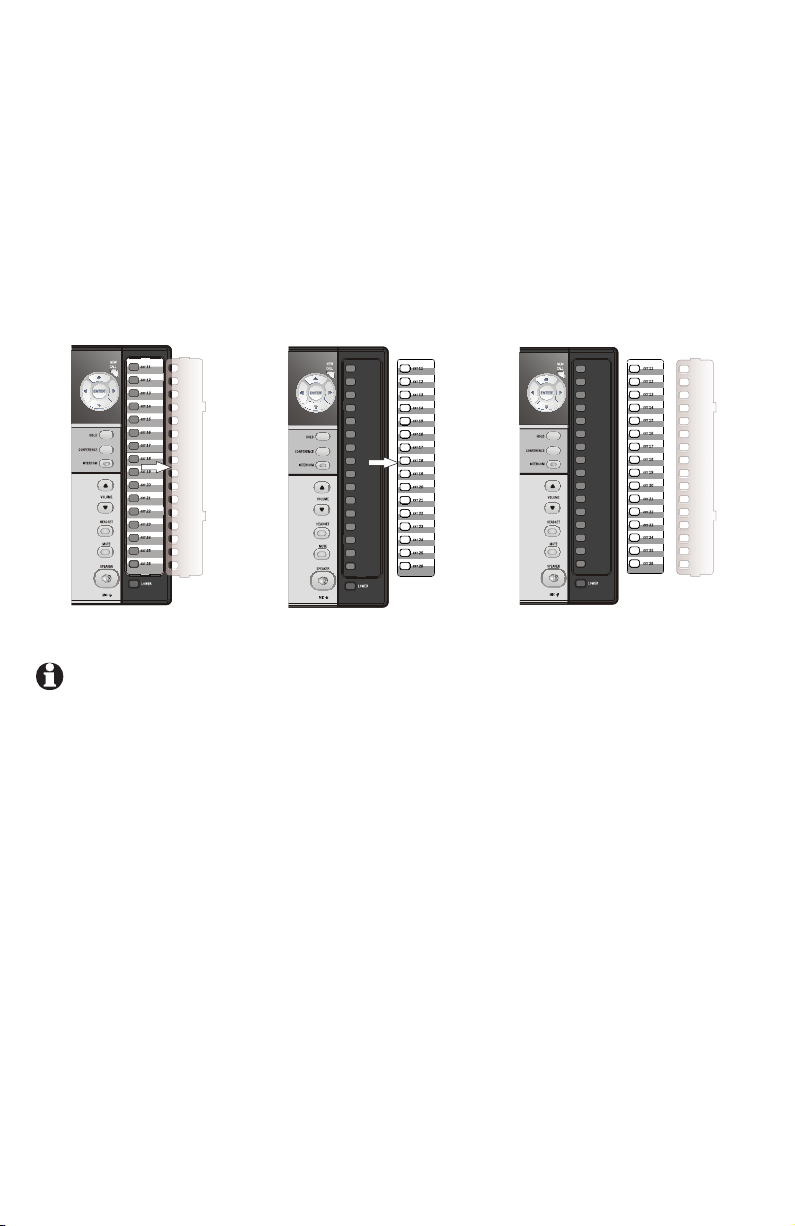
16
Directory card
To write names and/or phone numbers on the directory card, follow the steps
below:
1. Remove the clear plastic cover by inserting a small item such as a paperclip
into the hole on the lower right corner.
2. Pull out the directory card.
3. Write the information on the directory card.
4. Replace the directory card and then the plastic cover.
NOTE: There is a replacement directory card in the telephone package. You
can use it to replace the current one on the telephone if necessary.
Page 23
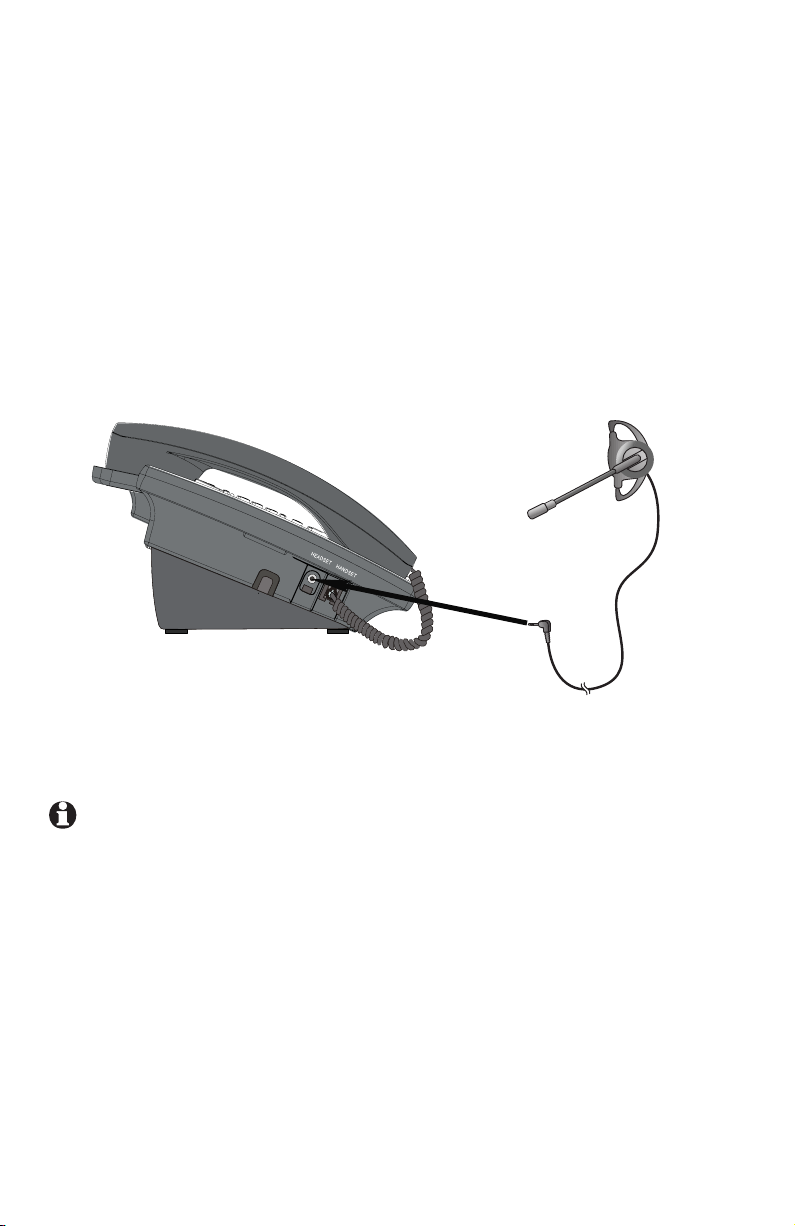
Optional headset (purchased separately)
For hands-free telephone conversations, use any industry-standard 2.5mm
headset (purchased separately). For best results, use an AT&T 2.5mm
headset. To order an AT&T 2.5mm headset, visit our website at
www.telephones.att.com
1 (866) 288-4268.
or call 1 (800) 222-3111. In Canada, dial
Plug a 2.5mm headset into
the HEADSET jack on the left
side of the telephone base
(beneath a small rubber flap).
NOTE: If the sound quality of the headset is unsatisfactory, try unplugging it,
and firmly plugging it in again.
17
Page 24

Feature menu
The table on the following pages provides a summary of the feature menu for
this telephone. It lists the features and their possible settings. Default settings
are underlined. Use the instructions below for getting around in the feature
menu.
1. To enter the feature programming menu, press
idle. You will see FEATURE SETUP.
2. Press
3. Press
4. Use
5. To save the setting, press
-OR-
To save the setting and move to the next feature, press
-OR-
To save the selection and exit,
Rapid scroll
You can scroll through menu items or setting choices more quickly by
pressing and holding the scroll button ([ ], [ ], [ ] or [ ]). The screen will
scroll through your choices at the rate you set during feature setup. See
SCROLL RATE on page 40 for setting instructions.
For more detailed instructions on using the feature setup menu, see the user’s
manual.
[ ] or [ ] to move among the different feature categories. When you see
a category that you want to customize, press [ENTER].
[ ] or [ ] to get to a specific feature.
[ ] or [ ] to change a setting for that feature, or the dial pad to enter
numbers.
[ENTER].
press and hold [ENTER].
[ENTER] when the phone is
[ ].
This telephone comes factory set for English screen displays. If it is necessary
to change the screen language to Spanish or French, see page 29.
18
Page 25
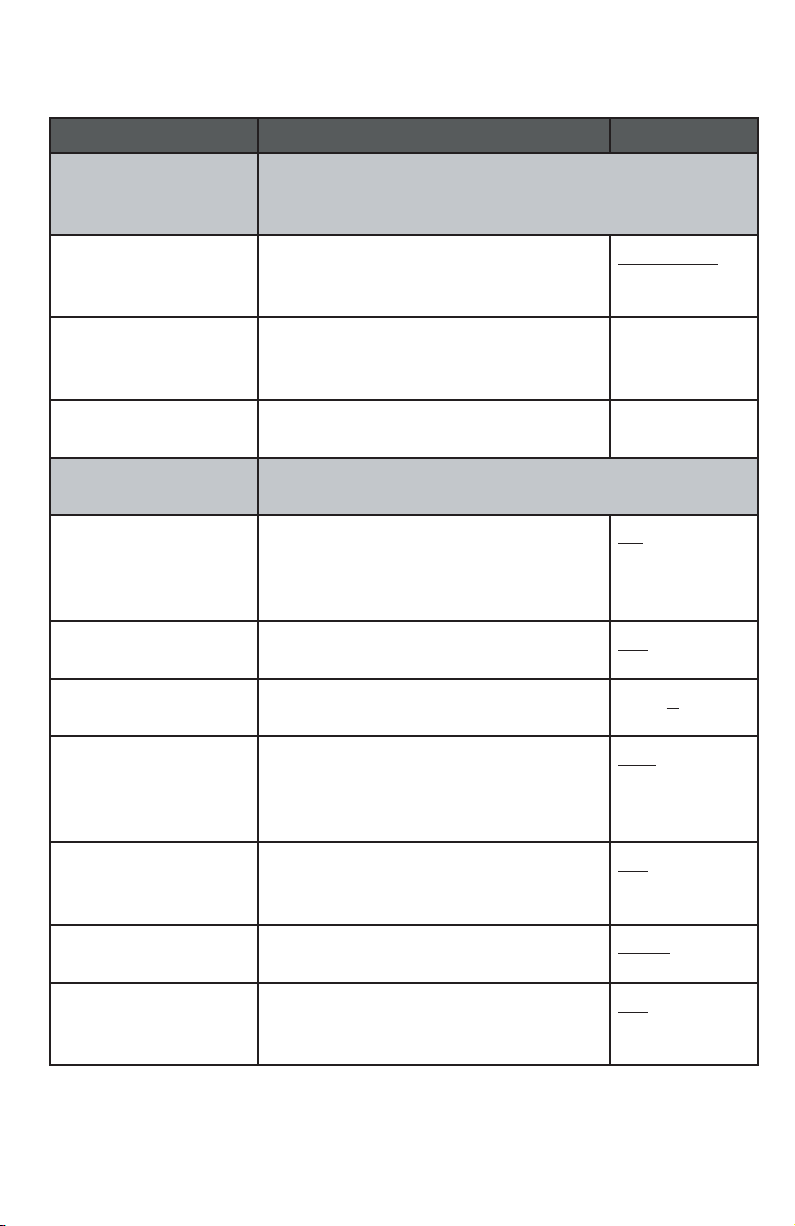
Feature menu
All default settings are underlined.
Feature Function Options
ONE TOUCH Assign the one-touch keys on the right of the phone
as intercom or outside call shortcut keys, and enter
and view the outside phone numbers.
PREFERENCE Assign the one-touch keys as
intercom or outside call shortcut
keys.
PROGRAM Store a telephone number into a one-
touch memory location.
VIEW View telephone numbers stored in
one-touch memory locations.
PHONE SETTINGS Customize the telephone functions for this phone.
EXTENSION NO Assign an extension number to
this phone. Extension numbers are
usually assigned automatically during
initial setup.
RINGER ON/OFF Turn the outside ringer on or off for
each line.
RINGER TYPE Select a ring pattern for this phone. Type 1, 2, 3, 4
DELAY RING Set the length of time before incoming
outside calls will ring. One ring cycle
lasts about six seconds.
INTERCOM,
TELEPHONE
up to 24 digits
(including
pause and #)
N/A
11 – 26
ON, OFF
OFF, 2, 4, 6, 8,
10, 12, 14, 16,
18, 20, 22, 24,
26, 28, 30 SEC
AUTO-MUTE When on, sounds at this telephone
are not heard in response to a page
until you answer the page.
TONE/PULSE Set the dial mode for touch tone or
dial pulse (rotary) dialing.
HOLD REMINDER Remind users with an audible tone
that a call at this extension is on
hold.
19
ON, OFF
TONE, PULSE
ON, OFF
Page 26
Feature menu
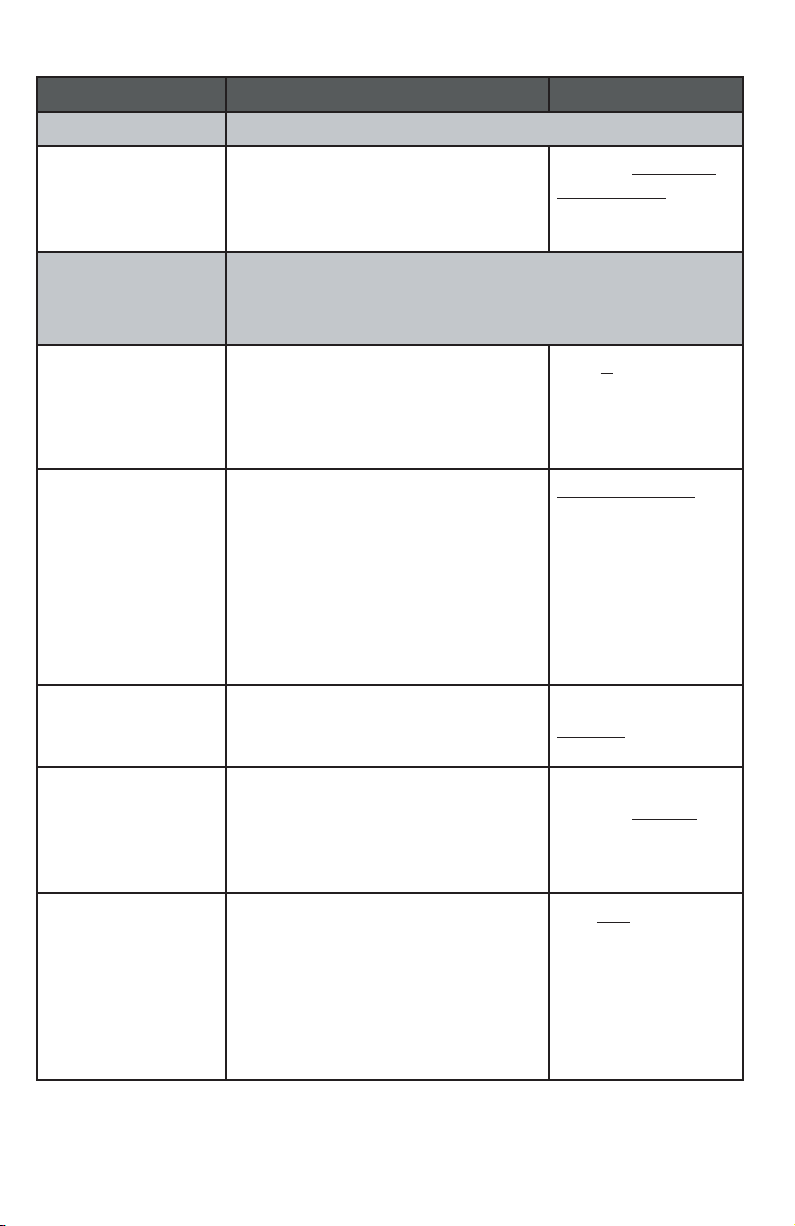
Feature Function Options
TIME/DATE Set the date and time. Set the clock.
YEAR, MONTH,
DATE, HOUR,
MINUTE, AM/PM
SPECIAL OPTIONS Customize some multi-line functions, display behavior,
PRIME LINE Assign a line on this phone to be
AUTOMATIC
MODE
SCROLL RATE Choose the speed for the rapid
Set the date and time. For the
1080 and 1070, incoming caller
ID updates the clock setting
automatically.
Central Office Voice Mail (COVM) setup, and Area Code
setup.
selected automatically when you
make or answer a call.
Choose the mode (speakerphone
or headset) to be used after
you select a line key to make or
answer an outside call, or when
you press [INTERCOM] to make
or answer an intercom or voice
page call.
scroll feature.
Default: 1:00 AM
1/01, 2007
Line 1, 2 ,3, 4
SPEAKERPHONE,
HEADSET
VERY SLOW, SLOW,
MEDIUM, FAST, VERY
FAST
LCD CONTRAST Adjust the screen contrast to
one of eight levels to maximize
readability in different lighting
conditions.
COVM ON/OFF
(1080 and 1070
only)
If you subscribe to Central Office
Voice Mail (COVM) services
provided by your local telephone
company, turn on COVM for that
line.
20
LEVEL 1 – LEVEL 8
Default: LEVEL 4
ON, OFF
Page 27
Feature menu
Feature Function Options
COVM RESET
(1080 and 1070
only)
AREA CODES
(1080 and 1070
only)
LINE GROUP Assign the telephone to a line
RESET ALL This feature will return all feature
AUTO ATT SETUP
(1080 only)
Clear Central Office Voice Mail
(COVM) indicator when the
telephone indicates there is voice
mail when you have none, or you
have accessed your voice mail from
a remote location (while away from
home or office).
Set one home area code and up
to five local area codes for use
with caller ID features.
group. If all the extensions in your
system have the same telephone
lines connected in the same order,
this feature does not apply.
settings for this phone to their
factory settings. Voice messages
on 1080 extensions will not be
erased.
Designate a desired phone as an Auto Attendant (AA)
and control the timing of the AA features.
N/A
3 digits, empty
PRIVATE LINE,
LINE 04 – LINE
15
N/A
EVERY 1080=AA Make all 1080 telephones auto
attendants.
NO 1080=AA No 1080 telephones will be auto
attendants.
PER 1080=AA Assign a desired 1080 telephone
as an auto attendant.
AUTO ATT DELAY Specify how long an auto attendant
waits before picking up incoming
calls.
DAY/NIGHT TIMES Specify times to be considered
day or night for auto attendant
features.
RESET AUTO ATT Return auto attendant setup for
all telephones to default.
21
N/A
N/A
YES, NO
6 – 30 SEC
Default:
Day 9:00AM,
Night 6:00PM
N/A
Page 28
Feature menu
Feature Function Options
SYS EXT MAILBOX
(1080 only)
AUTO SETUP Automatically assigns all 1070
CUSTOM SETUP Assign a desired 1080 telephone
UNASSIGN MBOXES Cancels the auto attendant mailbox
REMOVE EXT MSGS Delete all messages for a specific
Assign 1070 and 1040 telephones to use a desired
1080 telephone as a voice message mailbox.
and 1040 telephones to individual
1080 mailboxes. If a 1070 or 1040
telephone is already using a specific
1080 telephone as a mailbox, that
assignment remains.
as the mailbox for 1070 and 1040
system telephones.
function for this 1080 telephone. Any
1070 or 1040 telephones assigned
to its mailbox will now have no
mailbox, although the messages
will still be there.
1070 or 1040 telephone that uses
this 1080 mailbox, or delete all
1070 and 1040 messages in this
1080 mailbox.
N/A
Current autoattendant
phone extension
numbers
N/A
N/A
DTAD SETUP
(1080 only)
ANSWER STATUS Turn the answering system on or
ANSWER DELAY Set the length of time this telephone
Control the Answering System functions.
off for recording private messages
meant for this 1080 extension.
rings before the answering system
picks up the call. One ring cycle
lasts about six seconds.
22
ON, OFF
12 – 40 SEC
Page 29

Feature menu
Feature Function Options
TOLL SAVER When turned on, the answering system
picks up incoming calls within eight
seconds if there is at least one new
private message.
REMOTE CODE Set the code (password) needed
for remote access to some features
of your phone. This code also
allows people at 1070 and 1040
telephones, and non-system
telephones, to listen to their
messages.
MESSAGE LENGTH Set the maximum length of
recorded incoming messages.
MESSAGE ALERT Turn the audible message alert on
or off.
CALL SCREENING Choose whether incoming messages
are heard over the speaker as they
are recorded.
DTAD INTERCEPT Choose whether private messages
are intercepted by other system
telephones during recording.
ON, OFF
000 – 999
Default: 111
1 MINUTE,
UNLIMITED,
GREETINGS
ONLY
ON, OFF
ON, OFF
ON, OFF
SYS EXT MAILBOX
(1070 and 1040
only)
CALL FORWARD Turn on or off the call forwarding
FWD DELAY TIME Set the delay time before an
Set up the call forwarding options to the DTAD
mailbox.
function.
auto attendant transferred call is
forwarded to the DTAD mailbox
1080 phone.
23
OFF, FWD TO
DTAD
15 SEC
(02-40)
Page 30
Feature menu
Feature Function Options
CENTREX Set up a Centrex console telephone.
CONSOLE Specify whether your telephone is
the Centrex console telephone.
CSL DELAY RING Set the time to delay ring for the
Centrex console telephone. One
ring cycle lasts about six seconds.
LANGUAGE Choose the display language.
LANGUAGE Select the language for screen
displays.
ON, OFF
OFF, 2, 4, 6, 8,
10, 12, 14, 16,
18, 20, 22, 24,
26, 28, 30 SEC
English,
Spanish, French
24
Page 31

DTAD feature menu (1080 only)
Use the features in this menu to listen to and delete incoming messages, and
to record and review outgoing messages.
To enter the DTAD menu:
1. Press
2. Press
3. Press
4. You may need to use
5. Press
[ENTER] to exit setup.
For more detailed instructions on using the DTAD feature menu, see 1080 user’s
manual.
[DTAD] when the phone is idle. You see DTAD FEATURE.
[ ] or [ ] to move among the different DTAD categories. When you
see a category that you want to customize, press [ENTER].
[ ] or [ ] to get to a specific feature.
[ ] or [ ] to choose a subfeature.
[ENTER] when the feature is correct.
NOTE: Press [ ] to get out of the feature, press [DTAD] or press and hold
25
Page 32
DTAD feature menu (1080 only)
Feature Function
PRIVATE MSGS Play and delete private messages, and record an
outgoing message for the private message mailbox.
PLAY NEW MSGS Play back new private messages.
PLAY ALL MSGS Play back all private messages.
REMOVE ALL
MSGS
PRIVATE OGM Record the private outgoing message. The pre-recorded
CENTRAL MSGS Play and delete central (general) messages.
PLAY NEW MSGS Play back new central messages.
PLAY ALL MSGS Play back all central messages.
REMOVE ALL
MSGS
RECORD CALL Record an ongoing telephone conversation.
RECORD MEMO Record a message from the 1080 telephone.
SYSTEM OGMS Record, share and download the outgoing
AA DAY-OGM Record the auto attendant system message. For
Delete all private messages.
message is, "Hello. Please leave a message after the
tone.”
Delete all central messages.
announcements played when the auto attendant
answers a call.
daytime, the default message is, "Thank you for calling
our company. If you know your party's extension, you
may dial it at any time. For our company directory,
please dial 0. To leave a message, please dial 9."
26
Page 33

DTAD feature menu (1080 only)
Feature Function
AA NIGHT-OGM Record the auto attendant system message. For
nighttime, the default message is, "Thank you for
calling our company. We are currently closed. If you
would like to leave a message and you know your
party's extension, you may dial it now. For our company
directory, please dial 0. To leave a message, please dial
9."
AA DIR-OGM Record a directory of extension assignments for your
business.
SHARE OGMS Share your self-recorded auto-attendant
announcements with other auto attendants in the
system.
DOWNLOAD
OGMS
RECORD TIME Find out how much record time remains.
Download shared auto-attendant announcements from
other auto attendants in the system.
27
Page 34

Menu operation
Feature setup, memory programming, and some individual feature operations
for the 1040, 1070, 1080 use menus shown in the display. Use the navigation
keys ([ ], [ ], [ ], [ ], [ENTER]) to begin, end, and move through menu
operations. The menu operation you are accessing (for example, FEATURE
SETUP) is on the top line of the display.
Access the menu by pressing [ENTER] when the telephone is idle. Press [ ] or
[ ] until you see the feature menu options. Press [ENTER] to select an item. Press
and hold [ENTER] to save the settings and exit.
• When you select a menu choice, the first menu item for this topic or data
appears in line four of the screen.
NOTE: If you do not press a key to continue menu operations within 30 sec-
onds, the telephone automatically exits the menu.
• When
through the menu.
• Press
lower level menu, an action, or a feature settings screen.
• When
setting choices.
• Press
show the next option for the feature currently displayed.
• To return to the main menu, press the
display includes MAIN MENU or EXIT. Then, press [ENTER].
• To exit programming mode,
NOTE: If the phone beeps twice, repeat the steps to program the feature.
The following pages describe the feature operations you can change. Except
for LANGUAGE, they appear in the same order as that of the feature menu
tables that began on page 19.
appears, you can press the [ ] or [ ] button repeatedly to move
[ENTER] to choose the menu item currently displayed. This may be a
appears, you can press the [ ] or [ ] button to scroll through
[ENTER] to store the setting, or press [ ] to store the setting and
[ ] or [ ] button until the screen
press and hold [ENTER].
28
Page 35

FEATURE SETUP
ENGLISH
LANGUAGE
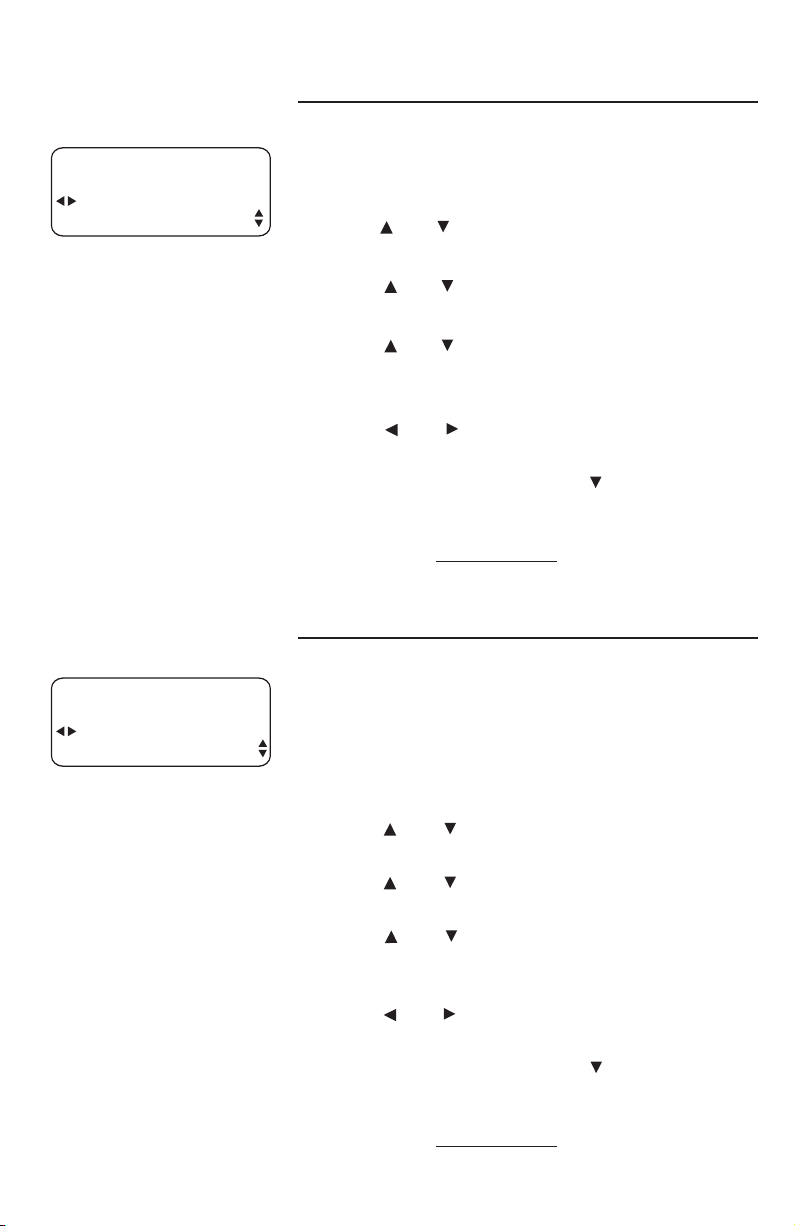
Phone settings
LANGUAGE
This telephone comes factory set for English
displays. If it is necessary to change the display
language that is used in all menus and screen
displays to Spanish or French, follow these steps
to reach the LANGUAGE menu:
CONFIG FUNCIONES
ESPANOL
IDIOMA
CONFIG. FONCT.
FRANçAIS
LANGUE
1. Press
2. Press
3. Press
[ENTER].
[ ] until you see LANGUAGE.
[ ] or [ ] to select the desired language
(ENGLISH, ESPANOL or FRANçAIS).
4. To move to the next feature, press [ ].
-OR-
To exit setup,
press and hold [ENTER].
29
Page 36

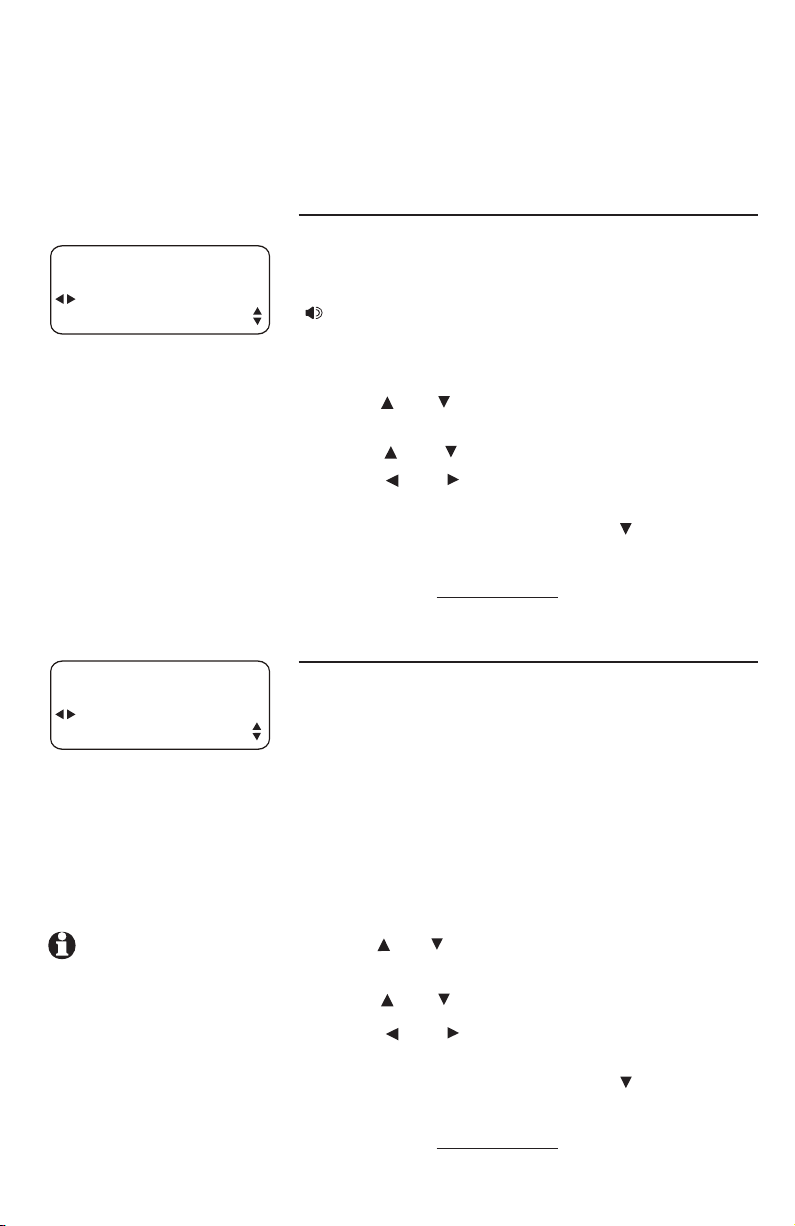
One touch
Assign the buttons on the right side of the phone,
the one-touch keys, as intercom or outside call
shortcut keys, and enter and view the outside
phone numbers.
PREFERENCE
ONE TOUCH
TELEPHONE
PREFERENCE
ONE TOUCH
PROGRAM
Assign the one-touch keys as intercom or outsidecall shortcut keys.
1. Press
2. Press
[ENTER].
[ENTER] again to enter the ONE TOUCH
menu.
3. Press
4. Press
[ ] or [ ] until you see PREFERENCE.
[ ] or [ ] to highlight INTERCOM or
TELEPHONE. INTERCOM is the default setting.
To move to the next feature, press [ ].
5.
-OR-
To exit setup,
press and hold [ENTER].
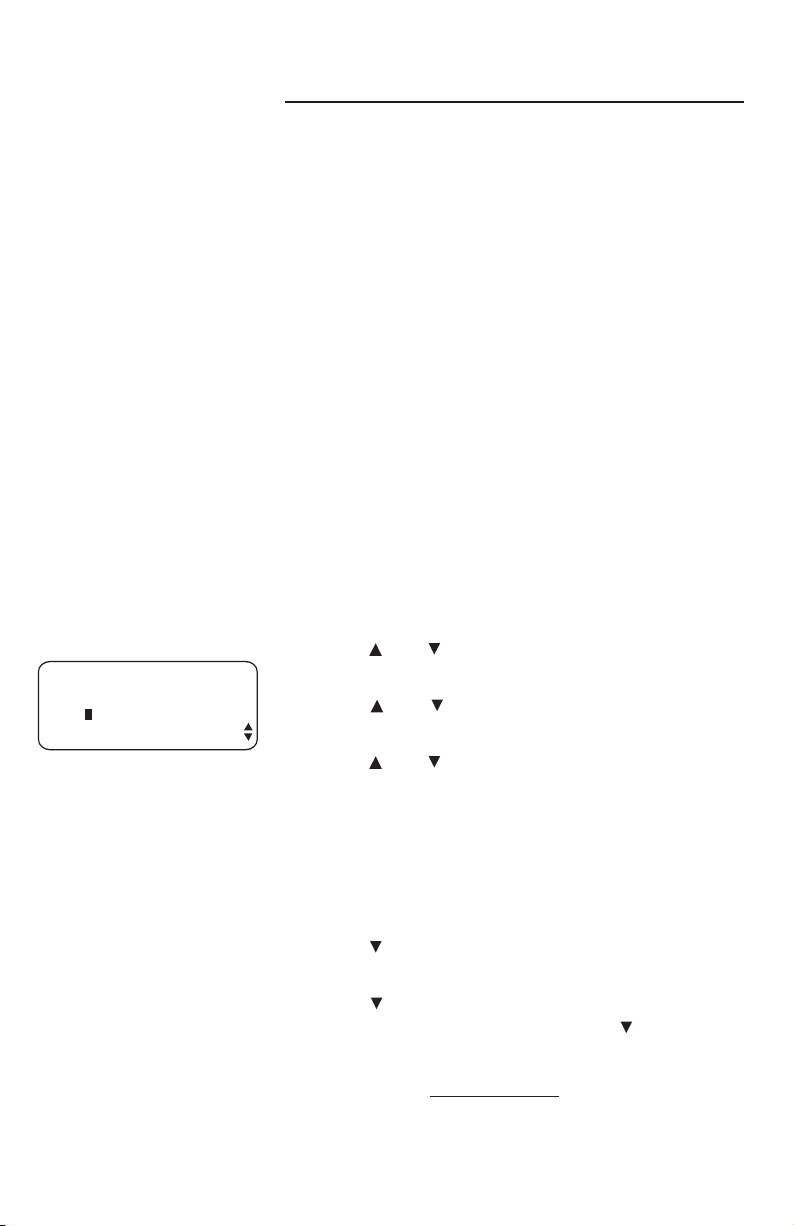
PROGRAM
Store a telephone number into a one-touch memory
location.
1. Press
2. Press
[ENTER].
[ ] or [ ] until you see ONE TOUCH. Press
[ENTER].
3. Press [ ] or [ ] until you see PROGRAM. Press
[ENTER].
4. Press dial pad keys to enter up to 24 digits.
•
You can include a pause while storing a
dialing sequence that requires one during
actual dialing. Press [ ] or [ ] until you see
PAUSE, then press [ENTER] when you want
to store a pause. The screen displays P. Each
pause counts as one digit. Continue storing
the number as usual.
Continued on next page
30
Page 37

PROGRAM
5550100
PAUSE
PROGRAM
5550100
TONE
PROGRAM
5550100
FLASH
PROGRAM
5550100
DELETE CHAR
PROGRAM
5550100
CANCEL
One touch
Continued from previous page
•
Store a signal for switching to temporary
tone dialing. If you have dial pulse (rotary)
service, this signal is required for some
special services. Press [ ] or [ ] until you see
TONE, then press [ENTER]. A T appears on
the screen. All numbers you enter after this
will send touch-tone signals during dialing.
•
You can store the flash signal required by
some special services as part of a dialing
sequence. Press [ ] or [ ] until you see
FLASH, then press [ENTER]. An F appears on
the screen. Continue storing the number as
usual.
•
To erase the last digit, scroll to DELETE
CHAR and then press [ENTER].
-OR-
Press [REMOVE].
•
To copy the most recently dialed number
from redial, press [(AUTO) REDIAL]. You can
copy only the last number dialed from this
extension to a one-touch location. You cannot
copy the other numbers in the redial stack.
•
To cancel programming, scroll to CANCEL
and then press [ENTER].
5. Press the desired one-touch key to store the
telephone number in a location.
-OR-
Press
[LOWER], then the desired one-touch
key to store the telephone number in the lower
location.
6.
To move to the next feature, press [ ].
-OR-
To e
xit, press and hold [ENTER].
31
Page 38

PHONE SETTING
11
EXTENSION NO
Phone settings
Customize the telephone functions for this phone.
EXTENSION NUMBER
Every individual phone in your telephone system
MUST be assigned a unique extension number for
the intercom feature to work. The assignment is
done automatically when the phone is initially
setup.
If you want to change the extension number,
follow the instructions below.
1. Press
2. Press
[ENTER].
[ ] or [ ] until you see PHONE SETTINGS.
Press [ENTER].
3. Press
4. Press
[ ] or [ ] until you see EXTENSION NO.
[ ] or [ ] to choose a desired number
(11 through 26). If the current extension
number is already used, the screen displays
ID IN USE. Press [ ] or [ ] to choose another
extension number.
5.
To move to the next feature, press [ ].
-OR-
To exit setup,
press and hold [ENTER].
NOTES:
• After you change an extension number, you can
check to make sure that the number was not
already being used. Press a line button on the
set you are setting up. If the extension number
is already being used, the other system phone(s)
using the same extension number beep, and
they display IS ALREADY USED.
• If you want to assign an extension number
that is already being used, do the following:
Identify the set that has the extension number
you want to reassign, disconnect the telephone
line cord connected to its L1/L2 jack so that
its extension number is available, and assign its
number to the new set. Then you can reconnect
the set to Line 1, and assign it an unused
extension number.
32
Page 39
RINGER ON/OFF
ON
L1 RINGER
Phone settings
RINGER ON/OFF
Use this feature to control whether there is
audible alerting for outside calls on a line.
1. Press
2. Press
[ENTER].
[ ] or [ ] until you see PHONE SETTINGS.
Press [ENTER].
RINGER TYPE
TYPE 1
L1 RINGER TYPE
3. Press
[ ] or [ ] until you see RINGER ON/OFF.
Press [ENTER].
4. Press
[ ] or [ ] to select the desired line
(L1 RINGER, L2 RINGER, L3 RINGER or L4
RINGER).
5. Press
[ ] or [ ] to turn the ringer ON or OFF.
ON is the default setting.
6.
To move to the next line, press [ ].
-OR-
To exit setup,
press and hold [ENTER].
RINGER TYPE
Use this feature (also known as selectable ring
tones) to choose one of four ringer types for
incoming calls. You can choose different ringer
types for the different lines so you can easily
identify which line is ringing.
1. Press
2. Press
[ENTER].
[ ] or [ ] until you see PHONE
SETTINGS. Press [ENTER].
3. Press
[ ] or [ ] until you see RINGER TYPE.
Press [ENTER].
4. Press
[ ] or [ ] to highlight the desired
line (L1 RINGER TYPE, L2 RINGER TYPE, L3
RINGER TYPE or L4 RINGER TYPE).
5. Press
[ ] or [ ] to highlight the desired ringer
type (TYPE 1, TYPE 2, TYPE 3 or TYPE 4).
6.
To move to the next line, press [ ].
-OR-
To exit setup,
33
press and hold [ENTER].
Page 40

PHONE SETTINGS
OFF
DELAY RING
Phone settings
DELAY RING
Use this feature to set the length of time before
incoming calls ring at this telephone.
1. Press
2. Press
3. Press
[ENTER].
[ ] or [ ] until you see PHONE SETTINGS.
Press [ENTER].
[ ] or [ ] until you see DELAY RING.
4. Press
[ ] or [ ] to choose a setting, OFF or
2-30 seconds. If you selected OFF, the
telephone rings immediately when a call
is received. If you did not select OFF, the
telephone will ring after the desired ring delay
time. A ring cycle lasts about six seconds.
5.
To move to the next feature, press [ ].
-OR-
To exit setup,
press and hold [ENTER].
NOTE: For the 1080 only, if the answering
system (DTAD) delay time (ANSWER DELAY, see
the ANSWER DELAY section on the 1080 user’s
manual) is shorter than the delay ring time, the
answering system answers the calls without the
telephone ringing.
34
Page 41

PHONE SETTINGS
ON
AUTO-MUTE
Phone settings
AUTO-MUTE
Use this feature to choose whether sound at this
extension will be heard automatically in response
to a page (auto-mute off) or only when [MUTE] is
pressed.
Choose auto-mute OFF to permit hands-free
conversation and room monitoring (see the Room
monitor section on the user’s manual). Choose
auto-mute ON to protect privacy (see the Page a
specific extension section on the user's manual).
1. Press
2. Press
[ENTER].
[ ] or [ ] until you see PHONE SETTINGS.
Press [ENTER].
3. Press
4. Press
5.
To exit setup,
[ ] or [ ] until you see AUTO-MUTE.
[ ] or [ ] to highlight ON or OFF.
To move to the next feature, press [ ].
-OR-
press and hold [ENTER].
35
Page 42

PHONE SETTINGS
TONE
TONE/PULSE
Phone settings
TONE/PULSE
Use this feature to choose tone (Touch-Tone) or
pulse (Dial-Pulse) dialing. The factory setting is TONE.
Change this to PULSE (rotary) only if you do not
have touch-tone dialing service.
1. Press
2. Press
3. Press
4. Press
5.
-OR-
[ENTER].
[ ] or [ ] until you see PHONE SETTINGS.
Press [ENTER].
[ ] or [ ] until you see TONE/PULSE.
[ ] or [ ] to choose TONE or PULSE.
To move to the next feature, press [ ].
PHONE SETTINGS
ON
HOLD REMINDER
To exit setup,
press and hold [ENTER].
HOLD REMINDER
Use this feature to turn the hold reminder tone on
or off. If you selected ON, when an outside call is
on hold (see the HOLD section on the user’s manual),
a double beep sounds every 30 seconds to remind
you.
1. Press
2. P
[ENTER].
ress [ ] or [ ] until you see PHONE SETTINGS.
Press [ENTER].
3. Press
[ ] or [ ] until you see HOLD REMINDER.
4. Press [ ] or [ ] to choose ON or OFF.
To move to MAIN MENU, press [ ].
5.
-OR-
xit setup, press and hold [ENTER].
To e
36
Page 43

Time/date
When the telephone is idle, the screen displays
the date and time. You can set the time manually
or, for 1080 and 1070 extensions, with incoming
caller ID information. Even if you have caller ID,
you must set the year once for voice messages to
have the correct day of the week.
TIME/DATE
= 2007
YEAR
1. Press
2. Press
3. Press
[ENTER].
[ ] or [ ] until you see TIME/DATE.
[ENTER] to see YEAR. Press the dial pad
keys to enter the correct year.
4. Press
[ ] until you see MONTH. Press the dial
pad keys to enter the correct month.
5. Press
[ ] until you see DATE. Press the dial
pad keys to enter the correct date.
6. Press
[ ] until you see HOUR. Press the dial
pad keys to enter the correct hour (12-hour
clock format).
7. Press
[ ] until you see MINUTE. Press the dial
pad keys to enter the correct minute.
8. Press
[ ] until you see AM/PM. Press [ ] or [ ]
to highlight AM or PM.
9.
To move to MAIN MENU, press [ ].
-OR-
To exit setup,
press and hold [ENTER].
NOTES:
• For the 1080 and 1070 extensions, caller ID
provides the time and date. Set the year so that
the day of the week can be calculated from the
caller ID information. After you set the time once,
it is updated automatically with incoming caller ID
information.
The time is set automatically only if you subscribe
to caller ID service provided by your local
telephone company (see the About caller ID
section on the 1080 or 1070 user’s manual).
Continued on next page
37
Page 44

Time/date
Continued from previous page
• Setting the clock in this menu also sets the time
for the answering system. Before playing each
message, the answering system announces the
day and time the message was received (see
the Private message playback section on the
1080 user’s manual). Before using the answering
system, use this menu to set the year. If you
do not have caller ID, you will also have to set
the date and time, so that messages are dated
correctly.
38
Page 45
Special options
Use the following features to customize some
multi-line functions, display settings, Central Office
Voice Mail (COVM) setup, and, for 1070 & 1080
users, caller ID/area code setup.
PRIME LINE
SPECIAL OPTIONS
LINE 1
PRIME LINE
SPECIAL OPTIONS
SPEAKERPHONE
AUTOMATIC MODE
Use this feature, also known as automatic line
selection, to choose which line is automatically
selected each time you lift the handset, press
[ SPEAKER] or [HEADSET] (if a headset is
connected) to make or answer an outside call.
1. Press
2. Press
[ENTER].
[ ] or [ ] until you see SPECIAL OPTIONS.
Press [ENTER].
3. Press
4. Press
[ ] or [ ] until you see PRIME LINE.
[ ] or [ ] to choose the desired line
(LINE 1, LINE 2, LINE 3 or LINE 4).
5.
To move to the next feature, press [ ].
-OR-
To exit setup,
press and hold [ENTER].
AUTOMATIC MODE
Use this feature to choose the mode
(speakerphone or headset) to be used after you
select a line key to make or answer an outside
call, or when you press [INTERCOM] to make or
answer an intercom or voice page call. (See the
Intercom operation section in the user’s manual
for information on the intercom.)
NOTE: If you select
HEADSET when you
have no headset
connected, and you
press a line key, the
speakerphone is used.
If you lift the handset, the handset mode is used.
1. Press
2. Press
[ENTER].
[ ] or [ ] until you see SPECIAL OPTIONS.
Press [ENTER].
3. Press
4. Press
[ ] or [ ] until you see AUTOMATIC MODE.
[ ] or [ ] to choose SPEAKERPHONE or
HEADSET.
5.
To move to the next feature, press [ ].
-OR-
To exit setup,
press and hold [ENTER].
39
Page 46

SPECIAL OPTIONS
MEDIUM
SCROLL RATE
Special options
SCROLL RATE
Use this feature to choose the speed for the rapid
scroll feature. (See Rapid scroll on page 18 for
details.)
1. Press
2. Press
3. Press
4. Press
5.
-OR-
To exit setup,
LCD CONTRAST
Use this feature to adjust the screen contrast to one
of eight levels to optimize readability in different
lighting conditions.
[ENTER].
[ ] or [ ] until you see SPECIAL OPTIONS.
Press [ENTER].
[ ] or [ ] until you see SCROLL RATE.
[ ] or [ ] to choose the desired scrolling
speed VERY SLOW, SLOW, MEDIUM, FAST or
VERY FAST.
To move to the next feature, press [ ].
press and hold [ENTER].
SPECIAL OPTIONS
LEVEL-4
LCD CONTRAST
1. Press
2. Press
[ENTER].
[ ] or [ ] until you see SPECIAL OPTIONS.
Press [ENTER].
3. Press
4. Press
[ ] or [ ] until you see LCD CONTRAST.
[ ] or [ ] to select the screen contrast
level (1-8).
5.
To move to the next feature, press [ ].
-OR-
To exit setup,
press and hold [ENTER].
40
Page 47

Special options
COVM ON/OFF, 1080 and 1070 only
If you subscribe to voice mail service with your
local telephone service provider, turn the COVM
(Central Office Voice Mail) indicator on to have
the screen display the appropriate telephone line
number(s) when there are telephone company
messages waiting. If you do not subscribe to voice
mail service, turn the COVM indicator off for each
line.
COVM ON/OFF
OFF
L1 COVM ON/OFF
NOTE: For more
information on COVM,
see the Call waiting
and message waiting section on the
1070 or 1080 user’s
manual.
1. Press
2. Press
[ENTER].
[ ] or [ ] until you see SPECIAL OPTIONS.
Press [ENTER].
3. Press
[ ] or [ ] until you see COVM ON/OFF.
Press [ENTER].
4. Press
[ ] or [ ] to select the line with voice
mail services (L1, L2, L3 or L4).
5. Press
6. Repeat step 4 and 5 to turn the
[ ] or [ ] to select ON or OFF.
COVM
indicator ON or OFF for other lines at this
extension.
7. When you have finished setting the
COVM
indicator, press [ ] until the screen displays
DONE.
8. Press
[ENTER]. The screen includes COVM
ON/OFF.
9.
To move to the next feature, press [ ].
-OR-
To exit setup,
press and hold [ENTER].
41
Page 48
Special options
AREA CODES, 1080 and 1070 only
You can program this phone to recognize one home
and up to five local area codes. If you simply dial
the last seven digits of a telephone number to make
a call within your own area code, you should enter
your own area code into the telephone as the home
area code. Then, if you receive a call from within
your home area code, the screen displays the seven
digits of the telephone number.
If you must dial 10 digits (the area code and
telephone number) for calls within your own home
area code, enter 000 for the home area code and
enter your area code as a local area code. Then,
if you receive a call from within your area code,
the screen displays the 10 digits of the telephone
number.
If you ever have to dial 10-digit phone numbers,
(the area code with the 7-digit phone number), for
other nearby area codes, enter those area codes as
local area codes.
AREA CODES
=908
HOME AC
1. Press
2. Press
[ENTER].
[ ] or [ ] until you see SPECIAL
OPTIONS. Press [ENTER].
3. Press
[ ] or [ ] until you see AREA CODES.
Press [ENTER].
4. Press
[ ] or [ ] to choose HOME AC to set the
home area code, or choose LOCAL AC1 (AC2,
AC3, AC4, or AC5) to set the local area codes.
5. Use the dial pad keys to enter the 3-digit area
code. Enter 000 for your home area code if you
never dial 7-digit numbers.
6. If you need to dial 10-digit phone numbers,
press [ ] and use the dial pad keys to enter the
3-digit local area code.
7. Press
[ ] to highlight DONE then press [ENTER].
To move to the next feature, press[ ].
-OR-
To exit setup,
press and hold [ENTER].
42
Page 49

SPECIAL OPTIONS
PRIVATE LINE
LINE GROUP
Special options
LINE GROUP
If all of the sets have the default setting of
LINE 4, and all the extensions in your system are
connected to all lines, you can ignore this feature.
If there are extensions that have a private (not
shared) telephone line connected to line 4, choose
PRIVATE LINE. If you choose PRIVATE LINE,
then call transfer, hold, call privacy, and other
advanced features may not work correctly. Also,
no messages can be recorded on the 1080 auto
attendant mailbox for private lines on 1040 or
1070 telephone sets.
If there are lines that some, but not all, sets share,
connect them to line 4. Make sure that all those
extensions have the same line group number,
(LINE 04 - LINE 15).
Correctly assigning each group its own line group
number allows the Line 4 indicator lights, hold,
call transfer, and even ringing to work properly.
There is an example of a line group installation on
the next page.
1. Press [ENTER].
2. Press
3. Press
4. Press
5.
[ ] or [ ] until you see SPECIAL OPTIONS.
Press [ENTER].
[ ] or [ ] until you see LINE GROUP.
[ ] or [ ] to scroll through the line
group choices (LINE 04 ... LINE 15, or PRIVATE
LINE).
To move to the next feature, press [ ].
-OR-
To exit setup,
43
press and hold [ENTER].
Continued on next page
Page 50

Special options
Continued from previous page
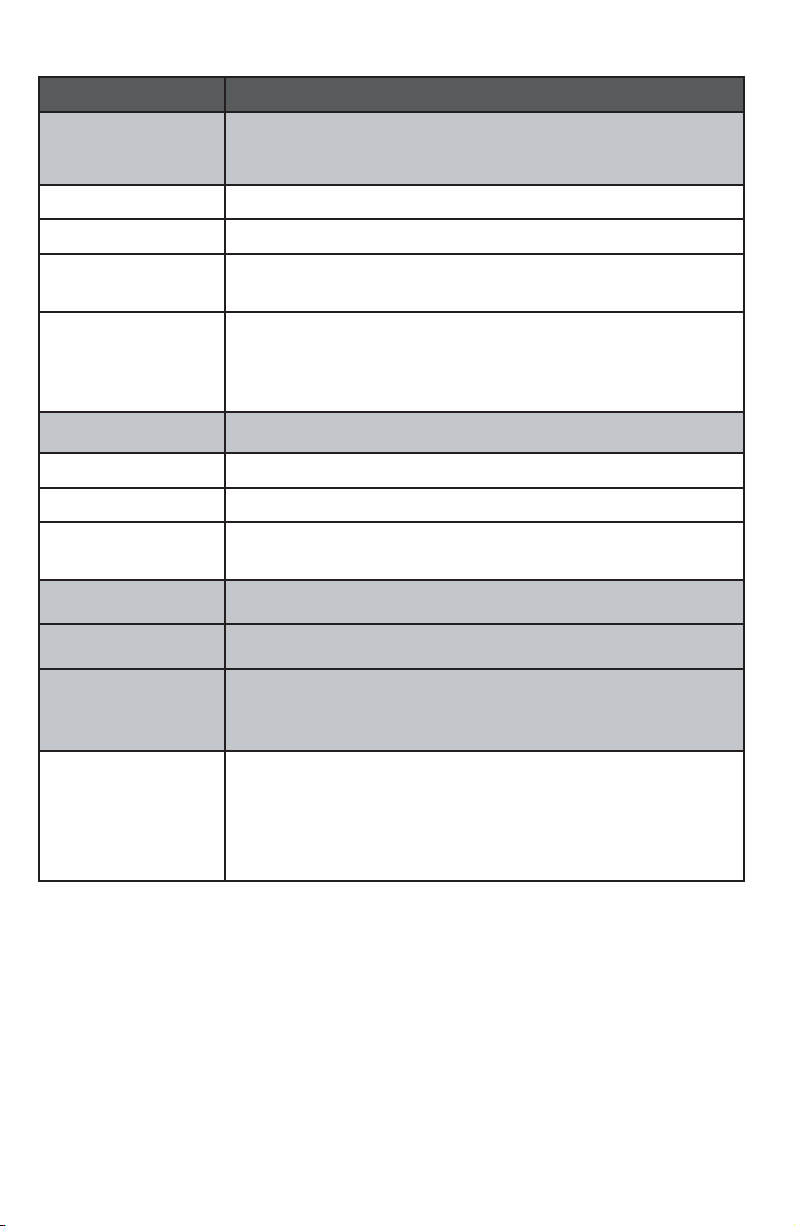
Line group example
There are 12 line group numbers to select (4-15). Refer to the table below
for the various line-group combinations that result from using 16 units and 7
telephone lines.
EXT 11
EXT 12
EXT 13
EXT 14
EXT 15
EXT 16
EXT 17
EXT 18
EXT 19
EXT 20
EXT 21
EXT 22
Intercom Extensions
EXT 23
EXT 24
EXT 25
EXT 26
Telephone Lines in System
TL 1 TL 2 TL 3 TL 4 TL 5 TL 6 TL 7
P P P P
P P P P
P P P P
P P P P
P P P P
P P P P
P P P P
P P P P
P P P P
P P P P
P P P P
P P P P
P P P P
P P P P
P P P P
P P P P
Line
Group
Number
Group 4 Marketing
Group 6 Procurement
Group 4 Marketing
Group 5 Engineering
Group 4 Marketing
Group 6 Procurement
Group 5 Engineering
Group 5 Engineering
Group 7 Administration
Group 7 Administration
Group 6 Procurement
Group 4 Marketing
Group 5 Engineering
Group 4 Marketing
Group 6 Procurement
Group 7 Administration
Example of
Function
44
Page 51

Special options
RESET ALL
SPECIAL OPTIONS
RESET ALL
RESET ALL
ENTER: RESET ALL?
Use this feature to return all feature settings for
this phone to their factory settings and erase
the redial stack and all one-touch entries. Voice
messages left in a 1080 mailbox are not erased.
STOP
If you reset all features to the default
settings, all previous feature programming and
one-touch entries are erased. You will need to
program your preferences for every feature again
and reenter numbers in one-touch locations. You
cannot undo the RESET ALL command.
1. Press
2. Press
[ENTER].
[ ] or [ ] until you see SPECIAL OPTIONS.
Press [ENTER].
3. Press
[ ] or [ ] until you see RESET ALL. Press
[ENTER].
4. The screen displays
RESET ALL? Press
[ENTER] within three seconds to confirm and
reset all settings. If you do nothing, the screen
will eventually time out, and no changes will
be made.
5.
To exit setup, press and hold [ENTER].
45
Page 52

AUTO ATT SETUP (1080 only)
Set up the programmable auto attendant to answer outside calls, provide
callers with company directories, and record voice messages for a multiphone system.
If a 1080 extension is an active auto attendant and its auto attendant is
answering or directing a call, playing or recording an announcement or
message, the LINE light flashes continuously (two short flashes with a long
one continually). To interrupt the auto attendant, press the flashing LINE
button on this 1080 telephone to talk to the caller on that line, or press any
other LINE button to disconnect this call and make a new call on another
line. See the installation guide, page 48. EVERY 1080=AA lets you make all
1080 phones auto attendants. Use NO 1080=AA to make sure that no 1080
phones are auto attendants. Use PER 1080=AA to assign 1080 sets as auto
attendants individually.
Use AUTO ATT DELAY to specify how long a 1080 auto attendant rings
before it answers a call. Be sure to make this delay different for every auto
attendant, so only one 1080 phone tries to answer a call at a time.
If an auto attendant is active, adjust the delay times for different features to let
the auto attendant system answer outside calls. The answering system answer
delay time (ANSWER DELAY, page 58) of all 1080 telephones in the same
system must be longer than the auto attendant answer delay time (AUTO ATT
DELAY, page 49).
You can set the system to deliver different messages, depending on the
time of day. Program DAY/NIGHT TIMES on one set to control all the auto
attendants in the system.
Use RESET AUTO ATT to erase all of the auto-attendant programming on all
of the phones. All auto-attendant programming is erased.
You may wish to set one or more additional phones to act as auto attendant(s)
when the primary auto attendant is turned off or busy.
An auto attendant is busy when someone at that extension is doing any of the
following:
• programming the phone
• accessing messages
• on an intercom call
• dialing from the directory or call history
• using any of the lines to make or answer a call
• when the DTAD is recording a message at that extension
You can choose a particular extension to always be the primary auto attendant
by setting that extension to have the shortest auto attendant pickup delay and
setting the pickup delays of other auto attendants in the order you choose.
Otherwise, the primary auto attendant may change as the system automatically
assigns incoming calls among active auto attendants.
46
Page 53

AUTO ATT SETUP
EVERY 1080 = AA
AUTO ATT SETUP (1080 only)
EVERY 1080 = AA
Use this feature to make all 1080 phones auto
attendants.
1. Press
2. Press
3. Press
4. The screen will show
5.
-OR To exit setup, press and hold [ENTER].
NO 1080 = AA
[ENTER] on any 1080 system telephone.
[ ] or [ ] until you see AUTO ATT SETUP.
Press [ENTER].
[ ] or [ ] until you see EVERY 1080=AA.
Press [ENTER].
CONFIRM? Press
[ENTER] within three seconds to confirm the
selection.
To move to the next feature, press [ ].
AUTO ATT SETUP
NO 1080 = AA
Use this feature to make no 1080 phones auto
attendants.
1. Press
2. Press
[ENTER] on any 1080 system telephone.
[ ] or [ ] until you see AUTO ATT SETUP.
Press [ENTER].
3. Press
[ ] or [ ] until you see NO 1080 = AA.
Press [ENTER].
4. The screen will show
CONFIRM? Press
[ENTER] within three seconds to confirm the
selection.
5.
To move to the next feature, press [ ].
-OR-
To exit setup,
press and hold [ENTER].
47
Page 54

AUTO ATT SETUP (1080 only)
PER 1080 = AA
Use this feature to assign individual 1080
telephone(s) as auto attendant(s).
PER 1080 = AA
NO
EXT# 11 = AA?
1. Press
2. Press
[ENTER] on any 1080 system telephone.
[ ] or [ ] until you see AUTO ATT SETUP.
Press [ENTER].
3. Press
[ ] or [ ] until you see PER 1080 = AA.
Press [ENTER].
4. Press
[ ] or [ ] to highlight the extension num-
ber of the desired 1080 telephone.
5. Press
[ ] or [ ] to highlight the desired setting,
YES to make this 1080 an auto attendant, NO so
that it is not an auto attendant. When the auto
attendant setting is on, the [DTAD] light on the
telephone base is lit.
6.
To move to the next extension, press [ ].
-OR-
To exit setup,
press and hold [ENTER].
NOTE: The auto attendant will not answer calls
when the extension is busy.
48
Page 55
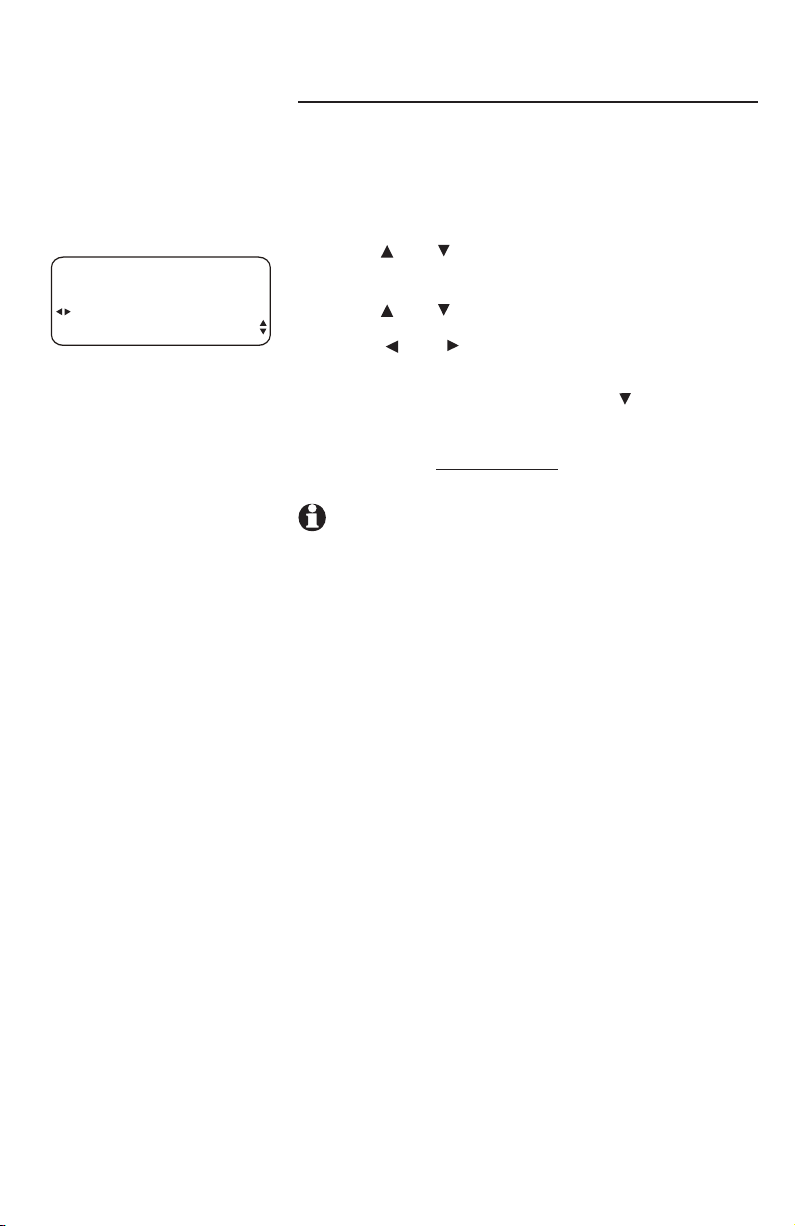
AUTO ATT SETUP (1080 only)
AUTO ATT DELAY
Use this feature to choose how long this phone
rings before the auto attendant picks up a call.
One ring cycle lasts about six seconds.
AUTO ATT SETUP
06 SEC
AUTO ATT DELAY
1. Press
2. Press
[ENTER].
[ ] or [ ] until you see AUTO ATT SETUP.
Press [ENTER].
3. Press
4. Press
[ ] or [ ] until you see AUTO ATT DELAY.
[ ] or [ ] to choose the desired setting
(6–30 seconds).
5.
To move to the next feature, press [ ].
-OR-
To exit setup,
press and hold [ENTER].
NOTES:
• The DTAD answer delay time (ANSWER DELAY,
page 58) of all 1080 telephones in the same
system must be longer than the auto attendant
answer delay time (AUTO ATT DELAY).
If multiple auto attendants are assigned in the
•
same system, you must select different AUTO
ATT DELAY settings for these telephones (at
least three seconds among them so they do not
all answer calls at the same time).
49
Page 56
AUTO ATT SETUP (1080 only)
DAY/NIGHT TIMES
Use this feature to specify times to be considered day or night for auto
attendant features.
The auto attendant feature only works with a multi-phone system. If you need
to have different outgoing messages at different times of the day, you MUST
program the hours for day and night times so the answering system plays the
correct auto attendant outgoing announcement.
1. Press [ENTER].
AUTO ATT SETUP
DAY/NIGHT TIMES
DAY/NIGHT TIMES
DAY TIME
DAY/NIGHT TIMES
NIGHT TIME
NOTE: It is only
necessary to set the
auto attendant day
and night times once
in an auto attendant
telephone. This setting
affects all other auto
attendant telephones
(if you have any) in the
same system.
2. Press
3. Press
4. Press
5. Press
6. Press
7. Press
8. Press
9. Press
10. Press
11. Press
12. Press
13. Scroll to and select
-OR-
To exit setup,
[ ] or [ ] until you see AUTO ATT
SETUP. Press [ENTER].
[ ] or [ ] until you see DAY/NIGHT
TIMES. Press [ENTER].
[ ] or [ ] until you see DAY TIME. Press
[ENTER].
[ ] or [ ] to choose the desired hour.
Press [ ].
[ ] or [ ] to choose the desired minute.
Press [ ].
[ ] or [ ] to choose AM or PM.
[ ] or [ ] until you see DONE. Press
[ENTER] to finish the daytime setting.
[ ] or [ ] until you see NIGHT TIME.
Press [ENTER].
[ ] or [ ] to choose the desired hour.
Press [ ].
[ ] or [ ] to choose the desired minute.
Press [ ].
[ ] or [ ] to choose AM or PM.
DONE to return to the
DAY TIME or NIGHT TIME menu.
press and hold [ENTER].
50
Page 57

AUTO ATT SETUP
RESET AUTO ATT
AUTO ATT SETUP (1080 only)
RESET AUTO ATT, (1080 only)
Use this feature to return auto attendant setup for
all phones to default.
STOP
When you confirm this function on a 1080
telephone, all settings in the AUTO ATT SETUP
menu and SYS EXT MAILBOX menu of all 1080
telephones will return to the factory settings.
RESET AUTO ATT
ENTER: CONFIRM ?
1. Press
[ENTER] on the desired 1080 system
telephone.
2. Press
[ ] or [ ] until you see AUTO ATT SETUP.
Press [ENTER].
3. Press
[ ] or [ ] until you see RESET AUTO ATT.
Press [ENTER].
4. The screen displays
CONFIRM? Press [ENTER]
within three seconds to confirm the command
and reset all settings. If you do nothing, the
screen eventually times out, and no changes
are made.
5.
To move to MAIN MENU, press [ ].
-OR-
To exit setup,
press and hold [ENTER].
NOTE: Resetting the auto attendant cancels
call forwarding from all 1040 or 1070 phones. See
the 1070 or 1040 user’s manual.
51
Page 58

SYS EXT mailbox (1080 only)
About system extension mailboxes
If a 1080 telephone is an auto attendant (page
46), it can be a system extension (SYS EXT)
mailbox for 1070 and 1040 telephones in the
system. When the 1080 phone is a SYS EXT
mailbox, it can answer calls transferred by
the auto attendant system and record caller’s
messages for its SYS EXT telephones. These
messages are called extension messages. Each
extension message can be up to one minute.
System Extensions
If you want one or more of your 1080 telephones
to automatically record messages directed to
individual 1070 and 1040 telephones, you need to
customize these features. By doing this, you will
be linking specific 1080 phones with specific 1040
and 1070 system extensions.
Use AUTO SETUP to randomly assign all the
1040 and 1070 extensions to all the 1080
auto-attendant mailboxes. Any 1040 and 1070
extension can be assigned to only one 1080 auto
attendant.
If you want to control which 1040 and 1070
phones are assigned to a particular 1080 system
extension, use CUSTOM SETUP. You select a 1040
or 1070 set, and then decide which 1080 auto
attendant mailbox to assign to it.
If you don’t want a 1080 set to record messages
for its 1040 and 1070 extensions, you can
UNASSIGN MBOXES. That 1080 set will no longer
be a system extension mailbox, and its 1040 and
1070 sets will no longer have a system extension
mailbox.
If the 1080 system extension mailbox is getting
full, messages for a specific 1040 or 1070 set, or
all 1040 and 1070 messages can be removed by
using REMOVE EXT MSGS.
52
Page 59

SYS EXT MAILBOX
SYS EXT mailbox (1080 only)
AUTO SETUP
Use this feature to automatically assign all 1070
and 1040 phones to individual 1080 mailboxes. If
a 1070 or 1040 phone is already using a specific
1080 phone as a mailbox, that assignment
remains.
AUTO SETUP
AUTO SETUP
PLEASE WAIT!
SYS EXT MAILBOX
CUSTOM SETUP
CUSTOM SETUP
PLEASE WAIT!
CUSTOM SETUP
MAILBOX #12
EXT #13 MAILBOX
NOTE: If the 1080
phone is the SYS EXT
mailbox for other
extensions, it answers
transferred calls from
its extension telephones
with a preset outgoing
message. You can neither
delete nor replace this
outgoing message.
1. Press
2. Press
[ENTER] on any 1080 telephone.
[ ] or [ ] until you see SYS EXT MAILBOX.
Press [ENTER].
3. Press
[ ] or [ ] until you see AUTO SETUP. Press
[ENTER].
4. The screen shows
PLEASE WAIT! with a beep to
confirm.
5.
To move to the next feature, press [ ].
-OR-
To exit setup,
press and hold [ENTER].
CUSTOM SETUP
Use this feature to individually assign 1070 and
1040 phones to a 1080 SYS EXT mailbox.
1. Press
2. Press
[ENTER] on any 1080 telephone.
[ ] or [ ] until you see SYS EXT MAILBOX.
Press [ENTER].
3. Press
[ ] or [ ] until you see CUSTOM SETUP.
Press [ENTER], and the screen shows PLEASE
WAIT! to confirm.
4. Press
[ ] or [ ] to choose the extension number
of the desired 1070 or 1040 phone.
5. Press
[ ] or [ ] to select the extension number
of the desired 1080 system extension mailbox, or
choose NONE to turn off the system extension
mailbox.
6.
Press [ ] highlight DONE then press [ENTER]. To
move to the next feature, press [ ].
-OR-
To exit setup,
press and hold [ENTER].
53
Page 60

UNASSIGN MBOXES
ENTER: CONFIRM ?
SYS EXT mailbox (1080 only)
UNASSIGN MBOXES
Use this feature to cancel the auto attendant
mailbox function for all 1080 phones. Any 1070
or 1040 phones assigned to 1080 mailboxes now
have no mailboxes, although the already-recorded
messages are still there. Listen and delete all
extension messages before selecting UNASSIGN
MBOXES (see the Listening to messages internal access section in the 1070 or 1040
user’s manual).
1. Press
2. Press
3. Press
4. The screen displays
5.
-OR-
To exit setup,
MBOXES above, none of the 1070 or 1040 system
extensions assigned to this 1080 telephone will
be able to listen to messages in the 1080 system
extension mailbox. To hear the messages, you need
to reassign the 1070 or 1040 system extensions
to the same 1080 telephone (page 53). For more
details of the internal access feature, see the
Listening to messages - internal access section in
the 1070 or 1040 user’s manual.
[ENTER] on any 1080 telephone in the
system.
[ ] or [ ] until you see SYS EXT
MAILBOX. Press [ENTER].
[ ] or [ ] until you see UNASSIGN
MBOXES. Press [ENTER].
CONFIRM? Press [ENTER]
within three seconds to confirm the command
and unassign the mailboxes. If you do nothing,
the screen eventually times out, and no
changes will be made.
To move to the next feature, press [ ].
press and hold [ENTER].
NOTE: After you select and confirm UNASSIGN
54
Page 61

SYS EXT MAILBOX
REMOVE EXT MSGS
SYS EXT mailbox (1080 only)
REMOVE EXT MSGS
Use this feature to delete all messages for a
specific 1070 or 1040 phone that uses this 1080
mailbox, or delete all 1070 and 1040 messages in
this 1080 mailbox.
To delete all messages from one SYS EXT telephone
REMOVE EXT MSGS
MESSAGES: 02/06
13
MSGS PER EXT
1. Press
2. Press
[ENTER] on the 1080 mailbox phone.
[ ] or [ ] until you see SYS EXT
MAILBOX. Press [ENTER].
3. Press
[ ] or [ ] until you see REMOVE EXT
MSGS. Press [ENTER].
4. Press
[ ] or [ ] to choose the extension number
of the desired 1070 or 1040 system telephone.
The telephone shows the message counter
MESSAGES: XX/YY for the desired 1070 or
1040 system telephone.
5. Press
6. Press
[ENTER]. The screen displays REMOVE ALL?
[ENTER] within three seconds to confirm the
command and delete all messages of the desired
extension telephone. If you do nothing, the screen
eventually times out, and no changes are made.
7.
To move to MAIN MENU, press [ ].
-OR-
To exit setup,
press and hold [ENTER].
55
Page 62

SYS EXT mailbox (1080 only)
To delete all messages of all SYS EXT phones
REMOVE EXT MSGS
ALL EXTS MSG
MSGS PER EXT
1. Press
2. Press
[ENTER] on the 1080 telephone.
[ ] or [ ] until you see SYS EXT MAILBOX.
Press [ENTER].
3. Press
[ ] or [ ] until you see REMOVE EXT
MSGS. Press [ENTER].
4. Press
5.
6. Press
[ ] or [ ] to choose ALL EXTS MSG.
Press [ENTER]. The screen displays REMOVE ALL?
[ENTER] within three seconds to confirm the
command and delete all messages of all extension
phones assigned to that 1080 mailbox. If you do
nothing, the screen eventually times out, and no
changes are made.
7.
To move to MAIN MENU, press [ ].
-OR-
To exit setup,
press and hold [ENTER].
56
Page 63

DTAD SETUP
ON
ANSWER STATUS
DTAD setup (1080 only)
ANSWER STATUS
Use this feature to set up the 1080 phone
to record private messages (not the SYS EXT
messages meant for the associated 1070 and
1040 phones).
1. Press
2. Press
3. Press
4.
-OR-
To exit setup,
the 1080 phone can still record central messages
and extension messages.
[ENTER].
[ ] or [ ] until you see DTAD SETUP. Press
[ENTER]. The screen displays ANSWER STATUS.
[ ] or [ ] to choose ON to turn the
answering system on, or OFF to turn the answering
system off.
To move to the next feature, press [ ].
press and hold [ENTER].
NOTE: If the ANSWER STATUS setting is OFF,
57
Page 64

DTAD SETUP
15 SEC
ANSWER DELAY
NOTE: For the auto
attendant to work
properly, you must
make sure that the
DTAD answer delay
time is longer than the
auto attendant answer
delay time (page 49).
DTAD SETUP
ON
TOLL SAVER
DTAD setup (1080 only)
ANSWER DELAY
Use this feature to set the length of time this
phone rings before the answering system picks up
the call. One ring cycle lasts about six seconds.
1. Press
2. Press [ ] or [ ] until you see DTAD SETUP.
3. Press
4. Press
5.
-OR-
To exit setup,
TOLL SAVER
Use this feature to turn toll saver on or off. When
toll saver is turned on, the answering system picks
up incoming calls within eight seconds if there
are any new private messages. When there are no
new messages, the answering system picks up the
incoming call in the time you set as the answer
delay. (See ANSWER DELAY section above on this
page for details).
To turn toll saver on or off:
[ENTER].
Press [ENTER].
[ ] or [ ] until you see ANSWER DELAY.
[ ] or [ ] to choose the desired setting
(12–40 seconds).
To move to the next feature, press [ ].
press and hold [ENTER].
NOTE: If the toll
saver feature is ON,
for the auto attendant
to work properly, you
must make sure that
the auto-attendant
delay time (page 49)
is shorter than eight
seconds.
1. Press
2. Press
[ENTER].
[ ] or [ ] until you see DTAD SETUP. Press
[ENTER].
3. Press
4. Press
5.
[ ] or [ ] until you see TOLL SAVER.
[ ] or [ ] to choose ON or OFF.
To move to the next feature, press [ ].
-OR-
To exit setup,
press and hold [ENTER].
58
Page 65

DTAD SETUP
= 111
REMOTE CODE
DTAD setup (1080 only)
REMOTE CODE
Use this feature to select a three-digit number
to allow remote access from another telephone
(away from your home or office, see the 1080
user's manual for details) and internal access from
the SYS EXT telephones (See the 1070 or 1040
user's manual for details). This code is 111 by
default.
1. Press
[ENTER].
2. Press [ ] or [ ] until you see DTAD SETUP.
Press [ENTER].
3. Press
4.
[ ] or [ ] until you see REMOTE CODE.
Press and hold [ ] to delete the current code.
Press the dial pad keys to enter a three-digit
remote access code (000-999).
5.
To move to the next feature, press [ ].
-OR-
To exit setup,
press and hold [ENTER].
59
Page 66
DTAD SETUP
1 MINUTE
MESSAGE LENGTH
DTAD setup (1080 only)
MESSAGE LENGTH
Use this feature to set the maximum length of
recorded messages.
You can select the maximum length for the
messages callers can record. If you choose
UNLIMITED, the caller can record a message of
any length, up to the amount of time remaining
for all messages, memos, and announcements. If
you choose GREETING ONLY, the caller hears the
selected outgoing announcement but is not able
to record a message. If you choose 1 MINUTE, the
caller can record a message up to one minute.
1. Press
2. Press
[ENTER].
[ ] or [ ] until you see DTAD SETUP.
Press [ENTER].
3. Press
[ ] or [ ] until you see MESSAGE
LENGTH.
4. Press
5.
[ ] or [ ] to choose the desired setting.
To move to the next feature, press [ ].
-OR-
To exit setup,
NOTE: Only incoming messages can be limited
press and hold [ENTER].
to one minute. Memos and two-way conversation
messages are unlimited (up to the amount of time
remaining).
60
Page 67

DTAD setup (1080 only)
MESSAGE ALERT
Use this feature to turn the audible message alert
on or off.
DTAD SETUP
ON
MESSAGE ALERT
If the message alert tone is on, the telephone
beeps every 30 seconds when there are new
private or central messages.
1. Press
2. Press
[ENTER].
[ ] or [ ] until you see DTAD SETUP.
Press [ENTER].
3. Press
4. Press
5.
[ ] or [ ] until you see MESSAGE ALERT.
[ ] or [ ] to choose ON or OFF.
To move to the next feature, press [ ].
-OR-
To exit setup,
press and hold [ENTER].
61
Page 68

DTAD setup (1080 only)
CALL SCREENING
DTAD SETUP
ON
CALL SCREENING
DTAD SETUP
ON
DTAD INTERCEPT
Use this feature to choose whether incoming
messages can be heard over the speaker when
they are being recorded. If you turn call screening
on, you hear the incoming private message on
your telephone when a call comes in.
1. Press
2. Press
[ENTER].
[ ] or [ ] until you see DTAD SETUP.
Press [ENTER].
3. Press
[ ] or [ ] until you see CALL
SCREENING.
4. Press
5.
[ ] or [ ] to choose ON or OFF.
To move to the next feature, press [ ].
-OR-
To exit setup,
press and hold [ENTER].
NOTE: If the Do Not Disturb (DND) feature is
active (page 15 of the 1080 user’s manual), the
call screening feature is disabled automatically.
DTAD INTERCEPT
Choose whether private incoming messages can
be intercepted by other phones. Someone at the
1080 phone that is recording the message can
always intercept the call. If DTAD intercept is on
when a caller leaves a message, someone on
another system telephone sharing the same line
can answer the call by pressing the corresponding
line key.
1. Press
2. Press
[ENTER].
[ ] or [ ] until you see DTAD SETUP.
Press [ENTER].
3. Press
4. Press
5.
[ ] or [ ] until you see DTAD INTERCEPT.
[ ] or [ ] to choose ON or OFF.
To move to MAIN MENU, press [ ].
-OR-
To exit setup,
press and hold [ENTER].
62
Page 69

DTAD FEATURE
PRIVATE MSGS
DTAD FEATURE MENU (1080 only)
Setup the answering system in DTAD FEATURE
menu. The DTAD FEATURE menu allows you to:
• Play or remove incoming private messages,
and record your outgoing announcement for
your private mailbox.
• Play or remove central messages.
• Record a 2-way conversation.
• Record a memo or reminder into your private
mailbox.
• Record, share or download announcements for
the auto attendant.
• Check the remaining record time.
Press [DTAD] to access the DTAD FEATURE menu.
Press [DTAD] to return to the idle screen at any
time.
63
Page 70

DTAD FEATURE MENU (1080 only)
Here is the menu structure for the DTAD FEATURE
menu:
Feature Menu Function
PRIVATE MSGS Play and delete private messages,
PLAY NEW MSGS Play back new private messages.
PLAY ALL MSGS Play back all private messages.
REMOVE ALL MSGS Delete all private messages.
PRIVATE OGM Record the private announcement.
CENTRAL MSGS Play and delete central (general)
PLAY NEW MSGS Play back new central messages.
PLAY ALL MSGS Play back all central messages.
REMOVE ALL MSGS Delete all central messages.
RECORD CALL Record two-way conversations.
RECORD MEMO Record memos.
SYSTEM OGMS Record, share, and download the
AA DAY-OGM
AA NIGHT-OGM
AA DIR-OGM
SHARE OGMS Share your self-recorded auto-
DOWNLOAD OGMS Download shared auto-attendant
RECORD TIME Select to see how much record time
and record an outgoing message for
the private message mailbox.
messages.
outgoing announcements played
when the auto attendant answers a
call.
Record the auto attendant system
announcements. For details, see
Outgoing announcements for auto
attendant on the next page.
attendant announcements with other
auto attendants in the system.
announcements from other auto
attendants in the system.
remains.
64
Page 71

DTAD FEATURE MENU (1080 only)
Outgoing announcements for auto attendant
If your system has an auto attendant, you need to program the day and night
times (see DAY/NIGHT TIMES on page 50). The auto attendant uses the times
you program to determine which announcement to play.
There are three different auto attendant announcements available.
You can choose to record your own auto attendant announcements or use
the pre-recorded announcements listed here. You can use SYSTEM OGMS to
record your own announcements, share your announcements with the system
or download shared announcements from the system.
The auto attendant outgoing daytime announcement
(AA DAY-OGM) plays during the day time you program. The pre-recorded
announcement is: “Thank you for calling our company. If you know your
party’s extension, you may dial it at any time. For a company directory, please
dial 0. To leave a message, please dial 9.”
The auto attendant outgoing nighttime announcement
(AA NIGHT-OGM) plays during the night time you program. The pre-recorded
announcement is: “Thank you for calling our company. We are currently
closed. If you would like to leave a message and you know your party’s
extension, you may dial it now. For a company directory, please dial 0. To
leave a message, please dial 9.”
The auto attendant directory announcement
(AA DIR-OGM) plays when an outside caller presses [0] on their phone after
hearing the day or night announcement. The pre-recorded announcement is:
“Please enter the extension number.”
NOTE: You can retain the pre-recorded auto attendant day and
night announcements, but you MUST record your directory of extension
assignments as the auto attendant directory announcements.
65
Page 72

SYSTEM OGMS
AA DAY-OGM
RECORD
Microphone
SYSTEM OGMS
AA DAY-OGM
RECORDING 00:20
STOP
NOTE: The answering
system uses the
AUTOMATIC MODE
set on page 39 to
record system outgoing
messages. If the
AUTOMATIC MODE
is SPEAKERPHONE
(default), face the
microphone (the
MIC opening) on the
telephone to record
system outgoing
announcements. If the
AUTOMATIC MODE
is HEADSET, use the
headset microphone to
record system outgoing
announcements.
DTAD FEATURE MENU (1080 only)
Outgoing daytime announcement
To record the daytime announcement
The 1080 has a pre-recorded daytime
announcement, “Thank you for calling our
company. If you know your party’s extension, you
may dial it at any time. For a company directory
please dial 0. To leave a message please dial 9.”
You can use this announcement or replace it with
a recording of your own, using the steps below.
1. Press [DTAD] on a system telephone assigned
as auto attendant.
2. Press
3. Press
4. Press
Speak facing the telephone from about nine
5. When you are finished recording, press
6. Press [ENTER] to skip the play back.
-OR-
After you have played the recording, the
7. Press
[ ] or [ ] until you see SYSTEM OGMS.
Press [ENTER].
[ ] or [ ] until you see AA DAY-OGM.
[ ] or [ ] until you see RECORD. Press
[ENTER].
inches away. The elapsed time (in seconds)
shows on the screen when recording. You can
record an announcement up to 75 seconds
long. Announcements shorter than three
seconds long are not recorded.
[ENTER]. The recorded announcement plays
back and the screen will show PLAYING.
screen will go back to the AA DAY-OGM
menu.
[DTAD] to exit the DTAD feature menu.
66
Page 73

SYSTEM OGMS
AA DAY-OGM
PLAY
DTAD FEATURE MENU (1080 only)
Outgoing daytime announcement
To play the daytime announcement
1. Press [DTAD].
2. Press
3. Press
4. Press
5. Press
To delete the daytime announcement
1. During the daytime announcement playback,
2. Press
3. Press
[ ] or [ ] until you see SYSTEM OGMS.
Press [ENTER].
[ ] or [ ] until you see AA DAY-OGM.
[ ] or [ ] until you see PLAY. Press
[ENTER]. The current daytime announcement
plays. To stop playing, press [ENTER].
[DTAD] to exit the DTAD feature menu.
press [REMOVE]. The screen displays
REMOVE?
[REMOVE] again within three seconds
to delete your daytime announcement.
[DTAD] to exit the DTAD feature menu.
When your outgoing announcement is deleted,
calls are answered with the preset daytime
announcement described on the previous page.
67
Page 74

SYSTEM OGMS
AA NIGHT-OGM
RECORD
Microphone
SYSTEM OGMS
AA NIGHT-OGM
RECORDING 00:20
STOP
DTAD FEATURE MENU (1080 only)
Outgoing nighttime announcement
To record the nighttime announcement
The default outgoing nighttime announcement
is, “Thank you for calling our company. We are
currently closed. If you would like to leave a
message and you know your party’s extension,
you may dial it now. For a company directory
please dial 0. To leave a message, please dial
9.” You can use this message, or replace it with a
recording of your own.
1. Press
2. Press [
3. Press [
4. Press [
5. When you have finished recording, press
6. Press
[DTAD] on the system telephone assigned
as auto attendant.
] or [ ] until you see SYSTEM OGMS.
Press [ENTER].
] or [ ] until you see AA NIGHT-OGM.
] or [ ] until you see RECORD. Press
[ENTER].
Speak facing the telephone from about nine
inches away. The elapsed time (in seconds)
appears on the screen when recording. You can
record an announcement of up to 75 seconds.
Announcements shorter than three seconds
long are not recorded.
[ENTER] to select the displayed STOP. Your
recorded announcement plays back.
[DTAD] to exit the DTAD feature menu.
68
Page 75

SYSTEM OGMS
AA NIGHT-OGM
PLAY
DTAD FEATURE MENU (1080 only)
Outgoing nighttime announcement
To play the nighttime announcement
1. Press
2. Press
3. Press
4. Press
5. Press
To delete the nighttime announcement
1. During the nighttime announcement playback,
2. Press
3. Press
When you delete your outgoing announcement,
calls are answered with the preset nighttime
announcement described on the previous page.
[DTAD].
[ ] or [ ] until you see SYSTEM OGMS.
Press [ENTER].
[ ] or [ ] until you see AA NIGHT-OGM.
[ ] or [ ] until you see PLAY. Press [ENTER]. The current nighttime announcement will
be played. To stop playing, press [ENTER].
[DTAD] to exit the DTAD feature menu.
press [REMOVE]. The screen displays REMOVE?
[REMOVE] again within three seconds to
delete your nighttime announcement.
[DTAD] to exit the DTAD feature menu.
69
Page 76
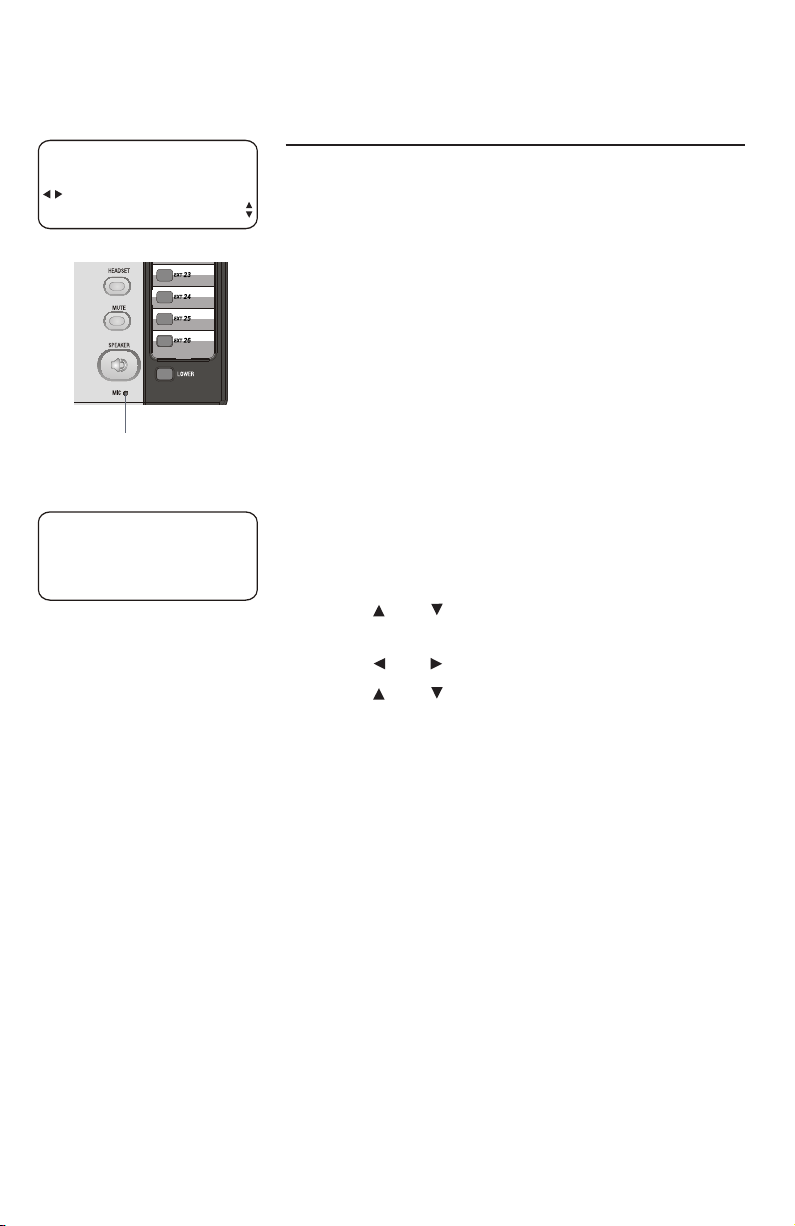
SYSTEM OGMS
AA DIR-OGM
RECORD
Microphone
SYSTEM OGMS
AA DIR-OGM
RECORDING 00:20
STOP
DTAD FEATURE MENU (1080 only)
Directory announcement
To record the directory announcement
The default directory announcement is, “Please
enter the extension number.” You can use this
announcement, or replace it with a recording of
your own.
The directory announcement is what callers hear
when they press [0] to listen to the company
directory. If you are using the pre-recorded
daytime and/or nighttime auto-attendant
recordings, or recording your own announcements
that direct users to dial [0] for a directory, record
your directory announcement. You might record
something like, “This is XYZ Company. To purchase
new parts, dial 16. To talk to customer service,
dial 17. To talk to an associate, dial 18. To talk to
Joe, dial 19.”
1. Press
2. Press
3. Press
4. Press
5. When you have finished recording, press
6. Press
[DTAD] on a system telephone assigned
as auto attendant.
[ ] or [ ] until you see SYSTEM OGMS.
Press [ENTER].
[ ] or [ ] until you see AA DIR-OGM.
[ ] or [ ] until you see RECORD. Press
[ENTER].
Speak facing the telephone from about nine
inches away. The elapsed time (in seconds)
appears on the screen when recording. You
can record a message of up to 75 seconds.
Announcements shorter than three seconds
long are not recorded.
[ENTER] to select the displayed STOP. Your
recorded announcement plays back.
[DTAD] to exit the DTAD feature menu.
70
Page 77

SYSTEM OGMS
AA DIR-OGM
PLAY
DTAD FEATURE MENU (1080 only)
Directory announcement
To play the directory announcement
1. Press
2. Press
3. Press
4. Press
5. Press
To delete the directory announcement
1. During the directory announcement playback,
2. Press
3. Press
When you delete your announcement, calls are
answered with the preset directory announcement
described on the previous page.
[DTAD].
[ ] or [ ] until you see SYSTEM OGMS.
Press [ENTER].
[ ] or [ ] until you see AA DIR-OGM.
[ ] or [ ] until you see PLAY. Press
[ENTER]. The current directory announcement
plays. To stop playing, press [ENTER].
[DTAD] to exit the DTAD feature menu.
press [REMOVE]. The screen displays REMOVE?
[REMOVE] again within three seconds to
delete your directory announcement.
[DTAD] to exit the DTAD feature menu.
71
Page 78

DTAD FEATURE MENU (1080 only)
Share system announcements
If you have recorded your own auto-attendant
announcements, you can share them with the
other auto attendants in the system.
SYSTEM OGMS
ON
SHARE OGMS
1. Press
2. Press
Press [ENTER].
3. Press
4. Press
share the auto-attendant announcements with
the other auto attendants.
5. Press
[ENTER]. Press [ ] to move to the next DTAD
feature.
-OR-
Press
[DTAD].
[ ] or [ ] until you see SYSTEM OGMS.
[ ] or [ ] until you see SHARE OGMS.
[ ] or [ ] to select ON if you want to
[ ] until you see EXIT, then press
[DTAD] to exit the DTAD feature menu.
72
Page 79

SYSTEM OGMS
DTAD FEATURE MENU (1080 only)
Download system announcements
If there are auto-attendant announcements shared
in the system, you can download them from other
auto attendants.
DOWNLOAD OGMS
DOWNLOAD OGMS
FROM EXT#15
DOWNLOAD
DOWNLOAD OGMS
DOWNLOADING
PLEASE WAIT!
07 SECONDS
Press [DTAD].
1.
Press [ ] or [ ] until you see SYSTEM OGMS.
2.
Press [ENTER].
Press [ ] or [ ] until you see DOWNLOAD
3.
OGMS.
Press [ENTER].
4.
NOTE: If there are no shared announcements,
the screen shows NO SHARED OGMS IN SYSTEM!
Press [ ] or [ ] to choose the extension
5.
number of the desired auto attendant.
Press [ENTER]. The screen shows
6.
DOWNLOADING PLEASE WAIT!
Wait for about one minute until the screen
7.
shows SUCCESS!
Press [ ] to show EXIT then press [ENTER].
8.
Press [ ] to move to the next SYSTEM OGMS
feature.
-OR-
Press [DTAD] to exit the DTAD feature menu.
9.
NOTE: If the screen shows FAILED! or
SYSTEM BUSY!, the downloading has failed. Press
[DTAD] to exit the DTAD feature menu. Wait for a
while then start from step 1 again.
73
Page 80
Centrex
Use this feature with the Centrex system only. You
will need to program the next two features if this
phone is the destination console phone for your
Centrex system.
For more information on using Centrex (a service
provided by your service provider for a fee), see
pages 77-78.
CONSOLE
Specify whether this phone is the Centrex console
phone.
CENTREX
ON
CONSOLE
1. Press
[ENTER] on the desired system telephone
to be assigned as a console.
2. Press
[ ] or [ ] until you see CENTREX. Press
[ENTER].
3. Press
4. Press
[ ] or [ ] until you see CONSOLE.
[ ] or [ ] to choose ON to set this tele-
phone as a console. On the other system telephones, choose OFF.
To move to the next feature, press [ ].
5.
-OR-
To exit setup,
NOTE: On the Centrex console phone, make
press and hold [ENTER].
sure to assign a private telephone number to line
4 and select PRIVATE LINE in the LINE GROUP
menu (see the LINE GROUP section on page 43).
74
Page 81

Centrex
CSL DELAY RING
Set the length of time before this phone routes a
call to the Centrex console phone. One ring cycle
lasts about six seconds.
CENTREX
02 SEC
CSL DELAY RING
1. Press
[ENTER] on the desired system telephone
for the Centrex service (except the console
telephone).
2. Press
[ ] or [ ] until you see CENTREX. Press
[ENTER].
3. Press
4. Press
[ ] or [ ] until you see CSL DELAY RING.
[ ] or [ ] to choose the desired delay
time (2–30 seconds). On the console telephone,
choose OFF.
5.
To move to MAIN MENU, press [ ].
-OR-
To exit setup,
NOTE: If you want the DTAD to answer calls,
press and hold [ENTER].
the CSL DELAY RING time should be longer than
the ANSWER DELAY time (page 58) on the same
1080 telephone.
75
Page 82

FEATURE SETUP
Language
This telephone comes factory set for English
displays. If it is necessary to change the display
language to Spanish or French, follow these steps
to reach the LANGUAGE menu:
ENGLISH
LANGUAGE
CONFIG FUNCIONES
ESPANOL
IDIOMA
CONFIG. FONCT.
FRANçAIS
LANGUE
1. Press
2. Press
3. Press
[ENTER].
[ ] or [ ] until you see LANGUAGE.
[ ] or [ ] to select the desired lan-
guage used in all menus and screen displays
(ENGLISH, ESPANOL or FRANçAIS).
4. To exit setup, press and hold [ENTER].
76
Page 83

Centrex operation
Setup checklist
Before expanding your system or installing for Centrex, review the System
planner on page 4. If you have Centrex, contact your local telephone
company for further information about Centrex service.
• The phone number for Line 1 must be the same on all phones in order
for the intercom and paging features to work.
• Identify the phone that you will use as the console phone.
• Follow the regular installation instructions in this manual.
• Enable the console phone.
• Store the Centrex pickup codes and the seven- or ten-digit phone numbers, as directed by your phone company, in the one-touch locations.
(See One touch beginning on page 30.)
Enable the console phone
Determine which phone is the console phone for your system and program
the console following the directions to CONSOLE section on page 74.
Console operation
Once another system phone has enabled its delayed ring, the console phone
will receive those calls. All the phone features work in the same manner as
described in this manual.
The console phone can pick up other Centrex lines through Centrex switching.
You can store the Centrex pickup codes and the seven- or ten-digit phone
number (as directed by your phone company) of each station, except for the
console phone, in the one-touch locations.
77
Page 84

Centrex operation
Set ring delay duration
This feature allows other system telephones’ calls
to ring at the console phone. After a specified ring
delay, the calls ring at the console phone. (See
CSL DELAY RING on page 75.)
78
Page 85

About a fax machine
Adding a fax machine
You may wish to use a fax machine with your
phone. Choose line 3 or 4 for the fax machine,
and connect it according to the manufacturer’s
instructions for installation and use.
• That line’s telephone number is your fax
number.
• The same line can be used for outgoing calls,
(incoming faxes get a busy signal when the line
is in use).
• Set your fax machine to answer on the first ring
(follow manufacturer’s instructions).
• To prevent the fax line from ringing at all the
extensions, turn the ringer off for that line at
other extensions (see RINGER ON/OFF on
page 33).
NOTES:
1. Do not connect a fax machine to line 1. Doing
so interrupts the telephone’s intercom data
channel.
2. If you are using a fax switch, or a fax machine
with a built-in fax switch, see Using a fax
switch, below.
Using a fax switch
A fax switch lets the telephone know, before the
phone rings, whether an incoming call is a voice
call or a fax call. Some fax machines have a builtin fax switch. Using a fax switch may affect the
operation of the LINE lights or other system
features.
79
Page 86

Technical specification
Operating temperature 32°F — 122°F
0°C — 50°C
Power adapter input AC120V 60Hz
Power adapter output DC12V 500mA
Backup battery
(purchased separately)
Headset jack 2.5mm, 32 - 150ohm
Wiring limitation No more than 600 feet
REN 0.3B
System signal carrier
frequency
Alkaline 9V, size 1604A
1.7 MHz
80
Page 87

Appendix A
Glossary
Auto Attendant: A 1080 telephone in your multi-telephone system is
assigned to pick up a ringing line automatically after a selected number of
rings. The Auto Attendant plays the selected auto attendant message and
redirects the call if the caller enters an extension number. You can assign up
to 16 Auto Attendants in your telephone system.
Auto line selection: This feature allows you to assign a prime line to be
selected automatically when you lift the handset, press [ SPEAKER] or press
[HEADSET] to answer or make a call.
Caller ID: Caller identification is a subscriber service available from most local
telephone companies for a fee. When you subscribe to caller identification,
you can see who’s calling before you answer the phone if you and the caller
are both in areas offering caller ID service with compatible equipment.
Caller ID with call waiting: This is a single, combined subscriber service that
may be available from your local telephone company. If you subscribe to this
service, you can use your 1080 or 1070 telephone to see who’s calling even
while you are on another call (as long as your caller is in an area with caller
ID service and both telephone companies use compatible equipment).
Central message: When the auto attendant answers a call, and a caller
presses [9], a central message, one not intended for any particular extension,
is created.
Centrex service: This is a special subscriber service that may be available
from your local telephone company for a fee. This 1080, 1070 or 1040
telephone can be used with Centrex service.
COVM: Central Office Voice Mail is a subscriber voice message service that
may be available from your local telephone company. This service may be
called by another name in your area (e.g. call answering).
Data ports (also called AUX ports): You can use these jacks on the
telephones to connect non-system devices such as fax machines to the
telephone lines.
DND: When activated, the Do Not Disturb (DND) feature prevents interruptions
during a call.
DSL: Digital subscriber line (DSL) service is available from your telephone
company for a fee. It allows you to receive high-speed Internet through
your telephone line(s). Some special equipment, splitters and/or filters, are
required for the telephone and data service to work properly together.
Continued on next page
81
Page 88

Appendix A
Glossary
Continued from previous page
DSL filter: DSL filters filter out the high-frequency data signals that carry highspeed data to computers. Any of system lines 2 through 4 that carry Digital
Subscriber Line (DSL) service need DSL filters installed in the telephone line jacks
to improve voice call quality and caller ID reception. You cannot use DSL filters on
system Line 1 because it carries data to all the system phones.
DSL splitter: A DSL splitter separates the high-frequency signals for the DSL
modem from the low-frequency voice signals going to a System Line. System
Line 1, if it carries DSL service, needs a DSL splitter. Using a splitter, rather than a
filter, for Line 1 allows the system data to be carried among the system sets. Most
splitters must be installed by the telephone company. However, some are installed
by the customer. If you are not sure what type of splitter to use, contact your
service provider.
DTAD: The Digital Telephone Answering Device is a sophisticated, tapeless
answering system built into the 1080 telephone. In some installations, messages
for your phone can be recorded on a 1080 in your system.
Home area code: This is the area code for your telephone number. Users simply
dial the seven digits of a telephone number to make a call within their own area
code and 11 digits outside of their area code. If this applies to you, you should
enter your own area code into the telephone as the home area code. After setting,
if you receive a call from within your home area code, the screen will display the
last seven digits of the telephone number.
You may, however, live in a region where for calls within your own area code, you
must dial 10 digits (that is, the area code and telephone number). If this applies to
you, enter 000 for the home area code and enter your area code as a local area
code. After setting, if you receive a call from within your area code, the screen
displays the 10 digits of the telephone number.
For details, see the AREA CODES section (page 42).
Line group: A group of system telephones sharing some lines within a multitelephone system.
Local area code: Most users dial 11 digits to make calls outside their home area
codes. If this applies to you, you do not need to program any local area codes.
However, if you dial only 10 digits to make calls to some areas outside your home
area code (without dialing 1), then set these local area codes on the telephone.
Up to five local area codes can be set. For details, see the AREA CODES section
(page 42). After setting, if you receive a call from one of these local area codes,
the screen displays the 10 digits of the telephone number.
Continued on next page
82
Page 89

Appendix A
Glossary
Continued from previous page
Mailbox: A place to store answering system messages. The 1080 phone can
have separate mailboxes for private messages, central messages, and system
extension messages.
Memory loss protection: Even if the telephone has no AC power or a battery,
all programming and messages are retained.
Navigation keys: These are the buttons you use to program your 1080 phone
and for scrolling through feature options ([ENTER], [ ], [ ], [ ], [ ]).
Prime line: This is the line on the telephone you assign to be selected
automatically when you lift the handset, press [ SPEAKER] or press
[HEADSET] to answer or make a call.
Private message: This is a message that did not come through the auto
attendant. If the 1080 is not an auto attendant, or if it has a private line, or
if the ANSWER DELAY is shorter than the AUTO ATT DELAY, and if DTAD
SETUP ANSWER STATUS is on, callers will leave a private message.
System extension message: This is a message recorded for an individual
1070 or 1040 telephone that is associated with a 1080 phone’s auto
attendant mailbox (pages 52-56).
System telephone: Any 1080, 1070 or 1040 telephone in your telephone
system (also called an extension).
Telephone system (or business system): Two or more system telephones
combined to form an interacting system of shared lines. You can have up to
16 system telephones in the system.
83
Page 90

Appendix B
7
7
Optional spare battery (purchased separately)
Install a 9V alkaline battery (purchased separately) to use some features of
this telephone in the event of a power failure. If power fails and a working
battery is installed, all four lines of this phone will work only to answer calls
with the handset, and to dial calls using the dial pad and the one touch or
redial features. No other features will work until AC power is restored.
After your set has an extension number, you can unplug the telephone line
and install a spare battery.
NOTES:
• Use disposable alkaline batteries only. Do not use rechargeable batteries.
• When there is AC power and there is no spare battery or the spare battery
is low, the screen will show LOW BATT.
1. Unplug all telephone line cords from this set.
2. Press on the tabs in the direction of the arrows and pull the bracket away
from the telephone base.
3. Remove the battery compartment screw with a Phillips screwdriver.
4. Press as shown in the picture and then pull out the battery door.
84
Page 91
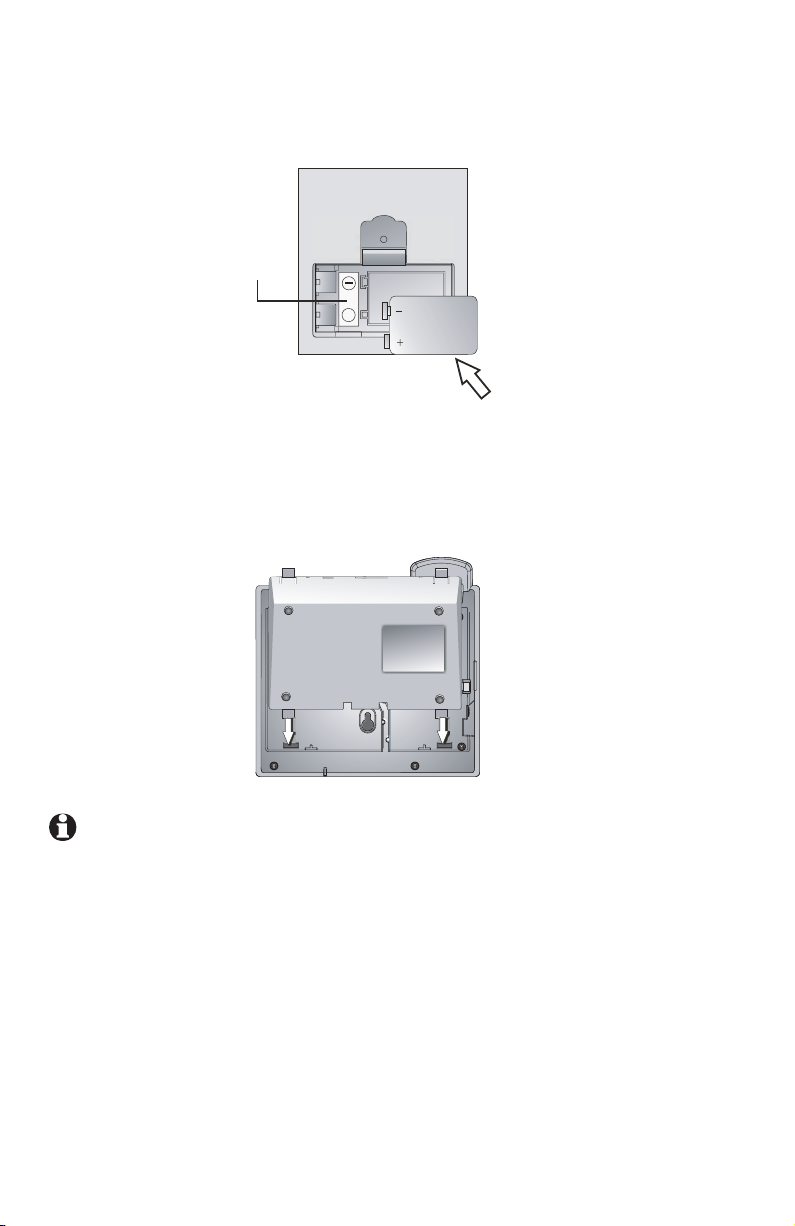
Appendix B
Getting started
Spare battery installation
Polarity label
7
+
7
Optional spare battery (purchased separately)
5. Insert a new alkaline battery (9V, size 1064A, purchased separately)
following the polarity label in the battery compartment.
6. Replace the battery compartment cover and tighten the screw. Replace the
battery compartment screw with a Phillips screwdriver.
7. For desktop mode, reattach the bracket to the telephone base by sliding
the tabs into the holes as shown. Snap the bracket into the telephone base.
Then see pages 11 and 12 to reinstall the telephone line cord.
NOTES:
If there is a power failure when a working battery is installed:
• The telephone screen shows
AC FAIL.
• You can use the handset to make or answer outside calls.
• The handset volume is at the minimum level and only the two lowest levels
are available for the ringer volume.
85
Page 92

Troubleshooting
If you have difficulty with your telephone, please try the suggestions below.
For Customer Service, visit our website at www.telephones.att.com, or
call 1 (800) 222-3111. In Canada, dial 1 (866) 288-4268. Have the
serial number, found on the underside of your phone, available when contacting
customer service. Please retain your receipt as your proof of purchase.
To purchase accessories or replacement parts, please contact customer
service by visiting our website at www.telephones.att.com or calling
1 (800) 222–3111. In Canada, dial 1 (866) 288-4268.
My telephone appears to
be dead.
System features,
(intercom, transfer, hold
release, etc.) do not work
with my old AT&T 4-line
telephones (984, 974, 945,
etc.).
Intercom, hold, call privacy or other advanced
features do not work
properly.
• Make sure the power adapter is securely
plugged into an outlet not controlled by a wall
switch.
• Make sure the telephone line cords are plugged
firmly into the telephone base and the jack.
• Unplug the telephone’s electrical power. Wait for
approximately 15 seconds, then plug it back in.
Allow up to one minute for the telephone to
synchronize.
• This system is not compatible with any other AT&T
4-line small business telephones, except for the
1080, 1070 and 1040 telephones.
• This system is not compatible with any other
AT&T 4-line small business telephones, except
for the 1080, 1070 and 1040 telephones.
• If you have fiber optic service (digital service to
the building, analog service within the building)
VoIP (Voice over the Internet) service, or cable
telephone service, the router that the system
uses may interfere with system communication.
• If you subscribe to DSL service, you need to
have a DSL splitter installed. See Important
information for DSL users section on page 6 in
this manual.
• Make sure that the LINE GROUP assignment is
correct. See page 43.
86
Page 93

Troubleshooting
• If Line 1 is a DSL line, have a professional
install a splitter on the telephone line. See the
installation guide and contact your DSL service
provider for more information.
• If the wiring for your system is greater than 600
feet, some of the advanced features may not
work properly. You may have to remove some
of the phones from remote areas.
•
Check to make sure that each telephone set
has a unique extension number. If the sets
receive AC power at the same time, either at
initial installation or after a power failure, the
extension numbers may be the same. Refer to
the EXTENSION NUMBER section on page 32.
There is no dial tone.
I cannot dial out.
• First, try all the suggestions of
appears to be dead on page 86.
• The telephone line cord might be malfunctioning.
Try installing a new telephone line cord.
• Disconnect the telephone base from the telephone
jack and connect a different telephone. If there
is no dial tone on the telephone either, the
problem is in your wiring or local service. Contact
your local telephone company.
• Make sure a line is selected. Press a line button
[ SPEAKER].
or
• Make sure the
• If there is no dial tone when the
is pressed, make sure the headset is firmly connected in the HEADSET jack.
• First, try all the above suggestions in There
is no dial tone on this page.
• Make sure there is a dial tone before dialing. It is
normal if the telephone takes a second or two to
synchronize before producing a dial tone. Wait an
extra second before dialing.
• Check that all the telephones connected to the
same telephone line are hung up.
• Make sure the telephone is set to the correct
dial mode (pulse dial or tone dial) for the service
in your area. Refer to the
of the user’s manual to set the dial mode.
[HOLD] key is not pressed.
87
My telephone
[HEADSET] key
TONE/PULSE section
Page 94

Troubleshooting
• If the other telephones in your home or office
are having the same problem, the problem is
in the wiring or local service. Contact your local
telephone company (charges may apply).
If you are using the speakerphone, eliminate any
•
background noise. Noise from a television, radio,
or other appliances may cause the telephone
not to dial out properly. If you cannot eliminate
the background noise, first try muting the
telephone before dialing, or dialing from another
room in your home with less background noise.
I cannot page or make
intercom calls.
I cannot transfer outside
calls.
• Make sure you dialed the extension correctly.
• Make sure Line 1 is connected and has the same
phone number on all system phones.
• The destination telephone may be on an external
call. Wait and try again.
• Make sure the Do Not Disturb function is turned
off on the destination system telephone (see the
DO NOT DISTURB section on the user’s manual).
• Make sure the
make a page or Intercom call. If the light is on, the
system is busy or the intercom is unavailable. Try
again when the intercom light goes out.
• Make sure the telephone line cord connected to
line jack
• Check to make sure that each telephone set has
a unique extension number. If the sets receive
AC power at the same time, either at initial
installation or after a power failure, the
extension numbers may be the same. Refer
to the EXTENSION NUMBER section on page 32.
• If you are on a conference call with another telephone
in the same system (see the
section on the user’s manual), the call cannot be
transferred.
• If the destination telephone is on an outside call
or intercom call with another system telephone,
the call cannot be transferred.
[INTERCOM] light is off before you
L1/L2 was provided with the telephone.
Conference calls
88
Page 95

Troubleshooting
• All extensions must have the same outside telephone
line connected to Line 1.
• Make sure the telephone line cord connected to
line jack
• Check to make sure that each telephone set has
a unique extension number. If the sets receive
AC power at the same time, either at initial
installation or after a power failure, the
extension numbers may be the same. Refer
to the EXTENSION NUMBER section on page 32.
• Make sure that the LINE GROUP assignment is
correct. See page 43.
L1/L2 was provided with the telephone.
LOW BATT appears on
screen.
The telephone does not
ring when there is an
incoming call.
• No spare battery is installed or the spare battery
needs to be replaced.
• Remove and re-install the battery.
• Make sure the ringer is on (page 33).
• Make sure the telephone line cord(s) and the
power adapter are plugged in properly (See
pages 11-15).
• There may be too many extension telephones on
the telephone line to allow all of them to ring
simultaneously. Try unplugging one phone at a
time until the phones start ringing.
• Test a working telephone at the same telephone
jack. If another telephone has the same problem,
the problem is in the telephone jack. Contact
your local telephone company (charges may apply).
• The telephone line cord might be malfunctioning.
Try installing a new telephone line cord.
• Make sure the
activated (see the DO NOT DISTURB section on
the user’s manual).
• Make sure the ringer delay time (page 34) is not
longer than the answer delay time of the answering system (see the ANSWER DELAY section on
page 58). This would cause the answering system
to answer the call before the phone rings.
• If you are on a call, a beep alerts you of
incoming calls on the other lines.
• Make sure that the
correct. See page 43.
Do Not Disturb feature is not
LINE GROUP assignment is
89
Page 96

Troubleshooting
Cannot join a conversation
in progress.
The call privacy feature
does not work.
Error tone (fast busy signal) is heard when making
a page call.
A double beep sounds
every 30 seconds.
Operation during a power
failure.
• The call privacy feature prevents another set
on the system from interrupting a conversation.
Make sure you press the LINE button to release
privacy. (See the Call privacy section on the
user’s manual.)
• In some installations that have fiber optic service
(digital service to the building, analog service
within the building) the signals to the extensions
may not support the call privacy feature.
• The Do Not Disturb feature is activated at the
extension you are calling.
• There is a call on hold at this extension. Press
and release the LINE button of the call on hold
to return to the call and turn off the reminder
beep.
• This phone operates during a power failure if
a working battery is installed. You will be able
to answer calls with the handset, and dial calls
using the dial pad keys and the one-touch or
redial features. No other features will work until
power is restored. All programming and voice
messages are retained during a power failure.
The screen displays AC
FAIL.
Display screen is blank. • Make sure the power cord is connected to both
• The phone has been disconnected from AC
power. When AC power is restored, the screen
returns to the usual display, and one-touch
numbers will be retained but the redial numbers
will be erased.
the phone and an electrical outlet not controlled
by a wall switch.
90
Page 97

Troubleshooting
My calls fade out or cut in
and out when I am using
the telephone.
• If you have a headset plugged into the telephone,
try unplugging it and firmly plugging it in again.
• Disconnect the telephone base from the
modular jack and plug in another corded
telephone. If calls are still not clear, the problem
is probably in the wiring or local service. Contact
your local service company (charges may apply).
• If you are using the speakerphone when this
problem occurs, eliminate any background noise.
Noise from the television, radio, or other appliances
may cause the speakerphone to cut in and out.
Try engaging the [MUTE] button when you are not
speaking or eliminating the background noise.
• If you subscribe to DSL service, you need to
have a DSL splitter installed. See Important
information for DSL users section on page 6 in
this manual.
• If you have DSL service,
three telephone sets, and you have installed
microfilters, you may need to have a DSL splitter
installed by your DSL service provider.
and you have more than
The sound quality of the
headset is poor
I hear other calls when
using the telephone.
• Unplug it and firmly plug it in again.
• Disconnect the telephone base from the telephone
jack. Plug in a different telephone. If you still hear
other calls, the problem is probably in the wiring
or local service. Call your local telephone company.
• Make sure you are using the round black cords
that came with the phone. These cords help
prevent crosstalk (hearing other calls).
91
Page 98

Troubleshooting
My caller ID features are
not working properly
(1070 and 1080 only).
COVM line indicator remains on (1070 and 1080
only).
The system does not
receive caller ID or
the system does not
display caller ID during
call waiting (1070 and
1080 only).
• Caller ID is a subscription service. You must
subscribe to this service from your local
telephone company for this feature to work on
your telephone.
• The caller may not be calling from an area that
supports caller ID.
• Both you and the caller’s telephone companies
must use equipment that are compatible with
caller ID service.
• Make sure the area codes are set correctly on
the telephone (page 42).
• Reset the phone. See
electronic equipment on the next page.
• Make sure you have reviewed all messages on
that line.
• You may have received a false signal from the
central office. To clear, see COVM reset section
on the 1080 or 1070 user’s manual.
• Make sure you subscribe to caller ID with call
waiting features services provided by the local
telephone company.
• The caller may not be calling from an area that
supports caller ID.
• Both you and the caller’s telephone companies
must use equipment that are compatible with
caller ID service.
• If your phone is currently in use and a new call
comes in, you must press the [ ] to see the
new call. This procedure allows you to see call
waiting caller ID and caller ID from other lines
on the phone.
• Make sure the telephone line cords were
provided with the telephone.
• If you subscribe to DSL service you need to
have a DSL splitter installed. See Important
information for DSL users section on page 6 in
this manual.
Common cure for
92
Page 99

Troubleshooting
Common cure for
electronic equipment:
The answering system
does not answer at the
correct time (1080 only).
If the telephone is not responding normally, try
the following (in the order listed):
1. Disconnect the power to the telephone base.
2. Disconnect the spare battery (if the set has
one).
3. Wait a few minutes before connecting power to
the telephone base.
4. Re-install the spare battery (if the set has one).
5. Wait for the telephone to synchronize its
connection. This may take up to one minute.
• For private messages, make sure the answering
system is on. Select ON in ANSWER STATUS
(see the ANSWER STATUS section on the 1080
user’s manual).
Toll Saver is activated, the number of rings
• If
changes to eight seconds when there are new
messages waiting (see the TOLL SAVER section
on page 58 of this manual).
• If you subscribe to the Centrex service provided
by your local telephone company, make sure
the ANSWER DELAY time (see the ANSWER
DELAY on page 58 of this manual) is shorter
than the CSL DELAY RING time on the same
telephone (see the CSL DELAY RING section on
page 75 of this manual).
• If a 1080 extension is on a phone call, or
recording, or playing any type of message or
announcement, it will not be able to answer
incoming calls.
The outgoing announcement is not clear (1080
only).
• When recording the announcement, make sure
you speak in a normal tone of voice about nine
inches from the front of the telephone base.
HEADSET is selected in the AUTOMATIC
• If
MODE menu and a headset is connected on
the telephone, you need to speak into the
microphone of the headset to record the
announcement (page 39).
• Make sure there is no background noise
(television, music, traffic, etc.) when recording.
93
Page 100

Troubleshooting
The answering system
does not record
messages (1080 only).
Some messages on the
answering system are
cut off (1080 only).
• Make sure the answering system is on.
• If the memory is full, the system announces
"Memory full" and then hangs up. You need to
delete some old messages in order to make
room for new messages.
GREETING ONLY is selected in the MESSAGE
• If
LENGTH menu, the answering system only
plays back the outgoing announcement. It does
not record incoming private messages. (See the
MESSAGE LENGTH section on the 1080 user’s
manual.)
• If you subscribe to the Centrex service provided
by your local telephone company, make sure
the ANSWER DELAY time (see the ANSWER
DELAY section on the 1080 user’s manual) is
shorter than the CSL DELAY RING time on the
same telephone (see the CSL DELAY RING
section on the user’s manual).
• If a caller reaches the maximum recording time
you set for each message (see the MESSAGE
LENGTH section on the 1080 user’s manual),
the system disconnects and part of the
message may be lost.
• If the caller pauses for more than seven
seconds, the system stops recording and
disconnects the call.
• If the memory on the system becomes full
during a message, the system stops recording
and disconnects the call.
• If the caller’s voice is very soft, the system may
stop recording and disconnect the call.
• If the
DTAD INTERCEPT feature is on and
another telephone answers the call on that line,
the message stops recording (see the DTAD
INTERCEPT section on the 1080 user’s manual).
94
 Loading...