

Page 1
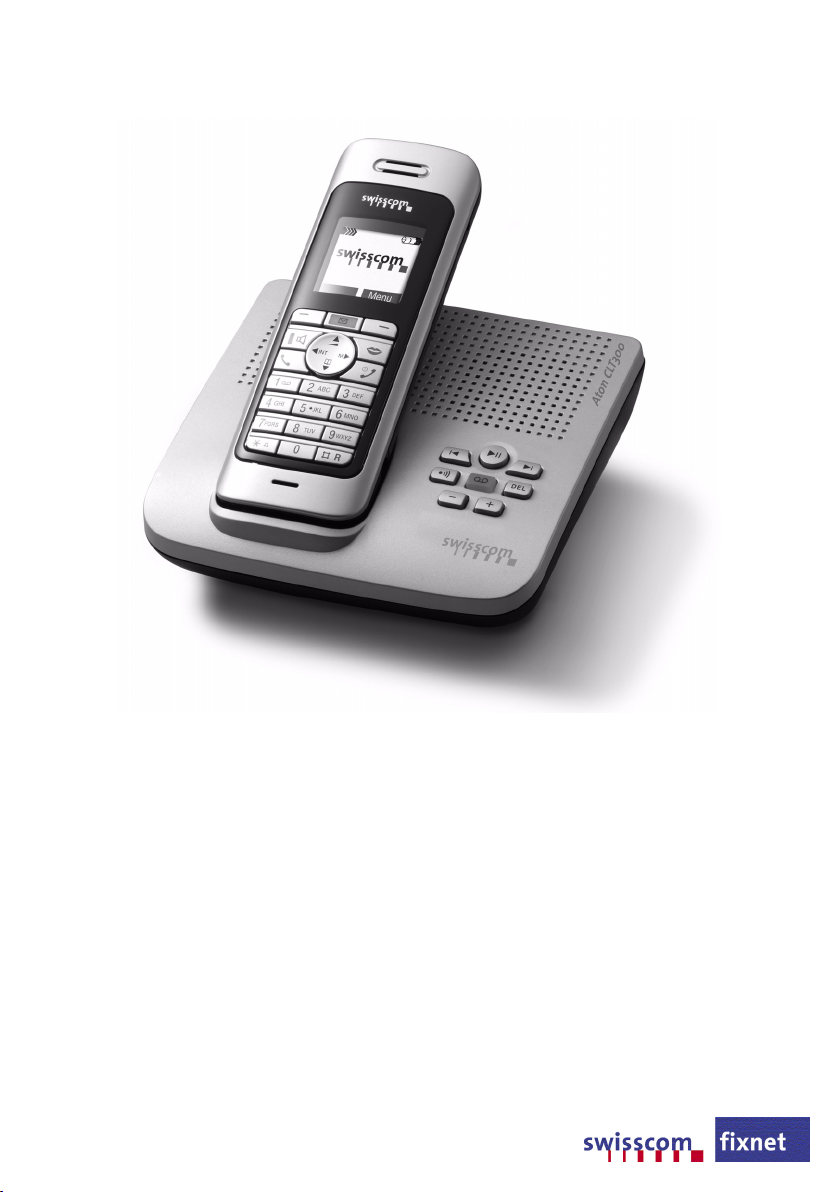
Aton CLT300
User guide
-1
Page 2

0
Page 3
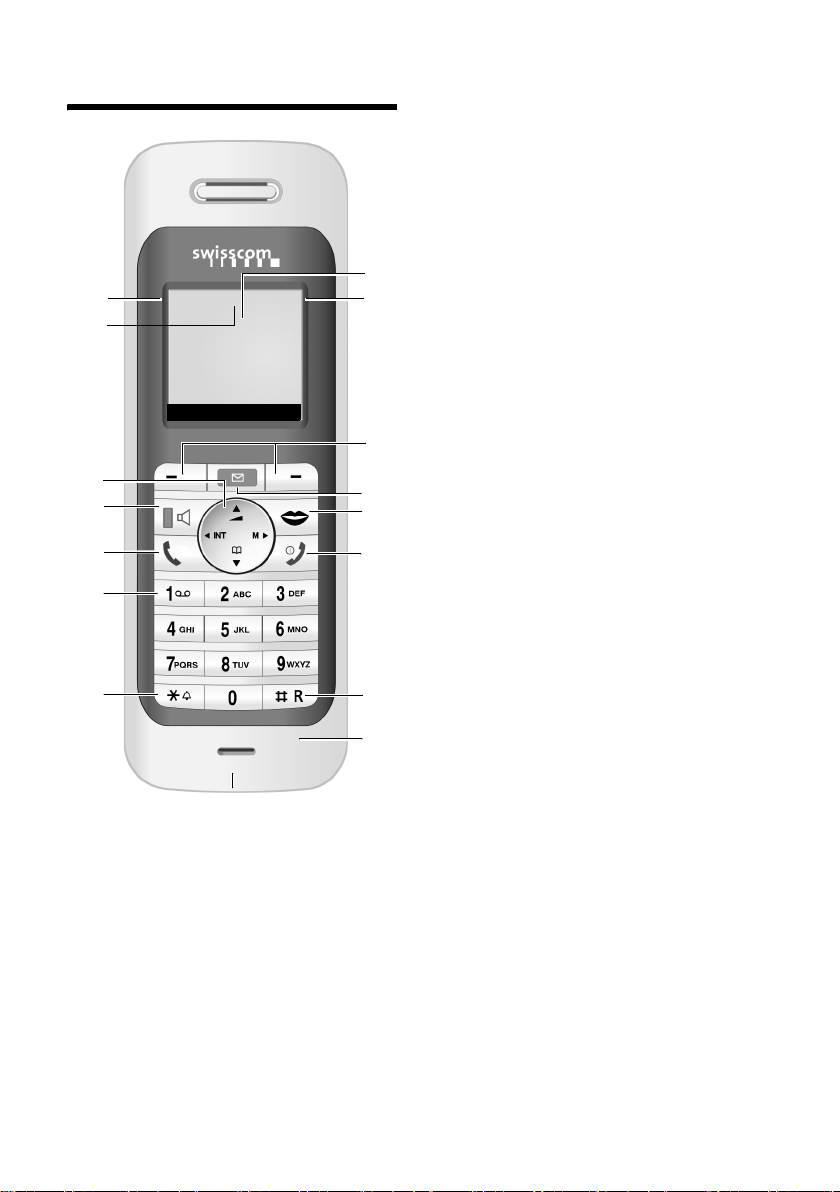
Handset at a glance
Handset at a glance
15
16
14
13
12
11
10
Ð × V
INT 1
10.05.05 09:45
INT SMS
9
1 Display in idle status
2 Charge status of the batteries
= e V U (flat to full)
= flashes: batteries almost flat
e V U flashes: batteries charging
3 Display keys (page 14)
4 Message key
Access to calls and message lists;
Flashes: new message or new call.
5 End call key, On/Off key
1
2
3
4
7
5
6
8
End call, cancel function, go back one menu
level (press briefly), back to idle status (press
and hold), activate/deactivate handset
(press and hold in idle status)
6 Hash key
Confer (Flash) (press and hold),
Toggle between upper/lower case and digits
7 « Swisscom Voice Portal » key
8 Connection socket for headset
9 Microphone
10 Star key
Ringtones on/off (press and hold),
Open table of special characters
11 Key 1
Select answering machine/network mailbox
(press and hold)
12 Tal k key
Answer a call, open last number redial list
(press briefly), start dialling (press and hold)
13 Handsfree key
Switch between earpiece and handsfree
mode;
Lights up: handsfree activated;
Flashes: incoming call
14 Control key (page 15)
15 Signal strength
Ð i Ñ Ò (high to low)
| flashes: no reception
16 Answering machine symbol
Answering machine switched on.
Flashes: answering machine is recording a
message or is being operated by another
caller.
1
Page 4
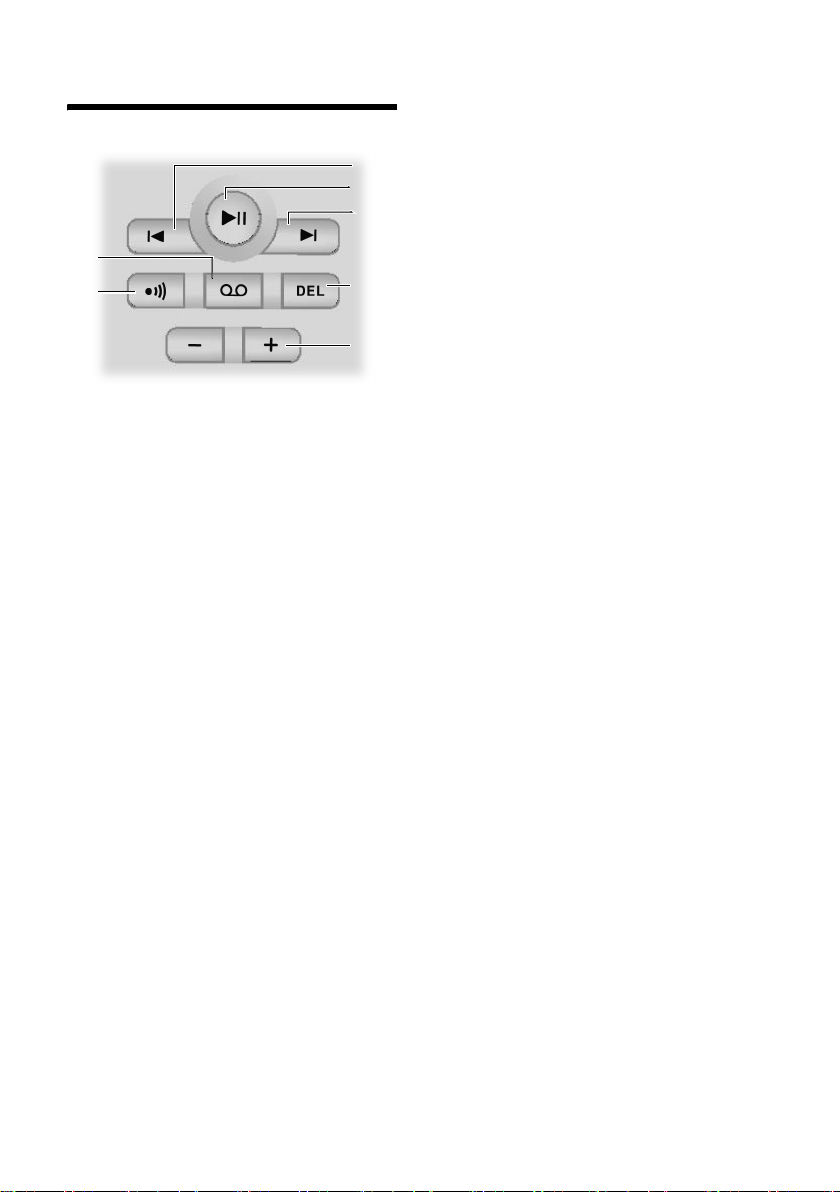
Base station at a glance
Base station at a glance
3
4
5
2
1
You can use the keys on the base station to
operate the integrated answering
machine and register the handset to the
base station.
1 Registration/paging key
Press briefly: search for handsets "Paging",
see page 42.
Register handsets and DECT devices (press
and hold), see page 41.
2 On/Off key: activate/deactivate answering
machine.
Lights up: answering machine is activated.
Flashes: at least one new message is
present.
6
7
Please remember:
u If the answering machine is being oper-
ated from a handset or if it is recording
a message, it cannot be operated from
the base station.
u If the On/Off key flashes although the
answering machine is switched off, it
means that there is still at least one
new message that has not been played
back yet.
During message playback:
3 Skip back to beginning of message (press
once) or to previous message (press twice).
4 Play/stop key:
Play back new messages from the answering
machine or cancel the playback (press
briefly).
Play back new and old messages (press and
hold).
5 Skip to next message (press once) or next
message but one (press twice).
6 Delete current message.
7 Adjust volume during message playback:
ð = quieter; ñ = louder.
While an external call is being signalled:
adjust ringtone volume.
2
Page 5

Contents
Contents
Handset at a glance . . . . . . . . . . . 1
Base station at a glance . . . . . . . 2
Safety precautions . . . . . . . . . . . . 5
Aton CLT300 –
more than just a telephone . . . . . 6
First Steps . . . . . . . . . . . . . . . . . . . 6
Pack contents . . . . . . . . . . . . . . . . . . . . 6
Installing the base station . . . . . . . . . . 6
Setting up the handset for use . . . . . . . 7
Menu tree . . . . . . . . . . . . . . . . . . 10
Making calls . . . . . . . . . . . . . . . . 13
Making an external call . . . . . . . . . . . 13
Ending a call . . . . . . . . . . . . . . . . . . . . 13
Answering a call . . . . . . . . . . . . . . . . . 13
Calling Line Identification . . . . . . . . . 13
Handsfree operation . . . . . . . . . . . . . 13
Muting . . . . . . . . . . . . . . . . . . . . . . . . 14
Operating the handset . . . . . . . . 14
Control key . . . . . . . . . . . . . . . . . . . . . 14
Display keys . . . . . . . . . . . . . . . . . . . . 15
Returning to idle status . . . . . . . . . . . 15
Menu guidance . . . . . . . . . . . . . . . . . 15
"Swisscom Voice Portal" key . . . . . . . . 15
Correcting incorrect entries . . . . . . . . 16
Network services . . . . . . . . . . . . 17
Setting functions for the next call . . . 17
Setting functions for all
subsequent calls . . . . . . . . . . . . . . . . . 17
Functions during a call . . . . . . . . . . . . 18
Functions after a call . . . . . . . . . . . . . 18
Activating/deactivating
network mailbox . . . . . . . . . . . . . . . . 18
Using the directory and lists . . . 19
Directory/call-by-call list . . . . . . . . . . . 19
Transferring SIM card entries . . . . . . . 21
Last number redial list . . . . . . . . . . . . 23
Opening lists with the message key . 23
Making cost-effective calls . . . . 24
Displaying call duration and charges . 24
Operating the answering
machine . . . . . . . . . . . . . . . . . . . . 26
Operation via the handset . . . . . . . . . 26
Activating/deactivating listen in . . . . . 29
Setting up the answering machine . . 29
Resetting fast access on the
answering machine . . . . . . . . . . . . . . 30
Operating when on the move
(remote operation) . . . . . . . . . . . . . . . 30
SMS (text messages) . . . . . . . . . 32
Writing/sending an SMS . . . . . . . . . . . 32
Receiving an SMS . . . . . . . . . . . . . . . . 34
Notification by SMS . . . . . . . . . . . . . . 36
SMS mailboxes . . . . . . . . . . . . . . . . . . 36
Setting SMS centre . . . . . . . . . . . . . . . 37
SMS info services . . . . . . . . . . . . . . . . 38
SMS to a PABX . . . . . . . . . . . . . . . . . . . 38
Activating/deactivating the
SMS function . . . . . . . . . . . . . . . . . . . . 39
SMS troubleshooting . . . . . . . . . . . . . 39
Using the network mailbox
(Combox) . . . . . . . . . . . . . . . . . . . 40
Configuring the network mailbox
for fast access . . . . . . . . . . . . . . . . . . . 40
Viewing the network mailbox
message . . . . . . . . . . . . . . . . . . . . . . . 40
Using several handsets . . . . . . . 41
Registering handsets . . . . . . . . . . . . . . 41
De-registering handsets . . . . . . . . . . . 41
Locating a handset ("paging") . . . . . . 42
Changing the base station . . . . . . . . . 42
Making internal calls . . . . . . . . . . . . . . 42
Linking internal callers to
an external call . . . . . . . . . . . . . . . . . . 43
Changing the name of a handset . . . . 43
Changing a handset's internal
number . . . . . . . . . . . . . . . . . . . . . . . . 44
Using a handset as a room monitor . . 44
Handset settings . . . . . . . . . . . . . 45
Changing the display language . . . . . 45
Setting the display . . . . . . . . . . . . . . . 45
Setting the screen picture . . . . . . . . . . 46
Setting display illumination . . . . . . . . 46
Activating/deactivating auto answer . 46
Adjusting the loudspeaker volume . . . 46
3
Page 6

Contents
Changing ringtones . . . . . . . . . . . . . . 47
Activating/deactivating first
ring muting . . . . . . . . . . . . . . . . . . . . 48
Activating/deactivating
advisory tones . . . . . . . . . . . . . . . . . . 48
Setting the alarm clock . . . . . . . . . . . 48
Restoring the handset
default settings . . . . . . . . . . . . . . . . . 49
Base station settings . . . . . . . . . 49
Protecting against unauthorised
access . . . . . . . . . . . . . . . . . . . . . . . . . 49
Changing ringtones . . . . . . . . . . . . . . 49
Activating/deactivating the
wait melody . . . . . . . . . . . . . . . . . . . . 49
Repeater support . . . . . . . . . . . . . . . . 50
Restoring default settings to
base station . . . . . . . . . . . . . . . . . . . . 50
Connecting the base station
to the PABX . . . . . . . . . . . . . . . . . 51
Flash time . . . . . . . . . . . . . . . . . . . . . . 51
Setting pauses . . . . . . . . . . . . . . . . . . 51
Appendix . . . . . . . . . . . . . . . . . . . 52
Care . . . . . . . . . . . . . . . . . . . . . . . . . . 52
Contact with liquid . . . . . . . . . . . . . . 52
Faults and Self-help with
Troubleshooting . . . . . . . . . . . . . . . . . 52
Warranty/Maintenance/Repair/
Authorisation . . . . . . . . . . . . . . . . . . . 53
Repair/Maintenance . . . . . . . . . . . . . . 53
Specifications . . . . . . . . . . . . . . . . . . . 54
Notes on the
operating instructions . . . . . . . . 55
Symbols used . . . . . . . . . . . . . . . . . . . 55
Example: menu input . . . . . . . . . . . . . 55
Example: multiple line input . . . . . . . 56
Writing and editing a text message . . 56
Accessories . . . . . . . . . . . . . . . . . 58
Index . . . . . . . . . . . . . . . . . . . . . . 61
4
Page 7
Safety precautions
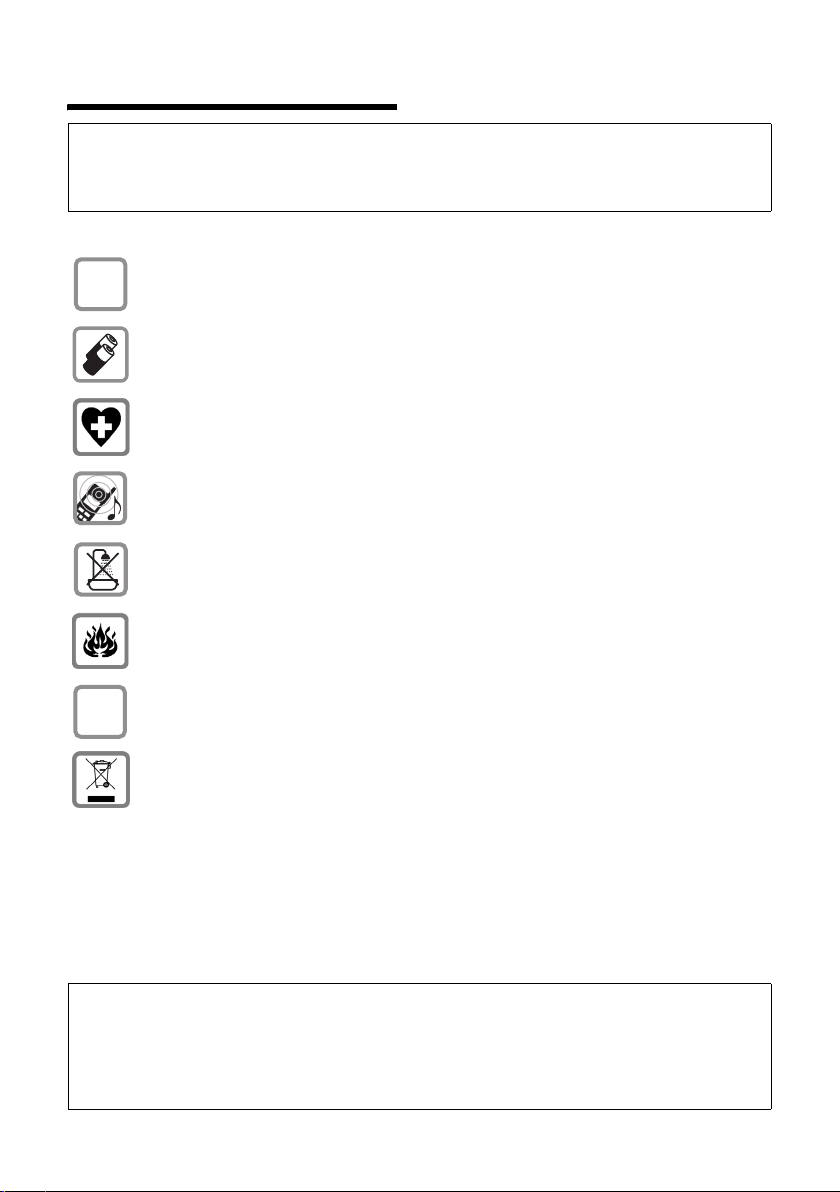
Safety precautions
Caution:
Read the safety precautions and the user guide before use.
Explain their contents to your children, and the potential hazards associated with using the telephone.
Only use the mains adapter supplied, as indicated on the underside of the base
$
station.
Fit only the approved, rechargeable batteries! Never use conventional (non-
rechargeable) batteries as this could damage your health and cause injury. Use
the batteries as directed in this user guide (page 54).
The operation of medical appliances may be affected. Be aware of the technical
conditions in your particular environment, e.g. doctor's surgery.
The handset may cause an unpleasant humming noise in hearing aids.
Do not install the base station in bathrooms or shower rooms. The handset and
base station are not splash proof (page 52).
Do not use the phone in environments with a potential explosion hazard,
e.g. auto paint shops.
ƒ
If you give your Aton CLT300 to someone els e, m ake sure you a lso give th em the
user guide.
Information about disposal
At the end of its service life this product must not be disposed of among the normal household refuse. Instead, it must be handed in at a sales outlet or at a collection point for recycling electrical and electronic devices in accordance with
regulations governing the return, taking back and disposal of electrical and electronic devices (ORDEA).
The materials can be recycled as indicated. By recycling materials and reusing or
utilising old appliances in any other way you are making an important contribution to the protection of the environment.
Note:
– Not all of the functions described in this user guide are available in all countries. CLIP (Calling Line
Identification Presentation), SMS (Short Message Services) and "Swisscom Voice Portal": these
functions depend on the network provider.
EATONI predictive text: EATONI predictive text helps you when you are writing text messages. It can
be activated or deactivated (page 57).
5
Page 8
Aton CLT300 – more than just a telephone
Aton CLT300 –
more than just a telephone
Your phone not only enables you to send
and receive text messages over the fixed
network and store up to 150 telephone
numbers (page 19) – it can do a whole lot
more:
u You can designate important people as
VIPs so you can tell important calls from
the ringtone (page 19).
u You can store anniversaries (page 21)
in your phone and it will remind you of
them in advance.
u Select frequently used phone numbers
at the press of a single key (page 19).
u View missed calls on your phone
(page 24).
Have fun using your new telephone!
First Steps
Pack contents
Please note:
u Never expose the telephone to heat
sources, direct sunlight, other electrical
appliances.
u Protect your Aton CLT300 from mois-
ture, dust, corrosive liquids and
vapours.
Range and reception strength
Range:
u Up to 250 m in the open
u Up to 40 m in buildings
Reception strength:
The display shows the quality of the radio
contact between the base station and
handset:
u Good to poor: ÐiÑÒ
u No reception: | flashes
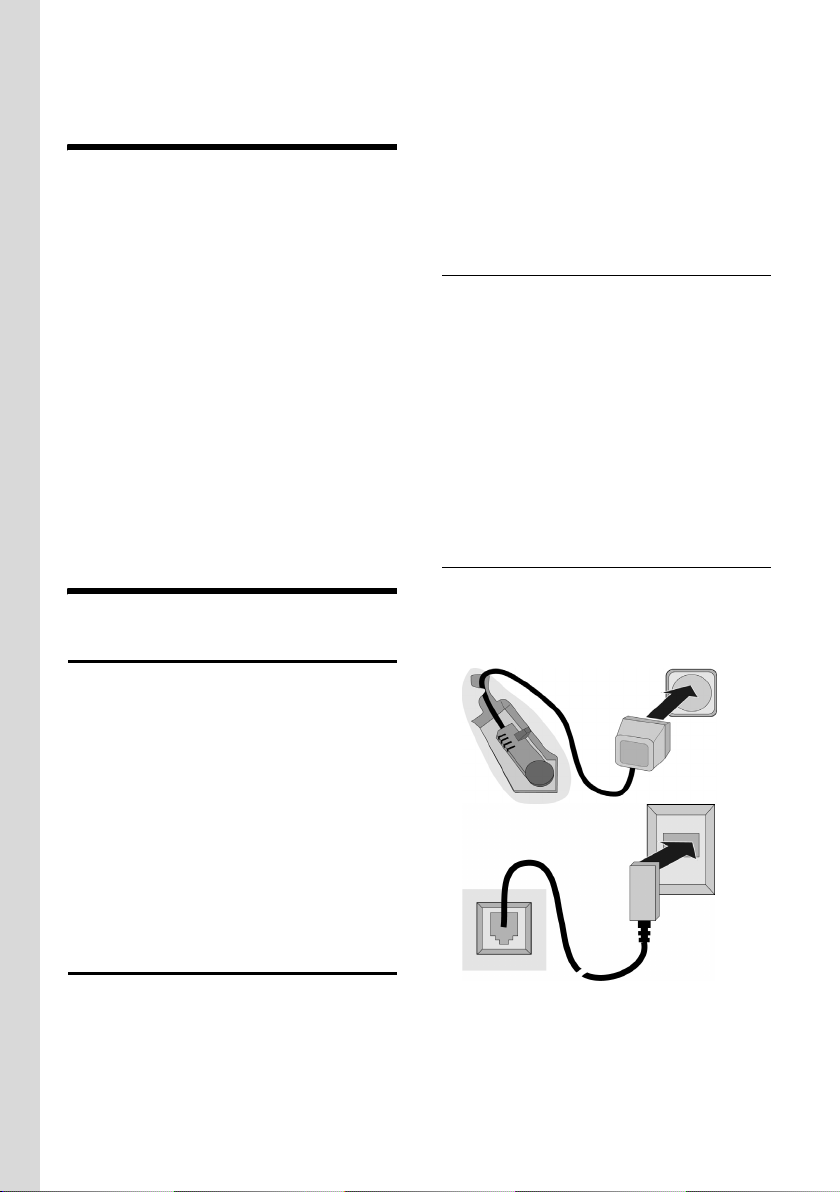
Connecting the base station
¤ First connect the mains adapter and
then the phone jack as shown belowand place the cables in the cable
recesses.
u one Aton CLT300 base station,
u one handset,
u one mains adapter,
u one phone cord,
u two batteries,
u one battery cover,
u one belt clip,
u one user guide (German, French,
Italian).
u one headset.
Installing the base station
The base is designed for use in closed, dry
rooms with a temperature range of +5 °C
to +45 °C.
Set up the base station at a central point in
the apartment or house.
6
2
1
1
3
1
1
1 Underside of the base station (detailed
view)
2 Mains adapter 230 V
3 Phone jack with phone cord
Page 9
First Steps
Please note:
u The mains adapter must be always
connected, as the phone will not oper-
ate without mains connection.
u If you buy a replacement phone cord
from a store, ensure that the phone
jack is connected correctly.
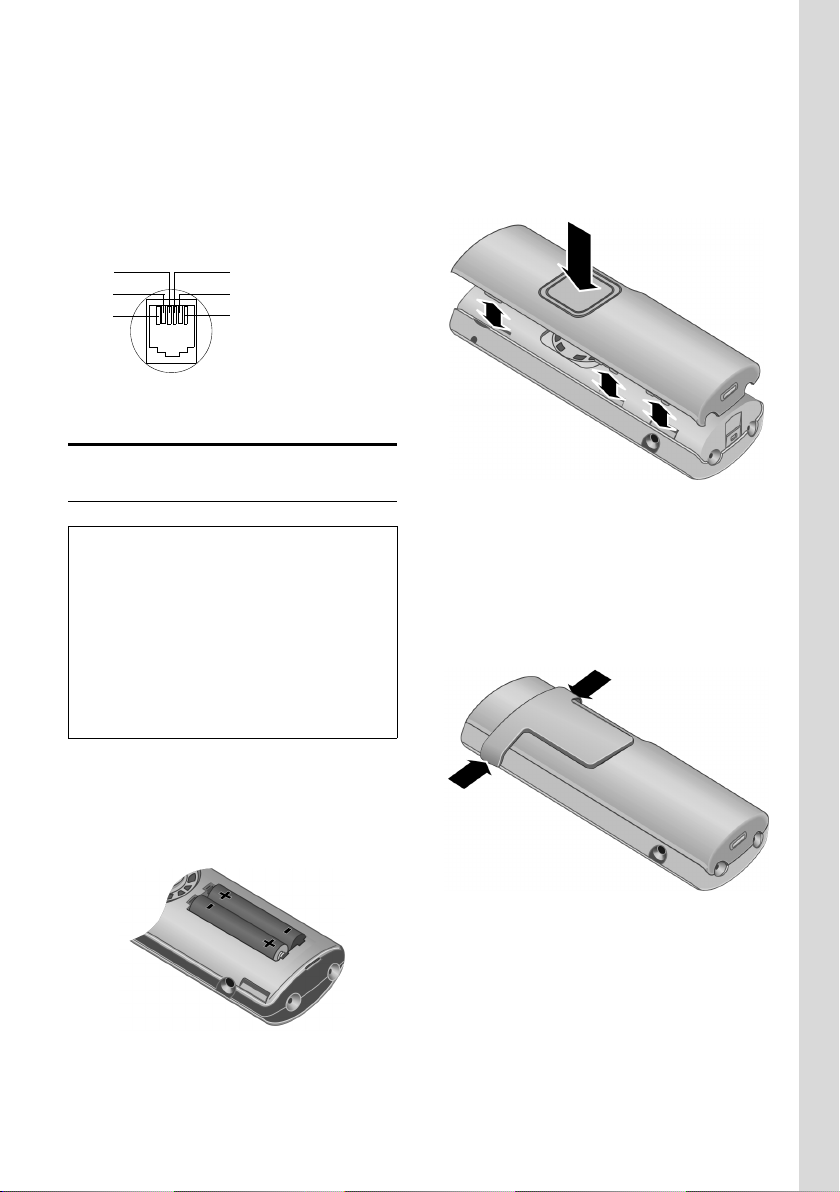
Correct phone jack assignment
1unused
3
2
1
4
5
6
2unused
3a
4b
5unused
6unused
Setting up the handset for use
Inserting the batteries
Caution:
Use only the rechargeable batteries recommended (page 54). Never use conventional
(non-rechargeable) batteries or other battery
types as this may cause significant damage to
health and property. For example, the outer
casing of the batteries could be destroyed or
the batteries could explode. The phone could
also malfunction or be damaged as a result of
using batteries that are not of the recommended type.
Closing the battery cover
¤ First align the notches on the side of
the battery cover with the lugs on the
inside of the casing.
¤ Then press the cover so that it clicks
into place.
Attaching the belt clip
There are notches for attaching the belt
clip on the side of the handset at the same
height as the display.
¤ Press the belt clip onto the back of the
handset so that the protrusions on the
belt clip engage with the notches.
¤ Fit the batteries with the correct polar-
ity (see diagram).
The polarity is indicated in/on the battery
compartment.
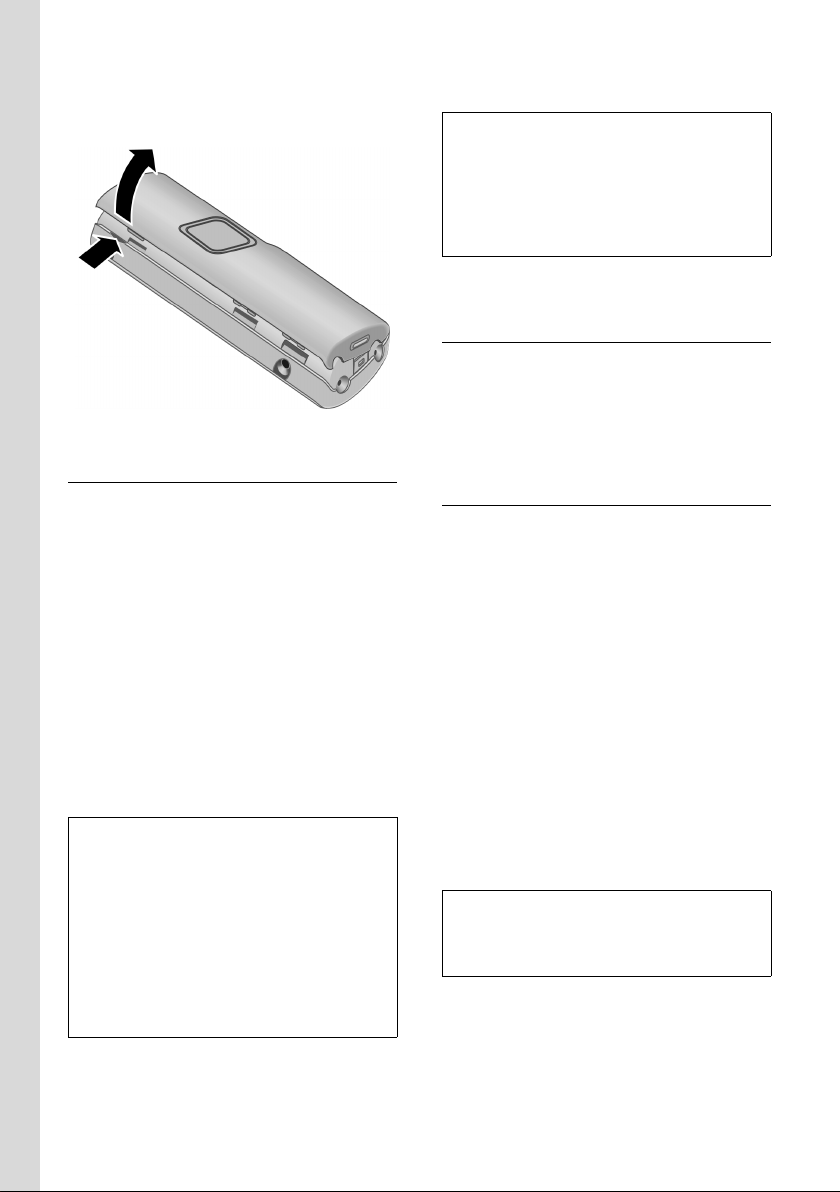
Opening the battery cover
¤ If fitted, remove belt clip.
7
Page 10
First Steps
¤ Insert a fingernail into the headset
socket cavity and pull the battery cover
upwards.
Placing the handset in the base station and registering
¤ Place the handset in the base with its
display facing upwards.
The handset registers automatically. Registration can take up to 5 minutes. During
this time Regstr.Procedure appears in the
display and the name of the base station
flashes, e.g. Base 1. The handset will be
assigned the lowest unassigned internal
number (1–6).
This will appear in the display when registration is complete, e.g. INT 1. This means
that the number 1 has been assigned. If
the internal numbers 1–6 are already
assigned to other units, the number 6 is
overwritten.
Notes:
– Automatic registration is only possible
while no-one is making calls using the base
station.
– Each key press interrupts the automatic
registration.
– If automatic registration does not work the
handset will have to be registered manually
(page 41).
– You can change the name of the handset
(page 44).
To charge the batteries, leave the handset
in the base station.
Notes:
– If the handset has switched itself off
because the batteries are flat and is then
placed in the base station, it will switch
itself on automatically.
– Only place the handset in the base or
charging cradle that is intended for it.
For questions and problems see page 52.
Headset socket
You can connect the following types of
headset (with jack connector): HAMA
Plantronics M40, MX100, MX150 and the
supplied headset.
Initial charging and discharging of batteries
If the handset is activated, the flashing
battery icon e in the top right of the display indicates that the batteries are being
charged.
During handset operation, the battery
icon indicates the charge status of the batteries (page 1). The correct charge level
can only be displayed if the batteries are
first fully charged and discharged.
¤ To do this, leave the handset in the
base or charging cradle continuously
for ten hours. Your handset need not
be switched on for it to charge.
¤ Afterwards, remove the handset from
the base station and do not put it back
again until the batteries are fully dis-
charged.
Note:
After the first battery charge and discharge
you may replace your handset in its base after
every call.
Please remember:
u Always repeat the charging and dis-
charging procedure if you remove the
batteries from the handset and re-
insert them.
8
Page 11

u The batteries may warm up as they are
charging. This is not dangerous.
u After a time the charge capacity of the
batteries will decrease for technical reasons.
Your answering machine is set with a
standard announcement.
¤ Set the date and the time, for example
to ensure the correct time of incoming
calls is recorded.
Setting the date and time
¤ If you have not yet set the date and
time, press the display key
the input field.
To change the time, open the input field
via:
¢ Ð ¢ Date/Time
v
§Time§ to open
¤ Change multiple line input:
Date:
Enter day, month and year in 6-digit
format.
Time:
Enter hours and minutes with 4 digits,
e.g. Q M 1 5 for 07:15 a.m.
§Save§ Press the display key.
First Steps
Display in idle status
Once the phone is registered and the time
set, the idle display looks as shown here
(example). If the device has an answering
machine the answering machine icon ×
is also shown in the header.
ÐV
INT 1
10.05.05 07:15
INT SMS
Your phone is now ready for use.
9
Page 12
Menu tree
Menu tree
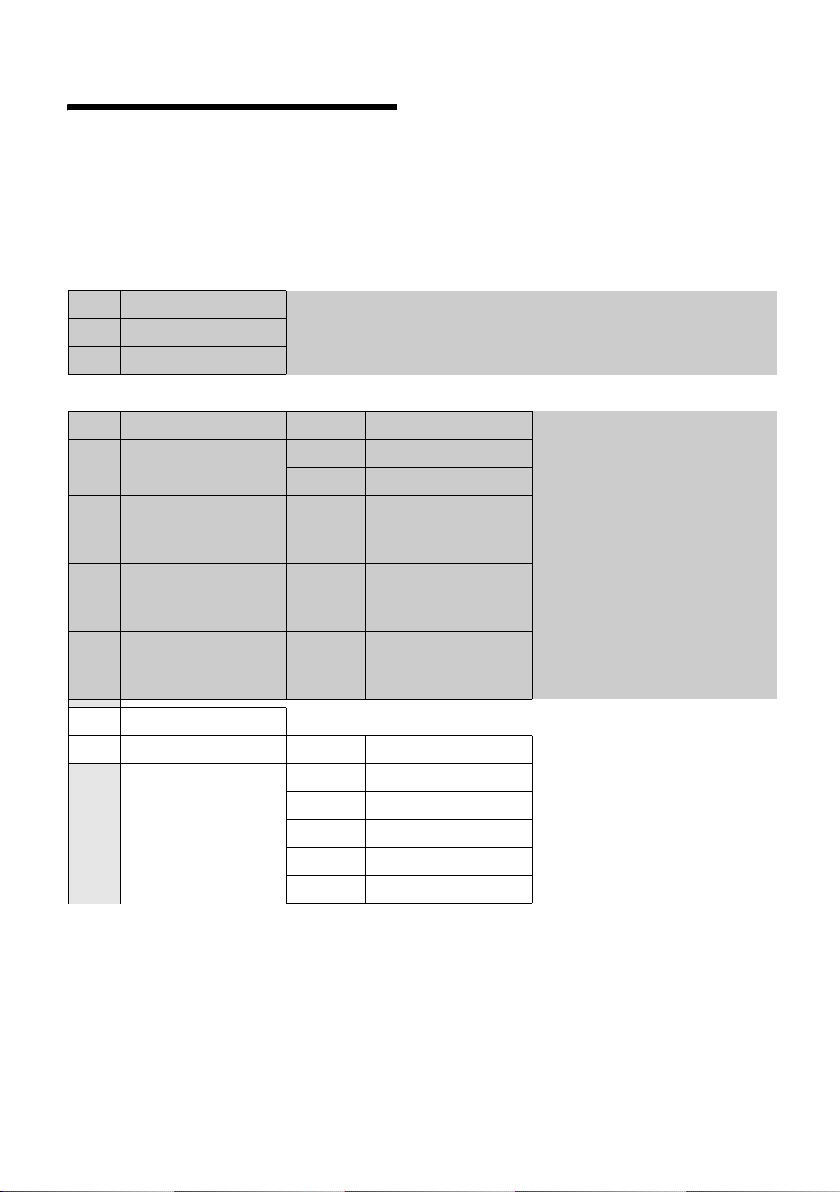
Instead of scrolling to locate a menu function, you can select a menu function faster by
opening the menu and keying in the digit combination ("shortcut").
Example: v 5 2 11 for "Set ringtone for external calls".
With the telephone in idle status, press v (open main menu):
1 SMS î
You have activated an SMS mailbox (general or private) without a PIN
1-1 New SMS (page 32)
1-2 Incoming 0 (page 35)
1-3 Outgoing 0 (page 33)
You have activated an SMS mailbox with a PIN or 2-3 mailboxes
1-1 Mailbox 1-1-1 New SMS (page 32)
1-1-2 Incoming 0 (page 35)
1-1-3 Outgoing 0 (page 33)
1-2
to
1-4
Mailbox 1
Mailbox 2
Mailbox 3
1-2-1
to
1-4-1
1-2-2
to
1-4-2
1-2-3
to
1-4-3
New SMS (page 32)
Incoming 0 (page 35)
Outgoing 0 (page 33)
1-5 SMS Service (page 38)
1-6 Settings 1-6-1 Service Centres (page 37)
1-6-2 SMS Mailboxes (page 36)
1-6-3 Notify Number (page 36)
1-6-4 Notify Type (page 36)
1-6-5 Status Report (page 33)
1-6-6 Subscribe to SMS (page 32)
10
Page 13
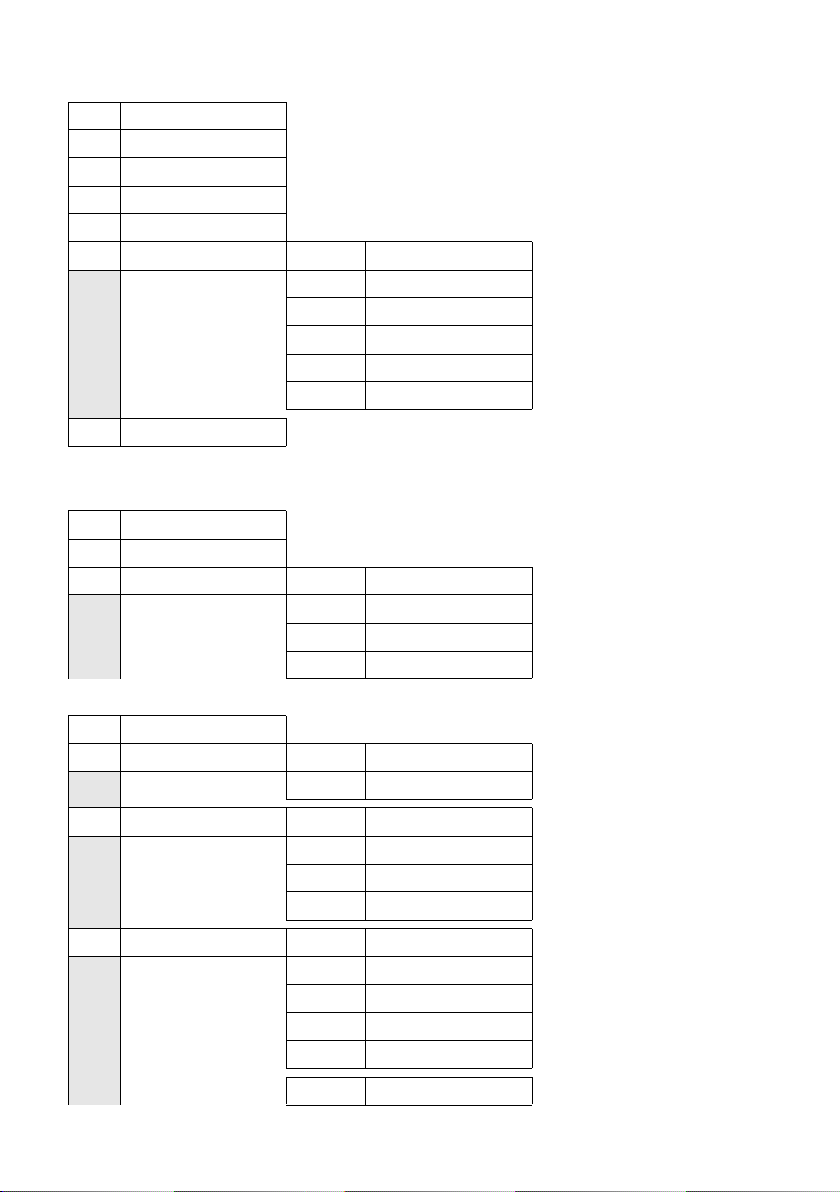
2 Sel. Services ê
2-1 Automatic Recall (page 18)
2-2 Network Mailbox (page 18)
2-3 Withhold No. (page 17)
2-4 Send Number (page 17)
2-5 Call Waiting Off (page 17)
2-6 All Calls 2-6-1 Call Divert (page 17)
2-6-2 Parallel Ringing (page 17)
2-6-3 Call Waiting (page 17)
2-6-4 Fixed Destin. Call (page 17)
2-6-5 Call Protection (page 17)
2-6-6 Unknown Call Rej. (page 17)
2-7 Ringback Off (page 18)
Menu tree
3 Alarm Clock
4 Add. Features
4-3 Room Monitor (page 44)
4-4 SIM Card Transfer (page 21)
4-5 Call Charges 4-5-1 Last Call (page 25)
5 Settings
5-1 Date/Time
5-2 Audio Settings 5-2-1 Ringer Settings (page 47)
5-3 Display 5-3-1 Screen Picture (page 46)
5-4 Handset 5-4-1 Language (page 45)
ì
í
4-5-2 All Calls (page 25)
4-5-3 Settings (page 24)
4-5-4 Per Handset (page 25)
Ð
5-2-2 Advisory Tones (page 48)
5-3-2 Colour Scheme (page 45)
5-3-3 Contrast (page 45)
5-3-4 Backlight (page 46)
5-4-2 Auto Answer (page 46)
5-4-3 Register H/Set (page 41)
5-4-4 Select Base (page 42)
5-4-5 Reset Handset (page 49)
5-4-8 Area Codes
11
Page 14
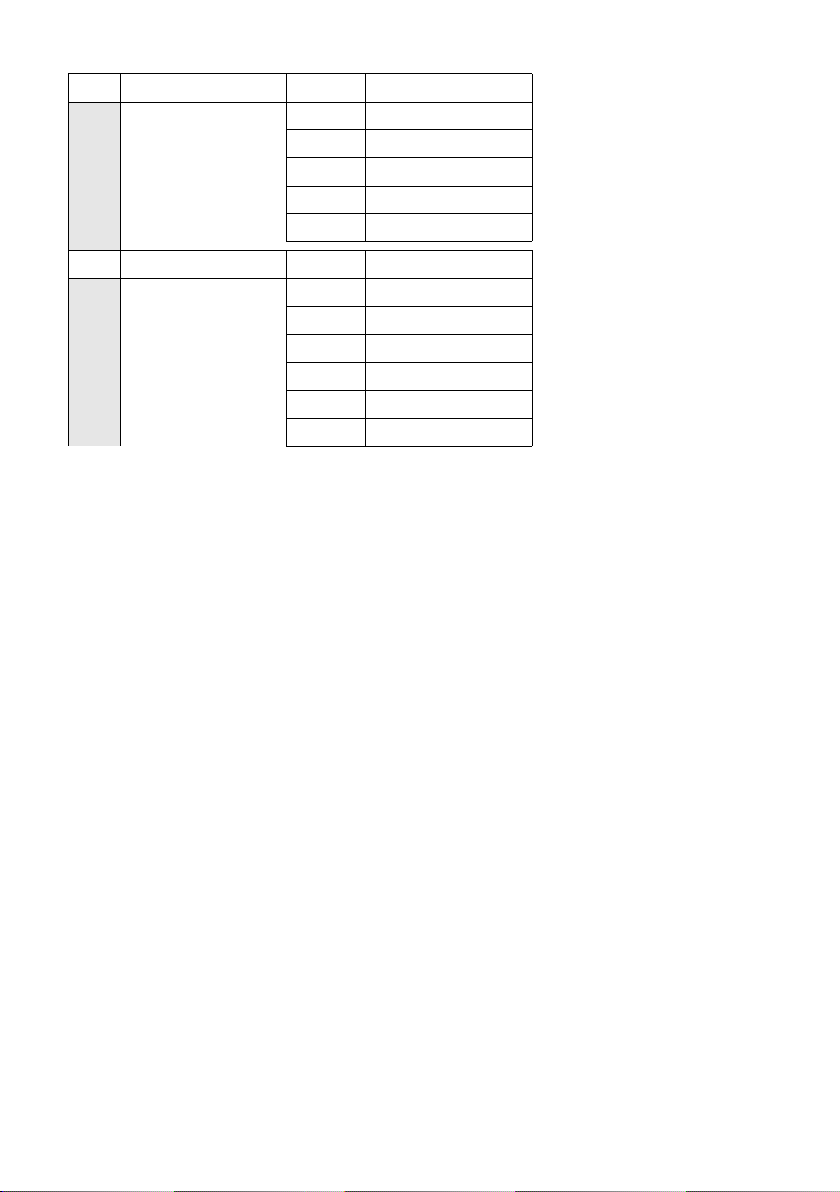
Menu tree
5-5 Base 5-5-1 Ringer Settings (page 49)
5-5-2 Music on hold (page 49)
5-5-3 System PIN (page 49)
5-5-4 Base Reset (page 50)
5-5-5 Add. Features (page 43, page 50, page 51)
5-5-7 Calls List Type (page 24)
5-6 Voice Mail 5-6-1 Set Key 1 (page 40)
5-6-2 Ans Machine (page 26)
5-6-3 Call Screening (page 29)
5-6-4 Announcements (page 26)
5-6-5 Message Length (page 30)
5-6-6 Record Quality (page 30)
5-6-7 Ring Delay (page 29)
12
Page 15
Making calls
Making calls
Making an external call
External calls are calls using the public telephone network.
~c Enter the number and press
the talk key.
Or:
c~ Press and hold the talk key
c and then enter the
number.
You can cancel the dialling operation with
the end call key a.
You are shown the duration and charges
of the call while the call is in progress.
Notes:
– Dialling using the directory or calls list
(page 23) saves time re-entering numbers.
Ending a call
a Press the end call key.
Answering a call
The handset indicates an incoming call in
three ways: by ringing, by a display on the
screen and by the flashing handsfree
key d.
You can accept the call by:
¤ Pressing the talk key c.
¤ Pressing the handsfree key d.
¤ Pressing the display key Ÿ to
divert the call to the answering
machine (page 29).
If the handset is in the base and the Auto
Answer function is activated (page 46), the
handset will take a call automatically
when you lift it out of the base.
If the ringtone is intrusive, press the display key
long as it is displayed on the screen.
§Silence§. You can take the call as
Calling Line Identification
When you receive a call, the caller's
number is displayed on the screen if the
following conditions are met:
u Your network provider supports CLIP,
CLI.
– CLI (Calling Line Identification):
number of the caller is transmitted.
– CLIP (Calling Line Identification Pres-
entation): number of the caller is
indicated.
Call display with CLIP/CLI
If the number of the caller is stored in your
directory, you will see their name.
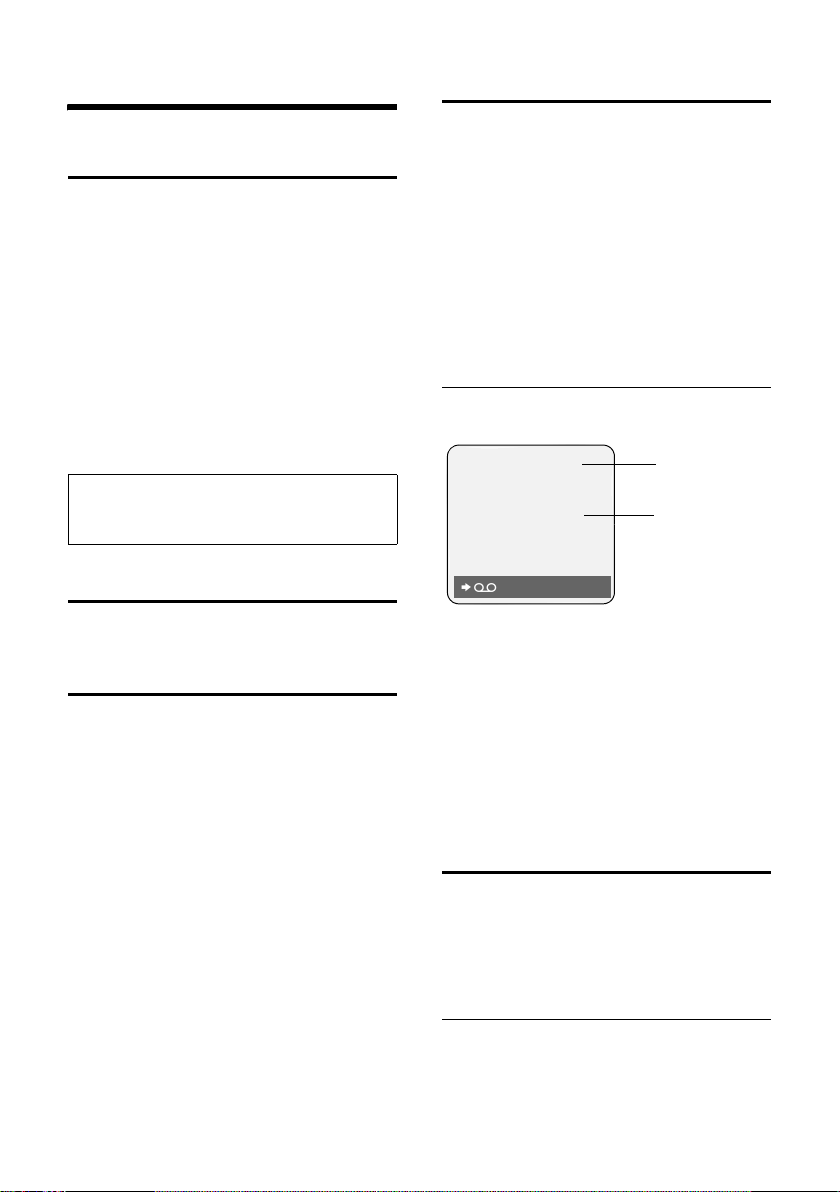
Å
1234567890
Silence
1Ring symbol
2 Number or name of caller
The following is displayed in place of the
number:
u External, if no number is transmitted.
u Withheld, if the caller has withheld
Calling Line Identification (page 17).
u Unavailable, if the caller has not
arranged Calling Line Identification.
1
2
Handsfree operation
In handsfree mode, instead of holding the
handset to your ear you can put it down
e.g. on the table in front of you to allow
others to participate in the call.
Activating/deactivating handsfree
Activating while dialling
~d Enter the number and press
the handsfree key.
13
Page 16

Operating the handset
¤ You should inform your caller before
you use the handsfree function so that
they know someone else is listening.
Switching between earpiece and
handsfree mode
d Press the handsfree key.
During a call and when listening to the
answering machine, switch handsfree on
or off.
If you wish to place the handset in the
charging cradle during a call:
¤ Press and hold the handsfree key d
while placing the handset in the base
station. If handsfree key d does not
light up, press the key again.
For how to adjust the volume, see
page 46.
Muting
You can deactivate the microphone in
your handset during an external call.
The other party hears a wait melody.
u Press the control key on the
left to mute the handset.
” Press the display key to reacti-
vate the microphone.
You can switch the wait melody on and off
(page 49).
Operating the handset
Control key
In the description below, the side of the
control key (up, down, right, left) which
you have to press in the different operating situations is marked in black, e.g. v
for "press right on the control key".
The control key has a number of different
functions:
When the handset is in idle status
s Open the directory.
v Open main menu.
u Open list of handsets.
t Set the ringtones on the hand-
set (page 47).
In the main menu and in input fields
You can use the control key to move the
cursor up t, down s, right v or
left u.
In lists and submenus
t / s Scroll up/down line by line.
v Open submenu or confirm
selection.
u Go back one menu level, or
cancel.
Activating/deactivating the handset
a Press and hold the end call
key. You will hear the confirmation beep.
14
During an external call
s Open the directory.
u Initiate an internal consulta-
tion call.
t Adjust loudspeaker volume for
earpiece and handsfree mode.
Page 17
Operating the handset
Display keys
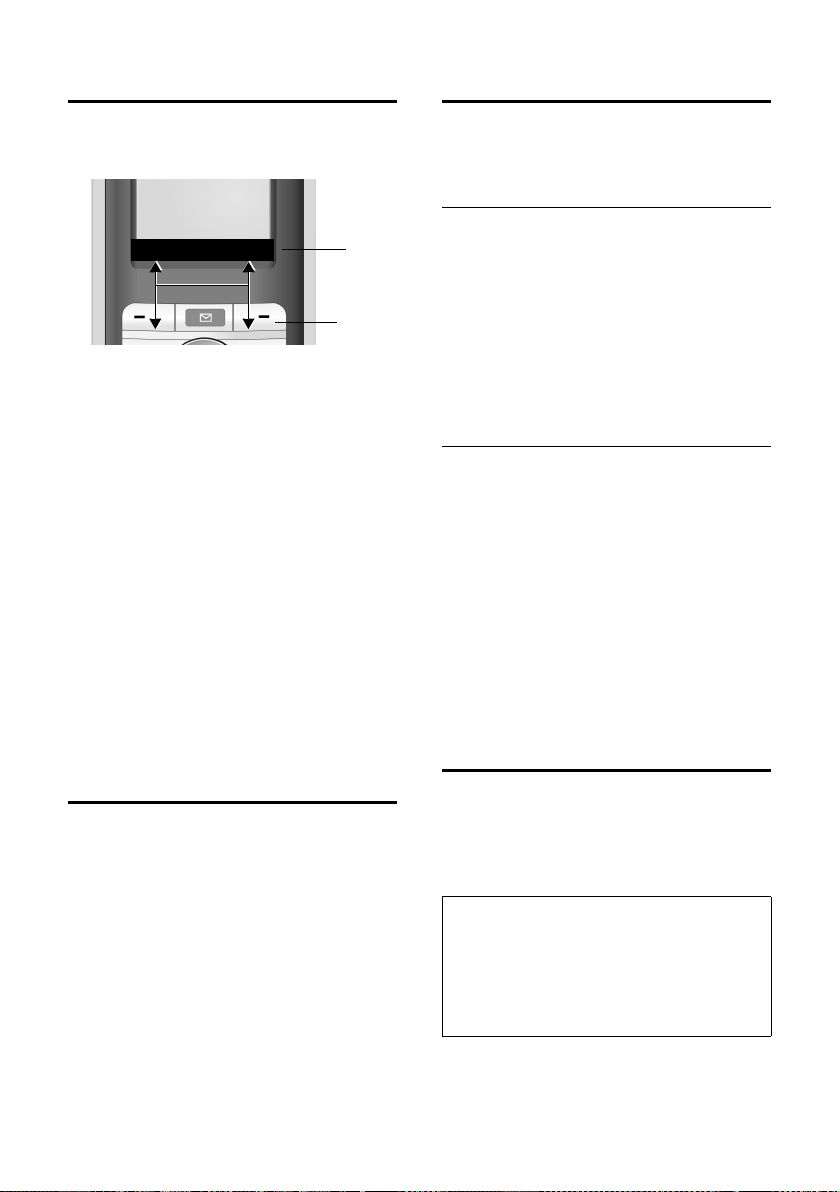
The function of the display keys changes
depending on the particular operating situation. Example:
INT SMS
1 The display keys' current functions are
shown in the bottom display line.
2Display keys
The most important display symbols are:
§§§§§Menu§§§§ Open the main menu.
§Options§ Open a context-dependent
menu.
W Delete key: deletes one char-
acter at a time from right to
left.
Î Go back one menu level or
cancel operation.
Ó Copy number into directory.
Ÿ Divert external call to answer-
ing machine.
• Open the last number redial
list.
1
2
Returning to idle status
You can revert to idle status from anywhere in the menu as follows:
¤ Press and hold the end call key a.
Or:
¤ Do not press any key: after 2 minutes
the display will automatically revert to
idle status.
Changes that you have not confirmed or
saved by pressing
Save Entry
An example of the display in idle status is
shown on page 1.
§OK§ will be lost.
§OK§, §Yes§, §Save§, §Send§ or
Menu guidance
Your telephone's functions are accessed
using a menu that has a number of levels.
Main menu (first menu level)
¤ Press v with the handset in idle status
to open the main menu.
The main menu functions are shown in
the display as a list with icon and name.
To access a function, i.e. open the corresponding submenu (next menu level):
¤ Navigate to the function using the con-
trol key q. Press the display key
Submenus
The functions in the submenus are displayed as lists.
To access a function:
§OK§.
¤ Scroll to the function with the control
key q and press
Or:
§OK§.
¤ Enter the corresponding digit combina-
tion (page 10).
Pressing briefly on the end call key a
returns you to the previous menu level /
cancels the operation.
"Swisscom Voice Portal" key
C Press the key.
Select Swisscom VP. You will be directly
connected to the Swisscom Voice Portal.
The access number 0848 849 850 is preprogrammed and cannot be changed.
Note:
This key allows you to connect to the Swisscom Voice Portal, where you can activate additional services such as call diversion (Service
21, 61 or 67), call waiting (Service 43) or
three-party conference with a simple voice
command.
15
Page 18

Operating the handset
Correcting incorrect entries
You can correct incorrect characters in the
text by navigating to the incorrect entry
using the control key. You can then:
u press X to delete the character to the
left of the cursor,
u insert characters to the left of the cur-
sor,
u overwrite the character (flashing)
when entering the time and date etc.
You will find examples of symbols used,
menu entries and multiple line input in the
appendix to this user guide, page 55.
16
Page 19

Network services
Network services
Network services are functions that your
network provider makes available to you.
You have to request these services from
your network provider.
¤ If you require assistance, please con-
tact your network provider.
Setting functions for the next call
You have the following option:
Withhold No.
Withhold Calling Line Identification for
the next call (CLIR).
Send Number
Transmit number for next call.
Call Waiting Off
Suppress call waiting.
¢ ê ¢ Withhold No. / Send Number /
v
Call Waiting Off
~ Enter number.
c Press talk key.
Setting functions for all subsequent calls
If you have completed one of the following procedures, a code is sent.
¤ After confirmation from the telephone
network, press the end call key a.
You can set the following features:
General call diversion
v ¢ ê ¢ All Calls ¢ Call Divert
¤ Change multiple line input:
When:
All Calls / No Answer / When Busy dialling.
Call No.:
Press the display key
to which call is to be diverted, and press
Save Entry §OK§.
§Edit§. Enter number
Status:
Activating/deactivating call diversion.
¤ Press the display key §Send§.
Parallel ringing
v ¢ ê ¢ All Calls ¢Parallel Ringing
¤ Change multiple line input:
Number:
Press the display key
and press
Status:
Activating/deactivating parallel ring-
ing.
Save Entry §OK§ .
Edit. Enter number
¤ Press the display key §Send§.
Activating/deactivating call waiting
v ¢ ê ¢ All Calls ¢Call Waiting
Status: Activating/deactivating.
§Send§ Press the display key.
Fixed destination call
v ¢ê ¢All Calls ¢ Fixed Destin. Call
¤ Change multiple line input:
Number:
Press display key
Save Entry §OK§.
press
Status:
Activating/deactivating fixed destina-
tion call.
Edit. Enter number and
¤ Press the display key §Send§.
Call protection
v ¢ ê ¢ All Calls ¢ Call Protection
Status: Activating/deactivating.
§Send§ Press the display key.
Unknown call rejection
v ¢ ê ¢ All Calls ¢Unknown Call
Rej.
Status: Activating/deactivating.
§Send§ Press the display key.
17
Page 20

Network services
Functions during a call
Initiating callback
You hear the busy tone.
§Options§ ¢ Ringback
a Press the end call key.
Consultation
During a call:
§Ext.Call§ Press the display key.
~ Enter number.
You have the following options:
u Tog glin g:
¤ Use q to toggle between the par-
ticipants.
End the call with one participant:
¤ Use q to switch to the caller. Then:
§Options§ End Active Call.
u Conference call:
¤ Press the display key §Conf.§.
End the conference call (toggle):
¤ Press §EndConf§.
u End call with both participants:
¤ Press the end call key a.
Favour call waiting
§Options§ ¢ Favour waiting call
Divert call
You toggle or you initiate a consultation.
§Options§ ¢ Call Transfer
Functions after a call
Cancelling callback
v ¢ ê ¢ Ringback Off
Activating/deactivating network mailbox
v ¢ ê ¢ Network Mailbox
Status: Activating/deactivating.
§Send§ Press the display key.
a Press the end call key.
Accepting a waiting call
§Accept§ Press the display key.
You have the option of toggling or holding
a conference call.
Note:
Without CLIP a waiting call is only announced
with a beep.
Accept call waiting
§Options§ £ Accept waiting call
Reject call waiting
§Options§ ¢ Reject waiting call
18
Page 21

Using the directory and lists
Using the directory and lists
The options are:
u Directory,
u Call-by-Call list,
u Last number redial list,
u SMS list,
u Calls list,
u Answering machine list.
You can store a maximum of 150 entries in
the directory and call-by-call list (the
actual number depends on the size of the
individual entries).
You create the directory and call-by-call
list for your own individual handset. You
can also send lists/entries to other handsets (page 20).
Directory/call-by-call list
In the directory, you can store numbers
and the associated names.
¤ With the handset in idle status, open
the directory by pressing the s key.
In the call-by-call list , you can store prefixes of network providers (so-called "callby-call numbers").
¤ Open the call-by-call list in idle status
by pressing the C key.
Length of entries
Number: max. 32 digits
Name: max. 16 characters
Note:
For quick access to a number from the directory or the call-by-call list (quick dial), you can
assign the number to a key.
Storing a number in the directory
s ¢ New Entry
¤ Change multiple line input:
Number :
Enter number.
Name :
Enter name.
Annivers.:
Enter anniversary if required (page 21).
Speed Dial:
Select key for quick dial.
¤ Save changes.
Storing a number in the call-by-call list
C ¢ New Entry
¤ Change multiple line input:
Number :
Enter number.
Name :
Enter name.
Selecting entries in the directory and call-by-call list
s / C Open directory or call-by-call
list.
You have the following options:
u Use s to scroll through the entries
until the required name is selected.
u Enter the first character of the name, or
scroll to the entry with s if required.
Dialling with the directory/ call-by-call list
s / C ¢ s (select entry)
c Press the talk key. The number
is dialled.
Managing entries in the directory/ call-by-call lists
s / C ¢ s (select entry)
Viewing an entry
§View§ Press the display key.
The entry is displayed.
Back with
Editing entries
§View§ §Edit§ Press display keys one after the
other.
§OK§.
¤ Carry out changes and save.
19
Page 22

Using the directory and lists
Using other functions
s / C ¢ s (select entry)
¢ §Options§ (open menu)
The following functions can be selected
with q:
Display Number
Edit or add to a stored number. Then
dial or call up further functions by
pressing Ó.
Edit Entry
Edit selected entry.
Delete Entry
Delete selected entry.
VIP Entry (directory only)
Mark a directory entry as VIP
(Very Important Person) and assign it
a particular ringtone. You can then
identify VIP calls by their ringtones.
Requirement: Calling Line Identification (page 13).
Copy Entry
Send a single entry to a handset
(page 20).
Delete List
Delete all entries in the directory/callby-call list.
Copy List
Send complete list to a handset
(page 20).
Available Memory
Display the available entries in the
directory and call-by-call list (page 19).
u The other handset and base station can
send and receive directory entries.
s / C
~ Enter the internal number of
§Yes§ / §No§ Press the display key.
A successful transfer is confirmed by a
message and confirmation tone on the
receiver handset.
¢ s (select entry)
¢ §Options§ (open menu)
¢ Copy Entry / Copy List
the receiver handset. You see
Copying entry.
Please remember:
u Entries with identical numbers are not
overwritten on the receiver handset.
u The transfer is cancelled if the phone
rings or if the memory of the receiver
handset is full.
Adding a displayed number to the directory
Numbers that appear in a list, e.g. the calls
list or the last number redial list, in a text
message or displayed during a call can be
added to the directory.
A number is displayed:
§Options§ ¢ Copy to Directory
¤ Complete the entry, see page 19.
While the number is being transferred
from the answering machine list, the
message playback is interrupted.
Using quick dial keys
¤ Press and hold the required quick dial
key (page 19).
Sending the directory/call-by-call list to another handset
Requirements:
u The sending and receiving handsets
must both be registered to the same
base station.
20
Copying a number from the directory
There are many operating situations in
which you can open the directory, e.g. to
copy a number. Your handset need not be
in idle status.
¤ Depending on the operating situation,
open the directory with s or Ò
§Menu§ Directory .
or
q Select an entry (page 19).
Page 23
Storing anniversaries in the directory
You can store an anniversary for every
number in the directory and specify a time
when you will receive a reminder call on
the anniversary.
¢ s (Select entry; page 19)
s
§View§ §Edit§ Press display keys one after the
other.
s Scroll to the Annivers.: line.
§Edit§ Press the display key.
¤ Change multiple line input:
Date:
Enter the day/month in 4-digit format.
Time:
Enter the hour/minute for the reminder
call in 4-digit format.
Prompt:
Select the type of signal for the
reminder and press
§OK§.
¤ Save changes (page 56).
Note:
Reminder calls require a time stamp. If you
select a visual signal, then a time stamp is not
required and is automatically set to 00.00.
Deleting anniversaries
s ¢ s (Select entry; page 19)
§View§ §Edit§ Press display keys one after the
other.
s Scroll to the Annivers.: line.
§Edit§ §Delete§ §Save§
Press display keys one after the
other.
Using the directory and lists
An incoming call interrupts all other operations, including the operation of the SIM
card.
However, it is possible to make an outgoing call and continue using the SIM card at
the same time.
Caution:
u Never insert any metallic objects (such
as coins or knife blades) in the SIM
card slot as otherwise the electrical
safety cannot be guaranteed.
u Avoid touching the contact surfaces
on the SIM card.
u Inserting the SIM card wrongly might
damage it.
u Do not remove the SIM card during
data transmission.
Reminder call on an anniversary
A reminder call is signalled on the handset
using the selected ring tone.
§Silence§ Press the display key to stop
the reminder call.
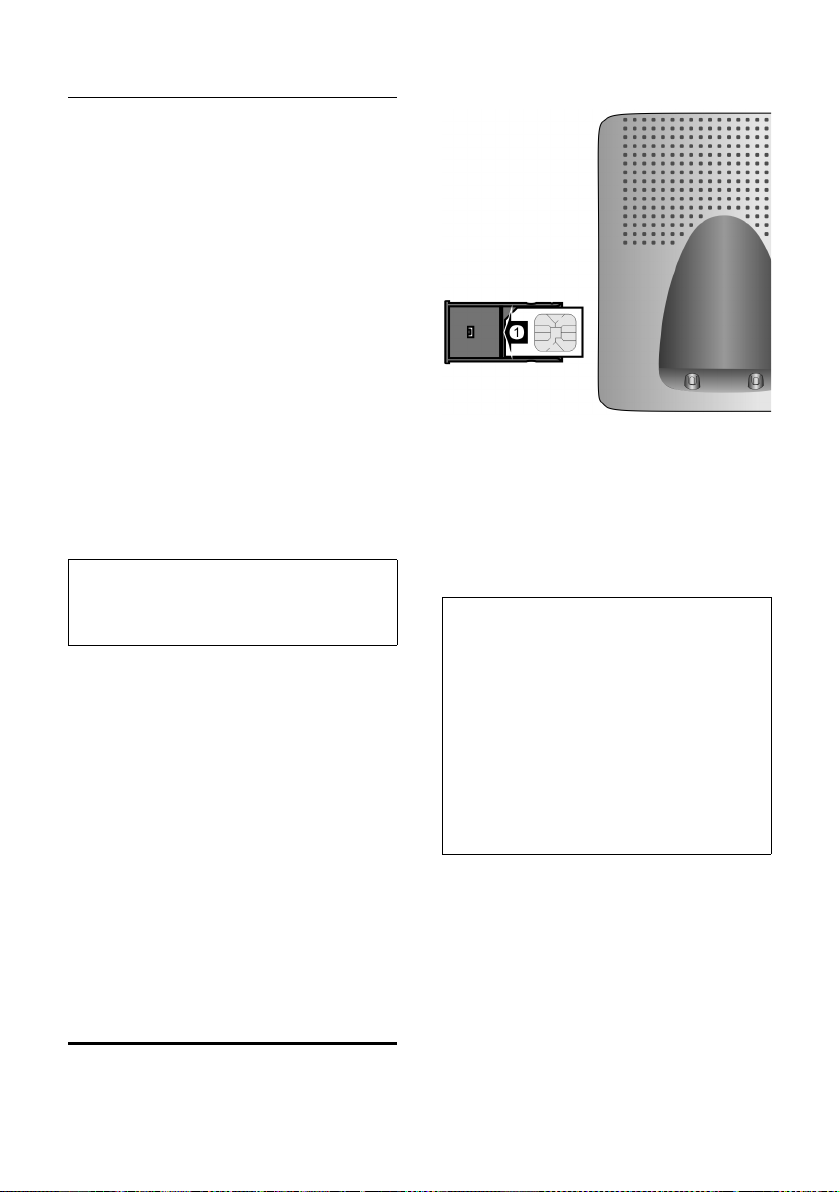
Transferring SIM card entries
There is a SIM card reader integrated in the
base station. Insert the SIM card as
shown.
You can copy entries from SIM cards to the
directory and vice versa. If the SIM card is
PIN-protected you will be prompted to
enter the PIN before transmission.
If the SIM card is blocked (e.g. as the result
of several wrong PIN entries), you must
first insert the SIM card in your mobile
phone and unblock it with the super PIN
(PUK).
21
Page 24
Using the directory and lists
¢ í ¢ SIM Card Transfer
v
Note:
In order to transfer phone numbers
between SIM card and phone, it is essential that your dialling code (country and
area code) is stored on the phone.
Some of these numbers are already preset.
¢ Ð ¢ Handset ¢ Area Codes
v
Check that the (pre)set dialling code is
correct.
Change multiple line input:
q Select/change input field.
r Navigate in the input field.
X If necessary, delete number:
press the display key.
~ Enter number.
§Save§ Press the display key.
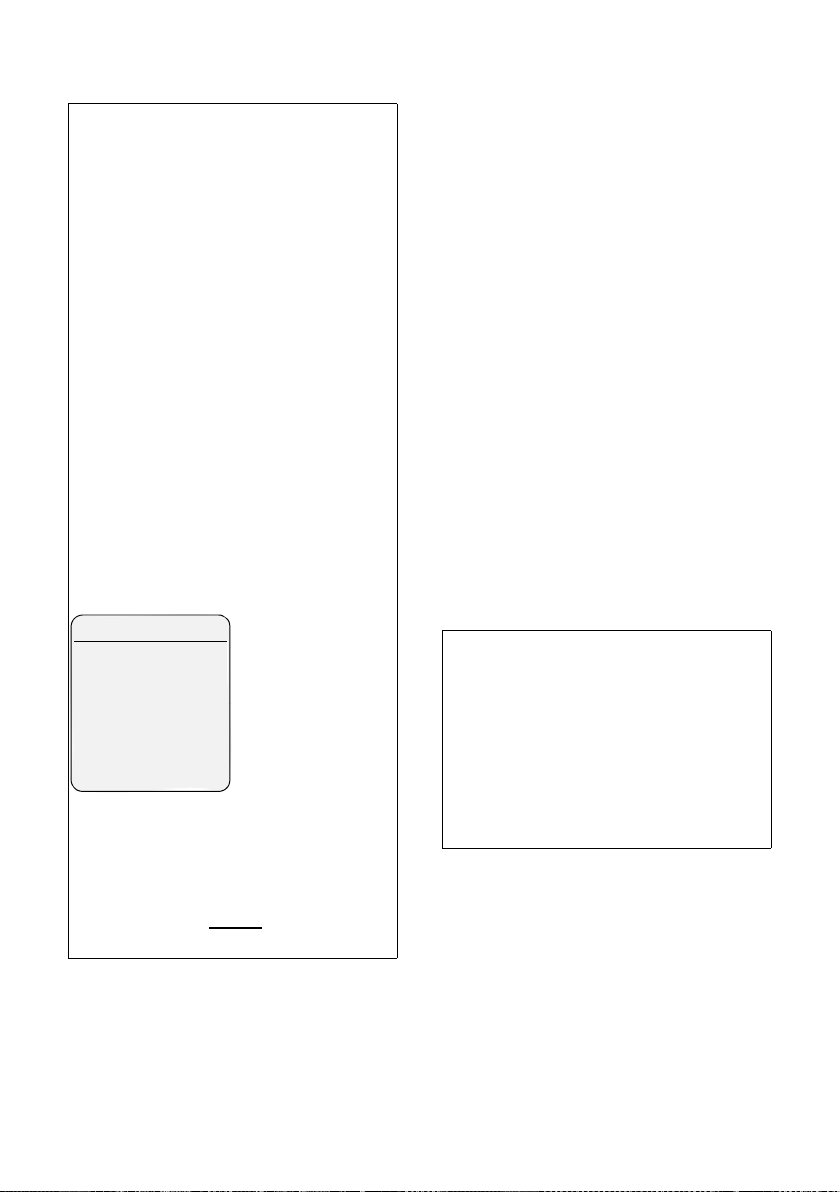
Example:
Area Codes
International code:
00 - 47
Local area code:
- [ ]
X
When copying fixed network phone numbers and mobile phone numbers, conversion for usage on the SIM card and/or
your handset occurs automatically.
Save
Service numbers cannot be copied from
the SIM card to your directory!
If you have still not inserted the SIM card
you will be prompted to do so. You have
the following options:
All entries from SIM
Transfer all entries from the SIM card to
the directory.
Entry from SIM
Transfer a selected entry from the SIM
card to the directory.
All entries to SIM
Transfer all entries from the directory to
the SIM card.
Entry to SIM
Transfer a selected entry from the
directory to the SIM card.
Start transferring the data from a list by
pressing the display key
Start transferring the data from a single
entry by pressing the display key
§Copy§ or §OK§.
§Copy§.
Data transfer
SIM card
u Names are abbreviated to 16 characters
u Entries are copied in alphabetic order.
u Numbers are converted:
) directory
Please note that approx. 125 entries
are copied (check the entry up to
which your list has been transferred).
+41 )0
+ ) 00
Note:
Data is only transferred to the handset
from which the connection to the SIM
card has been established.
The process only takes place in handsets
of the same family.
To transfer to another handset within the
family, send your directory entries in the
usual way.
Data transfer
Directory
u Names stay the same
u Entries are copied in alphabetic order
u Numbers are converted:
) SIM card
0 ) +41
00 ) +
22
Page 25

Using the directory and lists
Last number redial list
The last number redial list contains the ten
numbers last dialled with the handset
(max. 32 numbers). If one of the numbers
is in the directory, then the corresponding
name will be displayed.
Manual last number redial
c Press the key briefly.
s Select entry.
c Press the talk key again. The
number is dialled.
When displaying a name, you can have the
respective phone number displayed by
using the display key
§View§.
Managing entries in the last number redial list
c Press the key briefly.
s Select entry.
§Options§ Open menu.
The following functions can be selected
with q:
Display Number (as in the directory,
page 20)
Copy to Directory
Copy an entry to the directory
(page 20).
Delete Entry (as in the directory, page 20)
Delete List (as in the directory, page 20)
Opening lists with the message key
You can use the message key f to open
the following lists:
u SMS list
If several mailboxes are set up
(page 36), several lists are displayed.
u Answering machine list
u Network mailbox
If your network provider supports this
function and the network mailbox is
configured for fast access (page 40).
u Calls list
An advisory tone sounds as soon as a new
entry appears on a list. The f key
flashes (it goes off when the key is
pressed). In idle status, the displays shows
an icon for the new message.
Icon New message...
Ã
Á
À
The number of new entries is shown
beneath the corresponding icon.
Only the lists that contain messages are
shown (exception: network mailbox). Lists
with new messages are shown first and
identified in bold. The number of new or
old messages contained are each shown
in brackets.
Select the list with q. To open, press
... in answering machine list or
network mailbox
... in calls list
... in SMS list
§OK§.
SMS incoming message list
All received SMS messages are saved in
the incoming message list, see page 34.
Calls list
Requirement: Calling Line Identification
(CLIP, page 13)
Depending on the type of list set, the calls
list contains
u accepted calls ( )
u missed calls
u calls recorded by the answering
machine (Ã)
The numbers of the last 30 incoming calls
are stored.
Multiple missed calls from the same
number are only stored once (the last
call).
‰
23
Page 26
Making cost-effective calls
Setting list type for calls list
v ¢ Ð ¢ Base ¢Calls List Type
Missed Calls / All Calls
‰
Select and press
§OK§ (=on).
a Press and hold (idle status).
The entries in the calls list are retained
when you change the list type.
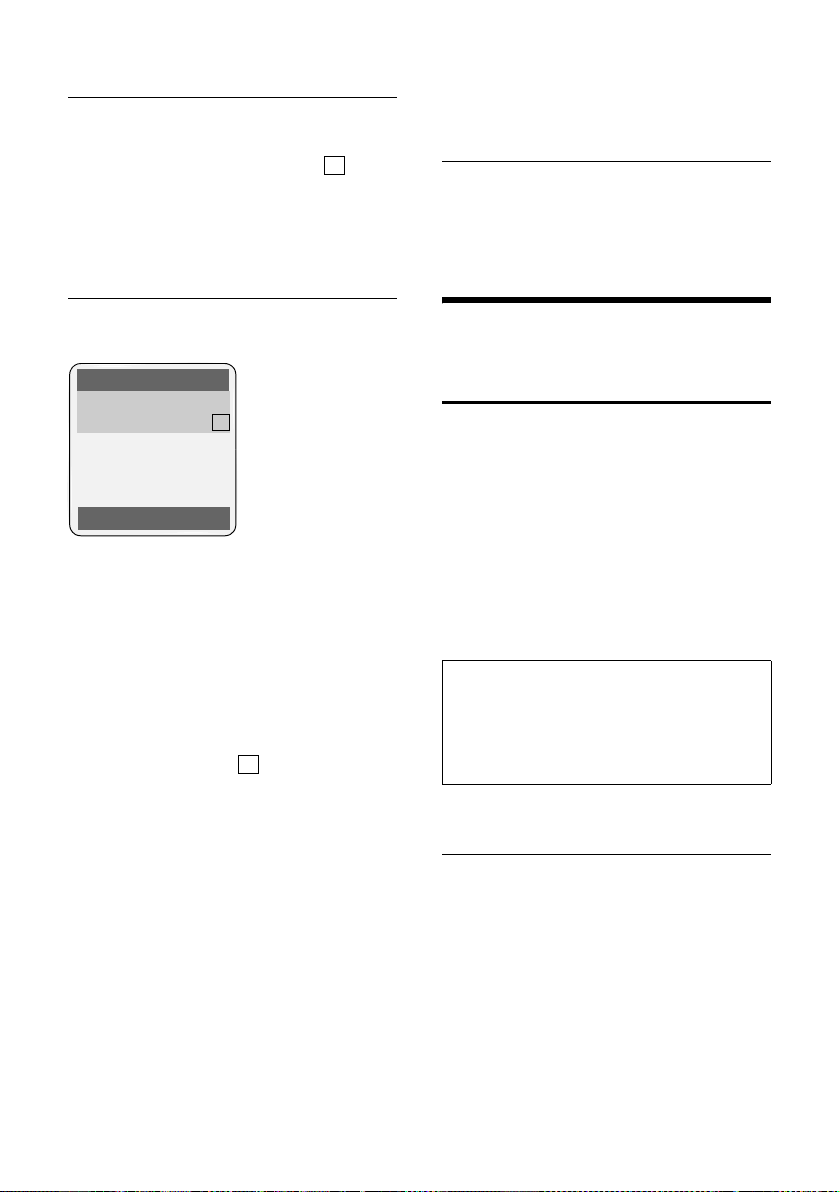
List entry
New messages are at the top.
Example of list entries:
All Calls
Susi Sorglos
29/08/05 12:20 ‰
Louise Miller
29/08/05 11:15 Ã
**************************
Delete Options
u List type (in header)
u Status of entry
Bold: new entry
u Number or name of caller
You can add the number of the caller to
the directory (page 20).
u Date and time of call (if set, page 9)
u Typ e of e ntry:
– accepted calls ( )
– missed calls
– calls recorded by the answering
machine (Ã)
Pressing the display key
marked entry.
After pressing the display key
can select more functions with q:
Copy to Directory
Add a number to the directory.
Delete List
Delete complete list.
When you leave the calls list all entries are
set to the status "old", i.e. the next time
‰
§Delete§ deletes the
§Options§ you
you call the list up they will no longer be
shown in bold.
Answering machine list
You can use the answering machine list
to listen to the messages that are on the
answering machine.
Making cost-effective calls
Displaying call duration and charges
The display of call duration and call
charges depends on whether call metering pulses are sent to your phone:
u If call metering pulses are not trans-
mitted, the duration of the call is dis-
played.
u If call m ete ring puls es are transmitted,
the units of the call are displayed. If
you have set the charge per unit and
the currency, then the charges for a
call will be displayed..
Note:
The factor 0.10 and CHF (currency) are set by
default.
The actual costs can differ from the costs displayed. The amount stated in the bill is always
legally binding.
Setting the charge per unit and the currency
v ¢ í ¢ Call Charges ¢Settings
¤ Change multiple line input:
Cost per Unit:
Enter charge per unit, e.g.
QQQL for 6 centimes.
Currency:
Enter currency symbol.
24
Page 27

¤ Save changes (page 56).
Note:
Previously stored call charges are deleted if the
cost per unit is changed.
Displaying/deleting call charges
v ¢ í ¢ Call Charges
q Select entry and press §OK§ .
You have the following options:
Last Call
Display charges for the last call.
All Calls
Display charges for calls on all handsets.
Per Handset
Display charges for calls per handset.
Making cost-effective calls
25
Page 28

Operating the answering machine
Operating the answering
machine
You can operate the answering machine
that is integrated in the base station via
the handset, via the keypad of the base
station (page 2) or via remote operation
(other phone/mobile phone). You can also
listen to messages via remote operation
using voice commands (page 31).
Announcement mode
You can use the answering machine in
two different modes.
u In Ans. & Record mode, the caller hears
the announcement and can then leave
a message.
u In Announce Only mode, the caller hears
your announcement but cannot leave a
message.
Operation via the handset
The handset loudspeaker activates automatically if you receive an acoustic
prompt or message while operating.
You can switch it off with the handsfree
key d.
Recording a personal announcement/ announce only
v ¢ Ð ¢ Voice Mail ¢ Announcements
¢ Record Announce / Record Anc Only
§OK§ Press the display key to start
the recording.
You hear the ready tone (short tone).
¤ Now speak your announcement (at
least 3 secs.).
§End§ Press the display key to end
the recording.
Cancel the recording with a or ”.
Restart the recording with
After recording, the announcement is
played back for you to check. You can rerecord the announcement with
§OK§.
§New§.
Please note:
u Recording ends automatically if the
maximum recording time of 170 seconds is exceeded or there is a break in
speech for more than 2 seconds.
u If you cancel the recording, the pre-
recorded announcement is then used.
u The recording is cancelled if the
answering machine memory is full.
¤ Delete old messages and repeat
recording if required.
Switching answering machine on/off
v ¢ Ð ¢ Voice Mail ¢ Ans Machine
‰
(=on)
After switching on, the remaining memory time is announced. If the time has not
yet been set (page 9), an appropriate
announcement is then made. The × icon
is displayed on the screen.
The phone is supplied with a pre-recorded
announcement for the answer and record
mode or announce only mode. If a personal announcement has not been
recorded, the corresponding pre-recorded
announcement is used.
26
Playing back announcements
v ¢ Ð ¢ Voice Mail ¢ Announcements
¢ Play Announce / Play Anc Only
If no personal announcement has been
recorded, the corresponding pre-recorded
announcement is played.
Record a new announcement while playing back announcement:
§New§ Press the display key.
The recording is cancelled if the answering machine memory is full.
¤ Delete old messages and repeat record-
ing if required.
Page 29

Operating the answering machine
Deleting announcements
v ¢ Ð ¢ Vo ice Mai l ¢ Announcements
¢ Del Announce / Del Anc Only
§Yes§ Press the display key to con-
firm the prompt.
a Press and hold (idle status).
After deletion, the corresponding pre-
recorded announcement is then used.
Selecting announcement mode
You can choose between Ans. & Record and
Announce Only.
¢ Ð ¢ Voic e Mail ¢ Announcements
v
¢ Set Ans. Mode ¢ Ans. & Record /
Announce Only (=on)
a Press and hold (idle status).
The selected mode is saved even after the
answering machine is deactivated.
If in Ans. & Record mode the memory for
messages is full the selection is interrupted and you will receive an instruction
to delete old messages.
‰
¤ Delete old messages.
The answering machine automatically
switches back to the set mode once deletion is complete or else you can reselect
the required recording mode.
Setting 'answer and record' or 'announce
only' by toggling
You can use the Ans Mode Time setting to
change over the announcement mode for
a specific period.
Example: The Ans. & Record mode is set. If
you activate Ans Mode Time and set a
period (e.g. 18.00 to 8.00 h) the answering machine switches to Announce Only
mode for this period. Outside this period
(08.01 to 17.59), the Ans. & Record is
active.
¢ Ð ¢ Voice Mail ¢ Announcements
v
¢ Set Ans. Mode ¢ Ans Mode Time
‰
(=on)
¤ Change multiple line input:
From:
Enter hours/minutes for the start of the
period in 4-digit format.
Until:
Enter hours/minutes for the end of the
period in 4-digit format.
Activation:
Select On or Off .
¤ Save changes with §Save§.
If the memory for messages is full and Acti-
vation: On has been selected, saving is
interrupted and you will receive an
instruction to delete old messages.
¤ Delete old messages and repeat the set-
ting.
As soon as you change the announcement
mode (page 27), the function Ans Mode
Time is automatically deactivated.
Playing back messages
The date and time of each message is
logged (provided this has been set,
page 9) and displayed during the playback. If Calling Line Identification is activated, then the caller's number is displayed. If the caller's number is stored in
the directory, the respective name is displayed.
Playing back new messages
New messages that have not yet been
heard are indicated by the à icon in the
display and by the f key flashing on
the handset.
f Press the message key.
Ans M.: Select and press
An announcement informs you if there are
new messages or just old ones or no messages.
If there are new messages playback then
begins with the first new message. After
the last new message you will hear the
end tone and an announcement about
how much recording time remains.
§OK§.
27
Page 30

Operating the answering machine
If the message concerned has been saved
with the date and time you will hear an
appropriate announcement before playback begins.
Playing back old messages
You can listen to old messages if there are
no more new messages. Start the playback as described under "Listening to new
messages".
After the entry time and date have been
played back (after approx. 3 seconds) a
new message assumes the status "old".
Stopping and controlling playback
During message playback:
2 Pause playback. Press 2
again to resume
t or 1
To previous message.
s or I
To n ext m ess age.
After an interruption of over one minute,
the answering machine returns to idle status.
Marking a message as "new"
A previously played back "old" message is
displayed as a "new" message again.
During message playback:
* Press the star key.
An announcement informs you of the
message's new status.
Or:
§Options§ Open menu.
Mark as New
Select and press
Playback of the current message is cancelled. Playback of next message starts, if
applicable.
The f key on the handset flashes.
§OK§.
Deleting messages
You can delete old messages either all
together or individually.
Deleting all old messages
During playback or pause:
§Options§ Press the display key.
Del All Old Msgs
Select and press
§Yes§ Press the display key to con-
firm the prompt.
§OK§.
Deleting individual old messages
During playback or pause:
§Delete§ Press the display key.
Picking up a call from the answering machine
You can pick up a call while the answering
machine is recording it or being operated
via remote operation:
§Accept§
c /
Press the talk or display key.
Recording stops and you can speak to the
caller.
If 2 seconds of the call have already been
recorded when you pick it up, the call will
be displayed as a new message. The f
key on the handset flashes.
You can accept the call even if it is not signalled on the handset.
Adding the telephone number of a
message to the directory
See also "Adding a displayed number to
the directory", page 20.
28
Page 31

Operating the answering machine
Diverting an external call to the answering machine
You can divert an incoming external call to
the answering machine even if it is
switched off.
Requirement: sufficient storage space is
available on the answering machine.
An external call is signalled on the handset:
Ÿ Press the display key.
The answering machine starts immediately in recording mode and records the
call. The set time for the call acceptance
(page 29) is ignored.
Activating/deactivating two-way recording
You can record an external call with the
answering machine.
¤ Inform the caller that the call is being
recorded.
§Options§ Open menu.
Two Way Record
Select and press
The two-way recording is indicated on the
display by an advisory text and is added to
the answering machine list as a new message.
§End§ Press the display key to stop
the two-way recording.
The max. recording time depends on the
available memory of the answering
machine. If the memory is full you will
hear an end tone, the recording is
aborted, and the call recorded up to that
point is listed in the answering machine
list as a new message.
§OK§.
Activating/deactivating listen in
During recording of a message you can listen in via the loudspeaker of registered
handsets and the base station.
Permanently activating/deactivating listen in
v ¢ Ð ¢ Voice Mail ¢ Call Screening
¢ Handset and/or Base
‰
(=on)
a Press and hold (idle status).
You can switch off the Call Screening func-
tion on the handset during the recording.
Switching off listen in for the current recording
a Press the end call key.
Setting up the answering machine
The answering machine has already been
preset at the factory. Make individual settings using the handset.
Call acceptance/charge saving function for remote operation
You can set when you want the answering
machine to accept a call.
The options are: 0 sec., after 10 sec., 20 sec.
or 30 sec. and the cost-saving setting Auto-
matic.
On Automatic the following applies for call
acceptance:
u If no new messages are present, the
answering machine accepts a call after
20 seconds.
u If new messages are present, the
answering machine accepts a call after
10 Seconds.
29
Page 32

Operating the answering machine
When operating remotely you then know
after approx. 15 seconds that there are no
new messages (otherwise the answering
machine would already have accepted
your call). There will be no call charges if
you hang up now.
¢ Ð ¢ Voice Mail ¢ Ring Delay
v
Select r 0 sec. / 10 sec. / 20 sec. / 30 sec. /
Automatic.
§Save§ Press the display key.
a Press and hold (idle status).
Please remember:
You can set your telephone so that on all
calls the first ringtone is suppressed
(page 48). Therefore, the time set for the
call acceptance does not indicate how
long the phone rings before the answering machine accepts the call.
Setting the recording time
You can set the maximum recording time
of a message. The options are: 30, 60,
120 seconds or Maximum.
¢ Ð ¢ Voice Mail ¢ Message Length
v
r Select recording time.
§Save§ Press the display key.
Changing language for voice prompt and pre-recorded announcement
v55O2
Enter the digits.
§OK§ Set German.
1
2 §OK§ Set French.
I §OK§ Set Italian.
Resetting fast access on the answering machine
The integrated answering machine is factory-set for fast access. However if you
have set the network mailbox for fast
access (page 40) you can reset this setting.
¢ Ð ¢ Voice Mail ¢ Set Key 1
v
Answer Machine / Network Mailb.
Select and press
a Press and hold (idle status).
After you have selected the network mail-
box or the answering machine, press and
hold key 1. You will be connected
directly.
The setting for fast access applies to all
Gigaset E45 handsets.
§OK§.
Setting recording quality
Set the quality you require for your recordings. The options are: Standard, High, Excel-
lent. If the quality is higher the max.
recording time is reduced.
¢ Ð ¢ Voice Mail ¢ Record Quality
v
r Select the recording quality.
§Save§ Press the display key.
30
Operating when on the move (remote operation)
You can check or activate the answering
machine from any other telephone (e.g.
hotel, pay phone).
Requirements:
u You have set a system PIN other than
0000 (page 49).
u The phone you are using for remote
operation has tone dialling (DTMF), i.e.
you hear different tones when you
press the keys. Alternatively, you can
use a code transmitter (available from
your mobile phone retailer).
Page 33

Operating the answering machine
Calling the answering machine and playing back messages
~ Dial your own number.
9~ While you listen to your
announcement, press the 9
key and enter the system PIN.
You will be informed whether any new
messages have been recorded. The messages are now played back. You can now
operate the answering machine via the
keypad or by voice prompts.
Operating the answering machine via the
keypad
The following keys are used for operation:
A Go to the start of the previous
message.
B Stop playback. Press again to
resume.
3 Go to the next message.
: Mark message as "new".
0 Delete current message.
Number codes for operation:
A B 3
Previous Stop/cont. Next
D E F
Operating the answering machine with
voice prompts
You can control message playback using
the voice commands "BACK" und "FOR-
WARD". You can delete individual messages during playback using the voice
command "DELETE".
¤ Before each voice command, press 9
and then speak the command when
you hear the ready tone.
When deleting a message you are
prompted to repeat the command.
¤ Repeat "DELETE", without first press-
ing the 9.
Activating the answering machine
Phone home and allow to ring until you
hear: "Please enter PIN".
~
Your answering machine is activated. It
tells you how much memory time is left.
The messages are now played back.
The answering machine cannot be deacti-
vated remotely.
Enter system PIN.
G H 9
Begin
: 0 ;
New Delete
31
Page 34

SMS (text messages)
SMS (text messages)
Your unit is supplied ready for you to send
text messages immediately.
Note:
The access number (062 210 00 0) for the
Swisscom SMS centre is pre-programmed
when supplied.
Requirements:
u Calling Line Identification (page 13)is
enabled for your phone connection.
u Your network provider supports SMS in
the fixed network (information on this
can be obtained from your network
provider).
u You are registered with your service
provider to send and receive text messages.
Text messages are exchanged between
SMS centres that are operated by service
providers. You must enter the SMS centre
in the unit through which you wish to
send and receive. You can receive SMS
from every SMS centre that is entered if
you have registered with your service provider.
Your text messages are sent via the Serv-
ice Centr. that is entered as the send
service centre. However, you can activate
any other SMS centre as the active send
service centre to send a current message
(page 37).
If no SMS Service Centre is entered,
the SMS menu only consists of the entry
Settings . Enter an SMS Service Centre
(page 37).
u Entering text, see page 56.
u Writing using the predictive text tool
EATONI, see page 57.
Rules
u An SMS can be up to 612 characters
long.
u If there are more than 160 characters
or a lot of image data, the text message
is sent as a linked SMS (up to 4 messages with 153 characters each).
Please remember:
u Each incoming SMS is signalled by a
single ring (ringtone as for external
calls). If you accept such an SMS "call"
on the first ring, the SMS will be lost. To
prevent this ringing, suppress the first
ringtone for all external calls (page 48).
u If your phone is connected to a PABX,
please read page 38.
u To receive text messages you must be
registered with your service provider.
Registering with the registration wizard
The first time you press the display key
§SMS§ you will be asked if you wish to regis-
ter automatically with all entered SMS
centres (see page 37). Confirm with
You can now receive text messages from
any of the SMS centres whose number you
have entered.
You can call up automatic registration
thereafter via the menu:
¢ î ¢ Settings ¢ Subscribe to
v
SMS
The registration wizard does not support
setting up personal mailboxes (page 36).
§OK§ .
Writing/sending an SMS
Writing an SMS
v ¢ î
Mailbox 2 Select mailbox if necessary
and press
~ Enter mailbox PIN if necessary
and press
New SMS Select and press §OK§.
~ Write an SMS.
§Options§ Press the display key.
Send Select and press §OK§.
SMS Select and press §OK§.
§OK§.
§OK§.
32
Page 35

SMS (text messages)
Sending an SMS
s / C / ~
Select number with area code
(even if you are in that area)
from the directory or call-bycall list or enter it directly. For
SMS to an SMS mailbox: put
the mailbox ID at the end of
the number.
§Options§ Press the display key.
Send Select. The SMS is sent.
Notes:
– If you are interrupted by an external call
while writing an SMS, the text is automatically saved in the draft message list.
– If the memory is full, or if the SMS function
on the base is being used by another handset, this cancels the operation. An appropriate message appears in the display. Delete
SMS messages you no longer require or
send the SMS later.
Setting input language
¤ You are writing an SMS (page 32).
§Options§ Press the display key.
Select Language
Select and press
s Select input language and
§OK§.
press
a Press the end call key briefly
to return to the text panel.
The input language setting only applies to
the current SMS.
SMS status report
Requirement: Your service provider supports this feature.
If you have activated the status report,
you will receive a message with a confirmation text after you have sent your SMS.
Activating/deactivating the status report
v ¢ î ¢ Settings
Status Report
Select and press
§OK§.
‰
§OK§ (=on).
Reading/deleting a status report
¤ Open the incoming message list
(page 35) and then:
q Select SMS with the status
State OK or State not OK.
§Read§ Press the display key.
Or:
§Delete§ Press the display key. The text
message is deleted.
Draft message list
In the draft message list, you can save,
edit later and send an SMS.
Saving an SMS in the draft message list
¤ You are writing an SMS (page 32).
§Options§ Press the display key.
Save Entry Select and press §OK§.
Opening the draft message list
v ¢ î ¢ (Mailbox, mailbox PIN)
¢ Outgoing (3)
The first list entry is displayed, e.g.:
1234567890
21.09.05 09:45
Reading or deleting individual SMS
¤ Open the draft message list and then:
q Select SMS.
§Read§ Press the display key.
The entry will be displayed.
Scroll line by line using q.
Or:
§Options§ Open menu.
Delete Entry Press §OK§. The SMS is deleted.
Writing/editing an SMS
¤ You are reading an SMS in the draft
message list.
§Options§ Open menu.
You have the following options:
New SMS
Write and then send a new SMS
(page 33) or save.
33
Page 36

SMS (text messages)
Edit
Edit the text of the saved SMS and then
send (page 33).
Character Set
Text is shown in the selected character
set.
Deleting draft message list
¤ Open the draft message list and then:
§Options§ Open menu.
Delete all Select, press §OK§ and confirm
§Yes§. The list is cleared.
with
a Press and hold (idle status).
Sending an SMS to an e-mail address
If your service provider supports the SMS
to e-mail service, then you can also send
your text messages to e-mail addresses.
The e-mail address must be written at the
beginning of the text. You must send the
SMS to the e-mail service of your SMS
send centre.
¢ î ¢ (Mailbox, mailbox PIN)
v
¢ New SMS
~ Enter the e-mail address. End
with a space or colon (depending on the service provider).
~ Enter the SMS text.
§Options§ Press the display key.
Send Select and press §OK§.
E-mail Select and press
number of the e-mail service is
not entered (page 37), enter
the number of the e-mail service.
§Options§ Press the display key.
Send Select and press §OK§.
* Dependent on provider. Currently not
possible on the Swisscom network.
§OK§. If the
Sending an SMS as a fax*
You can also send an SMS to a fax
machine.
Requirement: Your service provider supports this feature.
¤ You are writing an SMS (page 32).
§Options§ Press the display key.
Send Select and press §OK§.
Fax Select and press §OK§.
s / ~ Select number from the direc-
tory or enter directly. Enter the
number with dialling code
*
© Press the display key.
Send Select and press
(even when you are in the
same area).
Receiving an SMS
All received text messages are saved in the
incoming message list. Linked text messages are displayed as one me ssag e. If thi s
is too long or has not transferred completely, it will be split into individual messages. Since an SMS remains in the list
even after it has been read, you should
regularly delete SMS messages from
the list.
The display tells you if the message memory is full.
¤ Deleting text messages you no longer
require (page 35).
Incoming message list
The incoming message list contains:
u all received text messages, starting
with the most recent.
u messages that could not be sent on
account of an error.
New text messages are signalled on all
Aton CL300 handsets by the À icon in the
display, the flashing message key f
and an advisory tone.
§OK§.
34
Page 37

SMS (text messages)
Opening the incoming message list with
the
f key
f Press.
Select mailbox if necessary and enter
mailbox PIN.
The incoming message list is displayed as
follows (example):
SMS: (2)
1 bold: number of new entries
not bold: number of read entries
2 name of mailbox, here: general mailbox
Open list with §OK§.
An entry in the list is displayed e.g as fol-
lows:
1234567890
21.09.05 09:45
1
2
Opening the incoming message list via the
SMS menu
v ¢ î ¢ (Mailbox, mailbox PIN)
¢ Incoming (2)
Reading or deleting individual SMS
messages
¤ Open the incoming message list.
¤ Continue as described at "Reading or
deleting individual SMS", page 33.
A new message which you have read
acquires the status Old.
Deleting incoming message list
All new and old SMS in the list are
deleted.
¤ Open the incoming message list.
§Options§ Open menu.
¤ To continue, see "Deleting draft mes-
sage list", page 34.
Replying to or forwarding text messages
¤ Read the SMS (page 35):
§Options§ Press the display key.
You have the following options:
Reply
Write and send a reply SMS directly
(page 32).
Edit
Edit the text in the SMS and then
send it (page 32). Attachments
(e.g. pictures, melodies) are not sent.
Forwarding an SMS
¤ You are reading an SMS (page 35):
§Options§ Press the display key.
Forward Select and press §OK§.
To continue see page 32.
Attachments are forwarded. If a service
provider does not permit the forwarding
of attachments:
¤ Select Edit to forward the SMS without
attachments.
¤ Confirm the prompt New SMS will not
contain picture/ melody. Continue? with
§Yes§.
Adding a number to the directory
Adding the sender's number
¤ Open incoming message list and select
entry (page 34).
§Options§ Press the display key. Continue
see page 20.
Notes:
– You can create a special directory for text
messages within your main directory by
putting a star (*) before the names.
– An attached mail box identifier is added to
the directory.
Copying/selecting numbers from an SMS
text
¤ Read SMS (page 35) and scroll to the
telephone number.
The digits are reverse-highlighted.
Ó Press the display key. Continue
see page 20.
Or:
c Press the talk key to dial the
number.
35
Page 38

SMS (text messages)
If you wish to use the number to send an
SMS:
¤ Save the number with the area code
(dialling code) in the directory.
Changing the character set
¤ Read the SMS (page 35):
§Options§ Press the display key.
Character Set
Text is shown in the selected character
set.
Notification by SMS
You can be notified by SMS about missed
calls or new messages on the answering
machine.
Requirement: For missed calls, the
caller's number (CLI) must have been
transmitted.
Notification is sent to your mobile phone
or another phone with SMS functionality.
You only need to set the phone number to
which notification should be sent (notification number) and the notification type.
Storing the notification number
v ¢ î ¢ Settings ¢Notify Number
~ Enter the number to which the
SMS is to be sent.
§Save§ Press the display key.
a Press and hold (idle status).
Caution:
Do not enter your own fixed network number
for the notification of missed calls. This can
lead to chargeable endless looping.
Setting the notification type
v ¢ î ¢ Settings ¢Notify Type
¤ Change multiple line input if necessary:
Missed Calls:
Set On if you want SMS notification.
Ans Machine:
Set On if you want SMS notification.
¤ Save changes (page 56).
SMS mailboxes
The General Mailbox is the default setting. Anyone can access this mailbox and
it cannot be protected by a PIN. You can
also set up three personal mailboxes and
protect these with a PIN. Each mailbox is
identified by a name and a "Mailbox ID" (a
kind of extension number).
Please note:
u If you operate a number of devices
(base stations) with SMS functionality
on a single phone line, then each SMS
mailbox ID may only occur once. In this
case you must also change the preset
ID of the general mailbox ("0").
u You can only use personal mailboxes if
your service provider supports such a
function. You can tell that this is supported by the fact that a star (*) is
added to the number of a (preset) SMS
centre.
u If you have forgotten your mailbox PIN,
you can reset it by restoring the base
station's factory settings. This will
delete all messages from all mailboxes.
Setting up and changing a personal mailbox
Setting up a personal mailbox
v ¢ î ¢ Settings ¢SMS Mailboxes
s Select a mail box,
e.g. Mailbox 2 , and press
§OK§ .
¤ Change multiple line input:
On/Off:
Activate or deactivate mailbox.
ID:
Select mailbox ID (0–9). You can only
select the available numbers.
Protection:
Activate/deactivate PIN protection.
PIN
Enter 4-digit PIN, if necessary.
¤ Save changes (page 56).
36
Page 39

SMS (text messages)
Active mailboxes are marked with in
the mailbox list. They are shown in the
SMS list and can, if necessary, be displayed by pressing the message key f.
‰
Deactivating a mailbox
¤ Set On/Off: to Off . Confirm message
§Yes§ if necessary.
with
All SMS saved in this mailbox will be
deleted.
Deactivating PIN protection
¤ Set Protection: to Off .
The mailbox PIN is reset to "0000".
Changing the name of a mailbox
v ¢ î ¢ Settings ¢SMS Mailboxes
¢ s (Select mailbox)
§Edit§ Press the display key.
~ Enter new name.
§Save§ Press the display key.
a Press and hold (idle status).
Changing a mailbox's PIN and ID
v ¢ î ¢ Settings ¢SMS Mailboxes
¢ s (Select mailbox)
~ Enter mailbox PIN if necessary
und press
§OK§.
¤ Set ID:, Protection: and PIN (page 36).
Sending a text message to a personal mailbox
To send a text message to a personal mailbox, the sender must know your ID and
enter it after your number.
¤ You can send your SMS contact an SMS
via your personal mailbox.
Your SMS contact will receive your SMS
number with current ID and can save it in
their directory. If the ID is invalid, the SMS
will not be delivered.
Setting SMS centre
Entering/changing SMS centres
Note:
The access number (062 210 00 0) for the
Swisscom SMS centre is pre-programmed
when supplied.
¤ You should find out about the services
and special functions offered by your
service provider before you make a
new application and/or before you
delete pre-configured call numbers.
¢ î ¢ Settings ¢Service Centres
v
s Select SMS centre (e.g. Service
Centr. 1) and press
§OK§.
¤ Change multiple line input:
Active Send:
Select Yes if the text messages are to be
sent via the SMS centre. For the SMS
centres 2 to 4, the setting only applies
to the next SMS.
SMS:
Press the display key
number of the SMS service and insert a
star if your service provider supports
personal mailboxes.
E-mail:
Press the display key
number of the email service.
§Edit§. Enter the
§Edit§. Enter the
¤ Save changes (page 56).
Note:
Ask your service provider for details of how
you should enter service numbers if you wish
to use personal mailboxes (requirement: your
service provider supports this function).
Sending an SMS through another SMS centre
¤ Activate the SMS centre (2 to 4) as send
centre.
¤ Send the SMS.
This setting only applies to the SMS that is
being sent next. Afterwards, the setting
automatically changes back to Service
Centr. 1.
37
Page 40

SMS (text messages)
SMS info services
You can have your service provider send
you certain information (e.g. weather
forecast or lottery numbers) via SMS. Up
to 10 info services can be stored. You can
obtain information about the info services
available and their costs from your service
provider.
Setting up/ordering an info service
Setting up an info centre
v ¢ î ¢ SMS Service ¢Info Centre
~ Enter destination number
(max. 20 digits).
§Options§ Open menu.
Save Entry Select and press §OK§.
Ordering an info service
v ¢ î ¢ SMS Service ¢Ordering
s Select info service.
§Send§§ Press the display key.
Setting up an info service
¤ Select info service (see above). Now:
§Edit§§ Press the display key.
~ Enter code and designation, if
necessary.
§Save§ Press the display key.
Changing/deleting an info service
¤ Select info service (see above). Now:
§View §Edit Press display keys one after the
other.
~ Change code and designation
if necessary. Press the display
key X to delete.
§Save§ Press the display key.
Setting up/ordering an info service
Ordering an info service
v ¢ î ¢ SMS Service
s Select info service.
§Send§§ Press the display key.
Setting up an info service
¤ Select info service (see above). Now:
§Edit§ Press the display key.
~ If necessary, enter code, desig-
nation and destination
number.
§Options§ Open menu.
Save Entry Select and press §OK§.
Changing/deleting an info service entry
¤ Select info service (see above). Now:
§View§ Press the display key.
§Edit§ Press the display key.
~ If necessary, change code,
designation or destination
number. Press the display key
X to delete.
§Save§ Press the display key.
SMS to a PABX
u You can only receive an SMS when the
Calling Line Identification is forwarded to the extension of the PABX
(CLIP). The CLIP of the phone number
for the SMS centre is evaluated in your
Aton CLT300.
u If required, you must prefix the number
for the SMS centre with the access code
(depending on your PABX).
If in doubt, test your PABX e.g. by sending a text message to your own
number: once with and once without
the access code.
u When you send SMS messages, your
sender number may be sent without
your extension number. In this case the
recipient cannot reply to you directly.
Sending and receiving SMS on ISDN
PABXs is only possible via the MSN
number assigned to your base station.
38
Page 41

SMS (text messages)
Activating/deactivating the SMS function
When you switch off you cannot send or
receive any SMS with your phone.
The settings which you have made for
sending and receiving SMS (e.g. the call
numbers of the SMS centres) and the
entries in the incoming and draft message
lists are saved when you switch off your
phone.
v Open menu.
55O2L
Enter the digits.
§OK§ Deactivate the SMS function.
Q
Or:
1 §OK§ Activate SMS function (default
settings).
SMS troubleshooting
Errors when sending
E0 Calling Line Identification permanently
withheld (CLIR) or Calling Line
Identification is not working.
FE Error occurred during SMS transfer.
FD Connection to SMS centre failed, see self-
help.
Self-help with errors
The following table lists error situations
and possible causes and provides notes on
troubleshooting.
You cannot send messages.
1. The CLIP service (Calling Line Identification
Presentation) is not working.
¥ Have the service checked by your service
provider.
2. Text message transmission has been interrupted (e.g. by a call).
¥ Re-send the text message.
3. Feature is not supported by network provider. .
4. No number or an invalid number is entered
for the SMS centre activated as the send
centre.
¥ Enter the number (page 37).
You receive a message whose text is incomplete.
1. Your phone memory is full.
¥ Delete old messages (page 35).
2. The provider has not yet sent the rest of the
message.
You have stopped receiving messages.
1. You have changed the ID of your mailbox.
¥ Tell your SMS contacts your new ID or
undo the change (page 37).
2. You have not activated your mailbox.
¥ Activate your mailbox (page 37).
3. Call diversion is activated with When: All Calls
or the call diversion All Calls is activated for
the network mailbox.
¥ Change your call diversion.
The message is played back.
1. The "display call number" service is not activated.
¥ Have your service provider enable this
service (there is a charge for this).
2. Mobile phone operator and network SMS
service provider have not agreed on a
cooperation.
¥ Obtain information from your network
SMS service provider.
3. Your terminal is recorded in the records of
your SMS provider as having no fixed network SMS functionality, i.e. you are no
longer registered with the provider.
¥ Start the registration wizard for auto-
matic registration (see page 32).
– Register the terminal (again) for SMS
reception.
Messages are only received during the day.
1. The terminal is stored in your SMS provider's
database as having no fixed network SMS
functionality, i.e. you are no longer registered with the provider.
¥ Start the registration wizard for auto-
matic registration (see page 32).
¥ Register the terminal (again) for SMS
reception (see above).
39
Page 42

Using the network mailbox (Combox)
Using the network mailbox
(Combox)
The network mailbox is your network provider's answering machine within the network. You cannot use the network mailbox unless you have requested it from
your network provider.
Configuring the network mailbox for fast access
With fast access, you can dial either the
network mailbox or your integrated
answering machine directly.
The integrated answering machine is preconfigured for fast access. You can configure the network mailbox instead. Ask your
network provider about this.
Configuring the network mailbox for fast
access and entering the network mailbox
number
v ¢ Ð ¢ Voice Mail ¢ Set Key 1
Network Mailb.
Select and press
~ Enter the number for the
network mailbox.
Save§ Press the display key.
a Press and hold (idle status).
The setting for fast access applies to all
Aton CL300 handsets.
‰
§OK§ (=on).
Calling the network mailbox
1 Press and hold.
You are connected straight to
the network mailbox.
d Press handsfree key d if
required. You hear the network mailbox announcement.
Viewing the network mailbox message
If a message arrives for you, you receive a
call from the network mailbox. If you have
requested Calling Line Identification, the
displays shows the network mailbox
number. If you accept the call, the new
messages are played back. If you do not
accept the call, the network mailbox
number will be stored in the missed calls
list and the message key flashes
(page 23).
40
Page 43

Using several handsets
Using several handsets
Registering handsets
You can register up to a total of six handsets on your base station.
An Aton CL300 handset can be registered
on up to four base stations.
Automatic registration to base station Aton CLT300
Important: The handset must not already
be registered to any base station.
Registering the handset to the
Aton CLT300 base station occurs automatically.
¤ Place the handset in the base with its
display facing forward.
Registration takes around 1 minute. During this process, Regstr.Procedure appears
in the display and the name of the base
station flashes e.g. Base 1. When the
handset has registered, its screen displays
its internal number, e.g. INT 2 for internal
number 2. The handset is assigned the
lowest available internal number (1-6).
If all internal numbers 1-6 have been
assigned, number 6 is overwritten, provided the handset with the internal
number 6 is in idle status.
Notes:
– Automatic registration is not possible when
the base station on which you wish to register the handset is being used to make a
call.
– Each key press interrupts the automatic
registration.
– If automatic registration does not work,
you will have to register the handset manually.
– You can change the name of the handset
(page 44).
Manual registration to base station Aton CLT300
You must activate manual registration of
the handset at both the handset and the
base station.
After it has registered, the handset returns
to idle status. The internal number of the
handset appears in the display, e.g. INT 1.
If it does not, repeat the procedure.
On the handset
v ¢ Ð ¢ Handset ¢Register H/Set
s Select base station, e.g. Base 1
and press
~ Enter the system PIN of the
base station (the default is
0000) and press
screen will display, e.g. Base 1.
§OK§.
§OK§. The
On the base station
Within 60 secs. press and hold the registration/paging key on the base station
(page 2) (approx. 3 secs.).
Registering other handsets
You can register other Aton CL300 handsets and handsets for other devices with
GAP functionality as follows.
On the handset
¤ Start to register the handset as
described in its user guide.
On the base station
¤ Press and hold the registration/paging
key on the base station (page 2)
(approx. 3 secs.).
De-registering handsets
You can de-register any registered handset from any registered Aton CL300 handset.
u Open list of internal users.
The handset you are currently
using is indicated by < .
41
Page 44

Using several handsets
s Select the internal user you
wish to de-register.
§Options§ Open menu.
De-reg. H/Set No.
Select and press
~ Enter current System PIN and
§OK§.
press
§Yes§ Press the display key.
§OK§.
Locating a handset ("paging")
You can locate your handset using the
base station.
¤ Press the registration/paging key on
the base station briefly.
¤ All handsets will ring at the same time
("paging"), even if the ringers are
switched off.
Ending paging
¤ Briefly press the registration/paging
key on the base station or press the talk
key c on the handset.
Changing the base station
If your handset is registered to more than
one base station, you can set it to a particular base station or to the base station
that has the best reception (Best Base).
¢ Ð ¢ Handset ¢Select Base
v
s Select one of the registered
base stations or Best Base and
§OK§.
press
Making internal calls
Internal calls to other handsets registered
on the same base station are free.
Calling a specific handset
u Initiate internal call.
~ Enter the number of the hand-
set.
Or:
u Initiate internal call.
s Select handset.
c Press the talk key.
Calling all handsets ("group call")
u Initiate internal call.
* Press the star key. All handsets
are called.
Ending a call
a Press the end call key.
Transferring a call to another handset
You can transfer an external call to
another handset (connect).
u Open list of handsets.
The external caller hears the
wait melody if activated (see
page 49).
s Select a handset or Call All and
§OK§.
press
When the internal participant answers:
¤ If necessary announce the external call.
a Press the end call key.
The external call is transferred to the other
handset.
If the internal participant does not answer
or is busy, press the display key
return to the external call.
When diverting a call you can also press
the end call key a before the internal
participant lifts the receiver.
Then, if the internal participant does not
answer or is busy, the call will automatically return to you (the display will show
Recall).
Internal consultation calls
When you are speaking to an external
participant you can simultaneously call an
internal participant for consultation.
u Open list of handsets.
§End§, to
42
Page 45

Using several handsets
The external caller hears the
wait melody if activated (see
page 49).
s Select handset and press
§OK§.
Ending an enquiry call
§End§ Press the display key.
You are reconnected with the external
caller.
Accepting/rejecting call waiting
If you get an external call while conducting an internal call, you will hear the call
waiting tone (short tone). The caller's
number will appear in the display if phone
number identification is enabled.
Ending an internal call, accepting an
external call
§Accept§ Press the display key.
The internal call is ended. You are connected to the external caller.
Rejecting external call
§Reject§ Press the display key.
The call waiting tone is turned off. You
remain connected with the internal participant. The ringtone can still be heard at
other registered handsets.
Linking internal callers to an external call
Important: The Listening In function must
be activated.
You are conducting an external call. An
internal caller can listen in on this call and
take part in the conversation. All the participants are made aware of the 'listeningin' by a signal tone.
Activating/deactivating internal listening in
v ¢ Ð ¢ Base ¢Add. Features
¢ Listening In
a Press and hold (idle status).
Internal listening in
The line is engaged with an external call.
Your screen will display information to
that effect You want to listen in to the
existing external call.
c Press and hold the talk key.
You are linked into the call. All participants
hear a signal tone. During this time, this
handset will not display any information
or messages and no selection can be
made from this handset.
Ending listening in
a Press the end call key.
All participants hear a signal tone.
If the first internal participant presses the
end call key a, the handset that has 'listened-in' remains connected to the external caller.
Changing the name of a handset
The names "INT 1", "INT 2" etc. are
assigned automatically at registration.
You can change these names. The name
must be no more than 10 characters. The
changed name is displayed in every handset's list.
u Open list of handsets. Your
own handset is indicated by <.
s Select handset.
§Edit§ Press the display key.
~ Enter name.
§Save§ Press the display key.
43
Page 46

Using several handsets
Changing a handset's internal number
A handset is automatically assigned the
lowest unassigned number when it is registered. If all the numbers have been
assigned, number 6 is overwritten, provided the handset is in idle status. You can
change the internal number of all registered handsets (1–6).
u Open list of handsets. Your
own handset is indicated by <.
v Open menu.
Edit H/Set No.
Select and press
handsets is displayed.
s The current number flashes.
Select a handset.
~ Enter the new internal
number(1–6). The handset's
old number is overwritten.
§Save§ Press the display key to save
the input.
a Press and hold (idle status).
You will hear the error tone (descending
tone sequence) if you assign an internal
number twice.
§OK§. The list of
¤ Repeat the process with an unused
number.
Using a handset as a room monitor
If the room monitor is activated, a previously stored destination number is called
as soon as a set noise level is reached. You
can store an internal or external number
in your handset as the destination
number.
The room monitor call to an external
number stops after approx. 90 seconds.
The room monitor call to an internal
number (handset) stops after approx. 3
minutes (depending on the base station).
While the room monitor is activated, all
keys are locked except the end call key.
The handset's speaker is muted.
When the room monitor is activated,
incoming calls to the handset are indicated without a ringtone and are only
shown on the screen. The display and keypad are not illuminated and advisory
tones are also turned off.
If you accept an incoming call, the room
monitor mode is suspended for the duration of the call, but the function remains
activated.
If you switch off the handset, the room
monitor mode is deactivated. You must
reactivate the function after switching on
the handset again.
Caution!
– Please note that the "room monitor" does
not function in certain situations, e.g. if
the mobile phone number specified by
the user is busy or has no reception, if
the mains power supply fails or if batteries are empty.
– You should always check the operation
of the room monitor before use. For
example, test its sensitivity. Check the
connection if you are diverting the room
monitor to an outside number.
– When the function is switched on the hand-
set's operating time is severely reduced. If
necessary, place the handset in the base.
This ensures that the batteries do not run
down.
– Ideally the handset should be positioned 1
to 2 metres away from the baby. The microphone must be directed towards the baby.
– The connection to which the room monitor
is diverted must not be blocked by an activated answering machine.
Activating the room monitor and entering the number to be called
v ¢ í ¢ Room Monitor
¤ Change multiple line input:
Room M.:
Select On to activate.
Call to:
Press the display key
tination number.
§Edit§ and enter des-
44
Page 47

Handset settings
External number: select number from
the directory or enter directly. Only the
last 4 digits are displayed.
Internal number: delete any stored
external number.
set or Call All , if all registered handsets
are to be called)
Store number with
Level:
Set noise level sensitivity (Low or High).
§INT§ s (select hand-
§OK§.
§Save§.
¤ Save changes (page 56).
The function is now activated. With v,
you can move directly to settings.
Changing previously set external destination number
v ¢ í ¢ Room Monitor
s Scroll to the Call to: line.
§Edit§ Press the display key.
X Delete existing number.
¤ Enter number as described in "Activat-
ing the room monitor and entering the
number to be called" (page 44).
¤ Save changes (page 56).
Changing previously set internal destination number
v ¢ í ¢ Room Monitor
s Scroll to the Call to: line.
§Edit§ Press the display key.
§Yes§ Press the display key to con-
firm the prompt.
¤ Enter number as described in "Activat-
ing the room monitor and entering the
number to be called" (page 44).
¤ Save changes (page 56).
Deactivating the room monitor remotely
Important: The phone must support
touch tone dialling and the room monitor
should be set for an external destination
number.
¤ Take the call from the room monitor
and press keys 9 ;.
The room monitor function will deactivate
after the call ends. There will be no further
room monitor calls. The other room monitor settings on the handset (e.g. no ringtone) will however remain activated until
you press the display key
set.
To reactivate the room function with the
same phone number:
§OFF§ on the hand-
¤ Turn on the activation again and save
(page 44) with
§Save§.
Handset settings
Your handset is preconfigured, but you
can change these settings to suit your
individual requirements.
Changing the display language
You can view the display texts in different
languages.
¢ Ð ¢ Handset ¢Language
v
The current language is indicated by .
s Select a language and
§OK§.
press
a Press and hold (idle status).
If you accidentally choose a language you
do not understand:
v 5 41
Press keys one after the other.
s Select the correct language
and press
§OK§.
Setting the display
You have a choice of four colour schemes
and several different contrasts.
¢ Ð ¢ Display
v
Colour Scheme
Select and press
§OK§.
‰
45
Page 48

Handset settings
s Select a colour scheme and
press
our).
a Press briefly.
Contrast Select and press
r Select contrast.
§Save§ Press the display key.
a Press and hold (idle status).
‰
§OK§ ( = current col-
§OK§.
Setting the screen picture
You can display a screen picture (picture
or digital clock) when the handset is in idle
status. This will replace the idle status display. It may conceal the date, time and
name.
The screen picture is not displayed in certain situations, e.g. during a call or when
the handset has been deregistered.
If a screen picture has been activated,
the menu item Screen Picture is marked
‰
with .
¢ Ð ¢ Display ¢Screen Picture
v
The current setting is displayed.
¤ Change multiple line input:
Activation:
Select On (screen picture is displayed)
or Off (no screen picture).
Selection:
Change screen picture if necessary (see
below).
¤ Save changes.
If the screen picture conceals the display,
press the end call key briefly to show the
idle display with time and date.
Changing the screen picture
v ¢ Ð ¢ Display ¢Screen Picture
s Scroll to the Selection line.
§View§ Press the display key.
The active screen picture
is displayed
s Select picture/Clock.
§Save§ Press the display key.
¤ Save changes.
Setting display illumination
Depending on whether or not the handset
is in the base station you can set different
levels of display illumination. If it is
switched on, the display is permanently
dimmed.
¢ Ð ¢ Display ¢Backlight
v
The current setting is displayed.
¤ Change multiple line input:
In Charger
Select On or Off .
without Charger
Select On or Off .
§Save§ Press the display key.
a Press and hold (idle status).
Note:
When the display illumination is switched on,
the standby time of the handset is reduced to
approx. 30 hours.
Activating/deactivating auto answer
If you have activated this function, when
you get a call you can simply lift the handset out of the base station without having
to press the talk key c.
¢ Ð ¢ Handset
v
Auto Answer
Select and press
a Press and hold (idle status).
Adjusting the loudspeaker volume
You can set the loudspeaker volume for
handsfree speaking to five different levels
and the earpiece volume to three different
‰
§OK§ (=on).
46
Page 49

Handset settings
levels. You can only make these adjustments during a call.
The handsfree volume can only be
adjusted when this function is set.
You are conducting an external call.
t Open menu.
r Select volume.
§Save§ Press display key if necessary
to save the setting permanently.
If t is assigned a different function,
e.g. when toggling (page 18):
§Options§ Open menu.
Vol ume Select and press §OK§.
Configure setting (see above).
Changing ringtones
u Volume:
You can choose between five volumes
(1–5; e.g. volume 2 = ˆ) and
the "Crescendo" ring (6; volume
increases with each ring =
‰).
u Ringtones:
You can choose between 15 different
melodies.
You can configure the following functions
with different ringtones:
u Ext. Calls : for external calls
u Internal Calls : for internal calls
u All: the same for all functions
For how to set the ringtones for the base
station, see page 49.
r Set volume (1–6).
s Scroll to the next line.
r Select melody.
§Save§ Press the display key to save
the setting.
In idle status, you can also open the menu
Ringer Settings by pressing t briefly.
Settings for all functions to ring the same
v ¢ Ð ¢ Audio Settings ¢
Ringer Settings ¢ All
¤ Set volume and ringtone (see "Settings
for individual functions").
§Yes§ Press the display key to con-
firm the prompt.
a Press and hold (idle status).
Activating/deactivating the ringtone
You can deactivate the ringtone on your
handset before you answer a call or when
the handset is in idle status; the ringtone
can be deactivated permanently or just for
the current call. The ringtone cannot be
re-activated while an external call is in
progress.
Deactivating the ringtone permanently
* Press the star key and hold
until you can no longer hear
the ringtone.
The Ú icon appears in the display.
Re-activating the ringtone
* Press and hold the star key.
Settings for individual functions
Set the volume and melody depending on
the type of signalling required.
¢ Ð ¢ Audio Settings ¢
v
Ringer Settings
q Set, e.g. select Ext. Calls and
§OK§.
press
¤ Change multiple line input:
Deactivating the ringtone for the
current call
§Silence§ Press the display key.
Activating/deactivating the alert tone
In place of a ringtone you can activate an
alert tone. When you get a call, you will
hear a short tone ("Beep") instead of the
ringtone.
47
Page 50

Handset settings
* Press and hold the star key
and within 3 seconds:
§Beep§§ Press the display key. A call is
now signalled by one brief
alert tone. You will now see
º
in the display.
Activating/deactivating first ring muting
v Open menu.
55O1O
Press keys.
§OK§ First ring audible.
Q
Or:
1 §OK§ First ring muted.
Activating/deactivating advisory tones
Your handset uses ‘advisory tones’ to tell
you about different activities and statuses. The following advisory tones can be
activated and deactivated independently
of each other:
u Key beep: Each key press is acknowl-
edged.
u Acknowledge tones:
– Confirmation tone (ascending tone
sequence): at the end of an entry/
setting and when an SMS or a new
entry arrives in the answering
machine list or calls list
– Error beep (descending tone
sequence): when you make an
incorrect entry
– Menu end tone: when scrolling at
the end of a menu
u Battery tone: The batteries need to be
charged.
¢ Ð ¢ Audio Settings
v
¢ Advisory Tones
¤ Change multiple line input:
Key Tones:
Select On or Off .
Confirm.:
Select On or Off .
Battery:
Select On, Off or In Call. The battery
warning tone is activated/deactivated
or only sounds during a call.
¤ Save changes (page 56).
You cannot deactivate the confirmation
tone for placing the handset in the base
station.
Setting the alarm clock
Requirement: The date and time have
already been set (page 9).
Activating/deactivating and setting the alarm clock
v ¢ ì
¤ Change multiple line input:
Alarm Clock:
Select On or Off .
Time:
Enter the wake-up time in 4-digit format.
Melody:
Select melody.
Vol ume :
Set the volume (1-6).
¤ Save changes (page 56).
You will see the icon ¼.
A wake-up call with the selected ringer
melody is signalled on the handset. The
wake up call sounds for 60 seconds. The
display shows Alarm Clock . If no key is
pressed the wake-up call is repeated twice
at five minute intervals and then switched
off.
During a call, the wake-up call is signalled
by a short tone.
48
Page 51

Base station settings
Deactivating the wake-up call/ repeating after a pause (slumber mode)
Requirement: A wake-up call is sounding.
§OFF§ Press the display key. The
wake-up call is deactivated.
or
§Snooze§ Press the display key or any
key. The wake-up call is deactivated and then repeated after
5 minutes. After the second
repetition the wake-up call is
deactivated completely.
Restoring the handset default settings
You can reset any individual settings and
changes that you have made. This will not
affect entries in the directory, call-by-call
list, calls list, or SMS lists or the handset's
registration to the base station.
¢ Ð ¢ Handset ¢Reset Handset
v
§Yes§ Press the display key.
a Press and hold (idle status).
Cancel the restoring process by pressing
a or the display key
§No§.
Base station settings
The base station settings are carried out
using a registered Aton CL300 handset.
Protecting against unauthorised access
Protect the system settings of the base
station with a PIN known only to yourself.
The system PIN must now be entered
when, for example, registering/de-registering a handset to/from the base station
or when restoring the default settings.
Changing the system PIN
You can change the 4-digit system PIN set
on the base station (default setting: 0000)
to a 4-digit PIN known only to yourself.
Caution:
Memorise the new system PIN well! If you forget it, the phone will require specialist attention. If this happens, contact the Hotline
(page 53).
Setting a system PIN facilitates remote
operation of the answering machine
(page 30).
¢ Ð ¢ Base ¢System PIN
v
~ Enter current System PIN and
§OK§.
press
~ Enter new system PIN. For
security the PIN is shown as
four stars (
s~ Scroll to the next line, re-enter
new system PIN and press
a Press and hold (idle status).
****
).
§OK§.
Changing ringtones
u Volume:
You can choose between five volumes
and the "crescendo" ring, see page 47.
Select "0" to deactivate the ringtone of
the base station.
u Ringtones:
You can set a ringtone melody for
external calls, see page 47.
¢ Ð ¢ Base ¢Ringer Settings
v
For how to adjust the settings, see
page 47.
Activating/deactivating the wait melody
v ¢ Ð ¢ Base ¢Music on hold
Press §OK§ to activate or deactivate the wait
melody ( = on).
‰
49
Page 52

Base station settings
Repeater support
With a repeater you can increase the
range and reception strength of your base
station. First you must activate the
repeater mode. This will terminate any
calls currently running through the base
station.
Requirement: A repeater is registered.
¢ Ð ¢ Base ¢Add. Features
v
¢ Repeater Mode
§Yes§ Press the display key.
When repeater mode is active, the menu
item is marked with .
Restoring default settings to base station
When resetting, the handsets remain registered. The following settings are not
reset:
u System PIN
u Setting "First ringtone suppressed"
u SMS info services
v ¢ Ð ¢ Base ¢Base Reset
~ Enter the system PIN and
press
§Yes§ Press the display key.
Cancel the restoring process by pressing
a or the display key
a Press and hold (idle status).
‰
§OK§.
§No§.
50
Page 53

Connecting the base station to the PABX
Connecting the base station
to the PABX
The following settings are only needed
when your PABX requires them. Please
refer to the user guide for your PABX.
You cannot send or receive SMS on PABXs
that do not support Calling Line Identification.
Flash time
The current setting is indicated by .
Setting the flash time
v ¢ Ð ¢ Base ¢Add. Features
¢ Recall
s Select flash time ( = on)
and press
a Press and hold (idle status).
Setting pauses
§OK§.
‰
‰
Changing the pause after the recall key
You can change the length of the pause if
your PABX requires this (refer to the user
guide for your PABX).
v Open menu.
5 5 O 1 2
Press keys.
~ Enter a digit for the length of
the pause (1 = 800 ms;
2 = 1600 ms; 3 = 3200 ms)
and press
§OK§.
Changing pause after line seizure
You can change the length of pause that is
inserted between pressing the talk key
c and sending the number.
v Open menu.
5 5 O 1 L
Press keys.
~ Enter digit for the pause
length (1 = 1 sec.; 2 = 3 secs.;
3 = 7 secs.) and press
§OK§.
51
Page 54
Appendix
Appendix
Care
¤ Wipe the base station and handset with
a damp cloth (do not use solvent) or an
antistatic cloth.
Never use a dry cloth. This can cause
static.
Contact with liquid
If the handset has come into contact with
liquid:
1. Switch the handset off and remove
the batteries immediately.
2. Allow the liquid to drain from the handset.
3. Pat all parts dry, then place the handset
with the battery compartment open
and the keypad facing down in a dry,
warm place for at least 72 hours (not
in a microwave, oven etc.).
4. Do not switch on the handset again
until it is completely dry.
When it has fully dried out, you will normally be able to use it again.
Faults and Self-help with Troubleshooting
Not every fault is due to a defective
phone. In certain circumstances, it can
come from a brief interruption in the
power supply to the base station (unplug/
plug in power supply) or if the batteries of
the handset are removed and inserted
again. The following instructions should
be of help for specific faults.
Important: problems or faults can only be
remedied if you bring the complete unit
(base station, handset, as well as connecting cable) to the place of purchase.
!
The display is blank.
1. The handset is not switched on.
¥ Press and hold the end call key a.
2. The batteries are flat.
¥ Charge or replace the batteries (page 8).
"Base station x" is flashing in the display.
1. The handset is outside the range of the base
station.
¥ Reduce the distance between handset/
base station.
2. The handset has been de-registered.
¥ Register the handset (page 41).
3. The base station is not switched on.
¥ Check the base station mains adapter
(page 6).
Base Search is flashing in the display.
The handset is set for Best Base and no base station is switched on or within range.
¥ Reduce the distance between handset/base
station.
¥ Check the base station mains adapter
(page 6).
Handset does not ring.
1. The ringtone is switched off.
¥ Activate the ringtone (page 47).
2. Call diversion set to All Calls.
¥ Switch off Call Diversion (page 17).
You cannot hear a ringtone/dialling tone.
Base station's phone cord has been replaced.
¥ When purchasing a new cord, ensure that it
has the correct pin connections (page 7).
The other party cannot hear you.
You have pressed the
set is "muted".
u (INT) key. The hand-
¥ Switch on the microphone again (page 14).
The incoming call number is not displayed
although CLIP is set.
Phone number identification is not working.
¥ Caller should ask network provider to check
phone number identification (CLI).
52
Page 55

Appendix
You hear an error tone when keying an input
(a descending sequence of tones).
Action has failed/invalid input.
¥ Repeat the operation.
Watch the display and refer to the operating
instructions if necessary.
You cannot listen to messages on the network mailbox.
Your phone system is set for pulse dialling.
¥ Set your phone system to tone dialling.
The calls list does not indicate a time for a
message.
Date/time are not set.
¥ Set the date/time (page 9).
The answering machine reports "PIN is incorrect" during remote operation.
1. System PIN entered is incorrect
¥ Repeat input of system PIN,
2. System PIN is still set to 0000.
¥ Change system PIN to a number other
than 0000 (page 49).
The answering machine does not record any
messages/has switched over to 'announce
only'.
Its memory is full.
¥ Delete old messages.
¥ Play back new messages and delete.
Warranty/Maintenance/Repair/ Authorisation
Warranty
The warranty period is 2 years as of the
date of purchase.
For warranty repair, the warranty card,
filled out and stamped by the place of purchase must be included with the defective
device.
Excluded from the warranty are damages
due to improper use, wear and tear, or
tampering by others. The warranty does
not include consumed materials and deficiencies which only affect the value or
capability for use inconsiderably.
In case of an error, please contact your
place of purchase.
Repair/Maintenance
Rental devices
If your phone does not operate properly,
notify Technical Assistance (phone
number 175).
The repair
charge.
Purchased devices
Repair services are performed free of
charge within the warranty period in
accordance with the regulation of the
warranty certificate). If a repair is necessary, the device must be returned to the
place of purchase.
If Technical Assistance is made available
(during the warranty period as well
the fault action is charged (route lump
sum price as well as time expenses). The
repair costs are additional outside the
warranty period.
Batteries
Battery cells are considered consumed
material, which is not covered by the warranty service. Defective batteries are not
replaced free of charge. This applies to
rental and purchased devices.
* except for damage to wearing parts (cables,
** except for damage to wearing parts (cables,
*
and the fault action are free of
**
),
labels, batteries etc.) and damage arising
from incorrect handling such as dropping it
or allowing fluid to penetrate into handset
etc.
labels, batteries etc.) and damage arising
from incorrect handling such as dropping it
or allowing fluid to penetrate into handset
etc.
53
Page 56
Appendix
Help
If you have any general questions about
products, services, etc., please contact
your Swisscom Information Centre (tollfree number 0800 800 800).
Authorisation
This device is intended to be operated on
the analogue Swiss network.
Country-specific conditions have been
taken into account.
If you have any questions about the
differences between the public phone
networks, please contact your specialist
dealer or network provider.
Swisscom hereby declare that this device
meets the essential requirements and
other relevant regulations laid down in
Directive 1999/5/EC.
The Declaration of Conformity can be found on
the following web site:
www.swisscom.com under the rubric
Online Shop, Phone, Declaration of Conformity
or can be ordered from the following postal
address:
Swisscom Fixnet AG
RES-Voice
Customer Premises Equipments (CPE)
3050 Bern
Specifications
Recommended batteries
(Valid at the time of going to press)
Nickel-metal-hydride (NiMH):
u Sanyo Twicell 650
u Sanyo Twicell 700
u Panasonic 700mAh "for DECT"
u GP 700mAh
u Yuasa Technology AAA Phone 700
u Varta Phone Power AAA 700mAh
u GP 850 mAh
u Sanyo NiMH 800
u Yuasa Technologies AAA 800
The handset is supplied with the authorised batteries.
Handset operating times/charging times
Capacity 650 mAh
Standby time Approx. 170 hours (7 days)
Calling time Approx. 13 hours
Charging time approx. 6 hours
The operating and charging times apply
only when using the recommended batteries.
Note:
When the display illumination is switched on,
the standby time of the handset is reduced to
approx. 30 hours.
Base station power consumption
In standby mode: approx. 2 watt
During a call: approx. 3 watt.
General specifications
DECT standard is supported
GAP standard is supported
No. of channels 60 duplex channels
Radio frequency
range 1880–1900 MHz
Duplex method Time multiplex,
Channel grid 1728 kHz
Bit rate 1152 kbit/s
Modulation GFSK
Language code 32 kbit/s
Transmission
power
10 ms frame length
10 mW, average power per
channel
54
Page 57
Notes on the operating instructions
Range up to 250 m outdoors,
Base station
power supply 230 V ~/50 Hz
Environmental
conditions for
operation
Dialling mode DTMF (tone dialling)/
up to 40 m indoors
+5 °C to +45 °C;
20 % to 75 % relative
humidity
DP (dial pulsing)
Notes on the
operating instructions
This section explains the meaning of certain symbols and typographical conventions that are used in this user guide.
Symbols used
Copy Entry / Copy List (example)
Select one of the two menu
functions specified.
~ Enter digits or letters.
§Save§ The display keys' current func-
tions are shown reverse highlighted in the bottom display
line. Press the display key
below to launch the function.
q Press the top or the bottom of
the control key: scroll up or
down.
r Press the right or left of the
control key: e.g. select setting.
c / Q / * etc.
Press the corresponding key
on the handset.
v ¢ Ð ¢ Display
¤ With the handset in idle status, press
on the right of the control key to open
the main menu.
¤ Select the Ð icon using the control key
– press the control key at the top or
bottom.
In the display header, Settings is displayed.
¤ Press the §OK§ display key to confirm the
function Settings .
The Settings submenu is displayed .
¤ Press the bottom of the control key
repeatedly until Display is selected.
¤ Press the §OK§ display key to confirm the
selection
Contrast Select and press
§OK§.
¤ Press the bottom of the control key
repeatedly until Contrast is selected.
¤ Press the §OK§ display key to confirm the
selection
r Select contrast and press
§OK§.
¤ Press on the right or left of the control
key to select the contrast.
¤ Press the §Save§ display key to confirm
the selection
a Press and hold (idle status).
¤ Press and hold the end call key until
the handset returns to idle status.
Example: menu input
In the user guides, the steps you need to
perform are shown in abbreviated form.
This is illustrated below using the example
of "Setting the contrast for the display".
The things you have to do are explained in
the boxes.
55
Page 58
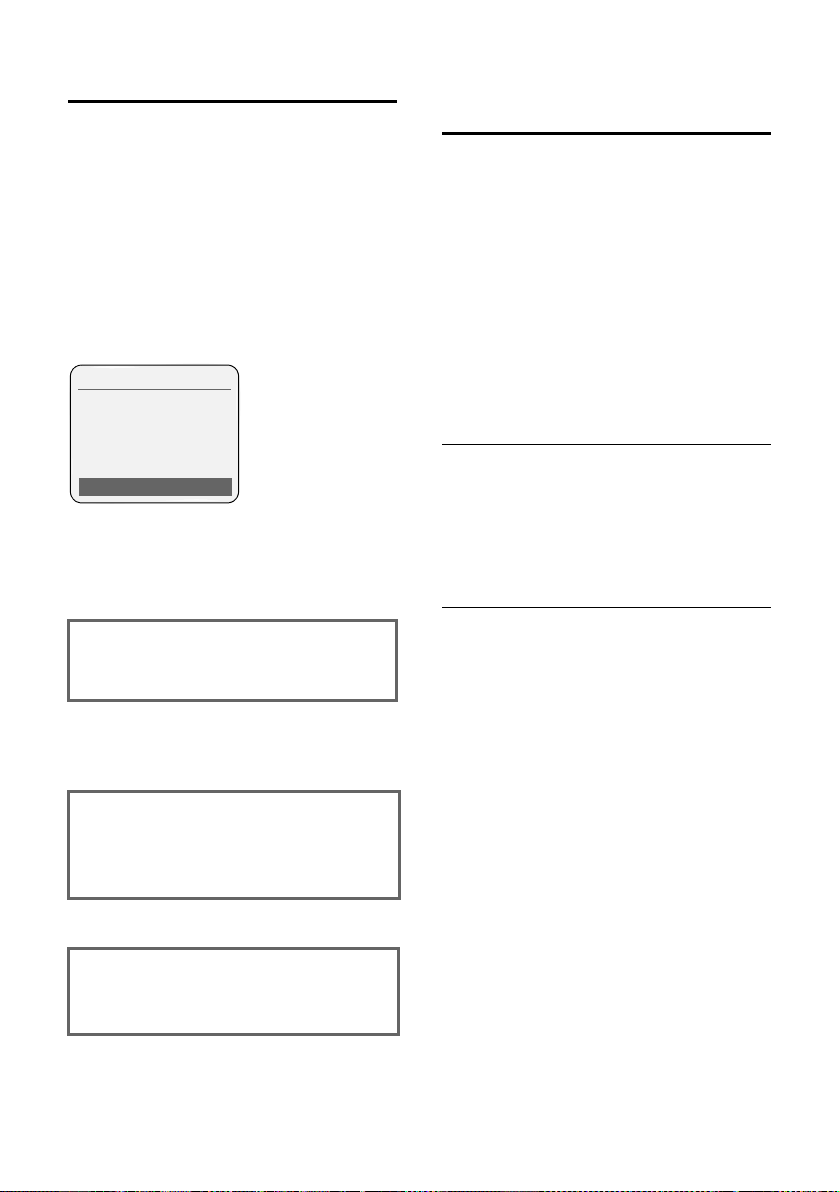
Notes on the operating instructions
Example: multiple line input
There are many situations in which you
can change the settings of a display or
enter data in several lines.
In this user guide symbols are used to
guide you step by step through multiple
line input. This is illustrated below using
the example of "Setting the date and
time". The things you have to do are
explained in the boxes.
You will see the following display (example):
Date/Time
Date:
[10.06.05]
Time:
11:11
Ý Save
Date:
Enter day, month and year in 6-digit
format.
The second line is marked with [ ] to
show it is active.
¤ Enter the date using the digit keys.
Time:
Enter hours/minutes in 4-digit format.
¤ Press the s key.
The four th lin e is marked with [ ] to show
it is active.
¤ Enter the date using the digit keys.
¤ Save changes.
¤ Press the §Save§ display key.
¤ Then press and hold the a key.
The handset changes to idle status.
Writing and editing a text message
The following rules apply when writing a
text message:
u Control the cursor with u v t
s.
u Characters are added to the left of the
cursor.
u Press the star key
table of special characters.
u The first letter of the name of directory
entries is automatically capitalised, followed by lower case letters.
Entering special characters
You can call up the table of special characters when writing an SMS using the
key. Select the required character and
insert it with
§Insert§.
Writing an SMS/name (without predictive text)
Press the hash key # briefly to switch
from "Abc" mode to "123" and from "123"
to "abc" and from "abc" to "Abc" (upper
case: 1st letter upper case, all others
lower case). Press the hash key #
before entering the letter.
The following applies when writing an
SMS:
u The display shows whether upper case,
lower case or digits is selected. "Abc",
"abc" or "123" appears at the top right
of the display.
u When you press a key and hold it, the
characters of that key appear in the
bottom display line and are highlighted one after the other. When you
release the key the highlighted character is inserted into the input field.
to show the
*
*
56
Page 59
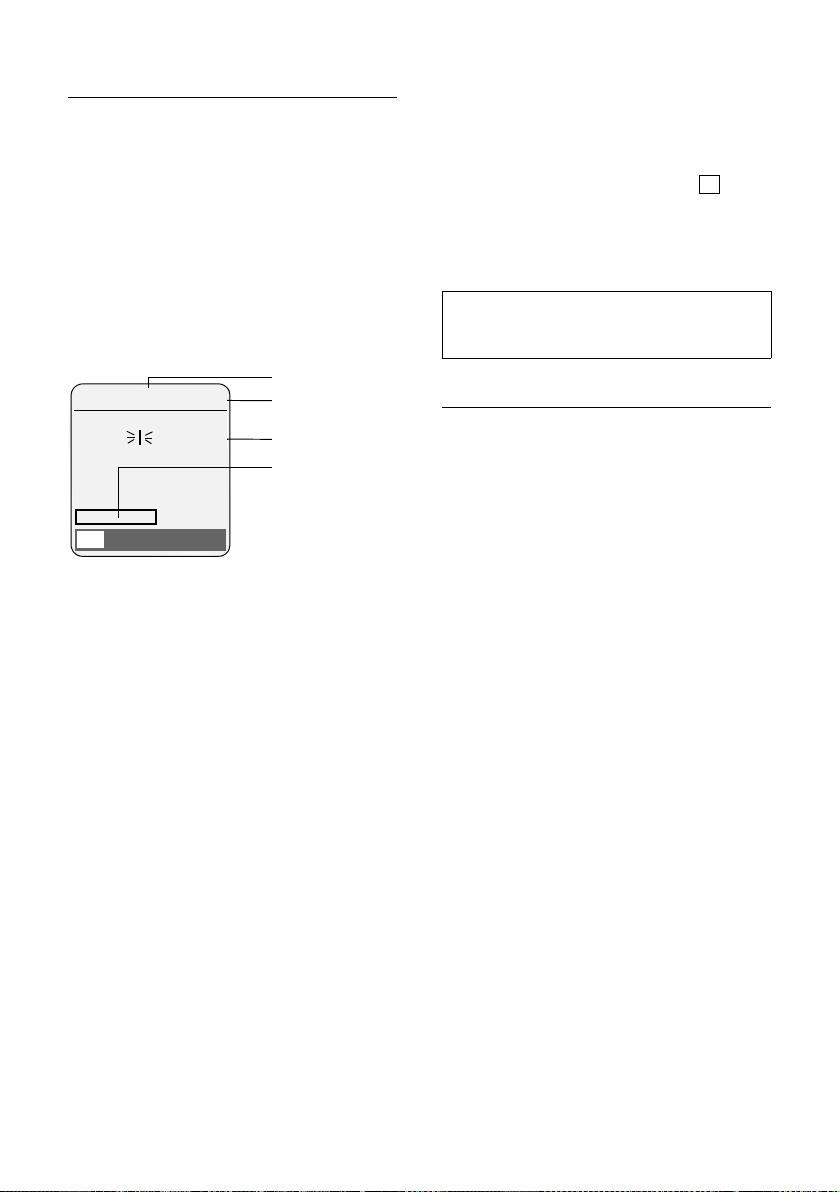
Notes on the operating instructions
Writing an SMS (with predictive text)
EATONI predictive text helps you when
you are writing an SMS.
Each key between Q and O is
assigned several letters and characters
(see the character set tables, page 56).
These appear in a selection line immediately under the text panel (above the display keys) as soon as you press a key. The
letter you are most likely looking for is
reverse-highlighted and is at the beginning of the selection line. It is copied into
the text panel.
612(1) Ç Abc
Hello Peter, I cannot come
today. Ic
hgi
X Options
1 EATONI is activated
2 Upper/lower case or digits
3SMS text
4 Selection line
If this letter is the one you want, confirm
it by pressing the next key. If it is not the
one you want, briefly press the hash
key # repeatedly until the required letter is reverse-highlighted on the display
line and copied into the text panel.
If you press and hold the hash key #
you switch from "Abc" mode to "123" and
from "123" to "abc" and from "abc" to
"Abc".
1
2
3
4
Deactivating/activating predictive text
Requirement: You are writing an SMS.
§Options§ Press the display key.
Predictive Text
‰
Select and press
§OK§ (=on).
a Press the end call key briefly
to return to the text panel.
Enter the text.
Note:
EATONI predictive text is deactivated by
default.
Order of directory entries
The directory entries are usually sorted in
alphabetical order. Spaces and digits take
first priority. The sort order is as follows:
1. Space
2. Digits (0–9)
3. Letters (alphabetical)
4. Other characters
To get round the alphabetical order of the
entries, insert a space or a digit in front of
the name. These entries will then move to
the beginning of the directory. Names
which you have preceded with an asterisk
will move to the end of the directory.
57
Page 60
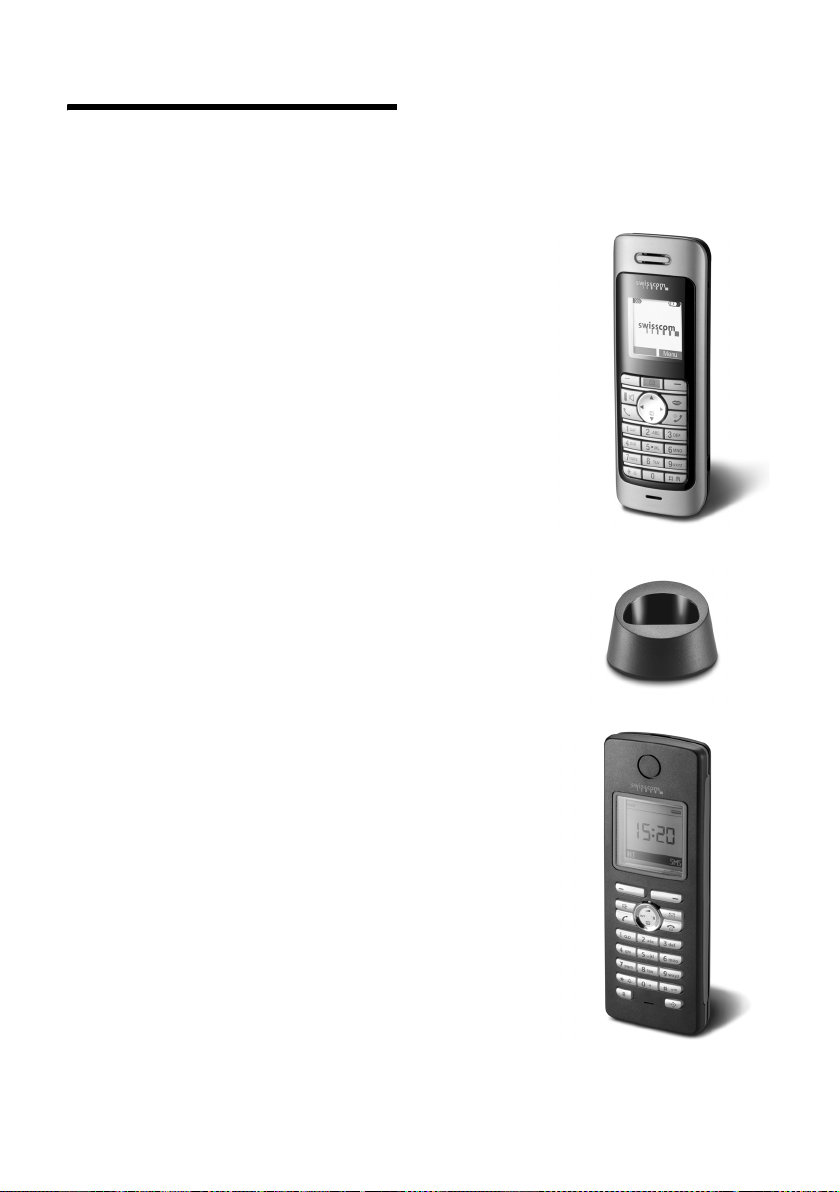
Accessories
Accessories
Handsets
Turn your Aton CLT300 into a cordless telephone system:
Handset Aton CL300 / CL400ISDN / CL700IP
u Illuminated colour display (4096 colours)
u Illuminated keypad
u Handsfree operation
u Polyphonic ringer melodies
u Directory for around 150 entries
u SMS (CLIP must be enabled)
u Headset socket including Headset
u Room monitor
Charger Aton CL100 / CL300
(Including mains adapter)
Handset Top S329 / Aton CL102
u Dust and splash proof casing
u Illuminated colour display (4096 colours)
u Illuminated keypad
u Handsfree operation
u Polyphonic ringer melodies
u Directory for around 250 entries
u SMS (CLIP must be enabled)
u Headset socket including Headset
u Room monitor
58
Page 61
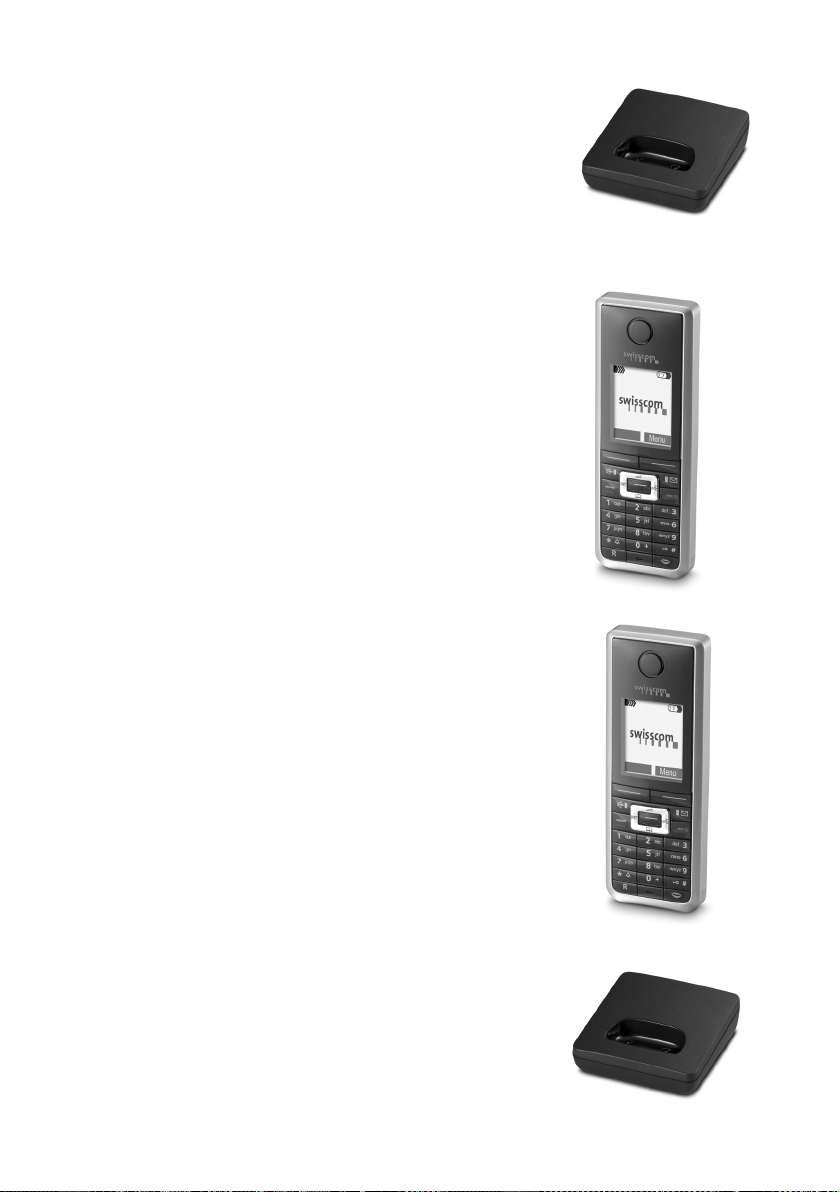
Charger Top S329 / Aton CL102
(Including mains adapter)
Handset Top S600
u Illuminated graphical colour display (65k colours)
u Illuminated keypad
u Handsfree operation
u Polyphonic ringer melodies
u Directory for around 250 entries
u Picture CLIP
u SMS (CLIP must be enabled)
u Voice dialling
u PC interface, e.g. for managing directory entries,
ringtones and screen savers
u Headset socke including Headset
Accessories
Handset Aton CL303
u Illuminated graphical colour display (65k colours)
u Illuminated keypad
u Handsfree operation
u Polyphonic ringer melodies
u Directory for around 250 entries
u Picture CLIP
u SMS (CLIP must be enabled)
u Voice dialling
u PC interface, e.g. for managing directory entries,
ringtones and screen savers
u Headset socke including Headset
u Bluetooth
Charger Top S600 / Aton CL303
(Including mains adapter)
59
Page 62

Accessories
Repeater V2 or Type RTX
The repeater can be used to increase the reception range of
your Aton CLT300 handset to the base station.
Accessories and battery packs are available from the Swisscom shop and mobile phone
retailers, or you can order them directly from the Internet at
www.swisscom.com/Online Shop.
Only use original accessories. This will avoid possible health risks and damage, and also
ensure that all the relevant regulations are complied with.
60
Page 63

Index
Index
A
Access protection . . . . . . . . . . . . . . . 49
Accessories
Acknowledge tones
Activating
advisory tones
answering machine
answering machine
auto answer
handset
internal listening in
muting ringtone
room monitor
two-way recording of call
Activating/deactivating network
mailbox
Adjusting
loudspeaker volume
Advisory tones
Alarm clock
Alert tone
Anniversary
storing in directory
Announcement (answering
machine)
Announcement mode (answering
machine)
Answering machine
activating/deactivation
deleting messages
playing back messages
recording a personal announcement/
remote operation
scrolling back
scrolling forwards
Answering machine list
Answering machine, see
Network mailbox
Auto answer
B
Base station
changing
connecting and setting up
connecting the device
. . . . . . . . . . . . . . . . . . . . 58
. . . . . . . . . . . . . . 48
. . . . . . . . . . . . . . . . 48
. . . . . . . . . . . . 26
(remote operation)
. . . . . . . . . 31
. . . . . . . . . . . . . . . . . . 46
. . . . . . . . . . . . . . . . . . . . . 14
. . . . . . . . . . . . 43
. . . . . . . . . . . . . . . 48
. . . . . . . . . . . . . . . . 44
. . . . . . . . 29
. . . . . . . . . . . . . . . . . . . 18
. . . . . . . . . . . . 46
. . . . . . . . . . . . . . . . . 48
. . . . . . . . . . . . . . . . . . . . 48
. . . . . . . . . . . . . . . . . . . . . 47
. . . . . . . . . . . . . . . . . . . . 21
. . . . . . . . . . . . . 21
. . . . . . . . . . . . . . . 26, 27
. . . . . . . . . . . . . . . 26, 27
. . . . . . . . . . . . . . 26
. . . . . . . . . . 26
. . . . . . . . . . . . . 28
. . . . . . . . . . 27
announce only
. . . . . . . . . . . . 26
. . . . . . . . . . . . . . 30
. . . . . . . . . . . . . . . . . 28
. . . . . . . . . . . . . 28
. . . . . . . . . . . 24
. . . . . . . . . . . . . . . . 13, 46
. . . . . . . . . . . . . . . . . . . . 42
. . . . . . . . 6
. . . . . . . . . . . 6
connecting to PABX. . . . . . . . . . . . .51
. . . . . . . . . . . . . . . . . . . . . . . 6
range
restoring to factory settings
. . . . . . . . . . . . . . . . . . . . . .49
setting
system PIN
Battery
charging
display
fitting
icon
recommended batteries
tone
Best base station
Birthday, see Anniversary
. . . . . . . . . . . . . . . . . . .49
. . . . . . . . . . . . . . . . . . . . . 8
. . . . . . . . . . . . . . . . . . . . . . 8
. . . . . . . . . . . . . . . . . . . . . . . 7
. . . . . . . . . . . . . . . . . . . . . . . . 8
. . . . . . . . . . . . . . . . . . . . . . . .48
. . . . . . . . . . . . . . . .42
. . . . . . .50
. . . . . . . . . .54
C
Call
answering
caller listening in
disconnecting (toggle)
ending
external
forwarding
forwarding (connecting)
internal
picking up from answering
transferring (connecting)
two-way recording
unknown call rejection
Call acceptance
Call diversion
Call duration
Call duration/units
Call history
Call protection
Call waiting
accepting/rejecting
activating/deactivating
favouring waiting call
internal call
no call waiting
suppressing once
Callback
Call-by-call list
Call-by-call numbers
Calling
external
Calling back a caller
Calling Line Identification.
. . . . . . . . . . . . . . . . . . . .13
. . . . . . . . . . . . . . .43
. . . . . . . . . .18
. . . . . . . . . . . . . . . . . . . . . .13
. . . . . . . . . . . . . . . . . . . . .13
. . . . . . . . . . . . . . . . . . .18
. . . . . . . . .42
. . . . . . . . . . . . . . . . . . . . . .42
machine
. . . . . . . . . . . . . . . . . .28
. . . . . . . . .43
. . . . . . . . . . . . .29
. . . . . . . . . .17
. . . . . . . . . . . . . .29, 46
. . . . . . . . . . . . . . . . . . .17
. . . . . . . . . . . . . . . . . . .13
. . . . . . . . . . . . . . .24
. . . . . . . . . . . . . . . . . . . . .23
. . . . . . . . . . . . . . . . . .17
. . . . . . . . . . . . .18
. . . . . . . . . .17
. . . . . . . . . . .18
. . . . . . . . . . . . . . . . . . .43
. . . . . . . . . . . . . . . .17
. . . . . . . . . . . . . .17
. . . . . . . . . . . . . . . . . . . . . . .18
. . . . . . . . . . . . . . . . . .19
. . . . . . . . . . . . . .19
. . . . . . . . . . . . . . . . . . . . .13
. . . . . . . . . . . . . .18
. . . . . .13, 17
61
Page 64

Index
Cancelling (operation)
Care of the telephone
Changing
destination number
display language
internal number of a handset
name of handset
pause time
ringtone
system PIN
Changing PIN
Changing system PIN
Character set table, see
Special characters
Charge saving function
Charge status display
Charges for a call
CLI, CLIP
CLIR
. . . . . . . . . . . . . . . . . . . . . . . . . 17
Conference call
Confirmation beep
Connecting, base station to PABX
Consultation
Consultation (internal)
Control key
Correcting incorrect input
Customer Care
. . . . . . . . . . . . . . . . . . . 51
. . . . . . . . . . . . . . . . . . . . 47
. . . . . . . . . . . . . . . . . . . 49
. . . . . . . . . . . . . . . . . . 49
. . . . . . . . . . . . . . . . . . . . . . 13
. . . . . . . . . . . . . . . . . . . 18
. . . . . . . . . . . . . . . . . . 1, 14
. . . . . . . . . . . . 15
. . . . . . . . . . . . 52
. . . . . . . . . . . . 45
. . . . . . . . . . . . . . 45
. . . . . . . . . . . . . . 43
. . . . . . . . . . . . . 49
. . . . . . . . . . . 29
. . . . . . . . . . . . . . 1
. . . . . . . . . . . . . . . . 25
. . . . . . . . . . . . . . . . . 18
. . . . . . . . . . . . . . 48
. . . . . . . . . . . 42
. . . . . . . . . 16
. . . . . . . . . . . . . . . . . 53
D
Deactivating
advisory tones
answering machine
auto answer
handset
internal listening in
muting ringtone
room monitor
two-way recording of call
Delete key
Deleting
announcement for answering
machine
characters
message
De-registering (handset)
Dialling
call-by-call list
directory
with quick dial
Directory
. . . . . . . . . . . . . . . . . . . . . . 19
. . . . . . . . . . . . . . . . 48
. . . . . . . . . . . . 26
. . . . . . . . . . . . . . . . . . 46
. . . . . . . . . . . . . . . . . . . . . 14
. . . . . . . . . . . . 43
. . . . . . . . . . . . . . . 48
. . . . . . . . . . . . . . . . 45
. . . . . . . . 29
. . . . . . . . . . . . . . . . . . . . . 15
. . . . . . . . . . . . . . . . . 27
. . . . . . . . . . . . . . . . . . . 16
. . . . . . . . . . . . . . . . . . . . 28
. . . . . . . . . . 41
. . . . . . . . . . . . . . . . 19
. . . . . . . . . . . . . . . . . . . . 19
. . . . . . . . . . . . . . . . 20
. . . . . 44
. . . . 51
copying number from text . . . . . . . .20
managing entries
opening
order of entries
saving entry
sending entry/list to handset
storing anniversary
storing number of sender (SMS)
using to enter numbers
Disconnecting waiting caller (toggle)
Display
changing display language
contrast
illumination
in idle status
keys
memory
network mailbox message
number (CLI/CLIP)
screen picture
setting
suppressing (CLIR)
wrong language
Display keys
Draft message list (SMS)
Duration of a call
. . . . . . . . . . . . . . . . . . . . .14
. . . . . . . . . . . . . . . . . . . . .45
. . . . . . . . . . . . . . . . . . . . . .1, 15
. . . . . . . . . . . . . . . . . . . . .20
. . . . . . . . . . . . . . . . . . . . . .45
. . . . . . . . . . . . . .19
. . . . . . . . . . . . . . . .57
. . . . . . . . . . . . . . . . . .19
. . . . . .20
. . . . . . . . . . . . .21
. . .35
. . . . . . . . . .20
.18
. . . . . . .45
. . . . . . . . . . . . . . . . . .46
. . . . . . . . . . . . . . . . . .15
. . . . . . . .40
. . . . . . . . . . . . . .13
. . . . . . . . . . . . . . . . .46
. . . . . . . . . . . . . .17
. . . . . . . . . . . . . . .45
. . . . . . . . . . . . . . . . . . . .15
. . . . . . . . . . .33
. . . . . . . . . . . . . . . .24
E
Earpiece mode . . . . . . . . . . . . . . . . . .14
Earpiece volume
EATONI (predictive text)
E-mail address
End call key
Ending, call
Ending, see Deactivate
Entry
selecting (menu)
selecting from directory
Error beep
Example
menu input
multiple line entry
External call
diverting to answering machine
. . . . . . . . . . . . . . . . .46
. . . . . . . . . . .57
. . . . . . . . . . . . . . . . . .34
. . . . . . . . . . . . . . . . . .1, 13
. . . . . . . . . . . . . . . . . . . .13
. . . . . . . . . . . . . . .55
. . . . . . . . . .19
. . . . . . . . . . . . . . . . . . . . .48
. . . . . . . . . . . . . . . . . . .55
. . . . . . . . . . . . . .56
. . . .29
F
FAQs . . . . . . . . . . . . . . . . . . . . . . . . .52
Fast access
answering machine
assigning key 1
. . . . . . . . . . . . .30
. . . . . . . . . . . . . . . . 1
62
Page 65

Index
network mailbox
Fax (SMS)
Flash time
. . . . . . . . . . . . . . . . . . . . . 34
. . . . . . . . . . . . . . . . . . . . . 51
. . . . . . . . . . . . . . 40
G
Group call . . . . . . . . . . . . . . . . . . . . . 42
H
Handset
activating/deactivating
advisory tones
changing internal number
changing name
changing number
changing to best reception
changing to different base station
contact with liquid
de-registering
display illumination
display language
forwarding call
idle status
. . . . . . . . . . . . . . . . . . . . . . . . . 14
list
loudspeaker volume
muting
. . . . . . . . . . . . . . . . . . . . . . 42
paging
reception strength
registering
registering on another
base station
restoring to factory settings
screen picture
. . . . . . . . . . . . . . . . . . . . . . . . 7
setup
using room monitor
using several handsets
Handset charging times
Handset operating time
in room monitor mode
Handset settings
Handsfree key
Handsfree talking
Hash key
Headset socket
Hearing aids
. . . . . . . . . . . . . . . . . . . . . . . 1
. . . . . . . . . . . . . . . . 48
. . . . . . . . . . . . . . . . 41
. . . . . . . . . . . . . . . . 42
. . . . . . . . . . . . . . . . . . . 15
. . . . . . . . . . . . . . . . . . . . . 14
. . . . . . . . . . . . . . . . . . . 41
. . . . . . . . . . . . . . . . 46
. . . . . . . . . . . . . . . . 45
. . . . . . . . . . . . . . . . . . . 1
. . . . . . . . . . . . . . . . . . 8
. . . . . . . . . . . . . . . . . . . . 5
. . . . . . . . . . 14
. . . . . . . 44
. . . . . . . . . . . . . . . 43
. . . . . . . . . . . . . 44
. . . . . . . 42
. . 42
. . . . . . . . . . . . . 52
. . . . . . . . . . . . 46
. . . . . . . . . . . . . . 45
. . . . . . . . . . . . 46
. . . . . . . . . . . . . . 6
. . . . . . . . . . . . . . . 42
. . . . . . 49
. . . . . . . . . . . . 44
. . . . . . . . . . 41
. . . . . . . . . . . 54
. . . . . . . . . . . 54
. . . . . . . . . . 44
. . . . . . . . . . . . . . . 13
I
Icon
alarm clock
answering machine
battery
. . . . . . . . . . . . . . . . . . 48
. . . . . . . . . . . . 26
. . . . . . . . . . . . . . . . . . . . . . 8
. . . . . . . . . . . . . . . . . . . . . .15
display
for new messages
new message
new SMS
ringtone
Idle status (display)
Idle status, returning to
Incoming message list (SMS)
Incorrect input (correction)
Info services (SMS)
Input language (SMS)
Internal
consultation
listening in
making calls
Internal call
call waiting
. . . . . . . . . . . . . . . . . . . .34
. . . . . . . . . . . . . . . . . . . . .47
. . . . . . . . . . . . . . . . . . . .42
. . . . . . . . . . . . . .28
. . . . . . . . . . . . . . . . .27
. . . . . . . . . . . . . .15
. . . . . . . . . . .15
. . . . . . .34
. . . . . . . . .16
. . . . . . . . . . . . . . .38
. . . . . . . . . . . . .33
. . . . . . . . . . . . . . . . . .42
. . . . . . . . . . . . . . . . . . .43
. . . . . . . . . . . . . . . . . .42
. . . . . . . . . . . . . . . . . . .43
K
Key 1 (fast access) . . . . . . . . . . . . .1, 30
Keys
assigning directory entry
cancel key
control key
delete key
display keys
end call key
fast access
handsfree key
hash key
menu key
message key
On/Off key
quick dial
star key
Swisscom Voice Portal
talk key
. . . . . . . . . . . . . . . . . . . .15
. . . . . . . . . . . . . . . . .1, 14
. . . . . . . . . . . . . . . . . . . .15
. . . . . . . . . . . . . . . . .1, 15
. . . . . . . . . . . . . . . . .1, 13
. . . . . . . . . . . . . . . . .1, 30
. . . . . . . . . . . . . . . . . 1
. . . . . . . . . . . . . . . . . . . . . 1
. . . . . . . . . . . . . . . . . . . .15
. . . . . . . . . . . . . . . . . . 1
. . . . . . . . . . . . . . . . . . . 1
. . . . . . . . . . . . . . . . .19, 20
. . . . . . . . . . . . . . . . . . . .1, 47
. . . . . . . . . . . . . . . . . . . .1, 13
. . . . . . . . .19
. . . . . . . . . . . 1
L
Language, display. . . . . . . . . . . . . . . .45
Last number redial
Linking, see SMS
. . . . . . . . . . . . . . . . . . . . . . . .52
Liquid
List
answering machine list
call history
call-by-call list
handsets
missed calls
Listening in during recording
. . . . . . . . . . . . . . .23
. . . . . . . . . .24
. . . . . . . . . . . . . . . . . . .23
. . . . . . . . . . . . . . . . .19
. . . . . . . . . . . . . . . . . . . . .14
. . . . . . . . . . . . . . . . . .24
. . . . . . .29
63
Page 66

Index
Listening in to call
Loudspeaker volume
. . . . . . . . . . . . . . . 43
. . . . . . . . . . . . . 46
M
Mailbox ID, see SMS
Mailboxes, see SMS
Mains adapter
Making calls
answering a call
external
internal
Making cost-effective calls
Manual last number redial
Medical appliances
Memory
Menu
back one menu level
end tone
key
. . . . . . . . . . . . . . . . . . . . . . . . 15
menu guidance
menu input
opening
overview
Message key
opening lists
Message list
opening list
Messages
deleting
icon for new message
. . . . . . . . . . . . . . . . . . . . . . . . . 1
key
marking as "new"
playing back
Microphone
Missed call
Multiple line entry
Muting
first ring
Muting handset
. . . . . . . . . . . . . . . . . . . 5
. . . . . . . . . . . . . . . 13
. . . . . . . . . . . . . . . . . . . . . 13
. . . . . . . . . . . . . . . . . . . . . 42
. . . . . . . . . 24
. . . . . . . . . 23
. . . . . . . . . . . . . . . 5
. . . . . . . . . . . . . . . . . . . . . . 20
. . . . . . . . . . . 15
. . . . . . . . . . . . . . . . . . . . 48
. . . . . . . . . . . . . . . 15
. . . . . . . . . . . . . . . . . . 55
. . . . . . . . . . . . . . . . . . 14, 15
. . . . . . . . . . . . . . . . . . . . 10
. . . . . . . . . . . . . . . . . 23
. . . . . . . . . . . . . . . . . . 34
. . . . . . . . . . . . . . . . . . . . . 26
. . . . . . . . . . . . . . . . . . . . . 28
. . . . . . . . . . . 27
. . . . . . . . . . . . . . 28
. . . . . . . . . . . . . . . . . 27
. . . . . . . . . . . . . . . . . . . . 1
. . . . . . . . . . . . . . . . . . . . 24
. . . . . . . . . . . . . . . 56
. . . . . . . . . . . . . . . . . . . . . . . 14
. . . . . . . . . . . . . . . . . . . . 48
. . . . . . . . . . . . . . . . . 14
N
Name
of a handset
Network mailbox
Network provider (number list)
Network services
Notification via SMS
Number
adding to directory
as destination for room monitor
. . . . . . . . . . . . . . . . . . 43
. . . . . . . . . . . . . . . . 40
. . . . . . . . . . . . . . . . 17
. . . . . . . . . . . . . 36
. . . . . . . . . . 20, 21
. . . . . 19
. . . 44
copying from an SMS text
copying from directory
display calling number (CLIP)
entry using directory
fixed destination call
saving in directory
suppressing
transmitting
Number list
network provider
. . . . . . . . . . . . . . . . . .17
. . . . . . . . . . . . . . . . . .17
. . . . . . . . . . . . . . .19
. . . . . . . .35
. . . . . . . . . .20
. . . . . .13
. . . . . . . . . . . .20
. . . . . . . . . . . .17
. . . . . . . . . . . . . .19
O
On/Off key . . . . . . . . . . . . . . . . . . . . . 1
Order of entries in directory
. . . . . . . .57
P
PABX
connecting base station
pause times
setting flash time
. . . . . . . . . . . . . . . . . . . . . . . .38
SMS
Pack contents
Paging
Paging, handset
Parallel call, see Parallel ringing
Parallel ringing
. . . . . . . . . . . . . . . . . . . . . . . . .51
Pause
Phone jack assignment
Play back
announcement (answering
machine)
message (answering machine)
Power consumption
Predictive text
Protecting phone from access
. . . . . . . . . . . . . . . . . .51
. . . . . . . . . . . . . . . . . . . 6
. . . . . . . . . . . . . . . . . . . . . . . .42
. . . . . . . . . . . . . . . . .42
. . . . . . . . . . . . . . . . . .17
. . . . . . . . . . . . . . . . .26
. . . . . . . . . . . . . . . . . .57
. . . . . . . . . .51
. . . . . . . . . . . . . .51
. . . . . . . . . . . . 7
. . . . .27
. . . . . . . . . . . . . .54
. . . . . . .49
Q
Questions and answers. . . . . . . . . . . .52
Quick dial
. . . . . . . . . . . . . . . . . . . . . .19
R
Range . . . . . . . . . . . . . . . . . . . . . . . . 6
Recall key
pause after
Reception booster, see Repeater
Reception strength
Recording
two-way recording of call
Recording quality
Recording time
Registering (handset)
. . . . . . . . . . . . . . . . . . .51
. . . . . . . . . . . . . . . 6
. . . . . . . .29
. . . . . . . . . . . . . . . .30
. . . . . . . . . . . . . . . . . .30
. . . . . . . . . . . . .41
64
Page 67

Index
Reminder call
Remote control
Repeater
Ringtone
changing
muting
setting
setting melody
setting volume
Room monitor
. . . . . . . . . . . . . . . . . . 21
. . . . . . . . . . . . . . . . . 30
. . . . . . . . . . . . . . . . . . . . . . 50
. . . . . . . . . . . . . . . . . . . . 47
. . . . . . . . . . . . . . . . . . . . . 48
. . . . . . . . . . . . . . . . . . . . . . 14
. . . . . . . . . . . . . 47, 49
. . . . . . . . . . . . . 47, 49
. . . . . . . . . . . . . . . . . . 44
S
Screen picture. . . . . . . . . . . . . . . . . . 46
Searching in directory
Sending
directory entry to handset
Sensitivity (room monitor)
Setting
display illumination . . . . . . . . . . . . 46
screen picture
Setting date
Setting melody
Setting time
Setting up, base station
Setup
handset
Shortcut
Signal beep, see Advisory tones
SIM card reader
Slumber mode
. . . . . . . . . . . . . . . . . . . . . . . . . 32
SMS
changing mailbox
deleting
draft message list
forwarding
info services
input language
linked
mailbox ID
mailboxes
notification number
notification type
notification via SMS
PIN protection
reading
receiving
registration wizard
replying to and forwarding
. . . . . . . . . . . . . . . . . . . . 9
. . . . . . . . . . . . . . . . . . . . 9
. . . . . . . . . . . . . . . . . . . . . . 7
. . . . . . . . . . . . . . . . . . . . . . 10
. . . . . . . . . . . . . . . . . . . . . 33
. . . . . . . . . . . . . . . . . . . 35
. . . . . . . . . . . . . . . . . . . . . . 32
. . . . . . . . . . . . . . . . . . . 36
. . . . . . . . . . . . . . . . . . . 36
. . . . . . . . . . . . . . . . . . . . . 33
. . . . . . . . . . . . . . . . . . . . 34
. . . . . . . . . . . . 19
. . . . . . . 20
. . . . . . . . . 45
. . . . . . . . . . . . . . . . 46
. . . . . . . . . . . . . . 47, 49
. . . . . . . . . . . . 6
. . . . . . . . . . . . . . . . . 21
. . . . . . . . . . . . . . . . . 49
. . . . . . . . . . . . . 37
. . . . . . . . . . . . . . 33
. . . . . . . . . . . . . . . . . 38
. . . . . . . . . . . . . . . 33
. . . . . . . . . . . . 36
. . . . . . . . . . . . . . 36
. . . . . . . . . . . . 36
. . . . . . . . . . . . . . . . 36
. . . . . . . . . . . . . 32
. . . . . . . 35
rules
. . . . . . . . . . . . . . . . . . . . . . . .32
self help with error messages
sending as fax
sending to a personal mailbox
sending to e-mail address
status report
storing number
to a PABX
troubleshooting
SMS centre
changing number
setting
Sound, see Ringtone
Special characters
Special functions
Specifications
Star key
Suppressing
Swisscom Voice Portal
System settings
. . . . . . . . . . . . . . . . . . . . .1, 47
Calling Line Identification . . . . . . . .17
. . . . . . . . . . . . . . . . . . . . . . . . . 1
key
. . . . . . . . . . . . . . . . .34
. . . . . . . . . . . . . . . . . .33
. . . . . . . . . . . . . . . .35
. . . . . . . . . . . . . . . . . . . .38
. . . . . . . . . . . . . . .39
. . . . . . . . . . . . . .37
. . . . . . . . . . . . . . . . . . . . . .37
. . . . . . . . . . . . . . . .56
. . . . . . . . . . . . . . . .51
. . . . . . . . . . . . . . . . . . .54
. . . . . . . . . . . . . . . . .49
. . . . . .39
. . . . .37
. . . . . . . .34
T
Tal k key . . . . . . . . . . . . . . . . . . . . .1, 13
Text message, see SMS
Tog glin g
Tro ubl eshootin g
Troubl eshooting (SMS)
. . . . . . . . . . . . . . . . . . . . . .18
. . . . . . . . . . . . . . . . .52
. . . . . . . . . . . .39
U
Units of a call . . . . . . . . . . . . . . . . . . .24
Unknown
Unknown caller
. . . . . . . . . . . . . . . . . . . . . .13
. . . . . . . . . . . . . . . . .13
V
Viewing network mailbox message . . .40
VIP (directory entry)
Volume
earpiece
handset loudspeaker
loudspeaker
ringtone
setting
. . . . . . . . . . . . . . . . . . . . .46
. . . . . . . . . . . . . . . . . .47, 49
. . . . . . . . . . . . . . . . . . . . . .47
. . . . . . . . . . . . . .20
. . . . . . . . . . . .46
. . . . . . . . . . . . . . . . . .46
65
Page 68

Index
W
Wait melody . . . . . . . . . . . . . . . . 14, 49
Warning beep, see Advisory tones
Writing (SMS)
Writing, editing ext
. . . . . . . . . . . . . . . . . . 32
. . . . . . . . . . . . . . 56
66
 Loading...