

Page 1
Aton CL115/CLT115 Duo
User manual
Page 2

2
Page 3
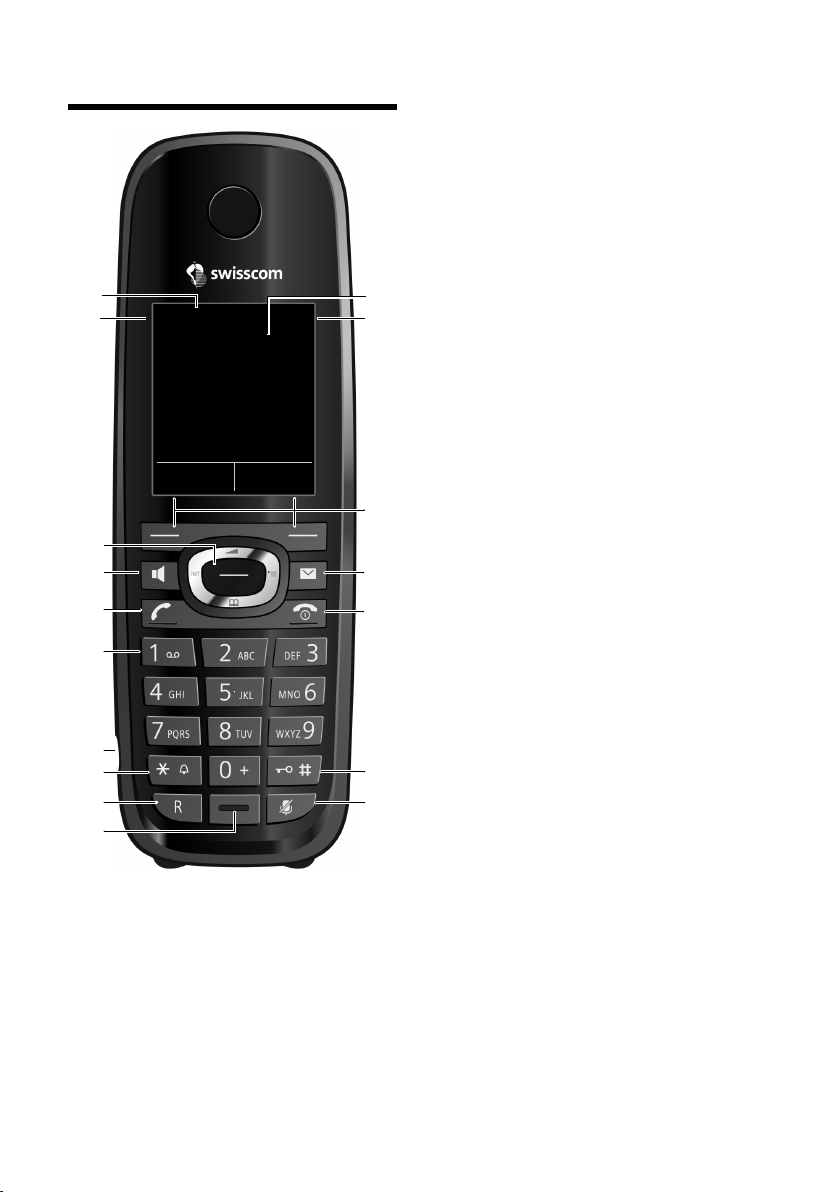
The handset at a glance
i
à V
07:15
INT 1 14 Oct
Calls SMS
2
3
5
4
6
7
15
13
11
8
1
14
16
9
10
12
17
The handset at a glance
1 Display in idle status
2 Battery charge status (¢ page 19)
3 Display keys (¢ page 22)
4 Message key (¢ page 40)
Access to calls and message lists;
Flashes: new message or new call
5 End call key, On/Off key
End call, cancel function, go back one menu
level (press briefly), back to idle status (press
and hold), activate/deactivate handset (press
and hold in idle status)
6 Hash key
Keypad lock on/off (press and hold in
idle status);
toggles between upper/lower case and digits
7 Mute key (¢ page 32)
Mute the microphone
8 Microphone
9 Recall key
- Consultation call (flash)
- Insert a dialling pause (press and hold)
10 Star key
Ringtone on/off (press and hold);
with an open connection: switch between dial
pulsing/tone dialling (press briefly);
Text input: Open table of special characters
11 Connection socket for headset (¢ page 19)
12 Key 1
Dial answering machine (Aton CLT115 only)/
network mailbox (press and hold)
13 Talk k ey
Flashes: incoming call;
Accept a call; open redial list (press briefly);
start dialling (press and hold);
When writing an SMS: send SMS
14 Handsfree key
Switch between earpiece and handsfree mode
15 Control key (¢ page 21)
16 Signal strength (¢ page 19)
Green: Eco Mode activated (¢ page 58)
17 Answering machine icon (Aton CLT115 only)
Answering machine switched on;
Flashes: Answering machine is recording
a message or is being operated by another
internal party
1
Page 4
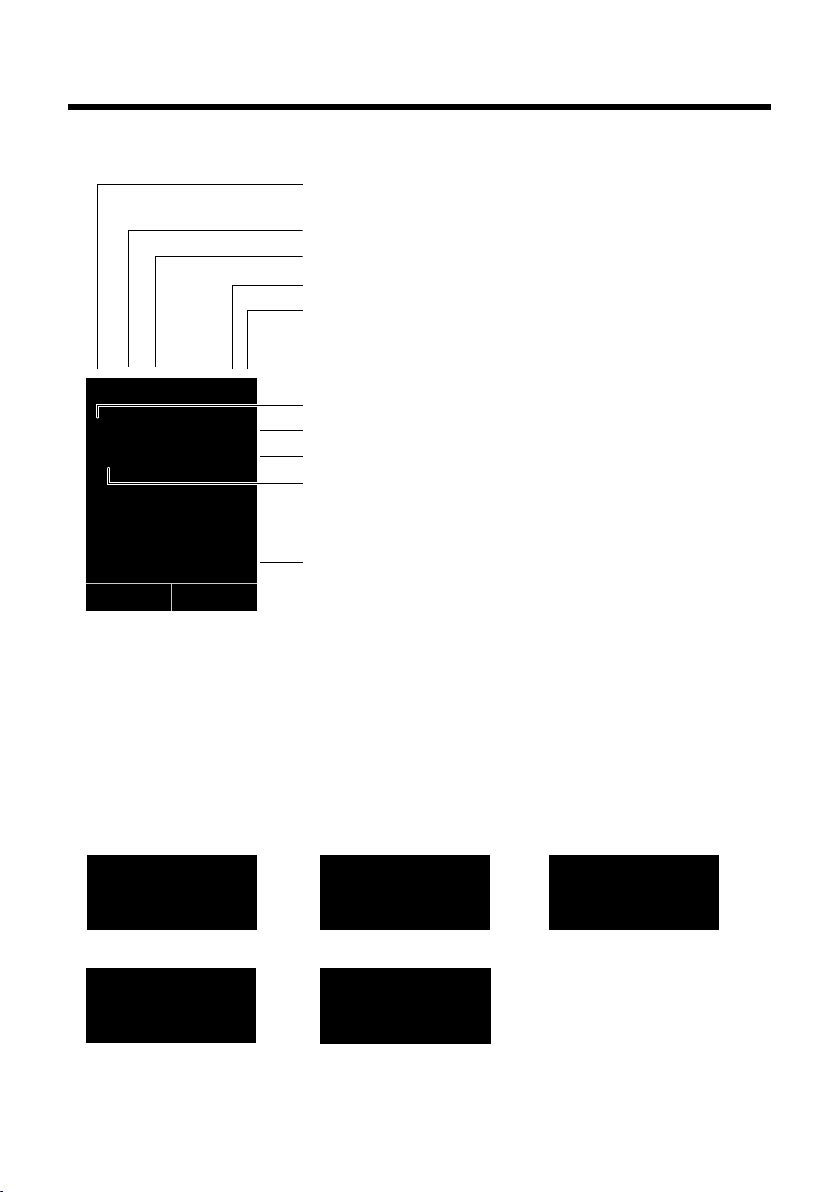
Display symbols
Ø
«
Ú
Signalling
External call (¢ page 30)
ØåÚ Ø
þ
Ú
Internal call (¢ page 60)
Answering machine is
recording (¢ page 51)
i à ó V
Û 08:00
07:15
INT 1 14 Oct
Ã
™
¾
02 10 09 08
Calls SMS
ØðÚ
Anniversary (¢ page 39)
ØìÚ
Alarm clock (¢ page 59)
Signal strength i(¢ page 58)
or ECO Mode+ ¼
icon (¢ page 58)
Answering machine activated (Aton CLT115 only)
Ringtone switched off (¢ page 67)
Battery charging (¢ page 19)
Battery charge status (¢ page 19)
Alarm switched on and wake-up time (¢ page 59)
Current time (¢ page 19)
Current day and month (¢ page 19)
Name of the handset (¢ page 62)
Number of new messages:
u
à on the answering machine (Aton CLT115 only)/
network mailbox (¢ page 39)
u ™ in the list of missed calls (¢ page 40)
u ¾ in the SMS list (¢ page 45)
u in the list of missed appointments (¢ page 41)
Display symbols
The following symbols are displayed dependent on the settings and the operating status of
your telephone:
2
Page 5
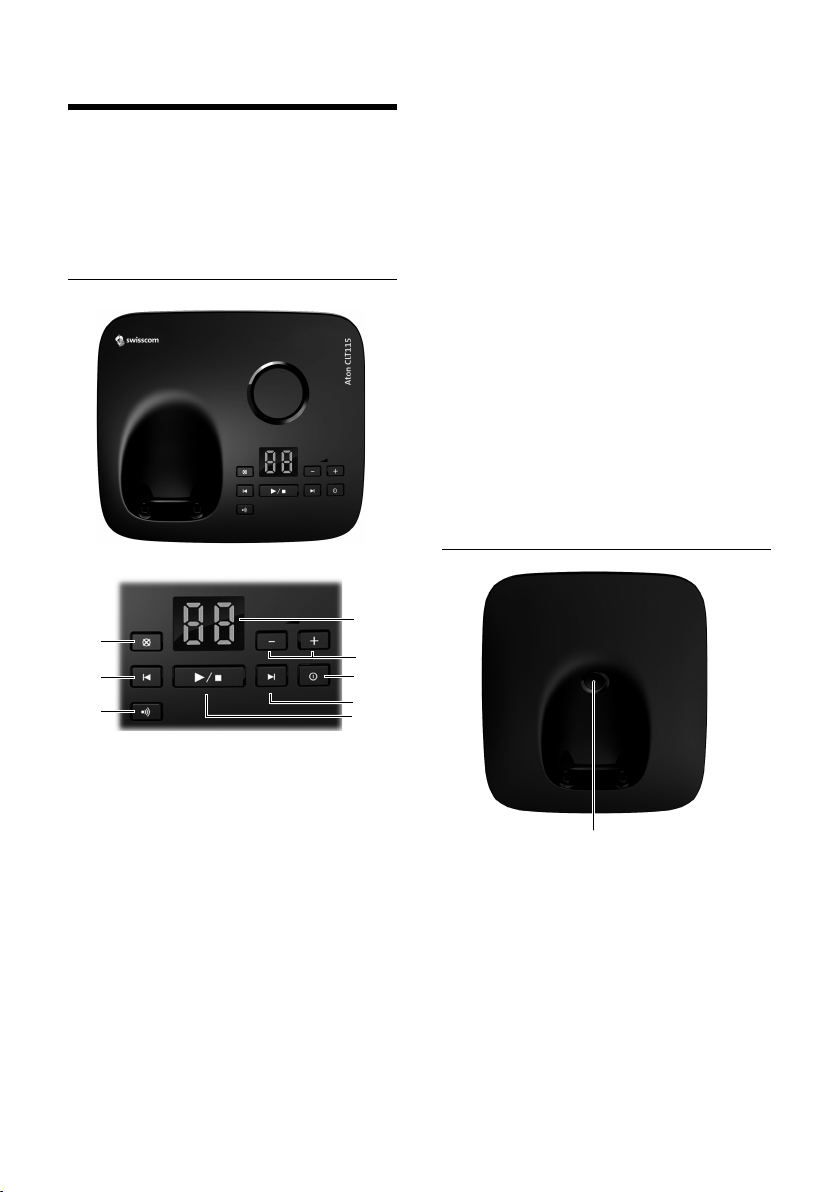
The base at a glance
7
8
2
4
6
1
5
3
The base at a glance
You can use the keys on the base to register
handsets to the base, search for handsets
(paging)
grated answering machine (Aton CLT115
only).
Aton CLT115 base
¢ page 60 and operate the inte-
During message playback:
4 Play/stop key
Play back new messages from answering
machine or cancel playback (press briefly).
Play back new and old messages (press and
hold).
5 Sk ip to next mess age ( press once ) or nex t mes-
sage but one (press twice).
6 Skip back five seconds (press briefly once), to
skip back to the beginning of the message
(press and hold) or skip back to the previous
message (press twice).
7 Delete current message.
8 Adjust volume during message playback:
= quieter;
While an external call is being signalled: adjust
ringtone volume.
ø = louder.
÷
Please note:
If the answering machine is being operated
from a handset or if it is recording a message
(00 flashes), it cannot be operated from the
base.
Aton CL115 base
1 Registration/paging key
Press briefly: Search for handsets (paging)
¢ page 60.
Press and hold: Register handsets and
DECT devices ¢ page 59.
2 On/Off key
Activating/deactivating the answering machine.
3 Display icon
Lights up: answering machine is activated.
The number of saved messages is displayed.
00 flashes: The answering machine is recording a new message.
Flashes slowly: There are new messages. The
number of new messages is displayed.
99 flashes quickly: The answering machine is
full.
Registration/paging key
– Press briefly: Search for handsets (paging)
¢ page 60.
– Press and hold: Register handsets and
DECT devices ¢ page 59.
3
Page 6

Contents
Contents
The handset at a glance . . . . . . . . . . . . . . . . . . . . . . . . . . . . . . . . . . . . . . . . . . . . 1
Display symbols . . . . . . . . . . . . . . . . . . . . . . . . . . . . . . . . . . . . . . . . . . . . . . . . . . . 2
The base at a glance . . . . . . . . . . . . . . . . . . . . . . . . . . . . . . . . . . . . . . . . . . . . . . . 3
Safety precautions . . . . . . . . . . . . . . . . . . . . . . . . . . . . . . . . . . . . . . . . . . . . . . . . . 7
Environmental benefits of the Aton CL115/CLT115 . . . . . . . . . . . . . . . . . . 8
Aton CL115/CLT115 – more than just a telephone . . . . . . . . . . . . . . . . . . . 9
First steps . . . . . . . . . . . . . . . . . . . . . . . . . . . . . . . . . . . . . . . . . . . . . . . . . . . . . . . . 10
Checking the pack contents . . . . . . . . . . . . . . . . . . . . . . . . . . . . . . . . . . . . . . . . . . . . . . . . . . 10
Setting up the base and charging cradle (if included) . . . . . . . . . . . . . . . . . . . . . . . . . 11
Connecting the base . . . . . . . . . . . . . . . . . . . . . . . . . . . . . . . . . . . . . . . . . . . . . . . . . . . . . . . . . 11
Connecting the charging cradle (if included) . . . . . . . . . . . . . . . . . . . . . . . . . . . . . . . . . . 12
Setting up the handset for use . . . . . . . . . . . . . . . . . . . . . . . . . . . . . . . . . . . . . . . . . . . . . . . 13
Changing the display language . . . . . . . . . . . . . . . . . . . . . . . . . . . . . . . . . . . . . . . . . . . . . . 16
Setting the date and time . . . . . . . . . . . . . . . . . . . . . . . . . . . . . . . . . . . . . . . . . . . . . . . . . . . . 17
Connecting the headset . . . . . . . . . . . . . . . . . . . . . . . . . . . . . . . . . . . . . . . . . . . . . . . . . . . . . 19
What would you like to do next? . . . . . . . . . . . . . . . . . . . . . . . . . . . . . . . . . . . . . . . . . . . . . . 20
Using the phone . . . . . . . . . . . . . . . . . . . . . . . . . . . . . . . . . . . . . . . . . . . . . . . . . . 21
Control key . . . . . . . . . . . . . . . . . . . . . . . . . . . . . . . . . . . . . . . . . . . . . . . . . . . . . . . . . . . . . . . . . . 21
Display keys . . . . . . . . . . . . . . . . . . . . . . . . . . . . . . . . . . . . . . . . . . . . . . . . . . . . . . . . . . . . . . . . . 22
Keys on the keypad . . . . . . . . . . . . . . . . . . . . . . . . . . . . . . . . . . . . . . . . . . . . . . . . . . . . . . . . . . 22
Correcting incorrect entries . . . . . . . . . . . . . . . . . . . . . . . . . . . . . . . . . . . . . . . . . . . . . . . . . . 22
Menu guidance . . . . . . . . . . . . . . . . . . . . . . . . . . . . . . . . . . . . . . . . . . . . . . . . . . . . . . . . . . . . . . 22
Activating/deactivating the handset . . . . . . . . . . . . . . . . . . . . . . . . . . . . . . . . . . . . . . . . . . 24
Activating/deactivating the keypad lock . . . . . . . . . . . . . . . . . . . . . . . . . . . . . . . . . . . . . . 24
Illustration of operating steps in the user guide . . . . . . . . . . . . . . . . . . . . . . . . . . . . . . . 25
Menu overview . . . . . . . . . . . . . . . . . . . . . . . . . . . . . . . . . . . . . . . . . . . . . . . . . . . 27
Making calls . . . . . . . . . . . . . . . . . . . . . . . . . . . . . . . . . . . . . . . . . . . . . . . . . . . . . . 30
Making an external call . . . . . . . . . . . . . . . . . . . . . . . . . . . . . . . . . . . . . . . . . . . . . . . . . . . . . . 30
One Touch Call . . . . . . . . . . . . . . . . . . . . . . . . . . . . . . . . . . . . . . . . . . . . . . . . . . . . . . . . . . . . . . . 30
Ending a call . . . . . . . . . . . . . . . . . . . . . . . . . . . . . . . . . . . . . . . . . . . . . . . . . . . . . . . . . . . . . . . . . 30
Accepting a call . . . . . . . . . . . . . . . . . . . . . . . . . . . . . . . . . . . . . . . . . . . . . . . . . . . . . . . . . . . . . . 30
Calling Line Identification . . . . . . . . . . . . . . . . . . . . . . . . . . . . . . . . . . . . . . . . . . . . . . . . . . . . 31
Notes on calling line display (CLIP) . . . . . . . . . . . . . . . . . . . . . . . . . . . . . . . . . . . . . . . . . . . . 31
Handsfree mode . . . . . . . . . . . . . . . . . . . . . . . . . . . . . . . . . . . . . . . . . . . . . . . . . . . . . . . . . . . . . 32
Switching to mute . . . . . . . . . . . . . . . . . . . . . . . . . . . . . . . . . . . . . . . . . . . . . . . . . . . . . . . . . . . 32
Making calls using network services . . . . . . . . . . . . . . . . . . . . . . . . . . . . . . . 33
Calling Line Identification . . . . . . . . . . . . . . . . . . . . . . . . . . . . . . . . . . . . . . . . . . . . . . . . . . . . 33
Ringback . . . . . . . . . . . . . . . . . . . . . . . . . . . . . . . . . . . . . . . . . . . . . . . . . . . . . . . . . . . . . . . . . . . . 33
Call waiting during an external call . . . . . . . . . . . . . . . . . . . . . . . . . . . . . . . . . . . . . . . . . . . 33
Call divert (CD) . . . . . . . . . . . . . . . . . . . . . . . . . . . . . . . . . . . . . . . . . . . . . . . . . . . . . . . . . . . . . . . 34
4
Page 7

Contents
Consultation call, call swap, conference . . . . . . . . . . . . . . . . . . . . . . . . . . . . . . . . . . . . . . . 34
Further functions . . . . . . . . . . . . . . . . . . . . . . . . . . . . . . . . . . . . . . . . . . . . . . . . . . . . . . . . . . . . 35
Using the directory and lists . . . . . . . . . . . . . . . . . . . . . . . . . . . . . . . . . . . . . . . 36
Directory . . . . . . . . . . . . . . . . . . . . . . . . . . . . . . . . . . . . . . . . . . . . . . . . . . . . . . . . . . . . . . . . . . . . 36
Redial list . . . . . . . . . . . . . . . . . . . . . . . . . . . . . . . . . . . . . . . . . . . . . . . . . . . . . . . . . . . . . . . . . . . . 39
Incoming SMS message list . . . . . . . . . . . . . . . . . . . . . . . . . . . . . . . . . . . . . . . . . . . . . . . . . . 39
Answering machine list (Aton CLT115 only) . . . . . . . . . . . . . . . . . . . . . . . . . . . . . . . . . . . 39
Call lists . . . . . . . . . . . . . . . . . . . . . . . . . . . . . . . . . . . . . . . . . . . . . . . . . . . . . . . . . . . . . . . . . . . . . 39
Message key function . . . . . . . . . . . . . . . . . . . . . . . . . . . . . . . . . . . . . . . . . . . . . . . . . . . . . . . . 40
List of missed appointments . . . . . . . . . . . . . . . . . . . . . . . . . . . . . . . . . . . . . . . . . . . . . . . . . 41
Making cost-effective calls . . . . . . . . . . . . . . . . . . . . . . . . . . . . . . . . . . . . . . . . 42
SMS (text messages) . . . . . . . . . . . . . . . . . . . . . . . . . . . . . . . . . . . . . . . . . . . . . . 43
Writing/sending an SMS . . . . . . . . . . . . . . . . . . . . . . . . . . . . . . . . . . . . . . . . . . . . . . . . . . . . . 43
Receiving an SMS . . . . . . . . . . . . . . . . . . . . . . . . . . . . . . . . . . . . . . . . . . . . . . . . . . . . . . . . . . . . 45
SMS with vCard . . . . . . . . . . . . . . . . . . . . . . . . . . . . . . . . . . . . . . . . . . . . . . . . . . . . . . . . . . . . . . 47
Notification by SMS . . . . . . . . . . . . . . . . . . . . . . . . . . . . . . . . . . . . . . . . . . . . . . . . . . . . . . . . . . 47
SMS mailboxes . . . . . . . . . . . . . . . . . . . . . . . . . . . . . . . . . . . . . . . . . . . . . . . . . . . . . . . . . . . . . . . 47
Setting SMS centres . . . . . . . . . . . . . . . . . . . . . . . . . . . . . . . . . . . . . . . . . . . . . . . . . . . . . . . . . . 48
SMS on a PABX . . . . . . . . . . . . . . . . . . . . . . . . . . . . . . . . . . . . . . . . . . . . . . . . . . . . . . . . . . . . . . . 49
Activating/deactivating first ringtone muting . . . . . . . . . . . . . . . . . . . . . . . . . . . . . . . . . 49
Activating/deactivating SMS function . . . . . . . . . . . . . . . . . . . . . . . . . . . . . . . . . . . . . . . . 49
SMS troubleshooting . . . . . . . . . . . . . . . . . . . . . . . . . . . . . . . . . . . . . . . . . . . . . . . . . . . . . . . . 50
Operating the answering machine of the Aton CLT115 base . . . . . . . . . 51
Operation via the handset . . . . . . . . . . . . . . . . . . . . . . . . . . . . . . . . . . . . . . . . . . . . . . . . . . . . 51
Activating/deactivating call screening . . . . . . . . . . . . . . . . . . . . . . . . . . . . . . . . . . . . . . . . 54
Setting the recording parameters . . . . . . . . . . . . . . . . . . . . . . . . . . . . . . . . . . . . . . . . . . . . 54
Resetting fast access for the answering machine using key 1 . . . . . . . . . . . . . . . . . . 55
Operating when on the move (remote operation) . . . . . . . . . . . . . . . . . . . . . . . . . . . . . 55
Using the network mailbox (Combox) . . . . . . . . . . . . . . . . . . . . . . . . . . . . . . 57
Configuring fast access for the network mailbox . . . . . . . . . . . . . . . . . . . . . . . . . . . . . . 57
Viewing the network mailbox message . . . . . . . . . . . . . . . . . . . . . . . . . . . . . . . . . . . . . . . 57
ECO DECT . . . . . . . . . . . . . . . . . . . . . . . . . . . . . . . . . . . . . . . . . . . . . . . . . . . . . . . . 58
Setting the alarm clock . . . . . . . . . . . . . . . . . . . . . . . . . . . . . . . . . . . . . . . . . . . 59
Using several handsets . . . . . . . . . . . . . . . . . . . . . . . . . . . . . . . . . . . . . . . . . . . 59
Registering handsets . . . . . . . . . . . . . . . . . . . . . . . . . . . . . . . . . . . . . . . . . . . . . . . . . . . . . . . . . 59
De-registering handsets . . . . . . . . . . . . . . . . . . . . . . . . . . . . . . . . . . . . . . . . . . . . . . . . . . . . . . 60
Locating a handset ("Paging") . . . . . . . . . . . . . . . . . . . . . . . . . . . . . . . . . . . . . . . . . . . . . . . . 60
Changing the base . . . . . . . . . . . . . . . . . . . . . . . . . . . . . . . . . . . . . . . . . . . . . . . . . . . . . . . . . . . 60
Making internal calls . . . . . . . . . . . . . . . . . . . . . . . . . . . . . . . . . . . . . . . . . . . . . . . . . . . . . . . . . 60
Listening in to an external call . . . . . . . . . . . . . . . . . . . . . . . . . . . . . . . . . . . . . . . . . . . . . . . . 62
Changing the name of a handset . . . . . . . . . . . . . . . . . . . . . . . . . . . . . . . . . . . . . . . . . . . . . 62
Changing a handset's internal number . . . . . . . . . . . . . . . . . . . . . . . . . . . . . . . . . . . . . . . 62
Using a handset as a room monitor (Babyphone) . . . . . . . . . . . . . . . . . . . 63
5
Page 8

Contents
Handset settings . . . . . . . . . . . . . . . . . . . . . . . . . . . . . . . . . . . . . . . . . . . . . . . . . 64
Quick access to numbers and functions . . . . . . . . . . . . . . . . . . . . . . . . . . . . . . . . . . . . . . . 64
Changing the display language . . . . . . . . . . . . . . . . . . . . . . . . . . . . . . . . . . . . . . . . . . . . . . 65
Setting the display . . . . . . . . . . . . . . . . . . . . . . . . . . . . . . . . . . . . . . . . . . . . . . . . . . . . . . . . . . . 65
Activating/deactivating auto answer . . . . . . . . . . . . . . . . . . . . . . . . . . . . . . . . . . . . . . . . . 66
Changing the speaker/earpiece volume . . . . . . . . . . . . . . . . . . . . . . . . . . . . . . . . . . . . . . 66
Changing ringtones . . . . . . . . . . . . . . . . . . . . . . . . . . . . . . . . . . . . . . . . . . . . . . . . . . . . . . . . . . 67
Activating/deactivating advisory tones . . . . . . . . . . . . . . . . . . . . . . . . . . . . . . . . . . . . . . . 68
Setting your own area code . . . . . . . . . . . . . . . . . . . . . . . . . . . . . . . . . . . . . . . . . . . . . . . . . . 68
Restoring the handset default settings . . . . . . . . . . . . . . . . . . . . . . . . . . . . . . . . . . . . . . . . 69
Base settings . . . . . . . . . . . . . . . . . . . . . . . . . . . . . . . . . . . . . . . . . . . . . . . . . . . . . 69
Changing the base ringtones (Aton CLT115 only) . . . . . . . . . . . . . . . . . . . . . . . . . . . . . 69
Activating/deactivating music on hold . . . . . . . . . . . . . . . . . . . . . . . . . . . . . . . . . . . . . . . 69
Repeater support . . . . . . . . . . . . . . . . . . . . . . . . . . . . . . . . . . . . . . . . . . . . . . . . . . . . . . . . . . . . 69
Protecting against unauthorised access . . . . . . . . . . . . . . . . . . . . . . . . . . . . . . . . . . . . . . . 70
Restoring the base to the factory settings . . . . . . . . . . . . . . . . . . . . . . . . . . . . . . . . . . . . . 70
Connecting the base to the PABX . . . . . . . . . . . . . . . . . . . . . . . . . . . . . . . . . . 71
Dialling modes and recall . . . . . . . . . . . . . . . . . . . . . . . . . . . . . . . . . . . . . . . . . . . . . . . . . . . . 71
Saving an access code (outside line code) . . . . . . . . . . . . . . . . . . . . . . . . . . . . . . . . . . . . . 71
Setting pauses . . . . . . . . . . . . . . . . . . . . . . . . . . . . . . . . . . . . . . . . . . . . . . . . . . . . . . . . . . . . . . . 72
Temporarily switching to tone dialling (DTMF) . . . . . . . . . . . . . . . . . . . . . . . . . . . . . . . . 72
Warranty/Maintenance/Repair/ Approval . . . . . . . . . . . . . . . . . . . . . . . . . . 73
Warranty . . . . . . . . . . . . . . . . . . . . . . . . . . . . . . . . . . . . . . . . . . . . . . . . . . . . . . . . . . . . . . . . . . . . 73
Repair/Maintenance . . . . . . . . . . . . . . . . . . . . . . . . . . . . . . . . . . . . . . . . . . . . . . . . . . . . . . . . . 73
Faults and self-help with troubleshooting . . . . . . . . . . . . . . . . . . . . . . . . . . . . . . . . . . . . . 74
Approval . . . . . . . . . . . . . . . . . . . . . . . . . . . . . . . . . . . . . . . . . . . . . . . . . . . . . . . . . . . . . . . . . . . . 75
Appendix . . . . . . . . . . . . . . . . . . . . . . . . . . . . . . . . . . . . . . . . . . . . . . . . . . . . . . . . 75
Care . . . . . . . . . . . . . . . . . . . . . . . . . . . . . . . . . . . . . . . . . . . . . . . . . . . . . . . . . . . . . . . . . . . . . . . . . 75
Contact with liquid . . . . . . . . . . . . . . . . . . . . . . . . . . . . . . . . . . . . . . . . . . . . . . . . . . . . . . . . . . 75
Specifications . . . . . . . . . . . . . . . . . . . . . . . . . . . . . . . . . . . . . . . . . . . . . . . . . . . . . . . . . . . . . . . . 75
Writing and editing text . . . . . . . . . . . . . . . . . . . . . . . . . . . . . . . . . . . . . . . . . . . . . . . . . . . . . . 77
Accessories . . . . . . . . . . . . . . . . . . . . . . . . . . . . . . . . . . . . . . . . . . . . . . . . . . . . . . . 78
Mounting the base on the wall . . . . . . . . . . . . . . . . . . . . . . . . . . . . . . . . . . . . 80
Mounting the charging cradle on the wall . . . . . . . . . . . . . . . . . . . . . . . . . . 80
Index . . . . . . . . . . . . . . . . . . . . . . . . . . . . . . . . . . . . . . . . . . . . . . . . . . . . . . . . . . . . 81
6
Page 9
Safety precautions
$
ƒ
Safety precautions
Warning
Read the safety precautions and the user guide before use.
Explain their content and the potential hazards associated with using the telephone to your
children.
Only use the mains adapter supplied, as indicated on the underside of the base.
Only use the recommended, rechargeable batteries (¢ page 75) as this could otherwise result in significant health risks and personal injury.
Using your telephone may affect nearby medical equipment. Be aware of the technical conditions in your particular environment e.g., doctor's surgery.
If you use a medical device (e.g. a pacemaker), please contact the device manufacturer. They will be able to advise you regarding the susceptibility of the device to
external sources of high-frequency energy. Please refer to the “Appendix” chapter
for the specifications of this Aton product.
Do not hold the rear of the handset to your ear when it is ringing or when handsfree
mode is activated. Otherwise you risk serious and permanent damage to your hearing.
Your telephone is compatible with the majority of digital hearing aids on the market.
However, perfect function with all hearing aids cannot be guaranteed.
The handset may cause an unpleasant humming or whistling noise in hearing aids
or cause them to overload. If you require assistance, please contact the hearing aid
supplier.
Do not install the base or charging cradle in bathrooms or shower rooms. The base
and charging cradle are not splashproof (¢ page 75).
Do not use your phone in environments with a potential explosion hazard (e.g. paint
shops).
If you give your telephone to someone else, make sure you also give them the
user guide.
Please remove faulty bases from use or have them repaired by our Service department, as they could interfere with other wireless services.
7
Page 10
Environmental benefits of the Aton CL115/CLT115
Information about disposal
Batteries should not be disposed of in general household waste. Observe the local
waste disposal regulations, details of which can be obtained from your local authority or the dealer you purchased the product from.
At the end of its service life, this product must not be disposed of with normal household waste, but must be handed in at the place of purchase or at a collection point
for recycling electrical and electronic devices in accordance with the ordinance
governing the return, acceptance and disposal of electrical and electronic equipment (VREG).
The materials can be recycled according to their identification. By reusing and recycling materials along with other methods of recycling used equipment, you can
make an important contribution to protecting the environment.
Please note
u Not all of the functions described in this user guide are available in all countries.
u The device cannot be used in the event of a power failure. It is also not possible to trans-
mit emergency calls.
Environmental benefits of the Aton CL115/CLT115
The Aton CL115/CLT115 has a low level of energy consumption and reduces radiation.
Reduced power consumption
Your telephone has a power-saving adapter plug and uses 60% less power than standard
devices. Power consumption in standby mode is approx. 1.3 watt.
Minimal radiation
The Aton CL115/CLT115 with its preset Eco Mode plus switches off all radiation when in idle
status. During a call, the handset reduces the transmission power according to the distance
from the base station.
In addition, you also have the option of further reducing the transmission power of your
Aton CL115/CLT115 during a call by reducing the range.
Detailed information ¢ page 58.
8
Page 11

Aton CL115/CLT115 – more than just a telephone
Aton CL115/CLT115 – more than just a telephone
Your telephone sets new standards for the way you communicate at home.
The large TFT display, user-friendly keypad and clearly laid out menu are very simple to use.
It can do a whole lot more:
u Store anniversaries such as birthdays in your phone and it will remind you
of them in advance.
u Allocate important people to one of six VIP groups so you can identify important
calls from the ringtone and the colour of the allocated VIP group.
u If you only want to accept calls when you can see the number, you can set your
phone to only ring when the phone number is transferred.
u You can assign important numbers to the number keys on your handset.
The number is then dialled by simply pressing the key.
u Set the display to show in large print to increase readability during certain
important situations (e.g. in the directory and in lists).
u Set the menu display to suit your individual requirements so that only the most
important functions (standard mode) or all functions are displayed (expert
mode
with the
). Menu options that are only available in expert mode are marked
•
icon.
•
Have fun using your new phone!
9
Page 12
First steps
21
345
76
8
or
9J
First steps
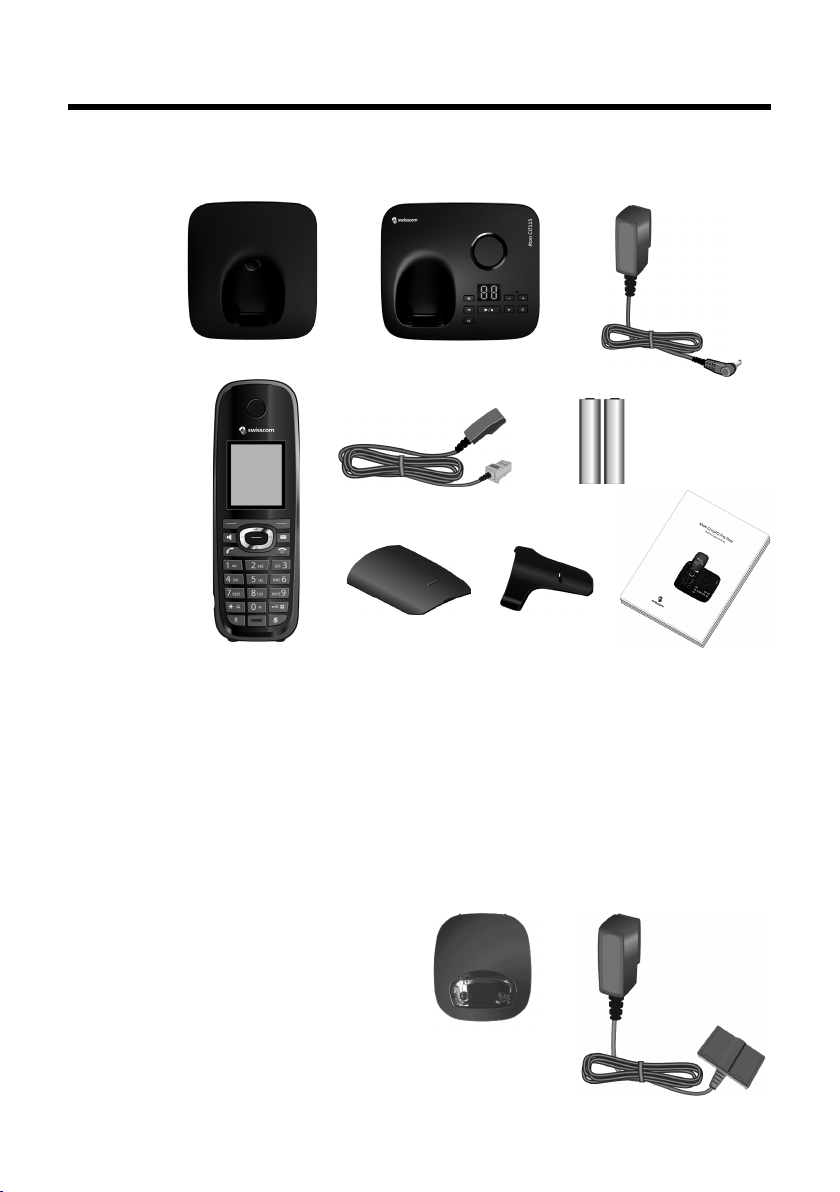
Checking the pack contents
1 one Aton CL115/CLT115 base
2 one mains adapter
3 one handset
4 one phone cord
5 two batteries
6 one battery cover
7 one belt clip
8 one user guide
10
If you have purchased a
model with multiple handsets the package should
contain two batteries, a battery cover, a belt clip and a
charging cradle
mains adapter
additional handset.
9 with
J for each
Page 13
Setting up the base and charging cradle (if included)
1
1
1
2
The base and charging cradle are designed for use in enclosed dry rooms with a
temperature range of +5°C to +45°C.
¤ Install the base on a level, non-slip surface in a central location in your house or
flat or mount the base or charging cradle on the wall ¢ page 80.
Please note
Pay attention to the range of the base.
This is up to 250 m in unobstructed outdoor areas and up to 40 m inside buildings. The range is reduced when Eco Mode (¢ page 58) is activated.
The phone's feet do not usually leave any marks on surfaces. However, due to the
multitude of different varnishes and polishes used on today's furnishings, the
occurrence of marks on the surfaces cannot be completely ruled out.
Please note:
u Never expose the telephone to the influence of heat sources, direct sunlight or
other electrical devices.
u Protect your telephone from moisture, dust, corrosive liquids and vapours.
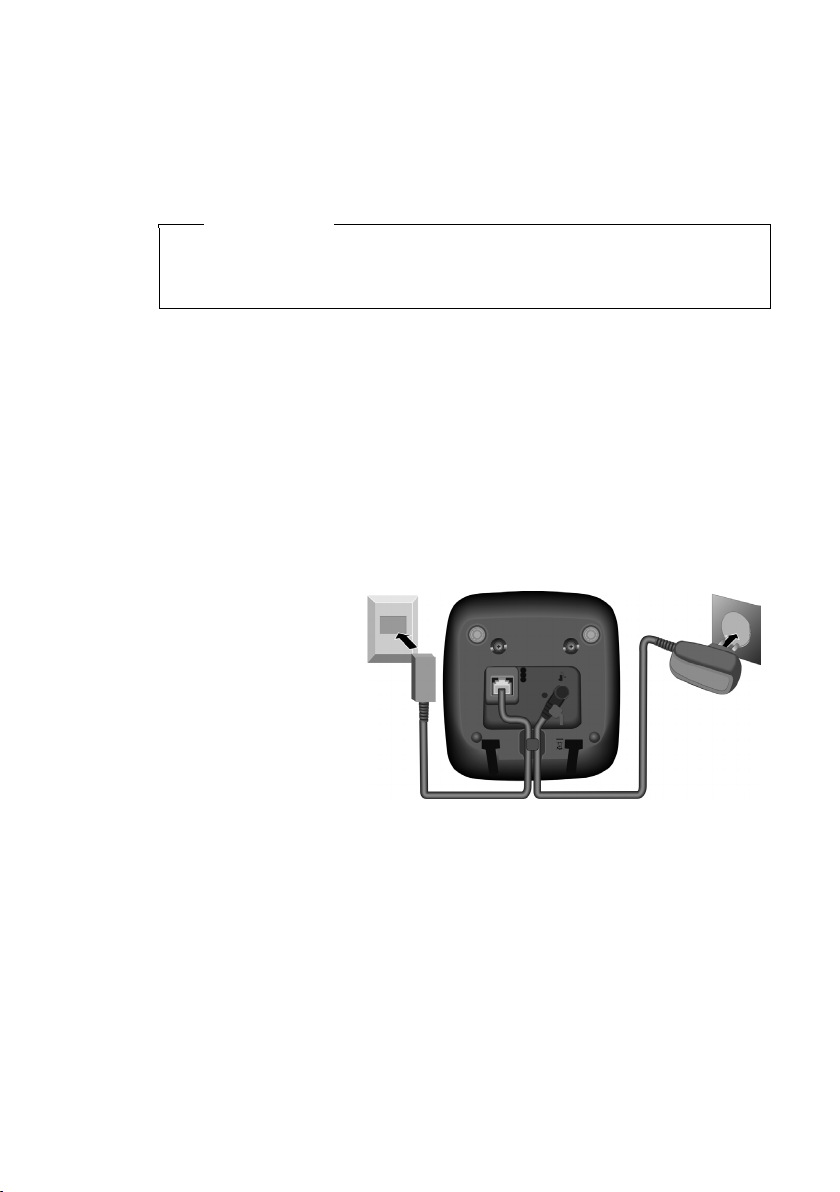
Connecting the base
¤ First connect the tel-
ephone jack 2 and
insert the cables into
the cable ducts.
¤ Then connect the
mains adapter 1.
First steps
Please note:
u The mains adapter must always be connected, as the phone will not operate
without a mains connection.
u Only use the mains adapter and phone cord supplied. Pin connections on tele-
phone cables can vary (pin connections ¢ page 76).
11
Page 14
First steps
¤ Plug the mains adapter into the plug
socket 2.
¤ Connect the flat plug from the mains
adapter 1.
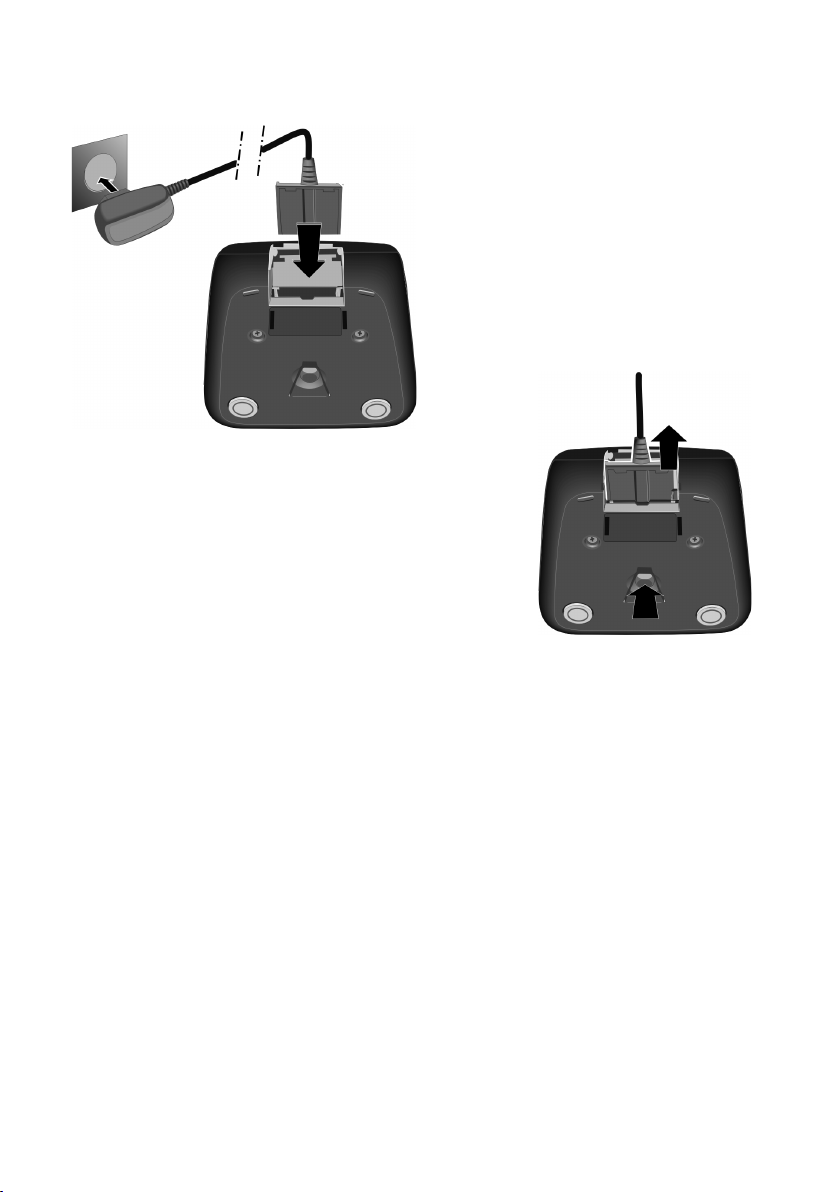
If you need to disconnect the plug from the charging cradle,
press the release button 3 and disconnect the plug 4.
1
2
3
4
Connecting the charging cradle (if included)
12
Page 15
Setting up the handset for use
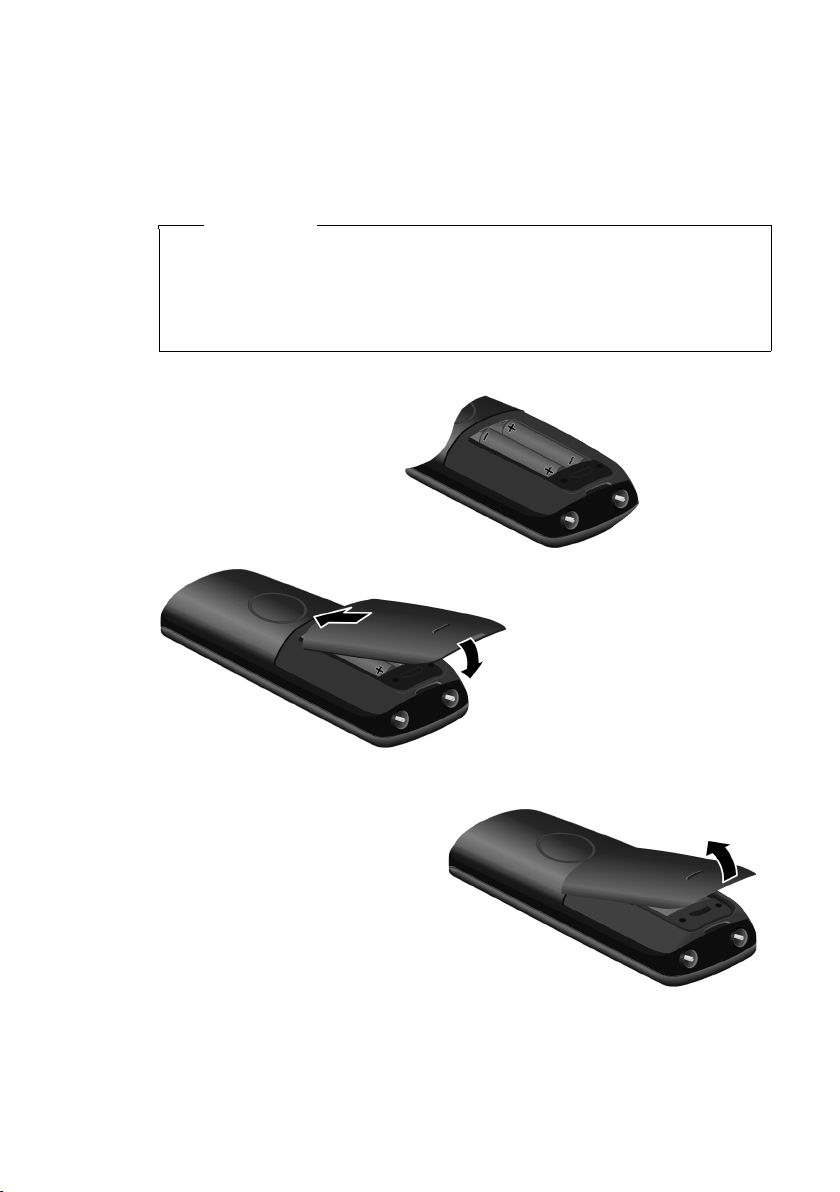
¤ Insert the batteries the
right way round.
The polarity is indicated
in/on the battery compartment.
¤ First insert the battery
cover at the top a.
¤ Then press the cover b
until it clicks into place.
If you need to open the battery
cover, for instance to replace the
batteries, place your fingertip in
the cavity on the casing and pull
the battery cover upwards.
a
b
The display is protected by a plastic film.
Please remove the protective film!
Inserting the batteries and closing the battery cover
Only use the rechargeable batteries (¢ page 75), i.e. never use conventional
(non-rechargeable) batteries, as this could result in significant health risks and
personal injury. For example, the outer casing of the batteries could be damaged or the batteries could explode. The phone could also malfunction or be
damaged as a result of using batteries that are not of the recommended type.
First steps
Warning
13
Page 16

First steps
Attaching the belt clip
The handset has notches on each side to attach the belt clip.
¤ To att ach – press the belt clip
onto the back of the handset so
that the protrusions on the belt
clip engage with the notches.
¤ To re move – using your right
thumb apply pressure to the centre of the belt clip, push the fingernail of your left index finger
between the clip and the casing
and lift the clip upwards.
14
Page 17
First steps
10 h
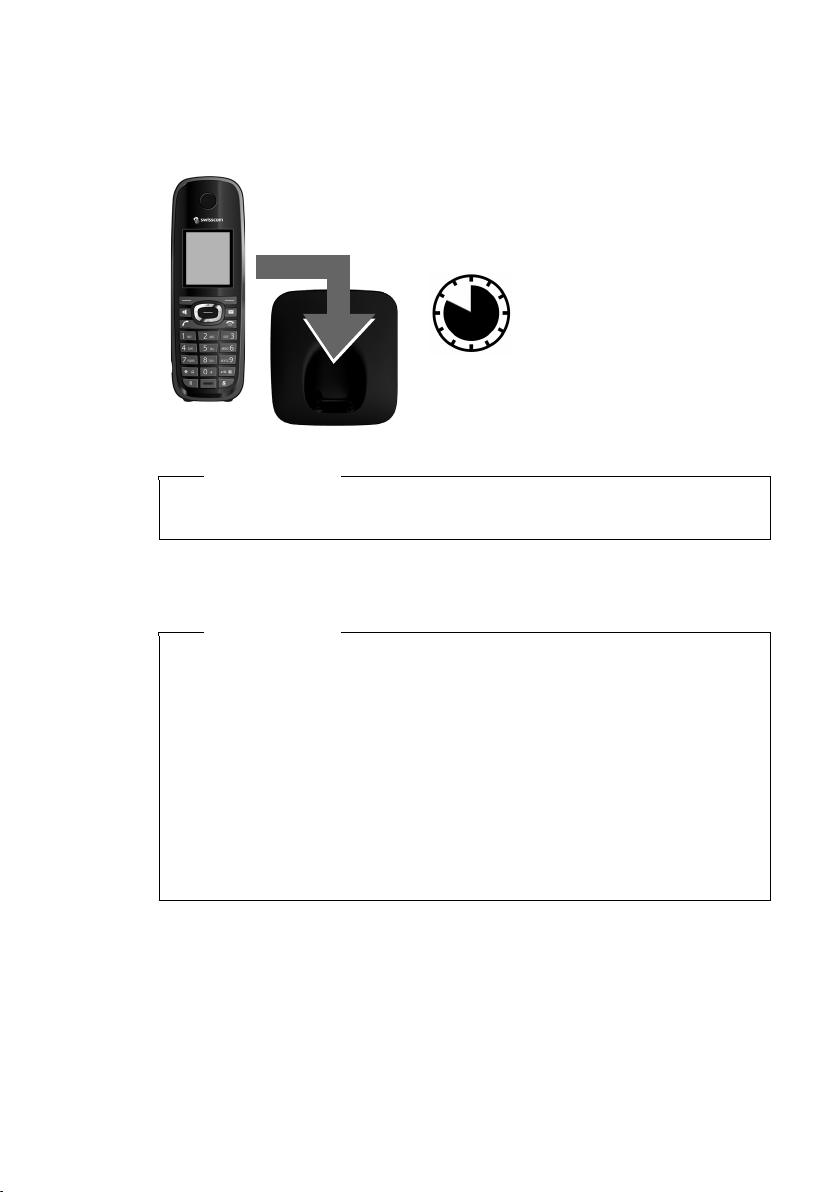
Initial charging and discharging of the batteries
The correct charge status can only be displayed if the batteries are first fully
charged and discharged.
¤ Charge the handset in the base for 10 hours.
Please note
The handset must only be placed in the designated Aton CL115/CLT115 base or
charging cradle.
¤ After charging, remove the handset from the base and only replace it when the
batteries are fully discharged.
Please note
u Each handset is registered with the base at the factory. You do not need to
register the handset again. If you wish to use your handset with a different
base or use further handsets with your base, you have to register the handset
manually ¢ page 59.
u After the first battery charge and discharge, you may place your handset in
the base after every call.
u Always repeat the charging and discharging procedure if you remove the
batteries from the handset and reinsert them.
u The batteries may warm up during charging. This is not dangerous.
u After a while, the charge capacity of the batteries will decrease for technical
reasons.
15
Page 18
First steps
L5
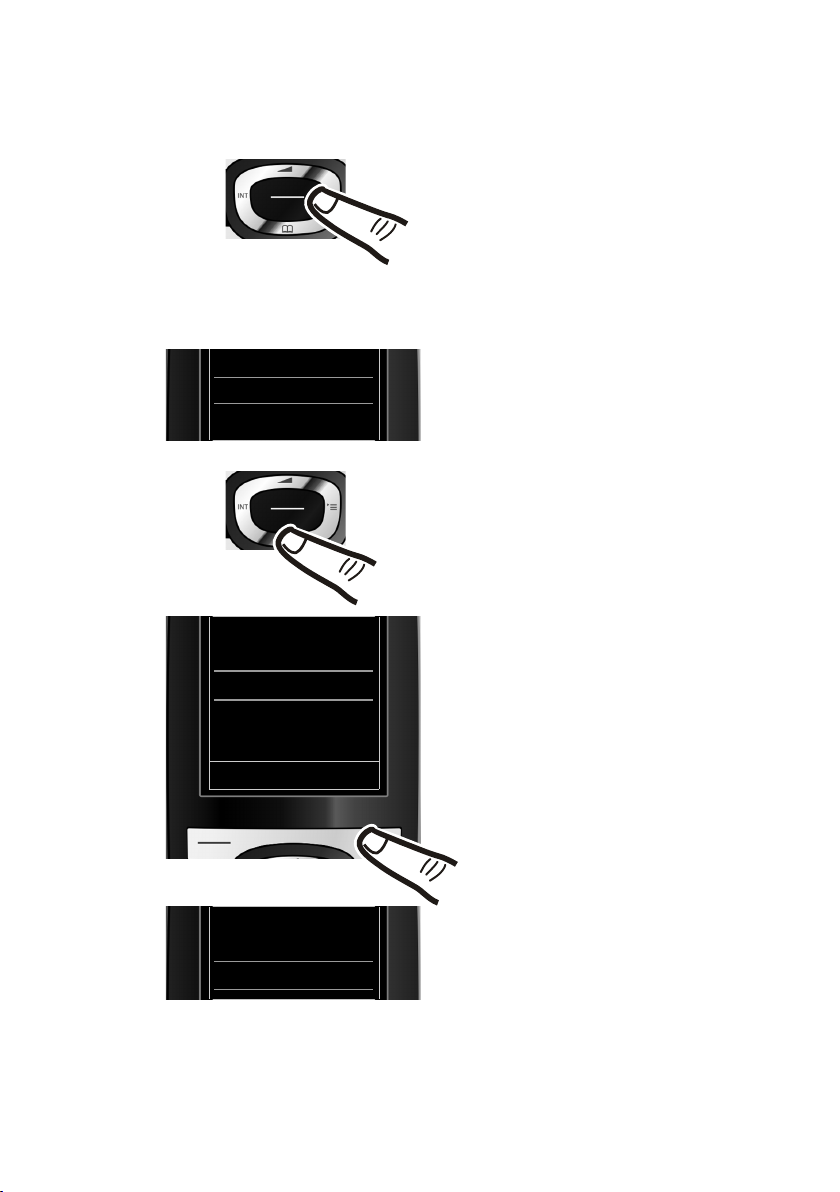
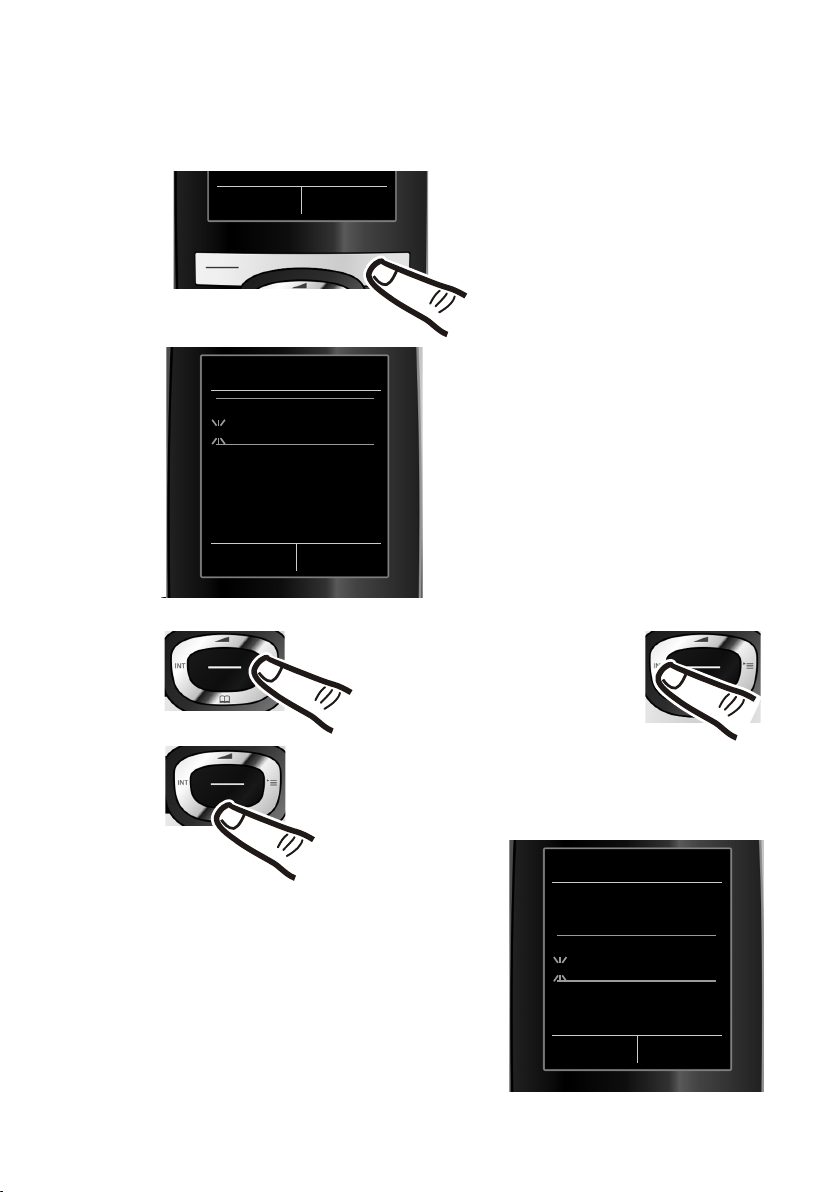
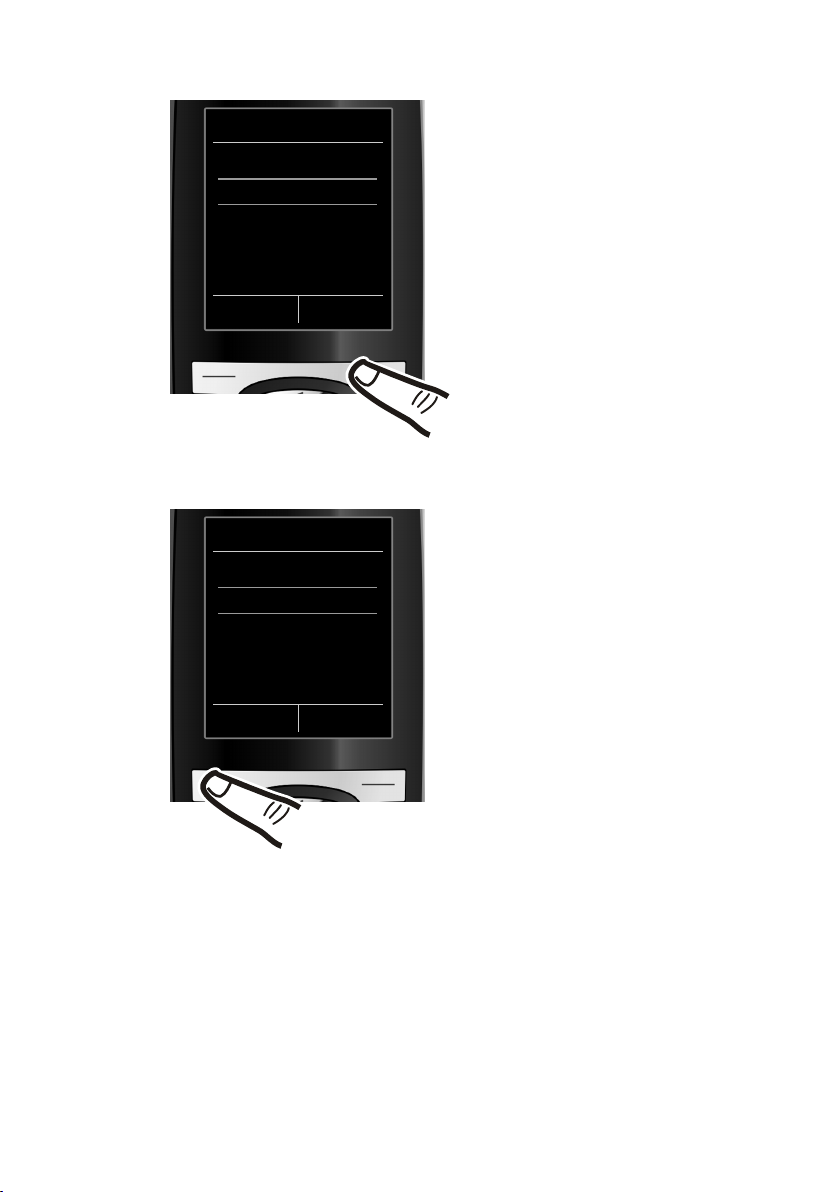
¤ Press right on the control key.
¤ Press the keys L and 5 slowly
one after the other.
The display for setting languages appears.
The current language (e.g. English) is
selected.
¤ Press down on the control key s ...
... until the language you wish to use
is marked, e.g. French.
¤ Press the right key directly below the
display to select this language.
The selection is marked with Ø.
Deutsch
±
English
Ø
Fran cais
±
Deutsch
±
English
Ø
Fran cais
±
Italiano
±
Espanol
±
x
Back Select
Deutsch
±
English
±
Fran cais
Ø
Changing the display language
Change the display language, if you do not understand the language currently set.
16
¤ Press and hold the end call key a to return to idle status.
Page 19
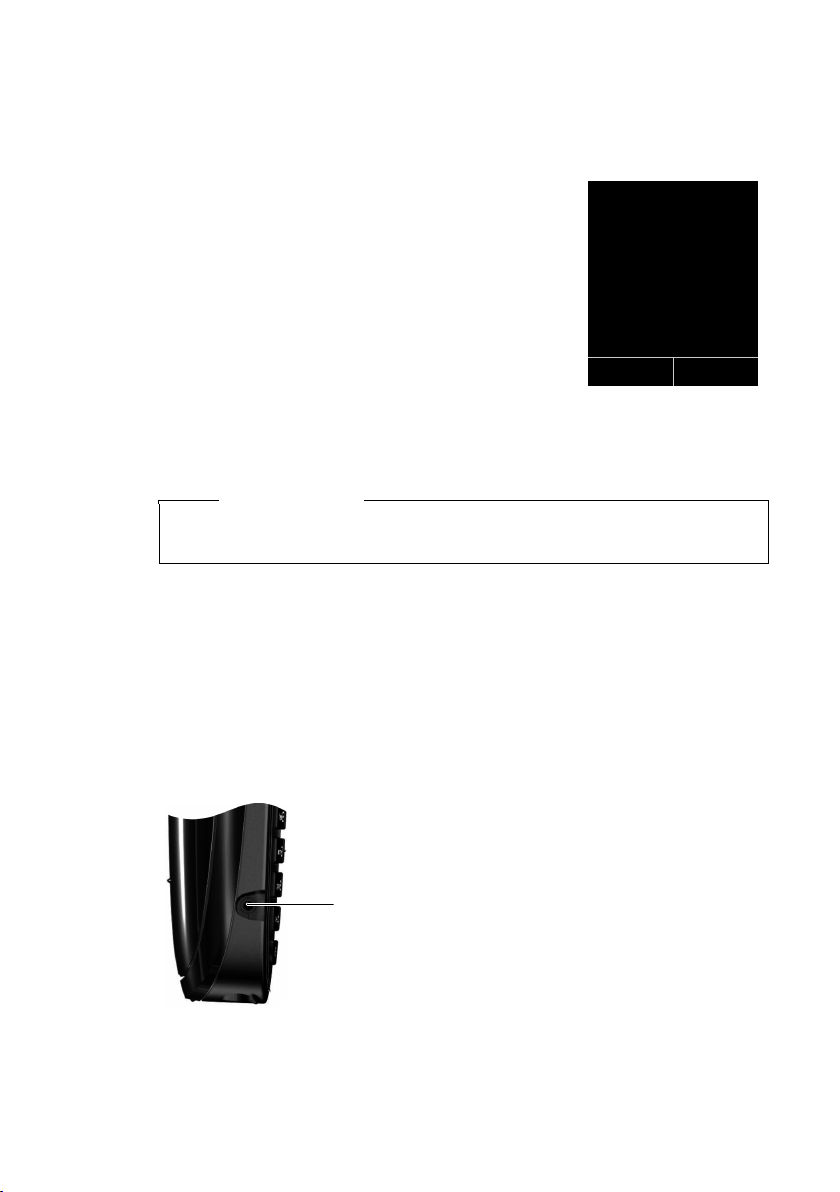
Setting the date and time
Date/Time
Date:
14.10.2011
Time:
00:00
Back Save
¤ Press the key below §Time§ on the screen
display to open the input field.
(If you have already set the time and
date, open the input field via the menu
¢ page 29.)
The Date/Time submenu is shown on
the display.
¤ The active input position flashes.
Enter day, month and year as an
8-digit number via the keypad,
e.g. 4Q
2Q for 14/10/2011.
Date/Time
Date:
31.01.2011
Time:
00:00
Back Save
Calls Time
Press the right or left control key
to change the input position and
correct an entry.
¤ Enter the hours and minutes as
four digit numbers via the keypad,
e.g. QM5 for 07:15 am.
Change the input position with
the control key if necessary.
¤ Press down on the control key to switch
to the time input field.
Set the date and time so that the correct date and time can be assigned to incoming
calls, and so that the alarm can be used.
First steps
17
Page 20

First steps
¤ Press the key below §Save§ on the dis-
play screen to confirm your entry.
The display shows Saved. You will hear a
confirmation tone and the handset will
automatically return to idle status.
Back Save
Date/Time
‰
Saved
18
Page 21
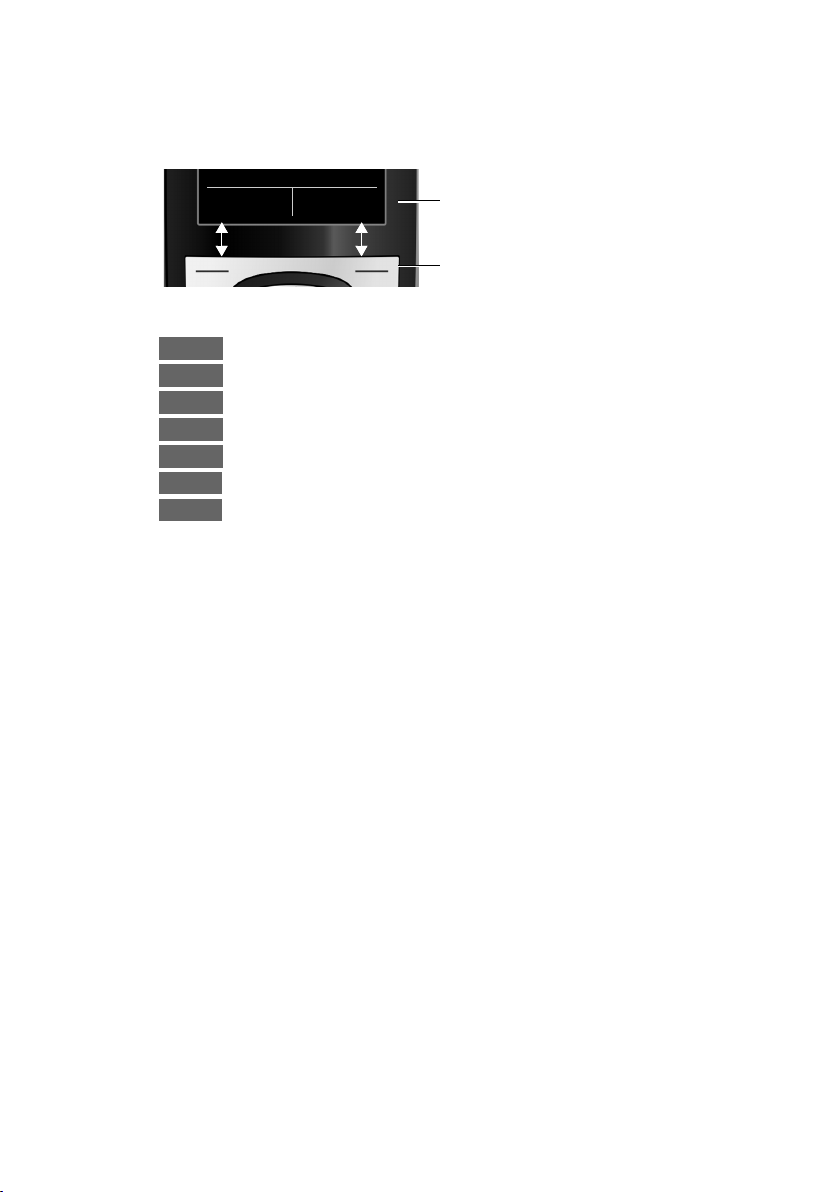
First steps
i à V
07:15
INT 1 14 Oct
Calls SMS
Display in idle status
Once the phone is registered and the time set, the idle display is shown as in this
example. If the answering machine is activated, the answering machine icon
will be displayed in the header.
Displays
u Reception signal between the base and handset:
– good to poor: ÐiÑÒ
– no reception: |
Green: Eco Mode activated (¢ page 58)
u Battery charge status:
– { white: charged over 66%
– { white: charged between 34% and 66 %
– y white: charged between 11% and 33 %
– y red: charged below 11 %
– y flashes red: battery almost empty (less than 10-minutes talktime)
– xyxyx{x{ white: battery charging
Please note
Have you chosen a color scheme with white background, the white symbols are
displayed in black.
u INT 1
Internal name of the handset (¢ page 62)
If Eco Mode+ (¢ page 58) is activated, the ¼ icon is displayed in the top left.
Your answering machine is set with a pre-recorded announcement.
Ã
Your phone is now ready for use!
Connecting the headset
You can connect a headset with a 2.5 mm jack connector.
Recommended headset: SAP No. 117959.
Available from Swisscom.
19
Page 22

First steps
g
g
g
g
g
g
g
g
What would you like to do next?
Now you have successfully started your telephone, you will probably want to adapt
it to your personal requirements. Use the following guide to quickly locate the most
important subjects.
If you are unfamiliar with menu-driven devices such as other Aton telephones you
should first read the section entitled "Using the phone" ¢ page 21.
Information on ... ... is located here.
Setting the ringtone and volume page 67
Setting the earpiece volume page 66
Recording a personal announcement for the
answering machine
Setting Eco Mode / Eco Mode+ page 58
Preparing the telephone for SMS reception page 43
Operating the telephone on a PABX page 71
Registering existing Aton handsets to a base page 59
Transferring directory entries from existing
handsets to new handset(s)
If you have any questions about using your phone, please read the tips
on troubleshooting (¢ page 74) or contact our Customer Care team
(¢ page 73).
page 51
page 38
20
Page 23

Using the phone
Control key
Below, the side of the control key that you must press in
the respective operating situation is marked in black
(top, bottom, right, left, centre), e.g. v for "press right on the
control key" or w for "press the centre of the control key".
The control key has a number of different functions:
When the handset is in idle status
s Open the directory.
v Open the main menu.
u Open the list of handsets.
t Call up the menu to set the call volume (¢ page 66) of the handset.
In the main menu
t, s, v or u
Navigate to the required function.
In submenus and lists
t / s Scroll up/down line by line.
In input fields
Use the control key to move the cursor up t, down s, right v or left u.
Press and hold v or u to move the cursor word by word.
Using the phone
During an external call
s Open the directory.
u Initiate an internal consultation call.
t Adjust the loudspeaker volume for earpiece and handsfree mode.
Functions when pressing the middle of the control key
Depending on the operating situation, the key has different functions.
u In idle status the key opens the main menu.
u In submenus, selection and input fields the key takes on the function of the dis-
play keys
§OK§, §Yes§, §Save§, §Select§ or §Change§.
Please note
In these instructions, opening the main menu is represented by pressing right
on the control key and functions are confirmed by pressing the corresponding
display key. However, if you prefer, you can use the control key as described
above.
21
Page 24
Using the phone
Back Save
Current display key functions.
Display keys
Options
OK
Û
Back
Save
Þ
à
Display keys
The functions of the display keys change depending on the particular operating situation. Example:
Some important display keys:
Open a context-dependent menu.
Confirm selection.
Delete key: delete one character/word at a time from right to left.
Go back one menu level or cancel operation.
Store entry.
Open the redial list.
Forward a call to the answering machine.
Keys on the keypad
c/ Q / * etc.
Press the matching key on the handset.
~ Enter digits or letters.
Correcting incorrect entries
Menu guidance
22
You can correct incorrect characters in the input fields by navigating to the incorrect entry using the control key. You can then:
u Delete the character by briefly pressing Ñ or press and hold to delete the
word to the left of the cursor.
u Insert characters next to the cursor.
u Overwrite the highlighted (flashing) character, e.g. when entering time and
date.
Your telephone's functions are accessed using a menu that has a number of levels.
The menu display can be extended (Expert mode •) or reduced (Standard
mode). Expert mode is activated by default.
Settings or functions that are only available in expert mode are marked in these
instructions with the
Switching between standard/expert mode and the menu overview ¢ page 27.
icon.
•
Page 25

Using the phone
Settings
Ë
Ê
Ì
Ç
É Ï
Back OK
Settings
Date/Time
Audio Settings
Display
Language
Registration
Back OK
Main menu (first menu level)
¤ When the handset is in idle status press the right v control key to open the
main menu.
The main menu functions are shown in the display with
icons. The icon for the selected function is marked in
orange and the name of the associated function
appears in the display's header.
To access a function, i.e. to open the corresponding submenu (next menu level):
¤ Use the control key p to select the required func-
tion and press the display key
Briefly press the display key §Back§ or the end call key
a to revert back to idle status.
§OK§.
Submenus
The functions in the submenus are displayed as lists
(example on the right).
To access a function:
¤ Scroll to the function with the control key q and
§OK§.
press
Briefly press the display key §Back§ or the end call key
a to return to the previous menu level/cancel the
operation.
Reverting to idle status
You can revert to idle status from anywhere in the menu as follows:
¤ Press and hold the end call key a.
Or:
¤ Do not press any key: after 2 minutes the display will automatically rev ert to i dle
Settings that have not been saved by selecting the display key
§Change§ will be lost
An example of the display in idle status is shown on page 19.
status.
§OK§, §Yes§, §Save§ or
23
Page 26

Using the phone
Activating/deactivating the handset
a With the phone in idle status, press and hold the end call key
(confirmation tone) to switch off the handset.
Press and hold the end call key again to switch the handset on.
Activating/deactivating the keypad lock
The keypad lock prevents any inadvertent use of the phone.
# Press and hold the hash key in idle status to activate or deactivate the
keypad lock. You will hear the confirmation tone.
If the keypad lock is activated a warning will be shown when you press a key.
The keypad lock deactivates automatically when you receive a call. It is reactivated
when the call is ended.
Please note
When the keypad lock is active, you cannot call emergency numbers.
24
Page 27
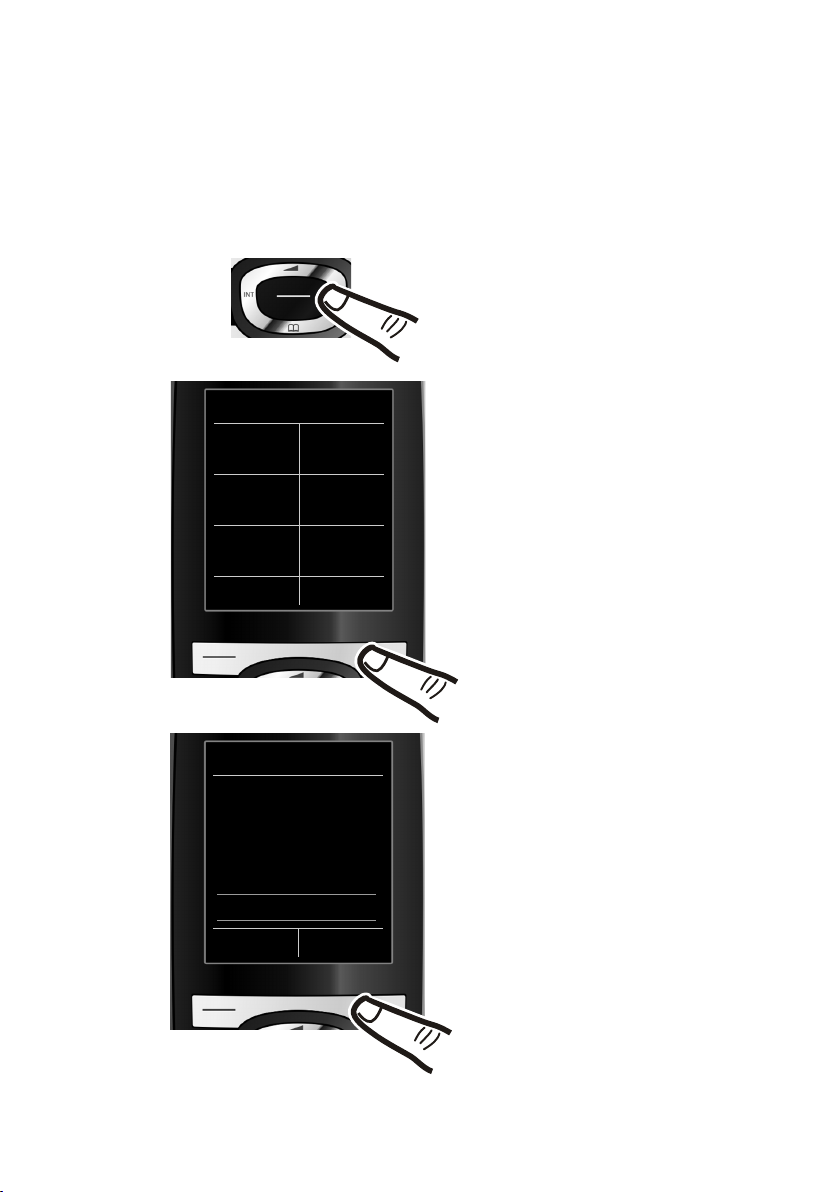
Illustration of operating steps in the user guide
¤ Press right on the control key v to
open the main menu.
¤ Use the right, left, down and up
control key p to navigate to the
Settings submenu.
¤ Press the display key §OK§ to confirm
your selection.
¤ Press down on the control key s
until the Eco Mode menu appears on
the display.
¤ Press the display key
§OK§ to confirm
your selection.
Settings
Display
Language
Registration
Menu View
Eco Mode
Back OK
Settings
Ë
Ê
Ì
Ç
É Ï
Back OK
The operating steps are shown in abbreviated form.
Example:
The illustration:
v ¢Ï ¢ Eco Mode ¢ Eco Mode+ (³=on)
means:
Using the phone
25
Page 28
Using the phone
Changes are effective immediately
and do not have to be confirmed.
¤ Press down on the control key s
until the Eco Mode+ menu appears
on the display.
¤ Press the display key
§Change§ to
activate/deactivate the function.
Tel ep ho ny
Eco Mode
³
Eco Mode+
³
Back Change
Eco Mode
Eco Mode
³
Eco Mode+
´
Back Change
¤ Press the key below §Back§ on the
display to jump back to the previous
menu level.
or
Press and hold the end call key a
to return to idle status.
gfgf
jnfgfgn
26
Page 29
Menu overview
Menu overview
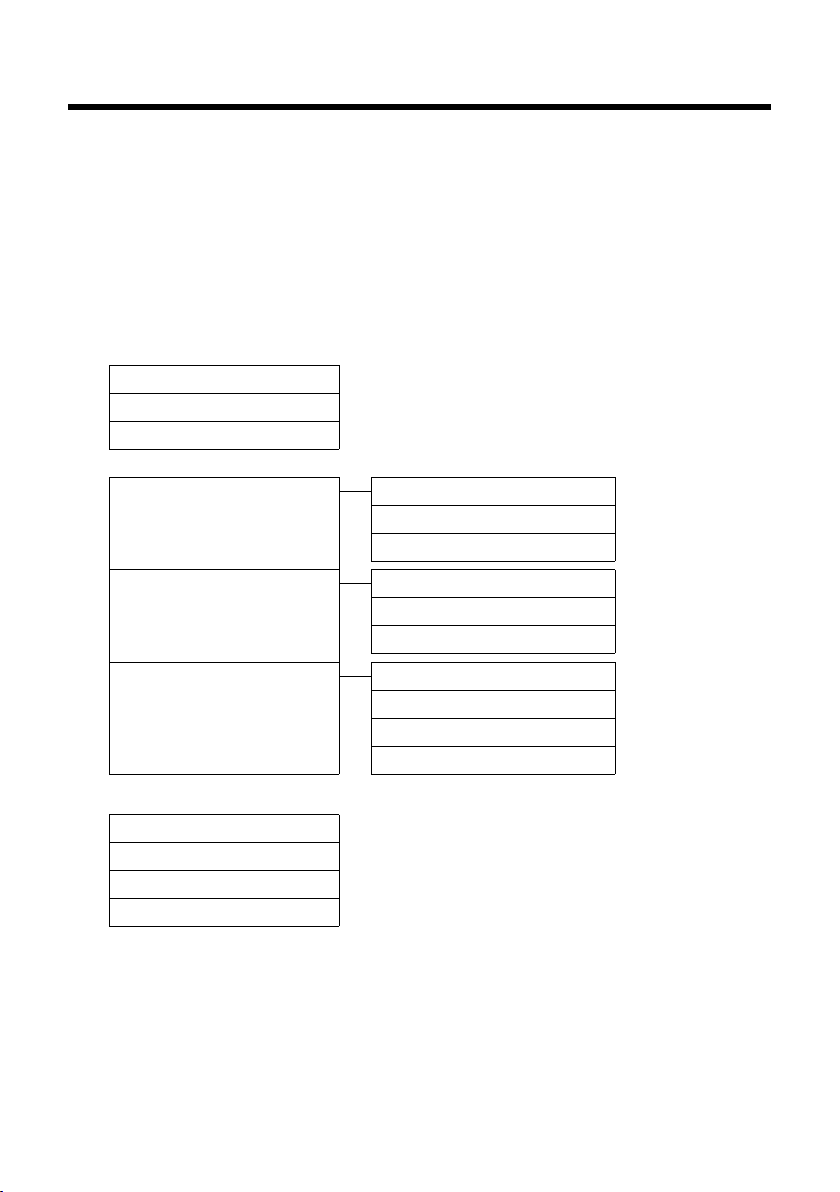
Setting standard or expert mode
The menu display can be extended (Expert mode •) or reduced (Standard mode). Menu
options that are only available in expert mode are marked with the
The settings are carried out as follows:
Select v ¢Ï ¢ Menu View ¢ Simplified (standard mode) or Complete (expert mode)
§Select§ (the active mode is marked with Ø).
¢
Open the main menu: When the telephone is in idle status pressv.
SMS
Ë
You have activated an SMS mailbox (general or private) without a PIN
New SMS ¢ page 43
Incoming ¢ page 46
Draft ¢ page 44
You have activated an SMS mailbox with a PIN or 2-3 mailboxes
Mailbox New SMS ¢ page 43
Incoming ¢ page 46
Draft ¢ page 44
•
icon.
Mailbox 1
Mailbox 2
Mailbox 3
Settings Service Centres ¢ page 49
•
Call Lists
Ê
All Calls ¢ page 39
Outgoing Calls ¢ page 39
Accepted Calls ¢ page 39
Missed Calls ¢ page 39
New SMS ¢ page 43
Incoming ¢ page 46
Draft ¢ page 44
SMS Mailboxes ¢ page 47
Notification ¢ page 47
Status Report ¢ page 44
27
Page 30
Menu overview
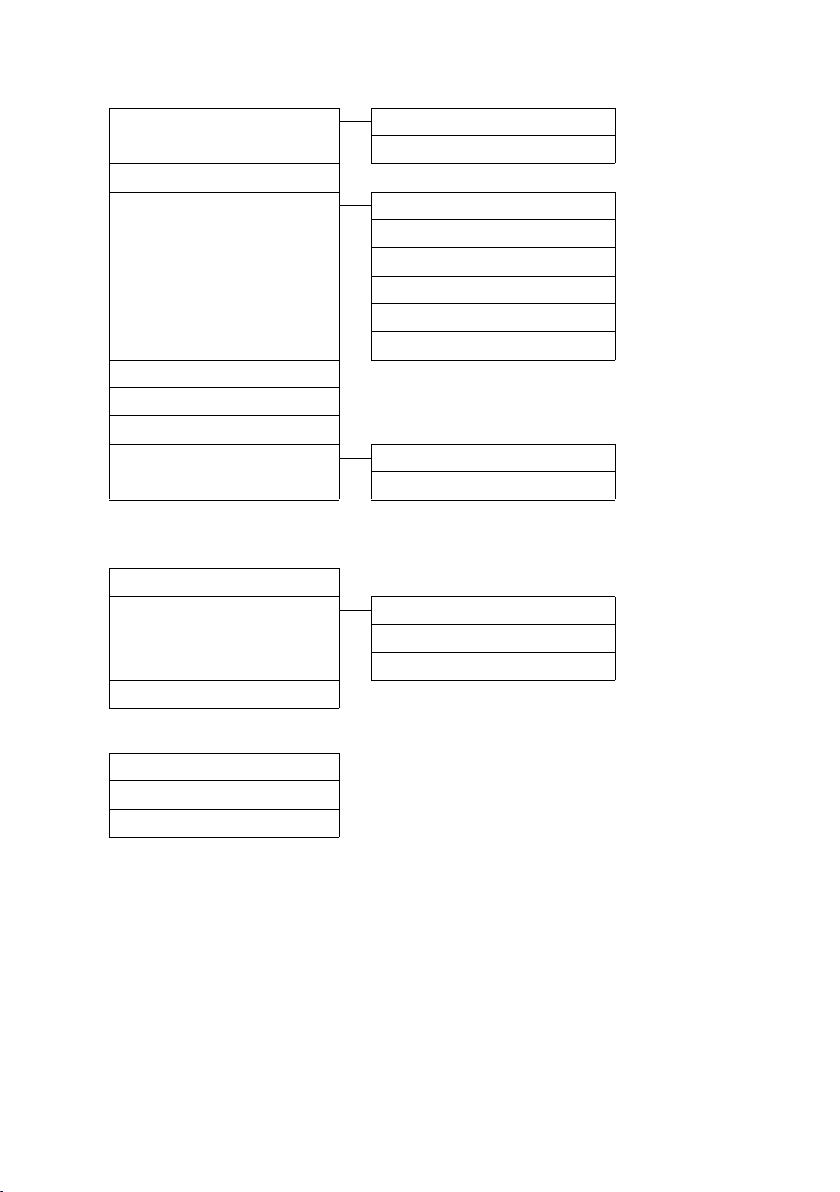
Voice Mail
Ì
Play Messages Network Mailbox ¢ page 57
Answ. Machine * ¢ page 51
Activation * ¢ page 51
Announcements * Rec. Announcement * ¢ page 51
Play Announcement * ¢ page 51
Del. Announcement * ¢ page 51
Rec. Advisory Msg. * ¢ page 51
•
Play Advisory Msg. * ¢ page 52
•
Del. Advisory Msg. * ¢ page 52
•
Recordings * ¢ page 54
•
Call Screening * ¢ page 54
•
Network Mailbox ¢ page 57
•
Set Key 1 * Network Mailbox ¢ page 57
•
Answ. Machine ¢ page 57
* Only base with answering machine
Select Services
Ç
Withhold Number ¢ page 33
All Calls Call Divert ¢ page 34
Call Waiting ¢ page 33
Call Protection ¢ page 35
Ringback Off ¢ page 33
Additional Features
É
Alarm Clock ¢ page 59
Room Monitor ¢ page 63
One Touch Call ¢ page 30
28
Page 31
Settings
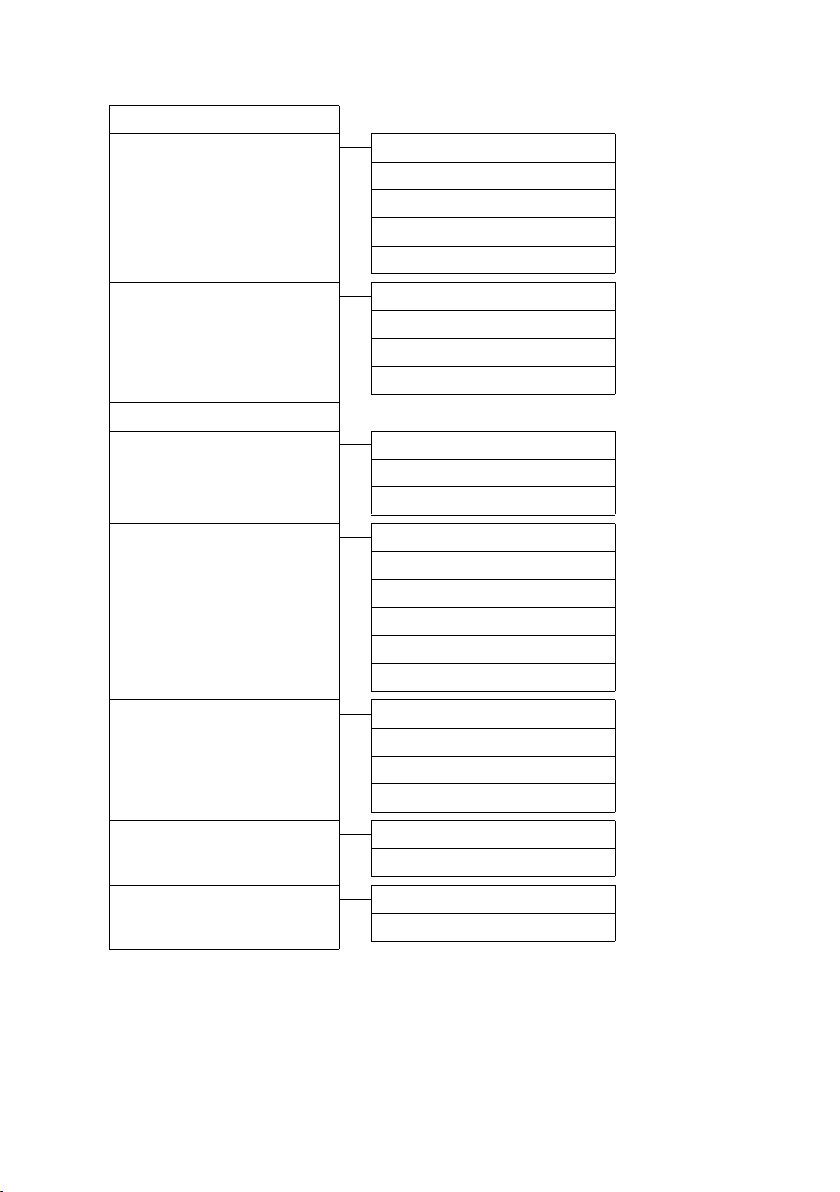
Ï
Date/Time ¢ page 17
Audio Settings Handset Volume ¢ page 66
Advisory Tones ¢ page 68
•
Ringtones(Handset) ¢ page 67
Ringtones (Base) ¢ page 69
Music on hold ¢ page 69
•
Display Screensaver ¢ page 65
Large Font ¢ page 66
Colour Schemes ¢ page 66
Backlight ¢ page 66
•
Language ¢ page 65
Registration Register Handset ¢ page 59
De-reg. Handset ¢ page 60
Select Base ¢ page 60
Telephony Auto Answer ¢ page 66
•
Area Codes ¢ page 68
Listening In ¢ page 62
Access Code ¢ page 71
Dialling Mode ¢ page 71
Recall ¢ page 71
Menu overview
System Handset Reset ¢ page 69
•
Base Reset ¢ page 70
Repeater Mode ¢ page 69
System PIN ¢ page 70
Menu View Simplified ¢ page 27
Complete ¢ page 27
Eco Mode Eco Mode ¢ page 58
Eco Mode+ ¢ page 58
29
Page 32
Making calls
i à V
07:15
INT 1 22 Oct
”
OneTouchCall active
0891234567
OFF
Making calls
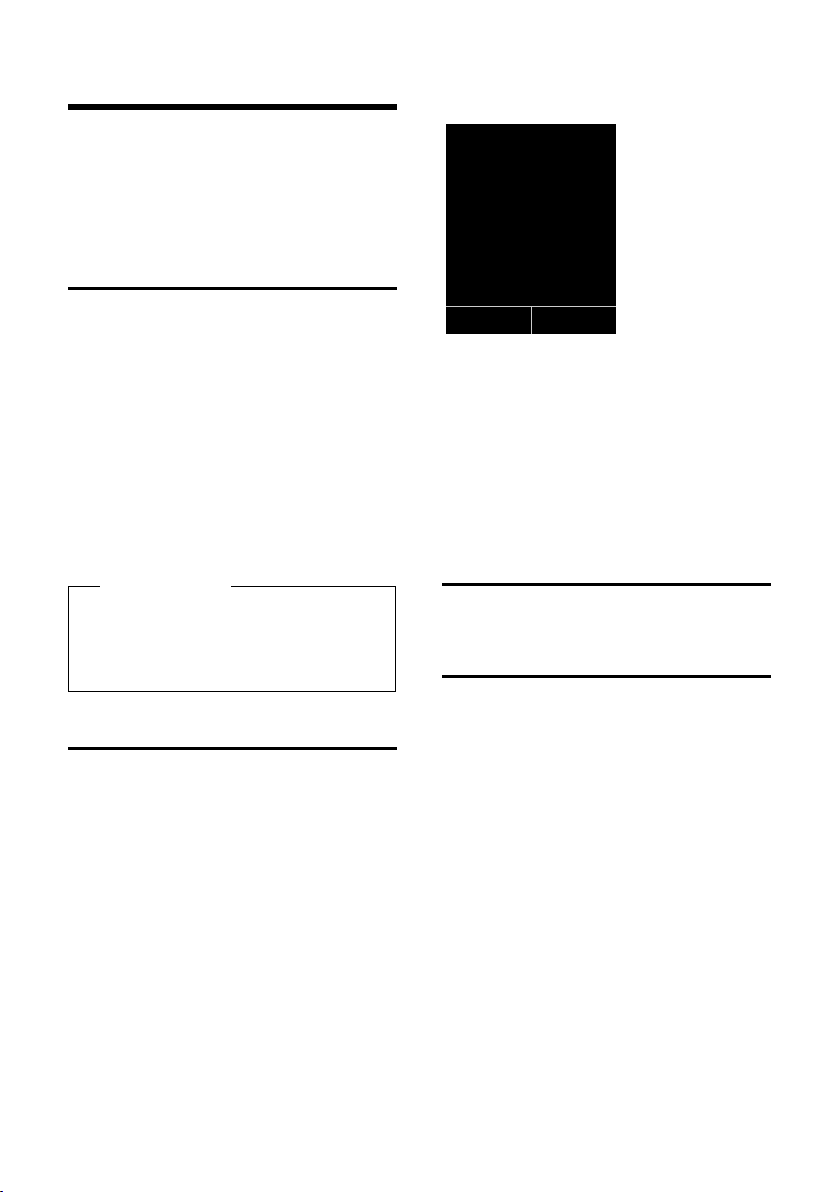
If the backlight is deactivated (¢ page 66) it
is switched on by pressing any key. Digit
keys appear on the display for pre-dialling;
all other keys do not have any further func-
tions.
Making an external call
External calls are calls using the public telephone network.
~c Enter the number and press the
Or:
c~ Pr ess and hold the talk key c
You can cancel the dialling operation with
the end call key a.
You are shown the duration of the call while
the call is in progress.
Please note
Dialling with the directory (¢ page 36),
calls list (¢ page 39) and redial list
(¢ page 39) saves you from repeatedly
keying in phone numbers.
One Touch Call
You can set up your phone that by pressing
any key a previously stored number is
dialled. This allows for example children,
who can not enter a number, to call a certain
number.
É ¢ One Touch Call
v ¢
¤ Change multiple line input:
Activation:
Select On to activate.
Call to:
Enter or change number.
¤ Press
§Save§ to save the settings.
30
talk key.
and then enter the number.
When the function is activated, the idle display looks as shown below:
By pressing any key the saved number is
dialled. Press the end call key a, to cancel
the dialling operation or to end the call.
Deactivating the One Touch Call
¤ In idle status, press the display key §OFF§.
¤ Press and hold the hash key #, to
deactivate the One Touch Call.
Ending a call
a Press the end call key.
Accepting a call
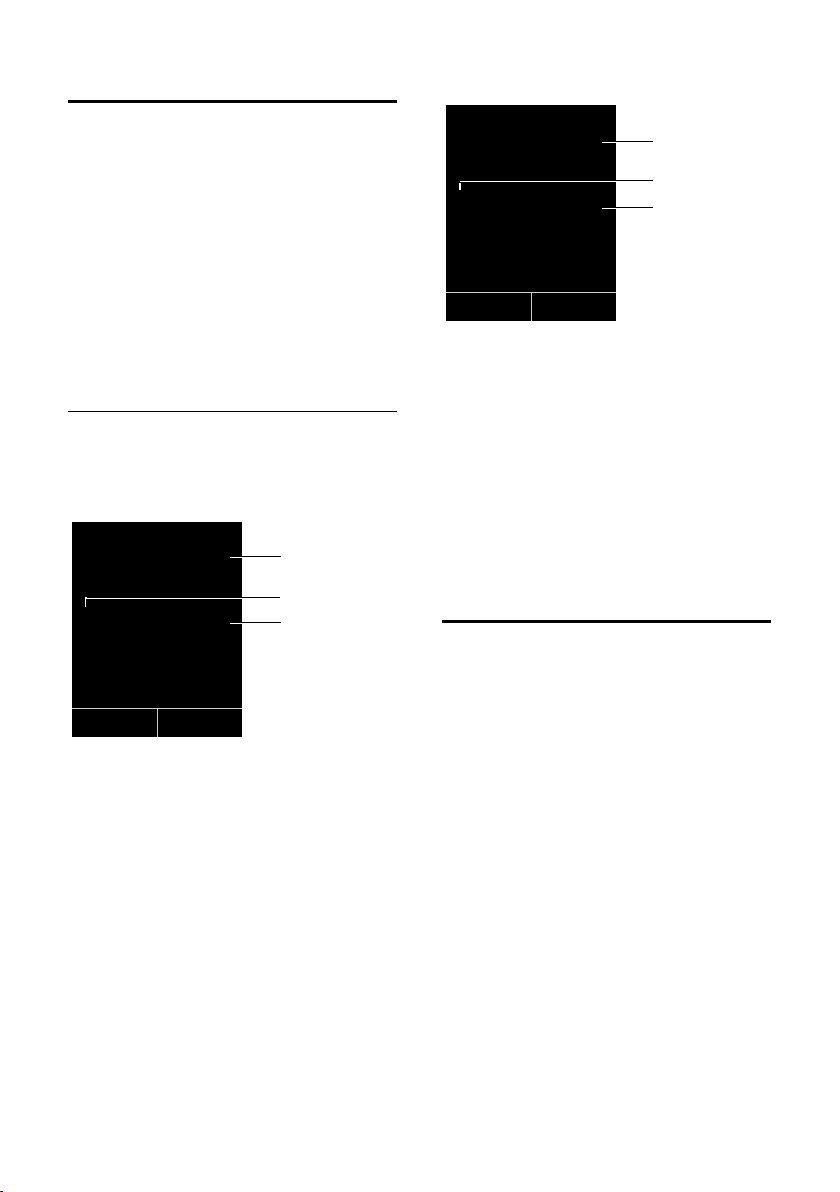
The handset indicates an incoming call in
three ways: by ringing, by a display on the
screen and by the flashing talk key c.
You can accept the call by:
¤ Pressing the talk key c.
¤ Pressing the speaker key d.
¤ Aton CL115: Press the display key
¤ Aton CLT115: Press the display key Ô
to divert the call to the answering
machine (¢ page 54).
If the handset is in the base/charging cradle
and the Auto Answer function is activated
(¢ page 66), the handset automatically
answers the call when you remove it from
the charging cradle.
To deactivate the ringtone, press the
display key. You can accept the call as long as
it is displayed on the screen.
§Accept§.
§Silence§
Page 33
Making calls
Ø«Ú
ä
1234567890
Accept Silence
1
3
Aton CL115
2
1
3
Aton CLT115
Ø«Ú
ä
1234567890
à
Silence
2
Calling Line Identification
When you receive a call, the caller's number
is displayed on the screen if the following
conditions are met:
u Your network provider supports CLIP, CLI.
– CLI (Calling Line Identification): the
caller's number is transmitted.
– CLIP (Calling Line Identification Pres-
entation): the caller's number is displayed.
u You have requested CLIP from your net-
work provider.
Call display with CLIP/CLI
If the caller's number is saved in your directory, the number is replaced by the corresponding directory entry (Symbol
and name/number).
*
ä/ k/ l
or
1 Ringtone icon (background colour changes if
VIP group is assigned ¢ page 36)
2Symbol
3Number or name of caller
The following is displayed in place of the
number:
u External, if no number is transmitted.
u Withheld, if the caller has withheld Call-
ä/ k/ l
from directory
ing Line Identification (¢ page 33).
Notes on calling line display (CLIP)
By default, the number of the caller is shown
in the display of your telephone. You do
not have to make any other settings on your
telephone.
In the Swisscom ISDN network, CLIP is trans-
*
mitted automatically, CNIP does not work
However, if the caller's number is not
displayed, this can be due to the
following:
u CLIP is not supported or
u You have not ordered CLIP from your net-
work provider or
u Your telephone is connected via a PABX
or a router with an integrated PABX (gate-
way) that does not transmit all informa-
tion.
.
31
Page 34

Making calls
Is your telephone connected via a
PA BX /g at ew ay ?
You can establish this by checking for an
additional device connected between your
telephone and house connection, e.g., a
PABX, gateway etc. In most cases, simply
resetting this device will remedy the situation:
¤ Briefly disconnect the mains plug of your
PABX. Re-insert the plug and wait for the
device to restart.
If the caller number is still not
displayed:
¤ Check the CLIP settings of your PABX and
activate this function if necessary. In the
user guide for the device, search for the
term "CLIP" (or an alternative term such
as "calling line identification", "phone
number transmission", "caller ID", ...).
If necessary, contact the device manufacturer.
If this does not resolve the problem, it is possible that your network provider does not
the CLIP service for this number.
Have you ordered the calling line
display service from your network
provider?
¤ Check whether your provider supports
calling line display (CLIP) and that the
function has been activated for you. If
necessary, contact your provider.
Handsfree mode
In handsfree mode, instead of holding the
handset to your ear you can put it down, for
example on the table in front of you. This
allows others to participate in the call.
Activating/deactivating handsfree mode
Activating while dialling
~d Enter the number and press the
speaker key.
¤ You should inform your caller before you
use the speaker function so that they
know someone else is listening.
Switching between earpiece and
handsfree mode
d Press the speaker key.
During a call and when listening to the
answering machine (Aton CLT115 only), activate or deactivate handsfree mode.
If you wish to place the handset in the base/
charging cradle during a call:
¤ Press and hold the speaker key d while
placing the handset in the base.
For instructions on how to adjust the loudspeaker volume, ¢ page 66.
Switching to mute
You can deactivate the microphone in your
handset during an external call.
h Press key to mute the handset.
The display shows Microphone
is off.
Press the key again to reactivate
the microphone.
32
Please note
If the telephone is muted, all keys except
the mute key h and the end-call key
a will not work.
Page 35

Making calls using network services
Making calls using
network services
Network services are functions that your
network provider makes available to you.
You have to request these services from your
network provider.
¤ It is not possible to reprogram the net-
work services.
¤ If you require assistance, please contact
your network provider.
Calling Line Identification
Withhold Calling Line Identification
once (CLIR):
If you make a call, your number is shown in
the display of the call recipient if that person
has activated CLIP (¢ page 31).
If in certain instances you do not wish to
have your number displayed, you can withhold your number for the next call (CLIR).
v ¢ Ç ¢ Withhold Number
~
Enter phone number.
c Press the talk key.
or
§Dial§ Press the display key.
Ringback
Call waiting during an external call
If the function is activated during an external call you will hear a call waiting tone to
signal that another external caller is trying to
get through. If you have CLIP (¢ page 31)
the number of the waiting caller or the corresponding directory entry is shown in the
display.
Activating/deactivating call waiting
v ¢ Ç ¢ All Calls ¢ Call Waiting
Status Activate/deactivate.
§Send§ Press the display key.
Accepting a waiting call
You are making an external call and hear the
call waiting tone.
You have the following options:
§Options§ ¢ Accept Waiting call
or
(only if CLIP is activated ¢ page 31)
§Accept§ Press the display key.
Once you have accepted the waiting call
you can switch between the two callers
("call swap" ¢ page 34) or speak to both
at the same time ("conference"
¢ page 34).
Initiating ringback
If the number you have called is engaged,
you can initiate ringback. As soon as the line
of the person you called is free, your handset
will ring.
You hear the busy tone.
§Options§ ¢ Ringback
a Press the end call key.
Cancelling ringback
You can cancel a ringback that has already
started.
v ¢ Ç ¢ Ringback Off
Rejecting a waiting call
You can hear the call waiting tone but do not
want to speak to the caller.
§Options§ ¢ Reject Waiting call
The caller hears the busy tone.
33
Page 36

Making calls using network services
Call divert (CD)
When diverting a call, the call is forwarded to
another connection.
The following options are available:
u All Calls: Calls are diverted immediately.
No more calls are signalled on your
phone.
u No Answer: Calls are diverted if no one
accepts the call within several rings.
u When Busy: Calls are diverted when your
line is busy. Call is diverted without a call
waiting tone.
v ¢ Ç ¢ All Calls ¢ Call Divert
¤ Change multiple line input:
When:
Select All Calls / When Busy / No Answer.
Phone Number:
Enter the number to which the call is to
be diverted.
Status:
Activate/deactivate call divert.
§Send§ Press the display key.
a After the announcement, press
the end call key.
Consultation call, call swap, conference
These functions enable you to
u Call a second external caller (consultation
call call)
u Switch between two calls (call swap)
u Talk to two callers at the same time (con-
ference)
~ Enter the second participant's
telephone number.
The phone number is dialled. You are
connected to the second participant.
If the caller does not answer, select the display key
§End§ to return to the first participant.
Please note
You can also select the second participant's phone number from the directory
(¢ page 37) or the calls list (¢ page 39).
Ending a consultation call
§Options§ ¢ End Active Call
You are reconnected to the first caller.
You can also end the consultation call by
selecting the end call key. The connection is
briefly interrupted and you will be called
back. Once you have pressed the talk key
you are reconnected to the first caller.
Call swapping
You can speak to both callers one at a time
(call swap).
Precondition: You are conducting an external call and have called a second participant
(consultation call) or have accepted a waiting call.
¤ Use q to swap between the partici-
pants.
The caller you are currently speaking to is
marked with the
End the current call
§Options§ ¢ End Active Call
You are re-connected to the waiting caller.
æ icon.
Consultation call
You can call a second external caller. The first
call is placed on hold.
During an external call:
§Ext. Call§ Press the display key.
The previous call is placed on
hold. The other participant
hears an announcement.
34
Conference
You can speak to both participants simultaneously.
Precondition: You are conducting an external call and have called a second participant
(consultation call) or have accepted a waiting call.
§Conf.§ Press the display key.
Page 37

You and the two other callers (both marked
by the
other simultaneously.
æ icon) can hear and speak to each
Ending a conference call
a Press the end call key to end the
call with both participants.
Or:
§EndConf§ Press the display key.
You return to the "call swap" status. You are
reconnected to the caller with whom you
started the conference call.
You can continue your conversation with the
other callers.
Each of the callers can end their participation in the conference call by selecting the
end call key and replacing the handset.
Further functions
Call protection
Incoming calls are not signalled. The caller
receives a notification that the called party
should not be disturbed.
v ¢ Ç ¢ All Calls ¢ Call Protection
Status: Activate/deactivate.
§Send§ Press the display key.
Making calls using network services
35
Page 38

Using the directory and lists
Using the directory and
lists
The options are:
u Directory
u Redial list
u Incoming SMS message list
u Call lists
u List of missed appointments
u Answering machine list
(Aton CLT115 only)
You can create a personalised directory for
your own individual handset. You can also
send lists/entries to other handsets
(¢ page 38).
Directory
You can save up to 150 entries in the directory.
Please note
For quick access to a number from the
directory (shortcut), you can assign the
number to a key (¢ page 64).
Directory
In the directory, you can save
u Up to three numbers and associated first
names and surnames
u E-mail address
u Anniversaries with reminder
u VIP ringtones with VIP symbol.
You open the directory in idle status using
the s key.
Length of the entries
3 numbers:
each max. 32 digits
First name and surname:
each max. 16 characters
E-mail address:
max. 64 characters
Saving a number in the directory
s ¢ <New Entry>
¤ Change multiple line input:
First Name: / Surname:
Enter first names and/or surnames.
If a name is not entered in any of the
fields, the telephone number is saved and
displayed as the surname.
(For instructions on how to enter text and
special characters, please see
¢ page 77.)
Phone (Home): / Phone (Office): /
Phone (Mobile):
Enter a number in at least one of the
fields.
When scrolling through the directory, the
entries are highlighted by a prefixed sym-
bol: ä/ k/ l.
E-mail:
Enter the e-mail address.
Anniversary:
Select On or Off.
When set to On:
Enter Annivers. (Date) and Anniversary
(time) and select reminder type:
Anniversary (tone) ¢ page 38.
VIP Group:
Mark directory entry as VIP
(VeryImportant Person).
Each entry can be allocated to one of
6 VIP groups, which are defined by the
colour of the Æ symbol, the name of the
VIP group and the corresponding ring-
tone.
VIP calls are recognised by the ringtone.
The background colour of the ringtone
animation changes to the colour of the
VIP group.
Precondition: Calling Line Identification
(¢ page 31).
§Save§ Press the display key.
36
Page 39

Using the directory and lists
Order of directory entries
Directory entries are generally sorted alphabetically by surname. Spaces and digits take
first priority. If only the first name was
entered in the directory, this is incorporated
into the sort order instead of the surname.
The sort order is as follows:
1. Space
2. Digits (0–9)
3. Letters (alphabetical)
4. Other characters
To get round the alphabetical order of the
entries, insert a space or a digit in front of the
first letter of the surname. These entries will
then move to the beginning of the directory.
Selecting a directory entry
s Open the directory.
You have the following options:
u Use s to scroll through the entries until
the required name is selected.
u Enter the first letters of the name; if nec-
essary scroll to the entry with the s key.
The directory searches for the surname. If
a surname has not been entered, the
directory searches for the first name.
Dialling with the directory
s ¢ s(Select entry).
c Press the talk key.
(If several numbers have been
entered, select the required
number and press talk key c
again).
The number is dialled.
Managing directory entries
Viewing entries
s ¢ s(Select entry).
§View§ Press the display key. The entry
is displayed.
§Options§ Press the display key.
The following functions can be selected
with q:
Display Number
To edit or add to a saved number, or to
save it as a new entry, press Óafter the
number is displayed.
Delete Entry
Delete selected entry.
Copy Entry
to Internal: Send a single entry to a hand-
set (¢ page 38).
vCard via SMS: Send a single entry in
vCard format via SMS.
Editing entries
s ¢ s (Select entry).
§View§ §Edit§ Press the display keys one after
the other.
¤ Carry out changes and save.
Using other functions
s ¢ s(Select entry) ¢ §Options§ (Open
menu)
The following functions can be selected with
q:
Display Number
Edit or add to a saved number and then
dial with c or save as a new entry; to
do this, press Óafter the number
appears on the display.
Edit Entry
Edit selected entry.
Delete Entry
Delete selected entry.
Copy Entry
to Internal: Send a single entry to a hand-
set (¢ page 38).
vCard via SMS: Send a single entry in
vCard format via SMS.
VIP Groups
Change the name and ringtone of VIP
groups; to do this:
Select the VIP group ¢
¢ Change entry ¢ §Save§.
Delete All
Delete all entries in the directory.
§Edit§
37
Page 40

Using the directory and lists
Copy All
to Internal: Send the complete list to a
handset (¢ page 38).
Available Memory
Display the number of entries that are still
available in the directory (¢ page 36).
Using shortcut keys
¤ Press and hold the required shortcut key
(¢ page 64).
Sending the directory to another handset
Preconditions:
u The sending and receiving handsets must
both be registered to the same base.
u The other handset and the base can send
and receive directory entries.
s ¢ s(Select entry) ¢
menu) ¢ Copy Entry / Copy All ¢ to
Internal
s Select the internal number of
the receiving handset and press
§OK§.
You can transfer several individual entries
one after the other by responding to
the Entry copied - Copy next entry? prompt
§Yes§.
with
A successful transfer is confirmed by a message and confirmati7n tone.
Please note:
u Entries with identical numbers are not
overwritten on the receiving handset.
u The transfer is cancelled if the phone
rings or if the memory of the receiving
handset is full.
u Pictures and sounds allocated to entries
are not transferred.
§Options§ (Open
A number is displayed:
§Options§ ¢ Copy to Directory
¤ Complete the entry ¢ page 36.
Aton CLT115: Message playback is interrupted during the number transfer from the
answering machine list.
Copying a number or e-mail address from the directory
In some operating situations, you can open
the directory to copy a number or e-mail
address, for example. Your handset need not
be in idle status.
¤ Depending on the operating situation,
open the directory with s or Ó.
q Select entry (¢ page 37).
Saving an anniversary in the directory
For each number in the directory, you can
save an anniversary and specify a time
at which a reminder call should be made on
the anniversary (default setting:
Anniversary: Off).
s ¢ s (Select entry)
§View§ §Edit§ Press the display keys one after
the other.
s Scroll to the Anniversary: line.
v Select On.
¤ Change multiple line input:
Annivers. (Date)
Enter day/month/year in 8-digit format.
Anniversary (time)
Enter the hour/minute for the reminder
call in 4-digit format.
Anniversary (tone)
Select the type of signal for the reminder.
§Save§ Press the display key.
Copying the displayed number to the directory
You can copy numbers displayed in a list, e.g.
the calls list or the redial list, or in an SMS to
the directory.
38
Please note
A time must be specified for reminder
calls. If you select a visual signal, a time is
not required and is automatically set to
00.00.
Page 41

Using the directory and lists
ØðÚ
Miller,
Frank
Off SMS
Deactivating anniversaries
s ¢ s (Select entry)
§View§ §Edit§ Press the display keys one after
the other.
s Scroll to the Anniversary: line.
v Select Off.
§Save§ Press the display key.
Reminder call on an anniversary
In idle status, a reminder call is shown in the
handset display and indicated by the
selected ringtone.
You can:
§SMS§ Write an SMS.
§Off§ Press the display key to
acknowledge and end the
reminder call.
When you are on the phone a reminder call
is indicated on the handset with a single
advisory tone.
Anniversaries that are indicated during a call
and that are elapsed are entered in the
Missed Alarms list (¢ page 41).
c Press the talk key again.
The number is dialled.
When a name is displayed, you can display
the corresponding phone number by pressing the display key
§View§.
Managing entries in the redial list
c Press the key briefly.
s Select entry.
§Options§ Open menu.
The following functions can be selected
with q:
Copy to Directory
Copy an entry to the directory (page 36).
Display Number (as in the directory,
page 37)
Delete Entry (as in the directory, page 37)
Delete All (as in the directory, page 37)
Incoming SMS message list
All received SMS messages are saved in the
incoming message list ¢ page 45.
Answering machine list (Aton CLT115 only)
You can use the answering machine list to
listen to the messages that are on the
answering machine.
Call lists
Redial list
The redial list contains the twenty numbers
last dialled with the handset (max. 32 digits).
If one of the numbers is in the directory, the
corresponding name will be displayed.
Manual redial
c Press the key briefly.
s Select entry.
Precondition: Calling Line Identification
(CLIP, page 31)
Your telephone stores various types of calls:
u Accepted calls
u Outgoing calls
u Missed calls
u Calls recorded by the answering machine
(Aton CLT115 only)
39
Page 42

Using the directory and lists
All Calls
™
l
Frank
14.10.11, 15:40
š 089563810
14.10.11, 15:32
™ ...0123727859362922
14.10.11, 15:07
View Options
Ã
œ
¾
02 10 09
08
You can view each type of call separately or
gain an overview of all calls. Each call record
contains the last 20 numbers in its category.
When in idle status, open the call lists by
selecting the
menu:
v ¢
Ê
List entry
New messages are displayed at the top.
Example of list entries:
u List type (in header)
u Status of entry
Bold: New entry
u Number or name of caller
u Date and time of call (if set, page 17)
u Type of entry:
– Accepted calls (
– Missed calls (
– Outgoing calls (
– Calls recorded by the answering
machine (Ã, Aton CLT115 only)
Press the talk key c to return the calls
selected.
Select the
tional information, including for example
the number linked to the name
Select the
following options:
Copy to Directory
40
§View§ display key to access addi-
§Options§ display key to select the
Copying a displayed number to the directory.
§Calls§ display key or via the
› )
™)
š )
Delete Entry
Delete selected entry.
Delete All
Delete all entries.
When you quit the call lists, all entries are set
to the status "old", i.e. the next time you
open the call the list they will no longer be
shown in bold.
Message key function
Opening lists
You can use the message key f to open the
following list selection:
u Answering machine list (Aton CLT115
only) or network mailbox, if your network
provider supports this function and a
shortcut is set for the network mailbox
(¢ page 57).
u Incoming message list (¢ page 45)
If several mailboxes are set up
(¢ page 47), several lists are displayed.
u List of missed calls
u List of missed appointments (¢ page 41)
An advisory tone sounds as soon as a new
message arrives in a list.
Depending in the type of the new entry, an
icon appears in the display while in idle sta-
tus:
Icon New message...
... in the answering machine list
Ã
™
Ë
The number of new entries is displayed
under the corresponding icon.
(Aton CLT115 only) or on the network
mailbox
... in list of missed calls
... in the SMS list
... in the Missed Alarms list:
Page 43
Using the directory and lists
Messages & Calls
Calls: (3)
Missed Alarms (1)
SMS: (2)
Back OK
System
97
System
975 SET:
[ 0 ]
System
975 SET:
[ 1 ]
Please note
If calls are saved in the network mailbox,
you will receive a message if the appropriate settings have been made (see your
network provider user guide).
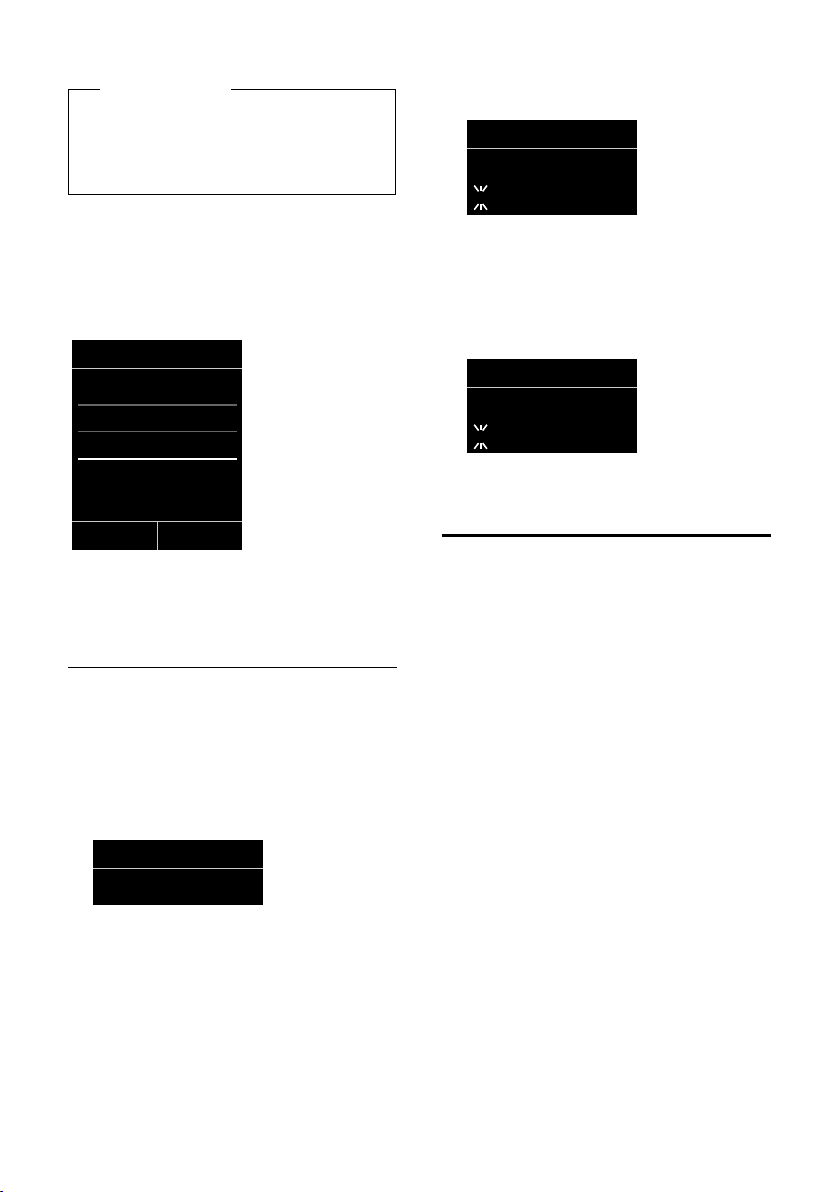
After pressing the message key f you will
see all the lists that contain messages and
the network mailbox list.
Lists containing new messages are at the top
of the list and are marked in a bold font.
Select a list with q. To open, press
Disabling/enabling message key flashing
You can select whether the message key f
flashes (default setting) or does not flash
when new messages arrive. Please do the
following:
¤ Press the key sequence:
v ¢ *#Q5#M
The following is displayed:
¤ Press one of the following keys to select
the message type:
5 for missed calls
or L for new SMS
or M for messages on the answer-
§OK§.
ing machine (Aton CLT115
only)/network mailbox
Your selection is displayed (e.g. 5 for
missed calls); the current setting flashes:
¤ Press key Q or , to set the behavior
for new messages:
Q message key flashes (it stops
when the key is pressed)
or message key does not flash
Your selection is displayed (e.g. 1):
¤ Press the display key
§OK§.
List of missed appointments
Missed anniversaries (¢ page 38) are saved
in the Missed Alarms list if:
u You do not accept an anniversary.
u The anniversary was signalled during
a phone call.
u The handset is deactivated at the time of
the anniversary.
u Open the list by pressing the messages
key f (¢ page 40).
Each entry is shown with
u Number or name
u Date and time
The most recent entry is at the head of the
list.
Press the display key
selected entry.
If 10 entries are already stored in the list, the
next appointment reminder will delete the
oldest entry.
§Delete§ to delete the
41
Page 44

Making cost-effective calls
Making cost-effective
calls
Make phone calls through a network provider who offers particularly low-cost call
rates (call-by-call).
42
Page 45

SMS (text messages)
SMS (text messages)
Your device is delivered ready to send SMS
messages.
Please note
When supplied, the access number
(062 210 00 0*) for the Swisscom
SMS centre is pre-programmed.
Preconditions:
u Calling Line Identification is enabled for
your phone line.
u Your network provider supports SMS on
the fixed line network (information on
this can be obtained from your network
provider).
u The number of the SMS centre is entered.
Register with the Swisscom network by
sending an SMS.
u An incoming SMS is signalled by one alert
tone.
Please note
If your phone is connected to a PABX,
please read ¢ page 49.
Writing/sending an SMS
Writing an SMS
v ¢Ë
Mailbox 2 Select mailbox if necessary and
§OK§.
press
~ Enter mailbox PIN if necessary
and press
New SMS Select and press §OK§.
~ Write an SMS.
§OK§.
Please note
u For instructions on how to enter text
and special characters, please see
page 77.
u An SMS can be up to 612 characters.
If there are more than 160 characters,
the SMS is sent as a linked SMS (up to
4 SMS messages with 153 characters
each). The number of characters
remaining and which part of a linked
SMS has already been written is
shown in the top right of the display.
Sending an SMS
c Press the talk key
Or:
§Options§ Press the display key.
Send Select and press §OK§.
SMS Select and press §OK§.
~ / s Select number with area code
(even if you are in that area)
from the directory or enter
directly. For sending SMS to an
SMS mailbox: add the mailbox
ID to the end of the number.
§Send§ Press the display key. The SMS is
sent.
Please note
u If you are interrupted by an external
call while writing an SMS, the text is
automatically saved in the draft SMS
list.
u If the memory is full, or if the SMS
function on the base is being used by
another handset, the operation is cancelled. An appropriate message
appears in the display. Delete SMS
messages you no longer require or
send the SMS later.
43
Page 46

SMS (text messages)
•
Saved
14.10.11 15:07
SMS status report
Precondition: Your network provider sup-
ports this feature.
If you have activated the status report, you
will receive an SMS with a confirmation message after sending.
Activating/deactivating status reports
v ¢Ë ¢ Settings
Status Report
Select and press
(³=on).
§Change§
Reading/deleting status report/saving
number to directory
¤ Open the incoming message list
(¢ page 45) and then:
q Select SMS with State OK or
State not OK status.
§Read§ Press the display key.
u Delete:
§Options§ ¢ Delete Entry ¢ §OK§.
u Copy to directory:
§Options§ ¢ Copy to Directory ¢ §OK§.
u Delete entire list:
§Options§ ¢ Delete All ¢ §OK§.
Draft SMS list
You can save an SMS in the draft SMS list, and
edit and send it later.
Saving an SMS in the draft SMS list
¤ You are writing an SMS (¢ page 43).
§Options§ Press the display key.
Save Entry Select and press §OK§.
The number will be displayed in the first line,
if the entry has been saved with the phone
number, i.e. when the SMS was saved from
the incoming message list.
Reading or deleting SMS messages
¤ Open the draft SMS list and then:
q Select SMS.
§Read§ Press the display key. The entry
will be displayed. Scroll line by
line using q.
Or delete the SMS with
§Options§ ¢ Delete Entry ¢ §OK§.
Writing/changing an SMS
¤ You are reading an SMS in the draft SMS
list.
§Options§ Open menu.
You have the following options:
Send
Send stored SMS.
Edit
Edit the text of the saved SMS and then
send it (¢ page 43).
Character Set
Display text in the selected character set.
Deleting draft SMS list
¤ Open the draft SMS list and then:
§Options§ Open menu.
Delete All Select, press §OK§ and confirm
§Yes§. The list is cleared.
with
Opening the draft SMS list
v ¢Ë ¢ if necessary ~ (Mailbox,
mailbox PIN) ¢ Draft
The first list entry is displayed, e.g.
44
Page 47

SMS (text messages)
SMS: (2)
Sending SMS messages to an e-mail address
If your service provider supports the SMS as
e-mail feature, you can also send your SMS
messages to e-mail addresses.
The e-mail address must be at the beginning
of the text. You must send the SMS to the email service of your SMS send centre.
v ¢
¢ New SMS
s/ ~ Load the e-mail address from
~ Enter the SMS text.
§Options§ Press the display key.
Send Select and press §OK§.
E-mail Select and press §OK§. If the
§Send§ Press the display key.
¢ (Mailbox, mailbox PIN)
Ë
the directory or enter it directly.
End the entry with a space or
colon (depending on the service provider).
number of the e-mail service is
not entered (¢ page 48), enter
the number of the e-mail service.
Sending SMS messages as a fax
You can also send an SMS to a fax machine.
Precondition: Your network provider supports this feature.
¤ You are writing an SMS (¢ page 43).
§Options§ Press the display key.
Send Select and press §OK§.
Fax Select and press §OK§.
s/ ~ Select number from the direc-
tory or enter it manually. Enter
the number with area code
(even if you are in the same
area).
§Send§ Press the display key.
Receiving an SMS
All received SMS messages are saved in the
incoming SMS list. Linked SMS messages are
displayed as one message. If this is too long
or is not transferred completely, it is split into
individual messages. Since an SMS remains
in the list even after it has been read, you
should regularly delete SMS messages
from the list.
The display tells you if the SMS memory is
full.
Please note
Each incoming SMS is signalled by a single ring (ringtone as for external calls). If
you accept such a "call", the SMS will be
lost. To prevent this ring, suppress the
first ringtone for all external calls
(¢ page 49).
Incoming SMS list
The incoming SMS list contains:
u All received SMS messages, starting with
the most recent.
u SMS messages that could not be sent due
to an error.
New SMS messages are signalled on all
Aton CLT115 handsets by the
display, the flashing message key f and an
advisory tone.
Opening the incoming SMS list with
the
f key
f Press.
The incoming message list is indicated by
the mailbox name and the number of entries
(example):
bold: new entries
normal font: read entries
Ë icon in the
45
Page 48

SMS (text messages)
0123727859362922
14.10.11 09:07
If necessary select a mailbox and open list by
selecting
and confirm by pressing
The number and date of receipt are displayed in the entry list.
§OK§ (if necessary enter mailbox PIN
§OK§).
Opening the incoming message box
via the SMS menu
v ¢Ë ¢ if necessary select mailbox,
enter mailbox PIN) ¢ Incoming
Deleting the incoming SMS list
All new and old SMS messages in the list are
deleted.
¤ Open the incoming message box.
§Options§ Open menu.
Delete All Select, press §OK§ and confirm
§Yes§. The list is cleared.
with
Reading or deleting SMS messages
¤ Open the incoming message list, then:
q Select SMS.
§Read§ Press the display key. The entry
will be displayed. Scroll line by
line using q.
Or delete the SMS with
§Options§ ¢ Delete Entry ¢ §OK§.
After you have read a new SMS, it is given the
status "Old" (is no longer shown in bold).
Changing the character set
¤ Reading an SMS
§Options§ Press the display key.
Character Set
Text is shown in the selected character
set.
Replying to or forwarding text messages
¤ Reading an SMS
§Options§ Press the display key.
You have the following options:
Reply
Write and send a new SMS in reply to the
sender (¢ page 43).
Edit
Edit the text in the SMS and return it to
the sender (¢ page 43).
Forward
Forward the SMS to another number
(¢ page 43).
Copying the number to the directory
Copying the sender's number
¤ Open the incoming message list and
select entry (¢ page 45).
§Options§ ¢ Copy to Directory
¤ Complete the entry ¢ page 38.
Please note
An attached mailbox identifier is added
to the directory.
Copying/dialling numbers from an
SMS text
¤ Read the SMS and scroll to the telephone
number.
The digits are highlighted.
Ó Press the display key.
Complete the entry ¢ page 38.
Or:
c Press the talk key to dial the
number.
If you wish to use the number to send an
SMS:
¤ Save the number with the local area code
(dialling code) in the directory.
46
Page 49

SMS (text messages)
•
SMS with vCard
The vCard is an electronic business card. It is
displayed by the Å symbol in the body of
the SMS.
A vCard can include:
u Name
u Private number
u Business number
u Mobile phone number
u Birthday
Entries in a vCard can individually be saved
to the directory one after the other.
Opening the vCard
¤ Read the SMS containing the vCard.
§View§ Press the display key.
To return to the body of the
SMS, press
q Select number.
§Save§ Press the display key.
When you save a number, the directory is
opened automatically. The number and
name are copied. If a birthday is entered on
the vCard, the date is copied to the directory
as an anniversary.
¤ If necessary, edit the entry in the direc-
tory and save it. You will return to the
vCard automatically.
§Back§.
Notification by SMS
You can be notified about missed calls or
new answering machine messages
(Aton CLT115 only) via SMS.
Precondition: For missed calls, the caller's
number (CLI) must have been transmitted.
Notification is sent to your mobile phone or
another device with SMS functionality.
You only need to save the telephone
number to which you wish the message to
be sent.
v ¢
¢ Settings ¢ Notification
Ë
¤ Change multiple line input:
To:
Enter the number to which the SMS
should be sent.
On missed call
Select On if you require SMS notification.
On message on answer machine
(Aton CLT115 only).
Select On if you require SMS notification.
§Save§ Press the display key.
Warning
Do not enter your own fixed line network
number for the notification of missed
calls. This can lead to chargeable endless
looping.
SMS mailboxes
The general mailbox is the default setting.
Anyone can access this mailbox and it cannot be protected by a PIN. You can additionally set up three personal mailboxes and
protect these with a PIN. Each mailbox is
identified by a name and a "mailbox ID" (a
kind of extension number).
Please note:
u If you operate a number of devices
(bases) with SMS functionality on a single
phone line, then each SMS mailbox ID
may only occur once. In this case you
must also change the preset ID of the
general mailbox ("0").
u You can only use personal mailboxes if
your service provider supports this func-
tion. You can tell whether this is the case
by the addition of a star (*) to the number
of a (preset) SMS centre.
u If you have forgotten your mailbox PIN,
you can reset it by restoring default set-
tings of the base. This will delete all SMS
messages from all mailboxes.
47
Page 50

SMS (text messages)
•
Setting up and changing a
personal mailbox
Setting up a personal mailbox
v ¢Ë ¢ Settings ¢ SMS Mailboxes
s Select mailbox, e.g. Mailbox 2
and press
¤ Change multiple line input:
Activation:
Activate or deactivate mailbox.
Name:
Enter name.
Box ID:
Select mailbox ID (0–9). You can only
select the available numbers.
Protection:
Activate/deactivate PIN protection.
SMS PIN:
If necessary, enter 4-digit PIN.
§Save§ Press the display key.
Active mailboxes are marked with μ in the
mailbox list. They are shown in the SMS list
and can, if necessary, be displayed by pressing the message key f.
Deactivating a mailbox
¤ Set Activation to Off. Confirm message
§Yes§ if necessary.
with
All SMS messages saved in this mailbox will
be deleted.
Deactivating PIN protection
¤ Set Protection to Off.
The mailbox PIN is reset to "0000".
Changing the name of a mailbox
v ¢Ë ¢ Settings ¢ SMS Mailboxes
¢ s(Select mailbox)
§Edit§ Press the display key.
~ Enter new name.
§Save§ Press the display key.
Changing a mailbox's PIN and ID
v ¢Ë ¢ Settings ¢ SMS Mailboxes
¢ s(Select mailbox)
§Edit§.
~ Enter mailbox PIN if necessary
and press
¤ Set Box ID, Protection and SMS PIN
(¢ page 48).
§OK§.
Sending an SMS to a personal mailbox
To send an SMS to a personal mailbox, the
sender must know your ID and enter it after
your number.
¤ You can send your SMS contact an SMS
via your personal mailbox.
Your SMS contact will receive your SMS
number with current ID and can save it in
their directory. If the ID is invalid, the SMS
will not be delivered.
Setting SMS centres
Please note
When supplied, the access number
(062 210 00 0*) for the Swisscom
SMS centre is pre-programmed.
SMS messages are exchanged between SMS
centres operated by service providers. You
must enter the SMS centre through which
you wish to send and receive SMS messages
into your phone. You can receive SMS messages from every SMS centre that is entered,
provided you have registered with your service provider.
Your SMS messages are sent via the SMS
centre that is entered as the active send
service centre. However, you can activate
any other SMS centre as the active send service centre to send a current message
(¢ page 49).
The following SMS centres are
pre-programmed:
– Centre 1: 062210000* (Swisscom)
– Centre 2: 0435400000 (Cablecom)
Should you have any questions regarding
the SMS service, please contact your
provider.
48
Page 51

SMS (text messages)
•
If no SMS service centre is entered, the SMS
menu only contains the entry Settings.
Enter an SMS Service Centre (¢ page 48).
Entering/changing SMS
centres
¤ You should find out about the services
and special functions offered by your
service provider before you make a new
application and/or before you delete
pre-configured call numbers.
v ¢
s Select SMS centre (e.g. Service
¤ Change multiple line input:
Active Send:
SMS Service Centre no.:
Send e-mail to:
§Save§ Press the display key.
¢ Settings ¢ Service Centres
Ë
Centr. 1) and press
§Yes§ if SM S mes sages are t o be s ent
Select
via the SMS centre. For the SMS centres 2
to 4, the setting only applies to the next
SMS.
Enter the number of the SMS service and
insert a star if your service provider supports personal mailboxes.
Enter the number of the e-mail service.
§Edit§.
Please note
Ask your service provider for details on
how to enter service numbers if you wish
to use personal mailboxes (precondition:
your service provider supports this function).
Sending an SMS via another SMS centre
¤ Activate the SMS centre (2 to 4) as the
active send service centre.
¤ Send the SMS.
This setting only applies to the next SMS to
be sent. After that, the setting returns to
Service Centr. 1.
SMS on a PABX
u You can only receive an SMS when
the Calling Line Identification is for-
warded to the extension of the PABX
(CLIP). The CLIP evaluation of the SMS
centre number is completed in your
Aton.
u Depending on your PABX, you may have
to add the access code (external line pre-
fix) before the number of the SMS centre.
If in doubt, test your PABX, e.g. by send-
ing an SMS to your own number: once
with and once without the access code.
u When you send SMS messages, your
sender number may be sent without your
extension number. In this case the recipi-
ent cannot reply to you directly.
Sending and receiving SMS messages on
ISDN PABXs is only possible via the MSN
number assigned to your base.
Activating/deactivating first ringtone muting
v Open the main menu.
*#Q5# O
Press keys.
§OK§ Make the first ring audible.
Q
Or:
§OK§ Mute the first ring.
Activating/deactivating SMS function
If you deactivate the SMS function, you cannot send or receive any SMS messages with
your phone.
The settings you have selected for sending
and receiving SMS messages (e.g. the numbers of the SMS centres) and the entries in
the incoming and draft SMS lists are saved
even after you turn off your phone.
49
Page 52
SMS (text messages)
v Open the main menu.
*#Q5#2 L
Enter the digits.
§OK§ Deactivate the SMS function.
Q
Or:
§OK§ Activate the SMS function
(default setting).
SMS troubleshooting
Error codes when sending
E0 Calling Line Identification permanently
restricted (CLIR) or Calling Line Identification
is not working.
FE Error occurred during SMS transmission.
FD Connection to SMS centre failed; see self-
help.
Self-help with errors
The following table lists error situations, possible causes and provides notes on troubleshooting.
You cannot send messages.
1. The "Calling Line Identification Presentation"
feature (CLIP) is not working.
¥ Ask your service provider to check this
service.
2. SMS transmission has been interrupted (e.g.
by a call).
¥ Re-send the SMS.
3. The network provider does not support this
feature.
4. No number or an invalid number is entered for
the SMS centre set as the active send service
centre.
¥ Enter the number (¢ page 48).
You receive an incomplete SMS.
1. Your phone's memory is full.
¥ Delete old SMS messages (¢ page 44).
2. The service provider has not yet sent the rest
of the SMS.
You have stopped receiving SMS messages.
1. You have changed the ID of your mailbox.
¥ Give your SMS contacts your new ID or
undo the change (¢ page 48).
2. You have not activated your mailbox.
¥ Activate your mailbox (¢ page 48).
3. Call divert (redirecting) is activated with
When: All Calls or for the network mailbox by
selecting All Calls.
¥ Change the call divert (¢ page 34).
The SMS is played back.
1. The "display call number" feature is not activated.
¥ Ask your service provider to activate this
function (chargeable).
2. Your mobile phone operator and your fixed
line network SMS service provider have no
agreement to work together.
¥ Obtain information from your fixed line
network SMS service provider.
3. Your terminal has been recorded by your SMS
provider as having no fixed line network SMS
functionality, i.e. you are not registered with
the provider.
¥ Send any SMS to automatically register
your telephone to receive SMS.
Messages are only received during the day.
The terminal is recorded in your SMS provider's database as having no fixed line network SMS functionality, i.e. you are not registered with the provider.
¥ Obtain information from your fixed line
network SMS service provider.
¥ Send any SMS to automatically register
your telephone to receive SMS.
50
Page 53

Operating the answering machine of the Aton CLT115 base
•
•
Operating the answering
machine of the
Aton CLT115 base
The answering machine is operated via the
handset, the keys on the base (¢ page 3) or
by remote operation (from another telephone/mobile phone). You can record your
own announcement message or advisory
message via the handset.
Answering machine mode
You can use the answering machine in two
different modes.
u In Answer & record mode, the caller
hears the announcement and can then
leave a message.
u In Answer only mode, the caller hears
your announcement but cannot leave a
message.
Operation via the handset
The handset loudspeaker activates automatically if you receive an acoustic prompt
or message while operating the answering
machine. You can switch it off with the
speaker key d.
Activating/deactivating and setting the answering machine mode
You can choose between Answer & record,
Answer only and Alternating. By using the
Alternating setting you can activate the
answer and record mode for a set period,
outside this period the caller will hear the
advisory message.
v ¢Ì ¢ Activation (μ=on)
§Edit§ Press the display key.
¤ Change multiple line input:
Activation:
Select On or Off to activate/deactivate
the answering machine.
Mode:
Answer & record, Answer only or
select Alternating.
If the Alternating mode is selected:
Record from:
Enter hours/minutes for the start of the
period in 4-digit format.
(The time must be set on the phone
beforehand.)
Record until:
Enter hours/minutes for the end of the
period in 4-digit format.
§Save§ Press the display key.
When you switch the answering machine
on, the remaining memory time is
announced. If the time has not yet been set
an appropriate announcement is made (Set
time ¢ page 17). The
the display. The LED display lights up on the
base (¢ page 3).
The phone is supplied with pre-recorded
announcements for answer and record
mode and for advisory only mode. If a
personal announcement has not been
recorded, the relevant pre-recorded
announcement is used.
If the messages memory is full and
Activation: On has been selected, saving
is interrupted and you will receive an
instruction to delete old messages.
Ã
icon appears in
Recording announcements/
advisory messages
v ¢Ì ¢ Announcements
¢ Rec. Announcement / Rec. Advisory
Msg.
§OK§ Press the display key to start the
recording.
You hear the ready tone (short tone).
¤ Now speak your announcement (at least
3 secs.).
Just as if making a call via the receiver,
place the telephone against your ear and
speak into the microphone at a normal
volume.
51
Page 54

Operating the answering machine of the Aton CLT115 base
•
•
Ã
02
§End§ Press the display key to end the
recording.
Cancel recording with a or
the recording with
After recording, the announcement is
played back for you to check. You can rerecord the announcement with
§OK§.
§Back§. Restart
§New§.
Please note:
u Recording ends automatically if the max-
imum recording time of 100 seconds is
exceeded or there is a break in speech for
more than 2 seconds.
u If you cancel the recording, the pre-
recorded announcement will be used
again.
u If the answering machine's memory is
full, it will switch to Answer only mode.
¤ Delete old messages and the answer-
ing machine will automatically switch
back to Answer & record mode.
Repeat recording if required.
Playing back announcements/
advisory messages
v ¢Ì ¢ Announcements
¢ Play Announcement / Play Advisory
Msg.
If you have not recorded a personal
announcement, the relevant pre-recorded
announcement is played.
Record a new announcement while playing
back the announcement:
§New§ Press the display key.
If the answering machine's memory is full, it
will switch to Answer only mode.
¤ Delete old messages and the answering
machine will automatically switch back
to Answer & record mode. Repeat
recording if required.
Deleting announcements/
advisory messages
v ¢Ì ¢ Announcements
¢ Del. Announcement / Del. Advisory
Msg.
§Yes§ Press the display key to confirm
the prompt.
Once you have deleted your announcement,
the relevant pre-recorded announcement
will be used again.
Playing back messages
The date and time of each message is logged
(provided this has been set, ¢ page 17) and
displayed during the playback. If Calling Line
Identification is activated, the caller's
number is displayed. If the caller's number is
saved in the directory, their name is displayed.
Playing back new messages
New messages that have not yet been heard
are indicated in the display with a symbol
and number:
The fkey on the handset and the display
on the base will flash. The number of new
messages is shown on the base.
f Press the message key.
Answer. Mach.:
Select and press
If there are new messages, playback then
begins with the first new message. After the
last new message you will hear the end tone
and an announcement about how much
recording time remains.
If the message has been saved with the date
and time, you will hear an appropriate
announcement before playback begins.
§OK§.
52
Page 55

Operating the answering machine of the Aton CLT115 base
Playing back old messages
You can listen to old messages if there are no
more new messages. Begin playback as
described under "Playing back new messages".
After the entry time and date have been
played back (after approx. 3 seconds) a new
message assumes the status "old".
Stopping and controlling playback
During message playback:
2 Pause playback. Press 2
again to resume.
or
§Options§ Open menu.
Pause Select and press §OK§.
To c o ntinue se l e c t Continue
and press
t or
Go to the start of the current
message.
Press twice to go back to the
previous message.
s or 3
Skip to next message.
Press twice to skip to the next
but one message.
4 Skip back 5 seconds in the cur-
rent message.
(Skip back function
prerequisite: more than five seconds of the current message
have been played back).
If playback is interrupted for over a minute,
the answering machine returns to idle status.
§OK§.
Marking a message as "new"
A previously played back "old" message is
displayed as a "new" message again.
During message playback:
* Press the star key.
Or:
§Options§ Open menu.
Mark as New
Select and press
§OK§.
An announcement informs you of the message's new status.
Playback of the current message is cancelled. Playback of next message starts, if
applicable.
The f key on the handset flashes.
Copying the phone number of a
message to the directory
During playback or pause:
§Options§ ¢ Copy to Directory
¤ Complete the entry ¢ page 38.
Deleting messages
You can either delete all old messages
together or individually.
Deleting all old messages
During playback or pause:
§Options§ ¢ Delete Old List
§OK§ Press the display key to confirm
the prompt.
§Yes§ Press the display key to confirm
the prompt.
Deleting individual old messages
During playback or pause:
§Delete§ Press the display key.
Picking up a call from the answering machine
You can pick up a call while the answering
machine is recording or is being operated
via remote operation:
§Accept§
c/
Press the talk or display key.
Recording stops and you can speak to the
caller.
If 2 seconds of the call have already been
recorded when you pick it up, the call will be
displayed as a new message. The f key on
the handset flashes.
You can answer the call even if it is not
signalled on the handset.
53
Page 56

Operating the answering machine of the Aton CLT115 base
•
•
Diverting an external call to the answering machine
You can divert an incoming external call to
the answering machine even if it is deactivated.
Precondition: Sufficient memory space is
available on the answering machine.
An external call is signalled on the handset:
Ô Select display key.
The answering machine immediately starts
in recording mode and records the call. The
set time for ring delay (¢ page 54) is
ignored.
Activating/deactivating two-way record
You can record an external call with the
answering machine.
¤ Inform the caller that the call is being
recorded.
§Options§ Open menu.
Two-way Record
Select and press
Two-way record is indicated on the display
by an advisory text and is added to the
answering machine list as a new message.
§End§ Press the display key to stop
two-way record.
The maximum recording time is dependent
on the memory available on the answering
machine. If the memory is full you will hear
an end tone, the recording is aborted, and
the call recorded up to that point is listed in
the answering machine list as a new message.
§OK§.
Activating/deactivating
call screening
While a message is recording, you can screen
calls via the loudspeaker of the base and registered handsets.
Permanently activating/deactivating
call screening
v ¢Ì ¢ Call Screening
¢ Handset / Base (³=on)
§Change§ Select display key to activate/
deactivate the function.
Call screening can be simultaneously activated on the base and handset.
Deactivating call screening for the
current recording
You can deactivate the function on the
handset during the recording.
§Silence§ Press the display key.
Setting the recording
parameters
The answering machine has already been
preset at the factory. Individual settings can
be adjusted using the handset.
v ¢Ì ¢ Recordings
¤ Change multiple line input:
Length:
Select maximum recording time 1 min.,
2 min., 3 min. or Maximum.
Quality:
Select recording quality Long Play or
Excellent. If the quality is higher, the max-
imum recording time is reduced.
Ring Delay:
Select when the answering machine
should accept a call: Immediately, after
10 sec., 18 sec., 30 sec. or Automatic.
§Save§ Press the display key.
54
Page 57

Operating the answering machine of the Aton CLT115 base
•
Information about call acceptance
In Automatic mode, the following applies
for ring delay:
u If there are no new messages, the answer-
ing machine accepts a call after 18 seconds.
u If new messages are present, the answer-
ing machine accepts a call after 10 seconds.
When operating remotely (¢ page 55) you
can tell after approx. 15 seconds that there
are no new messages (otherwise the
answering machine would already have
accepted your call). There will be no call
charges if you hang up now.
Please note:
You can configure your telephone so that
the first ring is suppressed on all calls
(¢ page 49). This means that the time
selected for call acceptance predetermines
how long the caller must wait before the
answering machine answers the call.
Changing the language for voice prompt and pre-recorded announcement
v Open the main menu.
*#Q5#2
Enter digits and press
§OK§ To s e t German.
Q
§OK§ To set French.
2 §OK§ To s e t I talian.
3 §OK§ To se t E nglish.
Resetting fast access for the answering machine using key 1
By default, key has been assigned for
fast access to the integrated answering
machine. However, if you have set the network mailbox for fast access (¢ page 57),
you can reset this setting.
v ¢Ì ¢ Set Key 1
Answ. Machine
Select and press
Once you have selected the answering
machine, press and hold key . You will
be connected directly.
The setting for fast access applies to all registered handsets.
§OK§.
Operating when on the move (remote operation)
You can check and activate your answering
machine from any other telephone (hotel,
pay phone etc.), or initiate ringback from the
answering machine with an SMS.
Preconditions:
u You have set a system PIN other than
0000 (¢ page 70).
u The phone you are using for remote oper-
ation has tone dialling (DTMF), i.e. you
hear different tones when you press the
keys. Alternatively, you can use a code
transmitter (available from a retailer).
55
Page 58

Operating the answering machine of the Aton CLT115 base
Calling the answering machine and playing back messages
~ Dial your own number.
9~ When you hear your announce-
ment, press 9 and enter the
system PIN.
You will be informed whether any new messages have been recorded. The messages are
now played back. You can now operate the
answering machine with the keypad.
The following keys are used for operation:
A To return to the start of the cur-
rent message.
Press twice to go back to the
previous message.
B Pause playback. Press again to
resume.
3 Go to the next message.
D Skip back 5 seconds in the cur-
rent message.
(Skip back function
prerequisite: more than five seconds of the current message
have been played back).
: A previously played back "old"
message is displayed as a "new"
message again.
0 Delete current message.
Initiating ringback from the answering machine with SMS and listening to messages
Precondition: You must have stored a notifi-
cation number (¢ page 47).
You can use the telephone (mobile phone or
any other device with SMS functionality) for
which you have stored the notification
number in your phone to send an SMS to
your answering machine when you are away
from home. It will then call you back. Message playback begins when you accept the
call and press any digit key.
The SMS must contain the following:
*<System PIN>*<Ringback number>*
The ringback number is optional.
Examples:
*4711* or *4711*089123456*
If a ringback number is entered, it is dialled;
otherwise the notification number is dialled.
You can now operate the answering
machine via the keypad, as described in the
previous sections.
Activating the answering machine
¤ Phone home and let the phone ring until
you hear: "Please enter PIN".
~
Your answering machine is activated. It tells
you how much memory time is left.
The messages are now played back.
The answering machine cannot be deactivated remotely.
56
Enter system PIN.
Page 59

Using the network mailbox (Combox)
•
Using the network
mailbox (Combox)
The network mailbox is your network provider's answering machine within the network. You cannot use the network mailbox
unless you have requested it from your network provider.
Configuring fast access
for the network mailbox
With fast access, you can dial the network
mailbox or the integrated answering
machine (Aton CLT115 only) directly.
Aton CL115: Fast access is preset for the network mailbox. You only need to enter the
number of the network mailbox.
Aton CLT115: The integrated answering
machine is preset for fast access. You can
configure the network mailbox instead. Ask
your network provider about this.
Configuring fast access for the
network mailbox and entering the
network mailbox number
Aton CLT115:
v ¢Ì ¢ Set Key 1
Network Mailbox
Select and press
Ø = selected).
(
Aton CL115:
v ¢Ì ¢ Network Mailbox
Continue with:
~ Enter the number for the net-
work mailbox.
§Save§ Press the display key.
The setting for fast access applies to all Aton
handsets.
§Select§
Calling the network mailbox
Press and hold. You are con-
nected directly to the network
mailbox.
d Press speaker key d if
required. You will hear the network mailbox announcement.
Viewing the network mailbox message
When a message is recorded, you receive a
call from the network mailbox. If you have
requested Calling Line Identification, the
network mailbox number will be displayed.
If you accept the call, the new messages are
played back. If you do not accept the call, the
network mailbox number will be saved in
the missed call list and the message key
flashes (¢ page 40).
57
Page 60
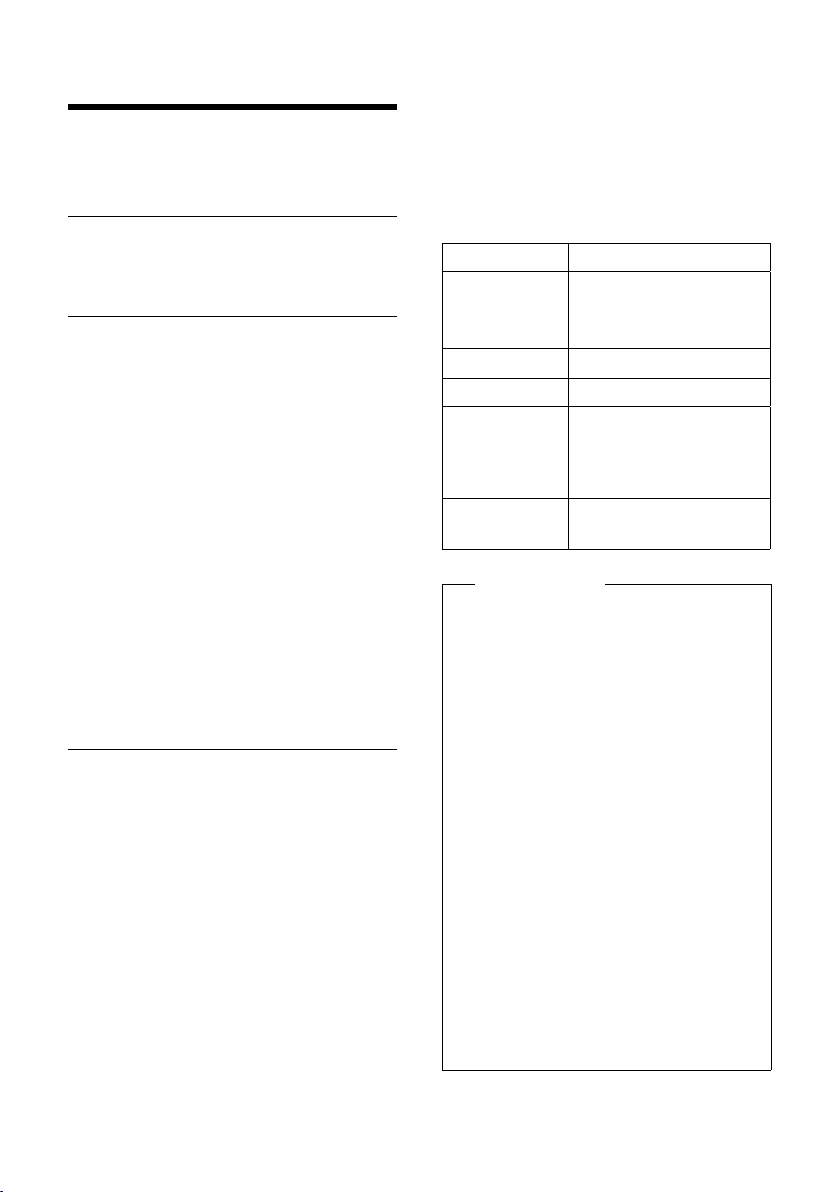
ECO DECT
ECO DECT
You are helping to protect the environment
with your Aton CLT115.
Reduced energy consumption
By using an energy-saving power supply,
your telephone consumes less power.
Reducing radiation
The radiation from your telephone is
reduced automatically:
u Handset: The closer the handset is to the
base, the lower the radiation.
u Base station: The radiation is reduced to
virtually zero when only one handset is
registered and the handset is placed in
the base.
You can reduce the radiation from the handset and base even more by using Eco Mode:
u Eco Mode
Reduces the radiation by 80% - whether
you are making a call or not. Eco Mode
reduces the range of the base station by
approx. 50%. Using Eco Mode always
makes sense when a reduced range is sufficient.
Switching off radiation
Eco Mode+
When you activate Eco Mode+, radiation
(DECT transmission power) from the base
and handset is switched off in the idle state.
This is also true when multiple handsets are
used, provided the handsets support Eco
Mode+.
Eco Mode / Eco Mode+ can be activated/
deactivated independently of one another
and can also be used with multiple handsets.
The handset does not have to be in the base.
Activating/deactivating the
Eco Mode / Eco Mode+
v ¢Ï ¢ Eco Mode
¢ Eco Mode / Eco Mode+
§Change§ Press the display key (³=on).
Status displays
Display icon
Signal strength:
ÐiÑÒ
|
Ð white Eco Mode deactivated
Ð green Eco Mode enabled
¼ white Eco Mode+ enabled
¼ green Eco Mode and Eco
– good to poor
– no signal
(displayed instead of the
reception strength icon
when in idle status)
Mode+ activated
Please note
u With Eco Mode+ enabled, press and
hold the talk key c to check that
the base can be reached. You will hear
the dialing tone if the base can be
reached.
u When Eco Mode+ is enabled:
– call setup will be delayed by
approx. 2 seconds.
– handset standby time will be
reduced by approx. 50%.
u Registering handsets that do not sup-
port Eco Mode+ will cause the mode
to be deactivated on the base and all
other handsets.
u Activating Eco Mode reduces the
range of the base.
u Eco Mode / Eco Mode+ and repeater
support (¢ page 69) cancel each
other out, i.e. if you use a repeater you
cannot use Eco Mode and Eco
Mode+.
58
Page 61

Setting the alarm clock
Setting the alarm clock
Precondition: The date and time have
already been set (¢ page 17).
Activating/deactivating the alarm clock and setting the wake-up time
v ¢ É ¢ Alarm Clock
¤ Change multiple line input:
Activation:
Select On or Off.
Time:
Enter the wake-up time in 4-digit format.
Volume:
Set the volume (1–6).
Melody:
Select melody.
§Save§ Press the display key.
In idle status, the ¼ icon and wake-up time
are displayed.
A wake-up call is signalled on the display
and with the selected ringtone (¢ page 2).
The wake-up call sounds for 60 seconds. If
no key is pressed, the wake-up call is
repeated twice at five minute intervals and
then switched off.
During a call, the wake-up call is only signalled by a short tone.
Deactivating the wake-up call/ repeating after a pause (snooze mode)
Precondition: A wake-up call is sounding.
§OFF§ Press the display key. The wake-
up call is deactivated.
or
§Snooze§ Press the display key or any key.
The wake-up call is deactivated
and then repeated after 5 minutes. After the second repetition
the wake-up call is deactivated
completely.
Using several handsets
Registering handsets
You can register up to six handsets to your
base.
A Aton CLT115H handset can be registered
on up to four bases.
Manual registration of a handset on Aton CL115/CLT115
You must activate manual registration of the
handset on both the handset (1) and the
base (2).
When the registration process has completed successfully, the handset returns to
idle status. The handset's internal number is
shown in the display e.g. INT 1. If not, repeat
the procedure.
1) On the handset
The handset must not be registered to a
base.
§Register§ Press the display key.
The handset is already registered to a base:
v ¢Ï ¢ Registration
¢ Register Handset
If the handset is already registered on four
bases:
s Select base, e.g. Base 3 and
§OK§.
press
~ If required, enter the system
PIN for the base and press
A message displays that a search for a base
that is ready for registration is being carried out.
2) On the base
Within 60 seconds press and hold the registration/paging key on the base
(¢ page 3) (approx. 3 seconds).
§OK§.
59
Page 62

Using several handsets
Registering other handsets
You can register other Aton handsets and
handsets for other devices with GAP functionality as follows.
1) On the handset
Start to register the handset as described in
its user guide.
2) On the base
Press and hold the registration/paging key
on the base (¢ page 3) (approx. 3 sec.).
De-registering handsets
You can de-register any other registered
handset from any registered Aton CLT115
handset.
Ï
v ¢
¢ De-reg. Handset
s Select the internal subscriber
~ Enter the current system PIN
§Yes§ Press the display key.
¢ Registration
you wish to deregister and press
§OK§.
(The handset you are currently
using is highlighted with <).
and press
§Save§.
Locating a handset ("Paging")
You can locate your handset using the base.
¤ Briefly press the registration/paging key
on the base (¢ page 3).
¤ All handsets will ring simultaneously
("paging"), even if the ringtones are deactivated.
Changing the base
If your handset is registered to more than
one base, you can set it to a particular base
or to the base that has the best reception
(Best Base).
Ï
v ¢
s Select one of the registered
¢ Registration ¢ Select Base
bases or Best Base and press
§Select§.
Making internal calls
Internal calls to other handsets registered on
the same base are free.
Calling a specific handset
u Initiate internal call.
~ Enter the number of the hand-
set.
Or:
u Initiate internal call.
s Select handset.
c Press the talk key.
Calling all handsets ("group call")
u Initiate internal call.
* Press the star key.
or
Call All Select menu option and
c Press the talk key.
All handsets are called.
Ending a call
a Press the end call key.
Ending paging
¤ Briefly press the registration/paging key
on the base or press the talk key c on
the handset.
60
Page 63

Using several handsets
Transferring a call to another handset
You can transfer an external call to another
handset (connect).
u Open the list of handsets.
The external participant hears
hold music if activated
(¢ page 69).
s Select a handset or Call All and
§OK§.
press
When the internal participant answers:
¤ If necessary, announce the external call.
a Press the end call key.
The external call is transferred to the other
handset.
If the internal participant does not answer or
the line is busy, press the display key
return to the external call.
When transferring a call you can also press
the end call key a before the internal participant answers.
Then, if the internal participant does not
answer or the line is busy, the call will automatically return to you.
§End§ to
Internal consultation/conference calls
When you are conducting an external call,
you can call an internal participant at the
same time for consultation or hold a conference call between all 3 participants.
You are conducting an external call:
u Open the list of handsets.
The external participant hears
hold music if activated
(¢ page 69).
s Select handset and press
You are connected to the internal participant.
§OK§.
either:
§End§ Press the display key.
You are reconnected with the
external participant.
Or:
§Conference§ Press the display key.
All 3 participants are connected
with each other.
Ending a conference call
a Press the end call key.
If an internal participant presses the end call
key a, the other handset remains connected to the external participant.
Accepting/rejecting call waiting
If you receive an external call during an
internal call, you will hear the call waiting
tone (short tone). The caller's number will
appear in the display if Calling Line Identification is enabled.
Ending an internal call, accepting an
external call
§Accept§ Press the display key.
The internal call is ended. You are connected
to the external caller.
Rejecting the external call
§Reject§ Press the display key.
The call waiting tone is turned off. You
remain connected with the internal participant. The ringtone can still be heard on
other registered handsets.
61
Page 64

Using several handsets
•
Listening in to an external call
Precondition: The Listening In function
must be activated.
You are conducting an external call. An internal participant can listen in on this call and
take part in the conversation. All participants
are made aware of the "listening in" by a signal tone.
Activating/deactivating
listening in
v ¢Ï ¢ Te le ph on y ¢ Listening In
Press §Change§ to activate/deactivate the function (³=on).
Internal listening in
The line is engaged with an external call.
Your screen will display information to that
effect. You want to listen in to the external
call.
c Press and hold the talk key.
You can listen in to the call. All participants
hear a signal tone. During this time, this
handset displays the Conference message
and it is not possible to dial another number
from this handset.
Ending listening in
a Press the end call key.
All participants hear a signal tone.
If the first internal participant presses the
end call key a, the handset that has "listened in" remains connected to the external
participant.
Changing the name of a handset
The names "INT 1", "INT 2" etc. are assigned
automatically on registration. You can
change these names. The name must be no
more than 10 characters. The changed name
is displayed in every handset list.
u Open the list of handsets. Your
own handset is indicated by
s Select handset.
§Options§ Open menu.
Rename
~ Enter name.
§Save§ Press the display key.
f
Changing a handset's internal number
A handset is automatically assigned the
lowest free number when it is registered. If
all slots are occupied, number 6 is overwritten if this handset is in idle status. You can
change the internal number of all registered
handsets (1–6).
u Open the list of handsets. Your
own handset is indicated by
§Options§ Open menu.
Assign Handset No.
Select and press
r Select number. Only numbers
that have not been assigned are
displayed.
§Save§ Press the display key to save the
input.
§OK§.
f
.
.
62
Page 65

Using a handset as a room monitor (Babyphone)
Using a handset as a
room monitor
(Babyphone)
If the room monitor is activated, a previously
saved destination number is called as soon
as a set noise level is reached. You can save
an internal or external number in your handset as the destination number. All of the
handset keys are deactivated, with the
exception of the display keys.
The room monitor call to an external
number is terminated after approximately
90 seconds. The room monitor call to an
internal number (handset) stops after
approx. 3 minutes (depending on the base).
When the room monitor is activated, all keys
are locked except the end call key. The handset's speaker can be switched on or off (Two
Way Talk = On or Off). If Two Way Talk is
switched on, you can answer the room
monitor call.
When the room monitor is activated, incoming calls to the handset are indicated with-
out a ringtone and are only shown on the
screen. The display and keypad are not illuminated and advisory tones are also turned
off.
If you accept an incoming call, the room
monitor is suspended for the duration of the
call, but the function remains activated.
If you deactivate then reactivate the handset, the room monitor remains activated.
Warning!
u You should always check the opera-
tion of the room monitor before use.
For example, test its sensitivity.
Check the connection if you are
diverting the room monitor to an
external number.
u When the function is switched on, the
handset's operating time is considerably reduced. If necessary, place the
handset in the base/charging cradle.
This ensures that the battery does not
run down.
u Ideally the handset should be posi-
tioned 1 to 2 metres away from the
baby. The microphone must be
directed towards the baby.
u The connection to which the room
monitor is diverted must not be
blocked by an activated answering
machine.
Activating the room monitor and entering the destination number
v ¢ É ¢ Room Monitor
¤ Change multiple line input:
Activation:
Select On to activate.
Alarm to:
Select Internal or External.
External number: Select the number
from the directory (press display key
or enter it directly.
Internal number: Select display key
§Change§ ¢ Select handset or Ca ll All if you
want to call all registered handsets
§OK§.
¢
In idle status, the destination number or
the internal destination number is displayed.
Two Way Talk:
Switch the handset's speaker on or off
(select On oder Off).
Sensitivity:
Select sensitivity for noise level (Low or
High).
ö)
63
Page 66
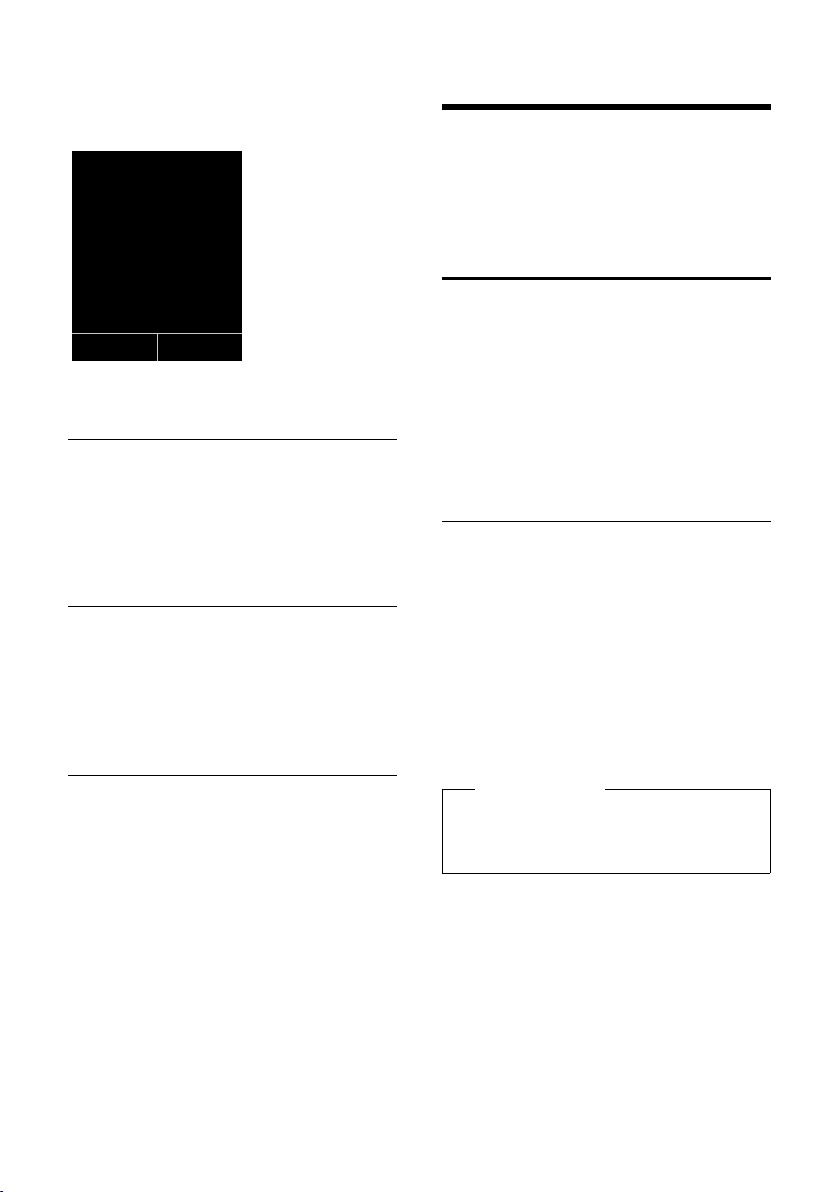
Handset settings
i à V
07:15
INT 1 22 Oct
Á
Room Monitor
0891234567
OFF Options
¤ Press §Save§ to save the settings.
When the room monitor function is activated, the idle display looks as shown below:
Changing the set destination number
v ¢ É ¢ Room Monitor
¤ Enter and save number as described in
"Activating the room monitor and entering the destination number"
(¢ page 63).
Cancel/deactivate room monitor
Press the end call key a to cancel the call
when the room monitor is activated.
In the idle status press the display key
to deactivate the room monitor mode.
Deactivating the room monitor remotely
Preconditions: The phone must support
tone dialling and the room monitor should
be set for an external destination number.
¤ Accept the call from the room monitor
and press keys 9 ;.
The room monitor function will deactivate
after the call ends. There will be no further
room monitor calls. The other room monitor
settings (e.g. no ringtone) on the handset
will remain activated until you press the display key
To reactivate the room function with the
same phone number:
¤ Turn on the activation again and save
64
§OFF§ on the handset.
§Save§ (¢ page 63).
with
§OFF§
Handset settings
Your handset is preconfigured, but you can
change the settings to suit your individual
requirements.
Quick access to numbers and functions
You can assign a number from the directory
to each of the digit keys Q and 2to
O.
The left and right display keys have a func-
tion pre-selected by def ault. You can change
the assignment (¢ page 65).
The number is then dialled or the function
started by simply pressing a key.
Assigning digit keys
Precondition: You have not yet assigned a
number to the digit key.
¤ Press and hold the digit key.
or
Press the digit key briefly and press the
§QuickDial§ display key.
The directory is opened.
¤ Select an entry and press
The entry is saved on the appropriate digit
key.
Please note
If you delete or edit the entry in the
directory at a later date, this will not
affect the assignment to the number key.
§OK§.
Page 67

Handset settings
Dialling a number/changing assignment
Precondition: The digit key already has a
number assigned to it.
When the handset is in idle status
¤ Press and hold the digit key.
The number is dialled immediately.
or
¤ Briefly press the digit key:
Press the display key with number/name
(abbreviated if necessary) to dial the
number or
Press the
the digit key assignment or to delete the
assignment.
§Change§ display key to change
Changing display key assignments
¤ Press and hold the left or right display
key.
The list of possible key assignments is
opened. The following can be selected:
Room Monitor
Assign menu for setting and activating
the room monitor to a key (¢ page 63).
Alarm Clock
Assign menu for setting and activating
the alarm clock to a key (¢ page 59).
Redial
Display the redial list.
More Functions...
More features are available:
Call Lists
Display the call lists (¢ page 39).
INT
Internal calls (¢ page 60).
SMS
Assign menu for SMS functions to a
key (¢ page 43).
Withhold Number
Suppress Calling Line Identification for
the next call (¢ page 33).
¤ Select an entry and press
§OK§.
Changing the display language
You can view the display texts in different
languages.
Ï
v ¢
The current language is indicated by a Ø.
s Select language and
If you accidentally choose a language you do
not understand:
v ¢ L5
s Select the correct language and
¢ Language
§Select§.
press
press the right display key.
Setting the display
Setting the screensaver
You can set a picture or the time to be displayed as a screensaver when the handset is
in idle status. This will replace the idle status
display. It may conceal the date, time and
name.
The screensaver is not displayed in certain
situations, e.g. during a call or if the handset
is deregistered.
If a screensaver is activated, the Screensaver
menu option is marked with μ.
Ï
v ¢
The current setting is displayed.
¤ Change multiple line input:
Activation:
Selection:
§Save§ Press the display key.
¢ Display ¢ Screensaver
Select On (screensaver is displayed)
or Off (no screensaver).
Select screensaver or
§View§ Press the display key. The active
screensaver is displayed.
s Select screensaver and
§OK§.
press
65
Page 68

Handset settings
•
•
When the screensaver conceals the display,
briefly press a to show the idle display.
Setting large font
You can increase the font size of print and
symbols in call lists and in the directory to
improve readability. After doing this, only
one entry instead of multiple entries can be
shown at the same time on each display and
names are shortened where necessary.
Ï
v ¢
§Change§ Press display key (³=on).
¢ Display ¢ Large Font
Setting the colour scheme
You can set the display to have a dark or light
background.
Ï
v ¢
Select Colour Scheme 1 or Colou r Scheme 2
and press
¢ Display ¢ Colour Schemes
§OK§.
Setting the display backlight
Depending on whether or not the handset is
in the base/charging cradle, you can activate
or deactivate the lighting. If it is activated,
the display is permanently dimmed. If the
backlight is deactivated it is switched on by
pressing any key. Digit keys appear on the
display for pre-dialling; all other keys do not
have any further functions.
Ï
v ¢
The current setting is displayed.
¤ Change multiple line input:
In Charger
Out of Charger
§Save§ Press the display key.
¢ Display ¢ Backlight
Select On or Off.
Select On or Off.
Please note
With the On setting, the standby time
of the handset can be significantly
reduced.
Activating/deactivating auto answer
If you activate this function, when you
receive a call you can simply lift the handset
out of the base/charging cradle without having to press the talk key c.
Ï
v ¢
§Change§ Press display key (³=on).
¢ Te le ph o ny ¢ Auto Answer
Changing the speaker/ earpiece volume
You can set the loudspeaker volume for
handsfree talking and the earpiece volume
to five different levels.
In idle status:
t Call up the Handset Volume
menu.
r Set the earpiece volume.
s Scroll to the Speaker: line.
r Set the speaker volume.
§Save§ Press the display key if neces-
sary to save the setting permanently.
Setting the volume during a call:
t Press the control key.
r Select volume.
The setting will automatically be saved after
approximately 3 seconds, if not then press
the display key
If t is assigned to another function,
e.g. call swap (¢ page 34):
§Options§ Open menu.
Volu me Select and press §OK§.
Configure setting (see above).
Please note
You can also set the call volume using the
menu (¢ page 29).
§Save§.
66
Page 69

Handset settings
•
Changing ringtones
u Volume:
You can choose between five volumes
(1–5; e.g. volume 3 = Š) and the "crescendo" ringtone (6; volume increases
with each ring = ‡).
u Ringtones:
You can select a ringtone from a list of
pre-loaded ringtones.
You can set different ringtones for the following functions:
u Int. Calls
u Extern. Calls
Setting volume/melody
In idle status:
v ¢Ï ¢ Audio Settings
¢ Ringtones(Handset)
¢ Volume / Melodies
r Set volume/melody for internal
calls and anniversaries.
s Scroll to the next line.
r Set volume/melody for external
calls.
§Save§ Press the display key to save the
setting.
Additionally for external calls:
You can specify a time period when you do
not want the telephone to ring, e.g., during
the night.
Ï
v ¢
¢ Ringtones(Handset) ¢ Time Control
For external calls:
If the time control is activated:
Suspend ring. from:
Suspend ring. until:
¢ Audio Settings
Select On or Off.
Enter the start of the period in 4-digit format.
Enter the end of the period in 4-digit format.
Please note
During this period, you will continue to
receive calls from numbers to which you
have assigned a VIP group in the directory.
Switching on/off the ringtone for anonymous calls
You can set your handset not to ring if a
caller withholds their number (no answering
machine). The call will only be signalled in
the display.
In idle status:
Ï
v ¢
¢ Ringtones(Handset)
¢ Anon. Calls Silent
Press
tion (³= on).
¢ Audio Settings
§Change§ to activate/deactivate the func-
Activating/deactivating the ringtone
You can deactivate the ringtone on your
handset before you answer a call or when
the handset is in idle status; the ringtone can
be deactivated permanently or just for the
current call. The ringtone cannot be re-activated while an external call is in progress.
Deactivating the ringtone
permanently
* Press and hold the star key.
The ó icon appears in the display.
Reactivating the ringtone
* Press and hold the star key.
Deactivating the ringtone for the
current call
§Silence§ Press the display key.
67
Page 70
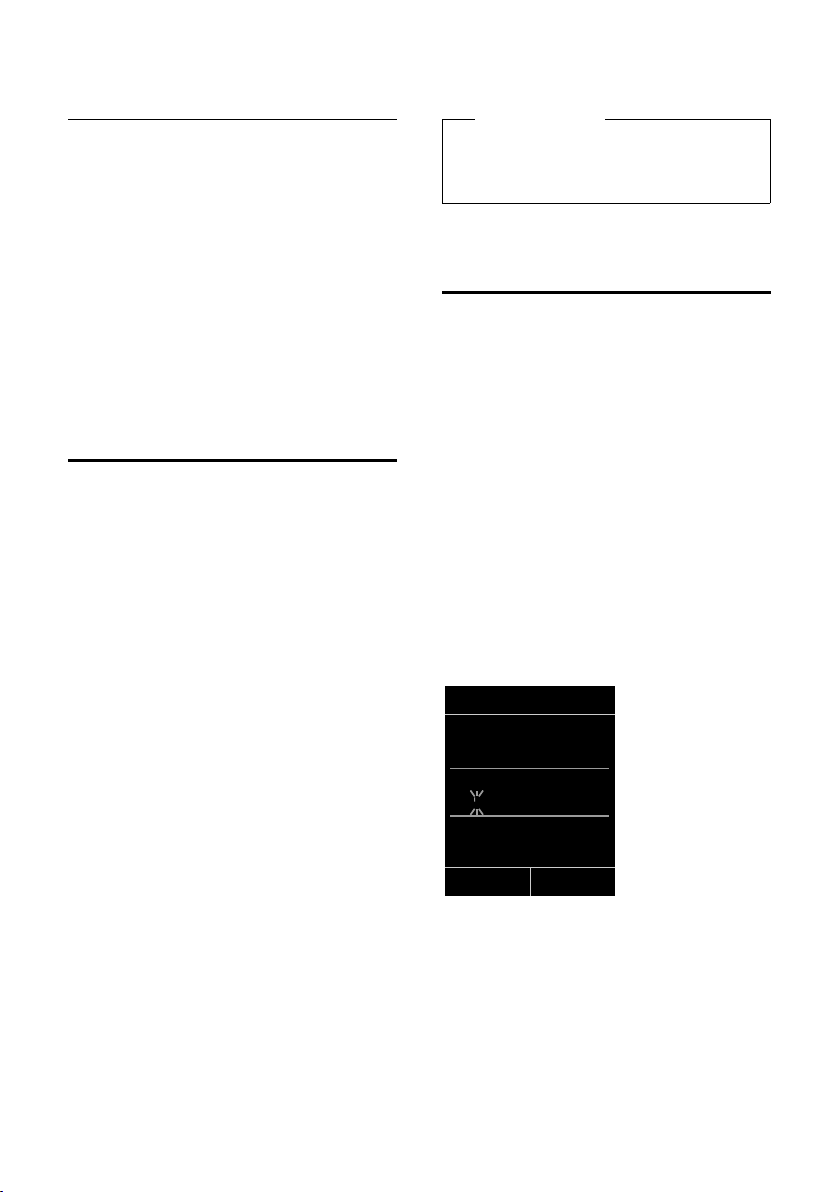
Handset settings
•
•
Area Codes
International code:
00 - 41
Local area code:
0 - [ ]
Û
Save
Activating/deactivating the alert tone
In place of the ringtone you can activate an
alert tone. When you receive a call, you will
hear a short tone ("Beep") instead of the
ringtone.
* Press and hold the star key and
§Beep§ Press the display key. A call will
advisory tones
Your handset uses advisory tones to tell you
about different activities and statuses. The
following advisory tones can be activated/
deactivated independently of each other:
u Key click: every key press is confirmed.
u Acknowledge tones:
– Confirmation tone (ascending tone
– Error tone (descending tone
– Menu end tone: when scrolling to the
u Battery low beep: the battery requires
charging.
In idle status:
v ¢
¢ Advisory Tones
¤ Change multiple line input:
Key Tones:
Select On or Off.
Confirmation:
Select On or Off.
Battery:
Select On or Off.
within 3 seconds:
now be signalled by one short
alert tone.
The ñ icon appears in the display.
Activating/deactivating
sequence): at the end of an entry/setting and when an SMS or a new entry
arrives in the answering machine list
or call list
sequence): when you make an incorrect entry
end of a menu
Ï
¢ Audio Settings
§Save§ Press the display key.
Please note
You can also set the call volume, the ringtones and the advisory tones via the
menu (¢ page 29).
Setting your own area code
In order to transfer phone numbers (e.g. in
vCards), it is essential that your area code
(international and local area code) is saved
on the phone.
Some of these numbers are already preset.
Ï
v ¢
Check that the (pre)set area code is correct.
¤ Change multiple line input:
q Select/change input field.
r Navigate in the input field.
Ñ If necessary, delete number:
~ Enter number.
§Save§ Press the display key.
Example:
¢ Te le ph o ny ¢ Area Codes
press the display key.
68
Page 71
Base settings
•
•
•
Restoring the handset
default settings
You can reset individual settings and
changes that you have made.
The following settings are not affected by a
reset
u Registration to the base
u Date and time
u Directory entries, the call lists, the SMS
lists
Ï
v ¢
§Yes§ Press the display key.
¢ System ¢ Handset Reset
Base settings
The base settings are carried out using a registered Aton CLT115 handset.
Changing the base ringtones (Aton CLT115 only)
u Volume:
You can choose between 6 volumes (0–5;
e.g. volume 3 = Š), the "crescendo"
ringtone (6; volume increases with each
ring = ‡).
u Ringtones:
You can select a ringtone from a list of
pre-loaded ringtones.
In idle status:
Ï
v ¢
¢ Ringtones (Base)
¤ Change multiple line input:
r Set volume.
s Scroll to the next line.
r Set melody.
§Save§ Press the display key to save the
¢ Audio Settings
setting.
Activating/deactivating music on hold
v ¢Ï ¢ Audio Settings
¢ Music on hold
§Change§ to activate or deactivate the
Press
music on hold (³ = on).
Repeater support
With a repeater you can increase the range
and signal strength of your base. You will
need to activate repeater mode. This will terminate any calls that are in progress at the
time.
Precondition: A repeater is registered.
Ï
v ¢
Press §Change§ to deactivate repeater mode
(³= on).
Eco Mode / Eco Mode+ (¢ page 58) and
repeater support cancel each other out,
i.e. if you use a repeater you cannot use
Eco Mode and Eco Mode+.
¢ System ¢ Repeater Mode
Please note
69
Page 72

Base settings
•
•
Protecting against
unauthorised access
Protect the system settings of the base with
a PIN known only to yourself. The system PIN
must be entered when, for example, registering/deregistering a handset to/from the
base or when restoring the default settings.
Changing the system PIN
You can change the 4-digit system PIN set on
the base (default setting: 0000) to a 4-digit
PIN known only by you.
Aton CLT115: Setting a system PIN facilitates
remote operation of the answering machine
¢ page 55.
Ï
v ¢
~ Enter the current system PIN
~ Enter your new system PIN and
Resetting the system PIN
If you have forgotten your system PIN you
can reset the base to the original code 0000:
Disconnect the power cord from the base.
Hold down the registration/paging key on
the base while reconnecting the power
cable to the base. Press and hold the key for
at least five seconds.
The base has now been reset and the system
PIN 0000 set.
¢ System ¢ System PIN
and press
press
§OK§.
§OK§.
Restoring the base to the factory settings
When the settings are restored
u date and time will be retained
u handsets are still registered
u Eco Mode and Eco Mode+ is switched off
u the system PIN is not reset
Ï
v ¢
~ Enter the system PIN and
§Yes§ Press the display key.
¢ System ¢ Base Reset
§OK§.
press
Please note
All handsets are deregistered and must
be re-registered. All settings are restored
to the factory settings.
70
Page 73

Connecting the base to the PABX
•
•
Connecting the base to
the PABX
The following settings are only necessary if
your PABX requires them; see the PABX user
guide.
You cannot send or receive SMS messages
on PABXs that do not support Calling Line
Identification.
Dialling modes and recall
The current setting is indicated by Ø.
Changing the dialling mode
The following dialling modes can be
selected:
u Tone dialling (DTMF)
u Dial pulsing (DP)
Ï
v ¢
s Select dialling mode and press
Setting recall
Your phone is preset at the factory for operation on the main connection. For operation
on a PABX, you may have to change this
value. Please refer to the user guide for your
PA BX .
v ¢
s Select recall and press §Select§
¢ Te le ph on y ¢ Dialling Mode
§Select§ (Ø = selected).
Ï
¢ Te le ph on y ¢ Recall
Ø = set value).
(
Possible values are:
80 ms, 100 ms, 120 ms, 180 ms,
250 ms, 300 ms, 400 ms, 600 ms,
800 ms.
Saving an access code (outside line code)
Precondition: You may have to enter an
access code for external calls in your PABX,
e.g. "0".
Ï
v ¢
~ Enter or change access code,
§Save§ Press the display key.
If an access code has been saved:
u The access code is prefixed automatically
u The access code must be entered when
u If you copy the recipient's number from
u An existing access code is deleted
¢ Te le ph o ny ¢ Access Code
max. 3 digits.
when you select from the following lists:
numbers of the SMS centres, calls list or
answering machine list.
dialling manually and when manually
entering directory, emergency/shortcut
numbers and SMS centre numbers.
the directory when sending an SMS, you
have to delete the access code.
using Ñ.
71
Page 74

Connecting the base to the PABX
Setting pauses
Changing the pause after line seizure
You can change the length of the pause that
is inserted between pressing the talk key
c and sending the number.
v Open the main menu.
*#Q5#L
Press keys.
~ Enter digit for the pause length
(1 = 1 sec.; 2 = 3 sec.; 3 =7sec.)
and press
Change pause after recall key
You can change the length of the pause if
your PABX requires this (refer to the user
guide for your PABX).
v Open the main menu.
*#Q5#2
Press keys.
~ Enter a digit for the length of the
pause (1 = 800 ms; 2 =1600ms;
3 = 3200 ms) and press
§OK§.
§OK§.
Temporarily switching to tone dialling (DTMF)
If your PABX still operates with dial pulsing
(DP), but you need tone dialling for a connection (e.g. to listen to the network mailbox) you must switch to tone dialling for the
call.
Precondition: You are conducting a call or
have already dialled an external number.
* Press the star key.
After the call is ended, dial pulsing is automatically activated again.
Changing a dialling pause (pause after access code)
Precondition: You have saved an access
code (¢ page 71).
v Open the main menu.
*#Q5#
Press keys.
~ Enter number for the length of
the pause (1 = 1 sec.; 2 = 2 sec.;
3 = 3 sec.; 4 = 6 sec.) and press
§OK§.
To insert a dialling pause: press and hold
S for 2 seconds. A P appears in the display.
72
Page 75

Warranty/Maintenance/Repair/ Approval
Warranty/Maintenance/Repair/ Approval
Warranty
The warranty period is 2 years as of the date of purchase. For warranty repair, the warranty card,
filled out and stamped by the place of purchase must accompany the faulty device. Excluded
from the warranty are damages due to improper use, wear and tear or tampering by others. The
warranty does not include consumable materials and faults that have only an insignificant
affect on the value or usability of the product. In case of errors, please contact your place of purchase.
Repair/Maintenance
Rental devices
If your phone does not operate properly, notify Technical Assistance (phone number
0800 800 800).
The repair
Purchased devices
Repair services are performed free of charge within the warranty period in accordance with the
regulation of the warranty certificate. If a repair is necessary, the device must be returned to the
place of purchase.
If Technical Assistance is made available (also during the warranty period
charged (route lump sum price as well as expenses for time). The repair costs are additional outside the warranty period.
*
and the fault action are free of charge.
*
), the fault action is
Help
If you have any general questions about products, services etc., please contact your Swisscom
Information Centre (toll-free number 0800 800 800).
* An exception is damage to wearing parts (cable, labels, batteries etc.) and due to improper handling
(damage from dropping, infiltrated fluids etc.).
73
Page 76
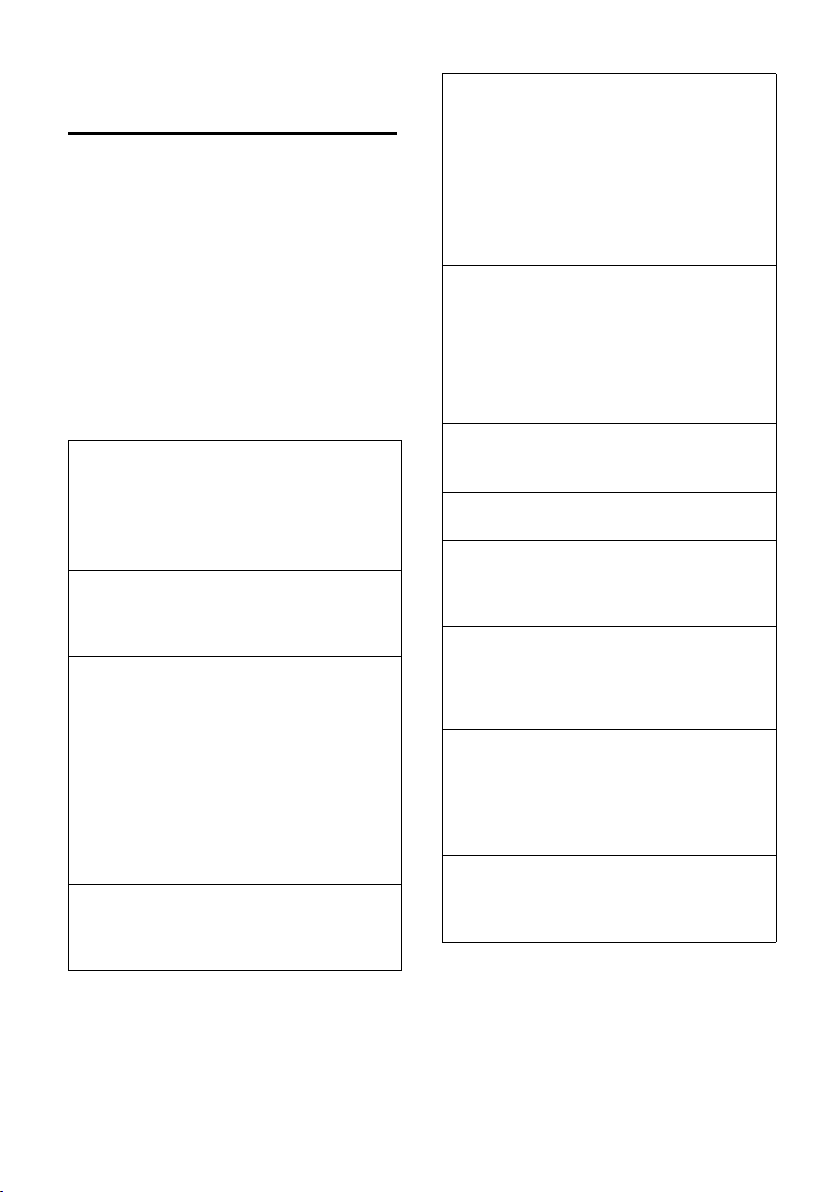
Warranty/Maintenance/Repair/ Approval
Faults and self-help with troubleshooting
Not every problem signifies a fault in your
telephone. In some cases, problems can be
resolved by briefly interrupting the power
supply to the base station (unplug the
power supply unit and then plug it in again)
or removing the battery cells from the handset and reinserting them. The following
information is designed to help you with
specific problems.
Important: Some problems or faults can only
be resolved if you take the complete device
(base station, handset and connection
cable) to the place of purchase.
The display is blank.
1. The handset is not switched on.
¥ Press and hold the end call key a.
2. The battery is flat.
¥ Charge the battery or replace it
(¢ page 13).
Not all menu options are displayed.
The menu display is reduced (Standard mode).
¥ Activate extended menu display (Expert
mode
No Base flashes on the display.
1. The handset is outside the range of the base.
¥ Move the handset closer to the base.
2 The range of the base is reduced because eco
mode is activated.
¥ Deactivate eco mode (¢ page 58) or
3. The base is not switched on.
¥ Check the mains adapter of the base
Please register handset flashes on the display.
Handset has not been registered with the base or
has been deregistered.
¥ Register the handset (¢ page 59).
) (¢ page 27).
•
reduce the distance between the handset
and the base.
(¢ page 11).
Handset does not ring.
1. The ringtone is deactivated.
¥ Activate the ringtone (¢ page 67).
2. Call divert set for "All Calls".
¥ Deactivate call divert (¢ page 34).
3. The telephone only rings when the phone
number is transferred.
¥ Activate the ringtone for anonymous calls
(¢ page 67).
You cannot hear a ringtone/dialling tone from
the fixed line network.
The phone cord supplied has not been used or
has been replaced by a new cord with the wrong
pin connections.
¥ Please always use the phone cord supplied or
ensure that the pin connections are correct
when purchasing from a retailer (¢ page 11).
Error tone sounds after system PIN prompt.
You have entered the wrong system PIN.
¥ Reset the system PIN to 0000 (¢ page 70).
Forgotten the system PIN.
¥ Reset the system PIN to 0000 (¢ page 70).
The other party cannot hear you.
You have pressed the mute key h. The handset
is "muted".
¥ Activate the microphone again (¢ page 32).
The number of the caller is not displayed
despite CLIP.
Calling Line Identification is not enabled.
¥ The caller should ask the network provider to
enable Calling Line Identification (CLI).
You hear an error tone when keying an input
(a descending tone sequence).
Action has failed/invalid input.
¥ Repeat the operation.
Watch the display and refer to the user guide if
necessary.
You cannot listen to messages on the network
mailbox.
Your PABX is set for dial pulsing.
¥ Set your PABX to tone dialling.
74
Page 77
Appendix
!
Aton CLT115 only:
No time is specified for a message in the call list.
Date and time have not been set.
¥ Set the date/time (¢ page 17).
The answering machine announces "PIN is
incorrect" during remote operation.
1. You have entered the wrong system PIN.
¥ Enter the system PIN again.
2. The system PIN is still set to 0000.
¥ Change the system PIN (¢ page 70).
The answering machine is not recording any
messages/has switched to announce only.
Its memory is full.
¥ Delete old messages.
¥ Play back new messages and delete.
Exclusion of liability
Some displays may contain pixels (picture elements), which remain activated
or deactivated. As a pixel is made up of
three sub-pixels (red, green, blue), it is
possible that pixel colours may vary.
This is completely normal and does not
indicate an error.
Approval
Appendix
Care
¤ Wipe the base, charging cradle and the
handset with a damp cloth (do not use
solvent) or an antistatic cloth.
Never use a dry cloth as this can cause static.
Contact with liquid
If the handset should come into contact with
liquid:
1. Switch the handset off and remove the
battery immediately.
2. Allow the liquid to drain from the handset.
3. Pat all parts dry, then place the handset
with the battery compartment open and
the keypad facing down in a dry, warm
place for at least 72 hours (not in a microwave, oven etc.).
4. Do not switch on the handset again until it is completely dry.
When it has fully dried out, you will usually
be able to use it again.
This device is intended for analogue telephone connection in the Swiss network.
Country-specific requirements have been
taken into consideration.
If you have any questions about the differences between the public phone networks,
please contact your specialist dealer or network provider.
Swisscom hereby declare that this device
meets the essential requirements and other
relevant regulations laid down in Directive
1999/5/EC
The Declaration of Conformity can be found on
the following website:
www.swisscom.ch
under the heading "Online Shop", Telephones,
Conformity Declaration.
Specifications
Tec hn ol og y :
Nickel-metal-hydride (NiMH)
Size: AAA (Micro, HR03)
Voltage: 1,2 V
Capacity: 550 - 1000 mAh
We recommend the following battery types,
because these are the only ones that guarantee the specified operating times, full
functionality and long service life:
u Yuasa AAA 800 mAh
The device is supplied with two approved
batteries.
75
Page 78
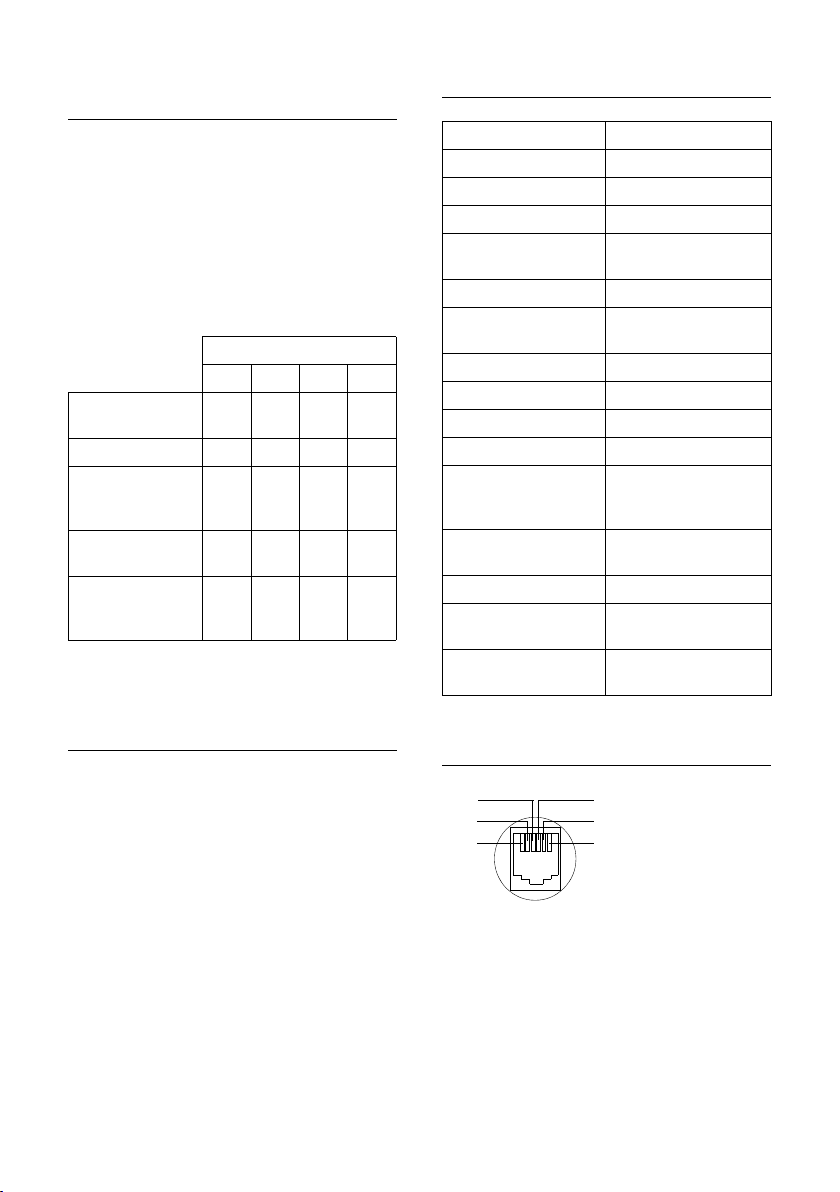
Appendix
1unused
2unused
3a
4b
5unused
6unused
3
2
1
4
5
6
Handset operating times/charging times
This handset can charge batteries up to a
capacity of 1000 mAh. The use of special
high-performance batteries or batteries
with high capacities is not recommended for
cordless phones.
The operating time of your handset depends
on the capacity and age of the batteries and
the way they are used. (All times are maximum possible times).
Capacity (mAh) approx.
550 700 800 1000
Standby time
(hours)*
Talktime (hours) 10121317
Operating time for
1.5 hrs of calls per
day (hours)**
Charging time in
base (hours)
Charging time in
charging cradle
(hours)
* with/without display backlight
** without display backlight
(Setting the display backlight ¢ page 66)
160/ 48185/ 56210/ 64260/
79
85 100 115 140
7,5 8,5 10 12
6,5 7,5 8,5 10,5
General specifications
DECT standard is supported
GAP standard is supported
No. of channels 60 duplex channels
Radio frequency range 1880–1900 MHz
Duplex method Time multiplex,
Pulse repetition rate 100 Hz
Pulse transmission
length
Channel grid 1728 kHz
Bit rate 1152 kbit/s
Modulation GFSK
Language code 32 kbit/s
Transmission power 10 mW average power
Range up to 250 m outdoors,
Base power supply 230 V ~/50 Hz
Environmental conditions in operation
Dialling mode DTMF (tone dialling)/
10 ms frame length
370 μs
per channel,
250 mW pulse power
up to 40 m indoors
+5°C to +45°C, 20% to
75% relative humidity
DP (dial pulsing)
Base power consumption
Pin connections on the telephone jack
In standby mode:
Aton CL115: approx. 1,1 watt
Aton CLT115: approx. 1,2 watt
During the call:
Aton CL115: approx. 1,0 watt
Aton CLT115: approx. 1,1 watt
76
Page 79

Appendix
1)
2)
Writing and editing text
The following rules apply when writing text:
u Each key between Q and O is
assigned several letters and characters.
u Control the cursor with uvts
Press and hold u or v to move the
cursor word by word.
u Characters are inserted at the cursor posi-
tion.
u Press the star key * to display the
table of special characters. Select the
required character and press the display
§Insert§ to insert the character at the
key
cursor position.
u Press and hold Q to O to insert dig-
its.
u Press Ñ display key to delete the char-
acters to the left of the cursor. Press and
hold to delete the word to the left of the
cursor.
u The first letter of the name of directory
entries is automatically capitalised, followed by lower case letters.
Writing an SMS/names
Press the relevant key several times to enter
letters/characters.
If you press and hold a key, the corresponding digit is inserted.
Setting upper/lower case or digits
Press the hash key # briefly to switch
from "Abc" mode to "123" and from "123" to
"abc" and from "abc" to "Abc" (upper case:
1st letter upper case, all others lower case).
Press the hash key # before entering the
letter.
You can see in the display whether upper
case, lower case or digits is selected.
Standard characters
2
3
4
5
L
M
N
O
Q
1) Space
2) Line break
1x 2x 3x 4x 5x 6x 7x 8x 9x 1 0x
1
abc2дбавгз
def3лйик
gh i4ïíìî
jkl5
mno6цсутфх
pq r s 7ß
tuv 8üúùû
wx y z 9 яэжше
.,?! 0
77
Page 80
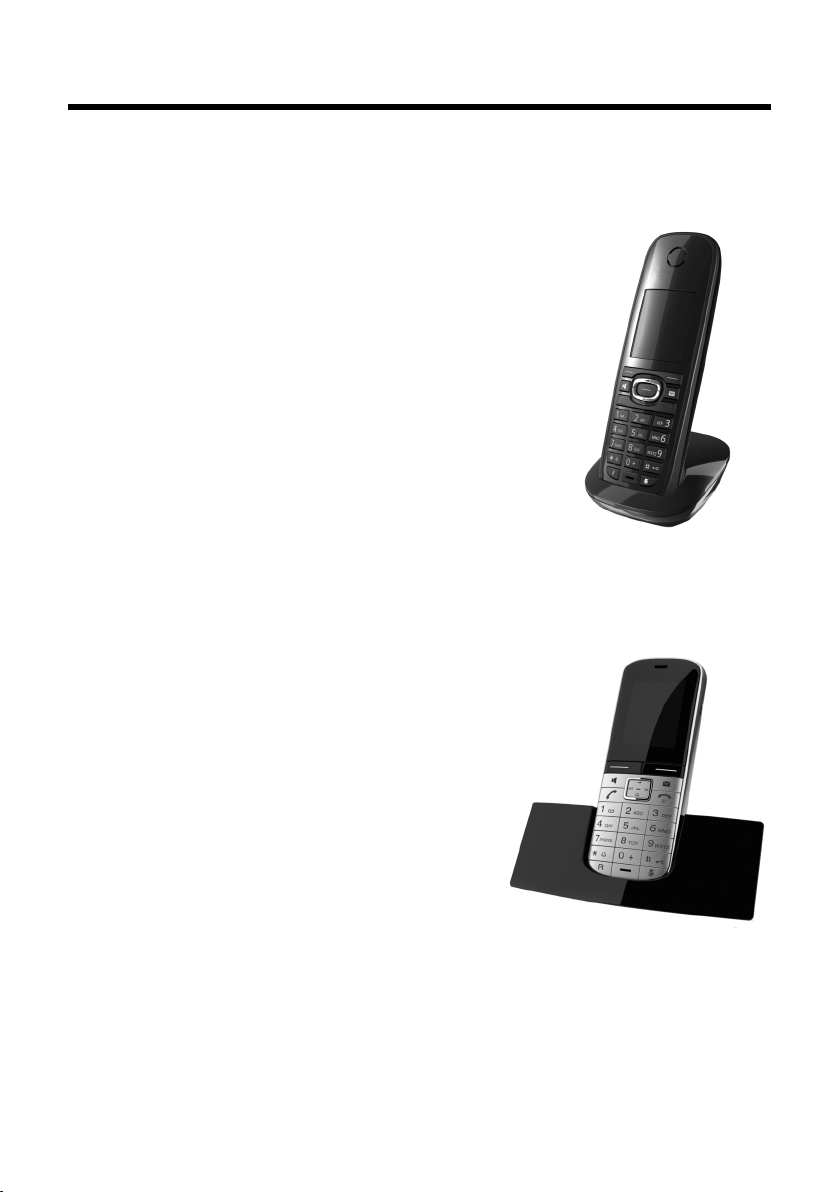
Accessories
Accessories
Handsets
Upgrade your telephone to a cordless PABX:
Aton CLT115 handset
u Social life management with room monitor and birthday
reminders, One Touch Call mode
u Individual programming of ringtones with 6 VIP-groups
u High-quality keypad with illumination
u 1.8´´ TFT colour display
u Directory for up to 150 vCards
u Talk/standby time of up to 12h/180h, standard batteries
u Large font for call lists and directory
u Brilliant sound quality in handsfree mode
u Time control for external calls
u Screensaver (digital clock)
u ECO DECT
u Alarm clock
u Night mode with time-controlled ringtone deactivation
u No interruptions from unknown calls
u Room monitor (Babyphone), One Touch Call mode
u SMS with up to 640 characters
SL400 handset
u Genuine metal frame and keypad
u High-quality keypad illumination
u 1.8´´ TFT colour display
u Bluetooth® and mini USB
u Directory for up to 500 vCards
u Talk/standby time of up to 14h/230h
u Large font for call lists and directory
u Brilliant sound quality in handsfree mode: 4
handsfree settings
u Caller pictures, slide show and screensaver
(analogue and digital clock)
u Silent alert, download ringtones
u ECO DECT
u Alarm clock
u Calendar with appointment scheduler
u Night mode with time-controlled ringtone deactivation
u No interruptions from unknown calls
u Room monitor (Babyphone), One Touch Call mode
u SMS with up to 640 characters
78
Page 81
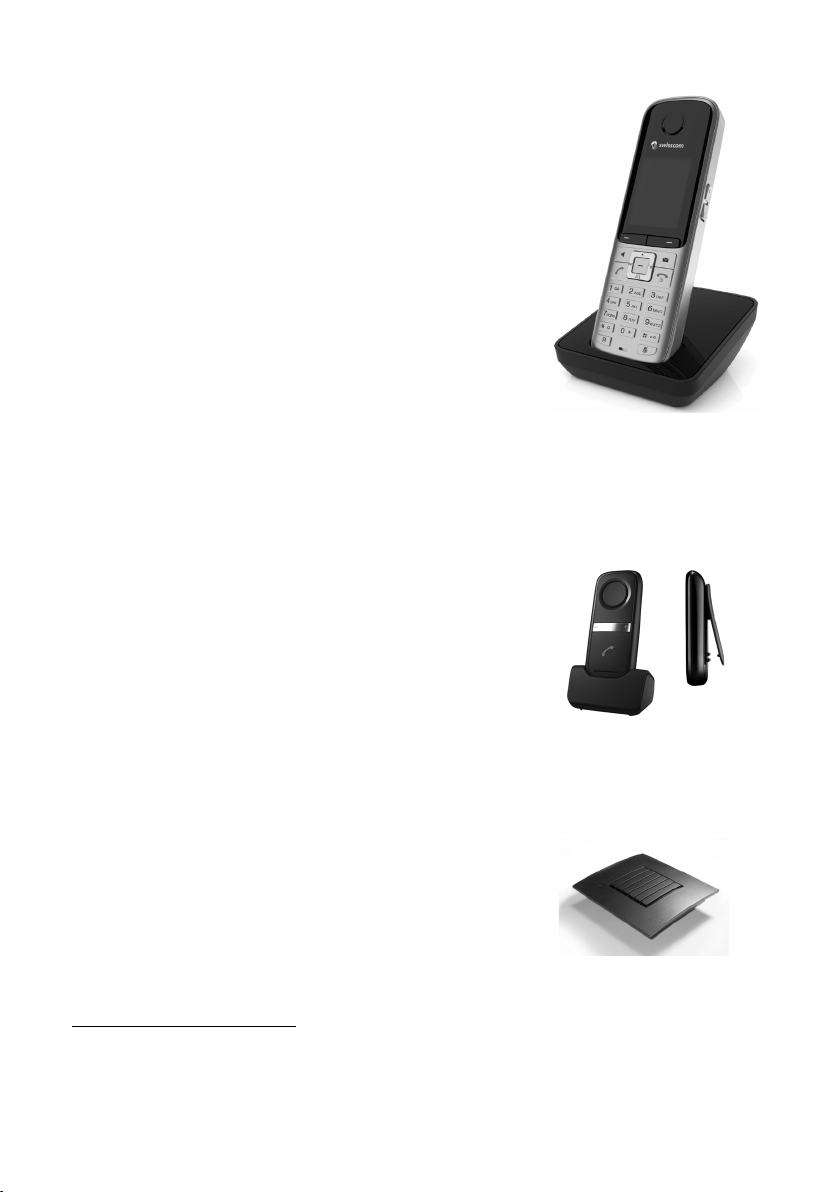
Aton CL315/CLT315 handset with charging cradle
u Brilliant sound quality in handsfree mode
u High-quality genuine metal keypad with illumination
u Plus/minus key for simple volume control
u 1.8´´ TFT colour display
u Bluetooth® and mini USB
u Directory for up to 500 vCards
u Talk/standby time of up to 13h/180h, standard batteries
u Large font for call lists and directory
u Brilliant sound quality in handsfree mode:
4 handsfree settings
u Caller pictures, screensaver (analogue and digital clock)
u Download ringtones
u ECO DECT
u Alarm clock
u Calendar with appointment scheduler
u Night mode with time-controlled ringtone deactivation
u No interruptions from unknown calls
u Room monitor (Babyphone), One Touch Call mode
u SMS with up to 640 characters
L410 handsfree clip for cordless phones
u Move during a call without any restrictions
u Handy clip belt
u Brilliant sound quality in speaker mode
u Simple to transfer calls from the handset
u Weight approx. 30 g
u ECO-DECT
u Five different volume levels
u Status indication via LED
u Talk/standby time of up to 5 h/120 h
u Range of up to 50 m indoors and up to 300 m outdoors
Accessories
RTX 4002 Repeater
The repeater can be used to increase the reception range from
your handset to the base station.
All accessories and batteries are available from your phone retailer or on the following website:
www.swisscom.ch.onlineshop
Only use original accessories. This will avoid possible health risks and damage to property, and
also ensure that all the relevant regulations are complied with.
.
79
Page 82
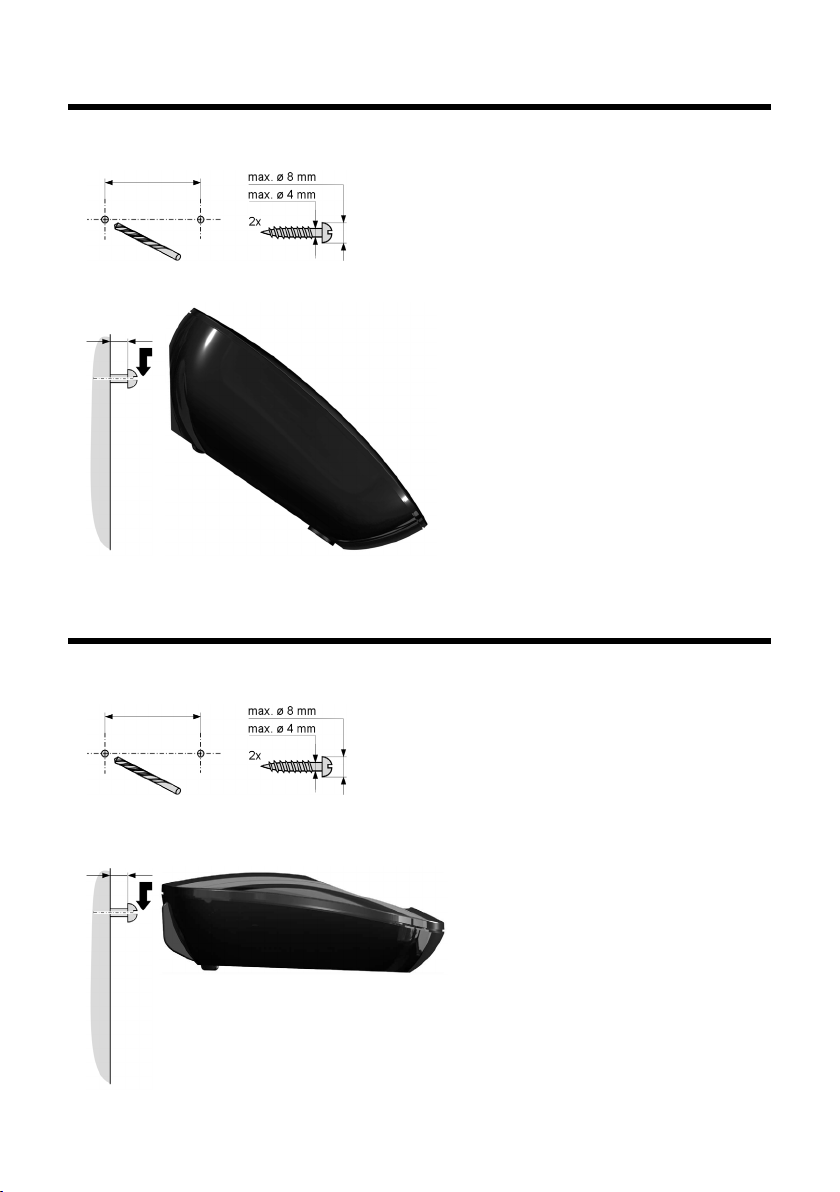
Mounting the base on the wall
approx.
2.5 mm
Aton CLT115: 64 mm
Aton CL115: 43 mm
approx.
2.5 mm
21 mm
Mounting the base on the wall
Mounting the charging cradle on the wall
80
Page 83

Index
Index
A
Access code . . . . . . . . . . . . . . . . . . . . . . . . . . 71
for a PABX
Access protection
Accessories
Acknowledge tones
Activating
advisory tones
answering machine
answering machine (remote
handset
keypad lock
listening in
muting ringtone
room monitor
two-way record
Advisory tones
Alarm clock
Alert tone
Anniversary
deactivating
missed
saving in directory
Announcement (answering
Announcement mode
Anonymous calling
Answering machine
activating/deactivating
deleting messages
list
playing back messages
recording announcement/
remote operation
scrolling back
scrolling forward
skip-back function
Answering machine, see also
Approval
Area code
setting own area code
Assigning a number key
. . . . . . . . . . . . . . . . . . . . . . . . . . 71
. . . . . . . . . . . . . . . . . . . . . 70
. . . . . . . . . . . . . . . . . . . . . . . . . . . 78
. . . . . . . . . . . . . . . . . . . 68
. . . . . . . . . . . . . . . . . . . . . . 68
. . . . . . . . . . . . . . . . . 51
operation)
. . . . . . . . . . . . . . . . . . . . . . 56
. . . . . . . . . . . . . . . . . . . . . . . . . . . . 24
. . . . . . . . . . . . . . . . . . . . . . . . 24
. . . . . . . . . . . . . . . . . . . . . . . . . 62
. . . . . . . . . . . . . . . . . . . . 49
. . . . . . . . . . . . . . . . . . . . . . 63
. . . . . . . . . . . . . . . . . . . . . 54
. . . . . . . . . . . . . . . . . . . . . . . . 68
. . . . . . . . . . . . . . . . . . . . . . . . . . . 59
. . . . . . . . . . . . . . . . . . . . . . . . . . . . 68
. . . . . . . . . . . . . . . . . . . . . . . . 36, 38
. . . . . . . . . . . . . . . . . . . . . . . . 39
. . . . . . . . . . . . . . . . . . . . . . . . . . . . . 41
. . . . . . . . . . . . . . . . . . 38
machine)
(answering machine)
. . . . . . . . . . . . . . . . . . . . . . . . . 52
. . . . . . . . . . . . . . 51
. . . . . . . . . . . . . . . . . . . . 33
. . . . . . . . . . . . . . . . . . . 51
. . . . . . . . . . . . . . 51
. . . . . . . . . . . . . . . . . . 53
. . . . . . . . . . . . . . . . . . . . . . . . . . . . . . 39, 40
. . . . . . . . . . . . . . 52
announce only
. . . . . . . . . . . . . . . . . 51
. . . . . . . . . . . . . . . . . . . 55
. . . . . . . . . . . . . . . . . . . . . . . 53
. . . . . . . . . . . . . . . . . . . . 53
. . . . . . . . . . . . . . . 53, 56
Network mailbox
. . . . . . . . . . . . . . . . . . . . . . . . . . . . . 75
. . . . . . . . . . . . . . . 68
. . . . . . . . . . . . . . . 64
Auto answer
. . . . . . . . . . . . . . . . . . . . . . . 30, 66
B
Babyphone . . . . . . . . . . . . . . . . . . . . . . . . . . . 63
Base
changing
connecting
connecting to PABX
restoring to factory settings
set ringtone
setting up
settings
system PIN
Battery
charging
display
icon
inserting
tone
Best base
Birthday, see Anniversary
. . . . . . . . . . . . . . . . . . . . . . . . . . . 60
. . . . . . . . . . . . . . . . . . . . . . . . . 11
. . . . . . . . . . . . . . . . . 71
. . . . . . . . . . 70
. . . . . . . . . . . . . . . . . . . . . . . . 69
. . . . . . . . . . . . . . . . . . . . . . . . . . 11
. . . . . . . . . . . . . . . . . . . . . . . . . . . . 69
. . . . . . . . . . . . . . . . . . . . . . . . . 70
. . . . . . . . . . . . . . . . . . . . . . . . . . 1, 2
. . . . . . . . . . . . . . . . . . . . . . . . . . . . 1, 2
. . . . . . . . . . . . . . . . . . . . . . . . . . . . . . . 1, 2
. . . . . . . . . . . . . . . . . . . . . . . . . . . 13
. . . . . . . . . . . . . . . . . . . . . . . . . . . . . . . 68
. . . . . . . . . . . . . . . . . . . . . . . . . . . . . 60
C
Call
accepting
connect participant
diverting (connecting)
ending
external
internal
make anonymous call
picking up from answering
transferring (connecting)
two-way record
Call duration
Call forwarding
Call lists
Call protection
Call screening during recording
Call swapping
Call waiting
accepting/rejecting
activating/deactivating
external call
internal call
Calling
anonymously
external
. . . . . . . . . . . . . . . . . . . . . . . . . . 30
. . . . . . . . . . . . . . . . . 62
. . . . . . . . . . . . . . . 61
. . . . . . . . . . . . . . . . . . . . . . . . . . . . . 30
. . . . . . . . . . . . . . . . . . . . . . . . . . . . 30
. . . . . . . . . . . . . . . . . . . . . . . . . . . . 60
. . . . . . . . . . . . . . . 33
machine
. . . . . . . . . . . . . . . . . . . . . . . 53
. . . . . . . . . . . . 62
. . . . . . . . . . . . . . . . . . . . . 54
. . . . . . . . . . . . . . . . . . . . . . . . . . 30
. . . . . . . . . . . . . . . . . . . . . . . 34
. . . . . . . . . . . . . . . . . . . . . . . . . . . . . . 39
. . . . . . . . . . . . . . . . . . . . . . . . 35
. . . . . . . . 54
. . . . . . . . . . . . . . . . . . . . . . . . . 34
. . . . . . . . . . . . . . . . . 33
. . . . . . . . . . . . . . 33
. . . . . . . . . . . . . . . . . . . . . . . . 33
. . . . . . . . . . . . . . . . . . . . . . . . . 61
. . . . . . . . . . . . . . . . . . . . . . . 33
. . . . . . . . . . . . . . . . . . . . . . . . . . . . 30
81
Page 84

Index
internal . . . . . . . . . . . . . . . . . . . . . . . . . . . . 60
Calling line display, notes
Calling Line Identification
cancel once
Care of the telephone
CD, see Call divert
Changing
dialling mode
display language
earpiece volume
internal number of a handset
name of a handset
pauses
ringtone
speaker volume
system PIN
Character set
Charge status display
CLI, CLIP
. . . . . . . . . . . . . . . . . . . . . . . . . . . . . . . . . . 33
CLIR
Colour scheme
Conference
Conference (internal)
Confirmation tone
Connecting the headset
Connecting, base to PABX
Consultation call
Consultation call (internal)
Control key
Correcting incorrect entries
Customer Care
Customer service
. . . . . . . . . . . . . . . . . . . . . . . . . 33
. . . . . . . . . . . . . . . . . . . . . . . 71
. . . . . . . . . . . . . . . . . . . . . . . . . . . . . 72
. . . . . . . . . . . . . . . . . . . . . . . . . 67, 69
. . . . . . . . . . . . . . . . . . . . . . . . . 70
. . . . . . . . . . . . . . . . . . .44, 46, 77
. . . . . . . . . . . . . . . . . . . . . . . . . . . . . . 31
. . . . . . . . . . . . . . . . . . . . . . . . 66
. . . . . . . . . . . . . . . . . . . . . . . . . . . 34
. . . . . . . . . . . . . . . . . . . . . . 34
. . . . . . . . . . . . . . . . . . . . . . . . . 1, 21
. . . . . . . . . . . . . . . . . . . . . . . . 73
. . . . . . . . . . . . . . . . . . . . . . 73
. . . . . . . . . . . . . . 31
. . . . . . . . . . . . . . 31
. . . . . . . . . . . . . . . . . 75
. . . . . . . . . . . . . . . . . 16, 65
. . . . . . . . . . . . . . . . . . . . 66
. . . . . . . . 62
. . . . . . . . . . . . . . . . . . 62
. . . . . . . . . . . . . . . . . . . . . 66
. . . . . . . . . . . . . . . . . 1, 2
. . . . . . . . . . . . . . . . . . 61
. . . . . . . . . . . . . . . . . . . . . 68
. . . . . . . . . . . . . . . 19
. . . . . . . . . . . . . . 71
. . . . . . . . . . . . . 61
. . . . . . . . . . . . 22
D
Deactivate anonymous calls. . . . . . . . . . . . 67
Deactivating
advisory tones
answering machine
handset
keypad lock
listening in
muting ringtone
room monitor
two-way record
Delete key
Deleting
announcement for answering
machine
characters
message
. . . . . . . . . . . . . . . . . . . . . . 68
. . . . . . . . . . . . . . . . . 51
. . . . . . . . . . . . . . . . . . . . . . . . . . . . 24
. . . . . . . . . . . . . . . . . . . . . . . . 24
. . . . . . . . . . . . . . . . . . . . . . . . . 62
. . . . . . . . . . . . . . . . . . . . 49
. . . . . . . . . . . . . . . . . . . . . . 64
. . . . . . . . . . . . . . . . . . . . . 54
. . . . . . . . . . . . . . . . . . . . . . . . . . . . 22
. . . . . . . . . . . . . . . . . . . . . . . 52
. . . . . . . . . . . . . . . . . . . . . . . . . . 22
. . . . . . . . . . . . . . . . . . . . . . . . . . . 53
Deregistering (handset). . . . . . . . . . . . . . . . 60
Destination number (room monitor)
Dial pulsing
Dialling
directory
mode
pause
using quick dial
Directory
copying number from text
managing entries
opening
order of entries
saving anniversary
saving entry
saving the sender’s number
sending entry/list to handset
using to enter numbers
Display
changing display language
colour scheme
in idle status
lighting
memory directory
missed anniversaries
network mailbox message
number (CLI/CLIP)
screensaver
setting
symbols
Display keys
assigning
DP (dial pulsing)
Draft message list (SMS)
. . . . . . . . . . . . . . . . . . . . . . . . . . . 71
. . . . . . . . . . . . . . . . . . . . . . . . . . . 37
. . . . . . . . . . . . . . . . . . . . . . . . . . . . . . 71
. . . . . . . . . . . . . . . . . . . . . . . . . . . . . . 72
. . . . . . . . . . . . . . . . . . 38, 64
. . . . . . . . . . . . . . . . . . . . . . . . . . . . . 36
. . . . . . . . . . . . . . . . . . . 37
. . . . . . . . . . . . . . . . . . . . . . . . . . . . 21
. . . . . . . . . . . . . . . . . . . . . 37
. . . . . . . . . . . . . . . . . . 38
. . . . . . . . . . . . . . . . . . . . . . . . 36
. . . . . . . . . . . . . . . . . . . . . . . . . . 46
(SMS)
. . . . . . . . . . . . . . 38
. . . . . . . . . . . . . . . . . . . . . . 66
. . . . . . . . . . . . . . . . . . . . . 19, 23
. . . . . . . . . . . . . . . . . . . . . . . . . . . . 66
. . . . . . . . . . . . . . . . . . . 38
. . . . . . . . . . . . . . . . 41
. . . . . . . . . . . . . . . . . . . 31
. . . . . . . . . . . . . . . . . . . . . . . . . 65
. . . . . . . . . . . . . . . . . . . . . . . . . . . . . 65
. . . . . . . . . . . . . . . . . . . . . . . . . . . . . .2
. . . . . . . . . . . . . . . . . . . . . . . . 1, 22
. . . . . . . . . . . . . . . . . . . . . . . . . . . 64
. . . . . . . . . . . . . . . . . . . . . . 71
. . . . . . . . . . . . . . . 44
. . . . 63
. . . . . . . . . . . 38
. . . . . . . . . 38
. . . . . . . 16, 65
. . . . . . . . . . . 57
E
Earpiece volume . . . . . . . . . . . . . . . . . . . . . . 66
ECO DECT
Eco Mode
Eco Mode+
Editing
E-mail address
End call key
Ending, call
Entry
. . . . . . . . . . . . . . . . . . . . . . . . . . . . 58
. . . . . . . . . . . . . . . . . . . . . . . . . . . . 58
. . . . . . . . . . . . . . . . . . . . . . . . . . . 58
destination number
(room monitor)
. . . . . . . . . . . . . . . . . 64
. . . . . . . . . . . . . . . . . . . . . . . . 45
copying from the directory
. . . . . . . . . . . . . . . . . . . . . . . . . 1, 30
. . . . . . . . . . . . . . . . . . . . . . . . . . . 30
selecting from directory
. . . . . . . . . . . . . 37
. . . . . . . . . . 38
82
Page 85

Index
Error tone . . . . . . . . . . . . . . . . . . . . . . . . . . . . 68
Expert mode
External call
call waiting
diverting to ans. mach.
. . . . . . . . . . . . . . . . . . . . . . . 27, 74
. . . . . . . . . . . . . . . . . . . . . . . . . 33
. . . . . . . . . . . . . . 54
F
Fast access
answering machine
network mailbox
Fax (SMS)
Flashing of the message key
. . . . . . . . . . . . . . . . . . . . . . . . . . . . . 45
disable/enable
. . . . . . . . . . . . . . . . . 55
. . . . . . . . . . . . . . . . . . . . 57
. . . . . . . . . . . . . . . . . . . . 41
G
General troubleshooting. . . . . . . . . . . . . . . 74
Group call
. . . . . . . . . . . . . . . . . . . . . . . . . . . . 60
H
Handset
activating/deactivating
advisory tones
changing internal number
changing name
changing the number
changing to a different base
changing to best reception
colour scheme
contact with liquid
de-registering
display language
display lighting
diverting a call
earpiece volume
idle status
large font
. . . . . . . . . . . . . . . . . . . . . . . . . . . . . . . . . 21
list
locating
muting
paging
registering
registering to a different base
restoring to factory settings
screensaver
set up for use
setting
speaker volume
using room monitor
using several
Handset mode
. . . . . . . . . . . . . . . . . . . . . . 68
. . . . . . . . . . . . . . . . . . . . . . 66
. . . . . . . . . . . . . . . . . . . 59, 60
. . . . . . . . . . . . . . . . . . . . . . 61
. . . . . . . . . . . . . . . . . . . . . . . . . . 23
. . . . . . . . . . . . . . . . . . . . . . . . . . . 66
. . . . . . . . . . . . . . . . . . . . . . . . . . . . 60
. . . . . . . . . . . . . . . . . . . . . . . . . . . . . 32
. . . . . . . . . . . . . . . . . . . . . . . . . . . . . 60
. . . . . . . . . . . . . . . . . . . . . . . . . 59
. . . . . . . . . . . . . . . . . . . . . . . . . 65
. . . . . . . . . . . . . . . . . . . . . . . 13
. . . . . . . . . . . . . . . . . . . . . . . . . . . . . 64
. . . . . . . . . . . . . . . . . . . . . . . 59
. . . . . . . . . . . . . . . . . . . . . . . . 32
. . . . . . . . . . . . . . 24
. . . . . . . . . . . 62
. . . . . . . . . . . . . . . . . . . . . 62
. . . . . . . . . . . . . . . 62
. . . . . . . . . 60
. . . . . . . . . . 60
. . . . . . . . . . . . . . . . . . 75
. . . . . . . . . . . . . . . . . 16, 65
. . . . . . . . . . . . . . . . . . . . . 66
. . . . . . . . . . . . . . . . . . . . 66
. . . . . . . . 60
. . . . . . . . . . 69
. . . . . . . . . . . . . . . . . . . . . 66
. . . . . . . . . . . . . . . . . 63
Handset operating time
in room monitor mode
Handsfree key
Handsfree mode
Hash key
Headset socket
Hearing aids
. . . . . . . . . . . . . . . . . . . . . . . . . . . . . . . . . 74
Help
. . . . . . . . . . . . . . . . . . . . . . . . . .1
. . . . . . . . . . . . . . . . . . . . . . 32
. . . . . . . . . . . . . . . . . . . . . . . . . . . 1, 24
. . . . . . . . . . . . . . . . . . . . . . . 19
. . . . . . . . . . . . . . . . . . . . . . . . . . . .7
. . . . . . . . . . . . . . 63
I
Icon
alarm clock
answering machine
for new messages
keypad lock
new message
new SMS
ringtone
Icons
display . . . . . . . . . . . . . . . . . . . . . . . . . . . . . . .2
Idle status (display)
Idle status, returning to
Incoming message list (SMS)
Incorrect input (correction)
Installing, base
Internal
conference
consulting
listening in
making calls
Internal call
call waiting
. . . . . . . . . . . . . . . . . . . . . . . . . 59
. . . . . . . . . . . . . . 51, 54
. . . . . . . . . . . . . . . . . . . 40
. . . . . . . . . . . . . . . . . . . . . . . . 24
. . . . . . . . . . . . . . . . . . . . . . . 52
. . . . . . . . . . . . . . . . . . . . . . . . . . . 45
. . . . . . . . . . . . . . . . . . . . . . . . . . . 67
. . . . . . . . . . . . . . . . . 19, 23
. . . . . . . . . . . . . . . . 23
. . . . . . . . . . . 45
. . . . . . . . . . . . 22
. . . . . . . . . . . . . . . . . . . . . . . . 11
. . . . . . . . . . . . . . . . . . . . . . . . . 61
. . . . . . . . . . . . . . . . . . . . . . . . . . 61
. . . . . . . . . . . . . . . . . . . . . . . . . 62
. . . . . . . . . . . . . . . . . . . . . . . . 60
. . . . . . . . . . . . . . . . . . . . . . . . . . . 60
. . . . . . . . . . . . . . . . . . . . . . . . . 61
K
Key 1 (fast access) . . . . . . . . . . . . . . . . . . . 1, 55
Keypad lock
Keys
assign function or number
control key
delete key
display keys
end call key
fast access
handsfree key
hash key
message key
mute key
On/Off key
quick dial
recall key
. . . . . . . . . . . . . . . . . . . . . . . . . . 24
. . . . . . . . . . . 64
. . . . . . . . . . . . . . . . . . . . . . . 1, 21
. . . . . . . . . . . . . . . . . . . . . . . . . . 22
. . . . . . . . . . . . . . . . . . . . . . 1, 22
. . . . . . . . . . . . . . . . . . . . . . . 1, 30
. . . . . . . . . . . . . . . . . . . . . . . . 1, 55
. . . . . . . . . . . . . . . . . . . . . . . .1
. . . . . . . . . . . . . . . . . . . . . . . . . 1, 24
. . . . . . . . . . . . . . . . . . . . . . . . . .1
. . . . . . . . . . . . . . . . . . . . . . . . . . . . .1
. . . . . . . . . . . . . . . . . . . . . . . . . . .1
. . . . . . . . . . . . . . . . . . . . . . . . . . . 38
. . . . . . . . . . . . . . . . . . . . . . . . . . . . .1
83
Page 86

Index
star key . . . . . . . . . . . . . . . . . . . . . . . . . . . . . .1
. . . . . . . . . . . . . . . . . . . . . . . . . . . 1, 30
talk key
L
Language, display . . . . . . . . . . . . . . . . . . 16, 65
Large font
Linking, see SMS
List
answering machine
call lists
handsets
missed calls
network mailbox
SMS draft message list
SMS incoming message list
SMS list
Listening in to a call
Locating, handset
Lock
activating/deactivating keypad lock . . 24
. . . . . . . . . . . . . . . . . . . . . . . . . . . . 66
. . . . . . . . . . . . . . 39, 40
. . . . . . . . . . . . . . . . . . . . . . . . . . . . 39
. . . . . . . . . . . . . . . . . . . . . . . . . . . 21
. . . . . . . . . . . . . . . . . . . . . . . . . 39
. . . . . . . . . . . . . . . . . . . . 40
. . . . . . . . . . . . . . . 44
. . . . . . . . . . 45
. . . . . . . . . . . . . . . . . . . . . . . . . . . . 40
. . . . . . . . . . . . . . . . . . . 62
. . . . . . . . . . . . . . . . . . . . . 60
M
Mailbox ID, see SMS
Mailboxes, see SMS
Mains adapter
Making calls
accepting a call
cost-effective calls
external
internal
Manual redial
Medical equipment
Memory, directory
Menu
end tone
opening
overview
prompting
Menu display
Expert mode
Standard mode
Message key
disable/enable flashing
opening lists
Messages
copy the number to the
deleting
. . . . . . . . . . . . . . . . . . . . . . . . . . . . . . . . . .1
key
. . . . . . . . . . . . . . . . . . . . . . . . . .7
. . . . . . . . . . . . . . . . . . . . . 30
. . . . . . . . . . . . . . . . . . 42
. . . . . . . . . . . . . . . . . . . . . . . . . . . . 30
. . . . . . . . . . . . . . . . . . . . . . . . . . . . 60
. . . . . . . . . . . . . . . . . . . . . . . . . 39
. . . . . . . . . . . . . . . . . . . . .7
. . . . . . . . . . . . . . . . . . . . 38
. . . . . . . . . . . . . . . . . . . . . . . . . . . 68
. . . . . . . . . . . . . . . . . . . . . . . . . . . . 21
. . . . . . . . . . . . . . . . . . . . . . . . . . . 27
. . . . . . . . . . . . . . . . . . . . . . . . . 22
. . . . . . . . . . . . . . . . . . . . . 27, 74
. . . . . . . . . . . . . . . . . . 27, 74
. . . . . . . . . . . . . . 41
. . . . . . . . . . . . . . . . . . . . . . . . 40
. . . . . . . . . . . . . . . . . . . . . . . . . . . . . 51
directory
. . . . . . . . . . . . . . . . . . . . . . . 53
. . . . . . . . . . . . . . . . . . . . . . . . . . . . 53
marking as "new" . . . . . . . . . . . . . . . . . . . 53
new message icon
playing back
Microphone
Missed calls
Music on hold
Mute key
Muting
first ring
handset
. . . . . . . . . . . . . . . . . . . . . . . . . . . .1
. . . . . . . . . . . . . . . . . . . . . . . . . . . 39
. . . . . . . . . . . . . . . . . . . . . . . . . . . . . . .1
. . . . . . . . . . . . . . . . . . . . . . . . . . . . 49
. . . . . . . . . . . . . . . . . . . . . . . . . . . . 32
. . . . . . . . . . . . . . . . . . 52
. . . . . . . . . . . . . . . . . . . . . . . . 52
. . . . . . . . . . . . . . . . . . . . . . . . . 69
N
Name
of a handset
Network mailbox
Network services
Night mode see Time Control
Notification by SMS
Number
as destination for room monitor. . . . . . 63
copying from an SMS text
copying from directory
copying to directory
displaying caller's number (CLIP)
entering with directory
saving in the directory
. . . . . . . . . . . . . . . . . . . . . . . . 62
. . . . . . . . . . . . . . . . . . . . . . 57
. . . . . . . . . . . . . . . . . . . . . . 33
. . . . . . . . . . . . . . . . . . . 47
. . . . . . . . . . . . 46
. . . . . . . . . . . . . . 38
. . . . . . . . . . . . . . . . . 38
. . . . . 31
. . . . . . . . . . . . . . 38
. . . . . . . . . . . . . . . 36
O
On/Off key. . . . . . . . . . . . . . . . . . . . . . . . . . . . . .1
One Touch Call
Order in directory
. . . . . . . . . . . . . . . . . . . . . . . . 30
. . . . . . . . . . . . . . . . . . . . . 37
P
PAB X
connecting base
. . . . . . . . . . . . . . . . . . . . . . . . . . . . . 72
pauses
saving access code
setting dialling mode
setting recall
. . . . . . . . . . . . . . . . . . . . . . . . . . . . . . . . 49
SMS
switching to tone dialling
Pack contents
. . . . . . . . . . . . . . . . . . . . . . . . . . . . . . . 60
Paging
Pause
after access code
after line seizure
after recall key
PIN change
system PIN
Pin connections
. . . . . . . . . . . . . . . . . . . . 71
. . . . . . . . . . . . . . . . . . 71
. . . . . . . . . . . . . . . . 71
. . . . . . . . . . . . . . . . . . . . . . . . 71
. . . . . . . . . . . . 72
. . . . . . . . . . . . . . . . . . . . . . . . . 10
. . . . . . . . . . . . . . . . . . . . 72
. . . . . . . . . . . . . . . . . . . . 72
. . . . . . . . . . . . . . . . . . . . . . 72
. . . . . . . . . . . . . . . . . . . . . . . . . 70
. . . . . . . . . . . . . . . . . . . . . . . 76
84
Page 87

Index
Playing back
announcement (answering
machine)
message (answering machine)
Power consumption
Protecting the phone against access
. . . . . . . . . . . . . . . . . . . . . . . 52
. . . . . . . 52
. . . . . . . . . . . . . . . . . . . 76
. . . . 70
Q
Questions and answers . . . . . . . . . . . . . . . . 74
R
Range. . . . . . . . . . . . . . . . . . . . . . . . . . . . . . . . 11
. . . . . . . . . . . . . . . . . . . . . . . . . . . . . . . . 71
Recall
Recall key
Reception booster, see Repeater
Recording
Redial
Redirect, see Call divert
Registering (handset)
Reminder call
Remote operation
Repeater
Ring delay
Ringback
Ringtone
Room monitor
. . . . . . . . . . . . . . . . . . . . . . . . . . . 1, 72
. . . . . . . . . . . . . . . . . . . . . . . . . . . . . 54
quality
. . . . . . . . . . . . . . . . . . . . . . . . . . . . . . . 54
time
two-way record
. . . . . . . . . . . . . . . . . . . . . 54
. . . . . . . . . . . . . . . . . . . . . . . . . . . . . . . . 39
. . . . . . . . . . . . . . . . . . 59
. . . . . . . . . . . . . . . . . . . . . . . . . 39
. . . . . . . . . . . . . . . . . . . . . 55
. . . . . . . . . . . . . . . . . . . . . . . . . . . . . 69
. . . . . . . . . . . . . . . . . . . . . . . . . . . . 54
. . . . . . . . . . . . . . . . . . . . . . . . . . . . . 33
changing
muting
setting volume
. . . . . . . . . . . . . . . . . . . . . . . . 67, 69
. . . . . . . . . . . . . . . . . . . . . . . . . . . . . 49
. . . . . . . . . . . . . . . . . . . 67, 69
. . . . . . . . . . . . . . . . . . . . . . . . 63
S
Saving (access code). . . . . . . . . . . . . . . . . . . 71
Screensaver
Searching in directory
Sending
directory entry to handset
Sensitivity (room monitor)
Setting
date
time
Setting up
handset
Signal tone, see Advisory tones
Skip-back function
. . . . . . . . . . . . . . . . . . . . . . . . . . . 65
. . . . . . . . . . . . . . . . . 37
. . . . . . . . . . . 38
. . . . . . . . . . . . . 63
. . . . . . . . . . . . . . . . . . . . . . . . . . . . 17, 29
. . . . . . . . . . . . . . . . . . . . . . . . . . . . 17, 29
. . . . . . . . . . . . . . . . . . . . . . . . . . . . 13
(answering machine)
. . . . . . . . . . . 53, 56
SMS. . . . . . . . . . . . . . . . . . . . . . . . . . . . . . . . . . 43
active send service centre
changing mailbox
deleting
diverting
draft message list
incoming message list
linked
list
mailbox ID
mailboxes
notification by SMS
PIN protection
reading
receiving
replying to or diverting
saving number
self help with error messages
sending as a fax
sending to a personal mailbox
sending to an e-mail address
SMS to PABXs
status report
troubleshooting
vCard
writing
SMS centre
changing number
setting
Snooze mode
Sound, see Ringtone
Special functions
Specifications
Speed dial
Standard mode
Star key
System settings
. . . . . . . . . . . . . . . . . . . . . . . . . 44, 46
. . . . . . . . . . . . . . . . . . . . . . . . . . . 46
. . . . . . . . . . . . . . . . . . . . . . . . . . . . . . 43
. . . . . . . . . . . . . . . . . . . . . . . . . . . . . . . . . 40
. . . . . . . . . . . . . . . . . . . . . . . . . 44, 46
. . . . . . . . . . . . . . . . . . . . . . . . . . . 45
. . . . . . . . . . . . . . . . . . . . . . . . . . . . . . 47
. . . . . . . . . . . . . . . . . . . . . . . . . . 43, 77
. . . . . . . . . . . . . . . . . . . . . . . . . . . . . 48
. . . . . . . . . . . . . . . . . . . . . . . . . 36, 64
. . . . . . . . . . . . . . . . . . . . . . . . . . . . . . . .1
. . . . . . . . . . . . . . . . . . . 48
. . . . . . . . . . . . . . . . . . . 44
. . . . . . . . . . . . . . . . . . . . . . . . . . 47
. . . . . . . . . . . . . . . . . . . . . . . . . . 47
. . . . . . . . . . . . . . . . . . . . . . 48
. . . . . . . . . . . . . . . . . . . . . . 46
. . . . . . . . . . . . . . . . . . . . . 45
. . . . . . . . . . . . . . . . . . . . . . . 49
. . . . . . . . . . . . . . . . . . . . . . . . 44
. . . . . . . . . . . . . . . . . . . . 50
. . . . . . . . . . . . . . . . . . . 49
. . . . . . . . . . . . . . . . . . . . . . . . . 59
. . . . . . . . . . . . . . . . . . . . . . 71
. . . . . . . . . . . . . . . . . . . . . . . . . 75
. . . . . . . . . . . . . . . . . . . . 27, 74
. . . . . . . . . . . . . . . . . . . . . . . 70
. . . . . . . . . . . 48
. . . . . . . . . . . . . . . 45
. . . . . . . . . . . . . . . . . 47
. . . . . . . . . . . . . . 46
. . . . . . . . 50
. . . . . . . 48
. . . . . . . . . 45
T
Tal k key . . . . . . . . . . . . . . . . . . . . . . . . . . . . 1, 30
Telephone jack, pin connections
Text message, see SMS
Three-party conference
Time Control (Night mode)
Ton e dia llin g
Troubleshooting (SMS)
Two Way Talk (room monitor)
. . . . . . . . . . . . . . . . . . . . . . . 71, 72
. . . . . . . . . . . . . . . . 34
. . . . . . . . . . . . . . . . 50
. . . . . . . . 76
. . . . . . . . . . . . . 67
. . . . . . . . . . 63
85
Page 88

Index
U
Unknown. . . . . . . . . . . . . . . . . . . . . . . . . . . . . 31
Unknown caller
. . . . . . . . . . . . . . . . . . . . . . . 31
V
vCard (SMS). . . . . . . . . . . . . . . . . . . . . . . . . . . 47
Viewing the network mailbox
message
VIP group (Directory entry)
VIP group (directory entry)
Volume
earpiece
handset speaker volume
loudspeaker
ringtone
. . . . . . . . . . . . . . . . . . . . . . . . . 57
. . . . . . . . . . . . . 37
. . . . . . . . . . . . . 36
. . . . . . . . . . . . . . . . . . . . . . . . . . . . 66
. . . . . . . . . . . . . 66
. . . . . . . . . . . . . . . . . . . . . . . . 66
. . . . . . . . . . . . . . . . . . . . . . . . . 67, 69
W
Warning tone, see Advisory tones
Writing (SMS)
Writing and editing text
. . . . . . . . . . . . . . . . . . . . . . . . . 43
. . . . . . . . . . . . . . . 77
86
Page 89

dt/fr/it 05/2012
 Loading...