


ATOMOS SUMO19
USER MANUAL
EDITION 1: SEPTEMBER 2017
Have you registered your Sumo19 yet? Upgrade to 3 year warranty now
Register now to receive communication on all future updates
Web: www.atomos.com Sales: sales@atomos.com Support: www.atomos.com/support
*Subject to change without notice |
Atomos Sumo19 – User Manual Edition 1: September 2017 1 |

Contents |
|
Safety Instructions |
|
|
|
Warranty & Conditions |
3 |
Introduction |
4 |
1. What’s included |
5 |
2. What you also need |
6 |
Spinning Disk Drives (HDD) |
6 |
Solid State Drives (SSDs) |
6 |
Mechanical Shock and Vibration |
6 |
Backing up and archiving |
7 |
HDMI Cables |
7 |
3. Mounting disks in the Master Caddy II |
8 |
4. Connecting and powering up |
9 |
Power ON/Power OFF |
10 |
5. Sumo19 connections |
11 |
6. Master Caddy II, Screw Mounts and Sun Hood |
13 |
Master Caddy II / Screw Mounts / Modularity |
13 |
Sun Hood |
14 |
7. Using the Sumo19 |
15 |
Using the Sumo19 |
15 |
Category 1: Operating Settings |
15 |
Category 2: Shot Setup & Monitor Tools |
15 |
Category 3: Main Controls, REC, PLAY & MENU |
15 |
Home Screen / Menu functions |
16 |
File Naming / Date & Time / Display Options |
17 |
Screen lock / Timecode / Sumo19 Info |
18 |
Input Menu |
19 |
Storage Capacity Indicator / Formatting HDD/SSD / Unit Name |
20 |
Audio panel |
21 |
8. Monitoring and Recording |
22 |
Before recording / Choosing your recording format |
22 |
SmartControl / 6 ways to start recording |
23 |
Waveform Monitoring |
24 |
Luma Overlay / RGB Parade / Vectorscope |
25 |
Monitor Assist |
26 |
Focus Assist / Zebra / False Color |
27 |
Blue Only / Grid Lines / Focus Assist Settings |
28 |
SmartLog |
29 |
Exporting .xml |
30 |
Monitor mode (HDR / Log / Custom Looks) |
31 |
Anti-shock technology |
35 |
File Recovery |
35 |
9. Timecode |
36 |
LTC / Record Run / Auto Restart |
37 |
10. HD Pulldown |
38 |
11. Record mode options |
39 |
12. Playback & Playout |
41 |
13. Connecting and Editing |
43 |
Connect to Input |
43 |
NLE Support |
43 |
exFAT compatibility |
43 |
Transferring files |
43 |
Importing / Import into Final Cut Pro |
44 |
SmartLog with FCPX |
45 |
14. Software Upgrades |
46 |
Updating AtomOS (Firmware) |
46 |
15. Technical Specifications |
47 |
The Sumo19 is designed to a high standard but there are some things you should be aware of to prolong the life of the unit and for your own safety.
Using the Sumo19 safely
Although the Sumo19 is very lightweight compared to all the devices it replaces, it is still a solid object that could cause injury if misused.
•Always make sure that the Sumo19 is mounted securely and is unable to fall onto anyone nearby. This is especially important when there are children present who might be tempted to pull on cables.
•Always ensure that cable runs to the Sumo19 are clearly visible and do not present a trip hazard.
•Do not place on uneven or unstable surfaces.
•Do not insert anything but Sumo19 Master Disk caddies in the Master Disk slot on the side of the Sumo19.
•Do not touch the Sumo19’s screen with sharp, metallic or abrasive objects.
•Do not expose to strong electrical or magnetic fields.
•Do not expose to or use near liquids, rain or moisture.
•Do not dispose of the Sumo19 in municipal waste and do not incinerate it, always follow local regulations for safe disposal.
Care of disk drives
Spinning disks and SSDs are very sensitive to damage from static electricity. Please observe all the usual ESD precautions when handling them.
Please see the section Mechanical shock and vibration later in this manual for information about how to handle and care for your disk drives.
SDI Cables
Please remember that SDI cables use locking connectors and will not simply pull out if they are jerked or tripped over. They are therefore a significant trip hazard to your equipment, which may be damaged if the cables are misused.
HDMI cables
Please remember that HDMI cables do not use locking connectors and will simply pull out if they are jerked or tripped over. Please ensure your cables make a secure connection and avoid flexing them excessively to maintain reliability.
User Manual Conventions
To keep things simple but clear, we’ve only adopted two conventions in this manual:
A helpful tip, suggestion or something to note because it’s not obvious at first.
An important note or warning
*Subject to change without notice |
Atomos Sumo19 – User Manual Edition 1: September 2017 2 |

Warranty & Conditions
Notice
Copyright © 2017 ATOMOS Global Pty Ltd (‘referred to as ATOMOS’). All rights reserved. All information in this document is subject to change
without notice. No part of the document may be reproduced or transmitted in any form, or by any means, electronic or mechanical, including photocopying or recording, without the express written permission
of ATOMOS. A reference to ATOMOS includes its related entities, subsidiaries and parent company.
Trademarks
Sumo19 and ATOMOS are registered trademarks of ATOMOS. Apple, the Apple logo, AppleShare, AppleTalk, FireWire, iPod, iPod
Touch, Mac, and Macintosh are registered trademarks of Apple Inc. Final Cut Pro, QuickTime and the QuickTime Logo are trademarks of Apple Inc. DNxHD, DNxHR and Avid logo are registered trademarks of Avid Technology, Inc. All other trademarks are the property of their respective holders.
International Hardware Limited Warranty
ATOMOS warrants that:
•Main product, not including TFT/LCD, or any external accessories, will be free from defects in materials and workmanship for a period of 1 years from the date of purchase, the user may upgrade to a 3 year warranty upon registering their product at www.atomos.com
•The TFT/LCD, HDD/SSD Docking Station, Master Caddy II and Cable will be free from defects in materials and workmanship for a period of 1 year from the date of purchase.
This warranty is exclusively for the benefit of the original purchaser and is not assignable or transferable.
If during the warranty period the product is shown to be defective ATOMOS may at its option:
a)replace the goods or supply equivalent ones,
b)repair the goods,
c)pay the cost of replacing the goods or of acquiring equivalent ones and
d)paying the cost of having the goods repaired;
The customer must notify ATOMOS of any defect in the goods in writing prior to the expiry of the warranty periods set out above. The customer will be solely responsible for returning the goods to ATOMOS or its authorized distributor. Upon acceptance of a warranty claim by ATOMOS, where ATOMOS repairs or replaces the goods, it will be responsible for reasonable shipping costs incurred in sending the goods to the Customer, provided that customer is located in a country in which ATOMOS has an authorized distributor or repair centre or agent.
Warranty Exclusions
This warranty applies only to defects in workmanship and does not cover defects caused by:
•Neglect;
•Improper or negligent acts or omissions;
•Repairs or attempted repairs;
•Tampering with or modification of the goods;
•Connection to incompatible equipment or power sources;
•Exposure to water or weather;
•Exposure to magnetic fields or corrosive liquids or substances;
•Physical damage
Except as stated in this warranty,Atomos, it’s vendors, agents, resellers and distributors disclaim in their entirety all other warranties, express or implied, including without limitation all warranties of merchantability or fitness for a particular purpose. The remedies outlined in this warranty are the exclusive remedy a customer from defective goods, which are subject to the warranty.
Atomos does not warrant that the goods will operate in a manner that is error free, or uninterrupted. The goods are not intended to be the primary or only data storage device for data – customers are solely responsible for back up and protection of data.
Software License Agreement
IMPORTANT, PLEASE READ CAREFULLY. THIS IS A LICENSE AGREEMENT.
This ATOMOS software, related documentation, any included sample images files (the “Software”), is protected by copyright laws and international copyright treaties, as well as other intellectual property laws and treaties. The Software is licensed, not sold.
This End User License Agreement (“EULA”) is a legal agreement between you (either an individual or a single entity) and ATOMOS with regard to the copyrighted Software provided with this EULA. Use of the Software
provided to you by ATOMOS in whatever form or media, will constitute your acceptance of these terms, unless separate terms are provided
by the software supplier, in which case certain additional or different terms may apply. If you do not agree with the terms of this EULA, do not download, install copy or use the Software. By installing, copying or otherwise using the Software, you agree to be bound to the terms of this EULA. If you do not agree to the terms of this EULA, ATOMOS is unwilling to license the Software to you.
1.Eligible licensees. This Software is available for license solely to purchasers of the ATOMOS Sumo19, who have purchased a unit manufactured by ATOMOS Sumo19 and purchased through an ATOMOS authorized reseller, with no right of duplication or further distribution, licensing or sub-licensing.
2.License Grant. ATOMOS grants you a personal, non-transferable and non-exclusive right to use the copy of the Software provided with this EULA. You agree you will not copy the Software except as necessary to use it with the ATOMOS Sumo19. You agree that you may not copy the written materials accompanying the Software. Modifying, reverse engineering, translating, renting, copying, transferring or assigning all or part of the Software or any rights granted hereunder, to any other persons or reverse engineering the hardware on which the Software runs, is strictly prohibited. The software is license, not sold. You acknowledge that no title to intellectual property in the Software is transferable to you. You further acknowledge that title and full ownership rights to the Software will remain the exclusive property of
ATOMOS and/or its suppliers, and you will not acquire any rights to the Software, except as expressly set forth above. All copies of the software will contain the same proprietary notices as contained in or on the Software. All title and copyrights in and to the Software (including but not limited to any images, animations, video, audio, text incorporated), the accompanying printed materials, and any copies of the Software are owned by ATOMOS or its suppliers.
3.Reverse engineering. You agree that you will not attempt, and if you are a corporation, you will use your best efforts to prevent your employees and contractors from attempting to reverse compile, derive circuits, modify, translate or disassemble the Software and/or the Atomos Sumo19 in whole or in part. Any failure to comply with the above or any other terms and conditions contained herein will result in the automatic termination of this license and the reversion of the rights granted hereunder by ATOMOS.
ATOMOS reserves the right to terminate this license without prejudice to any additional recourse ATOMOS may have against you if you violate any of its terms and conditions.
Registration + Warranty Upgrade
Standard warranty is 1 year. Register to upgrade your warranty to 3 years. Visit: www.atomos.com/registration
*Subject to change without notice |
Atomos Sumo19 – User Manual Edition 1: September 2017 3 |

Introduction
Thank you for choosing the Atomos Sumo19, the in-studio and on-set 10-bit 4K SDI/HDMI Recorder-Monitor. Featuring a super high-resolution screen in a portable body, with waveform monitoring, vectorscope and on the fly conversion between HDMI & SDI input/output sources.
This user manual will get you up to speed with all the amazing features packed into the Sumo19 with tools designed to help your workflow both on set and in post.
Stay up to date with the latest information and software, by registering your product or visiting the Support section of the website:
www.atomos.com/support
Your Sumo19 comes with a standard 1 year warranty on all parts and accessories. You can upgrade to a 3 year warranty on the main
Sumo19 unit alone (excluding IPS screen) by registering your Sumo19 online at www.atomos.com/registration
This will enable us to let you know about updates to the product and other important information surrounding your purchase.
*Subject to change without notice |
Atomos Sumo19 – User Manual Edition 1: September 2017 4 |
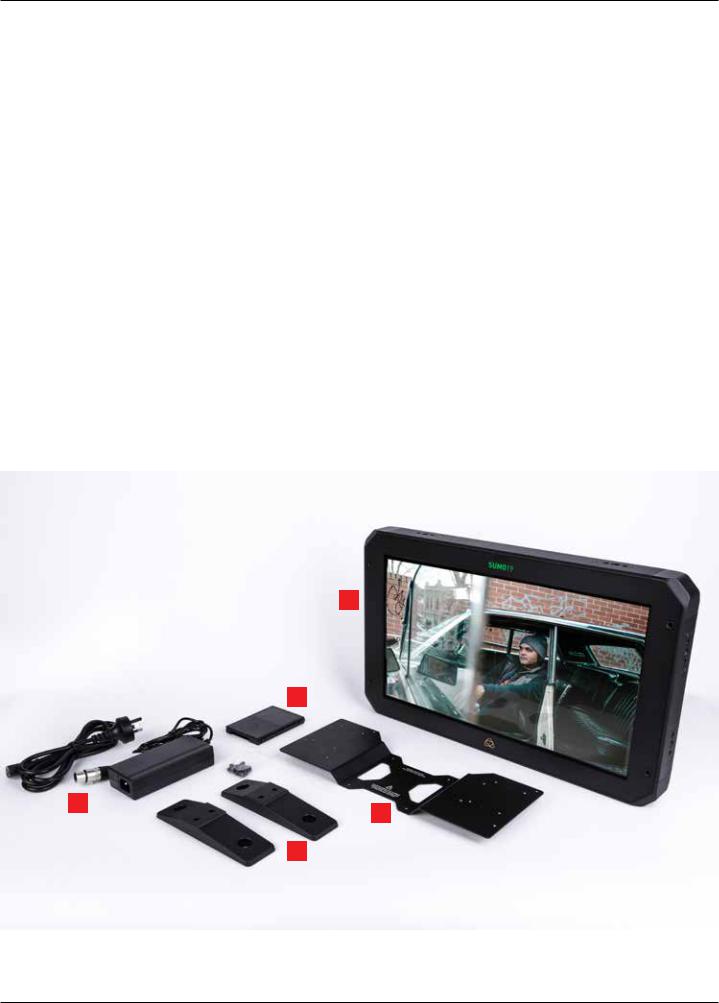
What’s Included
The Sumo19 comes with a power supply and Master Caddy to get you going right out of the box - all you need to add is 2.5” SSD storage media and accessories to suit your workflow like HDMI or SDI cables and tripod screws.
Here’s the complete list
1.Sumo19 recorder/monitor
2.1 x Empty Master Caddy II with fixing screws
3.Sumo19 19” power supply
4.BattWing - Dual battery plate mounting bracket with 4 x screws
5.2 x Desktop Feet with 4 x 1/4” mounting screws
6.Sumo19 Quick Start Guide (not pictured)
* Contents may differ slightly from those shown here.
Atomos does not sell storage and your package will not contain any spinning disks or SSDs. You can buy these locally to keep running costs as low as possible.
We recommend drives, please refer to Part 15 (Technical Specifications)
of this manual. For the most up-to-date information please visit:
www.atomos.com/drives
1
2
3
4
5
*Subject to change without notice |
Atomos Sumo19 – User Manual Edition 1: September 2017 5 |
What you also need
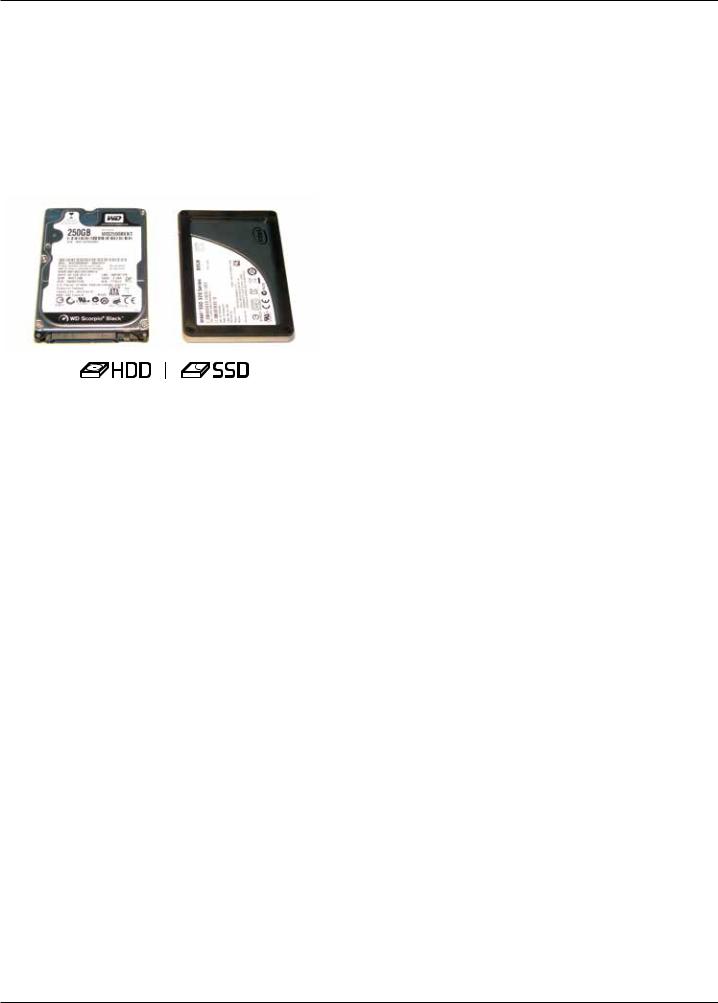
Widely available 2.5” drives are the basic storage medium for 4K Monitor recorder. We work closely with all the leading drive manufacturers to qualify as many options as possible. Hard drives / HDD or Spinning disk can only be used for HD recording. Solid State Drives / SSD are required for 4K recording or for more demanding production environments that may not be suited to HDDs.
See the section below about when you should consider using SSDs.
Mechanical Shock and Vibration for Spinning Disk HDD’s
Hard disks are precision mechanical devices that need to be handled carefully. The use of mechanical drives or Solid State drives will vary depending on the intended filming application.
We can’t give rigid guidelines because there are so many different kinds of drives, each which has different mechanical properties. You may find variations between drives of the same type.
What we have found is that mechanical drives are suitable for most purposes that don’t involve harsh vibration or mechanical shocks. We would not advise using mechanical disks if there is a likelihood that they might be dropped onto a hard surface.
Which drives should you use?
There are so many drives available, and newer models appear all the time. We are not able to test all drives but here are some guidelines.
Spinning Disk Drives (HDD) are recommended for recording up to 1080p30/1080i60 HD video only
Solid State Drives (SSDs) are recommended for recording up to
4KUHDp30 and 4KDCIp30 from RAW
Speed and reliability are the main factors. Here are a few things to bear in mind:
•Disk drive data rates tend to be given in megabytes per second, and codec data rates are normally given in megabits per second. It’s very easy to get confused. But there’s no need to be, because all you have to do to convert megabits to megabytes is divide by 8. So if you’re recording at 220 megabits per second, that’s going to result in 220/8 megabytes per second, which is 27.5 megabytes per second.
•We recommend at least 7200 RPM drives. Just remember that the higher the bit-rate of the codec you’re using, the faster the drive needs to be, with 4K recording your data rate is four times from that of HD recording, please ensure your drive is capable of keeping up with 4K write speed requirements.
Atomos regularly test hard drives – please check this link before purchasing drives: http://www.atomos.com/drives
Here are some things that you should bear in mind when using spinning disks:
•Even though spinning drives can withstand substantial shocks when they are not in use, they are more vulnerable when running. Harsh treatment that may not actually damage the drive may interrupt recordings at a much lower level of severity. We recommend that you experiment with your drives by testing them in the conditions that you normally work in.
•Do not bang or jolt the Sumo19 while recording.
•Do not use spinning drives (HDD) for recording 4K video
•You will find noticeable differences in the ability of drives to withstand shock and to continue recording during vibration and movement.
*Subject to change without notice |
Atomos Sumo19 – User Manual Edition 1: September 2017 6 |

What you also need
File Recovery
•Your Sumo19 is able to detect when the drive is under stress and it will recover from any break in a recording by waiting until the drive is ready to continue, and then resuming from that point. If frames have been dropped because of shock or vibration, a “Skippy” Kangaroo symbol will appear on the home screen on the Sumo19, in the top left hand corner of the display. This means that you will not normally have to restart the Sumo19, even if a recording has been interrupted by mechanical disruption to the disk drive. (see Monitoring and Recording : Anti-shock technology for more information)
Taking into account most usage scenarios, we think that mechanical disks will be suitable in the majority of cases when recording up to 1080p30 HD. Spinning disks are most sensitive when they are rotating. It is obviously best to avoid dropping them but many disks now have a
“drop detector” that will lock the most fragile mechanical parts in place and protect them from surprisingly hard knocks. We recommend that if you want to experiment with this, you do so with a drive that doesn’t contain the day’s shoot!
Backing up and archiving
Remember that no storage medium, including tape, optical disks, spinning disks and flash memory, is completely immune from failure.
You should bear this in mind when deciding how to manage your recorded content. At the very least, you should consider the consequences for you and your business if your storage medium were to suffer from a sudden failure, and you should back up your content accordingly. Hard drives that you can use for archiving are becoming increasingly affordable. You may find that it is completely feasible for your to keep your master Sumo19 disks on a shelf (just like tapes!), and, as a backup, store copies on large hard drives, RAID arrays, Network Attached Storage (NAS) or LTO.
4K SDI cables (not included)
SDI cables are robust physically and electrically: you should rarely have problems with signal transmission unless your cables are either damaged or too long. Please remember that SDI cables use locking connectors and will not simply pull out if they are jerked or tripped over. They are therefore a significant trip hazard, and also a hazard to your equipment, which may be damaged if the cables are mishandled or of a low grade. Please ensure you test and check your SDI cables for 4K, for longer runs cables of a Belden 1694A specification are recommended.
HDMI cables (not included)
HDMI cables are robust physically and electrically: you should rarely have problems with signal transmission unless your cables are either damaged or too long.
Atomos make a range of Professional HDMI cables which are ideal for connecting between your camera and Atomos device.
Not all HDMI cables are created equal and there are a variety of different qualities available. Please make sure you test your cables prior to shooting.
Also check your connectivity at both the camera connector and the recorder/monitor connector to make sure you have a firm connection to avoid any signal drop out.
If the SDI / HDMI cable is removed while recording the “Skippy” image will also be displayed. To remove touch Skippy and he will disappear ready for his next notification.
Refer to page 35: Atomos Anti-shock technology for more information about “Skippy”.
*Subject to change without notice |
Atomos Sumo19 – User Manual Edition 1: September 2017 7 |
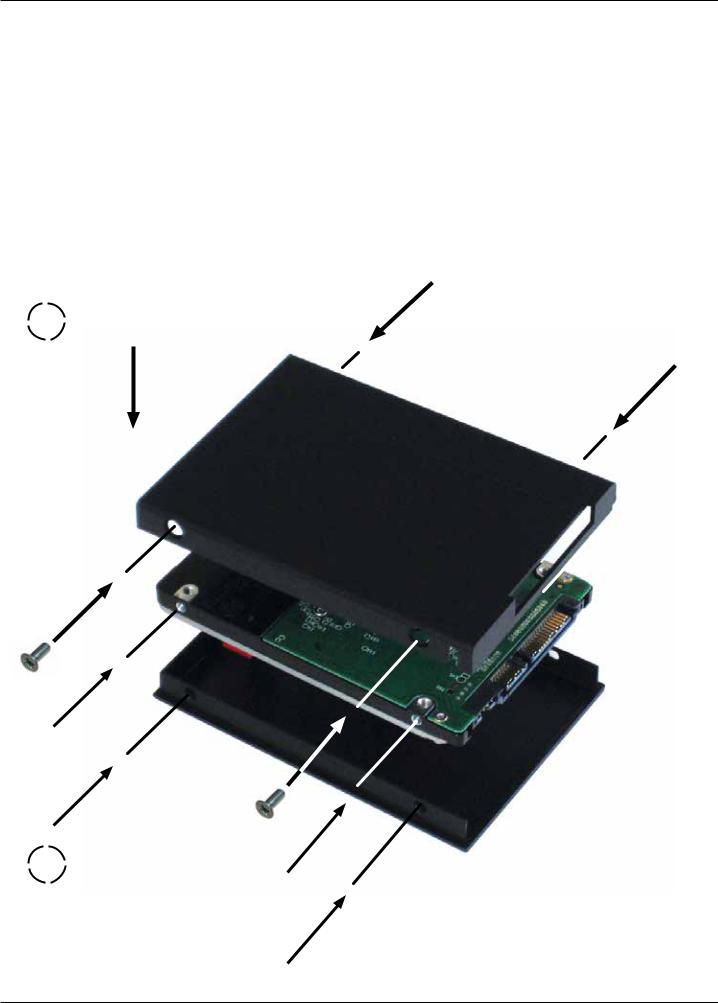
3. Mounting disks in the Master Caddy II
Mounting drives in the Master Caddy II
Insert the disk into the caddy, and secure with four screws. The caddy is light and the disk just needs to be held securely. Don’t over-tighten the screws. There are no connections to make because sliding the caddy into the Sumo19 or the Docking station makes all the connections for you.
The Master Caddy can’t be inserted the wrong way round. Always make sure that the disk connector faces the slot in the Sumo19. You have to be quite firm to push the Master Caddy II into place, but don’t push too hard, just in case something isn’t set up or aligned properly.
There is very little that can cause problems and the most likely thing is that the Master Caddy isn’t properly flush with the drive inside. A quick visual check will confirm this.
 Spinning disks and SSDs are very sensitive to damage from static electricity. Please observe all the usual precautions
when handling them, especially DO NOT EVER touch the exposed SATA connector as static electricity may be harmful
to your disk.
 Master Caddy II drives are backwards compatible with previous Atomos recorders, however Master Caddy 1 is not forward compatible with the Sumo19 due to the compact latch design.
1 |
Carefully assemble the |
|
Master Caddy II and disk |
Insert screw
Align all parts |
Insert screw |
|
2 |
Ensure all 3 parts aligned |
and insert 4 x screws (supplied) |
Do not over-tighten screws or alignment can not be guaranteed. We suggest squeezing the corners together near the screw you are tightening for optimal fit.
*Subject to change without notice |
Atomos Sumo19 – User Manual Edition 1: September 2017 8 |
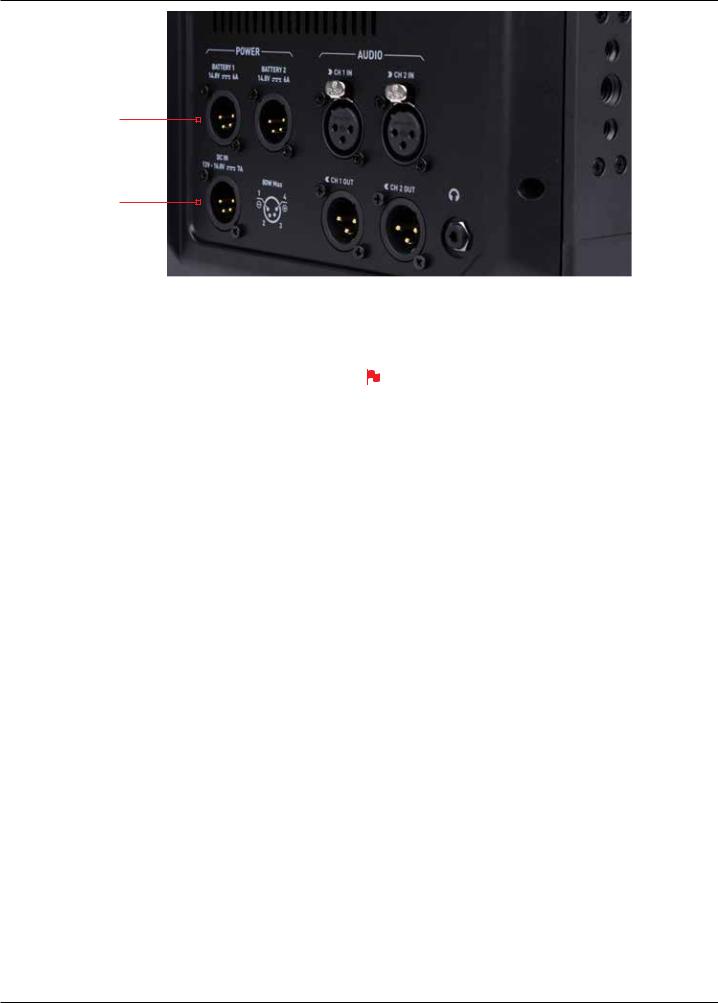
4. Connecting the Sumo19 and powering up
BatteryInputPower
DCIN
Battery Options
The Sumo19 can be powered by V-Lock / Anton Bauer batteries via the XLR terminal (optional mounting plates available). Like all batteries, you will need to take care of them. Make sure that you don’t short circuit the connections because this can result in very high currents that can damage the cells and could pose a fire hazard.
Charge new batteries before using them, using the battery charger supplied by the manufacturer.
 Before any type of disposal the battery should be discharged completely. Tape the contacts with electrical tape and package so as to prevent contacts accidentally coming together at any time.
Incineration must be performed by an approved and permitted waste treatment facility that handles lithium ion batteries. If you are not sure if your waste facility can handle lithium ion batteries, contact them and verify if they are permitted or not.
DC Power
Once the Sumo19 is switched on, it will operate from your external
DC power source if available, if no DC power source is present, then the battery will become the primary power source if it connected by the XLR terminal. The battery will work as redundant power if DC power is disconnected.
Continuous Power
The Sumo19 features an Atomos technology called Continuous Power which uses battery looping technology for uninterrupted switching between power sources during use.
The Sumo19 may be powered from NiMH & Li Ion 14.4V battery systems via the XLR terminal for V-Lock / Anton Bauer batteries.
*Subject to change without notice |
Atomos Sumo19 – User Manual Edition 1: September 2017 9 |
4. Connecting the Sumo19 and powering up cont.
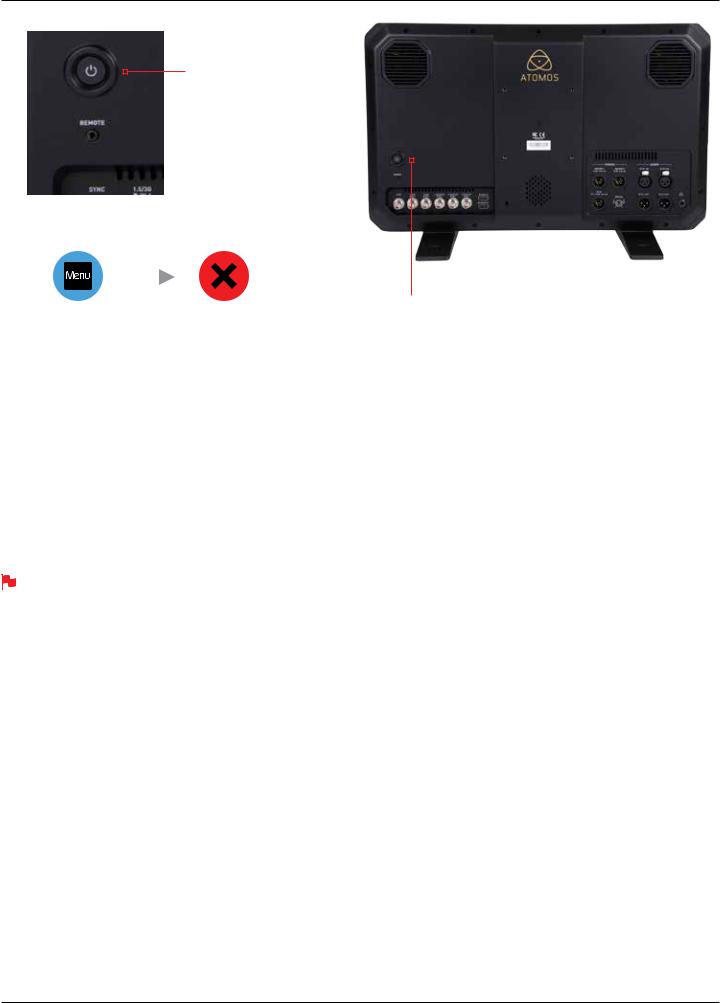
On
+ forced power down (located on rear)
Turning OFF power via touchscreen
Menu |
Power off |
PowerButton
Flashes red when recording
Turning ON power to the Sumo19
The power button is located on the rear panel just above the SDI connectors. Momentarily press the circular button on the top right side of the Sumo19 as you look at the screen to power up the unit. After a couple of seconds you will see the Atomos logo, and then the Sumo19 Home Screen.
Turning OFF power to the Sumo19
To turn the unit off, touch menu on the home screen, and then press the red Power off icon for 3 seconds the icon will go white when touched to indicate activation of the button. The unit will then power off. You can also do a forced power down by depressing the on/off button for three seconds.
Three seconds can seem like a long time! We’ve made it this way to make absolutely certain that the Sumo19 can’t be turned off accidentally.
*Subject to change without notice |
Atomos Sumo19 – User Manual Edition 1: September 2017 10 |
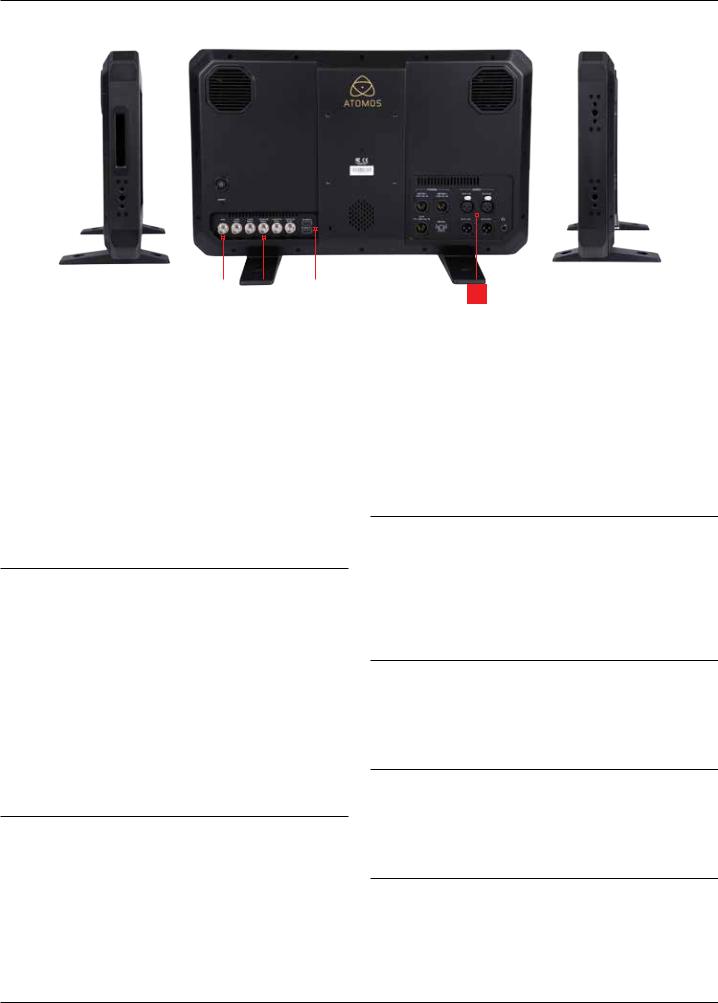
5. Sumo19 Connections
2
1 |
|
3 |
1. Power Button
The power button is used to power on/off the device.
2. Calibration Port
The calibration 2.5mm jack on the rear panel below the power button, allows for the connection of supported calibration devices with support now available for the retail version of the X-Rite i1Display Pro as well as legacy Atomos Spyder Calibrator. Both units utilize the optional USB to serial adaptor cable. The latest version of the Atomos Calibration software is available at www.atomos.com/support
3. Headphone Ports
A 3.5mm headphone jack is located on the rear panel adjacent to the XLR audio connections. Channel selection and volume for headphone monitoring is via the audio controls section in the lower left hand side of the touchscreen.
*Subject to change without notice |
Atomos Sumo19 – User Manual Edition 1: September 2017 11 |
5. Sumo19 Connections cont.
4 |
|
1 |
|
2 |
1. 4K/HD-SDI
4K/HD-SDI in: The SDI input connections are 12G compliant and backwards compatible meaning that it can be used for 12G, 6G, 3G and 1.5G signals. The SDI inputs support 3G in both level A and B standards. This input is also used to input RAW signals from supported cameras.
4K/HD-SDI out: This is for connection to an external monitor or other device with an SDI input. It carries a loop-through of the incoming SDI or HDMI signal in record and standby mode, and the playback signal when the Sumo19 is in playback mode. This output can carry either a 4K or HD signal (with the option to down scale the 4K input to HD). The SDI <->
HDMI conversion is always live allowing for instant conversion without any setup. The SDI outputs support 3G in only level B standards and is not active whilst receiving a RAW signal input
2. HDMI
HDMI IN: The video input is a full size HDMI 2.0a connection used to receive the video and when supported by your device embedded audio and Timecode. This is both displayed and recorded to the Atomos recorder/monitor storage media.
HDMI OUT: This is for connection to an external monitor or other device with an HDMI input. It carries a loop-through of the incoming HDMI or SDI signal in record and standby mode, and the playback signal when the
Sumo19 is in playback mode. This output is 2.0a and can carry either a 4K or HD signal (with the option to down convert the 4K input to HD). The SDI <-> HDMI conversion is always live allowing for instant conversion without any setup.
3. Analogue Audio
On the rear panel of the Sumo are the XLR audio input and output terminals. The inputs can be connected. A 2 in 2 out XLR cable is available as an optional additional accessory. The inputs can be configured at Line, Mic and Pro level in the Audio menu. The inputs can also provide 48V Phantom power to compatible microphones.
The XLR outputs are available for monitoring and the audio channel routed to them can be selected via the headphones selection in the Audio menu.
3
4. Synchronization
Located with the SDI input and output is another BNC connector marked
Genlock: Genlock is short for “Generator Lock” in video systems. The
Genlock is an input only and will lock the internal timing system in a video device to an external reference signal during play back.
The Genlock BNC can also be used as a LTC Timecode input. This allows for external LTC timecode to be used enabling multiple devices to be sharing the same master timecode signal, which makes it perfect for multi-camera setups. LTC is only available in Record mode and can be accessed via the Time code menu
HDMI and SDI
Built in to the Sumo19 are are both SDI and HDMI conversion. This means that either input is able to be routed out of both the HDMI and SDI outputs at the same time. This allows you to use SDI cameras with other HDMI equipment or HDMI cameras in an SDI infrastructure. To toggle between SDI and HDMI inputs access the Input Menu (page 19).
Video Scale Convert
Video out also has the option for a down scale to be applied allowing your
4K input to be converted to a 1080 HD output for use with existing HD equipment.
3D LUT Output
When not using AtomHDR mode 3D LUTs can be applied to the outputs of the Inferno and LUTs can also be selected to be applied to the outputs and routed out to other equipment via the HDMI or SDI connections.
Embedded Audio
The Sumo19 can record 12 channels of digital audio embedded in the SDI signal, and 8 channels of digital audio embedded in the HDMI signal.
*Subject to change without notice |
Atomos Sumo19 – User Manual Edition 1: September 2017 12 |

6. Master Caddy II, Screw Mounts and Sun Hood
Master Caddy II Slot
On the side of the unit is a 2.5mm HDD slot for Sumo19 Master Disk Caddy II’s. To insert a caddy, gently push until it clicks into position.
Formatting disks - see page 20
Master Caddy II - 2 keyway system
The Master Caddy II is hot-swappable, so you can do this at any time – even while the unit is turned on. But don’t do it while recording or you will get a corrupted file that may be unplayable.
The Sumo19 does NOT have a release latch - it is friction-fit. Simply pull the Master Caddy out using the top and bottom tabs on the caddy itself.
Master Caddy II is backwards compatible with previous Atomos recorders Master Caddy 1 is not compatible with Sumo19 as the keyways are on one side only.
Screw Mounts
The Sumo features standard tripod ¼” screw mounts and 3/8” screw mounts on the top/bottom/side of the unit along with a standard VESA mount on the rear panel, allowing you to configure your recording setup to suit your needs (camcorder mount accessories not included with Sumo).
 Ensure you do not over tighten the screw mounts as this may cause damage
*Subject to change without notice |
Atomos Sumo19 – User Manual Edition 1: September 2017 13 |

6. Master Caddy II, Screw Mounts and Sun Hood cont.
Screw the hood into the base 2
|
|
|
|
|
|
1 |
|
3 |
|
||
Attach base to Sumo19 |
Fold out the face of the hood |
||||
Attaching the Sun Hood
For HDR, the viewing experience can easily be influenced by the environmental conditions and the best experience for viewing HDR requires that you minimise the ambient light between your eyes and the screen to easily resolve the dynamic range of the scene.
For this reason, we have developed an optional sun hood for Sumo. It consists of a zippered corner construction that allows the user to collapse and use as screen protection during transportation and securely screws to the front face of Sumo to provide shelter for privacy and premium outdoor monitoring.
To assemble the sun hood please follow the following steps:
Attach the base to the Sumo19 in the orientation shown above.
 This is a snug fit in order to minimize external light bleed.
Push the sunhood in, align the top and bottom screw mounting holes and attach the retaining screws.
 As the retaining screws provide anchor point for mounting make sure they are firmly connected to provide a solid base.
With the Sun hood base in place, take the main section and pop this out to form a rectangular tunnel and zip up the sides to ensure it looks like the image above.
*Subject to change without notice |
Atomos Sumo19 – User Manual Edition 1: September 2017 14 |
7. Using the Sumo19
The Sumo19 is controlled via an intuitive touchscreen interface. Icons and buttons have been designed and laid out in a specific way to ensure operation is simple and fast.
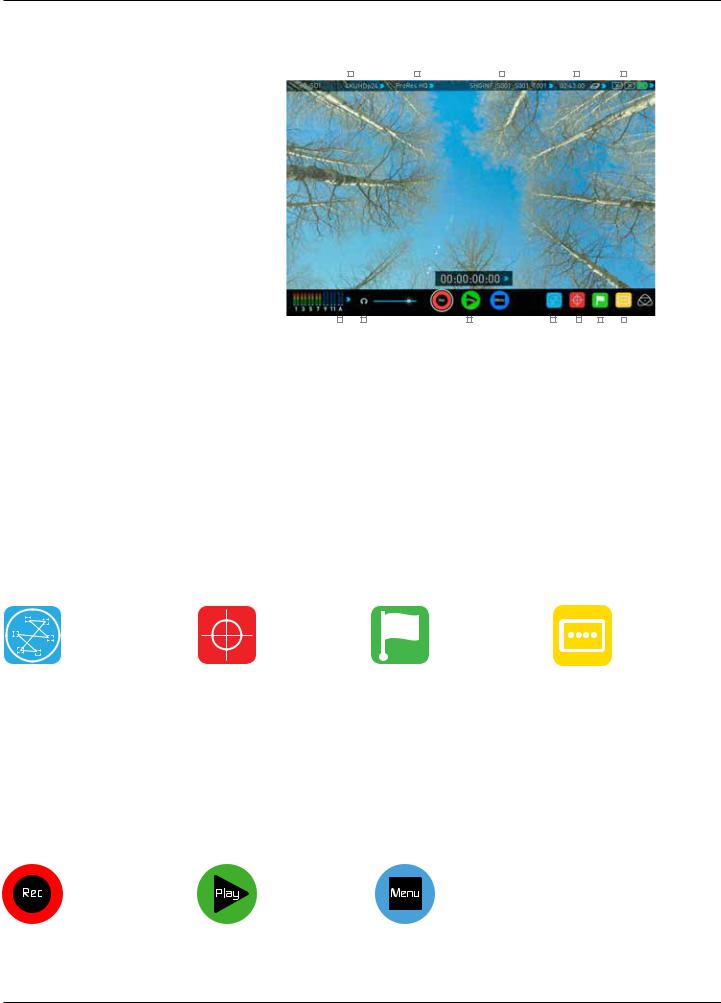
The high definition 1920x1080 Home Screen displays all necessary technical and functional information.
Everything important for operation and adjustment is no more than one touch away. Here is how it works:
Video Input Format and |
Recording |
File Name |
Recording Time |
Continuous Power |
||||||
Pulldown Status |
Quality |
|
|
|
Remaining |
Indicator |
||||
|
|
|
|
|
|
|
|
|
|
|
|
|
|
|
|
|
|
|
|
|
|
|
|
|
|
|
|
|
|
|
|
|
|
|
|
|
|
|
|
|
|
|
|
|
|
|
|
|
|
|
|
|
|
|
|
|
Monitor Mode |
|
|
|
|
|
|
|
|
|
|
|
|
|
(AtomHDR / |
|
|
|
|
|
|
|
|
|
|
|
|
|
3D LUTs) |
|
|
|
|
|
|
|
|
|
|
|
|
|
|
Audio Channels |
Headphone |
Rec/Play/Menu |
Waveform |
Monitor |
Cut and Tag |
||||||||
|
|
Line Out Volume |
|
|
Monitoring |
Assist |
Favorite / Reject |
||||||
 Touching the center of the screen at any time removes the top interface overlay, tapping again clears the bottom controls and a third tap brings all the options back up. Active Shot Setup or Monitor assist functions that are enabled will remain active when the menu system is cleared. This is to allow you to use the Shot Setup and Monitor assist functions at all times while shooting.
Category 1 – Operating Settings
This list of real-time operating settings can be adjusted or toggled when a BLUE ARROW  is present. If the Blue arrow is disabled, the setting cannot be adjusted.
Category 2 – Shot Setup & Monitor Assist Tools
This list represents the icons and functions available for Shot Setup and Monitor Assist Tools:
Waveform Monitoring Functions |
Monitor Assist Functions |
Smart Log Cut and Tagging |
Monitor Mode (AtomHDR & 3D LUTs) |
See page 24 |
See page 26 |
See page 29 |
See page 31 |
Touch these icons to reveal more functional options in a sub-category. Touch the sub category icons to toggle the functions on or off. When a Shot Setup or Monitor Assist function is active, detailed settings for each Shot Setup tool are also available from this panel.
Touch the  icon to go back to the Home Screen at any time.
Category 3 – Main Controls REC, PLAY & MENU
The Main Controls of the unit are indicated by large round icons.
To enable recording |
For instant playback and review |
To make settings changes |
See page 16 |
See page 16 |
See page 16 |
*Subject to change without notice |
Atomos Sumo19 – User Manual Edition 1: September 2017 15 |
 Loading...