

Atomos SHOGUN Quick Start Manual
QUICK START GUIDE
SHOGUN
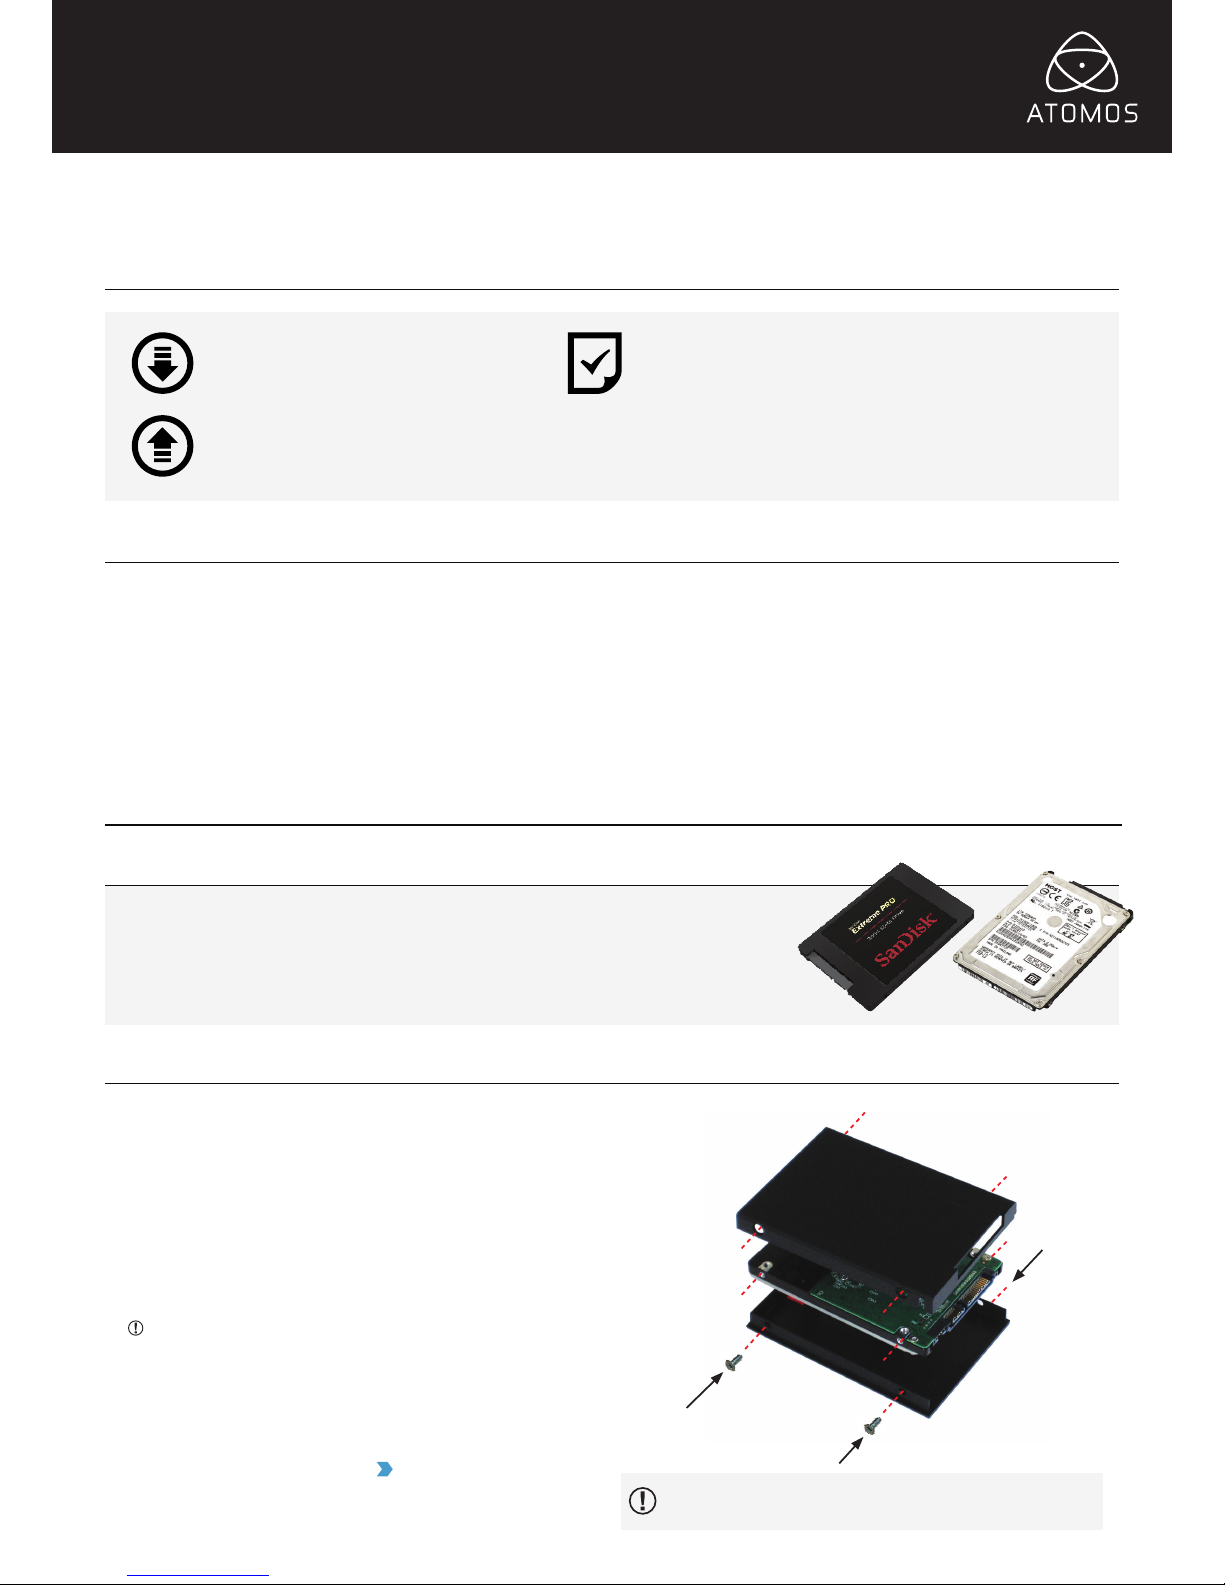
SSD
Solid State Drive [SSD]. For
recommendations refer to:
> www.atomos.com/drives
HD-SDI / HDMI Cable/s
The Shoguns BNC Connectors support SMPTE standards
of 259M, 292M and 296M. HDMI cables need to support
the HDMI 1.4 High Speed standard. Any make of HD/SD-SDI
& HDMI cable that supports these standards can be used.
Battery:
We recommend that you charge new batteries before using them. To
begin, connect battery to charger and commence charging. While
charging, the red charge light will illuminate. When the red charge light
turns green, the battery is 100% charged.
Assemble the Master Caddie II:
Fix the Solid State Drive into the Master Caddy as shown (right). Align
screw holes on all three pieces and assemble completely. Insert screws
last.
Handle the SSD with care
Touch screw holes or metal shell rst. Avoid contact with circuit board
and connectors. Refer to manual if unfamiliar with handling ESD sensitive
devices.
Format SSD:
Once your drive is inserted into the caddy, format it in your Shogun
recorder by selecting the BLUE arrow next to Recording Time
Remaining, Press Format HDD/SSD and follow the on-screen
instructions. For more information refer to the User Manual.
Checklist
Thank you for purchasing the Atomos Shogun, the world’s most advanced Monitor-Recorder designed to save you time and
money for 4K and HD video production. With so many Recorder, Monitor, Playback & Edit features included, please take the
time to read through this Quick Start Guide and register your product (www.atomos.com/registration) for free updates and
extended warranty. We truly hope this becomes your “4K Creative Weapon” of choice.
You will also need:
Getting started:
q 1 x Shogun Recorder
q 1 x Rugged Carry Case
q 1 x D-Tap Adaptor
q 1 x 4-Cell Battery
NP-F750 battery 5200mah
q 1 x Single Battery Charger
+ Power supply unit
q 1 x Master Caddy Docking Station
USB 3/2, 2.5” HDD/SSD
q 5 x Master Caddy II Caddies
q QuickStart Guide
q 1 x 2.5mm Male to 2 x 2.5 Female (Lanc Cable)
q 1 x AC/DC Power Supply
110-240V AC to DC operation
q 1 x Breakout XLR Cable
XLR Stereo Line in (adaptor not included)
XLR Mic Level In with 48v Phantom Power
DOWNLOAD THE FULL SHOGUN
USER MANUAL
www.atomos.com/support
ACTIVATE AVID DNxHD®
IF REQUIRED
www.atomos.com/activation
EXTENDED 3 YR WARRANTY
Register now to extend your warranty to 3 years
from date of purchase.
www.atomos.com/registration
Important: Insert screws last and DO NOT over-tighten the screws
or proper alignment of the Master Caddy cannot be guaranteed.
QUICK START GUIDE
SHOGUN
0-6-12-20-30-40
Attach Battery / Optional Power
Station:
Attach the supplied battery to the Shogun.
To utilize Atomos continuous power
functionality connect the optional
Atomos Power Station via the DC power
connection on the Shogun.
The Shogun utilizes only one battery
source at a time. This way a battery
can be removed, charged and
replaced during operation so long
as one battery with adequate charge
remains connected. Refer to the User
Manual for more information.
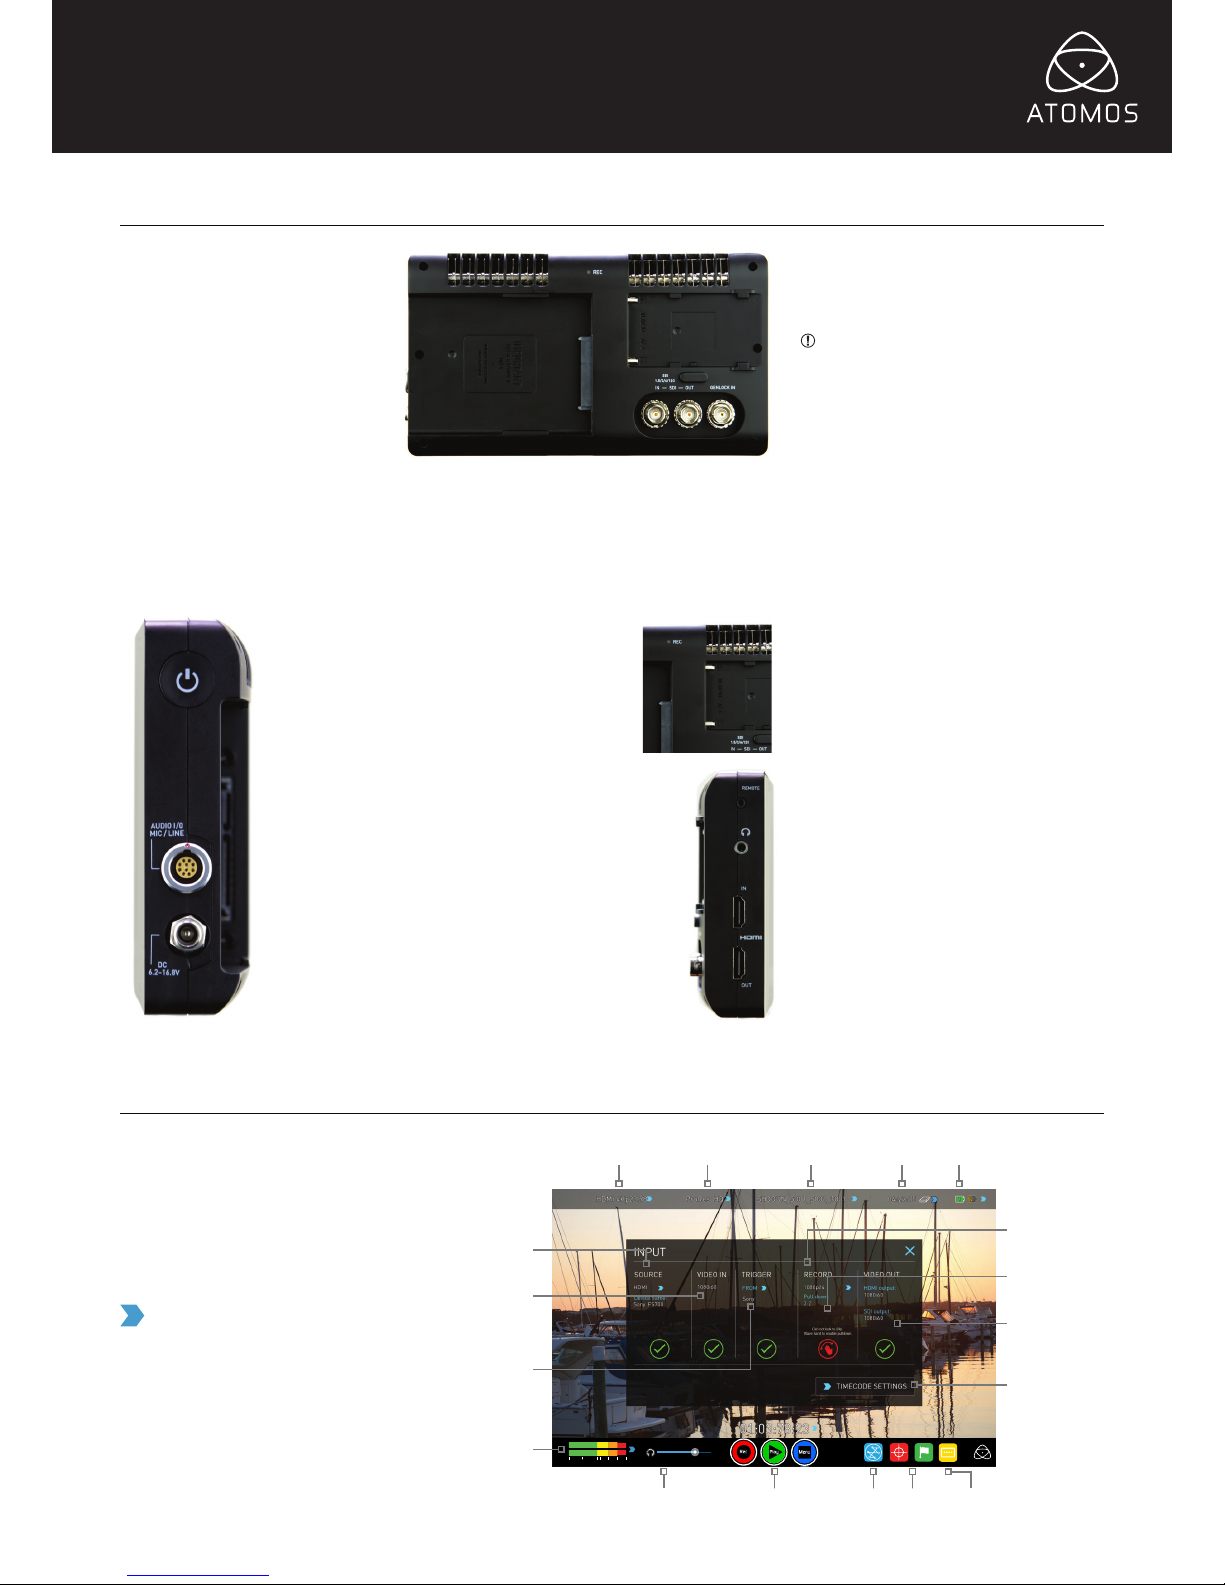
On/O & Screen lock:
Briey press the circular button on the side
of the Shogun to power-up the unit. To shut
down, depress button for at least 4 seconds
(until unit turns off)
When in operation, a single press of the
power on/off button will lock the display and
controls. A second press will enable the
display and controls again.
Breakout XLR Connector:
Connect the Atomos XLR breakout cable for
Line Level in / Mic Level In functionality with
+48v Phantom Power
DC Power
Connect DC power from an external source
such as the optional Atomos Powerstation, the
Shogun will automatically switch to this source
HDD/SSD Master Caddy II
Line up the Master Caddy II to the Shogun disk bay and
rmly slide into place. To remove, gently pull the drive out.
IMPORTANT: Avoid removing the drive whilst recording
as this may cause corruption
The Shogun is controlled by a simple userfriendly touchscreen interface. Pictured are
the main controls seen when the Shogun is
rst powered up and there is a video input
connection.
Pay special attention to any items on screen
which are marked by a small blue arrow.
Touch these items to access or cycle
through the available options.
For example, touching the Video Input
Format will bring up the central input /
output menu.
Tally Light
Red Tally light indicates active recording
Battery Latch
Press the release button to remove the battery
LANC Remote
Optionally control the Shogun using LANC
remote control connected here (use a 2.5mm
TRS/ 3-pin plug). Share remote control with
other devices (loop through) by connecting
them to the second LANC connector cable
Stereo Line Out
Stereo Line out for monitoring Headphones
HDMI In
The video input connection used to record
to the Shogun’s storage media.
HDMI Out
This is for connection to an external monitor
or other device with an HDMI input
Battery
Align the connectors, Gently push down on
the battery and slide into the lock position
Push release button to remove battery
4K HD SDI In: The video input connection
used to record to the Shogun’s storage media.
4K HD SDI Out: This is for connection to an
external monitor or other device with an HD-SDI
input
Genlock: For connection to a central Genlock
oscillator to maintain clock frequency sync
across multiple devices.
Connect and power-up
Touchscreen / User Interface
Source input
for recording
Video Input Format
and Pulldown Status
Recording
Quality
File Name
Scene/Shot/Take
Recording Time
Remaining
Continuous Power/
Battery Indicator
Record Status &
Pulldown Indicator
Status indicating
attention is required
Output Video
Resolution
Time code Settings
Video Input
Resolution
Monitor Assist
Functions
Record Trigger
Audio Control Panel
- Tap to control
audio input sources,
gains and channel
monitoring/recording.
Please refer to the
manual for more
information.
Headphone
Line Out Volume
Rec/Play/Menu Waveform
Monitoring
Monitor
Assist
Cut and Tag
Favorite/Reject
 Loading...