

Atomos Ninja 2, Ninja 2 Bare bones Quick Start Manual
Getting started:
Battery:
We recommend that you charge new batteries before using them.
To begin, connect battery to charger and commence charging. While
charging, the red light will illuminate. When the red light turns green,
the battery is 100% charged.
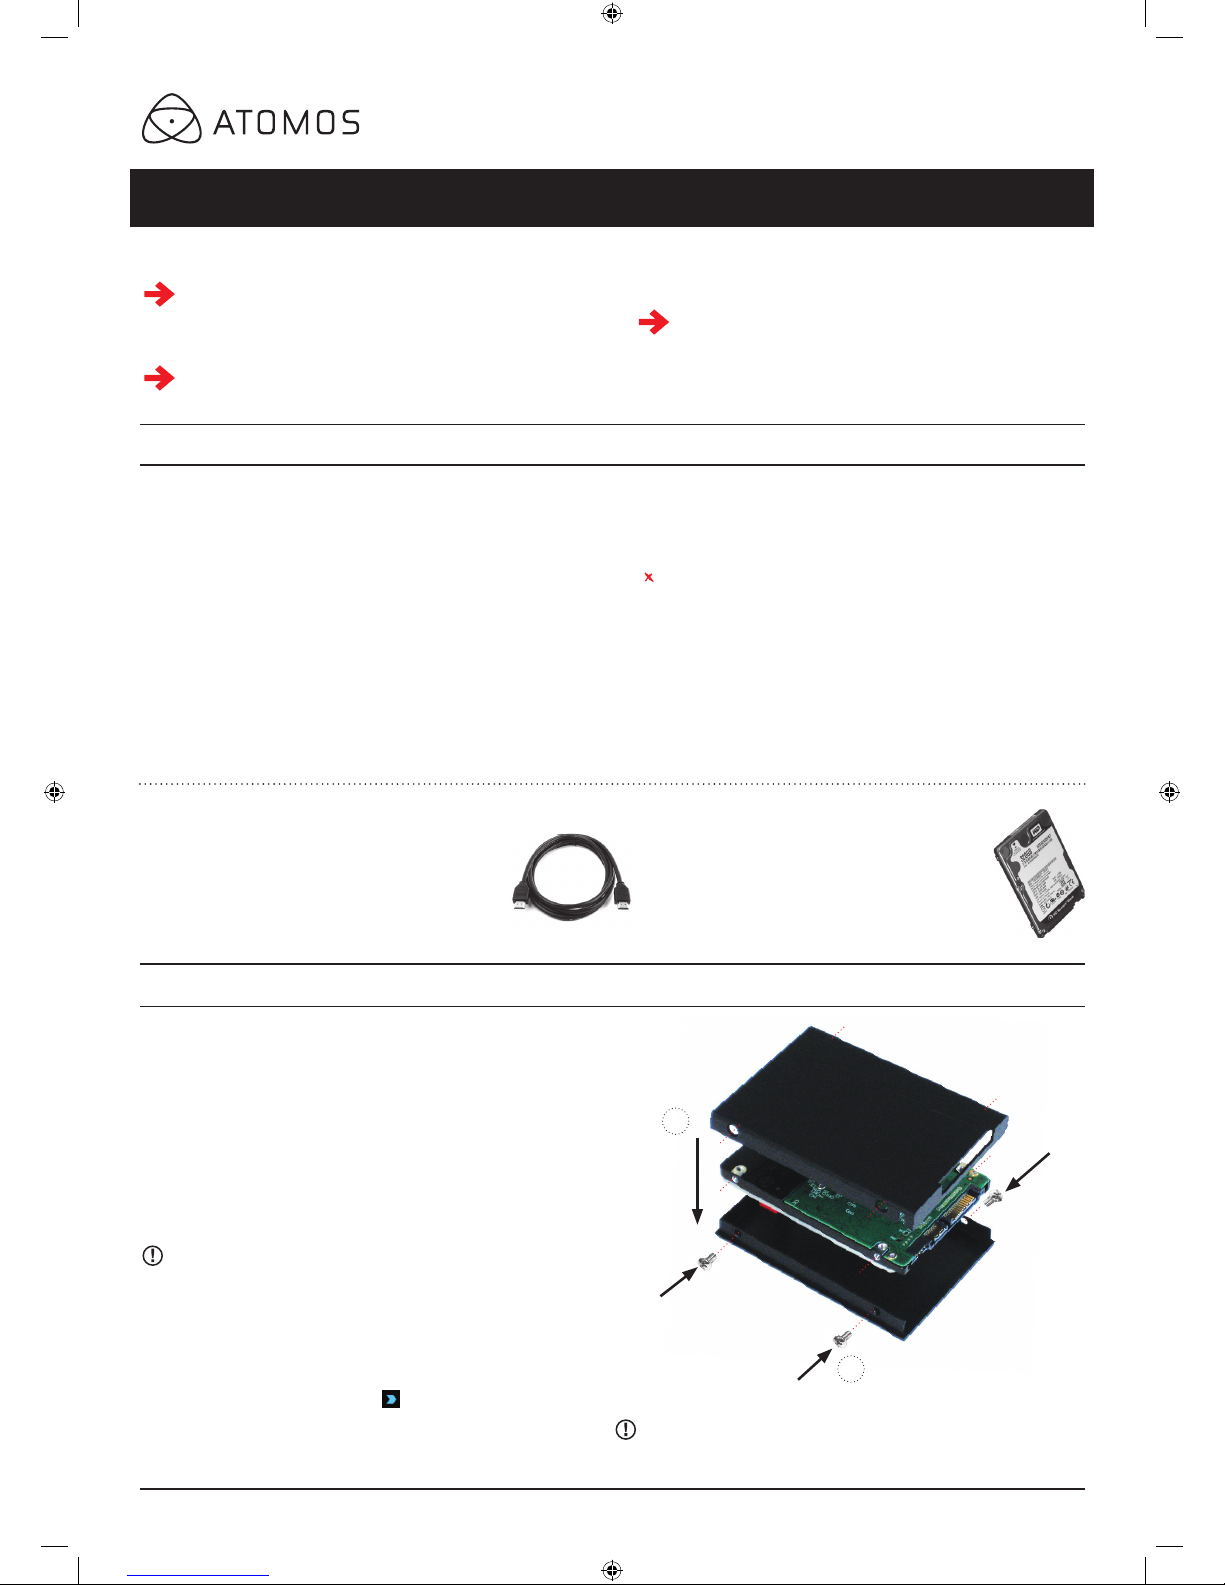
Assemble Master Caddy:
Fix the Hard Disk or Solid State Drive into the Master Caddy as
shown (right). Align screw holes on all three pieces and assemble
completely. Insert screws last.
Handle the HDD or SSD with care
Touch screw holes or metal shell rst. Avoid contact with circuit
board and connectors. Refer to manual if unfamiliar with handling
ESD sensitive devices.
Format HDD/SSD:
Once your drive is inserted into the caddy, format it in your Ninja-2
recorder by selecting the BLUE arrow next to Recording Time
Remaining, Press Format HDD/SSD and follow the on-screen
instructions. For more information refer to the User Manual.
1
2
HDD/SSD
2.5 inch Hard Disk Drive [HDD] or Solid State Drive
[SSD]. For recommendations refer to:
> www.atomos.com/drives
Checklist:
You will also need:
HDMI cable
One end having a common 13.9mm type A plug for
connection to Ninja-2, and the other end having a plug
suitable for your camera.
❏ Ninja-2
❏ 1 x 2-Cell Battery
NP-570 Compatible 2600mAh
❏ Single Battery Charger
+ Power Supply Unit
❏ Master Caddy Docking Station
+
USB 2.0 Power Cable, USB 3.0 Cable
❏ 9V AC Battery Eliminator
110-240V AC for AC operation
❏ 2 x Master Caddies
❏ QuickStart Guide’
❏ Canon LP-E6 or Nikon EN-EL15
Battery Adaptor
for use of Nikon and Canon batteries
Available upon registration*
* Due to unforeseen circumstances the Battery Adaptor Plates for
Canon & Nikon will not be available until July 2013. All registered users
will be notied when they are available. Please register now to ensure
you receive notication email > www.atomos.com/register
Download the full Ninja-2 User Manual
www.atomos.com/support
Activate Avid DNxHD® if required
www.atomos.com/activation
Register now to extend your warranty
to 3 years from date of purchase
www.atomos.com/registration
Atomos Ninja 2 ~ QuickStart Guide
Important: Insert screws last and DO NOT over-tighten the screws
or proper alignment of the Master Caddy can not be guaranteed.
Ninja 2 QSG.indd 1 21/05/2015 4:59 pm

Atomos Ninja 2 ~ QuickStart Guide
CAUTION: The Ninja-2 is constructed from aluminium which acts as the unit’s heat sink. In high or extreme temperatures / climates, the metal
chassis may feel slightly warm / hot to touch. This is completely normal and does not in any way effect the overall functionality of the Ninja-2.
Main Controls: One-touch Operation (Simple Touchscreen Interface)
The Ninja-2 is controlled by a simple
user-friendly touchscreen interface.
Please nd herewith a brief description of
the main controls seen when the Ninja-2
is rst powered up. Please refer to the
User Manual for more details.
Current video input
format and status
Codec used for recording
Battery power
remaining
Currently
active battery
1 or 2
Audio input
level meters
Headphone Line
Out volume
Recording time
remaining
Pay special attention to any items on
screen which are marked by a small blue
arrow. Touch these items to access or
cycle thru related options.
A larger blue arrow in the top right
corner of the screen will return you
from other menus to the main controls.
Eject Button: HDD / SSD
To eject the Master Caddy, slide the
latch on the side of the Ninja-2 and
pull out Master Caddy from the slot.
The Master Caddy is hot-swappable
so you can do this at any time...
except while actively recording.
Battery number 1
Gently slide down into battery
slot/s and lock into position.
On/Off
Briey press the circular button on
the side of the Ninja-2 to power-up
the unit.
To shut down, depress button for at
least 4 seconds (until unit turns off)
POWER:
Connect & power-up
Attach Battery:
Attach the supplied battery to the Ninja-2. Make
sure to use the battery slot marked with the
number “1” as this is the primary battery. If you
purchase an additional battery, it should be
connected to the other, secondary slot.
The Ninja-2 utilises only one battery at a time.
This way a battery can be removed, charged and
replaced during operation. Refer to the User
Manual for more information.
IMPORTANT Ninja-2 can only power up / turn on
from the primary battery position. [Battery Slot #1]
Ninja-2 Must power up
using battery slot 1 ONLY
Push latch to release battery
Rolling
timecode
trigger
Easy to use
Touchscreen
Interface
Media Storage:
Insert Master Caddy into the
Ninja-2 until it clicks into
position.
Stereo Line Out
or Headphones
Audio
Stereo Line In
Video Input
Connect camera or other
source device to the Ninja-2
using a HDMI cable.
CONNECT:
Video Output
Loop or Play out to an
external HDMI TV/Monitor
Mount
Mount the Ninja-2 on or between the camera or tripod
using the standard 1/4” inch tripod screw mounts top and bottom.
Ninja 2 QSG.indd 2 21/05/2015 4:59 pm
 Loading...