

Page 1
VirtualDJ
version 5.0
User Guide
(Updated and NEW Features ONLY)
**This guide only addresses items updated in the VirtualDJ version 5 release. For features carried over from
previous versions the User Guide for those options should be referenced. FULL Version coming soon.
Copyright 2007
Page 2

2
NEW Installation Paths for Microsoft VISTA compliance
NEW Database Management
NEW Global Search
NEW Browser
NEW Track/Album Cover browser
NEW ID3Tag Support
NEW Auto-MIX PlayList
NEW SideList
NEW Play History Management
NEW Genre Filtering
NEW Filter Folders
NEW Integration with Third-Party Applications (Crates and iTunes Play lists)
NEW Video Plugins
NEW Video Sampler
NEW Timecode Engine
NEW TimeCode Plugins
NEW AutoGain Fine Tuning Control
Enhanced Karaoke CDG File Detection
What’s New
Page 3

3
If installing VirtualDJ v5 as a fresh clean install please make the following notes:
Default application path provided during the install -
C:\Program Files\VirtualDJ\
All Application Configuration, Plug-in, Skins and Support Files are stored in –
C:\MyDocuments\VirtualDJ
**VERY IMPORTANT – EXTERNAL DRIVE USERS**
You should have your COMPLETE gig ready computer setup connected before launching V5
for the first time.
**VERY IMPORTANT – EXTERNAL DRIVE USERS**
When upgrading to VirtualDJ v5 the default application path stays the same and the new
application configuration, plug-in, skins, and support files are copied to
C:\MyDocuments\VirtualDJ. Since VISTA does not like applications writing data to the
Program Files folders, the Development Team moved these entries to a more accessible
location so they wouldn’t be placed in the Microsoft managed hidden folders profile
environment.
*For Power Users who have changed the location of their MyDocuments from the default Microsoft setting
(C:\MyDocuments), your new/copied files are stored there in the VirtualDJ folder.
The NEW core VirtualDJ Database is now titled - VirtualDJ Database v5.xml and is stored
In Windows XP: C:\MyDocuments\VirtualDJ
In Windows VISTA C:\_UserName\Documents\VirtualDJ
The NEW VirtualDJ Database system segments the database to each drive attached to the
system. Each additional database file will be found on the ROOT of that drive and is titled –
VirtualDJ Local Database.xml
Because of the ‘split’ database files and depending on the size of the v4.x database XML, the
FIRST LAUNCH of VirtualDJ after upgrading may act like it has stopped at the applications
splash screen. Please be patient and look for activity on the hard drive(s). VirtualDJ is
reading the v4.x database and splitting the various entries across the respective hard drives of
the system.
What is stored in the NEW Database files?
Path to the file
Analyzed data about the tracks
ID3Tag Display Information
Automix Information
INSTALLATION / UPGRADE NOTES
** IMPORTANT READ **
Page 4
4
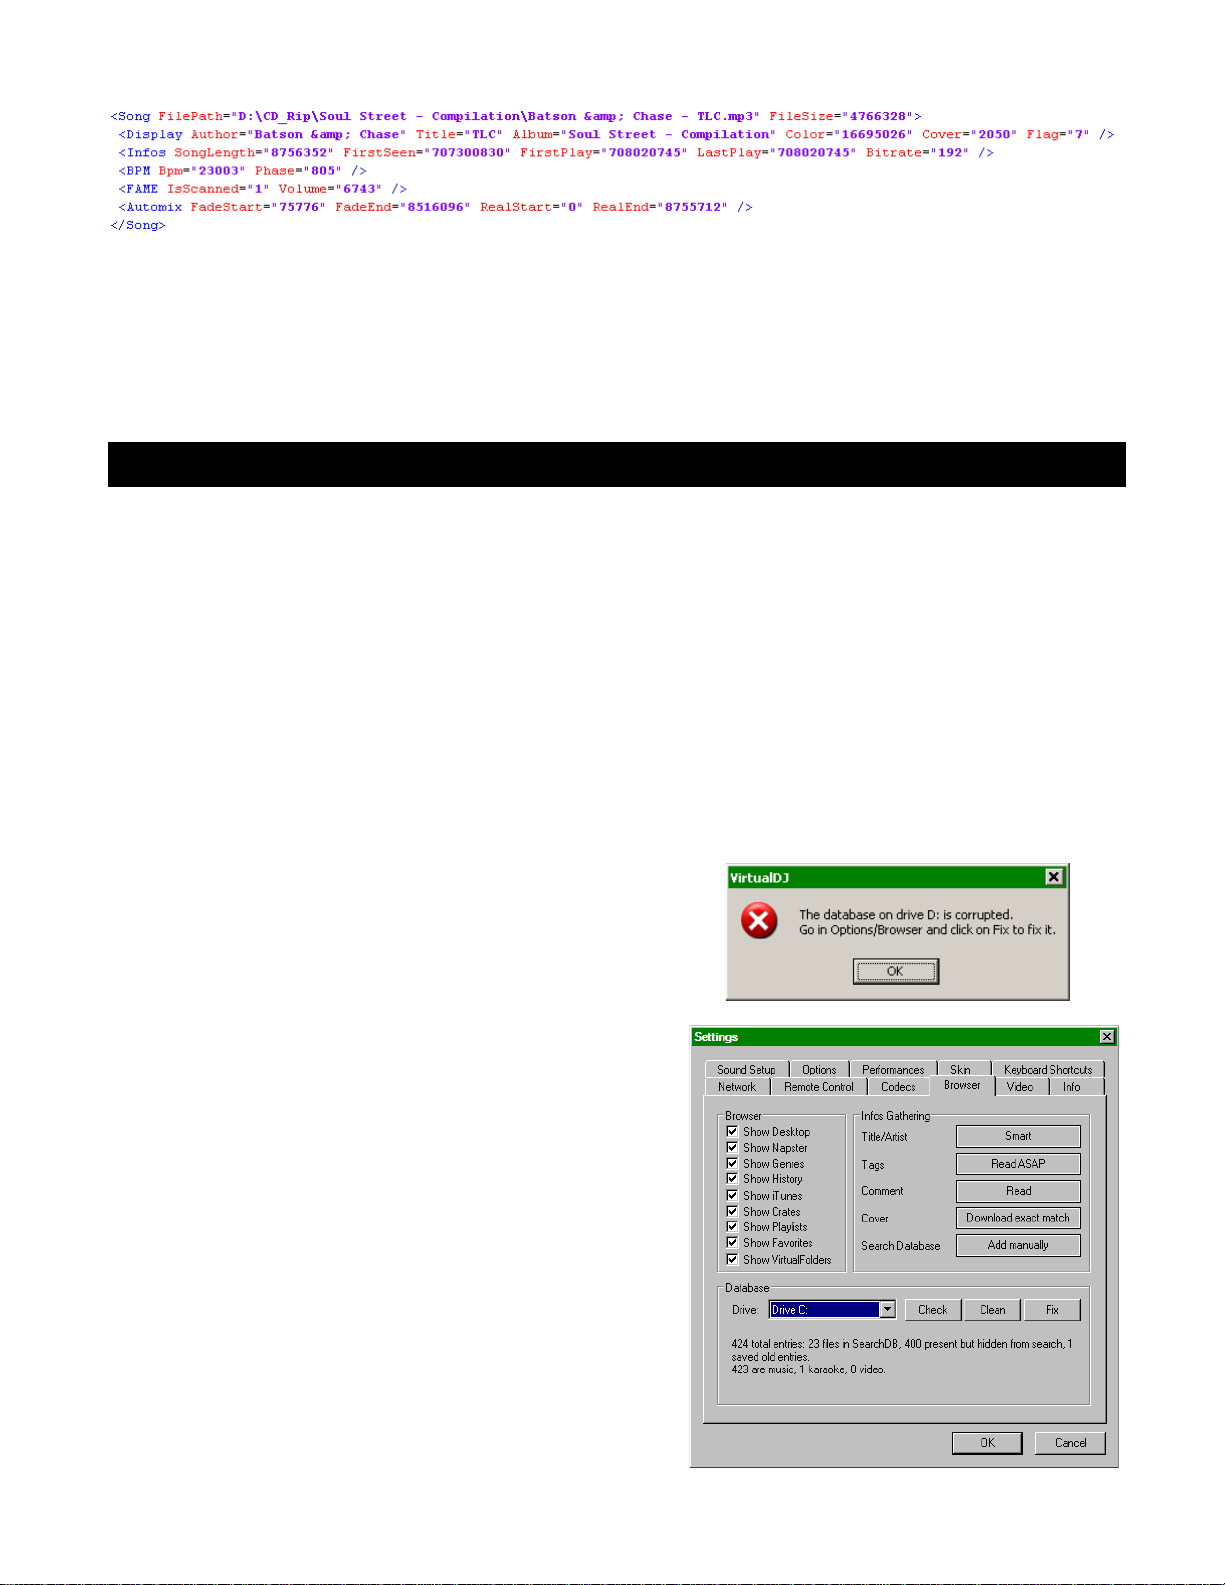
Example of a database entry –
*(this is not representative of all information stored)
The ‘split’ database files provide users of external hard drives the ability to COLD or HOT
SWAP drives between single or multiple systems. This allows for multiple DJs of a club or
venue to utilize 1 VirtualDJ installation and not have different OS logins in order to maintain
separate databases unique to each DJ. Now, the DJ just walks in plugs in the external device
and begins playing.
The NEW Database management system comes with additional tools as part of the VirtualDJ
Configuration Browser tab.
Save ‘On the Fly’ during each session use
Automatic check of database integrity at launch
Manually check the database integrity
Fix database error(s)
Clean out database entries for missing/moved files
VirtualDJ now saves the database immediately when additions or updates are required.
VirtualDJ also validates the integrity of all database files at the launch of the application. If a
problem is detected a message box will be displayed identifying which database has the
problem and what to do to correct the problem.
To correct the problem - here are the steps:
1. Open the configuration dialog
2. Go to the Browser tab
3. Select the Drive from the drop-down
4. Click the ‘FIX’ button
The other options for managing the databases are CHECK – this runs a validation of the database to
ensure the entries are still relevant to files stored on
that drive. The process simply re-labels the FilePath
entry for the file if it can not be found. Data about
that file is not lost.
CLEAN – this process will REMOVE any database
information about files that are no longer valid. This
is necessary for cleaning up the Global Search
capabilities.
DATABASE MANAGEMENT
Page 5
5
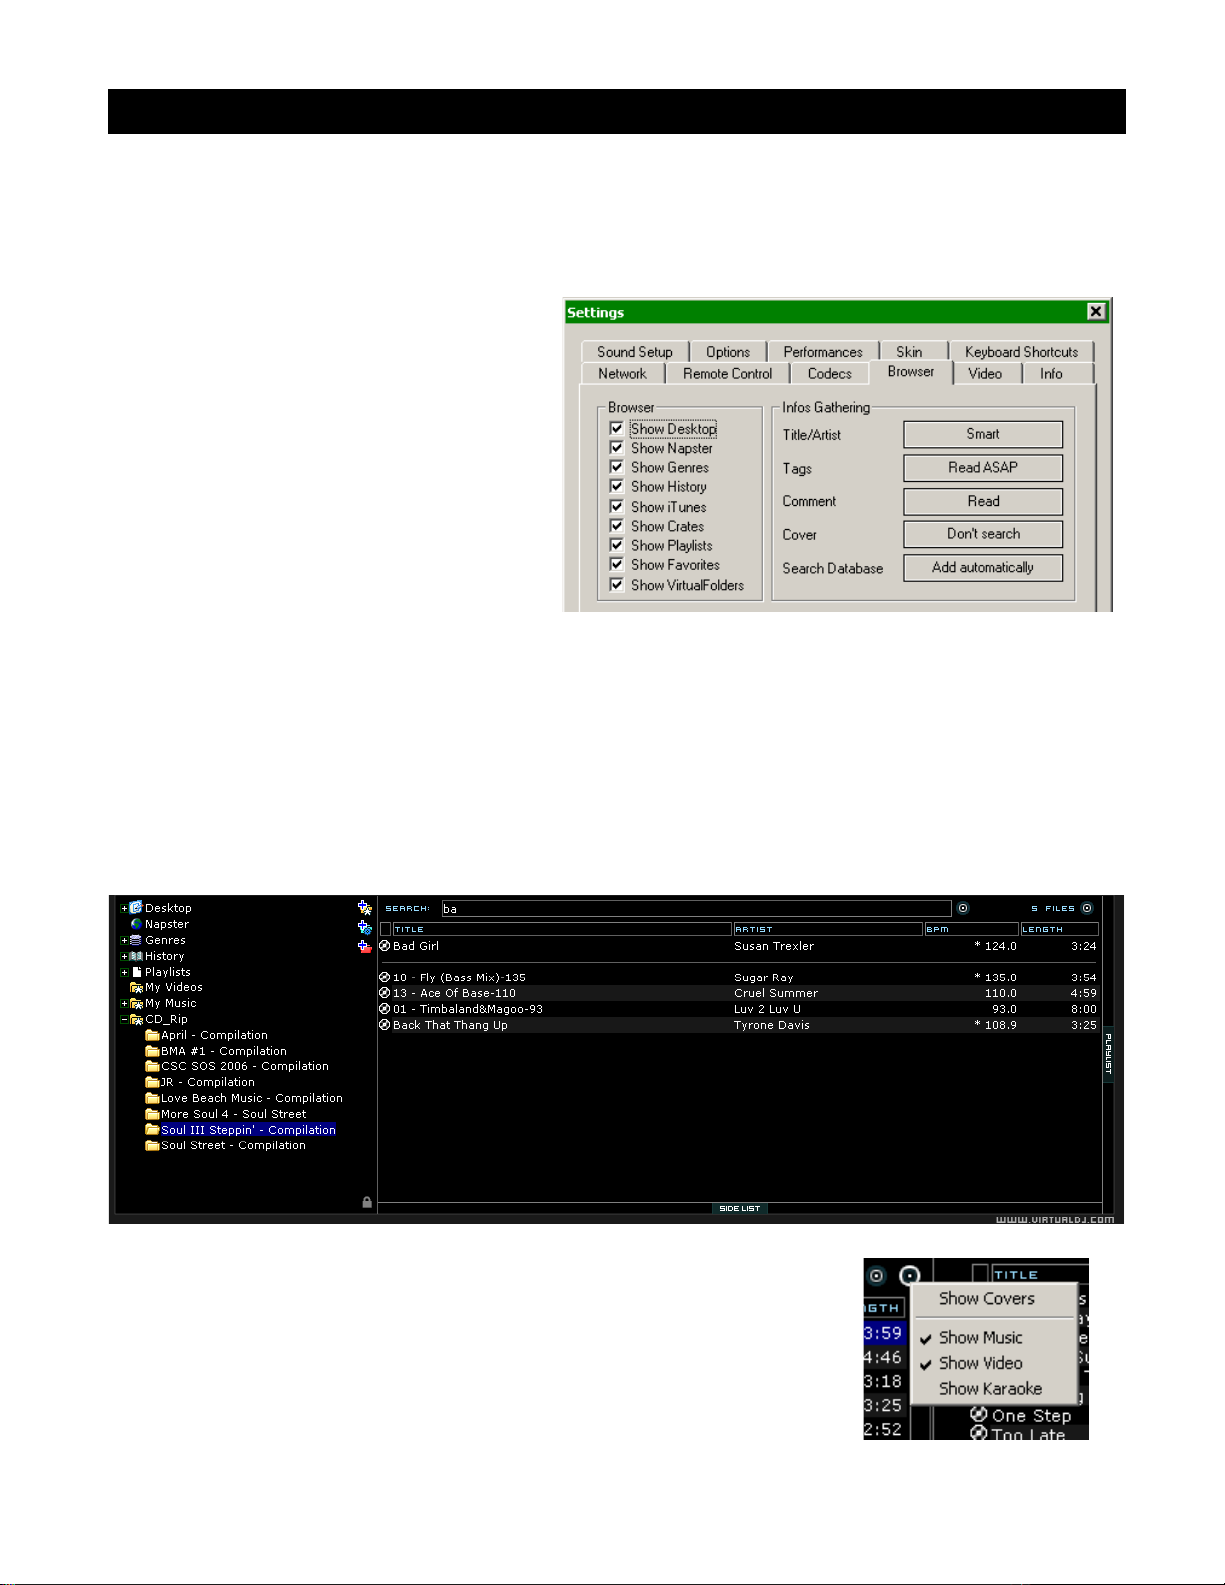
Local Database is no longer an option from the browser. Previous versions used the Local
Database (mp3database.txt) as the search pool for all tracks. VirtualDJ v5 now provides an
intuitive on the fly search capability. Adding files for using the need global search can be done
two (2) ways.
First is by setting the ‘Search Database’
property in the Configuration Browser
tab to ‘Add automatically’. This will add
all files when browsing the folder
structures to the search.
The other option is ‘Add manually’. This
requires using the ‘Add to Search DB’
option to be selected when right clicking
on a file or folder in the main browser
interface.
In either scenario, once added to the Global Search; the ability to find the file is always
available when doing a search. The difference is in the results display of the search
determines if it is in the currently selected folder or elsewhere in the system.
In the below example, a search on ‘ba’ is entered into the search box. The center file browser
panel displays the results of the search. The file(s) listed above the dividing line represent the
file(s) found in the folder that is currently highlighted in the left folder browser panel. All other
files below the dividing line are files that exist elsewhere in the database.
Also if you want to limit the results to specific types of files, click on
the second bull’s eye circle to the right of the search box and chose
from the Show Covers, Show Music, Show Videos, and Show
Karaoke options.
GLOBAL SEARCH
Page 6
6
What can be searched? Searching in VirtualDJ is now versatile a
variable. What is meant by that? Just to the right of the search box there
is a “search fields” selection button. Click on the bull’s eye circle and you
are presented with a list of 10 searchable fields.
Depending on what fields are selected your search results will very. So if
you want to ensure maximum results for all your searches, select all the
fields and you will be able to search anything all the time.
To browse the entire database just enter an asterisk - * - as the search
string and now the entire database is displayed.
Because of the expanded search fields you are able to get more creative. One way of being
more creative is when searching on BPM. You can now enter 110-120 and if the BPM column
is selected the results displayed will be tracks in the range of 110 to 120 BPM.
If this type of creative search is something you would do on a routine basis then VirtualDJ v5
has a NEW Filter Folder feature that can be used. This is explained later in the guide in the
Filter Folders section.
From the first look it is not much different from previous versions. What has been seen, in the
Configuration Browser tab; are entries that determine what will be displayed in the left browser
panel.
NEW Options
Genres – provides a generated tree of Genre types based on the imported ID3Tag Genre
field. But selecting on the various listed genres the file browser only shows those entries that
match the tag.
*POWER USERS – typically only
one genre is stored in the ID3Tag;
however, since VirtualDJ imports
and stores this data in it’s own
database multiple genres can be
assigned to a single file by
separating each genre with a semicolon ‘;’ . This action is performed
in the File Info dialog the Genre
field for the file.
BROWSER
SEARCHING
Page 7

7
NEW Options (cont’d)
Hi s tor y – provides access to data stored about each session use of VirtualDJ. The data is
stored as .m3u Playlist files and it is now stored in the MyDocuments\VirtualDJ\TrackHistory
folder instead of in the MyDocuments\VirtualDJ\Playlists folder. Only the ‘Saved Playlists’
created from the playlist panel are now stored in the Playlist folder. Also, the History data is
saved on the fly so a running history is always available.
*POWER USERS – by default VirtualDJ will separate the history play lists at 9AM this is based on
a registry entry titled TrackCutHour – change this value to have your history play lists split at a
different time. Time is based on a 24-hour clock, so 9PM would be 21.
iTunes – will display iTunes playlists and use the information in the playlist for accessing those
files. If the files don’t exist per the playlists path, you will see ‘Error’ show up in the deck’s
display.
Crates – allows access to the crates structure created and utilized by the Serato ScratchLive
application
The rest of the choices are items available in previous versions and should not require
explanation.
ID3Tag Support
Yes, one big improvement is the adding of ID3Tag support. However; it is not the same
support that other applications implement. VirtualDJ has always provided the fasts information
access about the tracks in the database. Adding direct ID3Tag access to every file would have
considerably SLOWED VirtualDJ’s ability to for browsing and search as experienced in other
applications.
VirtualDJ stores identified ID3Tag fields as part of its own database. This stored data can be
updated at anytime. And because it is not direct access any of the information can be
changed using the File Info dialog and it not affect the core ID3Tag info of the file. Also, since
video type files don’t have ID3Tags, VirtualDJ is able to make these fields available for storing
information about the video.
Retrieving ID3Tag Data
This can be accomplished in several methods at different points in time. The first and what will
be the most common is using the Configuration Browser tab’s Infos Gathering options.
Title/Artist
SMART – used for allowing VirtualDJ to determine
what it should retrieve. If a field is missing from the
traditional parsing of the filename and data resides
in the ID3Tag then VirtualDJ retrieves the data
Only from Filename – traditional parsing of the
filename data
Only from Tag – only use the data stored in the
ID3Tag
Page 8

8
Retrieving ID3Tag Data (cont’d)
TAGS
Never Read – Disables reading ID3Tags
Read on Load – Read the tags once a
file is loaded to a deck
Read ASAP – Read the ID3Tags
immediately on seeing the file in the
browser
COMMENT
Read – Read the ID3Tag Comment field
based on the TAGS setting
Never Read – Never Read the ID3Tag
Comment field
COVERS
Local Search Only – for the CoverFlow viewer files already locally stored will be used (to include ID3Tag
embedded)
Download Exact Match – if no cover found locally, download a cover that only matches based on the
song’s information
Download No Matter What – if no cover found locally, download anything that closely matches using the
song’s information
Don’t Search – don’t ever look for covers if no cover exists
Next possible way of retrieving ID3Tag information is by right clicking on a file in the browser
and selecting File Info. The below dialog displays the database stored information along with
the ID3Tag information that is retrievable.
Under each field with a button will have the read ID3Tag info next to it. Click on the button
to copy that data into the VirtualDJ data field. This data will be stored and used by the
VirtualDJ database. The next to the FileName field is used to parse the file name into the
Artist and Title.
Page 9

9
Retrieving ID3Tag Data (cont’d)
Another method of retrieving ID3Tag info is through the browser directly with multiple files
selected.
The options from File Infos are –
Title from tag
Title from filename
Genre/year/etc from tag
Comment from tag
Erase comment
Download cover
All pretty self explanatory.
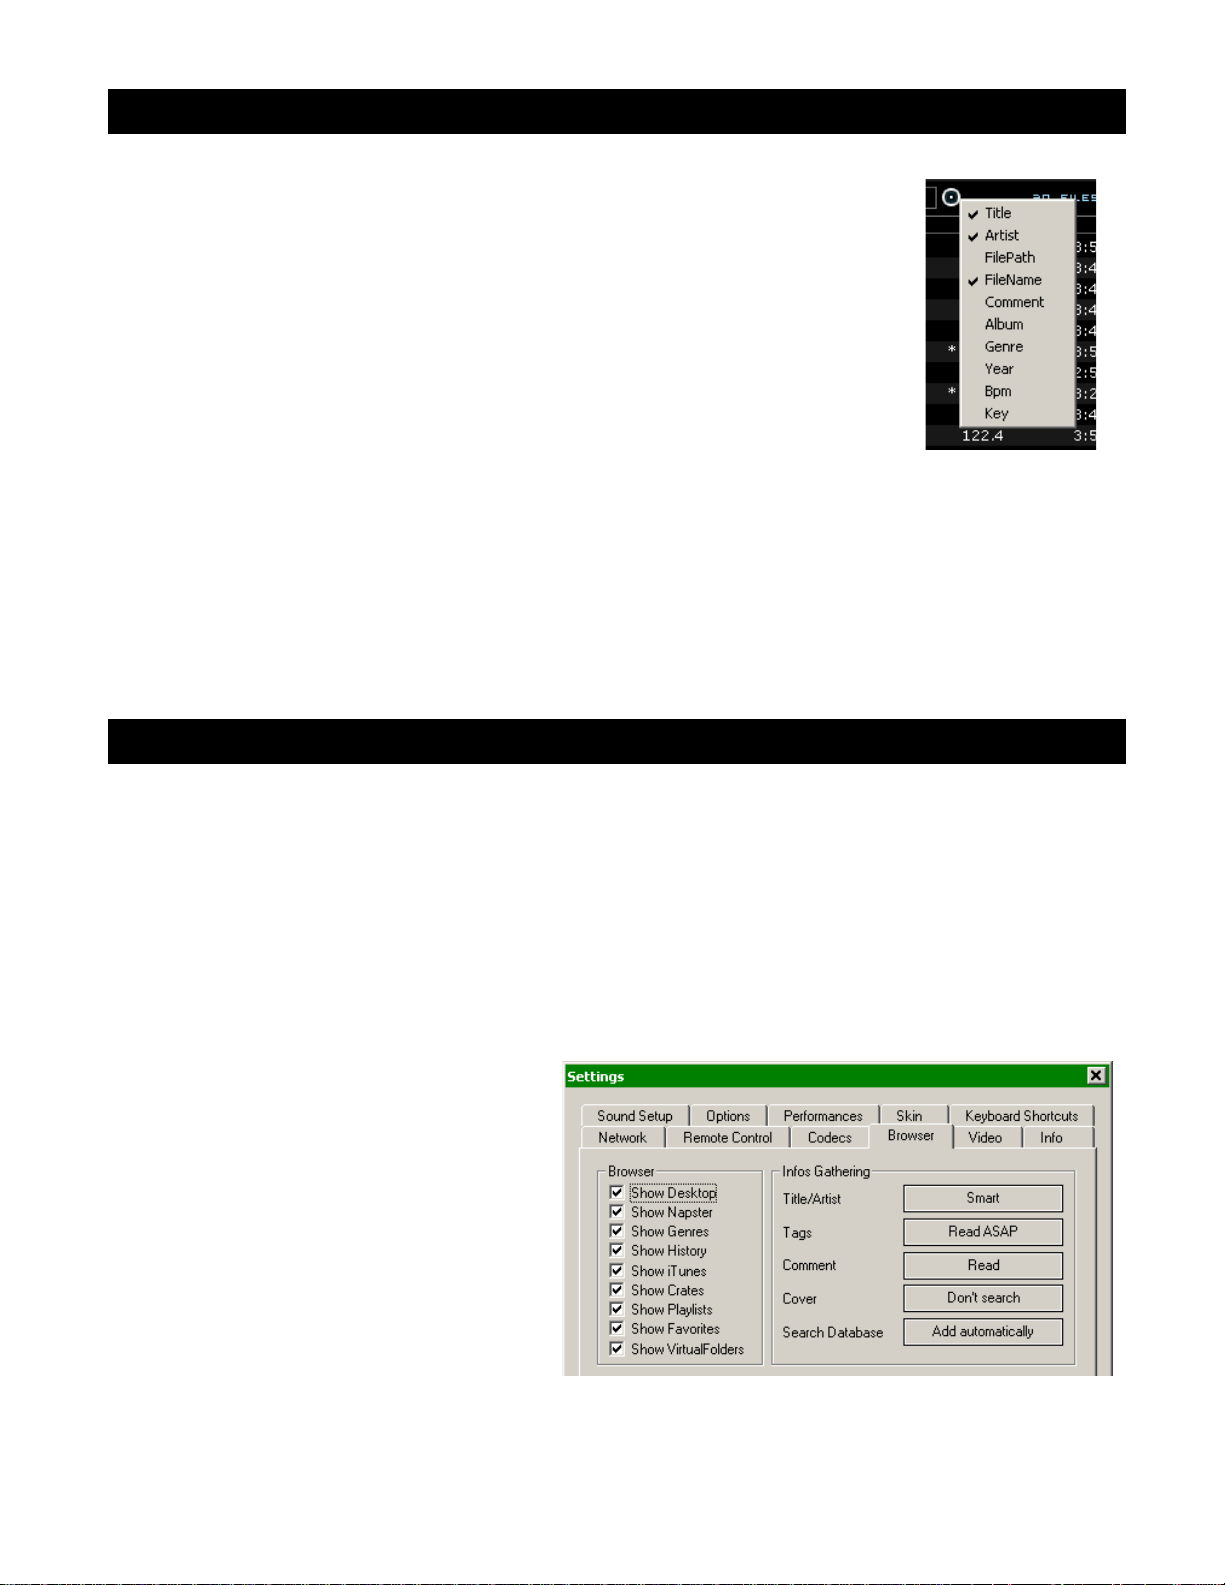
Displaying VirtualDJ data fields (ID3Tag) Columns
In the browser or playlist panels right clicking on any column and choose
from the pop-up list any or all of the available data fields now stored in
theVirtualDJ database.
Changing the order of the columns is very easy by
selecting the Order… option from the bottom of the
list. Then in the presented dialog –
Here you can choose the order by highlighting the
field and using the up and down arrows. Also add or
remove fields from the display by selecting the check
box for the field.
You can also select what you want displayed in the browser by
clicking on the second bull’s eye circle to the right of the search box
and chose from the Show Covers, Show Music, Show Videos, and
Show Karaoke options.
Page 10

10
Displaying VirtualDJ data fields (ID3Tag) Columns (cont’d)
Here are some screen shots of the fields being displayed in the browser -
[Typical ID3Tags + Key field]
[Additional VirtualDJ Fields]
Additional VirtualDJ Data Fields
The VirtualDJ database now stores additional data about each track for additional search
features and the NEW Filter folders.
Key – stores the key value of a song for use doing Harmonic Mixing.
** VirtualDJ does not analyze and populate this field. Manual entry using the File Info.
Play Count – stores the running play count of the track
First Seen – stores the date of when the track was first added to the database
First Play – stores the date of when track was first ever played
Last Play – stores the date of when the track was last played
Drive, Filepath, Filename, Filetype – stores the current known Drive, Filepath, Filename, and
Filetype for the track
Page 11

11
The SideList now takes on a NEW purpose in VirtualDJ v5.
Because the re-design of the Playlist is dedicated to the
Automix, all tracks added to a deck but then never played
are added to the SideList when a track replaces it on a
deck. This feature can be Enabled/Disabled in the
Configuration -> Options -> AutoSave Unplayed.
There are a collection of new shortcuts now available for
the Sidelist. Please see the section Shortcut Actions for
Keyboards and Skins for explanations on how to use the new shortcuts.
A new additional to better file management is the introduction of Filter Folders. On the left
panel’s border are three (3) folder options now.
Create Favorite Folder – pick a folder from the drive to always display in the browser
Create Virtual Folder – create a folder for manually populating with specific files
Create Filter Folder – create a folder based on a filter string that is run every time the
folder is selected
Create a Filter Folder
Click on the blue icon and a Filter Folder creation dialog is displayed.
Give the NEW filter folder a name.
For example - Top 100 Played
Now enter the Filter to be used for
creating the results desired. This is
where it can be complicated or
simple. This example is simple,
use the keyword ‘top’ with the
number ‘100’ and the element
‘nbplay’. ‘nbplay’ looks at the Play
Count data field.
So the entire filter statement would
look like ‘top 100 nbplay’. What
VirtualDJ will do each time this folder is selected with sort the entire database on the Play
Count field in Descending order and then display the first 100 entries or the Top 100.
The filter dialog provides some great examples but to get it’s real power need to now what are
the appropriate elements, operators, and a few keywords that are used.
SIDELIST
FILTER FOLDERS
Page 12

12
Elements -
"title", "author", "artist", "album", "genre", "year", "bpm", "key", "bitrate", "songlen", "filesize",
"filepath", "filename", "extension", "hascover", "isscanned", "alreadyplayed", "lastplay",
"firstplay", "firstseen", "nbplay", "type", "days since firstseen", "days since firstplay",
"days since lastplay"
Operators –
"==", "=", ">=", "<=", "!=", "<>", ">", "<", "is not", "is", "equals”, "equal", "contains", "contain",
"doesnt contain", "doesn’t contain", "don't contain", "starts with", "start with", "ends with", "end
with ", "and ",
"or ", "&&", "||", "&", "|"
Keywords –
“top”, “[inverted]”
Filter Folder Examples
FILTER
Expected Result
top 100 nbplay
top 100 list
top 100 firstseen
recently added
top 100 lastplay
recently played
bpm>120 and bpm<130
bpm range from 120 to 130
year>=1980 and year<1990
80s music
days since lastplay<7
songs played last week
days since lastplay<31
songs played last month
days since lastplay<365
songs played last year
lastplay=0
never played songs
isscanned=0
files not scanned
type=video
video group
type=audio
audio group
type=karaoke
karaoke group
hascover=1
has cover picture
hascover=0
doesn't have cover picture
top 20 nbplay and hascover=1 and
(type=video or type=karaoke)
Top 20 most played that have a cover and
are Video or Karaoke files
filepath start with "c:\mp3\80s" or filepath
start with "d:\music\80s"
Show all 80s files stored on two separate
drives in a folder titled 80s
extension is "mp3" and title doesn't contain
"madona"
Any mp3 file that does not contain
“madona” in the title
Page 13

13
The Playlist with Automix functionality in VirtualDJ v5 has been completely overhauled from
prior versions.
Automix now works from one deck. By default it is Deck 1; however, prior to starting the
Automix if Deck 2 is selected as the active deck then Deck 2 is used. By utilizing 1 deck this
frees the opposite deck for staging the first song to be used once you decide to stop the
Automix process.
PLAYLIST SETUP
As in prior versions, simply drag and drop the desired tracks into the PLAYLIST panel. Click
on the options button ( + : on default skin ) below the
activate/deactive automix button.
Automix Type – 4 modes
NONE – this is a simple CUT mix that plays the files from
complete from start to finish including any air gaps at the
beginning or end
SMART – VirtualDJ attempts to determine the optimal mix
point based on the outro of the current track and intro of the
upcoming track – mix time varies from ~4 to ~8 secs
depending on the tracks
FADE (skip intro/outro) – attempts to remove the dead air
intro or outro segments and creates a crossfade point based
on the settings of the Automix Length
FADE (keep intro/outro) – keeps the entire track from
beginning to end and creates a crossfade point based on the
settings of the Automix Length
Automix Length
Length used for the Automix FADE types. Lengths are 0 seconds (CUT), or 1, 2, 4, 8, or 16
seconds fades using the FULL crossfade.
All other options functions are from previous versions and have not changed.
Repeat
Two different ‘Repeat’ options appear in the Automix panel.
When clicking on the options button (‘+’) the ‘Repeat’ option lets you repeat the whole Automix
Playlist. Once all tracks have been played, the Automix will start over again with the first track
in the list.
Prior to or during the Automix, right click on a song and select ‘Repeat’ to have that song
continuously repeat until the ‘Repeat’ is deselected.
PLAYLIST & AUTOMIX
Page 14

14
Sequential Order Play Display
Tracks no longer disappear from the top and go to the bottom. The playlist navigation of what
is playing and what is next is sequential from top to bottom (like most media players). The
currently playing track is highlighted.
Add, Move or Remove Track
Reordering tracks by adding more, moving their order, or removing can be done at any time.
To include adding a new track as next, moving a track into the next play, or removing the next
track with the following track now becoming the new next track.
Jump and MIX NOW
While in the Automix ACTIVE mode, double-click on any track in the Playlist and VirtualDJ will
use the assigned crossfade automix settings and mix that track immediately. Also the playlist
will pickup from that point forward. It does not return to the left order location.
** SKIN FEATURE NOTE **
The AUTOMIX button traditionally found at the top center of most skins NO LONGER performs
a MIXNOW type of function when the AUTOMIX is disengaged. This feature has been
replaced with a new action called auto_crossfade. See more at the end of this guide for further
explanation.
Menu Features Replaced as Shortcut Actions
The “Put in Sidelist”, “Get from Sidelist”, and “Make Virtual Folder” have been removed from
the menu choices. The functionality is now accessible via shortcut actions –
switch_sidelist_playlist and vfolder_fromplaylist
Auto Load tracks from a Playlist
In the Configuration -> Options tab there is an option for
AutoLoad Playlists. The available values are Disabled,
Smart, and Always.
Disabled – a contents of the play list are displayed
in the center File Browser panel only
Always – when a play list is selected in the browser
the contents are immediately loaded to the playlist
Smart – doesn't change the playlist when you click on a playlist folder, if the actual
playlist has been manually edited
Page 15

15
There are new and revised plug-ins released with VirtualDJ v5. Some plug-ins are replacing
options removed from the Configuration – Video tab.
Titler – replaces the Show Title/Artist option in the Video
tab. This plug-in allows different font selections and
provides that MTV style bottom left flag on the screen
showing the Title and Artist of the currently playing track
ClipBank (Video) – provides 12 sample slots for video files/animations to be played as
ambient or fillers at any time. Samples played can be influenced by other video effect plug-ins.
To load a video right click on any empty or used panel and select Load Movie. Browse to the
video location and select file. To play a sample click on the appropriate panel and also right
click to set a LOOP option so the sample will play continuous until deactivated.
Camera – plugin re-written to support a wider range of camera types. This is not limited to
web cam type cameras. Also, digital and regular video connected cameras can be used; with
a Firewire, S-Video or Composite connection (a Video Capture card can be necessary).
VIDEO PLUG-INs
Page 16

16
Throughout the guide there have been a few ‘Power User’ info items provided. Here is a
straight comprehensive list of those items plus items that didn’t fit in the original context.
HISTORY – [Registry: TrackCutHour] –
by default VirtualDJ will separate the history play lists at
9AM this is based on a registry entry titled TrackCutHour – change this value to have your history play
lists split at a different time. Time is based on a 24-hour clock, so 9PM would be 21.
HISTORY – [Registry: HistoryTimer] –
allows the setting of when a track gets marked/flagged as a
played track. Changing the registry entry HistoryTimer using increments in seconds controls how long
a track must be played for it to be marked as played. Default is 5 (5 secs) a nominal value would be 20
or 30, so tracks played longer than 20 or 30 seconds then get marked as played and recorded to the
History Play list.
DATABASE – [Registry: IgnoreDrives] –
by default if VirtualDJ recognizes a viable track on a drive
it will create and use the database on that drive to represent that tracks information. The ability to
restrict access to specific drives from VirtualDJ was created so drives with ‘junk’ or ‘undesirable’ data
will be ignored. The registry entry IgnoreDrives is used to ignore drives from VirtualDJ creating a DB
on those drives. The registry entry is a DWORD value and using the HEX value grid below you can
determine which drives to restrict from VirtualDJ.
A
B
C
D
E
F
G
1 2 4 8 16
32
64
H
I
J
K
L
M
N
128
256
512
1024
2048
4096
8192
N
O
P
Q
R
S
T
8192
16384
32768
65536
131072
262144
524288
U
V
W
X
Y
Z
Default
1048576
2097152
4194304
8388608
16777216
33554432
0
To restrict drive D: you would use a registry value of 8.
To restrict multiple drives sum their values – drives D:,F:, and I: 8+32+256 = 296
**NOTE** You CAN NOT restrict access to the drive containing the MASTER Core database file in the
MyDocuments\VirtualDJ folder
SORTING – [Registry: SortOrderDefault] –
"AutoSort" has been removed and replaced with
“SortOrderDefault” in the registry. SortOrderDefault provides a ‘default’ type setting that VirtualDJ will
use to sort browsed folders or search result before a column sort changes the sort order. A value of
SortOrderDefault=1 sorts on the "smart" icon column which provides organization of the files typically
found in past versions – common played songs at top, already played songs at the bottom, and
everything else in-between. The following column order represents the sequential values 2-19 –
Title, Artist, Album, Genre, Bpm, Key, Length, Bitrate, Year, Comment, Play Count, First Seen, First
Play, Last Play, Drive, Filepath, Filename, Filetype
** If you reorder columns in the browser it will not change the meaning of the numbers in the registry
SORTING – [Registry: SortOrderForce] –
Force the order to be set again to a specific column each
time you change folder. (0 means keep previous, 1 is smart, etc...)
** The same values for SortOrderDefault are used here in representing the various columns
POWER USER (Tweaks, Registry, etc.)
Page 17

17
Action – mix – is now – auto_crossfade :: does not start the other deck only moves the
crossfader from active deck to opposite deck.
Can now access 5 video_fx_param and 5 video_trans_param values via shortcut or
midi configuration
Side List panel - load_fromsidelist and free_sidelist
add_filterfolder – opens the dialog window to create a new 'Filter Folder'.
file_info – opens the 'File Info' dialog window for the selected track in the Browser.
noduplicates – removes all duplicate files from the PlayList.
playlist_options – opens the options menu for the PlayList.
randomize – this action already existed but has been updated. It enables the
randomization of the files in the PlayList. The update is that the function now depends
on the current time to have a better randomization.
switch_sidelist_playlist – puts the content of the SideList in the PlayList and opposite.
timecode_bypass – good news for the TimeCode users. This action lets you bypass the
TimeCode engine, and play a regular vinyl. You can prelisten the vinyl, and mix it
without using stereo Y cable splitters.
vfolder_fromplaylist – creates a new Virtual Folder from the Playlist.
view_options – opens the view options of the Browser (Show Covers, Show Music, etc).
The “Put in Sidelist”, “Get from Sidelist”, and “Make Virtual Folder” have been removed
from the Automix menu choices. The functionality is now accessible via shortcut
actions – switch_sidelist_playlist and vfolder_fromplaylist
Action – savedatabase – removed because database is updated and saved in real time
SHORTCUT ACTIONS FOR KEYBOARD AND SKINS
REMOVED SHORTCUT ACTIONS
Page 18

18
Unloading a track – When the Security option is enabled to Always it prevents loading
and unloading a track on a deck while it is playing. If you select “Ask”, a prompt is
displayed to verify a load or unload of a track while the deck is playing. If “None”, the
security feature will be disabled.
Covers are stored as hidden .jpg files that have a filename the same as the file
associated with the cover :
e.g MP3 filename : Michael Jackson – Thriller.mp3
Cover filename : Michael Jackson – Thriller.mp3.jpg
Plugin SDK contains new Query commands – see the SDK for further info
NEW CustomIcons and CustomButtons area available for skins
CDG files are automatically recognized as valid files and not necessary in Codecs
NEW MIDI interface providing better support for MIDI controllers like BCD3000, Vestax
VCI-100 controllers, and others
mp3database.txt – no longer exists as search uses the actual DB XML files now
Database Protection – if a drive reaches capacity and can no longer store data in it’s
local database, VirtualDJ will use the CORE MyDocuments\VirtualDJ database XML
file.
NOTES OF INTEREST
 Loading...