

Atomic M01702AW User Manual

W e striv e t o ensur e tha t ou r product s ar e o f th e highes t quality
an d fre e o f manufacturin g defect s o r missin g parts . Howev e r , if
yo u hav e an y problem s wit h you r ne w product,
D O NO T RETUR N I T T O TH E S T ORE ,
pleas e contac t u s tol l fre e @:
1-88 8 -996-2729
F AX : 1-866-873-3531
gameroom@escaladesports.com
O r writ e to:
Escal a d e Spor t s
Cust o me r Servi c e Depa r tme n t
P .O . Bo x 8 8 9
Evansvill e I N 47706
Please
Whe n contactin g Escalad e Sport s pleas e provid e you r mode l numbe r , d at e
cod e (i f a pplicable ) an d par t n umbe r i f requestin g a replacemen t part . T hes e
number s ar e locate d o n th e product , packaging , an d t hi s owner s m anual .
Y ou r Mode l Numbe r
Dat e Cod e
hav e you r mode l numbe r whe n inquirin g abou t parts.
M01702AW/AF
2 - M0 1 702AW/AF - - WJ
Purchase Dat e
PLEASE RETAIN THIS INSTRUCTION MANUAL FOR FUTURE REFERENCE
All Rights Reserved.
©
2012 Escalad e Sports
1
Fo r Custome r Servic e Cal l 1-888-996-2729

IMPORTANT! READ EACH STEP
IN THIS MANUAL BEFORE YOU
BEGIN THE ASSEMBLY.
TWO
ADULTS ARE REQUIRED TO ASSEMBLE
THIS ATOMIC PLATINUM 9FT SHUFFLEBOARD
Tools Required:
T1-Allen Wrench (Included)
Phillips Screwdriver
Furniture Polish and Cloth
Assembly Tips
Make sure you understand the following tips before you begin to assemble your table.
1. Start all bolts by hand before tightening.
2. Some drawings or images in this manual may not look exactly like your product. Please
read and understand the text before starting each assembly step.
READ AND FOLLOW ALL ASSEMBLY, OPERATION, AND
SAFETY INSTRUCTIONS CAREFULLY. AT LEAST TWO
ADULTS ARE NEEDED TO PUT THIS GAME TABLE
TOGETHER.
All Rights Reserved.
©
2012 Escalade Sports
2
For Customer Service Call 1-888-996-2729
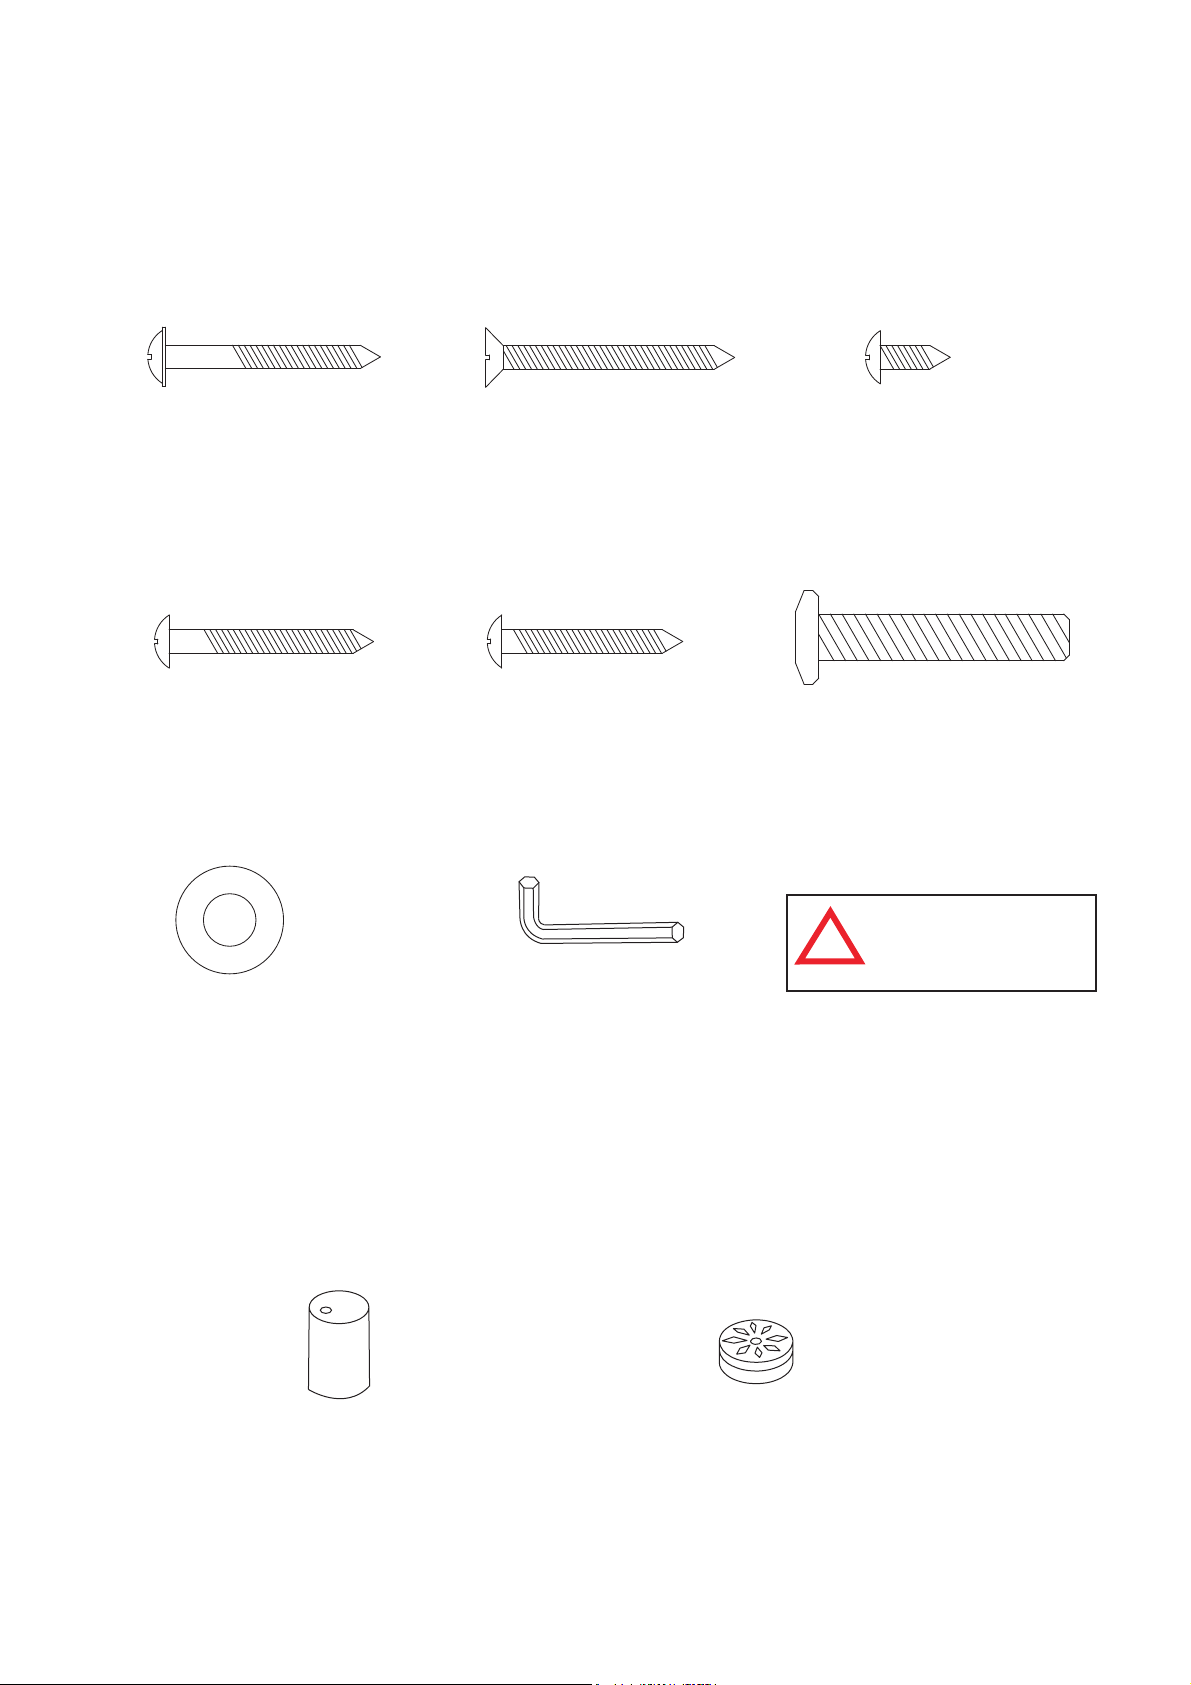
HARDWARE IDENTIFIER
( To Scale)
H1 - 3.5mm x 38mm
Phillips Washer Head
Screw (54 pcs)
H4 - 5mm x 35mm
Phillips Round Head
Screw (8 pcs)
H2 - 4mm x 44mm
Phillips Flat Head
Screw (4 pcs)
H5 - 5mm x 32mm
Phillips Round Head
Screw (8 pcs)
(Not to Scale)
H3 - 4mm x 12mm
Phillips Round Head
Screw (16 pcs)
H6 - 8mm x 44mm
Allen Head Bolt (12 pcs)
WARNING:
CHOKING HAZARD
!
Small parts.
Not for children under 3 yrs.
H7 - 8mm x 19mm
Flat Washer (12 pcs)
All Rights Reserved.
©
2012 Escalade Sports
T1 - Allen
Wrench (1 pc)
ACCESSORY IDENTIFIER
(Not to Scale)
A1-Shuffle Board
Wax (1 pc)
A2R-Red Shuffle Board Pucks (4 pcs)
A2B-Blue Shuffle Board Pucks (4 pcs)
3
For Customer Service Call 1-888-996-2729

PARTS IDENTIFIER
( Not to Scale)
P1 - Side Rail
Apron (2 pcs)
P4 - Playfield Middle
Support Brace (2 pcs)
P2 - End Rail
Apron (2 pcs)
P5 - Playfield End
Support Brace (2 pcs)
P3 - Playfield (1 pc)
P6 - Leg (4 pcs)
P7 - Leg Panel (4 pcs) P8 - End Rail Apron
P10 - Corner Post (4 pcs) P11 - Slide Scorer (2 pcs)
All Rights Reserved.
©
2012 Escalade Sports
Support Brace (4 pcs)
4
P9 - Leg Leveler
(4 pcs)
For Customer Service Call 1-888-996-2729
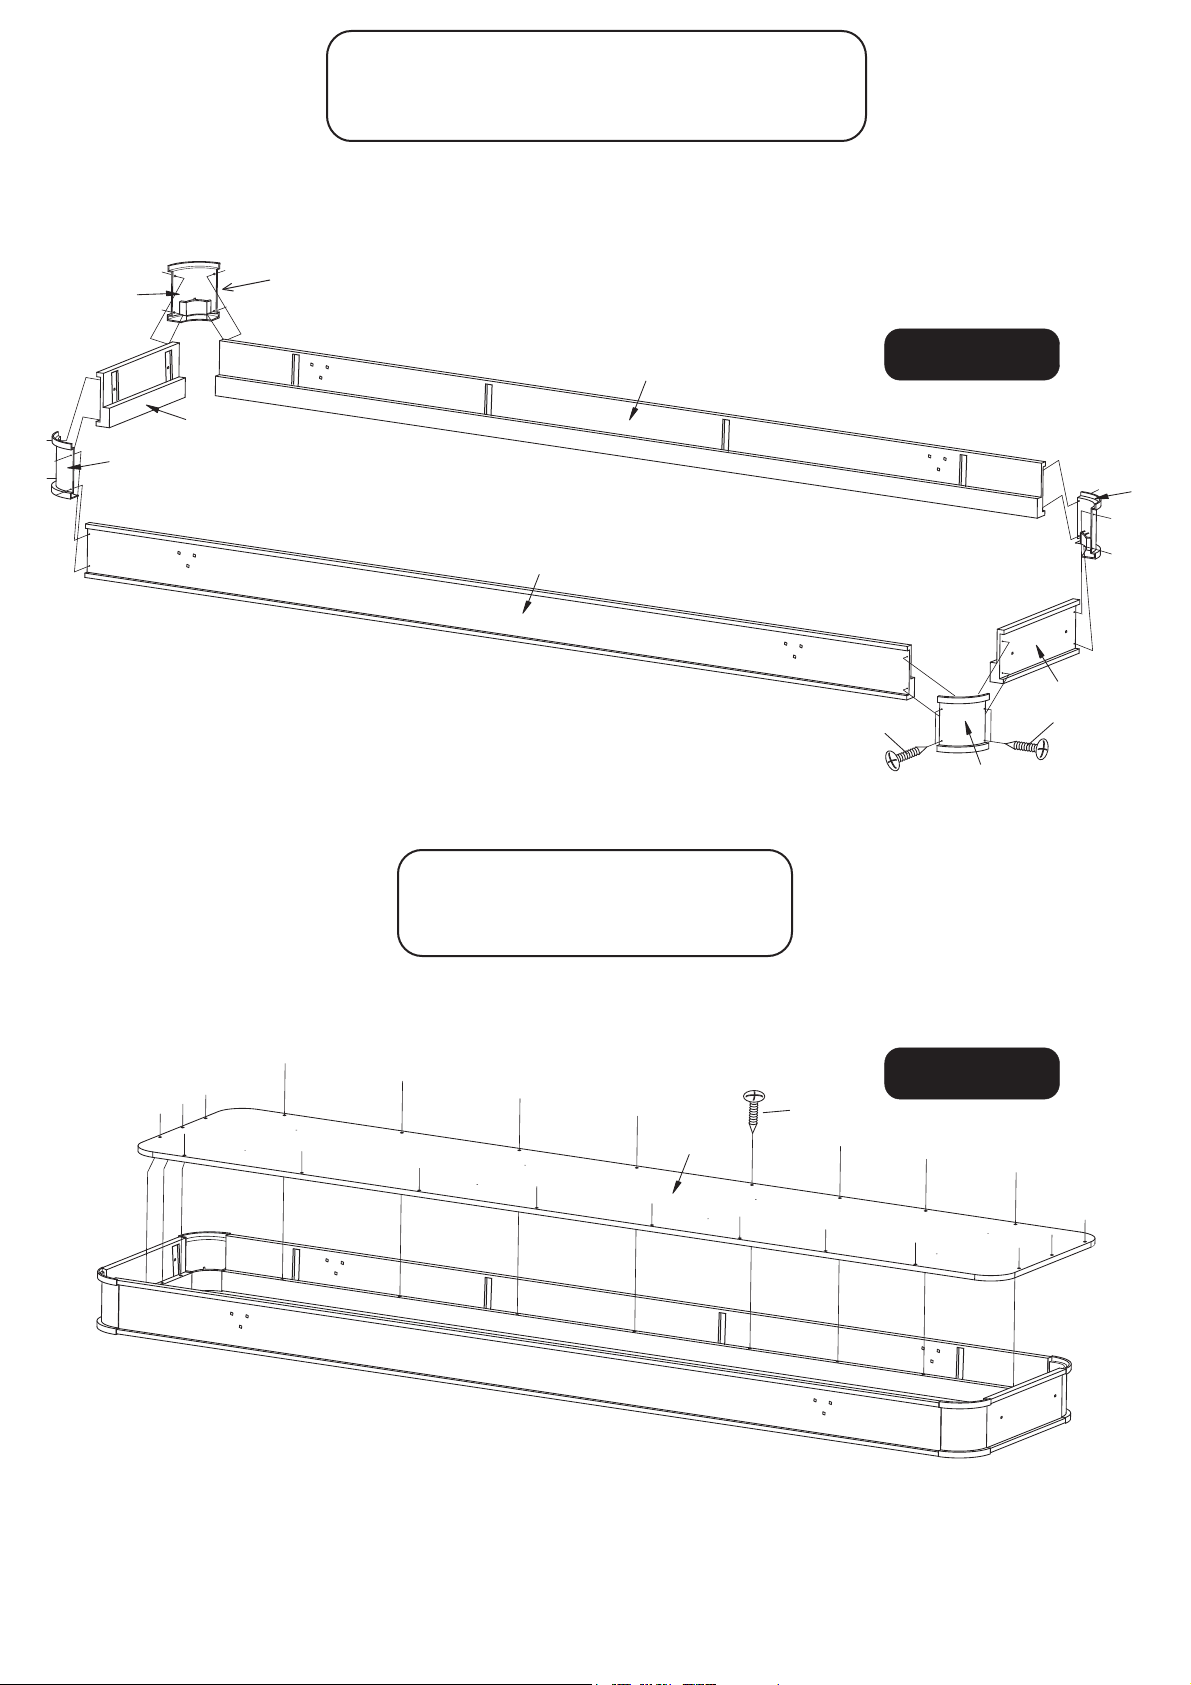
PARTS REQUIRED:
16 pcs - H3 Phillips Round 2 pcs - P2 End Rail Apron
Head Screw 4 pcs - P10 Corner Post
2 pcs - P1 Side Rail Apron
STEP 1:
On a clean level surface, place each Side Rail Apron P1, each End Rail Apron P2, and each Corner Post
P10 upside down as shown in Figure 1. Next, attach each Corner Post using Phillips Round Screws H3.
P10
P2
P10
NOTE: These assemblies are
being built upside down.
NOTE: Make sure Corner Post
is in this position for
correct assembly.
P1
P1
Figure 1
H3
P10
P2
H3
P10
PARTS REQUIRED:
22 pcs - H1 Phillips Washer Head Screw
1 pc - P3 Playfield
STEP 2:
With the help of another adult, place Playfield P3 face down into the cabinet assembly and attach using
Phillips Washer Head Screws H1 as shown in Figure 2.
Figure 2
H1
P3
IMPORTANT NOTE: Playfield must be lowered into cabinet evenly on both ends at same time. Cabinet must be assembled
in a perfect rectangle. If playfield is still difficult to lower into cabinet , remove the top H3 corner post screws, carefully install
playfield, and reinstall H3 corner posts screws. Be careful to not strip these screws out.
All Rights Reserved.
©
2012 Escalade Sports
5
For Customer Service Call 1-888-996-2729
PARTS REQUIRED:
2 pcs - P4 Playfield Middle 8 pcs - H5 Phillips Round
Support Brace Head Screw
2 pcs - P5 Playfield End
Support Brace
STEP 3:
Attach each Playfield Middle Support Brace P4 and Playfield End Support Brace P5 using Phillips Round
Head Screws H5 into side apron as shown in Figure 3.
H5
H5
P4
P5
P3
P4
P1
P5
P1
Figur e 3
PARTS REQUIRED:
8 pcs - H1 Phillips Washer 4 pcs - P8 End Rail Apron
Head Screw Support Brace
8 pcs - H4 Phillips Round
Head Screw
STEP 4:
First, Place End Rail Apron Support Braces P8 between Playfield End Support Brace P5 and End Rail
Apron P2 as shown. Next, secure each End Rail Apron Support Braces P8 with Screws H1 as shown
in Figure 4.
To complete, secure each Support Braces P4, P5 and P8 into Playfield P3 using Screws H4 as shown
in Figure 4.
H4
H4
P8
P5
H1
P8
Figur e 4
All Rights Reserved.
©
2012 Escalad e Sports
P1
P4
6
P3
H1
P2
Fo r Custome r Servic e Cal l 1-888-996-2729
 Loading...