

Page 1

y t i l a u q t s e h g i h e h t f o e r a s t c u d o r p r u o t a h t e r u s n e o t e v i r t s e W
e r f d n a
f i , r e v e w o H . s t r a p g n i s s i m r o s t c e f e d g n i r u t c a f u n a m f o e
, t c u d o r p w e n r u o y h t i w s m e l b o r p y n a e v a h u o y
E R O T S E H T O T T I N R U T E R T O N O D ,
: @ e e r f l l o t s u t c a t n o c e s a e l p
888-996-2729 - 1
1 3 5 3 - 3 7 8 - 6 6 8 - 1 : X A F
m o c . s t r o p s e d a l a c s e @ gameroom
: o t e t i r w r O
s t r o p S e d a l a c s E
t n e m t r a p e D e c i v r e S r e m o t s u C
9 8 8 x o B . O . P
6 0 7 7 4 N I , e l l i v s n a v E
. s t r a p t u o b a g n i r i u q n i n e h w dat e code r u o y e v a h e s a e l P
date code (if , r e b m u n l e d o m r u o y e d i v o r p e s a e l p s t r o p S e d a l a c s E g n i t c a t n o c n e h W
e r a g n i t s e u q e r f i r e b m u n t r a p d n a , ) e l b a c i l p p a
. l a u n a m s r e n w o s i h t n i d n a , g n i g a k c a p , t c u d o r p e h t n o d e t a c o l
G03617W
r e b m u N l e d o M r u o Y
Dat e Code:
Purchase Date:
PLEASE RETAIN THIS INSTRUCTION MANUAL FOR FUTURE REFERENCE
All Rights Reserved
2 - G03617W - - WJ
888-996-2729 - 1 l l a C e c i v r e S r e m o t s u C r o F 1 s t r o p S e d a l a c s E 120 2 ©
e r a s r e b m u n e s e h T . t r a p t n e m e c a l p
Page 2
IMPORTANT! READ EACH STEP
IN THIS MANUAL BEFORE YOU
BEGIN THE ASSEMBLY.
TWO ADULTS ARE REQUIRED TO ASSEMBLE
THIS REDLINE VICTORY 6FT HOCKEY TABLE
Allen Wrench T1 included with the Hardware Kit
hockey table.
1. Start all bolts by hand before tightening.
2. Some drawings or images in this manual may not look exactly like your product. Please
read and understand the text before starting each assembly step.
ATTENTION:
READ AND FOLLOW ALL ASSEMBLY, OPERATION, AND
SAFETY INSTRUCTIONS CAREFULLY. AT LEAST TWO
ADULTS ARE NEEDED TO PUT THIS HOCKEY
TABLE TOGETHER.
All Rights Reserved
888-996-2729 - 1 l l a C e c i v r e S r e m o t s u C r o F 2 s t r o p S e d a l a c s E 120 2 ©
Page 3
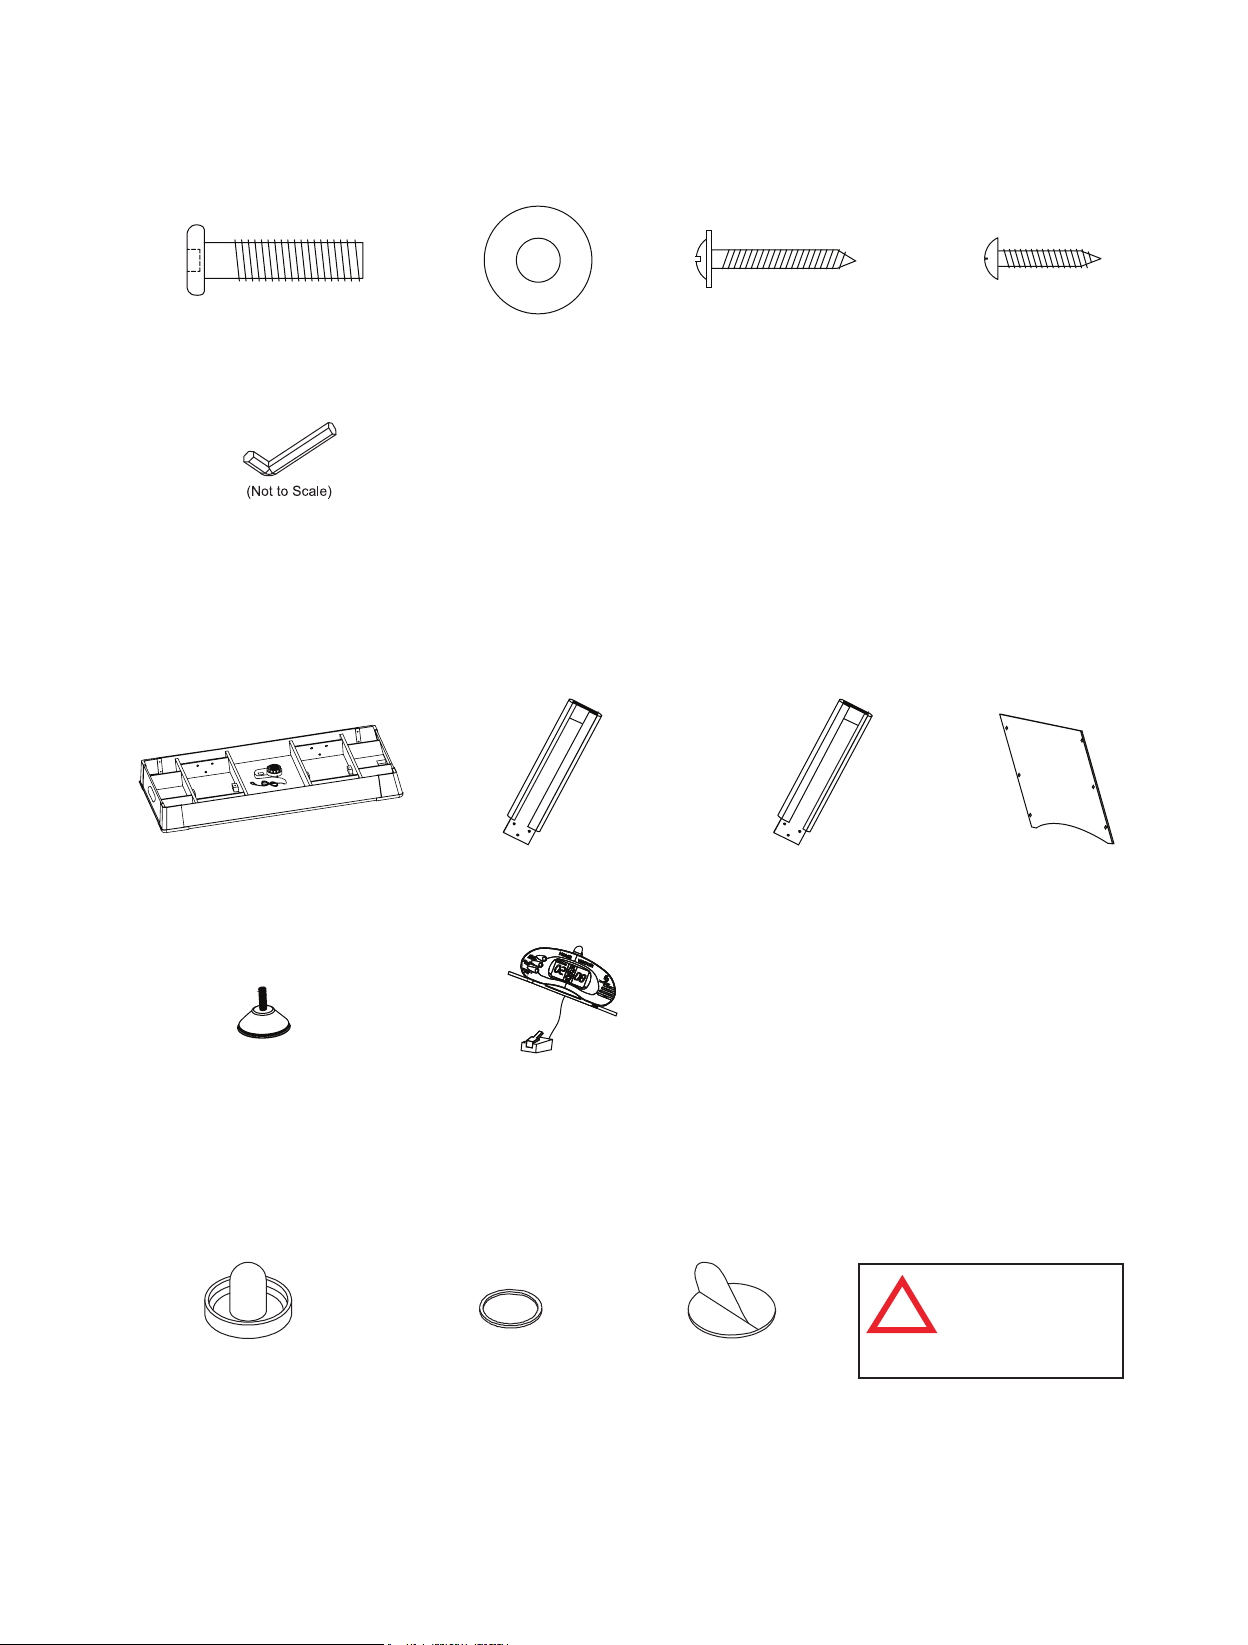
HARDWARE IDENTIFIER
(To Scale)
H1 - 8mm x 28mm
Allen Head Bolt (12)
T1 - Allen Wrench (1 pc)
P1 - Air Hockey Table
Cabinet (1)
H2 - 8mm x 19mm
Flat Washer (12)
H3 - 3.5mm x 25mm
Phillips Washer
Head Screw (12)
H4 - 4mm x 18mm
Phillips Round
Head Screw (2)
PART IDENTIFIER
(Not To Scale)
P2 - Left Leg (2) P4 - End
P3 - Right Leg (2)
Leg Panel (2)
P5 - Leg Leveler (4)
P6 - Electronic Scorer (1)
ACCESSORY IDENTIFIER
(Not To Scale)
A1 - Red Striker (2) A2 - Red Puck (2) A3 - Striker
Felt Pad (2)
NOTE: A3 Felt Pads may already
be attached to A1 Strikers.
All Rights Reserved
Note: P4 End Leg Panels
are packed under the table
cabinet and underneath
styrofoam block.
WARNING:
CHOKING HAZARD
!
Small parts.
Not for children under
3 yrs.
888-996-2729-1llaCecivreSremotsuCroF3stropSedalacsE1202©
Page 4
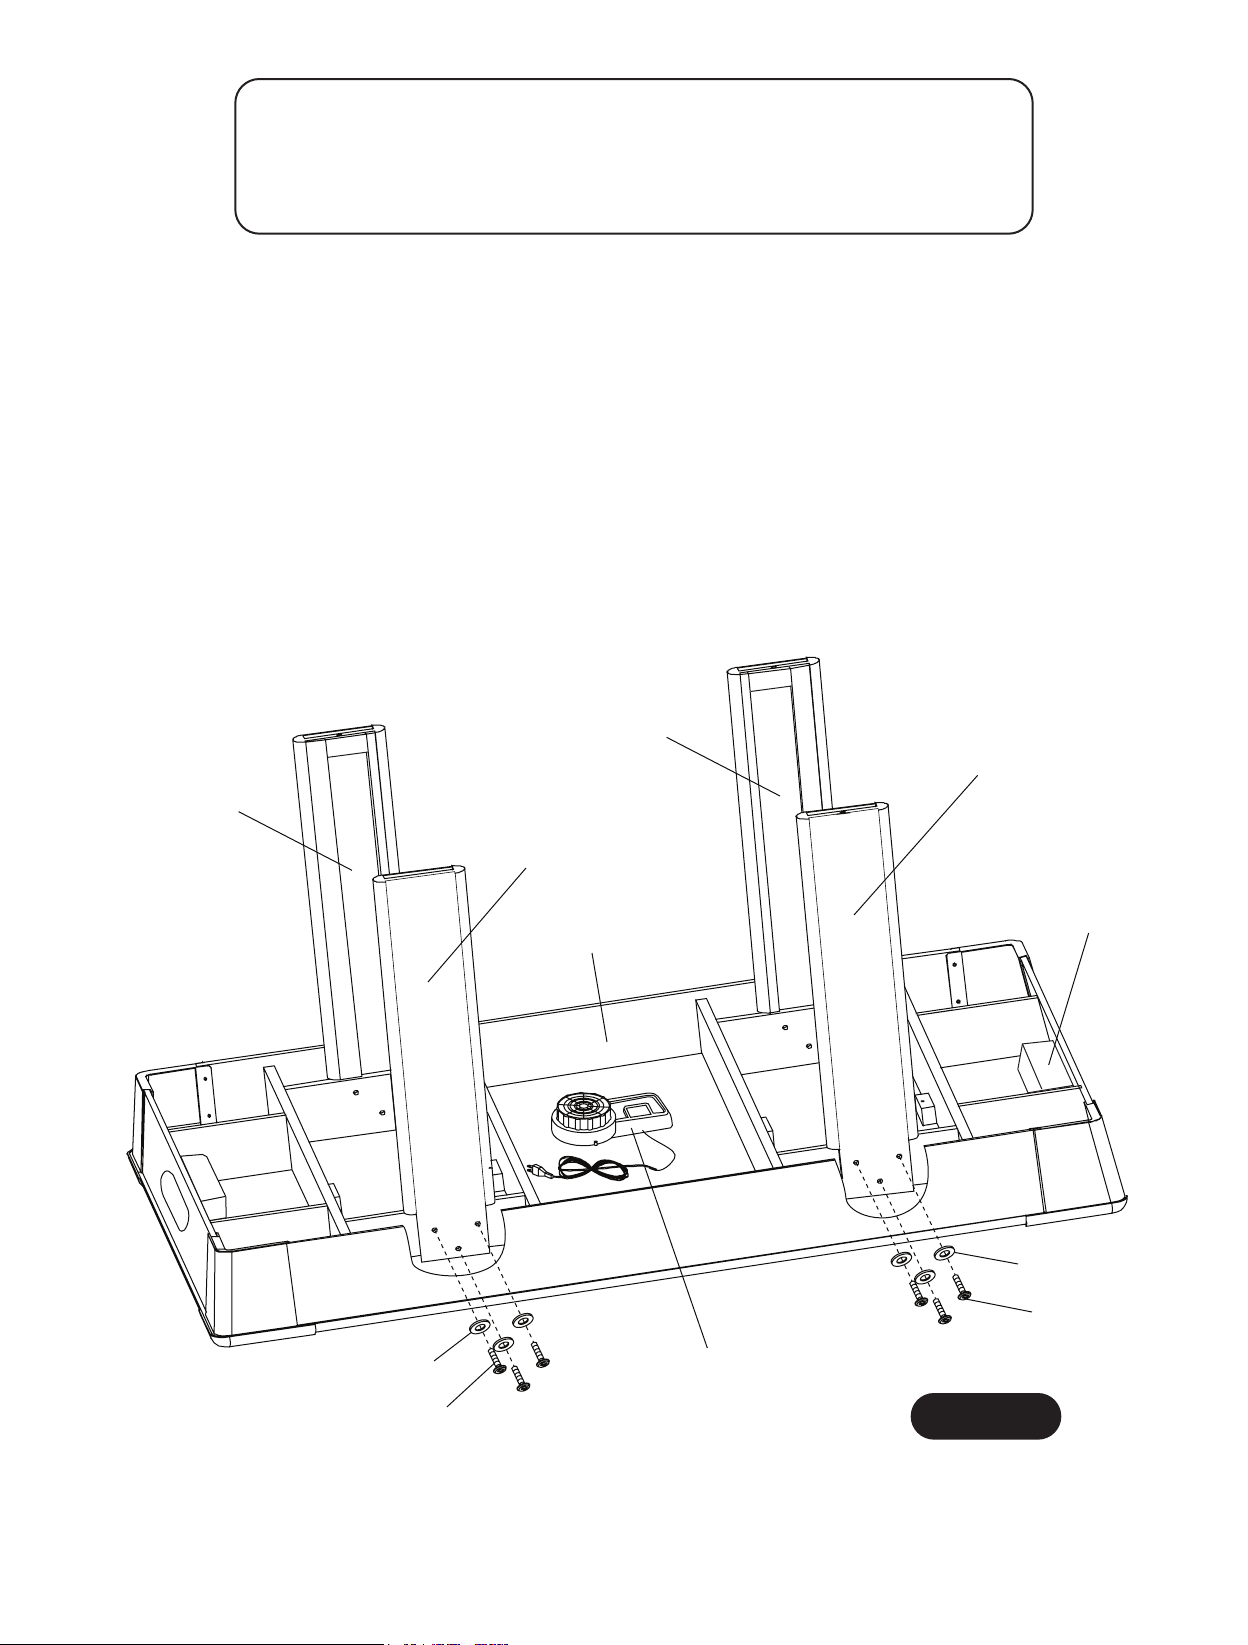
PARTS REQUIRED:
1 pc - P1 Hockey Table Cabinet 12 pcs - H1 Allen Head Bolt
2 pcs - P2 Left Leg 12 pcs - H2 Flat Washer
2 pcs - P3 Right Leg 1 pc - T1 Allen Wrench
STEP 1:
Leave Hockey Table Cabinet P1 face down in carton to assemble.
Attach P2 Left Legs and P3 Right Legs using H1 Allen Head Bolts with H2 Flat Washers as shown
in FIGURE 1. Use Allen Wrench T1 to tighten bolts.
IMPORTANT NOTE:
Be sure P2-Left Legs and P3-Right Legs are installed OUTSIDE of Support Beams as shown
in FIGURE 1.
Be careful to install P2-Left Legs and P3-Right Legs exactly per FIGURE 1. If not installed
correctly, P4 End Leg Panels will not install correctly in the next assembly step.
P3
P2
P3
P2
C2
P1
H2
H1
All Rights Reserved
H2
H1
C1
FIGURE 1
888-996-2729- 1 l l a C e c i v r e S r e m o t s u C r o F 4s t r o p S e d a l a c s E 120 2 ©
Page 5
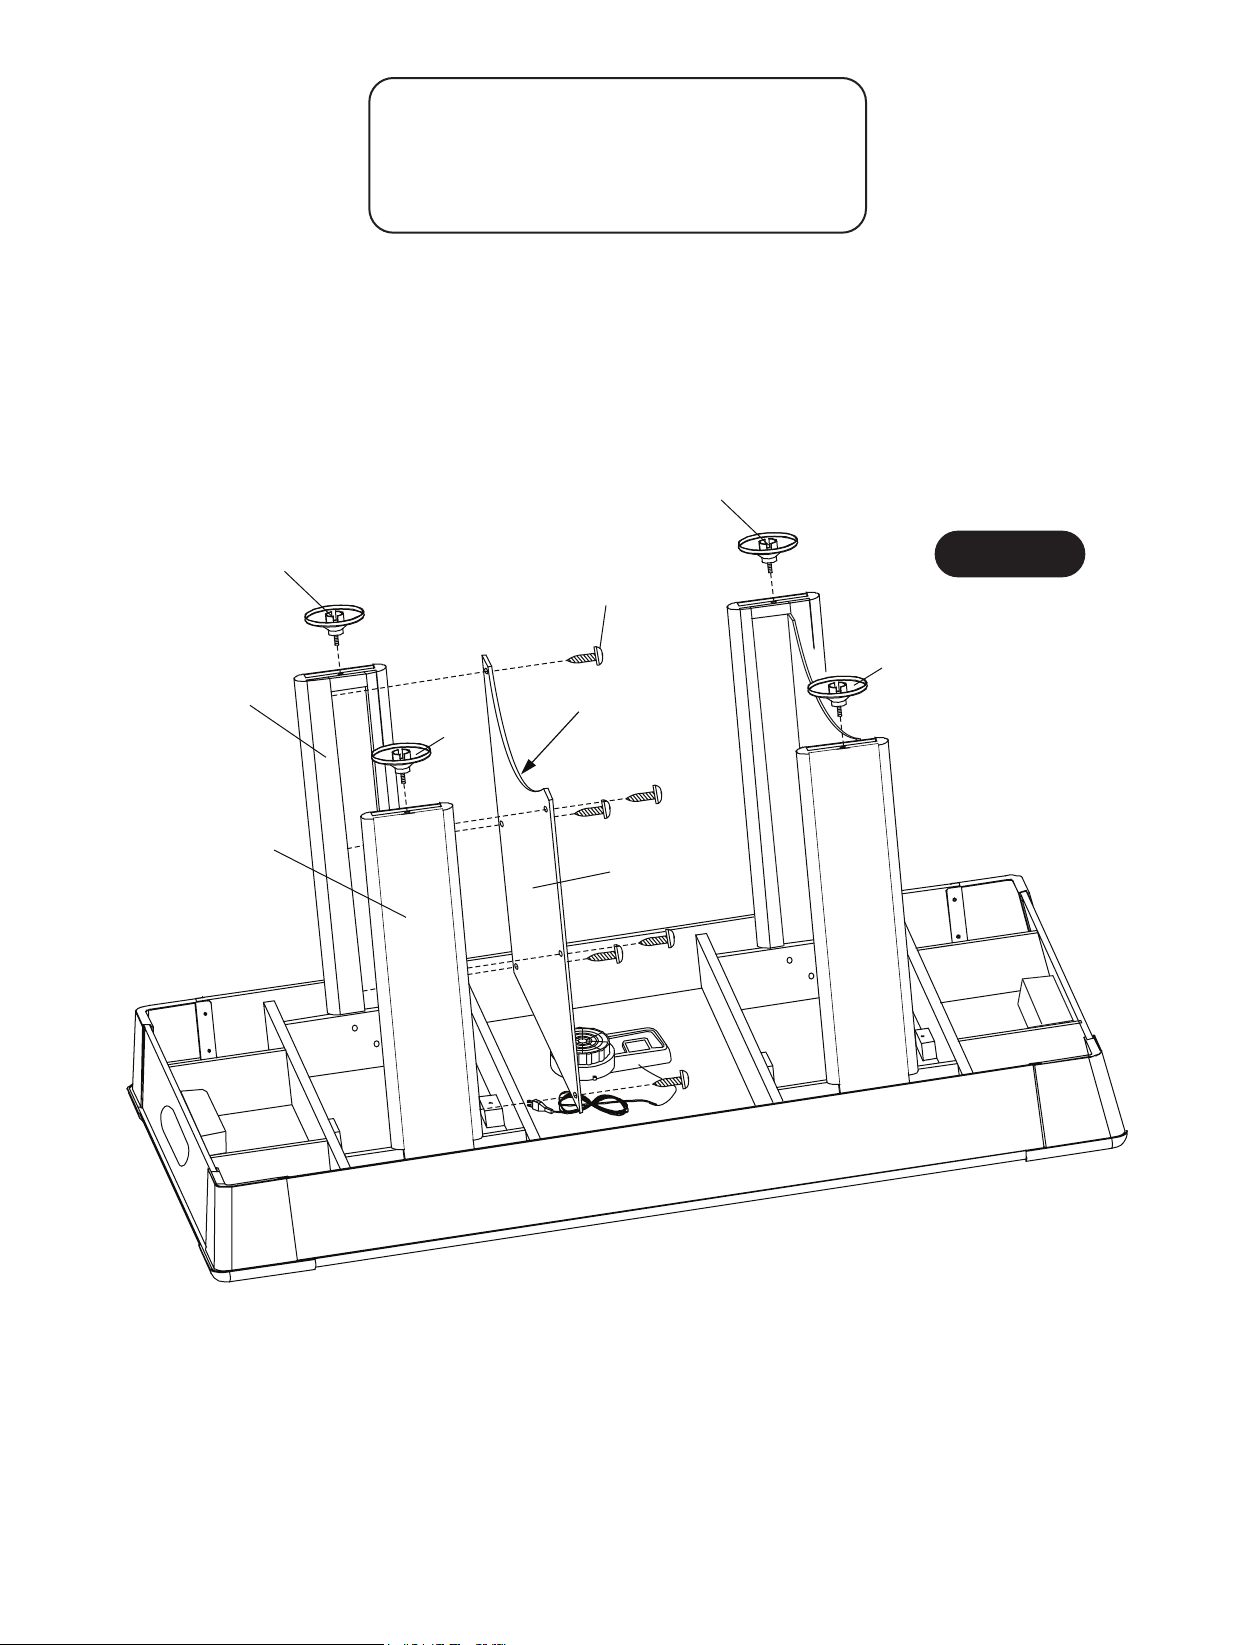
PARTS REQUIRED:
12 pcs - H3 Phillips Washer Head Screw
2 pcs - P4 End Leg Panel
4 pcs - P5 Leg Leveler
STEP 2:
Attach P4 End Leg Panels between two legs of P2 Left Legs and P3 Right Legs using pre-drilled
pilot holes with H3 Screws as shown in FIGURE 2. Tighten, but do not strip out H3 screws.
Thread P5 Leg Levelers on each leg as shown in FIGURE 2.
Note: P4 End Leg Panels are packed under the table cabinet and underneath styrofoam block.
P5
P3
P5
P2
P5
FIGURE 2
H3
P5
NOTE: Opening
Curve in this
position.
P4
All Rights Reserved
888-996-2729- 1 l l a C e c i v r e S r e m o t s u C r o F 5s t r o p S e d a l a c s E 120 2 ©
Page 6
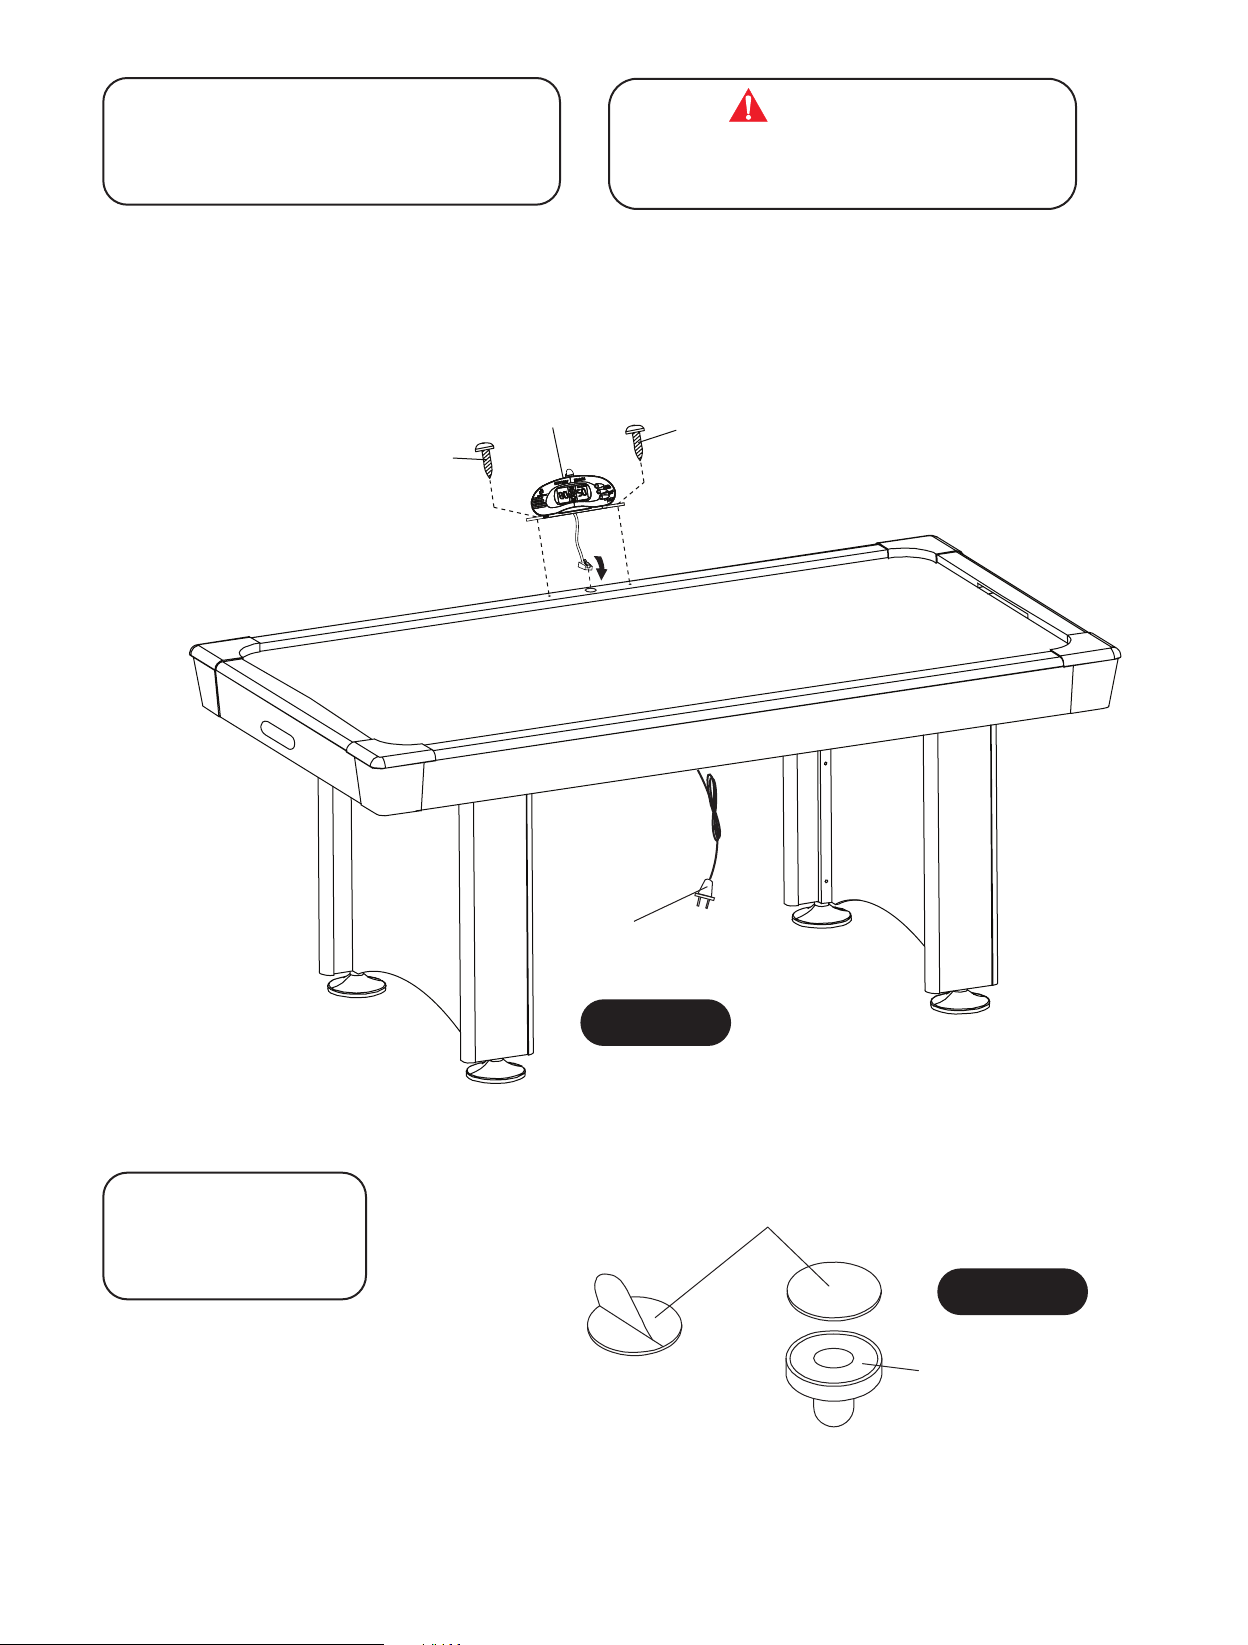
PARTS REQUIRED:
2 pcs - H4 Phillips Round Head Screw
1 pc - P5 Electronic Scorer
THIS STEP REQUIRES TWO OR MORE ADULTS.
VERY CAREFULLY TURN THE TABLE OVER AND SET IT ON
ITS LEGS. BE CAREFUL, THE TABLE IS HEAVY.
CAUTION:
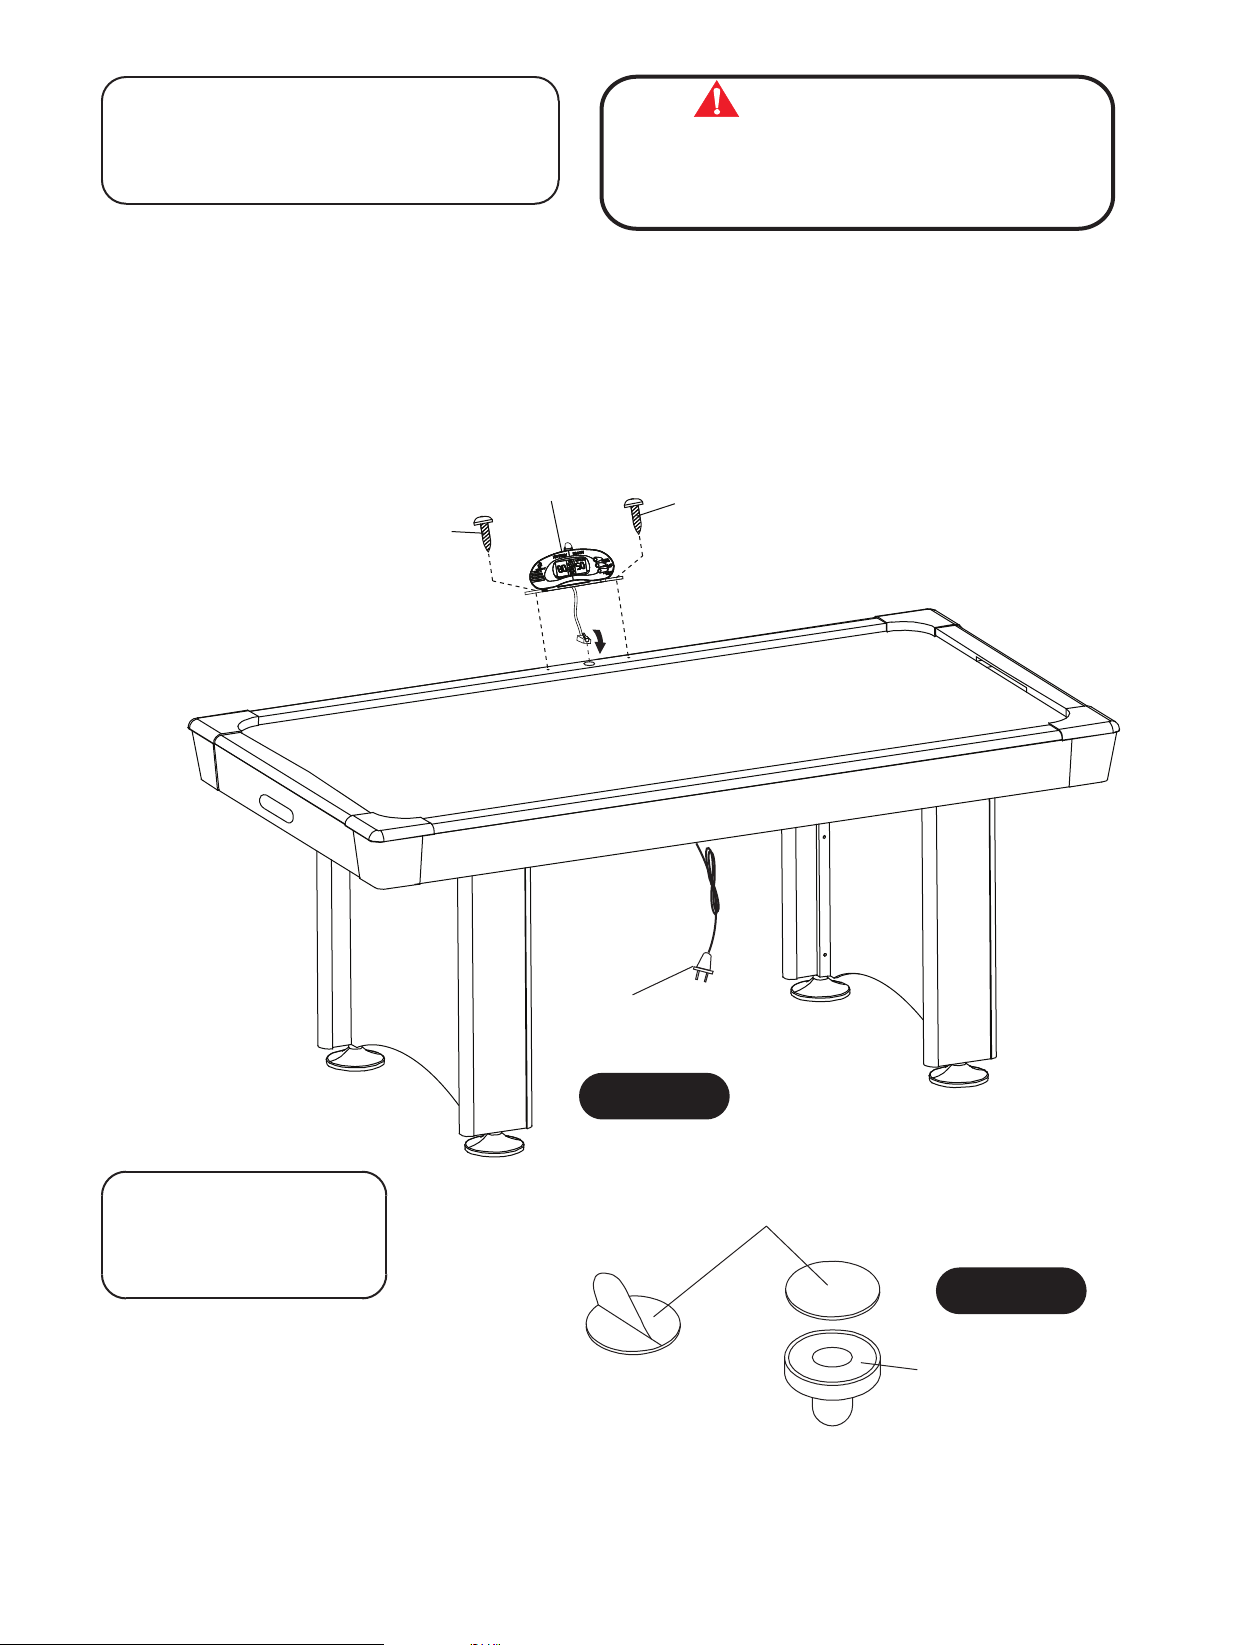
STEP 3:
Feed P5 Electronic Scorer plug through the hole from side top rail as shown. Connect plug onto C3
Junction Box.
Attach P5 Electronic Scorer onto top rail using pre-drilled pilot holes with H4 Screws as shown in
FIGURE 3.
Install 3 "AAA" batteries (not included) into electronic scorer. To preserve battery life - turn electronic
scorer off when not in use.
P5
H4
H4
PARTS REQUIRED:
2 pcs - A1 Striker
2 pcs - A3 Felt Pad
STEP 4:
Peel the backing off A3 Felt Pad
and attach to A1 Striker as shown
in FIGURE 4.
Blower
Motor Cord with
ON/OFF Switch
FIGURE 3
NOTE: A3 Felt Pads may
already be attached to
A1 Strikers.
A3
FIGURE 4
A1
All Rights Reserved
888-996-2729- 1 l l a C e c i v r e S r e m o t s u C r o F 6s t r o p S e d a l a c s E 120 2 ©
Page 7
Congratulations! You have now assembled your Hockey Table. Please note the Care and Use instructions below
to ensure many years of trouble free use of your Hockey Table.
CARE AND USE OF YOUR HOCKEY TABLE
1. For long life and best play from your air hockey table, apply spray furniture polish to clean cloth
and wipe down the playfield with air motor running to make the pucks slide faster before first play
and frequently thereafter.
2. This product is intended for
3. Use a carpenters level to properly level table using the leg levelers.
4. DO NOT operate the motor if the cord is damaged in any way.
5. DO NOT sit, climb or lean on the table.
6. DO NOT drag the table when moving it. This will damage the legs.
7. DO NOT set drinks on the table.
8. It is suggested that this table be placed close to a wall thus allowing the air motor cord to NOT
be a trip hazard. Always turn air motor off when table is not in use.
ELECTRONIC SCORER OPERATION:
1. To Turn On: Press and release “ON/OFF SOUND/POWER” button.
2. To Turn On Scoring: Press and release “RESET START/PAUSE” button.
3. To Pause the game during play: Press and release “RESET START/PAUSE” button.
To Restart game: Simply press and release “RESET START/PAUSE” button.
4. To Reset scoring to “00” “00” for a new game: Press and Hold “RESET START/PAUSE” button for 3 seconds.
5. To Turn on or off sound: Press and release “ON/OFF SOUND/POWER” button.
6. To Turn off electronic scorer: Press and Hold “ON/OFF SOUND/POWER” button.
7. To increase the time limit of game: Press and release “TIME UP/DOWN” button.
NOTE: If no score has been made for 30 minutes, the scoreboard will automatically turn off. You can turn it on
again by pressing the “ON/OFF SOUND/POWER” button. However, we suggest turning the power off when the
game will not be used for an extended period of time.
INDOOR use only.
PRODUCT PARTS LIST # G03617W
Part#
03617WJH1 8 mm x 28 mm
Allen Head Bolt 12
03617WJH2 8 mm x 19 mm
Flat Washer 12
03617WJH3 3.5 mm x 25 mm
Phillips Washer
Head Screw 12
03617WJH4 4 mm x 18 mm
Phillips Round
Head Screw 12
03617WJT1 Allen Wrench 1
03617WJP1 Hockey Table Cabinet
(no blower motor) 1
Description
Qty
Part#
03617WJP2 Left Leg 2
03617WJP3 Right Leg 2
03617WJP4 End Leg Panel 2
03617WJP5 Leg Leveler 4
03617WJP6 Electronic Scorer 1
03617WJA1 Red Sticker 2
03617WJA2 Red Puck 2
03617WJA3 Felt Pad 2
03617WJC1 Blower Motor 1
03617WJC2 Puck Catcher 2
03617WJC3 Junction Box 1
03617WJC4 Sensors with Wire 2
03617WJK1 Hardware Kit 1
03617WJM1 Owner’s Manual 1
Description
AIR HOCKEY RULES
The Object of the Game
To score a predetermined number of points or to score the most points in a given amount of time.
How to Play
Flip a coin to determine who will begin play. Play begins when the puck is placed on the playing surface.
Players must hit the puck with the striker and attempt to shoot it into thier opponent’s goal. One point is awarded when a
puck is shot into the opponent’s goal.
Sometimes pucks can fly off the table. If this occurs, players may take turns placing the puck back on the table.
Qty
All Rights Reserved
888-996-2729-1llaCecivreSremotsuCroF7stropSedalacsE1202©
Page 8

: N O I T A R U D Y T N A R R A W 0 9 f o d o i r e p a r o f , r e n w o l a n i g i r o e h t o t d e t n a r r a w s i t c u d o r P s i h T
: E G A R E V O C Y T N A R R A W t c u d o r p s i h t , r e n w o l a n i g i r o e h t o t s t n a r r a w S T R O P S E D A L A C S E
. e s a h c r u p l a n i g i r o e h t m o r f s y a d
: T N E M E C A L P E R Y T N A R R A W , d o i r e p y t n a r r a w y a d 0 9 e v o b a e h t g n i r u D
Y T N A R R A W D E T I M I L Y A D 0 9
y ESCALADE n a f o e s a h c r u p e h t n o , r e n w o l a n i g i r o e h t o t s d n e t x e y t n a r r a w r e m o t s u c s i h T
. ) " t c u d o r P " e h t s a d e r r e f e r r e t f a n i e r e h ( t c u d o r P S T R O P S
e s o p r u p d e d n e t n i e h t r o f d e s u n e h w p i h s n a m k r o w d n a l a i r e t a m n i s t c e f e d m o r f e e r f e b o t
N E E B S A H T C U D O R P E H T F I D I O V S I Y T N A R R A W S I H T . s n o i t i d n o c d n a e s u l a m r o n r e d n u
, E C I V R E S R E P O R P M I , E C N E G I L G E N , E S U E L B A N O S A E R N U , T N E D I C C A Y B D E G A M A D
R E H T O R O T C U D O R P E H T H T I W D E D I V O R P S N O I T C U R T S N I W O L L O F O T E R U L I A F
. P I H S N A M K R O W D N A L A I R E T A M N I S T C E F E D F O T U O G N I S I R A T O N S E S U A C
e l b a r a p m o c a h t i w e c a l p e r r o s t n e n o p m o c t n e m e c a l p e r e d i v o r p l l a h s S T R O P S E D A L A C S E
f e d s i t c u d o r p f I . g n i s o o h c r u o t a t c u d o r p
. t p e D e c i v r e S r e m o t s u C r u o t c a t n o c
e s a e l p , e r a c r e p o r p d n a e s u l a m r o n r e d n u e v i t c e
. t p e D e c i v r e S r e m o t s u C / 888-996-2729 - 1
: t a s u e t i r W r O
6 0 7 7 4 N I , e l l i v s n a v E , 9 8 8 x o B . O . P - . c n I , s t r o p S ® e d a l a c s E
. t p e D e c i v r e S r e m o t s u C : n t t A
: t a s u l i a m - E r O
m o c . s t r o p s e d a l a c s e @ gameroom
Other than shipping requirements, no charge will be made for such replacement of in-warranty
products.
: S R E M I A L C S I D Y T N A R R A W T U O G N I S I R A S E I T N A R R A W D E I L P M I Y N A
E R A , E S O P R U P R A L U C I T R A P A R O F S S E N T I F D N A Y T I L I B A T N A H C R E M F O
T O T N O I T A R U D N I D E T I M I L S
T R O P S E D A L A C S E . D O I R E P Y A D 0 9 E V O B A E H
R E H T O R O T C U D O R P E H T F O E S U F O S S O L R O F E L B A I L E B T O N L L A H S
S E G A M A D R O S E S N E P X E , S T S O C L A T N E D I C N I R O L A I T N E U Q E S N O C
. E S U R E H T O Y N A F O R E M U S N O C E H T Y B D E R R U C N I
r o l a i t n e u q e s n o c r o s e i t n a r r a w d e i l p m i f o n o i t a t i m i l r o n o i s u l c x e e h t w o l l a t o n o d s e t a t s e m o S
. u o y o t y l p p a t o n y a m s n o i s u l c x e r o s n o i t a t i m i l e v o b a e h t o s , s e g a m a d l a t n e d i c n i
S E I T N A R R A W D E I L P M I E H T O T D E T I M I L T O N T U B G N I D U L C N I , E L A S S I H T F O
h g i r r e h t o
All Rights Reserved
: S E I D E M E R L A G E L e v a h o s l a y a m u o y d n a s t h g i r l a g e l c i f i c e p s u o y s e v i g y t n a r r a w s i h T
. e t a t s o t e t a t s m o r f y r a v y a m h c i h w s t
888-996-2729 - 1 l l a C e c i v r e S r e m o t s u C r o F 8s t r o p S e d a l a c s E 120 2 ©
Page 9

Nosotros tratamos de asegurarnos que nuestros productos se
an
de la más alta calidad y libre de problemas, como defectos de
fabricación ó partes incompletas. Sin embargo, Si usted tiene
alg
ún problema con su producto, por favor
NO LO REGRESE A LA TIENDA
pongase en contacto con nosotros llamando gratis al:
1-888 -996-2729
FAX : 1-866-873-3531
gameroom@Escalade Sports.com
O escriba a:
Escal
Departamento de Atenci
Cliente
Evansvill
adeSports
ón al
P.O.Bo x 889
e IN 47706
Visite nuestro sitio Web en:
Por favor tenga el n
Al contactar a Escalade Sports, por favor incluya su número de modelo, código
de fecha (si lo hubiera) y el número de parte en caso de solicitar una parte. Estos
números se ubican en el producto, el empaque y en el manual del usuario.
Número de modelo:
C
ódigo de fecha:
Fecha de Compra:
CONSERVE ESTE MANUAL DE INSTRUCCIONES PARA REFERENCIA.
Todos los derechos reservados.
2 - G03617W - - WJ
stropSedalacsE1202©
úmero de modelo cuando solicite partes.
G03617W
Para Servicio al cliente llame 1-888-996-2729
1
Page 10
IMPORTANTE! LEA TODOS LOS
PASOS DE ESTE MANUAL ANTES
DE COMENZAR A ARMAR.
IMPOR
TANTE!
UAL
RADO
SE REQUIEREN DOS (2) ADULTOS PARA
ENSAMBLAR ESTA MESA DE HOCKEY REDLINE
“VICTORY”
Herramientas necesarias:
Llave Allen T1 (incluida)
Desarmador Phillips
Abrillantador para muebles y un paño
Un desarmador eléctrico, puede resultarle muy útil para armar la mesa. Sin embargo,
debe usarlo en baja potencia y tener mucho cuidado de no ajustar en exceso y
dañar los tornillos.
Consejos de ensamblamiento
úrese de que comprende los siguientes consejos antes de comenzar a armar la mesa.
Aseg
1. Coloque todos los tornillos manualmente antes de apretarlos.
2. Algunos dibujos o imágenes de este manual puede que no se vean exactamente igual
a su producto. Asegúrese de leer y comprender el texto antes de comenzar
cada paso.
IMPORTANTE:
LEA Y SIGA LAS INSTRUCCIONES DE ENSAMBLAR
FUNCIONAMIENTO Y SEGURIDAD ATENTAMENTE.
SE REQUIEREN POR LO MENOS DOS ADULTOS
PARA ARMAR ESTA MESA
Todos los derechos reservados.
stropSedalacsE1202©
Para Servicio al cliente llame 1-888-996-2729
2
Page 11
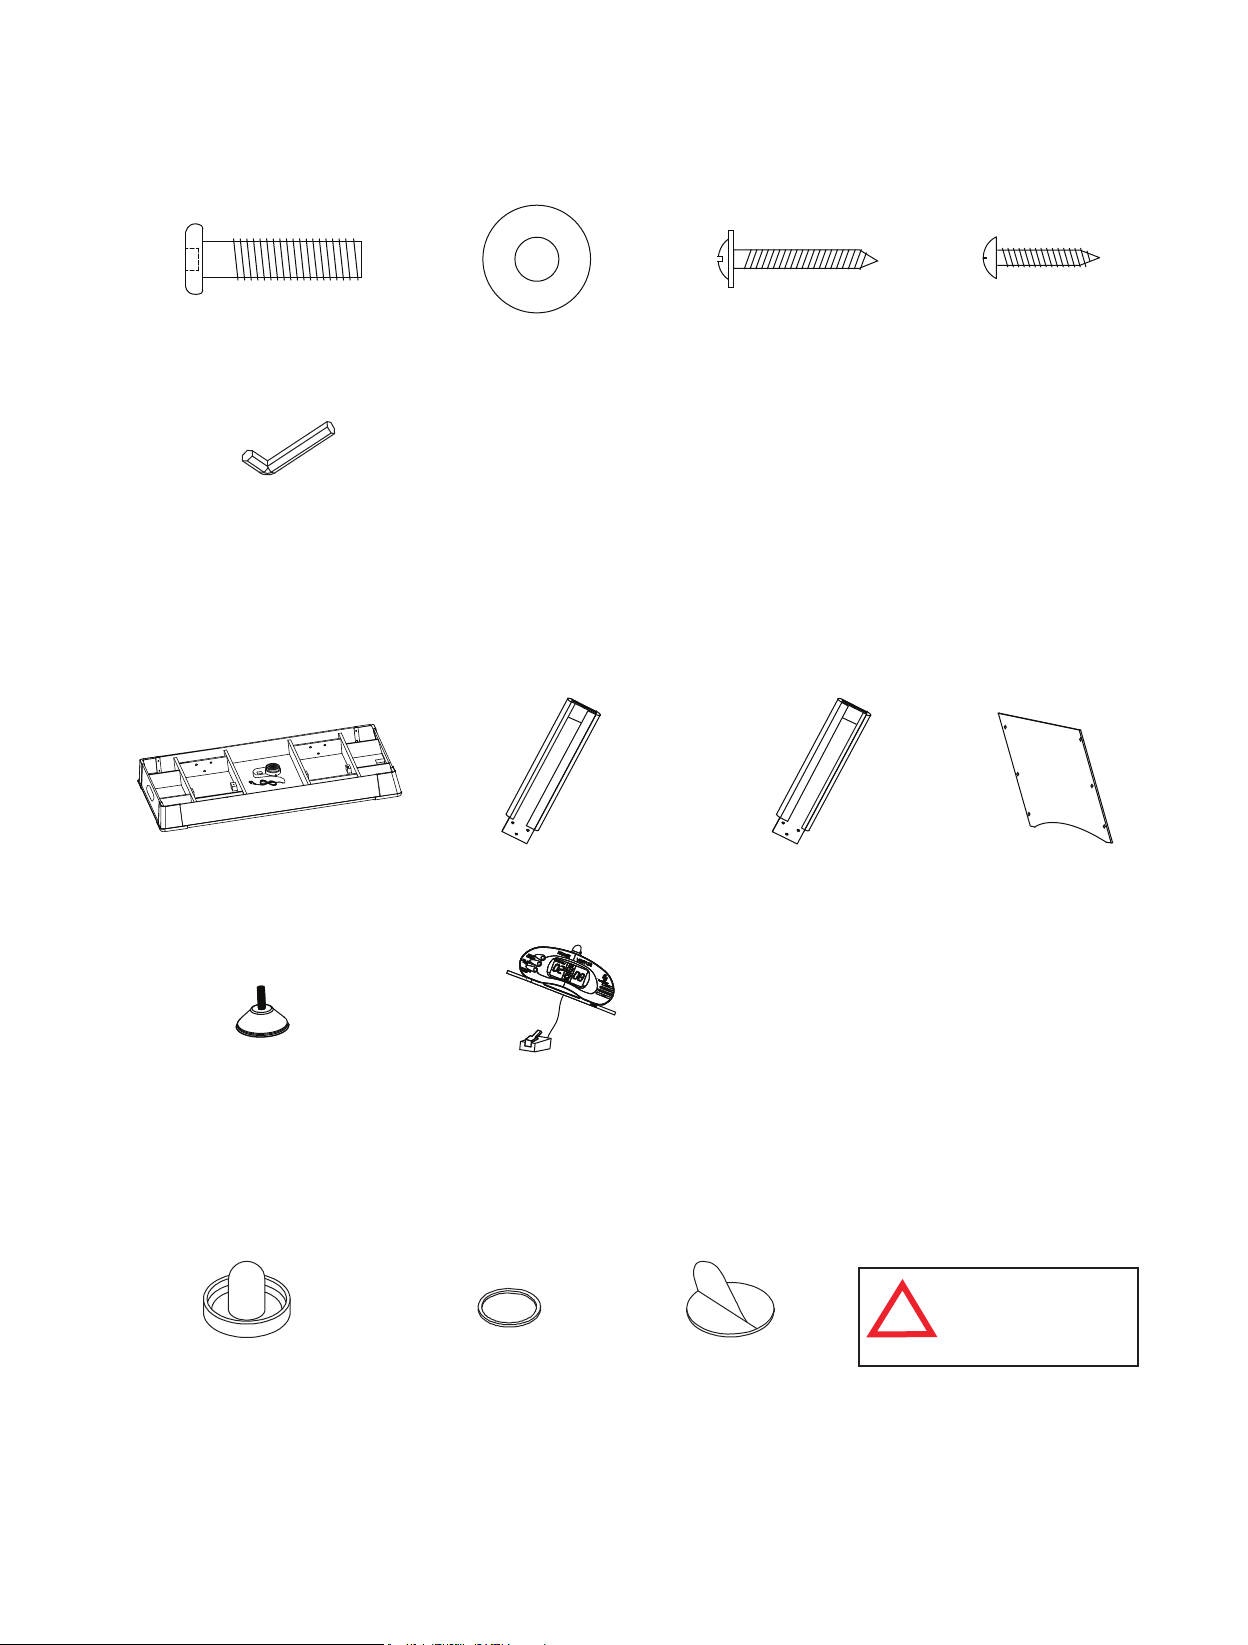
IDENTIFICADOR DE TORNILLOS
(A Escala)
H1 - 8mm x 28mm
Tornillo Allen (12)
(No a Escala)
T1 - Llave Allen (1 pza.)
P1 - Gabinete de la
Mesa de hockey de
aire
(1)
H2 - 8mm x 19mm
Rondana (12)
H3 - 3.5mm x 25mm
Tornillo Phillips (cabeza
tipo Rondana)
(12)
H4 - 4mm x 18mm
Tornillo Phillips
(Cabeza redonda)
(2)
IDENTIFICADOR
DE PARTES.
(No a Escala)
P2 - Pata (Izquierda) (2) P4 - Tabla del
P3 - Pata (Derecha) (2)
extremo para las
patas
(2)
NOTA: Las Tablas del extremo para
las patas P4 están empacadas
debajo del gabinete de la mesa y
debajo del bloque de unicel.
P5 - Nivelador de las
patas (4)
A1 - Mazo Rojo (2)
Todos los derechos reservados.
stropSedalacsE1202©
P6 - Marcador (1)Electronico
IDENTIFICADOR DE
ACCESORIOS
(No a Escala)
A2 - Disco Rojo (2)
3
A3 - Fieltro para
el Mazo
NOTA: Fieltro puede venir
ya pegado en los mazos A1.
(2)
A3
ADVERTENCIA:
PELIGRO DE ASFIXIA
!
Piezas pequeñas.
No adecuadas para niños
menores de 3 años.
Para Servicio al cliente llame 1-888-996-2729
Page 12
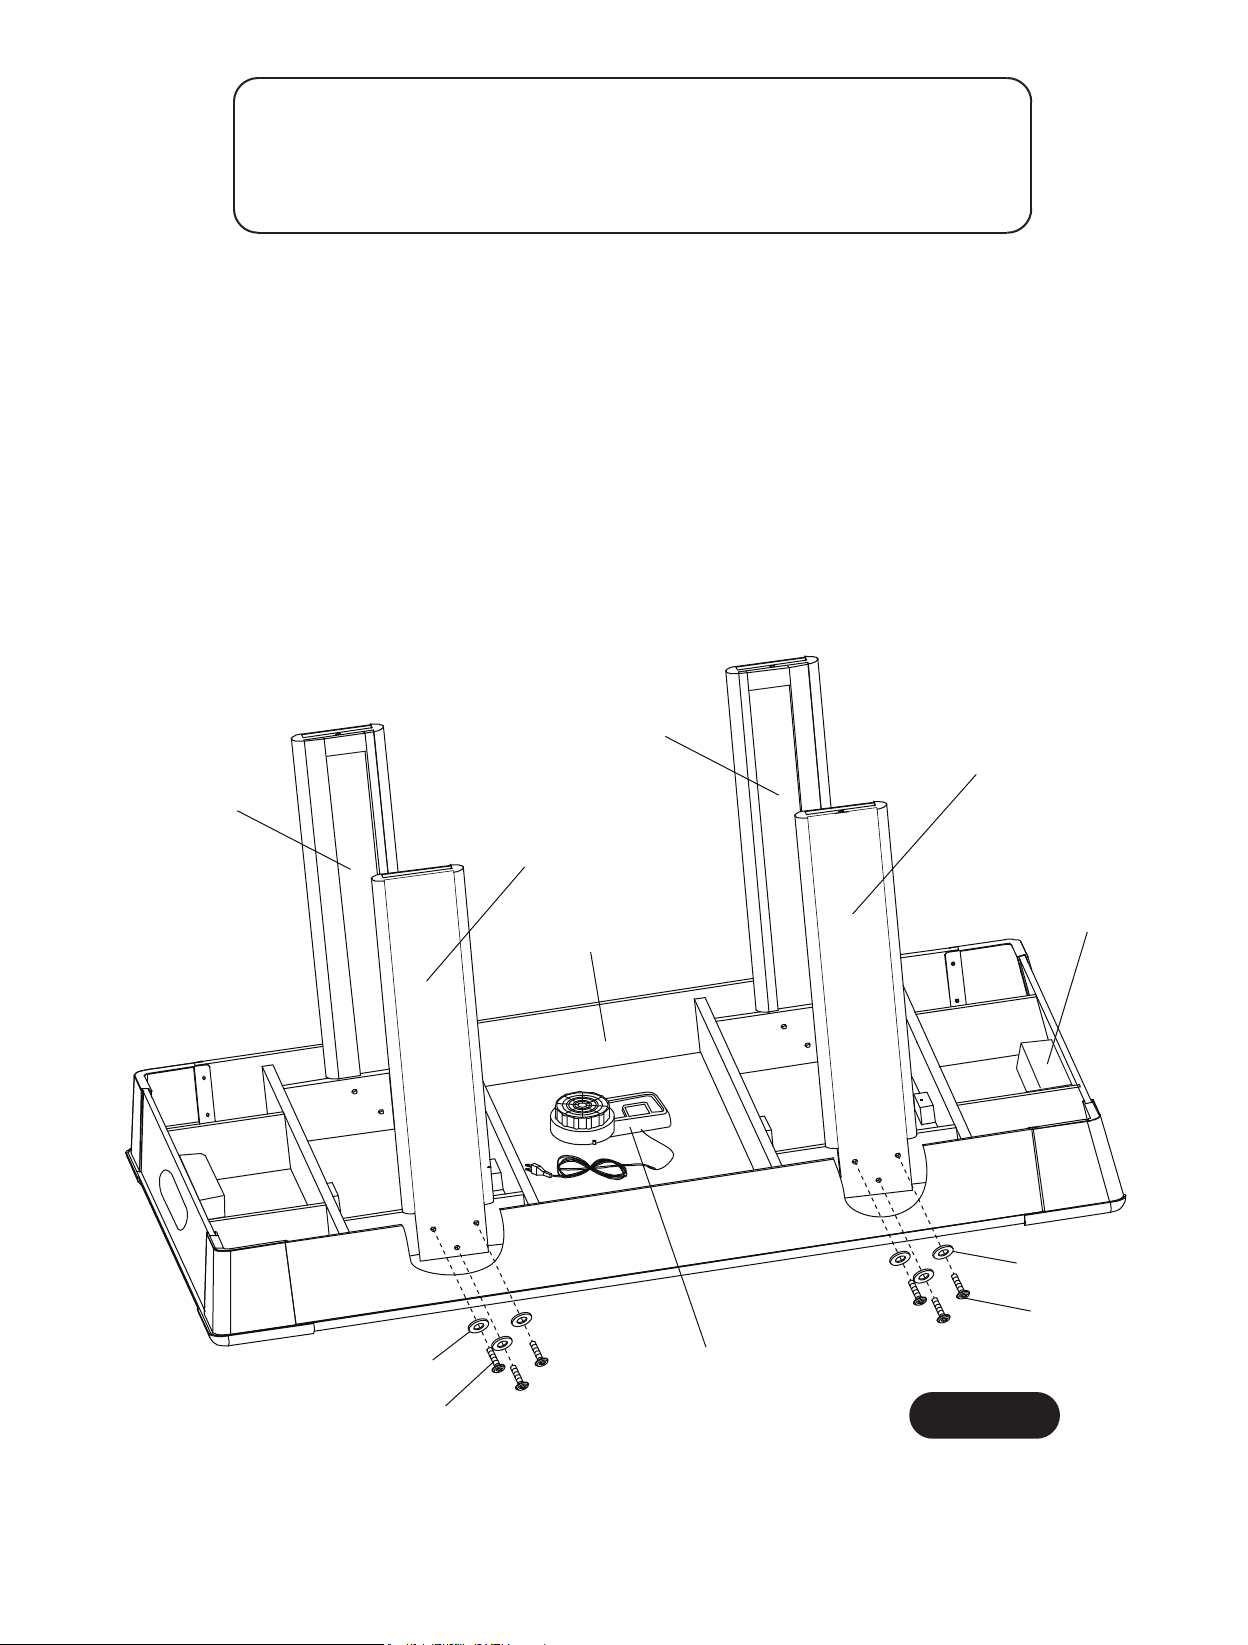
PARTES REQUERIDAS:
1 pza. - P1 Gabinete de la Mesa de Hockey 12 pzas. - H1 Tornillo Allen
2 pzas. - P2 Pata (Izquierda) 12 pzas. - H2 Rondana
2 pzas. - P3 Pata (Derecha) 1 pza. - T1 Llave Allen
PASO 1:
Para ensamblar la mesa, deje el Gabinete de la Mesa de Hockey P1 boca abajo sobre el cartón.
Coloque las Patas Izquierdas P2 y las patas Derechas P3 utilizando los Tornillos H1 con las
Rondanas H2 como se muestra en la FIGURA 1. Utilice la Llave T1 para apretar los tornillos.
NOTA IMPORTANTE:
Asegúrese que las Patas Izquierdas P2 y Las Patas Derechas P3 estén instaladas AFUERA
de las Tablas de Soporte como se muestra en la FIGURA 1.
Tenga cuidado al instalar las Patas Izquierdas P2 y las Patas Derechas P3 exactamente
como se indica en la FIGURA 1. Si no se instalan correctamente, las tablas del extremo P4
no quedarán instaladas correctamente en el siguiente paso del ensamblado.
P3
P2
P3
P2
C2
P1
H2
H1
Todos los derechos reservados.
stropSedalacsE1202©
H2
H1
C1
FIGURA 1
4
Para Servicio al cliente llame 1-888-996-2729
Page 13
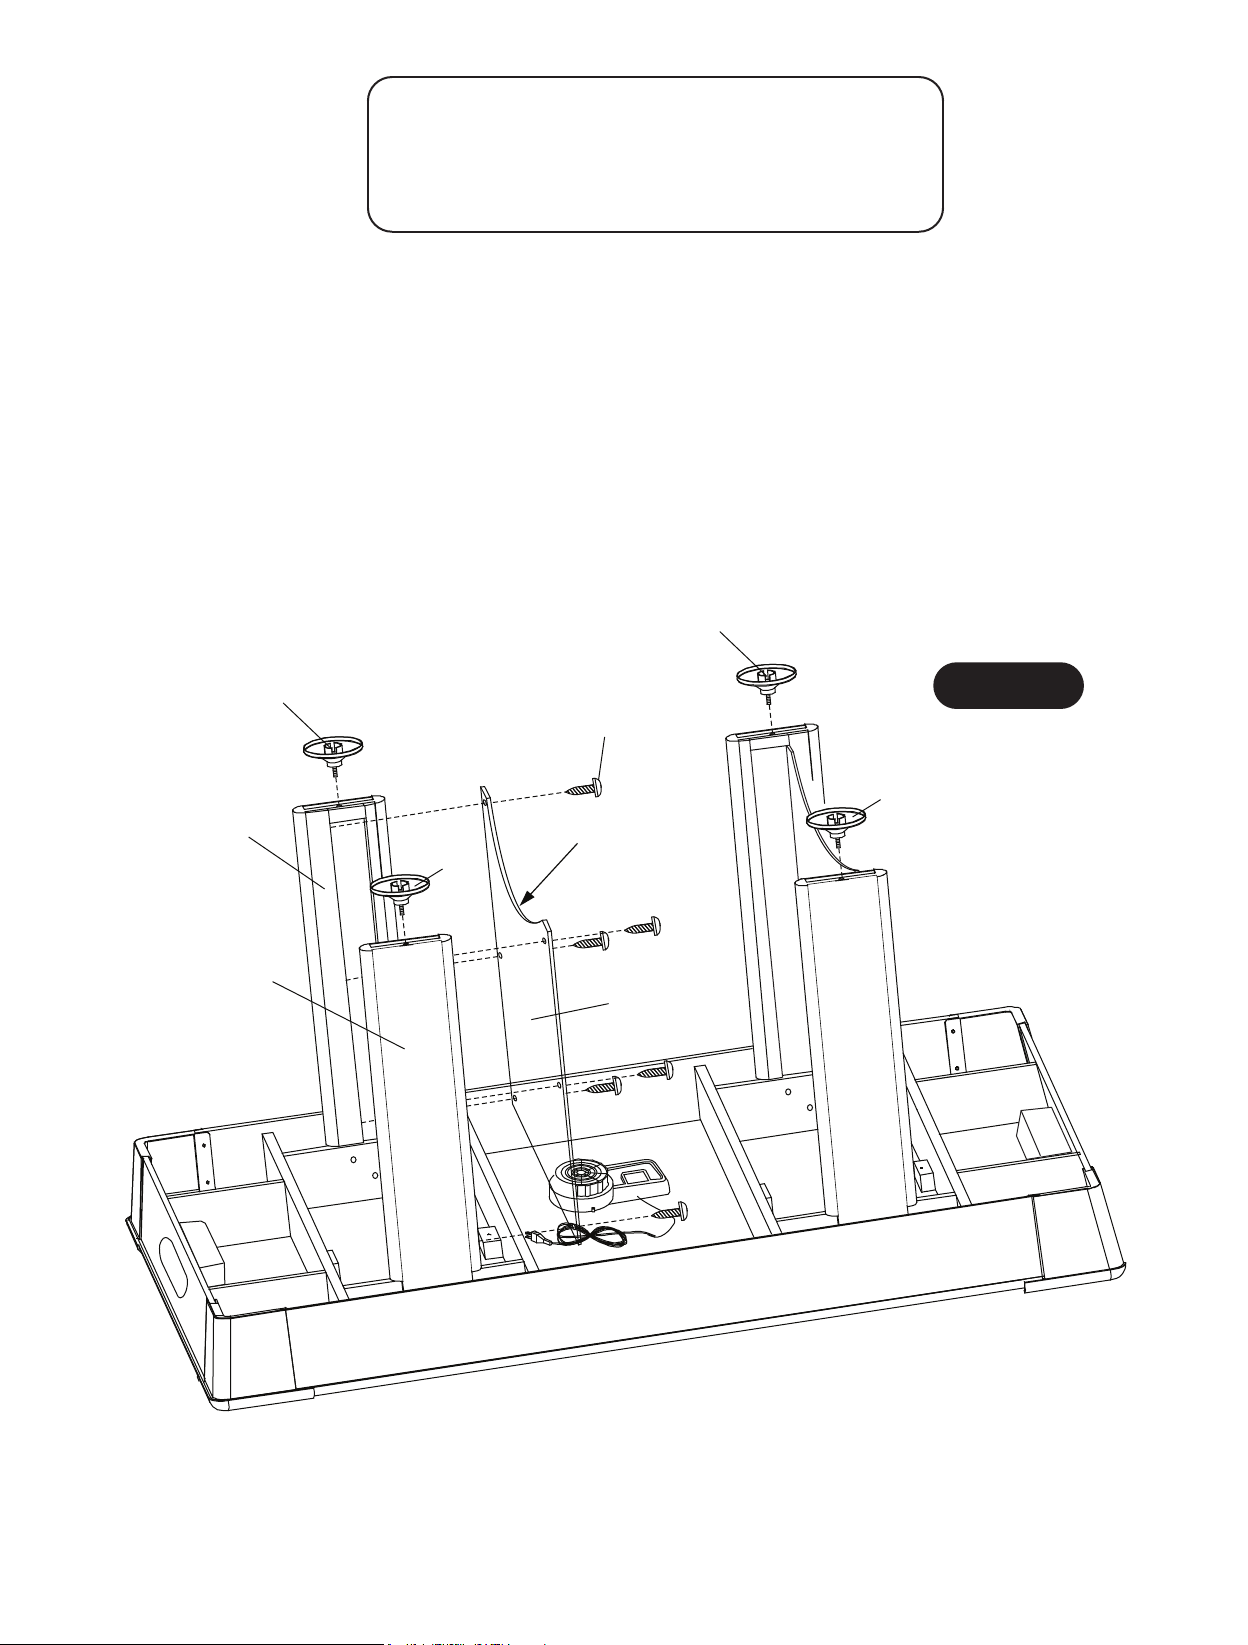
PARTES REQUERIDAS:
12 pzas. - H3 Tornillo Phillips (cabeza tipo Rondana)
2 pzas. - P4 Tabla del Extremo para las patas
4 pzas. - P5 Nivelador de las patas
PASO 2:
Coloque las Tablas del Extremo P4 entre las dos Patas Izquierdas P2 y las Patas Derechas P3
usando los orificios guía pre-perforados con los Tornillos H3 como se muestra en la FIGURA 2.
Atornille bien los Tornillos H3, pero no los sobre apriete para no barrerlos.
Coloque/Enrosque los Niveladores P5 en cada una de las Patas como se muestra en la
FIGURA 2.
NOTA: Las Tablas del extremo para las patas P4 están empacadas debajo del gabinete de la
mesa y debajo del bloque de unicel.
P5
P3
P5
P2
P5
FIGURA 2
H3
P5
NOTA: La
Abertura de la
Curva en esta
posición.
P4
Todos los derechos reservados.
stropSedalacsE1202©
5
Para Servicio al cliente llame 1-888-996-2729
Page 14
PARTES REQUERIDAS:
2 pzas. - H4 Tornillo Phillips
(Cabeza redonda)
1 pza. - P5 Marcador Electrónico
ESTE PASO REQUIERE DE DOS O MAS ADULTOS.
CON MUCHO CUIDADO VOLTEE LA MESA HASTA QUE LAS
TENGA CUIDADO LA MESA ESTÁ MUY PESADA.
ADVERTENCIA
PATAS DE LA MESA ESTÉN SOBRE EL PISO.
PASO 3:
Inserte el enchufe del Marcador Electrónico P5 a través del agujero del riel lateral superior como se
muestra. Conecte la enchufe en la caja de conexión C3.
Fije el Marcador Electrónico P5 en el riel superior usando los orificios guía pre-perforados con los
Tornillos H4 como se muestra en la FIGURA 3.
Instale 3 baterías “AAA” (no incluidas) en el Marcador Electrónico. Para preservar la duración de
las baterías – apague el Marcador Electrónico cuando no esté en uso.
H4
P5
Cable del Motor de
aire con Apagador
H4
PARTES REQUERIDAS:
2 pzas. - A1 Mazo
2 pzas. - A3 Fieltro para
el Mazo
PASO 4:
Despegue la protección del pegamento
del Fieltro A3 y colóquela al Mazo A1
como se muestra en la FIGURA 4.
Todos los derechos reservados.
stropSedalacsE1202©
FIGURA 3
A3
NOTA: El Fieltro puede venir
ya pegado en los mazos A1.
6
A3
FIGURA 4
A1
Para Servicio al cliente llame 1-888-996-2729
Page 15
Felicidades! Ya ha terminado de ensamblar su Mesa de Hockey. Siga las instrucciones de uso y cuidado
siguientes para garantizar que le dure Muchos años sin dar problemas.
INSTRUCIONES DEL CUIDADO Y USO DE SU MESA DE HOCKEY
1. Antes del primer Juego a
aire con el Motor de aire prendido para que los discos se deslicen rápido, mas fácilmente y para proteger la superficie de la
mesa.
2. Este producto está diseñado para su uso en INTERIORES exclusivamente.
3. Utilice un nivel de carpintero para nivelar la mesa con los niveladores de las patas.
4. NO opere el Motor si el cable está dañado.
5. NO salte, escale o se recargue en la mesa.
6. NO arrastre la mesa para moverla. Si lo hace se dañarán las patas.
7. NO ponga bebidas sobre la mesa.
8. Se sugiere que la mesa se coloque cerca de una pared para asegurar que el cable del Motor NO sea un riesgo de peligro
para tropezar. Siempre apague el Motor de aire cuando no utilice la mesa.
1. Para Prender: Oprima y suelte el botón de "ON/OFF SOUND/POWER".
2. Para Prender el Marcador: Oprima y suelte el botón "RESET START/PAUSE".
3. Para hacer una Pausa durante el juego: Oprima y suelte el botón "RESET START / PAUSE".
Para Reiniciar el juego: Simplemente oprima y suelte el botón "RESET START/PAUSE".
4. Para Reiniciar la puntuación a "00" "00" para un nuevo juego: Oprima y mantenga oprimido el botón "RESET START
PAUSA” durante 3 segundos.
5. Para Prender o Apagar el Sonido: Oprima y suelte el botón del "ON/OFF SOUND/POWER".
6. Para Apagar el Marcador Electrónico: Oprima y Mantenga el botón del "ON/OFF SOUND/POWER".
7. Para incrementar el límite de tiempo de juego: Oprima y suelte el botón “TIME UP/DOWN”.
plique spray abrillantador de muebles en un paño y limpie la superficie de la mesa de hockey de
FUNCIONAMIENTO DEL MARCADOR ELECTRÓNICO:
/
NOTA: Si no ha anotado por 30 minutos, el marcador se apagará automáticamente. Usted lo puede volver a prender
presionando el botón “ON/OFF SOUND/POWER”. Sin embargo, recomendamos apagar el juego cuando no sea utilizado
durante un periodo de tiempo prolongado.
LISTA DE PARTES PARA EL MODELO # G03617W
N.º de Parte#
03617WJH1 8 mm x 28 mm
03617WJH2 8 mm x 19 mm
03617WJH3 3.5 mm x 25 mm
03617WJH4 4 mm x 18 mm
03617WJT1 Llave Allen 1
03617WJP1 Gabinete de la Mesa de hockey
de aire (sin Motor) 1
Descripción
Tornillo Allen 12
Rondana 12
Tornillo Phillips
(Cabeza tipo Rondana) 12
Tornillo Phillips
(Cabeza Redonda) 12
REGLAS DEL HOCKEY DE AIRE
Objetivo del juego
Marcar un n mero determinado de puntos o un número superior de puntos en un espacio de tiempo determinado.ú
Cant.
N.º de Parte#
03617WJP2 Pata (Izquierda) 2
03617WJP3 Pata (Derecha) 2
03617WJP4 Tabla del extremo para las patas 2
03617WJP5 Nivelador de las patas 4
03617WJP6 Marcador Electrónico 1
03617WJA1 Mazo Rojo 2
03617WJA2 Disco Rojo 2
03617WJA3 Fieltro para el Mazo 2
03617WJC1 Motor de Aire 1
03617WJC2 Cancha de Hockey 2
03617WJC3 Caja de Conexión 1
03617WJC4 Sensores con Cable 2
03617WJK1 Conjunto de Tornillos y Tuercas 1
03617WJM1 Manual 1
Descripción
Cant.
Cómo jugar
Lance una moneda para determinar quien comenzara el juego. El juego se inicia cuando el disco se coloca sobre la
superficie de juego. Cada jugador debe golpear el disco con el Mazo e intentar disparar en la portería del oponente.
Cada vez que el disco entre en la portería se contara un punto. Los discos pueden salirse de la mesa ocasionalmente.
Cuando esto ocurra, los jugadores se turnaran para volver a colocar el disco sobre la mesa.
Todos los derechos reservados.
stropSedalacsE1202©
7
Para Servicio al cliente llame 1-888-996-2729
Page 16

GARANTÍA LIMITADA POR 90 DÍAS
Esta garantía para consumidores de la compra original de cualquier producto ESCALADE SPORTS (en adelante
es aplicable
®
denominado el "Producto").
DURACIÓN DE LA GARANTÍA: Se garantiza este Producto al comprador original por un período de (90) días a partir de la
fecha de compra.
COBERTURA DE LA GARANTÍA: ESCALADE SPORTS le garantiza al comprador original que cualquier producto de su
fabricación está libre de defectos en los materiales y fabricación cuando se lo utiliza para el propósito establecido, bajo
condiciones normales de uso. ESTA GARANTÍA NO TIENE VALIDEZ SI EL PRODUCTO SE HA DETERIORADO POR
ACCIDENTE, USO INDEBIDO, NEGLIGENCIA, MANTENIMIENTO INCORRECTO, NO SEGUIR LAS INSTRUCCIONES QUE
VIENEN CON EL PRODUCTO U OTRAS CAUSAS NO RELACIONADAS CON DEFECTOS EN LOS MATERIALES O
FABRICACIÓN.
APLICACIÓN DE LA GARANTÍA: Durante el período de garantía de (90) días, ESCALADE SPORTS reparará o reemplazará
con otro similar, todo modelo o Producto o componente que resulte defectuoso bajo condiciones normales de uso y cuidado,
cuando nuestra inspección demuestre que a nuestra satisfacción el mismo realmente es defectuoso; sírvase contactar a nuestro
Departamento de Garantía.
1-888-996-2729 / Departamento de Garantía (Warranty Dept.)
O escríbanos a:
Escalade® Sports, Inc. - P.O. Box 889, Evansville, IN 47706 - Attn: Warranty Dept.
O por correo electrónico a:
Fuera de los gastos de envío, no se impondrá cargo alguno por la reparación o reemplazo de los productos en garantía.
ESCALADE® SPORTS recomienda asegurar los Productos por su valor antes del envío.
LIMITACIÓN DE LA GARANTÍA: TODA GARANTÍA ORIGINADA EN ESTA VENTA, INCLUYENDO EN FORMA NO
TAXATIVA, LAS GARANTÍAS IMPLÍCITAS DE COMERCIALIZACIÓN Y APTITUD PARA UN FIN ESPECÍFICO, TENDRÁ VIGENCIA
POR UN PLAZO DE (90) DÍAS. ESCALADE® SPORTS NO SERÁ RESPONSABLE POR LA PÉRDIDA DE USO DEL PRODUCTO U
OTROS COSTOS INCIDENTALES O RELACIONADOS, PERJUICIOS O PERDIDAS GENERADAS POR EL CONSUMIDOR
ANTE CUALQUIER OTRO USO.
Algunos estados no permiten la exclusión o limitación de las garantías implícitas o daños incidentales o conexos, de modo que
las limitaciones que anteceden pueden no ser aplicabes en su caso.
RECURSOS LEGALES: Esta garantía le otorga algunos derechos específicos además de otros derechos que varían según el
estado.
Todos los derechos reservados.
stropSedalacsE1202©
8
Para Servicio al cliente llame 1-888-996-2729
 Loading...