

Atomic G04864W User Manual

W e striv e t o ensur e tha t ou r product s ar e o f th e highes t quality
an d fre e o f manufacturin g defect s o r missin g parts . Howev e r , if
yo u hav e an y problem s wit h you r ne w product,
D O NO T RETUR N I T T O TH E S T ORE ,
pleas e contac t u s tol l fre e @:
1-88 8 -996-2729
F AX : 1-866-873-3531
gameroom@escaladesports.com
O r writ e to:
Escal a d e Spor t s
Cust o me r Servi c e Depa r tme n t
P .O . Bo x 8 8 9
Evansvill e I N 47706
Please
Whe n contactin g Escalad e Sport s pleas e provid e you r mode l numbe r , d at e
cod e (i f a pplicable ) an d par t n umbe r i f requestin g a replacemen t part . T hes e
number s ar e locate d o n th e product , packaging , an d t hi s owner s m anual .
Y ou r Mode l Numbe r
Dat e Cod e
hav e you r mode l numbe r whe n inquirin g abou t parts.
G04864W New Version
2 - G04864W - - WJ
Purchase Dat e
PLEASE RETAIN THIS INSTRUCTION MANUAL FOR FUTURE REFERENCE
All Rights Reserved.
©
2012 Escalad e Sports
1
Fo r Custome r Servic e Cal l 1-888-996-2729
IMPORTANT! READ EACH STEP
IN THIS MANUAL BEFORE YOU
BEGIN THE ASSEMBLY.
TWO
ADULTS ARE REQUIRED TO ASSEMBLE
THIS ATOMIC AVENGER 8FT HOCKEY TABLE
Tools Required:
T1 - Wrench (Included)
Phillips Screwdriver
Furniture Polish and Cloth
Assembly Tips
Make sure you understand the following tips before you begin to assemble your hockey table.
1. Start all bolts by hand before tightening.
2. Some drawings or images in this manual may not look exactly like your product. Please
read and understand the text before starting each assembly step.
READ AND FOLLOW ALL ASSEMBLY, OPERATION, AND
SAFETY INSTRUCTIONS CAREFULLY. AT LEAST TWO
ADULTS ARE NEEDED TO PUT THIS HOCKEY TABLE
TOGETHER.
All Rights Reserved.
©
2012 Escalade Sports
2
For Customer Service Call 1-888-996-2729
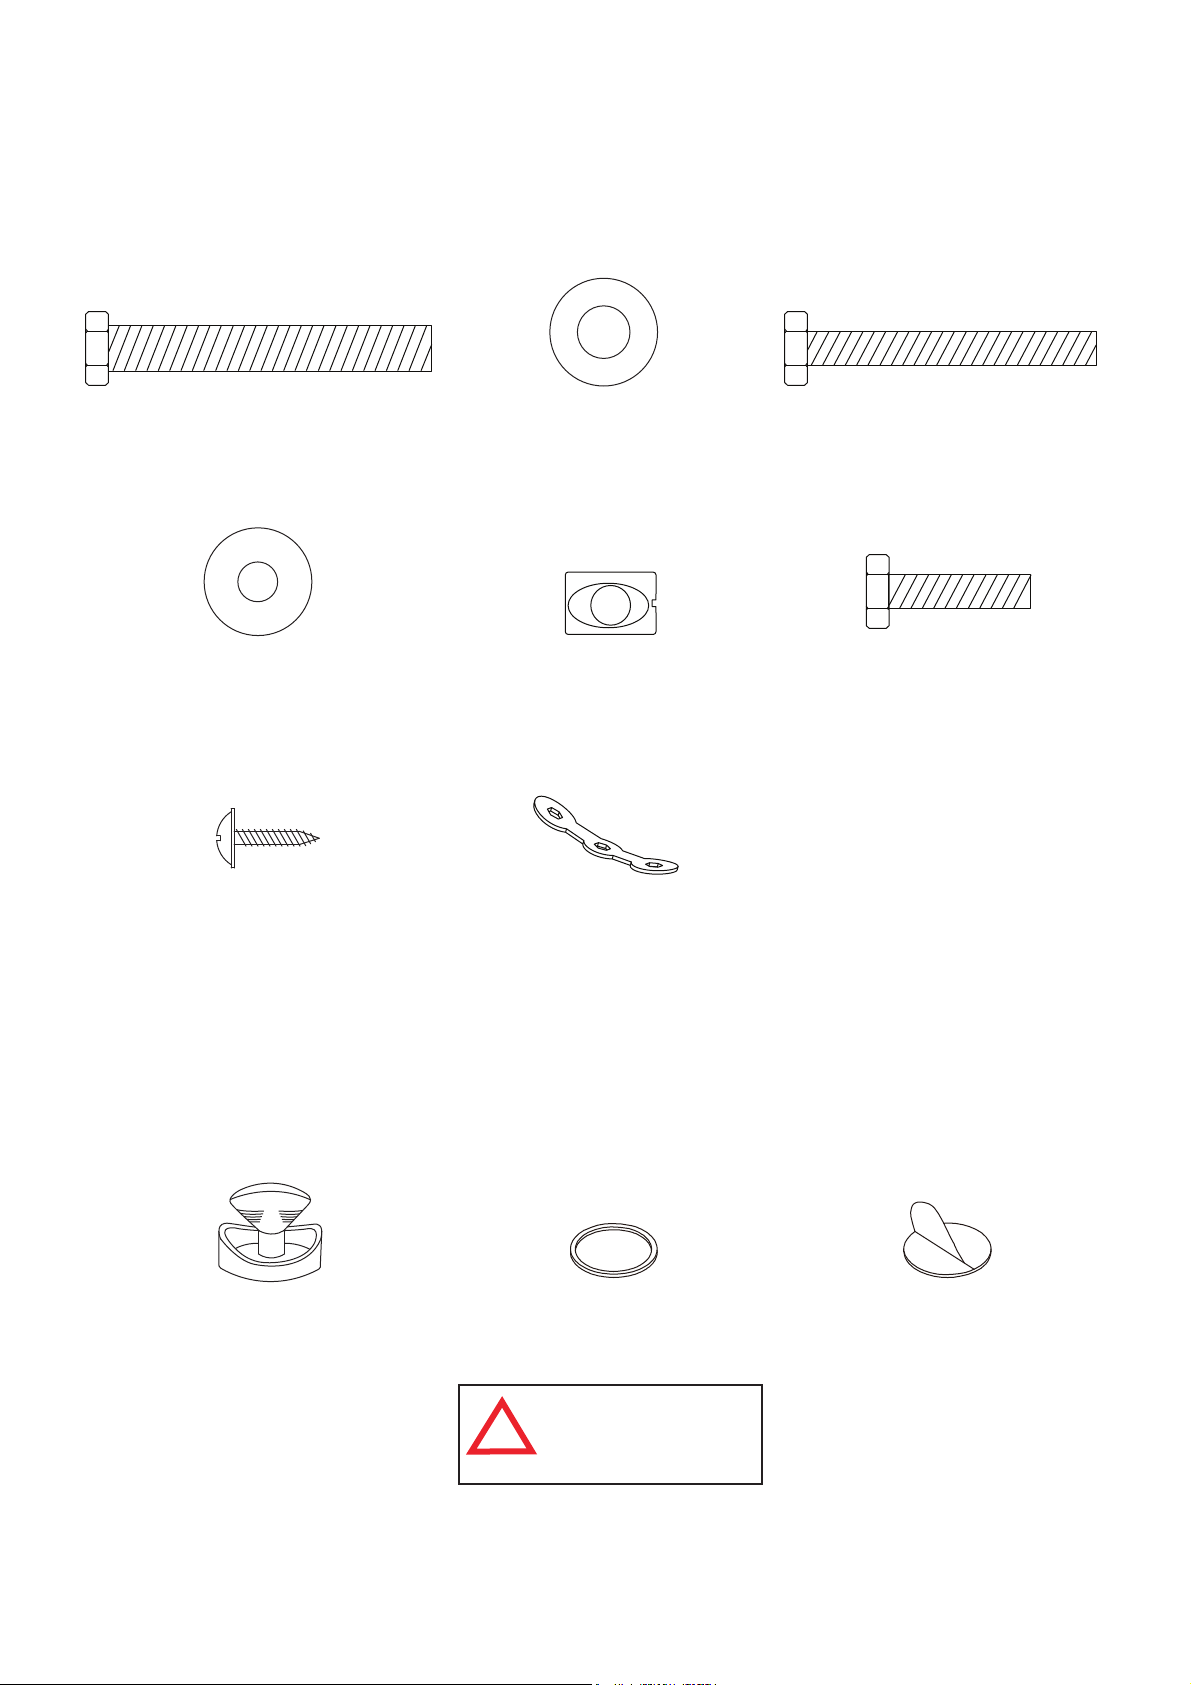
HARDWARE IDENTIFIER
( To Scale)
H1 - 8mm x 57mm
Hex Bolt (12 pcs)
H4 - 6mm x 19mm
Flat Washer (16 pcs)
H7 - 3mm x 15mm
Phillips Washer Head
Screw (4 pcs)
H2 - 8mm x 19mm
Flat Washer (12 pcs)
H5 - Barrel Nut (8 pcs)
(Not to Scale)
T1 - Wrench (1 pc)
H3 - 6mm x 50mm
Hex Bolt (8 pcs)
H6 - 6mm x 25mm
Hex Bolt (8 pcs)
A1 - Striker (2 pcs) A2 - Puck (2 pcs)
All Rights Reserved.
©
2012 Escalade Sports
ACCESSORY IDENTIFIER
(Not to Scale)
A
WARNING:
CHOKING HAZARD
!
Small parts.
Not for children under 3 yrs.
3
For Customer Service Call 1-888-996-2729
A3 - Felt Pad (2 pcs)
NOTE: A3 Felt Pads may
already be attached to
A1 Strikers.
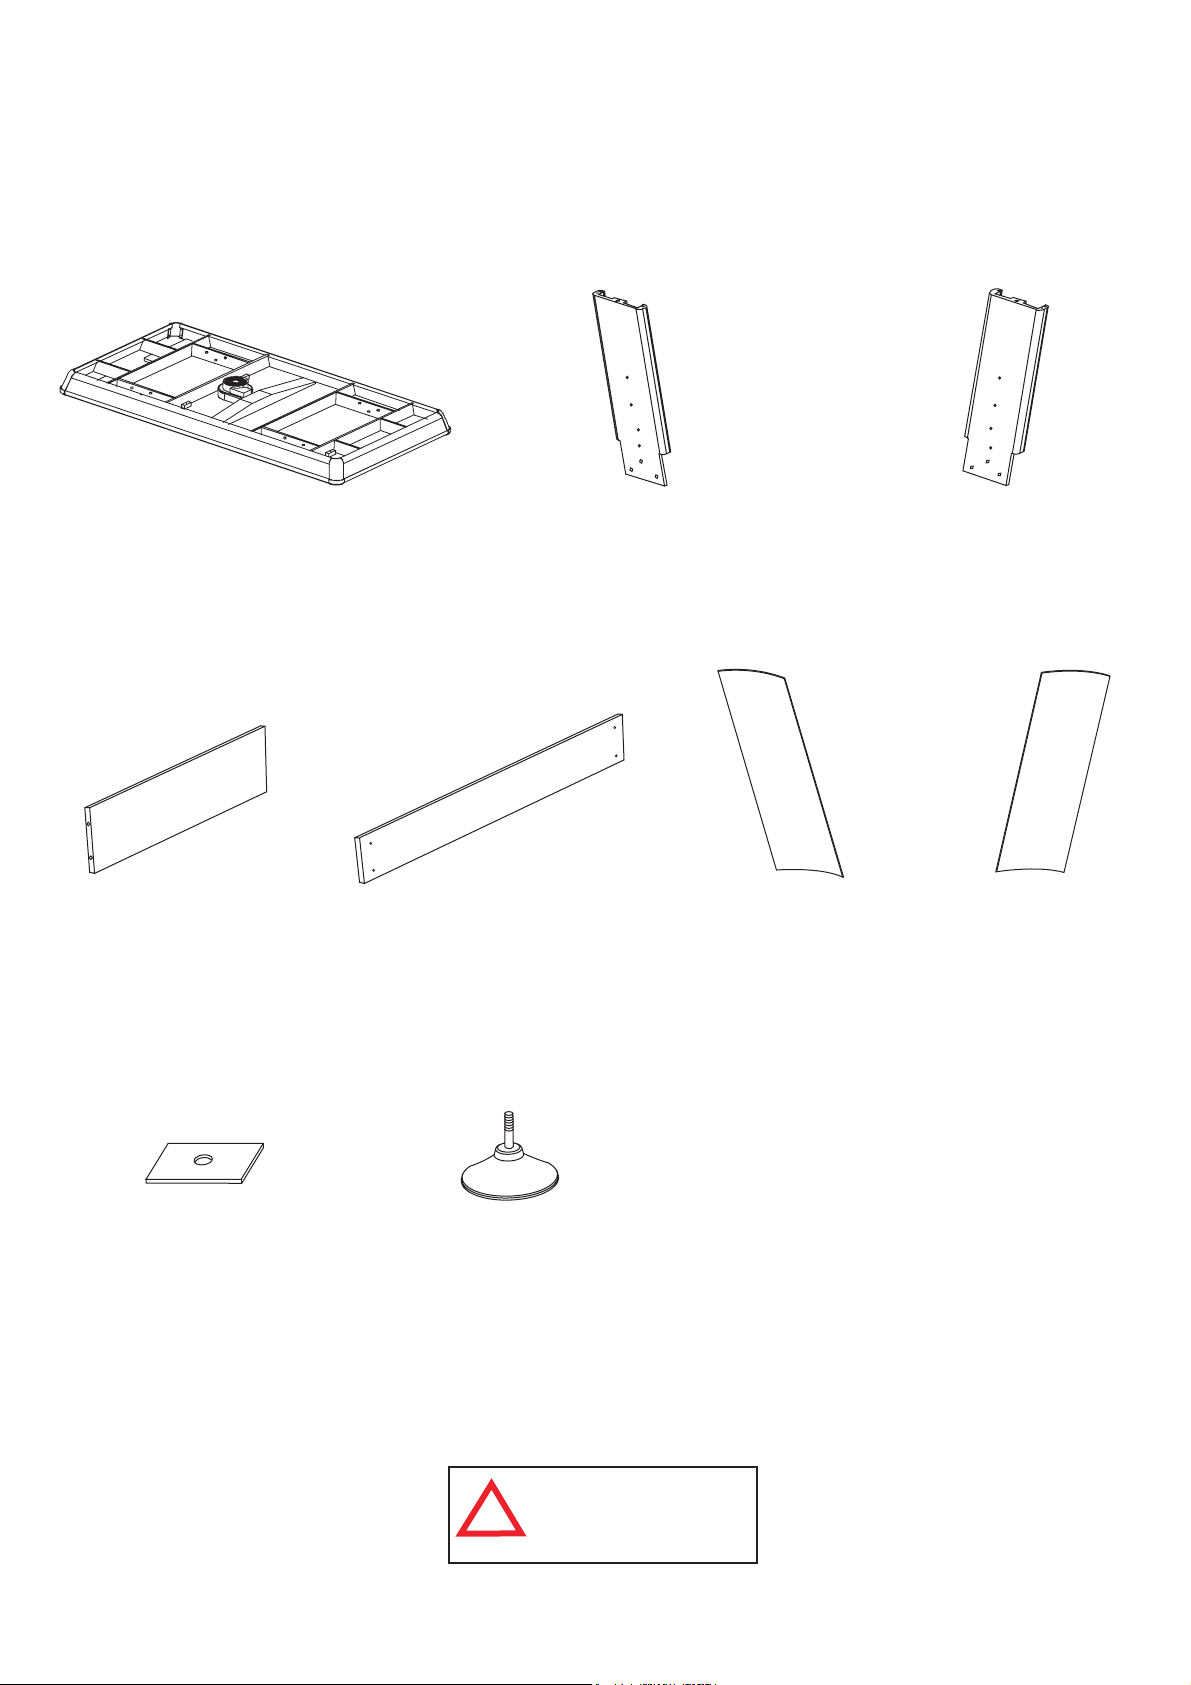
PARTS IDENTIFIER
( Not to Scale)
P1 - Hockey Table Cabinet (1 pc) P2 - Right Leg (2 pcs) P3 - Left Leg (2 pcs)
P4 - End Leg
Panel (2 pcs)
P8 - Leg Panel
Support Block
(4 pcs)
NOTE: Packed
with Hardware Kit
P5 - Side Leg
Panel (2 pcs)
P9 - Leg Leveler (4 pcs)
WARNING:
CHOCKING HAZARD
!
Small parts.
Not for children under 3 yrs.
P6 - Right Cover
Leg Panel (2 pcs)
P7 - Left Cover
Leg Panel (2 pcs)
All Rights Reserved.
©
2012 Escalade Sports
4
For Customer Service Call 1-888-996-2729

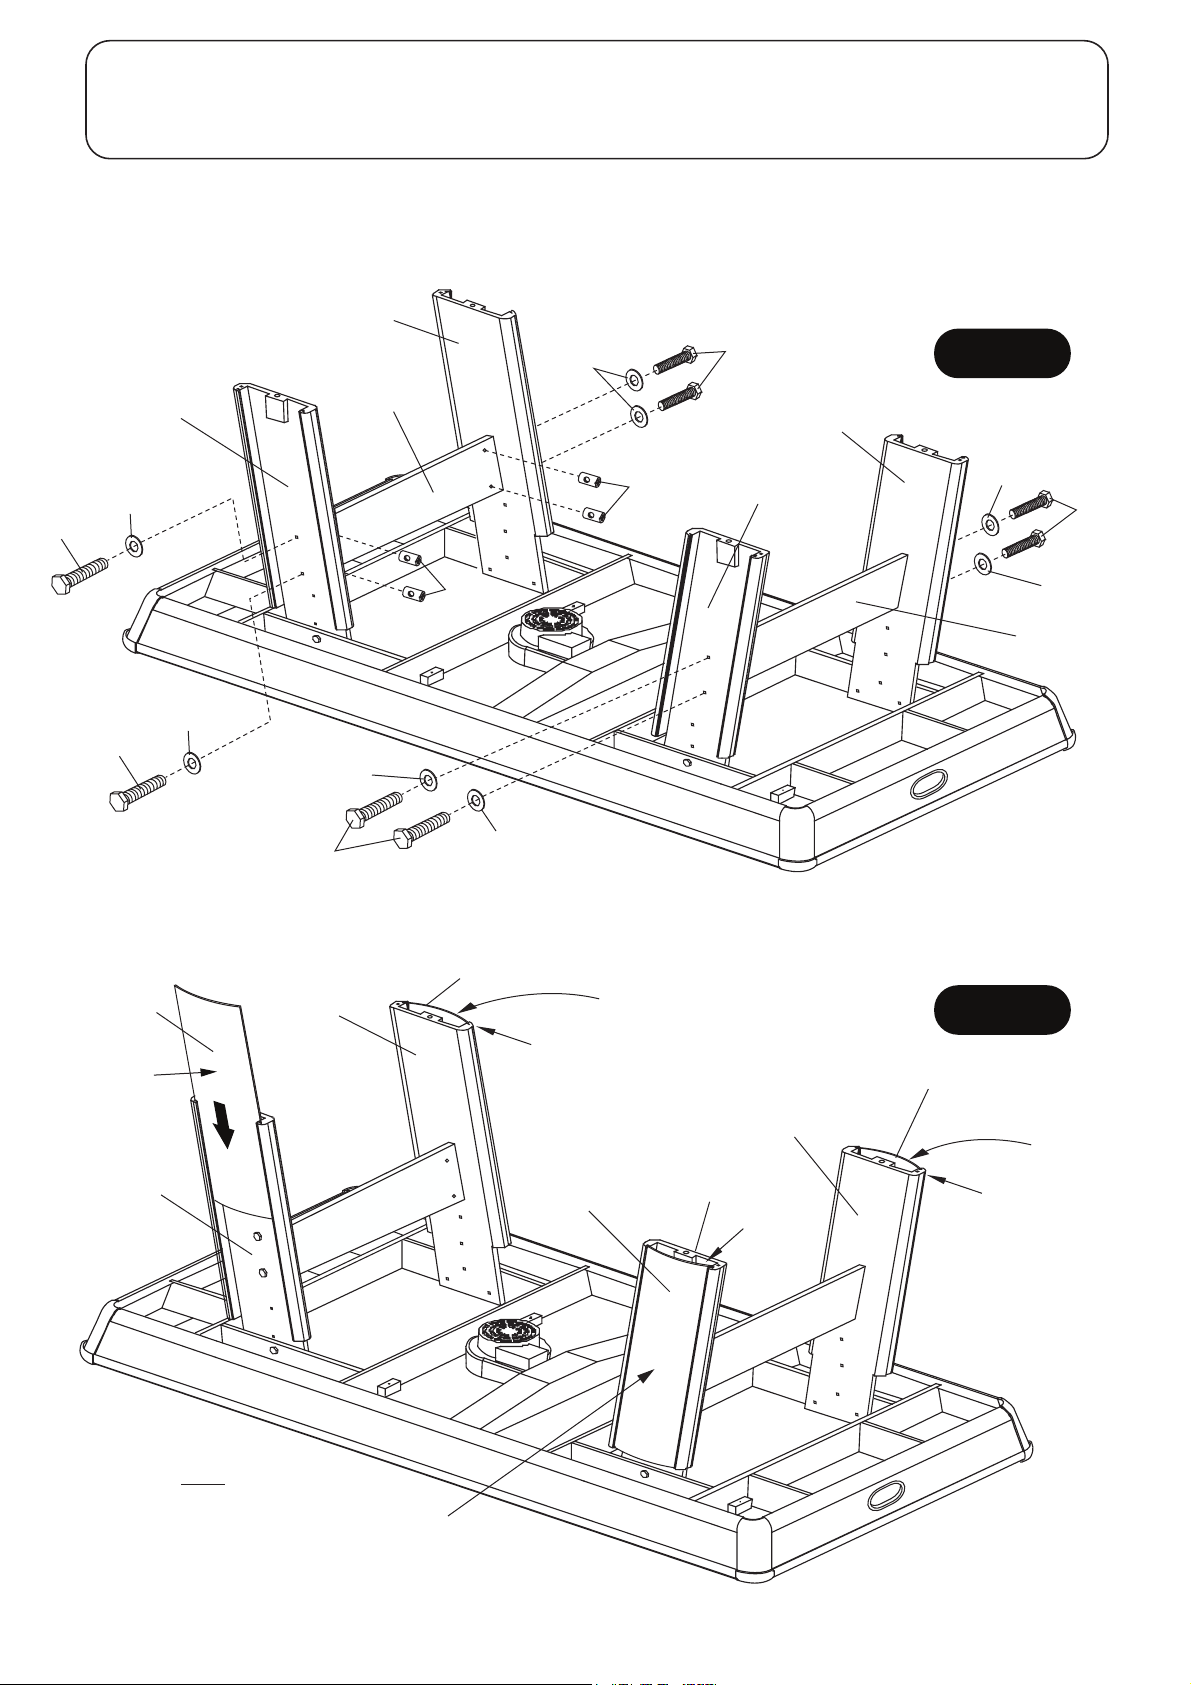
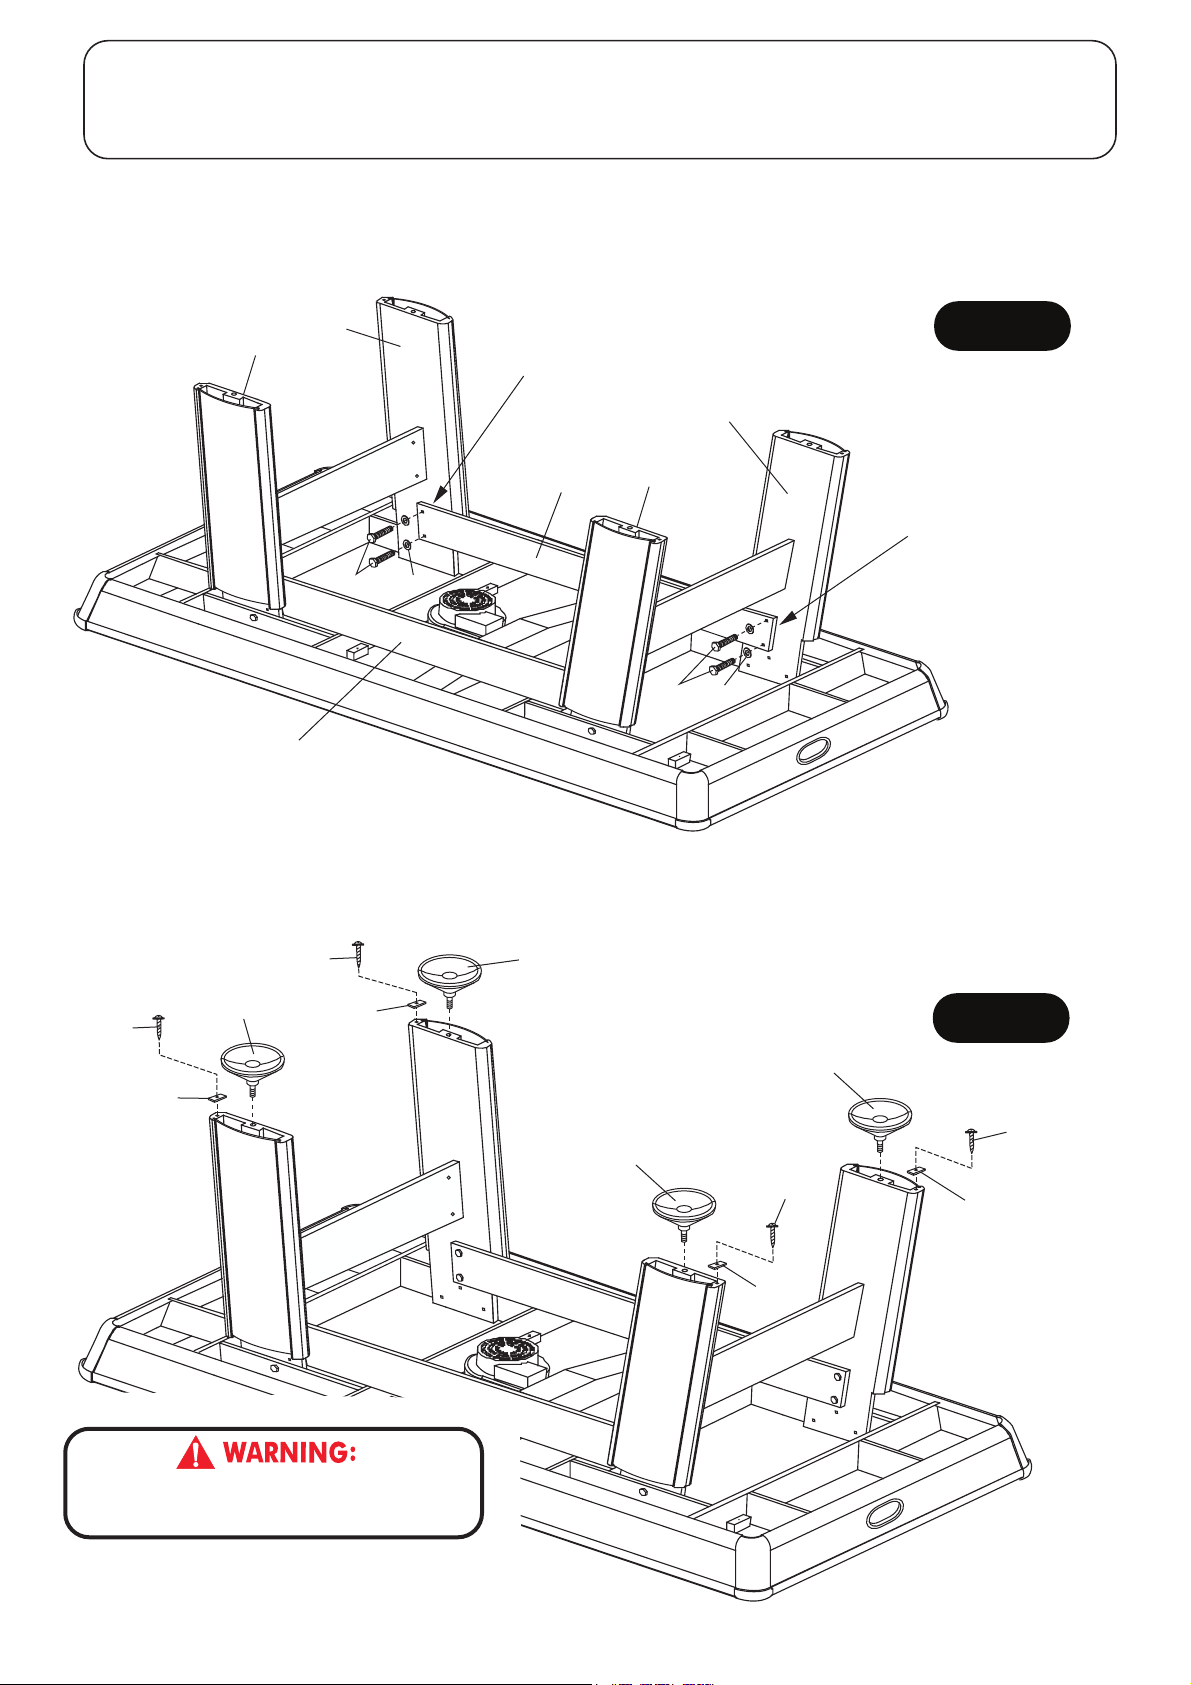
PARTS REQUIRED:
12 pcs - H1 Hex Bolt 2 pcs - P2 Right Leg
12 pcs - H2 Flat Washer 2 pcs - P3 Left Leg
1 pc - P1 Hockey Table Cabinet 1 pc - T1 Wrench
STEP 1:
To assemble this table, leave P1 Hockey Table Cabinet face down in the carton lid.
Attach P2 Right Legs and P3 Left Legs using H1 Hex Bolts with H2 Flat Washers as shown in FIGURE 1.
Do not tighten H1 Bolts until completion of STEP 4.
IMPORTANT NOTE:
BE SURE P2-RIGHT LEGS AND
P3-LEFT LEGS ARE INSTALLED
INSIDE OF SUPPORT BEAMS AS
PER DIAGRAM.
P3
P2
H2
CAUTION
PLEASE BE SURE TO ASSEMBLE P2-RIGHT
LEGS AND P3-LEFT LEGS EXACTLY AS PER
DIAGRAM.
FIGURE 1
P3
H1
P2
H1
H2
H1
All Rights Reserved.
©
2012 Escalade Sports
H2
C7
H1
H2
C8
P1
IMPORTANT NOTE:
BE SURE P2-RIGHT LEGS AND
P3-LEFT LEGS ARE INSTALLED
INSIDE OF SUPPORT BEAMS AS
PER DIAGRAM.
5
For Customer Service Call 1-888-996-2729
PARTS REQUIRED:
8 pcs - H3 Hex Bolt 8 pcs - H5 Barrel Nut 2 pcs - P6 Right Cover Leg Panel 1 pc - T1 Wrench
8 pcs - H4 Flat Washer 2 pcs - P4 End Leg Panel 2 pcs - P7 Left Cover Leg Panel
STEP 2:
Attach P4 End Leg Panels between two legs of P2 Right Legs and P3 Left Legs using H3 Hex Bolts with H4 Flat
Washers and H5 Barrel Nuts as shown in FIGURE 2. Use T1 Wrench to tighten all bolts.
Important Note: Tighten, but do not over tighten H3 Bolts.
P2
H4
H3
FIGURE 2
P4
H4
P3
H5
P2
P3
H4
H3
H3
H5
H4
P4
H4
H3
H4
H4
H3
STEP 3:
Carefully bow and slide P6 Right Leg Panel and P7 Left Leg Panel into the grooves of each leg assembly as
shown in FIGURE 3.
P7
White Laminate
on this side
P2
P6
Flush
White Laminate
on this side
FIGURE 3
P7
P3
NOTE: P6 and P7 Leg
Panel must be flush
with bottom of Legs.
All Rights Reserved.
©
2012 Escalade Sports
White Laminate
on this side
P6
P3
White Laminate
on this side
P2
Flush
6
For Customer Service Call 1-888-996-2729
Flush
PARTS REQUIRED:
8 pcs - H6 Hex Bolt 4 pcs - H7 Screw 4 pcs - P8 Leg Panel Support Block 1 pc - T1 Wrench
8 pcs - H4 Flat Washer 2 pcs - P5 Side Leg Panel 4 pcs - P9 Leg Leveler
STEP 4:
Attach P5 Side Leg Panels between P2 Right Legs and P3 Left Legs using H6 Hex Bolts with H4 Flat Washers as
shown in FIGURE 4. Use T1 Wrench to tighten all bolts. Remember to tighten all H1 Leg Bolts from STEP 1.
FIGURE 4
P3
P2
NOTE: Small wooden tab on end of
P5 Side Panel must face the leg.
P3
P2
H6
NOTE: Small wooden tab
on end of P5 Side Panel
must face the leg.
H4
H6
P5
H4
P5
STEP 5:
Attach P8 Leg Panel Support Blocks to bottom of Leg assembly using pre-drilled pilot hole with H7 Screws as
shown in FIGURE 5. Tighten, but do not strip out H7 screws.
Thread P9 Leg Levelers into the Leg assembly as shown in FIGURE 5.
H7
H7
P9
P8
P8
THIS STEP REQUIRES FOUR OR MORE ADULTS.
VERY CAREFULLY TURN THE TABLE OVER AND SET IT ON
ITS LEGS. BE CAREFUL. THE TABLE IS VERY HEAVY.
P9
P9
P8
H7
FIGURE 5
P9
H7
P8
All Rights Reserved.
©
2012 Escalade Sports
7
For Customer Service Call 1-888-996-2729
 Loading...