

Page 1

ENGINE DRIVEN DRILL
WORKSHOP MANUAL
PAGE 1
ACN 000 583 924
STEP 1
View after removing
handles and LH
Casing Fig. 2
Fig. 2
STEP 2
Lift out clutch drum
and spur gear
assembly
Fig. 3
STEP 3
Lift out spur drive
gear and pinion
assembly
Fig. 4
STEP 5
Lift out main drive
gear assembly
Fig. 6
STEP 4
Lift out pinion and
spiral crown gear
assembly
Fig. 5
Thoroughly
clean all parts
Fig. 3
Fig. 4
Fig. 5
Fig. 6
Remove
all screws
as shown
MANUAL 778
Atom products, including developments of AIRLIFT ® and BLOWMASTER® blowers, blower anti-vibration handle system,
SMARTFAN
®
impellers, and DRILLMASTER® engine powered drills with automatic reverse gear and rotary throttle control, are
extensively protected by many Patents Pending, Patents, Registered Designs, and Registered Shapes and many Trade Marks including
Atom Trade Mark 1,463,4000. Additionally, US Patent No. 8,210,272-B2 tiller construction also covers and protects Atom Lawn
Edger construction.
Registration No. 1470990 is a REGISTERED SHAPE of the Atom Lawn Edger consisting of three dimensional shape of lawn edgers
having a ground engaging wheel supporting a motor or engine and a pair of handles in a wheelbarrow-like configuration.
STEP 1
STEP 2
STEP 3
STEP 4
x11
x11
Fig. 1
Page 2

Atom Engine Drill: Inspect – Clean – Repair – Assemble
PAGE 2
2. Lift Drum and spur gear shaft out of casing. To replace Drum,
hold tightly in gloved hand and spin off clutch nut in left hand
rotation (normal RH thread) with air ratchet Fig. 7.
To reassemble fit clutch hub, drum, washer and screw nut up
fully by hand.
Washer under nut must fit over and around
clutch rib spigot.
! NOTE
Spur gear and shaft replaced as on assembly
as in Fig. 3.
! NOTE
3. To repair drive and pinion gears, remove 6mm screw. Slide
parts off. Replace parts if required. Fig. 8.
To remove pinion hold shaft in vice fitted with soft jaws (use
two pieces aluminium angle) and remove pinion in right
hand rotation (left hand thread). Fig. 9.
4. To replace pinion or spiral crown gear assembly, hold outer
gear diameter in vice with soft jaws and remove nut in left
hand (normal RH thread) rotation. Fig. 10.
5. To replace gears, bearings, clutch dogs, place rear end dog
clutch vertically in a strong vice (Fig. 11) fitted with soft jaws
or use two pieces of aluminium angle.
Remove locking collar, insert 12mm bar through grub screw
hole as shown in Fig. 11. Turn shaft clockwise (LH thread) to
remove clutch dog. Slide off all parts and inspect. Replace as
required. Reverse process to assemble.
6. To remove front gear dog, place shaft in vice (Fig. 12) and
tap counter clockwise (normal RH thread).
Clean all parts before reassembly. To assemble reverse above
procedure. Re-assemble in (reverse) sequence of Fig. 6, 5, 4,
3 and 2. Thoroughly grease all parts and pack about 30cc of
grease in and around all gear teeth. Install 2 casings rubber
gaskets, place top casing on, use 4-5 screws to hold together
then check gears turn smoothly. Complete final assembly.
Fig. 12
Fig. 7
Fig. 9
Fig. 8
Fig. 10
Fig. 11
Tighten nut by holding drum with gloved hand and air ratchet
drive (right hand rotation).
For engine explosions and Parts list, visit
our website: www.atomindustries.com
Go to Find Parts, Order & Service Info page and
enter the engine model number. Refer to Parts List attached.
! NOTE
Atom Industries is a division of Solo Industries Pty Ltd – an Australian owned company that invents, designs and manufactures unique
and outstanding products for local tough and hard Australian conditions with a history of international award winning gold medals,
great backup and service since 1961. Atom has a policy of continuous product improvement and development and reserves the
right to modify the design and appearance of products without notice.
Page 3
Page 4

07-07-14 1
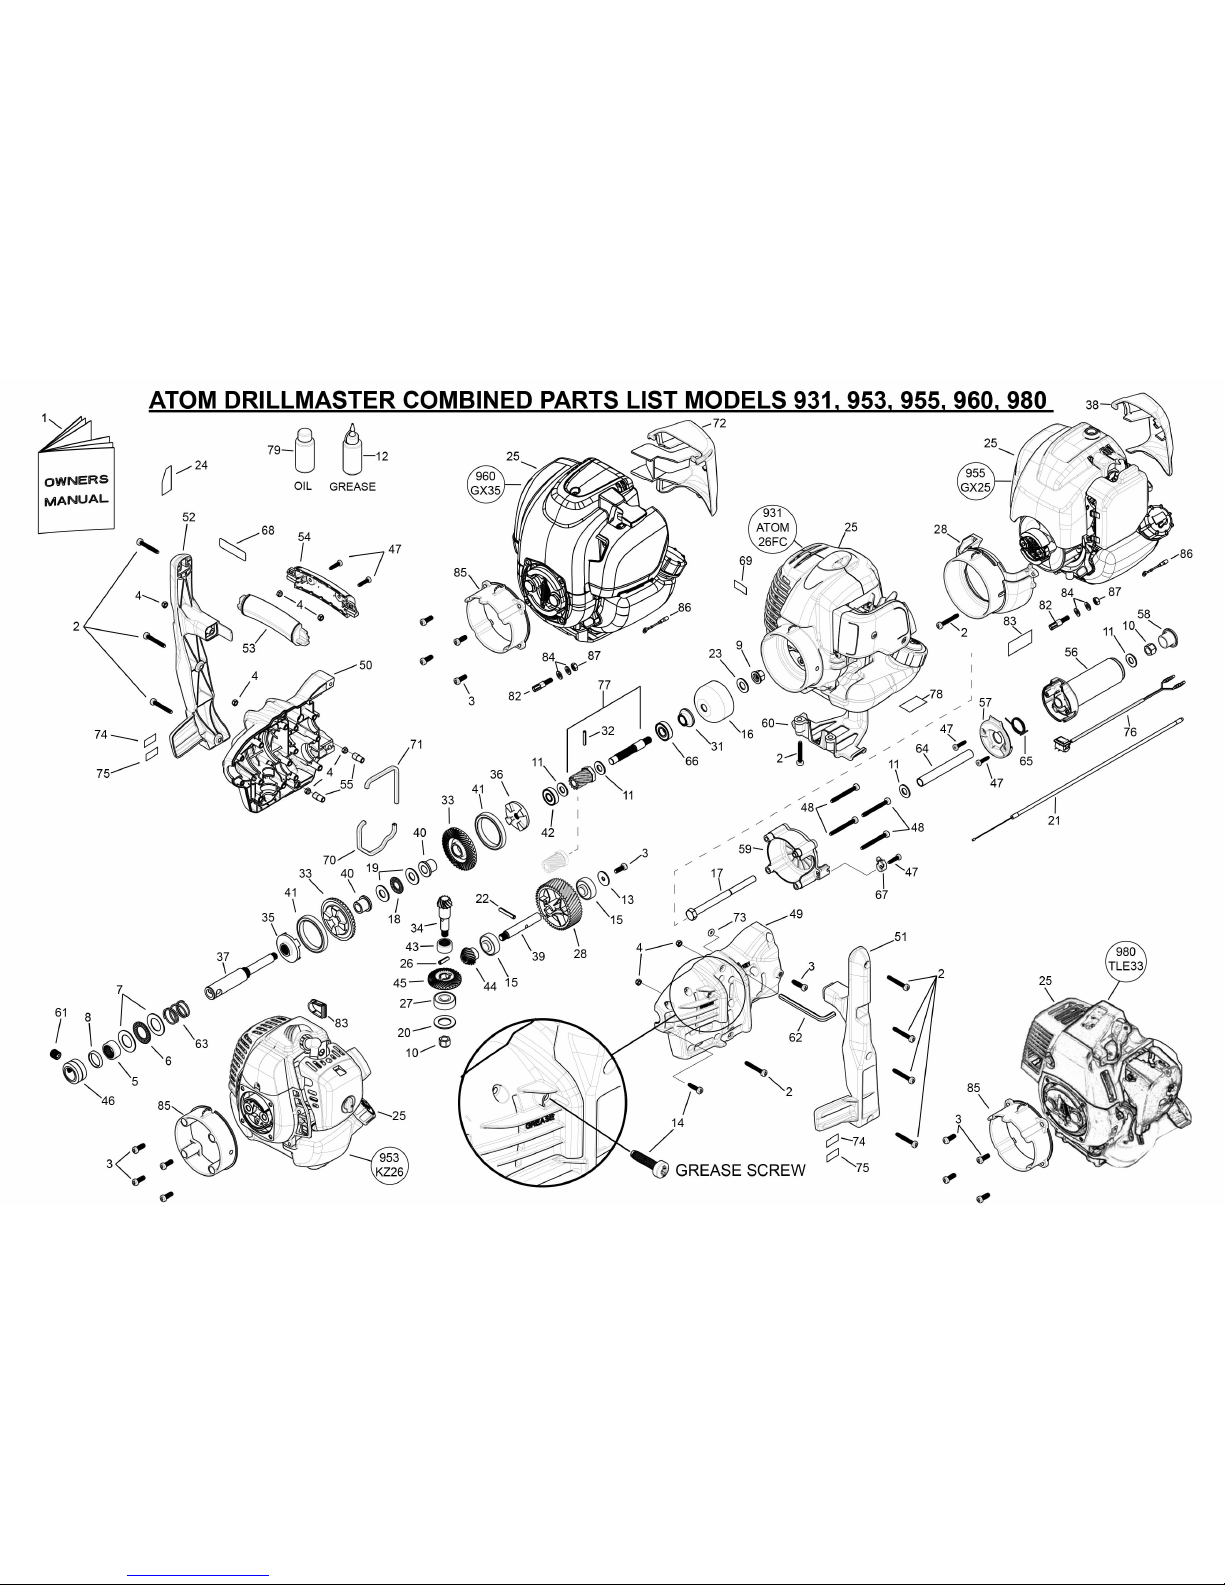
MODEL NO: 931,953,950,960,980
MODEL NO: 931,953,950,960,980MODEL NO: 931,953,950,960,980
MODEL NO: 931,953,950,960,980
Key
Key
Key
Key
Part No
Part No Part No
Part No
Substitute
Substitute Substitute
Substitute
Part No
Part NoPart No
Part No
Description
DescriptionDescription
Description
Key
Key
Key
Key
Part No
Part No Part No
Part No
Substitute
Substitute Substitute
Substitute
Part No
Part NoPart No
Part No
Description
DescriptionDescription
Description
Key
Key
Key
Key
Part No
Part No Part No
Part No
Substitute
Substitute Substitute
Substitute
Part No
Part NoPart No
Part No
Description
DescriptionDescription
Description
1 21775 MANUAL ALL MODELS(PDF) 31
64119 HUB SINTERED
62 64230 KEY ALLEN 6AF x 90
2
40650 SCREW M5 x 36
32
64130 PIN ROLL 4 x 24
63 64231 DR REVERSE SPRING
3
40651 SCREW M6 x 16mm
33 64176 DR CROWN GEAR WITH DOG 64 64232 DR HAN SPACER TUBE
4
40652 NUT NYLOC 5mm
34 64177 DR PINION 65 64233 DR THRO RET SPRING
5
40912 BEAR NEEDLE 20 x 12mm
35 64178 DR FORWARD GEAR DOG 66 64235 BEARING 6001-2RS GRSEALS
6
40914 BEAR THR 20x35x2
36 64179 DR REVERSE GEAR DOG 67 64333WP DR CABLE RETAINER
7
40915 WASHER REAR THRUST
37 64181 DR MAIN SHAFT 68 64335 LABEL WARNING DRILL HANDLE
8
40922 SEAL SHAFT 20 x 26 x 4mm
38 43966RN DEFLECTOR HONDA GX25 69 64337 LABEL
9
43163 NUT FLANGE RH 3/8
39 64183 DR SPUR GEAR SHAFT 70 64347 DR CASING SEAL 1
10
43172 NUT NYLOC 3/8 UNC
40 64184 DR SPACER SINTERED 71 64348 DR CASING SEAL 2
11
43218 WASHER 3/8 FLAT
41 64185 BEAR 6809-2RS 45x58x7 72 43965RN DEFLECTOR HONDA GX35
12
43227 GREASE & DISPENSER
42 64187 BEAR 10x26x8 73 64355 O RING 3 x 11 OD x 5 ID
13
43484 WASHER 22.43 x 5.94 Z/P
43 64188 BEAR NEEDLE 16x22x12 74 64382 LABEL DR HAN LOGO
14
43790 SCREW M5.5 x 22mm
44 64189 DR GEAR BEVEL T15 75 64383 LABEL DR HAN DRILLMASTER
15
43860 BEARING 32 x 10 x 12 + 4mm
45 64190 DR GEAR BEVEL T30 76 64411 DR SWITCH & WIRE
16
44312 DRUM CUP PRO 79x32mm (960,980)
46 64192 DR LOCKING COLLAR 12mm 77 64414 DR SHAFT & GEAR ASSY 12/48 (931)
16
44318 DRUM CLUTCH CUP 54mm (931,953,955)
47 64194 SCREW T20 x 19.50 SELF TAP 77 64415 DR SHAFT & GEAR ASSY 12/33 (953,950)
17
44439 BOLT G.WHEEL AXLE 3/8" x 5"
48 64206 SCREW M5 x 50mm TORX-25 77 64416 DR SHAFT & GEAR ASSY 15/30 (960,980)
18
62964 BEARING NEEDLE 12 x 26 x 2
48 64384 SCREW T20 4 x 50 78 63219 LABEL HOT MOT/OIL
19
62965 WASHER THRUST 12 x 26 x 1.5
48 64385 WASHER 4 x 9 x 1 79 48100 OIL 100ML (HON GX35)
20
62982 WASHER BEARING 32x18x1.6
49 64210GN
64859GN
DR MAIN CAS LH #64859GN 79 48101 OIL 80ML (HON GX25)
21
63263 CABLE THROTTLE (931)
49 64210RN
64859RN
DR MAIN CAS LH #64859RN 80
64859GN
SET ENG DRILL CASING
21 64227 DR THROTTLE CABLE 345+77 50 64211GN 64859GN DR MAIN CAS RH #64859GN 81
64859RN
SET ENG DRILL CASING
22
63275 PIN ROLL 5 x 30
50 64211RN 64859RN DR MAIN CAS RH #64859RN 82
62968
CABLE CONNECTOR M6 x 1.00
23
63277 WASHER 12x22.22x1 (931,953,955)
51 64212WN DR MAIN HANDLE LH 83 62969RN PLUG MUFFLER Z26
23
43116 WASHER 45 x 12 x 2 (960,980)
52 64213WN DR MAIN HANDLE RH 84 63457 WASHER 6.4 x 12.5 x 1.5 ZP
24
63322 LABEL BL WARN SYMBOLS
53 64216WP DR GRIP FRONT W/RUBBER 85 63360RN MOUNT ENGINE Z26
25
48002A ENG HONDA GX35 Model No 765
54 64217WP DR GRIP BACK W/RUBBER 85 63361RN MOUNT ENGINE PRO
25
48004A ENG HONDA GX25 Model No 764
55 64218WP DR NUT RETAINER 86 63355 GROUND WIRE
25
62993A ENG Z26 Model No 763
56 64219WP DR THROTTLE HANDLE (931) 87 63169 NUT M6 X 1mm
25
63405A ENG ATOM 26FCS Model No 767
56 64234WP DR THR HAN W/RUB (953,955,960,980)
26
63440 PIN ROLL 5 x 18
57 64220WP DR THRO HANDLE COV
27
63474 BEARING 32 x 10 x 12
58 64221WP DR THR HANDLE CAP
28
63780 DR HELIC GEAR 48T/12
59 64222WN DR THR MOUNT ATOM
28 64344 DR HELIC GEAR T33/12 (953,955) 59 64224WN DR THR MOUNT GX35
28 64346 DR GEAR HELIC T30/15 (960,980) 59 64225RN DR THR MOUNT Mitsu TLE 33
29
63806RN MOUNT/FAN COWL GX25
60 64226WP DR TANK GUARD A26FC
30 61 64229 SCREW GRUB M12x1.25x13
ATOM PRODUCT: ATOM ENGINE DRILL COMBINED PARTS LIST - ALL MODELS
ATOM PRODUCT: ATOM ENGINE DRILL COMBINED PARTS LIST - ALL MODELSATOM PRODUCT: ATOM ENGINE DRILL COMBINED PARTS LIST - ALL MODELS
ATOM PRODUCT: ATOM ENGINE DRILL COMBINED PARTS LIST - ALL MODELS
 Loading...