


 Loading...
Electric Tankless Water Heaters
ThermoPro Series
18kW, 24kW, 27kW
www.atmorusa.com

Important Safety Guidelines
SAVE THIS INSTRUCTION MANUAL FOR FUTURE REFERENCE.
Definitions: Safety Alert Symbols and Words
This instruction manual uses the following safety alert symbols and words to alert you to hazardous situations and your risk of personal injury or property damage.
DANGER: Indicates an imminently hazardous situation which, if not avoided, will result in death or serious injury.
WARNING: Indicates a potentially hazardous situation which, if not avoided, could result in death or serious injury.
CAUTION: Indicates a potentially hazardous situation which, if not avoided, may result in death or serious injury.
 (Used without word) Indicates a safety related message.
NOTICE: Indicates a practice not related to personal injury which, if not avoided, may result in property damage.
 WARNING: READ THIS INSTRUCTION MANUAL THOROUGHLY AND COMPLETELY
BEFORE INSTALLATION AND USE. FAILURE TO DO SO COULD CAUSE DAMAGE TO
PROPERTY, SERIOUS INJURY OR DEATH, AND VOID YOUR WARRANTY
Contact service directly if you have any questions regarding your unit.
Monday – Friday, 9AM–5PM EST
Phone: 1-888-783-6082
Email: info@paragongroupusa.com
WARNING: Cancer and Reproductive Harm – www.P65Warnings.ca.gov.
AVERTISSEMENT: Cancer et Troubles de l'appareil reproducteur – www.P65Warnings.ca.gov.
ADVERTENCIA: Cáncer y Daño Reproductivo – www.P65Warnings.ca.gov.
For California residents / Pour les résidents de la Californie / Para residentes en California
2

Table of Contents |
|
|
1. |
Safety Guidelines ------------------------------------------------------------------------------------------ |
4 |
2. |
About Your Atmor Electric Tankless Water Heater ----------------------------------------------- |
4 |
3. |
Selecting an Installation Location --------------------------------------------------------------------- |
5 |
4. |
Mounting the Water Heater ----------------------------------------------------------------------------- |
6 |
5. |
Plumbing Requirements and Precautions----------------------------------------------------------- |
7 |
6. |
Plumbing Installation-------------------------------------------------------------------------------------- |
8 |
7. |
Electrical Requirements and Precautions ----------------------------------------------------------- |
9 |
8. |
Electrical Installation------------------------------------------------------------------------------------ |
10 |
9. |
Flow Rate -------------------------------------------------------------------------------------------------- |
12 |
10. |
Operation Guide------------------------------------------------------------------------------------------ |
12 |
11. |
Care and Maintenance --------------------------------------------------------------------------------- |
13 |
12. |
User Interface/Controls--------------------------------------------------------------------------------- |
14 |
13. |
Troubleshooting ------------------------------------------------------------------------------------------ |
16 |
14. |
Reset Unit-------------------------------------------------------------------------------------------------- |
18 |
Before Installing
By installing this product, you acknowledge the terms of the manufacturer’s warranty and authorized dealer’s return policy. Once the heater is installed, do not return the product to the place of purchase. If you have any questions regarding the warranty or the product return policies, contact Atmor by phone or email.
3
1. Safety Guidelines
Read this manual thoroughly before installing and using the instant water heater. Failure to comply with the safety, installation or operating instructions will void the product warranty. The product manufacturer and the product distributor will not be liable for any damages or injury caused by failure to comply with the installation and operating instructions specified in this manual or by improper use of the product. For best performance, ensure that this water heater is installed in accordance with all electrical and plumbing codes applicable to your area, and as specified in this guide.
This product has more than one power supply connection point. Do not attempt to install, clean, inspect, disassemble, service or repair the water heater without first shutting off all the power to the unit by means of the circuit breakers on the main electrical panel.
WARNING: Failure to adhere to the safety guidelines might result in severe injury or death. The water heater must be installed in compliance with all national, state, provincial and local electrical and building regulations. We recommend that you consult a qualified electrician and a qualified plumber in case you have questions about anything relating to codes for this product.
 This product is intended for household and indoor use only. Do not immerse in water.
Each breaker used to power this unit must be grounded by means of the electrical panel.
The heater must be connected directly to dedicated circuit breakers on the main electrical panel.
Do not install the heater where it may be subjected to direct sunlight, rain, splashing water, moisture/humidity or freezing temperatures.
This unit is intended for heating water only. Do not attempt to use the unit for heating any other kind of liquid.
2. About Your Atmor Electric Tankless Water Heater
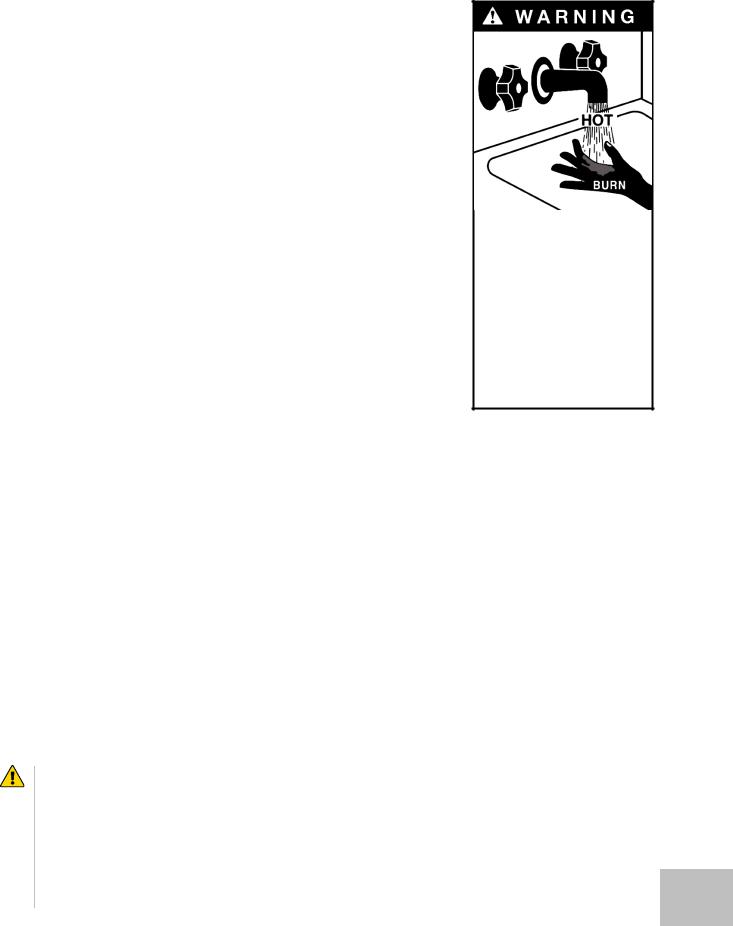
Congratulations on your decision to purchase one of the finest instant water heaters currently available in the market! Your new instant water heater has advanced water flow rate and temperature sensors that are designed to modulate power to the heating elements to maintain a user-selected output water temperature range for 18kW/ 24kW/ 27kW: 86°F (30°C) to 122°F (50°C) (subject to the temperature of the incoming water).
WARNING: When setting the water temperature of the instant water heater, be sure to consider safety and energy conservation. Prolonged skin exposure to water temperatures above 120°F (49°C) can result in severe burns or death. The maximum temperature setting on this instant water heater is 122°F (50°C). Always take precaution to feel the water before bathing or showering, and make sure the temperatures are not too hot. You are required to read and comply with the following Time/Temperature Relationship chart to determine the right water temperature for your home.
4
Temperature |
Exposure Time Resulting in Scalding |
120°F (49°C) |
5 minutes of exposure |
122°F (50°C) |
3 minutes of exposure |
 If you have small children, disabled, or elderly persons in your home, you may require a setting of 120°F (49°C) or lower to ensure their safety. Water temperature is regulated by the knob on the front of the water heater
3. Selecting an Installation Location |
|
|
|
• Children, disabled and |
|
• This water heater is designed for indoor installation only. |
|
elderly are at high risk |
|
of being scalded. |
|
• The heater should not be installed in a location where it might |
|
|
|
• See instruction manual |
|
be subjected to freezing temperatures, since frozen water in |
|
before setting your |
the unit can cause severe and irreversible damage which is |
|
desired hot water |
not covered under your warranty. |
|
temperature. |
• The water heater should be placed in a location that is easy |
|
• Always feel water |
|
before bathing or |
|
to access. |
|
|
|
showering. |
|
|
|
• Ensure that the water heater, as well as the power
supplies and water connections, are out of the reach of children to prevent them tampering with controls or touching an extremely hot pipe.
•Do not install the unit where it is may be exposed to excessive humidity, moisture or dust, or where it may be splashed with water or other liquids.
•Do not install the unit below water pipes or air conditioning lines, where it is susceptible to leaking or dripping water or other liquids.
•Do not install the unit above electrical boxes or junctions.
•If possible, avoid installation in a location that could be damaged due to leakage from the water heater. Install a drip pan with drainage, or an active leak detector and automatic shutoff valve, to prevent damage in case of a leak.
Item # |
Unit dimensions (inches) |
Weight (lbs) |
Connections |
ThermoPro 18 |
13-3/8 x 17-3/8 x 5-1/4 |
17 |
3/4" |
ThermoPro 24 |
13-3/8 x 17-3/8 x 5-1/4 |
17 |
3/4" |
ThermoPro 27 |
13-3/8 x 17-3/8 x 5-1/4 |
17 |
3/4" |
WARNING: Water heater are heat-producing appliances. To avoid damage, injury or |
|
death, the water heater must be installed in a manner that prevents contact with any |
|
substances or materials, and proper care must be taken to prevent unnecessary |
|
contact (especially by children) with the water heater. UNDER NO CIRCUMSTANCES |
|
SHOULD FLAMMABLE MATERIALS, SUCH AS GASOLINE OR PAINT THINNER, |
|
BE USED OR STORED IN THE VICINITY OF THIS WATER HEATER OR ANY |
|
LOCATION FROM WHICH FUMES COULD REACH THE WATER HEATER. |
5 |
|

4. Mounting the Water Heater
1.The instant water heater must be secured to solid mounting surface with four screws
(minimum 1” (25.4mm) long).
2.Make sure the unit is level before fastening the screws.
3.The unit must be installed in an upright position with the water inlet and outlet at the bottom of the unit. Do not install with connections on top or the sides.
4.Do not install the unit above electrical boxes or junctions.
5.The water heater must be installed in a manner that prevents contact with flammable materials. Keep flammable material at least two feet away from the heater and the hot water outlet pipe. The water heater and the hot water outlet pipe must be secured, and out of children’s reach to prevent tampering with controls or contact with an extremely hot pipe.
6.If installing the heater on an upper floor or attic, make sure installation complies with the local codes. Install a drip pan with drainage, or a leak detector and automatic shutoff valve, to prevent damage in case of any leakage.
7.Unscrew the 4 cover screws, and remove the unit cover. (Figure 1)
8.Disconnect the cables from the PCB within the unit. (Figure 2)
9.Use 4 mounting screws that are at least 1 inch (25.4mm) in length, mount the unit on the wall. (Figure 3)
10.Make sure the unit is leveled horizontally, with water inlet and outlet at the bottom. (Figure 4)
Figure 1 |
Figure 2 |
Figure 3 |
|
|
|
Do not install upside down or on its side.
Figure 4 |
Figure 5 |
6
Loading...