

Page 1
USER GUIDE
ZigBit USB Stick User Guide
Introduction
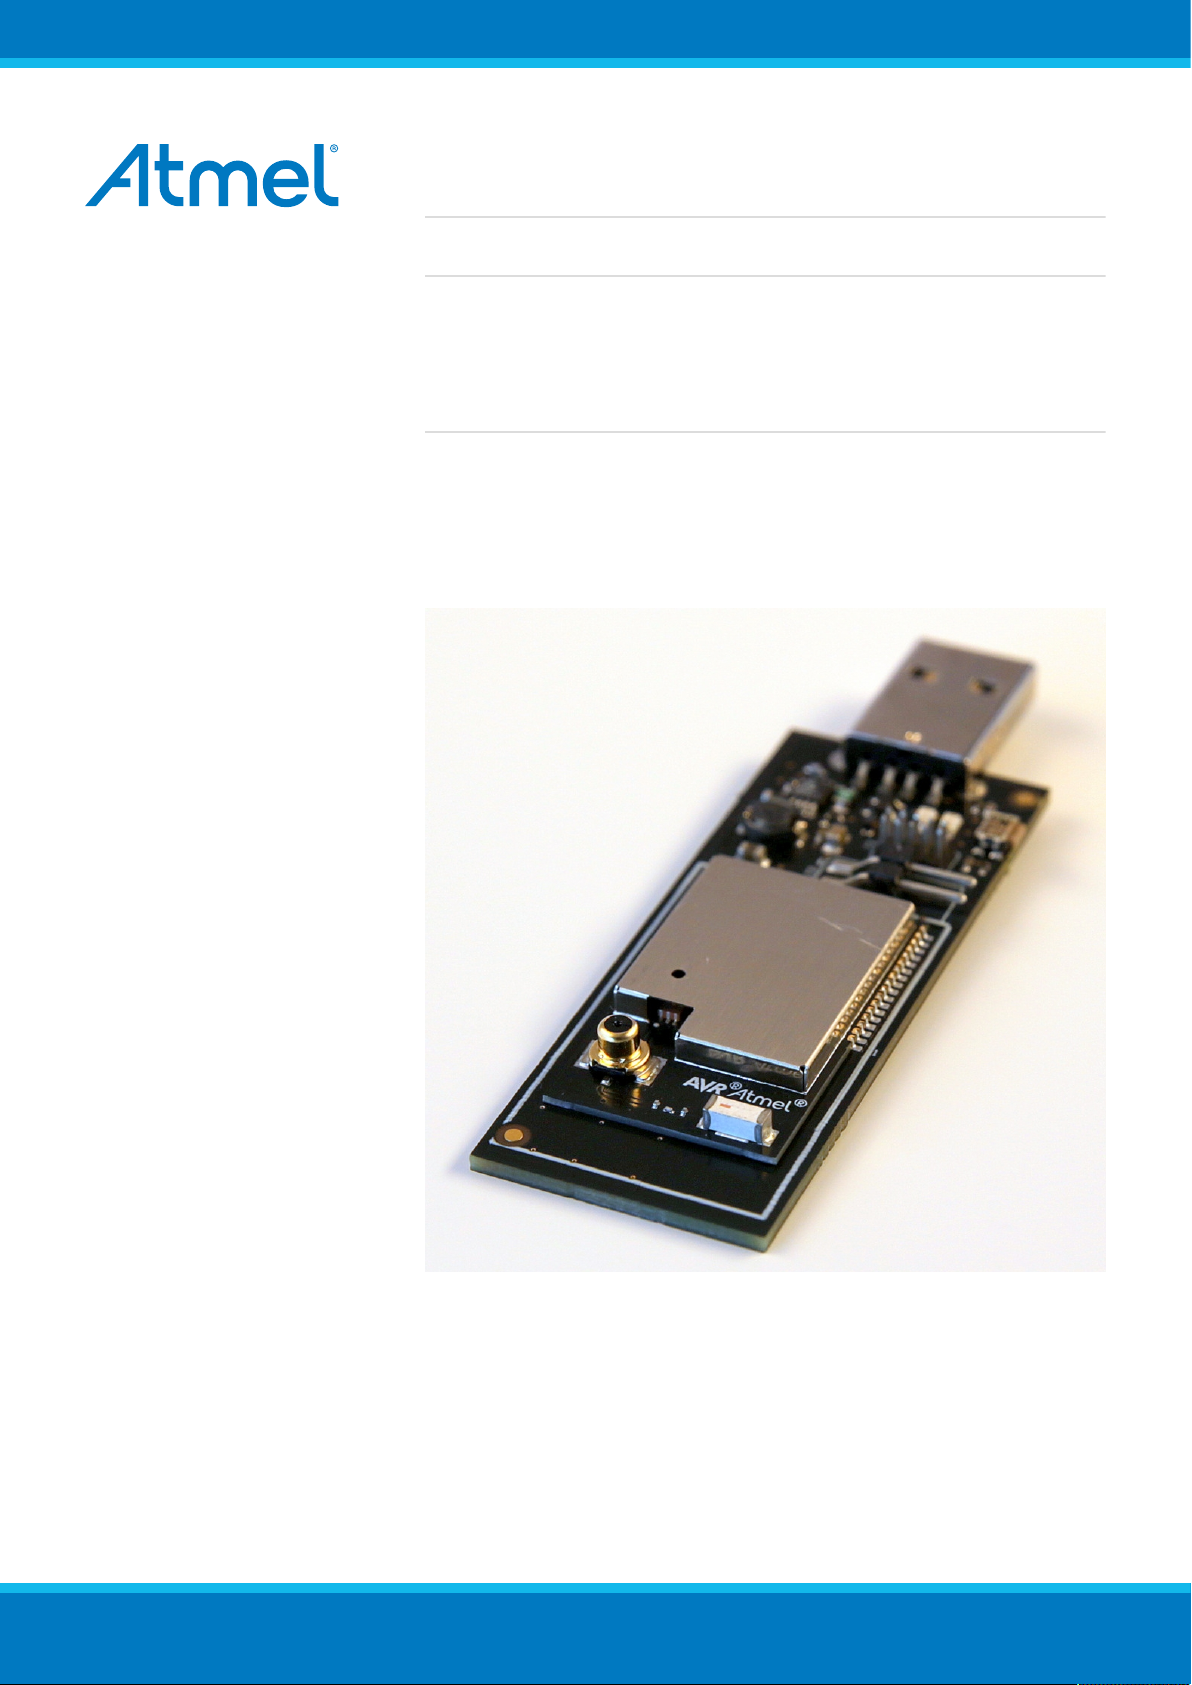
This user guide describes how to get started with the Atmel® ZigBit® USB
sticks.
The ZigBit USB sticks is targeted for evaluating the USB features of the Atmel
ZigBits, currently supporting the XMEGA® with AT86RF212B or AT86RF233
radio transceivers.
42194A-MCU-11/2013
Page 2

Table of Contents
Introduction .................................................................................... 1
1. Getting Started ........................................................................ 3
1.1. Features ..... ..... ............................ ..... ..... ..... ......................... 3
1.2. Design Documentation and Related Links ....................... ..... ..... . 3
1.3. Programming ....................... ..... ..... ..... ............................ ..... . 3
1.3.1. JTAGICE ......... ..... ..... ..... ............................ ..... ..... ... 3
1.3.2. Bootloader ............................ ..... ..... ..... .................... 3
1.4. Available Example Code ............. ..... ..... ..... ............................ . 8
2. Performance Analyzer ........................................................... 10
2.1. Introduction ....................... ..... ..... ..... ............................ ..... . 10
2.2. Program Installation .............. ..... ..... ..... ............................ .... 10
2.3. Program Use ................ ..... ..... ..... ............................ ..... ..... . 13
2.4. Typical Wireless Nodes . ..... ..... ..... ....................... ..... ..... ..... .. 13
3. WireShark .............................................................................. 15
3.1. Introduction ....................... ..... ..... ..... ............................ ..... . 15
3.2. Program Installation .............. ..... ..... ..... ............................ .... 15
3.2.1. WireShark Installation ...................... ..... ..... ............... 15
3.2.2. Sniffer Interface Installation .............. ..... ..... ..... .......... 16
3.2.3. Sniffer FW Installation ... ............................ ..... ..... ..... 17
3.3. Program Use ................ ..... ..... ..... ............................ ..... ..... . 17
4. Hardware User Guide ........................................................... 22
4.1. Board Overview . ..... ..... ............................ ..... ..... ..... ............ 22
4.2. Headers and Connectors ....................... ..... ..... ..... ................ 22
4.2.1. JTAG (J2) .. ..... ..... ..... ............................ ..... ..... ..... .. 22
4.2.2. Boot Select (J3) .. ..... ..... ..... ............................ ..... .... 23
4.3. Board GUI ... ..... ............................ ..... ..... ............................ 23
4.3.1. LED's ..... ..... ..... ............................ ..... ..... ............... 23
4.3.2. Button ..... ..... ............................ ..... ..... ..... .............. 23
4.4. Factory Programmed Data ........ ..... ..... ..... ............................ . 23
5. Persistence Memory ............................................................. 24
6. Document Revision History ................................................... 25
ZigBit USB Stick User Guide [USER GUIDE]
42194A-MCU-11/2013
2
Page 3

1. Getting Started
1.1 Features
The ZigBit® USB sticks demonstrates the XMEGA® ZigBits USB features providing a development/prototype
platform.
By using the WireShark sniffer FW the ZigBit USB stick's serve as a protocol analyzer.
1.2 Design Documentation and Related Links
The following list contains links to the most relevant documents and software for the USB sticks.
1. 2.4GHz USB stick: http://www.atmel.com/tools/ZB-X-233-USB.aspx
2. Sub GHz USB stick: http://www.atmel.com/tools/ZB-X-212B-USB.aspx
3. ZigBit: http://www.atmel.com/ZigBit
1.3 Programming
How to program the extension.
1.3.1 JTAGICE
How to program using the AVR® JTAGICE mkII and JTAGICE3.
1. Connect the JTAGICE USB to the PC.
2. Connect the JTAGICE to the USB stick connector (J2) as shown on picture.
3. Go to Atmel Studio: Tools/Device Programming, and select the JTAGICE connected as Tool and click
Apply.
4. Select Device = ATxmega256A3U.
5. Select "Memories" and locate the source hex or elf file and click Program.
JTAGICE3 connected to J2
AVR JTAGICE mkII connected to J2
1.3.2 Bootloader
This section describes how to use the bootloader to program the ZigBit on the USBstick.
ZigBit USB Stick User Guide [USER GUIDE]
42194A-MCU-11/2013
3
Page 4
1. Install the Bootloader interface on the PC as described in “How to Install the "Bootloader PC
tool"” on page 4.
2. Start the Bootloader PC GUI "FLIP" .
3. Insert a jumper on header J3 .
Insert the USB stick in the PC.
Press the reset button.
4. Select Device = ATxmega256A3U (Device - Select).
5. Select USB communication (Ctrl+U).
6. Select memory area to program (Use the toggle memory button bellow the Atmel logo).
7. Select Load Hex file (Ctrl+L).
8. Select Programming Options.
9. Click "Run", observe status in status field .
1.3.2.1 How to Install the "Bootloader PC tool"
How to install the Bootloader PC GUI tool,
1. Download the Flip "in system programming tool" installer from http://www.atmel.com/tools/FLIP.aspx
1
http://www.atmel.com/tools/FLIP.aspx
ZigBit USB Stick User Guide [USER GUIDE]
42194A-MCU-11/2013
1
4
Page 5
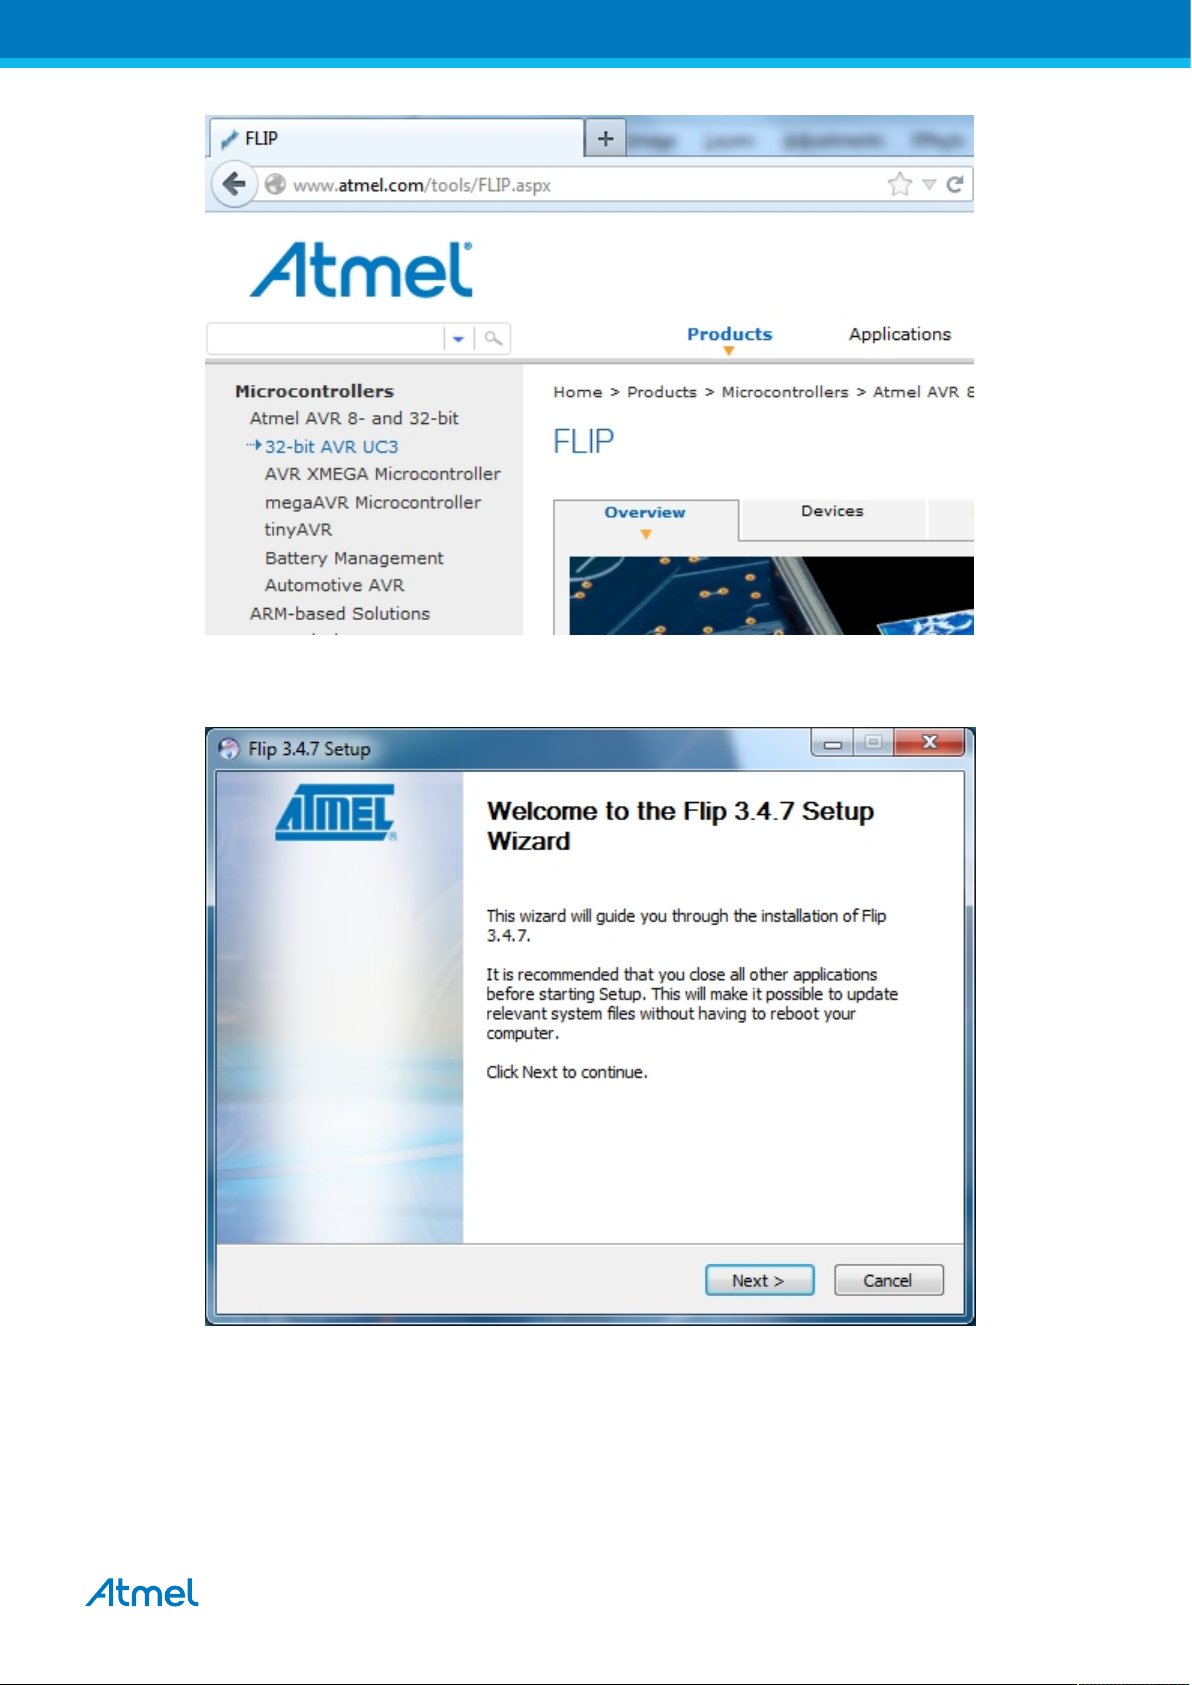
2. Run the Flip Installer .
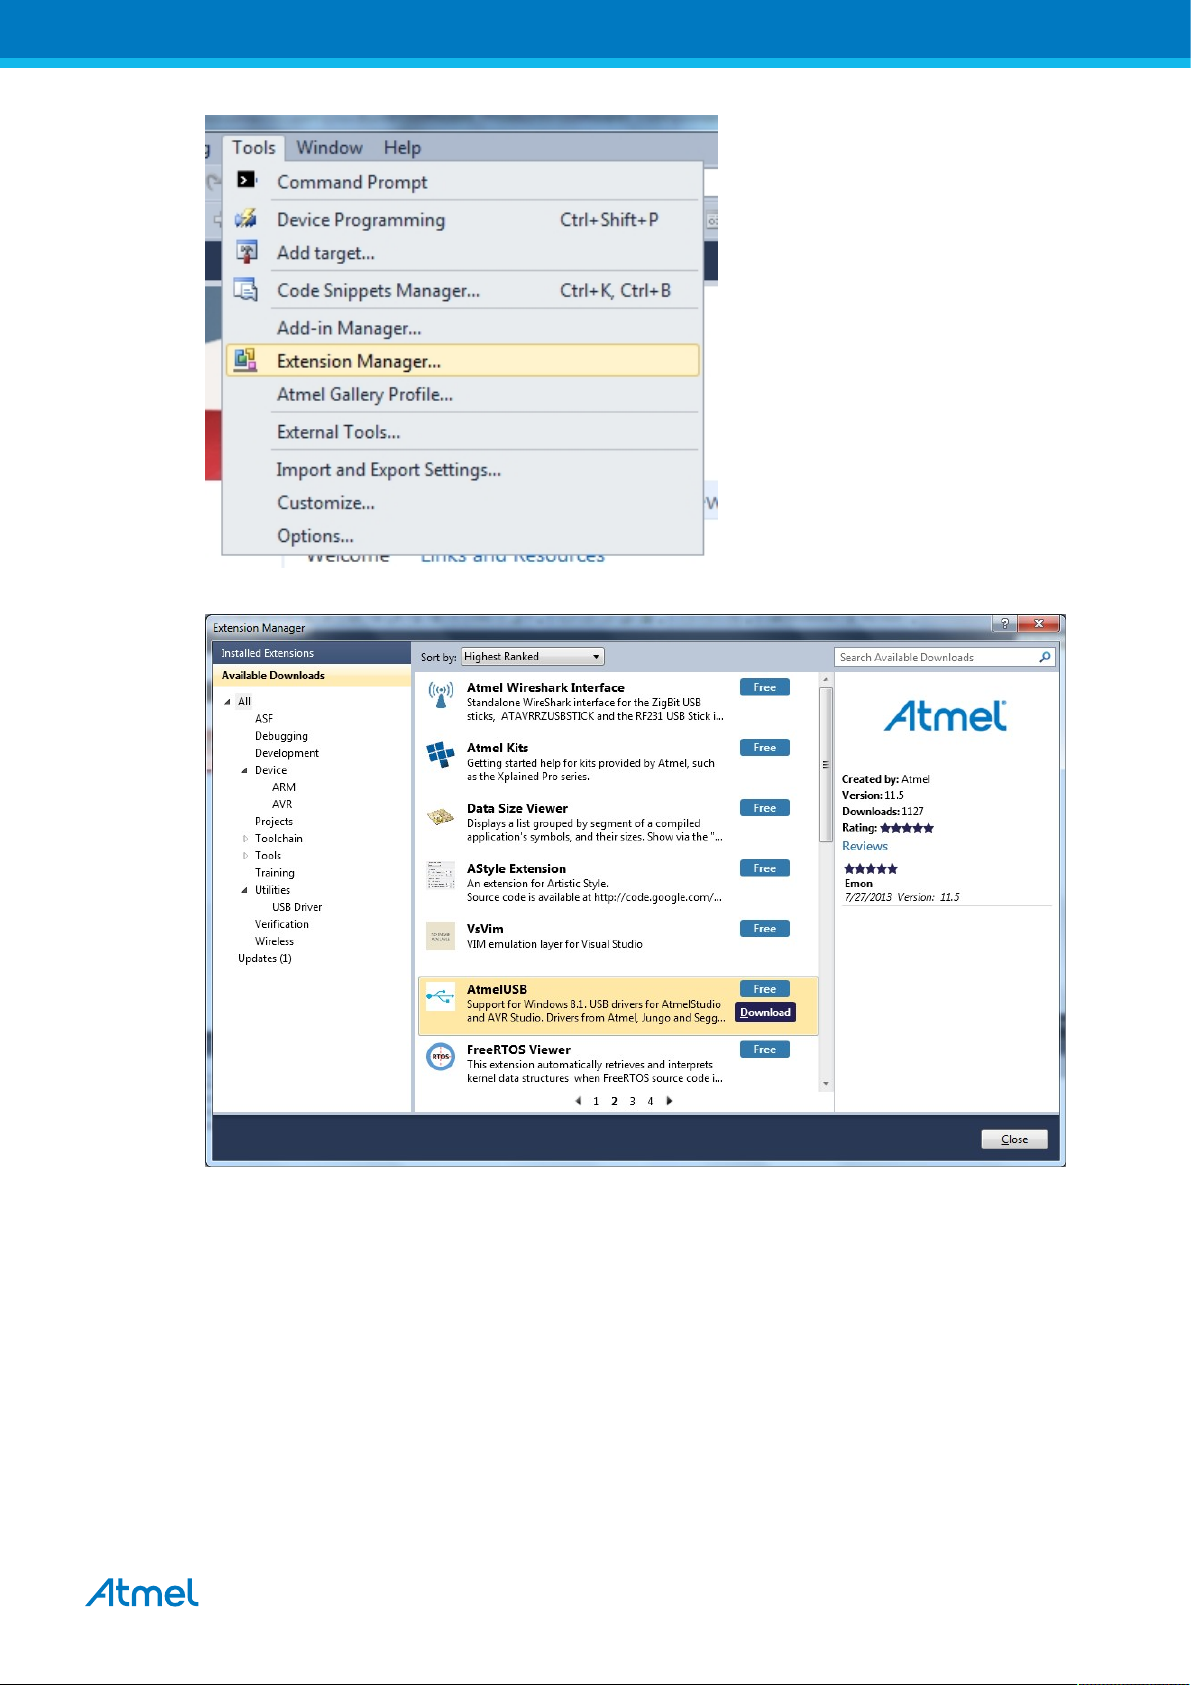
3. Download the Atmel USB extension and run the installer.
ZigBit USB Stick User Guide [USER GUIDE]
42194A-MCU-11/2013
5
Page 6
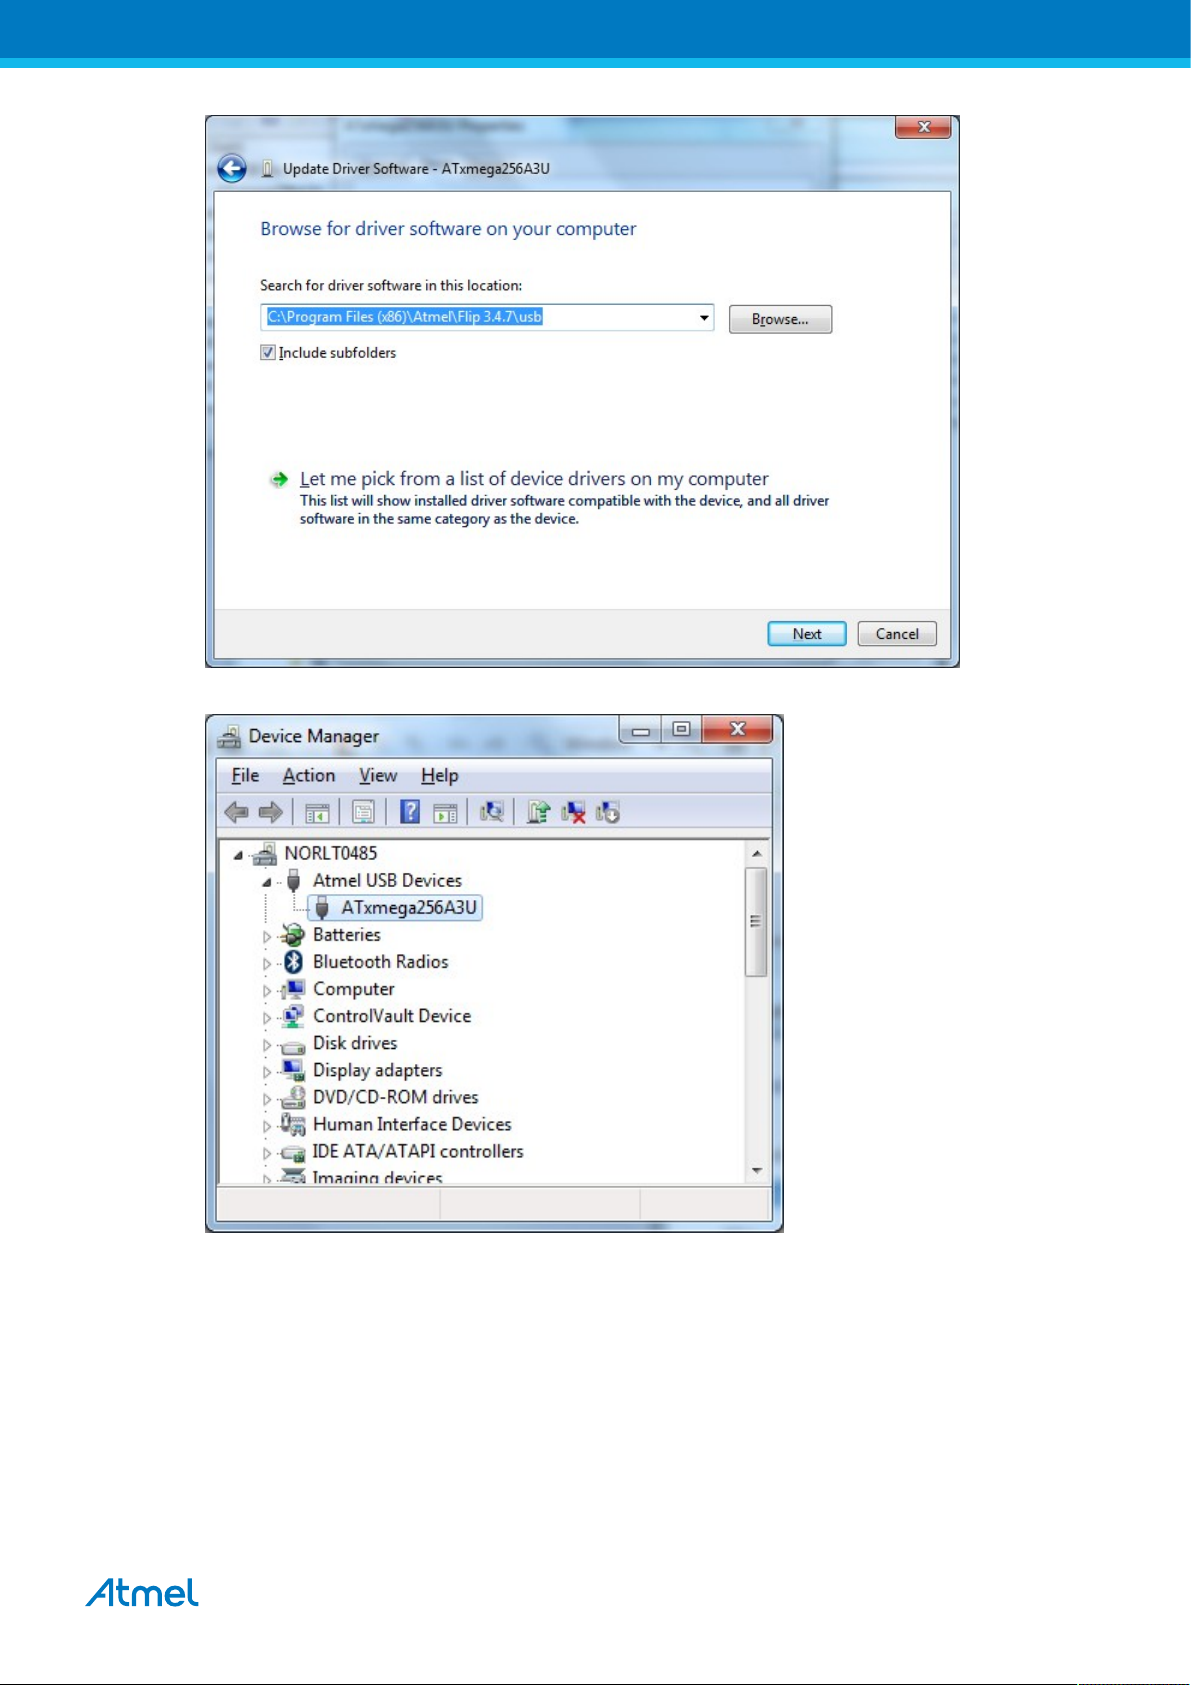
4. Start Flip - if the USBstick is not recognized continue with step 5.
5. Update the USB DFU driver.
ZigBit USB Stick User Guide [USER GUIDE]
42194A-MCU-11/2013
6
Page 7
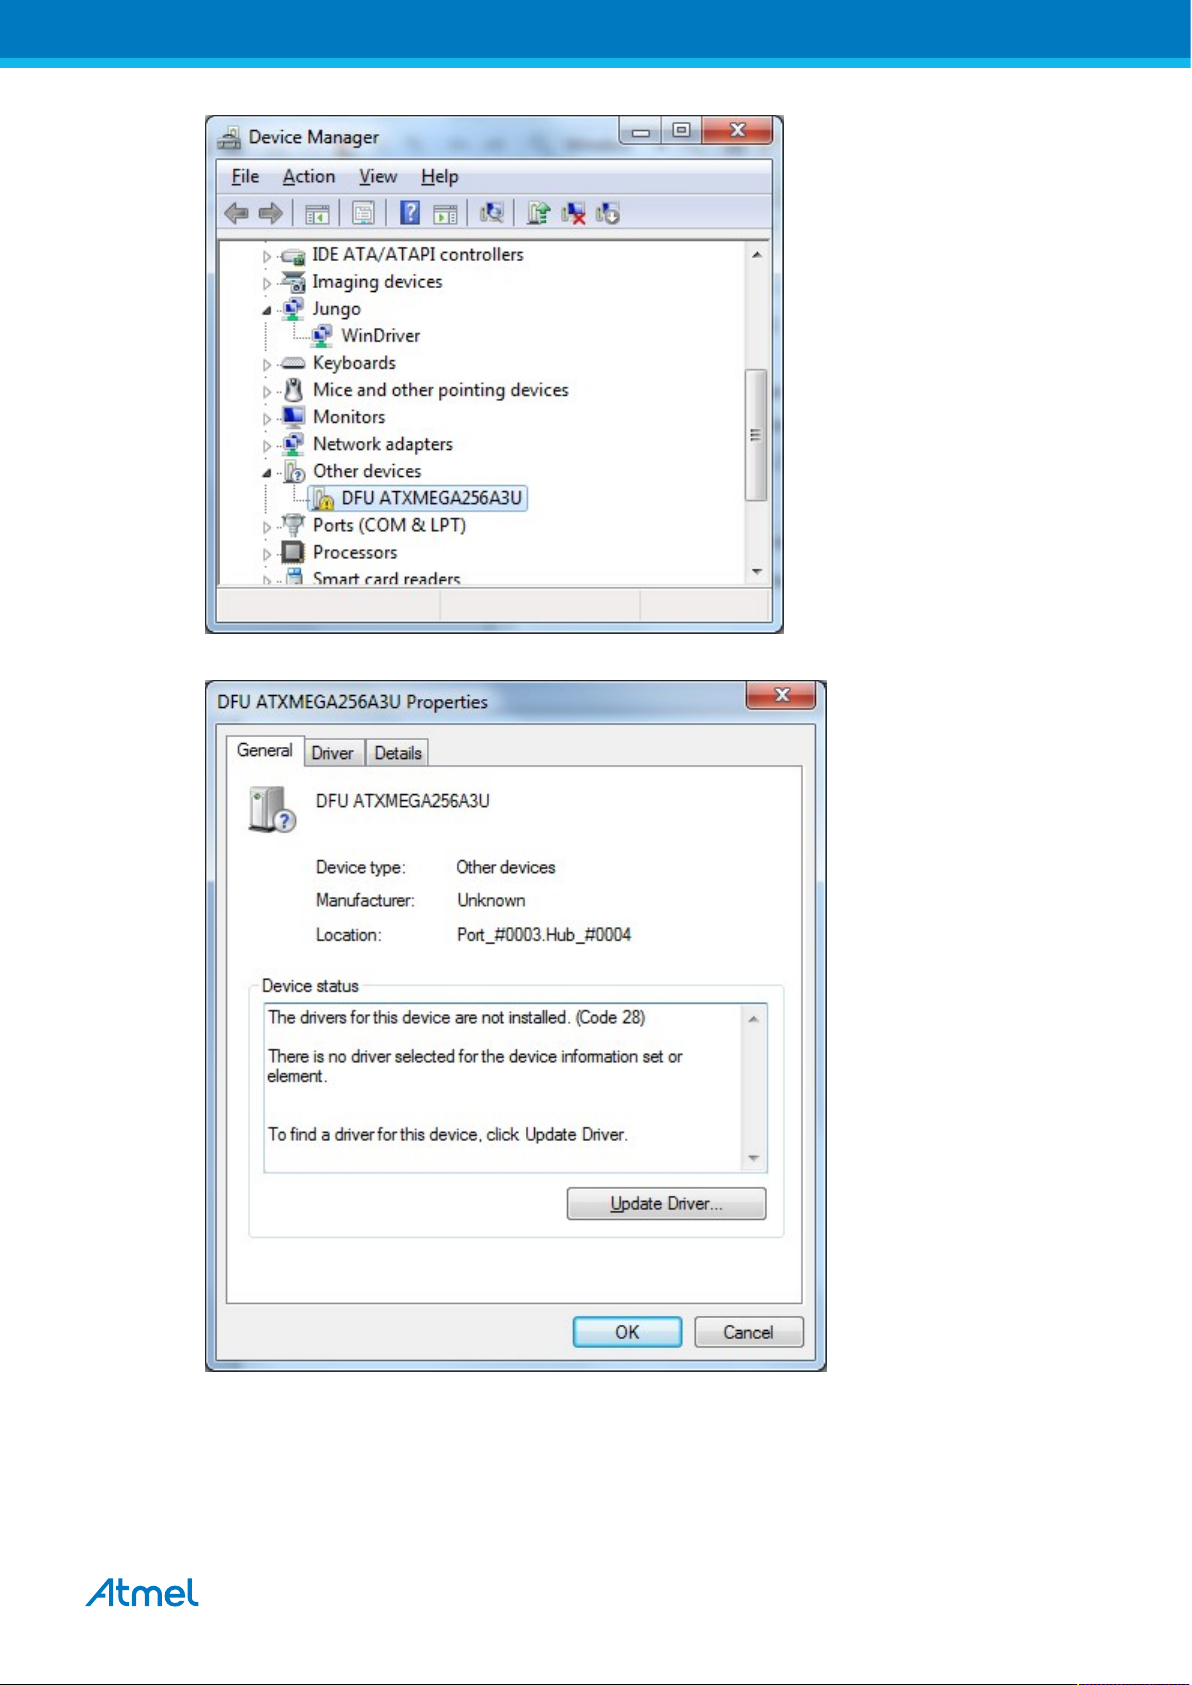
Clik the Update Driver button and select "Browse my computer-..."
ZigBit USB Stick User Guide [USER GUIDE]
42194A-MCU-11/2013
7
Page 8
1.4 Available Example Code
ASF contains a number of Wireless example projects with source code - use Wireless as key word and select
from the list.
ZigBit USB Stick User Guide [USER GUIDE]
42194A-MCU-11/2013
8
Page 9
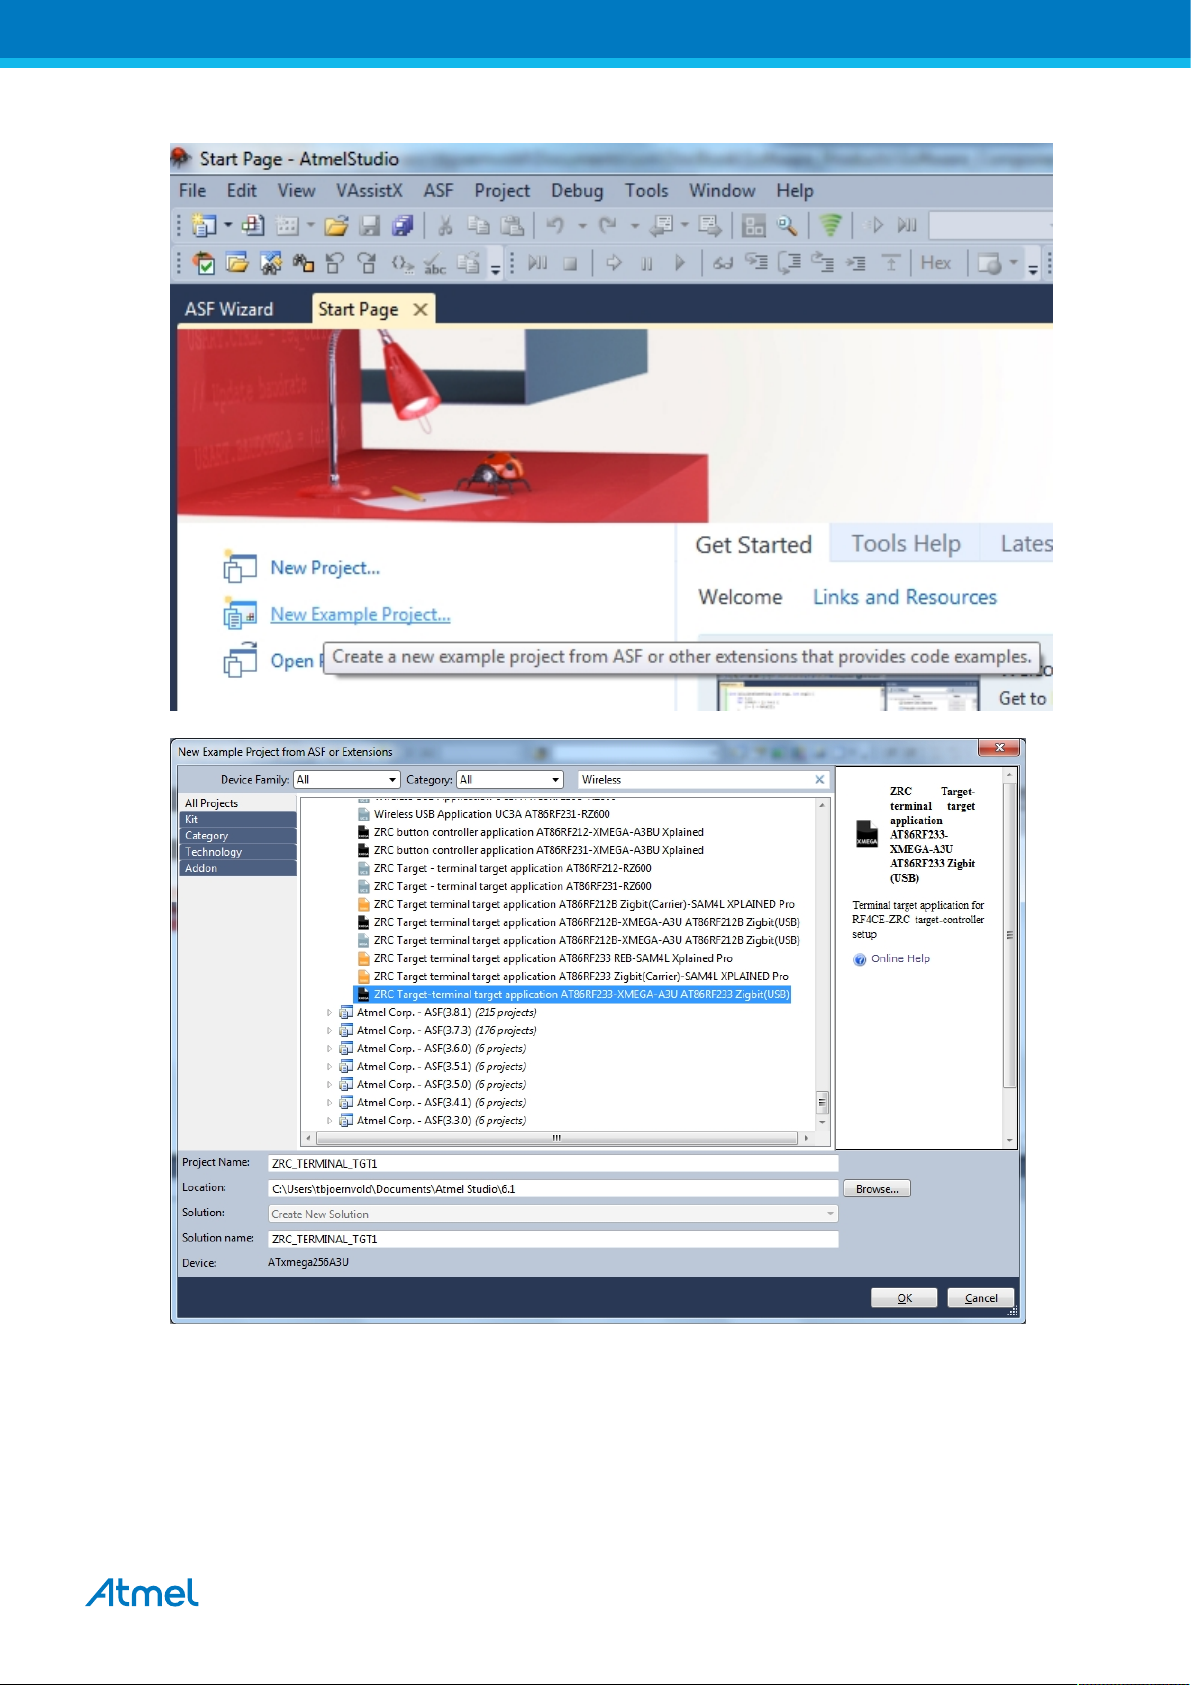
Figure 1-1. NewProjectASF.jpg
ZigBit USB Stick User Guide [USER GUIDE]
42194A-MCU-11/2013
9
Page 10

2. Performance Analyzer
2.1 Introduction
The Performance Analyzer FW together with the GUI in Atmel Studio Wireless Composer Extension provides a
number of basic functional RF tests.
A quick start guide and general help is provided in Wireless Composer once started.
2.2 Program Installation
How to install necessary SW.
1. Install Atmel Studio1.
2. Once Studio is installed and started use the Tools - Extension Manager to install the Wireless Composer.
Select Wireless and Wireless Composer.
1
http://www.atmel.com/tools/atmelstudio.aspx
ZigBit USB Stick User Guide [USER GUIDE]
42194A-MCU-11/2013
10
Page 11

Log in to Atmel Gallery.
Click download again and download starts.
ZigBit USB Stick User Guide [USER GUIDE]
42194A-MCU-11/2013
11
Page 12

Restart Atmel Studio, allow help to make changes and the Performance Analyzer GUI is available in the
Tools menu.
3. If not already preprogrammed - program the node with the Performance Analyzer FW available in the
"Wireless Performance Analyzer Firmware extension" or from source code provided in ASF.
If using an Wireless board with a μC embedded, the Performance Analyzer FW has to be programmed
using the Bootloader or JTAGICE.
If using a extension board which do not have a μC embedded, the Performance Analyzer FW has to be
programmed on the Xplained Pro board using the EBDG from Atmel Studio.
ZigBit USB Stick User Guide [USER GUIDE]
42194A-MCU-11/2013
12
Page 13

2.3 Program Use
How to get started.
1. Connect the Wireless board assembly, with the Performance Analyzer FW programmed, to the PC USB
connector and power on, a COM port should now be available for the kit.
2. Power on any other wireless node assemblies of similar frequency, running the Performance Analyzer FW,
and use it as a reference.
3. Start Performance Analyzer GUI, connect to the kit via the COM port and follow the quick start guide.
2.4 Typical Wireless Nodes
Typical board assembly.
The Atmel SAM4L Xplained Pro Evaluation Kit with Wireless Extension and remote node consisting of a
Wireless extension board and a battery pack.
ZigBit USB Stick User Guide [USER GUIDE]
42194A-MCU-11/2013
13
Page 14

The Atmel ATmega256RFR2 Xplained Pro Evaluation Kit and remote node consisting of a Wireless extension
board and a battery pack.
ZigBit USB Stick User Guide [USER GUIDE]
42194A-MCU-11/2013
14
Page 15

3. WireShark
3.1 Introduction
Wireshark is a free and open-source packet analyzer. It is used for network troubleshooting, analysis, software
and communications protocol development.
Atmel provides an interface enabling use of WireShark GUI to monitor wireless communication using Atmel RF
USB sticks.
Go to the WireShark home page1 to learn the detail on how to use WireShark.
3.2 Program Installation
How to install necessary SW and FW.
3.2.1 WireShark Installation
How to install the WireShark analyzer.
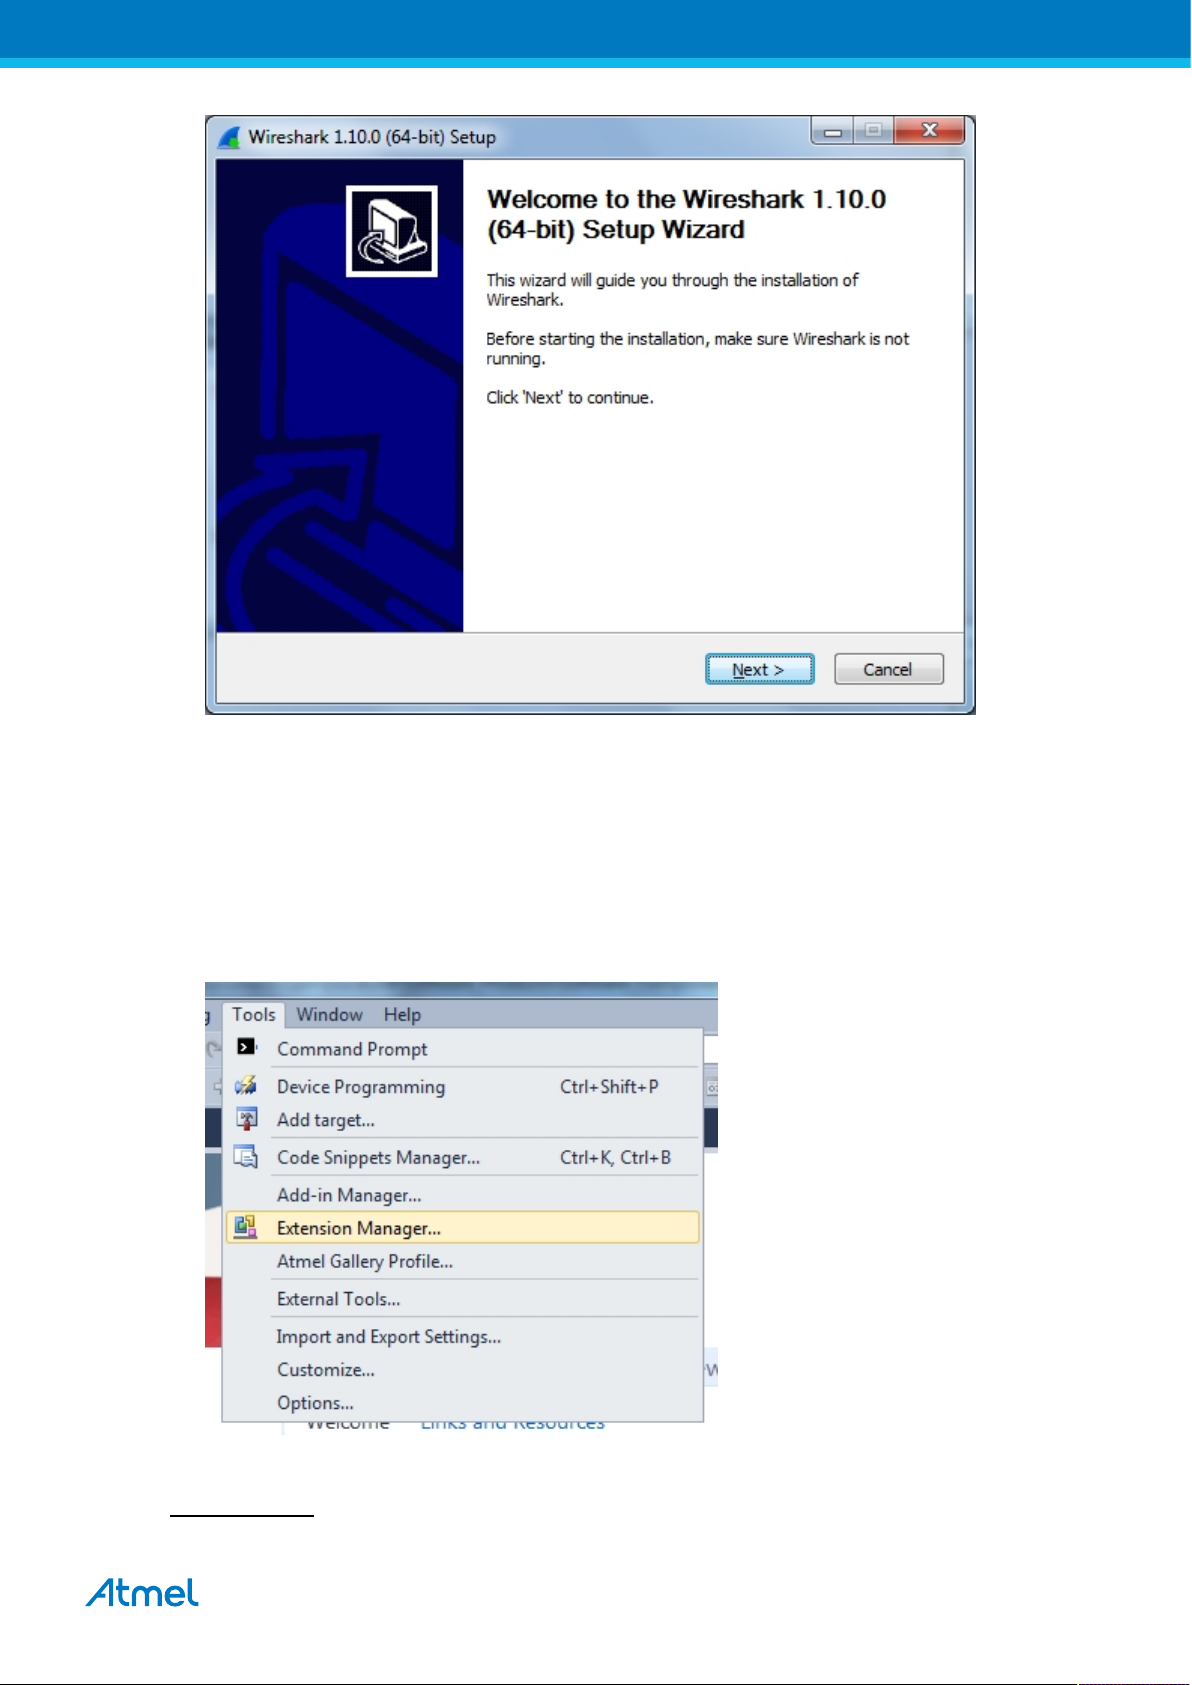
1. Go to the WireShark home page2 and download the WireShark installer.
2. Locate the downloaded installer and install WireShark.
1
http://www.wireshark.org
2
http://www.wireshark.org
ZigBit USB Stick User Guide [USER GUIDE]
42194A-MCU-11/2013
15
Page 16
3.2.2 Sniffer Interface Installation
How to install the WireShark sniffer interface, connecting the WireShark GUI and the sniffer FW running on the
USB stick.
The sniffer interface program can be downloaded from Atmel Gallery.
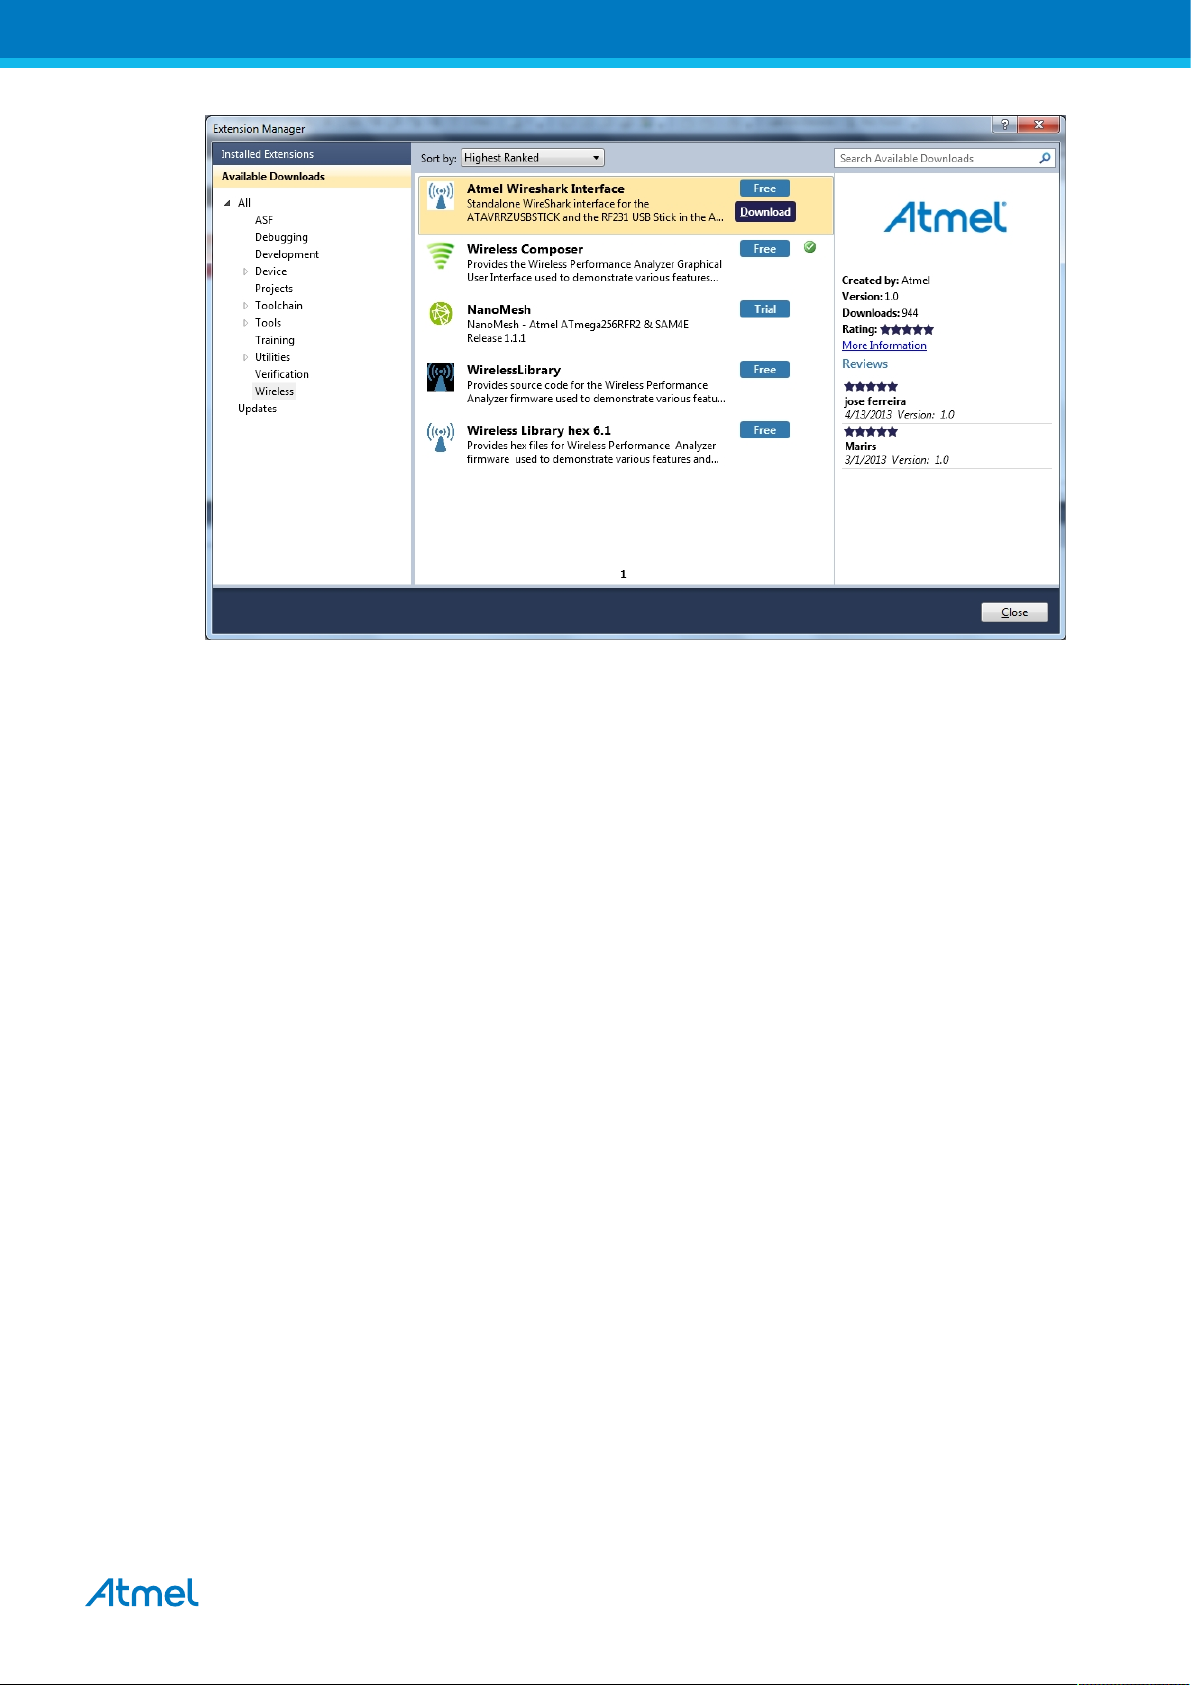
1. Install Atmel Studio3.
2. Once Studio is installed and started use the Extension Manager to download the Atmel WireShark
Interface installer.
3. Select Wireless and Atmel WireShark Interface.
3
http://www.wireshark.orghttp//www.atmel.com/tools/atmelstudio.aspx
ZigBit USB Stick User Guide [USER GUIDE]
42194A-MCU-11/2013
16
Page 17
4. Log in to Atmel Gallery if not already logged in.
5. Click download again and download starts.
6. You have now downloaded the Atmel WireShark installer, AtmelWiresharkFirmwareSetup.msi, run the
installer.
7. You now have the "Wireshark Sniffer" user interface in the Start Menu - All Programs - Atmel folder and
the sniffer firmware files located in C:/Program Files (x86)/Atmel/AtmelWiresharkFirmware/
3.2.3 Sniffer FW Installation
How to install the WireShark sniffer FW.
1. Download the Atmel WireShark Interface installer as described in “Sniffer Interface
Installation” on page 16 .
2. Program the USB stick using the bootloader or the JTAGICE as described in “Programming” on page 3.
The firmware files is located in C:/Program Files (x86)/Atmel/AtmelWiresharkFirmware/
3.3 Program Use
How to get started..
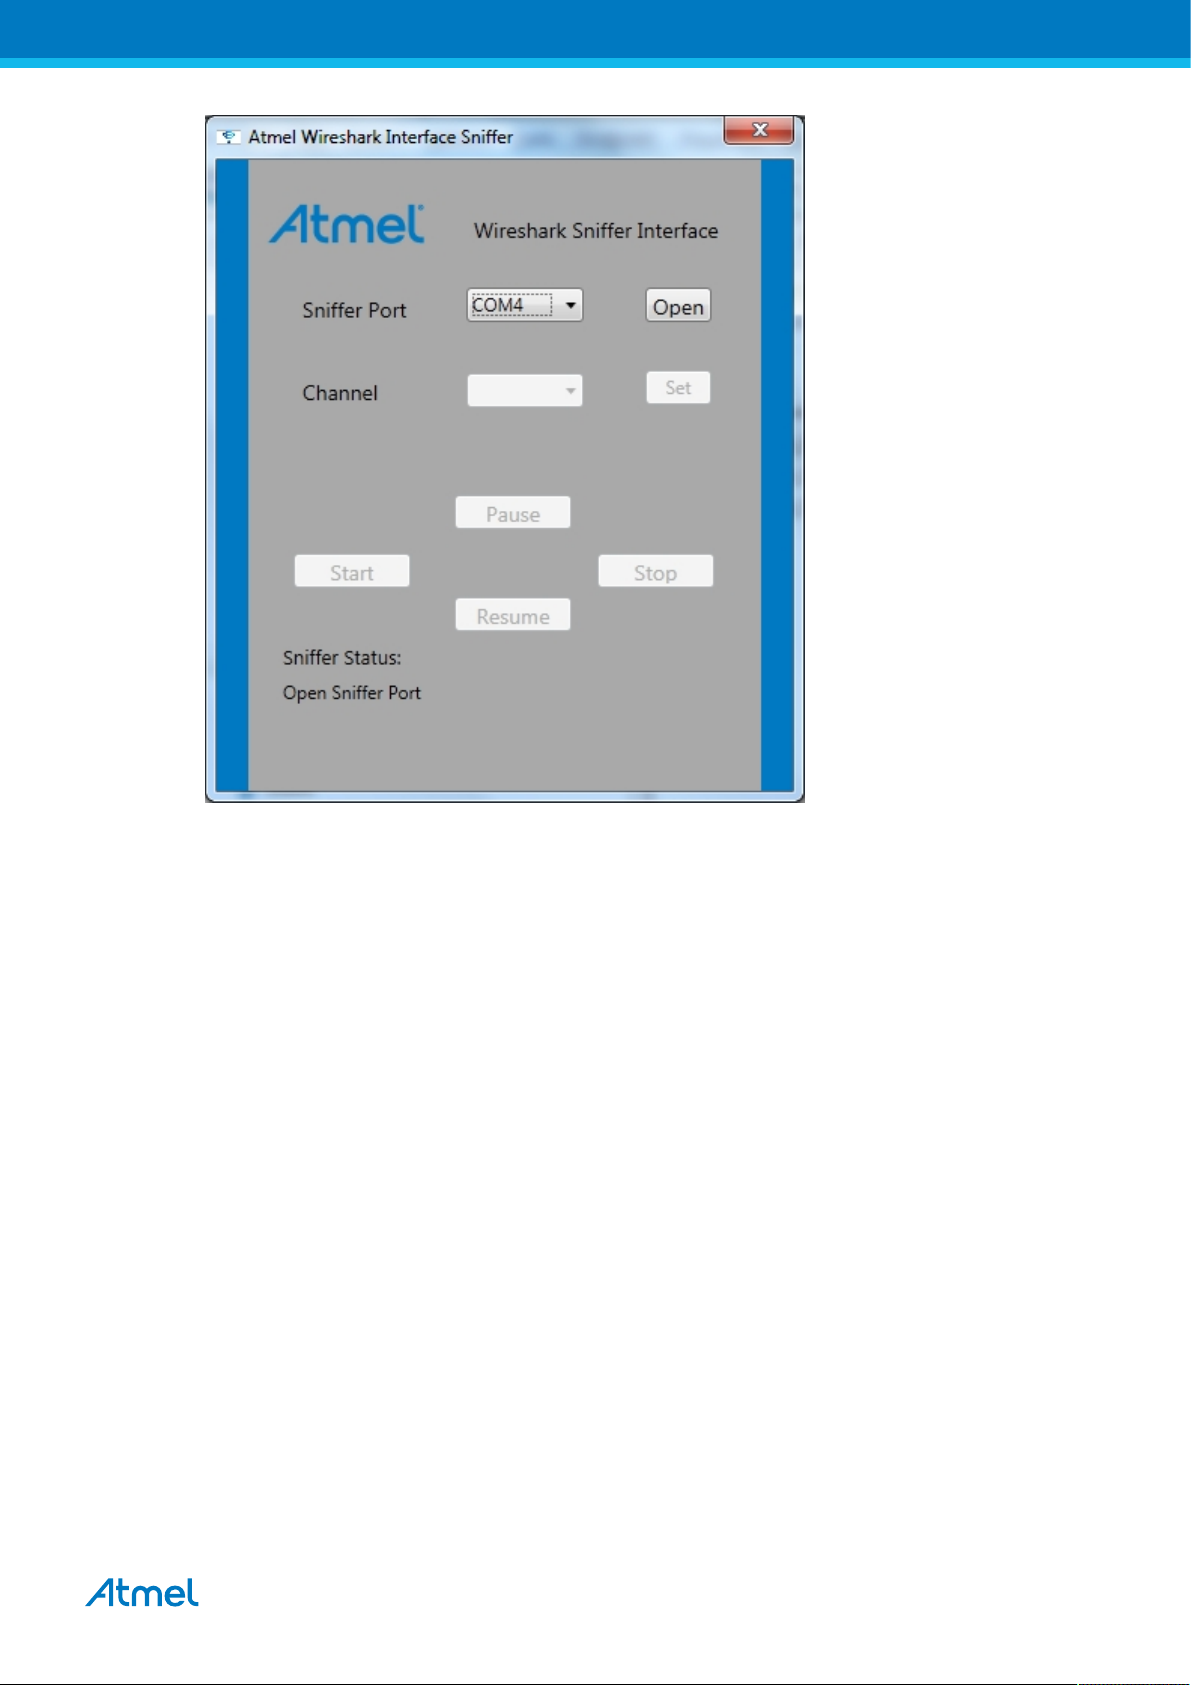
1. Insert the USB stick in the computer.
2. Start the Wireshark Interface program from the Atmel program folder
3. Select the COM port allocated to the USBstick with the sniffer FW and click Open.
ZigBit USB Stick User Guide [USER GUIDE]
42194A-MCU-11/2013
17
Page 18
4. Select the Channel you want to monitor and click Set.
ZigBit USB Stick User Guide [USER GUIDE]
42194A-MCU-11/2013
18
Page 19

5. Click Start and WireShark is started.
ZigBit USB Stick User Guide [USER GUIDE]
42194A-MCU-11/2013
19
Page 20
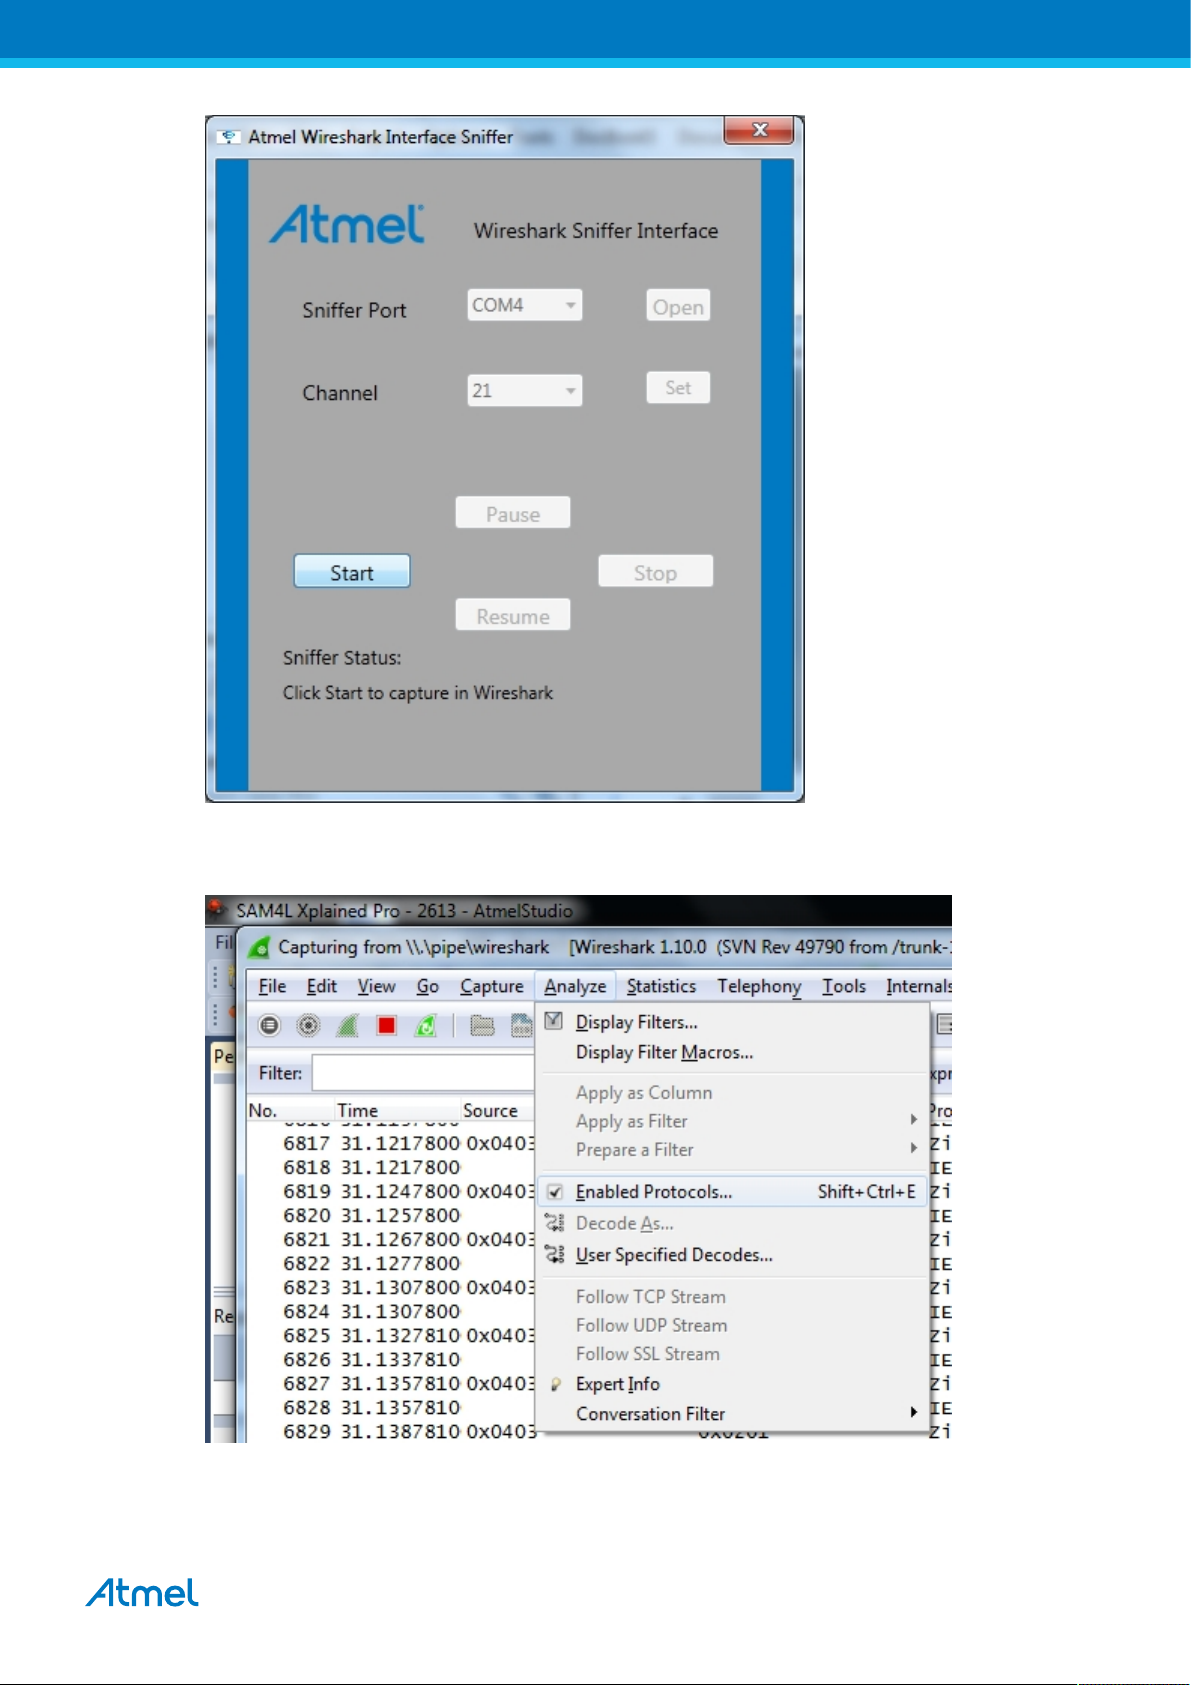
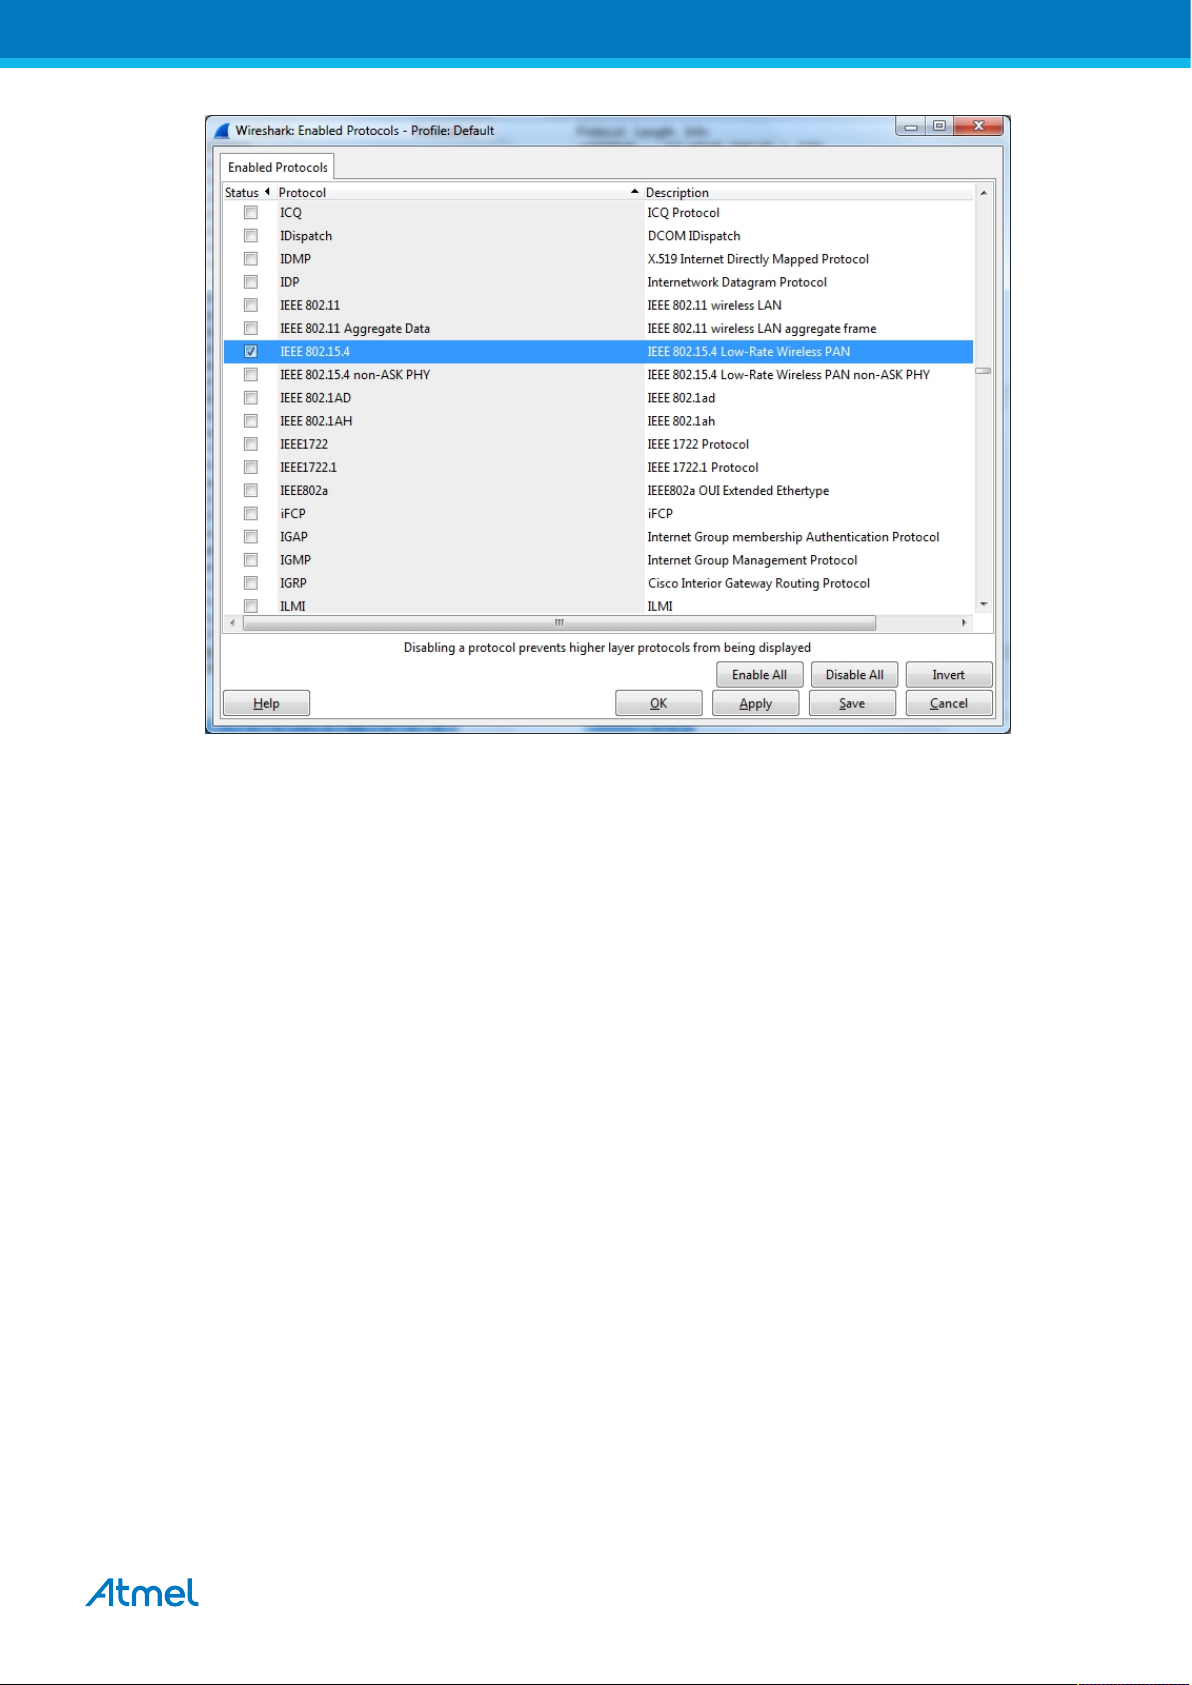
6. Select the protocol to Analyze in WireShark in order to get the protocol details decoded and displayed.
Disable all and select the applicable protocol.
ZigBit USB Stick User Guide [USER GUIDE]
42194A-MCU-11/2013
20
Page 21
7. You can now monitor captured frames.
ZigBit USB Stick User Guide [USER GUIDE]
42194A-MCU-11/2013
21
Page 22
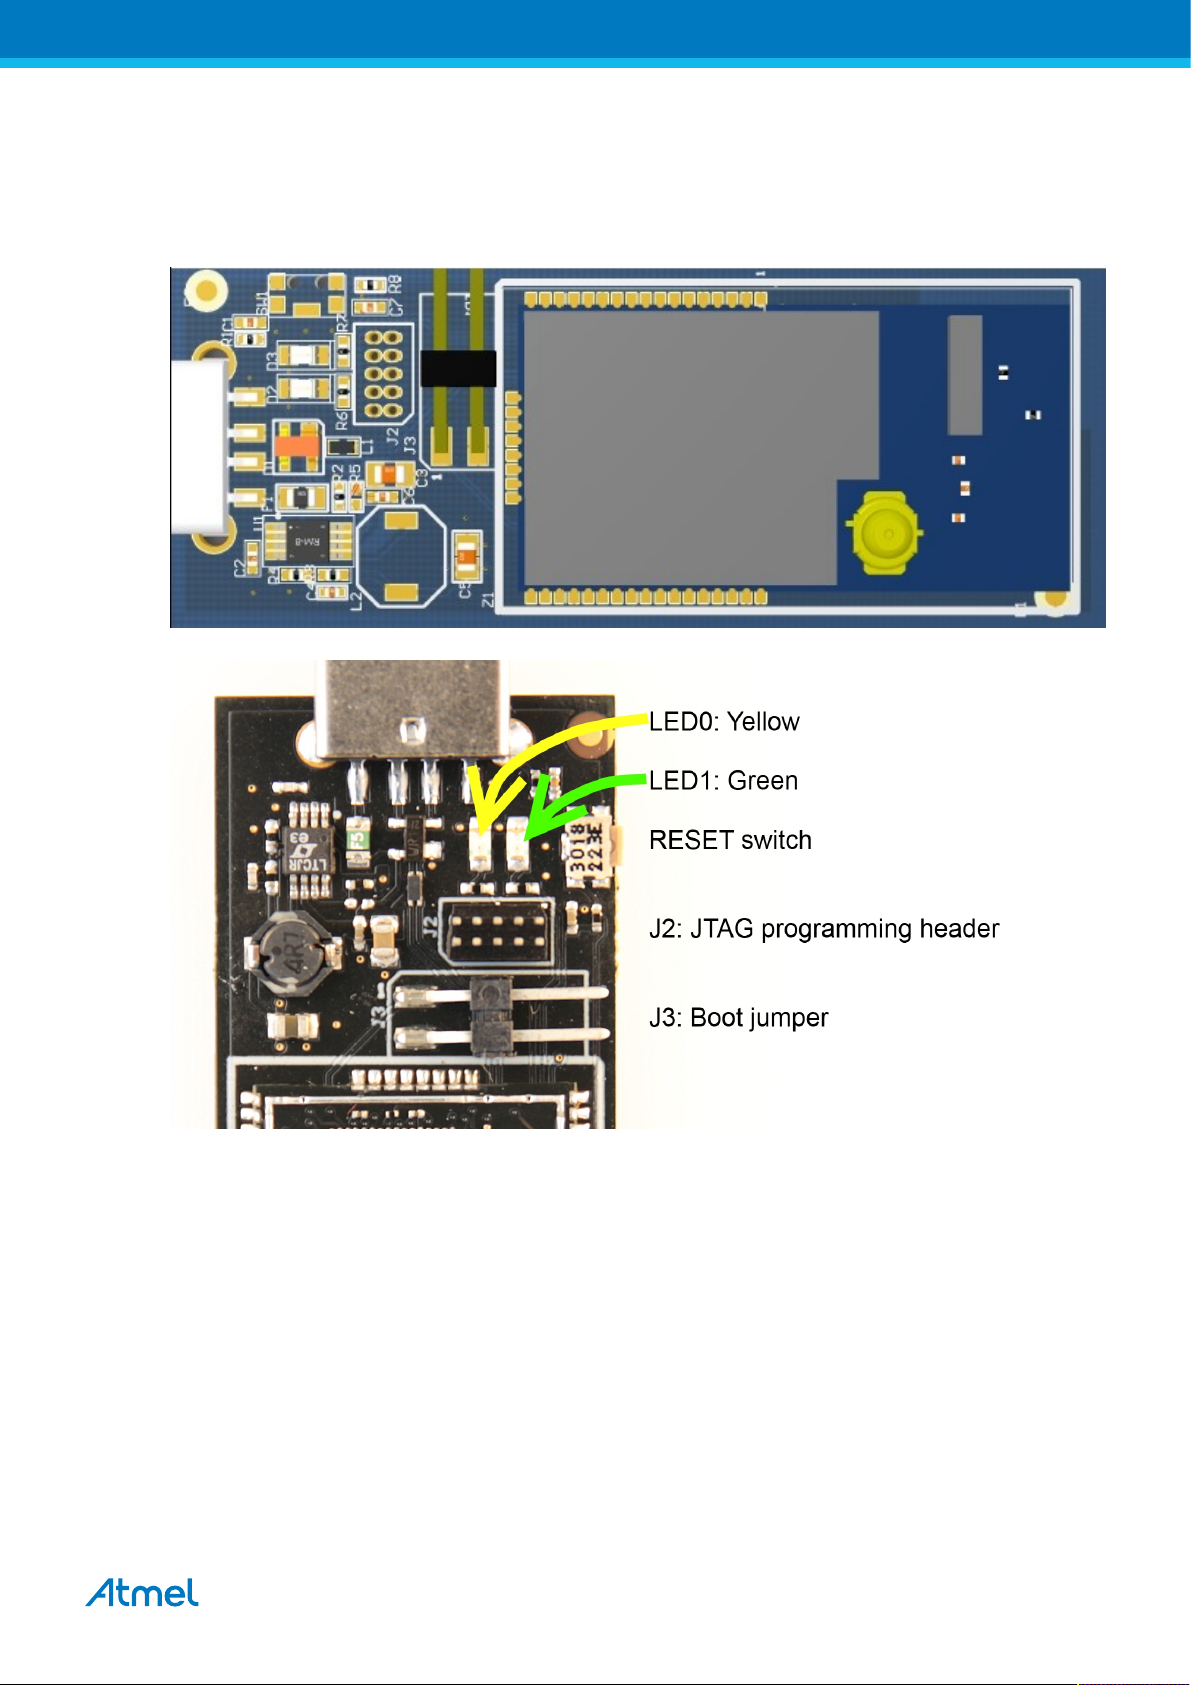
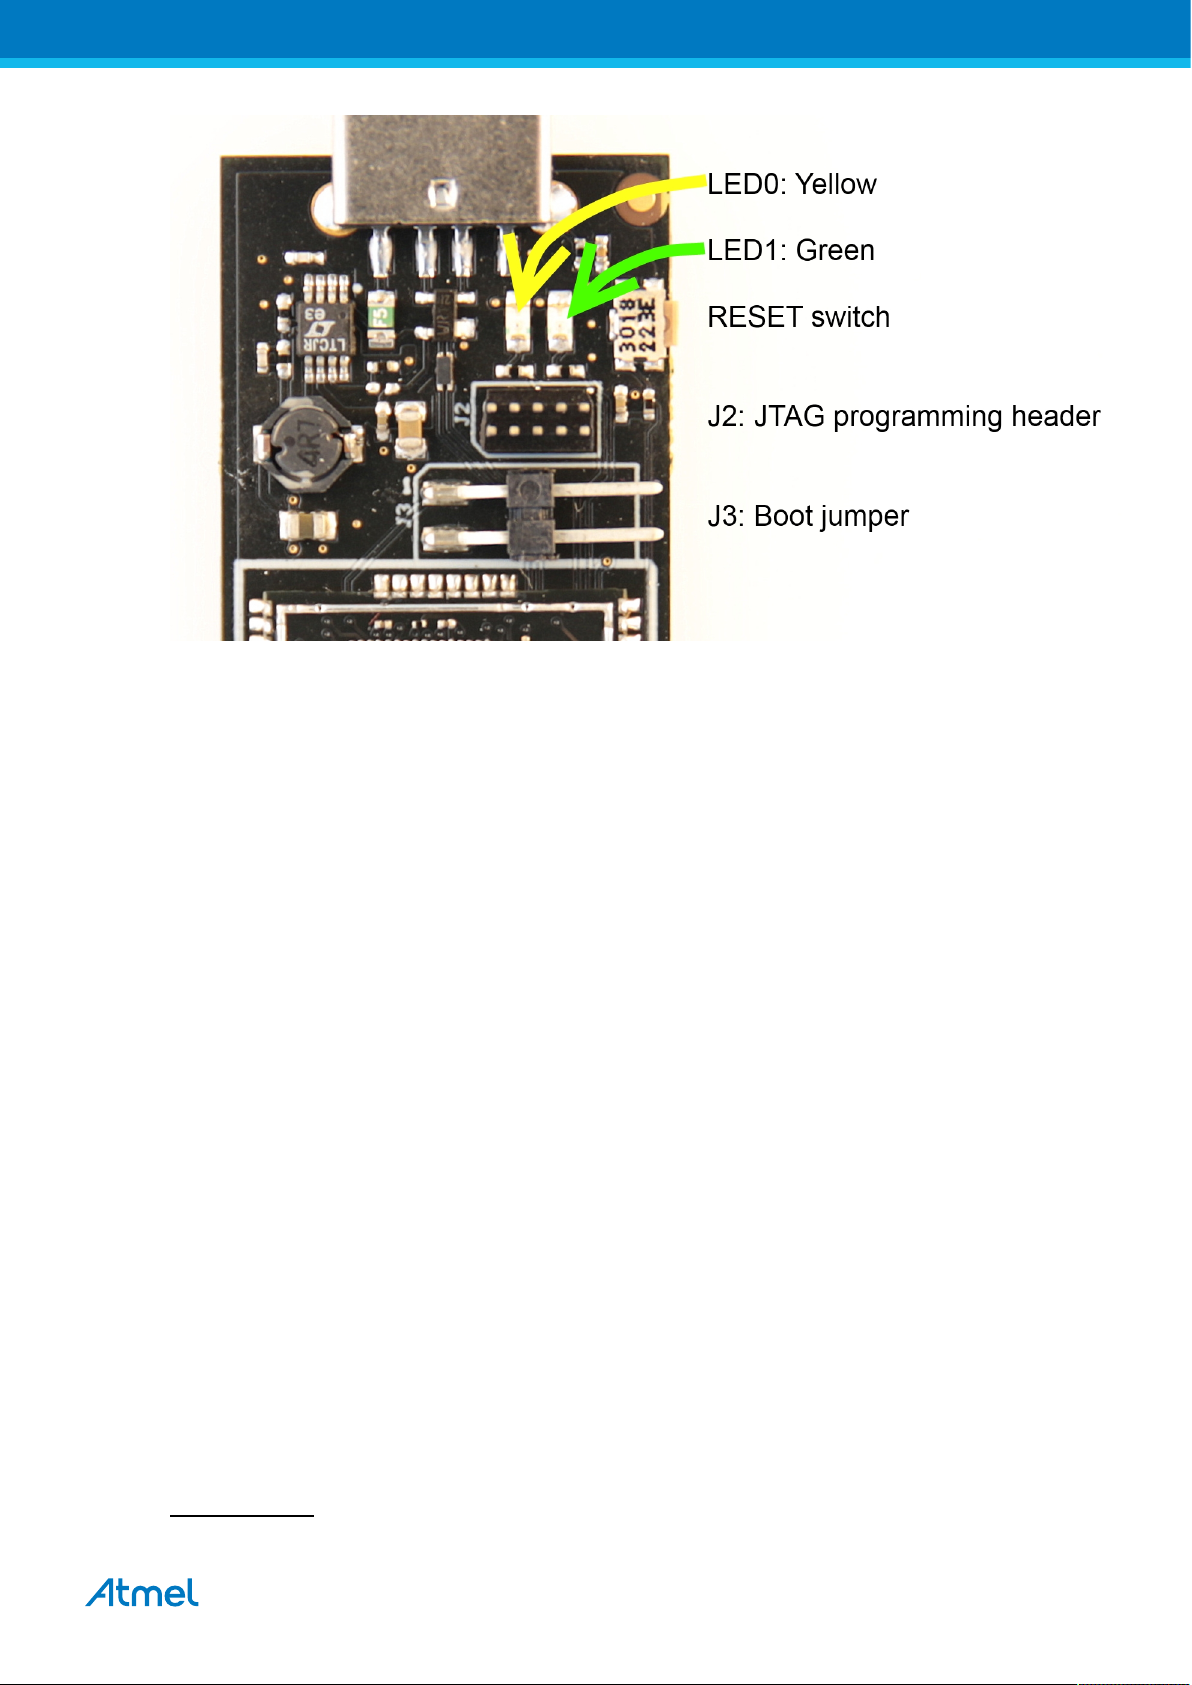
4. Hardware User Guide
4.1 Board Overview
Figure 4-1. Extension Assembly.jpg
4.2 Headers and Connectors
The extension board connectors.
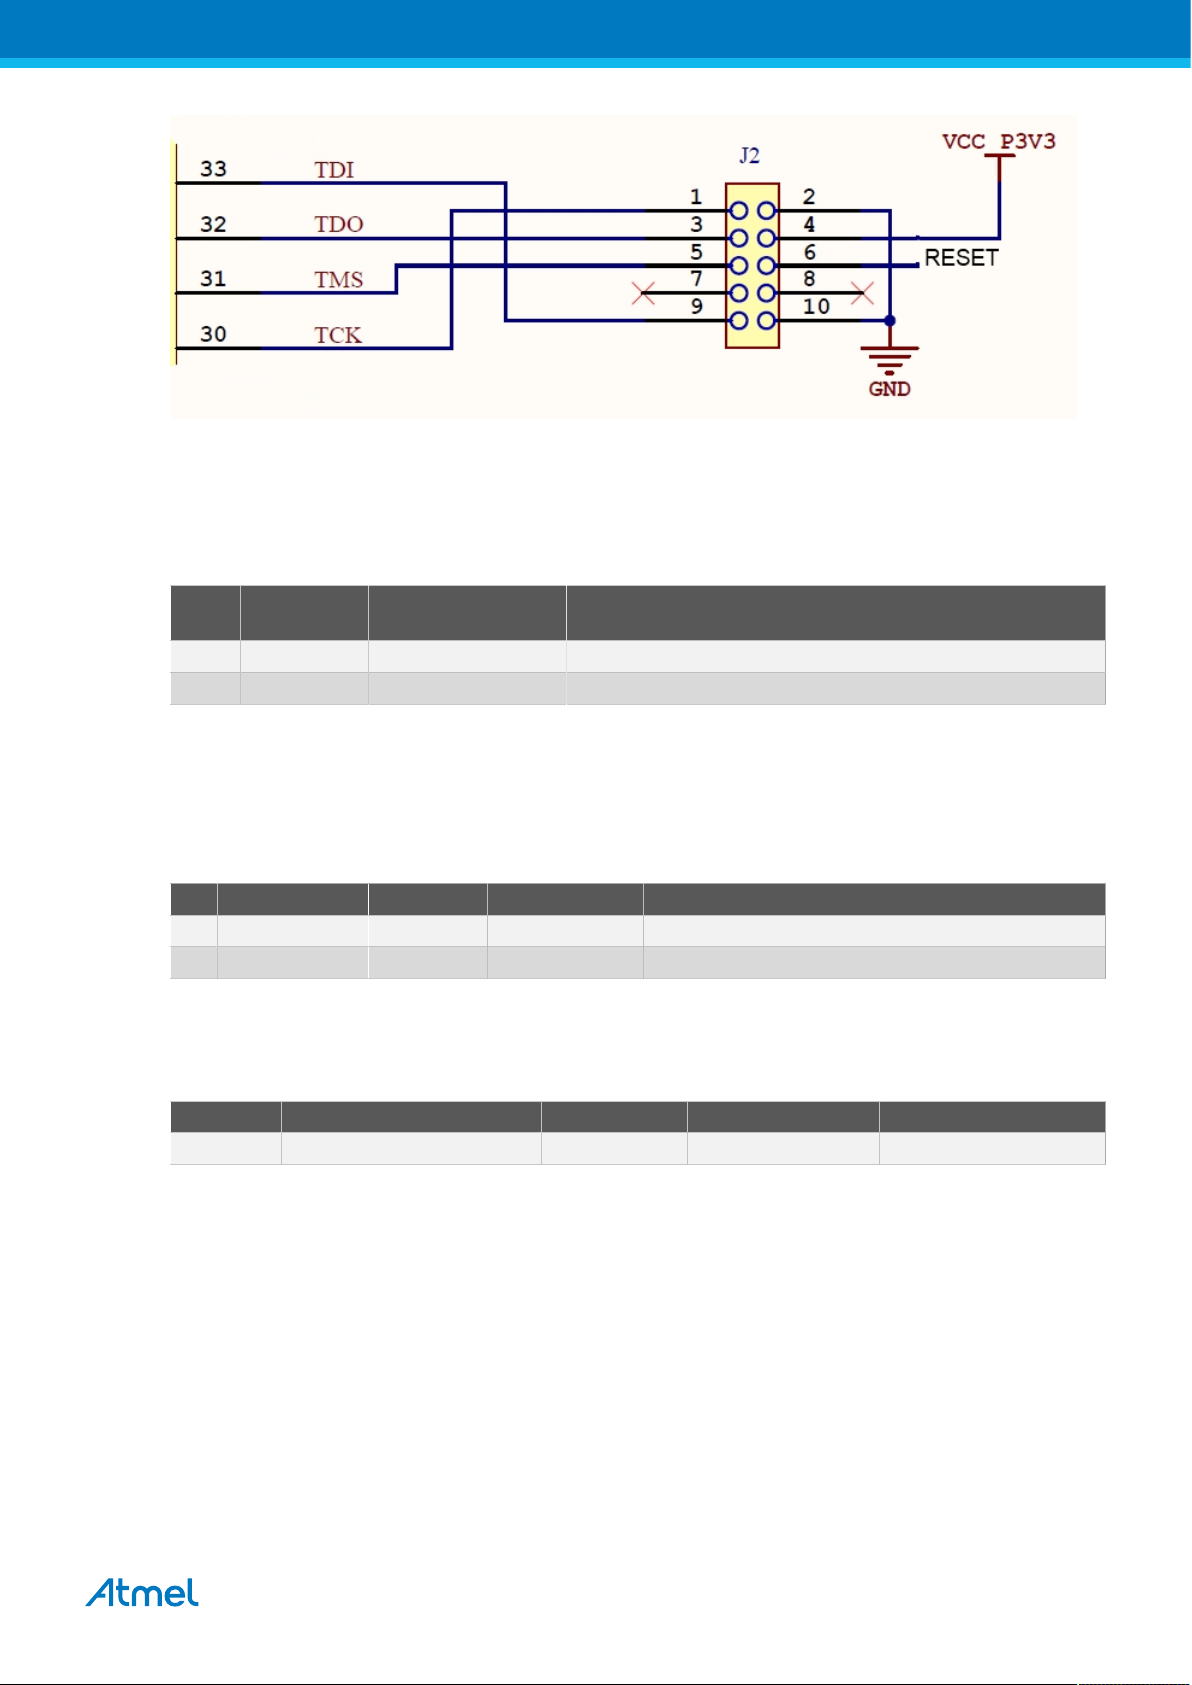
4.2.1 JTAG (J2)
J2 is the JTAG programming header typically used by the JTAGICE.
ZigBit USB Stick User Guide [USER GUIDE]
42194A-MCU-11/2013
22
Page 23
4.2.2 Boot Select (J3)
J3 enables the Bootloader when J3.1 connected to GND during RESET.
Insert jumper on J3 to connect J3.1 to J3.2.
Table 4-1. J5 Current measurement
J3
ZigBit pin XMEGA® pin Function
pin
1 38 41-PE5 Bootloader enable
2 GND GND GND
4.3 Board GUI
4.3.1 LED's
There are two LEDs available for use by application SW.
Table 4-2. LED's
LED ZigBit pin XMEGA pin
D2 LED0 - Yellow 10 3 - PA5
D3 LED1 - Green 11 2 - PA4
4.3.2 Button
There is one switch for RESET of the micro-controller.
Table 4-3. Buttons
Button Function ZigBit pin XMEGA pin
SW1 ZigBit Reset, press to reset 5 56 - RESET
4.4 Factory Programmed Data
The ZigBit® has a preprogrammed unique MAC address - details available in the ZigBit data sheet and in
“Persistence Memory” on page 24.
The USB stick comes with a Bootloader and the Performance Analyzer preprogrammed.
ZigBit USB Stick User Guide [USER GUIDE]
42194A-MCU-11/2013
23
Page 24

5. Persistence Memory
A dedicated memory space is allocated to store product specific information and called the Persistence
Memory. The organization of the persistence memory is as follows:
Table 5-1. Persistence Memory
Data Size
Structure Revision 2 bytes
MAC address 8 bytes
Board information – PCBA Name 30 bytes
Board information – PCBA Serial number 10 bytes
Board information – PCBA Atmel Part Number 8 bytes
Board information – PCBA Revision 1 byte
XTAL Calibration Value 1 byte
Reserved 7 bytes
Reserved 4 bytes
CRC 1 bytes
The MAC address stored inside the MCU is a uniquely assigned ID for each ZigBit® and owned by Atmel. User
of the ZigBit application can use this unique MAC ID to address the ZigBit in end-applications. The MAC ID
can be read from the ZigBit using the Performance Analyzer Application that is supplied through Atmel Studio
Gallery Extension.
ZigBit USB Stick User Guide [USER GUIDE]
42194A-MCU-11/2013
24
Page 25

6. Document Revision History
Document
Date Comment
revision
42194A 10/2013 Initial document release
ZigBit USB Stick User Guide [USER GUIDE]
42194A-MCU-11/2013
25
Page 26

Atmel Corporation 1600 Technology Drive, San Jose, CA 95110 USA T: (+1)(408) 441.0311 F: (+1)(408) 436.4200 | www.atmel.com
© 2013 Atmel Corporation. All rights reserved. / Rev.: 42194A-MCU-11/2013
Atmel®, Atmel logo and combinations thereof, Enabling Unlimited Possibilities®, ZigBit®, XMEGA®, AVR®, and others are registered trademarks or
trademarks of Atmel Corporation or its subsidiaries. Other terms and product names may be trademarks of others.
Disclaimer: The information in this document is provided in connection with Atmel products. No license, express or implied, by estoppel or otherwise, to any intellectual property right is granted
by this document or in connection with the sale of Atmel products. EXCEPT AS SET FORTH IN THE ATMEL TERMS AND CONDITIONS OF SALES LOCATED ON THE ATMEL WEBSITE,
ATMEL ASSUMES NO LIABILITY WHATSOEVER AND DISCLAIMS ANY EXPRESS, IMPLIED OR STATUTORY WARRANTY RELATING TO ITS PRODUCTS INCLUDING, BUT NOT
LIMITED TO, THE IMPLIED WARRANTY OF MERCHANTABILITY, FITNESS FOR A PARTICULAR PURPOSE, OR NON-INFRINGEMENT. IN NO EVENT SHALL ATMEL BE LIABLE FOR
ANY DIRECT, INDIRECT, CONSEQUENTIAL, PUNITIVE, SPECIAL OR INCIDENTAL DAMAGES (INCLUDING, WITHOUT LIMITATION, DAMAGES FOR LOSS AND PROFITS, BUSINESS
INTERRUPTION, OR LOSS OF INFORMATION) ARISING OUT OF THE USE OR INABILITY TO USE THIS DOCUMENT, EVEN IF ATMEL HAS BEEN ADVISED OF THE POSSIBILITY OF
SUCH DAMAGES. Atmel makes no representations or warranties with respect to the accuracy or completeness of the contents of this document and reserves the right to make changes to
specifications and products descriptions at any time without notice. Atmel does not make any commitment to update the information contained herein. Unless specifically provided otherwise,
Atmel products are not suitable for, and shall not be used in, automotive applications. Atmel products are not intended, authorized, or warranted for use as components in applications intended
to support or sustain life.
 Loading...