


Atlona HDMI to HDBaseT 6 by 6 Matrix Switcher
AT-PRO3HD66M
User Manual
atlona.com |
Toll free: 1-877-536-3976 |
|
Local: 1-408-962-0515 |
||
|

|
|
Table of Contents |
1. |
Introduction |
...................................................................................... 3 |
2. |
Package Contents |
...................................................................................... 3 |
3. |
Features |
...................................................................................... 3 |
4. |
Before You Start |
...................................................................................... 3 |
5. |
Panel Descriptions |
|
|
• Front Panel |
...................................................................................... 4 |
|
• IR |
...................................................................................... 4 |
|
• Back Panel |
...................................................................................... 5 |
6. |
Connection and Installation |
|
|
• 3rd Party Control |
...................................................................................... 6 |
|
• IR Remote Control |
...................................................................................... 7 |
|
• Matrix I/O Control |
...................................................................................... 8 |
|
• I/O Route Memory |
...................................................................................... 9 |
|
• EDID |
.................................................................................. 9-11 |
|
• Matrix Status |
..................................................................................... 12 |
7. |
RS-232 |
|
|
• Connection |
..................................................................................... 13 |
|
• Set Up |
..................................................................................... 13 |
8. |
TCP/IP |
|
|
• RS-232 TCP/IP Set Up |
..................................................................................... 14 |
|
• LAN TCP/IP Set Up |
.................................................................................14-15 |
|
• WebGUI |
.................................................................................15-22 |
9. |
TCP/IP and RS-232 Control |
|
|
• Commands |
...................................................................................... 23 |
|
• TCP/IP Commands |
..................................................................................23-24 |
|
• Baud Rate |
..................................................................................24-25 |
10. Remote Control |
..................................................................................... 25 |
|
11. Resetting and Updating |
..................................................................................... 26 |
|
12. Specifications |
..................................................................................... 27 |
|
13. Safety Information |
..................................................................................... 28 |
|
14. Warranty |
..................................................................................... 29 |
|
15. Atlona Product Registration |
..................................................................................... 30 |
|
atlona.com |
2 |
Toll free: 1-877-536-3976 |
Local: 1-408-962-0515 |
||
|
|

Introduction
With the latest and more affordable HDBaseT® technology extend HDMI® sources up to 230ft over category cable. The Atlona HDMI 6 by 6 Matrix Switcher allows for effortless control of up to 12 devices through IR, RS-232, TCP/IP and the front panel. With built in S/PDIF ports send audio to an AVR or distribution amp. To ensure all audio passes through, the 6 by 6 Matrix Switcher supports all Lossy and Lossless formats of Dolby® and DTS™ over HDMI.
Package Contents
•1 x AT-PRO3HD66M
•1 x 24V/6.25A DC adaptor
•1 x Power cord
•1 x IR Extender
•7 x IR Emitter
•1 x Remote control
•1 x Pair of dual purpose wall/rack mounts
•1 x User Manual
Features
•HDBaseT allows IR, RS-232, audio and visual signals to pass over a single category cable.
•Latest feature of Power over Category cable (PoCc™) enables the matrix to power all compatible receivers.
•IR ports for zone dedicated control through IR remote control and 3rd party control boxes.
•Programmable I/O memories, save I/O routes for faster switching to the most commonly used configurations.
•EDID™ learning function for up to 6 video display EDIDs.
•Built in internal EDID mode provides 12 individual EDIDs to ensure compatibility when using DVI projectors or trying to route digital multi-channel audio through an S/PDIF port
•Multiple control options such as RS-232, IR, TCP/IP, and the front panel.
•Dolby® TrueHD and DTS-HD Master Audio™ pass through HDMI output interface.
•Compatible with DVI/D (with DVI/D to HDMI adapter such as AT14050), allowing DVI/D to be passed to displays.
•Mirrored HDMI outputs on zones 5 and 6 for in room displays or AVRs
•Built in S/PDIF audio de-embedding for AVR or audio distribution amplifiers. Compatible with PCM 2Channel, Dolby 2.0, Dolby Digital 5.1, and DTS 5.1.
•Optional redundant power supply (AT-PW24V6.25A) in case the main power supply fails.
•HDCP compliant
Before You Start
•Make sure when connecting a category cable a 568B termination method is used.
•Make sure the matrix is connected to a component surge suppressor with line conditioning.
Note: Atlona’s warranty does not cover damage due to electrical disturbances. A component surge suppressor with line conditioning is highly suggested, especially in areas with electrical storms.
•Be sure you’re using a mono to mono (2 conductor) 3.5mm IR cable when using IR output control from 3rd party control boxes, stereo (3 conductor) 3.5mm cables are not compatible.
atlona.com |
3 |
Toll free: 1-877-536-3976 |
Local: 1-408-962-0515 |
||
|
|
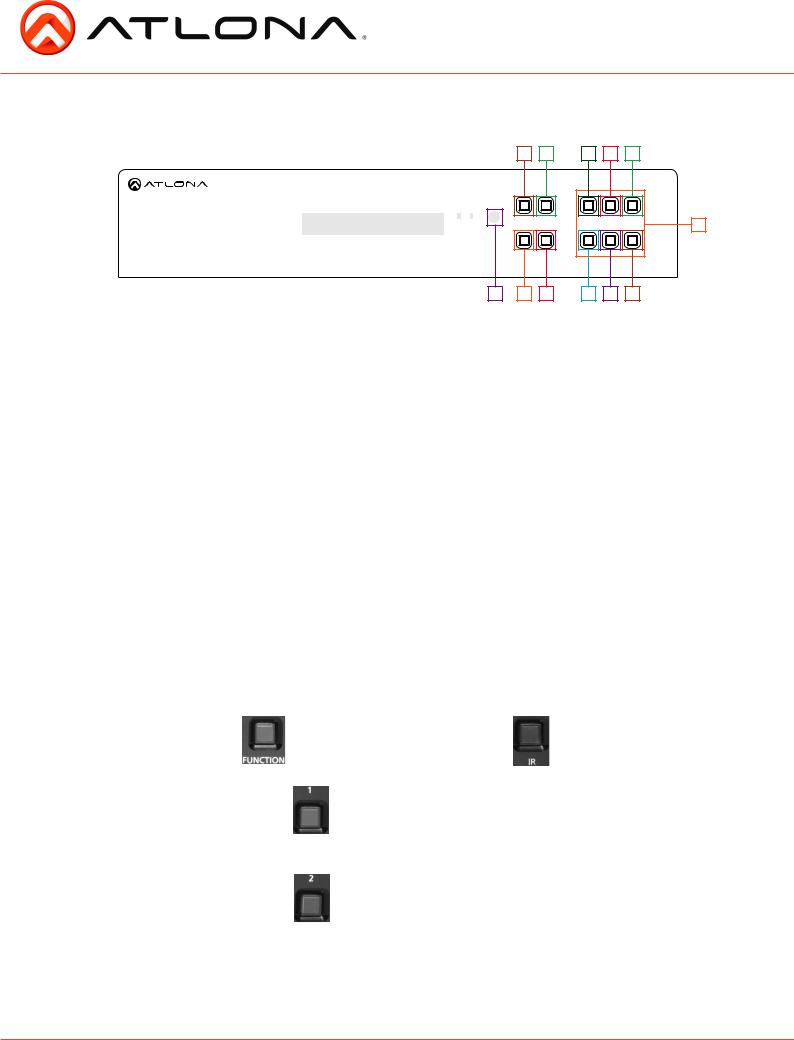
Panel Description
Front Panel
1 |
2 |
a |
b |
c |
|
|
|
1 |
2 |
3 |
|
M B |
|
|
|
|
|
POWER |
ENTER |
DEFAULT |
ALL |
MEMORY |
6 |
|
|
4 |
5 |
6 |
|
FCN |
CANCEL |
EDID |
IR |
INFO |
|
AT-PRO3HD66M |
|
|
|
|
|
3 4 |
5 |
d |
e |
f |
|
1.Power Button - Cycles the power between On (blue backlight) or Standby (red backlight) mode.
2.Enter Button - Use to view current status for inputs and outputs or to confirm a command.
3.IR Receiver Window - Receives the signal from the included IR Remote Control or a 3rd party control box.
4.Function Button - Select for command options. (blue backlight when selected)
a.Default: Mirrors all inputs to corresponding outputs. (i.e. 1 to 1, 2 to 2, 3 to 3, etc.)
b.All: Save a single input to all the outputs with this function
c.Memory: Save/load the current input and output route to memory
d.EDID: Save/Load EDIDs to individual inputs
e.IR: Turn IR receiving on/off (see below)
f.INFO: Displays the firmware version on the front display
5.Cancel Button - Within the functions menu use to go back one screen or to the home screen.
Note: You cannot power off or change functions unless you return to the home screen.
6.Number buttons - Use these buttons to select input and output paths or use with the function button to change matrix settings.
IR
The IR receiver window can sometimes pick up stray reflected IR commands causing loss of functionality. To disable the front panel, see directions below:
|
home screen |
|
|
|
|
|
|
|
|
|
|
|
|
AT-PRO3HD66M |
---> |
|
|
---> |
Select Function Option |
---> |
|
|
|||
|
Select Input Number |
|
|
|
|
|
|
|
|
|
|
|
|
|
|
|
|
|
|
|
|
|
|
|
|
|
|
|
|
|
|
|
|
|
|
|
||
|
|
|
|
|
|
|
|
|
|
|
|
|
---> |
Select IR 1:On 2: Off |
|
---> |
|
|
---> |
Select IR 1: On 2: Off |
---> |
Feedback= |
|||
|
|
Current: On/Off |
|
|
-------------------- |
|
|
|
Select IR 1: On 2: Off |
|
Feedback= |
|
|
|
|
|
|
|
|
|
Current On |
|
”IR On Selected” |
||
|
|
|
|
---> |
|
|
---> |
|
|
|
|
|
|
|
|
|
|
|
Current off |
---> |
”IR Off Selected” |
||||
|
|
|
|
|
|
|
|
|
|
|
|
|
|
|
|
|
|
|
|
|
|
|
|
|
|
atlona.com |
4 |
Toll free: 1-877-536-3976 |
Local: 1-408-962-0515 |
||
|
|
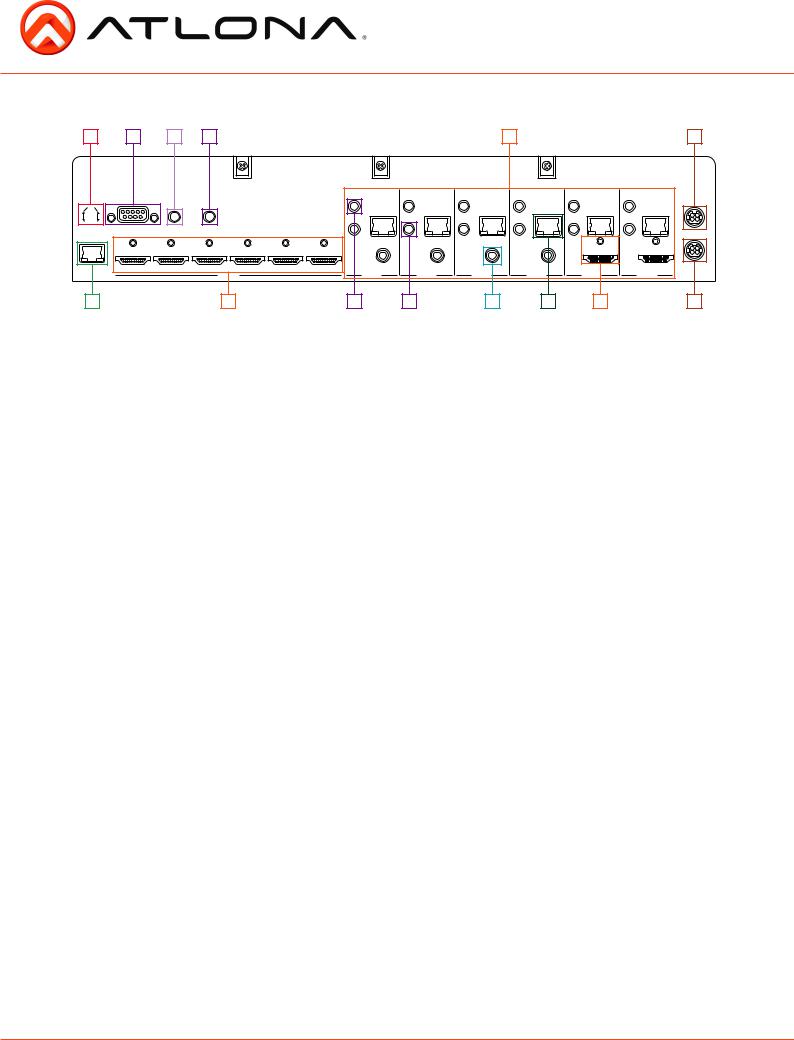
Back Panel
1 |
2 |
3 |
4 |
5 |
6 |
AT-PRO3HD66M
|
FW |
RS-232 |
MATRIX IN MATRIX OUT |
|
|
|
|
|
|
|
|
|
|
|
1 |
2 |
3 |
4 |
5 |
6 |
LAN |
|
|
HDMI IN |
|
|
7 |
8 |
IR IN |
IR IN |
IR IN |
IR IN |
IR IN |
IR IN |
|
|
|
|
|
|
|
MAIN |
CAT5e/6/7 |
CAT5e/6/7 |
CAT5e/6/7 |
CAT5e/6/7 |
CAT5e/6/7 |
CAT5e/6/7 |
|
IR OUT |
IR OUT |
IR OUT |
IR OUT |
IR OUT |
IR OUT |
|
|
|
|
|
|
|
BACKUP |
COAX OUT |
COAX OUT |
COAX OUT |
COAX OUT |
|
|
|
|
|
|
|
HDMI OUT |
HDMI OUT |
DC 24V |
ZONE 1 |
ZONE 2 |
ZONE 3 |
ZONE 4 |
ZONE 5 |
ZONE 6 |
|
a |
b |
c |
d |
e |
|
9 |
1.Firmware Update - Type B USB Port used for updating matrix firmware
2.RS-232 - Connect to this port for control from a computer or 3rd party control box.
3.Matrix IR In - Used to control matrix I/O switching from a 3rd party IR control box.
4.Matrix IR Out - Global output, combines IR for all incoming zones.
5.Zone dedicated ports
a.IR 3.5mm mono In ports: Used in conjunction with 3rd party IR control box to extend IR control commands to video displays over category cable.
Note: Be sure you’re using a mono to mono 3.5mm IR cable for 3rd party control boxes, 3.5mm stereo cables are not compatible.
b.IR Out ports: Sends IR signal to sources through a 3.5mm IR emitter
c.Coax Out (S/PDIF): Audio de-embedding for distribution amplifiers and AVRs. Compatible with PCM 2Channel, Dolby 2.0, Dolby Digital 5.1, and DTS 5.1.
d.CAT5e/6/7 Out (RJ45): Extends video and bidirectional RS-232, IR, and audio signals through a single category cable.
e.HDMI Out: Mirrored HDMI output
6.Main Power Port - Use included locking DC adaptor to power the matrix switcher
7.LAN Port - For TCP/IP matrix control
8.HDMI Input Ports - Connect HDMI sources into these ports, such as DVD players, Blu-ray players, computers, etc.
9.Back Up Power Port - Redundant power supply (AT-PW24V6.25A available at atlona.com)
atlona.com |
5 |
Toll free: 1-877-536-3976 |
Local: 1-408-962-0515 |
||
|
|

Connection and Installation
3rd Party Control box Set Up
With the feature of the IR input zone ports the AT-PRO3HD66M has the ability to receive IR commands from a 3rd party controller and send it out through the CAT5e/6/7 port to control the displays in any zone.
3rd Party Controller
|
|
|
|
|
|
|
|
|
|
|
|
|
|
|
|
|
1 |
2 |
3 |
4 |
|
ZIGBEE |
12V DC FACTORY |
ID |
1 |
3 |
5 |
|
HDMI |
COMPONENT |
WIFI 1 |
DIGITAL |
|
|
eSATA |
ETHERNET |
USB |
NO NC COM NO NC COM NO NC COM NO NC COM |
|
||||
|
RESTORE |
|
|
|
|
|
|
|
|
COAX OUT |
L |
|
|
|
|
RELAYS |
|||||
|
|
|
|
|
|
SERIAL 1 |
|
|
|
|
|
|
|
|
|
|
|
|
|
|
WIFI 2 |
|
|
|
2 |
4 |
6 |
|
|
|
|
|
R |
|
|
|
|
|
|
|
|
|
|
|
|
|
|
|
|
|
|
|
|
|
|
|
|
|
|
|
|
|
|||
|
|
|
|
IR OUT |
|
|
VIDEO OUT |
|
|
AUDIO OUT |
AUDIO IN |
|
|
|
|
|
|
|
|
CONTACTS |
|
|
|
|
|
|
|
SERIAL 2 |
ControlIR |
|
|
|
|
|
|
|
|
+12V |
+12V GND SIG |
+12V GND SIG |
+12V GND SIG |
GND SIG |
|
Matrix IR Control |
|
|
|
|
|
|
|
|
|
|
|
|
|
||||||||
|
|
|
|
|
|
|
|
|
|
|
|
|
|
|
|
||||||
|
|
|
|
|
|
|
Zone |
|
|
|
|
|
|
|
|
|
|
|
|
|
|
Blu-ray Player
IR Emitter
|
AT-PRO3HD66M |
|
|
|
|
|
|
|
|
|
|
|
|
|
|
|
|
|
|
|
IR IN |
|
IR IN |
IR IN |
IR IN |
IR IN |
|
B |
FW |
RS-232 |
MATRIX IN |
MATRIX OUT |
|
|
|
|
|
|
|
|
MAIN |
|
|
|
|
|
|
CAT5e/6/7 |
CAT5e/6/7 |
CAT5e/6/7 |
CAT5e/6/7 |
CAT5e/6/7 |
CAT5e/6/7 |
|
|
POWER |
ENTER |
|
|
|
|
|
|
||||||
|
|
|
|
|
IR OUT |
IR OUT |
IR OUT |
IR OUT |
IR OUT |
IR OUT |
|
||
|
|
|
|
|
|
|
|
||||||
|
|
|
|
|
|
|
|
|
|
|
|
|
BACKUP |
|
|
|
|
|
|
|
COAX OUT |
COAX OUT |
COAX OUT |
COAX OUT |
|
|
|
FCN |
CANCEL |
|
|
|
|
|
|
|
|
|
|
|
|
|
|
1 |
2 |
3 |
4 |
5 |
6 |
|
|
|
HDMI OUT |
HDMI OUT |
DC 24V |
|
LAN |
|
|
HDMI IN |
|
|
ZONE 1 |
ZONE 2 |
ZONE 3 |
ZONE 4 |
ZONE 5 |
ZONE 6 |
|
Front Panel |
|
|
|
|
|
|
|
|
|
|
|
|
|
IR Receiver |
|
|
|
|
|
AT-PRO3HDREC |
|
|
|
|
|
||
|
|
|
|
|
|
|
|
|
|
|
|
||
|
|
|
|
|
|
|
|
CAT5/6 |
|
|
|
|
|
|
|
|
|
|
|
|
LINK |
IN |
|
|
|
|
|
|
|
|
|
|
|
|
|
|
|
|
|
|
|
|
|
|
|
|
|
|
|
HDMI OUT |
|
|
|
|
|
|
|
|
|
|
|
|
RS232 OUT IR IN IR OUT |
|
|
|
|
|
|
IR Emitter
Video Display
atlona.com |
6 |
Toll free: 1-877-536-3976 |
Local: 1-408-962-0515 |
||
|
|
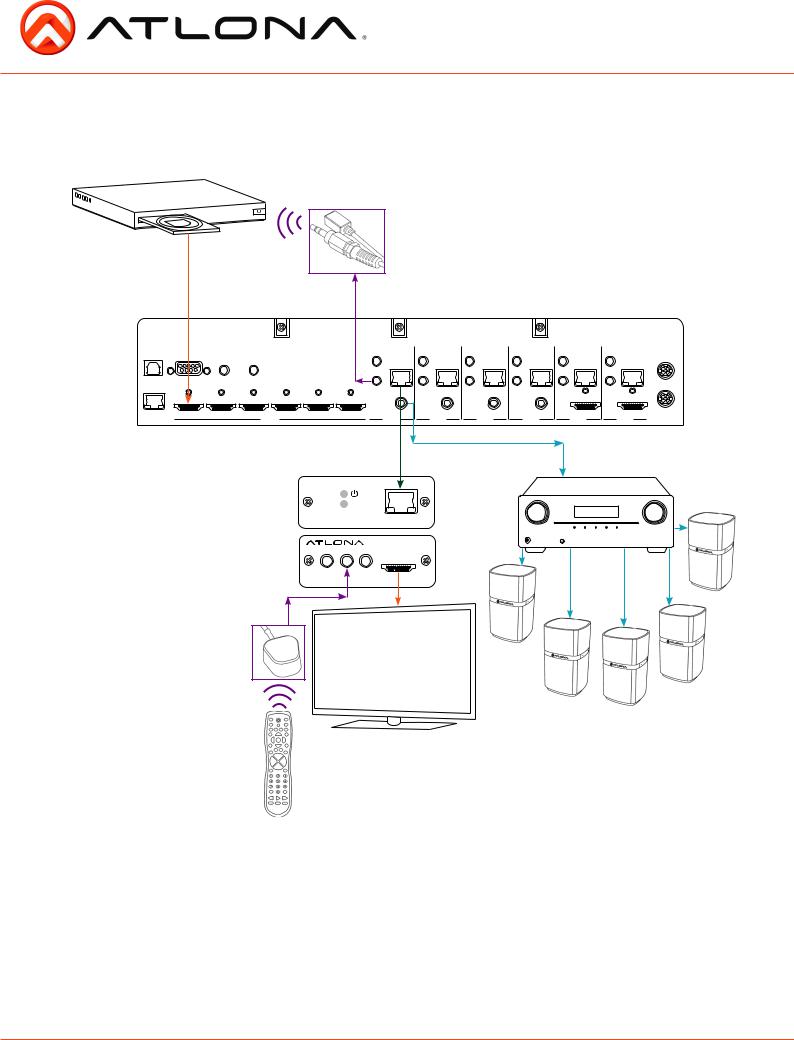
IR Remote Control Set Up
Note: IR signal is routed through the HDBaseT zone. Only the IR out of the corresponding zone will pass control signal when using a 3rd party IR controller
Blu-ray Player
IR Emitter
AT-PRO3HD66M |
|
|
|
|
|
|
|
|
|
|
|
|
|
|
|
|
|
|
IR IN |
IR IN |
IR IN |
IR IN |
IR IN |
IR IN |
|
FW |
RS-232 |
MATRIX IN |
MATRIX OUT |
|
|
|
|
|
|
|
|
MAIN |
|
|
|
|
|
|
CAT5e/6/7 |
CAT5e/6/7 |
CAT5e/6/7 |
CAT5e/6/7 |
CAT5e/6/7 |
CAT5e/6/7 |
|
|
|
|
|
|
|
IR OUT |
IR OUT |
IR OUT |
IR OUT |
IR OUT |
IR OUT |
|
|
|
|
|
|
|
|
|
|
|
|
|
BACKUP |
|
|
|
|
|
|
COAX OUT |
COAX OUT |
COAX OUT |
COAX OUT |
|
|
|
|
1 |
2 |
3 |
4 |
5 |
6 |
|
|
|
HDMI OUT |
HDMI OUT |
DC 24V |
LAN |
|
|
HDMI IN |
|
|
ZONE 1 |
ZONE 2 |
ZONE 3 |
ZONE 4 |
ZONE 5 |
ZONE 6 |
|
AT-PRO3HDREC
|
CAT5/6 |
LINK |
IN |
|
|
|
HDMI OUT |
RS232 OUT IR IN IR OUT |
|
IR Receiver
Module
Video Display
Remote
atlona.com |
7 |
Toll free: 1-877-536-3976 |
Local: 1-408-962-0515 |
||
|
|
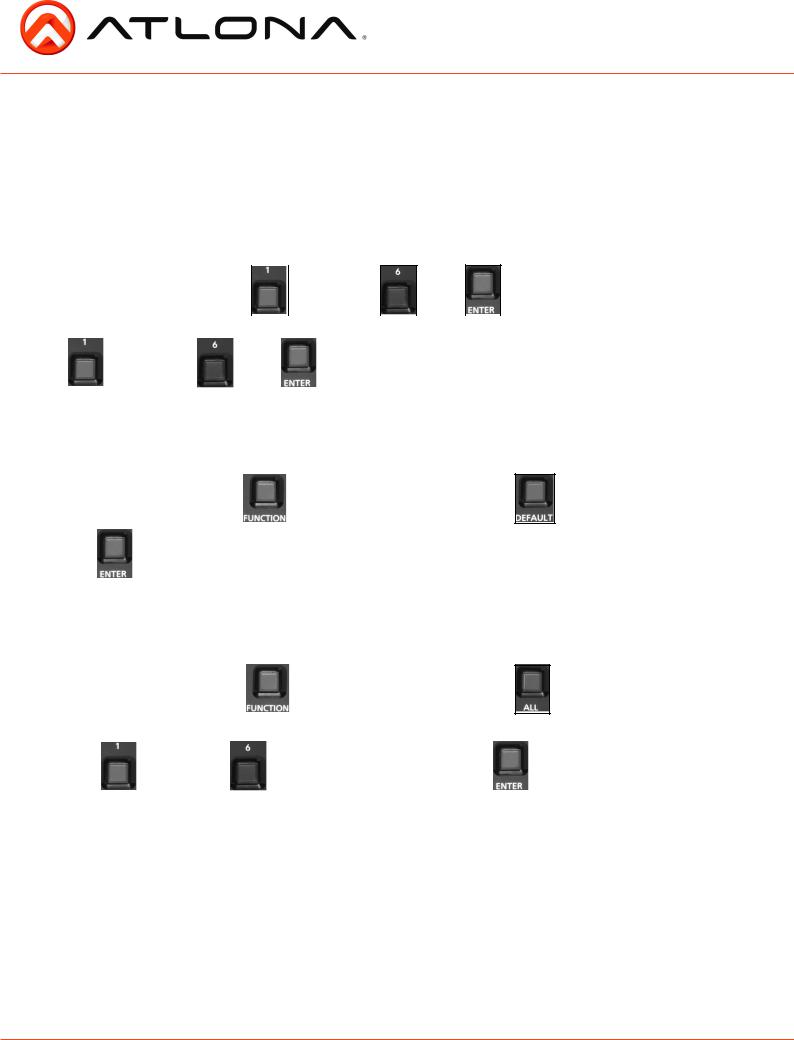
Matrix Front Panel Functions
The AT-PRO3HD66M’s front panel has 3 functions: I/O control, EDID, and matrix settings. The following sections go over step by step setup & control.
I/O Control
To set an input to an output
(I.E. Input 1 to output 2)
home screen |
input selection |
||
|
|
|
|
AT-PRO3HD66M |
---> |
|
|
through |
---> |
---> |
Select output number |
---> |
||||||
Select Input Number |
|
|
|
|
|
|
|
|
|
|
Press enter to confirm |
|
||
output selection |
|
|
|
|
|
|
|
|
|
|
|
|
||
|
|
|
|
|
|
|
|
|
|
|
|
|||
|
through |
|
|
---> |
|
|
---> Feedback =”Input # saved to |
|
||||||
|
|
|
|
|
|
|
|
|
|
Output #” |
|
|
||
To mirror all inputs and outputs
(I.E. Input 1 to output 1, input 2 to output 2, etc.)
|
home screen |
|
|
|
|
|
|
|
|
|
|
|
|
|
|
|
|
|
|||
|
AT-PRO3HD66M |
|
|
---> |
|
|
|
---> |
Select Function Option |
|
---> |
||||||||||
|
Select Input Number |
|
|
|
|
|
|
|
|
|
|
|
|
|
|
|
|||||
|
|
|
|
|
|
|
|
|
|
|
|
|
|
|
|
|
|
|
|
||
|
|
|
|
|
|
|
|
|
|
|
|
|
|
|
|
||||||
---> |
|
|
|
---> |
Feedback =”Mirroring In and Out” |
|
|
|
|
||||||||||||
|
|
|
|
|
|
|
|||||||||||||||
|
|
|
|
|
|
|
|
|
|
|
|
|
|
|
|
||||||
To route one input to all outputs |
|
|
|
|
|
|
|
||||||||||||||
(I.E. Input 1 to output 1, 2, 3, 4, 5 and 6) |
|
|
|
|
|||||||||||||||||
|
home screen |
|
|
|
|
|
|
|
|
|
|
|
|
|
|
|
|
|
|||
|
AT-PRO3HD66M |
|
|
---> |
|
|
|
|
|
---> |
Select Function Option |
|
---> |
||||||||
|
Select Input Number |
|
|
|
|
|
|
|
|
|
|
|
|
|
|
|
|||||
|
|
|
|
|
|
|
|
|
|
|
|
|
|
|
|
|
|
|
|
|
|
|
|
|
input selection |
|
|
|
|
|
|
|
|
|
|
|
|
|
|
||||
|
|
|
|
|
|
|
|
|
|
|
|
|
|
|
|
|
|||||
|
|
|
|
|
|
|
|
|
|
|
|
|
|
|
|
|
|
|
|
|
|
---> |
|
|
|
through |
|
|
|
---> |
|
Input # to all outputs |
---> |
|
|
||||||||
|
|
|
|
|
|
|
|
|
|
|
|
|
|
|
|
Press enter to confirm |
|
|
|
|
|
|
|
|
|
|
|
|
|
|
|
|
|
|
|
|
|
|
|
|
|
|
|
---> |
Mirror In to Out |
|
Press enter to confirm |
|
|
---> |
Select input number |
|
to save to all outputs |
|
|
---> Feedback =
”Input # saved to all”
atlona.com |
8 |
Toll free: 1-877-536-3976 |
Local: 1-408-962-0515 |
||
|
|
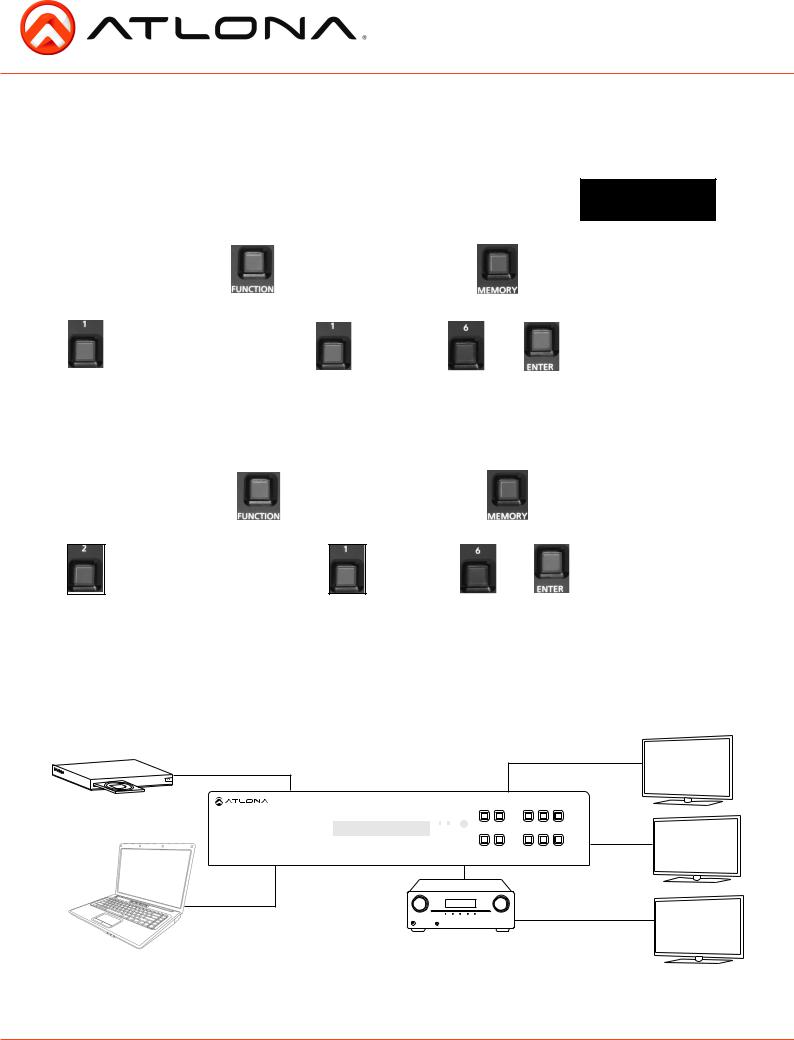
I/O Route Memory
Once inputs and outputs have been set they can be saved to memory and recalled later. Up to 6 individual input/output routes can be saved. The route will remain in memory until a new route has been saved to that memory number or the matrix has been factory reset. example route
|
|
|
|
|
|
|
|
|
|
|
|
|
|
|
|
|
|
O: |
1 |
2 |
3 |
4 |
5 |
6 |
|
|
To save an I/O route to memory |
|
|
|
|
|
|
|
|
|
|
I : |
4 6 1 3 2 |
6 |
|
|
|||||||||||
home screen |
|
|
|
|
|
|
|
|
|
|
|
|
|
|
|
|
|
|
|
|
|
|
|
|
||
AT-PRO3HD66M |
---> |
|
|
---> |
Select Function Option |
---> |
|
|
---> |
1 |
Save in/out route |
|
---> |
|||||||||||||
Select Input Number |
|
|
|
|
|
|
|
|
|
|
|
|
|
2 |
Select memory route |
|
|
|||||||||
|
|
|
|
|
|
|
|
|
|
|
|
|
|
|
|
|
|
|
|
|
|
|
|
|
|
|
|
|
|
|
|
|
|
|
|
|
|
|
|
|
|
|
|
|
|
|
|
|
|
|
|||
|
|
|
|
|
|
|
|
memory selection |
|
|
|
|
|
|
|
|
|
|
|
|
|
|
||||
|
|
|
|
|
|
|
|
|
|
|
|
|
|
|
|
|
|
|
Feedback = |
|
|
|
||||
|
---> |
Save to memory (1-6) # |
---> |
|
through |
|
|
---> |
|
|
|
---> |
|
|
|
|||||||||||
|
|
Press enter |
|
|
|
|
|
|
|
|
|
|
|
|
|
”Memory # saved” |
||||||||||
|
|
|
|
|
|
|
|
|
|
|
|
|
|
|
|
|
|
|
|
|
|
|
|
|
|
|
To load a saved I/O route
Once an input/output route has been saved, it can be loaded at any time.
home screen |
|
|
|
|
|
|
|
|
|
|
AT-PRO3HD66M |
---> |
|
---> |
Select Function Option |
---> |
|
---> |
1 |
Save in/out route |
---> |
Select Input Number |
|
|
|
|
|
|
|
2 |
Select memory route |
|
|
|
|
|
|
|
|
|
|
|
|
|
|
|
|
|
|
|
|
|
|
|
memory selection
---> |
Select Memory route 1-6 |
---> |
|
Press enter to load |
|
|
|
|
through |
|
---> |
|
---> |
Feedback = |
|
|
|
|
|
”Memory # loaded” |
EDID Set Up
When the matrix is completely connected and turned on it will load the default EDID, which is the highest common native resolution of the devices. (i.e. In the diagram below the default would be 720p with 2ch audio. Multi-channel audio and 3D are not enabled on internal mode, unless all devices have these features.)
|
|
1080p (3D)-2ch |
|||
1080p-Dolby TrueHD (3D) |
|
|
|
Output 1 |
|
Input 1 |
|
|
|
|
|
|
|
1 |
2 |
3 |
|
M B |
|
|
|
|
|
POWER |
ENTER |
DEFAULT |
ALL |
MEMORY |
|
|
|
4 |
5 |
6 |
720p-2ch |
|
|
|
|
|
|
FCN |
CANCEL |
EDID |
IR |
INFO |
Output 2 |
AT-PRO3HD66M |
|
|
|
|
|
720p-2ch |
|
1080p-Dolby TrueHD (3D) |
|||
Input 2 |
|
||||
Output 3
On default, all devices in the diagram will work at 720p. If a device is not syncing or a different resolution is required, internal EDID or EDID copy and load should resolve these issues. The PRO3HD66M can copy up to 6 EDIDs to memory.
atlona.com |
9 |
Toll free: 1-877-536-3976 |
Local: 1-408-962-0515 |
||
|
|
 Loading...